English / Español
Use & Care Guide
Manual de Uso y Cuidado
Kenmore Elite ®
Model/Modelo: 100.76771410
Sears Brands Management Corporation
Hoffman Estates, IL 60179 U.S.A.
www.kenmore.com
www.sears.com
Digital
Countertop Oven
Digital Countertop Oven
P/N 0000000000
KENMORE ELITE LIMITED WARRANTY
FOR FIVE YEARS from the date of sale this appliance is warranted against defects in
material or workmanship.
WITH PROOF OF SALE, return a defective appliance to the retailer from which it was
purchased for free replacement.
This warranty is void if this appliance is ever used for other than private household purposes.
This warranty gives you specific legal rights, and you may also have other rights which vary
from state to state.
Sears Brands Management Corporation, Hoffman Estates, IL 60179

3
Please read this guide. It will help you to operate your new
Digital Countertop
Oven
in the safest and most effective way.
Keep this book and your sales check (receipt) in a safe place for future reference.
2
TABLE OF CONTENTS
BEFORE USING YOUR NEW HEATER
Before Using Your Digital Countertop Oven..........................................................................2
Important Safety Instructions..............................................................................................2 - 6
Parts and Features..................................................................................................................7- 8
Operating Instructions.........................................................................................................9 - 27
Care and Maintenance.....................................................................................................28 - 29
Troubleshooting............................................................................................................................30
Warranty......................................................................................................................Back Cover
IMPORTANT SAFETY INSTRUCTIONS
7. Do not let the power cord hang over the edge of a table or counter, or touch
hot surfaces.
8. To protect against electric shock do not immerse the oven, power cord or
power plug in water or any other liquid.
9. When operating the oven, keep a minimum distance of 4” (10cm) of space
on both sides of the appliance. This will allow for adequate air circulation and
help prevent the possibility of wall discoloration due to radiated heat.
10. Do not touch hot surfaces. Appliance surfaces, including the door and outer
surface of the oven are hot during and after operation. To prevent burns or
personal injury, always use protective hot pads or insulated oven mitts, or use
handles and knobs where available, when inserting, removing or handling
items from the oven. Alternatively, allow the oven to cool down before handling.
11. Extreme caution must be used when removing pans, dishes and accessories
such as the included baking pan, that contain hot oil or other hot liquids.
12. The top of the oven is very hot during and after operation. Do not store any
item on top of the oven when in operation.
Alternatively, allow the oven to cool down before handling.
13. Do not place cardboard, plastic, paper, or other flammable materials in
the oven.
14. Do not cover the crumb tray or any other part of the oven, including accessories,
pans, and dishes with metal foil. This will cause overheating of the oven.
15. Extreme caution should be exercised when using pans and dishes constructed
of materials other than metal.
16. Do not use any type of glassware in the oven, including glass pans or dishes.
Even oven proof glassware can overheat and crack due to close contact with
the oven’s heating elements.
17. Do not use lids of any type in the oven. Lids, covering a pan or dish, can build
pressure of hot ingredients that may create a fire or risk of injury.
18. Oversized foods and metal utensils must not be inserted in the oven as they
may create fire or risk of electric shock.
19. Metal utensils such as knives should not be inserted in the oven to remove food
residue from the quartz tube elements. This can damage the elements as well
as lead to electrocution.
20. It is recommended to use only the accessories supplied with this oven.When
broiling, the broiling rack must be inserted into the supplied baking pan
IMPORTANT SAFETY INSTRUCTIONS
Read all instructions in this guide before using your
Digital Countertop Oven
.
The product is intended for household and indoor use only.. Use only with electrical
wiring that is in good working order and that meets applicable codes and
ordinances. If you have any questions whether your wiring is adequate, consult
a qualified electrician.
While using your Digital Countertop Oven, you should follow the IMPORTANT
SAFETY INSTRUCTIONS listed below. As part of those instructions, we have
used the word ” “ to indicate the level of hazard:
indicates a hazard which, if not avoided, could result in injury
or death.
IMPORTANT INSTRUCTIONS
When using electrical appliances, basic precautions should always be followed to
reduce the risk of fire, electric shock, and injury to persons, including the following:
1. Remove and safely discard any packing materials and promotional labels
before using the oven for the first time.
2. To eliminate a choking hazard for young children, remove and safely discard
the protective cover fitted to the power plug of this appliance.
3. Do not place the oven near the edge of a bench or table during operation.
Ensure the surface is level, clean and free of water, flour, etc.
4. Always operate the oven on a stable, heat resistant surface. Do not use on a
cloth-covered surface, near curtains or other flammable materials.
5. A fire may occur if the oven is covered or touches flammable material,
including curtains, draperies, walls, and the like, when in operation.
6. Do not place the oven on or near a hot gas or electric burner, or where it
could touch another heated oven.
WARNING
WARNING:
SAVE THESE INSTRUCTIONS!

5
4
IMPORTANT SAFETY INSTRUCTIONS
40. Do not, under any circumstances, cut or remove the third (ground) prong from
the power cord or use an adapter.
41. Consult a qualified electrician if the grounding instructions are not completely
understood, or if doubt exists as to whether the appliance is properly grounded.
42. The installation of a residual current device (safety switch) is recommended to
provide additional safety protection when using electrical appliances. It is
advisable that a safety switch with a rated residual operation current not
exceeding 30mA be installed in the electrical circuitsupplying the appliance.
See your electrician for professional advice.
43.
This appliance is for household use only.
44. Do not operate any appliance with a damaged cord or plug or after the
appliance malfunctions or has been damaged in any manner. Return
appliance to the nearest authorized service facility for examination, repair,
or adjustment.
SHORT CORD INSTRUCTIONS
a) A short power-supply cord (or detachable power-supply cord) should be used
to reduce therisk resulting from becoming entangled in or tripping over a
longer cord. This appliance is equipped with a short power-supply cord.
b) Extension cords are available and may be used if care is exercised in their use.
Do not allow children to use or be near this appliance without close adult
supervision. If an extension cord is used, (1) the marked electrical rating of the
cord set or extension cord should be at least as great as the electrical rating of
the appliance, (2) the cord should be arranged so that it will not drape over the
countertop or tabletop where it can be pulled on by children or tripped over
unintentionally and (3) the extension cord must include a 3-prong grounding plug.
IMPORTANT SAFETY INSTRUCTIONS
21. The use of any accessory attachments not recommended by Kenmore may
cause injuries.
22. Do not use the toast function for purposes other than toasting foods.
23. Do not place hands inside the oven during operation.
24. Do not use the appliance for anything other than its intended purpose as
described in this booklet. Do not use outdoors. Do not use in moving vehicles
or boats.
25. Do not attempt to operate the oven by any method other than those described
in this booklet.
26. Do not leave the appliance unattended when in use.
27. Close supervision is necessary when the appliance is used by or near children.
28. This appliance is not intended for use by persons (including children) with
reduced physical, sensory or mental capabilities or lack of experience and
knowledge, unless they have been given supervision or instruction concerning
use of the appliance by a person responsible for their safety.
29. To turn OFF the oven, press the Start/Stop button on the control panel.
The oven is OFF when the button illumination goes out.
30. To disconnect from the wall outlet, first turn OFF the oven, and then remove
the power plug from the wall outlet.
31. When the oven is not in use or when left unattended, disconnect the oven from
the wall outlet.
32. Before attempting to move the oven, or before assembling or disassembling
parts, cleaning or storing, turn OFF the oven, allow to cool, and disconnect
from the wall outlet.
33. Strictly follow the Care and Maintenance instructions on Page 28.
34. Do not clean with metal scouring pads. Pieces can break off the pad and
touch electrical parts, creating a risk of electric shock.
35. Regularly clean the crumb tray to discard crumbs. Ensure to turn OFF the oven,
remove the power plug from the wall outlet and allow the oven to cool before
pulling the crumb tray out.
36. Always ensure the crumb tray is thoroughly dried after cleaning. Ensure to
re-insert the crumb tray before operating the oven.
37. Do not store any materials other than the supplied accessories in the oven
when not in use.
38. This appliance is equipped with a power cord having a grounding wire with a
grounding plug. The appliance must be grounded using a 3-hole properly
grounded outlet. In the event of an electrical short circuit, grounding reduces
the risk of electrical shock.
39. If the power outlet is a standard 2-prong wall outlet, it is your personal
responsibility and obligation to have it replaced with a properly grounded
3-prong wall outlet.
SAVE THESE INSTRUCTIONS!
Use your Digital Countertop Oven only in dry environments. This Digital
Countertop Oven is not intended for use in a bathroom, laundry area, or
similar locations, or near sinks, washing machines, swimming pools or other
sources of water. Never locate Digital Countertop Oven where it may fall into
a bathtub or other water container. Do not use Digital Countertop Oven
outdoors. Do not use in damp environments such as flooded basements.
WARNING: SHOCK HAZARD
7
6
IMPORTANT SAFETY INSTRUCTIONS
Do not touch body of Digital Countertop Oven when in use. This Digital Countertop
Oven is hot when in use, to avoid burns, do not let bare skin touch hot surfaces.
If provided, use handles when moving this Digital Countertop Oven.
WARNING: HOT SURFACES
Digital Countertop Oven has hot and arcing or sparking parts inside. Do not use
near combustible materials or flammable gases or sources of heat. DO NOT USE
in areas wheregasoline, paint or flammable materials are used or stored. Keep
combustible materials such as furniture, pillows, bedding, papers, clothes and
curtains at least 3 feet (0.9 m) from the front of the Digital Countertop Oven
and keep them away from the sides and rear. To prevent a possible fire, do not
block air intakes or exhaust in any manner. Do not use on soft surfaces, like a bed,
where openings may become blocked. Do not place the Digital Countertop Oven
near a bed because objects such as pillows or blankets can fall off the bed and
be ignited by the Digital Countertop Oven. Do not insert or allow foreign objects
to enter any ventilation or exhaust opening as this may cause an electric shock,
fire, or damage the Digital Countertop Oven.
WARNING: FIRE HAZARD
SAVE THESE INSTRUCTIONS!
Do not use with damaged cord or plug. Use with adequate electrical system that
is up to code. Never use an extension cord. Do not operate any Digital Countertop
Oven with a damaged cord or plug or after Digital Countertop Oven malfunctions,
has been dropped or damaged in any manner. Do not operate Digital Countertop
Oven with a broken heating element or ceramic cone or any visual imperfections.
For all repairs contact a qualified service dealer. Do not operate Digital
Countertop Oven with its ventilation obstructed.
WARNING: ELECTRICAL SHOCK HAZARD
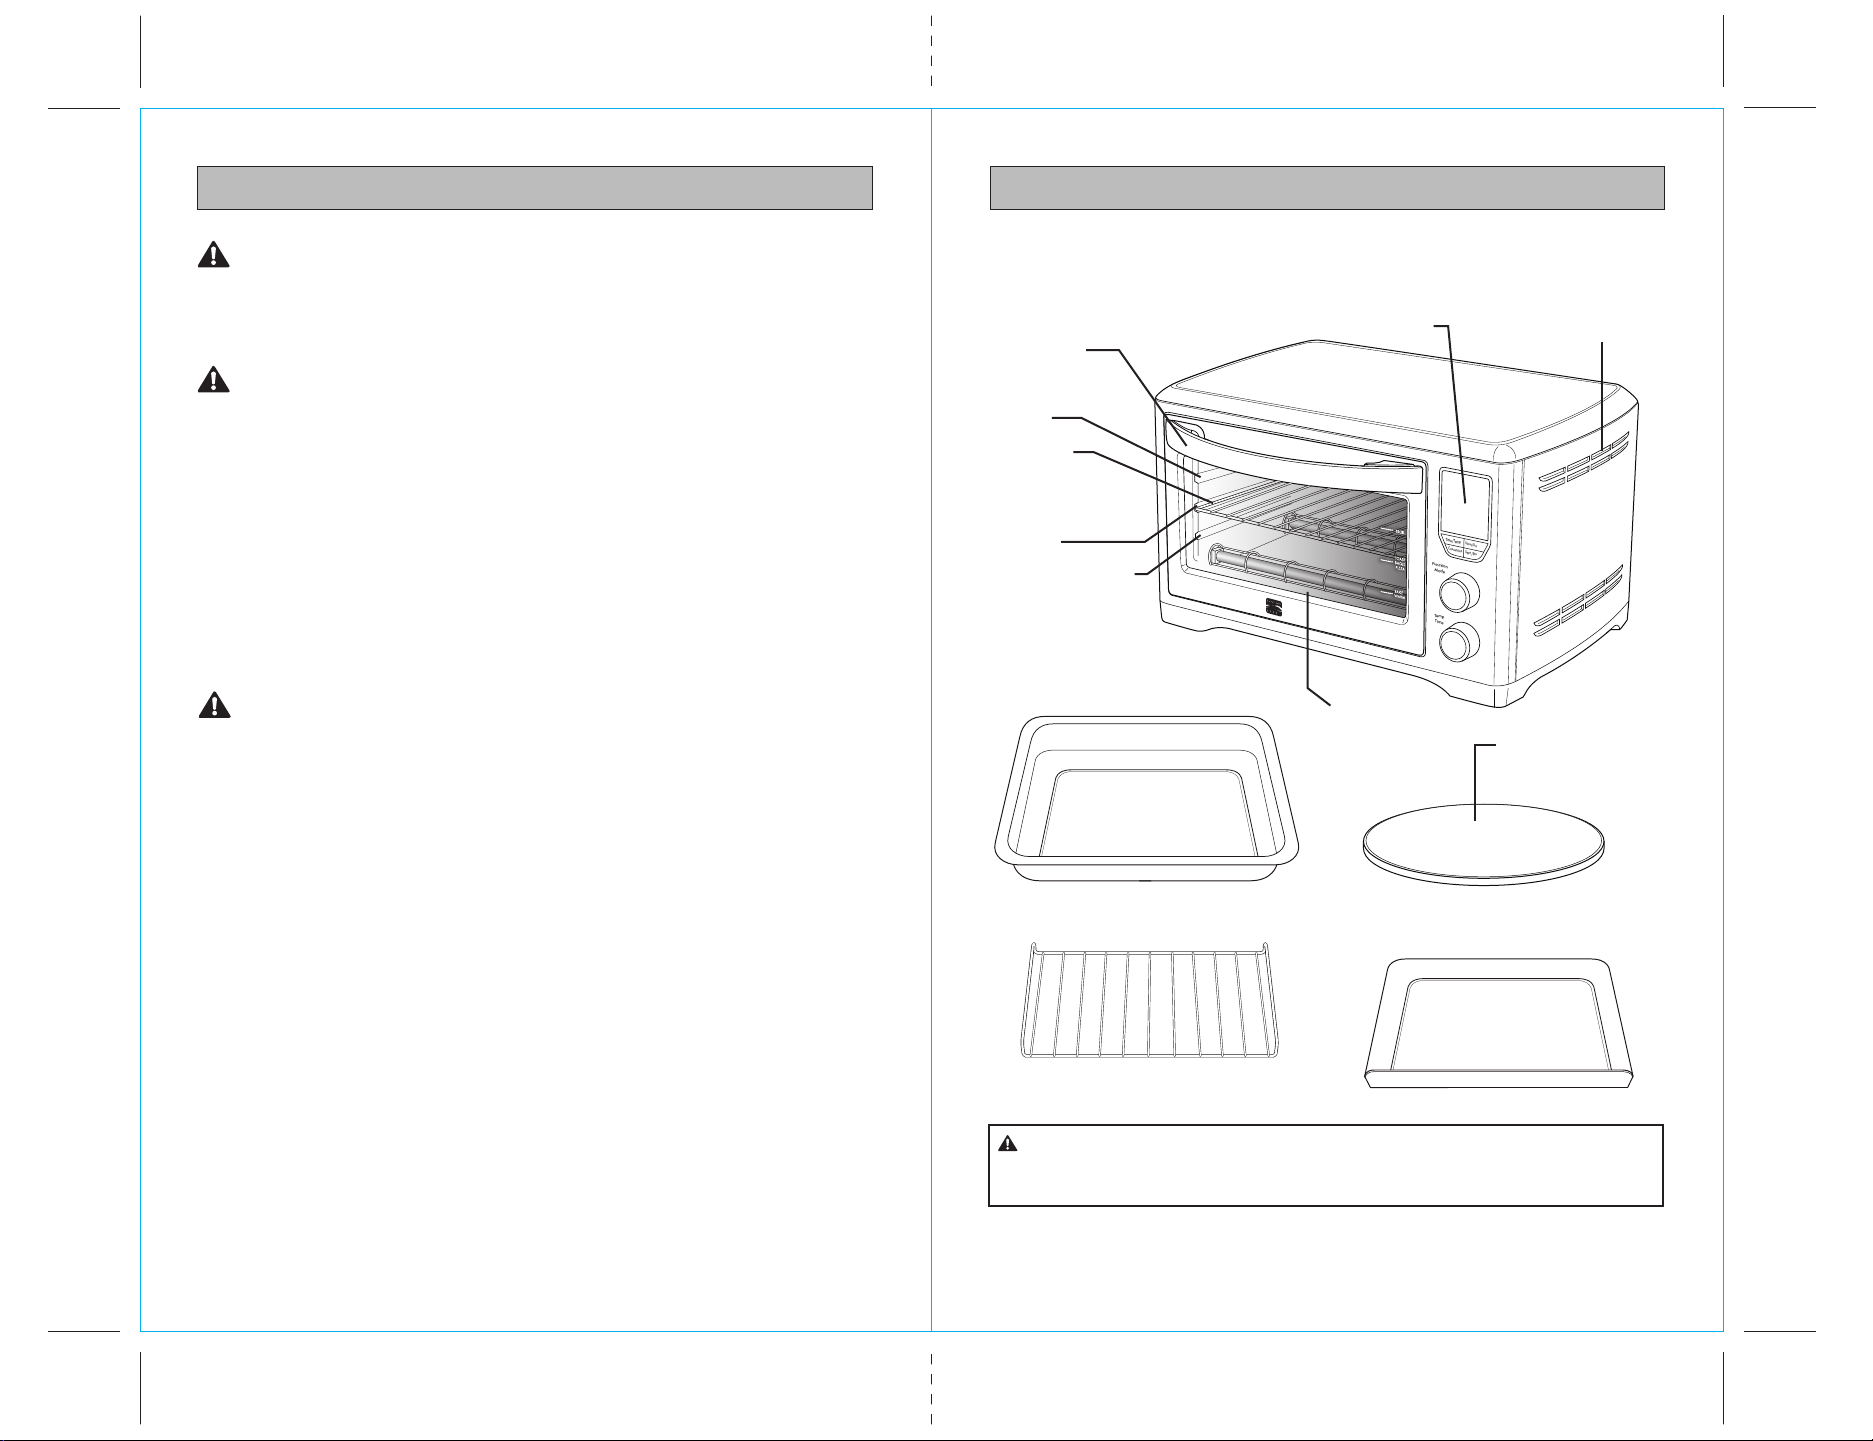
PARTS AND FEATURES
It is important to know your Digital Countertop Oven parts and features to ensure
its proper and safe use. Review these before using your Digital Countertop Oven.
Broiling Rack
12” x 12”
Baking Pan
12” non-stick
pizza stone
The outer surface of the oven, including the oven door, is hot
during and after operation. Always use protective hot pads or insulated oven
mitts when inserting, removing or handling items from the oven.
CAUTION:
DIGITAL COUNTERTOP OVEN
Fig. 1
Top rack height
position: BROIL
function
Middle rack height
position: TOAST,
BAGEL, PIZZA
functions
Bottom rack height
position: BAKE,
and WARM
functions.
Oven rack
Crumb Tray
Position
LED
screen
Ventilation slots
Door handle
CAUTION: HOT SURFACE
Time/Temp
Function
Mode
Temp
Time
Slices/Darkness
Start/Stop
Convection
Crumb Tray
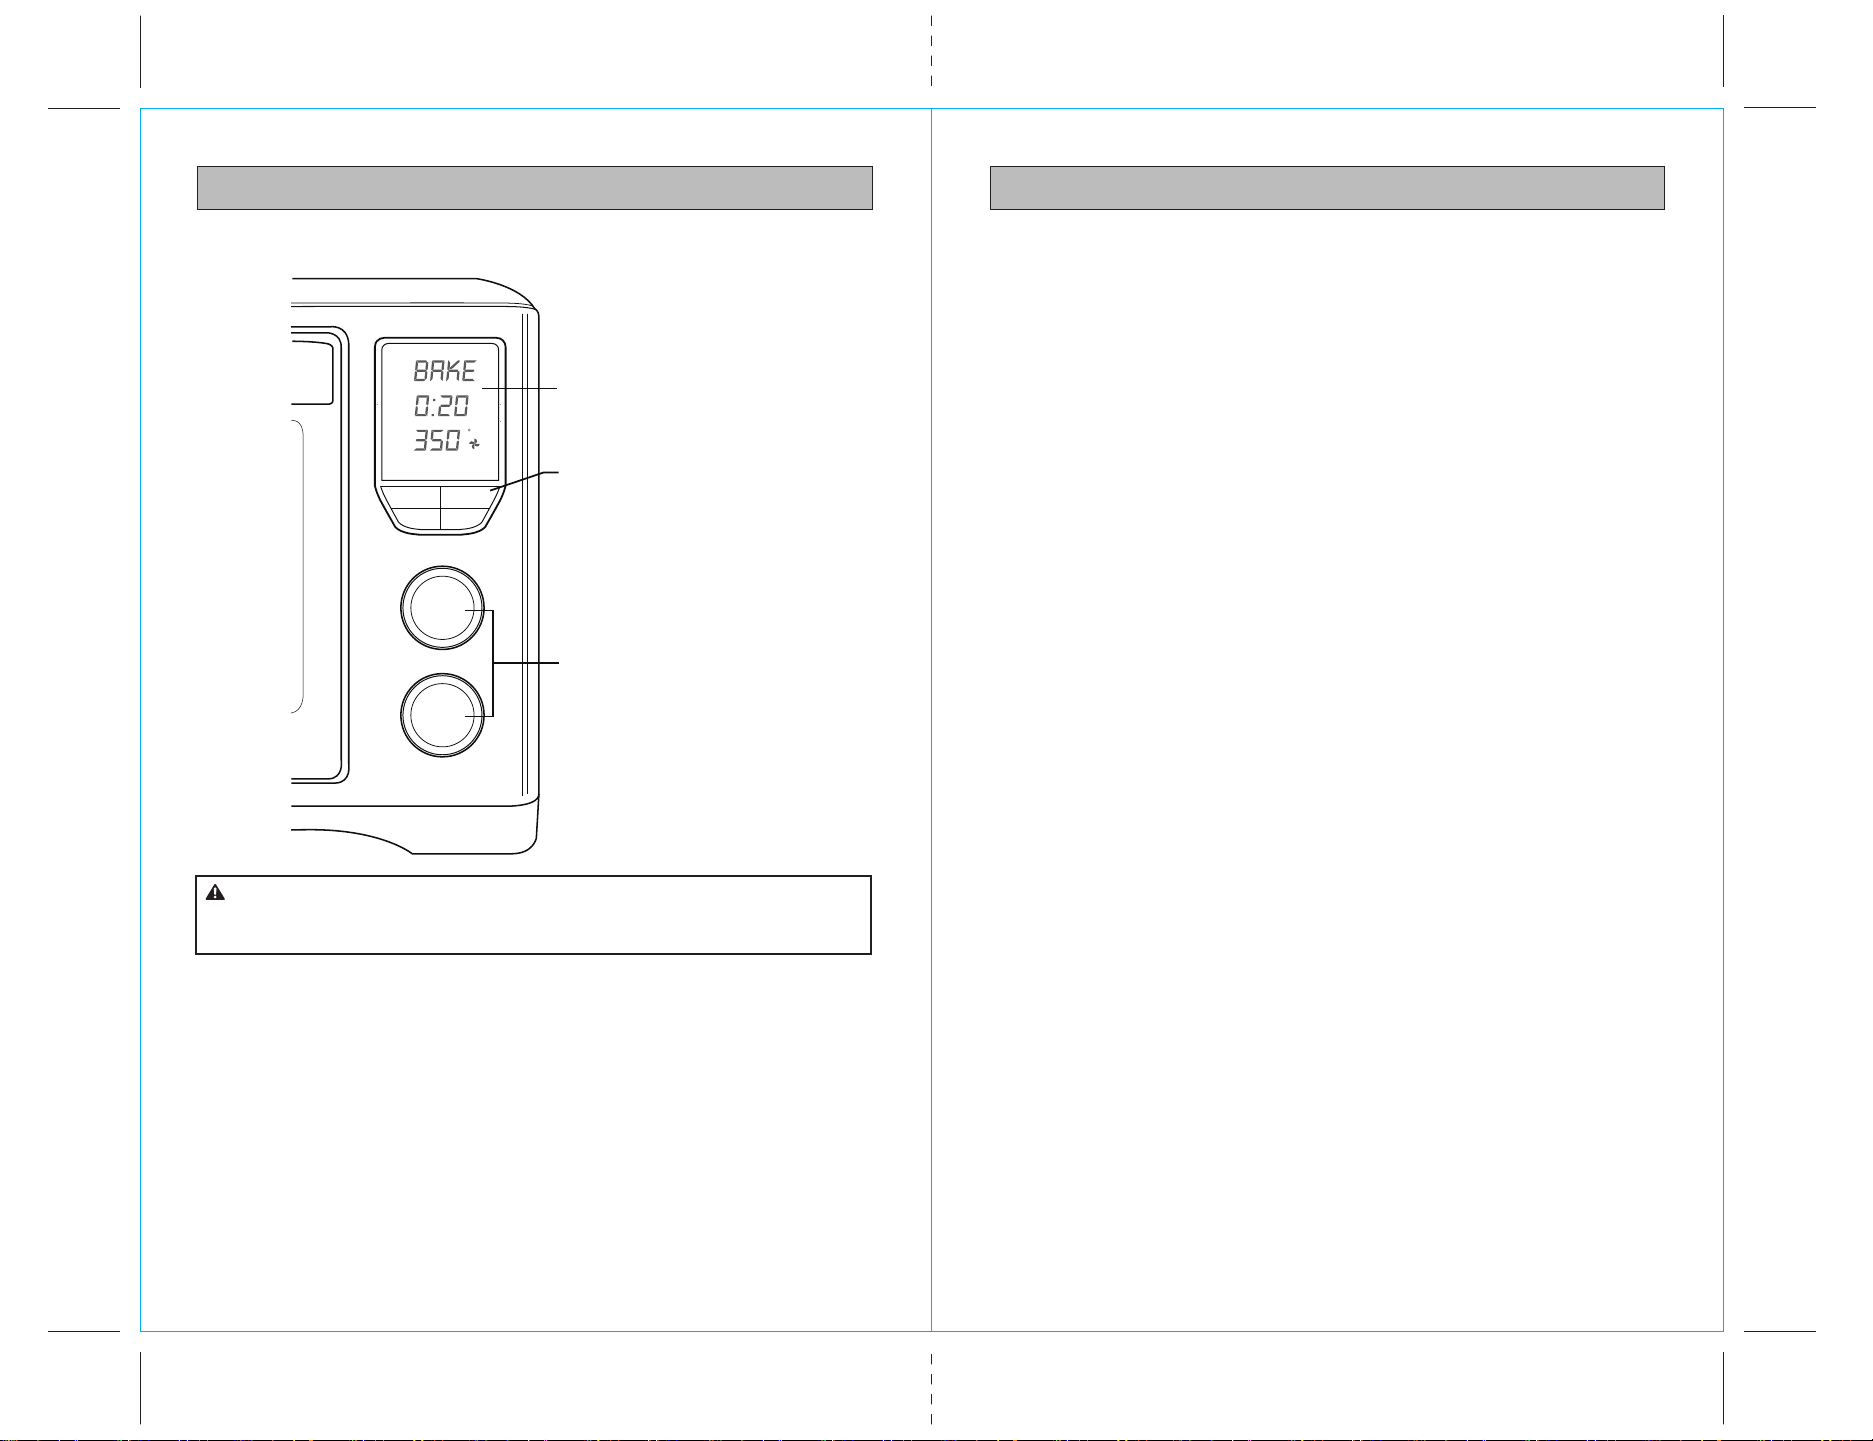
9
8
OPERATING INSTRUCTIONS
PREPARING THE OVEN FOR USE
PARTS AND FEATURES
DIGITAL CONTROL PANEL
LED Screen
Control Buttons
Control dials
Do not touch hot surfaces. The outer surfaces of the oven, including
the oven door, are hot during and after operation. Allow the oven to cool down
before handling.
CAUTION:
1. Remove and safely discard any packing material, promotional labels and tape
from the oven.
2. Remove the crumb tray, wire rack, broil rack, baking pan and pizza pan from
the polyfoam packaging. Wash them in warm soapy water with a soft sponge,
rinse and dry thoroughly. Re-insert the crumb tray into the oven.
3. Wipe the interior of the oven with a soft damp sponge. Dry thoroughly.
4. Place the oven on a flat, dry surface. Ensure there is a minimum distance of
4” (10cm) of space on both sides of the appliance. Ensure there are no items
on top of the oven.
5. Unwind the power cord completely and insert the power plug into a grounded
wall outlet.
6. The oven alert will sound one time and the LED screen will illuminate.
The function options will appear with an indicator on the preset BAKE function.
7. The oven is now ready to use.
NOTE: The cooking cycle can be stopped at any time by pressing the Start/
Stop button. This will cancel the cycle and the button illumination will go out.
INITIAL USE
Heat the oven empty for 15 minutes the first time it is used to burn off protective
coatings from the heating elements. The burn-off will emit non-toxic vapors which
are harmless, nor will they damage the oven.
Time/Temp
Convec
Function
Mode
Time
Temp
Start/Stop
Slice/Shade
Min
Time
Temp
Hr
F
Slic e Shade
Fig. 2

11
10
OPERATING INSTRUCTIONS
This cooking technology allows foods to cook more evenly and quickly, significantly
reducing cooking times. The oven’s preset cooking temperatures and times, as well
as the cooking temperature and time directions on pre-packaged foods, may need
to be adjusted depending on the recipe, the amount of food and your personal taste.
We recommend experimenting with the temperature and time settings to produce
the desired results.
The cooking temperature and time can be adjusted before or during the
cooking cycle:
SETTING COOK TIME AND TEMPERATURE
The Time setting is displayed in blue figures
on the LED screen. The Temperature setting
is displayed in orange figures.
- Press the Time/Temp control button to
select either the Time or Temperature
setting for adjustment. The selected setting
will blink for 10 seconds. During that time
turn the Time Temp dial to adjust the
setting. Press the Time/Temp control
button again to switch to the other setting.
The setting will blink for 10 seconds to
allow for adjustment. Turn the dial left to
reduce the setting; turn right to increase setting.
- The Time setting will adjust in one minute increments up to a maximum of 2 hours.
- The Temperature setting will adjust in 5°F increments for BAKE and PIZZA in a
range from 150 to 450°F. The range for WARM is from 150 to 200°F. BROIL has
only three temperature options: 300, 400 and 500°F .
OPERATING INSTRUCTIONS
HEATING ELEMENT ACTION
This oven features a unique cooking technology that varies the cooking element
combinations for optimum cooking results. See examples in the figures below.
It is normal to notice the following occur during the cooking cycle:
• It is normal that during the BROIL function, the bottom set of elements turn off
while the top set is heating at full power.
• It is normal that the ends of each heating element will glow more brightly than
the middle of the element.
• It is normal that the elements are heating even if they are not lighting up.
BROIL
Uses the three elements in ceiling
of oven for high temperature top
heat that melts and browns.
CONVECTION
Uses two ceiling and two floor
elements in combination with
circulating fan for most
effective baking.
TOAST, BAGEL
Uses two ceiling and two floor
elements for top and bottom
heat that sears and crisps.
1500 W
OFF OFF
OFFOFF
500 W
600 W 400 W
OFF
1800 W
500 W
400 W
450 W 450 W
OFF
O
N
1500 W
360 W
260 W
430 W 430W
REDUCE
TIME TEMP
INCREASE
TIME TEMP
ROTATE
TIME TEMP
DIAL
Fig. 3
Fig. 5
Fig. 6
Fig. 4
13
12
OPERATING INSTRUCTIONS
LED SCREEN VISIBILITY
When the oven is plugged into a wall outlet, the oven alert will sound one time.
The LED screen will illuminate for two minutes and then go dark if no further action
is taken to input a cooking cycle. To "wake up" the screen, lightly press any control
button or slightly turn either control dial. The oven alert will sound, and the screen
will relight for 2 minutes and then go dark again in the absence of further input.
When a control button function is operational, the button words will light up.
When the button words are dark, the button function is not in effect.
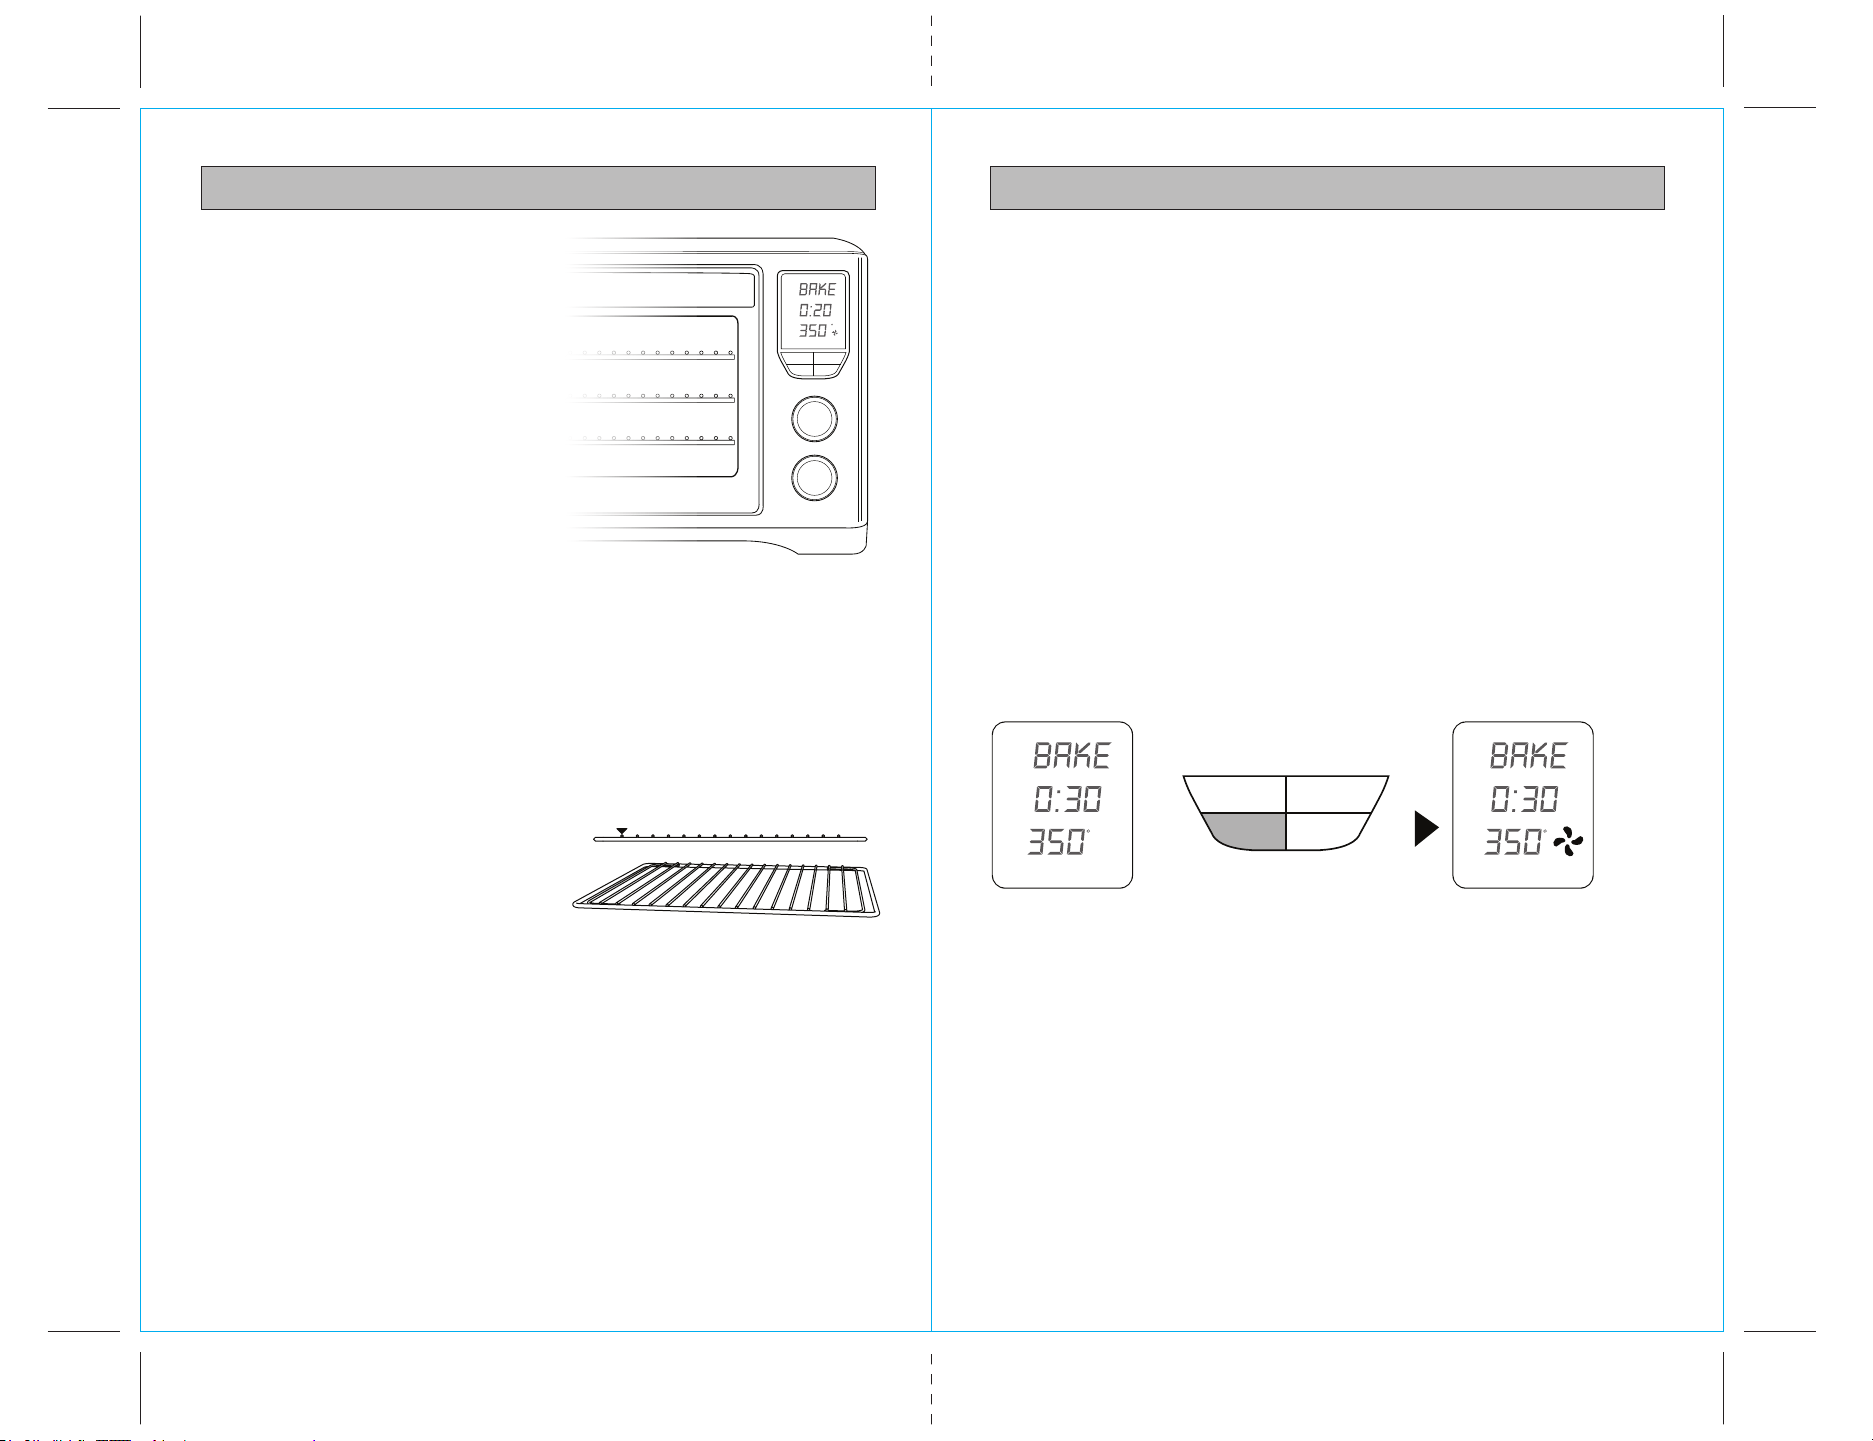
CONVECTION COOKING
Convection cooking is the default setting in the BAKE and PIZZA cooking functions.
The setting can be deselected by pressing the Convec control button, or reselected
by pressing Convec a second time.
Although Convection is not the WARM default setting, it can be selected by
pressing the Convec control button. The fan symbol displays on the LED screen
whenever Convection heating is in effect.
NOTE: When a control button function is operational, the button words will light
up. When the button words are dark, the button function is not in effect.
Convection cooking can reduce cooking times. We recommend experimenting
with the convection, temperature and time settings to produce the desired results.
For optimum results:
• Use oven-safe baking dishes, roasting pans, pizza pans or cookie sheets with
very low sides, and place on the center of the wire rack to allow for maximum
airflow around food.
• Also to maximize airflow do not cover foods with metal foil or lids.
• Most recipes recommend reducing temperatures by 25˚F when using convection
cooking. Always check the food 10 minutes before the suggested cooking time is
complete to avoid overcooking.
OPERATING INSTRUCTIONS
RACK HEIGHT POSITIONS
Cooking results are significantly affected
by the position of the wire rack as this
determines how close the food is to the
heating elements. The recommended
rack position for each cooking function
is printed on the right hand side of the
oven door glass window. However, these
are a guide only. Certain foods may
require a different rack height position
depending on the recipe, the amount
and size of the food and your
personal taste.
TOP RACK HEIGHT POSITION: BROIL function.
MIDDLE RACK HEIGHT POSITION: TOAST, BAGEL, and PIZZA functions.
BOTTOM RACK HEIGHT POSITION: BAKE and WARM functions.
For optimum cooking results:
• The recommended rack height position
should be used. However this is a guide
only. The position of the rack may vary
depending on the type and size of food
item being cooked.
• The wire rack should always be inserted
into the rack height position with the
spokes facing upwards.
• Food should be positioned on the
center of the wire rack, broil rack,
baking tray or pizza tray to allow for
maximum airflow around food.
NOTE: When the oven is plugged into a wall outlet, the oven alert will sound one
time. The LED screen will illuminate for two minutes and then go out if no further
action is taken. To "wake up" the screen, lightly press any control button or slightly
turn either control dial. The oven alert will sound, and the screen will relight for
2 minutes and then go dark again in the absence of further input.
NOTE: When a control button function is operational, the button words will light
up. When the button words are dark, the button function is not in effect.
CONVECTION ‘ON’CONVECTION ‘OFF’
Time/Temp
Convection
Function
Mode
Temp
Time
Start/Stop
Slice/Darkness
TOP
MIDDLE
BOTTOM
Time/Temp
Convection Start/Stop
Slice/Darkness
Min
Time
Temp
Hr
F
Sli ce Shad e
Min
Time
Temp
F
Min
Time
Temp
F
Fig. 7
Fig. 8
Fig. 9
OPERATING INSTRUCTIONS OPERATING INSTRUCTIONS
BAKE FUNCTION BAKE FUNCTION cont.
ELEMENTS
Top and bottom heating elements cycle on
and off to regulate the correct temperature.
The top middle element is off.
RACK POSITION
Bottom rack height position.
Time/Temp
Convection
Function
Mode
Temp
Time
Start/Stop
Slice/Darkness
BOTTOM
OPTIONAL SETTINGS
Convec button: Activate for convection cooking
Fig. 10
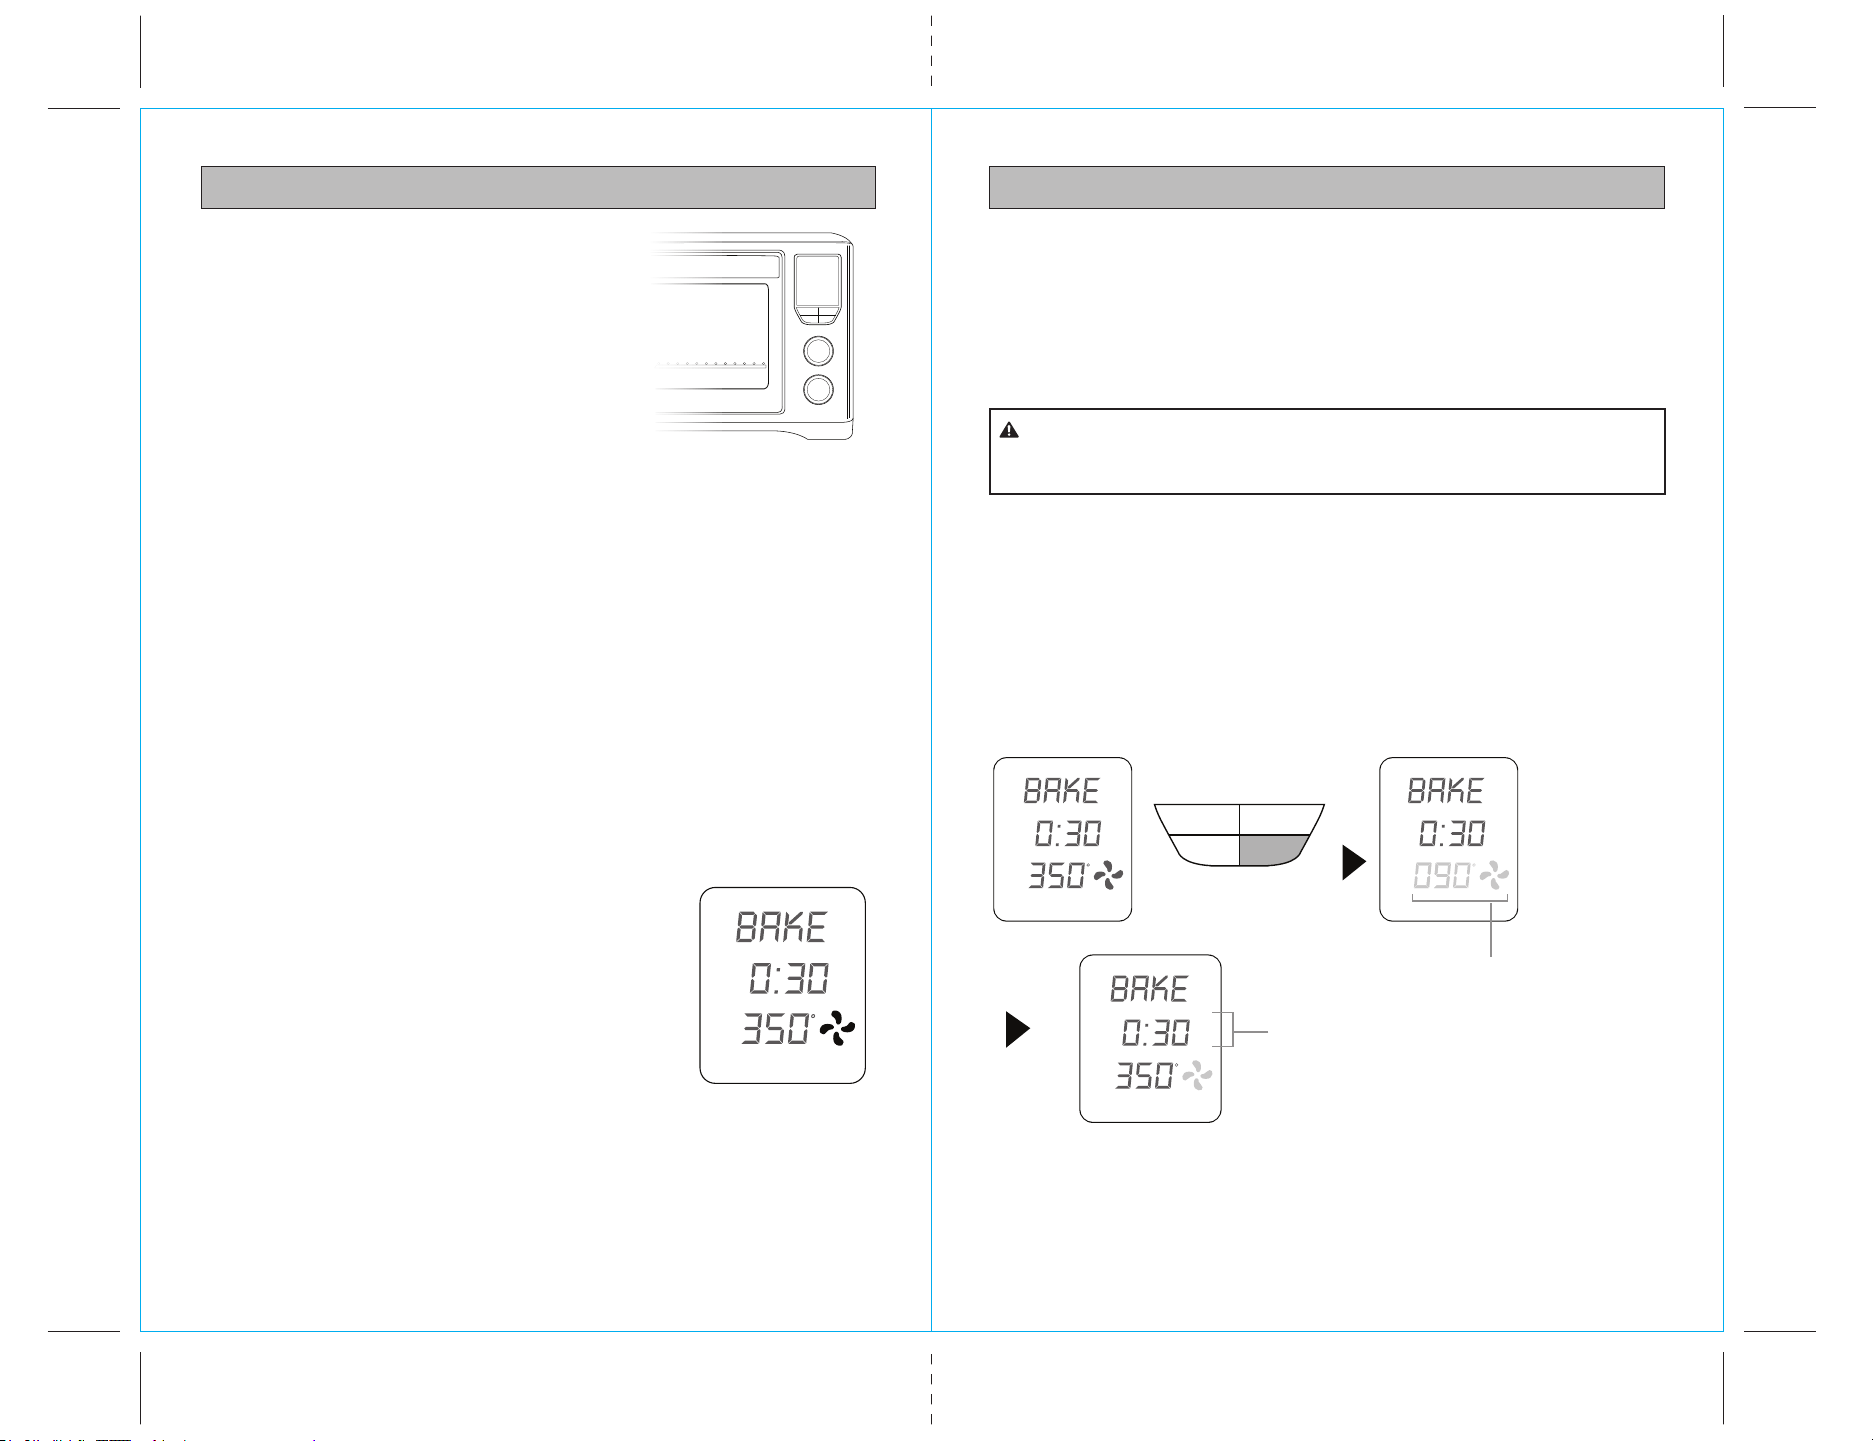
The BAKE function cooks food evenly throughout. This function is ideal for baking
cakes, muffins, brownies and pastries. The BAKE function is also ideal for cooking
pre-packaged frozen meals including lasagna and pot pies.
1. Insert the wire rack into the bottom rack position. Position the rack with the
spokes facing upwards.
NOTE: We recommend using the bottom rack position during the BAKE function.
However this is a guide only. The position of the rack may vary depending on the type
and size of food item being baked. Some baked goods such as brownies or pastries
may be more suited to the middle rack position.
2. Close the oven door.
3. Turn the FUNCTION dial until the indicator on the LED screen reaches the
BAKE function. The bottom figure on the LED screen indicates the preset BAKE
temperature of ‘350°F’, while the top figure on the LED screen indicates the preset
time of ‘0:30 MIN’. The Convection preset will also be displayed as a fan blade
icon. Press the Convec control button to cancel convection fan operation.
Press again to restore.
4. The baking temperature and time can be adjusted
before or during the baking cycle:-
a) Press the Time/Temp control button until
Temp flashes in the display.
b) Turn the Time Temp control dial to adjust
cooking temperature. Adjustment must be
made while Temp is flashing (10 seconds).
c) Press the Time/Temp control button again
for Time to flash in the display.
d) Turn the Time Temp control dial to adjust cooking
time. Adjustment must be made while Time is
flashing (10 seconds).
5. Press the Start/Stop control button to begin the oven Preheat period of time.
The Start/Stop control button words will light up and the oven alert will sound.
6. While the oven is preheating, the Temp digits will flash the escalating temperature
of the oven interior on the LED display. When the oven reaches the set cooking
temperature, the Temp digits stop flashing, the oven alert sounds, and the Time
Fig. 11
Min
Time
Temp
F
1514
7. At the end of the baking cycle, the oven alert will sound five times and the
Start/Stop button words will cease to be illuminated.
NOTE: You may stop the baking cycle at any time by pressing the Start/Stop
control button.
• Do not cover any part of the oven, including accessories, pans, and dishes with
metal foil. This may cause overheating of the oven.
• Extreme caution should be exercised when using pans and dishes constructed
of materials other than metal.
• Even oven proof glassware can overheat and crack due to close contact with the
oven’s heating elements.
• Do not use lids of any type in the oven as hot ingredients can build up pressure
and cause injury.
digits begin counting down in one minute increments. Immediately open the door
to place food in the oven. Place food in the supplied enamel baking pan (or
other oven-safe dish), and position pan on the center of the oven rack so that
air flows around the sides of the food.
NOTE: Opening the oven door does not stop the Time countdown. Also, when the
Time digits reach 10 minutes, the display shifts to counting down by the second.
The outer surface of the oven, including the oven door, is hot during
and after operation. Always use protective hot pads or insulated oven mitts when
inserting , removing or handling items from the oven.
CAUTION:
PREHEATING
WHEN AT
TEMPERATURE
Time/Temp
Convection Start/Stop
Slice/Darkness
Fig. 12
Min
Time
Temp
F
Min
Time
Temp
F
Min
Time
Temp
F
Flashing until selected
temperature is reached
Count down
begins
17
16
OPERATING INSTRUCTIONSOPERATING INSTRUCTIONS
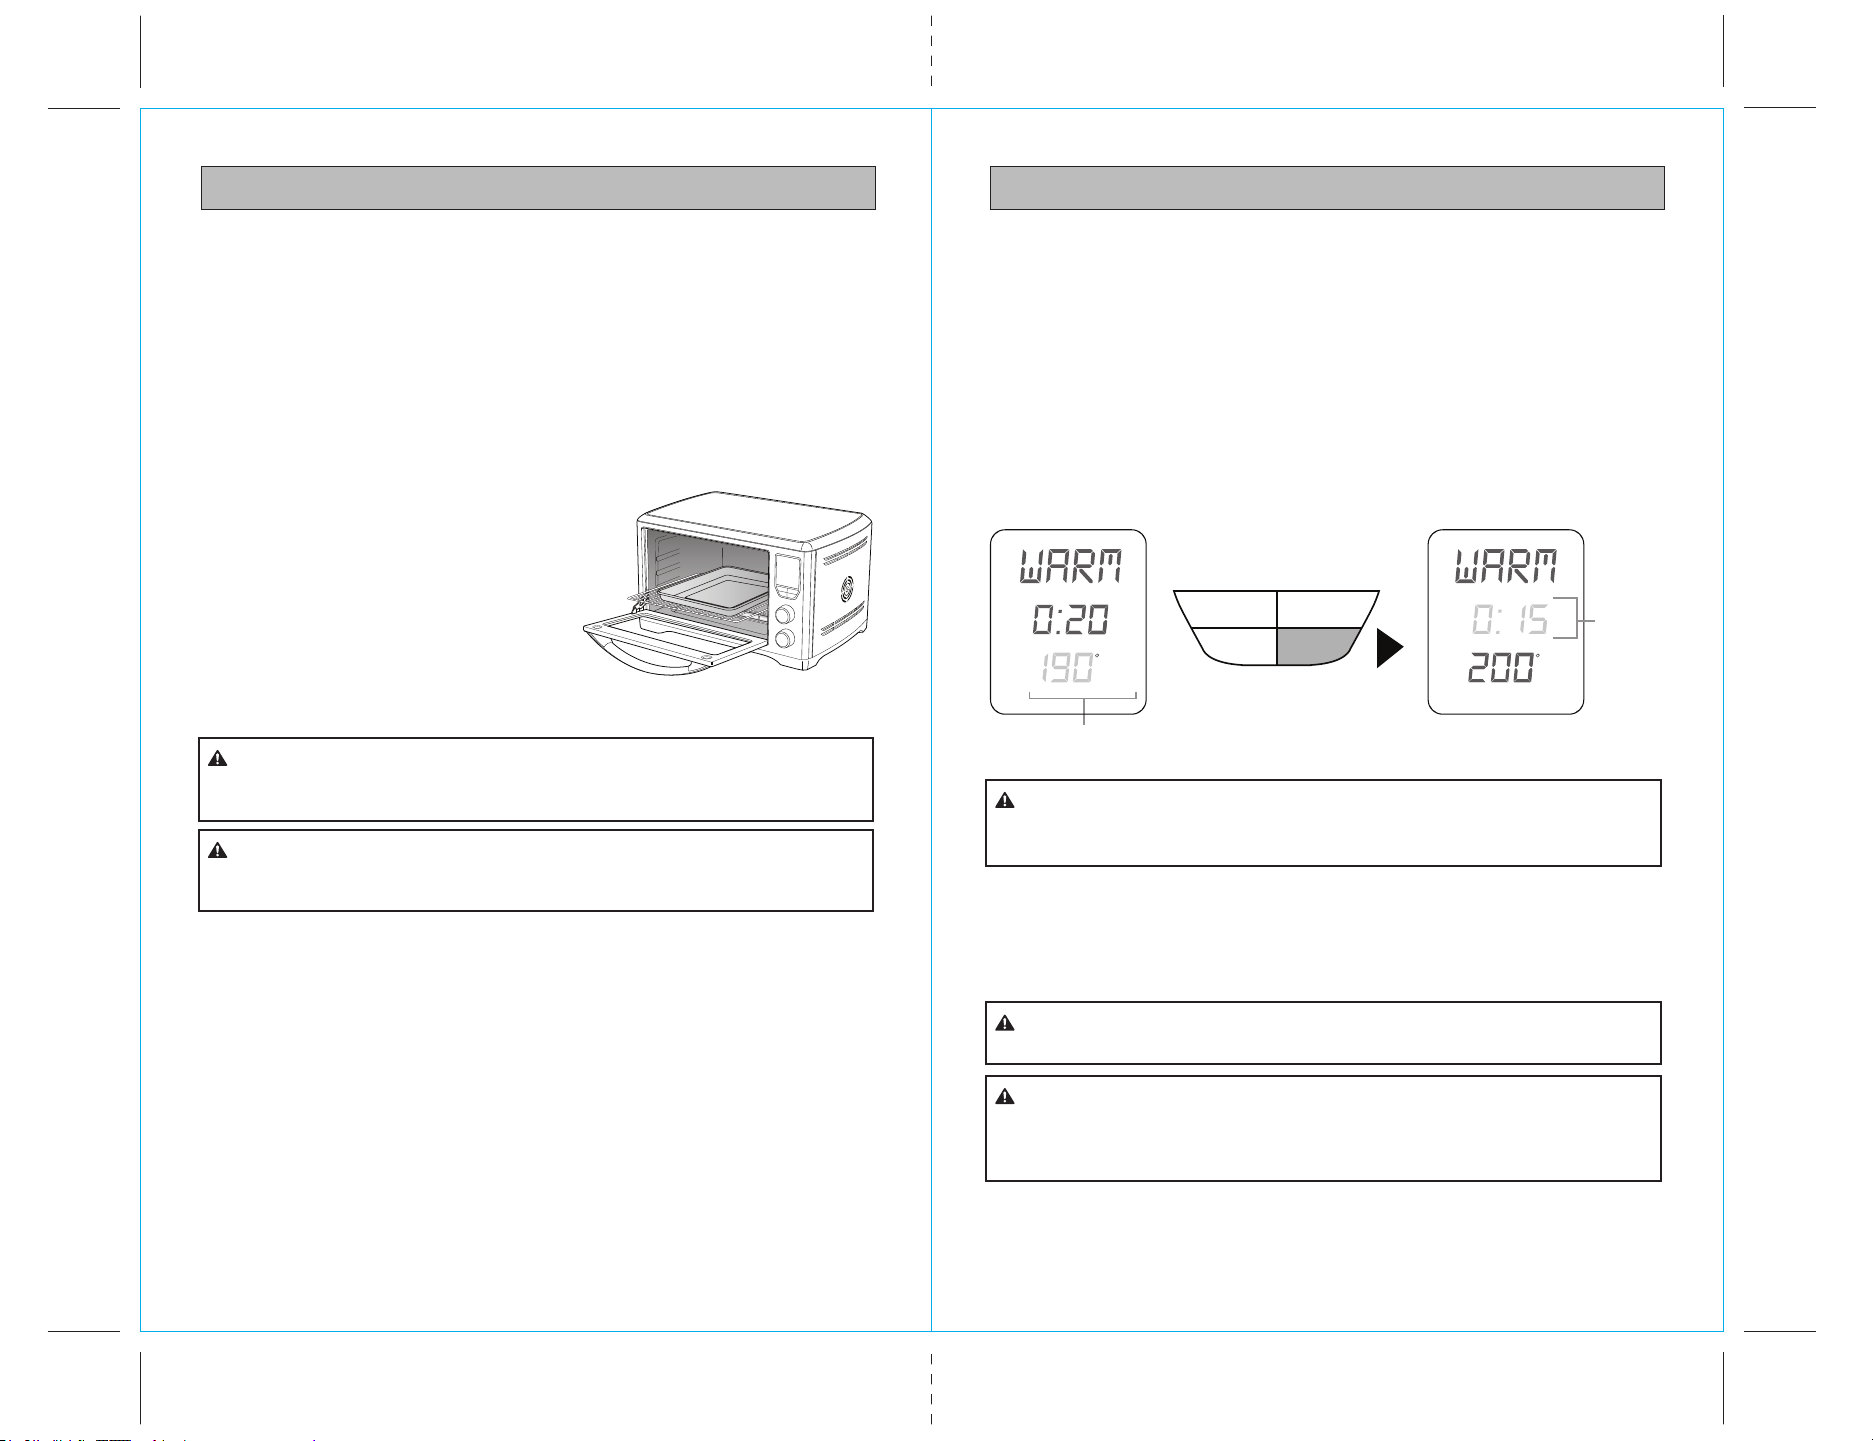
WARM FUNCTION
ELEMENTS
Top and bottom heating elements cycle on and off to regulate the correct
temperature. The top middle element is off.
RACK POSITION
Bottom rack height position.
OPTIONAL SETTINGS
Convec button: Activate for convection cooking
The WARM function maintains hot foods at selected temperatures between 150
and 200 to prevent bacterial growth.
1. Insert the wire rack into the bottom rack
height position. Position the rack with the
spokes facing upwards.
2. Place food on the Kenmore enamel baking
pan or in an oven-safe dish, then place on
the center of the wire rack so air flows
around the sides of the food.
CAUTION: HOT SURFACE
Time/Temp
Function
Mode
Temp
Time
Slices/Darkness
Start/Stop
Convection
Fig. 13
NOTE: Do not cover any part of the oven,
including accessories, pans, and dishes with metal foil. This may cause overheating
of the oven.
The outer surface of the oven, including the oven door, is hot during
and after operation. Always use protective hot pads or insulated oven mitts when
inserting, removing or handling items from the oven.
CAUTION:
The use of any accessory attachments not recommended in this
Use & Care Guide may cause injuries.
CAUTION:
The outer surface of the oven, including the oven door, is hot during
and after operation. always use protective hot pads or insulated oven mitts when
inserting, removing or handling items from the oven. Alternatively, allow the oven to
cool down before handling.
CAUTION:
Be extremely careful if using cooking vessels constructed of material
other than metal. Even oven-safe glassware can overheat and crack due to close
contact with the oven heating elements.
CAUTION:
DO NOT use lids of any type in the oven as they can cause hot
ingredients within cooking vessels to build up pressure and possibly cause sudden
eruption of contents and serious burns to vessel handlers.
WARNING:
6. Press the Start/Stop control button to begin the warming cycle. The Start/Stop
control button words will light up and the oven alert will sound.
7. While the oven is heating up, the Temp digits will flash the escalating temperature
of the oven interior on the LED display. When the oven reaches the set warming
temperature, the Temp digits stop flashing, the oven alert sounds, and the Time
digits begin counting down in one minute increments. When the Time digits
reach 10 minutes, the display shifts to counting down by the second.
8. The timer will be displayed and begin to count down in one minute increments.
The temperature and time can be adjusted during the warming cycle
9. At the end of the warming cycle, the oven alert will sound five times and the
Start/Stop button words will cease to illuminate.
NOTE: You may stop the warming cycle at any time by pressing the Start/Stop
control button.
WARM FUNCTION cont.
Fig. 14
Min
Time
3. Close the oven door.
4. Turn the FUNCTION dial until the indicator on the LED screen reaches the
function. The bottom figure on the LED screen indicates the preset temperature
while the top figure on the LED screen indicates the preset time of 0:20 min.
Press the Convec button to add convection fan operation to the warming cycle.
5. The warming temperature and time can be adjusted before or during the
warming cycle.
a) Press the Time/Temp control button until Temp flashes in the display.
b) Turn the Time Temp control dial to adjust warming temperature. Adjustment
must be made while Temp is flashing (10 seconds).
c) Press the Time/Temp control button again for Time to flash in the display.
d) Turn the Time Temp control dial to adjust warming time. Adjustment must
be made while Time is flashing (10 seconds).
Flashing until selected
temperature is reached
Time/Temp
Convection Start/Stop
Slice/Darkness
Min
Time
Temp
F
Temp
F
Count
down
begins
(Flashing)
19
18
OPERATING INSTRUCTIONSOPERATING INSTRUCTIONS
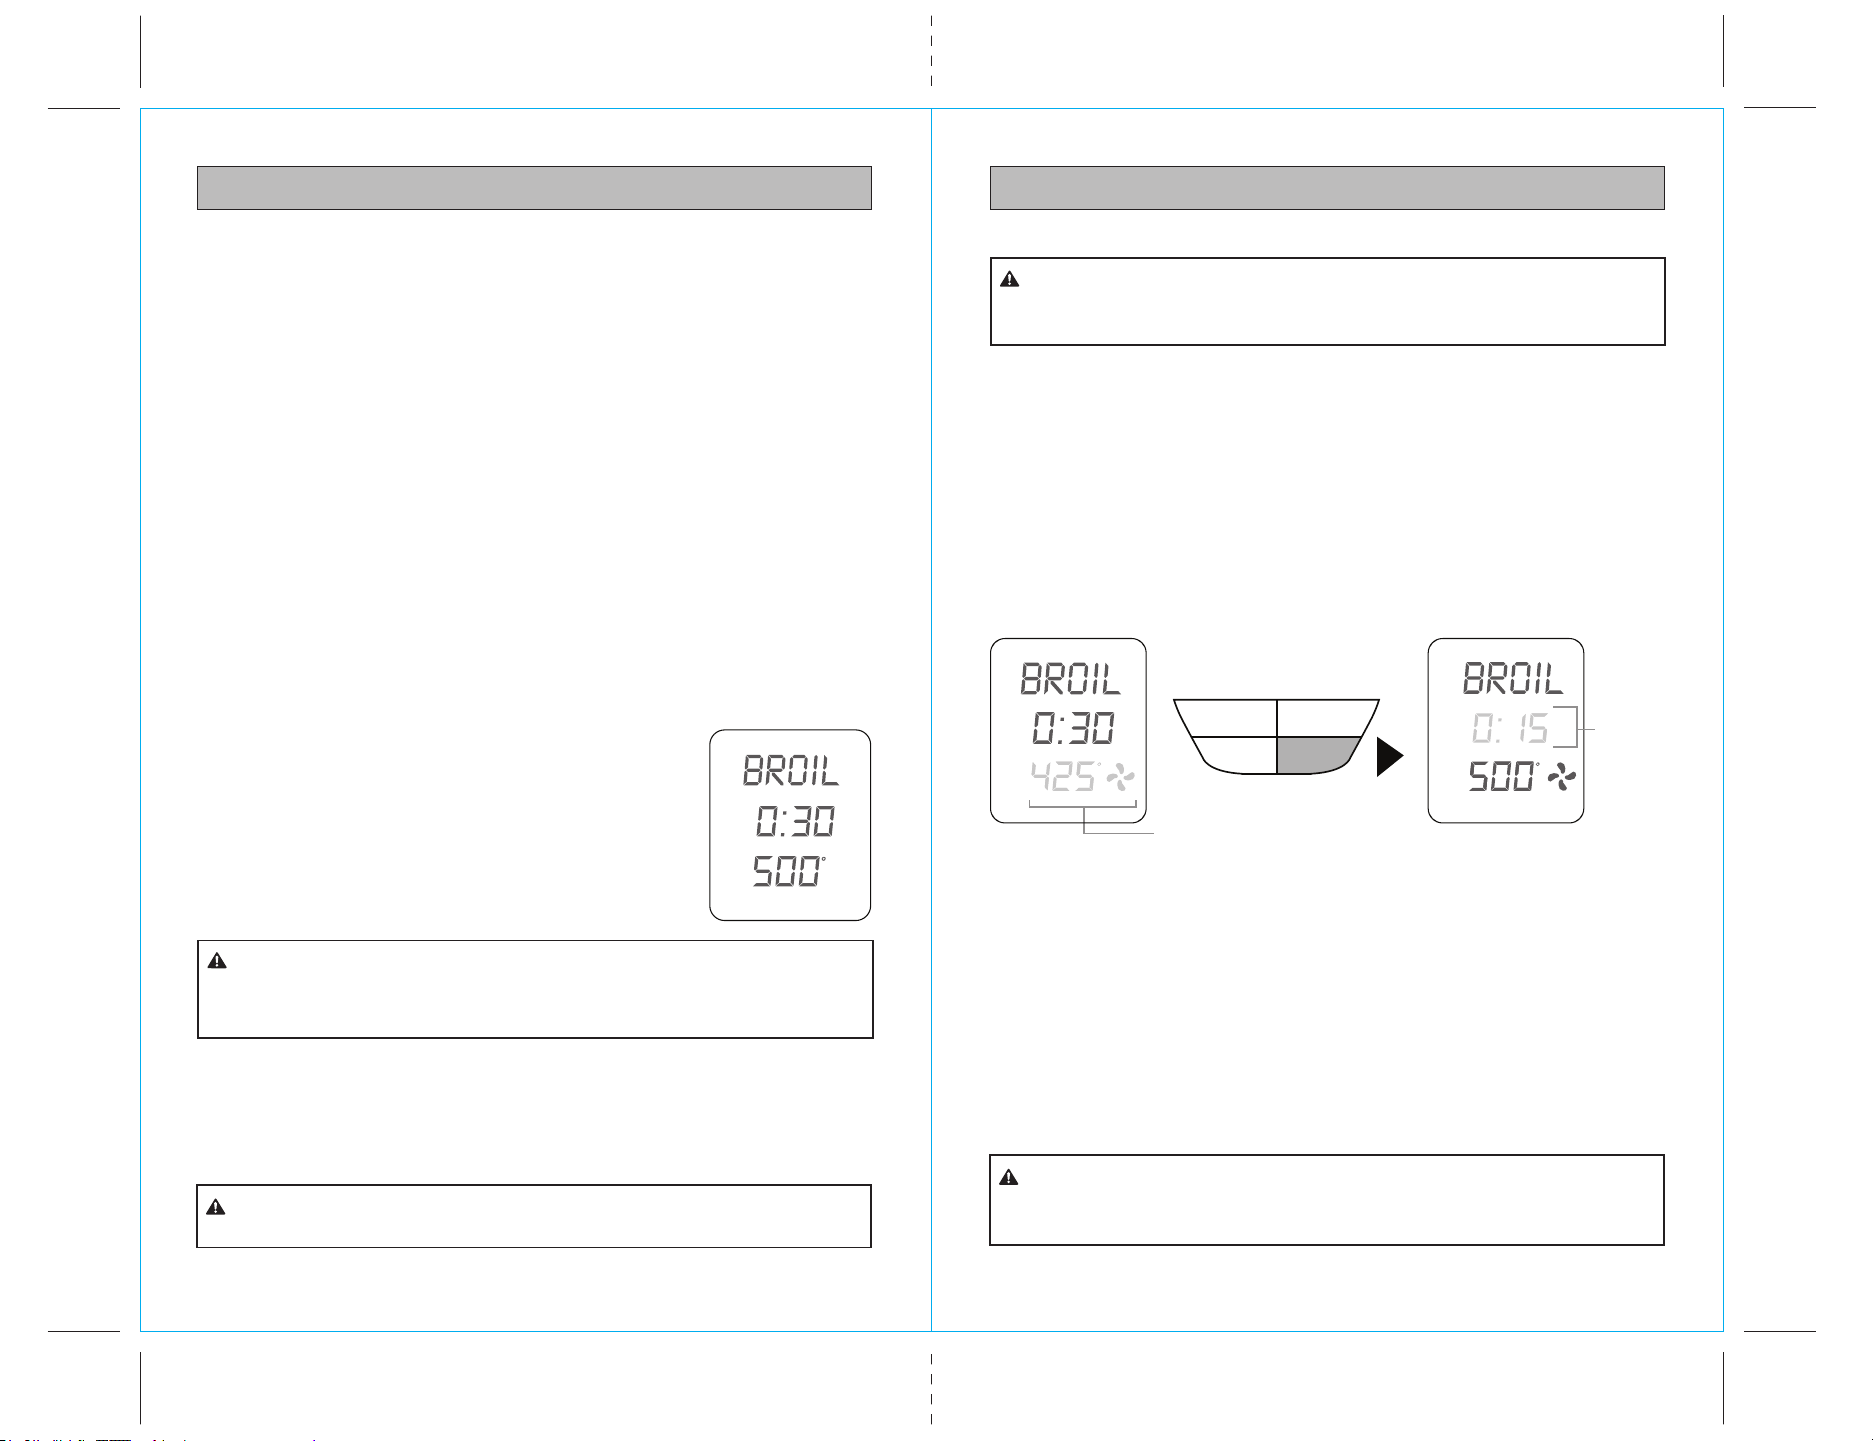
BROIL FUNCTION BROIL FUNCTION cont.
ELEMENTS
Top heating elements cycle on and off to regulate the correct temperature.
RACK POSITION
Top rack height position.
OPTIONAL SETTINGS
Convec button: Activate for convection cooking
The BROIL function is ideal for open sandwiches, small cuts of meat, poultry, fish, sausages
and vegetables. Broiling can also be used to brown the tops of casseroles and gratins.
1. Insert the oven rack into the top rack height position. Position the rack with the
spokes facing upwards.
NOTE: We recommend using the top rack height position during the BROIL function.
However this is a guide only. Certain foods may require the middle rack position
depending on the recipe, the amount and size of the food and your personal taste.
For example, the middle rack height position may be more appropriate for taller
foods that may touch the heating elements, thicker foods such as hamburger patties,
marinated foods such chicken wings, or foods that require a gentle broil.
We recommend experimenting with the rack height position, as well as the
temperature and time settings to produce the desired results.
2. Insert the broiling rack into the enamel baking pan with
the broiling rack spokes facing upwards. Place food on
the rack, then place rack onto the center of the oven
rack so that air flows around the sides of the food.
NOTE: When broiling, the broiling rack must be inserted into
the Kenmore enamel baking pan. When assembled together,
the broiling rack is designed to drain grease and fats away
from meats for healthier cooking. The baking pan collects
these pan drippings and helps prevent spattering.
Fig. 15
Min
Time
Temp
F
NOTE: Do not use lids of any type in the oven as hot ingredients can build up
pressure and cause injury.
3. Close the oven door.
4. Turn the FUNCTION dial until the indicator on the LED screen reaches the BROIL
function. The bottom figure on the LED screen indicates the preset temperature of
500°F’, while the top figure on the LED screen indicates the preset time of ‘0:30 MIN’.
5. The broiling temperature and time can be adjusted before or during the broiling cycle.
a) Press the Time/Temp control button until Temp flashes in the display.
b) Turn the Time Temp control dial to adjust broiling temperature. Adjustment
must be made while Temp is flashing (10 seconds).
c) Press the Time/Temp control button again for Time to flash in the display.
d) Turn the Time Temp control dial to adjust broiling time. Adjustment must be
made while Time is flashing (10 seconds).
Always ensure the oven door is completely closed when using the
broil function.
CAUTION:
Be extremely careful if using cooking utensils for broiling other than
the supplied broiling rack and baking pan, especially those constructed of material
other than metal. Even oven-safe glassware can overheat and crack if it contacts
the oven heating elements.
CAUTION:
6. Press the Start/Stop control button to begin broiling cycle. The Start/Stop control
button words will light up and the oven alert will sound.
7. While the oven is heating up, the Temp digits will flash the escalating temperature
of the oven interior on the LED display. When the oven reaches the set broiling
temperature, the Temp digits stop flashing, the oven alert sounds, and the Time digits
begin counting down in one minute increments. NOTE: When the Time digits reach
10 minutes, the display shifts to counting down by the second.
NOTE: Depending on the food being broiled, it may be necessary to turn food over
half way through the cooking time to achieve even cooking and browning.
8. At the end of the broiling cycle, the oven alert will sound five times and the
START/STOP button words will cease to illuminate.
NOTE: You may stop the broiling cycle at any time by pressing the Start/Stop control button.
Fig. 16
Min
Time
The outer surface of the oven, including the oven door, is hot during
and after operation. Always use protective hot pads or insulated oven mitts when
inserting, removing or handling items from the oven.
CAUTION:
DO NOT use lids of any type in the oven as they can cause hot
ingredients within cooking vessels to build up pressure and possibly cause sudden
eruption of contents and serious burns to vessel handlers.
WARNING:
NOTE: Do not cover any part of the oven, including accessories, pans, and dishes
with metal foil. This may cause overheating of the oven.
Flashing until selected
temperature is reached
Time/Temp
Convection Start/Stop
Slice/Darkness
Min
Time
Temp
F
Temp
F
Count
down
begins
(Flashing)
2120
OPERATING INSTRUCTIONSOPERATING INSTRUCTIONS
6. Press the Start/Stop button to start
toasting. The oven alert will sound,
the Start/Stop button words will
illuminate blue, and Time will
display and count down in the
LED screen.
NOTE: The oven controls will automatically adjust the toasting time depending
on the heat already present inside the oven. For example, if the oven is already
warm after one cycle of toasting, the toasting time for the second cycle will be less.
NOTE: During the toasting cycle, condensation may form on the oven door and
steam may be emitted. This is normal. Condensation and steam occur as a result
of the moisture content of the bread. Freshly baked and frozen breads generally
produce more condensation.
7. At the end of the toasting cycle, the oven alert will sound five times and the
Start/Stop button words will cease to be illuminated.
NOTE: You may stop the toasting cycle at any time by pressing the Start/Stop
control button.
TOAST FUNCTION TOAST FUNCTION cont.
ELEMENTS
Top and bottom heating elements cycle on and off to regulate the correct
temperature. The top middle element is off.
RACK POSITION
Middle rack height position.
1. Insert the oven rack into the
middle rack position.
Position the wire rack with the
spokes facing upward.
2. If toasting 4 to 6 slices,
evenly space them with
2 or 3 slices at the front
of the wire rack and 2 or 3
slices at the back of the rack.
3. Close the oven door.
4. Turn the FUNCTION dial until the indicator on the LED screen reaches the
TOAST function. The two number figures on the screen represent the number
and shade of darkness of the slices to be toasted. The preset default for
each is 4.
5. The shade of darkness and number
of slices can be adjusted before
or during the toasting cycle.
a) Press the Slice/Shade control button
to adjust the settings. Slice will flash
in the display. Adjust the setting within
10 seconds by turning the Time Temp
dial. The available settings range from
1 to 6 slices.
b) Press the Slice/Shade control button
again. Shade will flash in the display.
Adjust the setting within 10 seconds
by turning the Time Temp dial.
The available settings range from
1 (lightest) to 7 (darkest).
As a general guide:
Desired Toast Color Setting
Light color toast 1 or 2
Medium color toast 3, 4 or 5
Dark color toast 6 or 7
CAUTION: HOT SURFACE
Time/Temp
Function
Mode
Temp
Time
Slices/Darkness
Start/Stop
Convection
Time/Temp
Convection Start/Stop
Slice/Darkness
Shade Slices
Shade Slices Shade Slices
Fig. 17
Fig. 18
Fig. 19
Min
Time

Time/Temp
Convection
Function
Mode
Temp
Time
Start/Stop
Slice/Darkness
MIDDLE
Fig. 21
23
22
OPERATING INSTRUCTIONSOPERATING INSTRUCTIONS
PIZZA FUNCTION PIZZA FUNCTION cont.
ELEMENTS
Top and bottom heating elements cycle on and off to regulate the correct
temperature.
RACK POSITION
Middle rack height position.
OPTIONAL SETTINGS
Convec button: Activate for convection cooking
The PIZZA function melts and browns cheese and toppings, while crisping the
pizza crust.
1. Insert the wire rack into the middle rack height position. The wire rack should
be positioned with the spokes facing upwards.
2. Close the oven door.
3. Turn the FUNCTION dial until the indicator
on the LED screen reaches the PIZZA function.
The bottom figure on the LED screen indicates
the preset PIZZA temperature of ‘425°F’, while
the top figure on the LED screen indicates
the preset time of 0:15 min. The Convection
preset will also be displayed as a fan blade
icon. Press the Convec control button to cancel
convection fan operation. Press again to restore.
4. The pizza cooking temperature
and time can be adjusted before or
during the cooking cycle.
a) Press the Time/Temp control button until Temp flashes in the display.
b) Turn the Time Temp control dial to adjust cooking temperature. Adjustment
must be made while Temp is flashing (10 seconds).
c) Press the Time/Temp control button again for Time to flash in the display.
d) Turn the Time Temp control dial to adjust cooking time. Adjustment must be
made while Time is flashing (10 seconds).
Fig. 20
Min
Time
Temp
F
F
Flashing until selected
temperature is reached
6. While the oven is preheating, the Temp digits will
flash the escalating temperature of the oven interior
on the LED display. When the oven reaches the set
cooking temperature, the Temp digits stop flashing,
the oven alert sounds, and the Time digits begin
counting down in one minute increments. Immediately
open the door to place pizza in the oven. Place
pizza on the supplied pizza stone or enamel baking
pan (or other oven-safe pan), and position stone or
pan on the center of the oven rack so that air flows
around the sides of the food.
NOTE: Opening the oven door does not stop the Time countdown. Also, when the
Time digits reach 10 minutes, the display shifts to counting down by the second.
NOTE: Whether cooking a fresh or frozen pizza, use the supplied pizza stone. For best
results, insert the pizza stone without the pizza on it into the oven for the preheat cycle.
Sprinkle the stone with cornmeal or lightly spray it with cooking oil before placing pizza
onto it. This will make the pizza easier to remove when finished baking.
NOTE: Due to the wide variety of pizzas available, you will need to consider whether
you are cooking a fresh or frozen pizza or a thin crust or deep dish, and adjust the
cooking time to produce the ideal result. For example, frozen pizzas may need
additional cooking time. Thick crust pizzas may also require slightly more cooking time.
5. Press the Start/Stop control button to begin the oven Preheat period of time.
The Start/Stop control button words will light up and the oven alert will sound.
NOTE: To assure even browning, you may need to open the oven door halfway
through cooking time and rotate the pizza 90 degrees.
9. At the end of the cooking cycle, the oven alert will sound five times and the
Start/Stop button words will cease to be illuminated.
NOTE: You may stop the baking cycle at any time by pressing the Start/Stop
control button.
Time/Temp
Convection Start/Stop
Slice/Darkness
Fig. 22
Min
Time
Temp
Min
Time
Temp
F
Count
down
begins
(Flashing)
DO NOT bake pizza in a disposable metal foil pizza pan that may
be provided with a purchased pizza as it may cause the oven to overheat. If cooking
a frozen pizza, ensure to remove all packaging, including cardboard, plastic, paper,
or other flammable materials before placing the pizza in the oven. Use a pizza stone
when cooking a pizza. It is not recommended to cook pizzas directly onto the oven
rack as melted cheese and other ingredients may come into contact with elements
and create a potential fire risk.
CAUTION:
PREHEATING
25
24
OPERATING INSTRUCTIONSOPERATING INSTRUCTIONS
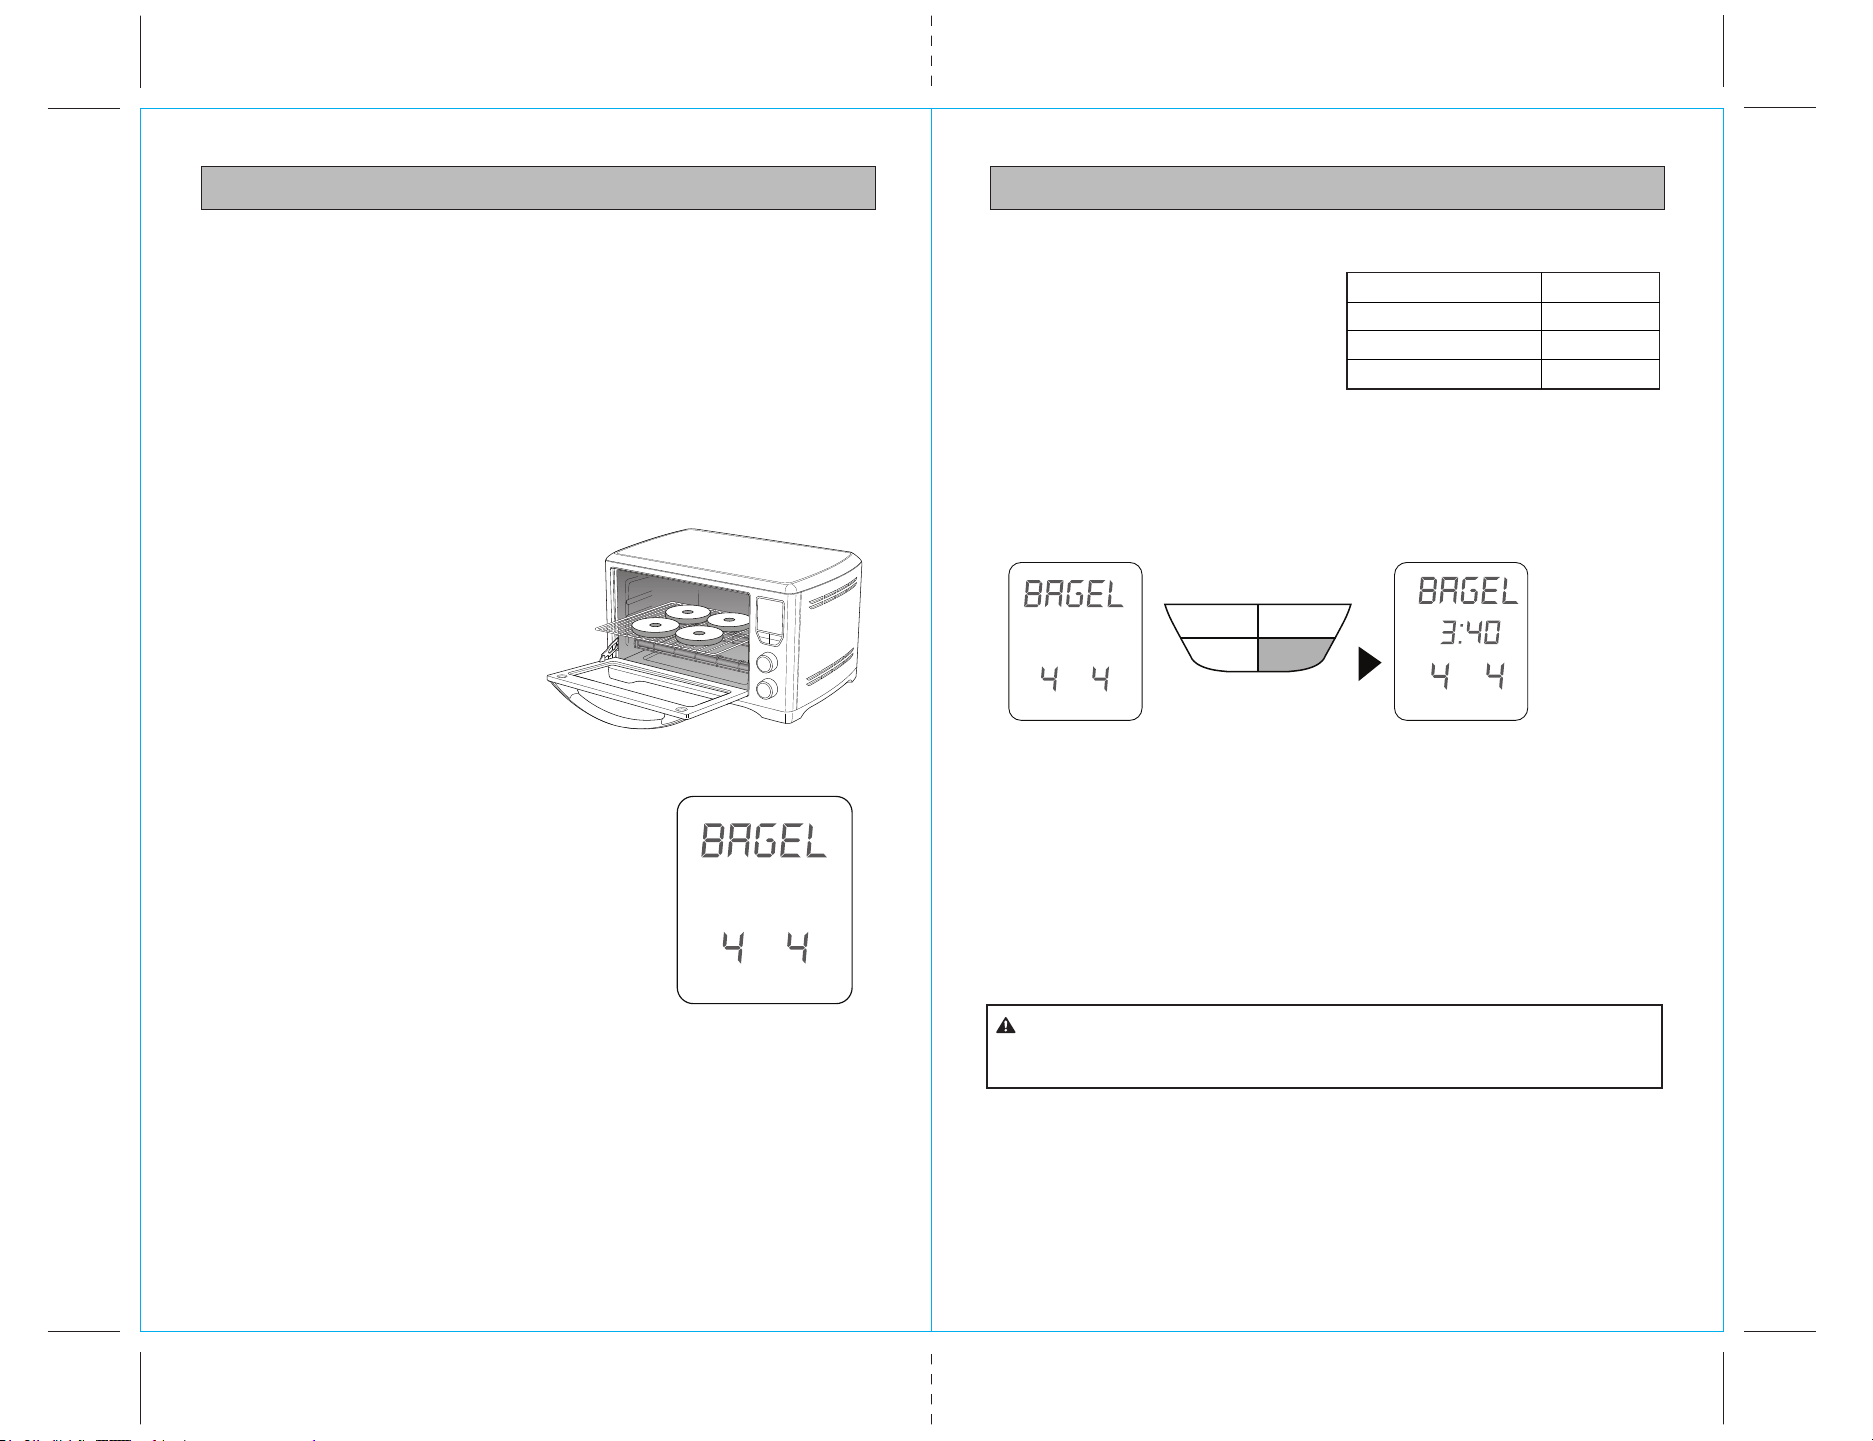
BAGEL FUNCTION BAGEL FUNCTION cont.
ELEMENTS
Top and bottom heating elements cycle on and off to regulate the correct
temperature.
RACK POSITION
Middle rack height position.
The BAGEL function crisps the insides of your cut bagel while only lightly toasting
the outside. This function is also ideal for toasting English muffins, crumpets or thick
sliced specialty breads which require one side to be toasted more than the other.
NOTE: If you like your bagel halves equally crisp on both the top and bottom, we
recommend using the TOAST function to toast your cut bagel.
1. Insert the oven rack into the middle
rack height position. Position the rack
with the spokes facing upwards.
2. Slice each bagel into two equal halves.
3. If toasting 4-6 halves, evenly space
them with 2-3 halves at the front
of the wire rack and 2-3 halves at
the back of the rack.
NOTE: The inside (cut side) of the bagel
must always face upwards towards the top heating elements. This allows the cut side
to be crisp while the crust is only lightly toasted.
CAUTION: HOT SURFACE
Time/Temp
Function
Mode
Temp
Time
Slices/Darkness
Start/Stop
Convection
Fig. 13
7. Press the Start/Stop button to start crisping. The oven alert will sound, the
Start/Stop button words will illuminate blue, and Time will display and count
down in the LED screen.
As a general guide:
Desired Bagel Color Setting
Light color toast 1 or 2
Medium color toast 3, 4 or 5
Dark color toast 6 or 7
4. Close the oven door.
5. Turn the FUNCTION dial until the indicator
on the LED screen reaches the BAGEL
function. The two number figures on the screen
represent the number and shade of darkness
of the bagel halves to be crisped. The preset
default for each is 4.
6. The shade of darkness and number of bagel
halves can be adjusted before or during the
crisping cycle.
a) Press the Slice/Shade control button to adjust the settings. Slice will flash in the
display. Adjust the setting within 10 seconds by turning the Time Temp dial. The
available settings range from 1 to 6 bagel halves.
Fig. 14
Shade Slices
NOTE: The oven controls will automatically adjust the crisping time depending on
the heat already present in the oven.
NOTE: During the bagel crisping cycle, condensation may form on the oven door
and steam may be emitted. This is normal. Condensation and steam occur as a
result of the moisture content of the bagel. Freshly baked and frozen bagels
generally produce more condensation.
8. At the end of the bagel cycle, the oven alert will sound five times and the
Start/Stop button words will cease to be illuminated.
NOTE: You may stop the bagel crisping cycle at any time by pressing the
Start/Stop control button.
The outer surface of the oven, including the oven door, is hot during
and after operation. Always use protective hot pads or insulated oven mitts when
inserting , removing or handling items from the oven.
CAUTION:
Time/Temp
Convection Start/Stop
Slice/Darkness
Fig. 15
Shade Slices
Shade
Slices
Min
Time
b) Press the Slice/Shade control
button again. Shade will flash in
the display. Adjust the setting
within 10 seconds by turning the
Time Temp dial. The available
settings range from 1 (lightest)
to 7 (darkest).
27
26
CARE AND MAINTENANCECARE AND MAINTENANCE
DO NOT immerse the body, power cord or power plug in water or
any other liquid as this may cause electrocution.
CAUTION:
Use extreme caution when cleaning the quartz heating elements.
Allow the oven to cool completely, then gently rub a soft, damp sponge or cloth
along the length of the heating element. do not use any type of cleanser or cleaning
agent. let all surfaces dry thoroughly prior to inserting the power plug into a wall
outlet and turning the oven on.
CAUTION:
CLEANING THE CRUMB TRAY
1. After each use, slide out the crumb tray and discard crumbs. Wipe the tray with
a soft, damp sponge. A non-abrasive liquid cleanser may be used to avoid
build-up of stains. Apply the cleanser to the sponge, not the tray, before
cleaning. Dry thoroughly.
2. To remove baked-on grease, soak the tray in warm soapy water then wash with
a soft sponge or soft plastic scouring pad. Rinse and dry thoroughly.
3. Always ensure to re-insert the crumb tray into the oven after cleaning and prior
to inserting the power plug into a wall outlet.
CLEANING THE OVEN RACK, BROILING RACK, BAKING PAN AND PIZZA STONE
1. Wash all accessories in warm soapy water with a soft sponge or soft plastic
scouring pad. Rinse and dry thoroughly.
2. The oven rack, broiling rack, baking pan and pizza stone are also dishwasher safe.
STORAGE
1. Ensure the oven heating is turned OFF by pressing the START/STOP button on
the control panel. The oven is OFF when the Start/Stop button words cease to
be illuminated. Then remove the power plug from the wall outlet.
2. Allow the oven and all accessories to cool completely.
3. Ensure the oven and all accessories are clean and dry.
4. Ensure the crumb tray is inserted into the oven, the broiling rack is inserted into
the baking pan and resting on the oven rack in the middle rack height position.
5. Ensure the door is closed.
6. Store the appliance in an upright position standing level on its support legs.
Do not store anything on top.
Ensure the oven is turned OFF by pressing the START/STOP button on the control
panel. The oven is OFF when the Start/Stop control button words cease to be
illuminated. Remove the power plug from the wall outlet. Allow the oven and all
accessories to cool completely before disassembling and cleaning.
NOTE: Do not use abrasive cleansers, metal scouring pads or metal utensils on any
of the interior or exterior surfaces of the oven, including the crumb tray. Do not use
abrasive cleansers, metal scouring pads or metal utensils to clean any of the
accessories as they may damage the porcelain enamel finish of the baking pan
and broiling rack or scratch the non-stick coating on the pizza stone.
CLEANING THE OUTER BODY AND DOOR
1. Wipe the outer body with a soft, damp sponge. A non-abrasive liquid cleanser
or mild spray solution may be used to avoid build-up of stains. Apply the
cleanser to the sponge, not the oven surface, before cleaning.
2. To clean the glass door, use a glass cleaner or mild detergent and a soft, damp
sponge or soft plastic scouring pad. Do not use an abrasive cleanser or metal
scouring pad as these will scratch the oven surface.
3. Let all surfaces dry thoroughly prior to inserting the power plug into a wall
outlet.
CLEANING THE INTERIOR
1. The walls on the inside of the oven feature a non-stick coating for easy cleaning.
To clean any spattering that may occur while cooking, wipe the walls with a
soft, damp sponge. A non-abrasive liquid cleanser or mild spray solution may be
used to avoid build-up of stains. Apply the cleanser to the sponge, not the oven
surface, before cleaning. Avoid touching the quartz heating elements.
2. Let all surfaces dry thoroughly prior to inserting the power plug into a wall
outlet.

29
28
NOTESTROUBLESHOOTING
POSSIBLE PROBLEM
Oven will not switch“ON”
EASY SOLUTION
• Check that the power plug is securely
inserted into the outlet
• Insert the power plug into an
independent outlet
• Insert the power plug into a different
outlet
• Reset the house circuit breaker if necessary
The LED display light
has gone out
• The oven LED screen goes blank if no
input is made within two minutes of it
lighting up.
• To relight the LED screen, lightly press
any control button or slightly turn either
control dial.
The pizza does not
cook evenly
• To assure even browning, you may need to
open the oven door halfway through
cooking time and rotate the pizza
90 degrees.
Steam is coming out
from the top of the
oven door
• This is normal. The door is vented to
release steam created from high-moisture
content foods such as frozen breads.
The heating elements
appear to be pulsing
• The oven controls accurately regulate the
heat inside the oven by pulsing the power
in the heating elements in short bursts.
This is normal heating activity.