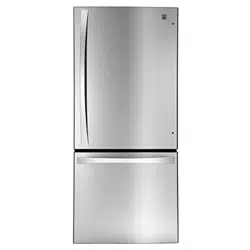
Use & Care Guide Bottom Freezer Refrigerator
PARTS AND FEATURES
Freezer Drawer Model

Use this page to become more familiar with the parts and features of your refrigerator.
NOTE: This guide covers several different models. The refrigerator you have purchased may have some or all of the items listed below. The locations of the features shown below may not match your model.
A Digital Sensor Control
B Refrigerator Light
C Refrigerator Shelves (split)
D Refrigerator Shelf (full)
E Humidity Controlled Crispers
F Pantry G Icemaker*
H Ice Bin
I Durabase Divider
J Dairy Bin
K Fold-Up Bin
L Door Bins
M Condiment Bin
N Freezer Light
O Pullout Drawer
P Durabase
Freezer Swing Model

REFRIGERATOR INSTALLATION
WARNING: Use two or more people to move and install the refrigerator. Failure to do so can result in back or other injury
UNPACKING YOUR REFRIGERATOR
Remove tape and any temporary labels from your refrigerator before using. Do not remove any warningtype labels, the model and serial number label, or the Tech Sheet that is located under the front of the refrigerator.
To remove any remaining tape or glue, rub the area briskly with your thumb. Tape or glue residue can also be easily removed by rubbing a small amount of liquid dish soap over the adhesive with your fingers. Wipe with warm water and dry.
Do not use sharp instruments, rubbing alcohol, flammable fluids, or abrasive cleaners to remove tape or glue. These products can damage the surface of your refrigerator.
Refrigerator shelves are installed in the shipping position. Please reinstall shelves according to your individual storage needs.
PRIOR TO USE
- Clean your refrigerator thoroughly and wipe off all dust that accumulated during shipping.
- Install accessories such as ice cube bin, drawers, shelves, etc., in their proper places. They are packed together to prevent possible damage during shipment.
- Allow your refrigerator to run for at least two to three hours before putting food in it. Check the flow of cold air in the freezer compartment to ensure proper cooling. Your refrigerator is now ready for use.
INSTALLATION
The refrigerator should always be plugged into its own individual properly grounded electrical outlet rated for 115 Volts, 60 Hz, AC only, and fused at 15 or 20 amperes. This provides the best performance and also prevents overloading house wiring circuits which could cause a fire hazard from overheated wires. It is recommended that a separate circuit serving only this appliance be provided.
- To avoid noise and vibration, the unit must be leveled and installed on a solidly constructed floor. If required, adjust the leveling legs to compensate for unevenness of the floor. The front should be slightly higher than the rear to aid in door closing. Leveling legs can be turned easily by tipping the cabinet slightly. Turn the leveling legs to the left to raise the unit or to the right to lower it. (See Leveling and door AlIgnment.) NOTE: Installing on carpeting, soft tile surfaces, a platform or weakly supported structure is not recommended.
- Install this appliance in an area where the temperature is between 55°F (13°C) and 110°F (43°C). If the temperature around the appliance is too low or high, cooling ability may be adversely affected.
- Select a place where a water supply can be easily connected for the automatic icemaker. NOTE: The water pressure must be between 20 and 120 psi on models without a water filter and between 40 and 120 psi on models with a water filter.
- Too small of a distance from adjacent items may result in lowered freezing capability and increased electricity consumption charges. Allow at least 33 ¾ inches (86 cm) in front of the refrigerator to open the doors and at least 2 inches (5.08 cm) between the back of the refrigerator and the wall

HOW TO REMOVE REFRIGERATOR DOOR HANDLE
NOTE: Handle appearance may vary from illustrations on this page.
Removing Refrigerator Handle: Loosen the set screws with a 3/32 in. Allen wrench and remove the handle.
NOTE: If the handle mounting fasteners need to be tightened or removed, use a ¼ in. Allen wrench.

REMOVING AND REPLACING REFRIGERATOR DOORS
Removing the Refrigerator Door
1. Open the door. Remove the top hinge cover screws (1)

2. Lift up the cover (2) and remove it.

3. Remove the three bolts using a 10mm or 13/32-inch socket wrench and lift off the top hinge.

CAUTION: When removing the bolts, be careful that the door does not fall forward.
4. Lift the door from the middle hinge pin and remove the door.

5. Place the door, inside facing up, on a non-scratching surface.
USING YOUR REFRIGERATOR
CARE AND CLEANING
GENERAL CLEANING TIPS
- Unplug the refrigerator or disconnect power.
- Remove all removable parts, such as shelves, crispers, etc. Refer to sections in Using Your Refrigerator for removal instructions.
- Use a clean sponge or soft cloth and a mild detergent in warm water. Do not use abrasive or harsh cleaners.
- Hand wash, rinse and dry all surfaces thoroughly.
- Plug in the refrigerator or reconnect power.
EXTERIOR
Waxing external painted metal surfaces helps provide rust protection. Do not wax plastic parts. Wax painted metal surfaces at least twice a year using appliance wax (or auto paste wax). Apply wax with a clean, soft cloth.
For products with a stainless steel exterior, use a clean sponge or soft cloth and a mild detergent in warm water. Do not use abrasive or harsh cleaners. Dry thoroughly with a soft cloth.
CONDENSER COILS
Use a vacuum cleaner with an attachment to clean the condenser cover and vents. Do not remove the panel covering the condenser coil area.

TROUBLESHOOTING GUIDE
COOLING
Refrigerator and Freezer section are not cooling.
- The refrigerator control is set to OFF (some models).
- Turn the control ON. Refer to the Setting the Controls section for proper temperature settings.
- Refrigerator is set to demo mode.
- Demo Mode allows the lights and control display to work normally while disabling cooling to save energy while on the showroom floor. Refer to the Setting the Controls section for instructions on how to disable Demo Mode.
- Refrigerator is in the defrost cycle.
- During the defrost cycle, the temperature of each compartment may rise slightly. Wait 30 minutes and confirm the proper temperature has been restored once the defrost cycle has completed.
- Refrigerator was recently installed.
- It may take up to 24 hours for each compartment to reach the desired temperature.
- Refrigerator was recently relocated.
- If the refrigerator was stored for a long period of time or moved on its side, it is necessary for the refrigerator to stand upright for 24 hours before connecting it to power.
Cooling System runs too much.