You can locate your model number on the tub wall just inside the door. Throughout this manual, features and appearance may vary from your model.
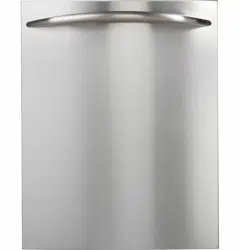
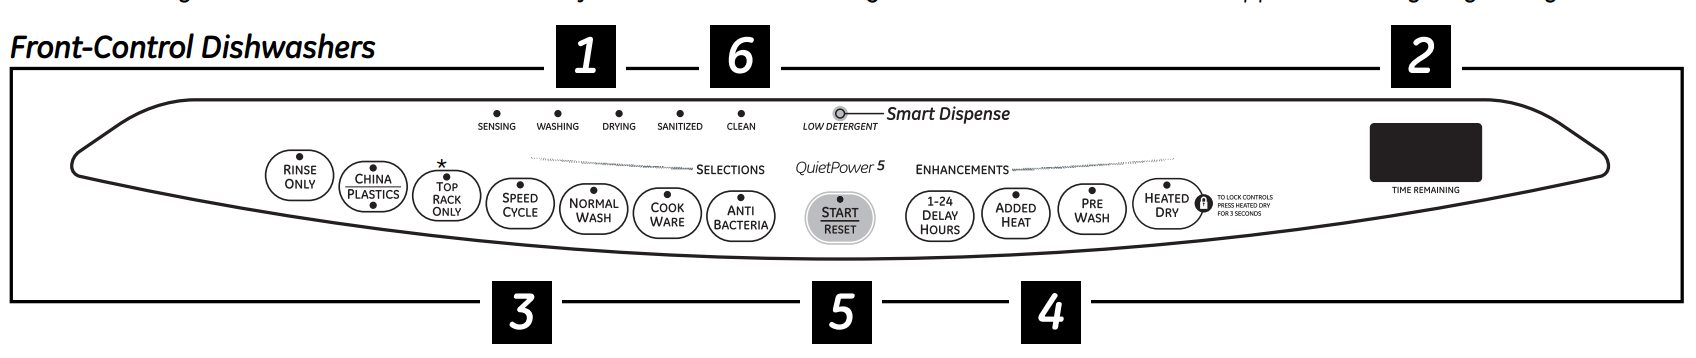
Front-Control Dishwashers
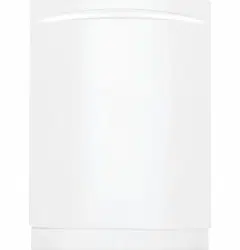
Top-Control Dishwashers
Control Settings
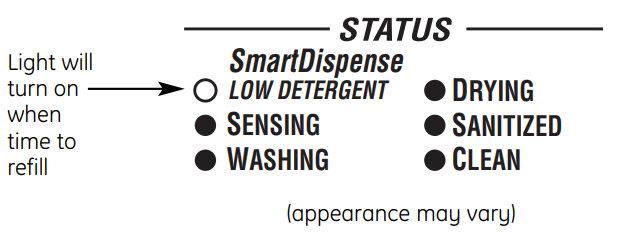
1. Status Indicator Lights (Indicators vary by models): The Status display tells you what is happening while the dishwasher is in operation and may flash, indicating a malfunction. The lights will come ON indicating the sequence of the dishwasher operation.
LOW DETERGENT: Displayed when the SmartDispenseTM needs to be refilled with liquid or gel automatic dishwasher detergent. NOTE: If you are not using SmartDispenseTM and you want to turn the LOW DETERGENT LED light off, press the ADDED HEAT pad 5 times within 3 seconds. You will hear 3 beeps; then the light will go off. You can turn the light back on by pressing the ADDED HEAT pad 5 times within 3 seconds.
SENSING: Displayed while the Clean SensorTM is measuring the amount of soil and temperature of water. The dishwasher will adjust the selected cycle to achieve optimal performance.
ADD-A-DISH: Displayed during prewash, indicating that dishes added now will still be cleaned.
WASHING: Displayed during prewash, main wash and rinse periods.
RINSING: Displayed during rinse periods.
DRYING: Displayed during HEATED DRY.
SANITIZED: Displayed when cycle has met sanitization conditions.
CLEAN: Displayed when a wash cycle is complete.
2. Time Remaining Display (on some models): During operation, the display shows the minutes remaining until the cycle is complete. The display may adjust the remaining time while the Sensing light is on. The time displayed at the start of each cycle may change from the factory setting as the unit customizes itself to home use. During a delay start, the display will show hours of time remaining until the cycle starts.
3. Wash Programs (Selections): Front-Control Dishwashers: Press the pad for the desired wash cycle. Top-Control Dishwashers: Use the Arrow Pads to scroll through the wash cycles. NOTE: All cycle times and water usage information contained in the following section are approximate values. Actual results will depend on several factors, including but not limited to inlet temperature, household water pressure and amount of soil in the wash water. The light above or next to the selected pad will be ON to indicate which WASH CYCLE has been selected.
ANTI-BACTERIA
Heavy 8.8 gal., 105 min.
Medium 7.5 gal., 95 min.
Light 6.3 gal., 85 min.
This cycle raises the water temperature in the final rinse to sanitize your dishware. The cycle length will vary depending on the temperature of your inlet water.
NOTE: The Anti-Bacteria cycle is monitored for sanitization requirements. If the cycle is interrupted during or after the main wash portion or if the incoming water temperature is so low that adequate water heating cannot be achieved, the sanitizing conditions may not be met. In these cases, the sanitized light will not illuminate at the end of the cycle.
NOTE: NSF-certified residential dishwashers are not intended for licensed food establishments
DEEP CLEAN (on some models)
9.6 gal., 111 min.
This cycle is meant for heavily soiled dishes or cookware with dried-on or baked-on soils. This cycle may not remove burned-on foods. Everyday dishes are safe to be used in this cycle.
NOTE: On some models, the STEAM PRE-WASH enhancement will be automatically selected when the DEEP CLEAN cycle is chosen, and cannot be de-selected.
COOKWARE/ POTS & PANS on some models)
Heavy 10.0 gal., 80 min
Medium 8.8 gal., 70 min
Light 7.5 gal., 60 min. This cycle is meant for heavily soiled dishes or cookware with dried-on or baked-on soils.
This cycle may not remove burned-on foods. Everyday dishes are safe to be used in this cycle.
NORMAL WASH
Heavy 8.8 gal., 70 min.
Medium 7.5 gal., 60 min.
Light 5.0 gal., 50 min.
This cycle is for medium/heavily soiled dishes and glassware
SPEED CYCLE (on some models)
7.5 gal., 35 min.
This cycle is for everyday dishes and glassware
HAND/GENTLE (CHINA CRYSTAL)
7.5 gal., 35 min.
This cycle is for lightly soiled china and crystal.
GLASSES on some models)
7.5 gal., 30 min.
This cycle is specifically designed for glasses.
PLASTICS CYCLE (on some models)
Heavy 8.8 gal., 120 min.
Medium 7.5 gal., 105 min.
Light 5.0 gal., 90 min.
The longer time for this cycle includes a built-in drying portion that is specifically designed to reduce the risk of melting plastic items and improve plastic drying. For removing red tomato-based stains, GE recommends the use of Cascade® Plastic BoosterTM
TOP RACK ONLY (on some models)
Heavy 8.2 gal., 70 min.
Medium 7.0 gal., 60 min.
Light 4.6 gal., 50 min.
This cycle washes lightly soiled dishes on the upper rack only
RINSE AND HOLD (RINSE ONLY)
2.5 gal., 10 min
For rinsing partial loads that will be washed later. Do not use detergent with this cycle.
NOTE: On some models, the HAND/GENTLE and PLASTICS selector is a toggle pad; push pad to switch between HAND/GENTLE and PLASTICS.
NOTE: This dishwasher is equipped with CleanSensorTM with automatic temperature control; therefore, cycle length and time may vary depending on soil and water temperature conditions.
NOTE: Only the Anti-Bacteria cycle has been designed to meet the requirements of Section 6, NSF 184 for soil removal and sanitization efficacy.
4. Enhancements: The light above the selected pad will be ON to indicate which ENHANCEMENT has been selected.
DELAY HOURS
You can delay the start of a wash cycle for up to 24 hours (depending on model). Press the DELAY START pad to choose the number of hours you want to delay the start of the cycle; then press START/RESET.
Front-Control Dishwashers: The machine will count down and start automatically at the correct time.
Top-Control Dishwashers: After closing the door, the machine will count down and automatically start at the correct time.
NOTE: To cancel the DELAY START selection before the cycle begins, repeatedly press the DELAY START pad until the display is blank
TEMP BOOST/ ADDED HEAT/ EXTRA HOT WASH
When selected, the cycle will run longer with heating element on to improve both wash and dry performance.
NOTE: Cannot be selected with RINSE AND HOLD cycle.
STEAM PRE-WASH/ PRE-WASH (on some models)
For use with heavily soiled and/or dried-on, baked-on soils. This option MUST be selected PRIOR to starting the cycle. The PRE-WASH option adds 15 minutes and the STEAM PRE-WASH option adds 24 minutes to the cycle time.
NOTE: Cannot be selected with RINSE AND HOLD cycle.
HEATED DRY Light Off
Shuts off the drying heat option. Dishes will air dry naturally (Front-Control Dishwashers) or fan dry (Top-Control Dishwashers) to save energy.
HEATED DRY Light On
Turns the heater on for fast drying. This will extend the total cycle time by 45 minutes for the NORMAL cycle, 38 minutes for the TOP RACK ONLY and COOKWARE cycles, 32 minutes for the DEEP CLEAN cycle, 15 minutes for the ANTI-BACTERIA and PLASTICS cycles, and 30 minutes for all other cycles.
LOCK
You can lock the controls to prevent any selections from being made. Or you can lock the controls after you have started a cycle.
Children cannot accidentally start dishwasher by touching pads with this option selected.
To unlock the dishwasher controls, press and hold the HEATED DRY pad for 3 seconds. The light above the lock pad will turn off. To lock the dishwasher, press and hold the HEATED DRY pad for 3 seconds. The light above the LOCK pad will turn on.
RESET
To change a cycle after washing starts…
Front-Control Dishwashers: Touch the START/RESET pad to cancel the cycle. The START/RESETlight will flash while the water is pumped out if needed. This takes approximately 2 minutes.
Top-Control Dishwashers:Open the door slowly to prevent splash-out. Touch the START/RESET pad to cancel the cycle. If the START/RESET light is flashing, close the door until the water pumps out (this takes approximately 2 minutes) and the light stops flashing.
When the light stops flashing, the dishwasher can be reprogrammed and restarted.
5. Start:
Front-Control Dishwashers
Close and latch the dishwasher door and select the cycle and desired enhancements. Touch the START/RESET pad to begin the cycle. Water fill begins immediately, and approximately 60 seconds later the wash action begins.
When the dishwasher door is fully closed and latched, the control panel lights will display the last settings you selected. If you don’t want to change any of the settings, simply touch the START/RESET pad to begin the cycle.
If the door is closed, the indicator lights will turn off if the START/RESET pad is not selected within 5 minutes. To activate the display, open and close the door or press any pad.
Top-Control Dishwashers
After selecting the cycle and desired enhancements, touch the START/RESET pad to ready the dishwasher to begin the cycle. Close the door to start the cycle or begin the DELAY START countdown. When the cycle starts, the water fill begins and approximately 60 seconds later the wash action begins.
The dishwasher will always display your last selection and enhancements. If you don’t want to change the settings, simply touch the START/RESET pad to ready the dishwasher and close the door to begin the cycle.
Also, if a power failure occurs NORMAL and HEATED DRY will automatically be programmed. Make any new selections and touch the START/RESET pad to begin the new cycle.
When the door is opened, the indicator lights will turn off if the START/RESET pad is not selected within 5 minutes. To activate the display, open and close the door or touch any pad.
6. Clean
Front-Control Dishwasher
The CLEAN light is illuminated when the selected cycle and enhancements are complete. The light will stay ON until a pad is pressed or the door is opened and then closed.
Top-Control Dishwasher
The CLEAN light is illuminated and a double beep will sound when the selected cycle and enhancements are complete. You may remove the dishes at any time. The high-efficiency fan will run quietly for 30 minutes to 4 hours (depending on selected cycle) after the CLEAN light is illuminated to continue drying the dishes. The fan can be turned off by opening the door and pressing any keypad.
ALL MODELS: To turn off the audible end-of-cycle signal (or re-activate it if it was previously turned off), press the HEATED DRY pad 5 times within 3 seconds. A triple beep will sound to indicate the end-of-cycle beep option has been toggled.
Flashing display lights.
Status Indicator Lights
What It Means
START/RESET
Cycle has been interrupted by pressing the START/RESET pad, or there has been a power failure. Light will stop flashing after the dishwasher automatically drains out the water. The dishwasher will restart if the interruption was the result of a power failure.
Recommended dishwasher products.
GE recommends the following products for use in its dishwashers:
For your manual detergent dispenser, Cascade® and Electrasol® powder, liquid or gel automatic dishwasher detergents are approved.
For your SmartDispenseTM Detergent Dispenser, use only the recommended detergents listed on page 10 of this manual.
Jet Dry® or Cascade Crystal Clear® rinse agents to remove spots and prevent new film buildup on your dishes, glasses, flatware, cookware and plastic. Using rinse agent also improves dry performance.
Cascade® Plastic BoosterTM to remove red staining inside your dishwasher that can come from some tomato-based foods.
Cerama Bryte® Stainless Steel Appliance Cleaner to clean the exterior stainless steel panel of GE and ProfileTM dishwashers (for stainless steel exterior models only).
Using the dishwasher
Check the Water Temperature
The entering water should be at least 120°F and not more than 150°F for effective cleaning and to prevent dish damage. Check the water temperature with a candy or meat thermometer. Turn on the hot water faucet nearest the dishwasher, place the thermometer in a glass and let the water run continuously into the glass until the temperature stops rising.
Use Jet-Dry ® or Cascade Crystal Clear® Rinse Agent
Jet-Dry® or Cascade Crystal Clear® rinse agent improves drying, removes spots and prevents new film buildup on your dishes, glasses, flatware, cookware and plastic.
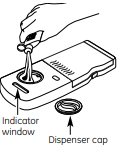
Filling the Dispenser
The rinse agent dispenser holds 3.5 oz. of rinse agent. Under normal conditions, this will last approximately one month. Try to keep it full, but do not overfill.
Make sure the dishwasher door is fully open.
Turn the dispenser cap to the left and lift it out.
Add rinse agent until the indicator window looks full.
Clean up any spilled rinse agent with a damp cloth.
Replace the dispenser cap
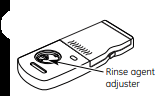
Rinse Aid Setting
The amount of rinse agent released into the final wash can be adjusted. The factory setting is at the midpoint. If there are rings of calcium (hard water) spots on dishes, try a higher setting. If there is foaming, use a lower setting.
To adjust the setting: Remove the dispenser cap; then turn the adjuster counterclockwise to increase the amount of rinse agent or clockwise to reduce the amount of rinse agent dispensed.
Dish Preparation Prior to Loading
No prerinsing of normal food soil is required.
Scrape off hard soils, bones, toothpicks, skins and seeds.
Remove large quantities of any remaining food.
Remove leafy vegetables, meat trimmings and excessive amounts of grease or oil.
Forget to Add a Dish?
A forgotten dish can be added any time before the main wash.
Squeeze the door latch to release the door.
Do not open the door until the water spray action stops. Steam may rise out of the dishwasher.
Add forgotten dishes.
Close the door.
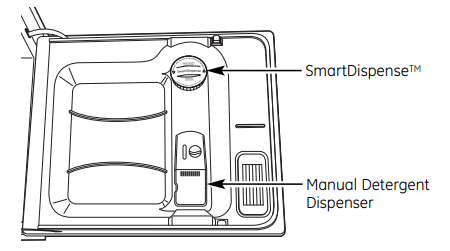
Manual Detergent Dispenser
Some models come equipped with an automatic liquid dishwasher detergent dispenser (SmartDispenseTM) and a manual dispenser. You can use either of these dispensers but don’t use both at the same time.
The cover of the manual dispenser will open during the wash cycle. If you are using SmartDispenseTM, leave the cover of the manual dispenser open before starting the cycle.
For the manual dispenser, Cascade ® and Electrasol ® Automatic Dishwashing Detergents have been approved. You may use powder, liquid, gel or tablets in this dispenser. It is important to keep powdered detergents and tablets fresh and dry so they don’t lose effectiveness. Therefore, do not put detergent into the manual dispenser until you are ready to wash dishes
Filling Manual Detergent Dispenser
The amount of detergent to use depends on whether your water is hard or soft. With hard water, you need extra detergent. With soft water, you need less detergent. Protect your dishes and dishwasher by contacting your water department and asking how hard your water is. Twelve or more grains is extremely hard water. A water softener is recommended. Without it, lime can build up in the water valve, which could stick while open and cause flooding. Too much detergent with soft water can cause a permanent cloudiness of glassware, called etching.
Use the information in the table below as a guide to determine the amount of automatic dishwasher detergent to place in the dispenser. You may use powder, liquid, gel or tablets in this dispenser.
When using automatic dishwashing detergent tablets, simply place one tablet in the main wash section and close the cover.
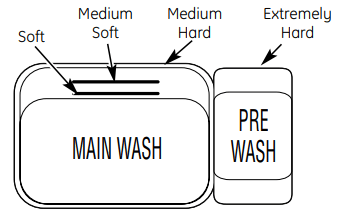
Number of Grains
Detergent Cups to Fill
Less than 4
Fill cup to soft line (1/3 full)
4 to 8
Fill cup to medium soft line (2/3 full)
8 to 12
Fill cup to medium hard line (completely full)
Greater than 12
Fill both main wash cup and pre wash cup
For heavily soiled loads, use a bit more detergent. For water temperatures above 140°F, use a bit less detergent.
For heavily soiled loads, use the Pots and Pans or Heavy Wash cycle.
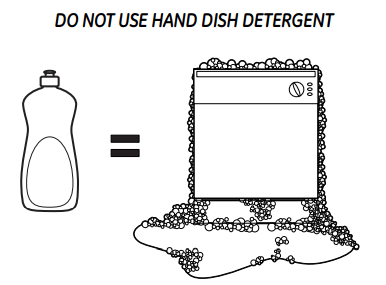
NOTE: Using a detergent that is not specifically designed for dishwashers will cause the dishwasher to fill with suds. During operation, these suds will spill out of the dishwasher vents, covering the kitchen floor and making the floor wet.
Because so many detergent containers look alike, store the dishwasher detergent in a separate space from all other cleaners. Show anyone who may use the dishwasher the correct detergent and where it is stored.
While there will be no lasting damage to the dishwasher, your dishes will not get clean using a dishwashing detergent that is not formulated to work with dishwashers
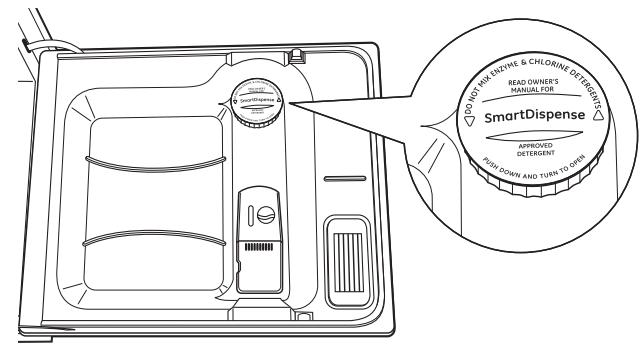
SmartDispenseTM Detergent Dispenser (some models)
This dishwasher may have SmartDispenseTM, a feature which automatically dispenses liquid automatic dishwasher detergent into each cycle based on soil level and water hardness.
To utilize the SmartDispenseTM Detergent Dispenser, it must first be filled. Although any liquid or gel automatic dishwashing detergent can be used in the SmartDispenseTM system, all liquid or gel automatic dishwashing detergents are not the same. Most automatic dishwashing detergents are chlorine bleach-based (such as Cascade® or Electrasol®) while others contain enzymes (such as Cascade Complete® or Electrasol® AdvancedTM Gel).
Do not mix any chlorine bleach-based automatic dishwashing detergent with any dishwashing detergent containing enzymes as this could cause the detergents to congeal and lead to blockage of the SmartDispenseTM system. Check the detergent label to determine if the detergent is chlorine bleach-based or one that contains enzymes. It is recommended that the same type of detergent be used when refilling your SmartDispenseTM system.
CAUTION! Absolutely do not add powder detergent, tablets or any liquid soap or detergent normally used for washing hands or dishes in a sink. Only use liquid or gel detergent specifically designed for use in an automatic dishwasher.
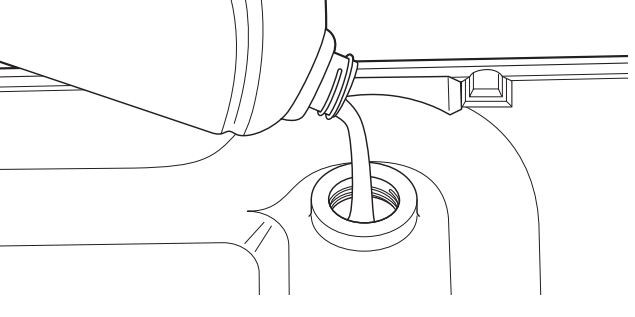
To open the dispenser for filling, push down and turn the blue cap counterclockwise until the cap is loose. Lift cap off.
Set the door at a comfortable angle to fill the dispenser.
Aim the detergent bottle at the opening in the door and begin to fill
The dispenser will hold 45 oz of liquid dishwasher detergent (standard size bottle).
When full, replace the cap and turn clockwise until tight to ensure no water enters the SmartDispenseTM dispenser. If residue is left on the door, it will be washed off in the next cycle.
An indicator light will turn on to notify you when the dispenser needs to be filled again. After filling, the light will not turn off until the door is closed. A full dispenser will last approximately 1 month for the average user.
NOTE: If you are not using SmartDispenseTM and you want to turn the LOW DETERGENT LED light off, press the ADDED HEAT pad 5 times within 3 seconds. You will hear 3 beeps; then the light will go off. You can turn the light back on by pressing the ADDED HEAT pad 5 times within 3 seconds.
SmartDispenseTM Detergent Dispenser Water Hardness Calibration
Prior to the first use, the dishwasher needs to be calibrated for water hardness. Please follow directions below to calibrate the dishwasher to the hardness of your tap water.
Determine the Hardness of Your Tap Water
In the bag that contained these instructions, you should find a water hardness test strip package. Read the instructions on the package, remove the test strip and follow the instructions to determine the hardness level of your tap water. You will use this information to calibrate your dishwasher to dispense the optimal amount of detergent.
Close and latch the door (lights on, dishwasher not running).
Press the COOKWARE or DEEP CLEAN and DELAY HOURS pads at the same time for 3 seconds. The display will show a number from 1 to 5. This is the water hardness value currently set.
Press the COOKWARE or DEEP CLEAN pad to raise the value or the NORMAL pad to lower the value. Set the water hardness value to the number determined with the test strip and table above.
Once the water hardness is set, press the START/RESET pad to save the setting and return the dishwasher to normal operation.
Open the door and touch a pad (other than START) to turn lights on.
Press the “Up” Arrow Pad and DELAY HOURS pad at the same time for 3 seconds. The display will show a number from 1 to 5. This is the water hardness value currently set.
Press the “Up” Arrow Pad to raise the value or the “Down” Arrow Pad to lower the value. Set the water hardness value to the number determined with the test strip and table at the left.
Once the water hardness is set, press the START/RESET pad to save the setting and return the dishwasher to normal operation.
Calibration of Models Without a 3-Digit Display Front controls
Close and latch the door (lights on, dishwasher not running).
Press the COOKWARE or DEEP CLEAN and DELAY HOURS pads together for 3 seconds. All lights will light up and you will hear 1 to 5 beeps. The number of beeps indicates the current hardness value.
To change the setting, press the DELAY HOURS pad the number of times that corresponds to the water hardness value determined at the left. The control will beep each time you press the pad.
Once finished pressing the pad, you will hear a confirmation with beeps for the number of times you pressed the pad.
If the number of beeps is not what you desire, start pressing the DELAY HOURS pad again to reenter a new water hardness level.
Once the water hardness is set, press the START/RESET pad to save the setting and return the dishwasher to normal operation.
Top controls
Open the door and touch a pad to turn lights on.
Press the “Up” Arrow Pad and DELAY HOURS pad at the same time for 3 seconds. All lights will light up and you will hear 1 to 5 beeps. The number of beeps indicates the current hardness value.
To change the setting, press the DELAY HOURS pad the number of times that corresponds to the water hardness value determined at the left. The control will beep each time you press the pad.
Once finished pressing the pad, you will hear a confirmation with beeps for the number of times you pressed the pad.
If the number of beeps is not what you desire, start pressing the DELAY HOURS pad again to reenter a new water hardness level.
Once the water hardness is set, press the START/RESET pad to save the setting and return the dishwasher to normal operation.
NOTE: You should recalibrate the dishwasher control if water conditions change; for example, if a water softener system is added or removed from your home.
Loading the dishwasher racks.
For best dishwashing results, follow these loading guidelines. Features and appearance of racks and silverware baskets may vary from your model.
Upper Rack
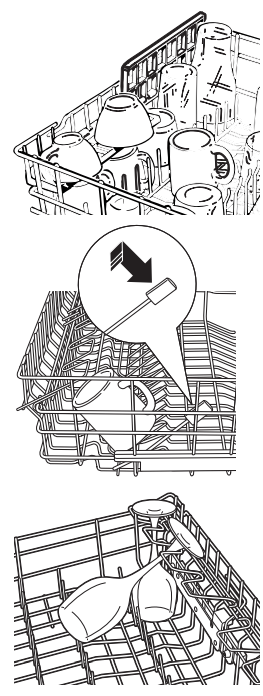
Although the upper rack is primarily for glasses, cups and saucers, pots and pans can be placed in this rack for effective cleaning. Cups and glasses fit best along the sides. This is also a secure place for dishwasher plastics.
The utility shelf (some models) may be placed in the up or down position to add flexibility. A wine glass holder (some models) secures wine glasses for best washability.
Some models have contoured metal cup shelves that can secure up to 12 wine glasses (as shown).
Because wine glasses come in various sizes, after loading, slowly push in the rack to make sure they will clear the top of the dishwasher.
Some models have an Angled Rack System, which allows you to angle your dishes, such as coffee mugs, for better cleaning and quicker drying. To position the tines, pull the lever forward then drop the tines into position, then release the lever.
The upper rack is good for all kinds of odd-shaped utensils. Saucepans, mixing bowls and other items should be placed face down. Fold-down tines (on some models) provide flexibility for extra-large and hardto-fit items.
Secure larger dishwasher-safe plastics over 2 tines when possible
Make sure small plastic items are secure so they can’t fall onto the heater.
Be sure that items do not protrude through the bottom of the rack and block rotation of the middle spray arm. This could result in poor wash performance for items in the upper rack. Check to make sure that no items will block rotation of the wash arm.
NOTE: The Single Rack Wash selection, on models with this feature, washes the upper rack only. If you use this feature, do not load items in the lower rack.
Adjustable Upper Rack
The standard position of your adjustable rack is “up” which allows for maximum clearance for your taller items in the lower rack. If you have taller wine glasses, tumblers or other items to place in the upper rack, you may want to adjust the rack to the lower position.
To lower the rack, support the weight of the rack with your hands as shown and press both finger pads about 1/4″ toward the inside of the rack as indicated and guide the rack down to its lower position.
To raise the rack to the “up” position, pull up on the center of the rack side frame until the rack locks into place.
Lower Rack
The lower rack is best used for plates, saucers and cookware. Large items such as broiler pans and baking racks should go along the left-hand side. Load platters, pots and bowls along the sides, in corners or in the back. The soiled side of items should face the center of the rack. If necessary, oversized glasses and mugs can be placed in the lower rack to maximize loading flexibility.
Also, be careful not to let a portion of an item such as a pot or dish handle extend through the bottom rack. This could block the wash arm and cause poor washing results.
Fold-down tines (on some models) provide flexibility for extra-large and hard-to-fit items. The tines may be left in the up position or folded down to customize the lower rack.
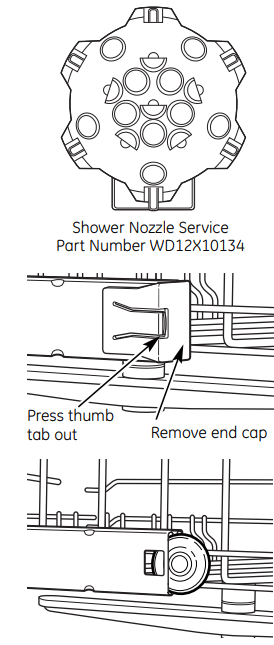
Removing the Upper Rack
Your new dishwasher has the capability to wash extra large items in the lower rack. This is accomplished by removing the upper rack and installing a nozzle over the port that normally supplies water to the upper rack. The nozzle is not included with your dishwasher, but is available for purchase from GE. Call GE at 1.800.626.2002 or go to the GE website ge.com and request Nozzle Spray Asm, part number WD12X10134.
Customers in Canada can order on-line at geappliances.ca 24 hours every day, or by phone at 1.800.661.1616 during normal business hours.
NOTE: Do not use the TOP RACK ONLY cycle (some models) with this feature. Single Rack Wash cycle is for upper rack wash only. The recommended cycle for lower rack only use is the COOKWARE cycle.
NOTE: Nozzle must be in place with upper rack removed. If not installed properly, poor wash performance and noise will result.
To remove the upper rack:
Press thumb tab out and remove the front end caps on each side of the rail.
Pull the rack straight out and off the rails.
Replace the end caps.
Push the rails all the way back into the dishwasher.
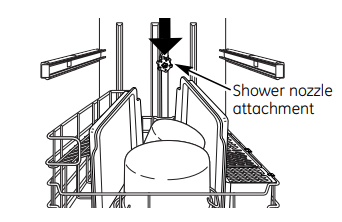
Slide the shower nozzle attachment over the spout.
Then fill the lower rack and begin your cycle.
NOTE: Don’t forget to remove the shower nozzle attachment before you replace the upper rack.
Silverware Basket
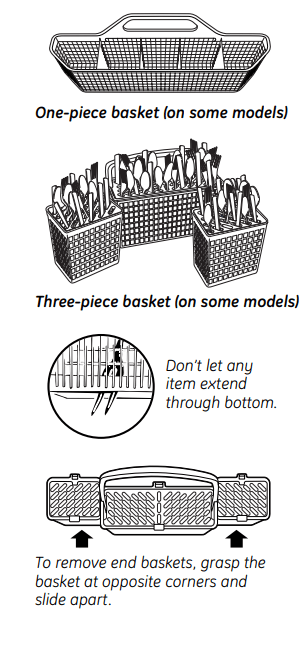
To load flatware, simply push the adjustable handle to either side (on some models). Put flatware in the removable basket with fork and knife handles up to protect your hands. Place spoons in the basket with handles down. Mix knives, forks and spoons so they don’t nest together. Distribute evenly. Small plastic items, such as measuring spoons and lids from small containers should go in the bottom of the silverware basket with the silverware on top.
The one-piece silverware basket (on some models) can be placed in the front, right side or back of the lower rack.
A variety of options is available regarding the three-piece silverware basket (on some models) in your dishwasher. The complete basket is designed to fit on the right side of the lower rack. Additionally, each end of the basket is removable to add loading flexibility to accommodate flatware and lower rack capacity needs.
The lids of both end and middle baskets (on some models) can be closed to contain small items. Long items can be placed on the utility shelf in the upper rack.
Extra Rack Features (on some models)
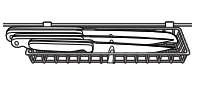
Cutlery Tray
The cutlery tray holds up to 4 large knifes such as a carver, chef’s knives, bread knife, etc., that are too tall to fit in the silverware basket.
Hook the tray onto the rear of the upper rack. Lay the knives between the guides (as shown).
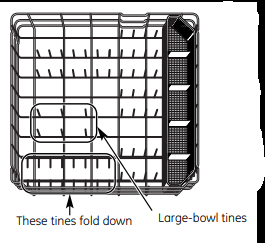
Bowl Tines
The special large-bowl tines in the lower rack add flexibility to your loading pattern. They are useful for serving bowls or other large bowls.
To use the bowl tines, fold down the 2 rows of flex tines in front of the bowl tines and load bowls just as you would in the upper rack.
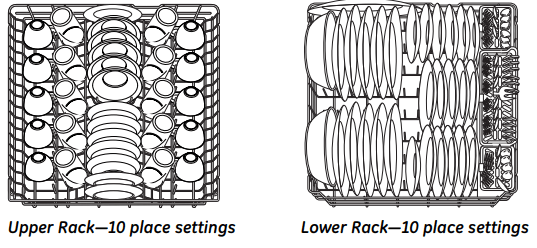
Loading place settings…
Follow these guidelines for loading 10 place settings. Features and appearance of racks and silverware baskets may vary from your model. NOTE: Silverware should be individually loaded into the slots on the silverware basket lid.
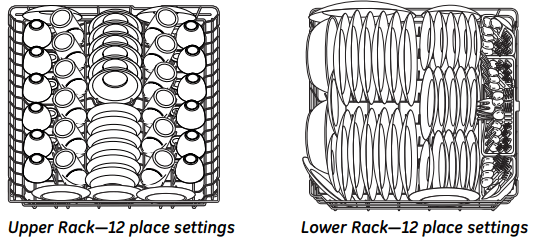
Follow these guidelines for loading 12 place settings. Features and appearance of racks and silverware baskets may vary from your model. NOTE: Silverware should be individually loaded into the slots on the silverware basket lid.
Caring for the dishwasher.
Cleaning the Exterior Door Panel
Before cleaning the front panel, make sure you know what type of panel you have. Refer to the last two letters of your model number. You can locate your model number on the left-hand tub wall just inside the door. If your model number ends with BB, CC, WW, SA or BG, then you have a Painted Door panel. If your model number ends with SS, then you have a Stainless Steel Door panel. If your model number ends with CS, then you have a CleanSteel panel.
Follow the instructions below for cleaning the door panel for your specific model.
Painted Door Panel (model numbers ending in BB–black, CC–bisque, WW–White, SA–silver metallic or BG–graphite black) Use a clean, soft, lightly dampened cloth, then dry thoroughly.
You may also use a good appliance wax or polish.
Stainless Steel Door Panel (model numbers ending in SS)
The stainless steel panels can be cleaned with Stainless Steel Magic or a similar product using a clean, soft cloth. Do not use appliance wax, polish, bleach or products containing chlorine on Stainless Steel doors.
You can order Stainless Steel Magic #WX10X15 through GE Parts by calling 800.626.2002.
CleanSteel Door Panel (model numbers ending in CS)
Use a clean, soft, lightly dampened cloth, then dry thoroughly. Do not use appliance wax, polish or any chemical agent on CleanSteel doors.
Do not wipe the dishwasher with a soiled dish cloth or wet towel. These may leave a residue. Do not use scouring pads or powdered cleaners because these products can scratch the finish.
Stainless Steel Interior—Tub and Inner Door
The stainless steel used to make the dishwasher tub and inner door provides the highest reliability available in a GE dishwasher. If the dishwasher tub or inner door should be scratched or dented during normal use, they will not rust or corrode. These surface blemishes will not affect their function or durability.
Cleaning the Control Panel
To clean the control panel, use a lightly dampened cloth. Then dry thoroughly.
Protect Against Freezing
If your dishwasher is left in an unheated place during the winter, ask a service technician to:
Cut off electrical power to the dishwasher. Remove fuses or trip circuit breaker.
Turn off the water supply and disconnect the water inlet line from the water valve.
Drain water from the water inlet line and water valve. (Use a pan to catch the water.)
Reconnect the water inlet line to the water valve.
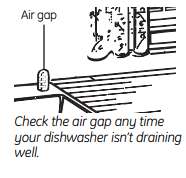
Does Your Dishwasher Have an Air Gap?
An air gap protects your dishwasher against water backing up into it if a drain clogs. The air gap is not a part of the dishwasher. It is not covered by your warranty. Not all plumbing codes require air gaps, so you may not have one.
The air gap is easy to clean.
Turn off the dishwasher and lift off the cover.
Remove the plastic cap and clean with a toothpick
Troubleshooting Tips
Error Messages
Possible Causes
What To Do
START/RESET status indicator light flashing
You have pressed the START/RESET pad while the dishwasher is running. This will cancel the cycle. The light will stop flashing after the dishwasher drains (about 90 seconds).
Press the START/RESET pad only one time to start the dishwasher. When the dishwasher is running, only press the START/RESET pad if you wish to cancel (reset) the cycle.
Power to the dishwasher was turned off while a cycle was running and power has just been restored to the dishwasher. The blinking lights indicate that the dishwasher is draining water inside.
The light will stop flashing after the dishwasher drains out the water. A new cycle will start automatically when the drain ends.
Dishwasher BEEPS once every 30 seconds
This is a reminder that your dishwasher door has been left open during operation. It will continue beeping until you close the door.
Close and latch the door after opening it mid-cycle. Beeping will stop and dishwasher will complete cycle.
Beeping at the end of the cycle
This is normal. The dishwasher will beep twice at the end of the cycle.
To turn off the double beep indicator (or re-activate it if it was previously turned off), press the HEATED DRY pad 5 times within 3 seconds. A triple beep will sound to indicate the end-of-cycle beep option has been turned on or off.
Problem
Possible Causes
What To Do
Dishes and flatware not clean
Low inlet water temperature
Make sure inlet water temperature is correct (see page 8). Turn on the hot water faucet nearest the dishwasher; let run until the water temperature stops rising. Then start the dishwasher and turn off the faucet. This ensures the entering water is hot.
Try not to use the dishwasher when hot water is being used elsewhere in the house; for example, when doing laundry or when a family member is using the shower.
Water pressure is temporarily low
Turn on a faucet. Is water coming out more slowly than usual? If so, wait until pressure is normal before using your dishwasher.
Try not to use the dishwasher when hot water is being used elsewhere in the house; for example, when doing laundry or when a family member is using the shower.
Air gap or disposer is clogged
Clean the air gap or flush the disposer.
Improper rack loading
Make sure large dishware does not block the detergent dispenser or the wash arms. See the Loading the dishwasher racks section.
No air gap or high drain loop
Verify that you have an air gap or a high drain loop. Refer to the Installation Instructions.
Spots and filming on glasses and flatware
Extremely hard water
Low inlet water temperature
Overloading the dishwasher
Improper loading
Old or damp powder detergent
Rinse agent dispenser empty
Too little detergent
Use Jet-Dry ® or Cascade Crystal Clear® rinse agents to remove spots and on glasses and prevent new film buildup.
Make sure water temperature is at least 120°F.
Load dishwasher as shown in the Loading Place Settings section.
Make sure detergent is fresh.
If water is extremely hard, a softener may be required.
Cloudiness on glassware
Combination of soft water and too much detergent
This is called etching and is permanent. To prevent this from happening, use less detergent if you have soft water. Wash glassware in the shortest cycle that will get them clean
Water temperature entering the dishwasher exceeds 150°F
This could be etching. Lower the water heater temperature.
Suds in the tub
Correct detergent wasn’t used
Use only automatic dishwasher detergents to avoid sudsing Cascade® and Electrasol® Automatic Dishwashing Detergents have been approved for use in all GE dishwashers.
To remove suds from the tub, open the dishwasher and let suds dissipate. Close and latch the dishwasher door. Pump out water by touching the START/RESET pad once; then 30 seconds later, touch the START/RESET pad again. Repeat if necessary
Rinse agent was spilled
Always wipe up rinse agent spills immediately.
Detergent left in dispenser cups
Dishes are blocking the detergent cup
Reposition the dishes, so the water from the lower spray arm can flush the detergent cup. See pages 13 and 14
Water in the SmartDispense™ dispenser
Cap not tightened after filling the dispenser
Use a turkey baster to remove as much water as possible from the SmartDispense™ dispenser and refill it as normal. Be sure to tighten the cap fully to prevent water from entering the dispenser
Black or gray marks on dishes
Aluminum utensils have rubbed against dishes
Remove marks with a mild, abrasive cleaner.
Dishes don’t dry
Low inlet water temperature
Make sure inlet water temperature is at least 120°F
Select HEATED DRY.
Use PRE-WASH or ADDED HEAT options.
Select a higher cycle, such as ANTI-BACTERIA or COOKWARE.
Rinse agent dispenser is empty
Check the rinse agent dispenser and fill as required.
Control panel responded to inputs but dishwasher never filled with water
Door latch may not be properly seated
Make sure the door is firmly closed.
Water valve may be turned of
Make sure water valve (usually located under the sink) is turned on
Stained tub interior
Some tomato-based foods can cause reddish stains
Use of the RINSE AND HOLD cycle after adding the dish to the load can decrease the level of staining. GE recommends Cascade® Plastic Booster to help remove these types of stains.
Tea or coffee stains
Remove the stain by hand, using a solution of 1/2 cup bleach and 3 cups warm water.
WARNING: Before cleaning interior, wait at least 20 minutes after a cycle for the heating elements to cool down. Failure to do so can result in burns.
An overall yellow or brown film can be caused by iron deposits in water
A special filter in the water supply line is the only way to correct this problem. Contact a water softener company.
White film on inside surface— hard water minerals
GE recommends Jet-Dry ® or Cascade Crystal Clear® to help prevent hard water mineral deposits from forming
Run dishwasher with citric acid to remove mineral deposits. Citric acid (Part number: WD35X151) can be ordered through GE Parts. See back cover for ordering information
Problem
Possible Causes
What To Do
Dishwasher won’t run
Fuse is blown or circuit breaker is tripped
Replace fuse or reset circuit breaker. Remove any other appliances from the circuit.
Power is turned off
In some installations, the power to the dishwasher is provided through a wall switch, often located next to the disposer switch. Make sure it is on.
Control panel is locked
Unlock control panel. See page 6.
Control panel needs to be rebooted
Turn off power to the dishwasher (circuit breaker or wall switch) for 30 seconds; then turn back on.
Control panel lights go off when you’re setting controls
Time too long between touching of selected pads
Each pad must be touched within 5 minutes of the others.
To relight, touch any pad again, or unlock and relatch door.
Water standing in the bottom of the tub
This is normal
A small amount of clean water around the outlet on the tub bottom at the back of the tub keeps the pump seal lubricated.
Water won’t pump out of the tub
Drain is clogged
If you have an air gap, clean it. See page 15.
If the dishwasher drains into a disposer, run disposer clear.
Check to see if your kitchen sink is draining well. If not, you may need a plumber.
Steam
This is normal
Warm, moist air comes through the vent by the door latch during drying and when water is being pumped out. This is necessary for drying.
Sanitized light does not illuminate at the end of the cycle (Anti-Bacteria cycle only)
The door was opened and the cycle was interrupted during or after the main wash portion
Do not interrupt the cycle anytime during or after main wash.
The incoming water temperature was too low
Raise the water heater temperature to between 120°F and 140°F.
The cycle is complete and the door has been open for longer than 60 seconds
This is normal. No action is required.
Noise
Normal operating sounds
Detergent cup opening
Water entering dishwasher
The motor stops and starts at various times during the cycle
Drain pump sounds during pump out
Drying fan running for 2–4 hours after CLEAN light is illuminated (Top Control Panel models only)
These are all normal. No action is required
Rattling dishes when the spray arm rotates
Make sure dishes are properly loaded. See the Loading the dishwasher racks section.

 to scroll through the wash cycles. NOTE: All cycle times and water usage information contained in the following section are approximate values. Actual results will depend on several factors, including but not limited to inlet temperature, household water pressure and amount of soil in the wash water. The light above or next to the selected pad will be ON to indicate which WASH CYCLE has been selected.


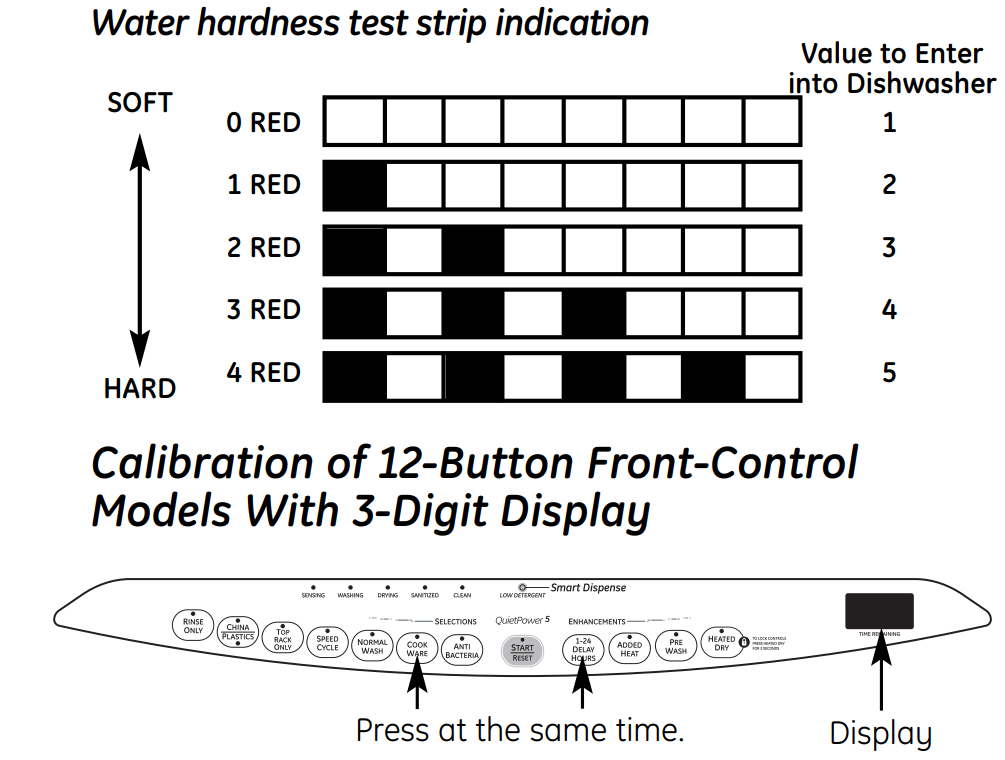

 Arrow Pad and DELAY HOURS pad at the same time for 3 seconds. The display will show a number from 1 to 5. This is the water hardness value currently set.
 Arrow Pad to lower the value. Set the water hardness value to the number determined with the test strip and table at the left.