Documents: Go to download!
- Owner's manual - (English)
USER MANUAL Built-in Double Oven
Getting to know your appliance
Control panel
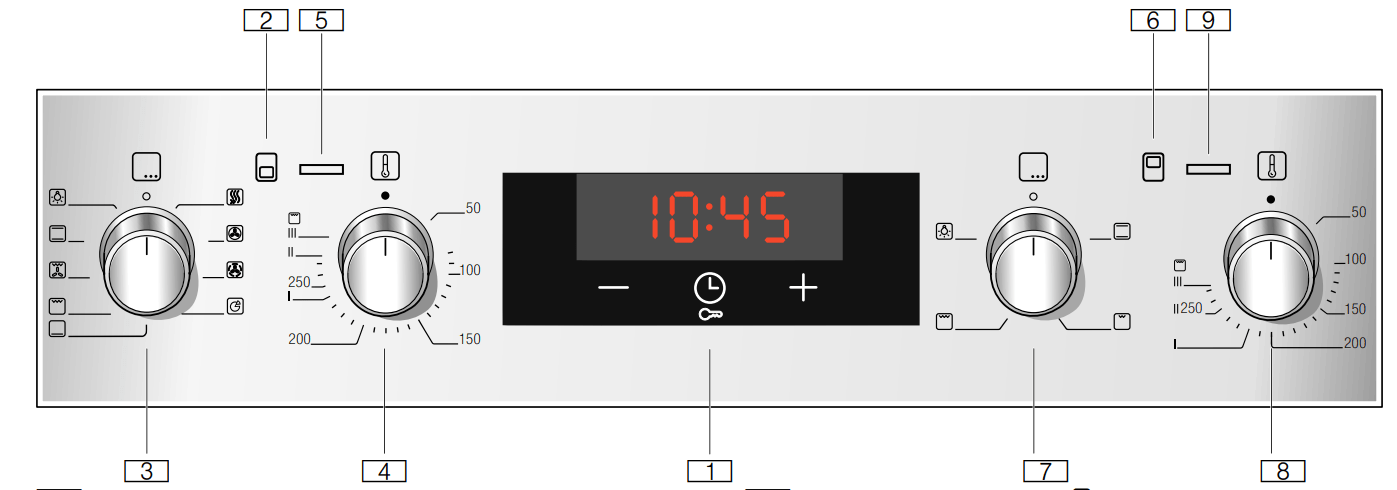
You can set your appliance's various functions on the control panel. Below, you will see an overview of the control panel and the layout of the controls.

1.Buttons and display
The buttons are touch keys with sensors underneath. Simply touch a symbol to select the function it represents. The display shows symbols for active functions and the time-setting options.
2. Main oven 
Controls for the main oven
3. Function selector 
Use the function selector to set the heating function or other functions for the main oven. You can turn the function selector clockwise or anti-clockwise from the "Off" position.
4. Temperature selector 
Use the temperature selector to set the temperature for the heating function or select the setting for other functions for the main oven. You can only turn the temperature selector clockwise from the "Off" position, until it offers resistance. Do not turn the selector beyond this point.
5. Heating-up indicator 
The heating-up indicator for the main oven remains lit while the appliance is heating.
6. Top oven 
Controls for the top oven
7. Function selector 
Use the function selector to set the heating function or other functions for the top oven. You can turn the function selector clockwise or anti-clockwise from the "Off" position.
8. Temperature selector 
Use the temperature selector to set the temperature for the heating function or select the setting for other functions for the top oven. You can only turn the temperature selector clockwise from the "Off" position, until it offers resistance. Do not turn the selector beyond this point.
9. Heating-up indicator 
The heating-up indicator for the top oven remains lit while the appliance is heating.
Note: On some appliances, the control knobs can be pushed in. To push the control knob in and engage it or to release it again, turn it to the "Off" position.
Operating the appliance
You have already learnt about the controls and how they work. Now we will explain how to apply settings on your appliance.
Switching the appliance on and off
Use the function selector to switch the appliance on or off. Turning the function selector to any position other than the "Off" position switches on the appliance. To switch off the appliance, always turn the function selector to the "Off" position.
Setting the heating function and temperature
The function selector and temperature selector make it very easy to apply the settings you require to your appliance. To find out which heating function is best for which type of food, please refer to the beginning of the instruction manual.
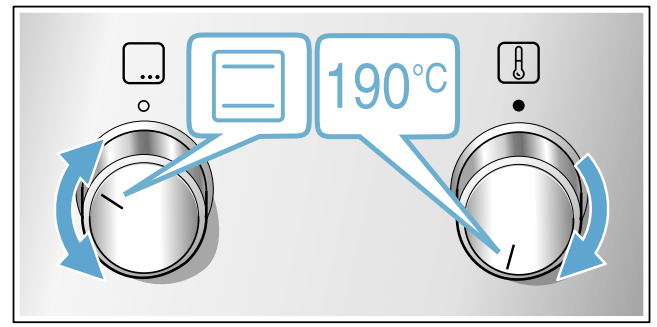
Example in the picture: Top/bottom heating  at 190 °C.
1. Use the function selector to set the heating function.
2. Use the temperature selector to set the temperature or grill setting.

The appliance starts heating after a few seconds.
Once your food is cooked, turn the function selector to the "Off" position to switch the appliance off.
Note: You can also set a cooking time and end time on the appliance.
Changing
The heating function and temperature can be changed at any time using the relevant selector.
Rapid heating
With Rapid heating, you can shorten the heat-up time.
Then, for best results, use:
■  3D hot air
Only use Rapid heating when a temperature of over 100 °C has been selected.
To achieve an even cooking result, do not place your food into the cooking compartment until Rapid heating is complete.
- Set the function selector to

- Use the temperature selector to set the temperature.
The oven will start heating after a few seconds.
Once Rapid heating is complete, an audible signal will sound. Place your food in the cooking compartment.
Cleaning
With good care and cleaning, your appliance will retain its appearance and remain fully functioning for a long time to come. We will explain here how you should correctly care for and clean your appliance.
Suitable cleaning agents
To ensure that the different surfaces are not damaged by using the wrong cleaning agent, observe the information in the table. Depending on the appliance model, not all of the areas listed may be on/in your appliance.
Caution! Risk of surface damage
Do not use:
■ Harsh or abrasive cleaning agents,
■ Cleaning agents with a high alcohol content,
■ Hard scouring pads or cleaning sponges,
■ High-pressure cleaners or steam cleaners,
■ Special cleaners for cleaning the appliance while it is hot.
Wash new sponge cloths thoroughly before use.
Tip: Highly recommended cleaning and care products can be purchased through the after-sales service. Observe the respective manufacturer's instructions.
 Warning – Risk of burns!
The appliance becomes very hot. Never touch the interior surfaces of the cooking compartment or the heating elements. Always allow the appliance to cool down. Keep children at a safe distance.
| Area | Cleaning |
| Appliance exterior | |
| Stainless steel front | Hot soapy water: Clean with a dish cloth and then dry with a soft cloth. Remove flecks of limescale, grease, starch and albumin (e.g. egg white) immediately. Corrosion can form under such flecks. Special stainless steel cleaning products suitable for hot surfaces are available from our after-sales service or from specialist retailers. Apply a very thin layer of the cleaning product with a soft cloth. |
| Plastic | Hot soapy water: Clean with a dish cloth and then dry with a soft cloth. Do not use glass cleaner or a glass scraper. |
| Painted surfaces | Hot soapy water: Clean with a dish cloth and then dry with a soft cloth. |
| Control panel | Hot soapy water: Clean with a dish cloth and then dry with a soft cloth. Do not use glass cleaner or a glass scraper. |
| Door panels | Hot soapy water: Clean with a dish cloth and then dry with a soft cloth. Do not use a glass scraper or a stainless steel scouring pad. |
| Door handle | Hot soapy water: Clean with a dish cloth and then dry with a soft cloth. If descaler comes into contact with the door handle, wipe it off immediately. Otherwise, any stains will not be able to be removed. |
| Appliance interior | |
| Enamel surfaces and self-cleaning surfaces | Observe the instructions for the surfaces of the cooking compartment that follow the table. |
| Glass cover for the interior lighting | Hot soapy water: Clean with a dish cloth and then dry with a soft cloth. If the cooking compartment is heavily soiled, use oven cleaner. |
Door seal Do not remove. | Hot soapy water: Clean with a dish cloth. Do not scour. |
| Door cover | made from stainless steel: Use stainless steel cleaner. Follow the manufacturers' instructions. Do not use stainless steel care products. made from plastic: Clean using hot soapy water and a dish cloth. Dry with a soft cloth. Do not use glass cleaner or a glass scraper. Remove the door cover for cleaning. |
| Rails | Hot soapy water: Soak and clean with a dish cloth or brush. |
| Pull-out system | Hot soapy water: Clean with a dish cloth or a brush. Do not remove the lubricant while the pull-out rails are pulled out – it is best to clean them when they are pushed in. Do not clean in the dishwasher. |
| Accessories | Hot soapy water: Soak and clean with a dish cloth or brush. If there are heavy deposits of dirt, use a stainless steel scouring pad. |
Surfaces in the cooking compartment
The back wall in the cooking compartment is selfcleaning.You can tell this from the rough surface. The base, ceiling and side panel are enamelled and have smooth surfaces.
Cleaning enamel surfaces
Clean the smooth enamel surfaces with a dish cloth and hot soapy water or a vinegar solution. Then dry them with a soft cloth.
Soften baked-on food remnants with a damp cloth and soapy water. Use stainless steel wire wool or oven cleaner to remove stubborn dirt.
Caution!
Never use oven cleaner in the cooking compartment when it is still warm. This may damage the enamel. Remove all food remnants from the cooking compartment and the appliance door before you next heat up the appliance.
Leave the cooking compartment open to dry after cleaning it.
Note: Food residues can cause white deposits to form. These are harmless and do not affect how the appliance works. You can remove these residues using lemon juice if required.
Cleaning self-cleaning surfaces
The self-cleaning surfaces are coated with a porous, matte ceramic layer. This coating absorbs and dispels splashes from baking and roasting while the appliance is in operation.
If the self-cleaning surfaces no longer clean themselves sufficiently and dark stains appear, they can be cleaned using targeted heating.
Making settings
Remove the rails, pull-out shelves, accessories and ovenware from the cooking compartment beforehand. Thoroughly clean the smooth enamel surfaces in the cooking compartment, the inside of the appliance door and the glass cover on the interior lighting.
- Set the 3D hot air type of heating.
- Set the maximum temperature.
- Start the mode and leave it to run for at least one hour.
The ceramic coating is regenerated.
When the cooking compartment has cooled down, remove the brown or white residue with water and a soft sponge.
Note: During operation, reddish spots form on the surfaces. This is not rust, but residues from food. These spots are not harmful and do not restrict the cleaning ability of the self-cleaning surfaces.
Caution! Do not use oven cleaner on the self-cleaning surfaces. This will damage the surfaces.If oven cleaner does get onto these surfaces, dab it off immediately using water and a sponge cloth. Do not rub the surface and do not use abrasive cleaning aids.
Keeping the appliance clean
Always keep the appliance clean and remove dirt immediately so that stubborn deposits of dirt do not build up.
 Warning – Risk of fire! Loose food remnants, fat and meat juices may catch fire. Before using the appliance, remove the worst of the food remnants from the cooking compartment, heating elements and accessories.
Tips
■ Clean the cooking compartment after each use. This will ensure that dirt cannot be baked on.
■ Always remove flecks of limescale, grease, starch and albumin (e.g. egg white) immediately.
■ Use the universal pan for baking very moist cakes.
■ Use suitable ovenware for roasting, e.g. a roasting dish.
Troubleshooting
If a fault occurs, there is often a simple explanation. Before calling the after-sales service, please refer to the fault table and attempt to correct the fault yourself.
Rectifying faults yourself
You can often easily rectify technical faults with the appliance yourself.
If a dish does not turn out exactly as you wanted, you can find useful cooking tips and instructions at the end of this instruction manual.
| Fault | Possible cause | Notes/remedy |
| The appliance is not working. | Defective circuit breaker. | Check the circuit breaker in the fuse box. |
| Power failure | Check whether the kitchen light or other kitchen appliances are working. | |
| The time is flashing on the display. | Power failure. | Reset the time. |
The settings on the appliance cannot be configured. A key symbol has lit up on the display or  . . | The childproof lock is activated. | Deactivate the childproof lock by pressing and holding the button with the key symbol for approx. 4 seconds. |
Error messages on the display
If an error message with " " appears on the display, e.g.
  , touch the
  button. This will reset the error message. Reset the time, if necessary.
If the fault was a one-off, you can continue to use your appliance as normal. If the error message appears again, call our after-sales service and quote the exact error message and the E no. of your appliance.
Replacing the bulb in the top of the cooking compartment
If the cooking compartment light bulb fails, it must be replaced. Heat-resistant, 25 watt, 230 V halogen bulbs are available from the after-sales service or specialist retailers.
When handling the halogen bulb, use a dry cloth. This will increase the service life of the bulb. Only use these bulbs.
1. Place a tea towel in the cold cooking compartment to prevent damage.
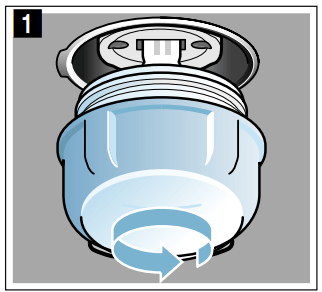
2. Turn the glass cover anti-clockwise to remove it (figure1).

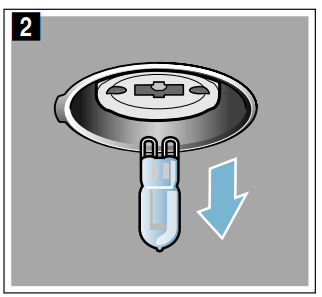
3. Pull out the bulb – do not turn it (figure 2).
Insert the new bulb, making sure that the pins are in the correct position. Push the bulb in firmly.

4. Screw the glass cover back on.
Depending on the appliance model, the glass cover may have a sealing ring. If the glass cover has a sealing ring, put it back in place before screwing the cover back on.
5. Remove the tea towel and switch on the circuit breaker.
See other models: HBG675BS1B HBM43S550A HBG6753S1A HVA541NS0 HBG6767S1A
