Loading ...
Loading ...
Loading ...
49-2000384 Rev. 0 19
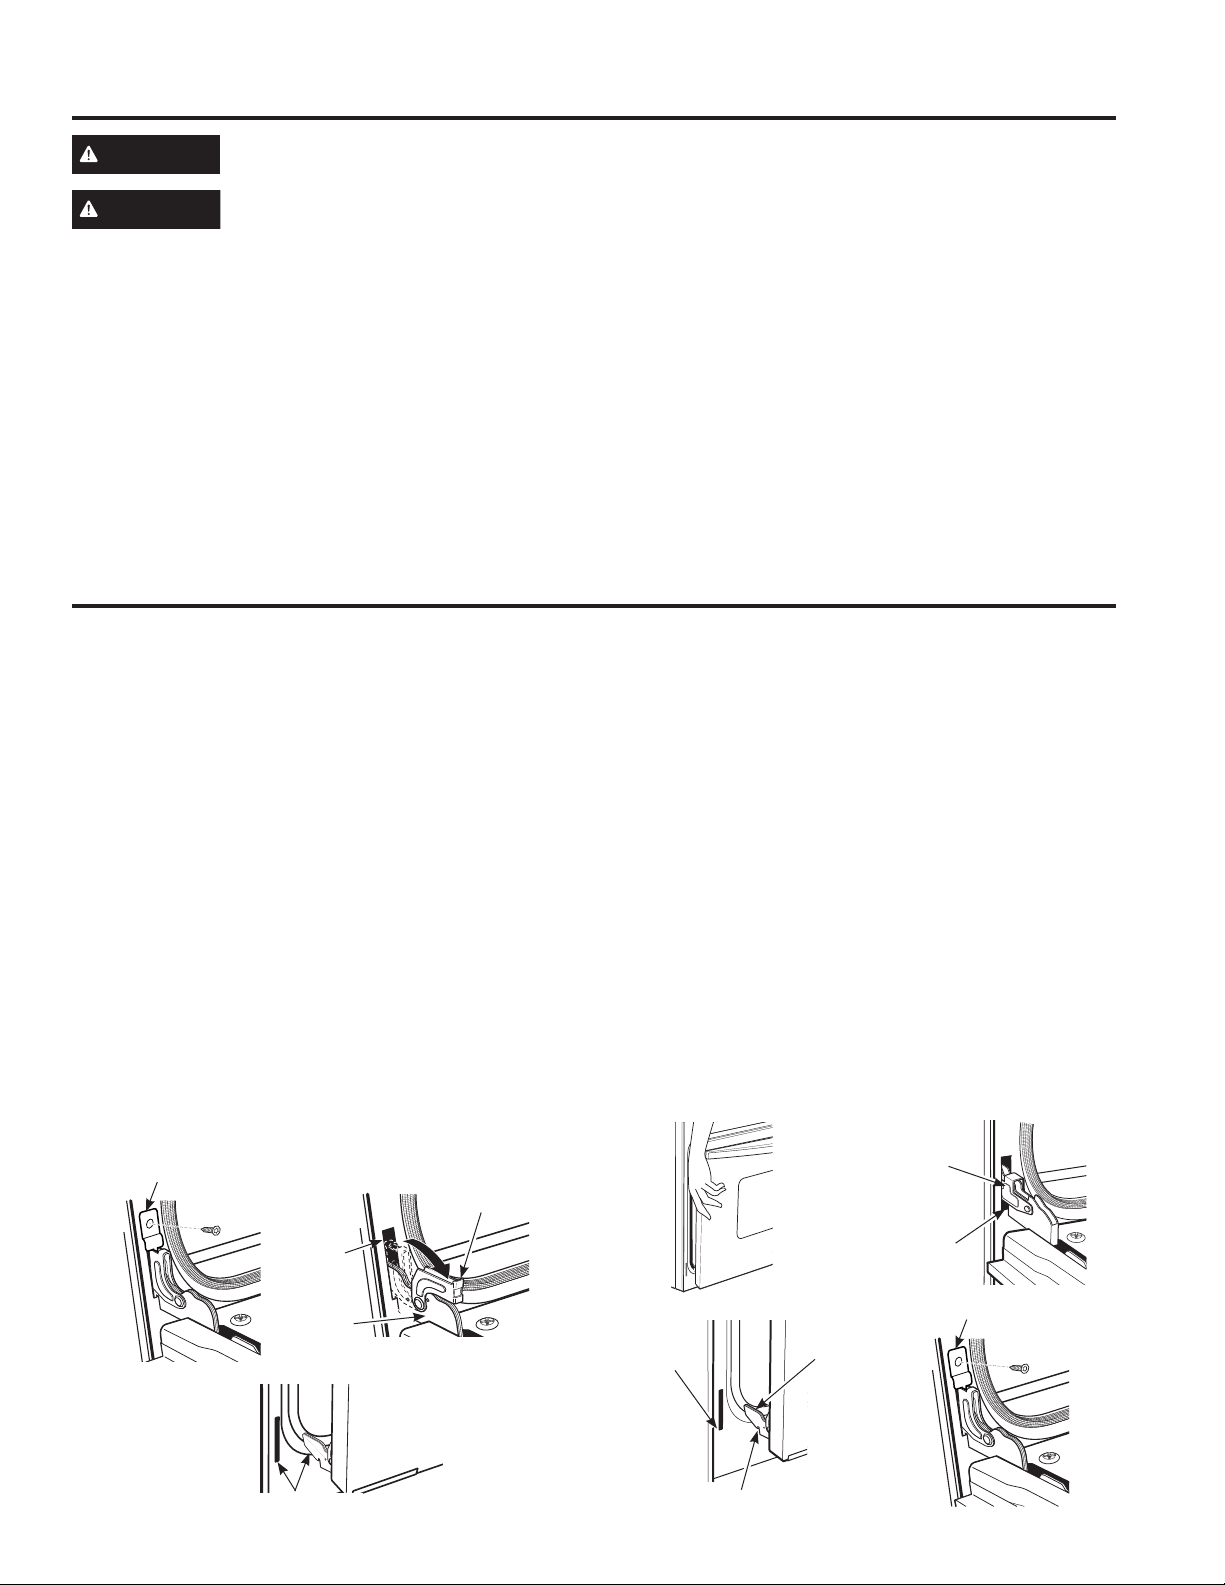
Oven Door Removal
NOTE:'RRUUHPRYDOLVQRWDUHTXLUHPHQWIRULQVWDOODWLRQ
of the product but is an added convenience.
To remove the door:
1. Open the oven door as far as it will go.
2. Remove hinge bracket (if present) from front frame
and set aside. The hinge bracket must be replaced
for proper door functionality when door is reinstalled.
3. Push both hinge locks down toward the door frame to
the unlocked position. This may require a flat-blade
screwdriver. DO NOT LIFT THE DOOR BY THE
HANDLE!
4. Place hands on both sides of the door and close the
oven door to the removal position (approximately
´±´>FP±FP@IURPWKHFORVHGSRVLWLRQ
/LIWWKHGRRUXSDQGRXWXQWLOWKHKLQJHDUPVFOHDUWKH
slots. NOTE:7KHRYHQGRRULVYHU\KHDY\%HVXUH
you have a firm grip before lifting the oven door off
WKHKLQJHV8VHFDXWLRQRQFHWKHGRRULVUHPRYHG
'RQRWOD\WKHGRRURQLWVKDQGOH7KLVFRXOGFDXVH
dents or scratches.
Replacing the Oven Door
NOTE: The oven door is heavy. You may need help
lifting the door high enough to slide it into the hinge slots.
'RQRWOLIWWKHGRRUE\WKHKDQGOH
/LIWWKHRYHQGRRUE\JUDVSLQJHDFKVLGH
2. With the door at the same angle as the removal
SRVLWLRQDSSUR[LPDWHO\´±´>FP±FP@IURP
the closed position), seat the notch of the hinge arm
into the bottom edge of the hinge slot. The notch of
the hinge arm must be fully seated into the bottom of
the slot.
)XOO\RSHQWKHGRRU,IWKHGRRUZLOOQRWIXOO\RSHQWKH
indentation is not seated correctly in the bottom edge
of the slot.
4. Push the hinge locks up against the front frame of the
oven cavity, to the locked position.
5. Replace hinge bracket (if present). The hinge bracket
must be replaced for proper door functionality.
6. Close the oven door.
Oven Light
Oven Door
CARE AND CLEANING: 2YHQ/LJKW2YHQ'RRU
Hinge in
/RFNHG
Position
1RWFKRI+LQJH
Securely Fitted
,QWR%RWWRPRI
Hinge Slot
%RWWRP
Edge of
Slot
Hinge
Arm
+LQJH1RWFK
+LQJH%UDFNHW
Hinge
Slot
Hinge
Arm
+LQJH8QORFNHG
Position
Hinge Clears Slot
+LQJH%UDFNHW
WARNING
SHOCK OR BURN HAZARD:%HIRUHUHSODFLQJRYHQOLJKWEXOEGLVFRQQHFWWKHHOHFWULFDOSRZHUWRWKH
oven at the main fuse or circuit breaker panel. Failure to do so may result in electric shock or burn.
CAUTION
BURN HAZARD: The glass cover and bulb should be removed when cool. Touching hot glass with
bare hands or a damp cloth can cause burns.
'LVFRQQHFWSRZHUDWWKHPDLQIXVHRUFLUFXLWEUHDNHU
panel.
2. Remove oven racks.
3. Slide a flat blade screwdriver or butter knife between
the metal housing and the glass light cover.
NOTE: on some models there is a metal clip visibly
holding the glass. The tool needs inserted between
the metal housing and the clip holding the glass.
4. Support the glass light cover with two fingers to prevent
the cover from falling to the bottom of the oven.
5. Gently twist the screwdriver blade or butter knife to
ORRVHQWKHJODVVOLJKWFRYHU%HFDUHIXOQRWWRFKLS
the oven coating.
6. Remove the glass light cover.
7. Remove the bulb by firmly grasping and sliding the
bulb straight out until the two prongs have cleared
the ceramic holder.
'RQRWWRXFKWKHJODVVRIWKHQHZUHSODFHPHQWEXOE
ZLWK\RXUILQJHUV,WZLOOFDXVHWKHEXOEWRIDLOZKHQLW
lights. Grasp the replacement bulb with a clean towel
or facial tissue with the prongs facing down. Align
the two prongs in the ceramic holder, pressing gently
until the bulb is securely in the ceramic socket.
9. Slide the protective lens into the holder and push
until the clips snap into the housing.
10. Reconnect power.
Loading ...
Loading ...
Loading ...