Precautions before operation Information in the Instruction Manual is only for reference. Before operation of accessories, it shall be ensured that the refrigerator is disconnected from power. Before adjusting the leveling feet, precautions shall be taken to prevent any personal injury.
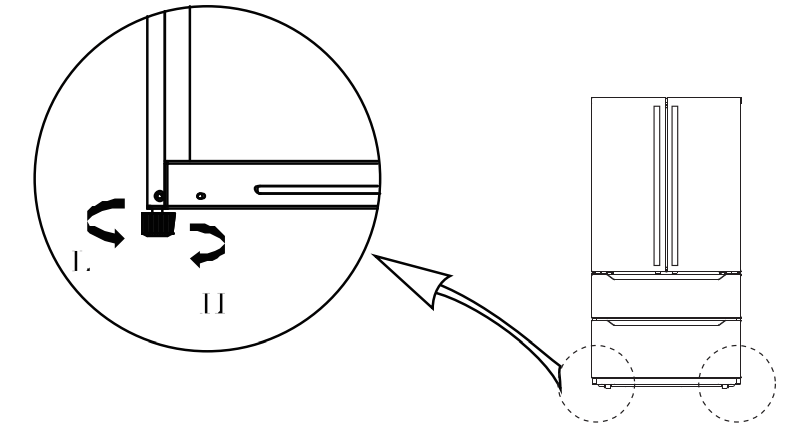
Schematic diagram of the levelling feet (The picture above is only for reference.The actual configuration will depend on the physical product or statement by the distributor)
Adjusting procedures:
Turn the feet clockwise to the refrigerator;
Turn the feet counterclockwise to lower the refrigerator;
Adjust the right and left feet based on the procedures above to a horizontal level.
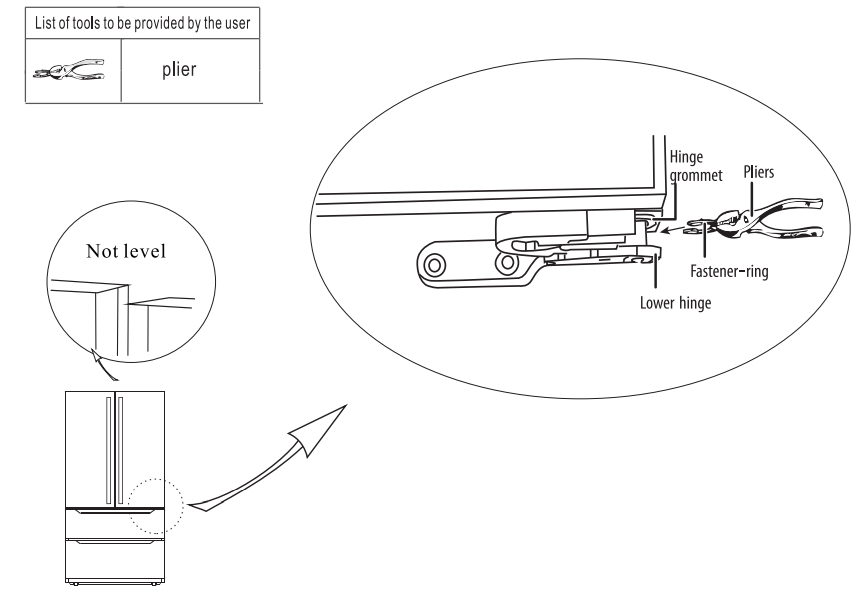
Levelling door
Precautions before operation: Information in the operation is only for reference. Before operation of accessories, it shall be ensured that the refrigerator is disconnected from power. Before adjusting the door, precautions shall be taken to prevent any personal injury.
Schematic diagram of leveling the door
The picture above is only for reference.The actual configuration will depend on the physical product or statement by the distributor)
Raise the lower door up to the level of the higher door. lnsert the supplied fastener-ring by using plier in the gap between the hinge-grommet and the lower hinge.
The number of fasten-rings you will need to insert depends on the gap.
Changing the Light
Any replacement or maintenance of the LED lamps is intended to be made by the manufacturer, its service agent or similar qualified person.
Starting
Before initial start, keep the refrigerator still for two hours before connecting it to power supply.
Before putting any fresh or frozen foods, the refrigerator shall have run for 2-3 hours, or for above 4 hours in summer when the ambient temperature is high.
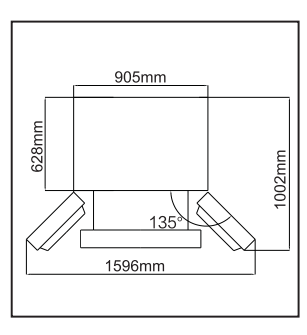
Spare enough space for convenient opening of the doors and drawers or statement by the distributor.
Energy saving tips
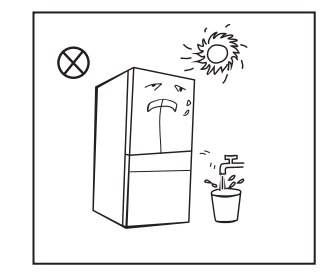
The appliance should be located in the coolest area of the room, away from heat producing appliances or heating ducts, and out of the direct sunlight.
Let hot foods cool to room temperature before placing in the appliance. Overloading the appliance forces the compressor to run longer. Foods that freeze too slowly may lose quality, or spoil.
Be sure to wrap foods properly, and wipe containers dry before placing them in the appliance.This cuts down on frost build-up inside the appliance.
Appliance storage bin should not be lined with aluminum foil, wax paper, or paper toweling. Liners interfere with cold air circulation, making the appliance less efficient.
Organize and label food to reduce door openings and extended searches. Remove as many items as needed at one time, and close the door as soon as possible.
Placement
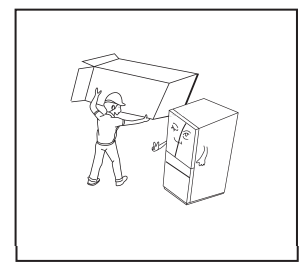
Before use, remove all packing materials, including bottom cushions, foam pads and tapes inside of the refrigerator; tear off the protective film on the doors and the refrigerator body.
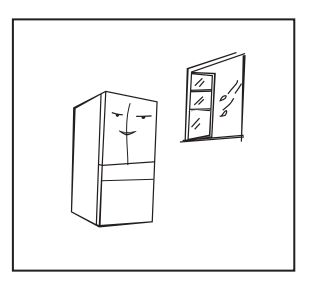
Keep away from heat and avoid direct sunlight. Do not place the freezer in moist or watery places to prevent rust or reduction of insulating effect.
Do not spray or wash the refrigerator; do not put the refrigerator in moist places easy to be splashed with water so as not to affect the electrical insulation properties of the refrigerator.
The refrigerator is placed in a well-ventilated indoor place; the ground shall be flat, and sturdy (rotate left or right to adjust the adjustable leg for levelling if unstable).
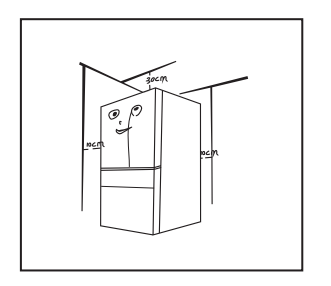
The top space of the refrigerator shall be greater than 30cm, and the refrigerator should be placed against a wall with a free distance more than 10cm to facilitate heat dissipation.
Precautions before installation:
Before installation or adjusting of accessories, it shall be ensured that the refrigerator is disconnected from power.
Precautions shall betaken to prevent fall of the handle from causing any personal injury.
Structure and functions
Key components
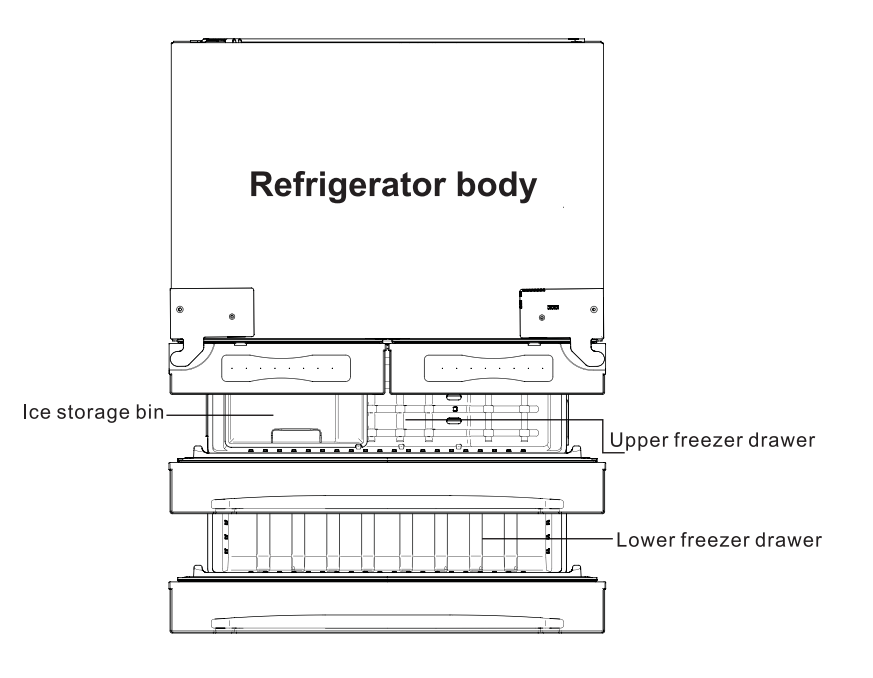
(Refrigerating chamber)
(The picture above is only for reference.The actual configuration will depend on the physical product or statement by the distributor)
The picture above is only for reference.The actual configuration will depend on the physical product or statement by the distributor)
Refrigerating chamber
The Refrigerating Chamber is suitable for storage of a variety of fruits, vegetables, beverages and other food consumed in the short term.
Cooking foods shall not be put in the refrigerating chamber until cooled to room temperature.
Foods are recommended to be sealed up before putting into the refrigerator.
The glass shelves can be adjusted up or down for a reasonable amount of storage space and easy use.
Freezing chamber
The low temperature freezing chamber may keep food fresh for a long time and it is mainly used to store frozen foods and making ice.
The freezing chamber is suitable for storage of meat, fish, rice balls and other foods not to be consumed in short term.
Chunks of meat are preferably to be divided into small pieces for easy access. Please be noted food shall be consumed within the shelf time.
Note: Storage of too much food during operation after the initial connection to power may adversely affect the freezing effect of the refrigerator. Foods stored shall not block the air outlet; or otherwise the freezing effect will also be adversely affected.
Functions
(The picture above is only for reference.The actual configuration will depend on the physical product or statement by the distributor)
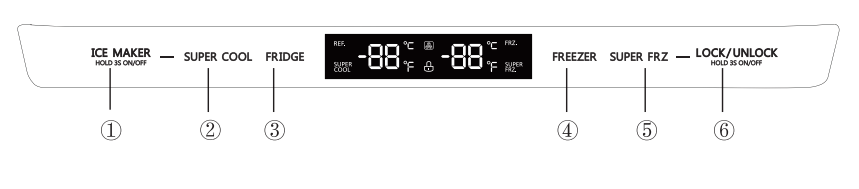
1, Buttons
Ice-making button
Supercool button
Temperature adjusting button of refrigerator rom
Temperature adjusting button of freeezer room
Super freeze button
Lock/unlock button
2, Display
a) When electrify the refrigerator, the display screen will totally display for 3 seconds, meanwhile the starting up bell rings .then the display screen enters the normal display of operation.(if power-on for first time, the default set temperature of the refrigerator room and the freezer room is 41°F/0°F).
b) lt will display the set temperature of both refrigerator and freezer rooms when there is no fault.
c) Under normal circumstances, the display light will go out after 30 seconds in lock state, button operation on display panel would wake up the display screen; if the opening door action wakes up the display screen, the display light would go out immediately when the door is closed; when the “fault code visible” type of fault occurs, the display screen lights up, and will go out after 30 seconds.
3, Lock/Unlock
a) ln the unlock state, press and hold the lock/unlock button for 3 seconds to enter the lock state , and the buzzer sound rings.
b) ln the lock state, press and hold the lock button for 3 seconds to enter the unlock state and the buzzer sound rings.
c) lt will enter the lock state if there is no opening door action or any buttons operation within 30 seconds.
d) The alarm sound can be stopped by pressing any one button in lock state, but all other button operations need to be performed in unlock state. If you operate in the lock state, an error beep will be given.
4, Refrigerator temperature setting
Click the temperature adjusting button of refrigerator room to change the set temperature of refrigerator room, Each time click the button, the set temperature will dropVF. when the set temperature reaches the 34°F, click the button again, the set temperature will switch to 44°F. The temperature setting will take effect after the display panel is locked.
5, Freezer temperature setting
Click the temperature adjusting button of freezer room to change the set temperature of freezer room, Each time click the button, the set temperature will drop1°F. when the set temperature reaches the -7°F, click the button again, the set temperature will switch to 7°F. The temperature setting will take effect after the display panel is locked.
6, Mode setting
Press the button to start the super cool function. The refrigerator room is set at 34°F automatically, and the icon shines . When exit the super cool mode, the set temperature of refrigerator room will go back to the set temperature before supercool mode.
Press the button to start the super freeze function. The freezer room is set at -7°F automatically, and the icon shines. When exit the super freeze mode, the set temperature of freezer room will go back to the set temperature before super freeze mode.
Press the button, the ice-making function could be switched between on/off. When the icon is on, it indicates that the ice-making function is activated.
7, Error code
When the following tips to appear on the display screen, it indicates a problem with the refrigerator. Although the refrigerator in the following fault case can still provide cool/freeze functions, but the user should contact maintenance personnel, ensure the normal use of refrigerator.
Error code
Error description
E1
Temperature sensor failure of refrigerator room
E2
Temperature sensor failure of freezer room
E5
Defrost sensor error of freezer room
E6
Communication error
E7
Ambient temperature sensor error
EH
Humidity sensor error
Eo
Ice maker error
Maintenance and care of the appliance
Overall cleaning
Dusts behind the refrigerator and on the ground shall be timely cleaned to improve the cooling effect and energy saving. The interior of the refrigerator should be cleaned regularly to avoid odor. Soft towels or sponge dipped in water and non-corrosive neutral detergents are suggested for cleaning. The freezer of shall be finally cleaned with clean water and dry cloth. Open the door for natural drying before the power is turned on.
Do not use hard brushes, clean steel balls, wire brushes, abrasives, such as toothpastes, organic solvents (such as alcohol, acetone, banana oil, etc.), boiling water, acid or alkaline items clean refrigerator considering that this may damage the fridge surface and interior.
Do not rinse with water so as not to affect the electrical insulation properties.
(Please unplug the refrigerator for defrost and cleaning.)
Cleaning of door tray
(The picture above is only for reference.The actual configuration will depend on the physical product or statement by the distributor)
According to the direction arrow in the figure below, use both hands to squeeze the tray, and push it upward, then you can take it out.
After washing the tray having been taken out, you can adjust its installing height in accordance with your requirement.
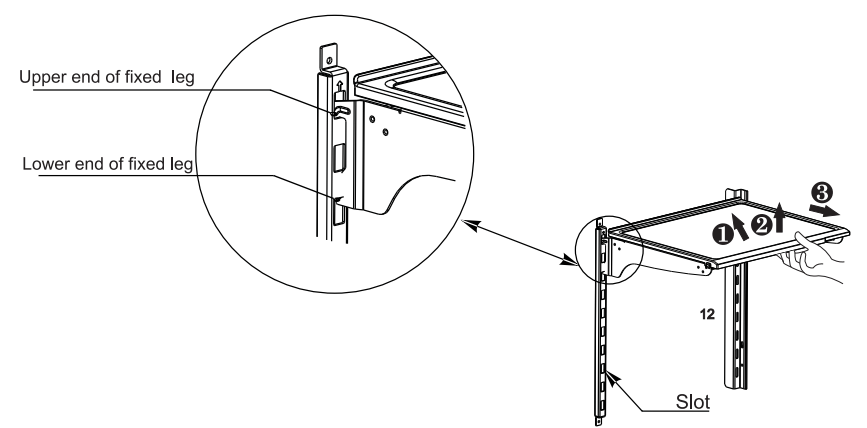
Cleaning of shelf
(The picture above is only for reference.The actual configuration will depend on the physical product or statement by the distributor)
Please dismantle the cantilever shelf according to the arrows shown as above :
please hold the front edge of shelf, and tilt the shelf inwards until the lower end of fixed leg is separated from the slot of supporting iron;
uplift the whole shelf until it can not rise anymore;
take out the shelf horizontally.
During installation, put the upper end of the fixed leg into one of the upper slots on the supporting iron first and then put the lower end of the fixed leg into the third slot on the lower part of the supporting iron.
Cleaning of freezer lower drawer
Pull out the lower freezer drawer to the proper position.
As shown in the Fig., press the buttons in both slots respectively(must press both sides at the same time), pull out the freezer drawer until it stops.
Take out the lower drawer as directed by the arrows.
After cleaning, put back the drawer to original position, then close the lower drawer, the button will lock the drawer automatically.
Note: Don't remove the lower freezer drawer if not necessary.
Defrosting
The refrigerator is made based on the air-cooling principle and thus has automatic defrosting function. Frost formed due to change of season or temperature may also be manually removed by disconnection of the appliance from power supply or by wiping with a dry towel.
Out of operation
Power failure: In case of power failure, even if it is in summer, foods inside the appliance can be kept for several hours; during the power failure, the times of door opening shall be reduced, and no more fresh food shall be put into the appliance.
Long-time nonuse: The appliance shall be unplugged and then cleaned; then the doors are left open to prevent odor.
Moving: Before the refrigerator is moved, take all objects inside out, fix the glass partitions, vegetable holder, freezing chamber drawers and etc. with tape, and tighten the levelling feet; close the doors and fix them with tape. During moving, the appliance shall not be laid upside down or horizontally, or be vibrated; the inclination during movement shall be no more than 45°.
The appliance shall run continuously once it is started. Generally, the operation of __the appliance shall not be interrupted;otherwise the service life may be impaired.
Trouble shooting
You may try to solve the following simple problems by yourself. If them cannot be solved, please contact the after-sales department.
Failed operation
Check whether the appliance is connected to power or whether the plug is in well contact .
Check whether the voltage is too low.
Check whether there is a power failure or partial circuits have tripped.
Odor
Odorous foods shall be tightly wrapped. Check whether there is any rotten food. Clean the inside of the refrigerator.
Long-time operation of the compressor
Long operation of the refrigerator is normal in summer when the ambient temperature is high.
It is not recommended having too much food in the appliance at the same time. Food shall get cool before being put into the appliance.
The doors are opened too frequently.
Light fails to get lit
Check whether the refrigerator is connected to power supply and whether the illuminating light is damaged.
Doors cannot be properly closed
The door is stuck by food packages. The refrigerator is tilted.
Loud noise
Check whether the floor is level and whether the refrigerator is placed stably. Check whether accessories are placed at proper locations.
Door seal fails to be tight
Remove foreign matters on the door seal. Heat the door seal and then cool it for restoration (or blow it with an electrical drier or use a hot towel for heating).
Water pan overflows
There is too much food in the chamber or food stored contains too much water. esulting in heavy defrosting.
The doors are not closed properly. resulting in frosting due to entry of air and increased water due to defrosting.
Hot housing
Heat dissipation of the built-in condenser via the housing. which is normal. When housing becomes hot due to high ambient temperature and storage of too much food. it is recommended to provide sound ventilation to facilitate heat dissipation.
Surface condensation
Condensation on the exterior surface and door seals of the refrigerator is normal when the ambient humidity is too high. Just wipe the condensate with a clean towel.
Abnormal noise
Buzz: The compressor may produce buzzes during operation. and the buzzes are loud particularly upon start or stop. This is normal.
Creak: Refrigerant flowing inside of the appliance may produce creak. which is normal.
Door handle installation
Precautions shall be taken to prevent fall of the handle from causing any personal injury.
(The picture above is only for reference. The actual configuration will depend on the physical product or statement by the distributor )
Explanatory notes:
Bolt Bolt hole Handle screw Screw hole cap
Installation procedures:
take out bolt from accessory bag. hen use cross screwdriver to fix the bolt into the bolt hole of refrigerator doors.
put the handle on the door through the bol t . And make sure the handle contact the door surface closely.
fix the handle by rotating the handle screw . if it already be fixed tightly
put the cap on the handle screw hole to complete this installation. the end. then to shake the handle for verifying
 Precautions before installation:
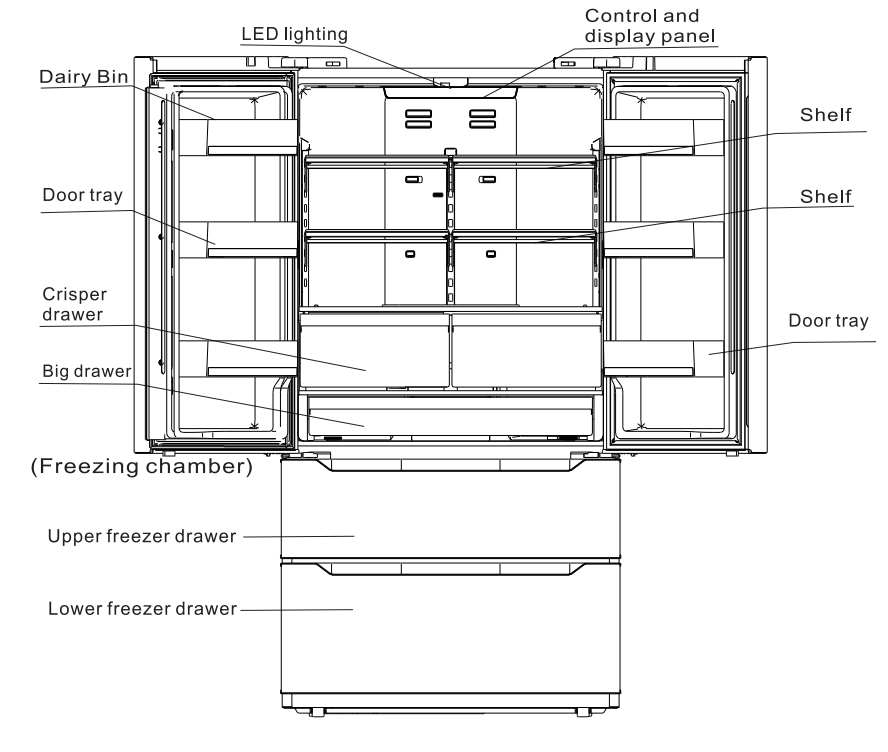
 Ice-making button
 Supercool button
 Temperature adjusting button of refrigerator rom
 Temperature adjusting button of freeezer room
 Super freeze button
 Lock/unlock button
 button to start the super cool function. The refrigerator room is set at 34°F automatically, and the
  icon shines . When exit the super cool mode, the set temperature of refrigerator room will go back to the set temperature before supercool mode.
 button to start the super freeze function. The freezer room is set at -7°F automatically, and the
  icon shines. When exit the super freeze mode, the set temperature of freezer room will go back to the set temperature before super freeze mode.
 button, the ice-making function could be switched between on/off. When the
 icon is on, it indicates that the ice-making function is activated.
 Please unplug the refrigerator for defrost and cleaning.)
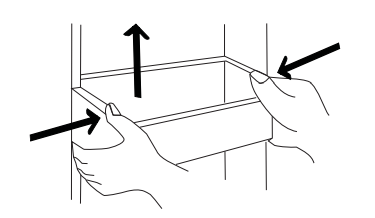
 please hold the front edge of shelf, and tilt the shelf inwards until the lower end of fixed leg is separated from the slot of supporting iron;
 uplift the whole shelf until it can not rise anymore;
 take out the shelf horizontally.
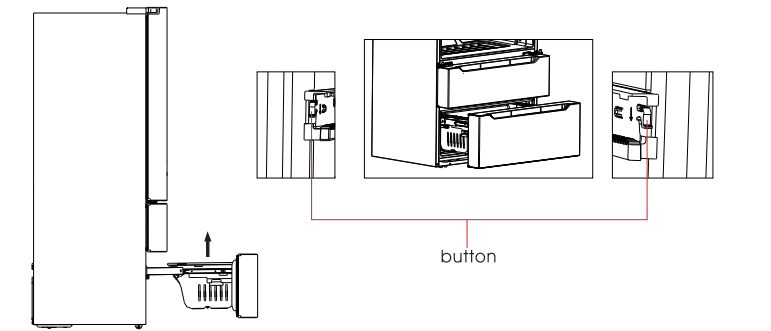
 The appliance shall run continuously once it is started. Generally, the operation of __the appliance shall not be interrupted;otherwise the service life may be impaired.
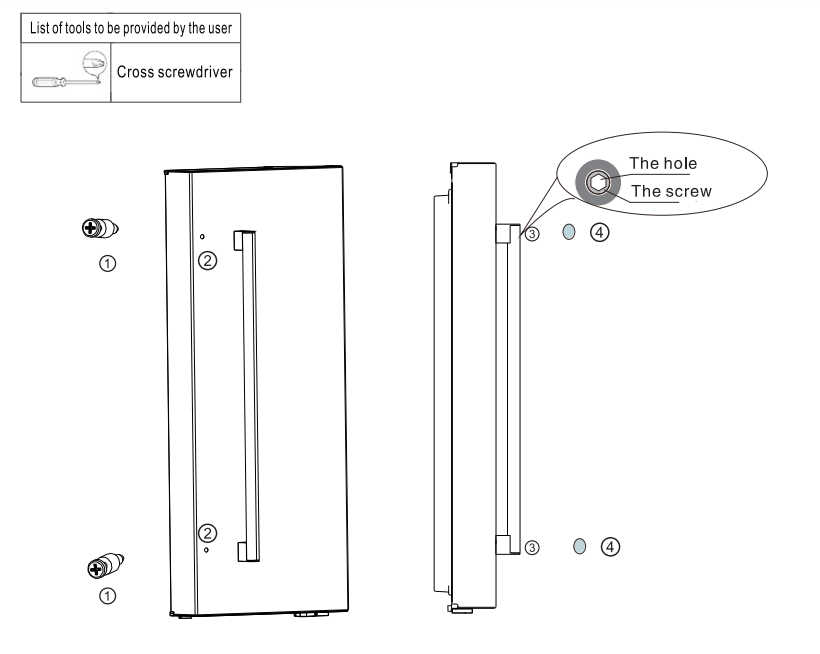
 Bolt
Bolt  Bolt hole
  Handle screw
  Screw hole cap