This is User Manual of Upright Carpet Cleaner
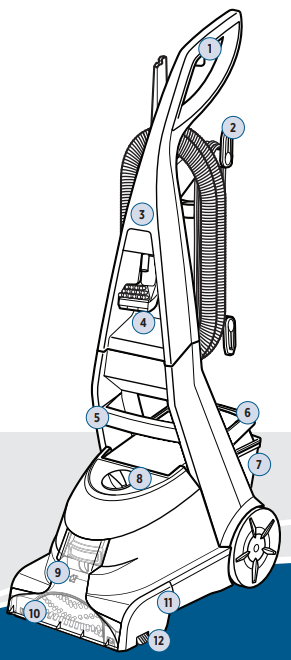
FEATURES OF THE CARPET CLEANER
1. Spray Trigger
2. Quick Release™
Cord Wrap
3. Upper Handle
4. Tool Storage
(select models)
5. Carry Handle
6. Tank Carry Handle
7. 2-in-1 Water Tank
8. ReadyTools™ Dial
9. Removable Nozzle
10. DirtLifter® PowerBrush
11. Belt Access Door
(underside of machine)
12. EdgeSweep® Brushes
|
|
|
INSTALLATION
Assembly
 |
|
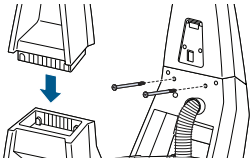
1. Slide Upper Handle onto lower base and secure with two long screws (taped to Upper Handle) into marked holes. |
 |
|
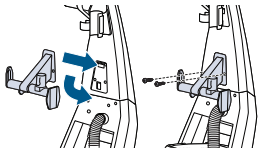
2. Attach upper hose/cord wrap to the back of the handle by inserting hook into the slot and pressing up until it’s seated flush with the back of the machine. Use 1 short screw to secure the bottom of the wrap to the machine. |
 |
|
3. Attach lower hose/cord wrap by inserting the hook into the slot and pressing up until it’s seated flush with the back of the machine. Use 2 short screws to secure the bottom hose/cord wrap. |
 |
|
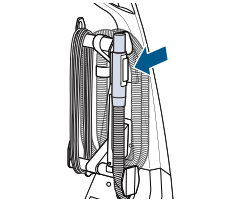
4. Wrap hose around both hose/cord wraps. Secure it by inserting the trigger hose grip into opening on the grip holder on the upper hose/cord wrap. |
 |
|
5. Wrap cord around lower and upper hose/cord wraps. Secure plug to cord with clip on plug. |
 |
|
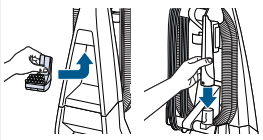
6. Attach included tools to the appropriate storage locations on the machine (varies by model). |
Filling the 2-in-1 Water Tank
 |
|
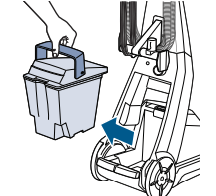
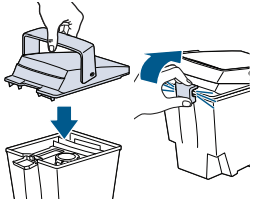
1. Use Tank Carry Handle to remove tank from the machine and bring it to the sink. |
 |
|
2. Pull up on the bottom edge of the latch on the tank to remove the lid. |
 |
|
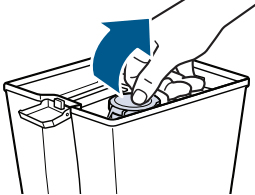
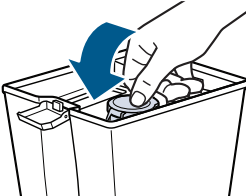
3. Pull up on bladder fill cover that says “Fill Here”. |
 |
|
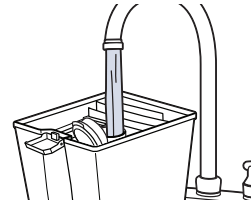
4. Fill tank with warm (60°C/140°F MAX) tap water to the water fill line. Do not boil or microwave water as it can destroy the tank. |
 |
|
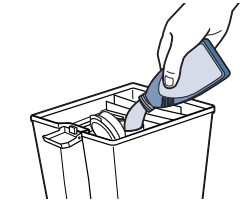
5. Fill the provided measuring cup with formula to the fill line and pour into the bladder. |
 |
|
6. Push down on bladder fill cover to close. |
 |
|
7. Replace the tank lid and latch |
 |
|
8. Place tank into machine base and seat firmly into place. |
Emptying the 2-in-1 Water Tank

|
|
1. Turn machine OFF and remove the 2-in-1 Water Tank from the machine. Carry tank to a sink or outside to dispose of dirty water.
|
 |
|
2. Pull up on the bottom edge of the latch on the tank to remove the lid. |
 |
|
3. Empty dirty water from back corner of tank. |
 |
|
4. Rinse the tank with running, warm (60°C/140°F MAX) tap water, taking care to clean underneath and around heavy-duty bladder. |
 |
|
5. After each use, remove any debris trapped in red lint screen on base of machine while tank is still removed. |
 |
|
6. Return 2-in-1 Water Tank to machine. |
OPERATE THE CLEANING MACHINE
Cleaning Your Carpet
1. Plug into a proper outlet.
2. Set ReadyTools™ Dial to FLOOR CLEANING setting.
3. Use the red power pedal on the back of the machine to turn it ON.
4. Push the gray pedal to recline the machine.
5. Press the Spray Trigger while making one slow forward and one slow backward pass. Do not overwet.
6. Release trigger and make one slow forward and backward pass over same area.
7. Repeat cleaning passes until solution being suctioned up appears clean. Continue passes without pressing Spray Trigger until you can’t see any more water being suctioned up. Repeated passes will help speed up dry time.
Using the Ready Tools
1. Set ReadyTools™ Dial to TOOLS setting. This will allow spray and suction from hose.
2. Attach cleaning tool of your choice to end of hose.
3. Hold tool about 1-2 inches above soiled surface. Press Spray Trigger to apply cleaning solution. Release trigger, apply downward pressure, and pull toward you to suction up dirt and cleaning solution. Do not overwet.
4. When finished cleaning, remove and rinse tool(s) and hose in clean, running water.
5. Before wrapping the hose, lift and stretch the hose to make sure water is cleared. Wrap hose around rack.
AFTER-CLEANING CARE
Cleaning the Removable Nozzle

|
|
1. Grab the sides of the top of the nozzle and pull forward. |
 |
|
2. Rinse nozzle under running water. |
 |
|
3. When finished, replace nozzle by slightly raising front of machine to line up slots on each side of the base with hooks the nozzle. Push forward to click nozzle into place. |
Cleaning the ReadyTools™ Dial
If ReadyTools Dial is hard to turn, the diverter assembly that holds it may need to be cleaned.

|
|
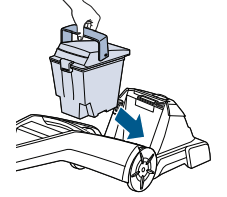
1. Remove the front nozzle |
 |
|
2. Use a Phillips-head screwdriver to remove the screws that hold the assembly in place. Set them aside. |
 |
|
3. Remove assembly. |
 |
|
4. Hold assembly under running water. Make sure water flows through and around the dial. Turn the dial about 10 times each way to clear debris. |
 |
|
5. Replace assembly and screw. |
 |
|
6. Replace the front nozzle |
TROUBLESHOOTING
Reduced spray OR no spray
- Bladder may be empty.
- Push power pedal OFF; refill bladder with clean, warm (60°F/140°C MAX) tap water and formula.
- 2 in-1 Water Tank may not be seated properly.
- Push power pedal OFF; remove and reseat tank.
- Pump may have lost prime.
- Push power pedal OFF; after 1 minute turn ON and press Spray Trigger.
- Pump belt may be broken.
- Push power pedal OFF and unplug from outlet and replacement.
DirtLifter® PowerBrush does not turn
- Brush belt or pump belt is off or broken.
- Push power pedal off and unplug from outlet and replacement.
Machine not picking up solution
- ReadyTools Dial may be on wrong setting for cleaning job.
- Set dial to either FLOOR CLEANING or TOOLS setting.
- Poor tool position (handheld attachments only).
- Adjust angle; apply more downward pressure.
- Removable Nozzle may not be properly attached.
- Make sure nozzle is on correctly by slightly raising front of machine to line up slots on each side of base of machine with hooks on each side of nozzle. Attach at base first and then click nozzle into place.
- 2-in-1 Water Tank lid is not properly installed.
- 2-in-1 Water Tank is not properly seated.
- Tank must be firmly seated to function; remove and reseat.
- 2-in-1 Water Tank has picked up maximum dirty water.
- Empty 2-in-1 Water Tank and refill.
- The lint screen may be clogged.