Search
Home
Bookmarks
Brands
Articles
About us
Home
Bosch
Bosch KIV38X22GB User Manual
Page 20
User Manual - Page 20
For KIV38X22GB. Also, The document are for others Bosch models: KIV..
Page 20/22
Page 1
Page 2
Page 3
Page 4
Page 5
Page 6
Page 7
Page 8
Page 9
Page 10
Page 11
Page 12
Page 13
Page 14
Page 15
Page 16
Page 17
Page 18
Page 19
Page 20
Page 21
Page 22
Contents
Table of Contents
Search
Previous
Next
Bookmarks
Loading ...
Loading ...
Loading ...
#$
%&
'(
Loading ...
Loading ...
<
17
18
19
20
21
22
>
File type: PDF
File name: Bosch KIV38X22GB Refrigerator.pdf
File size: 1.28 MB
Rating:
File Language: English
Pages: 22
Author: Bosch
Published: 2018-07-31 17:00:00
Updated: 2023-08-08
Verified by
Kathryn Cummings
on 2023-08-08
Download File
Table of Contents
×
en Instruction for Use
1
en Table of Contentsen Instruction for Use
3
Safety and warning information
3
Before you switch ON the appliance
3
Technical safety
3
If damage has occurred
3
â Keep naked flames and/or ignition sources away from the appliance,
3
â thoroughly ventilate the room for several minutes,
3
â switch off the appliance and pull out the mains plug,
3
â inform customer service.
3
Important information when using the appliance
4
â Never use electrical appliances inside the appliance (e.g. heater, electric ice maker, etc.). Explosion hazard!
4
â Never defrost or clean the appliance with a steam cleaner! The steam may penetrate electrical parts and cause a short-circuit. Risk of electric shock!
4
â Do not use pointed or sharp- edged implements to remove frost or layers of ice. You could damage the refrigerant tubes. Leaking refrigerant may cause eye injuries or ignite.
4
â Do not store products which contain flammable propellants (e.g. spray cans) or explosive substances in the appliance. Explosion hazard!
4
â Do not stand on or lean heavily against base of appliance, drawers or doors, etc
4
â For defrosting and cleaning, pull the mains plug out or switch off the fuse. Do not pull out the mains plug by tugging on the power cord.
4
â Store high-percentage alcohol tightly closed and standing up.
4
â Keep plastic parts and the door seal free of oil and grease. Otherwise, parts and door seal will become porous.
4
â Never cover or block the ventilation openings of the appliance!
4
â Avoiding placing children and vulnerable people at risk:
4
At risk are children, people who have limited physical, mental or sensory abilities, as well as people who have inadequate knowledge concerning safe operation of the appliance.
4
Ensure that children and vulnerable people have understood the hazards.
4
A person responsible for safety must supervise or instruct children and vulnerable people who are using the appliance.
4
Only children from 8 years and above may use the appliance.
4
Supervise children who are cleaning and maintaining the appliance.
4
Never allow children to play with the appliance.
4
â Do not store bottled or canned drinks (especially carbonated drinks) in the freezer compartment. Bottles and cans may burst!
5
â Never put frozen food straight from the freezer compartment into your mouth. Risk of low-temperature burns!
5
â Avoid prolonged touching of frozen food, ice or the evaporator pipes, etc. Risk of low-temperature burns!
5
Children in the household
5
â Keep children away from packaging and its parts. Danger of suffocation from folding cartons and plastic film!
5
â Do not allow children to play with the appliance!
5
â If the appliance features a lock: keep the key out of the reach of children!
5
General regulations
5
Information concerning disposal
5
* Disposal of packaging
5
* Disposal of your old appliance
5
Scope of delivery
6
The delivery consists of the following parts:
6
â Built-in appliance
6
â Interior fittings (depending on model)
6
â Bag containing installation materials
6
â Operating instructions
6
â Installation manual
6
â Customer service booklet
6
â Warranty enclosure
6
â Information on the energy consumption and noises
6
Installation location
6
â 3 cm to electric or gas cookers.
6
â 30 cm to an oil or coal-fired cooker.
6
Room temperature, ventilation and cavity depth
6
Ambient temperature
6
Ventilation
7
Cavity depth
7
Connecting the appliance
7
Electrical connection
7
Getting to know your appliance
7
Controls
8
Switching the appliance on
8
Operating tips
8
â After the appliance has been switched on, it may take several hours until the set temperature has been reached.
8
Do not put any food in the appliance beforehand.
8
â While the refrigeration unit is running, water droplets or hoarfrost may form at the rear panel of the refrigerator. This is due to functional reasons. It is not necessary to scrape off the frost or wipe off the water droplets. The rear panel def...
8
Setting the temperature
9
Refrigerator compartment
9
Freezer compartment
9
Usable capacity
9
Fully utilising the freezer volume
9
Removing the fittings
9
Refrigerator compartment
9
Storing food
9
â Store fresh, undamaged food. The quality and freshness will then be retained for longer.
9
â In the case of ready-made products and bottled goods, observe the best- before date or use-by date specified by the manufacturer.
9
â To retain aroma, colour and freshness, pack or cover food well before placing in the appliance. This will prevent the transfer of flavours and the discolouration of plastic parts in the refrigerator compartment.
9
â Allow warm food and drinks to cool down before placing in the appliance.
9
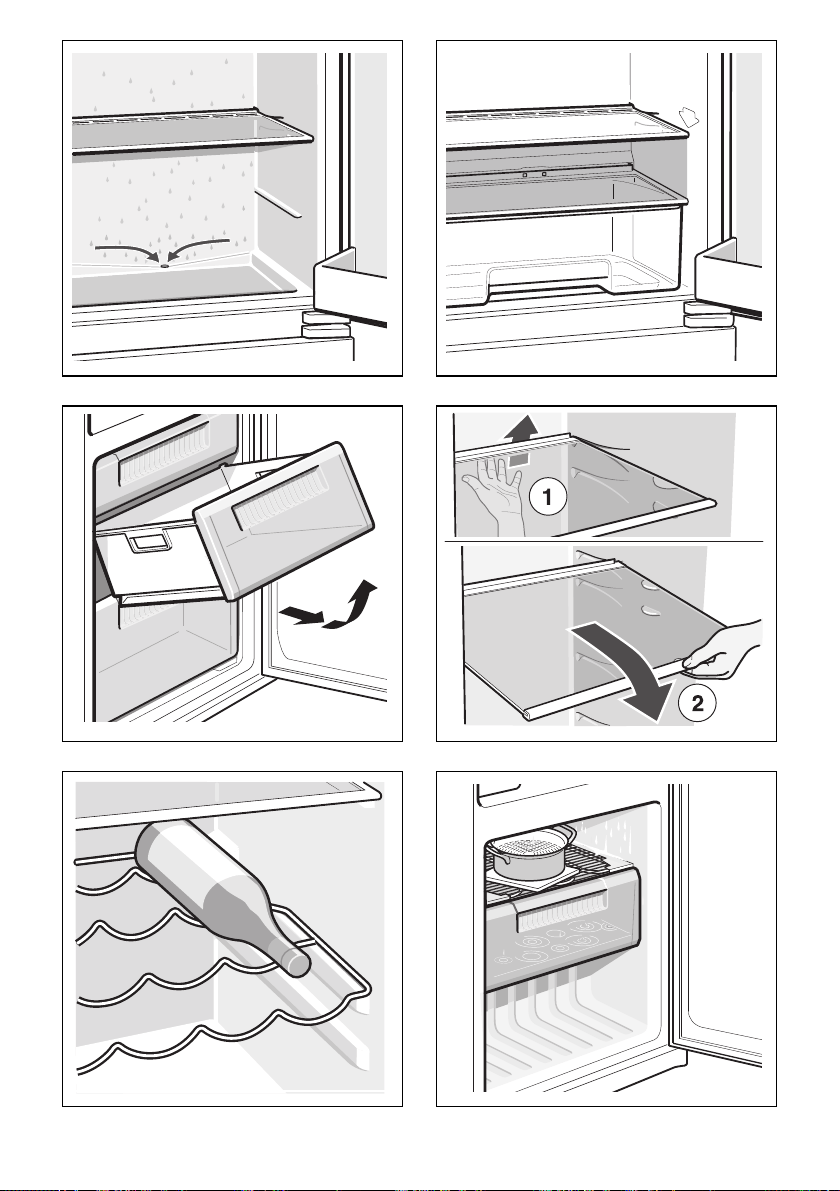
Note the chill zones in the refrigerator compartment
10
â Coldest zone is between the vegetable container and the glass shelf situated above. Fig. $
10
Note
10
Store perishable food (e.g. fish, sausage, meat) in the coldest zone above the vegetable container.
10
â Warmest zone is at the very top of the door.
10
Note
10
Store e.g. hard cheese and butter in the warmest zone. Cheese can then continue to release its flavour and the butter will still be easy to spread.
10
Freezer compartment
10
Use the freezer compartment
10
â To store deep-frozen food.
10
â To make ice cubes.
10
â To freeze food.
10
Max. freezing capacity
10
Prerequisites for max. freezing capacity
10
â Switch on super freezing before placing fresh products in the compartment (see chapter entitled âSuper freezingâ).
10
â Remove the fittings. The food can be stacked directly on the shelves and in the bottom of the freezer compartment.
10
â Freeze large quantities of food preferably in the very top compartment where food freezes particularly quickly and therefore also gently.
10
Freezing and storing food
10
Purchasing frozen food
10
â Packaging must not be damaged.
10
â Use by the âuse byâ date.
10
â Temperature in the supermarket freezer must be -18 °C or lower.
10
â If possible, transport deep-frozen food in an insulated bag and place quickly in the freezer compartment.
10
Note when loading products
11
â Preferably freeze large quantities of food in the top compartment, where food freezes particularly quickly and therefore also gently.
11
â Place the food over the whole area of the compartments or the frozen food containers.
11
Note
11
Food which is already frozen must not come into contact with the food which is to be frozen. If required, move the frozen food to other frozen food containers.
11
Storing frozen food
11
Freezing fresh food
11
â The following foods are suitable for freezing: Cakes and pastries, fish and seafood, meat, game, poultry, vegetables, fruit, herbs, eggs without shells, dairy products such as cheese, butter and quark, ready meals and leftovers such as soups, ste...
11
â The following foods are not suitable for freezing: Types of vegetables, which are usually consumed raw, such as lettuce or radishes, eggs in shells, grapes, whole apples, pears and peaches, hard-boiled eggs, yoghurt, soured milk, sour cream, crè...
11
Packing frozen food
11
Suitable packaging:
11
Unsuitable packaging:
11
Items suitable for sealing packaged food:
12
Shelf life of frozen food
12
â Fish, sausage, ready meals and cakes and pastries:
12
up to 6 months
12
â Cheese, poultry and meat:
12
up to 8 months
12
â Vegetables and fruit:
12
up to 12 months
12
Super freezing
12
Switching on and off
12
Thawing frozen food
12
â at room temperature
12
â in the refrigerator
12
â in an electric oven, with/without fan assisted hot-air
12
â in the microwave
12
Interior fittings
13
Glass shelves
13
Bottle shelf
13
Sticker âOKâ
13
Switching off and disconnecting the appliance
13
Switching the appliance off
13
Disconnecting the appliance
13
Defrosting
13
Refrigerator compartment defrosts fully automatically
13
Defrosting the freezer compartment
14
Proceed as follows:
14
Cleaning the appliance
14
â Do not use abrasive, chloride or acidic cleaning agents or solvents.
14
â Do not use scouring or abrasive sponges. The metallic surfaces could corrode.
14
â Never clean the shelves or containers in the dishwasher. The parts may become deformed!
14
Interior fittings
15
Take out glass shelves
15
Removing the container
15
Condensation channel
15
Take out shelves in the door
15
Tips for saving energy
15
â Install the appliance in a dry, well ventilated room! The appliance should not be installed in direct sunlight or near a heat source (e.g. radiator, cooker).
15
If required, use an insulating plate.
15
â Select 560 mm cavity depth.
15
A smaller cavity depth will result in a higher energy consumption.
15
â Allow warm food and drinks to cool down before placing in the appliance.
15
â Thaw frozen food in the refrigerator compartment and use the low temperature of the frozen food to cool refrigerated food.
15
â Open the appliance as briefly as possible.
15
â Regularly defrost the freezer compartment to remove the layer of frost.
15
A layer of hoarfrost will impair refrigeration of the frozen food and increase power consumption.
15
â Ensure that the freezer compartment door is always closed properly.
15
â To avoid increased power consumption, occasionally clean the back of the appliance.
15
â The arrangement of the fittings does not affect the energy rating of the appliance.
15
Operating noises
15
Quite normal noises
15
Droning
15
Bubbling, humming or gurgling noises
15
Clicking
15
Preventing noises
15
The appliance is not level
15
Containers or storage areas wobble or stick
15
Bottles or receptacles are touching each other
15
Eliminating minor faults yourself
16
â Appliance has been switched off.
17
â Power failure.
17
â The fuse has been switched off.
17
â The mains plug has not been inserted properly.
17
Customer service
18
Repair order and advice on faults
18
!
19
Search:
×
Search