Read all instructions before assembling and using product.
IMPORTANT - Keep Instructions for future use.
0324R1-SKU 453X
Owner’s Manual
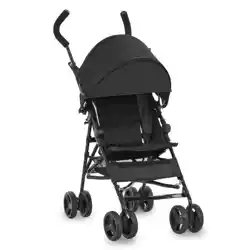
ROVER
CONVENIENCE STROLLER
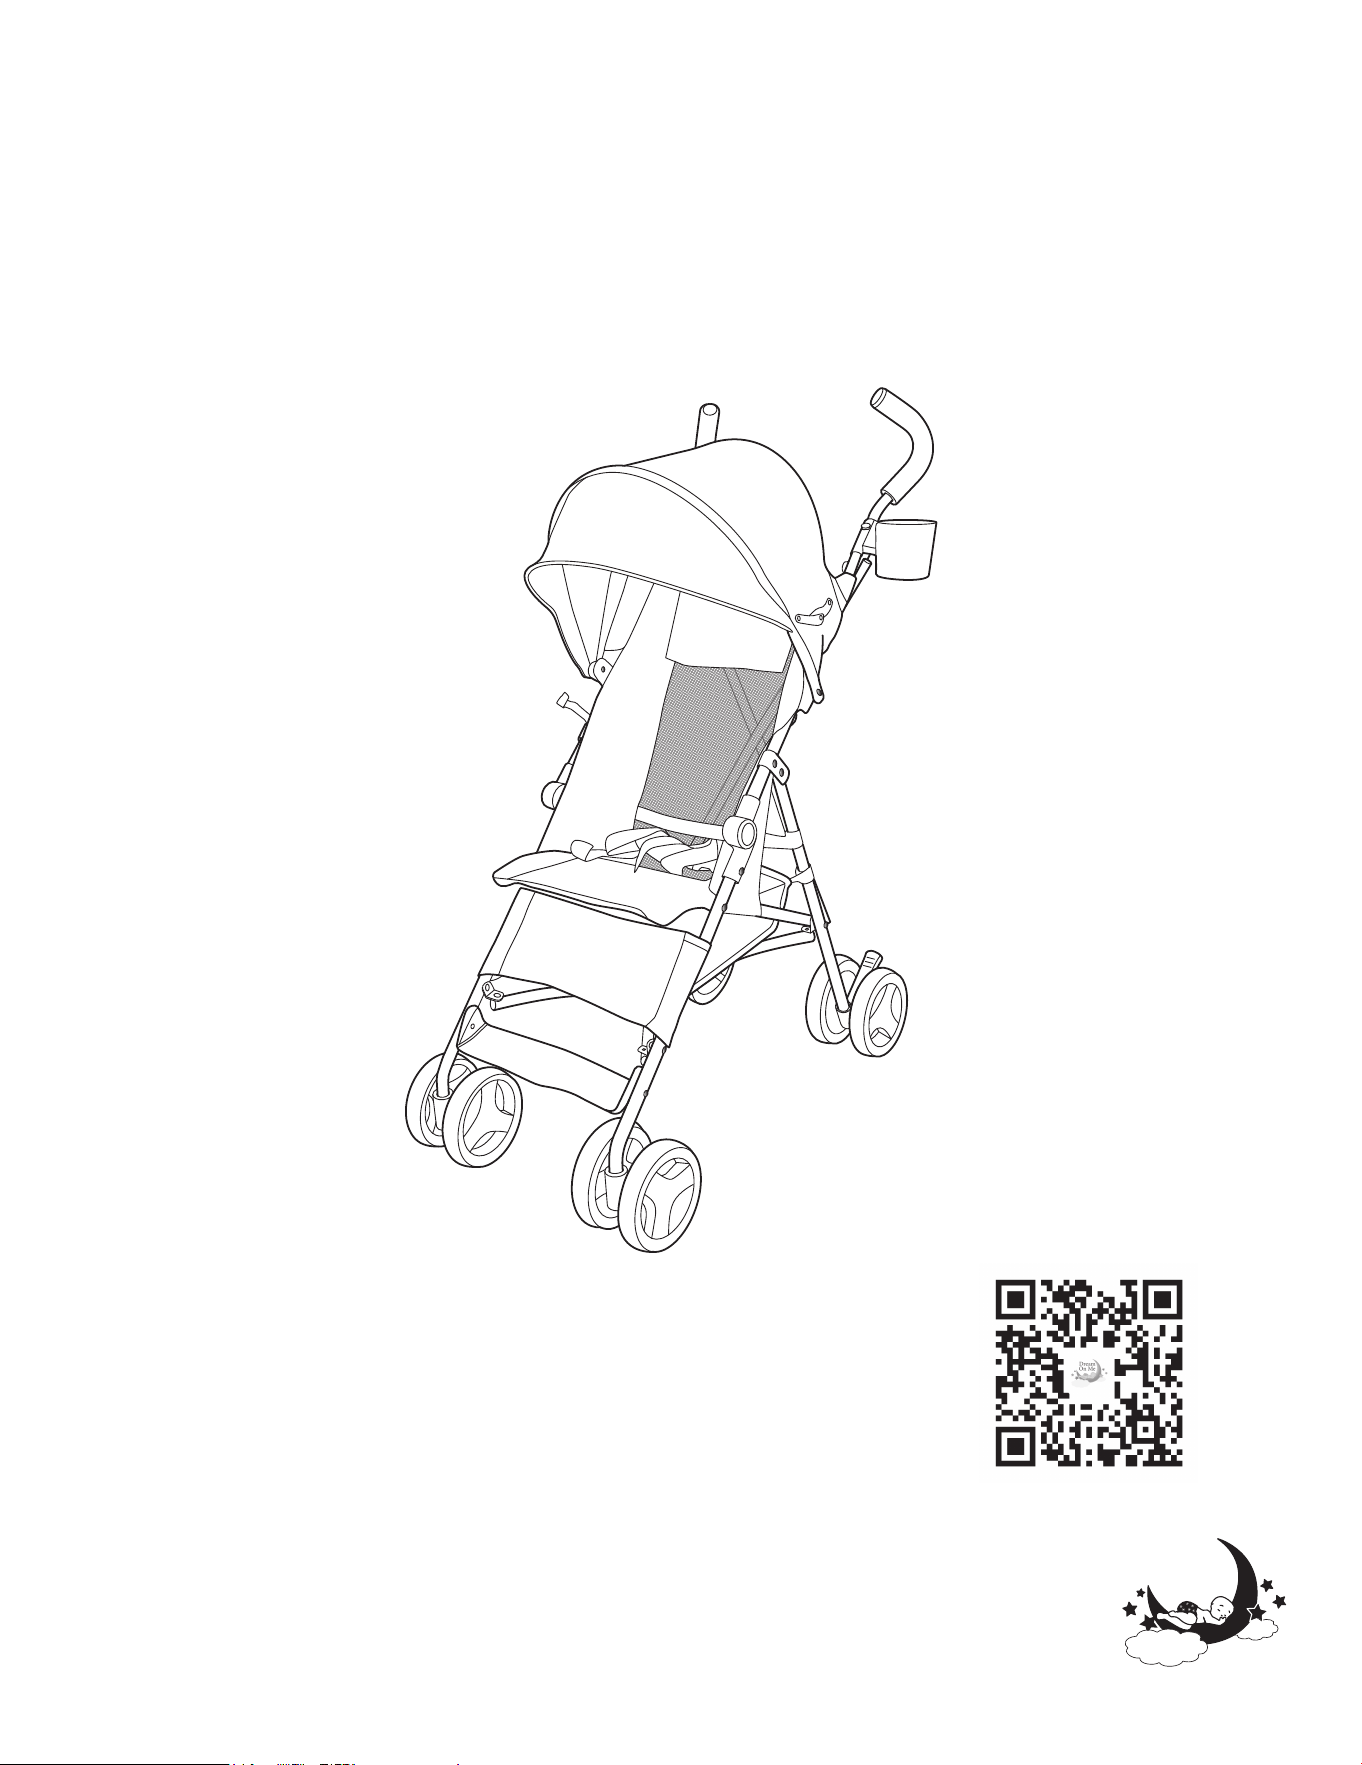
Scan the QR code to register your product
Scannez le code QR pour enregistrer votre produit
Escanee el código QR para registrar su producto
https://dreamonme.com/customercare/registration/
Manuel du propriétaire
Lisez toutes les instructions avant avant
d'assembler et d'utiliser le produit.
IMPORTANT - Conservez les instructions
pour pour une utilisation ultérieure.
Lea todas las instrucciones antes de
montar y utilizar el producto.
IMPORTANTE - Guarde las
instrucciones para uso futuro.
Manual del usuario

2
www.dreamonme.com/help
WARNINGS
• FAILURE TO FOLLOW THESE WARNINGS AND ASSEMBLY INSTRUCTIONS COULD
RESULT IN SERIOUS INJURY OR DEATH.
• ADULT ASSEMBLY REQUIRED.
• FOR FUTURE REFERENCE, KEEP THE INSTRUCTIONS HANDY.
• AVOID SERIOUS INJURY FROM FALLING OR SLIDING OUT. ALWAYS USE THE
RESTRAINT SYSTEM.
• YOUR CHILD’S SAFETY DEPENDS ON YOU. PROPER STROLLER USE CANNOT BE
ASSURED UNLESS YOU FOLLOW THESE INSTRUCTIONS.
• DO NOT USE STROLLER UNTIL YOU READ AND UNDERSTAND THESE
INSTRUCTIONS.
• ADULT ASSEMBLY IS REQUIRED.
• NEVER LEAVE YOUR CHILD UNATTENDED WHILE IN THE STROLLER.
• ACCIDENTS CAN HAPPEN QUICKLY WHILE YOUR BACK IS TURNED. YOU MUST
ALWAYS KEEP YOUR CHILD IN VIEW WHILE IN THE STROLLER, EVEN WHEN
SLEEPING.
• DO NOT USE THIS PRODUCT AS A BED. YOUR CHILD MAY BECOME TANGLED IN
STRAPS OR PADS AND SUFFOCATE.
• ALWAYS USE A RESTRAINT SYSTEM TO KEEP THE CHILD FROM STANDING UP OR
FALLING OUT OF THE STROLLER.
• ALWAYS LOCK THE STROLLER OPEN BEFORE ALLOWING YOUR CHILD IN OR NEAR
THE STROLLER. THIS PREVENTS INJURIES CAUSED BY THE STROLLER
COLLAPSING.
• BE AWARE AND CAREFUL DURING FOLDING AND UNFOLDING THE STROLLER. BE
CERTAIN THAT THE STROLLER IS FULLY ERECT AND LATCHED/LOCKED BEFORE
ALLOWING YOUR CHILD NEAR THE STROLLER. KEEP THE CHILD AWAY FROM THE
PINCH POINTS DURING FOLDING AND UNFOLDING THE STROLLER. WHEN
UNFOLDING THE STROLLER LOCK AND LISTEN TO THE ‘CLICK’
• ONLY USE THIS STROLLER WITH CHILDREN WHO WEIGH LESS THAN 40 LBS. (18.14
KG) AND ARE NO MORE THAN 40 INCHES (1 METER) TALL. USE BY LARGER
CHILDREN MAY DAMAGE THE STROLLER, OR CAUSE A HAZARDOUS UNSTABLE
CONDITION TO EXIST.
• ALWAYS SET THE WHEEL BRAKES WHEN THE STROLLER IS NOT MOVING,
ESPECIALLY ON AN INCLINE. THIS PREVENTS THE STROLLER FROM ROLLING AWAY.
• ALWAYS BALANCE THE WEIGHT OF THE STROLLER EVENLY.
• DO NOT PLACE PARCELS OR ACCESSORY ITEMS ON THE STROLLER, SEAT, OR
OVER THE HANDLE. DO NOT ALLOW CHILDREN TO PLAY WITH OR HANG ONTO THE
STROLLER.
• NEVER USE THIS STROLLER ON STAIRWAYS OR ESCALATORS.
• THIS IS NOT AN EXERCISE STROLLER! DO NOT USE THIS PRODUCT WHILE RUNNING,
JOGGING, IN-LINE SKATING, OR PARTICIPATING IN OTHER ATHLETIC ACTIVITIES.
• TAKE CARE WHEN FOLDING AND UNFOLDING TO PREVENT FINGER PINCHING.
• MAKE SURE CHILDREN ARE CLEAR OF ANY MOVING PARTS IF YOU ADJUST THE
STROLLER, OTHERWISE, THEY MAY BE INJURED.

3
www.dreamonme.com/help
WARNINGS (cont.)
• DO NOT ALLOW CHILDREN TO CLIMB INTO THE STROLLER UNASSISTED. THE
STROLLER MAY TIP OVER AND INJURE THE CHILD.
• ONLY USE REPLACEMENT PARTS SUPPLIED BY THE MANUFACTURER.
• DO NOT PUT THE CHILD IN THE BASKET.
• DO NOT USE ANY INFANT CAR SEATS WITH THIS PRODUCT. SERIOUS INJURY
COULD OCCUR.
• AVOID STRANGULATION, DO NOT PLACE ITEMS WITH A STRING AROUND YOUR
CHILD’S NECK, SUSPEND STRINGS FROM THIS PRODUCT, OR AVOID ATTACHING
STRINGS TO TOYS.
• USE THE STROLLER WITH ONLY ONE CHILD AT A TIME.
• PREVENT A HAZARDOUS, UNSTABLE CONDITION. NEVER PLACE PURSES,
SHOPPING BAGS, PARCELS, OR ACCESSORY ITEMS ON THE HANDLE (OTHER THAN
APPROVED BAGS AND STROLLER BAGS).
• AVOID BURNS, NEVER PUT HOT LIQUIDS IN ANY UNIVERSAL ADD-ON CUP HOLDERS.
• PREVENT TIPPING, DO NOT PLACE MORE THAN 3 LBS (1.36 KG) TOTAL IN ANY
UNIVERSAL ADD-ON CUP-HOLDERS.
• NEVER PLACE A CHILD IN THE STROLLER WITH HEAD TOWARD THE FOOTREST.
• NEVER ALLOW YOUR STROLLER TO BE USED AS A TOY.
• DISCONTINUE THE USE OF THE STROLLER IF DAMAGED OR BROKEN.
• STROLLER MUST ONLY BE USED AT WALKING SPEED. THE PRODUCT IS NOT
INTENDED FOR USE WHILE JOGGING, SKATING, ETC.
• CAREGIVERS MUST ALWAYS HELP CHILDREN GET INTO AND OUT OF THE
STROLLER.
• THE STROLLER IS DESIGNED FOR USE ON FLAT OR GENTLY SLOPING SURFACES
AND MAY BE UNSTABLE ON HIGHER-SLOPING AND UNEVEN SURFACES. USERS
SHOULD BE AWARE OF THE POSSIBILITY OF THE STROLLER ROLLING AWAY OR
TIPPING OVER.
• THE RIDER STROLLER HAS BEEN APPROVED IN ACCORDANCE WITH ASTM F833: 15.
• THE FRONT WHEELS MAY WOBBLE OR OSCILLATE WHEN WALKING FAST.
• THE STROLLER CAN BE TAKEN UP CURBS BY EITHER PRESSING DOWN ON THE
HANDLES AND RAISING THE FRONT WHEELS AND MOUNTING THE CURB, OR
TURNING THE STROLLER AROUND AND PULLING THE STROLLER UP THE CURB.
• CAUTION IS REQUIRED WHEN PUSHING THE STROLLER ACROSS STEEP SLOPES OR
UNEVEN SURFACES THIS MAY CAUSE THE STROLLER TO BECOME UNSTABLE AND
FALL OVER. ALWAYS HOLD THE HANDLES FIRMLY.
• DO NOT RUN WITH THE STROLLER.
• WHENEVER YOU STOP, ALWAYS APPLY THE BRAKES BEFORE YOU LEAVE THE
STROLLER.
• DO NOT HANG BAGS OR GOODS FROM THE HANDLE AS THIS COULD CAUSE THE
STROLLER TO TIP OVER.
• THE UPRIGHT POSITIONS ARE NOT SUITABLE FOR A CHILD UNDER 6 MONTHS OLD.

4
www.dreamonme.com/help
• LE NON-RESPECT DE CES AVERTISSEMENTS ET INSTRUCTIONS D'ASSEMBLAGE PEUT
ENTRAÎNER DES BLESSURES GRAVES, VOIRE MORTELLES.
• L'ASSEMBLAGE PAR UN ADULTE EST REQUIS.
• CONSERVEZ LES INSTRUCTIONS À PORTÉE DE MAIN POUR POUVOIR VOUS Y RÉFÉRER
ULTÉRIEUREMENT.
• ÉVITER LES BLESSURES GRAVES EN CAS DE CHUTE OU DE GLISSEMENT. UTILISEZ
TOUJOURS LE SYSTEME DE RETENUE.
• LA SÉCURITÉ DE VOTRE ENFANT DÉPEND DE VOUS. L'UTILISATION CORRECTE DE LA
POUSSETTE NE PEUT ÊTRE GARANTIE QUE SI VOUS SUIVEZ CES INSTRUCTIONS.
• NE PAS UTILISER LA POUSSETTE AVANT D'AVOIR LU ET COMPRIS CES INSTRUCTIONS.
• L'ASSEMBLAGE PAR UN ADULTE EST NÉCESSAIRE.
• NE LAISSEZ JAMAIS VOTRE ENFANT SANS SURVEILLANCE LORSQU'IL EST DANS LA
POUSSETTE.
• UN ACCIDENT PEUT SURVENIR RAPIDEMENT LORSQUE VOUS AVEZ LE DOS TOURNÉ.
VOUS DEVEZ TOUJOURS GARDER VOTRE ENFANT EN VUE LORSQUE VOUS ÊTES DANS
LA POUSSETTE, MÊME LORSQUE VOUS DORMEZ.
• N'UTILISEZ PAS CE PRODUIT COMME LIT. VOTRE ENFANT POURRAIT S'EMMÊLER DANS
LES SANGLES OU LES COUSSINS ET SUFFOQUER.
• UTILISEZ TOUJOURS UN SYSTEME DE RETENUE POUR EMPECHER L'ENFANT DE SE
LEVER OU DE TOMBER DE LA POUSSETTE.
• VERROUILLEZ TOUJOURS LA POUSSETTE EN POSITION OUVERTE AVANT DE LAISSER
VOTRE ENFANT ENTRER DANS LA POUSSETTE OU S'EN APPROCHER. CELA ÉVITE LES
BLESSURES CAUSÉES PAR L'EFFONDREMENT DE LA POUSSETTE.
• SOYEZ ATTENTIF ET PRUDENT LORS DU PLIAGE ET DU DÉPLIAGE DE LA POUSSETTE.
S'ASSURER QUE LA POUSSETTE EST BIEN DROITE ET VERROUILLÉE AVANT DE LAISSER
L'ENFANT S'APPROCHER DE LA POUSSETTE. TENEZ L'ENFANT ÉLOIGNÉ DES POINTS DE
PINCEMENT PENDANT LE PLIAGE ET LE DÉPLIAGE DE LA POUSSETTE.
• N'UTILISER CETTE POUSSETTE QU'AVEC DES ENFANTS PESANT MOINS DE 18,14 KG (40
LBS.) ET NE MESURANT PAS PLUS DE 1 MÈTRE (40 POUCES). (18,14 KG) ET QUI NE
MESURENT PAS PLUS DE 40 POUCES (1 MÈTRE). L'UTILISATION PAR DES ENFANTS PLUS
GRANDS PEUT ENDOMMAGER LA POUSSETTE OU PROVOQUER UNE CONDITION
DANGEREUSE ET INSTABLE.
• TOUJOURS SERRER LES FREINS DES ROUES LORSQUE LA POUSSETTE NE BOUGE PAS,
EN PARTICULIER SUR UNE PENTE. CELA PERMET D'ÉVITER QUE LA POUSSETTE NE SE
METTE À ROULER.
• TOUJOURS ÉQUILIBRER LE POIDS DE LA POUSSETTE.
• NE PAS PLACER DE COLIS OU D'ACCESSOIRES SUR L'AUVENT, LE SIÈGE OU LA
POIGNÉE DE LA POUSSETTE. NE PAS LAISSER LES ENFANTS JOUER AVEC LA
POUSSETTE OU S'Y ACCROCHER.
• NE JAMAIS UTILISER CETTE POUSSETTE DANS LES ESCALIERS OU LES ESCALATORS.
• CE N'EST PAS UNE POUSSETTE D'EXERCICE ! NE PAS UTILISER CE PRODUIT EN
COURANT, EN FAISANT DU JOGGING, DU PATIN À ROUES ALIGNÉES OU EN PARTICIPANT
À D'AUTRES ACTIVITÉS ATHLÉTIQUES.
• FAIRE ATTENTION LORS DU PLIAGE ET DU DÉPLIAGE POUR ÉVITER DE SE PINCER LES
DOIGTS.
AVERTISSEMENTS

5
www.dreamonme.com/help
• SI VOUS RÉGLEZ LA POUSSETTE, VEILLEZ À CE QUE LES ENFANTS NE SOIENT PAS EN
CONTACT AVEC LES PIÈCES MOBILES, SINON ILS POURRAIENT SE BLESSER.
• NE PAS LAISSER LES ENFANTS MONTER DANS LA POUSSETTE SANS AIDE. LA
POUSSETTE PEUT SE RENVERSER ET BLESSER L'ENFANT.
• N'UTILISER QUE LES PIECES DE RECHANGE FOURNIES PAR LE FABRICANT.
• NE PAS METTRE L'ENFANT DANS LE PANIER.
• NE PAS UTILISER DE SIEGE AUTO POUR ENFANT AVEC CE PRODUIT. DES BLESSURES
GRAVES POURRAIENT SURVENIR.
• POUR ÉVITER LA STRANGULATION, NE PLACEZ PAS D'OBJETS MUNIS D'UNE FICELLE
AUTOUR DU COU DE VOTRE ENFANT, NE SUSPENDEZ PAS DE FICELLES À CE PRODUIT
ET N'ATTACHEZ PAS DE FICELLES AUX JOUETS.
• UTILISER LA POUSSETTE AVEC UN SEUL ENFANT À LA FOIS.
• ÉVITER UNE SITUATION DANGEREUSE ET INSTABLE. NE JAMAIS PLACER DE SACS À
MAIN, DE SACS À PROVISIONS, DE COLIS OU D'ACCESSOIRES SUR LA POIGNÉE (AUTRES
QUE LES SACS APPROUVÉS ET LES SACS DE POUSSETTE).
• ÉVITER LES BRÛLURES, NE JAMAIS METTRE DE LIQUIDES CHAUDS DANS LES
PORTE-GOBELETS UNIVERSELS.
• POUR ÉVITER LE BASCULEMENT, NE PAS PLACER PLUS DE 1,36 KG (3 LBS) AU TOTAL
DANS LES PORTE-GOBELETS UNIVERSELS.
• NE JAMAIS PLACER UN ENFANT DANS LA POUSSETTE AVEC LA TÊTE VERS LE
REPOSE-PIEDS.
• NE JAMAIS LAISSER LA POUSSETTE ÊTRE UTILISÉE COMME UN JOUET.
• CESSER D'UTILISER LA POUSSETTE SI ELLE EST ENDOMMAGÉE OU CASSÉE.
• LA POUSSETTE NE DOIT ÊTRE UTILISÉE QU'À LA VITESSE DE LA MARCHE. LE PRODUIT
N'EST PAS CONÇU POUR ÊTRE UTILISÉ EN FAISANT DU JOGGING, DU PATINAGE, ETC.
• LES PERSONNES QUI S'OCCUPENT DES ENFANTS DOIVENT TOUJOURS LES AIDER À
MONTER ET À DESCENDRE DE LA POUSSETTE.
• LA POUSSETTE EST CONÇUE POUR ÊTRE UTILISÉE SUR DES SURFACES PLATES OU
LÉGÈREMENT INCLINÉES ET PEUT ÊTRE INSTABLE SUR DES SURFACES PLUS INCLINÉES
OU IRRÉGULIÈRES. LES UTILISATEURS DOIVENT ÊTRE CONSCIENTS DE LA POSSIBILITÉ
QUE LA POUSSETTE ROULE OU SE RENVERSE.
• LA POUSSETTE RIDER A ÉTÉ APPROUVÉE CONFORMÉMENT À LA NORME ASTM F833-15.
• LES ROUES AVANT PEUVENT VACILLER OU OSCILLER LORS D'UNE MARCHE RAPIDE.
• LA POUSSETTE PEUT ÊTRE MONTÉE SUR LES TROTTOIRS SOIT EN APPUYANT SUR LES
POIGNÉES ET EN LEVANT LES ROUES AVANT ET EN MONTANT SUR LE TROTTOIR, SOIT
EN RETOURNANT LA POUSSETTE ET EN LA TIRANT VERS LE HAUT DU TROTTOIR.
• LA PRUDENCE EST DE RIGUEUR LORSQUE VOUS POUSSEZ LA POUSSETTE SUR DES
PENTES RAIDES OU DES SURFACES IRRÉGULIÈRES, CAR LA POUSSETTE PEUT DEVENIR
INSTABLE ET SE RENVERSER. TOUJOURS TENIR FERMEMENT LES POIGNEES.
• NE PAS COURIR AVEC LA POUSSETTE.
• CHAQUE FOIS QUE VOUS VOUS ARRÊTEZ, SERREZ TOUJOURS LES FREINS AVANT DE
QUITTER LA POUSSETTE.
• NE PAS ACCROCHER DE SACS OU D'OBJETS À LA POIGNÉE, CAR CELA POURRAIT FAIRE
BASCULER LA POUSSETTE.
• LES POSITIONS DEBOUT NE CONVIENNENT PAS AUX ENFANTS DE MOINS DE 6 MOIS.
AVERTISSEMENTS (suite)

6
www.dreamonme.com/help
• EL INCUMPLIMIENTO DE ESTAS ADVERTENCIAS E INSTRUCCIONES DE MONTAJE PUEDE
PROVOCAR LESIONES GRAVES O LA MUERTE.
• SE REQUIERE EL MONTAJE POR PARTE DE UN ADULTO.
• PARA FUTURAS CONSULTAS, CONSERVE LAS INSTRUCCIONES A MANO.
• EVITE LESIONES GRAVES POR CAÍDAS O DESLIZAMIENTOS. UTILICE SIEMPRE EL
SISTEMA DE RETENCIÓN.
• LA SEGURIDAD DE SU HIJO DEPENDE DE USTED. NO SE PUEDE GARANTIZAR EL USO
CORRECTO DEL COCHECITO A MENOS QUE SIGA ESTAS INSTRUCCIONES.
• NO UTILICE EL COCHECITO HASTA HABER LEÍDO Y COMPRENDIDO ESTAS
INSTRUCCIONES.
• ES NECESARIO EL MONTAJE POR PARTE DE UN ADULTO.
• NUNCA DEJE A SU HIJO DESATENDIDO MIENTRAS ESTÉ EN EL COCHECITO.
• LOS ACCIDENTES PUEDEN OCURRIR RÁPIDAMENTE MIENTRAS USTED ESTÁ DE
ESPALDAS. SIEMPRE DEBE TENER A SU HIJO A LA VISTA MIENTRAS ESTÉ EN EL
COCHECITO, INCLUSO CUANDO ESTÉ DURMIENDO.
• NO UTILICE ESTE PRODUCTO COMO CAMA. SU HIJO PUEDE ENREDARSE EN LAS
CORREAS O ALMOHADILLAS Y ASFIXIARSE.
• UTILICE SIEMPRE UN SISTEMA DE RETENCIÓN PARA EVITAR QUE EL NIÑO SE PONGA DE
PIE O SE CAIGA DEL COCHECITO.
• CIERRE SIEMPRE EL COCHECITO ANTES DE PERMITIR QUE SU HIJO ENTRE O SE
ACERQUE AL MISMO. ESTO EVITA LESIONES CAUSADAS POR EL COLAPSO DEL
COCHECITO.
• TENGA CUIDADO AL PLEGAR Y DESPLEGAR EL COCHECITO. ASEGÚRESE DE QUE EL
COCHECITO ESTÉ COMPLETAMENTE ERGUIDO Y CERRADO ANTES DE PERMITIR QUE SU
HIJO SE ACERQUE AL MISMO. MANTENGA AL NIÑO ALEJADO DE LOS PUNTOS DE
PELLIZCO AL PLEGAR Y DESPLEGAR EL COCHECITO. AL DESPLEGAR EL COCHECITO,
BLOQUÉELO Y ESCUCHE EL "CLIC".
• UTILICE ESTE COCHECITO SÓLO CON NIÑOS QUE PESEN MENOS DE 40 LBS. (18,14 KG) Y
NO MIDAN MÁS DE 40 PULGADAS (1 METRO). EL USO POR NIÑOS MÁS GRANDES PUEDE
DAÑAR EL COCHECITO O PROVOCAR UNA SITUACIÓN DE INESTABILIDAD PELIGROSA.
• PONGA SIEMPRE LOS FRENOS DE LAS RUEDAS CUANDO EL COCHECITO NO ESTÉ EN
MOVIMIENTO, ESPECIALMENTE EN UNA PENDIENTE. ASÍ EVITARÁ QUE EL COCHECITO
SALGA RODANDO.
• EQUILIBRE SIEMPRE EL PESO DEL COCHECITO DE FORMA UNIFORME.
• NO COLOQUE PAQUETES NI ACCESORIOS SOBRE LA CAPOTA, EL ASIENTO O EL
MANILLAR DEL COCHECITO. NO PERMITA QUE LOS NIÑOS JUEGUEN CON EL
COCHECITO O SE CUELGUEN DE ÉL.
• NO UTILICE NUNCA ESTE COCHECITO EN ESCALERAS O ESCALERAS MECÁNICAS.
• NO ES UN COCHECITO PARA HACER EJERCICIO. NO UTILICE ESTE PRODUCTO
MIENTRAS CORRE, HACE FOOTING, PATINA EN LÍNEA O PARTICIPA EN OTRAS
ACTIVIDADES ATLÉTICAS.
• TENGA CUIDADO AL PLEGARLO Y DESPLEGARLO PARA EVITAR PELLIZCARSE LOS
DEDOS.
• ASEGÚRESE DE QUE LOS NIÑOS ESTÉN ALEJADOS DE CUALQUIER PIEZA MÓVIL SI
AJUSTA EL COCHECITO, DE LO CONTRARIO, PODRÍAN LESIONARSE.
ADVERTENCIAS

7
www.dreamonme.com/help
• NO PERMITA QUE LOS NIÑOS SUBAN AL COCHECITO SIN AYUDA. EL COCHECITO PUEDE
VOLCAR Y LESIONAR AL NIÑO.
• UTILICE SÓLO PIEZAS DE REPUESTO SUMINISTRADAS POR EL FABRICANTE.
• NO COLOQUE AL NIÑO EN LA CESTA.
• NO UTILICE SILLAS DE COCHE PARA NIÑOS CON ESTE PRODUCTO. PODRÍAN
PRODUCIRSE LESIONES GRAVES.
• EVITE EL ESTRANGULAMIENTO, NO COLOQUE OBJETOS CON UNA CUERDA ALREDEDOR
DEL CUELLO DE SU HIJO, NO SUSPENDA CUERDAS DE ESTE PRODUCTO NI SUJETE
CUERDAS A LOS JUGUETES.
• UTILICE EL COCHECITO CON UN SOLO NIÑO A LA VEZ.
• EVITE UNA SITUACIÓN PELIGROSA E INESTABLE. NO COLOQUE NUNCA BOLSOS,
BOLSAS DE LA COMPRA, PAQUETES O ACCESORIOS EN EL ASA (QUE NO SEAN BOLSAS
HOMOLOGADAS Y BOLSAS PARA COCHECITOS).
• EVITE QUEMADURAS, NO COLOQUE NUNCA LÍQUIDOS CALIENTES EN LOS PORTAVASOS
UNIVERSALES.
• PARA EVITAR VUELCOS, NO COLOQUE MÁS DE 1,36 KG (3 LBS) EN TOTAL EN NINGUNO
DE LOS PORTAVASOS COMPLEMENTARIOS UNIVERSALES.
• NUNCA COLOQUE A UN NIÑO EN EL COCHECITO CON LA CABEZA HACIA EL
REPOSAPIÉS.
• NO PERMITA NUNCA QUE SU COCHECITO SE UTILICE COMO JUGUETE.
• DEJE DE UTILIZAR EL COCHECITO SI ESTÁ DAÑADO O ROTO.
• EL COCHECITO SÓLO DEBE UTILIZARSE A VELOCIDAD DE PASEO. EL PRODUCTO NO
ESTÁ DISEÑADO PARA SER UTILIZADO MIENTRAS SE HACE FOOTING, SE PATINA, ETC.
• LOS CUIDADORES DEBEN AYUDAR SIEMPRE A LOS NIÑOS A SUBIR Y BAJAR DEL
COCHECITO.
• EL COCHECITO ESTÁ DISEÑADO PARA SU USO EN SUPERFICIES PLANAS O
LIGERAMENTE INCLINADAS Y PUEDE SER INESTABLE EN SUPERFICIES MÁS INCLINADAS
E IRREGULARES. LOS USUARIOS DEBEN SER CONSCIENTES DE LA POSIBILIDAD DE QUE
EL COCHECITO RUEDE O VUELQUE.
• EL COCHECITO RIDER HA SIDO HOMOLOGADO DE ACUERDO CON LA NORMA ASTM
F833: 15. LAS RUEDAS DELANTERAS PUEDEN TAMBALEARSE O VOLCAR.
• LAS RUEDAS DELANTERAS PUEDEN TAMBALEARSE U OSCILAR AL CAMINAR DEPRISA.
• EL COCHECITO PUEDE SUBIRSE A LOS BORDILLOS PRESIONANDO HACIA ABAJO LAS
EMPUÑADURAS Y LEVANTANDO LAS RUEDAS DELANTERAS Y SUBIÉNDOSE AL
BORDILLO, O DANDO LA VUELTA AL COCHECITO Y TIRANDO DE ÉL PARA SUBIRLO AL
BORDILLO.
• TENGA CUIDADO AL EMPUJAR EL COCHECITO POR PENDIENTES PRONUNCIADAS O
SUPERFICIES DESIGUALES, YA QUE EL COCHECITO PUEDE VOLVERSE INESTABLE Y
CAERSE. SUJETE SIEMPRE LAS ASAS CON FIRMEZA.
• NO CORRA CON EL COCHECITO.
• SIEMPRE QUE SE DETENGA, ACCIONE LOS FRENOS ANTES DE ABANDONAR EL
COCHECITO.
• NO CUELGUE BOLSAS NI OBJETOS DEL ASA, YA QUE EL COCHECITO PODRÍA VOLCAR.
• LAS POSICIONES VERTICALES NO SON ADECUADAS PARA NIÑOS MENORES DE 6
MESES.
ADVERTENCIAS (continuación)

8
www.dreamonme.com/help
PARTS
PIÈCES `PARTES
If there are any missing parts, please contact Dream On Me before using the product.
S'il y a des pièces manquantes, veuillez contacter Dream On Me avant d'utiliser le produit.
Si falta alguna pieza, póngase en contacto con Dream On Me antes de utilizar el producto.
1
Front Wheels (x2)
Roues avant (x2)
Ruedas delanteras (x2)
2
Axles (x2)
Axes (x2)
Ejes (x2)
4
Toy Frame
Cadre du jouet
Marco de juguete
7
Washers (x6)
Rondelles (x6)
Arandelas (x6)
8
Cotter Pins (x2)
Goupilles fendues (x2)
Pasadores (x2)
8
Hub Caps (x4)
Cache-moyeux (x4)
Tapacubos (x4)
5
Cup Holder
Porte-gobelet
Portavasos
6
Rear Wheels (x4)
Roues arrière (x4)
Ruedas traseras (x4)
3
Stroller Frame
Cadre de poussette
Armazón del cochecito
9
www.dreamonme.com/help
1
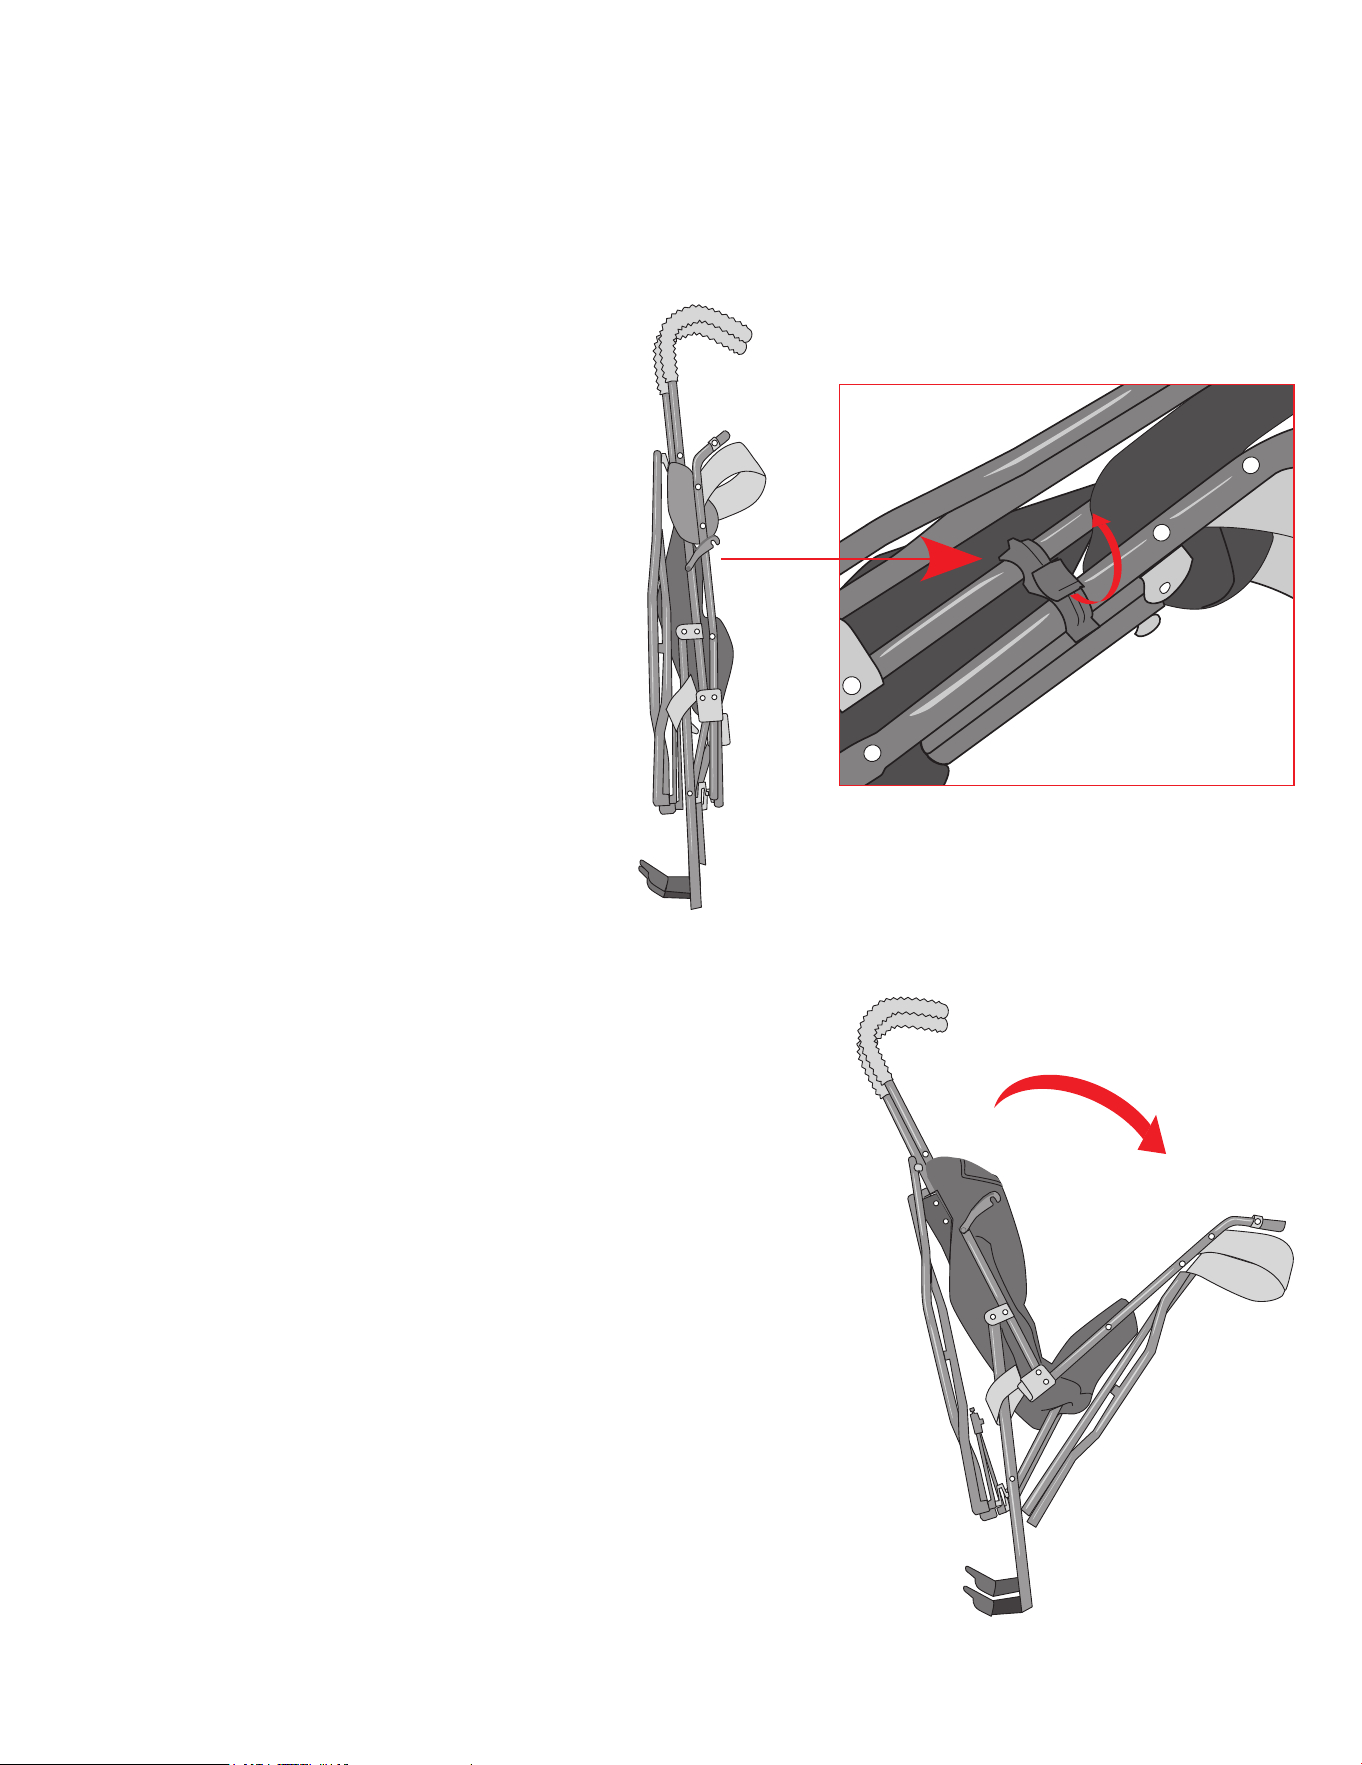
STROLLER ASSEMBLY - OPENING THE STROLLER
ASSEMBLAGE DE LA POUSSETTE - OUVRIR LA POUSSETTE
CONJUNTO COCHECITO - ABRIR EL COCHECITO
1a. Place the parts on a soft surface
before assembly.
1b. Carefully remove the
cardboard/plastic ties protecting the
stroller during shipping.
1c. Release the clips as shown in the
zoomed-in illustration on either side
of the stroller to access it.
1d. For the stroller to open, apply
downward pressure on the front.
1a. Placer les pièces sur une surface
souple avant de les assembler.
1b. Retirer avec précaution les attaches en
carton/plastique qui protègent la
poussette pendant le transport.
1c. Dégager les clips comme indiqué dans
l'illustration zoomée de chaque côté de
la poussette pour y accéder.
1d. Pour ouvrir la poussette, exercer une
pression vers le bas sur l'avant.
1a. Coloque las piezas sobre una
superficie blanda antes del montaje.
1b. Retire con cuidado las ataduras de
cartón/plástico que protegen el
cochecito durante el transporte.
1c. Suelte los clips como se muestra en la
ilustración ampliada a cada lado del
cochecito para acceder a él.
1d. Para que el cochecito se abra, aplique
presión hacia abajo en la parte
delantera.
10
www.dreamonme.com/help
2
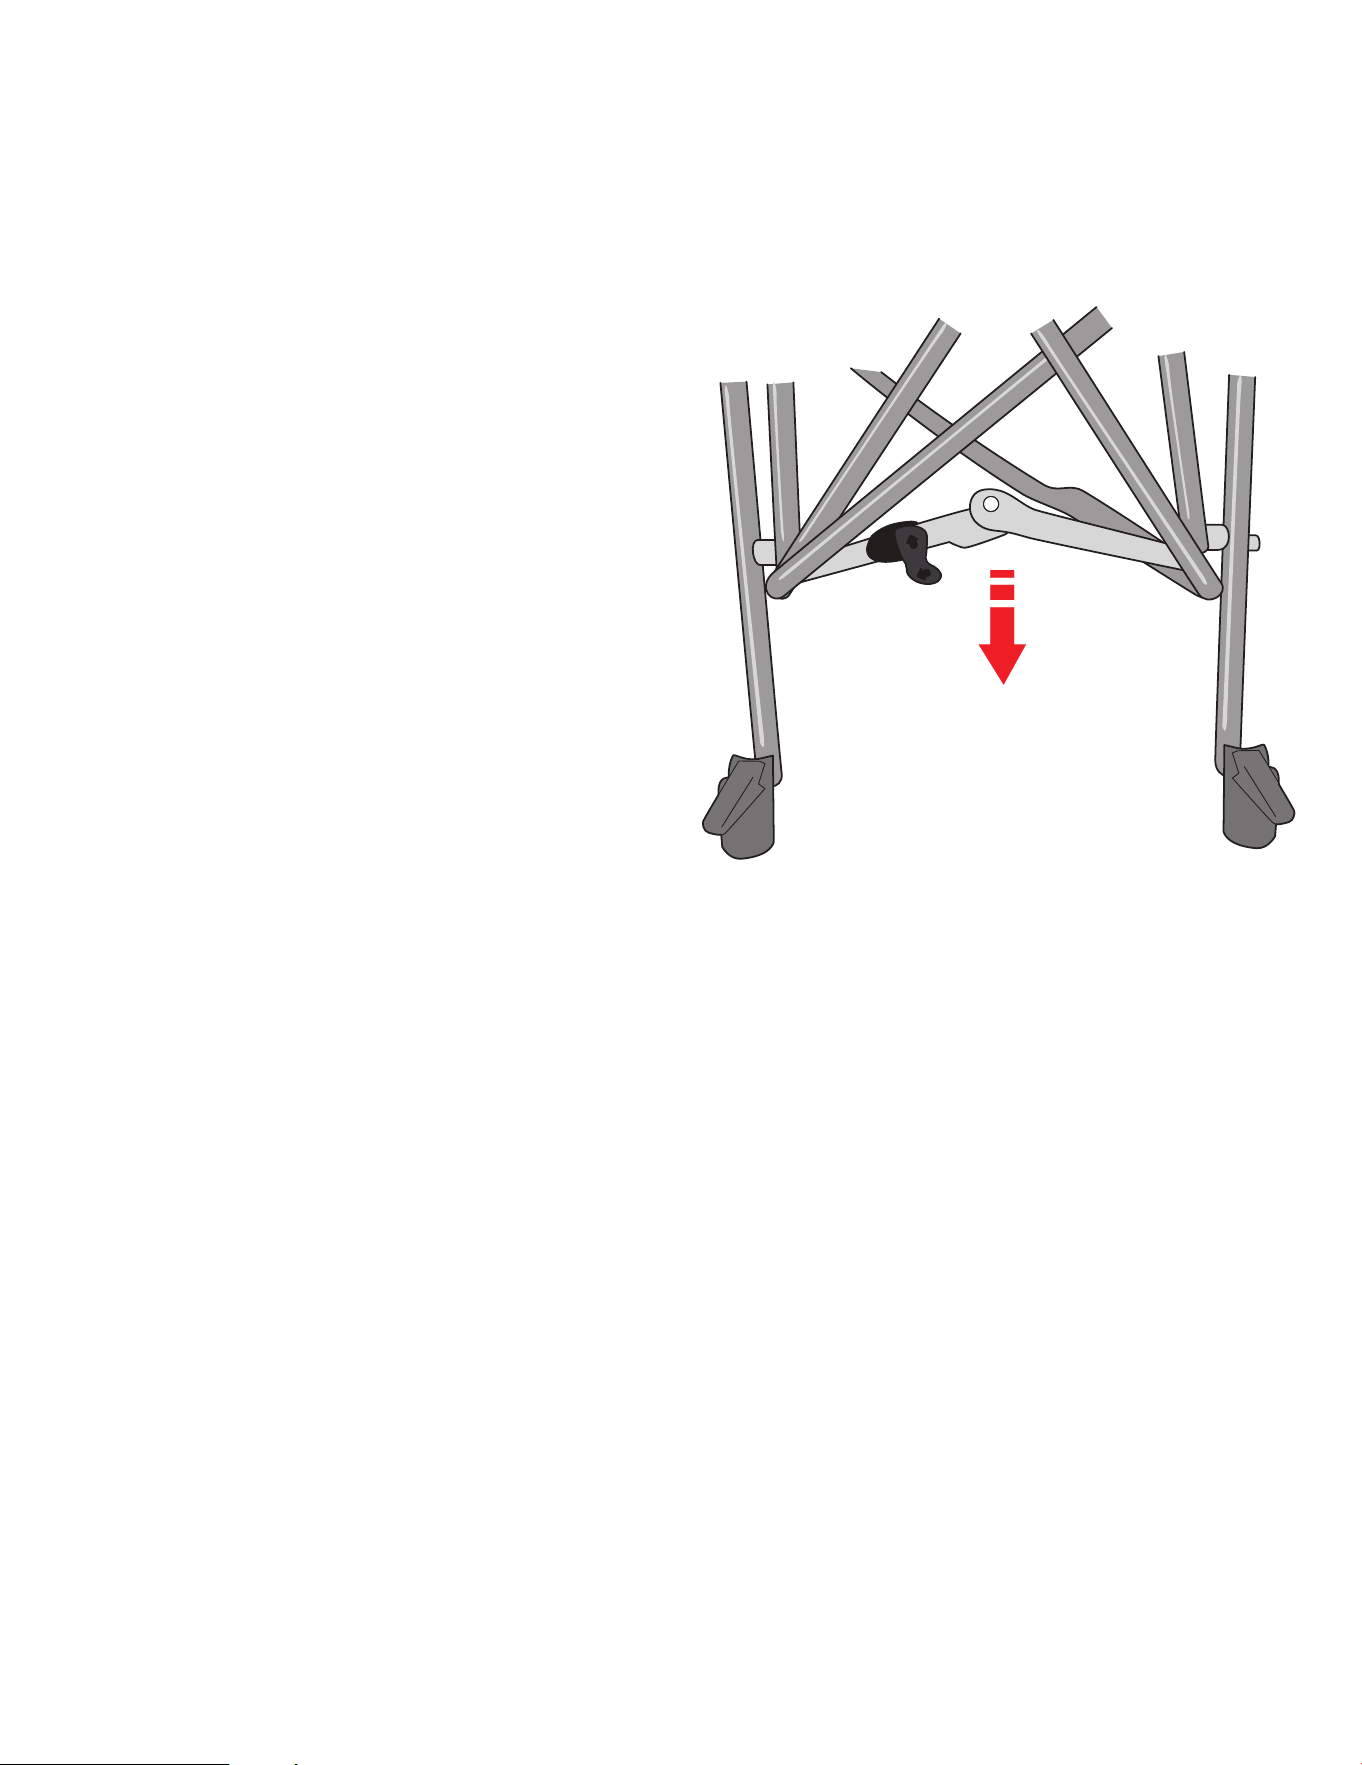
STROLLER ASSEMBLY - LOCKING THE STROLLER
ASSEMBLAGE DE LA POUSSETTE - VERROUILLAGE DE LA POUSSETTE
CONJUNTO COCHECITO - BLOQUEO DEL COCHECITO
2
1
2a. Once the stroller is open and
accessible, press down on the folding
bar as indicated in the illustration until
you hear a click.
2b. A lick indicates that the stroller is
locked securely.
2a. Une fois la poussette ouverte et
accessible, appuyez sur la barre de
pliage comme indiqué sur l'illustration
jusqu'à ce que vous entendiez un clic.
2b. Un coup de langue indique que la
poussette est bien verrouillée.
2a. Una vez que el cochecito esté abierto y
accesible, presione hacia abajo la barra
de plegado como se indica en la
ilustración hasta que oiga un clic.
2b. Un chasquido indica que el cochecito
está bien bloqueado.
11
www.dreamonme.com/help
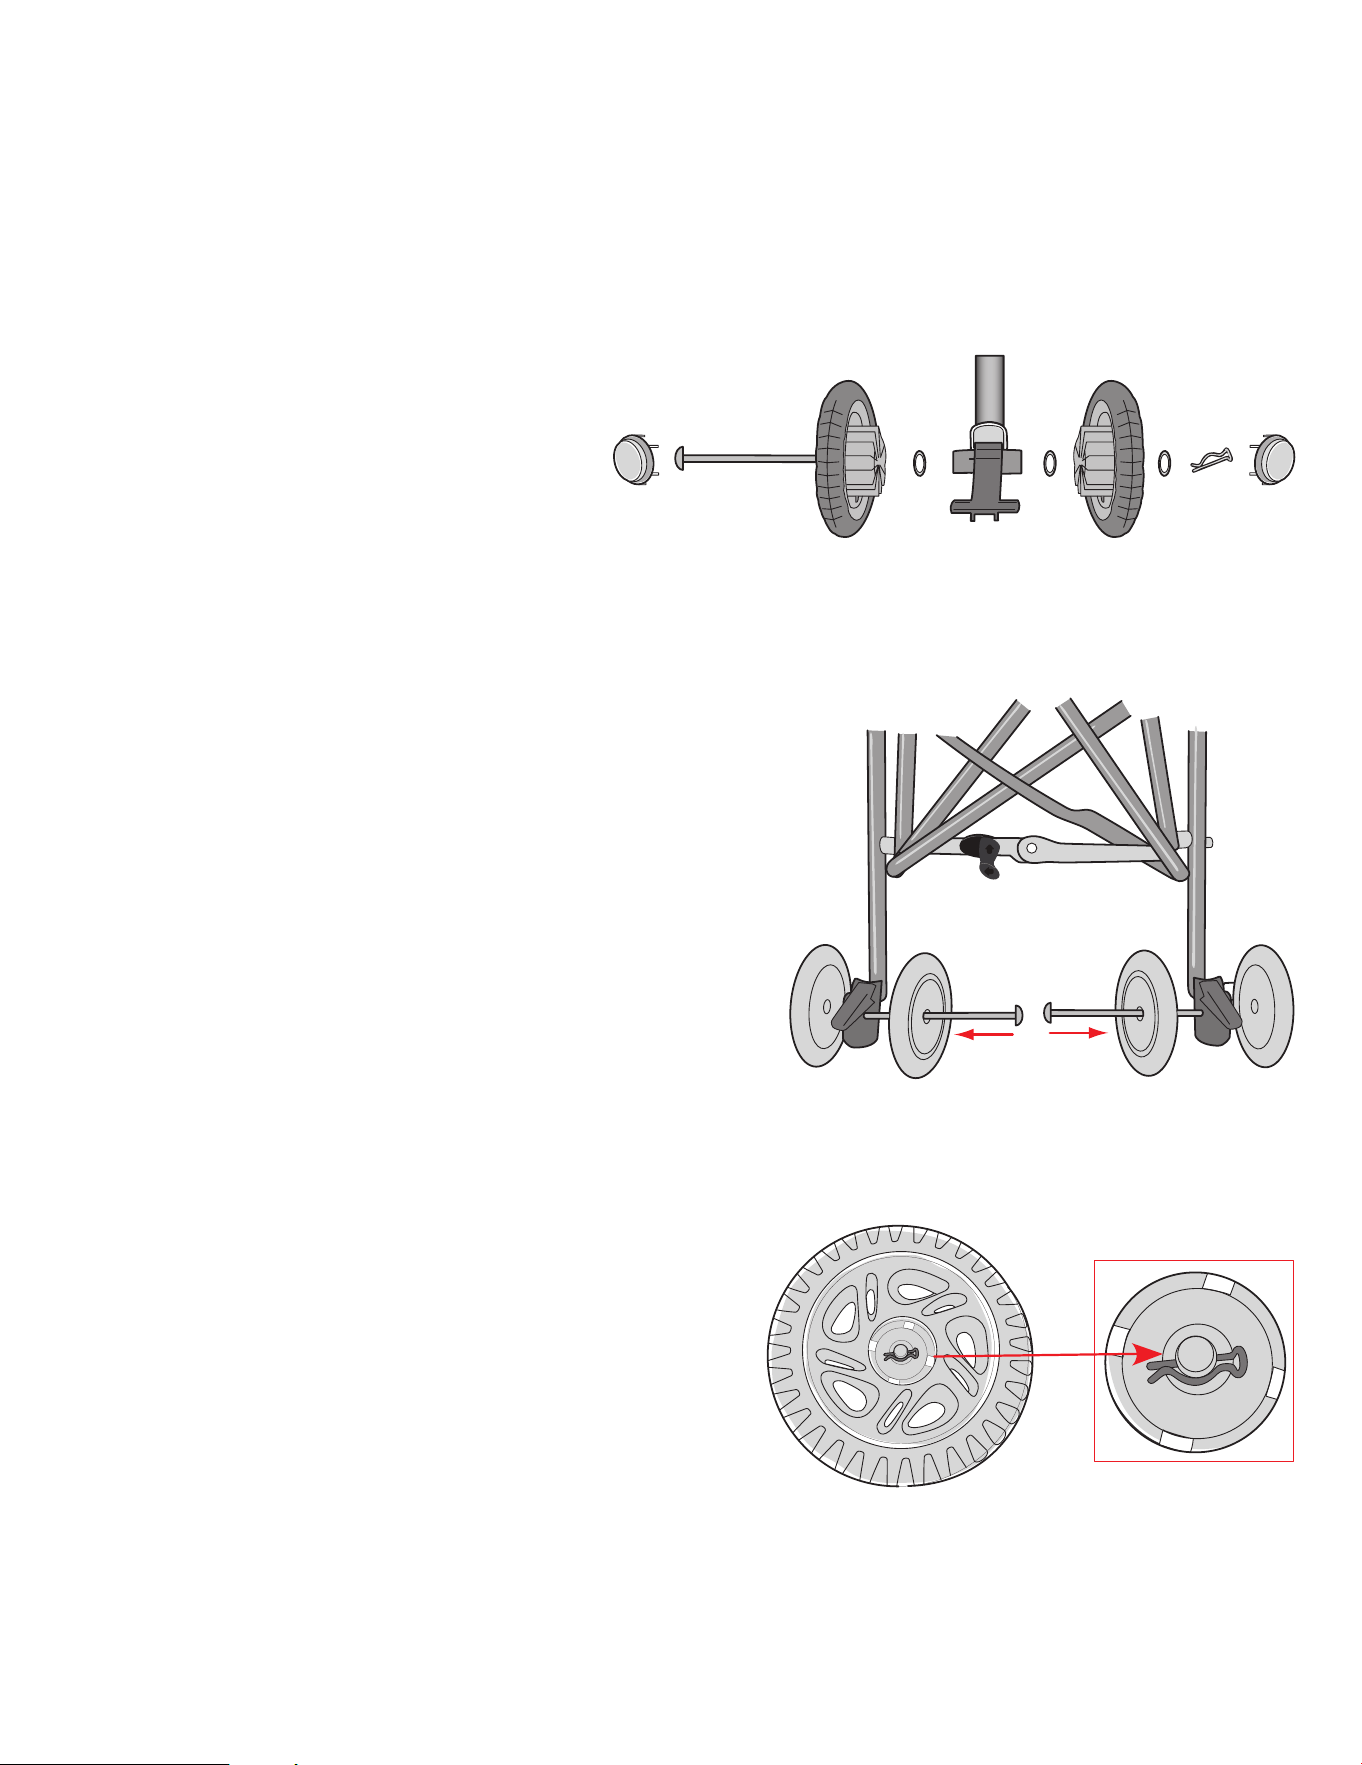
3
STROLLER ASSEMBLY - REAR WHEEL ASSEMBLY
ASSEMBLAGE DE LA POUSSETTE - ASSEMBLAGE DE LA ROUE ARRIÈRE
CONJUNTO COCHECITO - CONJUNTO RUEDA TRASERA
2
1
3a. Align and insert the 1st Rear Wheel onto the
Axle followed by the 1st Washer. Insert the
half-assembled axle into its slot in the Right
Rear Leg of the stroller.
3b. Ensure the axle is inserted from the inside as
indicated in the 2nd illustration.
3c. Align and insert the 2nd Washer in the axle
followed by the 2nd Rear Wheel. Insert the 3rd
washer following the wheel.
3d. Align and insert the straight portion of the
Cotter Pin in the insertions provided at the
axle's end.
3e. Align the tabs of the Hub Caps to the slots on
the wheels and snap them in place.
3f. Repeat the steps above to assemble the wheels
for the Left Rear Leg of the stroller.
3a. Aligner et insérer la première roue arrière sur l'axe, suivie de la
première rondelle. Insérer l'axe à moitié assemblé dans sa fente
dans la jambe arrière droite de la poussette.
3b. S'assurer que l'axe est inséré de l'intérieur comme indiqué sur la
deuxième illustration.
3c. Aligner et insérer la deuxième rondelle dans l'axe, suivie de la
deuxième roue arrière. Insérer la troisième rondelle après la roue.
3d. Aligner et insérer la partie droite de la goupille fendue dans les
insertions prévues à l'extrémité de l'essieu.
3e. Alignez les languettes des enjoliveurs sur les fentes des roues et
mettez-les en place.
3f. Répétez les étapes ci-dessus pour assembler les roues de la
jambe arrière gauche de la poussette.
3a. Alinee e inserte la 1ª Rueda Trasera en el Eje seguida de la 1ª
Arandela. Inserte el eje a medio montar en su ranura en la Pata
Trasera Derecha del cochecito.
3b. Asegúrese de que el eje se inserta desde el interior como se
indica en la 2ª ilustración.
3c. Alinee e inserte la 2ª arandela en el eje seguida de la 2ª rueda
trasera. Inserte la 3ª arandela siguiendo la rueda.
3d. Alinee e inserte la parte recta del pasador de chaveta en las
inserciones previstas en el extremo del eje.
3e. Alinee las lengüetas de los tapacubos con las ranuras de las
ruedas y encájelos en su sitio.
3f. Repita los pasos anteriores para montar las ruedas de la pata
trasera izquierda del cochecito.
12
www.dreamonme.com/help
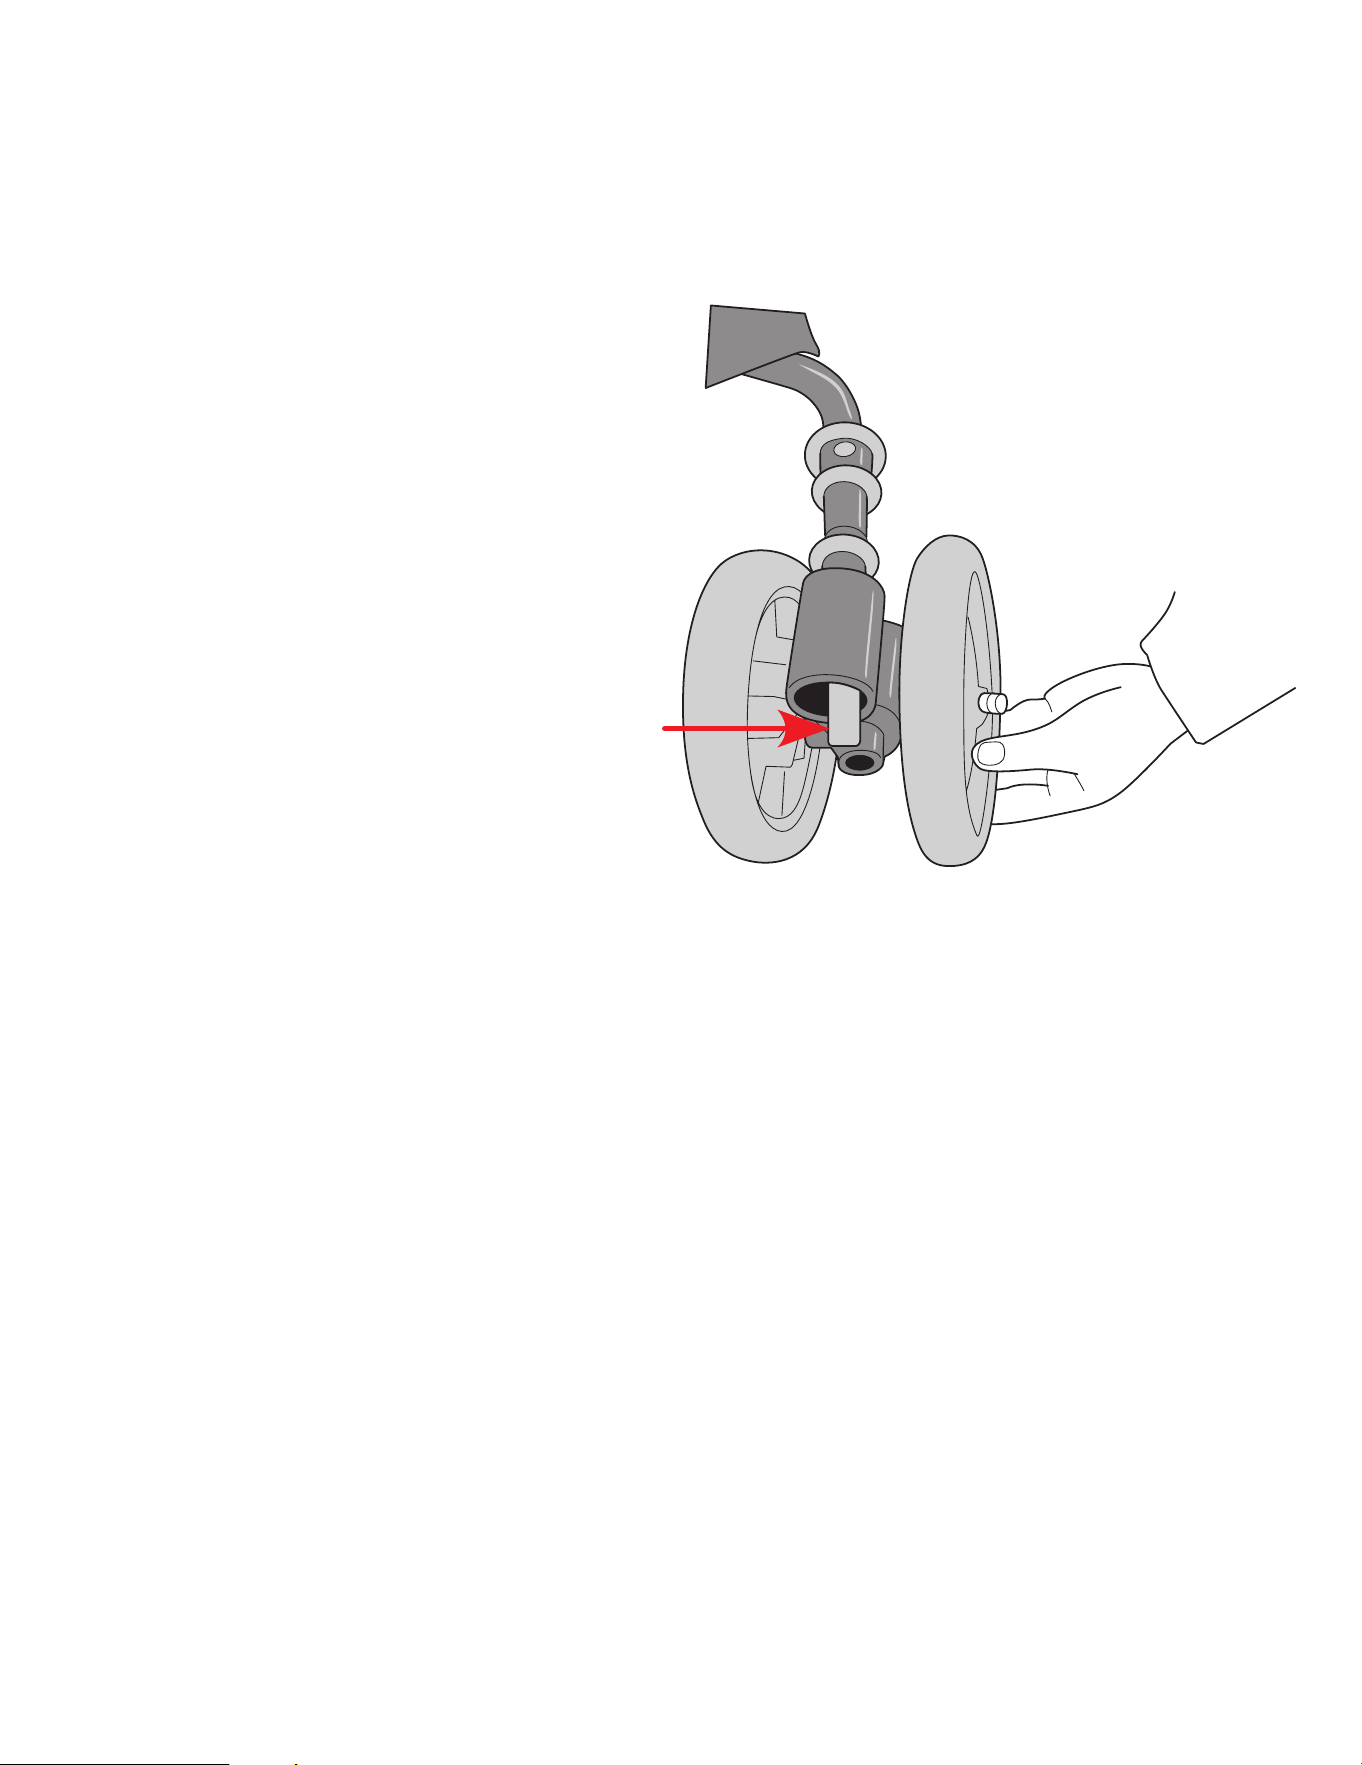
4
STROLLER ASSEMBLY - FRONT WHEEL ASSEMBLY
ASSEMBLAGE DE LA POUSSETTE - ASSEMBLAGE DE LA ROUE AVANT
CONJUNTO COCHECITO - CONJUNTO RUEDA DELANTERA
4a. Align the tab present on the front legs
away from the stroller.
4b. Align and insert the Front Wheels onto
the front legs until it locks in place.
4c. NOTE: To remove the front wheels, align
the tab on the front legs to the stroller
and pull the wheels off the legs.
4a. Aligner la languette présente sur les
pieds avant en l'éloignant de la
poussette.
4b. Aligner et insérer les roues avant sur les
pieds avant jusqu'à ce qu'elles se
verrouillent en place.
4c. REMARQUE : Pour retirer les roues
avant, alignez la languette des pieds
avant sur la poussette et retirez les
roues des pieds.
4a. Alinee la lengüeta presente en las patas
delanteras alejándolas del cochecito.
4b. Alinee e inserte las ruedas delanteras en las
patas delanteras hasta que encajen en su sitio.
4c. NOTA: Para quitar las ruedas delanteras, alinee
la lengüeta de las patas delanteras con el
cochecito y tire de las ruedas para sacarlas de
las patas.
13
www.dreamonme.com/help
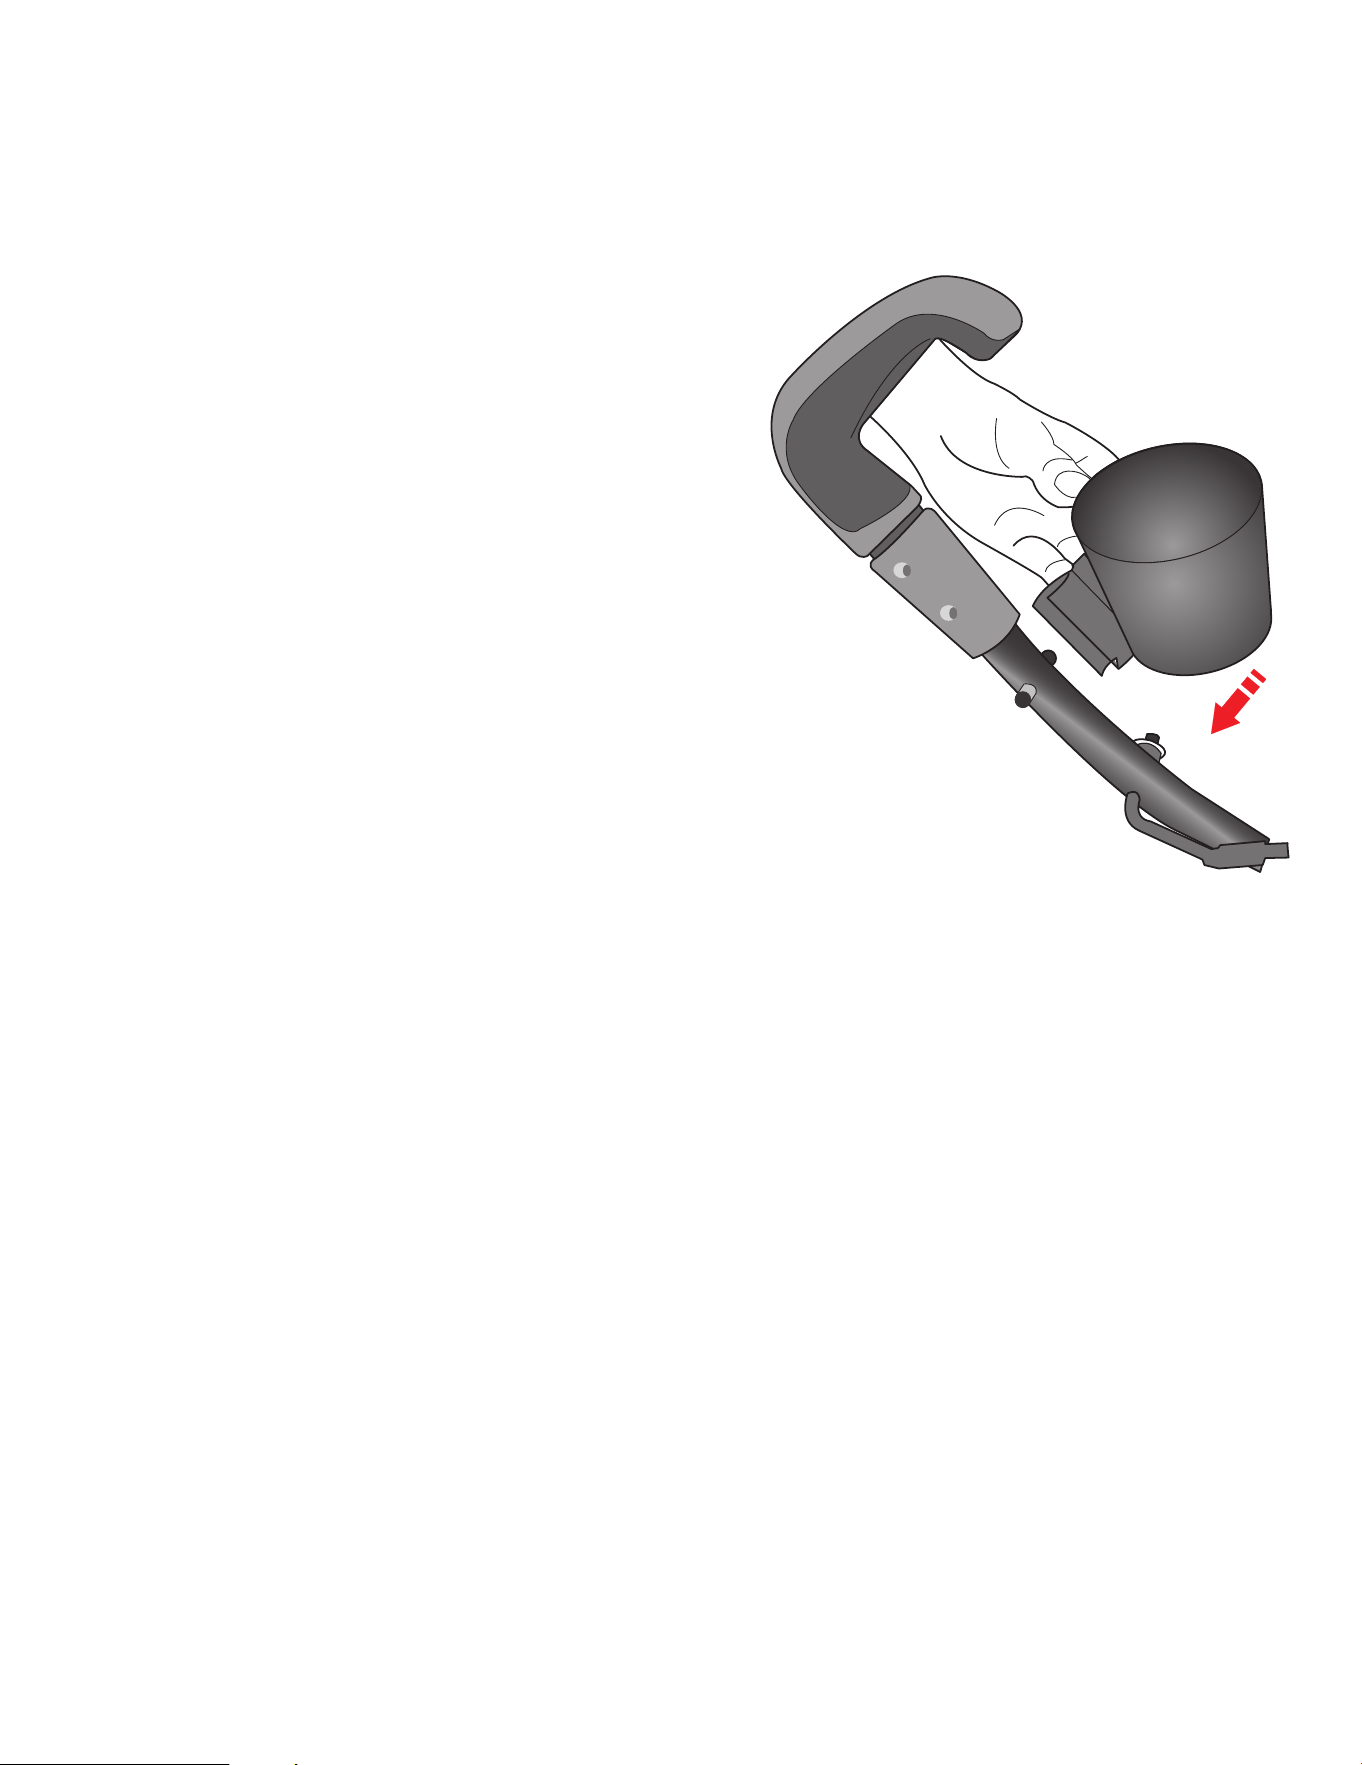
5
STROLLER ASSEMBLY - CUP-HOLDER ASSEMBLY
ASSEMBLAGE DE LA POUSSETTE - ASSEMBLAGE DU PORTE-GOBELET
CONJUNTO COCHECITO - MONTAJE DEL PORTAVASOS
5a. Align and attach the Cup Holder to the
left handle of the stroller.
5b. Make sure the insertion on the cup holder
is aligned with the pin on the left handle
and insert it until you hear a click.
5c. NOTE: To clean the same, detach it from
the stroller and use the top rack of the
dishwasher.
5d. WARNING: Do not place more than 1 lb
(0.45 kg) in this cupholder to prevent the
stroller from becoming unstable or
tipping. Do not place hot liquids in this
cupholder as they can burn your child.
5a. Aligner et fixer le porte-gobelet à la poignée gauche de la poussette.
5b. S'assurer que l'insertion du porte-gobelet est alignée avec la
goupille de la poignée gauche et l'insérer jusqu'à ce que vous
entendiez un clic.
5c. REMARQUE : Pour nettoyer le porte-gobelet, détachez-le de la
poussette et utilisez le panier supérieur du lave-vaisselle.
5d. AVERTISSEMENT : Ne pas placer plus de 0,45 kg (1 lb) dans ce
porte-gobelet pour éviter que la poussette ne devienne instable ou
ne bascule. Ne placez pas de liquides chauds dans ce porte-gobelet
car ils pourraient brûler votre enfant.
5a. Alinee y fije el portavasos al asa izquierda del cochecito.
5b. Asegúrese de que la inserción del portavasos está alineada con el
pasador del asa izquierda e insértelo hasta que oiga un clic.
5c. NOTA: Para limpiar el mismo, sepárelo del cochecito y utilice la
rejilla superior del lavavajillas.
5d. ADVERTENCIA: No coloque más de 0,45 kg (1 lb) en este portavasos
para evitar que el cochecito se vuelva inestable o vuelque. No
coloque líquidos calientes en este portavasos, ya que pueden
quemar a su hijo.
14
www.dreamonme.com/help
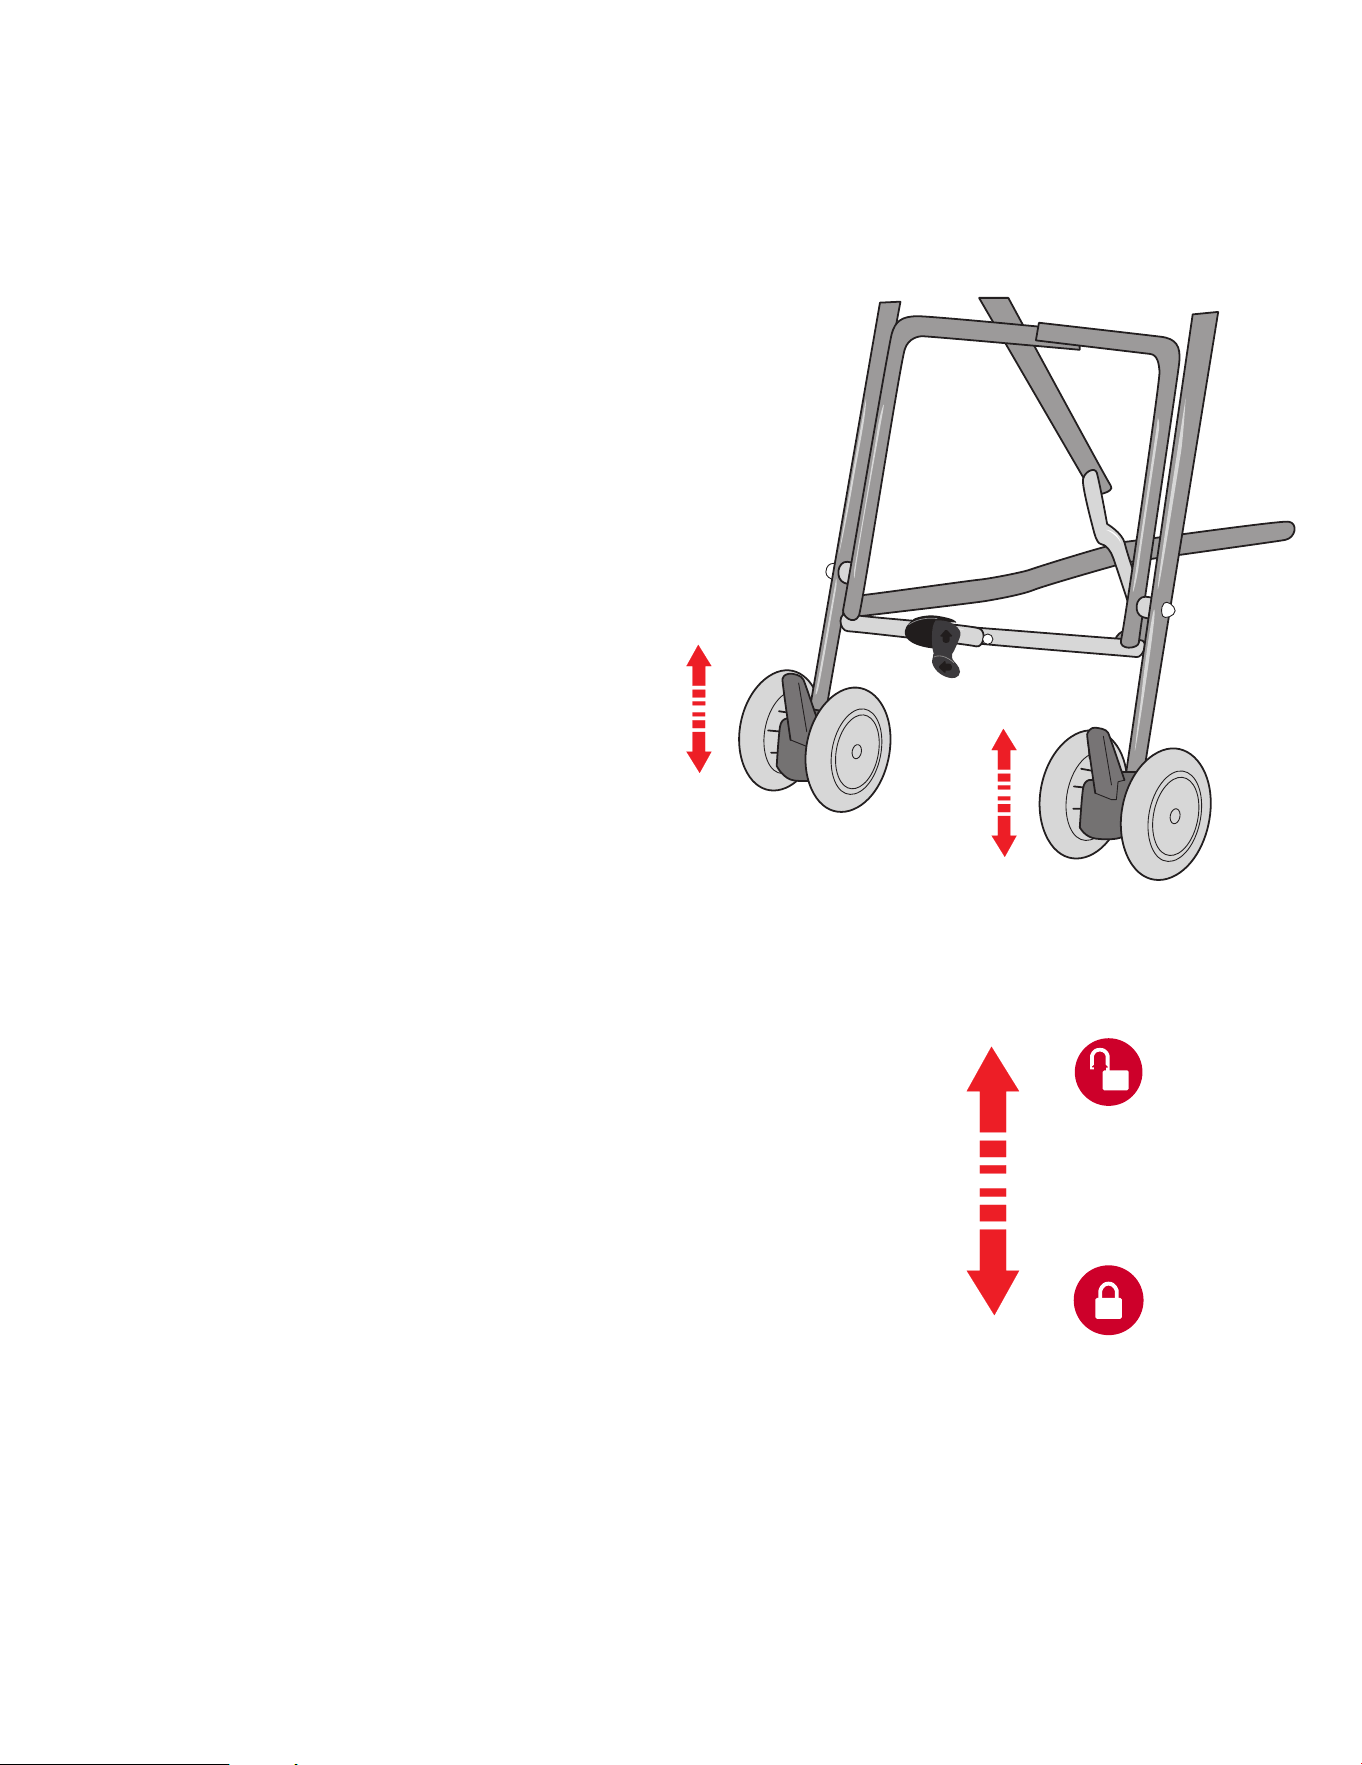
1
USE OF STROLLER - OPERATING THE BRAKES
UTILISATION DE LA POUSSETTE - ACTIONNEMENT DES FREINS
USO DEL COCHECITO - ACCIONAMIENTO DE LOS FRENOS
2
1
1a. Locate the levers present in the rear legs
of the stroller. Push down both levers to
lock the stroller in place.
1b. Similarly, push up both the levers present
to unlock and access the stroller.
1a. Localisez les leviers présents dans les
pieds arrière de la poussette. Pousser
les deux leviers vers le bas pour
verrouiller la poussette en place.
1b. De même, poussez les deux leviers vers
le haut pour déverrouiller la poussette et
y accéder.
1a. Localice las palancas presentes en las
patas traseras del cochecito. Empuje
hacia abajo ambas palancas para
bloquear el cochecito.
1b. Del mismo modo, empuje hacia arriba
las dos palancas presentes para
desbloquear y acceder al cochecito.
15
www.dreamonme.com/help
2
USE OF STROLLER - SAFETY HARNESS
UTILISATION DE LA POUSSETTE - HARNAIS DE SÉCURITÉ
USO DEL COCHECITO - ARNÉS DE SEGURIDAD
2
1
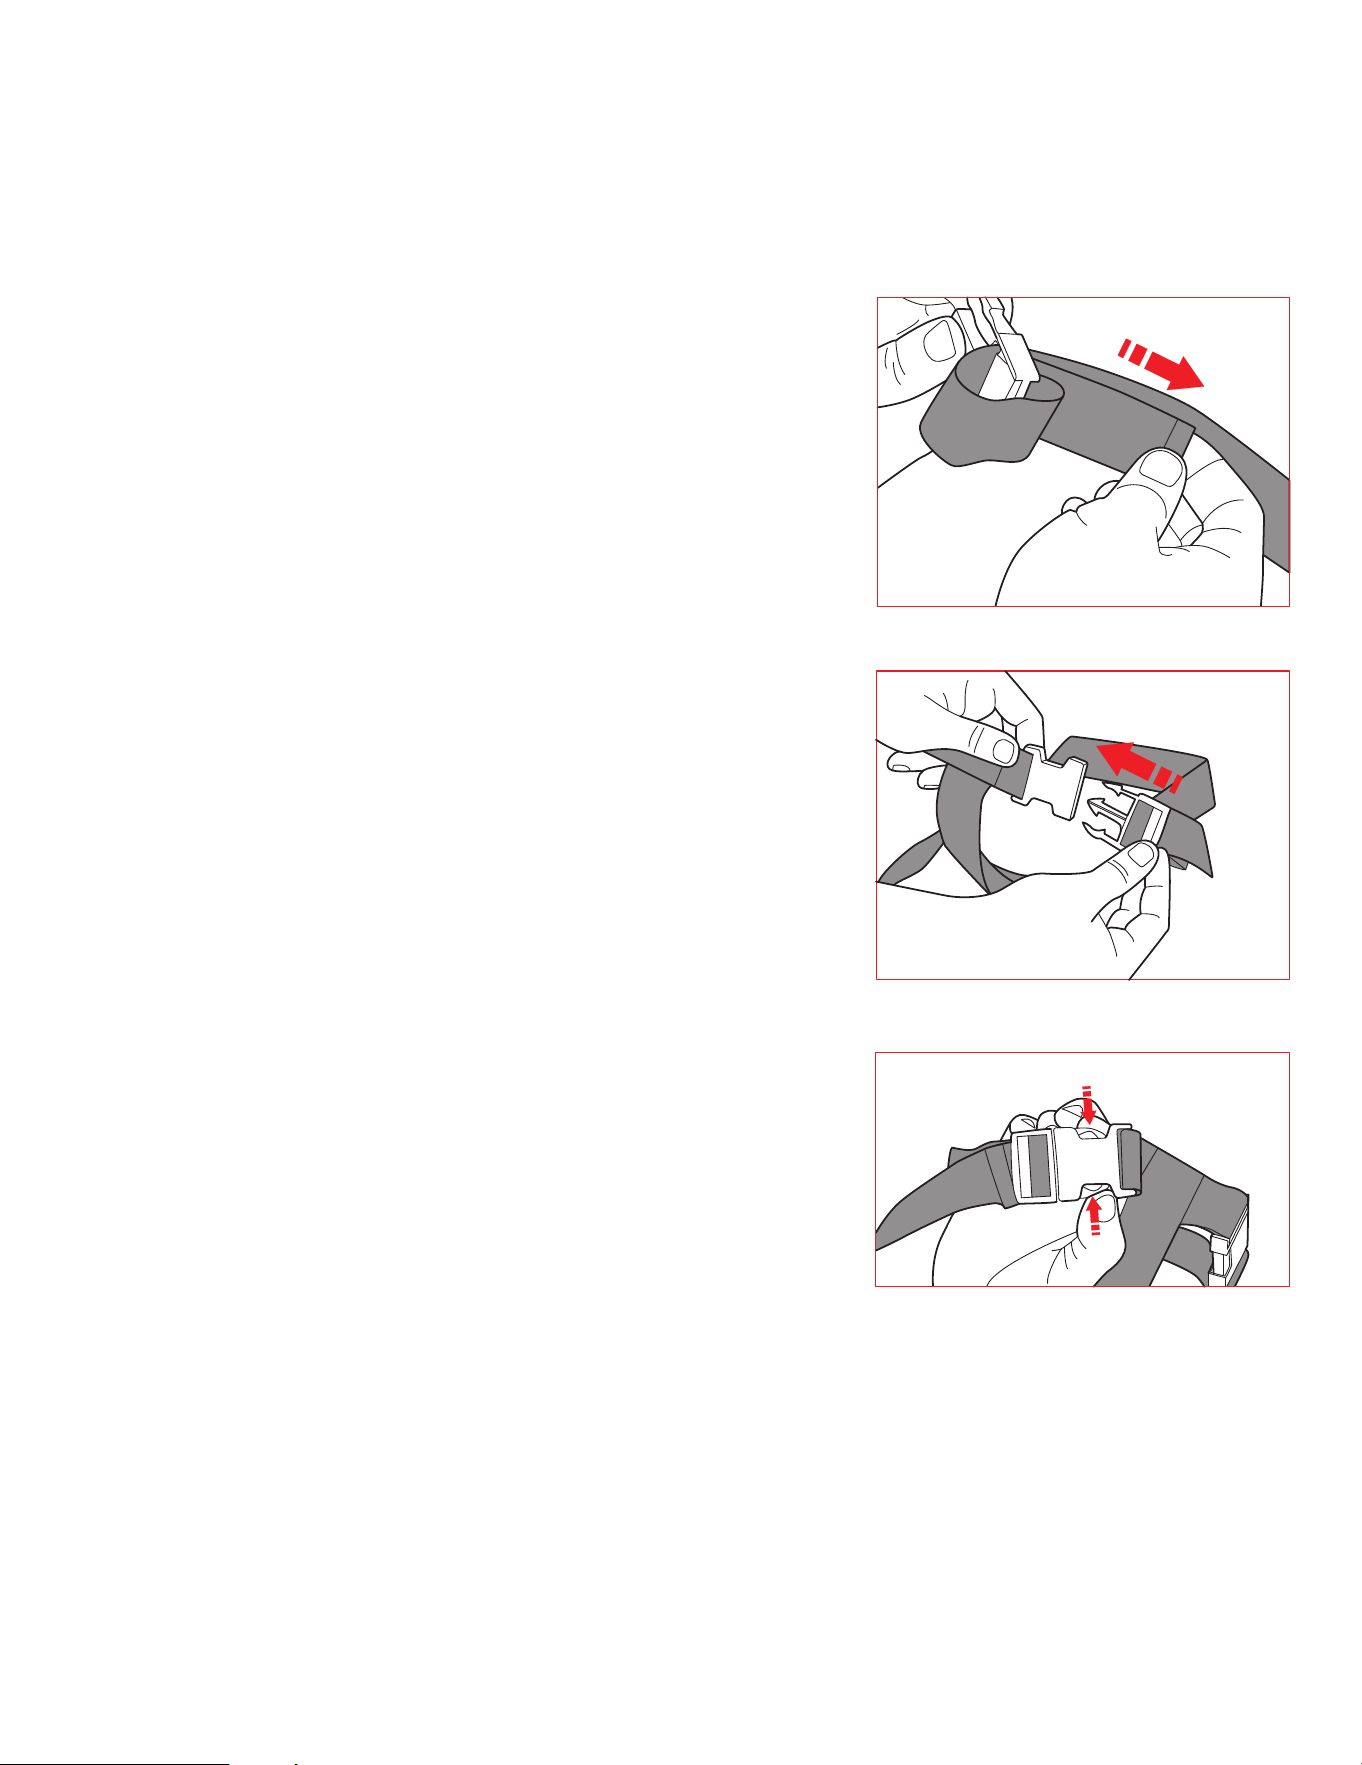
2a. To secure the child in the seat, lock the stroller in place
with the help of the brakes.
2b. Align and place the crotch strap between the child’s
legs. Slide the strap adjusters to adjust the harness
such that it fits snugly around the child’s waist as
shown in the 1st illustration.
2c. Snap the hook and the insertion ends of the buckle to
fasten the safety harness in place as indicated in 2nd
illustration. Ensure the buckles are fastened such that
the baby is safe and secure.
2d. To unsnap the buckle, press both arms of the hook end
to release it from the insertion end as shown in the 3rd
illustration.
2a. Pour fixer l'enfant dans le siège, bloquer la poussette en
place à l'aide des freins.
2b. Alignez et placez la sangle d'entrejambe entre les jambes
de l'enfant. Faites glisser les régleurs de sangle pour ajuster
le harnais de manière à ce qu'il s'adapte parfaitement à la
taille de l'enfant, comme indiqué sur la première illustration.
2c. Enclenchez le crochet et les extrémités d'insertion de la
boucle pour fixer le harnais de sécurité en place, comme
indiqué sur la deuxième illustration. Assurez-vous que les
boucles sont fixées de manière à ce que le bébé soit en
sécurité.
2d. Pour détacher la boucle, appuyez sur les deux bras de
l'extrémité du crochet pour la dégager de l'extrémité
d'insertion, comme indiqué sur la troisième illustration.
2a. Para asegurar al niño en el asiento, bloquee el cochecito con
la ayuda de los frenos.
2b. Alinee y coloque la correa de la entrepierna entre las piernas
del niño. Deslice los reguladores de las correas para ajustar
el arnés de forma que quede ceñido a la cintura del niño,
como se muestra en la 1ª ilustración.
2c. Encaje el gancho y los extremos de inserción de la hebilla
para fijar el arnés de seguridad en su sitio, como se indica
en la 2ª ilustración. Asegúrese de que las hebillas estén
abrochadas de forma que el bebé esté seguro y protegido.
2d. Para desabrochar la hebilla, presione ambos brazos del
extremo del gancho para soltarlo del extremo de inserción
como se indica en la 3ª ilustración.
16
www.dreamonme.com/help
3
USE OF STROLLER - WEATHER SEAT PAD
UTILISATION DE LA POUSSETTE - COUSSIN D'ASSISE POUR LES INTEMPÉRIES
USO DEL COCHECITO - COJÍN DEL ASIENTO PARA EL TIEMPO
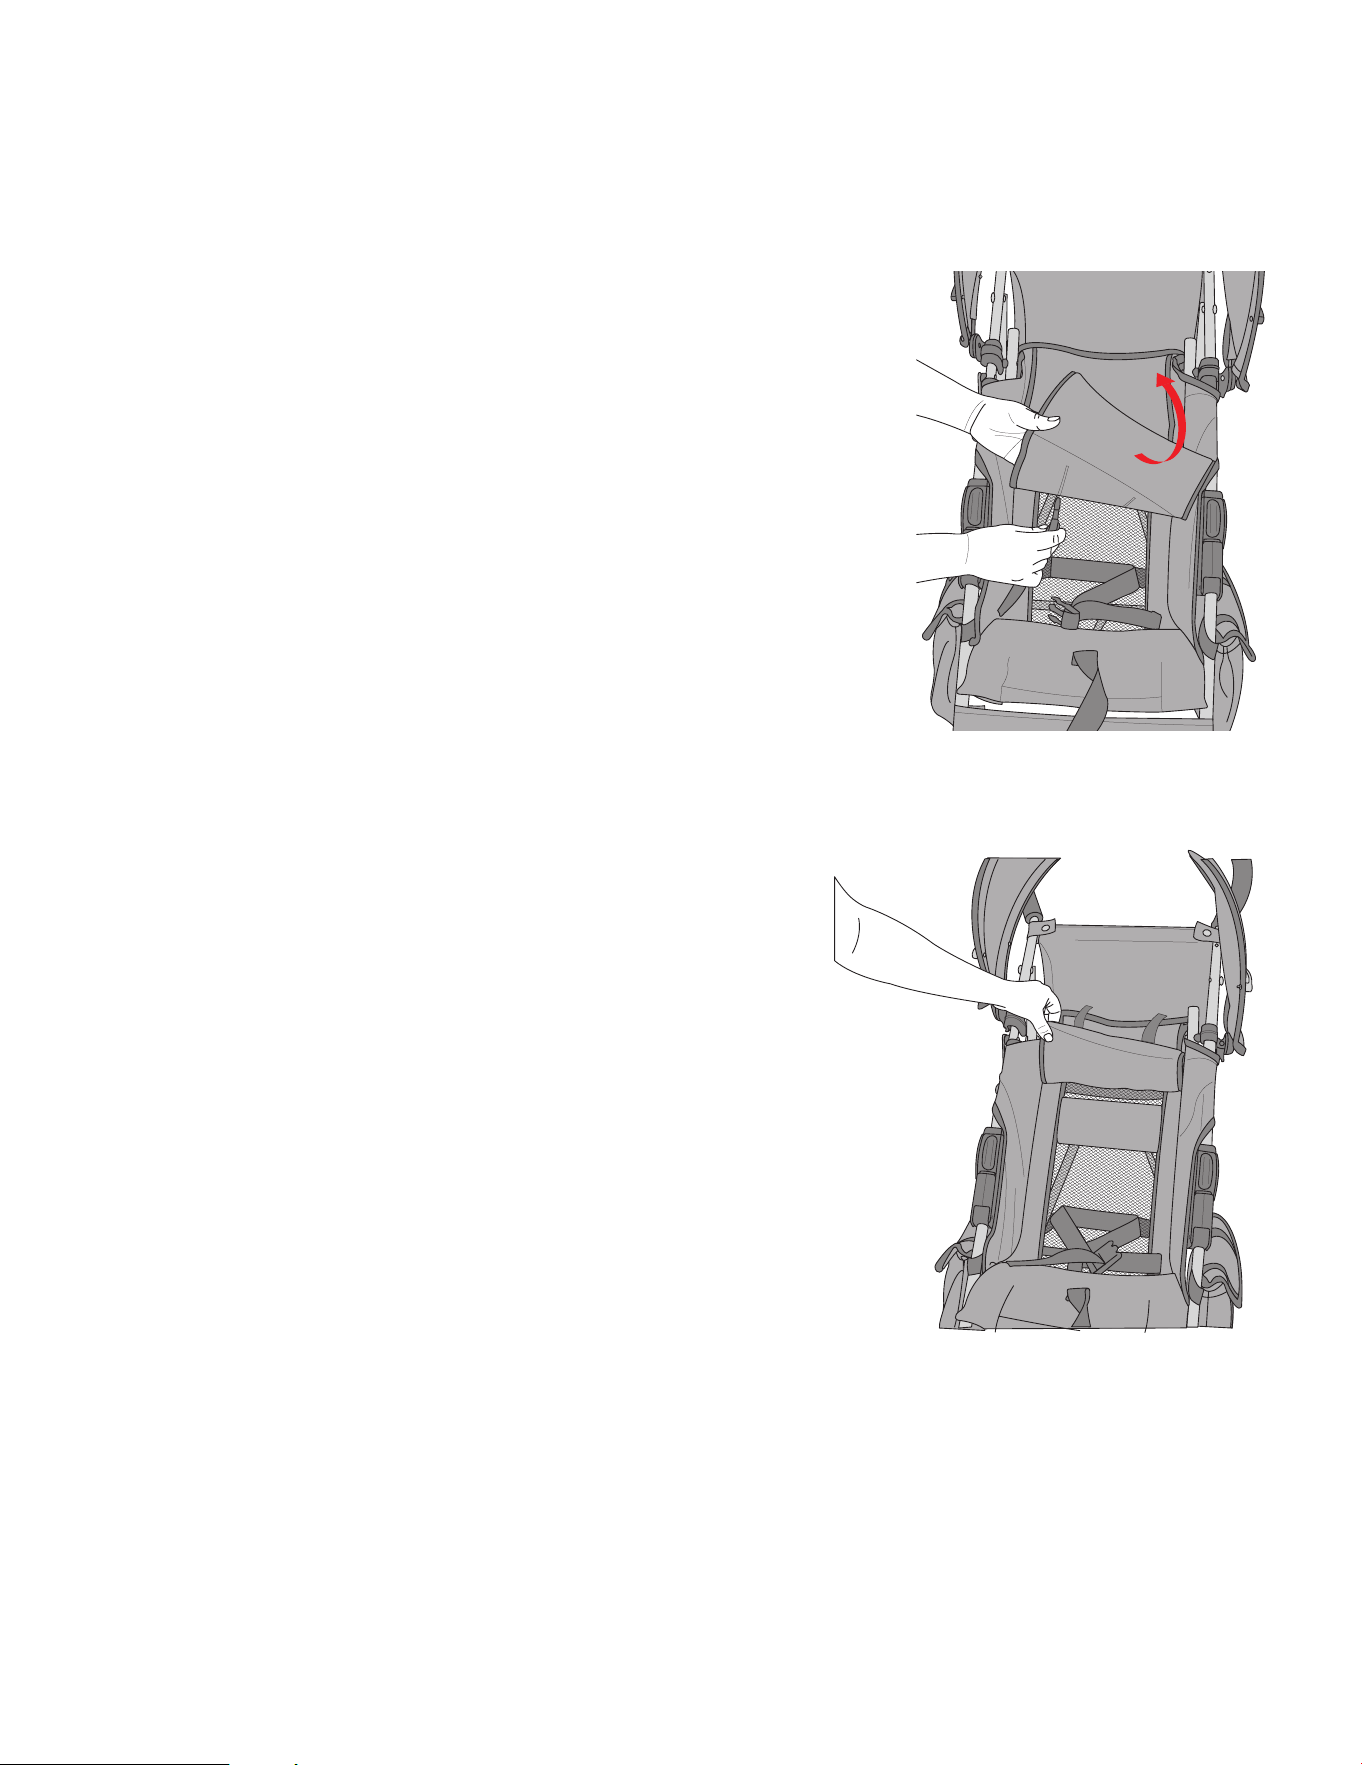
3a. Unthread the buckles from the seat pad as shown in
the 1st illustration.
3b. Roll up the seat pad and fasten the same with the
velcro straps as shown in the 2nd illustration.
3c. To keep the child cool during hot weather, roll up the
seat pad for better air circulation. During cold
weather, roll down the same to keep the baby warm.
3a. Détachez les boucles du siège comme indiqué sur la
première illustration.
3b. Enroulez la housse de siège et fixez-la à l'aide des
bandes velcro, comme indiqué sur la deuxième
illustration.
3c. Pour que l'enfant reste au frais par temps chaud,
enroulez le coussin de siège pour une meilleure
circulation de l'air. Par temps froid, enroulez le même
pour garder l'enfant au chaud.
3a. Desenrosque las hebillas del cojín del asiento como se
muestra en la 1ª ilustración.
3b. Enrolle el cojín del asiento y sujételo con las correas
de velcro como se muestra en la 2ª ilustración.
3c. Para mantener al niño fresco cuando hace calor,
enrolle el cojín de la silla para que circule mejor el aire.
Cuando haga frío, baje el cojín para mantener al bebé
caliente.
17
www.dreamonme.com/help
4
USE OF STROLLER - ADJUSTING THE CANOPY
UTILISATION DE LA POUSSETTE - RÉGLAGE DE LA CAPOTE
USO DEL COCHECITO - AJUSTE DE LA CAPOTA
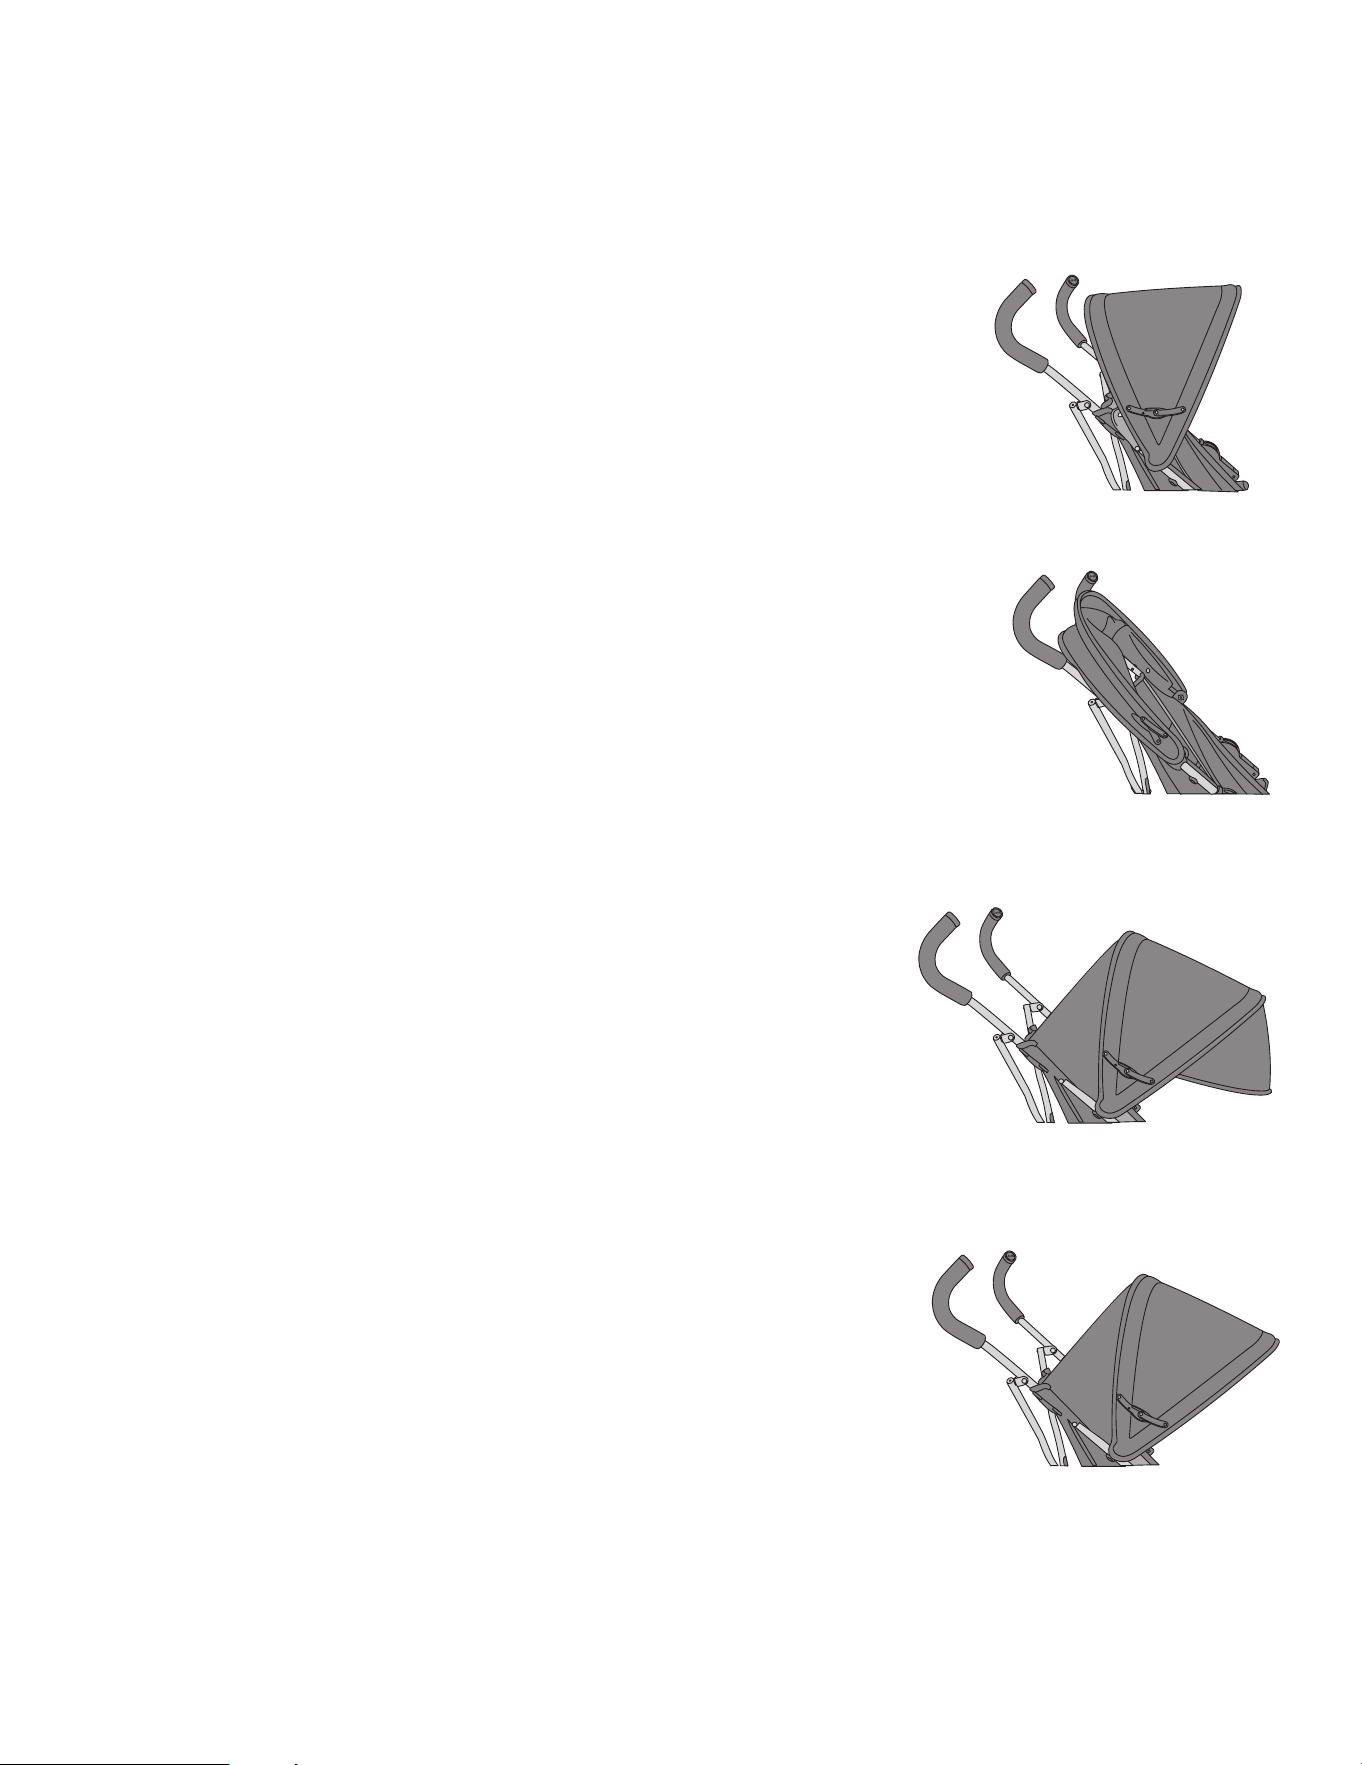
4a. Press down on the side hinges and ensure they are
straight as shown in the first illustration to fully open
up the canopy.
4b. To close the canopy, push up the side hinges as
shown in the 2nd illustration.
4c. NOTE: One can adjust the canopy to block sun or
wind by gently pushing the canopy forward to the
desired position.
4d. For maximum canopy coverage, extend the canopy
tier as shown in the 3rd illustration. NOTE: When not
in use, the extended canopy section tucks back
under the main canopy.
4a. Appuyez sur les charnières latérales et assurez-vous
qu'elles sont droites, comme indiqué sur la première
illustration, pour ouvrir complètement le canopy.
4b. Pour fermer le canopy, poussez les charnières latérales
vers le haut comme indiqué sur la deuxième illustration.
4c. REMARQUE : Il est possible d'ajuster la capote pour
bloquer le soleil ou le vent en la poussant doucement
vers l'avant jusqu'à la position souhaitée.
4d. Pour une couverture maximale de la canopée, déployer
le niveau de la canopée comme indiqué sur la troisième
illustration. REMARQUE : Lorsqu'elle n'est pas utilisée, la
partie étendue de la canopée se range sous la canopée
principale.
4a. Presione hacia abajo las bisagras laterales y asegúrese de
que estén rectas como se muestra en la primera
ilustración para abrir completamente la capota.
4b. Para cerrar la capota, empuje hacia arriba las bisagras
laterales como se muestra en la segunda ilustración.
4c. NOTA: Puede ajustar la capota para bloquear el sol o el
viento empujando suavemente la capota hacia delante
hasta la posición deseada.
4d. Para obtener la máxima cobertura de la capota, extienda
la grada de la capota como se muestra en la 3ª ilustración.
NOTA: Cuando no se utiliza, la sección extendida de la
capota se guarda debajo de la capota principal.
18
www.dreamonme.com/help
5
USE OF STROLLER - FOLDING THE STROLLER
UTILISATION DE LA POUSSETTE - PLIAGE DE LA POUSSETTE
USO DEL COCHECITO - PLEGADO DEL COCHECITO
2
1
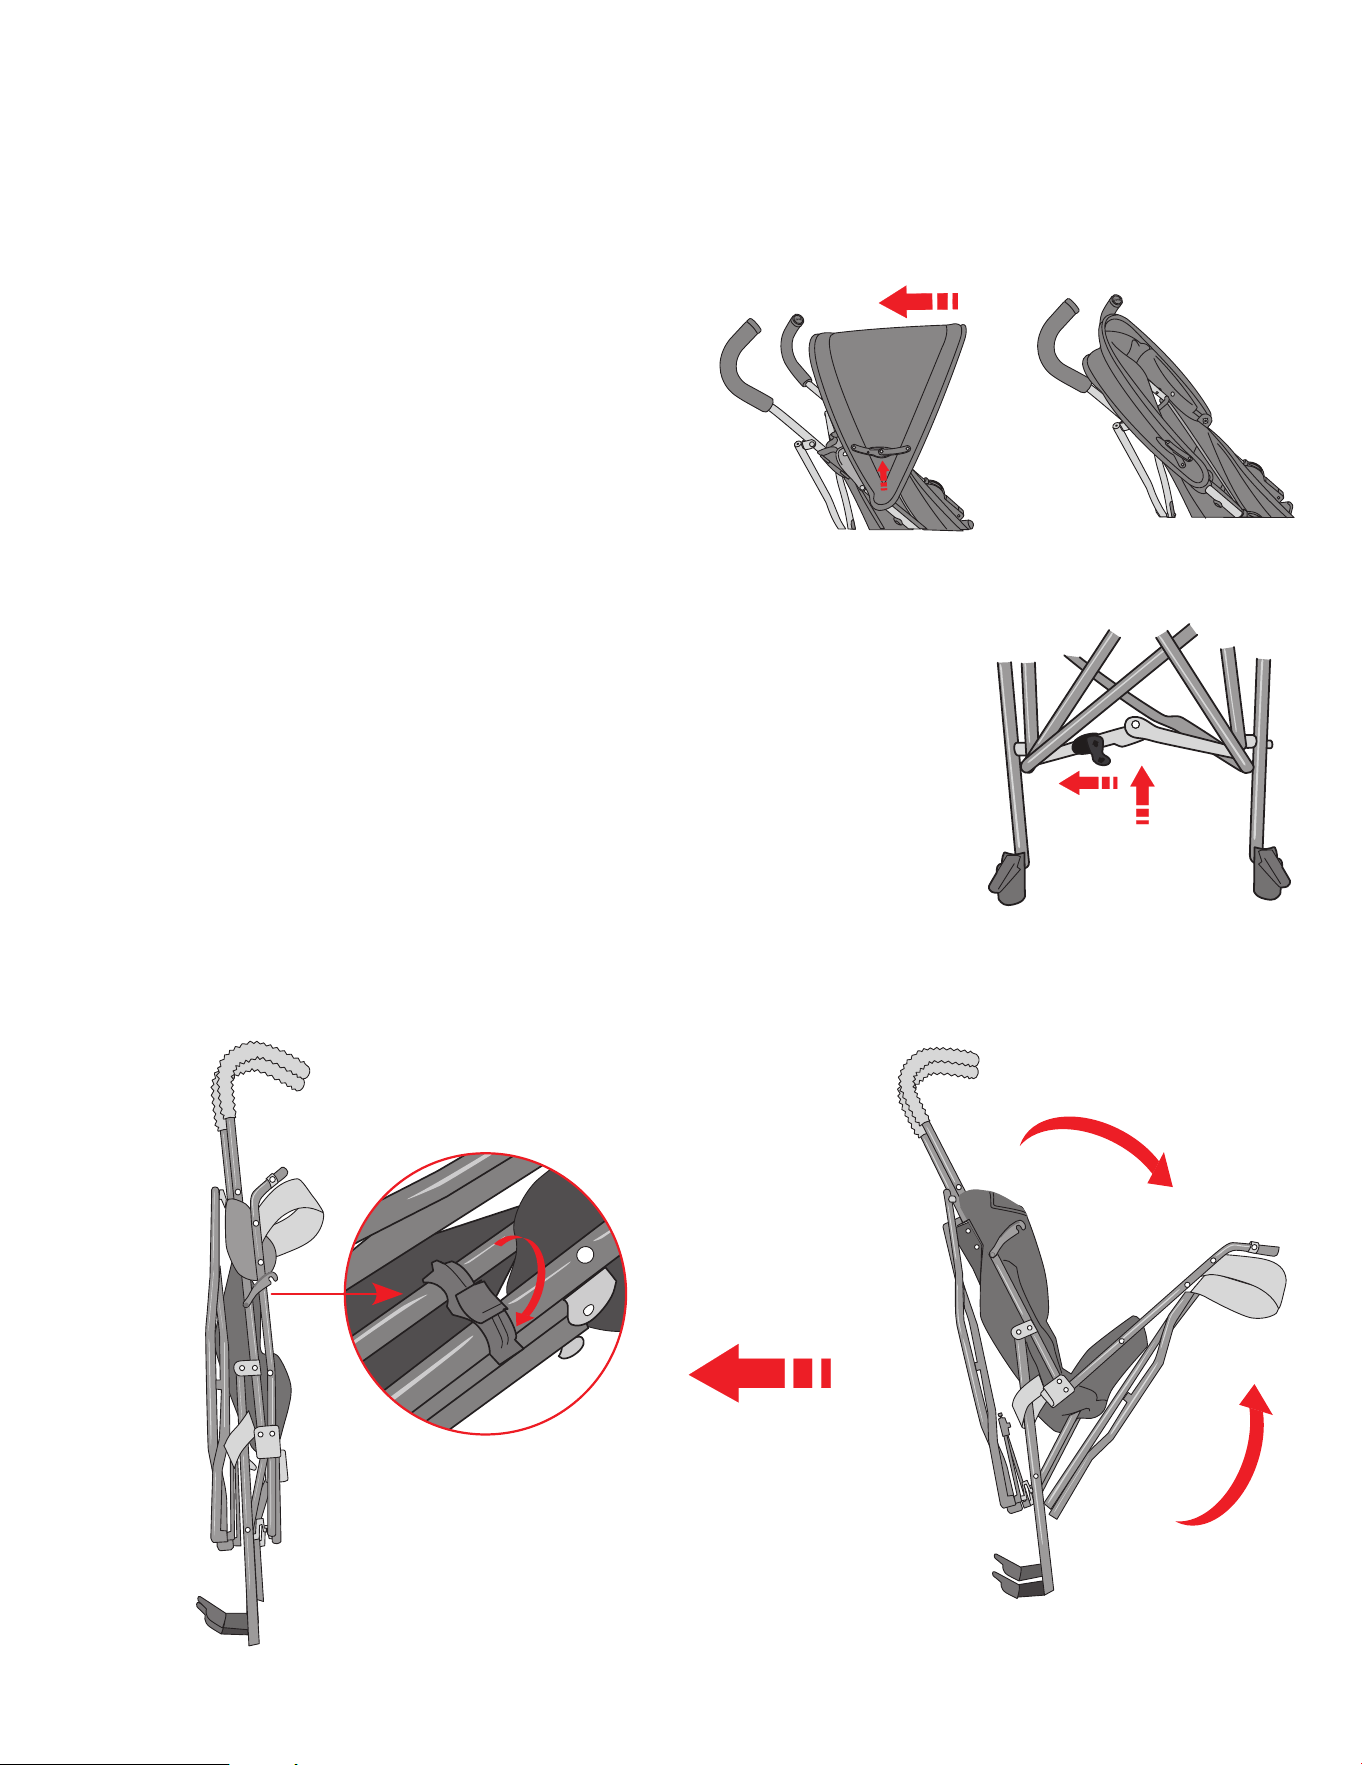
5a. Adjust the side hinges of the canopy and close
it to resemble the 1st illustration.
5b. Use your foot to align the foot brake lever to the
side as indicated in the 2nd illustration and lift
the folding bar to unlock the stroller.
5c. Push downwards the handlebars of the stroller
as indicated in the 3rd illustration to bring the
stroller to the folded position.
5a. Réglez les charnières latérales de la capote et fermez-la
pour qu'elle ressemble à la première illustration.
5b. Utilisez votre pied pour aligner le levier du frein à pied sur le
côté comme indiqué sur la 2ème illustration et soulevez la barre
de pliage pour déverrouiller la poussette.
5c. Poussez le guidon de la poussette vers le bas comme indiqué sur
la 3ème illustration pour amener la poussette en position pliée.
5a. Ajuste las bisagras laterales de la capota y ciérrela para que se
parezca a la 1ª ilustración.
5b. Utilice el pie para alinear la palanca del freno de pie hacia el lado
indicado en la 2ª ilustración y levante la barra de plegado para
desbloquear el cochecito.
5c. Empuje hacia abajo el manillar del cochecito como se indica en
la 3ª ilustración para llevar el cochecito a la posición plegada.

19
www.dreamonme.com/help
YOU DID IT!
CARE AND MAINTENANCE:
• To prolong the life of your stroller keep it clean and do not leave it in the direct
sunlight or in the car boot for extended periods.
• Removable woven fabric covers may be cleaned using warm water with household
soap or mild soap and water solution. Allow it to dry fully, preferably away from the
direct sunlight.
• Non-removable fabric covers, trims, and vinyl parts may be spot-cleaned using a
damp sponge with soap or a mild detergent. Allow it to dry completely before
folding or storing it away.
• Clean metal parts with a damp cloth and wipe dry.
• In some climates, the covers and trims may be affected by mold and mildew. To
help prevent this from occurring, do not fold or store the product if it is damp.
• Dry wet stroller with a soft cloth to prevent rusting.
• Always store the product in a well-ventilated area.
• When storing the stroller never stack other items on top of it; this may damage the
stroller.
• When using your stroller at the beach - completely clean your stroller afterward to
remove the sand and salt from the mechanisms and wheel assembly. Sand and
salt will cause premature wear and corrosion.
• Always check parts regularly for tightness of screws, nuts, and other fasteners.
Tighten if required.
• To maintain the safety of your nursery product, seek prompt repairs for bent, torn,
worn, or broken parts.
• Periodically check for worn parts, loose screws, torn materials, or stitching.
Replace any damaged parts immediately
It’s time to take your little one on a happy, joyful ride in this
sturdy, multi-tasking, stylish stroller!

20
www.dreamonme.com/help
VOUS L'AVEZ FAIT !
ENTRETIEN ET MAINTENANCE :
• Pour prolonger la durée de vie de votre poussette, gardez-la propre et ne la laissez
pas en plein soleil ou dans le coffre de la voiture pendant de longues périodes.
• Les housses amovibles en tissu peuvent être nettoyées à l'eau chaude avec du savon
ménager ou une solution d'eau et de savon doux. Laissez-les sécher complètement,
de préférence à l'abri de la lumière directe du soleil.
• Les housses en tissu non amovibles, les garnitures et les parties en vinyle peuvent
être nettoyées ponctuellement à l'aide d'une éponge humide avec du savon ou un
détergent doux. Laissez-les sécher complètement avant de les plier ou de les ranger.
• Nettoyez les parties métalliques avec un chiffon humide et essuyez-les.
• Dans certains climats, les housses et les garnitures peuvent être affectées par la
moisissure. Pour éviter cela, ne pas plier ou ranger le produit s'il est humide.
• Séchez la poussette mouillée avec un chiffon doux pour éviter qu'elle ne rouille.
• Rangez toujours le produit dans un endroit bien ventilé.
• Lorsque vous rangez la poussette, n'empilez jamais d'autres objets dessus, cela
pourrait endommager la poussette.
• Lorsque vous utilisez votre poussette à la plage, nettoyez-la complètement pour
enlever le sable et le sel des mécanismes et des roues. Le sable et le sel provoquent
une usure prématurée et de la corrosion.
• Vérifiez toujours régulièrement que les vis, les écrous et les autres fixations sont bien
serrés. Serrez-les si nécessaire.
• Pour maintenir la sécurité de votre produit de pépinière, faites réparer rapidement les
pièces tordues, déchirées, usées ou cassées.
• Vérifiez périodiquement l'absence de pièces usées, de vis desserrées, de matériaux
déchirés ou de coutures. Remplacez immédiatement toute pièce endommagée
Il est temps d'emmener votre enfant dans une joyeuse promenade
avec cette poussette robuste, polyvalente et élégante !

21
www.dreamonme.com/help
¡LO HA CONSEGUIDO!
CUIDADO Y MANTENIMIENTO:
• Para prolongar la vida útil de su cochecito, manténgalo limpio y no lo deje expuesto a
la luz solar directa ni en el maletero del coche durante periodos prolongados.
• Las fundas de tejido extraíbles pueden limpiarse con agua tibia y jabón de uso
doméstico o con una solución suave de agua y jabón. Déjela secar completamente,
preferiblemente lejos de la luz solar directa.
• Las fundas de tejido no extraíbles, los embellecedores y las piezas de vinilo pueden
limpiarse con una esponja húmeda con jabón o un detergente suave. Deje que se
seque completamente antes de plegarlo o guardarlo.
• Limpie las piezas metálicas con un paño húmedo y séquelas.
• En algunos climas, las cubiertas y los embellecedores pueden verse afectados por el
moho. Para evitar que esto ocurra, no pliegue ni guarde el producto si está húmedo.
• Seque el cochecito mojado con un paño suave para evitar que se oxide.
• Guarde siempre el producto en un lugar bien ventilado.
• Cuando guarde el cochecito, no apile otros objetos encima, ya que podría dañarlo.
• Cuando utilice el cochecito en la playa, límpielo completamente después para
eliminar la arena y la sal de los mecanismos y del conjunto de las ruedas. La arena y
la sal provocarán un desgaste prematuro y corrosión.
• Compruebe siempre con regularidad el apriete de tornillos, tuercas y otros elementos
de fijación. Apriételos si es necesario.
• Para mantener la seguridad de su producto para viveros, procure reparar rápidamente
las piezas dobladas, rasgadas, desgastadas o rotas.
• Compruebe periódicamente si hay piezas desgastadas, tornillos sueltos, materiales
rasgados o costuras. Sustituya inmediatamente cualquier pieza dañada.
Ha llegado el momento de llevar a tu pequeño en un paseo feliz y
alegre en esta silla de paseo resistente, multitarea y con estilo.
Courriel : [email protected]
Suivez-nous @dreamonmeinc
pour que votre crèche soit présentée sur nos médias sociaux.
Participez à notre concours mensuel !
Scannez le code QR pour vous inscrire.
Chattez avec nous !
Scannez le code QR pour accéder au Live Chat.
Siga con nosotros @dreamonmeinc
para que su guardería aparezca en nuestras redes sociales.
Participa en nuestro sorteo mensual.
Escanee el código QR para registrarse.
Chatea con nosotros.
Escanee el código QR para el chat en vivo.
Correo electrónico: [email protected]
45 VERONICA AVENUE
SOMERSET NEW JERSEY 08873
5375 BOUL DES GRANDES-PRAIRIES
SAINT-LEONARD, QC H1R 1B1
www.dreamonme.com
Follow Us @dreamonmeinc
to get your nursery featured on our social media.
Enter our monthly giveaway!
Scan the QR code to register.
Chat with us!
Scan the QR code to Live Chat.
E-mail: [email protected]
