
Instruction Manual Multifunctional Air Fryer
Instrukcja Obsługi Wielofunkcyjna frytkownica beztłuszczowa
Bedienungsanleitung Multifunktionale Luftfritteuse
Manuel de l'utilisateur Friteuse à air multifonctionnelle
Manuale d'uso Friggitrice ad Aria Multifunzione
Manual del usuario Freidora multifunción
Руководство пользователя Многофункциональная аэрофритюрница
AF3


1
Contents
English
2
Français
62
Italiano 50
Polski
38
Español
26Deutsch
14
русский язык 74
2
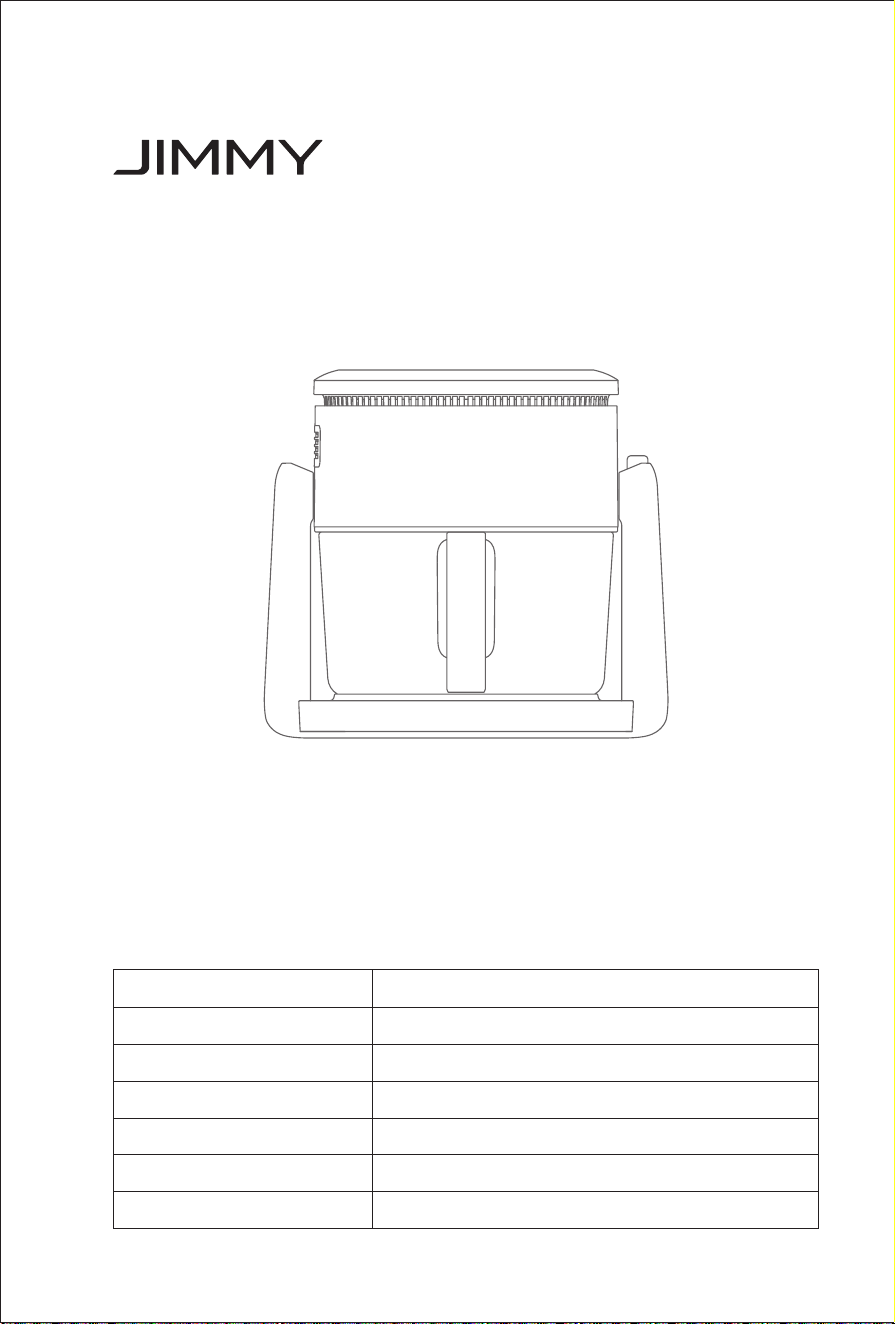
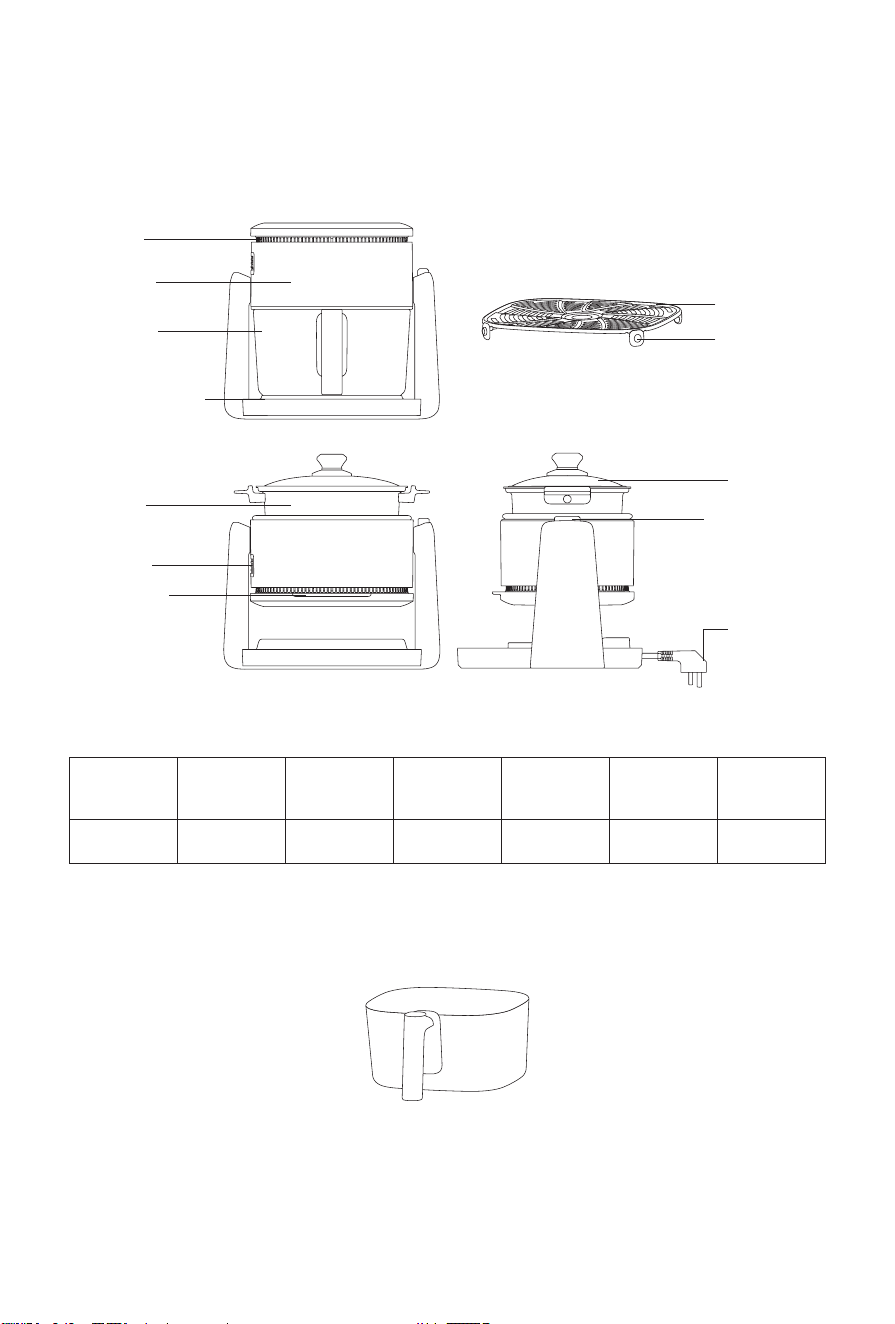
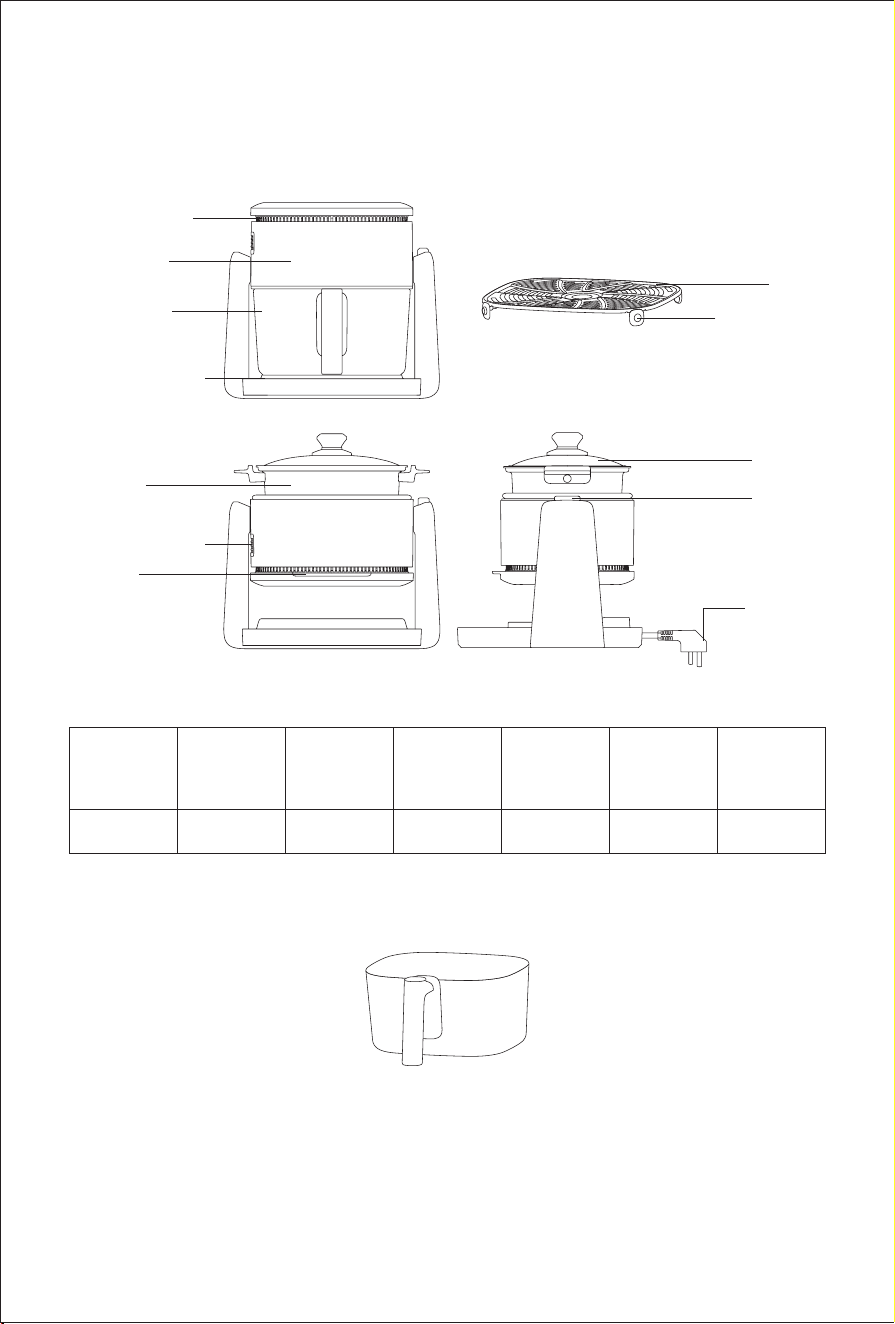
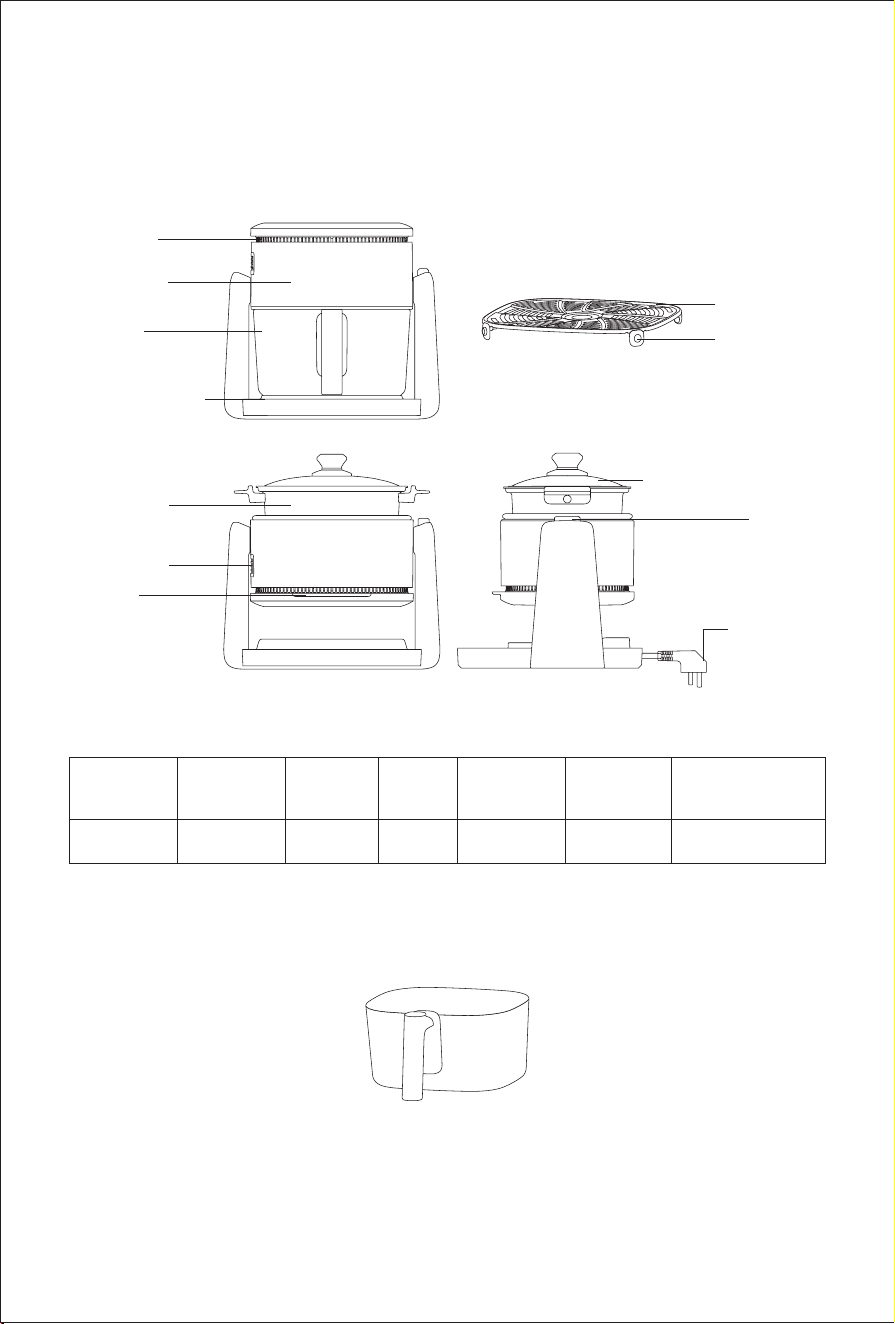
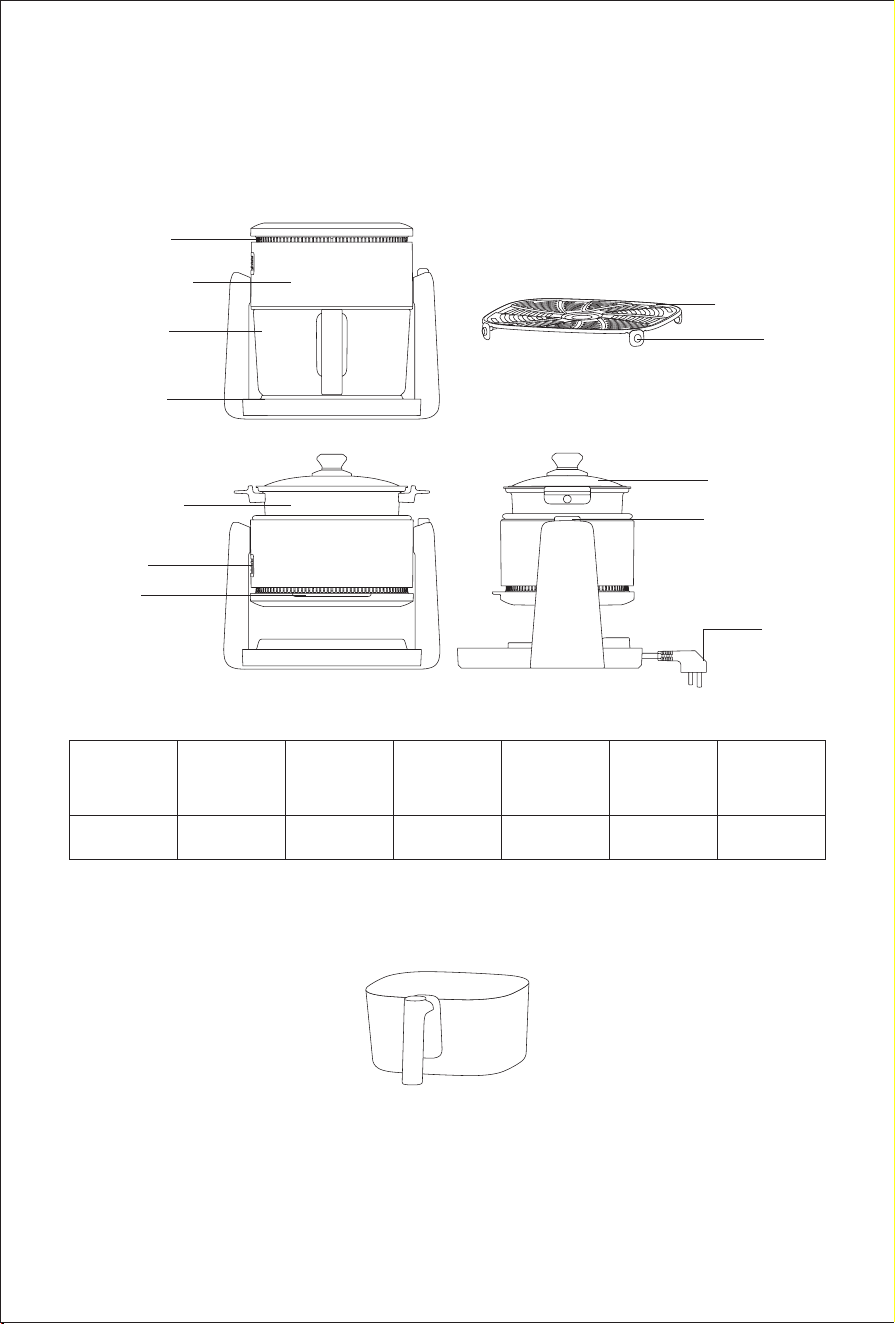
Product Assembly
Part Name
Air inlet
Mainbody
Frying pot
Operation panel
Air outlet
Rolling Grip
Grill pan lid
Grill pan
Rolling Button
Power cord
Crisper plate
Crisper plate
silicon rubber
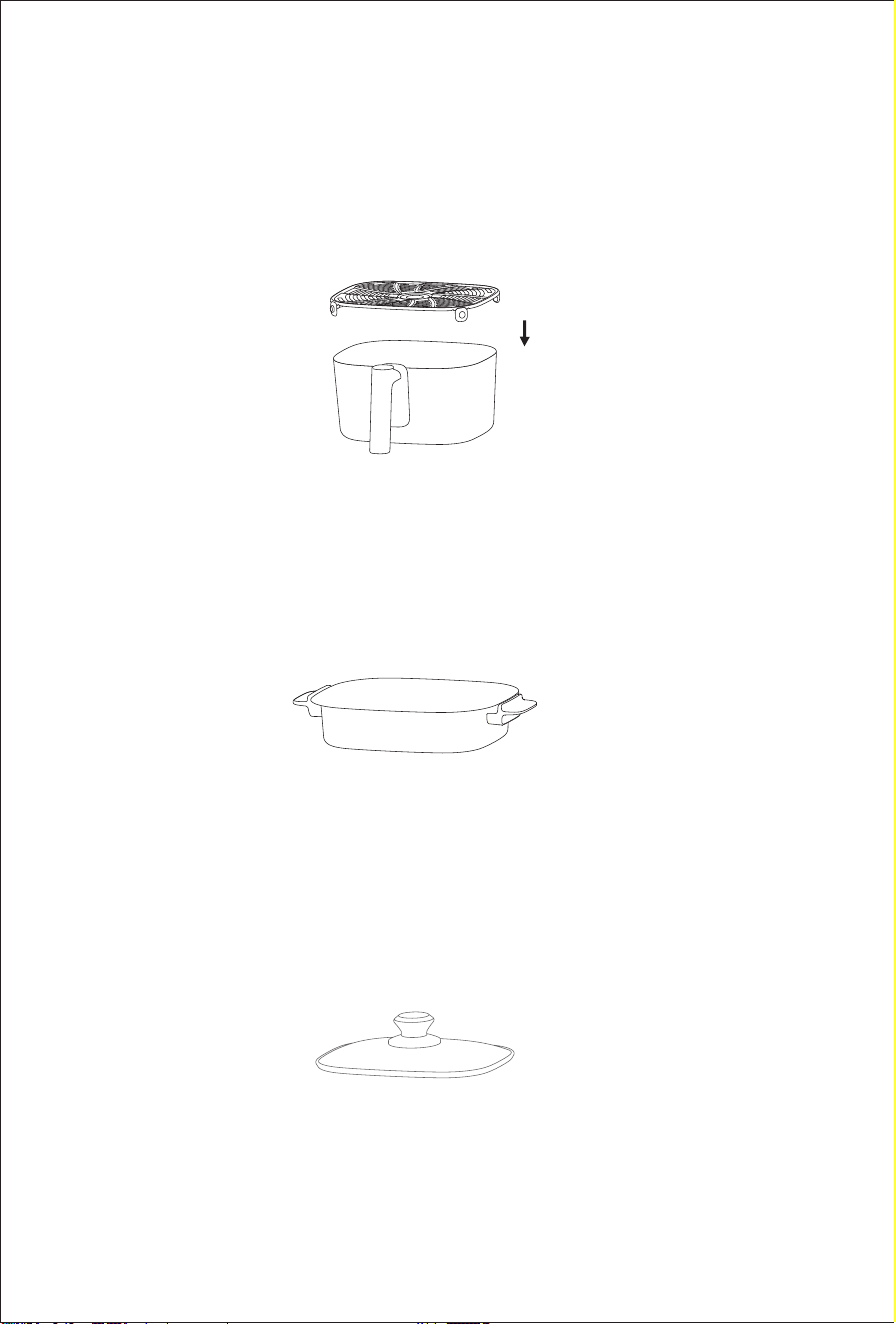
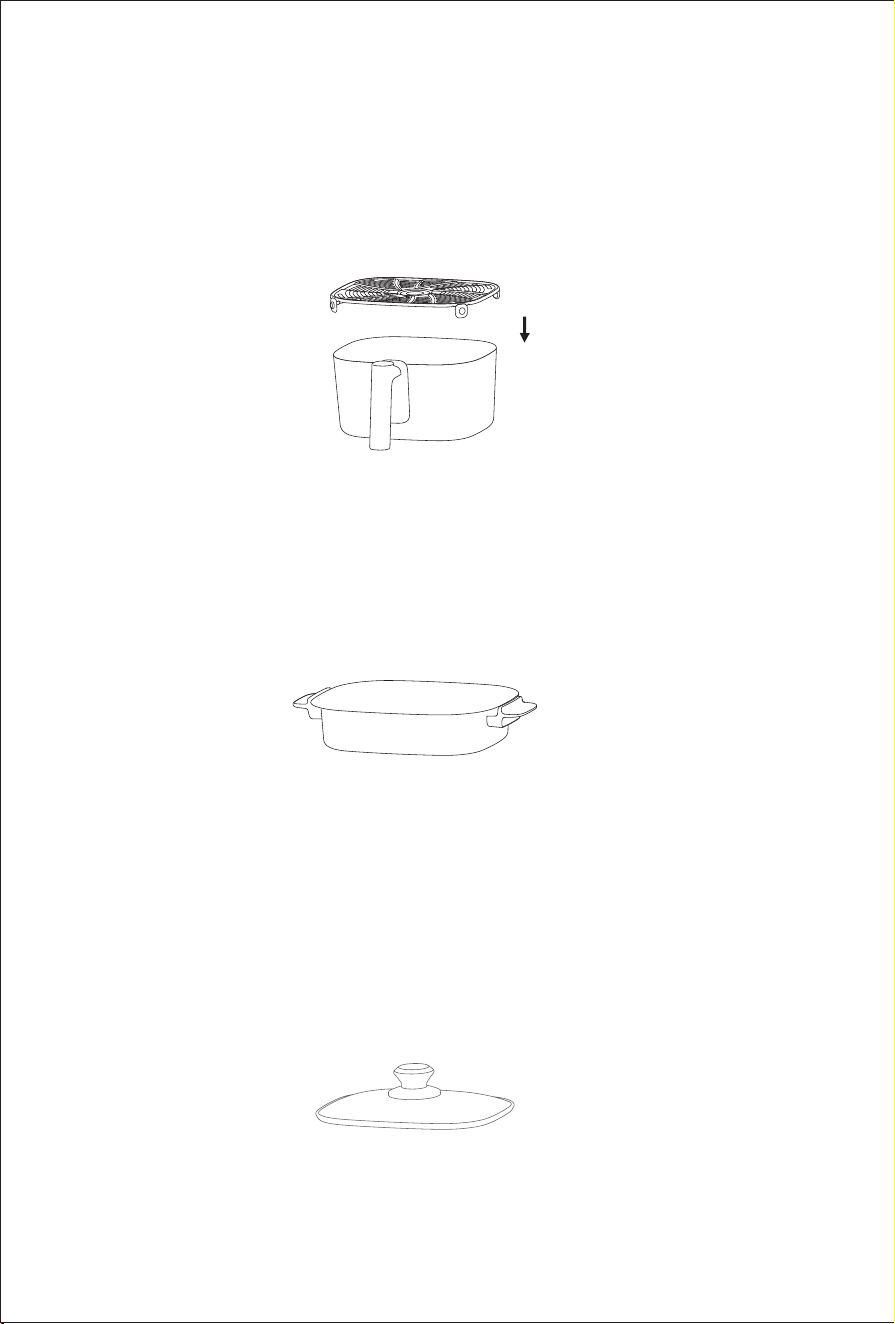
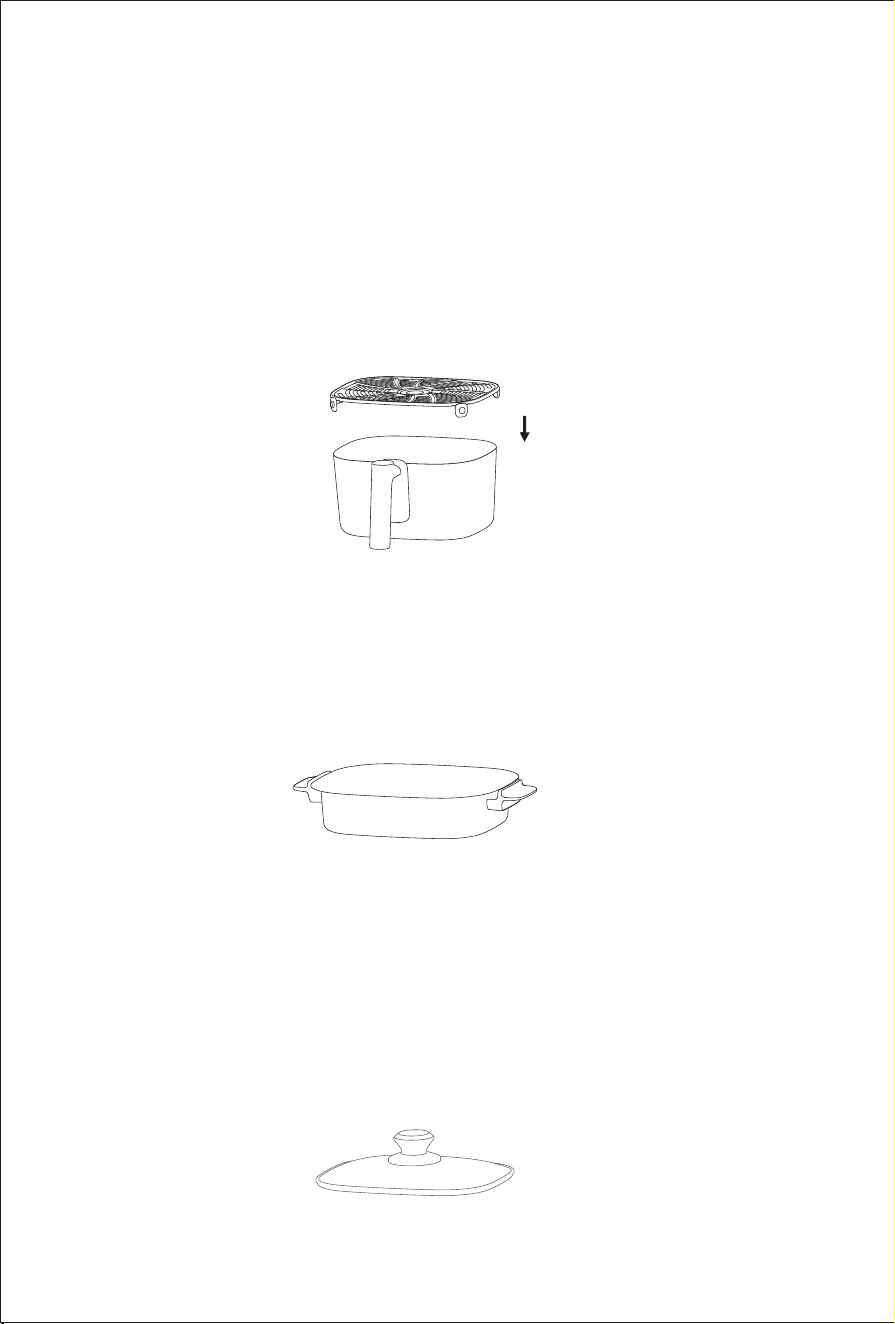
Accessories introduction
1. Frying pot: Frying pot is the main pot for cooking ingredients, with a maximum capacity of
4L.(Fig 1).
Packing List
Part Name Mainbody Frying pot Crisper plate Grill pan Grill pan lid User manual
Quantity 1 1 1 1 1 1
Note:
①
Push the frying pot to the bottom when installing it and t it in place with the mainbody.
②
The frying pot is made of glass, make sure there is no external force collision during the
handling process to avoid damage.
Fig 1
3
③
During heating, the surface temperature of the pot is high. Do not touch it directly, otherwise it
may cause burns.
④
Do not put the hot frying pot after cooking into water or refrigerator to avoid glass damage.
2.Crisper plate
:
The crisper plate is installed inside the frying pot (with its four legs facing
downwards) and can be taken out for cleaning. Its main function is to lift the ingredients up, for
better hot air circulation, and help them evenly heat up.
Note:
①
Except for special requirements, crisper plate must be used during air frying, otherwise it may
affect the cooking effect.
②
Place the ingredients in a single layer on the crisper plate, do not stack them, otherwise it may
affect the cooking effect.
3.Grill pan: grill pan is mainly used to fry or grill food.(Fig 3)
Note:
①
When installing the grill pan, be sure to place it stably on mainbody.
②
During heating, the surface temperature of the pan is high. Do not touch it directly, otherwise
it may cause burns.
③
The grill pan is only used for frying and grilling. Do not use it to heat liquid.
4.Grill pan lid:Grill pan lid is used together with grill pan to improve heating efciency and prevent
oil splashing.(Fig 4).
Note:
The grill pan lid is made of glass, make sure there is no external force collision during the handling
process to avoid damage.
Fig 3
Fig 2
Fig 4
4
Use of product
Before rst use, the following points should be noted:
1.Read this user manual carefully.
2.Place the product on a stable and at counter top. Do not place it on heat-labile surface.
3.Before plugging into power socket, conrm that the power supply is 220V-240V~and ensure it
is grounded.
4.Before initial use, wash the the frying pot, crisper bracket, grill pan, and grill pan lid with warm
water, detergent, and non abrasive sponge.
5.During initial use, it is normal to have odors a small amount of smoke. After cleaning, the odor
can be removed by heating at 200
℃
for 20 minutes under air frying mode.
6.Do not immerse the mainbody in water or rinse it under tap water, as there are electronic and
heating components in mainbody.
7.Do not cover the air inlet and air outlet of the product during operation.
8.When the product is working, the surface temperature of the air outlet, frying pot, grill pan, and
grill pan lid is high. Do not touch them to prevent burns.
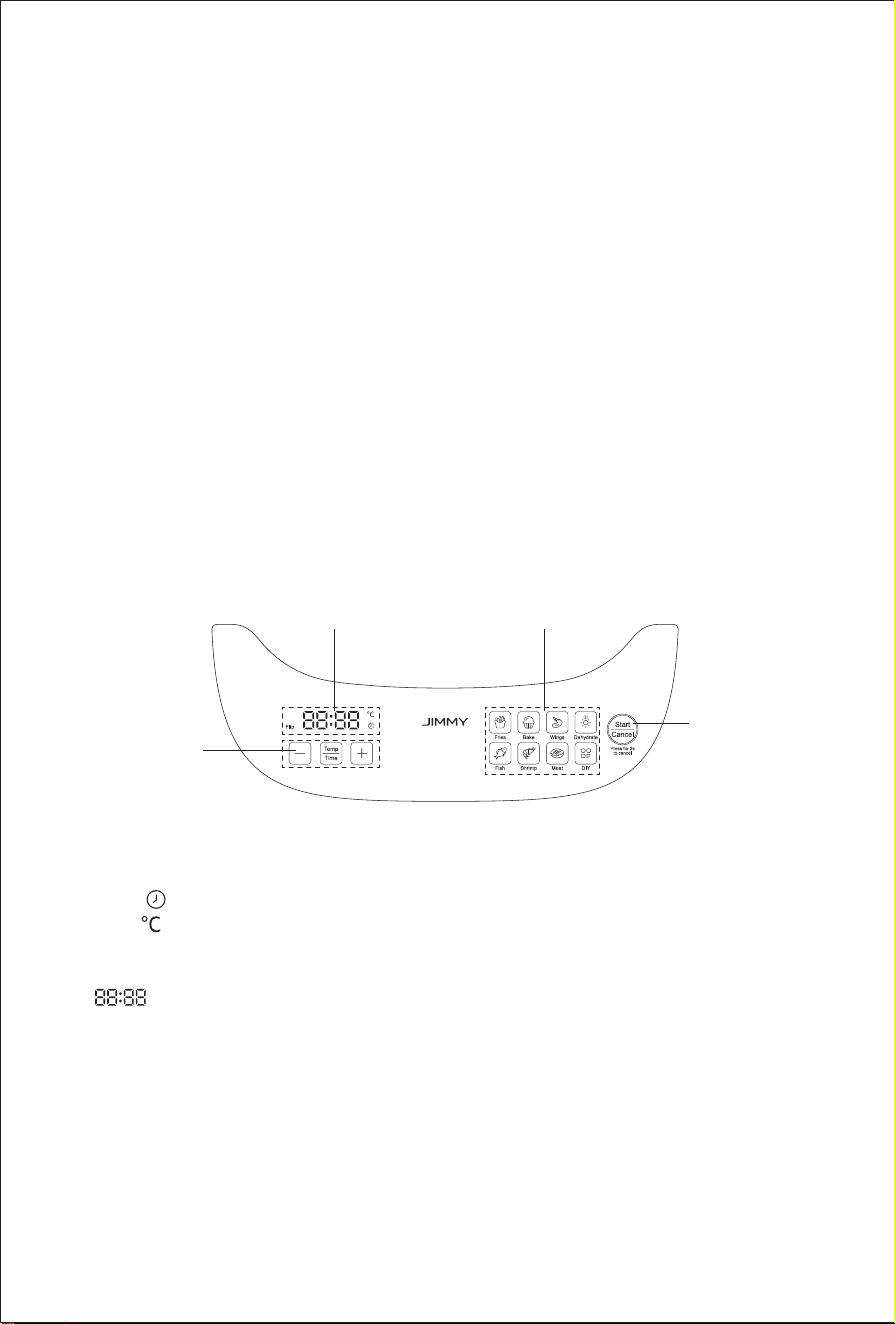
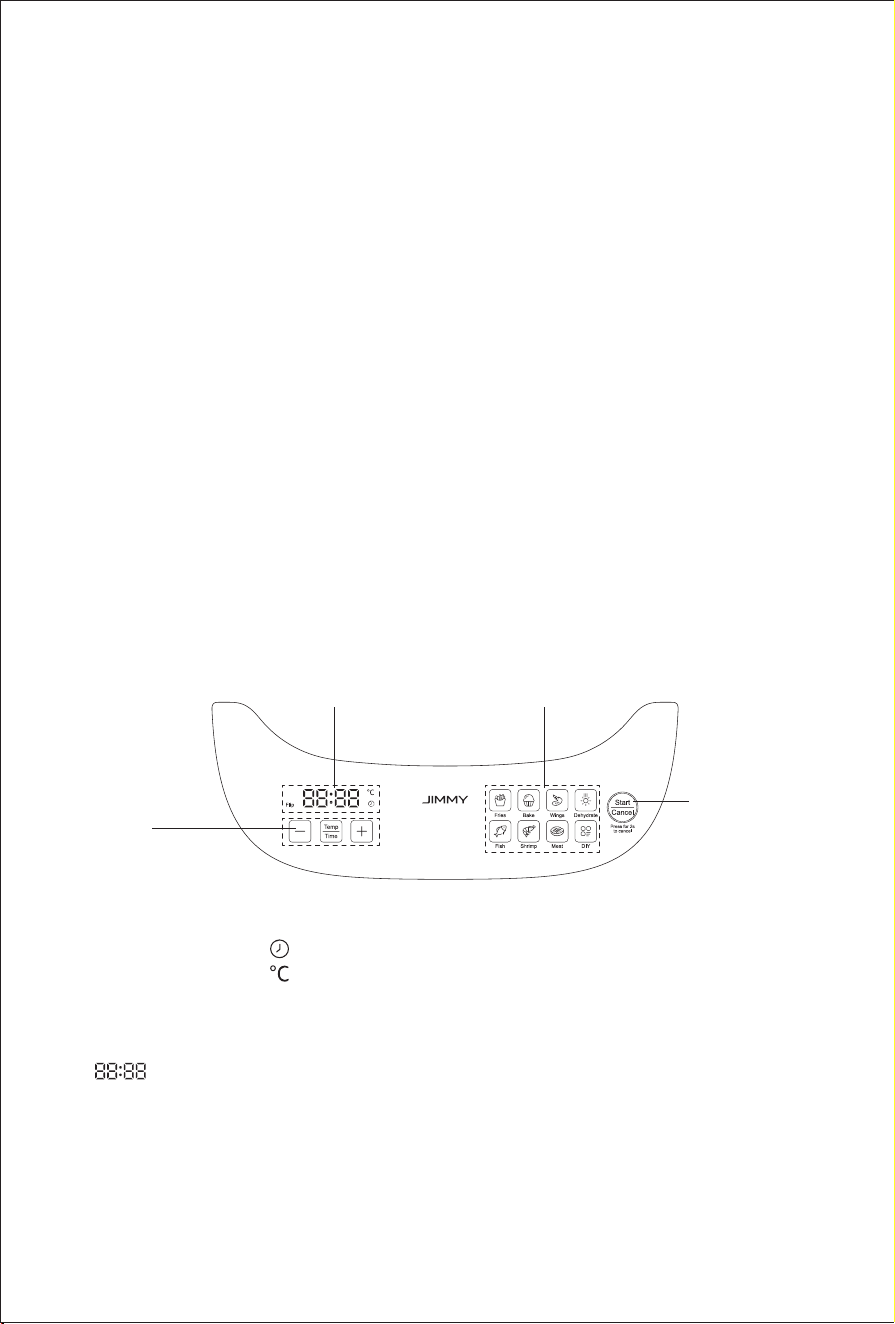
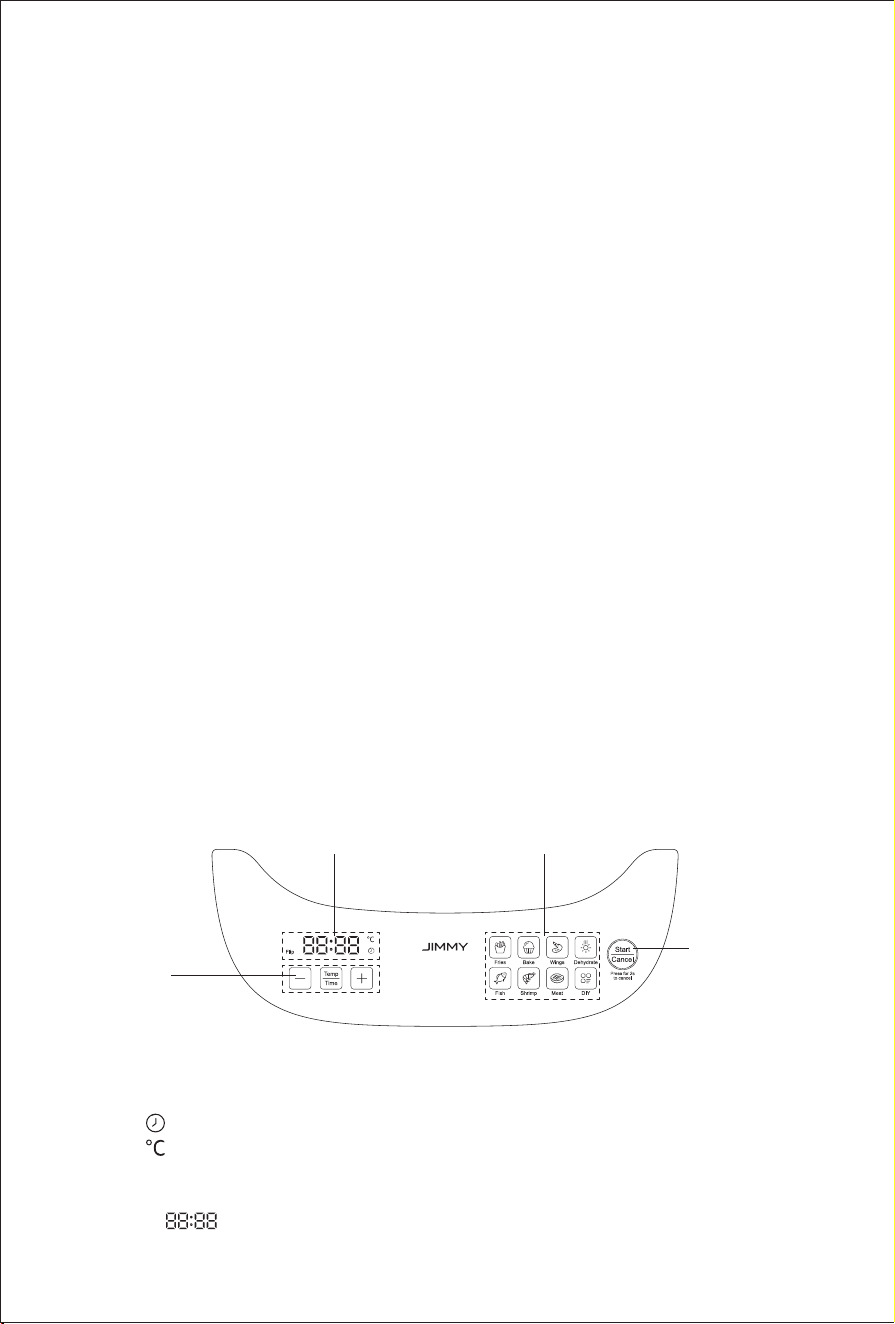
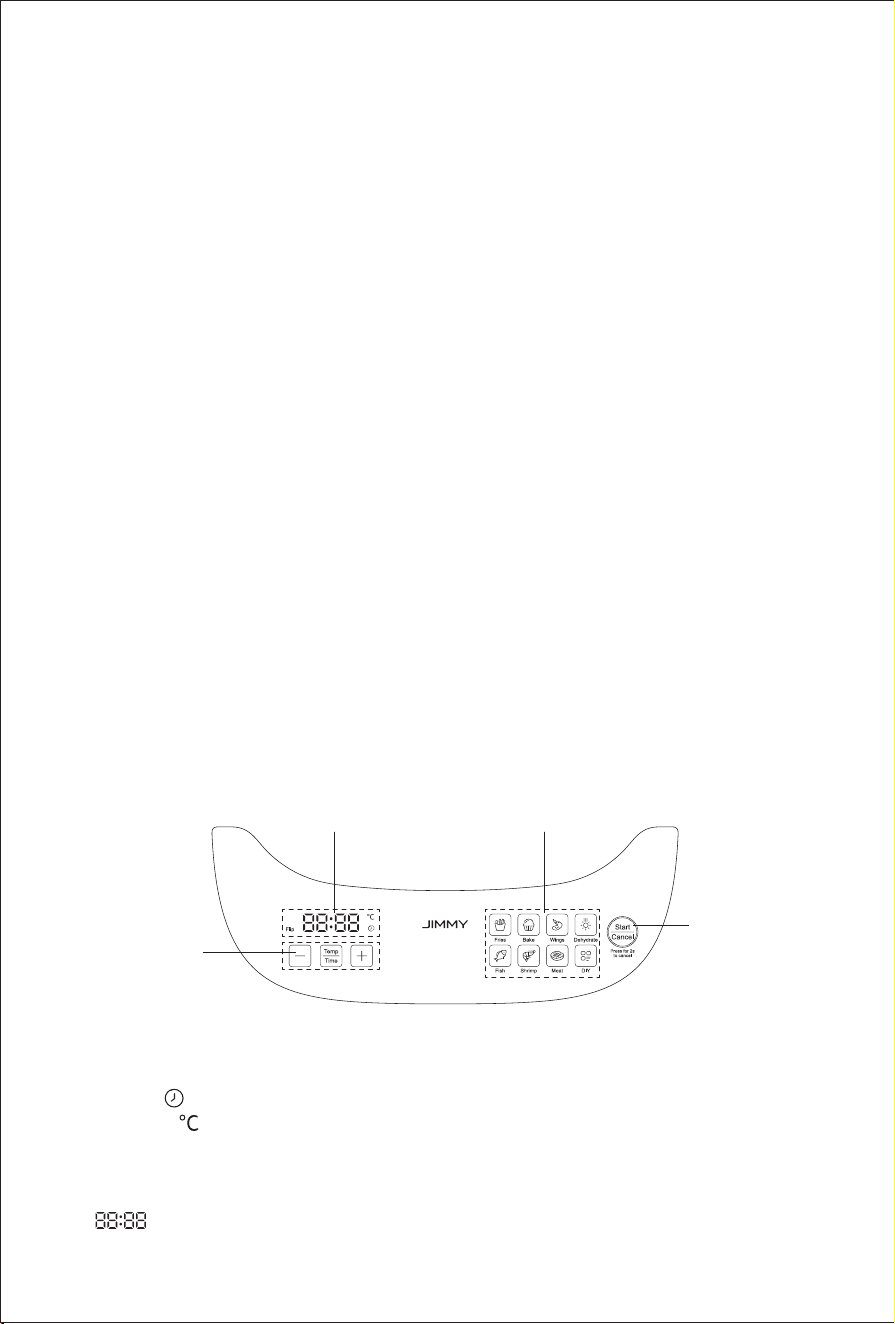
Function Description
Time status
display area
Quick start function
button area
Parameter
adjustment button
area
Start/Cancel
control button
area
Time status display area
1.When “ ”lights up, the screen displays the remaining time.
2.When“ ” lights up, the screen displays the preset temperature.
3.When “Flip ” lights up with 3 beeps, take out the frying pot, ip the food ingredients and then
reinstall the frying pot into mainbody, and the product will automatically resume working.
4.“ ”will show corresponding temperature and time
。
Quick start function button area
The product is preset with 7 quick start functions including French fries, Bake, Wings,Dehydrate,
Fish,Shrimp, Meat and a DIY mode . You can directly select the quick start function or customize
your cooking.
Note:
1.In air frying mode, all quick start functions can be used.
2.In grilling mode, only sh, shrimp, meat and DIY can be used.
5
Parameter adjustment button area
1.
“ ”
button:Used to display between temperature and time.
2.
“ ”“ ”
button: In time displaying mode: Press
“ ”
or
“ ”
to adjust cooking
time. Adjustment range is 1-45 minutes. Long pressing the button can adjust time fast. In
temperature displaying mode : Press
“ ”
or
“ ”
to adjust cooking temperature. The
adjustment range under air frying mode is 50
℃
to 200
℃
, and the adjustment range under grilling
mode is 150
℃
-220
℃
. Long pressing the button can adjust temperature fast.
Start/Cancel control button area
1.
“ ”
button: After the function and parameters are set, press
“ ”
button to start cooking.
2. During parameter setting or cooking, press
“ ”
and hold for two seconds to return to a
standby state, and the display screen displays "----".
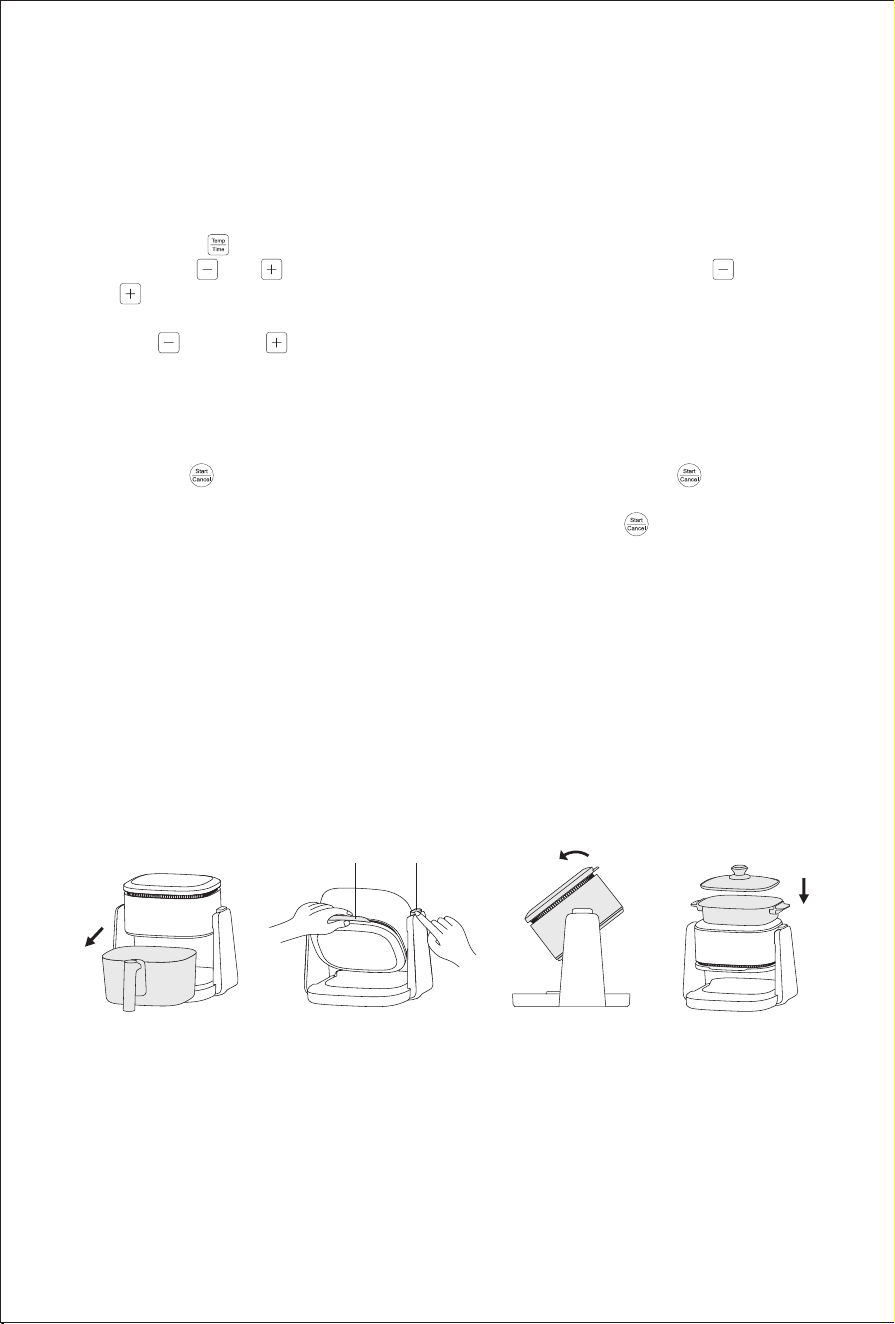
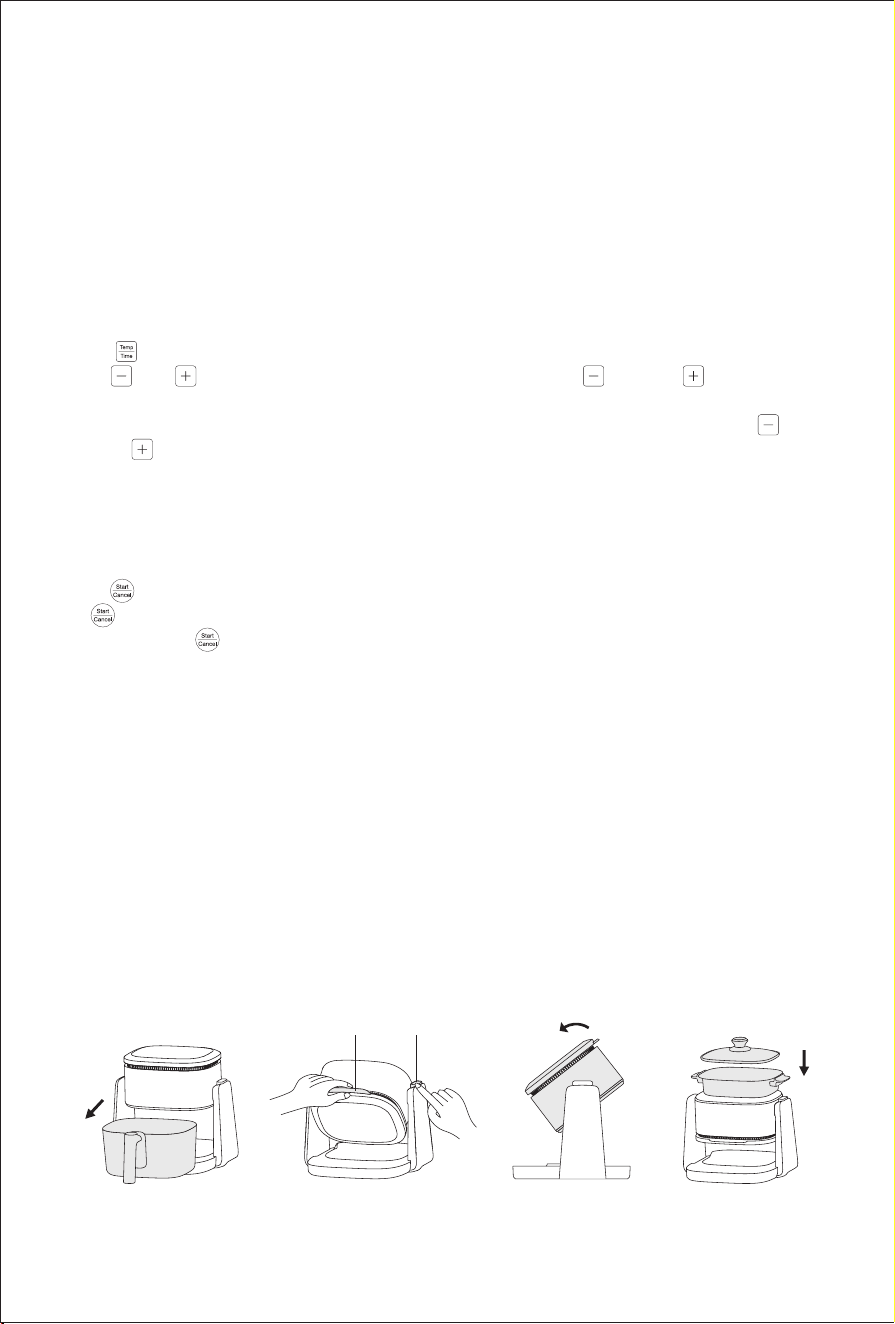
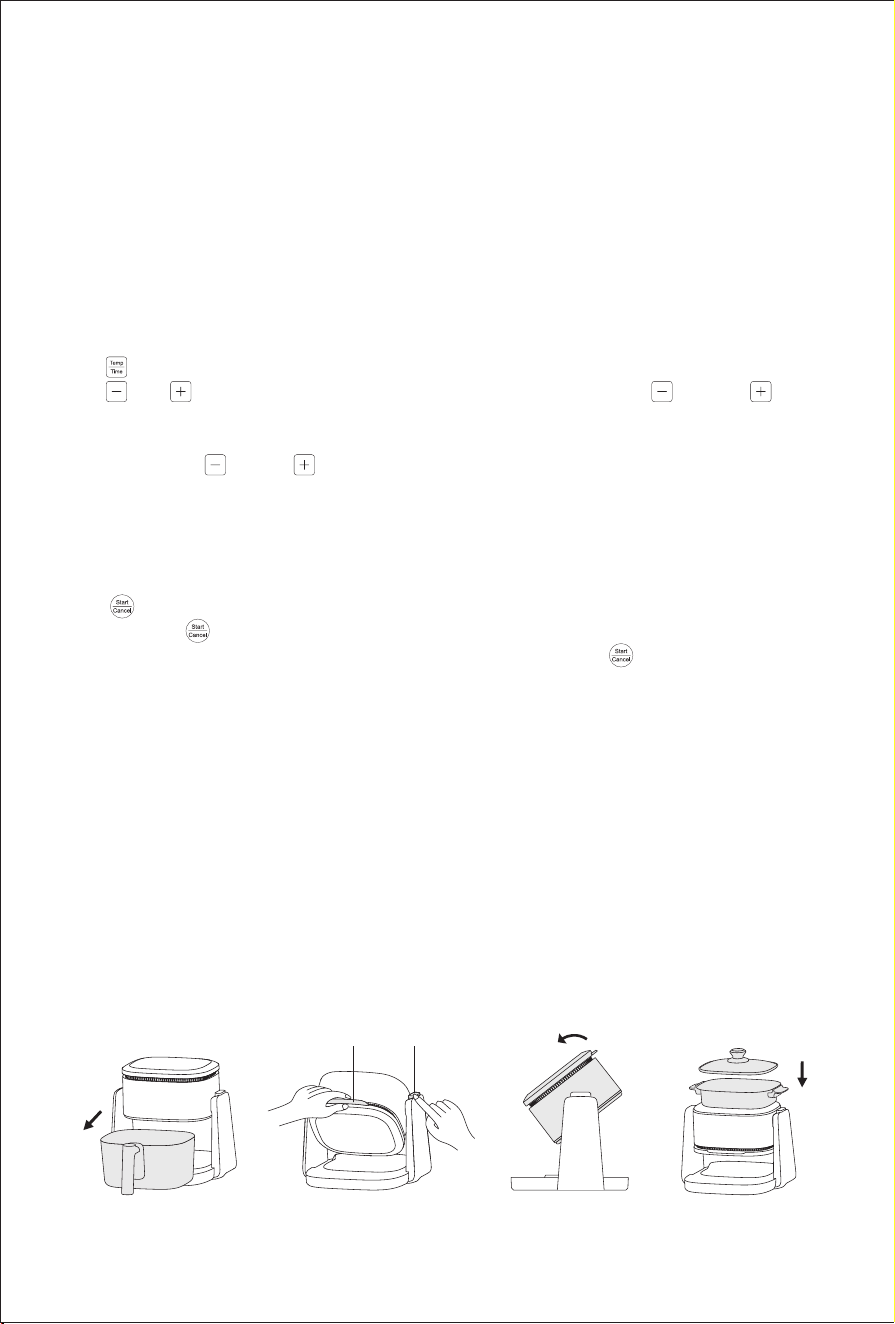
Function switch
This machine has two functions: air frying and grilling. Follow below steps to switch between the
two functions.
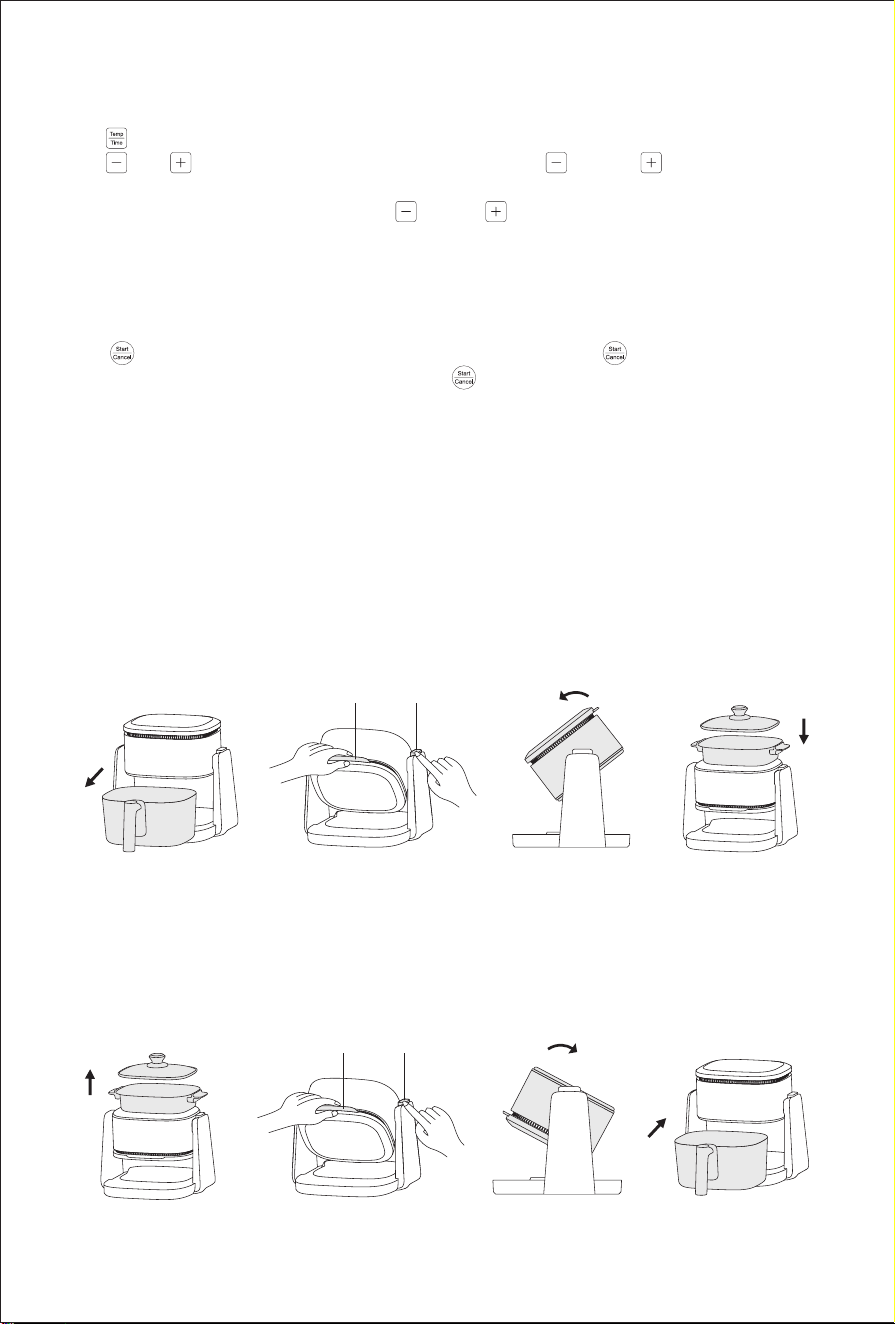
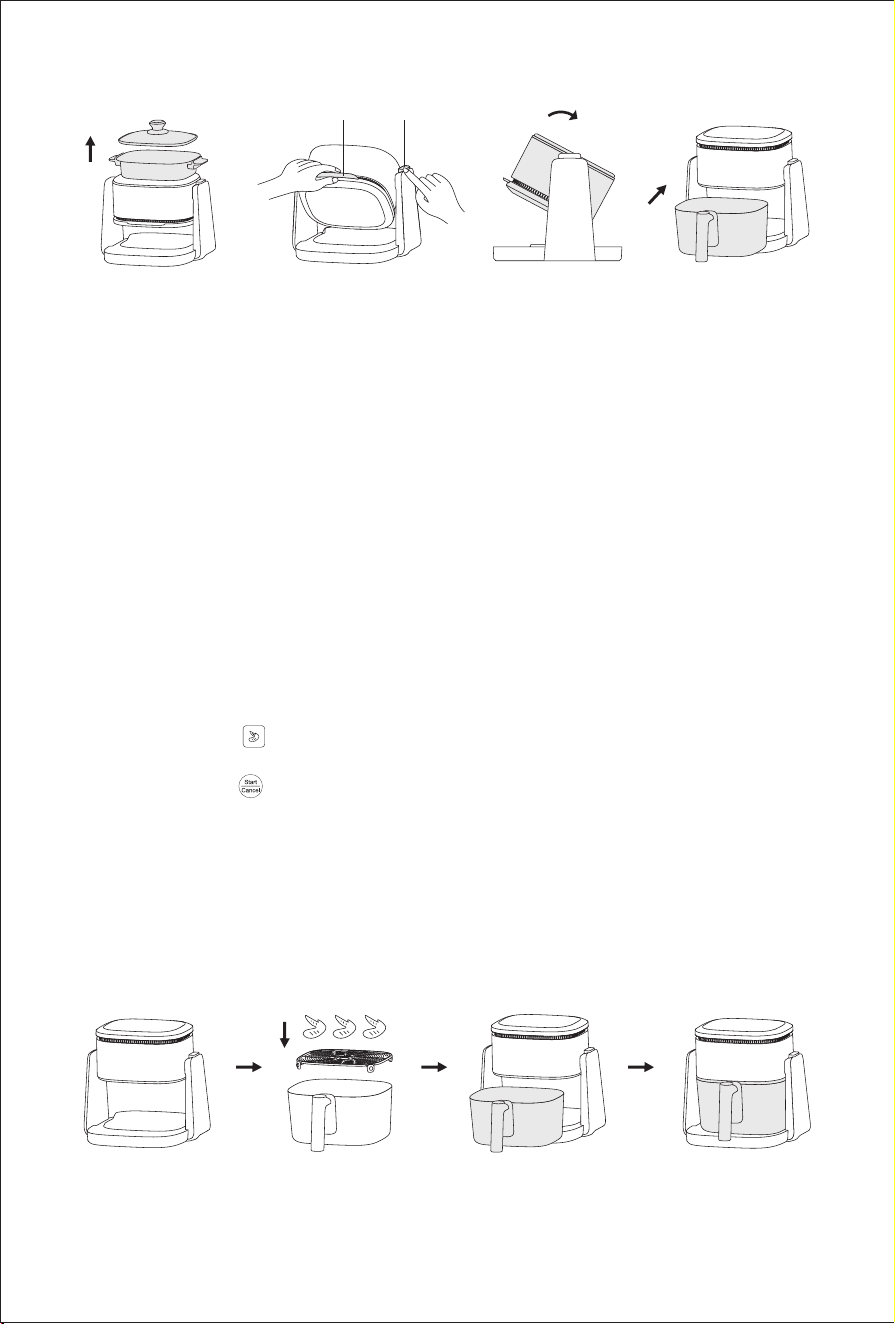
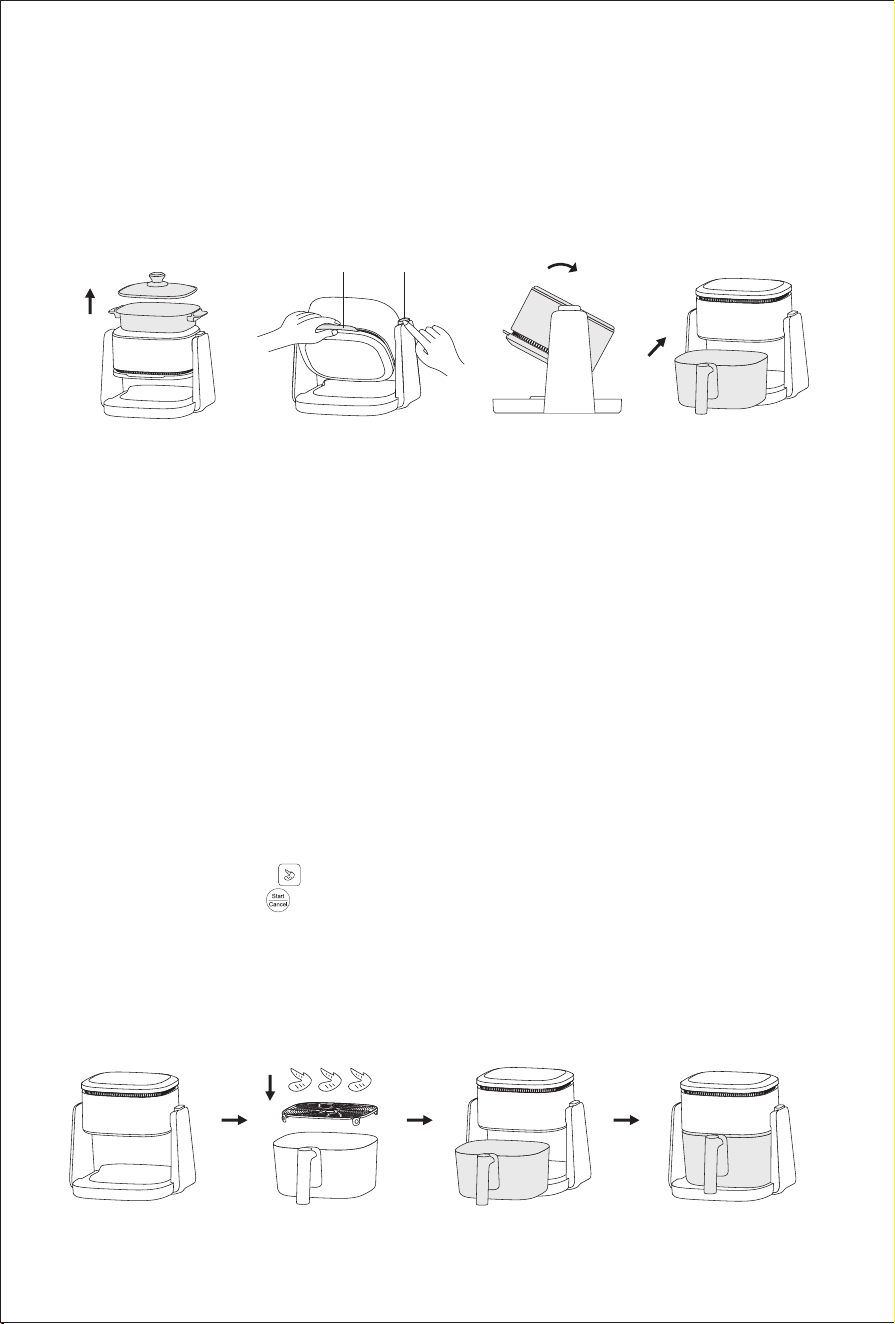
1.Air frying mode to grilling mode:
Take out the fryer (Fig5) rst, press and hold the ip button while holding onto the ip grip (Fig6),
ip the machine top in the arrow direction shown in picture(Fig 7). When a 'click' sound is heard,
it indicates machine is ipped in place. Place the grill pan on mainbody for use (Fig 8).
Flip grip Flip button
Fig 5 Fig 6 Fig 7 Fig 8
2.Grilling mode to air frying mode:
Remove the grill pan rst(Fig 9), press and hold the ip button while holding the ip grip (Fig 10),
and ip the machine top in the arrow direction shown in picture(Fig 11). When a "click" sound is
heard, it indicates machine is ipped in place. Place the frying pot into machine for use (Fig 12).
Flip grip Flip button
Fig 9 Fig 10 Fig 11 Fig 12
6
Note:
1. Machine can only be ipped in the direction required in the picture, cannot be ipped in opposite
direction.
2. Do not use brute force during the ipping process. When it is found that the ipping cannot
be done, please conrm whether the ip button is pressed and whether the ipping direction
is correct.
3. If the machine has just nished working, During ipping, be careful not to touch the heating
tube and nearby metal parts to prevent burns.
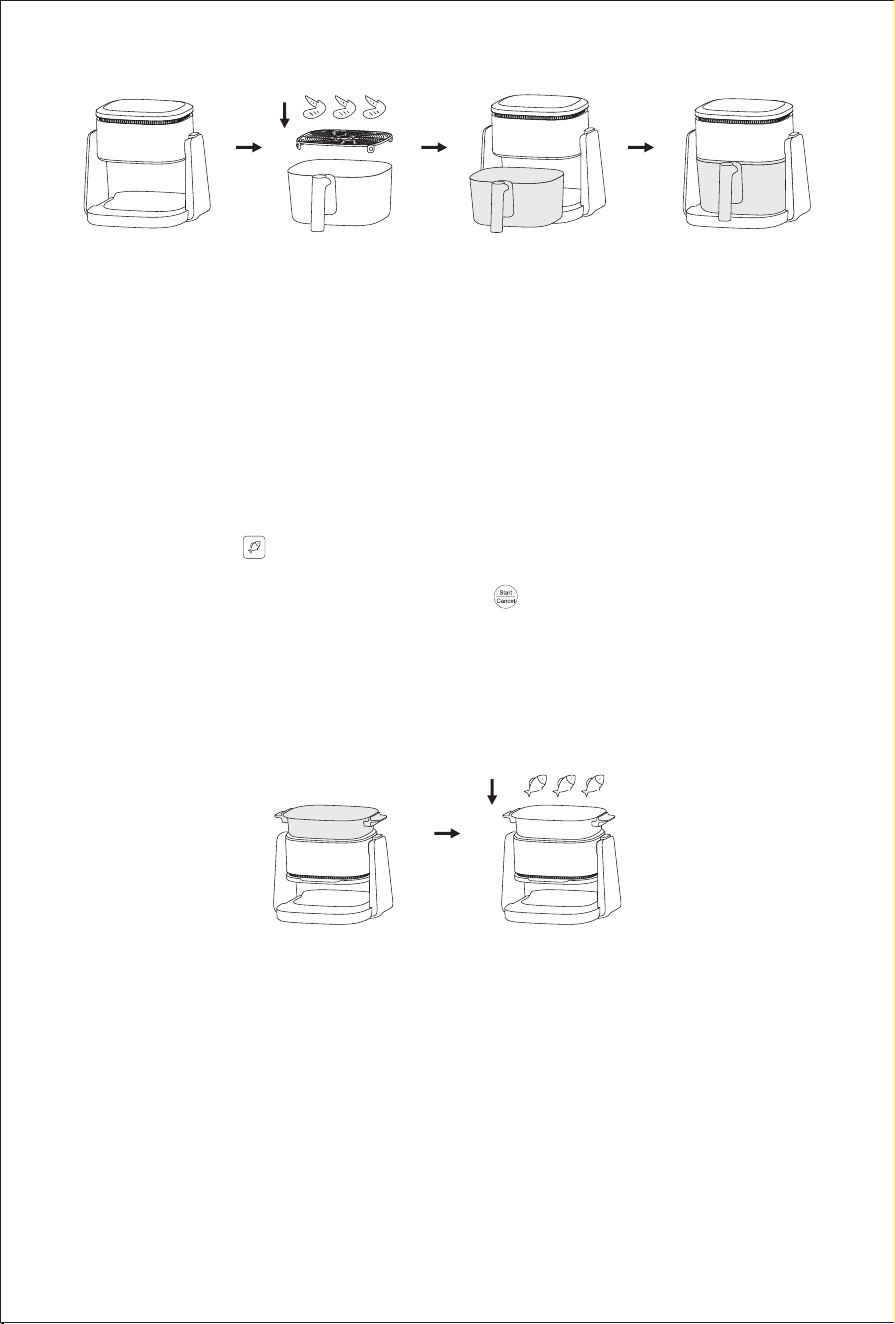
Operation steps
1.Example of air frying mode "Wings”
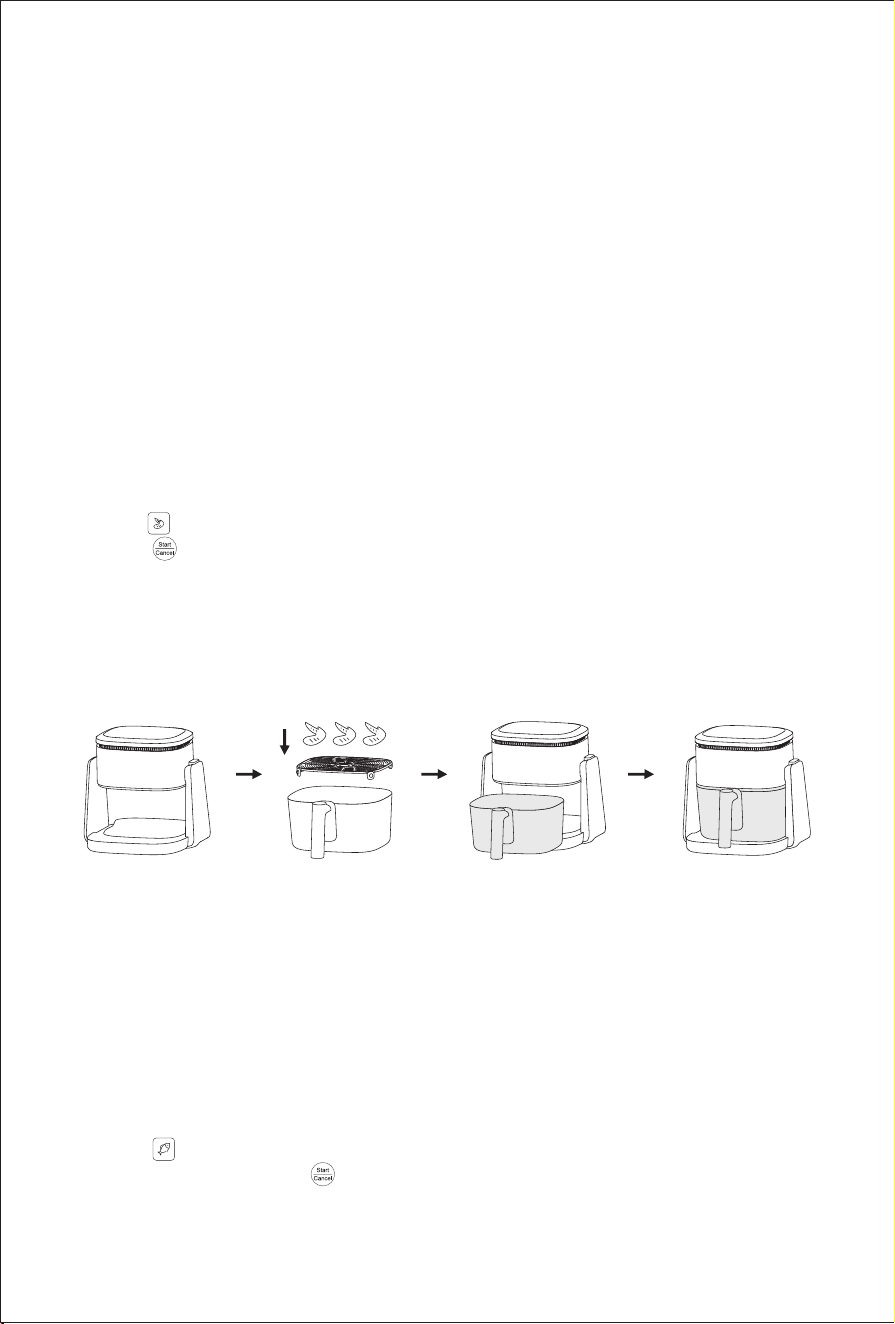
①
Adjust the machine to air frying status(Fig13)
②
Make sure silicone rubber is on the crisper bracket, and place the crisper plate correctly in
the frying pot (with four legs facing downward)(Fig 14).
③
Lay the marinated chicken wings at on the crisper bracket(Fig 14).
④
Install the frying pot into mainbody and push it into place(Fig 15-16).
⑤
Press“ ” button in quick start function area, display screen shows 200
℃、
20min.
⑥
Press “ ”button to start cooking, display screen starts to show remaining time.
⑦
When the cooking time is over half way, the product makes a beep and the "ip" indicator the
display area keeps ashing. Please pull out the frying pan and the machine will pause
cooking. After ipping the chicken wings and installing the frying pan in place, the machine
will continue cooking.
⑧
When the product makes ve beep sound, the cooking is completed and the display area
shows "End". Carefully remove the frying pot and take out the ingredients.
Note:
1. The machine does not have a pause button. If you need to pause, pull out the fryer to pause,
and the display screen displays "OPEN". Machine resumes working after re-installing..
2. When installing the frying pot, be sure to push it to the bottom and t it in place with the
mainbody.
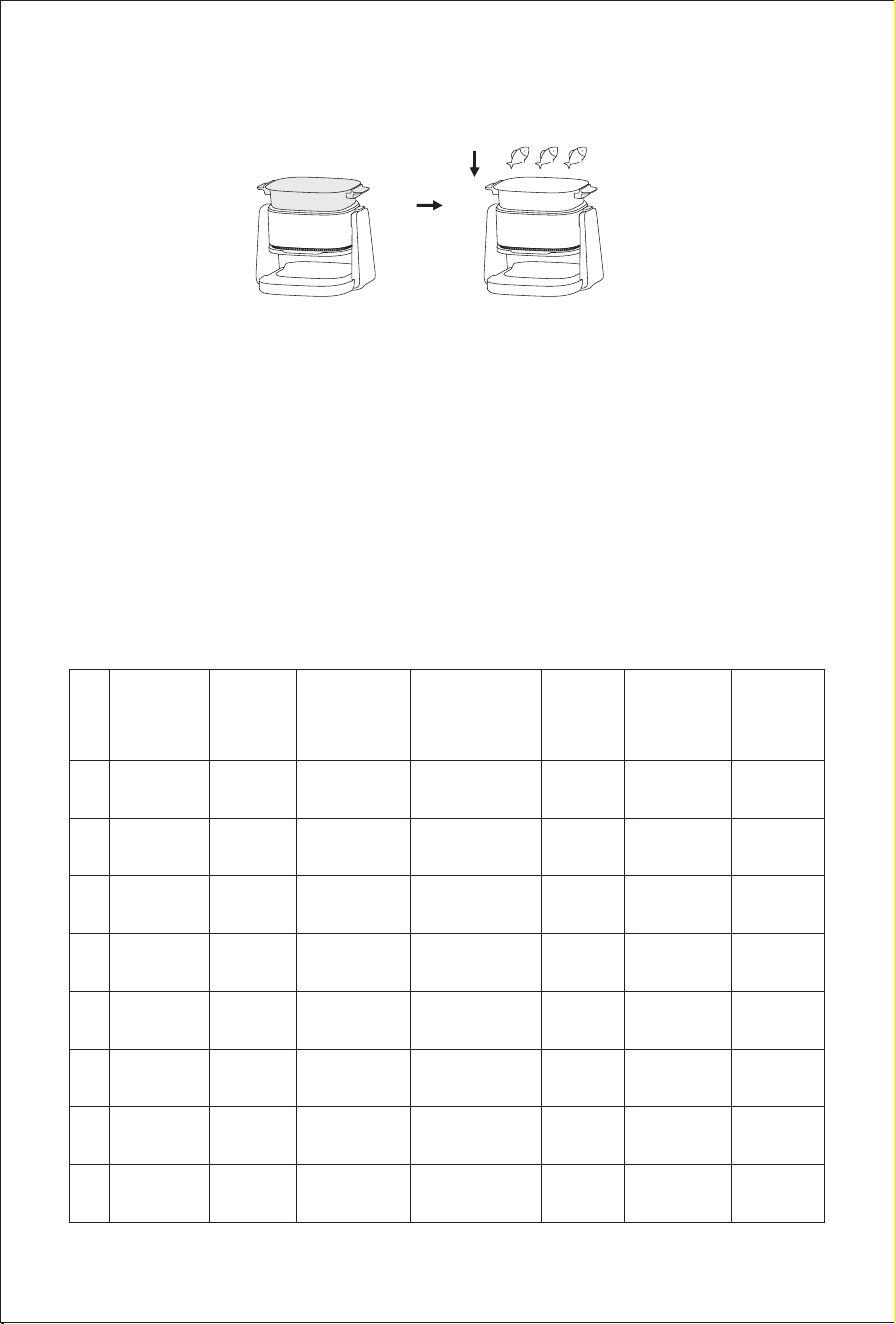
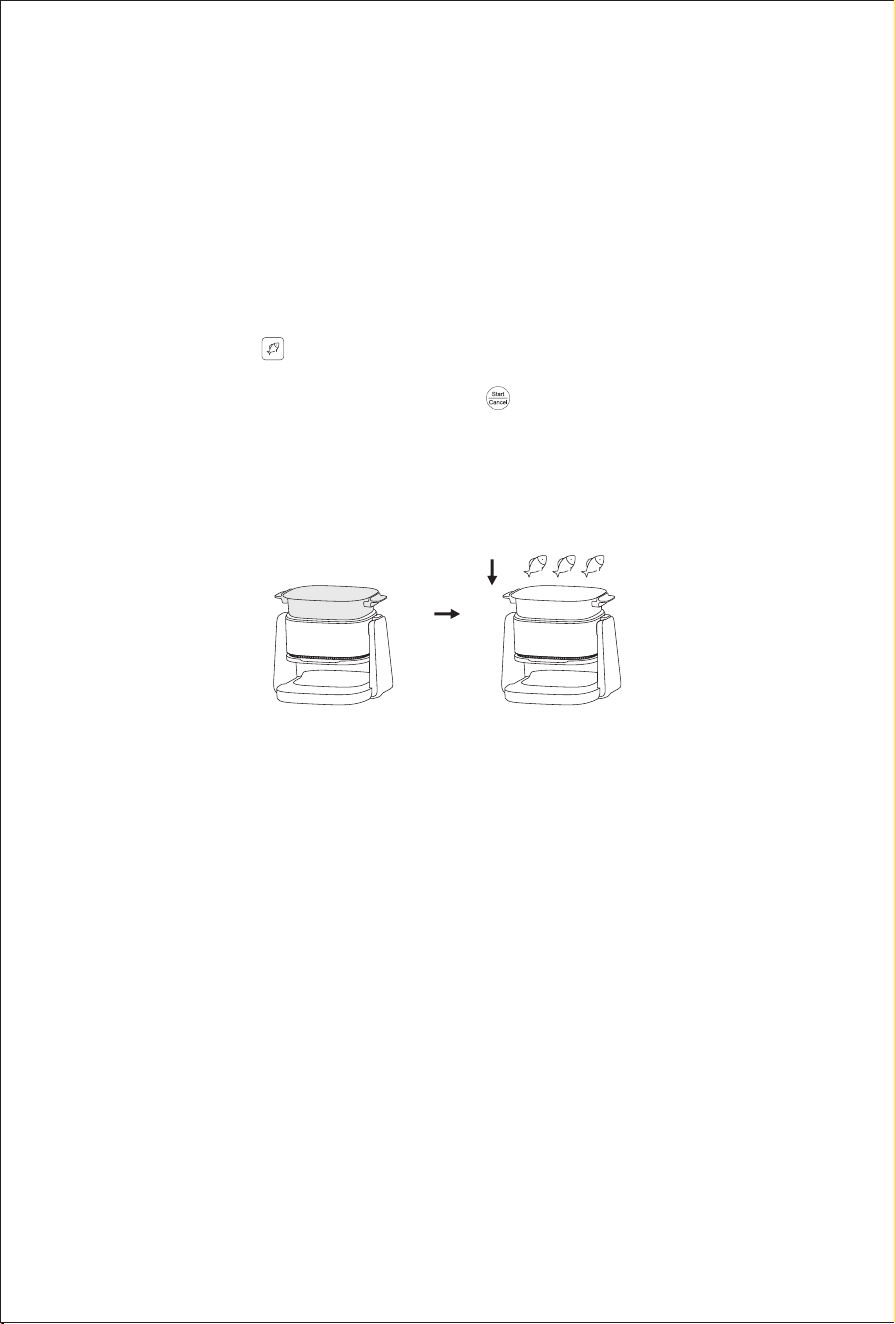
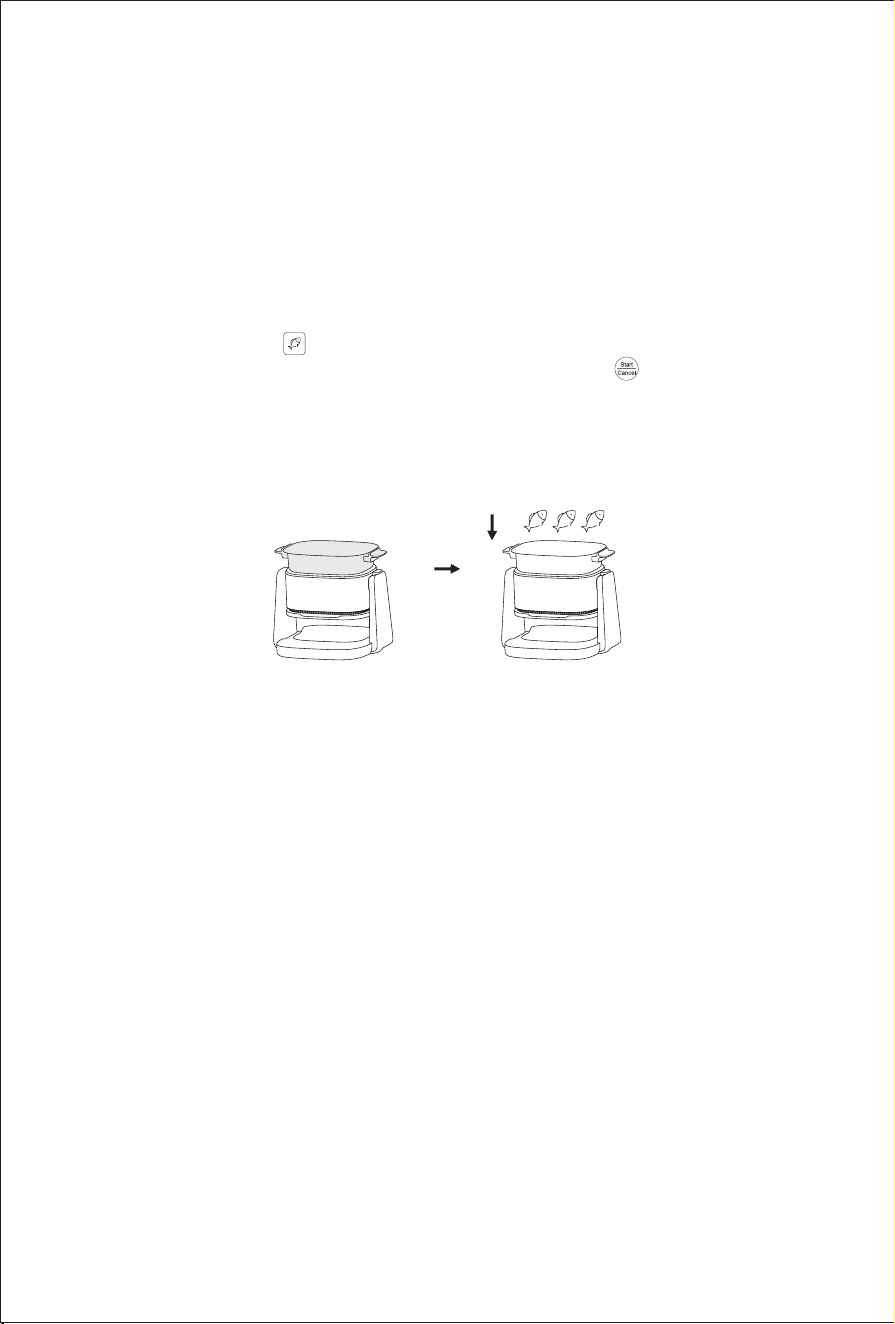
2.Example of air frying mode "Fish”
①
Adjust the machine to grilling status and assemble grill pan(Fig17)
②
Press “ ” button in quick start function area, display screen shows 200
℃、
20min.
③
Put oil into grill pan, press “ ” button to start preheating, display screen starts to show
remaining time.
④
After 3 minutes, put sh into pan to grill (Fig 18), ip the sh in suitable time.
Fig 13 Fig 14 Fig 15 Fig 16
7
No
Recipe
type
Proposed
volume
Default
Temperature
(℃)
Adjustable
Temperature
(℃)
Default
Time
(min)
Adjustable
Time
(
min
)
Flip at half
time or
not
1 Fries 300g 185 50-200 20 1~45 Yes
2 Bake / 150 50-200 22 1~45 No
3 Wings 300g 200 50-200 20 1~45 Yes
4 Dehydrate / 70 50~80 3h 3~8h No
5 Fish 220g 200 50-200 20 1~45 Yes
6 Shrimp 200g 200 50-200 8 1~45 No
7 Meat 130g 200 50-200 10 1~45 Yes
8 DIY / 200 50-200 20 1~45 /
Recipe Comparison Table
The following table will help you choose the basic settings for the ingredients you want to cook,
and these settings are for reference only. Due to the different sources, sizes, shapes, and
brands of ingredients, there may be slight differences. You can adjust to the best state you want
basing on your ingredients.
Air frying recipe
Note:
1.When installing the grill pan, be sure to ensure that it is placed at and free from warping.
2. When using the grilling mode, please pay attention to the anti scalding label warning to
prevent burns.
3. The pan lid can improve heating efciency and reduce water evaporation. You can choose
whether to use the pan lid according to your need.
Fig 17 Fig 18
⑤
When the product makes ve beep sound, the cooking is completed and the display area
shows "End". Carefully remove the grill and take out the ingredients.

8
Cleaning and maintenance
1. Unplug the power plug from the socket and wait for the machine body to cool before cleaning
and maintenance, otherwise it may cause danger such as electric shock, re, and scalding.
2. After cooking, wait for pot or pan to cool down before cleaning the remaining oil stains in the
pot or pan.
3. Do not immerse the mainbody in water or rinse it under the tap water. Instead, use a wet cloth
to wipe the surface.
4. It is recommended to use warm water, detergent, and non abrasive sponge to clean frying
pot, grill pan, crisper bracket or grill pan lid.
5. Do not use the dishwasher to wash frying pot.
6. Do not put the hot frying pot, grill pan or grill pan lid that has just nished cooking into water
or refrigerator, in order to prevent damage caused by cold and hot shock to the product.
Grill recipe
No
Recipe
type
Proposed
volume
Default
Temperature
(℃)
Adjustable
Temperature
(℃)
Default
Time
(
min
)
Adjustable
Time
(
min
)
Flip at half
time or
not
1 Fish 60g 220 150-220 20 1~45 /
2 Shrimp 200g 220 150-220 10 1~45 /
3 Meat 130g 220 150-220 8 1~45 /
4 DIY / 220 150-220 30 1~45 /

9
Important Safety notes
Please read this manual carefully before using this product to prevent incorrect operation or
any danger, and keep it properly for future reference. The following safety precautions must be
followed when using this product:
This appliance shall not be used by children from 0 year to 8 years. This appliance can be
used by children aged from 8 years and above if they are continuously supervised. This
appliance can be used by people with reduced physical, sensory or mental capabilities or lack
of experience and knowledge if they have been given supervision or instruction concerning use
of the appliance in a safe way and understand the hazards involved. Keep the appliance and its
cord out of reach of children aged less than 8 years. Cleaning and user maintenance shall not
be made by children.
If the supply cord is damaged, it must be replaced by a special cord or assembly available from
the manufacturer or its service agent.
The appliance is not intended to be operated by means of an external timer or a separate
remote-control system.
The appliance must not be immersed.
This appliance is intended to be used in household and similar applications such as:
– staff kitchen areas in shops, ofces and other working environments;
– farm houses;
– by clients in hotels, motels and other residential type environments;
– bed and breakfast type environments.
Precautions
1. There may be slight differences between product design and specication data between user
manual and the actual product. Please refer to the actual product for accuracy.
2. If there are children nearby, use this product with extra caution and do not let children use it
alone.
3. When the product is powered on or under cooling, the product and its power cord should be
placed out of reach of children under 8 years old.
4. The product must be used under the care of adult.
5. Do not let the power cord touch hot surfaces.
6. If any malfunctions or abnormalities occur during use, please stop using immediately and wait
until it is tested by after service of JIMMY local distributor before continuing to use. All
repairing must be carried out by professional staff.
7. Before use, please check if the power cord, plug, and other components are damaged. If any
damage is found, please stop using the product.
8. Before use, please conrm whether the input voltage complies with product rating label, and
conrm that power socket is grounded. Please use a separate power socket.

10
9. When taking out the product from box, take out machine and accessories separately to avoid
machine falling and causing damage.
10. The product must be placed on a stable desktop when suspended from use.
11.Do not use the product on tilted or unstable desktop, and keep it away from heat sources to
avoid damaging plastic components. Do not approach or place it on any electric appliances.
12. The product should not be used near or under curtain and other combustible materials.
13. Do not place the product against wall or other products. Leave at least 10cm of free space
behind, on both sides, and above the product. Do not place other items on the product.
14. The appliance has a heating surface. When using it for people who are not sensitive to
heat (such as patients with diabetes), attention must be paid to using it with the help of
normal people.
15. During heating, do not cover the air inlet and outlet.
16.During or after heating, if the frying pot or grill pan has not cooled down,do not touch them
directly with hands to avoid burning.
17.During heating, high-temperature steam will be released from the air outlet, hands and face
should be kept at a safe distance from the air outlet to prevent burning.
18. When taking out heated fryer pot from machine,pay attention to high-temperature steam and
hot air to prevent burns.
19. The product surface = with the high-temperature symbol
“ ”
may become hot during
operation. Please pay special attention to avoid burns.
20.Do not move the machine while it is working.
21.Hold the frying pot and grill pan assembly when moving the machine, to prevent it from
falling, causing injury or damaging.
22. Do not use accessories or components produced by other manufacturers without
recommendation by JIMMY, otherwise warranty will become invalid.
23.This product cannot be operated with an external timer or independent remote control system.
24. Do not put the hot frying pot after cooking directly into cold water or refrigerator to prevent
damage.
25. Do not use big force to turn the machine head. When it is found that it cannot be turned,
please conrm whether the release button is pressed and whether the turning direction is
correct.
26.After using the air frying function of the product, do not immediately ip the mainbody with
hands to prevent them from touching the heating element and causing injury
27.When the product is in grilling mode, do not place the fryer pot directly on the heating
element to heat it, to prevent the fryer pot from cracking and causing injury.

11
Trouble Possible causes Solution
Machine cannot
turn on
Not plugged to power socket. Insert plug into power socket.
Not press start/cancel button. Press start/cancel button to start working.
Air frying pot not assembled in
place.
Assemble air frying pot in place.
PCB damage. Contact after service to repair.
Ingredients not
fully cooked
Too many ingredients are put. Put less amount of ingredients.
Cooking time too short. Increase cooking time.
Cooking temperature too low. Increase temperature setting.
Air frying pot not installed in
place, air leakage causes
temperature too low.
Inspect whether air frying pot is assemble
in place without slant.
Grilling pan not assembled in
place and too far away from
heater, causes grilling pan
temperature too low.
Inspect whether grilling pan assembled in
place with slant and bending.
White smoke
from the product
Product is cooking ingredients
with rich oil.
When cooking rich oil ingredients, the oil
will produce white smoke, and the fryer
may be hotter than normal, which will not
affect the nal effect of the cooking.
There is still oil residue from the
last use on the crisper bracket or
frying pot.
Make sure crisper bracket and frying pot
are correctly cleaned after each use.
Display screen
shows E1
NTC open circuit or short circuit. Contact after service for repairing.
Note: If there is other failure, since special tools is needed, please send to appointed repairing
center for repairing or contact local JIMMY distributor for consultant.
Trouble shooting
Before sending the product to repair, please check below points first:
12
Product Specication
Technical parameter
Product name Air fryer
Model No AF3
Rated voltage 220V-240V~
Rated frequency 50-60Hz
Rated power 1100W
Rated capacity
4L
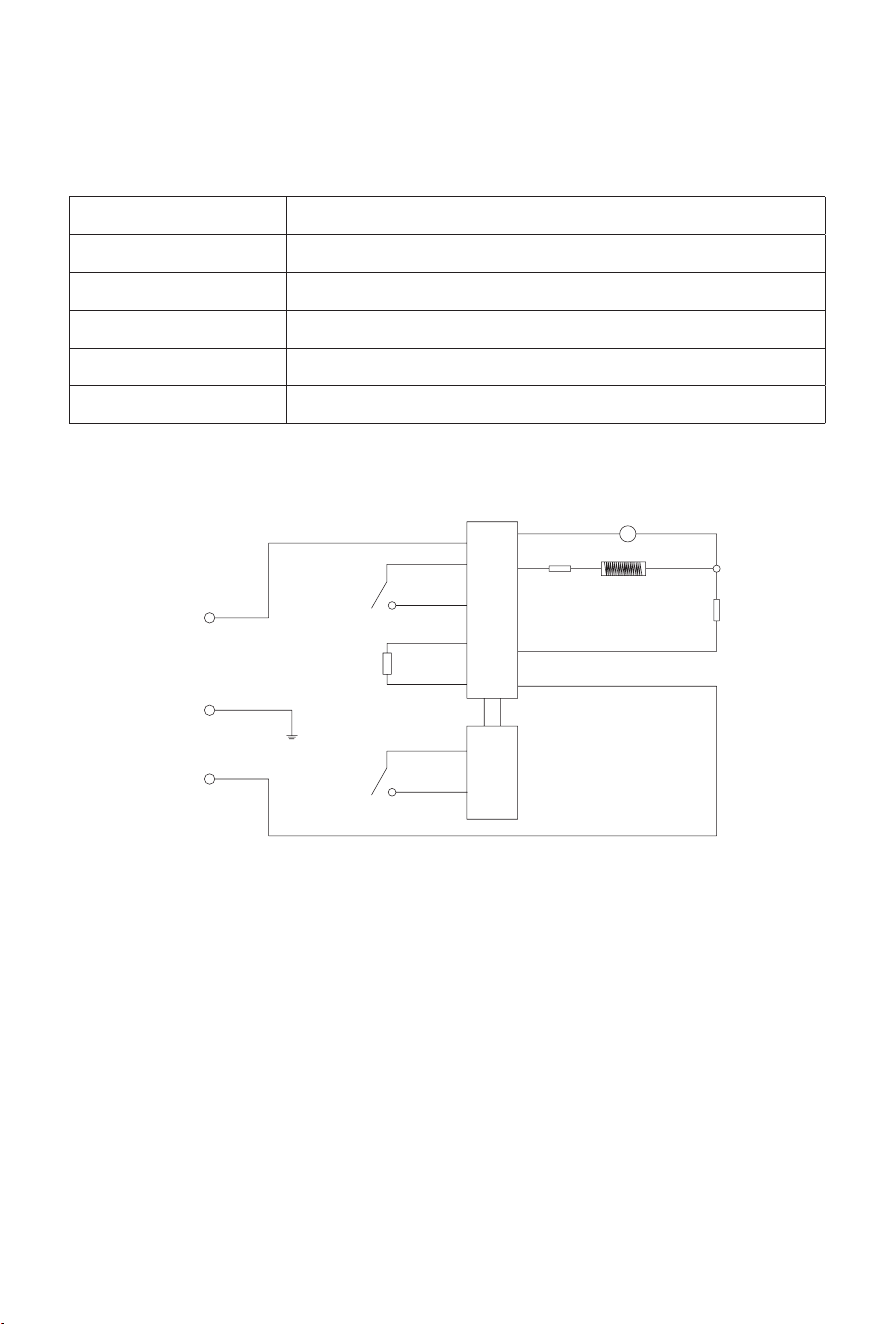
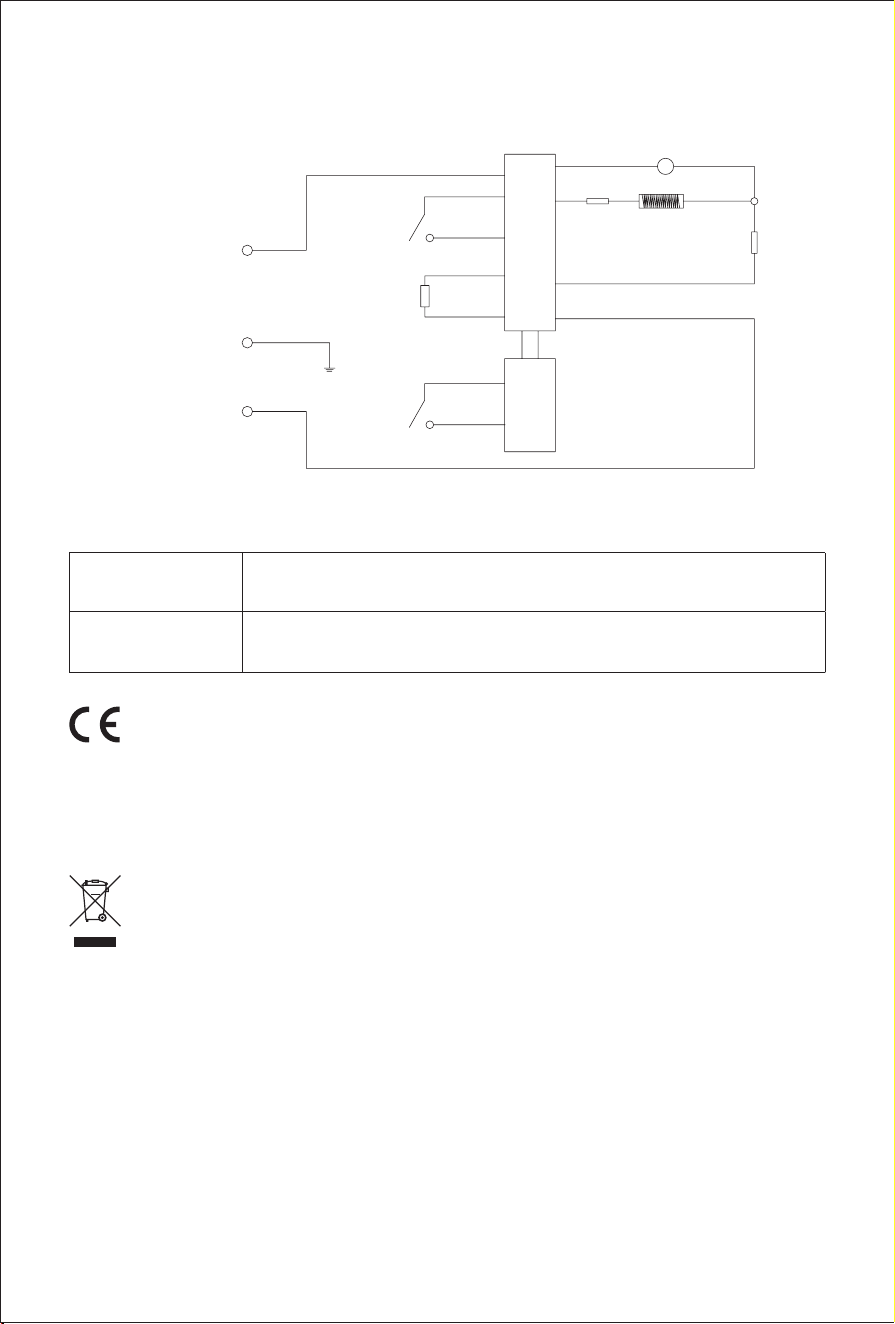
Circuit Diagram
L
E
N
220V-240V~50-60Hz
Motor
Fuse
Fuse
Power
PCB
Control
PCB
Heater
M
NTC
Micro
switch
Micro
switch

13
Manufacturer Information
Manufacturer Kingclean Electric Co., Ltd
Address
No.1 Xiangyang Road, Suzhou New District, Jiangsu Province 215009,
China
Disposal
The machine, accessories and packaging should be sorted for environmental-friendly recycling.
Do not dispose of the machine into household waste!
Subject to change without notice.
Warranty Information
Mainbody of this product enjoys one year warranty from the date of purchase.
Excluded from the guarantee is normal wear, commercial use, alterations to the appliance as
purchased, cleaning activities, consequences of improper use or damage by the purchaser
or a third person, damage that can be attributed to external circumstances(IE abnormal
voltage,natural calamities etc ).
14
Product Assembly
Part Name
Wlot powietrza
Frytkownica
Naczynie do
smażenia
Panel sterowania
Wylot powietrza
Uchwyt
obrotowy
Pokrywa patelni
grillowej
Patelnia
grillowa
Pokrętło
Przewód
zasilający
rys. 1
Płyta
Płyta z gumy
silikonowej
Wprowadzenie do akcesoriów
1.Naczynie do smażenia: o maksymalnej pojemności 4 l (rys. 1).
Packing List
Nazwa
części
Frytkownica
Naczynie do
smażenia
Płyta
Patelnia
grillowa
Pokrywa
patelni
grillowej
Instrukcja
obsługi
Ilość 1 1 1 1 1 1
Uwaga:
①
Podczas montażu dociśnij naczynie do dna i dopasuj je do korpusu.
②
Naczynie do smażenia jest wykonane ze szkła, dlatego należy upewnić się, że podczas
przenoszenia nie dojdzie do kolizji, aby uniknąć uszkodzeń.
③
Podczas podgrzewania temperatura powierzchni naczynia jest wysoka. Nie należy go
bezpośrednio dotykać, gdyż może to spowodować oparzenia.
15
rys. 2
rys. 3
rys. 4
④
Nie wkładaj gorącego naczynia po gotowaniu do wody lub lodówki, aby uniknąć uszkodzenia
szkła.
2.Płyta: Płyta jest zainstalowana wewnątrz naczynia do smażenia (z czterema nóżkami
skierowanymi w dół) i można ją wyjąć w celu wyczyszczenia. Jej główną funkcją jest unoszenie
składników do góry, aby zapewnić lepszą cyrkulację gorącego powietrza i pomóc w ich
równomiernym podgrzaniu(rys. 2).
Uwaga:
①
Z wyjątkiem specjalnych wymagań, podczas smażenia należy używać płyty, w przeciwnym
razie może to wpłynąć na efekt końcowy.
②
Umieść składniki w jednej warstwie na płycie, nie układaj ich jedna na drugiej, w przeciwnym
razie może to wpłynąć na efekt końcowy.
Patelnia grillowa: patelnia grillowa służy głównie do smażenia lub grillowania żywności (rys. 3).
Uwaga:
①
Podczas montażu patelni grillowej należy upewnić się, że jest ona stabilnie umieszczona na
korpusie.
②
Podczas nagrzewania temperatura powierzchni patelni jest wysoka. Nie należy dotykać jej
bezpośrednio, gdyż może to spowodować oparzenia.
③
Patelnia grillowa służy wyłącznie do smażenia i grillowania. Nie należy jej używać do
podgrzewania płynów.
4. Pokrywa patelni grillowej: Pokrywa patelni grillowej jest używana razem z patelnią grillową,
aby poprawić wydajność ogrzewania i zapobiec rozpryskiwaniu (rys. 4).
Uwaga:
Pokrywa patelni grillowej jest wykonana ze szkła, dlatego należy upewnić się, że podczas
przenoszenia nie dojdzie do zderzenia, aby uniknąć jej uszkodzenia.
16
Użycie produktu
Przed pierwszym użyciem należy zwrócić uwagę na następujące kwestie:
1.Przeczytaj uważnie niniejszą instrukcję obsługi.
2.Produkt należy umieścić na stabilnym i płaskim blacie. Nie należy umieszczać go na
powierzchni podatnej na nagrzewanie.
3.Przed podłączeniem do gniazda zasilania należy upewnić się, że zasilanie wynosi
220V-240V~ i że jest uziemione.
4.Przed pierwszym użyciem należy umyć naczynie do smażenia, uchwyt, patelnię grillową i
pokrywę patelni grillowej ciepłą wodą z detergentem i nieścierną gąbką.
5.Podczas pierwszego użycia normalne jest wydzielanie niewielkiej ilości dymu. Po
wyczyszczeniu, zapach można usunąć poprzez podgrzanie w temperaturze 200
℃
przez 20
minut w trybie smażenia.
6.Nie należy zanurzać korpusu w wodzie ani płukać go pod wodą z kranu, ponieważ znajdują
się w nim elementy elektroniczne i grzewcze.
7.Nie zakrywaj wlotu i wylotu powietrza produktu podczas pracy.
8.Podczas pracy produktu temperatura powierzchni wylotu powietrza, naczynia do smażenia,
patelni grillowej i pokrywy patelni grillowej jest wysoka. Nie należy ich dotykać, aby uniknąć
poparzeń.
Function Description
Obszar wyświetlania
czasu
Przyciski funkcji szybkiego
uruchamiania
Przyciski
regulacji
parametrów
Przycisk Start/
Cancel
Obszar wyświetlania czasu
1.Gdy świeci się symbol“ ”na ekranie wyświetlany jest pozostały czas.
2.Gdy świeci się symbol“ ” na ekranie wyświetlana jest ustawiona temperatura.
3.Gdy komunikat "Flip" zaświeci się po 3 sygnałach dźwiękowych, należy wyjąć naczynie do
smażenia, obrócić składniki potrawy, a następnie ponownie umieścić naczynie do smażenia w
urządzeniu, co spowoduje automatyczne wznowienie pracy.
4.“ ” pokaże odpowiednią temperaturę i czas.
Przyciski funkcji szybkiego uruchamiania
Produkt jest wyposażony w 7 funkcji szybkiego startu, w tym: frytki, pieczenie, skrzydełka,
odparowanie, ryby, krewetki, mięso i tryb DIY. Możesz bezpośrednio wybrać funkcję szybkiego
startu lub dostosować gotowanie.
17
Uwaga:
1.W trybie smażenia można korzystać ze wszystkich funkcji szybkiego uruchamiania.
2.W trybie grillowania można używać tylko funkcji przygotowania ryb, krewetek, mięsa i DIY.
Przyciski regulacji parametrów
1.“1.Przycisk:
“ ”
Służy do wyświetlania temperatury i czasu..
2.“Przyciski:
“ ”“ ”
W trybie wyświetlania czasu: Naciśnij przycisk
“ ”
lub
“ ”
aby dostosować czas gotowania. Zakres regulacji wynosi od 1 do 45 minut.
Przytrzymanie przycisku umożliwia szybką regulację czasu. W trybie wyświetlania temperatury:
Naciśnij
“ ”
lub
“ ”
aby dostosować temperaturę gotowania. Zakres regulacji w
trybie smażenia wynosi od 50
℃
do 200
℃
, a zakres regulacji w trybie grillowania wynosi od
150
℃
-220
℃
. Przytrzymanie przycisku umożliwia szybką regulację temperatury.
Przycisk Start/Cancel
1. Przycisk:
“ ”
Po ustawieniu funkcji i parametrów: Naciśnij przycisk:
“ ”
aby zacząć
gotowanie.
2. Podczas ustawiania parametrów lub gotowania naciśnij przycisk
“ ”
i przytrzymaj
przez dwie sekundy, aby powrócić do stanu czuwania, a na wyświetlaczu pojawi się "----".
Przełączanie funkcji
To urządzenie ma dwie funkcje: smażenie i grillowanie. Postępuj zgodnie z poniższymi krokami,
aby przełączać między tymi dwiema funkcjami.
1. Zmiana trybu smażenia na tryb grillowania:
Najpierw należy wyjąć naczynie (rys. 5), nacisnąć i przytrzymać przycisk obracania, trzymając
jednocześnie uchwyt (rys. 6), obrócić górną część urządzenia w kierunku wskazanym strzałką
na rysunku (rys. 7). Gdy rozlegnie się dźwięk "kliknięcia", oznacza to, że naczynie zostało
ustawione na swoim miejscu. Umieść patelnię grillową na korpusie urządzenia (rys. 8).
Uchwyt Przycisk obracania
rys. 5 rys. 6 rys. 7 rys. 8
2.Zmiana trybu grillowania na tryb smażenia:
Najpierw zdejmij patelnię grillową (rys. 9), naciśnij i przytrzymaj przycisk obracania, trzymając
jednocześnie uchwyt (rys. 10), a następnie obróć górną część urządzenia w kierunku
wskazanym strzałką (rys. 11). Gdy rozlegnie się dźwięk "kliknięcia", oznacza to, że urządzenie
zostało ustawione na swoim miejscu. Umieść naczynie do smażenia w urządzeniu (rys. 12).
18
Uchwyt Przycisk obracania
rys. 9 rys. 10 rys. 11 rys. 12
Uwaga:
1. Urządzenie można obrócić tylko w kierunku wskazanym na rysunku, nie można go obrócić w
przeciwnym kierunku.
2. Podczas procesu odwracania nie należy używać nadmiernej siły. Jeśli okaże się, że
obrócenie nie jest możliwe, należy sprawdzić, czy przycisk obracania jest wciśnięty i czy
kierunek obracania jest prawidłowy.
3. Jeśli urządzenie właśnie zakończyło pracę, podczas obracania należy uważać, aby nie
dotknąć przewodu grzejnego i pobliskich części metalowych, aby uniknąć oparzeń.
Etapy działania
1.Przykład trybu smażenia
①
Ustaw urządzenie na tryb smażenia (rys. 13)
②
Upewnij się, że guma silikonowa znajduje się na wsporniku pojemnika na żywność i umieść
płytę prawidłowo w naczyniu do smażenia (czterema nóżkami skierowanymi w dół) (rys. 14).
③
Połóż zamarynowane skrzydełka kurczaka płasko na uchwycie płyty (rys. 14).
④
Włóż naczynie do smażenia do korpusu i wciśnij je na miejsce (rys. 15-16).
⑤
Naciśnij przycisk “ ” w obszarze funkcji szybkiego uruchamiania, na wyświetlaczu pojawi
się 200
℃、
20min.
⑥
Naciśnij przycisk “ ” aby rozpocząć gotowanie, ekran wyświetlacza zacznie pokazywać
pozostały czas.
⑦
Gdy czas gotowania przekroczy połowę, urządzenie wyemituje sygnał dźwiękowy, a wskaźnik
w obszarze wyświetlacza będzie migać. Wyciągnij patelnię, a urządzenie wstrzyma gotowanie.
Po odwróceniu skrzydełek kurczaka i zamontowaniu patelni z powrotem, urządzenie będzie
kontynuować gotowanie.
⑧
Gdy urządzenie wyemituje pięć sygnałów dźwiękowych, gotowanie zostanie zakończone, a
na wyświetlaczu pojawi się komunikat "End" (Koniec). Ostrożnie wyjmij naczynie do smażenia i
wyjmij składniki.
rys. 13 rys. 14 rys. 15 rys. 16
19
Uwaga:
1. Urządzenie nie jest wyposażone w przycisk pauzy. Aby wstrzymać pracę, należy wyciągnąć
naczynie, a na wyświetlaczu pojawi się komunikat "OPEN". Urządzenie wznawia pracę po
ponownym włożeniu naczynia.
2.Podczas montażu naczynia do smażenia należy pamiętać o dociśnięciu go do dna i
dopasowaniu do korpusu.
2. Przykład trybu grillowania
"Ryba"
①
Ustaw urządzenie na tryb grillowania i włóż patelnię grillową (Rys. 17).
②
Naciśnij przycisk “ ” w obszarze funkcji szybkiego uruchamiania, ekran wyświetlacza
pokaże 200
℃、
20min.
③
Wlej olej na patelnię grillową, naciśnij przycisk “ ” aby rozpocząć podgrzewanie, ekran
wyświetlacza zacznie pokazywać pozostały czas.
④
Po 3 minutach przełóż rybę na patelnię do grillowania (rys. 18), odwróć rybę w odpowiednim
czasie.
⑤
Gdy produkt wyemituje pięć sygnałów dźwiękowych, gotowanie zostanie zakończone, a na
wyświetlaczu pojawi się komunikat "End" (Koniec). Ostrożnie wyjmij patelnię grillową i składniki.
rys. 17 rys. 18
Uwaga:
1. Podczas wkładania patelni grillowej należy upewnić się, że jest ona umieszczona płasko.
2. Podczas korzystania z trybu grillowania należy zwrócić uwagę na etykietę ostrzegającą przed
poparzeniem.
3. Pokrywa patelni może poprawić wydajność grzania i zmniejszyć parowanie wody. Można
wybrać, czy pokrywka ma być używana w zależności od potrzeb.

20
No Rodzaj
Proponowana
objętość
Domyślna
temperatura
(℃)
Regulacja
temperatury
(℃)
Domyślny
czas
(
min
)
Adjustable
Time
(
min
)
Flip at
half
time or
not
1 Frytki 300g 185 50-200 20 1~45 Tak
2 Pieczenie / 150 50-200 22 1~45 Nie
3 Skrzydełka 300g 200 50-200 20 1~45 Tak
4 Odparowanie / 70 50~80 3h 3~8h Nie
5 Ryba 220g 200 50-200 20 1~45 Tak
6 Krewetki 200g 200 50-200 8 1~45 Nie
7 Mięso 130g 200 50-200 10 1~45 Tak
8 DIY / 200 50-200 20 1~45 /
Tabela parametrów dla przepisów
Poniższa tabela pomoże Ci wybrać podstawowe ustawienia dla składników, które chcesz
ugotować, a ustawienia te służą wyłącznie jako odniesienie. Ze względu na różne źródła,
rozmiary, kształty i marki składników mogą występować niewielkie różnice. W zależności od
posiadanych składników można dostosować ustawienia do własnych potrzeb.
Parametry dla przepisów na smażone dania
Parametry dla przepisów na grillowane dania
No Rodzaj
Proponowana
objętość
Domyślna
temperatura
(℃)
Regulacja
temperatury
(℃)
Domyślny
czas
(
min
)
Adjustable
Time
(
min
)
Flip at
half
time or
not
1 Ryba 60g 220 150-220 20 1~45 /
2 Krewetki 200g 220 150-220 10 1~45 /
3 Mięso 130g 220 150-220 8 1~45 /
4 DIY / 220 150-220 30 1~45 /

21
Czyszczenie i konserwacja
1. Przed przystąpieniem do czyszczenia i konserwacji należy wyjąć wtyczkę zasilania z
gniazdka i zaczekać, aż korpus urządzenia ostygnie, w przeciwnym razie może dojść do
porażenia prądem elektrycznym, pożaru lub poparzenia.
2. Po zakończeniu gotowania należy odczekać, aż naczynie ostygnie, a następnie wyczyścić
plamy oleju pozostałe w naczyniu.
3. Nie zanurzaj korpusu w wodzie ani nie płucz go pod bieżącą wodą. Zamiast tego należy
przetrzeć powierzchnię mokrą szmatką.
4. Zaleca się używanie ciepłej wody, detergentu i nieściernej gąbki do czyszczenia naczynia do
smażenia, patelni grillowej, uchwytu lub pokrywy patelni grillowej.
5. Nie używaj naczynia w zmywarce.
6. Nie należy wkładać gorącego naczynia do smażenia, patelni grillowej lub pokrywy patelni
grillowej, które właśnie zakończyły gotowanie, do wody lub lodówki, aby zapobiec uszkodzeniom
spowodowanym przez szok termiczny.
Ważne uwagi dotyczące bezpieczeństwa
Przed rozpoczęciem korzystania z tego produktu należy uważnie przeczytać niniejszą instrukcję,
aby zapobiec nieprawidłowemu działaniu lub jakimkolwiek zagrożeniom. Podczas korzystania z
tego produktu należy przestrzegać następujących środków ostrożności:
Urządzenie nie może być używane przez dzieci w wieku od 0 do 8 lat. To urządzenie może
być używane przez dzieci w wieku od 8 lat i starsze pod stałym nadzorem. Urządzenie może
być używane przez osoby o ograniczonych zdolnościach fizycznych, sensorycznych lub
umysłowych lub osoby nieposiadające doświadczenia i wiedzy, jeśli są one nadzorowane lub
zostały poinstruowane w zakresie bezpiecznego korzystania z urządzenia i rozumieją związane
z tym zagrożenia. Urządzenie i jego przewód należy przechowywać w miejscu niedostępnym
dla dzieci w wieku poniżej 8 lat. Czyszczenie i konserwacja nie mogą być wykonywane przez
dzieci.
Jeśli przewód zasilający jest uszkodzony, należy go wymienić na specjalny przewód lub zestaw
dostępny u dystrybutora lub jego przedstawiciela serwisowego.
Urządzenie nie jest przeznaczone do obsługi za pomocą zewnętrznego wyłącznika czasowego
lub oddzielnego systemu zdalnego sterowania.
Nie wolno zanurzać urządzenia w jakichkolwiek płynach.
To urządzenie jest przeznaczone do użytku w gospodarstwie domowym i podobnych
zastosowaniach, takich jak:
- kuchnie pracownicze, biura i inne środowiska pracy;
- gospodarstwa rolne;
- przez klientów w hotelach, motelach i innych środowiskach mieszkalnych;

22
Środki ostrożności:
1. Mogą występować niewielkie różnice między obrazkiem w instrukcji obsługi a rzeczywistym
produktem. W celu uzyskania dokładnych informacji należy zapoznać się z rzeczywistym
produktem.
2. Jeśli w pobliżu znajdują się dzieci, należy używać tego produktu ze szczególną ostrożnością i
nie pozwalać dzieciom na samodzielne korzystanie z niego.
3. Gdy produkt jest włączony lub chłodzony, produkt i jego przewód zasilający powinny
znajdować się poza zasięgiem dzieci poniżej 8 roku życia.
4. Produkt musi być używany pod opieką osoby dorosłej.
5. Przewód zasilający nie może dotykać gorących powierzchni.
6. Jeśli podczas użytkowania wystąpią jakiekolwiek usterki lub nieprawidłowości, należy
natychmiast zaprzestać użytkowania. Wszelkie naprawy muszą być wykonywane przez
profesjonalny serwis.
7. Przed użyciem należy sprawdzić, czy przewód zasilający, wtyczka i inne elementy nie są
uszkodzone. W przypadku stwierdzenia jakichkolwiek uszkodzeń należy zaprzestać korzystania
z produktu.
8. Przed użyciem należy sprawdzić, czy napięcie wejściowe jest zgodne z etykietą znamionową
produktu oraz czy gniazdo zasilania jest uziemione. Należy użyć oddzielnego gniazda zasilania.
9. Podczas wyjmowania produktu z opakowania należy wyjmować urządzenie i akcesoria
osobno, aby uniknąć upadku urządzenia i jego uszkodzenia.
10. Produkt musi być umieszczony na stabilnym blacie.
11. Nie używaj produktu na przechylonym lub niestabilnym blacie i trzymaj go z dala od źródeł
ciepła, aby uniknąć uszkodzenia plastikowych elementów. Nie zbliżaj ani nie umieszczaj
urządzenia na urządzeniach elektrycznych.
12. Produkt nie powinien być używany w pobliżu lub pod zasłonami i innymi materiałami
łatwopalnymi.
13. Nie należy umieszczać produktu przy ścianie lub innych produktach. Należy pozostawić
co najmniej 10 cm wolnej przestrzeni z tyłu, po obu stronach i nad produktem. Nie umieszczaj
innych przedmiotów na produkcie.
14. Urządzenie posiada powierzchnię grzewczą. W przypadku korzystania z urządzenia przez
osoby, które nie są wrażliwe na ciepło (takie jak pacjenci z cukrzycą), należy zwrócić uwagę na
korzystanie z niego z pomocą zdrowych osób.
15. Podczas pracy urządzenia nie należy zakrywać wlotu i wylotu powietrza.
16.W trakcie lub po zakończeniu pracy urządzenia, jeśli naczynie lub patelnia grillowa nie
ostygły, nie należy dotykać ich bezpośrednio rękami, aby uniknąć poparzenia.
17.Podczas pracy urządzenia z wylotu powietrza uwalniana jest para o wysokiej temperaturze,
a ręce i twarz należy trzymać w bezpiecznej odległości od wylotu powietrza, aby zapobiec
poparzeniu.
18. Podczas wyjmowania rozgrzanego naczynia z urządzenia należy uważać na parę o wysokiej
temperaturze i gorące powietrze, aby zapobiec poparzeniom.
19. Powierzchnia produktu może się nagrzewać podczas pracy. Należy zwrócić szczególną
uwagę, aby uniknąć poparzeń.
“ ”
20.Nie należy przenosić urządzenia podczas jego pracy.
21.Podczas przenoszenia urządzenia należy trzymać naczynie i patelnię grillową, aby zapobiec
ich upadkowi, obrażeniom ciała lub uszkodzeniu.

23
22. Nie używaj akcesoriów lub komponentów wyprodukowanych przez innych producentów bez
rekomendacji JIMMY, w przeciwnym razie gwarancja straci ważność.
23.Ten produkt nie może być obsługiwany za pomocą zewnętrznego timera lub niezależnego
systemu zdalnego sterowania.
24. Nie wkładaj gorącego naczynia po gotowaniu bezpośrednio do zimnej wody lub lodówki, aby
zapobiec jego uszkodzeniu.
25. Do obracania głowicy urządzenia nie należy używać dużej siły. Jeśli okaże się, że nie można
jej obrócić, należy sprawdzić, czy przycisk zwalniający jest wciśnięty i czy kierunek obrotu jest
prawidłowy.
26.Po skorzystaniu z funkcji smażenia nie należy od razu odwracać korpusu rękami, aby nie
dotknąć elementu grzejnego i nie spowodować obrażeń.
27.Gdy produkt działa w trybie grillowania, nie należy umieszczać naczynia do smażenia
bezpośrednio na elemencie grzejnym w celu jego podgrzania, aby zapobiec pęknięciu naczynia
do smażenia i spowodowaniu obrażeń.
Rozwiązywanie problemów
Przed wysłaniem produktu do naprawy należy najpierw sprawdzić poniższe
informacje:
Problemy Możliwe przyczyny Rozwiązanie
Urządzenie nie
może się włączyć
Nie podłączono do gniazda
zasilania.
Włóż wtyczkę do gniazda zasilania.
Nie naciśnięto przycisku Start/
Cancel.
Naciśnij przycisk Start/Cancel, aby
rozpocząć pracę.
Naczynie do smażenia nie jest
zamontowane na miejscu.
Włóż naczynie na miejsce.
Uszkodzenie płytki drukowanej.
Skontaktuj się z serwisem w celu
naprawy.
Składniki nie są w
pełni ugotowane
Zbyt wiele składników. Umieść mniej składników.
Zbyt krótki czas gotowania. Zwiększ czas gotowania.
Zbyt niska temperatura
gotowania
Zwiększ ustawienia temperatury.
Naczynie do smażenia nie jest
zainstalowane na swoim miejscu,
wyciek powietrza powoduje zbyt
niską temperaturę.
Sprawdź, czy naczynie jest zamontowane
na miejscu.
Patelnia grillowa nie jest
zamontowana na miejscu i
znajduje się zbyt daleko od
grzałki, co powoduje zbyt niską
temperaturę patelni grillowej.
Sprawdź, czy patelnia jest zamontowana
na miejscu.
24
Note: If there is other failure, since special tools is needed, please send to appointed repairing
center for repairing or contact local JIMMY distributor for consultant.
Problemy Możliwe przyczyny Rozwiązanie
Biały dym
wydobywa się z
produktu
Produkt jest bogaty w olej.
Podczas gotowania składników bogatych
w olej, będzie wytwarzał on biały dym,
a frytownica może być gorętsza niż
zwykle, co nie wpłynie na końcowy efekt
gotowania.
Na uchwycie lub naczyniu do
smażenia nadal znajdują się
pozostałości oleju z ostatniego
użycia.
Po każdym użyciu należy upewnić się,
że płyta i naczynie do smażenia są
prawidłowo wyczyszczone.
Ekran
wyświetlacza
pokazuje E1
Otwarty obwód lub zwarcie NTC
Skontaktuj się z serwisem w celu
naprawy.
Specykacja produktu
Parametry techniczne
Nazwa produktu Frytkownica beztłuszczowa
Model AF3
Napięcie znamionowe 220V-240V~
Częstotliwość
znamionowa
50-60Hz
Moc znamionowa 1100W
Pojemność znamionowa
4L
25
Circuit Diagram
L
E
N
220V-240V~50-60Hz
Silnik
Bezpiecznik
Płytka
drukowana
zasilania
Płytka
drukowana
sterowania
Grzałka
M
NTC
Mikroprzełącznik
Informacje o producencie
Producent Kingclean Electric Co., Ltd
Adres
No.1 Xiangyang Road, Suzhou New District, Jiangsu Province 215009,
China
Prawidłowa utylizacja
Urządzenie, akcesoria i opakowanie powinny być poddane segregacji w celu przyjaznego dla
środowiska recyklingu.
Nie wolno wyrzucać urządzenia razem z odpadami domowymi.
Zastrzega się możliwość wprowadzania zmian bez wcześniejszego
powiadomienia.
Bezpiecznik
Mikroprzełącznik
26
Produkt installieren
Paketliste
Lufteinlass
Hauptmotor
Fritteuse
Bedienungsfeld
Lufuauslass
Rollgriff
Deckel der Grillpfanne
Bratpfanne
Rolltaste
Stromkabel
Grill
Grillsilikon
Einführung in das Zubehör
1. Fritteuse : Die Fritteuse ist das Hauptutensil zum Kochen von Zutaten mit einem maximalen
Volumen von 4 L(Abbildung 1).
Paketliste
Name Hauptkörper Fritteuse Grill Bratpfanne
Deckel der
Grillpfanne
Bedienungs
anleitung
Menge 1 1 1 1 1 1
Anmerkung:
①
Achten Sie bei der Installation der Fritteuse darauf, sie bis zum Ende zu schieben und mit
dem Host zu verbinden.
②
Das Material des Topfkörpers ist Glas, und während des Entnahme- und
Abb. 1
27
Platzierungsvorgangs sollte es keine Kollision mit äußerer Kraft geben, um Beschädigungen zu
vermeiden.
③
Wenn es erhitzt wird, ist die Oberächentemperatur des Topfkörpers hoch, bitte berühren Sie
es nicht direkt, da es sonst zu Verbrennungen kommen kann.
④
Stellen Sie die frisch gekochte Fritteuse nicht mit hoher Temperatur in das Wasser oder den
Kühlschrank, um Glasbruch zu vermeiden.
2. Grill: Der Grill wird in der Fritteuse installiert (die vier Beine des Grills zeigen nach unten), die
manuell entfernt und gereinigt werden kann, und die Hauptfunktion besteht darin, die Zutaten
anzuheben, die Zirkulation der Heißluft zu erleichtern und die Zutaten gleichmäßig zu erhitzen
(Abbildung 2).
Anmerkung:
①
Außer bei besonderen Anforderungen muss während des Heißluftfrittierens eine
Knusperplatte verwendet werden, da dies sonst den Kocheffekt beeinträchtigen kann.
②
Legen Sie die Zutaten in einer einzigen Schicht auf die Knusperplatte, stapeln Sie sie nicht, da
dies sonst den Kocheffekt beeinträchtigen kann.
3. Bratpfanne : Das Hauptutensil zum Braten in einer Pfanne (Abbildung 3).
Anmerkung:
①
Achten Sie bei der Installation der Grillpfanne darauf, sie stabil auf dem Hauptgehäuse zu
platzieren.
②
Während des Erhitzens ist die Oberächentemperatur der Pfanne hoch. Berühren Sie es
nicht direkt, da es sonst zu Verbrennungen kommen kann.
③
Die Grillpfanne wird nur zum Braten und Grillen verwendet. Verwenden Sie es nicht zum
Erhitzen von Flüssigkeiten.
4. Bratpfannendeckel: Verwenden Sie den Bratpfannendeckel mit der Bratpfanne, um die
Heizefzienz zu verbessern und Ölspritzer zu vermeiden (Abbildung 4).
Abb. 3
Abb. 2
Abb. 4
28
Anmerkung:
Das Material des Bratpfannendeckels ist Glas, und während des Handhabungs- und
Platzierungsvorgangs sollte es keine Kollision mit äußeren Kräften geben, um Schäden zu
vermeiden
Verwendung des Produkts
Vor dem ersten Gebrauch sollten folgende Punkte beachtet werden:
1. Bitte lesen Sie diese Bedienungsanleitung sorgfältig durch.
2. Legen Sie dieses Produkt auf eine stabile, ebene und ache Arbeitsplatte. Stellen Sie das
Produkt nicht auf eine hitzebeständige Oberäche.
3.Bevor Sie den Stecker des Produkts an die Steckdose anschließen, bestätigen Sie bitte, dass
die Stromversorgung 220V-240V~ist und stellen Sie eine zuverlässige Erdung sicher.
4.Reinigen Sie Fritteuse, Grill, Fritteuse und Pfannenabdeckung vor dem ersten Gebrauch
gründlich mit warmem Wasser, Reinigungsmittel und nicht scheuerndem Schwamm.
5. Wenn Sie zum ersten Mal verwenden, ist es normal, Gerüche zu riechen und eine kleine
Menge Rauch zu produzieren.
6. Tauchen Sie das Hauptgerät nicht in Wasser ein oder spülen Sie es nicht unter dem
Wasserhahn ab, da sich elektronische und Heizkomponenten im Körper benden.
7. Während des Betriebs des Produkts nicht den Lufteinlass und Auslass abdecken.
8. Wenn das Produkt arbeitet, ist die Oberächentemperatur des Luftaustritts, der Bratpfanne,
der Bratpfanne und der Bratpfannenabdeckung hoch. Bitte berühren Sie sie nicht, um
Verbrennungen zu verhindern
Funktionsbeschreibung
Anzeigebereich für den
Zeitstatus
Bereich der
Schnellstartfunktion
Bereich der
Tasten für die
Parameteranpassung
Start/Cancel
control button
area
Anzeigebereich für den Zeitstatus
1.Wenn “ ” Leuchtet, zeigt der Bildschirm die verbleibende Zeit an.
2.Wenn “ ” Leuchtet, zeigt der Bildschirm die voreingestellte Temperatur an.
3. "Flip" leuchtet mit 3 Tönen auf, Sie können die Fritteuse herausnehmen, die Zutaten drehen
und wieder in das Hauptgerät einsetzen, und das Produkt läuft automatisch weiter.
4. Das Bild“ ” wechselt und zeigt die entsprechende Temperatur und Uhrzeit an
29
Bereich der Schnellstartfunktion
Das Produkt ist mit 7 Schnellstartfunktionen voreingestellt, darunter Pommes Frites,
Backen, Flügel, Dörren, Fisch, Garnelen, Fleisch und ein DIY-Modus. Sie können direkt die
Schnellstartfunktion auswählen oder Ihr Kochen anpassen.
Anmerkung:
1.In Luft Bratmodus können alle Schnellstartfunktionen verwendet werden.
2.Im Grillmodus können nur Fisch, Garnelen, Fleisch und DIY verwendet werden.
Bereich der Tasten für die Parameteranpassung
1.
“ ”
Taste: Wird verwendet, um zwischen Temperatur und Zeit anzuzeigen.
2.
“ ”“ ”
Taste: Im Zeitanzeigemodus: Drücken Sie
“ ”
oder
“ ”
, um die
Garzeit einzustellen. Der Einstellbereich beträgt 1-45 Minuten. Durch langes Drücken der Taste
kann die Zeit schnell eingestellt werden. Im Temperaturanzeigemodus : Drücken Sie
“ ”
oder
“ ”
, um die Gartemperatur einzustellen. Der Einstellbereich im Heißluftfrittionsmodus
beträgt 50 °C bis 200 °C und der Einstellbereich im Grillmodus 150 °C -220 °C. Durch langes
Drücken der Taste kann die Temperatur schnell eingestellt werden.
Bereich der Start-Stopp-Bedientaste
1.
“ ”
Taste: Nachdem die Funktion und die Parameter eingestellt sind, drücken Sie die
“ ”
Taste, um den Garvorgang zu starten.
2. Halten Sie
“ ”
während der Parametrierung oder des Garvorgangs zwei Sekunden
lang gedrückt, um in den Standby-Zustand zurückzukehren, und auf dem Bildschirm wird "----"
angezeigt.
Funktion Umschaltung
Diese Maschine hat zwei Funktionen: Luftbraten und Grillen. Führen Sie die folgenden Schritte
aus, um zwischen den beiden Funktionen zu wechseln.
1. Luftbratmodus zum Grillmodus:
Nehmen Sie zuerst die Fritteuse (Abb. 5) heraus, halten Sie die Flip-Taste gedrückt, während
Sie den Flip-Griff (Abb. 6) festhalten, und drehen Sie die Maschinenoberseite in die im Bild
gezeigte Pfeilrichtung (Abb. 7). Wenn ein "Klick"-Geräusch zu hören ist, zeigt dies an, dass die
Maschine an Ort und Stelle geklappt ist. Stellen Sie die Grillpfanne zur Verwendung auf das
Hauptgehäuse (Abb. 8).
Flip Griff Flip Taste
Abb. 5 Abb. 6 Abb. 7 Abb. 8

30
2. Grillmodus zum Luftbratenmodus:
Entfernen Sie zuerst die Grillpfanne (Abb. 9), halten Sie die Flip-Taste gedrückt, während Sie
den Flip-Griff gedrückt halten (Abb. 10), und drehen Sie die Maschinenoberseite in die im Bild
gezeigte Pfeilrichtung (Abb. 11). Wenn ein "Klick"-Geräusch zu hören ist, zeigt dies an, dass die
Maschine umgedreht ist. Stellen Sie den Brattopf zur Verwendung in die Maschine (Abb. 12).
Anmerkung:
1. Der Flip kann nur in der von der Abbildung geforderten Richtung ausgeführt werden, und der
umgekehrte kann nicht ausgeführt werden.
2. Wenden Sie während des Wendevorgangs keine rohe Gewalt an. Wenn festgestellt wird,
dass das Spiegeln nicht möglich ist, überprüfen Sie bitte, ob die Spiegeltaste gedrückt ist und
ob die Spiegelrichtung korrekt ist.
3. Wenn die Maschine gerade mit der Arbeit fertig ist, achten Sie beim Wenden darauf, das
Heizrohr und nahe gelegene Metallteile nicht zu berühren, um Verbrennungen zu vermeiden.
Flip Griff Flip Taste
Abb. 9 Abb. 10 Abb. 11 Abb. 12
Bedienungsschritte
1.Beispiel für den Heißluftfrittiermodus "Wings":
①
Stellen Sie die gesamte Maschine auf den leeren Bombenzustand ein (Abbildung 13).
②
Nachdem Sie sich vergewissert haben, dass sich das Grillsilikon auf dem Grill bendet, legen
Sie den Grill richtig in die Fritteuse (mit den vier Beinen des Grills nach unten) (Abbildung 14).
③
Verteilen Sie die marinierten Hähnchenügel ach auf dem Grill (Abbildung 14).
④
Installieren Sie die Fritteuse am Hauptgerät und schieben Sie sie an ihren Platz (Abbildung
15-16).
⑤
Drücken Sie die “ ” Taste im Shortcut-Funktionsbereich, und der Bildschirm zeigt 200°C,
20min.
⑥
Drücken Sie kurz die “ ” Taste, um den Garvorgang zu starten, und auf dem Bildschirm
wird die verbleibende Zeit angezeigt.
⑦
Wenn die Garzeit nach der Hälfte überschritten ist, piept das Produkt und die "Flip"-Anzeige
im Anzeigebereich blinkt weiter. Bitte ziehen Sie die Bratpfanne heraus und die Maschine
unterbricht den Garvorgang. Nachdem Sie die Hähnchenügel umgedreht und die Bratpfanne
installiert haben, kocht die Maschine weiter.
⑧
Wenn das Produkt fünf Pieptöne von "Tropfen" ausgibt, ist der Garvorgang abgeschlossen,
der Anzeigebereich zeigt "Ende" an, nehmen Sie die Fritteuse vorsichtig heraus und nehmen
Sie die Zutaten heraus.
31
Anmerkung:
1. Achten Sie beim Aufstellen der Bratpfanne darauf, dass sie ach steht und sich nicht verzieht.
2. Achten Sie bei Verwendung des Frittiermodus auf das Anti-Verbrühungslogo, um
Verbrennungen zu vermeiden.
3. Der Bratpfannendeckel kann die Heizefzienz verbessern und die Verdunstung von Wasser
reduzieren, und Benutzer können wählen, ob sie den Bratpfannendeckel je nach tatsächlichem
Bedarf verwenden möchten.
2. Beispiel für den Heißluftbratmodus "Fisch"
①
Stellen Sie die Maschine auf den Grillstatus ein und montieren Sie die Grillpfanne (Abb. 17)
②
Drücken Sie die “ ” Taste im Schnellstartfunktionsbereich, der Bildschirm zeigt 200 ° C,
20 Minuten an.
③
Geben Sie Öl in die Grillpfanne, drücken Sie die“ ” Taste, um das Vorheizen zu starten,
und der Bildschirm zeigt die verbleibende Zeit an.
④
Legen Sie den Fisch nach 3 Minuten zum Grillen in die Pfanne (Abb. 18) und drehen Sie den
Fisch in geeigneter Zeit um.
⑤
Wenn das Produkt fünf Pieptöne ausgibt, ist der Garvorgang abgeschlossen und im
Anzeigebereich wird "Ende" angezeigt. Entfernen Sie vorsichtig den Grill und nehmen Sie die
Zutaten heraus.
Abb. 13 Abb. 14 Abb. 15 Abb. 16
Abb. 17 Abb. 18
Anmerkung:
1. Das Gerät verfügt nicht über eine Pausentaste. Wenn Sie eine Pause einlegen müssen,
ziehen Sie die Fritteuse heraus, um sie anzuhalten, und auf dem Bildschirm wird "OPEN"
angezeigt. Die Maschine arbeitet nach der Neuinstallation weiter.
2.Achten Sie bei der Installation des Frittiertopfs darauf, ihn nach unten zu schieben und mit
dem Hauptkörper zu verbinden.

32
Nr
Art des
Rezepts
Empfohle
ne Menge
Standardtem
peratur
(℃)
Temperatur
einstellbarer
Bereich
(℃)
Standa
rdzeit
(
min
)
Zeiteinste
llbarer
Bereich
(
min
)
Flip in der
Halbzeit
oder
nicht
1 Frites 300g 185 50-200 20 1~45 Ja
2 Backen / 150 50-200 22 1~45 Nein
3 Flügel 300g 200 50-200 20 1~45 Ja
4 Dehydriert / 70 50~80 3h 3~8h Nein
5 Fisch 220g 200 50-200 20 1~45 Ja
6 Darnele 200g 200 50-200 8 1~45 Ja
7 Fleisch 130g 200 50-200 10 1~45 Nein
8 DIY / 200 50-200 20 1~45 /
Nr
Art des
Rezepts
Empfohle
ne Menge
Standardtem
peratur
(℃)
Temperatur
einstellbarer
Bereich
(℃)
Standa
rdzeit
(
min
)
Zeiteinste
llbarer
Bereich
(
min
)
Flip in der
Halbzeit
oder
nicht
1 sch 300g 185 50-200 20 1~45 Ja
2 Garnele 200g 220 150-220 10 1~45 /
3 Fleisch 130g 220 150-220 8 1~45 /
4 DIY / 220 150-220 30 1~45 /
Rezeptvergleichstabelle
Die folgende Tabelle hilft Ihnen bei der Auswahl der Grundeinstellungen für die Zutaten, die Sie
kochen möchten, und diese Einstellungen dienen nur als Referenz. Je nach Quelle, Größe,
Form und Marke der Zutaten gibt es leichte Unterschiede, sodass Sie die Zutaten auf den
gewünschten Zustand einstellen können.
Luftfritteuse rezeipt
Grill recipe

33
Reinigung und Wartung
1. Achten Sie darauf, den Stecker aus der Steckdose zu ziehen und warten Sie, bis der
Maschinenkörper vor der Reinigung und Wartung abkühlt, da sonst Gefahr wie Stromschlag,
Feuer und Verbrühungen auftreten kann. Warte nach dem Kochen, bis die Fritteuse oder
Fritteuse abgekühlt ist, bevor du die restlichen Ölecken im Topf reinigst.
2. Warten Sie nach dem Kochen, bis die Fritteuse oder Fritteuse abgekühlt ist, bevor Sie die
restlichen Ölecken aus der Pfanne entfernen.
3. Tauchen Sie den Wirt nicht in Wasser ein oder spülen Sie ihn unter dem Wasserhahn ab.
Verwenden Sie stattdessen ein feuchtes Tuch, um die Oberäche abzuwischen.
4. Es wird empfohlen, warmes Wasser, Reinigungsmittel und nicht abrasiven Schwamm zu
verwenden, um Fritteusen, Fritteusen, Grills und Pfannenbezüge zu reinigen.
5. Verwenden Sie nicht die Spülmaschine, um die Fritteuse zu reinigen.
6. Stellen Sie frisch gekochte Fritteusen, Pfannen oder Deckel nicht in Wasser oder
Kühlschränke, um Schäden durch Hitze- und Kälteschocks zu vermeiden.
Wichtige Sicherheitshinweise
Bitte lesen Sie diese Bedienungsanleitung sorgfältig durch, bevor Sie dieses Produkt
verwenden, um Fehlbedienungen und Gefahren zu vermeiden, und bewahren Sie sie für
zukünftige Zwecke ordnungsgemäß auf. Die folgenden Sicherheitsvorkehrungen müssen bei
der Verwendung dieses Produkts beachtet warden.
Kinder zwischen 0 und 8 Jahren dürfen dieses Produkt nicht verwenden. Kinder ab 8 Jahren
können das Gerät unter ständiger Aufsicht benutzen. Wenn die physische, sensorische oder
geistige Kapazität eingeschränkt ist oder es der Person an Erfahrung und Wissen mangelt,
muss das Gerät beaufsichtigt oder angewiesen werden, das Gerät sicher zu verwenden und die
damit verbundenen Gefahren zu verstehen. Bewahren Sie Geräte und deren Kabel außerhalb
der Reichweite von Kindern unter 8 Jahren auf. Kinder sollten dieses Produkt nicht reinigen und
pegen.
Wenn das Stromkabel beschädigt ist, muss es durch ein spezielles Stromkabel oder eine
spezielle Komponente ersetzt werden, die vom Hersteller oder dessen Kundendienst
bereitgestellt wird.
Das Produkt kann nicht über eine externe Zeitschaltuhr oder eine separate Fernbedienung
bedient werden.
Dieses Produkt darf nicht in Wasser getaucht werden.
Dieses Produkt ist für Haushalts- und ähnliche Anwendungen konzipiert, wie z.B.:
– Küchenbereiche der Mitarbeiter in Geschäften, Büros und anderen Arbeitsumgebungen;
– Wohngebäude;
– Für Kunden in Hotels, Motels und anderen Wohnumgebungen;
- Wohn und Frühstücksumgebungen.

34
Anmerkung
1. In der Gebrauchsanweisung kann es geringfügige Unterschiede zwischen den Produktdesign-
und Spezikationsdaten und dem tatsächlichen Produkt geben, daher beziehen Sie sich bitte
auf das tatsächliche Produkt.
2.Wenn sich Kinder in der Nähe sind, verwenden Sie dieses Produkt mit besonderer Vorsicht
und lassen Sie Kinder es nicht allein verwenden.
3.Wenn das Produkt eingeschaltet oder gekühlt wird, sollten das Produkt und das Stromkabel
außerhalb der Reichweite von Kindern unter 8 Jahren platziert werden.
4.Das Produkt muss unter der Begleitung von Erwachsenen verwendet werden.
5.Achten Sie darauf, dass das Stromkabel nicht mit heißen Oberächen in Berührung kommt.
6. Wenn während des Gebrauchs Fehlfunktionen oder Anomalien auftreten, stellen Sie die
Verwendung bitte sofort ein und warten Sie, bis sie von einem JIMMY-Händler vor Ort getestet
wurde, bevor Sie die Verwendung fortsetzen. Alle Reparaturen müssen von professionellem
Personal durchgeführt werden.
7. Bitte überprüfen Sie vor dem Gebrauch, ob andere Teile wie Stromkabel und Stecker
beschädigt sind, und verwenden Sie das Produkt nicht mehr, wenn es kaput ist.
8 Bitte überprüfen Sie vor dem Gebrauch, ob die Eingangsspannung dem Produktkennzeichen
entspricht, und bitte verwenden Sie eine separate Steckdose und bestätigen Sie, dass die
Steckdose geerdet ist.
9. Wenn Sie das Produkt aus der Kisten herausnehmen, nehmen Sie Maschine und Zubehör
separat heraus, um zu vermeiden, dass die Maschine herunterfällt und Schäden verursacht.
10. Das Produkt muss auf einem stabilen Tisch platziert werden, wenn es nicht verwendet wird.
electric appliances.
11. Verwenden Sie das Produkt nicht auf geneigtem oder instabilem Tisch und halten Sie es von
Wärmequellen fern, um Beschädigungen von Kunststoffkomponenten zu vermeiden. Stellen Sie
die Maschine nicht auf Elektrogeräte.
12. Das Produkt sollte nicht in der Nähe oder unter Vorhang und anderen brennbaren
Materialien verwendet werden.
13. Stellen Sie das Produkt nicht gegen Wand oder andere Produkte. Lassen Sie mindestens
10cm Platz hinter, legen Sie keine anderen Gegenstände auf das Produkt.
14. Das Gerät hat eine wärmeerzeugende Oberäche, und Personen, die nicht hitzeempndlich
sind (z. B. Diabetiker), müssen darauf achten, es mit Hilfe normaler Menschen zu verwenden.
15.Während des Heizvorgangs den Lufteinlass und -auslass nicht abdecken.
16. Wenn die Fritteuse oder Fritteuse während und am Ende des Heizvorgangs nicht abgekühlt
ist, berühren Sie sie nicht direkt mit den Händen, um Verbrennungen zu vermeiden.
17. Während des Heizvorgangs wird Hochtemperaturdampf aus dem Luftauslass freigesetzt,
Hände und Gesicht sollten in einem sicheren Abstand zum Luftauslass gehalten werden, um
Verbrennungen zu vermeiden.
18. Achten Sie beim Entfernen der beheizten Fritteuse auf Hochtemperaturdampf und heiße
Luft, um Verbrennungen zu vermeiden.
19. Der Bereich mit dem Hochtemperatursymbol
“ ”
auf der Oberäche des Produkts kann
während des Betriebs heiß werden. Bitte achten Sie darauf, Verbrennungen zu vermeiden.
20. Bewegen Sie keine laufende Maschine.
21. Achten Sie beim Umgang mit der gesamten Maschine darauf, die Komponenten der
Fritteuse und der Bratpfanne zu halten, um Stürze und Verletzungen zu vermeiden.

35
Fehler Mögliche Gründen Lösungen
Motor
funktioniert
nicht
Stecker ist nicht angeschlossen Stecken Sie den Stecker in die Steckdose
Nicht auf Start/Abbruch drücken
Drücken Sie die Start-/Stoptaste, um mit
der Arbeit zu beginnen.
Die Fritteuse ist nicht an Ort und
Stelle
Installieren Sie die Fritteuse an Ort und
Stelle
PCB kapput
Kontaktieren Sie uns nach dem Service
zur Reparatur.
Die von der
Maschine
gegarten Zutaten
sind nicht
vollständig gegart
zu viele Zutaten Die Menge der Zutaten reduzieren
zu wenig kochzeit Erhöhen Sie die Garzeit
Gartemperatur zu niedrig Erhöhen Sie die Gartemperatur
Die Fritteuse ist nicht an Ort und
Stelle, verursacht Luftleckage
und führt zu niedrigen
Temperaturen
Überprüfen Sie, ob die Fritteuse
eingeschoben und nicht schief ist
Fehlersuche
Bevor Sie die Wartungsabteilung beauftragen, überprüfen Sie bitte die
folgenden Punkte:
22. Verwenden Sie kein Zubehör oder Komponenten anderer Hersteller ohne Empfehlung, sonst
wird Ihre Qualitätssicherung ungültig.
23. Dieses Produkt kann nicht mit einem externen Timer oder einer unabhängigen Fernbedienung
betrieben werden.
24. Stellen Sie den heißen Brattopf nach dem Kochen nicht direkt in kaltes Wasser oder
Kühlschrank, um Schäden zu vermeiden.
25. Verwenden Sie keine Gewalt während des Drehvorgangs des Maschinenkopfes. Wenn es
nicht gedreht werden kann, bitte bestätigen ob die Taste gedrückt ist und ob die Drehrichtung
korrekt ist.
26. Drehen Sie nach der Verwendung der Luftbratfunktion des Produkts den Hauptkörper
nicht sofort mit den Händen, um zu verhindern, dass diese das Heizelement berühren und
Verletzungen verursachen
27. Wenn sich das Produkt im Grillmodus befindet, stellen Sie den Fritteusetopf nicht direkt
auf das Heizelement, um es zu erhitzen, damit der Fritteusetopf nicht risst und Verletzungen
verursacht.

36
Hinweise:
Wenn es einen anderen Fehler gibt, sind Spezialwerkzeuge erforderlich, müssen sie
von Fachleuten des Herstellers seiner Wartungsabteilung oder einer ähnlichen
Abteilung repariert werden.
Fehler Mögliche Gründen Lösungen
Die von der
Maschine
gegarten Zutaten
sind nicht
vollständig gegart
Die Pfanne wird nicht an Ort und
Stelle platziert und ist zu weit
vom Heizrohr entfernt, was zu
einer niedrigen Temperatur der
Pfanne führt
Überprüfen Sie, ob die Pfanne an Ort und
Stelle steht und nicht gekippt oder gekippt
ist
Weißer Rauch
aus dem Produkt
Kochzutaten mit hohem Ölgehalt
Beim Kochen von Zutaten mit hohem
Ölgehalt in der Maschine erzeugt der
Ölgehalt weiße Öldämpfe, und die
Fritteuse kann heißer als normal sein,
was den endgültigen Gareffekt nicht
beeinusst
Es gibt noch Ölreste von der
letzten Verwendung im Grill oder
Fritteuse
Stellen Sie sicher, dass Grill und Fritteuse
nach jedem Gebrauch richtig gereinigt
sind
Display zeigt E1 NTC offen oder kurzgeschlossen
Wenden Sie sich an die After-Sales-
Reparatur
Product Specication
Technical parameter
Produkt Name Luftfritteuse
Modell AF3
Nennspannung 220V-240V~
Nennfrequenz 50-60Hz
Nennleistung 1100W
Nennvolumen
4L

37
Schaltplan
L
E
N
220V-240V~50-60Hz
Motor
Sicherung
Sicherung
Strom
PCB
Kontroll
PCB
Heizungsrohr
M
NTC
Mirco
schalter
Micro
switch
Info des Herstellers
Hersteller Kingclean Elektro GmbH
Anschrift
Xiangyang-Straße 1, Suzhou-Neustadtteil, Jiangsu-Provinz, VR China,
215009
Entsorgung
Maschinen, Zubehör und Verpackungen sollten umweltgerecht zurückgewonnen werden.
Werfen Sie die Maschine nicht in den Hausmüll!
Ohne Vorankündigung können die Regeln geändert werden.
Garantieinformationen
Der Hostteil dieses Produkts hat Anspruch auf eine einjährige Garantiezeit ab Kaufdatum.
Vom Garantieumfang ausgenommen sind normale Abnutzung, gewerbliche Nutzung,
Änderungen am Elektrogerät, Reinigungstätigkeiten, Schäden durch unsachgemäßen Gebrauch
durch den Käufer oder Dritte oder Schäden durch äußere Umgebungen (z.B. anormale
Spannung, Naturkatastrophen etc.).
3838
Assemblage de produits
Liste des pièces
Entrée d'air
Corps principal
Poêle à frire
Panneau de
commande
Air outlet
Poignée
roulante
Couvercle de
poêle à griller
Poêle à griller
Bouton roulant
Cordon
d'alimentation
Plaque
croustillante
Plaque
croustillante
en caoutchouc
silicone
Présentation des accessoires
1. marmite à frire : La poêle à frire est le récipient principal pour les ingrédients de cuisson, avec
une capacité maximale de 4 litres (Fig. 1).
Liste de colisage
Nom de la
pièce
Corps
principal
Poêle à frire
Plaque
croustillante
Poêle à
griller
Couvercle
de la poêle à
griller
Manuel de
l'utilisateur
Quantité 1 1 1 1 1 1
Remarque :
①
Poussez le pot de friture vers le bas lorsque vous l'installez et mettez-le en place avec le
corps principal.
②
La poêle à frire est en verre, assurez-vous qu'il n'y a pas de collision avec une force externe
pendant le processus de manipulation an d'éviter tout dommage
Fig 1

39
③
Pendant le chauffage, la température de surface du pot est élevée. Ne la touchez pas
directement, vous risqueriez de vous brûler.
④
Ne mettez pas la poêle à frire chaude après la cuisson dans l'eau ou le réfrigérateur pour
éviter d'endommager le verre.
2.plaque croustillante:La plaque croustillante est installée à l'intérieur du pot de friture (avec ses
quatre pieds tournés vers le bas) et peut être retirée pour être nettoyée. Sa fonction principale
est de soulever les ingrédients, pour une meilleure circulation de l'air chaud, et de les aider à
chauffer uniformément.
Remarque :
①
Sauf exigences particulières, la plaque croustillante doit être utilisée pendant la friture à l'air,
sinon l'effet de cuisson risque d'en être affecté.
②
Placez les ingrédients en une seule couche sur la plaque du bac à légumes, ne les empilez
pas, car cela pourrait affecter l'effet de la cuisson.
Poêle à griller : la poêle à griller est principalement utilisée pour frire ou griller les aliments (Fig. 3).
Remarque:
①
Lors de l'installation du bac à grillades, veillez à le placer de manière stable sur le corps
principal.
②
Pendant le chauffage, la température de surface de la casserole est élevée. Ne la touchez
pas directement, vous risqueriez de vous brûler.
③
La poêle à griller est uniquement utilisée pour frire et griller. Ne l'utilisez pas pour chauffer
des liquides.
4. Couvercle de la poêle à griller : le couvercle de la poêle à griller est utilisé avec la poêle à
griller pour améliorer l'efcacité du chauffage et éviter les éclaboussures d'huile (Fig. 4).
Fig 3
Fig 2
Fig 4
40
Remarque :
Le couvercle de la poêle à griller est en verre, assurez-vous qu'il n'y a pas de collision avec une
force externe pendant le processus de manipulation an d'éviter tout dommage.
Utilisation du produit
Avant la première utilisation, il convient de noter les points suivants :
1.Lisez attentivement ce manuel d'utilisation.
2.Placer le produit sur un plan de travail stable et plat. Ne pas le placer sur une surface
thermolabile.
3.Avant de brancher l'appareil dans la prise de courant, vériez que l'alimentation électrique est
de 220V-240V~ et que l'appareil est mis à la terre.
4.Avant la première utilisation, lavez la cuve à frire, le support du bac à légumes, la plaque à
griller et le couvercle de la plaque à griller avec de l'eau chaude, du détergent et une éponge
non abrasive.
5.Lors de la première utilisation, il est normal d'avoir des odeurs et une petite quantité de fumée.
Après le nettoyage, l'odeur peut être éliminée en chauffant à 200
℃
pendant 20 minutes en
mode friture à l'air.
6.Ne pas immerger le corps principal dans l'eau ou le rincer sous l'eau du robinet, car il contient
des composants électroniques et chauffants.
7.Ne pas couvrir l'entrée et la sortie d'air de l'appareil pendant son fonctionnement.
8.Lorsque l'appareil fonctionne, la température de surface de la sortie d'air, de la poêle à frire,
de la poêle à griller et du couvercle de la poêle à griller est élevée. Ne les touchez pas pour
éviter les brûlures.
Description de la fonction
Zone d'afchage de
l'heure
Zone des boutons de la
fonction de démarrage rapide
Zone des boutons
de réglage des
paramètres
Zone du bouton
de commande
Start/Cancel
Zone d'afchage de l'heure
1.Lorsque “ ”s'allume, l'écran afche le temps restant.
2.5.Lorsque “ ” s'allume, l'écran afche la température préréglée.
3.6.Lorsque le voyant "Flip" s'allume en émettant 3 bips, retirez le pot de friture, retournez les
ingrédients alimentaires, puis réinstallez le pot de friture dans le corps principal, et le produit se
remettra automatiquement en marche.
4.“ ”afche la température et l'heure correspondantes.
41
Zone des boutons de la fonction de démarrage rapide
Le produit est préréglé avec 7 fonctions de démarrage rapide, dont les frites, la cuisson au
four, les ailes, la déshydratation, le poisson, les crevettes, la viande et un mode bricolage.
Vous pouvez sélectionner directement la fonction de démarrage rapide ou personnaliser votre
cuisson.
Remarque:
1.En mode de cuisson à l'air, toutes les fonctions de démarrage rapide peuvent être utilisées.
2.En mode gril, seuls le poisson, les crevettes, la viande et le bricolage peuvent être utilisés.
Zone des boutons de réglage des paramètres
1.
“ ”
Bouton : Permet d'afcher la température et l'heure.
2.
“ ”“ ”
bouton:En mode d'afchage de l'heure:Appuyez sur
“ ”
ou
“ ”
our
régler le temps de cuisson. La plage de réglage est de 1 à 45 minutes. Une pression prolongée
sur la touche permet de régler rapidement le temps. En mode d'afchage de la température :
Appuyez sur
“ ”
ou
“ ”
pour régler la température de cuisson. La plage de réglage
en mode friture à l'air est de 50
℃
à 200
℃
, et la plage de réglage en mode grillade est de 150
℃
à 220
℃
. Une pression longue sur le bouton permet de régler rapidement la température.
Zone du bouton de commande Start/Cancel
1.
“ ”
Le bouton de cuisson est activé : Une fois la fonction et les paramètres réglés,
appuyez sur
“ ”
pour lancer la cuisson.
2. Pendant le réglage des paramètres ou la cuisson, appuyez sur
“ ”
et maintenez cette
touche enfoncée pendant deux secondes pour revenir à l'état de veille ; l'écran afche alors "----".
Commutateur de fonction
Cet appareil a deux fonctions : la friture à l'air et le gril. Suivez les étapes ci-dessous pour
passer d'une fonction à l'autre.
1.Du mode friture à l'air au mode gril :
Retirez d'abord la friteuse (Fig5), appuyez sur le bouton de basculement et maintenez-le
enfoncé tout en tenant la poignée de basculement (Fig6), basculez le dessus de la machine
dans le sens de la èche indiqué sur l'image (Fig 7). Lorsqu'un "clic" se fait entendre, cela
indique que l'appareil est retourné en place. Placez le plateau du gril sur le corps principal pour
l'utiliser (Fig 8).
Poignée à bascule Bouton à bascule
Fig 5 Fig 6 Fig 7 Fig 8
42
2. du mode gril au mode friture à l'air :
Retirez d'abord le plateau du gril (Fig 9), appuyez sur le bouton de basculement et maintenez-
le enfoncé tout en tenant la poignée de basculement (Fig 10), puis basculez le dessus de la
machine dans le sens de la èche indiqué sur l'image (Fig 11). Lorsqu'un "clic" se fait entendre,
cela indique que l'appareil est retourné en place. Placez le pot de friture dans la machine pour
l'utiliser (Fig 12).
Fig 9 Fig 10 Fig 11 Fig 12
Poignée à bascule Bouton à bascule
Remarque :
1. La machine ne peut être retournée que dans le sens indiqué sur l'image, elle ne peut pas être
retournée dans le sens inverse.
2. N'utilisez pas la force brute pendant le processus de retournement. S'il s'avère que le
retournement ne peut pas être effectué, vériez si le bouton de retournement est enfoncé et si
la direction du retournement est correcte.
3. Si la machine vient de fonctionner, pendant le retournement, veillez à ne pas toucher le tube
chauffant et les pièces métalliques voisines an d'éviter les brûlures.
Étapes de l'opération
1. exemple de mode de friture à l'air "Wings" (ailes)
①
Régler l'appareil sur le mode de friture à l'air (Fig. 13)
②
S'assurer que le caoutchouc de silicone est sur le support du bac à légumes, et placer le bac
à légumes correctement dans le pot de friture (avec les quatre pattes tournées vers le bas) (Fig 14).
③
Les ailes de poulet marinées sont posées à plat sur le support croustillant (Fig 14).
④
Installer le pot de friture dans le corps principal et le pousser en place (Fig 15-16).
⑤
Appuyez sur le bouton“ ” dans la zone de démarrage rapide, l'écran afche 200
℃
20min.
⑥
Appuyez sur la touche “ ”pour démarrer la cuisson, l'écran commence à afcher le temps restant.
⑦
Lorsque le temps de cuisson est supérieur à la moitié, l'appareil émet un signal sonore
et l'indicateur "ip" de la zone d'afchage clignote en permanence. Retirez la poêle à frire et
l'appareil interrompt la cuisson. Après avoir retourné les ailes de poulet et remis la poêle en
place, l'appareil poursuit la cuisson.
⑧
Lorsque l'appareil émet cinq bips sonores, la cuisson est terminée et l'écran afche "End".
Retirez délicatement le pot de friture et sortez les ingrédients.
Fig 13 Fig 14 Fig 15 Fig 16
43
Remarque :
1. lors de l'installation de la plaque du gril, veillez à ce qu'elle soit placée à plat et qu'elle ne soit
pas déformée.
2. Lors de l'utilisation du mode gril, veuillez prêter attention à l'avertissement de l'étiquette anti-
brûlure an d'éviter les brûlures.
3. Le couvercle de la casserole peut améliorer l'efcacité du chauffage et réduire l'évaporation
de l'eau. Vous pouvez choisir d'utiliser le couvercle de la casserole en fonction de vos besoins.
Remarque:
1. L'appareil n'est pas équipé d'un bouton de pause. Si vous devez faire une pause, tirez la
friteuse pour la mettre en pause et l'écran afche "OPEN". La machine se remet à fonctionner
après la réinstallation...
2. lors de l'installation du pot de friture, veillez à le pousser vers le bas et à le mettre en place
avec le corps principal.
2. Exemple de mode de friture à l'air "Poisson"
①
Régler l'appareil sur le mode gril et assembler la plaque à griller (Fig. 17).
②
Appuyez sur le bouton “ ” dans la zone de démarrage rapide, l'écran afche 200
℃
20min.
③
Mettre l'huile dans la poêle du gril, appuyer sur la touche “ ” pour commencer le
préchauffage, l'écran commence à afcher le temps restant.
④
Après 3 minutes, mettre le poisson dans la poêle à griller (Fig. 18), retourner le poisson au
moment opportun.
⑤
Lorsque l'appareil émet cinq bips sonores, la cuisson est terminée et l'écran afche "End".
Retirez délicatement la grille et sortez les ingrédients.
Fig 17 Fig 18

44
Non
Type de
recette
Volume
proposé
Température
par défaut
(℃)
Température
réglable
(℃)
Temps
par
défaut
(min)
Temps
réglable
(
min
)
Retournement
à la mi-temps
ou non
1 Frites 300g 185 50-200 20 1~45 Oui
2 Cuisson / 150 50-200 22 1~45 Non
3 Ailes 300g 200 50-200 20 1~45 Oui
4 Déshydratation / 70 50~80 3h 3~8h Non
5 Poisson 220g 200 50-200 20 1~45 Oui
6 Crevettes 200g 200 50-200 8 1~45 Non
7 Viande 130g 200 50-200 10 1~45 Oui
8 BRICOLAGE / 200 50-200 20 1~45 /
Non
Type de
recette
Volume
proposé
Température
par défaut
(℃)
Température
réglable
(℃)
Temps
par
défaut
(min)
Temps
réglable
(
min
)
Retournement
à la mi-temps
ou non
1 Poisson 60g 220 150-220 20 1~45 /
2 Crevettes 200g 220 150-220 10 1~45 /
3 Viande 130g 220 150-220 8 1~45 /
4 BRICOLAGE / 220 150-220 30 1~45 /
Tableau de comparaison des recettes
Le tableau suivant vous aidera à choisir les réglages de base pour les ingrédients que vous
souhaitez cuisiner, et ces réglages ne sont donnés qu'à titre indicatif. En raison des différentes
sources, tailles, formes et marques d'ingrédients, il peut y avoir de légères différences. Vous
pouvez ajuster l'appareil en fonction de vos ingrédients.
Recette de la friture à l'air libre
Recette de gril

45
Nettoyage et entretien
1. Débranchez la fiche d'alimentation de la prise de courant et attendez que le corps de la
machine refroidisse avant de procéder au nettoyage et à l'entretien, sous peine de provoquer
des risques d'électrocution, d'incendie et de brûlure.
2. Après la cuisson, attendez que la casserole ou la poêle refroidisse avant de nettoyer les
taches d'huile restantes dans la casserole ou la poêle.
3. N'immergez pas le corps principal dans l'eau et ne le rincez pas sous l'eau du robinet. Utilisez
plutôt un chiffon humide pour essuyer la surface.
4. Il est recommandé d'utiliser de l'eau chaude, du détergent et une éponge non abrasive pour
nettoyer la poêle à frire, la poêle à griller, le support du bac à légumes ou le couvercle de la
poêle à griller.
5. Ne pas utiliser le lave-vaisselle pour laver la poêle à frire.
6. Ne pas mettre la poêle à frire, la poêle à griller ou le couvercle de la poêle à griller qui vient
de nir de cuire dans l'eau ou dans le réfrigérateur, an d'éviter les dommages causés par les
chocs froids et chauds subis par le produit.
Notes de sécurité importantes
Veuillez lire attentivement ce manuel avant d'utiliser ce produit afin d'éviter toute erreur
d'utilisation ou tout danger, et conservez-le pour toute référence ultérieure. Les précautions de
sécurité suivantes doivent être respectées lors de l'utilisation de ce produit :
Cet appareil ne doit pas être utilisé par des enfants âgés de 0 à 8 ans. Cet appareil peut être
utilisé par des enfants âgés de 8 ans et plus s'ils sont surveillés en permanence. Cet appareil
peut être utilisé par des personnes dont les capacités physiques, sensorielles ou mentales sont
réduites ou qui manquent d'expérience et de connaissances, à condition qu'elles aient bénécié
d'une surveillance ou d'instructions concernant l'utilisation de l'appareil en toute sécurité et
qu'elles comprennent les risques encourus. Tenez l'appareil et son cordon hors de portée des
enfants âgés de moins de 8 ans. Le nettoyage et l'entretien ne doivent pas être effectués par
des enfants.
Si le cordon d'alimentation est endommagé, il doit être remplacé par un cordon ou un ensemble
spécial disponible auprès du fabricant ou de son agent de service.
L'appareil n'est pas destiné à être utilisé au moyen d'une minuterie externe ou d'un système de
commande à distance séparé.
L'appareil ne doit pas être immergé.
Cet appareil est destiné à être utilisé dans des applications domestiques et similaires telles que
- les cuisines du personnel dans les magasins, les bureaux et autres environnements de travail
- les fermes ;
- par les clients dans les hôtels, les motels et d'autres environnements de type résidentiel ;
- des environnements de type "bed and bre

46
Précautions
1. Il peut y avoir de légères différences entre la conception du produit et les données de
spécication entre le manuel de l'utilisateur et le produit réel. Veuillez vous référer au produit
réel pour plus de précision.
2. Si des enfants se trouvent à proximité, utilisez ce produit avec une prudence accrue et ne
laissez pas les enfants l'utiliser seuls.
3. Lorsque le produit est sous tension ou en cours de refroidissement, le produit et son cordon
d'alimentation doivent être placés hors de portée des enfants de moins de 8 ans.
4. Le produit doit être utilisé sous la surveillance d'un adulte.
5. Ne laissez pas le cordon d'alimentation toucher des surfaces chaudes.
6. En cas de dysfonctionnement ou d'anomalie en cours d'utilisation, veuillez cesser
immédiatement d'utiliser l'appareil et attendre qu'il soit testé par le service après-vente du
distributeur local de JIMMY avant de continuer à l'utiliser. Toutes les réparations doivent être
effectuées par du personnel professionnel.
7. Avant d'utiliser l'appareil, vérifiez que le cordon d'alimentation, la fiche et les autres
composants ne sont pas endommagés. Si vous constatez des dommages, cessez d'utiliser le
produit.
8. Avant d'utiliser l'appareil, vérifiez que la tension d'entrée est conforme à l'étiquette
signalétique du produit et que la prise de courant est reliée à la terre. Veuillez utiliser une prise
de courant séparée.
9. Lorsque vous sortez le produit de son emballage, sortez la machine et les accessoires
séparément an d'éviter que la machine ne tombe et ne soit endommagée.
10. Le produit doit être placé sur un bureau stable lorsqu'il est suspendu.
11. n'utilisez pas le produit sur un bureau incliné ou instable, et tenez-le éloigné des sources de
chaleur an d'éviter d'endommager les composants en plastique. Ne l'approchez pas et ne le
placez pas sur un appareil électrique.
12. Le produit ne doit pas être utilisé à proximité ou sous un rideau ou d'autres matériaux
combustibles.
13. Ne pas placer le produit contre un mur ou d'autres produits. Laissez au moins 10 cm d'espace
libre derrière, des deux côtés et au-dessus du produit. Ne placez pas d'autres objets sur le
produit.
14. L'appareil est doté d'une surface chauffante. Lorsqu'il est utilisé par des personnes qui ne
sont pas sensibles à la chaleur (comme les patients diabétiques), il faut veiller à l'utiliser avec
l'aide de personnes normales.
15. Pendant le chauffage, ne pas couvrir l'entrée et la sortie d'air.
16. pendant ou après le chauffage, si la poêle à frire ou la poêle à griller n'a pas refroidi, ne les
touchez pas directement avec les mains pour éviter de vous brûler.
17 Pendant le chauffage, de la vapeur à haute température s'échappe de la sortie d'air ; les
mains et le visage doivent être maintenus à une distance sufsante de la sortie d'air pour éviter
les brûlures.
18. Lorsque vous retirez la friteuse chauffée de la machine, faites attention à la vapeur à haute
température et à l'air chaud pour éviter les brûlures.
19. La surface du produit = avec le symbole de haute température
“ ”
peut devenir chaude
pendant le fonctionnement. Faites attention à ne pas vous brûler.
20. ne pas déplacer la machine pendant qu'elle fonctionne.

47
21. tenez l'ensemble poêle à frire et plaque de gril lorsque vous déplacez l'appareil, an d'éviter
qu'il ne tombe, ne se blesse ou ne s'endommage.
22. Ne pas utiliser d'accessoires ou de composants produits par d'autres fabricants sans
recommandation de JIMMY, sous peine d'annulation de la garantie.\
23 Ce produit ne peut pas être utilisé avec une minuterie externe ou un système de
télécommande indépendant.
24. Ne pas mettre la poêle à frire chaude après la cuisson directement dans l'eau froide ou dans
le réfrigérateur an d'éviter tout dommage.
25. Ne forcez pas trop pour faire tourner la tête de la machine. Si vous constatez qu'il est
impossible de la tourner, vérifiez si le bouton de déverrouillage est enfoncé et si le sens de
rotation est correct.
26. après avoir utilisé la fonction de friture à l'air du produit, ne pas retourner immédiatement le
corps principal avec les mains pour éviter qu'elles ne touchent l'élément chauffant et ne causent
des blessures.
27 Lorsque l'appareil est en mode gril, ne placez pas la cuve de la friteuse directement sur
l'élément chauffant pour la chauffer, an d'éviter que la cuve de la friteuse ne se ssure et ne
provoque des blessures.
Trouble shooting
Before sending the product to repair, please check below points first:
Problèmes Causes possibles Solution
La machine
ne s'allume
pas
Il n'est pas branché sur une prise de
courant.
Insérez la fiche dans la prise de courant.
Ne pas appuyer sur la touche de
démarrage/annulation.
Appuyez sur la touche start/cancel pour
commencer à travailler.
Le pot de friture n'est pas monté en
place.
Assemblez le pot de friture à air
comprimé en place.
Dommages au PCB.
Contactez le service après-vente pour la
réparation.
Ingrédients
non
entièrement
cuits
Trop d'ingrédients sont mis. Mettez moins d'ingrédients.
Temps de cuisson trop court. Augmentez le temps de cuisson.
Température de cuisson trop basse. Augmentez le réglage de la température.
Le pot de friture à air n'est pas installé
à sa place, les fuites d'air entraînent
une température trop basse.
Vérifiez que le pot de friture à l'air est
assemblé en place sans être incliné.
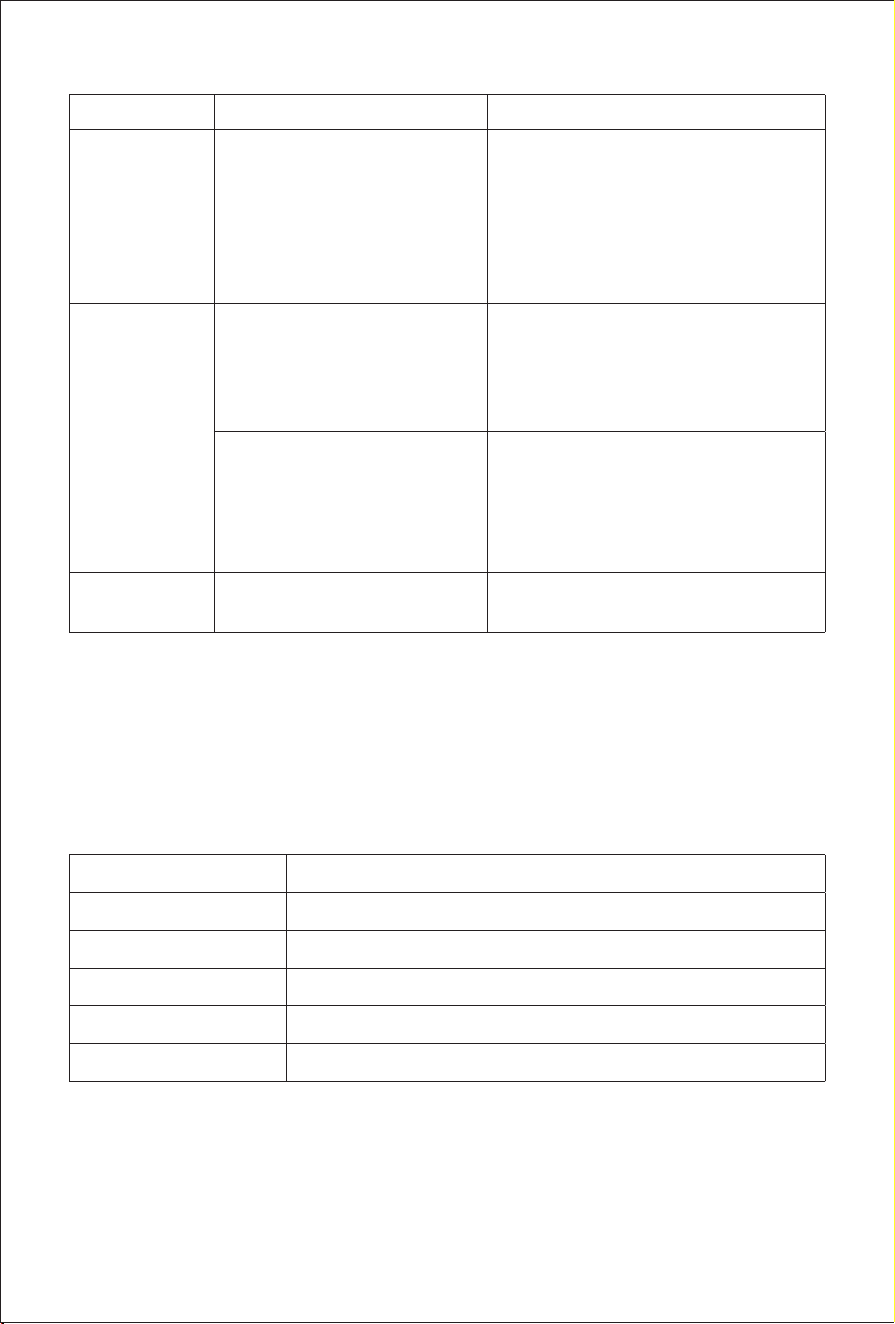
48
Problèmes Causes possibles Solution
Ingrédients
non
entièrement
cuits
La plaque de cuisson n'est
pas montée en place et est
trop éloignée de l'appareil de
chauffage, ce qui fait que la
température de la plaque de
cuisson est trop basse.
Vérifiez que la plaque à griller est bien
montée en place, de manière inclinée et
courbée.
Fumée blanche
émanant du
produit
Le produit est un ingrédient de
cuisine riche en huile.
Lors de la cuisson d'ingrédients riches en
huile, l'huile produira de la fumée blanche
et la friteuse peut être plus chaude que la
normale, ce qui n'affectera pas l'effet nal
de la cuisson.
Il reste des résidus d'huile de la
dernière utilisation sur le support
du bac à légumes ou la cuve de
friture.
Assurez-vous que le support du bac
à légumes et la cuve de friture sont
correctement nettoyés après chaque
utilisation.
L'écran afche
E1
NTC circuit ouvert ou court-circuit.
Contactez le service après-vente pour la
réparation.
Remarque : En cas d'autres défaillances, des outils spéciaux étant nécessaires, veuillez
envoyer l'appareil à un centre de réparation agréé ou contacter le distributeur JIMMY local pour
obtenir des conseils.
Spécication du produit
Paramètres techniques
Nom du produit Friteuse à air
Numéro de modèle AF3
Tension nominale 220V-240V~
Fréquence nominale 50-60Hz
Puissance nominale 1100W
Capacité nominale
4L

49
Schéma du circuit
L
E
N
220V-240V~50-60Hz
Moteur
Fuse
Fuse
Carte de
circuit
imprimé
d'alimentation
PCB de
contrôle
Chauffage
M
NTC
Micro-
interrupteur
Micro-
interrupteur
Informations sur le fabricant
Fabricant Kingclean Electric Co., Ltd
Adresse
No.1 Xiangyang road, Suzhou New District,Jiangsu province, 215009,
China
Mise au rebut
La machine, les accessoires et l'emballage doivent être triés pour un recyclage respectueux de
l'environnement.
Ne pas jeter la machine dans les ordures ménagères !
Sous réserve de modications sans préavis.
Informations sur la garantie
Le corps principal de ce produit bénécie d'une garantie d'un an à compter de la date d'achat.
Sont exclus de la garantie l'usure normale, l'utilisation commerciale, les modications apportées
à l'appareil tel qu'il a été acheté, les activités de nettoyage, les conséquences d'une utilisation
inappropriée ou les dommages causés par l'acheteur ou une tierce personne, les dommages
qui peuvent être attribués à des circonstances extérieures(IE tension anormale, calamités
naturelles, etc ).
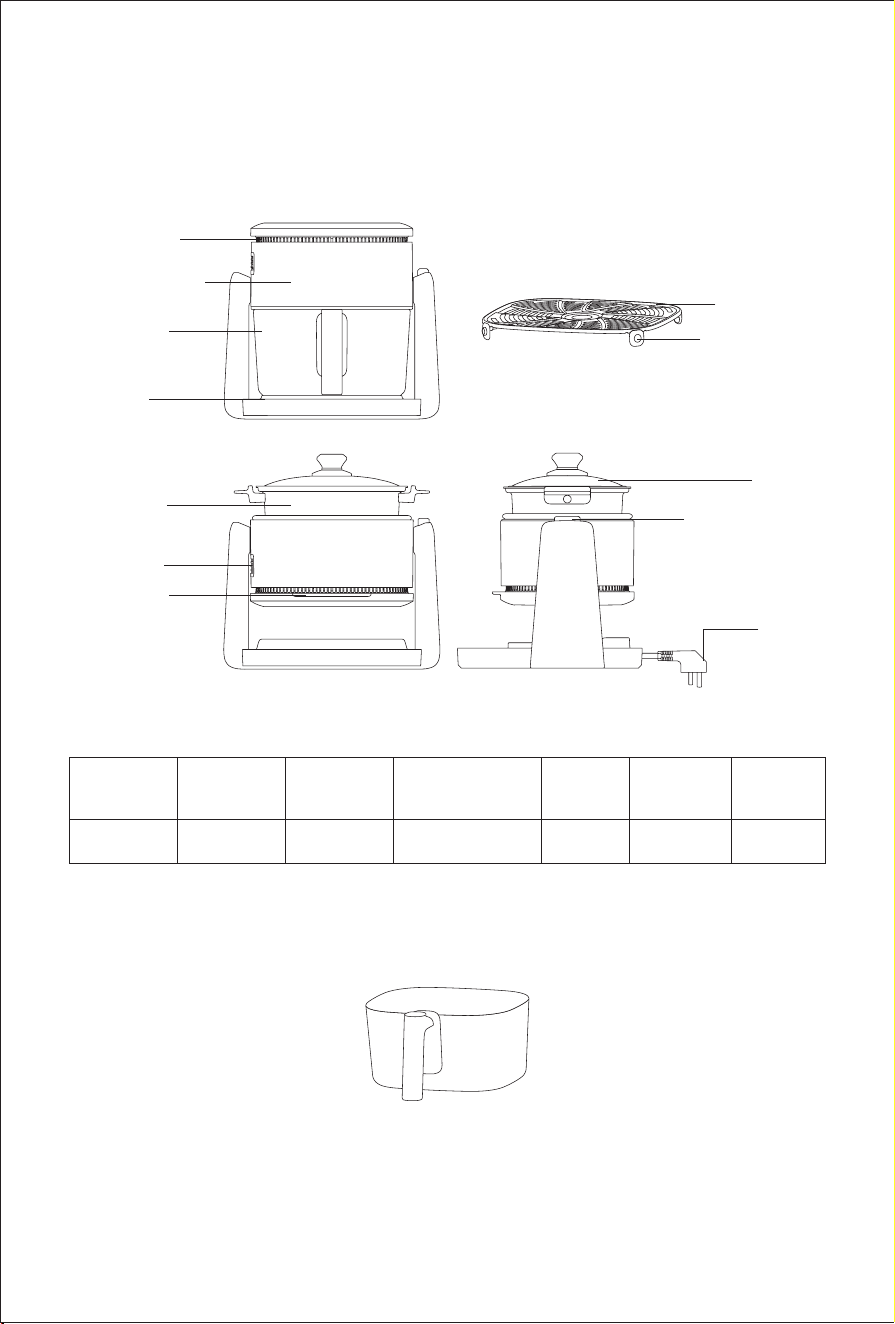
50
Product Assembly
Part Name
Ingresso aria
Corpo principale
Pentola per
friggere
Pannello
operativo
Uscita aria
Impugnatura
rotante
Coperchio per
grigliare
Padella per
grigliare
Pulsante rotante
Cavo di
alimentazione
Piatto crisper
Piastra Crisper
in gomma
siliconica
Introduzione agli accessori
1. Pentola per friggere: la pentola per friggere è la pentola principale per la cottura degli
ingredienti, con una capacità massima di 4 litri (Fig. 1).
Lista imballaggio
Nome parte
Corpo
principale
Pentola per
friggere
Piatto per frutta e
verdura
Padella
griglia
Coperchio
griglia
Manuale
d'uso
Quantità 1 1 1 1 1 1
Nota:
①
Spingere la pentola sul fondo durante l'installazione e inserirla in posizione con il corpo
principale.
②
La pentola è di vetro, assicurati che non avvenga alcuna collisione di forze esterne durante il
Fig 1
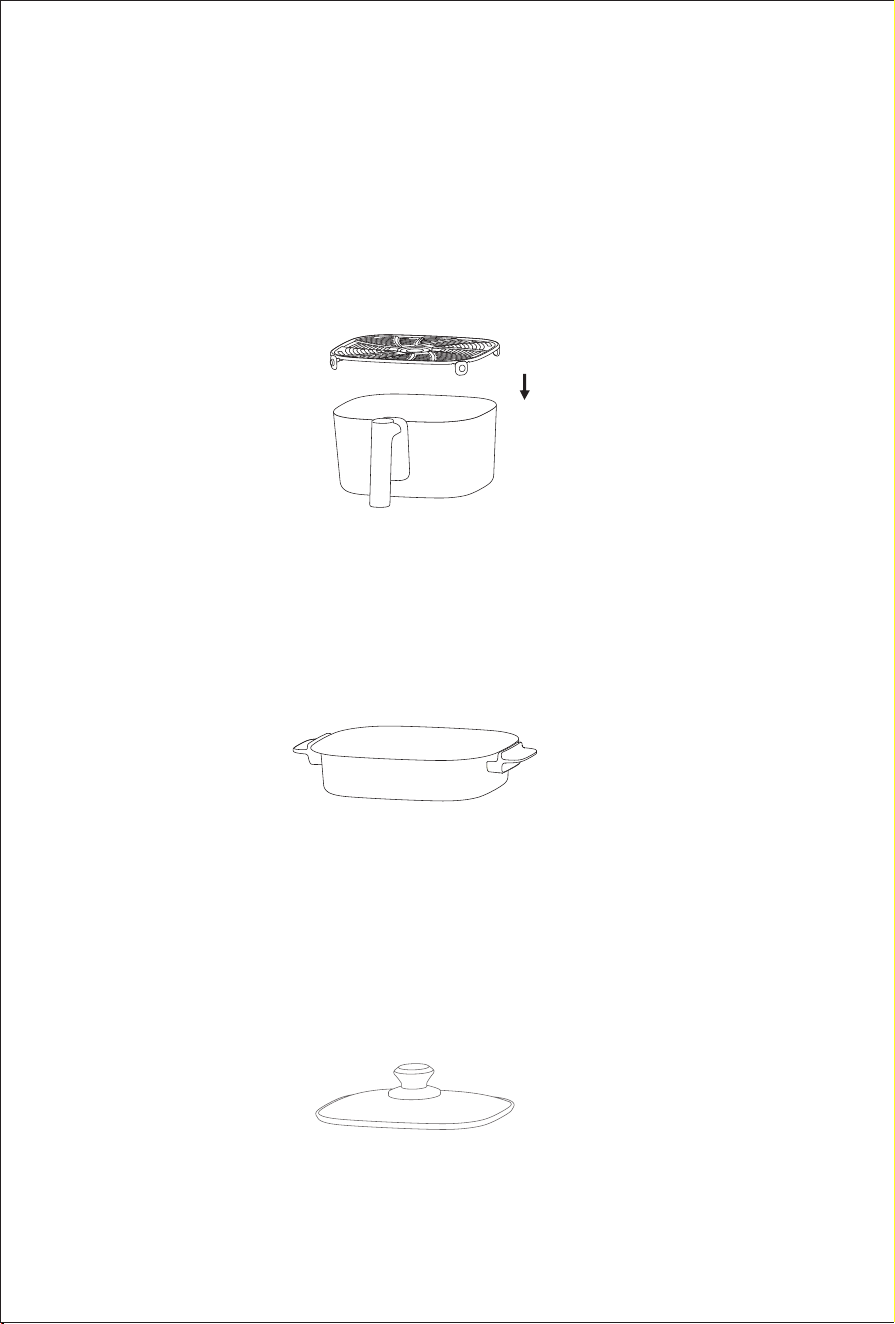
51
processo di movimentazione per evitare danni.
③
Durante il riscaldamento, la temperatura superciale della pentola è elevata. Non toccarla
direttamente, altrimenti potrebbe causare ustioni.
④
Non mettere la pentola calda dopo la cottura in acqua o frigorifero per evitare danni al vetro.
2 Piatto crisper: il piatto crisper è installato all'interno della pentola (con le quattro gambe
rivolte verso il basso) e può essere estratto per la pulizia. La sua funzione principale è quella di
sollevare gli ingredienti, per una migliore circolazione dell'aria calda, e di aiutarli a riscaldarsi in
modo uniforme.
Nota:
①
Ad eccezione di requisiti speciali, il piatto crisper deve essere utilizzato durante la frittura ad
aria, altrimenti potrebbe inuire sull'effetto di cottura.
②
Posiziona gli ingredienti in un unico strato sul piatto crisper, non impilarli, altrimenti ciò
potrebbe inuenzare l’efcacia di cottura.
Bistecchiera: la bistecchiera viene utilizzata principalmente per friggere o grigliare il cibo. (Fig. 3)
Nota:
①
Quando si installa la padella griglia, assicurati di posizionarla stabilmente sul corpo principale.
②
Durante il riscaldamento, la temperatura superciale della padella è alta. Non toccarla
direttamente, altrimenti potrebbe causare ustioni.
③
La padella griglia viene utilizzata solo per friggere e grigliare. Non usarla per riscaldare liquidi.
4. Coperchio della bistecchiera: il coperchio della bistecchiera viene utilizzato insieme alla
bistecchiera per migliorare l'efcienza del riscaldamento e prevenire schizzi d'olio. (Fig. 4).
Nota:
Il coperchio della bistecchiera è in vetro, assicurati che non ci sia alcuna collisione di forze
esterne durante il processo di movimentazione per evitare danni.
Fig 3
Fig 2
Fig 4
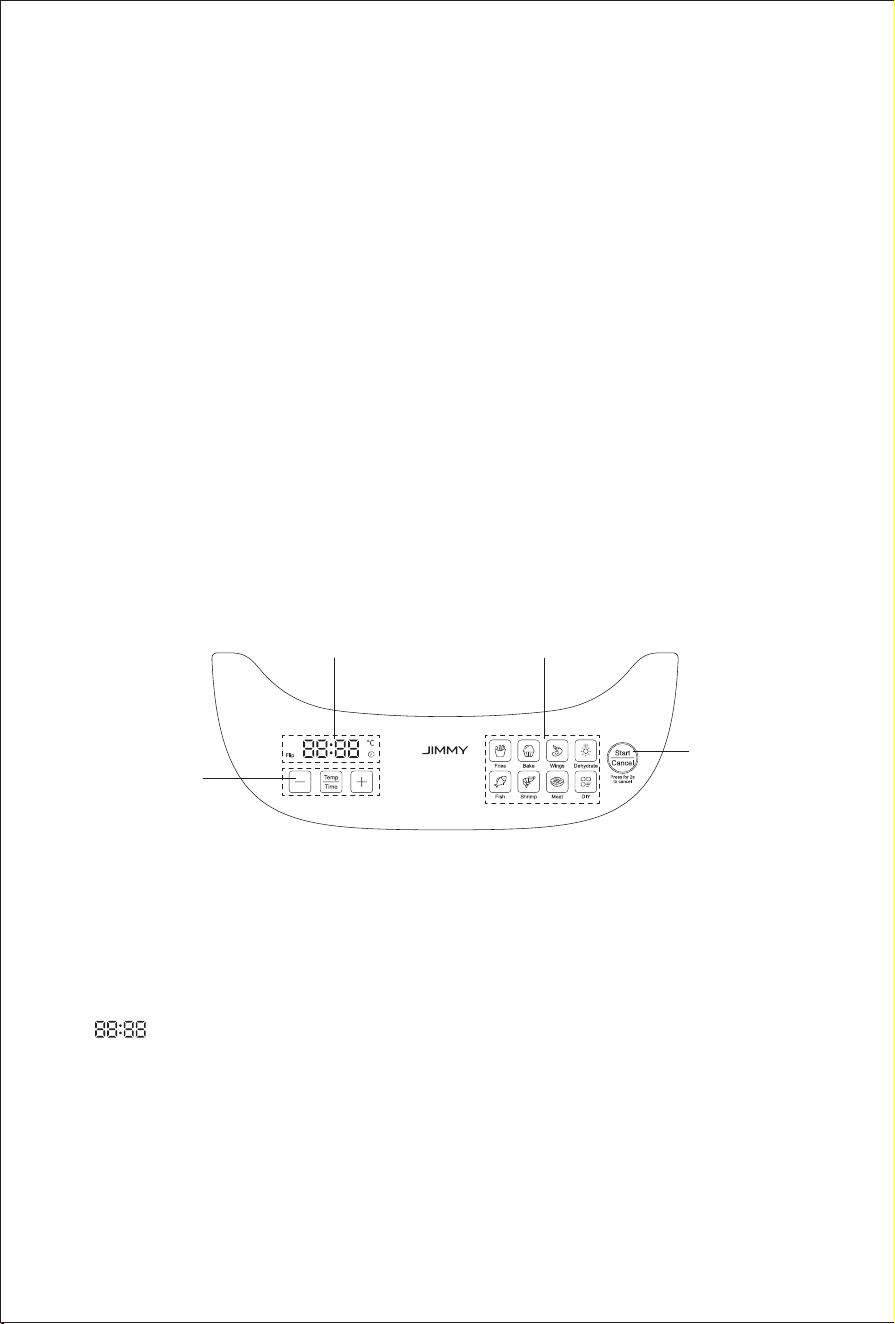
52
Uso del prodotto
Prima del primo utilizzo, è necessario notare i seguenti punti:
1.Leggere attentamente questo manuale utente.
2.Posizionare il prodotto su un piano d'appoggio stabile e piatto. Non collocarlo su una
supercie resistente al calore.
3.Prima di inserire la spina nella presa di corrente, verificare che l'alimentazione sia a
220V-240V~ e assicurarsi che sia collegata a terra.
4.Prima dell'uso iniziale, lavare la pentola per friggere, il supporto per il crisper, la padella per il
grill e il coperchio della padella per il grill con acqua calda, detersivo e spugna non abrasiva.
5.Durante il primo utilizzo, è normale che vi sia un piccolo odore di fumo. Dopo la pulizia, l'odore
può essere eliminato riscaldando a 200
℃
per 20 minuti in modalità di frittura ad aria.
6. Non immergere il corpo principale in acqua o risciacquarlo sotto l'acqua del rubinetto, poiché
al suo interno sono presenti componenti elettronici e di riscaldamento.
7. Non coprire l'ingresso e l'uscita dell'aria del prodotto durante il funzionamento.
8.Quando il prodotto è in funzione, la temperatura superciale dell'uscita dell'aria, della pentola,
della padella e del coperchio della padella è elevata. Non toccarli per evitare ustioni.
Descrizione delle funzioni
Area di visualizzazione
dello stato dell'ora
Area dei pulsanti delle
funzioni di avvio rapido
Area dei pulsanti
di regolazione dei
parametri
Area del
pulsante
di avvio/
annullamento
Area di visualizzazione dello stato dell'ora
1.Quando si accende, lo schermo visualizza il tempo rimanente.
2.Quando si accende, lo schermo visualizza la temperatura preimpostata.
3.Quando “Flip" si accende con 3 segnali acustici, estrarre la pentola, capovolgere gli
ingredienti del cibo e quindi reinstallare la pentola nel corpo principale e il prodotto riprenderà
automaticamente a funzionare.
4.“ ”mostrerà temperatura e tempo corrispondenti
Area dei pulsanti delle funzioni di avvio rapido
Il prodotto è preimpostato con 7 funzioni di avvio rapido, tra cui patatine fritte, cottura al forno,
ali, disidratazione, pesce, gamberetti, carne e una modalità fai da te. È possibile selezionare
direttamente la funzione di avvio rapido o personalizzare la cottura.
Nota:
1. Nella modalità di frittura ad aria è possibile utilizzare tutte le funzioni di avvio rapido.

53
2. In modalità grill, solo pesce, gamberi, carne e Fai da te possono essere utilizzati.
Area dei pulsanti di regolazione dei parametri
1.Pulsante
“ ”
: serve a visualizzare la temperatura e l'ora.
2. pulsante
“ ”“ ”
: In modalità di visualizzazione dell'ora: premere
“ ”
O
“
”
per regolare il tempo di cottura. L'intervallo di regolazione è 1-45 minuti. Premendo a lungo il
pulsante è possibile regolare rapidamente l'ora. In modalità di visualizzazione della temperatura:
premere
“ ”
O
“ ”
per regolare la temperatura di cottura. L'intervallo di regolazione in
modalità frittura ad aria è compreso tra 50
℃
e 200
℃
e l'intervallo di regolazione in modalità
griglia è 150
℃
-220
℃
. Premendo a lungo il pulsante è possibile regolare rapidamente la
temperatura.
Area del pulsante di avvio/annullamento
1.Pulsante
“ ”
: dopo aver impostato la funzione e i parametri, premere il pulsante
“
”
per avviare la cottura.
2. Durante l'impostazione dei parametri o la cottura, tenere premuto
“ ”
per due secondi
per tornare allo stato di attesa; sul display appare "----"."----".
Interruttore di funzione
Questa macchina ha due funzioni: friggere ad aria e grigliare. Per passare da una funzione
all'altra, procedere come segue.
1. Dalla modalità di frittura ad aria alla modalità di cottura alla griglia:
Estrarre la friggitrice (Fig. 5), premere e tenere premuto il pulsante di ribaltamento mentre si
tiene l'impugnatura di ribaltamento (Fig. 6), capovolgere la parte superiore della macchina nella
direzione della freccia mostrata nell'immagine (Fig. 7). Quando si sente un "clic", signica che la
macchina è stata girata in posizione. Posizionare la griglia sul corpo principale per l'uso (Fig. 8).
Impugnatura rotante Inverti il pulsante
Fig 5 Fig 6 Fig 7 Fig 8
2. Dalla modalità griglia alla modalità frittura ad aria:
Rimuovere prima la padella della griglia (Fig. 9), tenere premuto il pulsante di ribaltamento
mentre si tiene l'impugnatura di ribaltamento (Fig. 10) e capovolgere la parte superiore della
macchina nella direzione indicata dalla freccia (Fig. 11). Quando si sente un "clic", signica che
l'apparecchio è stato girato in posizione. Inserire la pentola per friggere nella macchina per l'uso
(Fig. 12).
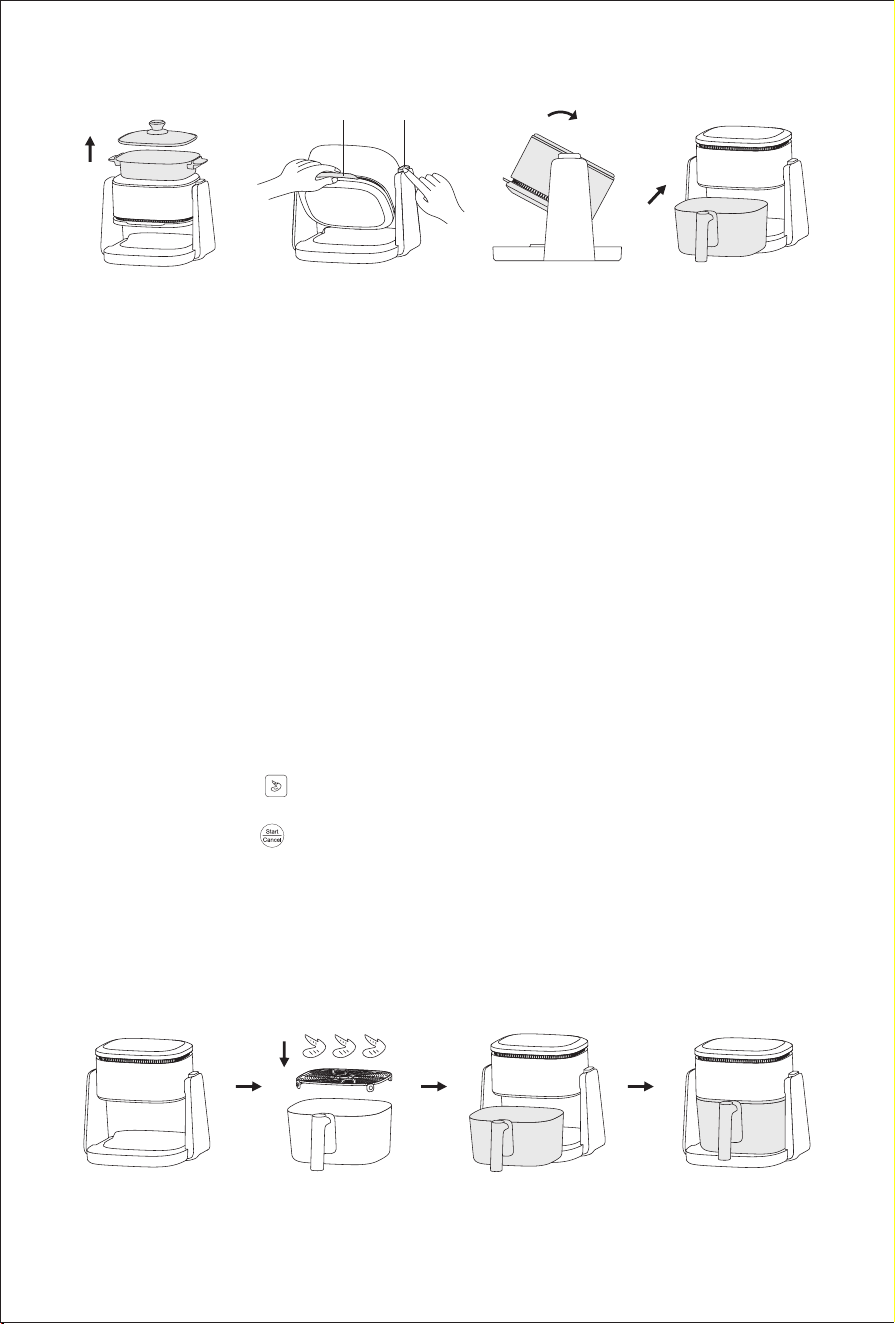
54
Impugnatura rotante Inverti il pulsante
Fig 9 Fig 10 Fig 11 Fig 12
Nota:
1. La macchina può essere ribaltata solo nella direzione richiesta dall'immagine, non può essere
ribaltata nella direzione opposta.
2. Non usare la forza bruta durante il processo di capovolgimento. Quando si scopre che non è
possibile eseguire il capovolgimento, confermare se il pulsante di capovolgimento è premuto e
se la direzione del capovolgimento è corretta.
3. Se la macchina ha appena nito di funzionare, Durante il capovolgimento, fare attenzione a
non toccare il tubo di riscaldamento e le parti metalliche vicine per evitare scottature.
Operation steps
1.Esempio di modalità di frittura ad aria "Ali"
①
Regolare la macchina sullo stato di frittura ad aria (Fig13)
②
Assicurarsi che la gomma siliconica sia sulla staffa del crisper e posizionare correttamente il
piatto crisper nella pentola (con le quattro gambe rivolte verso il basso) (Fig. 14).
③
Adagiare le ali di pollo marinate sulla staffa del crisper (Fig. 14).
④
Installare la pentola per friggere nel corpo principale e spingerla in posizione (Fig 15-16).
⑤
Premere il pulsante “ ” nell'area delle funzioni di avvio rapido, lo schermo mostra 200
℃、
20min.
⑥
Premere il pulsante “ ” per avviare la cottura, lo schermo del display inizia a mostrare il
tempo rimanente.
⑦
Quando il tempo di cottura è oltre la metà, il prodotto emette un segnale acustico e l'indicatore
di "ribaltamento" dell'area del display continua a lampeggiare. Si prega di estrarre la padella
e la macchina metterà in pausa la cottura. Dopo aver capovolto le ali di pollo e posizionato la
padella, la macchina continuerà a cuocere.
⑧
Quando il prodotto emette cinque bip, la cottura è completata e l'area del display mostra
"Fine". Rimuovere con attenzione la pentola e rimuovere gli ingredienti.
Fig 13 Fig 14 Fig 15 Fig 16
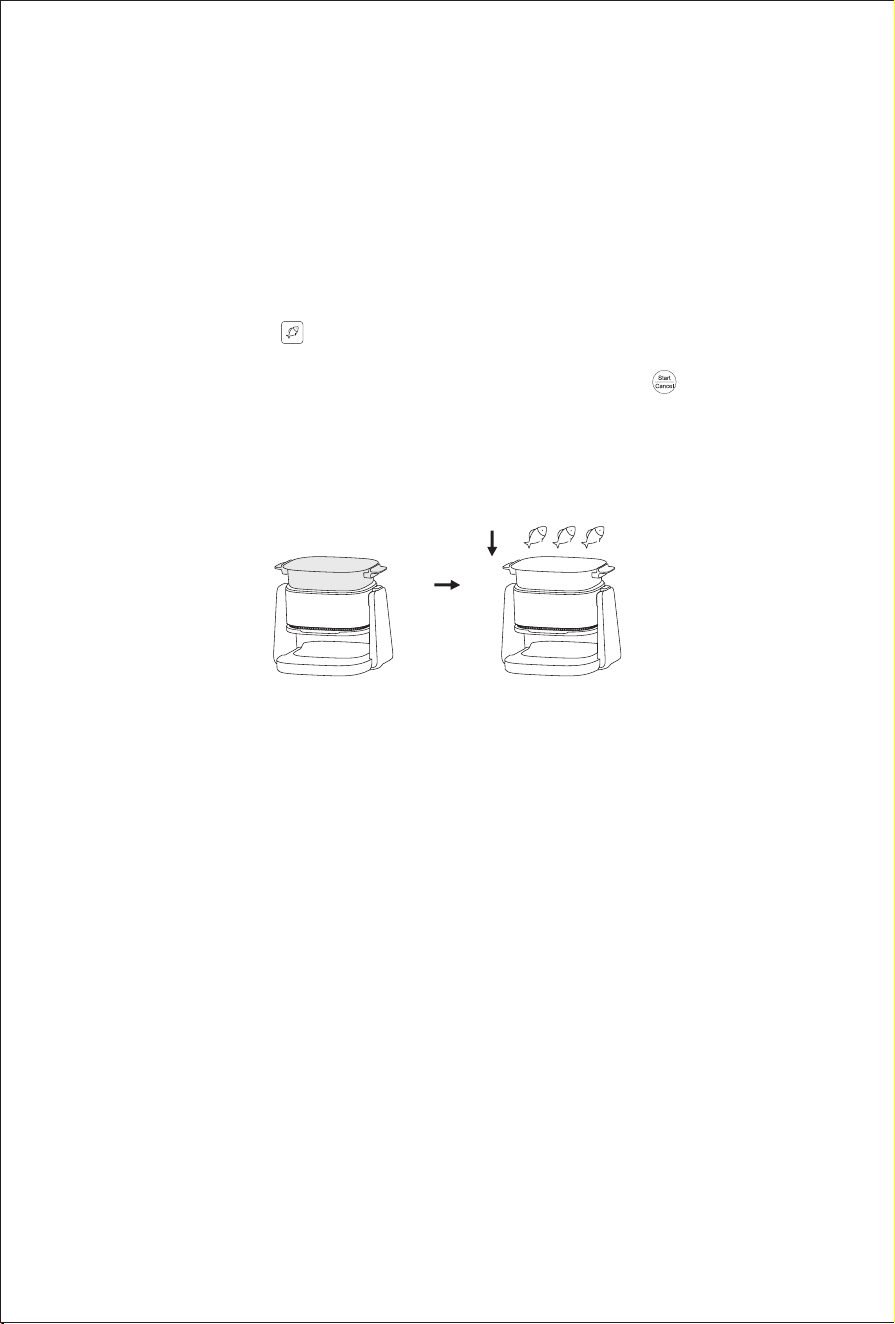
55
Nota:
1. La macchina non ha un pulsante di pausa. Se è necessario mettere in pausa, estrarre la
friggitrice per mettere in pausa e lo schermo del display visualizza "APERTO". La macchina
riprende a funzionare dopo la reinstallazione.
2. Quando si installa la pentola per friggere, assicurarsi di spingerla verso il basso e inserirla in
posizione con il corpo principale.
2. Esempio di modalità di frittura ad aria "Pesce"
① Regolare la macchina sullo stato di grigliatura e assemblare la griglia (Fig17)
② Premere il pulsante
“ ”
nell'area delle funzioni di avvio rapido, lo schermo mostra
200℃、20min.
③ Mettere l'olio nella padella della griglia, premere il pulsante
“ ”
per avviare il
preriscaldamento, lo schermo del display inizia a mostrare il tempo rimanente.
④ Dopo 3 minuti, mettere il pesce in padella per grigliare (Fig 18), girare il pesce al
momento opportuno.
⑤ Quando il prodotto emette cinque bip, la cottura è completata e l'area del display
mostra "Fine". Rimuovere con attenzione la griglia ed estrarre gli ingredienti.
Nota:
1. Quando si installa la bistecchiera, accertarsi che sia posizionata in piano e priva di
deformazioni.
2. Quando si utilizza la modalità grill, prestare attenzione all'avvertenza sull'etichetta
antiscottatura per evitare ustioni.
3. Il coperchio della padella può migliorare l'efcienza del riscaldamento e ridurre l'evaporazione
dell'acqua. Puoi scegliere se utilizzare il coperchio della padella in base alle tue esigenze.
Fig 17 Fig 18

56
Tabella di confronto delle ricette
La tabella seguente ti aiuterà a scegliere le impostazioni di base per gli ingredienti che desideri
cucinare e queste impostazioni sono solo di riferimento. A causa delle diverse fonti, dimensioni,
forme e marche di ingredienti, potrebbero esserci lievi differenze. È possibile regolare lo stato
migliore che si desidera in base agli ingredienti.
Ricetta frittura ad aria
Ricetta alla griglia
No
Tipo di
ricetta
Volume
proposto
Temperatura
predenita
(℃)
Temperatura
regolabile
(℃)
Tempo
predenito
(minimo)
Tempo
regolabile
(minimo)
)
Capovolgere
o meno a
metà tempo
1
Patatine
fritte
300
grammi
185 50-200 20 1~45 SÌ
2
Cottura al
forno
/ 150 50-200 22 1~45 NO
3 Ali
300
grammi
200 50-200 20 1~45 SÌ
4 Deidrato / 70 50 ~ 80 3 ore 3~8 ore NO
5 Pesce 220 g 200 50-200 20 1~45 SÌ
6 Gamberetti 200 g 200 50-200 8 1~45 NO
7 Carne 130 g 200 50-200 10 1~45 SÌ
8 Fai da te / 200 50-200 20 1~45 /
No
Tipo di
ricetta
Volume
proposto
Temperatura
predenita
(℃)
Temperatura
regolabile
(℃)
Default
Time
(minimo)
Tempo
predenito
(minimo)
Capovolgere
a metà tempo o
no
1 Pescare 60 g 220 150-220 20 1~45 /
2 Gamberetto 200 g 220 150-220 10 1~45 /
3 Carne 130 g 220 150-220 8 1~45 /
4 Fai da te / 220 150-220 30 1~45 /

57
Pulizia e manutenzione
1. Scollegare la spina di alimentazione dalla presa e attendere che il corpo della macchina si
raffreddi prima della pulizia e della manutenzione, altrimenti potrebbero vericarsi pericoli quali
scosse elettriche, incendi e scottature.
2. Dopo la cottura, attendere che la pentola o la padella si raffreddino prima di pulire le rimanenti
macchie di olio nella pentola o nella padella.
3. Non immergere il corpo principale in acqua o sciacquarlo sotto l'acqua del rubinetto. Utilizzare
invece un panno umido per pulire la supercie.
4. Si consiglia di utilizzare acqua tiepida, detersivo e una spugna non abrasiva per pulire la
padella, la teglia, la staffa del crisper o il coperchio della teglia.
5. Non usare la lavastoviglie per lavare la pentola.
6. Non mettere la pentola per friggere calda, la bistecchiera o il coperchio della bistecchiera che
ha appena terminato la cottura in acqua o in frigorifero, al ne di evitare danni causati da colpi di
freddo e caldo al prodotto.
Importanti note sulla sicurezza
Si prega di leggere attentamente questo manuale prima di utilizzare questo prodotto per
evitare un funzionamento errato o qualsiasi pericolo e conservarlo correttamente per future
consultazioni. Devono essere rispettate le seguenti precauzioni di sicurezza quando si usa
questo prodotto:
Questo apparecchio non deve essere utilizzato da bambini di età compresa tra 0 e 8 anni.
Questo apparecchio può essere utilizzato da bambini di età pari o superiore a 8 anni se
costantemente sorvegliati. Questo apparecchio può essere utilizzato da persone con
capacità siche, sensoriali o mentali ridotte o prive di esperienza e conoscenza se sono state
supervisionate o istruite sull'uso dell'apparecchio in modo sicuro e se comprendono i rischi
connessi. Tenere l'apparecchio e il suo cavo fuori dalla portata dei bambini di età inferiore a 8
anni. La pulizia e la manutenzione da parte dell'utente non devono essere effettuate da bambini.
Se il cavo di alimentazione è danneggiato, deve essere sostituito con un cavo o gruppo speciale
disponibile presso il produttore o il suo agente di servizio.
L'apparecchio non è progettato per essere azionato mediante un timer esterno o un sistema di
controllo remoto separato.
L'apparecchio non deve essere immerso.
Questo apparecchio è destinato all'uso in applicazioni domestiche e simili come:
– aree cucina per il personale in negozi, ufci e altri ambienti di lavoro;
– agriturismi;
– da clienti in hotel, motel e altri ambienti di tipo residenziale;
– ambienti tipo bed and breakfast.

58
Precauzioni:
1. Potrebbero esserci lievi differenze tra il design del prodotto e i dati delle specifiche tra il
manuale d'uso e il prodotto reale. Si prega di fare riferimento al prodotto reale per l'accuratezza
2. Se ci sono bambini nelle vicinanze, utilizzare questo prodotto con particolare cautela e non
lasciare che i bambini lo usino da soli.
3.Quando il prodotto è acceso o si sta raffreddando, il prodotto e il suo cavo di alimentazione
devono essere tenuti fuori dalla portata dei bambini di età inferiore a 8 anni.
4.Il prodotto deve essere utilizzato sotto la cura di un adulto.
5.Non lasciare che il cavo di alimentazione tocchi superci calde.
6.Se si verificano malfunzionamenti o anomalie durante l'uso, interrompere immediatamente
l'uso e attendere no a quando non viene testato dal servizio post-vendita del distributore locale
JIMMY prima di continuare ad usarlo. Tutte le riparazioni devono essere eseguite da personale
professionale.
7.Prima dell'uso, controllare se il cavo di alimentazione, la spina e altri componenti sono
danneggiati. Se si riscontrano danni, interrompere l'utilizzo del prodotto.
8. Prima dell'uso, vericare che la tensione di ingresso sia conforme all'etichetta del prodotto e
che la presa di corrente sia collegata a terra. Utilizzare una presa di corrente separata.
9. Quando si estrae il prodotto dalla scatola, estrarre la macchina e gli accessori separatamente
per evitare che la macchina cada e causi danni.
10.Il prodotto deve essere collocato su una supercie stabile quando sospeso dall'uso.
11.Non utilizzare il prodotto su piani inclinati o instabili e tenerlo lontano da fonti di calore per
evitare di danneggiare i componenti in plastica. Non avvicinarlo o posizionarlo su apparecchi
elettrici.
12. Il prodotto non deve essere utilizzato in prossimità o sotto tende o altri materiali combustibili.
13.Non posizionare il prodotto contro il muro o altri prodotti. Lasciare almeno 10 cm di spazio
libero dietro, su entrambi i lati e sopra il prodotto. Non posizionare altri oggetti sul prodotto.
14.L'apparecchio è dotato di una superficie riscaldante. Quando lo si utilizza per le persone
che non sono sensibili al calore (come i pazienti con diabete), è necessario prestare attenzione
all'utilizzo con l'aiuto di persone sane.
15. Durante il riscaldamento, non coprire l'ingresso e l'uscita dell'aria.
16.Durante o dopo il riscaldamento, se la padella o la bistecchiera non si sono raffreddate, non
toccarle direttamente con le mani per evitare scottature.
17.Durante il riscaldamento, vapore ad alta temperatura verrà rilasciato dall'uscita dell'aria, le
mani e il viso devono essere tenuti a una distanza di sicurezza dall'uscita dell'aria per evitare di
ustionarsi.
18. Quando si estrae la pentola della friggitrice riscaldata dalla macchina, prestare attenzione al
vapore ad alta temperatura e all'aria calda per evitare scottature.
19. La supercie del prodotto = con il simbolo di alta temperatura " " può diventare calda durante
il funzionamento. Prestare particolare attenzione per evitare ustioni.
20.Non spostare la macchina mentre è in funzione.
21.Tenere il gruppo pentola e bistecchiera quando si sposta la macchina, per evitare che cada,
causando lesioni o danni.
22.Non utilizzare accessori o componenti prodotti da altri produttori senza la raccomandazione
di JIMMY, Altrimenti la garanzia non sarà più valida.
23.Questo prodotto non può essere azionato con un timer esterno o un sistema di controllo
remoto indipendente.

59
24. Non mettere la pentola calda dopo la cottura direttamente in acqua fredda o in frigorifero per
evitare danni.
25. Non usare molta forza per girare la testa della macchina. Se non si riesce a girarla, vericare
che il pulsante di rilascio sia premuto e che la direzione di rotazione sia corretta.
26. Dopo aver utilizzato la funzione di frittura ad aria del prodotto, non capovolgere
immediatamente il corpo principale con le mani per evitare che queste tocchino l'elemento
riscaldante e causino lesioni.
27. Quando il prodotto è in modalità grill, non posizionare la pentola della friggitrice direttamente
sull'elemento riscaldante per riscaldarla, per evitare che la pentola della friggitrice si rompa e
causi lesioni.
Rozwiązywanie problemów
Przed wysłaniem produktu do naprawy należy najpierw sprawdzić poniższe
informacje:
Problema Cause possibili Soluzione
La macchina non
si accende
Non collegata alla presa di
corrente.
Inserire la spina nella presa di corrente.
Non premere il pulsante di avvio/
annullamento.
Premere il pulsante di avvio/annullamento
per azionarla.
Padella ad aria non assemblata
in posizione.
Assemblare la pentola ad aria in
posizione.
Danni ai PCB. Contattare il servizio per la riparazione.
Ingredienti non
completamente
cotti
Troppi ingredienti. Diminuire la quantità di ingredienti.
Tempo di cottura troppo breve. Aumentare il tempo di cottura.
Temperatura di cottura troppo
bassa.
Aumentare l'impostazione della
temperatura.
Pentola ad aria non installata in
posizione, la perdita d'aria causa
una temperatura troppo bassa.
Controllare se la pentola per friggere
ad aria è montata in posizione senza
inclinazione.
La teglia per grigliare non è
montata in posizione e troppo
lontana dal riscaldatore,
causando una temperatura della
teglia per grigliare troppo bassa.
Ispezionare se la teglia per grigliare è
montata in posizione con inclinazione e
piegatura.
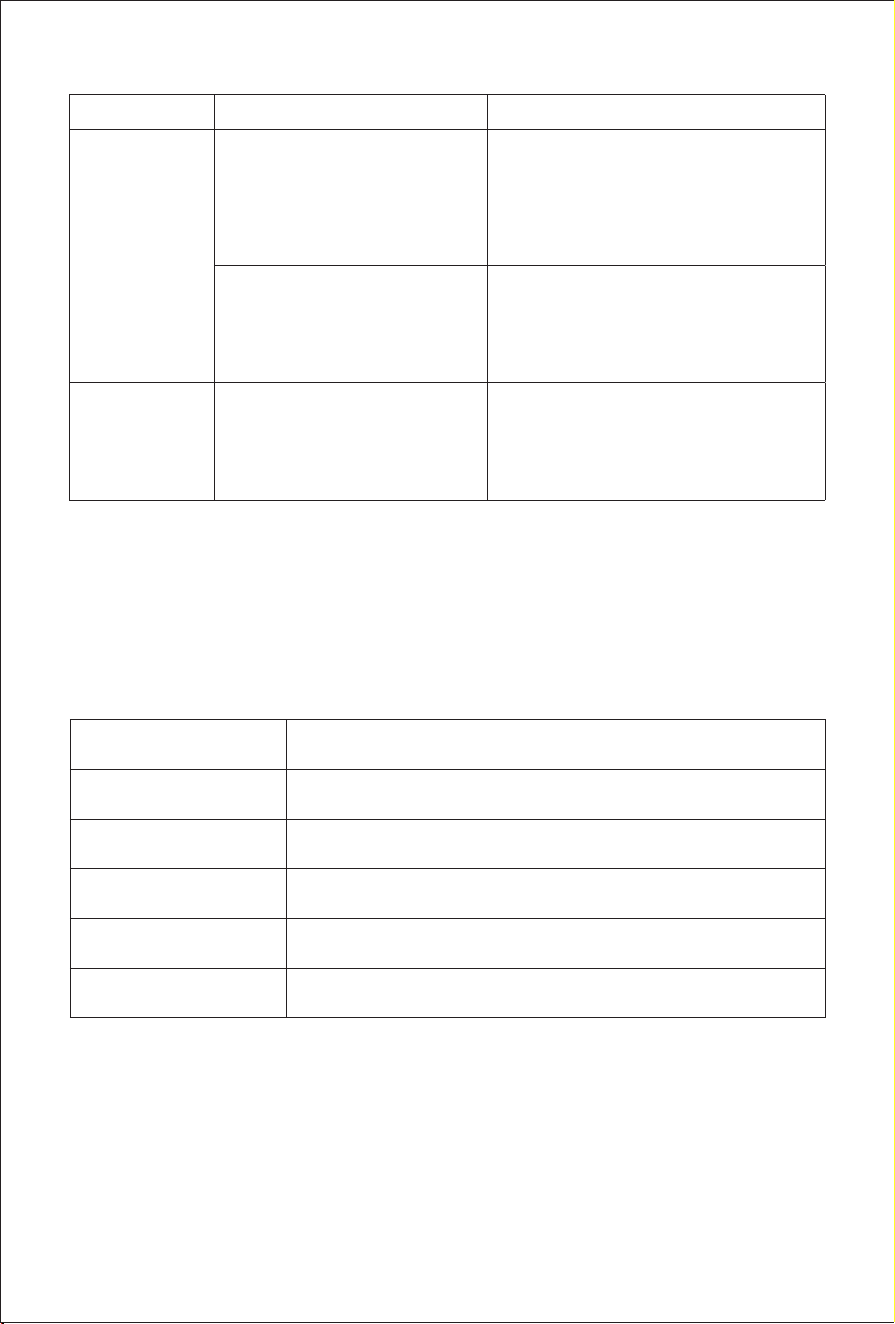
60
Nota: in caso di altri guasti, poiché sono necessari strumenti speciali, inviare al centro di
riparazione designato per la riparazione o contattare il distributore JIMMY locale per una
consulenza.
Problema Cause possibili Soluzione
Fumo bianco dal
prodotto
Il prodotto sta cucinando
ingredienti con molto olio.
Quando si cucinano ingredienti ricchi
di olio, l'olio produrrà fumo bianco e la
friggitrice potrebbe essere più calda del
normale, il che non inuirà sull'effetto
nale della cottura.
Sono ancora presenti residui di
olio dall'ultimo utilizzo sulla staffa
del crisper o sulla padella.
Assicurarsi che il supporto per frutta e
verdura e la pentola per friggere siano
puliti correttamente dopo ogni utilizzo.
Lo schermo
mostra E1
NTC circuito aperto o
cortocircuito.
Contattare il servizio per la riparazione.
Speciche di prodotto
Parametro tecnico
Nome del prodotto Friggitrice ad aria
Modello numero AF3
Tensione nominale 220V-240V~
Frequenza nominale 50-60Hz
Potenza nominale 1100W
Capienza stimata
4L
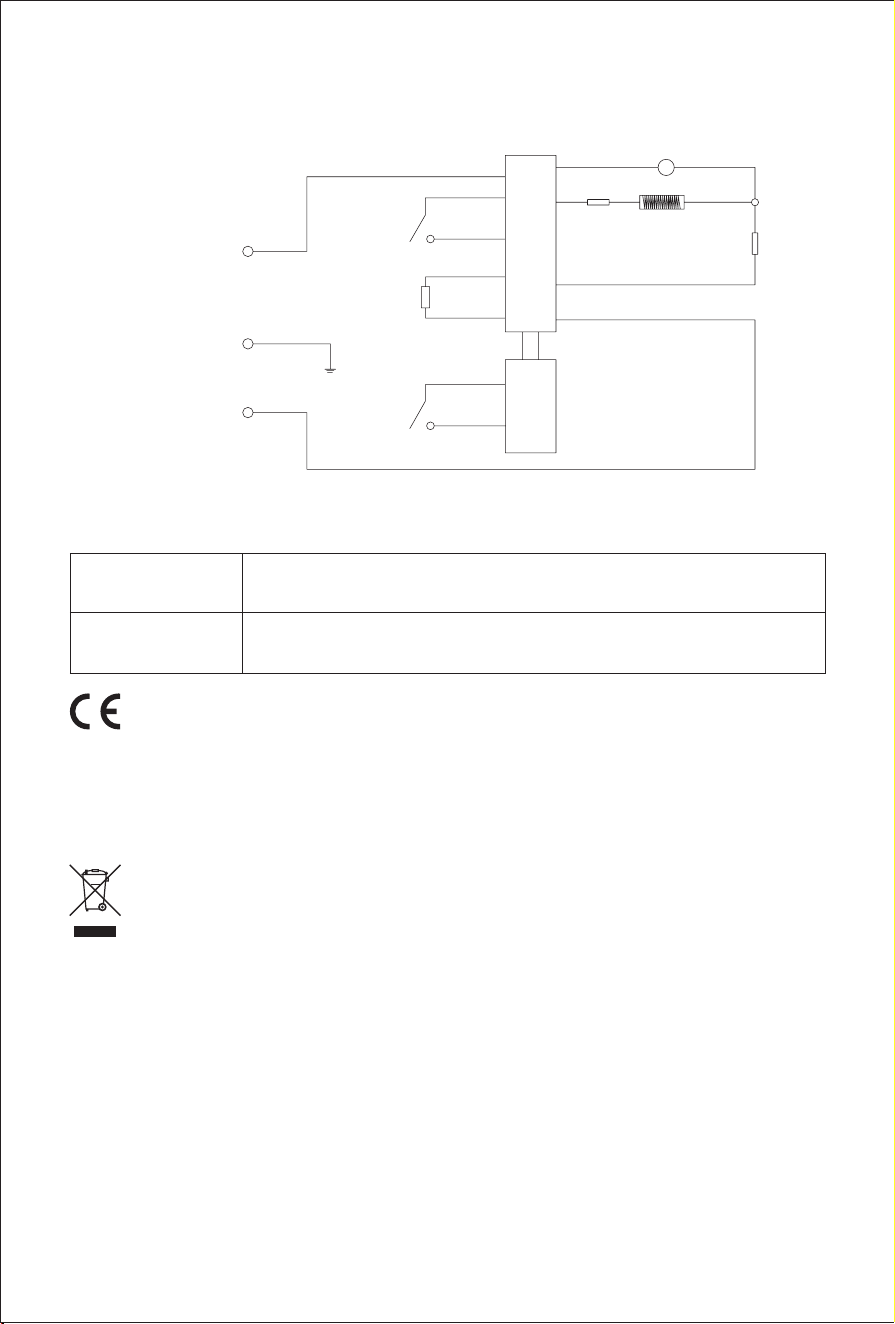
61
Schema elettrico
L
E
N
220V-240V~50-60Hz
Motore
Fusibile
PCB di
alimentazione
PCB di
controllo
Riscaldatore
M
NTC
Microinterruttore
Informazioni sul produttore
Produttore Kingclean Electric Co., Ltd
Indirizzo
No.1 Xiangyang road, Suzhou New District,Jiangsu province, 215009,
China
Disposal Disposizione
La macchina, gli accessori e l'imballaggio devono essere suddivisi per un riciclo rispettoso
dell'ambiente.
Non smaltire l’aspirapolvere e le sue parti assieme ai riuti domestici!
Con riserva di modiche senza preavviso.
Informazioni di garanzia
Il corpo centrale di questo prodotto gode di una garanzia di un anno dalla data di acquisto.
Sono esclusi dalla garanzia la normale usura, l'uso commerciale, le modiche all'apparecchio
acquistato, le attività di pulizia, le conseguenze di un uso improprio o di danni da parte
dell'acquirente o di terzi, i danni che possono essere attribuiti a circostanze esterne (tensione
anomala, calamità naturali, ecc.).
Fusibile
Microinterruttore

62
Montaje del producto
Lista de piezas
Entrada de aire
Cuerpo principal
Sartén
Panel de control
Salida de aire
Empuñadura
rodante
Tapa de la sartén
de la parrilla
Sartén grill
Botón rodante
Cable de
alimentación
Placa de
cocción
Placa crisper
de caucho de
silicona
Introducción de accesorios
1.Olla para freír: La olla de freír es la olla principal para cocinar ingredientes, con una capacidad
máxima de 4L.(Fig 1).
Lista de embalaje
Nombre de
la pieza
Cuerpo
principal
Sartén
Placa de
cocción
Sartén grill
Tapa de la
parrilla
Manual del
usuario
Cantidad 1 1 1 1 1 1
Nota:
①
Empuje la sartén hacia abajo al instalarla y encájela en su sitio con el cuerpo principal.
②
La sartén es de vidrio, asegúrese de que no haya colisión de fuerzas externas durante el
proceso de manipulación para evitar daños.
Fig 1

63
③
Durante el calentamiento, la temperatura de la supercie de la olla es elevada. No la toque
directamente, de lo contrario podría sufrir quemaduras.
④
No ponga la sartén caliente después de cocinar en agua o en el frigoríco para evitar daños
en el cristal.
2.Placa crujiente:La placa crujiente está instalada dentro de la olla de freír (con sus cuatro patas
hacia abajo) y se puede sacar para limpiarla. Su función principal es elevar los ingredientes,
para una mejor circulación del aire caliente, y ayudar a que se calienten uniformemente.
Nota:
①
Salvo requisitos especiales, durante la fritura al aire debe utilizarse una placa crujiente, ya
que de lo contrario podría afectar al efecto de cocción.
②
Coloque los ingredientes en una sola capa en el plato crisper, no los apile, de lo contrario
puede afectar al efecto de cocción.
3.Sartén grill: la sartén grill se utiliza principalmente para freír o asar alimentos.(Fig 3)
Nota:
①
Cuando instale la bandeja de la parrilla, asegúrese de colocarla de forma estable sobre el
cuerpo principal.
②
Durante el calentamiento, la temperatura de la supercie de la sartén es alta. No la toque
directamente, ya que podría sufrir quemaduras.
③
La sartén grill sólo se utiliza para freír y asar. No la utilice para calentar líquidos.
4. Tapa de la bandeja de la parrilla:La tapa de la bandeja de la parrilla se utiliza junto con la
bandeja de la parrilla para mejorar la eciencia del calentamiento y evitar salpicaduras de aceite.
(Fig 4).
Nota:
La tapa de la sartén grill es de cristal, asegúrese de que no hay colisión de fuerzas externas
durante el proceso de manipulación para evitar daños.
Fig 3
Fig 2
Fig 4
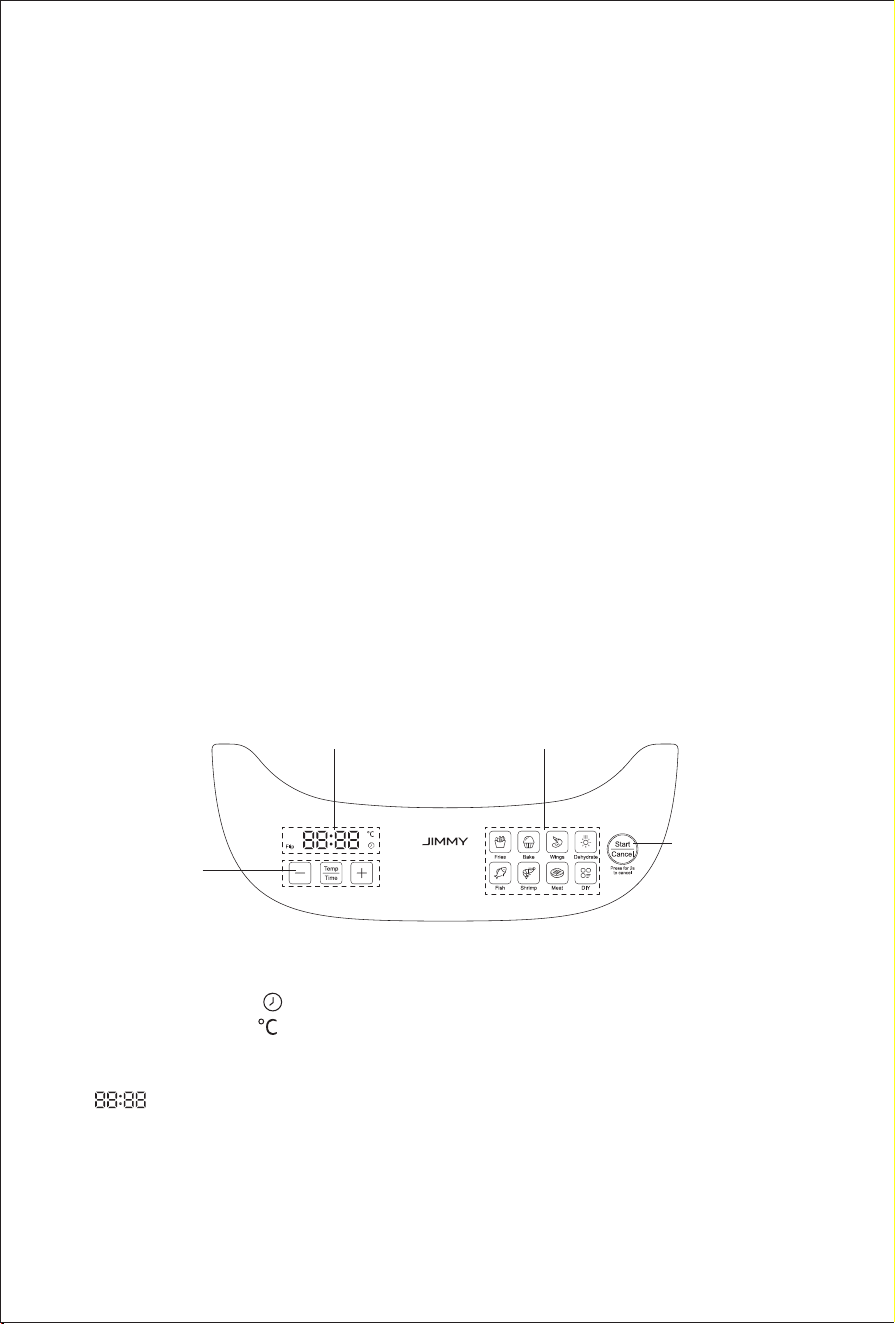
64
Uso del producto
Antes de utilizarlo por primera vez, conviene tener en cuenta los siguientes
puntos:
9.Lea atentamente este manual de usuario.
10.Coloque el producto sobre una encimera estable y plana. No lo coloque sobre una supercie
termolábil.
11.Antes de enchufarlo a la toma de corriente, conrme que la fuente de alimentación es de
220V-240V~y asegúrese de que tiene toma de tierra.
12.Antes del primer uso, lave la sartén, el soporte para verduras crujientes, la bandeja de
la parrilla y la tapa de la bandeja de la parrilla con agua tibia, detergente y una esponja no
abrasiva.
13.Durante el uso inicial, es normal tener olores una pequeña cantidad de humo. Tras la
limpieza, el olor puede eliminarse calentando a 200
℃
durante 20 minutos en modo de fritura
por aire.
14.No sumerja el cuerpo principal en agua ni lo enjuague bajo el grifo, ya que contiene
componentes electrónicos y de calefacción.
15.No cubra la entrada ni la salida de aire del producto durante el funcionamiento.
16.Cuando el producto está en funcionamiento, la temperatura de la supercie de la salida de
aire, la olla para freír, la sartén grill y la tapa de la sartén grill es elevada. No los toque para
evitar quemaduras.
Descripción de la función
Zona de visualización del
estado de la hora
Área de botones de función
de inicio rápido
Área de botones
de ajuste de
parámetros
Área de botones
de control de inicio/
cancelación
Time status display area
1.Cuando se enciende “ ”, la pantalla muestra el tiempo restante.
2.Cuando se enciende“ ” , la pantalla muestra la temperatura preajustada.
3.Cuando "Flip " se encienda con 3 pitidos, saque la olla, dé la vuelta a los ingredientes y vuelva
a colocar la olla en el cuerpo principal, y el producto volverá a funcionar automáticamente.
4.“ ” pasa a mostrar la temperatura y la hora correspondientes.
Área de botones de función de inicio rápido
El producto está precongurado con 7 funciones de inicio rápido, incluyendo patatas fritas,
hornear, alas, deshidratar, pescado, gambas, carne y un modo DIY. Puede seleccionar
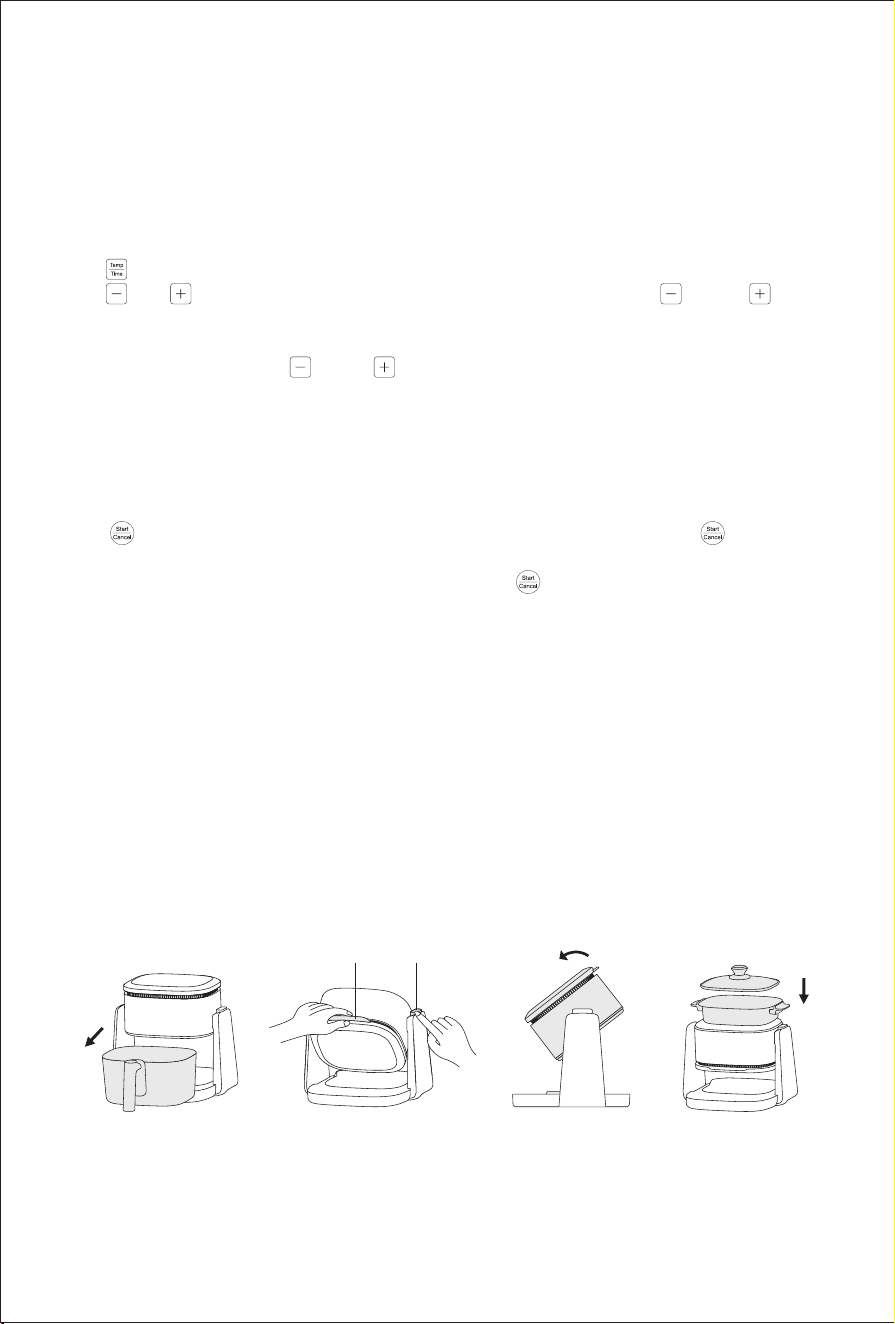
65
directamente la función de inicio rápido o personalizar su cocción.
Nota:
3.En el modo de freír al aire, se pueden utilizar todas las funciones de inicio rápido.
4.En modo grill, sólo se puede utilizar pescado, gambas, carne y bricolaje.
Área de botones de ajuste de parámetros
1.
“ ”
Botón:Permite alternar entre la temperatura y la hora.
2.
“ ”“ ”
botón: En el modo de visualización del tiempo: Pulse
“ ”
o
“
”
para ajustar el tiempo de cocción. El rango de ajuste es de 1-45 minutos. Pulsando
prolongadamente el botón se puede ajustar el tiempo rápidamente. En el modo de visualización
de la temperatura : Pulse
“ ”
o
“ ”
para ajustar la temperatura de cocción. El rango
de ajuste en el modo de freír al aire es de 50
℃
a 200
℃
, y el rango de ajuste en el modo de
asar a la parrilla es de 150
℃
-220
℃
. Pulsando prolongadamente el botón puede ajustar la
temperatura rápidamente.
Área de botones de control de inicio/cancelación
1.
“ ”
botón : Una vez ajustada la función y los parámetros, pulse el botón
“ ”
para
iniciar la cocción.
2.Durante el ajuste de parámetros o la cocción, pulse
“ ”
y manténgalo pulsado durante
dos segundos para volver al estado de espera, y la pantalla mostrará "----".
Interruptor de función
Esta máquina tiene dos funciones: freír al aire y gratinar. Siga los siguientes pasos para
cambiar entre las dos funciones.
1.Del modo freír al modo gratinar:
Saque primero la freidora (Fig. 5), pulse y mantenga pulsado el botón de giro mientras sujeta
la empuñadura de giro (Fig. 6), gire la parte superior de la máquina en la dirección de la echa
que se muestra en la imagen (Fig. 7). Cuando se oiga un "clic", indica que la máquina está
volteada en su sitio. Coloque la bandeja de la parrilla en el cuerpo principal para su uso (Fig. 8).
Empuñadura
abatible
Botón
deslizante
Fig 5 Fig 6 Fig 7 Fig 8
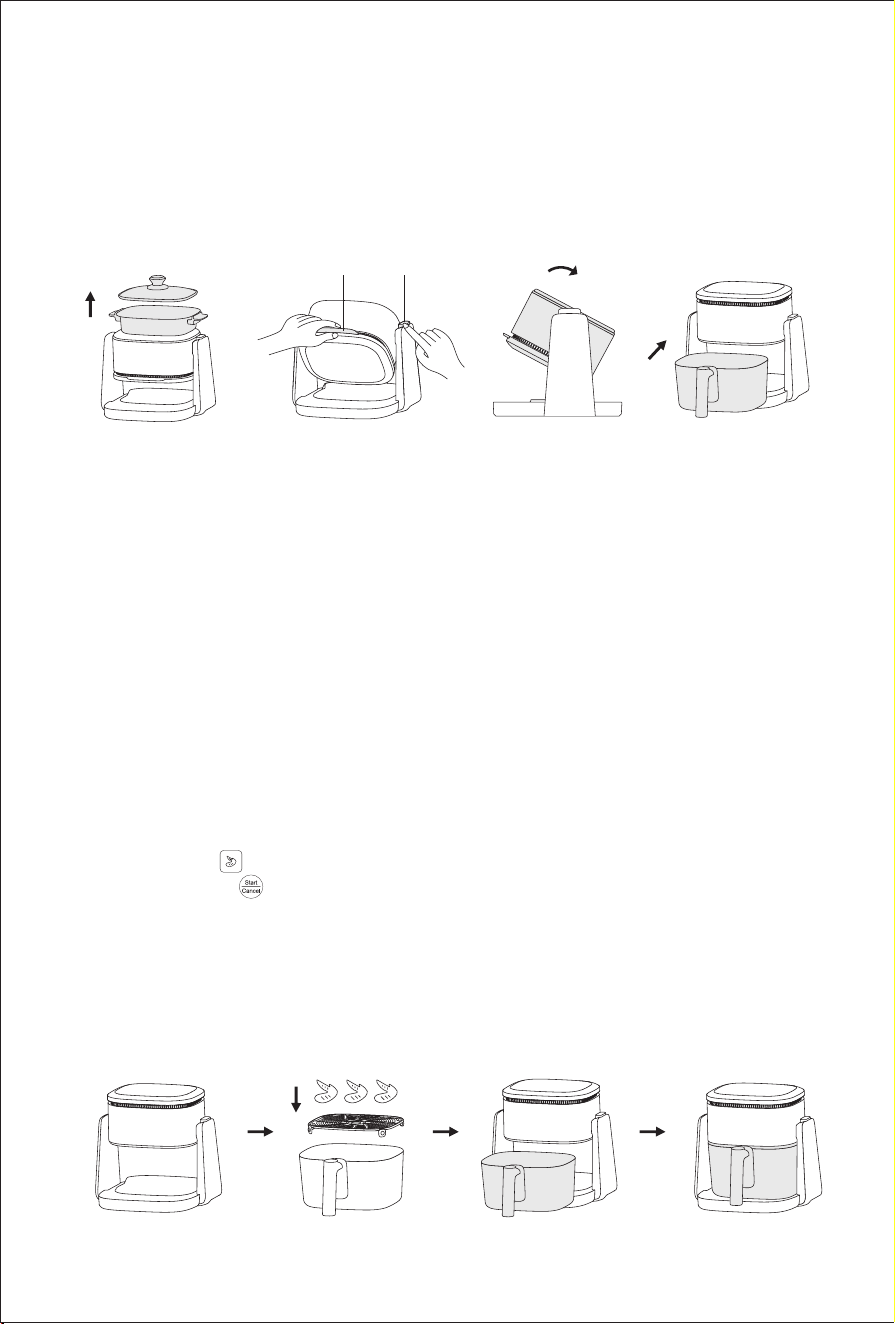
66
Fig 9 Fig 10 Fig 11 Fig 12
2.Modo grill a modo freír al aire:
Retire primero la bandeja de la parrilla (g. 9), pulse y mantenga pulsado el botón de volteo
mientras sujeta la empuñadura de volteo (g. 10), y voltee la parte superior de la máquina en la
dirección de la echa que se muestra en la imagen (g. 11). Cuando oiga un "clic", signica que
la máquina está colocada en su sitio. Coloque la olla en la máquina para su uso (Fig 12).
Nota:
1. La máquina sólo puede voltearse en la dirección indicada en la imagen, no puede voltearse
en la dirección opuesta.
2. No utilice la fuerza bruta durante el proceso de volteo. Si no puede realizar el volteo,
compruebe si el botón de volteo está pulsado y si la dirección de volteo es correcta.
3. Si la máquina acaba de terminar de funcionar, Durante el volteo, tenga cuidado de no tocar el
tubo calefactor ni las piezas metálicas cercanas para evitar quemaduras.
Empuñadura
abatible
Botón
deslizante
Pasos de la operación
1.Ejemplo del modo de fritura por aire "Alas"
①
Ajuste la máquina al estado de fritura por aire(Fig13).
②
Asegúrese de que la goma de silicona está en el soporte del crisper, y coloque correctamente
la placa del crisper en la sartén (con las cuatro patas hacia abajo)(Fig 14).
③
Ponga las alitas de pollo marinadas en posición horizontal sobre el soporte crujiente(Fig 14).
④
Instale la sartén en el cuerpo principal y empújela hasta que encaje en su sitio (Fig 15-16).
⑤
Pulse el botón “ ” en el área de función de inicio rápido, la pantalla muestra 200
℃
20min.
⑥
Pulse el botón “ ”para iniciar la cocción, la pantalla empezará a mostrar el tiempo
restante.
⑦
Cuando el tiempo de cocción supera la mitad, el aparato emite un pitido y el indicador "ip"
de la zona de visualización parpadea continuamente. Saque la sartén y el aparato detendrá la
cocción. Después de dar la vuelta a las alitas de pollo y volver a colocar la sartén en su sitio, la
máquina continuará cocinando.
⑧
Cuando el producto emita cinco pitidos, la cocción habrá nalizado y la zona de visualización
mostrará "Fin". Retire con cuidado la sartén y saque los ingredientes.
Fig 13 Fig 14 Fig 15 Fig 16

67
No
Tipo de
receta
Volumen
propuesto
Temperatura
por defecto
(℃)
Temperatura
regulable
(℃)
Hora por
defecto
(min)
Tiempo
ajustable
(
min
)
Voltear
en el
descanso
o no
1
Patatas
fritas
300g 185 50-200 20 1~45 Sí
2 Hornear / 150 50-200 22 1~45 No
3 Alas 300g 200 50-200 20 1~45 Sí
4 Deshidratar / 70 50~80 3h 3~8h No
Tabla comparativa de recetas
La siguiente tabla le ayudará a elegir los ajustes básicos para los ingredientes que desee
cocinar, y estos ajustes son sólo de referencia. Debido a las diferentes fuentes, tamaños,
formas y marcas de los ingredientes, puede haber ligeras diferencias. Puede ajustar el mejor
estado que desee en función de sus ingredientes.
Receta para freír al aire
Nota:
1. La máquina no tiene botón de pausa. Si necesita hacer una pausa, extraiga la freidora para
hacer una pausa y la pantalla mostrará "OPEN". La máquina vuelve a funcionar después de
reinstalar..
2.Al instalar la sartén, asegúrese de empujarla hasta el fondo y encajarla con el cuerpo
principal.
2.Ejemplo del modo de fritura por aire "Pescado"
①
Ajuste la máquina al estado de asado y monte la bandeja de asado(Fig17).
②
Pulse el botón “ ” en el área de función de inicio rápido, la pantalla muestra 200
℃
20min.
③
Ponga aceite en la sartén del grill, pulse el botón “ ” para iniciar el precalentamiento, la
pantalla empieza a mostrar el tiempo restante.
④
Después de 3 minutos, poner el pescado en la sartén para asar (Fig 18), dar la vuelta al
pescado en el tiempo adecuado.
⑤
Cuando el producto emita cinco pitidos, la cocción habrá nalizado y la zona de visualización
mostrará "Fin". Retire con cuidado la parrilla y saque los ingredientes.
Nota:
1.Al instalar la bandeja de la parrilla, asegúrese de que está colocada plana y sin alabeos.
2. Cuando utilice el modo de asado, preste atención a la advertencia de la etiqueta
antiquemaduras para evitar quemaduras.
3. La tapa de la olla puede mejorar la ecacia del calentamiento y reducir la evaporación del
agua. Usted puede elegir si desea utilizar la tapa de la cacerola de acuerdo a su necesidad.

68
No
Tipo de
receta
Volumen
propuesto
Temperatura
por defecto
(℃)
Temperatura
regulable
(℃)
Hora por
defecto
(min)
Tiempo
ajustable
(
min
)
Voltear
en el
descanso
o no
5 Pescado 220g 200 50-200 20 1~45 Sí
6 Gambas 200g 200 50-200 8 1~45 No
7 Carne 130g 200 50-200 10 1~45 Sí
8 BRICOLAJE / 200 50-200 20 1~45 /
No
Tipo de
receta
Volumen
propuesto
Temperatura
por defecto
(℃)
Temperatura
regulable
(℃)
Hora por
defecto
(min)
Tiempo
ajustable
(
min
)
Voltear
en el
descanso
o no
1 Pescado 60g 220 150-220 20 1~45 /
2 Gambas 200g 220 150-220 10 1~45 /
3 Carne 130g 220 150-220 8 1~45 /
4 BRICOLAJE / 220 150-220 30 1~45 /
Limpieza y mantenimiento
1. Desenchufe la clavija de alimentación de la toma de corriente y espere a que se enfríe el
cuerpo de la máquina antes de proceder a su limpieza y mantenimiento, ya que de lo contrario
podría causar peligros como descargas eléctricas, incendios y quemaduras.
2. Después de cocinar, espere a que la olla o sartén se enfríe antes de limpiar las manchas de
aceite que queden en la olla o sartén.
3. No sumerja la carcasa principal en agua ni la enjuague bajo el grifo. En su lugar, utilice un
paño húmedo para limpiar la supercie.
4. Se recomienda utilizar agua tibia, detergente y una esponja no abrasiva para limpiar la
sartén, la parrilla, el soporte para verduras crujientes o la tapa de la parrilla.
5. No utilice el lavavajillas para lavar la sartén.
6. No ponga la sartén caliente, la sartén grill o la tapa de la sartén grill que acaba de terminar
de cocinar en agua o en el frigoríco, para evitar daños causados por golpes de frío y calor en
el producto.
Receta a la parrilla

69
Notas importantes sobre seguridad
Lea atentamente este manual antes de utilizar este producto para evitar un funcionamiento
incorrecto o cualquier peligro, y consérvelo adecuadamente para futuras consultas. Deben
seguirse las siguientes precauciones de seguridad al utilizar este producto:
Este aparato no debe ser utilizado por niños de 0 a 8 años. Este aparato puede ser utilizado
por niños a partir de 8 años si están continuamente supervisados. Este aparato puede ser
utilizado por personas con capacidades físicas, sensoriales o mentales reducidas o con falta de
experiencia y conocimientos si han recibido supervisión o instrucciones sobre el uso del aparato
de forma segura y comprenden los peligros que conlleva. Mantenga el aparato y su cable fuera
del alcance de los niños menores de 8 años. La limpieza y el mantenimiento no deben ser
realizados por niños.
Si el cable de alimentación está dañado, debe ser sustituido por un cable o conjunto especial
disponible en el fabricante o su agente de servicio.
El aparato no está diseñado para funcionar mediante un temporizador externo o un sistema de
control remoto independiente.
El aparato no debe sumergirse.
Este aparato está destinado a ser utilizado en aplicaciones domésticas y similares tales como:
- zonas de cocina del personal en tiendas, ocinas y otros entornos de trabajo;
- granjas;
- por clientes en hoteles, moteles y otros entornos de tipo residencial;
- entornos tipo “bed and breakfast”.
Precauciones:
1. Puede haber ligeras diferencias entre el diseño del producto y los datos de especicación
entre el manual del usuario y el producto real. Por favor, consulte el producto real para mayor
precisión.
2. Si hay niños cerca, utilice este producto con especial precaución y no deje que los niños lo
utilicen solos.
3. Cuando el producto esté encendido o en refrigeración, el producto y su cable de alimentación
deben colocarse fuera del alcance de los niños menores de 8 años.
4. El producto debe utilizarse bajo el cuidado de un adulto.
5. No deje que el cable de alimentación toque supercies calientes.
6. Si se produce algún fallo o anomalía durante el uso, deje de utilizarlo inmediatamente y
espere a que lo compruebe el servicio postventa del distribuidor local de JIMMY antes de seguir
utilizándolo. Todas las reparaciones deben ser realizadas por personal profesional.
7. Antes de utilizar el producto, compruebe si el cable de alimentación, el enchufe y otros
componentes están dañados. Si detecta algún daño, deje de utilizar el producto.
8. Antes de utilizar el aparato, compruebe que la tensión de entrada coincide con la indicada en

70
la etiqueta del producto y que la toma de corriente tiene conexión a tierra. Utilice una toma de
corriente independiente.
9. Cuando saque el producto de la caja, saque la máquina y los accesorios por separado para
evitar que la máquina se caiga y cause daños.
10. El producto debe colocarse sobre un escritorio estable cuando se suspenda de su uso.
11.No utilice el producto sobre un escritorio inclinado o inestable, y manténgalo alejado de
fuentes de calor para evitar dañar los componentes de plástico. No lo acerque ni lo coloque
sobre aparatos eléctricos.
12. El producto no debe utilizarse cerca o debajo de cortinas y otros materiales combustibles.
13. No coloque el producto contra la pared u otros productos. Deje al menos 10 cm de espacio
libre detrás, a ambos lados y encima del producto. No coloque otros objetos sobre el producto.
14. El aparato dispone de una supercie calefactora. Cuando lo utilicen personas que no sean
sensibles al calor (como pacientes con diabetes), debe prestarse atención a utilizarlo con la
ayuda de personas normales.
15. Durante el calentamiento, no cubra la entrada ni la salida de aire.
16.Durante o después del calentamiento, si la sartén o la plancha no se han enfriado, no las
toque directamente con las manos para evitar quemaduras.
17.Durante el calentamiento, saldrá vapor a alta temperatura por la salida de aire, las manos y
la cara deben mantenerse a una distancia segura de la salida de aire para evitar quemaduras.
18. Cuando saque la olla caliente de la freidora, preste atención al vapor a alta temperatura y al
aire caliente para evitar quemaduras.
19. La superficie del producto = con el símbolo de alta temperatura " " puede calentarse
durante el funcionamiento. Preste especial atención para evitar quemaduras.
20.No mueva la máquina mientras esté funcionando.
21.Sujete el conjunto de la sartén y la parrilla cuando mueva la máquina, para evitar que se
caiga y provoque lesiones o daños.
22. No utilice accesorios o componentes producidos por otros fabricantes sin la recomendación
de JIMMY, de lo contrario la garantía quedará invalidada.
23.Este producto no puede ser operado con un temporizador externo o un sistema de control
remoto independiente.
24. No ponga la sartén caliente después de cocinar directamente en agua fría o en el frigoríco
para evitar daños.
25. No utilice mucha fuerza para girar el cabezal de la máquina. Si no se puede girar,
compruebe si se ha pulsado el botón de desbloqueo y si el sentido de giro es correcto.
26.Después de utilizar la función de fritura por aire del producto, no voltee inmediatamente el
cuerpo principal con las manos para evitar que toquen el elemento calefactor y causen lesiones.
27.Cuando el producto esté en modo de asado, no coloque la olla de la freidora directamente
sobre la resistencia para calentarla, para evitar que la olla de la freidora se agriete y cause
lesiones.

71
Problemas Posibles causas Solución
La máquina no
se enciende
No está enchufado a la corriente.
Inserte el enchufe en la toma de
corriente.
No pulsar el botón de inicio/
cancelación.
Pulsa el botón de inicio/cancelación para
empezar a trabajar.
Olla de freír no montada en su
sitio.
Monta la sartén de aire en su sitio.
Daños en el circuito impreso.
Póngase en contacto con el servicio
postventa para repararlo.
Ingredientes
no totalmente
cocidos
Se ponen demasiados
ingredientes.
Ponga menos cantidad de ingredientes.
Tiempo de cocción demasiado
corto.
Aumenta el tiempo de cocción.
Temperatura de cocción
demasiado baja.
Aumenta el ajuste de temperatura.
La olla de freír no está instalada
en su sitio, la fuga de aire
hace que la temperatura sea
demasiado baja.
Inspeccione si la olla de fritura de aire
está montada en su lugar sin inclinación.
La bandeja de asar no está
montada en su sitio y está
demasiado lejos del calentador,
lo que hace que la temperatura
de la bandeja de asar sea
demasiado baja.
Inspeccione si la bandeja de asar
ensamblada en su lugar con la inclinación
y la flexión.
Humo blanco
procedente del
producto
Producto es ingredientes de
cocina con aceite rico.
Al cocinar ingredientes ricos en aceite,
el aceite producirá humo blanco, y la
freidora puede estar más caliente de lo
normal, lo que no afectará al efecto nal
de la cocción.
Todavía quedan restos de aceite
del último uso en el soporte del
crisper o en la sartén.
Asegúrese de que el soporte del crisper
y la sartén se limpian correctamente
después de cada uso.
Solución de problemas
Antes de enviar el producto a reparar, compruebe primero los puntos
siguientes:
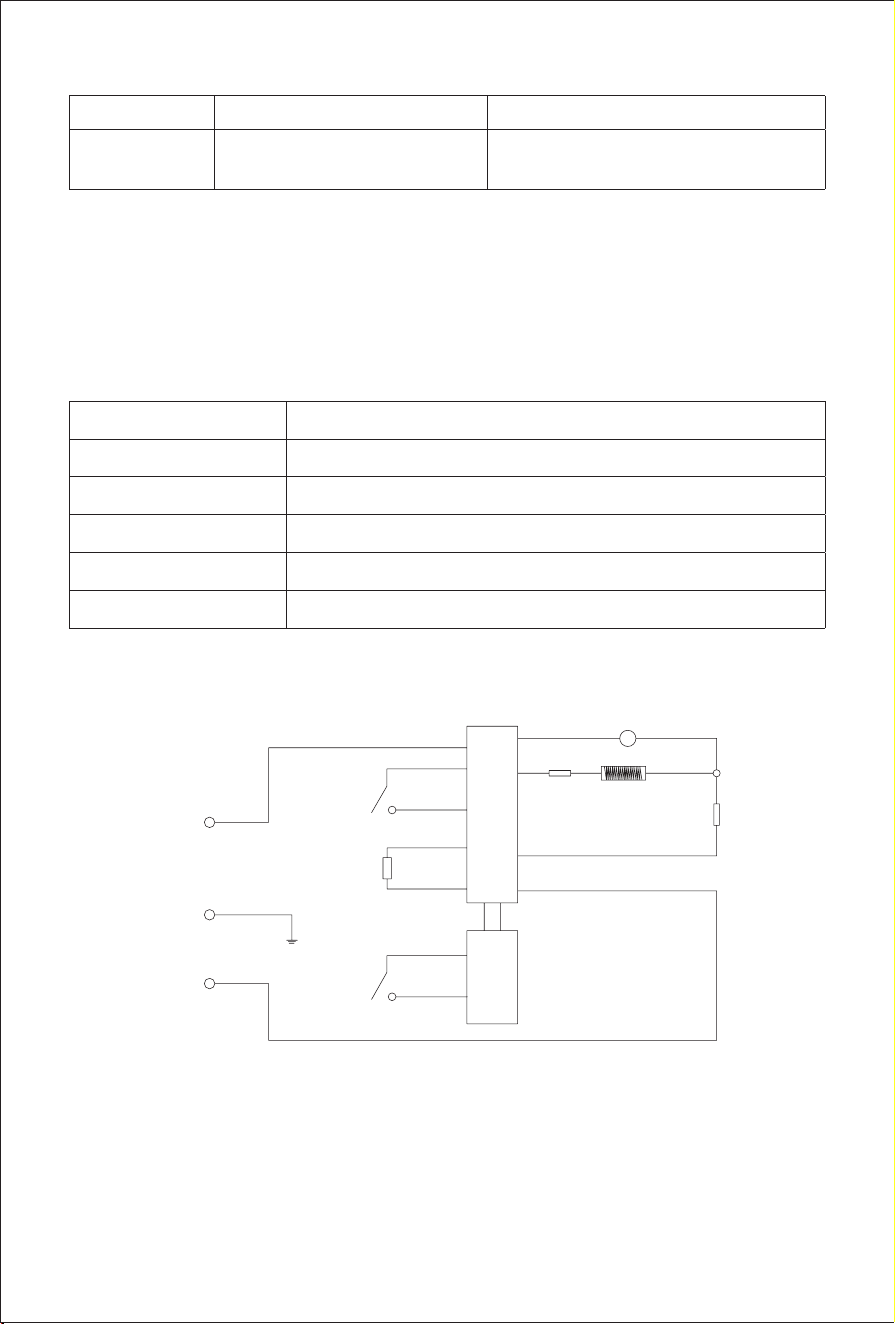
72
Problemas Posibles causas Solución
La pantalla
muestra E1
NTC circuito abierto o
cortocircuito.
Póngase en contacto con el servicio
postventa para su reparación.
Nota: Si hay otro fallo, ya que se necesitan herramientas especiales, por favor envíe al centro
de reparación designado para la reparación o póngase en contacto con el distribuidor local de
JIMMY para consultoría.
Especicación del producto
Parámetros técnicos
Nombre del producto Freidora de aire
Modelo AF3
Tensión nominal 220V-240V~
Frecuencia nominal 50-60Hz
Potencia nominal 1100W
Capacidad nominal
4L
Diagrama del circuito
L
E
N
220V-240V~50-60Hz
Motor
Fusible
Fusible
Placa de
circuito
impreso de
potencia
PCB de
control
Calentador
M
NTC
Microinte-
rruptor
Microinte-
rruptor

73
Información del fabricante
Fabricante Kingclean Electric Co, Ltd
Dirección
No.1 Xiangyang road, Suzhou New District, provincia de Jiangsu,
215009, China
Eliminación
La máquina, los accesorios y el embalaje deben clasicarse para su reciclaje ecológico.
No tire la máquina a la basura doméstica.
Sujeto a cambios sin previo aviso.
Información sobre la garantía
El cuerpo principal de este producto goza de un año de garantía a partir de la fecha de compra.
Quedan excluidos de la garantía el desgaste normal, el uso comercial, las alteraciones en
el aparato tal y como se adquirió, las actividades de limpieza, las consecuencias de un uso
inadecuado o los daños causados por el comprador o una tercera persona, los daños que
puedan atribuirse a circunstancias externas (IE tensión anormal, calamidades naturales, etc. ).
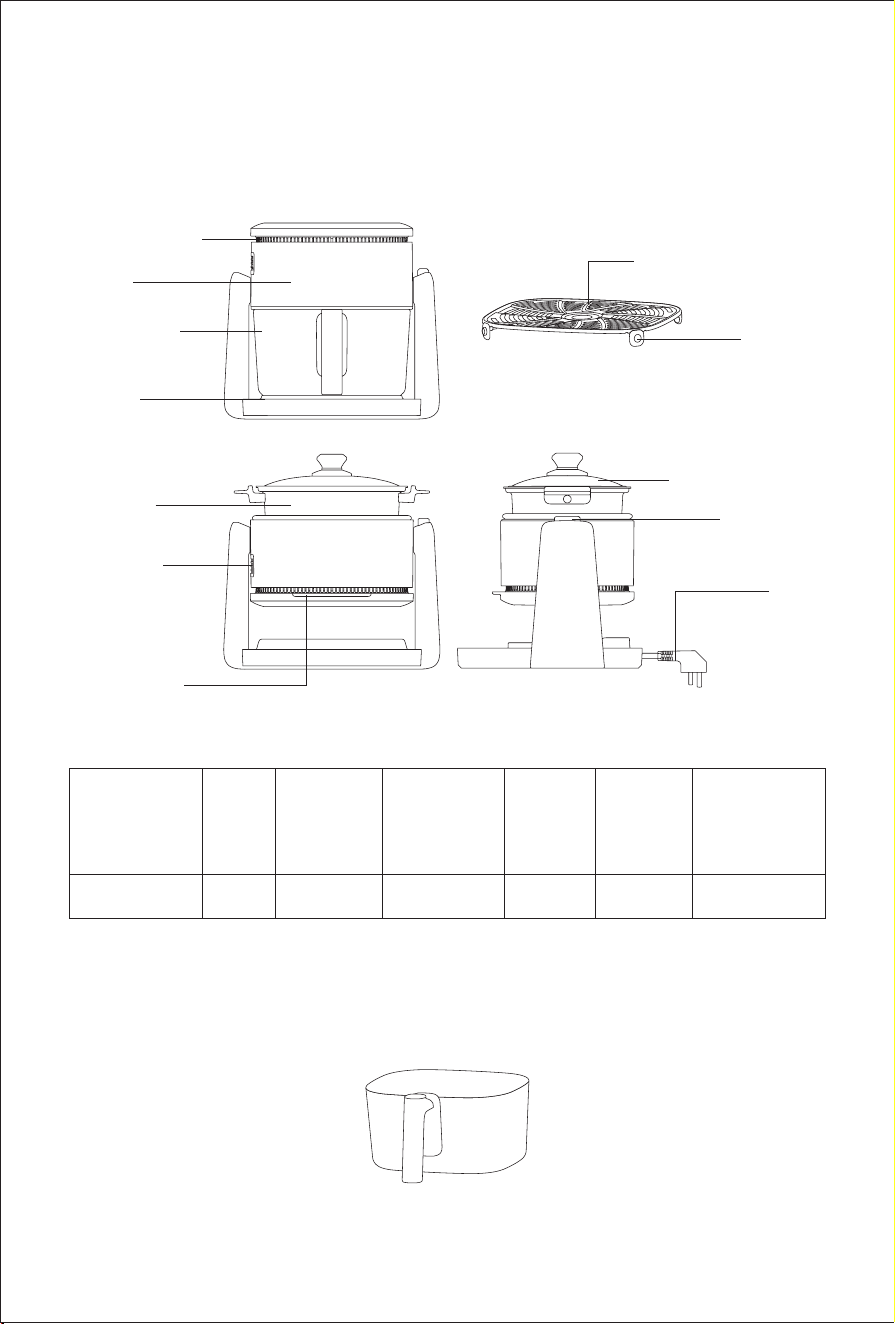
74
Product Assembly
Part Name
Отверстие для
впуска воздуха
Корпус
Корзина для
жарки
Панель
управления
Отверстие
для выпуска
воздуха
Ручка для
выкатывания
Крышка чаши для
гриля
Чаша для
гриля
Кнопка для
выкатывания
Шнур
электропитания
Решетка для создания
хрустящей корочки
Ножки из
силиконового
каучука для решетки
для создания
хрустящей корочки
Описание принадлежностей
1. Корзина для жарки:
Корзина для жарки представляет собой основную емкость для приготовления
ингредиентов, ее максимальный объем составляет 4 л (рис. 1)
Комплектация
Наименование
детали
Корпус
Корзина для
жарки
Решетка для
создания
хрустящей
корочки
Чаша для
гриля
Крышка
чаши для
гриля
Руководство
пользователя
Количество 1 1 1 1 1 1
рис. 1
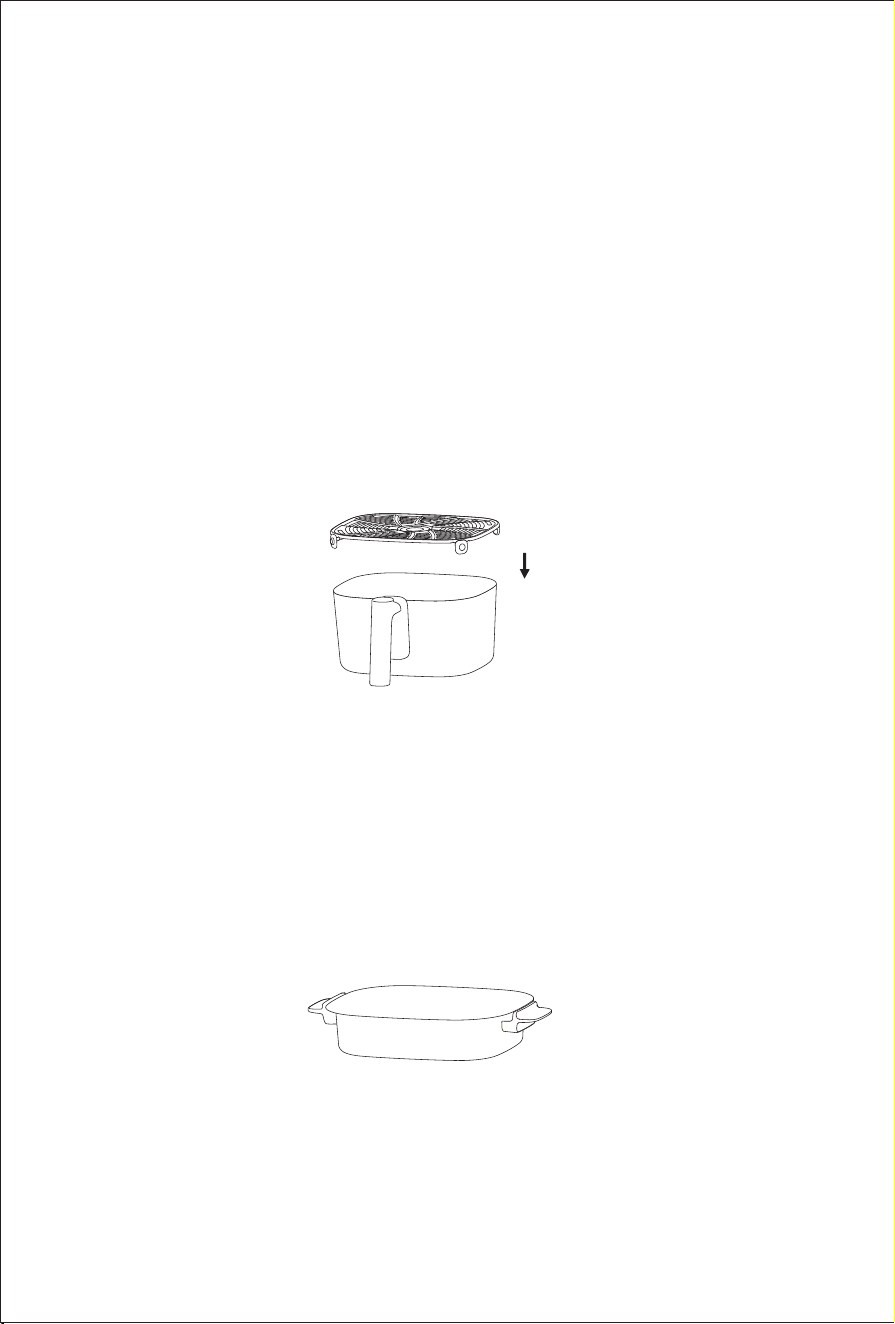
75
Примечание:
①
При установке прижмите корзину для жарки ко дну и установите ее на место вместе с
корпусом.
②
Корзина для жарки изготовлена из стекла, поэтому для предотвращения повреждений
убедитесь, что во время работы она не будет сталкиваться с рядом расположенными
предметами.
③
Во время нагрева поверхность корзины имеет высокую температуру. Не прикасайтесь к
корзине, в противном случае это может привести к ожогам.
④
После завершения готовки не опускайте горячую корзину для жарки в воду и не ставьте
в холодильник, чтобы не допустить повреждения стекла.
2. Решетка для создания хрустящей корочки:
Решетка для создания хрустящей корочки устанавливается внутри корзины для жарки (с
четырьмя ножками, обращенными вниз) и ее можно вынимать для очистки. Ее основная
функция заключается в том, чтобы приподнимать ингредиенты для более эффективной
циркуляции горячего воздуха и достижения равномерного нагрева.
Примечание:
①
За исключением особых требований, во время жарки воздухом необходимо
использовать решетку для создания хрустящей корочки, так как в противном случае это
может повлиять на результат готовки.
②
Положите ингредиенты одним слоем на решетку для создания хрустящей корочки, не
укладывайте их стопкой, так как это может повлиять на результат готовки.
3. Чаша для гриля:
Чаша для гриля используется в основном для жарки или приготовления пищи на гриле (рис.
3)
Примечание:
①
При установке чаши для гриля убедитесь, что она устойчиво располагается на корпусе.
②
Во время нагрева поверхность чаши имеет высокую температуру. Не прикасайтесь к
корзине, в противном случае это может привести к ожогам.
③
Чаша для гриля используется только для жарки и гриля. Не используйте ее для
нагревания жидкости.
рис. 3
рис. 2
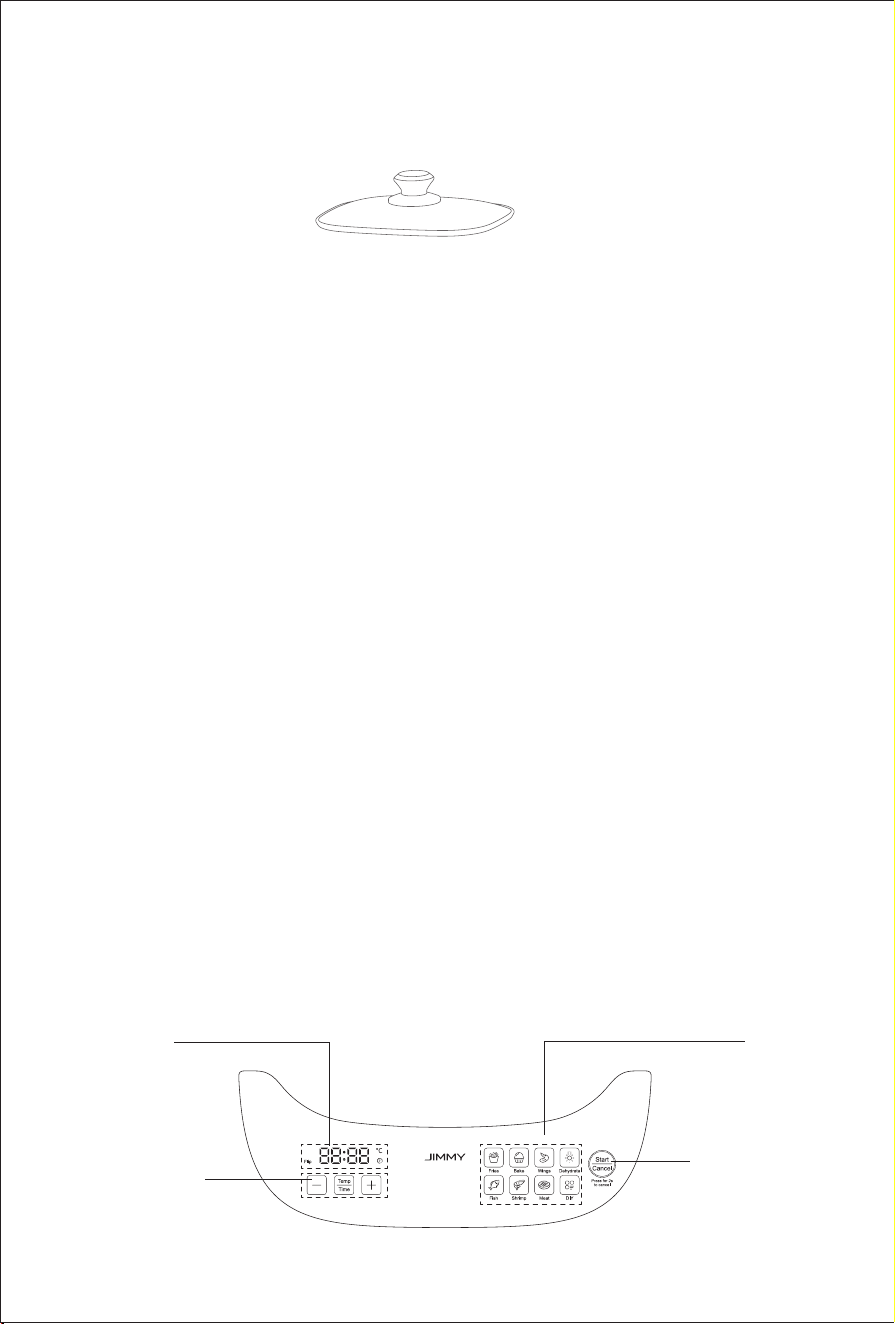
76
4. Крышка чаши для гриля:
Крышка чаши для гриля используется вместе с чашей для гриля для более эффективного
нагрева и предотвращения разбрызгивания масла (рис. 4).
Примечание:
Чаша для гриля изготовлена из стекла, поэтому для предотвращения повреждений
убедитесь, что во время работы она не будет ударяться о предметы, расположенные
рядом.
рис.
4
Использование изделия
Перед первым использованием следует обратить внимание на
следующие пункты:
1. Внимательно прочитайте данное руководство пользователя.
2. Разместите изделие на устойчивой плоской столешнице. Не размещайте его на
поверхности, не обладающей стойкостью к тепловому воздействию.
3. Перед тем как вставить вилку в розетку, убедитесь, что источник питания рассчитан на
напряжение 220-240 В~, а также, что он заземлен.
4. Перед использованием в первый раз вымойте корзину для жарки, решетку для создания
хрустящей корочки, чашу для гриля и крышку чаши для гриля теплой водой с моющим
средством, используя для этого неабразивную губку.
5. При первоначальном использовании возможно появление небольшого количества
дыма. После очистки запах можно устранить путем нагревания при температуре 200oC в
течение 20 минут в режиме жарки воздухом.
6. Не погружайте корпус в воду и не промывайте его под водопроводной водой, так как в
корпусе находятся электронные и нагревательные компоненты.
7. Не закрывайте отверстия для входа и выхода воздуха во время работы изделия.
8. Во время работы изделия температура поверхности отверстия для выхода воздуха,
корзины для жарки, чаши для гриля и крышки чаши для гриля высокая. Чтобы не
обжечься, не прикасайтесь к ним.
Описание функций
Область
отображения
временного
интервала
состояния
Область
функциональных
кнопок быстрого
старта
Область кнопок
настройки
параметров
Область кнопок
управления
«Старт/Отмена»

77
Область отображения временного интервала состояния
1. Когда загорается “ ” , на экране отображается оставшееся время.
2. Когда загорается “ ” , на экране отображается заданная температура.
3. Когда загорится индикатор «Flip» (Перевернуть) и прозвучит 3 звуковых сигнала,
достаньте корзину для жарки, переверните ингредиенты пищевых продуктов, затем снова
установите корзину для жарки в корпус, и прибор автоматически возобновит работу.
Область функциональных кнопок быстрого старта
В приборе предварительно настроено 7 функций быстрого старта, включая «Картофель
фри», «Выпечка», «Крылышки», «Сушка», «Рыба», «Креветки», «Мясо» и режим «Сделай
сам». Можно сразу выбрать функцию быстрого старта или настроить режим готовки по
желанию.
Примечание:
1. В режиме жарки воздухом можно использовать все функции быстрого старта.
2. В режиме гриля можно использовать только функции «Рыба», «Креветки», «Мясо» и
режим «Сделай сам».
Область кнопок настройки параметров
1. Кнопка
“ ”
: Используется для переключения отображения температуры и времени.
2. Кнопка
“ ”“ ”
: В режиме отображения времени: Нажмите
“ ”
или
“
”
, чтобы отрегулировать время приготовления. Диапазон регулировки: 1-45 минут.
Длительное нажатие данной кнопки позволяет быстро настроить время. В режиме
отображения температуры: Нажмите
“ ”
или
“ ”
, чтобы отрегулировать
температуру приготовления. Диапазон регулировки в режиме жарки воздухом — от 50oC
до 200 oC, в режиме гриля — от 150oC до 220oC. Длительное нажатие данной кнопки
позволяет быстро настроить температуру.
Область кнопок управления «Старт/Отмена»
1. Кнопка
“ ”
: После настройки функций и параметров нажмите кнопку
“ ”
,
чтобы начать готовку.
2. Во время настройки параметров или в процессе готовки нажмите и удерживайте кнопку
“ ”
в течение двух секунд, чтобы вернуться в режим ожидания, при этом на экране
дисплея появляется надпись "----".
Переключатель функций
Данное устройство имеет две функции: жарка воздухом и гриль. Для переключения между
двумя функциями выполните следующие действия.
1. Переключение режима жарки воздухом на режим гриля:
Сначала извлеките корзину (рис. 5), нажмите и удерживайте кнопку переворачивания,
держась за ручку для переворачивания (рис. 6), переверните верхнюю часть устройства в
направлении, показанном стрелкой на рисунке (рис. 7). Когда слышен звук «щелчка», это
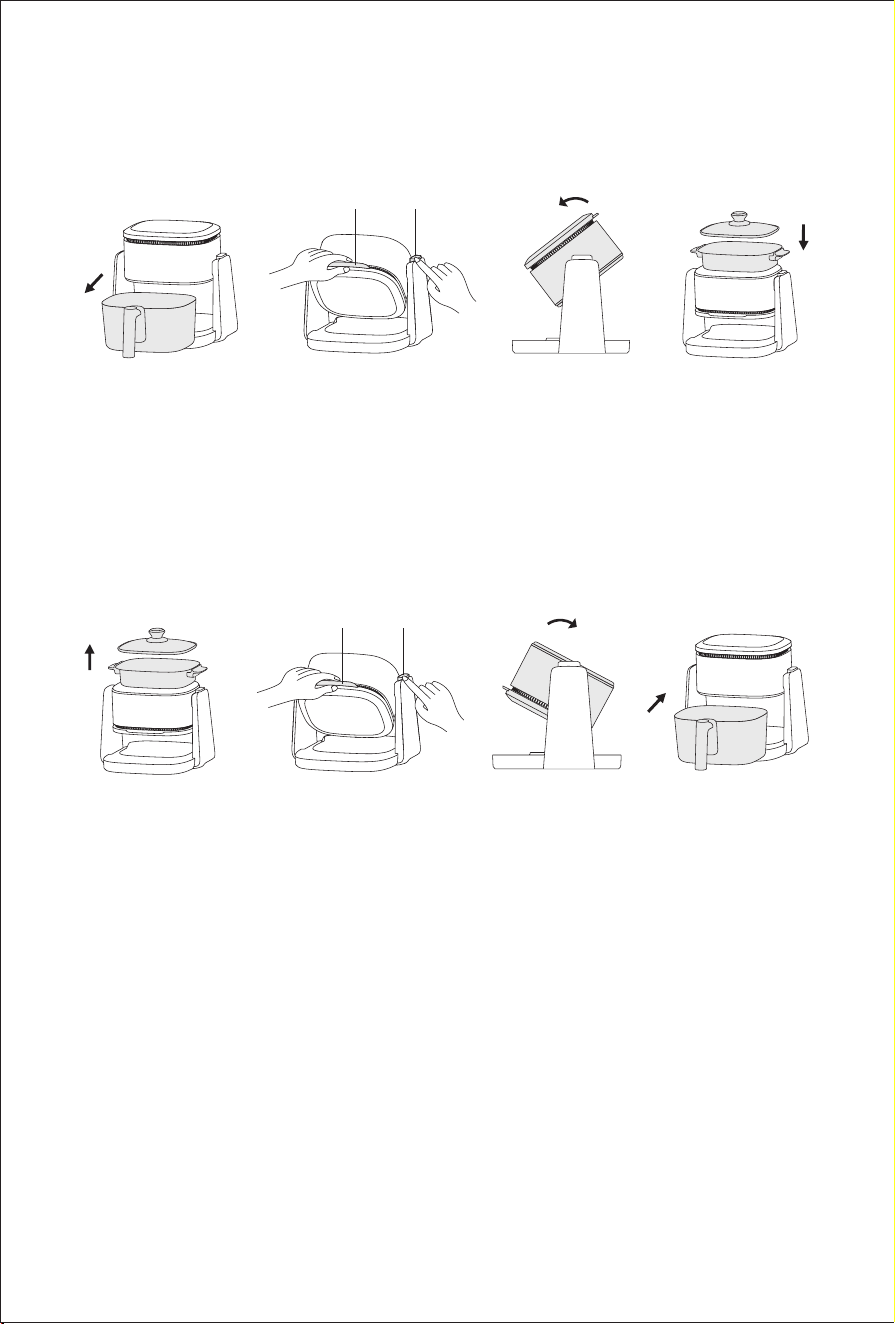
78
Ручка для
переворачивания
Кнопка
переворачивания
рис. 5 рис. 6 рис. 7 рис. 8
2. Переключение режима гриля на режим жарки воздухом:
Сначала извлеките чашу для гриля (рис. 9), нажмите и удерживайте кнопку
переворачивания, держась за ручку переворачивания (рис. 10), и переверните верхнюю
часть устройства в направлении, показанном стрелкой на рисунке (рис. 11). Когда
раздастся звук «щелчка», это означает, что устройство перевернуто на месте. Для
использования установите корзину для жарки (рис. 12).
Примечание:
1. Устройство можно переворачивать только в направлении, показанном на рисунке,
нельзя переворачивать в противоположном направлении.
2. Не прилагайте значительное усилие во время переворачивания. Если не удается
перевернуть устройство, проверьте, убедитесь, что кнопка переворачивания нажата и
выбрано направление переворачивания.
3. Если устройство только что закончило работу, то во время переворачивания
соблюдайте осторожность, чтобы не коснуться нагревательной трубки и расположенных
рядом металлических деталей, чтобы не допустить получения ожогов.
рис. 9 рис. 10 рис. 11 рис. 12
Ручка для
переворачивания
Кнопка
переворачивания
означает, что устройство перевернуто на месте. Установите чашу для гриля на корпус для
использования (рис. 8).
Этапы выполнения операций
1. Пример режима жарки воздухом «Крылышки»
①
Переключите устройство в режим жарки воздухом (рис. 13).
②
Убедитесь, что ножки из силиконового каучука находятся на решетке для создания
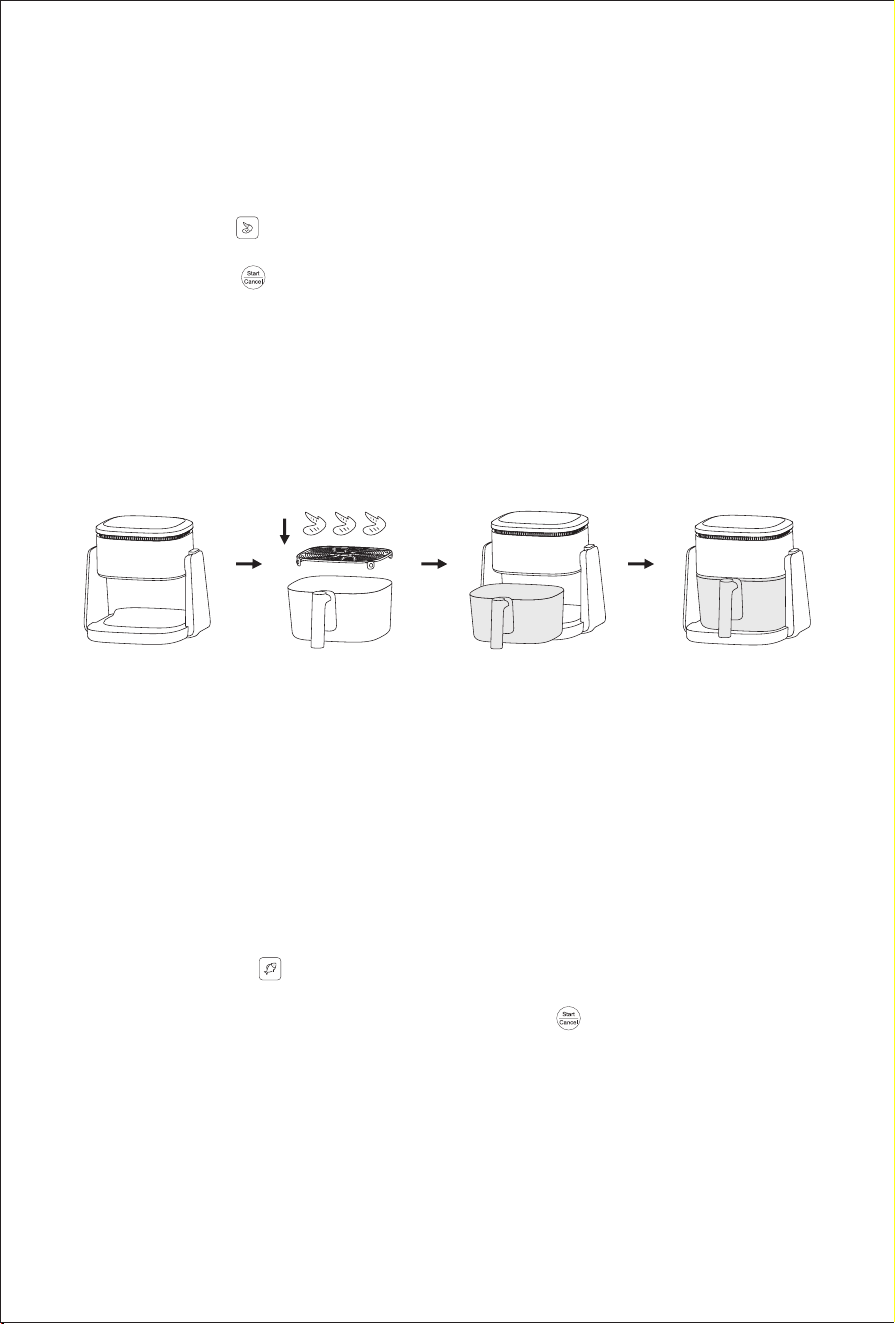
79
хрустящей корочки, и установите надлежащим образом решетку для создания хрустящей
корочки в корзину для жарки (с четырьмя ножками, обращенными вниз) (рис. 14).
③
Положите замаринованные куриные крылышки ровным слоем на решетку для создания
хрустящей корочки (рис. 14).
④
Установите корзину для жарки в корпус и протолкните ее на место (рис. 15-16).
⑤
Нажмите кнопку“ ” в области функций быстрого старта, на экране отобразится
200oC, 20 мин.
⑥
Нажмите кнопку “ ” для начала готовки, на экране дисплея начнет отображаться
оставшееся время.
⑦
Когда время готовки превысит половину, прибор подаст звуковой сигнал, при этом
на дисплее продолжит мигать индикатор «ip» (переворачивание). Вытащите корзину,
и устройство приостановит процесс приготовления. После переворачивания куриных
крылышек и установки корзины на место устройство продолжит готовку.
⑧
Когда изделие подаст пять звуковых сигналов, процесс приготовления завершится, и
на дисплее появится надпись «End» («Конец»). Соблюдая осторожность, снимите корзину
для жарки и извлеките ингредиенты.
рис. 13 рис. 14 рис. 15 рис. 16
Примечание:
1. В устройстве нет кнопки «пауза». Если нужно приостановить процесс готовки, вытащите
корзину для приостановки, при этом на экране дисплея появляется надпись «OPEN»
(Открыто). После повторной установки устройство возобновит работу.
2. При установке корзины для жарки убедитесь, что она прижата ко дну и находится на
своем месте вместе с корпусом.
2. Пример режима жарки воздухом «Рыба»
① Настройте устройство на режим гриля и соберите чашу для гриля (рис. 17).
② Нажмите кнопку
“ ”
в области функций быстрого старта, на экране
отобразится 200оС, 20 мин.
③ Налейте масло в чашу для гриля, нажмите кнопку
“ ”
для начала
предварительного нагрева, на экране дисплея начнет отображаться оставшееся
время.
④ Через 3 минуты выложите рыбу в чашу для гриля (рис. 18), переверните рыбу
через положенное время.
⑤ Когда изделие подаст пять звуковых сигналов, процесс приготовления
завершится, и на дисплее появится надпись «End» («Конец»). Соблюдая
осторожность, снимите чашу для гриля и извлеките ингредиенты.
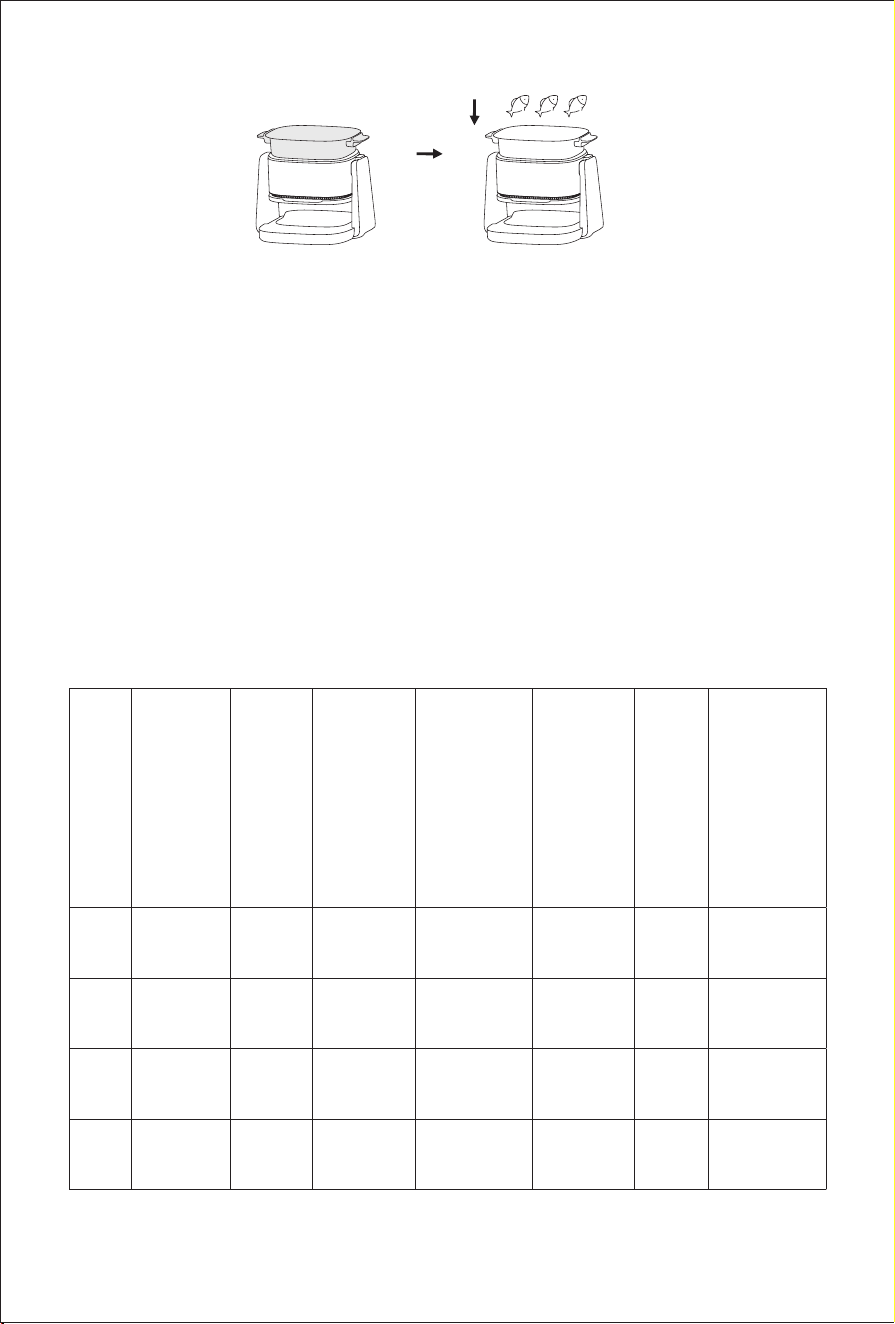
80
Номер
Тип
рецепта
Предл-
агаемый
объем
Темп-
ература по
умолчанию
(°С)
Регулир-
уемая
температура
(°С)
Время
по
умолчанию
(мин)
Регули-
руемое
время
(мин)
Требуется
ли
переворачи-
вание
после
истечения
половины
заданного
интервала
1
Картофель
фри
300 г 185 50-200 20 1~45 Да
2 Выпечка / 150 50-200 22 1~45 Нет
3 Крылышки 300 г 200 50-200 20 1~45 Да
4 Сушка / 70 50~80 3 ч 3~8 ч Нет
Сравнительная таблица рецептов
Следующая таблица позволяет выбрать основные настройки для ингредиентов,
которые вы хотите приготовить, данные настройки приведены только для справки.
Из-за разницы источников происхождения, размеров, форм и брендов ингредиентов
возможны небольшие различия. В зависимости от состава ингредиентов можно настроить
оптимальное состояние.
Рецепт для жарки
Примечание:
1. При установке чаши для гриля убедитесь, что она установлена ровно, без перекосов.
2. Чтобы избежать получения ожогов, при использовании режима гриля обращайте
внимание на предупреждение на этикетке об опасности получения ожогов.
3. Крышка сковороды позволяет повысить эффективность нагрева и уменьшить испарение
воды. Можно выбрать, нужно ли использовать крышку для сковороды, в зависимости от
потребностей.
рис. 17 рис. 18

81
Номер
Тип
рецепта
Предл-
агаемый
объем
Темп-
ература по
умолчанию
(°С)
Регулир-
уемая
температура
(°С)
Время
по
умолчанию
(мин)
Регули-
руемое
время
(мин)
Требуется
ли
переворачи-
вание
после
истечения
половины
заданного
интервала
5 Рыба 220 г 200 50-200 20 1~45 Да
6 Креветки 200 г 200 50-200 8 1~45 Нет
7 Мясо 130 г 200 50-200 10 1~45 Да
8
Сделай
сам
/ 200 50-200 20 1~45 /
Номер
Тип
рецепта
Предл-
агаемый
объем
Темп-
ература по
умолчанию
(°С)
Регулир-
уемая
температура
(°С)
Время
по
умолчанию
(мин)
Регули-
руемое
время
(мин)
Требуется
ли
переворачи-
вание
после
истечения
половины
заданного
интервала
1 Рыба 60 г 220 150-220 20 1~45 /
2 Креветки 200 г 220 150-220 10 1~45 /
3 Мясо 130 г 220 150-220 8 1~45 /
4
Сделай
сам
/ 220 150-220 30 1~45 /
Рецепт для гриля

82
Очистка и обслуживание
1. Перед очисткой и обслуживанием выньте вилку из розетки и подождите, пока корпус
устройства остынет, в противном случае это может привести к поражению электрическим
током, возгоранию или ошпариванию.
2. После окончания готовки подождите, пока чаша или сковорода остынет, и только после
этого удалите остатки масла из чаши или со сковороды.
3. Не погружайте корпус в воду и не промывайте его под струей воды из-под крана. Вместо
этого протрите поверхность влажной тканью.
4. Для очистки корзины для жарки, чаши для гриля, решетки для хрустящей корочки или
крышки чаши для гриля рекомендуется использовать теплую воду, моющее средство и
неабразивную губку.
5. Корзину для жарки нельзя мыть в посудомоечной машине.
6. Не помещайте горячую корзину для жарки, чаши для гриля или крышку чаши для гриля,
на которой вы только что закончили готовку, в воду или холодильник, чтобы не допустить
повреждения изделия в результате теплового шока из-за воздействия тепла или холода.
Важные указания по технике безопасности
Перед использованием данного изделия внимательно прочтите данное руководство,
чтобы исключить возможность неправильной эксплуатации или возникновения опасной
ситуации, и сохраните его для дальнейшего использования. При пользовании данным
изделием необходимо соблюдать следующие меры предосторожности:
Не разрешайте детям до 8 лет пользоваться этим прибором. Дети старше 8 лет могут
пользоваться этим прибором, если они находятся под постоянным присмотром. Лица
с ограниченными физическими, сенсорными или умственными способностями, или не
обладающими достаточным опытом и знаниями, могут пользоваться данным прибором
в том случае, если они прошли инструктаж или получили указания по использованию
прибора безопасным образом и осознают опасности, связанные с использованием
данного прибора. Храните прибор и шнур в месте, недоступном для детей до 8 лет. Дети
не должны заниматься очисткой и обслуживанием прибора.
При повреждении шнура питания его необходимо заменить специальным шнуром или
кабелем, который можно приобрести у производителя или его сервисного агента.
Данный прибор не предназначен для управления с помощью внешнего таймера или
отдельной системы дистанционного управления.
Данный прибор нельзя погружать в воду.
Данный прибор предназначен для домашнего использования и других подобных местах,
таких как:
– кухни для сотрудников в магазинах, офисах и других рабочих помещениях;
– жилые дома на ферме;

83
– кухни для постояльцев в гостиницах, мотелях и других жилых помещениях;
– гостиницы типа «постель и завтрак».
Меры предосторожности:
1. Конструкция изделия в реальном исполнении и его технические характеристики могут
иметь незначительные отличия от описанных в руководстве пользователя. Для получения
достоверной информации см. изделие в реальном исполнении.
2. Если рядом находятся дети, пользуйтесь этим изделием с особой осторожностью и не
позволяйте детям пользоваться им самостоятельно.
3. Когда изделие включено или находится в режиме охлаждения, то само изделие и шнур
питания должны находиться в месте, недоступном для детей в возрасте до 8 лет.
4. Дети могут пользоваться изделием под присмотром взрослых.
5. Не допускайте касания шнуром питания горячих поверхностей.
6. Если в процессе эксплуатации наблюдаются какие-либо неполадки или нарушения,
сразу же прекратите пользоваться прибором и перед тем, как продолжить его
использование обратитесь в сервисную службу местного дистрибьютора JIMMY для
проведения диагностики. Все ремонтные работы должны производиться специалистами.
7. Перед использованием выполните проверку на наличие повреждений шнура питания,
вилки и других компонентов. При обнаружении повреждений следует прекратить
пользование изделием.
8. Перед использованием убедитесь, что входное напряжение соответствует указанному
на паспортной табличке изделия, а штепсельная розетка заземлена. Используйте
отдельную розетку.
9. При извлечении изделия из коробки следует вынимать устройство и принадлежности по
отдельности, чтобы исключить возможность падения устройства и его повреждения.
10. Когда изделие не используется, оно должно располагаться на устойчивой столешнице.
11. Не пользуйтесь изделием на наклонной или неустойчивой столешнице, располагайте
изделие на отдаленном расстоянии от источников тепла, чтобы не повредить пластиковые
компоненты. Не располагайте изделие рядом с электроприборами или на них.
12. Изделие нельзя использовать рядом со шторами или под ними, а также рядом с
другими легковоспламеняющимися материалами.
13. Нельзя устанавливать изделие вплотную к стене или другим изделиям. Оставляйте
не менее 10 см свободного пространства за изделием, с обеих сторон и над ним. Не
размещайте на изделии другие предметы.
14. В приборе имеется нагревательная поверхность. Лица, не обладающие
чувствительностью к теплу (например, пациенты с диабетом), должны соблюдать
осторожность при пользовании прибором и обращаться за помощью к людям с
нормальной чувствительностью.
15. Во время нагрева не закрывайте отверстия для входа и выхода воздуха.
16. Во время или после нагревания, когда корзина для жарки или чаша для гриля еще не
остыли, не прикасайтесь к ним непосредственно руками, чтобы не обжечься.
17. Во время нагрева из отверстия для выпуска воздуха выходит высокотемпературный
пар, поэтому во избежание ожогов руки и лицо должны находиться на безопасном
расстоянии от отверстия для выпуска воздуха.

84
18. При извлечении нагретой фритюрницы из устройства следует соблюдать осторожность
во избежание ожогов высокотемпературным паром и горячим воздухом.
19. Поверхность изделия = с символом высокой температуры " " может нагреваться во
время работы. Будьте очень внимательны, чтобы избежать получения ожогов.
20. Не перемещайте устройство во время работы.
21. При перемещении устройства удерживайте корзину для жарки или чашу для гриля,
чтобы предотвратить их падение, которое может стать причиной получения травмы или
повреждения.
22. Не используйте принадлежности или компоненты других производителей без
рекомендации JIMMY, в противном случае гарантия теряет законную силу.
23. Данное изделие нельзя эксплуатировать с помощью внешнего таймера или
независимой системы дистанционного управления.
24. Чтобы не повредить горячую корзину для жарки, не ставьте ее после готовки сразу в
холодную воду или холодильник.
25. Не прилагайте значительное усилие для поворота головки устройства. Если не
удается повернуть головку, убедитесь, что кнопка фиксации нажата и выбрано верное
направление поворота.
26. После использования функции жарки воздухом не следует сразу переворачивать
корпус прибора руками, чтобы не допустить их касания нагревательного элемента и
получения травмы.
27. Когда изделие находится в режиме гриля, не ставьте фритюрницу непосредственно
на нагревательный элемент для ее нагрева, чтобы не допустить образования трещин на
фритюрнице и получения травмы.
Неисправность Возможные причины Способ устранения
Устройство не
включается.
Не подключено к штепсельной
розетке.
Вставьте вилку в розетку.
Не нажата кнопка «Старт/
Отмена».
Нажмите на кнопку «Старт/Отмена»
для начала работы.
Корзина для жарки воздухом не
установлена на место.
Установите корзину жарки воздухом на
место.
Повреждение печатной платы.
Обратитесь в сервисную службу для
проведения ремонта.
Ингредиенты
не доходят
до полной
готовности
Слишком много ингредиентов. Уменьшите количество ингредиентов.
Слишком малое время
приготовления пищи.
Увеличьте время приготовления пищи.
Слишком низкая температура
приготовления.
Увеличьте настройку температуры.
Поиск и устранение неисправностей
Перед тем как отдать изделие в ремонт, проверьте, следующие пункты:

85
Неисправность Возможные причины Способ устранения
Ингредиенты
не доходят
до полной
готовности
Корзина для жарки воздухом не
установлена на место, утечка
воздуха приводит к слишком
низкой температуре.
Убедитесь, что корзина для жарки
воздухом установлена на место без
наклона.
Чаша для гриля не установлена
на место и находится слишком
далеко от нагревательного
элемента, что приводит к
слишком низкой температуре
чаши для гриля.
Выполните проверку и убедитесь, что
чаша для гриля собрана на месте с
учетом наклона и изгиба.
Из изделия
выходит белый
дым.
Готовка из ингредиентов с
высоким содержанием масла.
В процессе приготовления пищи из
ингредиентов с высоким содержанием
масла, масло образует белый дым,
а фритюрница может нагреваться
сильнее, чем обычно, что не влияет на
конечный результат готовки.
На решетке для хрустящей
корочки или в корзине для
жарки осталось масло после
последнего использования.
После каждого использования
необходимо проверять, что корзина
для жарки и решетка для хрустящей
корочки очищены должным образом.
На экране
дисплея
отображается
E1.
NTC Обрыв в цепи или короткое
замыкание.
Обратитесь в сервисную службу для
проведения ремонта.
Примечание. В случае обнаружения других неисправностей, для устранения которых
требуются специальные инструменты, отправьте устройство в специализированный
ремонтный центр или обратитесь за консультацией к местному дистрибьютору JIMMY.
Поиск и устранение неисправностей
Перед тем как отдать изделие в ремонт, проверьте, следующие пункты:
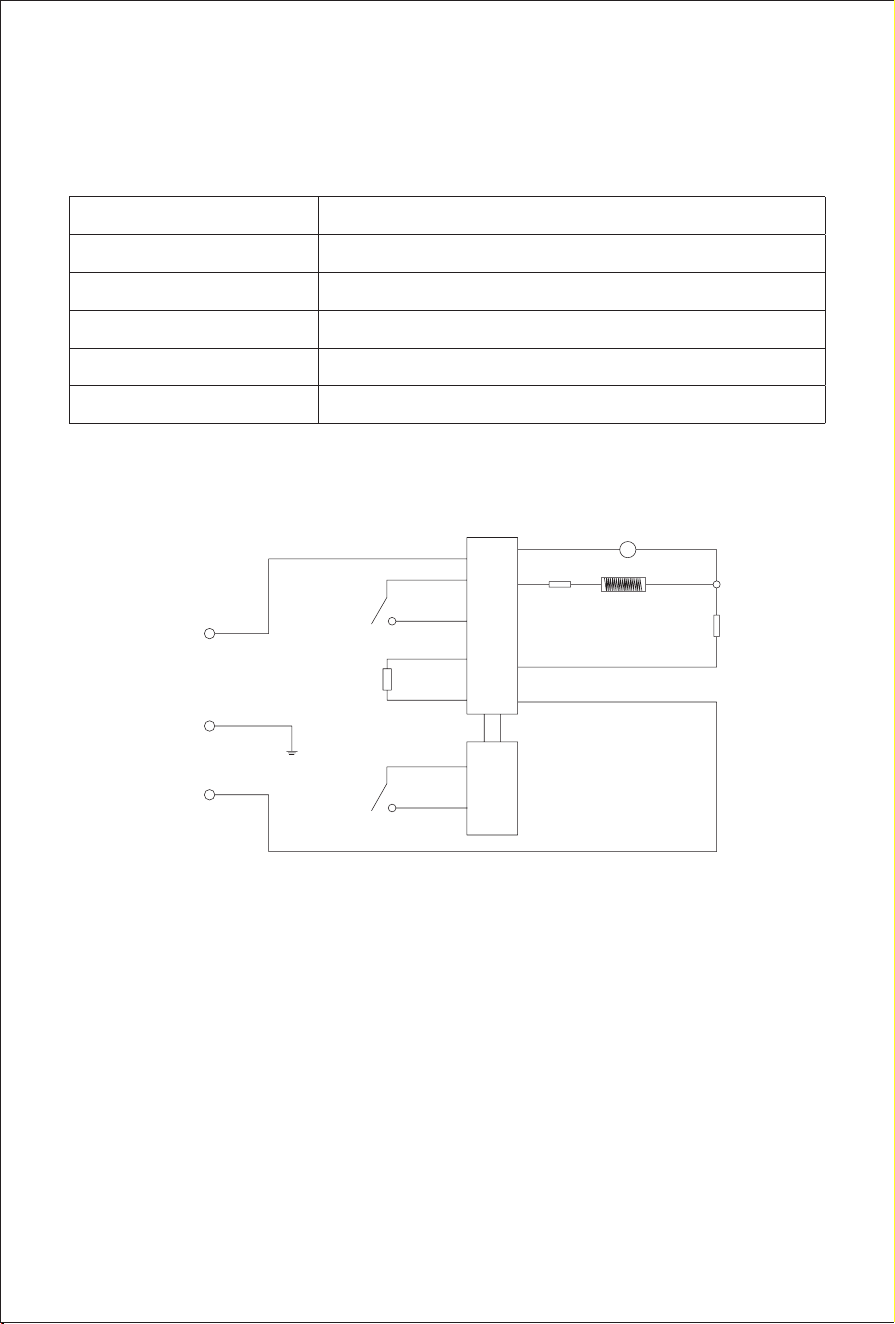
86
Спецификация изделия
Технические параметры
Наименование изделия Аэрофритюрница
Модель № AF3
Номинальное напряжение 220-240 В ~
Номинальная частота 50-60 Гц
Номинальная мощность 1100 Вт
Вместимость 4 л
Схема электрических соединений
L
E
N
220-240 В ~50-60 Гц
Motor
Предохр-
анитель
Мотор
Печатная
плата
питания
Контрольная
печатная плата
Нагреватель
M
NTC
Микровы-
ключатель
Микровы-
ключатель
87
Информация о производителе
Производитель Кингклин Электрик Ко., Лтд.
Адрес №1, Сянян Роуд, Нью Дистрикт, Сучжоу, Цзянсу Провинс, Китай
Утилизация
Во избежание нанесения вреда окружающей среде или здоровью человека от
неконтролируемого выброса отходов, устройство необходимо утилизировать отдельно от
других отходов и надлежащим образом переработать для повторного использования.
Отработанные приборы не должны выбрасываться совместно с бытовыми отходами!
Информация о гарантии
Гарантийный срок на изделие составляет 1 (один) год с даты покупки.
Срок службы изделия составляет 5 (пять) лет с даты покупки.
Гарантия не предоставляется в случае естественного износа, использования в
коммерческих целях, изменений первоначального состояния прибора, работ по очистке,
при последствиях ненадлежащего обращения или повреждении покупателем, или
третьими лицами, повреждении, вызванными внешними обстоятельствами.
Как узнать дату производства из серийного номера
Этикетка с серийным номером размещается на упаковке устройства, а также на корпусе
самого устройства. Дата производства закодирована в его серийном номере.
Чтобы расшифровать дату производства, ознакомьтесь с примером серийного номера,
который показан ниже:
Дата производства состоит из первых 3 символов: первый символ – год, второй символ –
месяц, третий символ – день.
DBP800547
D – год
B – месяц
P – день
8 – производственная линия

88
00547 – собственно серийный номер устройства
В нашем примере дата производства 23 ноября 2019 года.
Воспользуйтесь информацией, приведенной в таблице ниже для расшифровки даты
производства данного устройства.
Год Месяц Дата
Год Символ Месяц Символ Дата Символ Дата Символ
2016 A Январь 1 1 1 17 H
2017 B Февраль 2 2 2 18 J
2018 C Март 3 3 3 19 K
2019 D Апрель 4 4 4 20 L
2020 E Май 5 5 5 21 M
2021 F Июнь 6 6 6 22 N
2022 G Июль 7 7 7 23 P
2023 H Август 8 8 8 24 Q
2024 J Сентябрь 9 9 9 25 R
2025 K Октябрь A 10 A 26 S
2026 L Ноябрь B 11 B 27 T
2027 M Декабрь C 12 C 28 U
2028 N
13 D 29 V
2029 P
14 E 30 W
2030 Q
15 F 31 X
2031 R
16 G
Сделано в Китае
Товар сертифицирован

89

90
Web:www.jimmyglobal.com
Email:[email protected]
Contact us -we'll get back within 1 business day.
jimmytechnology
2M-01

