Bring you a healthy life !
INSTRUCTION MANUAL

- 1 -
IMPORTANT SAFEGUARDS
When using this electrical appliance, safety precautions
should always be observed, including the following:
READ ALL INSTRUCTIONS
1. Carefully read all of the instructions before using this appliance and save for
future reference.
2. Before plugging cord into wall outlet, or disconnecting, make sure that the cover
of the machine is in unlocked condition, and unplug from outlet when not in use
or before cleaning.
3. This appliance is not a toy, when used by or near children, close attention is
necessary, and store this appliance to a safe place, out of the reach of children.
4. Do not use any bags or attachments not recommended or appointed, and don’t
use this appliance for other purpose except its intended use.
5. Stop using the machine immediately if the cord is damaged and have it replaced
by a professional.
6. Keep away from moving parts.
7. Do not contact the hot sealing element located on edge of the top cover of this
machine. It is hot and may get burn.
8. Do not try to repair this appliance by yourself.
9. Don't use the appliance if it has fallen or appeared to be damaged.
10. Avoid to do the following: pull or carry by the cord, use cord as a handle, close a
door on cord, or pull cord around sharp edges or corners. Do not operate
appliance over cord or cord / plug is wet.
11. Keep away from hot gas, heated oven, electric burner or any other hot surfaces.
Do not use this appliance on wet or hot surface or near a heat source.
12. It’s better not to use an extension cord with this unit. However, if one is used, it
must have a rating equal to or exceeding the fating of this appliance.
13. When disconnect, to avoid any injury, please unplug by grasp the plug, not the
cord.
14.
Before plugging appliance in or operating, make sure your hands are dry and
safe to do the actions.

- 2 -
15. When it in “ON” or working position, always be on a stable surface, such as
table or counter.
16. It’s no need to use any lubricant, such as lubricating oils or water, on this
appliance.
17. Do not immerse any part of this appliance, power cord or plug in water or any
other liquid.
18. Do not use this appliance outdoors or on a wet surface, it’s recommended for
household, indoor use only.
19. This appliance is not intended for use by persons (including children ) with
reduced physical, sensory or mental capabilities, or lack of experience and
knowledge, unless they have been given supervision or instruction concerning
use of the appliance by a person responsible for their safety.
20. Children should be supervised to ensure that they do not play with the appliance.
21. If the supply cord is damaged, It must be replaced by the manufacturer, its
service agent or similarly qualified persons in order to avoid a hazard.
22. Cleaning and user maintenance shall not be made by children without
supervision.
23. This appliance can be used by children aged from 8 years and above and
persons with reduced physical,sensory or mental capabilities or lack of
experience and knowledge if they have been given supervision or instruction
concerning use of the appliance in a safe way and understand the hazards
involved.
CAUTION:FOR HOUSEHOLD USE ONLY
- 3 -
TECHNICAL PARAMETERS
Model
VH5188
Voltage
220-240V~
50Hz
Max sealing
width
300MM
Power
135W
Dimension
397Lx196Wx116Hmm
Max Vacuum
Pressure
-0.9 Bar Max.
Net Weight
~2.86 KGS
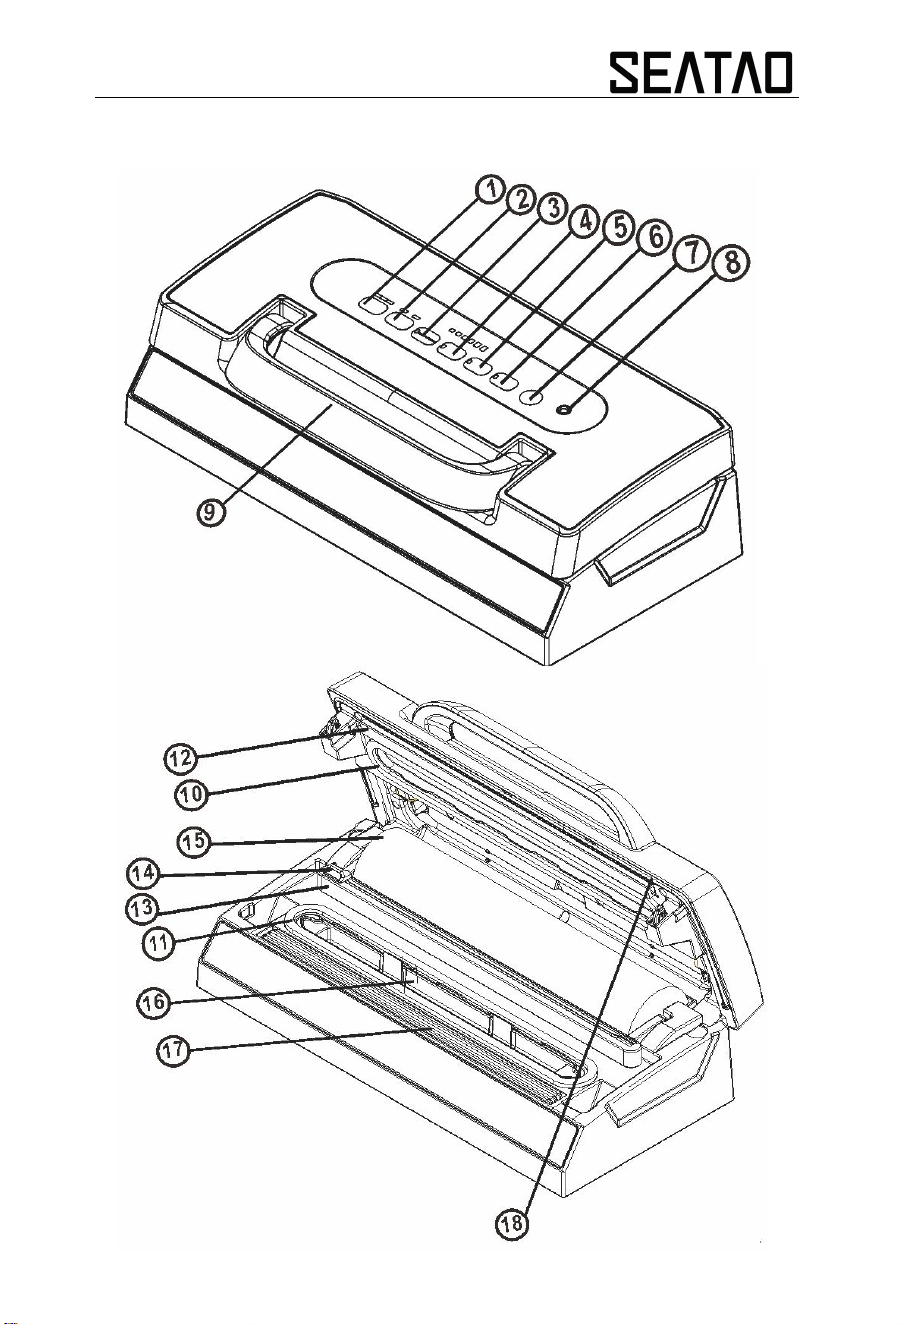
NO.
Unit
NO.
Unit
1
Sealing(Dry/Moist/Extended)
10
Upper Gasket
2
Pressure(High/Gentle)
11
Lower Gasket
3
Vac&Seal / Cancel
12
Sealing strip
4
Manual Seal
13
Cutter rack
5
Canister
14
Bag Cutter
6
Marinate
15
Roll storage area
7
Pulse
16
Vacuum chamber/Removable
liquid tray
8
Hose port
17
Sealing Element
9
Handle
18
LED Ring
- 4 -
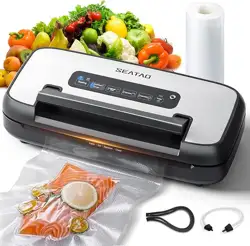
CONSTRUCTION AND FUNCTIONS

- 5 -
1. Sealing ( Dry / Moist / Extended) :
Three setting for choosing the best bag sealing time
Dry: for dry bags and items without moisture, with a shorter heat sealing time;
Moist: for moisture bags or foods with a little moisture, with a longer heat
sealing time.
Extended: for wet bags with longest heat sealing time.
2. Pressure ( High / Gentle):
This button provides two pressure choice:
High: for dry food stuff with very high vacuum pressure.
Gentle: For moisture food stuff with lower vacuum pressure.
3. Vac & Seal / Cancel :
When the automatic “Vac & seal” function is in operation, this button stops the
motor pump and immediately starts to seal the bag so that less vacuum
pressure inside the bag can be controlled by the operator to avoid crushing for
delicate items.
This button has two functions depending on the machine status:
At stand-by condition, it starts the automatic operation of vacuuming the bag and
then automatically seals the bag when vacuum is complete;
At working (vacuuming or sealing operations) condition, it stops the machine.
4. Manual Seal :
This button provides two functions:
To seal the open end of a bag without vacuuming air suction, used to make a
bag from a bag roll;
When the automatic “Vac & seal” function is in operation, this button stops the
motor pump and immediately starts to seal the bag so that less vacuum
pressure inside the bag can be controlled by the operator to avoid crushing for
delicate items.
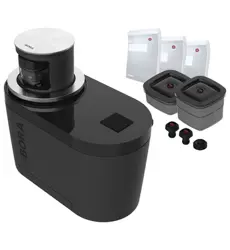
5. Canister: To start vacuuming for canisters, jar lids, wine stoppers or other
accessories through a hose.
6. Marinate: Press to marinate food in a vacuum Marinate bowl. Press this key , the
specific marinating cycle begins and will stop automatically after 5
cycles.
7. Pulse : Press this button, and the device starts vacuuming.Undo, it will stop.

- 6 -
This process can be repeated. Then press “manual seal” when meet
desired pressure, turn to seal. Different pressure according to different
type of foods can be chosen.
8. Hose port : To insert the hose for canister ,Marinate bowl and wine stopper.
9. Handle : Press the handle to lock the cover into the base very easily.
10. Upper Gasket: Keep air away by forming vacuum chamber. Clean and dry or
replace it when it is distorted or broken.
11. Lower Gasket: Same performance as the upper gasket, Clean and dry or
replace it when it is distorted or broken.
12. Sealing strip: Place the bag to be sealed over this strip, Clean and dry or
replace it when distorted or broken.
13. Cutter rack: Support the cutter to slide along.
14. Bag Cutter: Press and slide in one direction or another to cut bags to a
desired size.
15. Roll storage area: Store the vacuum bag rolls in this storage area to save
space.
16. Vacuum Chamber/ Removable liquid tray :Position the open end of the bag
inside the chamber, draws air out of bag and catches any liquid
overflow from the bag. The removable liquid tray can be take out for
cleaning purpose.
17. Sealing element: Teflon-coated heating element which is hot and seals the bag.
18. LED Ring : When machine locked well, the LED will bright, when the cover in
open condition, the LED light go out after 3 seconds.
OPERATING INSTRUCTIONS
1. Making a bag with bag roll
1. Put the rolls into the bag roll storage area.
2. Pull out the bag material to the suitable length and use the bag cutter to cut a bag.
If the bags in your hand is the cut bags, then, it can working with the machine
directly.
3. Put one end of the bag on top of the sealing element, but not enter the vacuum
chamber.

- 7 -
4. Close the cover and press handle to lock the cover.
5. Press “Manual Seal” button to start sealing the bags. The indicator light to indicate
sealing operate, progress LED will show the sealing progress.
6. When the indicator turn off, the sealing is done, rise the handle to open the cover
and take the bag out of the machine. The bag is then done and is ready for vacuum
sealing.
2. Vacuum packaging with a bag
1. Put the items inside the bag. Use only the special designed vacuum bags
supplied by us with vacuum air channels.
2. Clean and straighten the open end of the bag, make sure no dust, wrinkle or
ripples.
3. Place the open end of the bag within the vacuum chamber area. Make sure the air
intake is not covered by the bag.
4. Put the cover down and press handle to lock the cover.
5. Check the LED status of the “Sealing” to confirm sealing time depending on the
moisture status of packed items(dry / moist) according to the type of food;
6.Then press VAC&SEAL button, the unit start to vacuum and will seal the bag
automatically. The indicator light to indicate vacuum and sealing operate, progress
LED will show the vacuum&sealing progress.
NOTE:
This product provides very high vacuum pressure during vacuum packaging , in
order to avoid crushing of the delicate item by the high vacuum pressure, observe
the status of the vacuum pressure inside the bag and switch the “ Manual Seal”
button immediately when the desired vacuum pressure is achieved. The pump will
stop and change to heat-seal the bag.
7. When the indicator turn off ,the vacuum packaging is done. rise the handle to open
the cover and take out the packed bags.

- 8 -
NOTE:
This Appliance can be vacuum and seal continuously more than 200 cycles
without overheating. Wipe out any excess liquid or food residue in the vacuum
chamber after each bag packaged.
Your appliance can work only on the specific bags provided by us. Do not
attempt to use other bags not intended for vacuum packaging.
Cut the bag straight across with scissors to open a sealed bag.
3. Pulse/Vacuum function
1.This function is preferred for vacuum packing, when you want a slight vacuum
effect such as tomatoes, chips or similar. Or, if you have moist raw materials or a
sauce, where you just want to drain air from the bag and then stop the appliance
before the liquid is compressed.
2.Press the “Sealing” button to select sealing type on the product to be vacuum
packed: Choose “Dry” for dry raw materials, “Moist” for moisture contents.
3.Press the Pulse Vacuum button several times until you get the wanted result, then
press the Manual Seal button to seal the bag.
4. Vacuum package in a Canister & Vacuum Bowl
( Not included in the package )
1.Wipe canister cover, canister base and ensure they are clean and dry.
2.Put the items into the canister and do not fill up too full so that the cover can be in
good contact with the canister bowl rim. Clean the cover rim of the canister and
bottom seal gasket of the canister cover;
3.Insert one end of the hose into the HOSE PORT on the unit and another end of
the hose into the center hole of the canister cover.
4.Press the canister button to start vacuuming. To ensure there is no air leaking
between the cover and the canister, use your hand to push down the cover at the
beginning of the vacuuming work. The machine will stop automatically when enough
vacuum pressure is achieved.
5.Take out the hose tip from the canister cover firstly, and then, take out the hose
tip from the machine after the job is completed.

- 9 -
Attention: Must take out the hose tip from the canister cover firstly when finished
vacuuming job, otherwise it will cause leakage for the canister.
5. Open Canister after vacuum packaging
In order to open the canister, you need to press the “Release “button on the
canister cover.
Note:
At the beginning of the vacuum packaging in a canister or a vacuum bowl,
slightly press down the cover or on the hose adaptor to ensure no loose of the
hose and to avoid air leaking through the gap between the cover and the
canister top rim for a few seconds.
To test vacuum, simply tug on the cover. It shall not move;
Different canisters are available in the market . The operation procedure will be
a little different. Please refer to the individual manual for the specific canister.
6. Marinate food with a marinate Bowl
1) Fill the container and connect it to the machine .
2) Set the machine vacuum power according to the food being marinated.
3) Hook the lid onto the base of the machine by lowering the lock handle.
4) Press the “Marinate” button to start the marinate process. The machine will
vacuuming and release air by automatically with 5 cycles, around 6 minutes.
Then, the quick marinate process is completed.
5) Remove the hose tube from the container and the machine.
The machine can be stopped at any time by pressing “Vac & Seal / Cancel”
button.
If the marinate process needs to be repeated, the air will need to be released
from the container before reconnecting it to the machine.
- 10 -
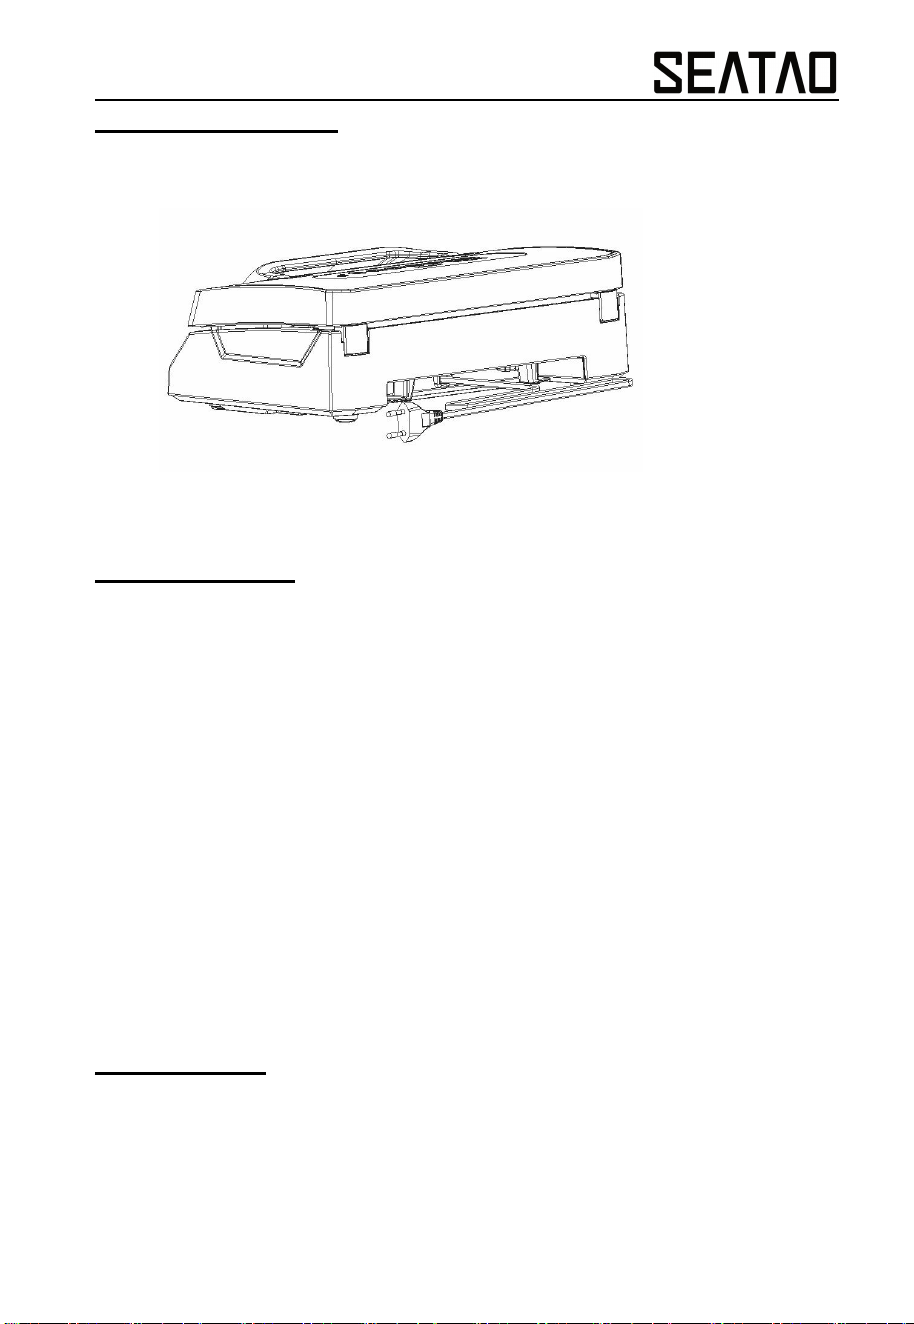
7. Cord storage
Put the power cord into the storage area when not use the machine which is in
the bottom of the machine. Do not wrap the cord around the appliance.
CLEANING AND MAINTENANCE
Vacuum sealer
1. Always unplug the unit before cleaning.
2. Do not immerse in water or any other liquid.
3. Avoid using abrasive products or material to clean the unit, for they will scratch
the surface.
4. Use a mild dishwashing soap and a warm, damp cloth to wipe away food
residue or around components.
5. Dry thoroughly before using again.
Note:
The foam gaskets around the vacuum chamber should be dried thoroughly
before re-assembling, when re-assembling, is careful to prevent any damage, and
assemble as original position to ensure no vacuum leaking.
Vacuum bags
1. Wash bags in warm water with a mild dishwashing soap.
2. When wash bags in dishwasher, turn bags inside out and spread them over top
rack of dishwasher, so entire surface is exposed to the washing water.
3. Dry thoroughly before reusing.

- 11 -
IMPORTANT: To avoid possible illness, do not reuse bags after storing raw
meats, raw fish or greasy foods. Do not reuse bags that have been microwaved
or boiled.
Accessories
Washing all vacuum accessories in warm water with a mild dishwashing soap,
But do not immerse cover in water.
1. Canister bases (not lids) are top rack dishwasher safe. But canister cover
should be wiping down with a damp cloth.
2. Ensure the accessories to be dry thoroughly before reusing.
3.
Canister and cover is not allowed to use in microwave or freezer.
Storing Your Vacuum Sealer:
1. Keep the unit in a flat and safe place, out of the reach of children.
2.
Do remember to make sure the lid of appliance is unlocked when not in use
and in storage. Keep the cover locked will distort the foam gaskets causing
leaking.
- 12 -
Troubleshooting
Problem
Solution
Vacuuming
but seal
function is
not good
Check if the edge of the bags has liquid, oil stain or any
chippings?
If yes, please clean the edge of bags and try again.
Check if the heating element damage and good setting or
not?
If damaged, please exchange the heating element and make sure
it is well installed.
Check if the sealing strip damage or well installed?
If damaged, please exchange the sealing strip and make sure it is
well installed.
Check if the edge of the bag has wrinkled?
If yes, please take out some foods so that the bags have enough
space for sealing and smooth the bag mouth and try again.
Seal function is
good but can not
vacuuming
Check if the gasket is deformed?
If deformed, replace it and try again.
Check if the bags is placed into the vacuum chamber?
If not, please put the edge of bags into the vacuum chamber.
Check if the food with sharp angel?
If yes, please packing the angel with safe paper before vacuuming
the food
Check if the edge of bag covered the suction hole?
If yes, please put the bag into the correct position.
Bag inflation after
vacuuming
Check if the good is belong to easy corrosion foods?
All the easy corrosion goods are need to be frozen or refrigerated
after vacuuming so that it can prolong it’s shelf life. But
vacuuming doesn’t guarantee the foods will never spoil.

- 13 -
Check if you packed the fresh vegetables or fruit and seed
food?
All fresh vegetables or fruit and seed are not suitable to storage
under room temperature after vacuumed, they have
photosynthesis and respiration. Suggest to storage them in
refrigerated.
The bag melts
Check if the sealing time is too long?
If yes, please reset the sealing time.