QUICK START GUIDE
GUIDE DE DÉMARRAGE RAPIDE
ATTENTION!
For Returns or Support you MUST contact
DefenderCameras.com/Support
Pour les retours ou l’assistance, vous devez
contacter Defendercameras.com/Support

2
TABLE OF CONTENTS
WHAT’S INCLUDED ..................................................................................................4
WHAT YOU’LL NEED ................................................................................................5
REGULATORY INFORMATION ................................................................................. 5
PRODUCT DETAILS ................................................................................................... 6
LET’S GET STARTED .................................................................................................. 7
SETTING UP YOUR CAMERA .................................................................................... 8
CAMERA MOUNTING OPTIONS ............................................................................ 11
USING THE APP ...................................................................................................... 11
FREQUENTLY ASKED QUESTIONS ......................................................................... 12
TABLE DES MATIÈRES ............................................................................................13
3
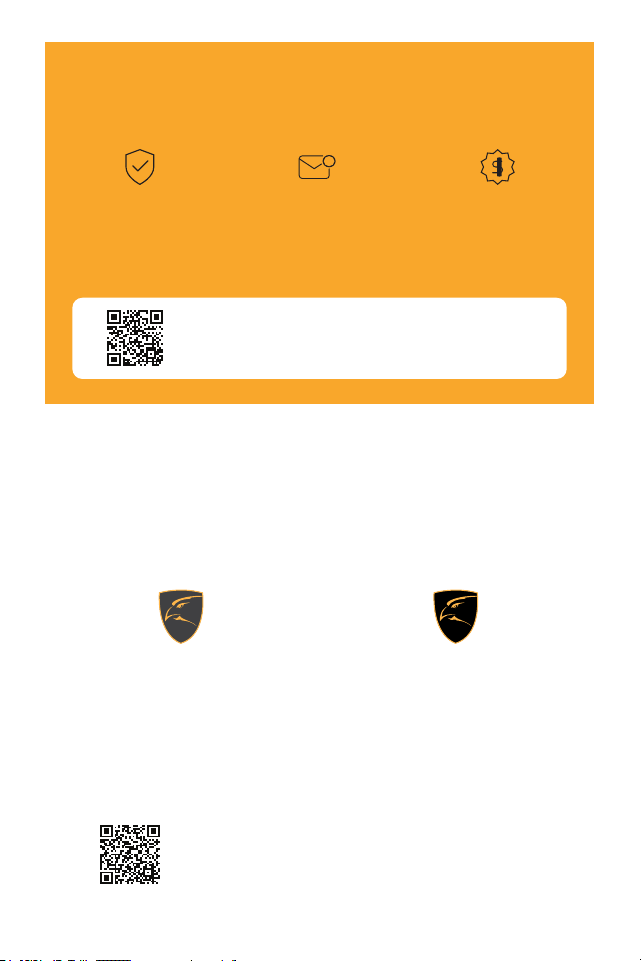
ACTIVATE YOUR WARRANTY
EXTEND YOUR WARRANTY
PROTECT
Covered for the
unexpected
SUPPORT
Receive videos, tips &
updates for your product
VALUE
Exclusive access to
special oers
Don’t forget to protect your purchase and ease your mind by extending your
included 1 year manufacturer warranty to 2 or 3 years. If something goes wrong,
our team of Security Experts will get you back up and running fast!
Extended Warranties can be purchased up to 60 days after your product’s purchase.
2 YEAR WARRANTY
Extend your peace of mind to two years
◊ Product Defects
◊ Advanced Replacements
◊ Free Return Shipping
3 YEAR WARRANTY
Extend your peace of mind to three years
◊ Product Defects
◊ Advanced Replacements
◊ Free Return Shipping
Open your camera & scan this QR code, or
visit: DefenderCameras.com/Warranty
Open your camera & scan this QR code, or visit:
DefenderCameras.com/pages/extended-warranties

4
WHAT’S INCLUDED WHAT YOU’LL NEED
REGULATORY INFORMATION
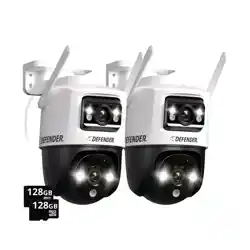
3K Guard Pro PTZ Dual-Lens Camera
Camera Power Supply (10ft)
Camera Power Extension Cable (25ft)
Camera Mounting Hardware
Camera Mounting Template
Camera Ethernet Waterproof Cable Shield
Window Warning Sticker
Quick Start Guide
Free Lifetime Customer Support
Wi-Fi Internet Connection
Drill and/or a Phillips #2 screwdriver
3/32” drill bit for pilot holes
7/32” drill bit for wall anchors
7/8” long drill bit
A compatible Android or iOS phone
The regulatory information herein might vary according to the model you purchased. Some information is only applicable for
the country or region where the product is sold.
FCC Information
CAUTION
Changes or modications not expressly approved by the party responsible for compliance could void the user’s authority to
operate the equipment.
FCC Conditions:
This device complies with part 15 of the FCC Rules. Operation is subject to the following two conditions:
• This device may not cause harmful interference.
• This device must accept any interference received, including interference that may cause undesired operation.
• This equipment complies with FCC radiation exposure limits set forth for an uncontrolled environment. This equipment
should be installed and operated with minimum distance 20cm between the radiator & your body.
FCC Compliance:
This equipment has been tested and found to comply with the limits for a digital device, pursuant to part 15 of the FCC Rules.
This equipment generates, uses, and can radiate radio frequency energy and, if not installed and used in accordance with the
instructions, may cause harmful interference to radio communication.
• For class A device, these limits are designed to provide reasonable protection against harmful interference in a commercial
environment. Operation of this equipment in a residential area is likely to cause harmful interference in which case the user
will be required to correct the interference at his own expense.
• For class B device, these limits are designed to provide reasonable protection against harmful interference in a residential
installation. However, there is no guarantee that interference will not occur in a particular installation. If this equipment does
cause harmful interference to radio or television reception, which can be determined by turning the equipment o and on,
the user is encouraged to try to correct the interference by one or more of the following measures:
• Reorient or relocate the receiving antenna.
• Increase the separation between the equipment and receiver.
• Connect the equipment into an outlet on a circuit dierent from that to which the receiver is connected.
• Consult the dealer or an experienced radio/TV technician for help.
Privacy Protection Notice
As the device user or data controller, you might collect personal data of others such as face, ngerprints, car plate number,
Email address, phone number, GPS and so on. You need to be in compliance with the local privacy protection laws and
regulations to protect the legitimate rights and interests of other people by implementing measures include but not limited to:
providing clear and visible identication to inform data subject the existence of surveillance area and providing related contact.
IMPORTANT: The Camera Power Supply is NOT waterproof.
5
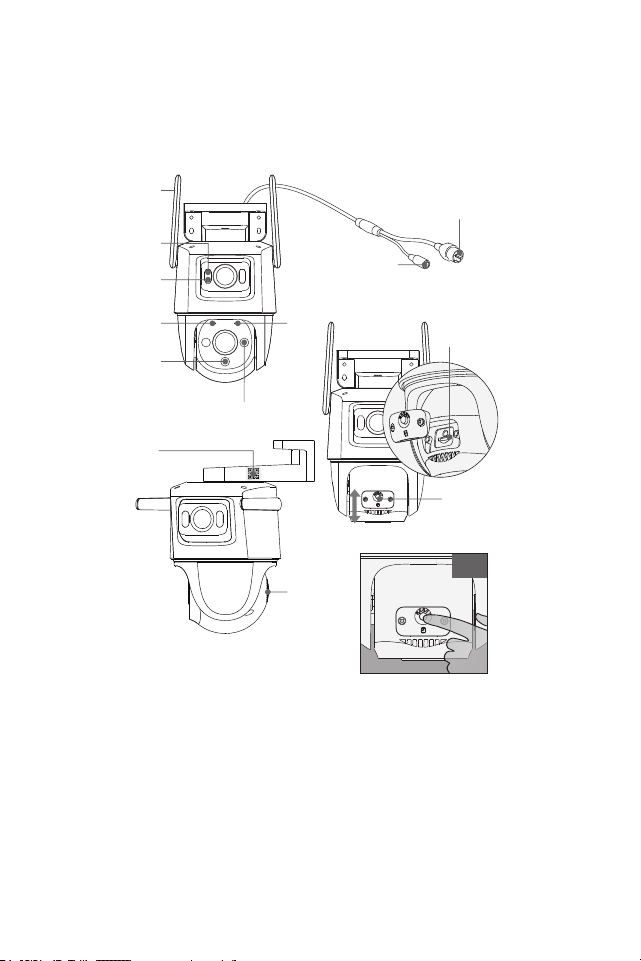
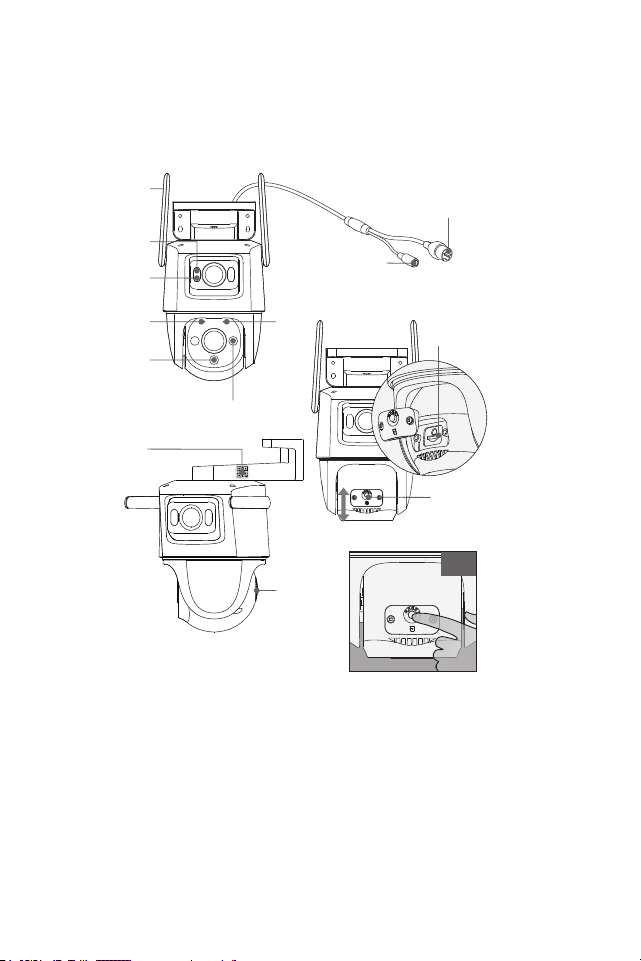
PRODUCT DETAILS
RESET
10 s
LED Indicator
Wi-Fi Antenna
Speaker
IR
Built-in Mic
QR Code
LED
Spot Light
IR
Reset Button
Micro SD Card Slot
(Remove cover to access)
Ethernet Cable Connector
(Optional for hard wire connection)
Power Adapter
Connector
6
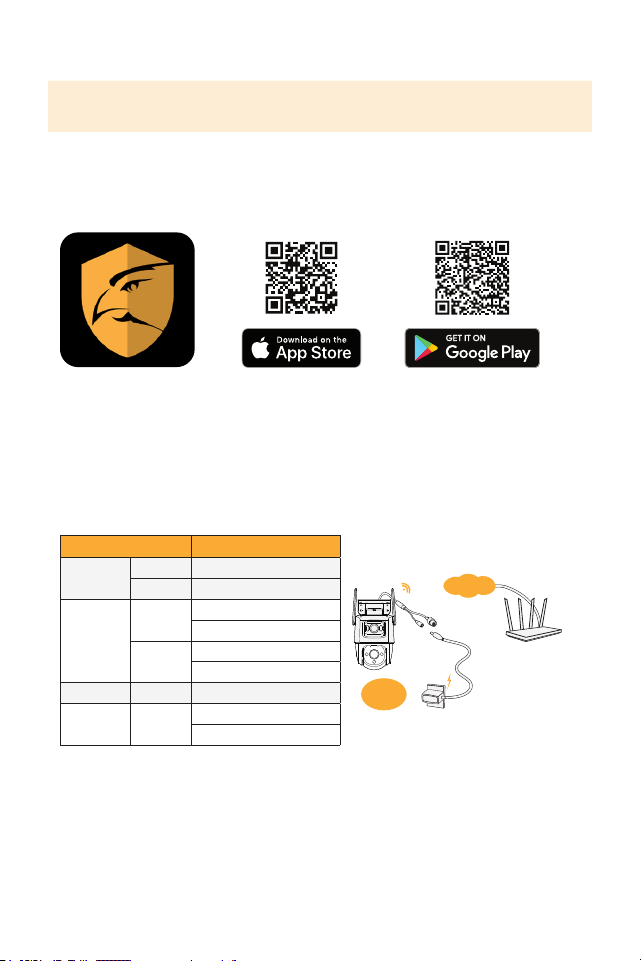
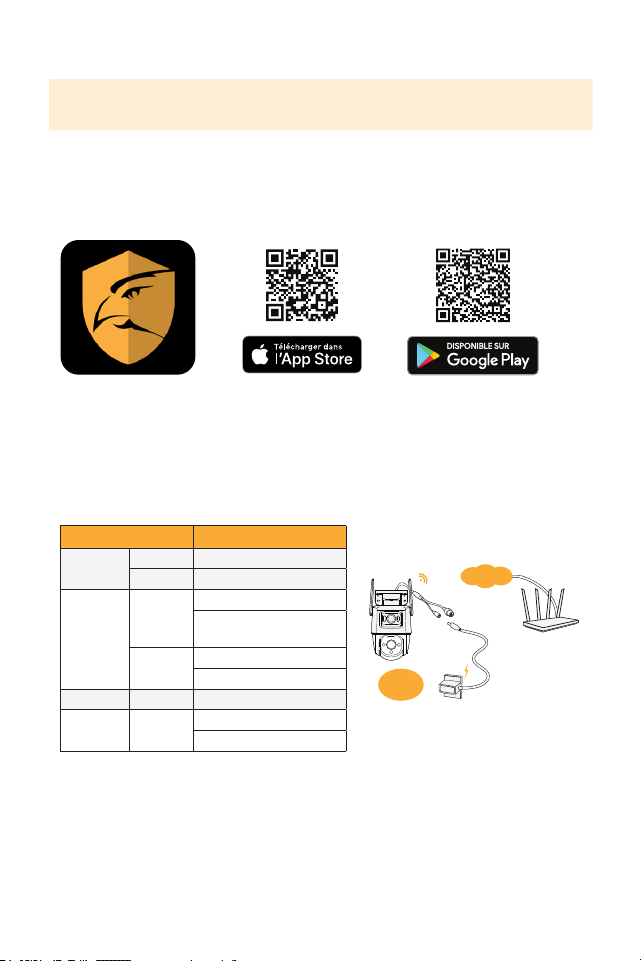
Wi-Fi
12 VDC
1 A
Internet
2. Plug-In Your Camera to Power On
Before connecting your camera to the App, wait 60 seconds for the LED indicator
light to ash green.
LET’S GET STARTED
IMPORTANT: Screenshots and some steps may vary based on the device used to
step up the App.
1: Download the App
Download the Defender Guard app and follow the steps to create an account. An
email account is required for verication.
LED Status Device Status
Green
Flashing Ready to set up the device
Solid Working properly
Red
Flashing
Network disconnected
Failed to set up the device
Solid
Booting
Device malfunction
Green & Red Alternating Updating rmware
O
/
Power o
LED turned o
7
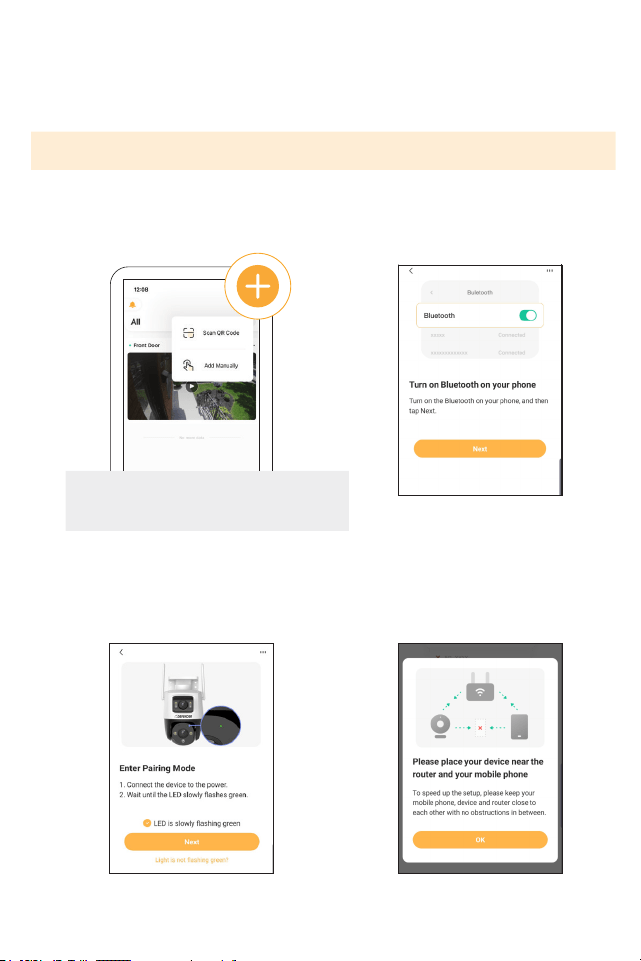
SETTING UP YOUR CAMERA
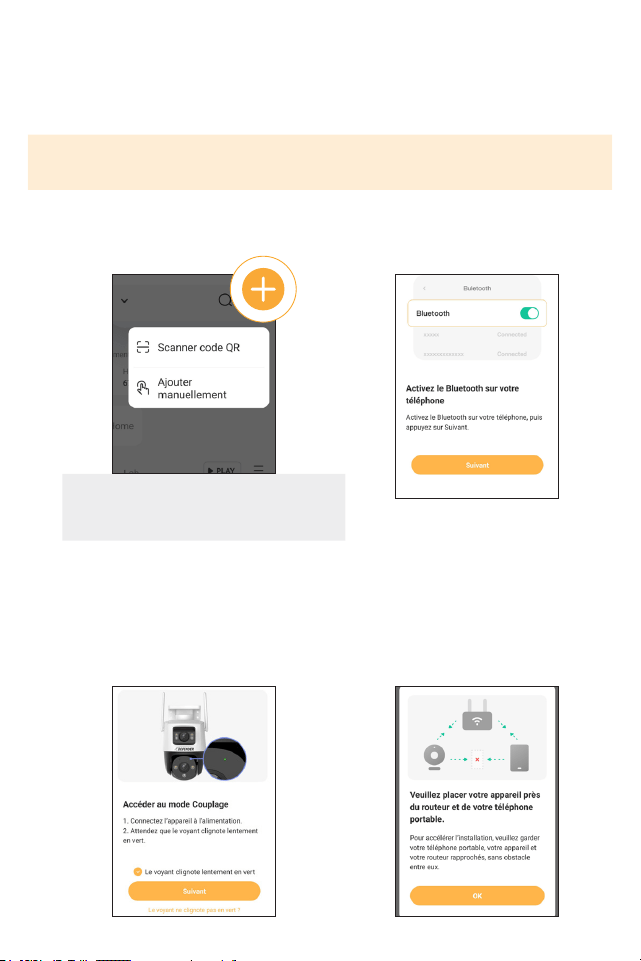
Step 1: Connect to Wi-Fi and Pair Your Camera
2. Ensure Bluetooth is turned on
your phone and tap Next.
1. Tap + to add your camera, then
tap Scan QR code.
3. Wait for the camera LED to ash
green slowly. Tap “Next” to proceed.
4. To ensure connection, please
keep your phone, device and
router close to each other.
Note: If your mobile device cannot scan
the QR code, tap “Add Manually”
IMPORTANT: Before pairing, ensure your phone is connected to a 2.4 GHz Wi-Fi network
8
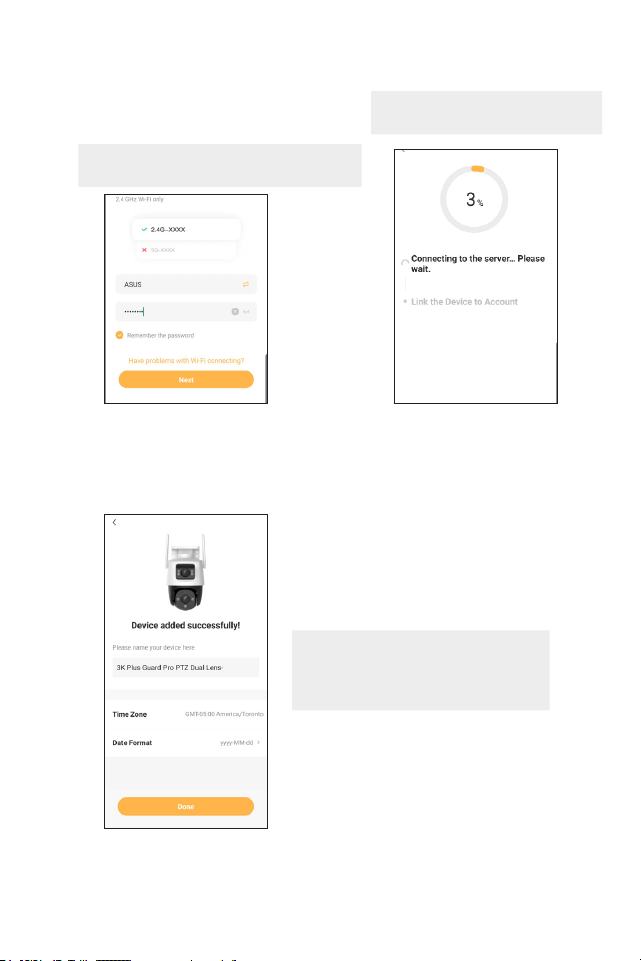
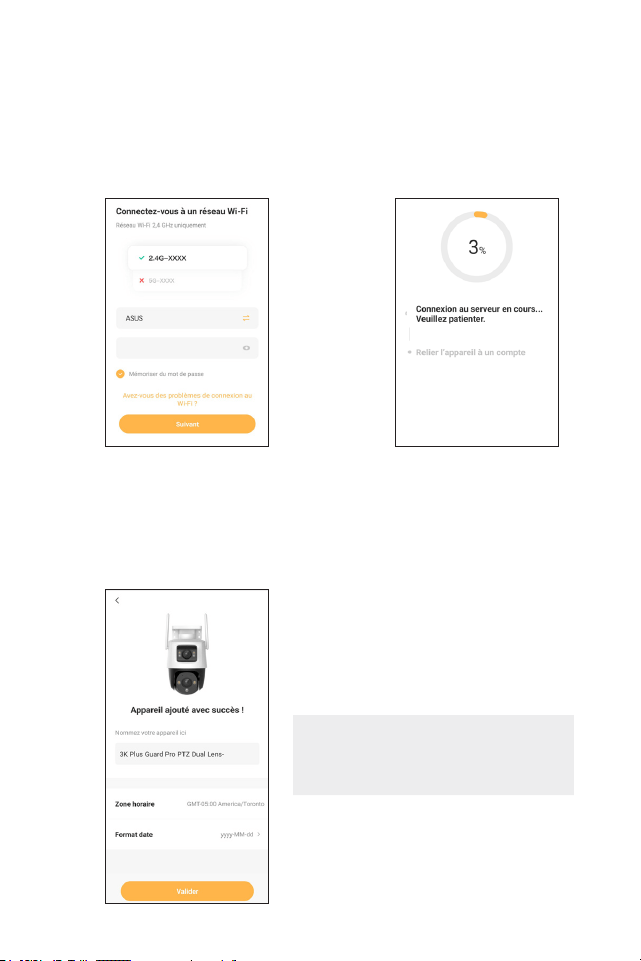
6. Please wait while the device
connects to the server.
5. Select the Wi-Fi network you want
to connect your camera with. Only
available 2.4 GHz Wi-Fi networks
show here. Enter your Wi-Fi Network
password then tap “Next”.
7. Name your device. We recommend naming your camera if you are con-
necting more than one camera. Tap “Done”. Your device has now been
added successfully.
Note: Please repeat these steps for
each additional camera you want
to connect.
Note: If your Wi-Fi network is not listed
here, please refresh the page.
Note: Make sure your phone is
connected to the same network.
9
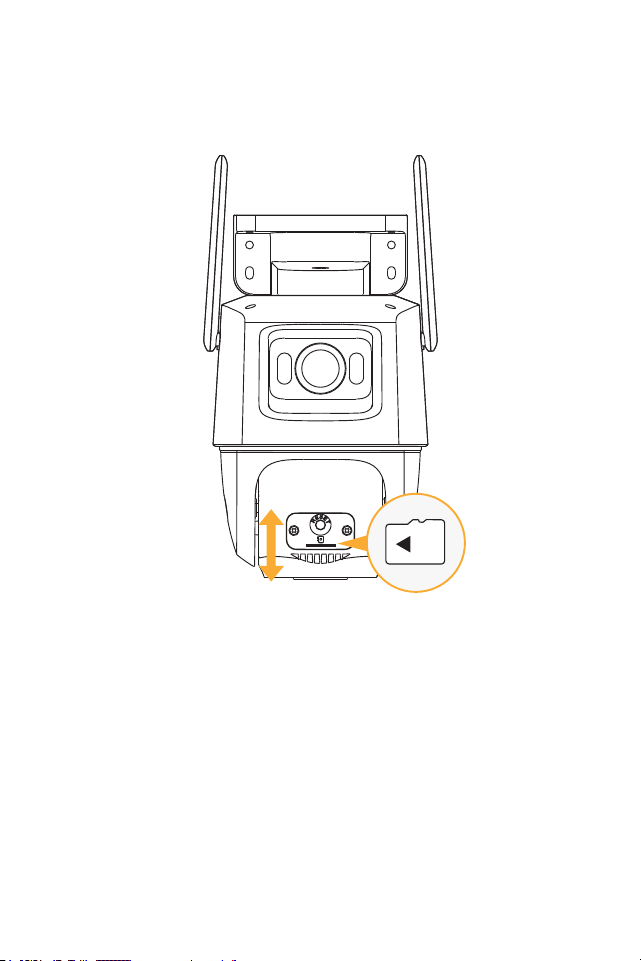
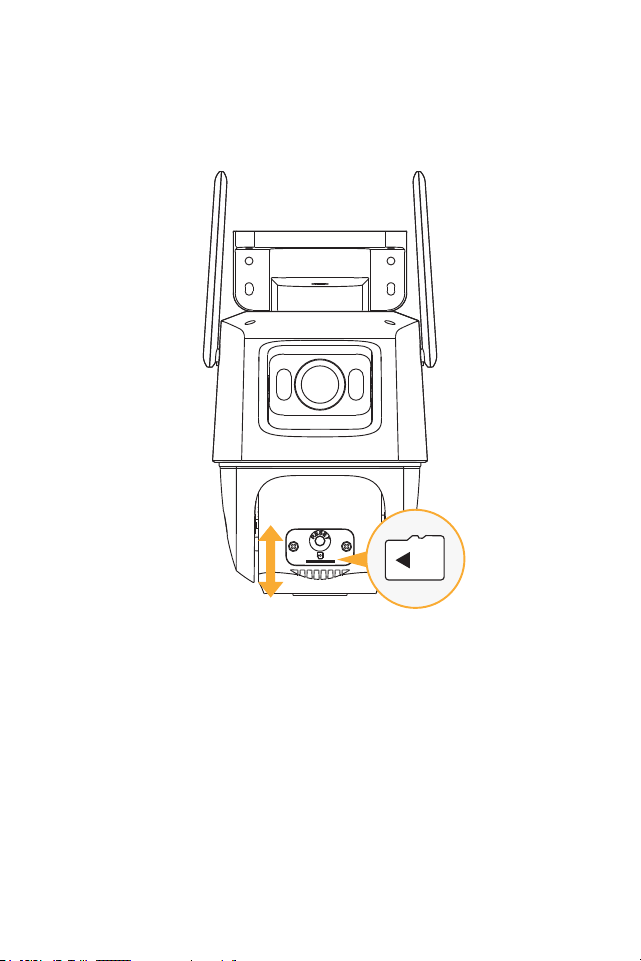
Step 2: Insert A Micro Sd Card
Recordings can be locally stored on a Micro SD card, to insert or swap out your Micro
SD card please follow the steps below. The maximum size Micro SD card is 256GB.
1. Remove the lower cover by unscrewing the Philips screws to access the SD card.
2. If swapping out a current Micro SD card, gently press on the card, it will pop out.
3. When inserting your Micro SD push it in until you hear a click sound.
10
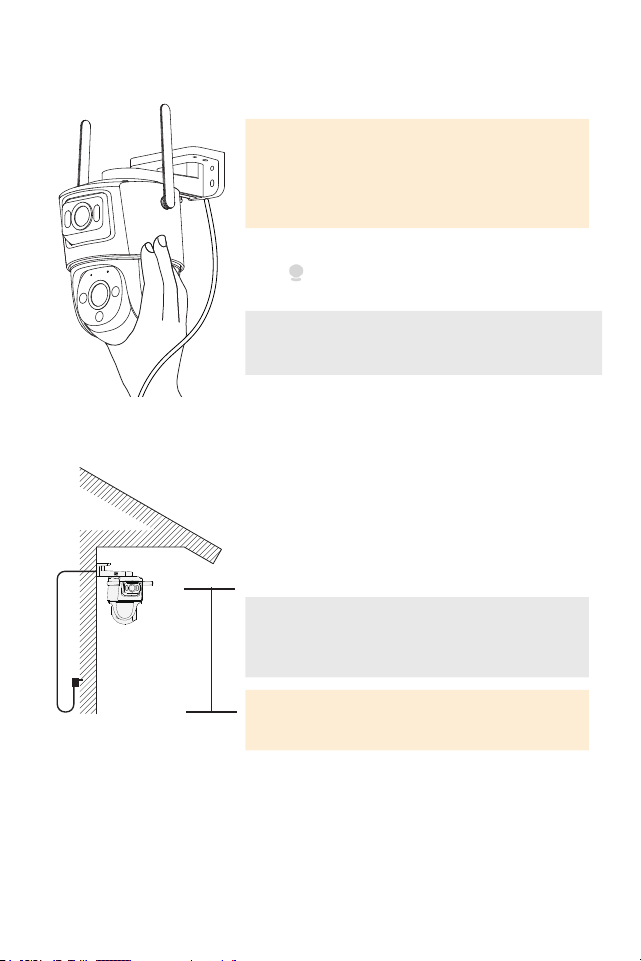
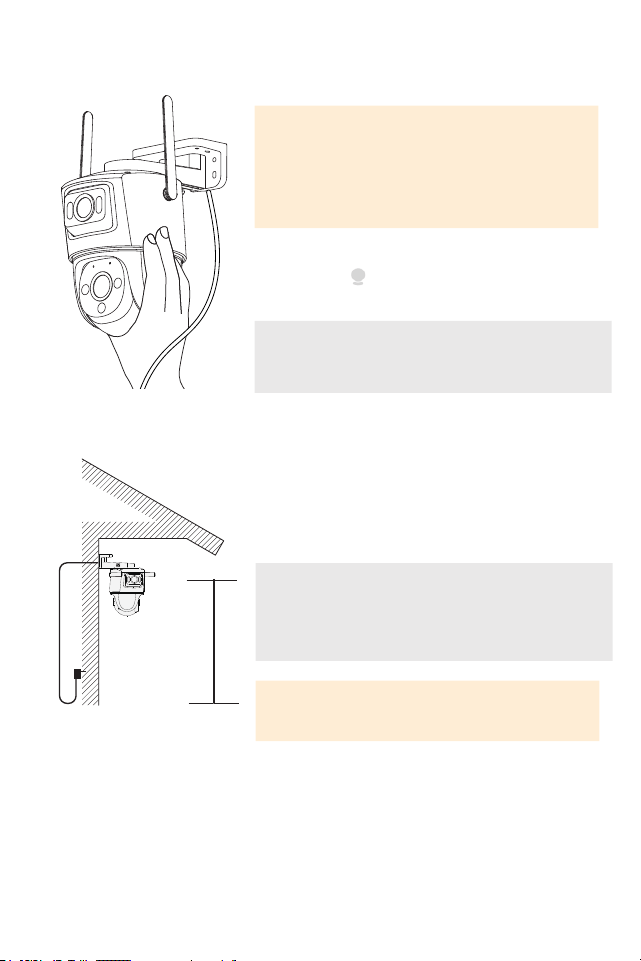
Step 3: Position and Install Your Camera
IMPORTANT: Before mounting your camera, use
the app to test your Wi-Fi strength and video feed.
Plug the camera in the area you’ll be monitoring
and view your footage to ensure you have a clear,
uninterrupted view.
To check your network signal strength,
tap > Tools > Wi-Fi Detection Tool >
Wi-Fi Detection
Note: Cement walls, exterior nishes, and thick insu-
lation can signicantly aect Wi-Fi signal strength.
8 ft
Using the recommended tools, install your camera
in a preferred place, at a height where you can
clearly see faces. Make sure there is a nearby
power outlet.
TIP: Your Guard Pro Camera comes with a 25ft.
extension cable, giving you 35ft. to mount your
camera from the power outlet.
IMPORTANT: The Camera Power Supply is NOT
waterproof.
11
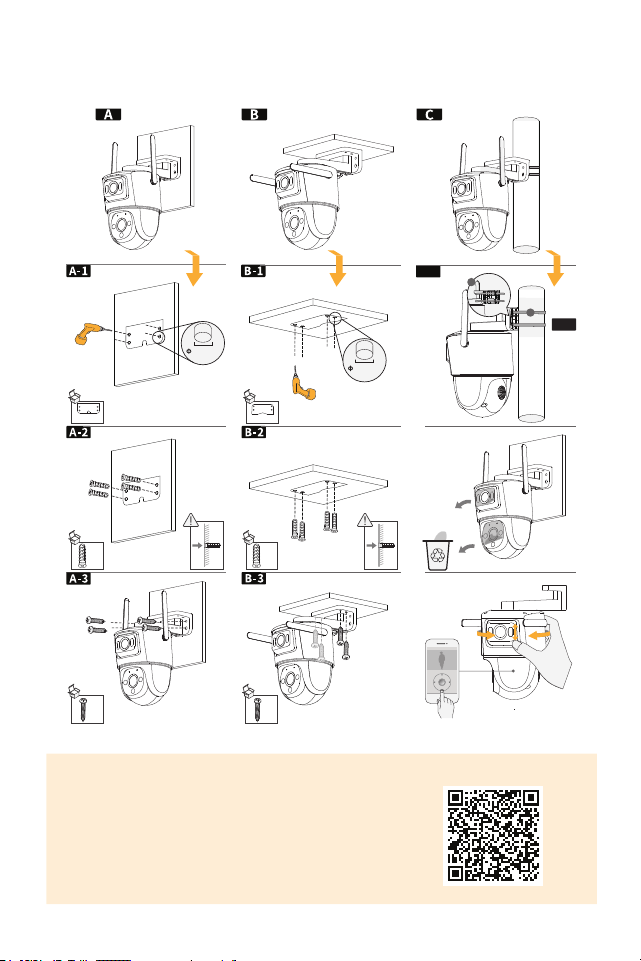
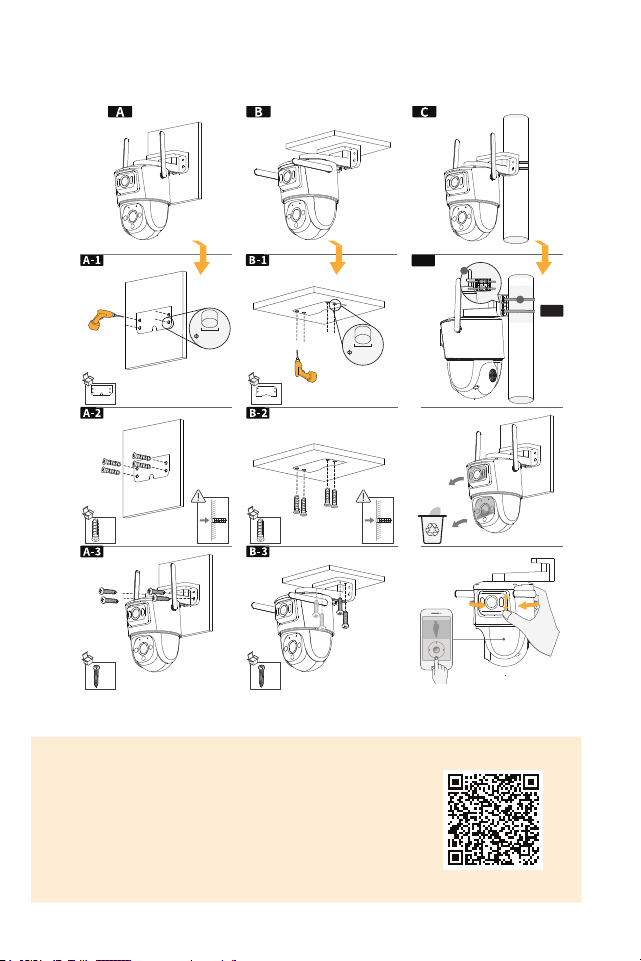
CAMERA MOUNTING OPTIONS
× 4 × 4
× 4 × 4
× 1 × 1
5.5-6.0
mm
5.5-6.0
mm
C-1
C-2
1
2
USING THE APP
The Defender Guard App allows you to remotely
view live video or playback recorded footage,
save and share recordings, share App access
and more. Scan the QR Code!

12
FREQUENTLY ASKED QUESTIONS
HOW MANY CAMERAS CAN I CONNECT TO THE DEFENDER GUARD APP?
You can connect a total of 16 cameras to the Defender Guard App and view up to
4 cameras at once. We recommend no more than 6 Guard/Guard Pro/Guard Pro
PTZ/ 4K Guard Pro cameras be connected in the same home/building to avoid
interference issues.
CAN I ALLOW OTHER PEOPLE TO VIEW MY CAMERA(S) REMOTELY?
You may share the Defender Guard App access with up to 5 additional users. Each
user will need to download the Defender Guard App and create their own account
before sharing access.
IS 3K GUARD PRO DUAL-LENS COMPATIBLE WITH ANY DEFENDER CAMERA
SYSTEM?
3K Guard Pro Dual-lens is only compatible with the Defender Guard, Guard Pro,
Guard Pro PTZ & Guard Pro Dual-lens camera. It cannot be used with any other
Defender Camera system. Guard/Guard Pro/Guard Pro PTZ cameras use the
Defender Guard App.
CAN I VIEW MY LIVE OR RECORDED FOOTAGE FROM A WEB BROWSER?
We do not oer web viewing. You can view the footage from the free Defender
Guard app with compatible IOS/Android smart phones/tablets. Alternatively, you
may export the footage from the SD card onto a personal computer using a com-
patible SD card reader.

13
TABLE DES MATIÈRES
CE QUI EST INCLUS ................................................................................................ 15
CE DONT VOUS AUREZ BESOIN ............................................................................15
INFORMATIONS RÉGLEMENTAIRES .....................................................................15
DÉTAILS DU PRODUIT ............................................................................................ 16
COMMEÇONS ......................................................................................................... 17
CONFIGURATION DE VOTRE CAMÉRA..................................................................18
OPTIONS DE MONTAGE DE LA CAMÉRA .............................................................. 22
UTILISATION DE L’APPLICATION .......................................................................... 22
QUESTIONS FRÉQUEMMENT POSÉES ................................................................... 23
14
ACTIVEZ VOTRE GARANTIE
PROLONGEZ VOTRE GARANTIE
PROTÉGER
Couvert pour les
imprévus
SOUTIEN
Recevez des vidéos, des
conseils et des mises à jour
pour votre produit
VALEUR
Accès exclusif à des
ores spéciales
N’oubliez pas de protéger votre achat et de vous rassurer en prolongeant votre
forfait inclus garantie constructeur à 2 ou 3 ans. Si quelque chose ne va pas, notre
équipe de sécurité Des experts vous remettront en marche rapidement !
2 ANS DE GARANTIE
◊ Défauts du produit
◊ Remplacements avancés
◊ Livraison de retour gratuite
la deuxième année
GARANTIE DE 3 ANS
◊ Défauts du produit
◊ Remplacements avancés
◊ Livraison de retour gratuite
Ouvrez votre caméra et scannez ce code QR,
ou visitez: DefenderCameras.com/Warranty
Ouvrez votre appareil photo et scannez ce code QR, ou visitez :
DefenderCameras.com/pages/extended-warranties

15
CE QUI EST INCLUS CE DONT VOUS AUREZ
BESOIN
INFORMATIONS RÉGLEMENTAIRES
Caméra PTZ à double objectif 3K Guard
Pro
Alimentation de la caméra (10 pieds)
Câble d’extension d’alimentation de la
caméra (25 pieds)
Matériel de montage de caméra
Modèle de montage de caméra
Blindage de câble étanche Ethernet pour
caméra
Autocollant d’avertissement de fenêtre
Guide de démarrage rapide
Assistance client gratuite à vie
Connexion Internet haut débit et
routeur sans l
Perceuse et/ou tournevis Phillips #2
(Gabarit de perçage inclus)
Foret 3/32” pour trous pilotes
Foret 7/32” pour ancrages muraux
Mèche à volants de 7/8” de long
(choisissez le bon foret en fonction du
matériau de la surface)
Un téléphone Android ou iOS com-
patible
Câble Ethernet (si vous souhaitez
installer une caméra laire)
DÉCLARATION FCC : Cet appareil est conforme à la partie 15 des règles FCC. Son fonctionnement est soumis aux deux condi-
tions suivantes : (1) Cet appareil ne doit pas provoquer interférences nuisibles. (2) Cet appareil doit accepter toute interférence
reçue, y compris les interférences susceptibles de provoquer un fonctionnement indésirable. Cet équipement
est conforme aux limites d’exposition aux rayonnements de la FCC établies pour un environnement non contrôlé. Cet équipe-
ment doit être installé et utilisé avec un minimum distance de 20 cm entre le radiateur et n’importe quelle partie de votre corps.
AVERTISSEMENT FCC : cet équipement a été testé et déclaré conforme aux limites d’un appareil numérique de classe B,
conformément à la partie 15 des règles FCC. Ces les limites sont conçues pour fournir une protection raisonnable contre
les interférences nuisibles dans une installation résidentielle. Cet équipement génère, utilise et peut émettre de l’énergie
radiofréquence et, s’il n’est pas installé et utilisé conformément aux instructions, peut provoquer des interférences nuisibles
aux communications radio. Cependant, rien ne garantit que des interférences ne se produiront pas dans une installation par-
ticulière. Si cet équipement provoque des interférences nuisibles à la radio ou réception de télévision, qui peut être déterminée
en éteignant et en allumant l’équipement, l’utilisateur est encouragé à tenter de corriger les interférences par un ou plusieurs
des mesures suivantes :
• Réorientez ou déplacez l’antenne de réception.
• Augmenter la distance entre l’équipement et le récepteur.
• Connectez l’équipement à une prise diérente de celle à laquelle le récepteur est connecté.
• Consultez le revendeur ou un technicien radio/TV expérimenté pour obtenir de l’aide.
IC STATEMENT / DÉCLA RATION IC: This device contains license-exempt transmitter(s)/receiver(s) that comply with Innovation,
Science and Economic Development Canada’s license-exempt RSS(s). Operation is subject to the following two conditions: (1)
This device may not cause interference. (2) This device must accept any interference, including interference that may cause
undesired operation of the device. L’émetteur/récepteur exempt de license contenu dans le présent appareil est conforme
aux CNR d’Innovation, Sciences et Développement économique Canada applicables aux appareils radio exempts de license.
L’exploitation est autorisée aux deux conditions suivantes: (1) L’appareil ne doit pas produire de brouillage; (2) L’appareil doit
accepter tout brouillage radioélectrique subi, même si le brouillage est susceptible d’en compromettre le fonctionnement.
This equipment complies with IC RSS-102 radiation exposure limits set forth for an uncontrolled environment. This equipment
should be installed and operated with minimum distance 20cm between the radiator and your body. Cet équipement est
conforme aux limites d’exposition aux radiations IC CNR-102 établies pour un environnement non contrôlé. Cet équipement
doit être installé et utilisé avec une distance minimale de 20 cm entre le radiateur et votre corps. Changes or modications not
expressly approved by the party responsible for compliance could void the user’s authority to operate the equipment.
IMPORTANT : L’alimentation de la
caméra n’est PAS étanche.
16
DÉTAILS DU PRODUIT
RESET
10 s
Voyant indicateur
LED
Antenne Wi-Fi
Haut-
parleur
IR
Micro intégré
Code QR
DEL
Projecteur
IR
Bouton de réinitialisation
Logement pour carte Micro SD
(Enlever le couvercle pour accéder)
Connecteur de câble Ethernet
(optionnel pour une connexion laire)
Connecteur de
l’adaptateur
d’alimentation
17
COMMEÇONS
IMPORTANT: Les captures d’écran et certaines étapes peuvent varier en fonction
de l’appareil utilisé pour congurer l’application.
1: Téléchargez l’application
Téléchargez l’application Defender Guard et suivez les étapes pour créer un
compte. Un compte e-mail est requis pour la vérication.
Wi-Fi
12 VDC
1 A
Internet
2. Branchez votre caméra pour l’allumer
Avant de connecter votre caméra à l’application, attendez 60 secondes que le
voyant indicateur LED clignote en vert.
État du voyant LED État de l’appareil
Vert
Clignotement
Prêt à congurer l’appareil
Fixe
Fonctionne correctement
Rouge
Clignotement
Réseau déconnecté
Échec de la conguration de
l’appareil
Fixe
Démarrage
Dysfonctionnement de l’appareil
Vert & Rouge
Alternant
Mise à jour du micrologiciel
Éteint
/
Éteindre
Le voyant LED est éteint
18
CONFIGURATION DE VOTRE CAMÉRA
Étape 1 : Connectez-vous au Wi-Fi et associez votre caméra
2. Assurez-vous que Bluetooth est
activé sur votre téléphone et
appuyez sur Suivant.
1. Appuyez sur + pour ajouter votre
caméra, puis appuyez sur Scanner
le code QR.
3. Attendez que le voyant de la caméra
clignote lentement en vert. Appuyez
sur “Suivant” pour continuer.
4. Pour garantir la connex-
ion, veuillez garder votre
téléphone, votre appareil et
votre routeur proches les
uns des autres.
IMPORTANT : Avant de jumeler, assurez-vous que votre téléphone est connecté à un
réseau Wi-Fi de 2,4 GHz.
Remarque : Si votre appareil mobile
Impossible de scanner le code QR, ap-
puyez sur “Ajouter manuellement”
19
6. Veuillez patienter pendant que
l’appareil se connecte au serveur.
5. Sélectionnez le réseau Wi-Fi 2.4
auquel vous souhaitez connecter
votre caméra. Appuyez sur la èche
si le réseau WIFI 2,4 GHz n’est pas
connecté. Sélectionnez le mot de
passe de votre réseau Wi-Fi, puis
appuyez sur “Suivant”.
7. Modiez nommez votre appareil. Nous vous recommandons de nommer
votre caméra si vous connectez plusieurs caméras. Appuyez sur « Ter-
miné ». Votre appareil a maintenant été ajouté avec succès
Remarque : Veuillez répéter ces étapes
pour chaque caméra supplémentaire
que vous souhaitez connecter
20
Étape 2: Insérer Une Carte Micro SD
Les enregistrements peuvent être stockés localement sur une carte Micro SD, pour
insérer ou échanger votre carte Mirco SD, veuillez suivre les étapes ci-dessous. La
taille maximale de la carte Micro SD est de 256 Go.
1. Retirez le capot inférieur en dévissant les vis Philips pour accéder à la carte
SD.
2. Si vous remplacez une carte Micro SD actuelle, appuyez doucement sur la
carte, elle sortira.
3. Lorsque vous insérez votre carte Micro SD, poussez-la jusqu’à ce que vous
entendiez un clic.
21
Étape 3: Positionnez et installez votre caméra
IMPORTANT : Avant de monter votre caméra,
utilisez l’application pour tester la puissance de
votre Wi-Fi et ux vidéo. Branchez la caméra dans
la zone où vous allez surveillez et visionnez vos
images pour assurez-vous d’avoir une vue claire et
ininterrompue.
Pour vérier la force du signal de votre réseau,
appuyez sur > Outil > Outil de détection Wi-Fi >
Détection Wi-Fi
Remarque : Murs de ciment, nitions extérieures
et une isolation épaisse peut aecter considérable-
ment le Wi-Fi force du signal.
À l’aide des outils recommandés, installez votre
caméra dans un endroit privilégié, en hauteur où
l’on voit clairement les visages. S’assurer il y a une
prise de courant à proximité.
ASTUCE : votre caméra Guard Pro est livrée avec un
câble de 25 pieds. Câble d’extension, vous donnant 35
pieds. pour monter votre l’appareil photo de la prise
de courant.
8 ft
IMPORTANT: L’alimentation de la caméra N’EST
PAS étanche.
22
OPTIONS DE MONTAGE DE LA CAMÉRA
× 4 × 4
× 4 × 4
× 1 × 1
5.5-6.0
mm
5.5-6.0
mm
C-1
C-2
1
2
UTILISATION DE L’APPLICATION
L’application Defender Empower vous permet de
visualiser à distance des vidéos en direct ou de lire des
séquences enregistrées, de sauvegarder et de partager
des enregistrements, de partager l’accès à l’application
et de recevoir des notications personnalisées.
Numérisez le code QR !

23
QUESTIONS FRÉQUEMMENT POSÉES
COMBIEN DE CAMÉRAS PUIS-JE CONNECTER À L’APPLICATION DEFENDER
GUARD ?
Vous pouvez connecter un total de 16 caméras à l’application Defender Guard et af-
cher jusqu’à 4 caméras à la fois. Nous recommandons de ne pas connecter plus de
6 caméras Guard/Guard Pro/Guard Pro PTZ/4K Guard Pro dans la même maison/
bâtiment pour éviter les problèmes d’interférence.
PUIS-JE AUTORISER D’AUTRES PERSONNES À VISUALISER MA OU MES CAMÉRAS
À DISTANCE ?
Vous pouvez partager l’accès à l’application Defender Guard avec jusqu’à 5 utilisa-
teurs supplémentaires. Chaque utilisateur devra télécharger l’application Defender
Guard et créer son propre compte avant de partager l’accès.
LE DOUBLE OBJECTIF 3K GUARD PRO EST-IL COMPATIBLE AVEC N’IMPORTE
QUEL SYSTÈME DE CAMÉRA DEFENDER ?
3K Guard Pro Dual-lens est uniquement compatible avec les caméras Defender
Guard, Guard Pro, Guard Pro PTZ et Guard Pro à double objectif. Il ne peut être
utilisé avec aucun autre système de caméra Defender. Les caméras Guard/Guard
Pro/Guard Pro PTZ utilisent l’application Defender Guard.
PUIS-JE VISUALISER MES SÉQUENCES EN DIRECT OU ENREGISTRÉES À PARTIR
D’UN NAVIGATEUR WEB ?
Nous ne proposons pas de visualisation Web. Vous pouvez visionner les images
de l’application gratuite Defender Guard avec les téléphones intelligents/tablettes
compatibles IOS/Android. Vous pouvez également exporter les images de la carte
SD vers un ordinateur personnel à l’aide d’un lecteur de carte SD compatible.

Need Help? Visit:
Besoin d’aide ? Visitez :
DefenderCameras.com/Support
Defender améliore continuellement ses produits pour orir aux clients la meilleure expéri-
ence utilisateur possible. Pour obtenir le guide de démarrage rapide le plus récent, veuillez
visiter DefenderCameras.com.
DEFENDER® ne cautionne aucun produit DEFENDER® pour des activités illégales. DEFEND-
ER® n’est en aucun cas responsable des dommages, vandalisme, vol ou toute autre action
survenue lors de l’utilisation d’un produit DEFENDER® par l’acheteur. Nous nous réservons
le droit de modier les modèles, congurations ou spécications sans préavis ni respons-
abilité. Le produit peut diérer légèrement de celui montré.
©2024 DEFENDER®. Tous droits réservés. DEFENDER®, le logo DEFENDER® et d’autres
marques DEFENDER® peuvent être enregistrés. Toutes les autres marques sont la propriété
de leurs propriétaires respectifs.
Defender is continuously enhancing our products to bring customers the best user experience. For the most up to date
Quick Start Guide, please visit DefenderCameras.com.
DEFENDER® does not endorse any DEFENDER® products for illegal activities. DEFENDER® is not responsible or liable in
any way for any damage, vandalism, theft or any other action that may occur while a DEFENDER® product is in use by the
purchaser. We reserve the right to change models, conguration, or specications without notice or liability. Product may
not be exactly as shown.
©2024 DEFENDER®. All rights reserved. DEFENDER®, the DEFENDER® logo and other DEFENDER® marks may be regis-
tered. All other Trademarks are the property of their respective owners.
REV02 07032024
IP10MDCB-QSG
8 42751 00830 6
