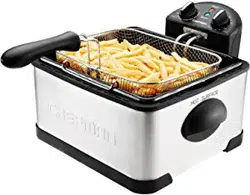
JUMBO SIZE
DEEP FRYER
USER GUIDE
RJ07-45-SS-PM
• Safety Instructions
• Features
• Operating Instructions
• Cleaning and Maintenance
• Terms and Conditions
• Warranty Registration
READ ALL INSTRUCTIONS BEFORE USE
For your safety and continued enjoyment of this product, always read the instruction manual before using.
COOKING FORWARD™
Welcome!
Whether this is your first Chefman appliance purchase or you’re already part of our
family, we’re happy to be cooking with you! With your new Jumbo Size Deep Fryer,
you can easily and safely fry up enough chicken, fish, or french fries to feed the entire
family. We know you’re excited to get frying, but please take a few minutes to read our
directions, safety instructions, and warranty information.
For more information on this product and our other high quality appliances, please
visit us at Chefman.com.
From our kitchen to yours,
The Chefman
®
Team

4 Safety Instructions
7 Features
8 Operating Instructions
11 Cleaning and Maintenance
12 Terms and Conditions
14 Warranty Registration
CONTENTS
4
When using electrical appliances, basic safety precautions should always be followed
including the following:
1. Read all instructions.
2. Do not touch hot surfaces. Use handles or knobs.
3. To protect against electric shock, do not immerse cord, plugs, or unit body in
water or other liquid.
4. Close supervision is necessary when any appliance is used by or near children.
5. This appliance is not intended for use by persons (including children) with reduced
physical, sensory or mental capabilities, or lack of experience and knowledge, unless
they have been given supervision or instruction concerning use of the appliance by a
person responsible for their safety. Children should be supervised to ensure that they
do not play with the appliance.
6. Unplug from outlet when not in use and before cleaning. Allow to cool before putting
on or taking o parts, and before cleaning the appliance.
7. Do not operate any appliance with a damaged cord or plug or after the
appliance malfunctions, or has been damaged in any manner. If this should
occur, contact Chefman® Customer Support.
8. The use of accessory attachments not recommended by Chefman® may
cause injuries.
9. Do not use outdoors.
SAFETY INSTRUCTIONS
IMPORTANT SAFEGUARDS

5
10. Do not let cord hang over edge of table or counter or touch hot surfaces.
11. Do not place on or near a hot gas or electric burner or in a heated oven.
12. Extreme caution must be used when moving an appliance containing hot oil or
other hot liquids.
13. Always attach plug to appliance first, then plug cord in the wall outlet. To disconnect,
turn any control to OFF, then remove plug from wall outlet.
14. Do not use appliance for other than intended use.
15. Be sure handles are properly assembled to basket and locked in place. See assembly
instructions.
Do not place the appliance
on a stovetop or any other
hot surface, even if the stove is
not on. Doing so is a fire hazard.
SAFETY INSTRUCTIONS
SAVE THESE INSTRUCTIONS
FOR HOUSEHOLD USE ONLY
IMPORTANT SAFEGUARDS

6
WARNING: This appliance has a polarized plug (one blade is wider than the other). This
plug is intended to fit into a polarized outlet only one way. If the plug does not fit fully
into the outlet, reverse the plug. If it still does not fit, contact a qualified electrician. Do not
attempt to modify the plug in any way or force it into the outlet. This could result in injury or
electric shock.
SHORT CORD INSTRUCTIONS
1. A short, detachable power cord is provided to reduce the risk resulting from becoming
entangled in or tripping over a longer cord.
2. WARNING: Do not use an extension cord with this product. Serious hot oil burns may
result from the Deep Fryer being pulled o a countertop. Do not allow the cord to
hang over the edge of the counter where it may be grabbed by children or become
entangled with the user.
POWER CORD SAFETY TIPS
1. Never pull or yank on the cord or the appliance.
2. To insert the plug, grasp it firmly and guide it into the outlet.
3. To disconnect appliance, grasp the plug and remove it from the outlet.
4. Never use the product if the power cord shows signs of abrasion or excessive wear.
Contact Chefman Customer Support for additional guidance and support.
5. Never wrap the cord tightly around the appliance, as this could place undue stress
on the cord where it enters the appliance and cause it to fray and break.
DO NOT OPERATE APPLIANCE IF THE POWER CORD SHOWS ANY DAMAGE OR
IF THE APPLIANCE WORKS INTERMITTENTLY OR STOPS WORKING ENTIRELY.
SAFETY INSTRUCTIONS
IMPORTANT SAFEGUARDS
7
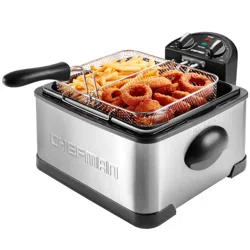
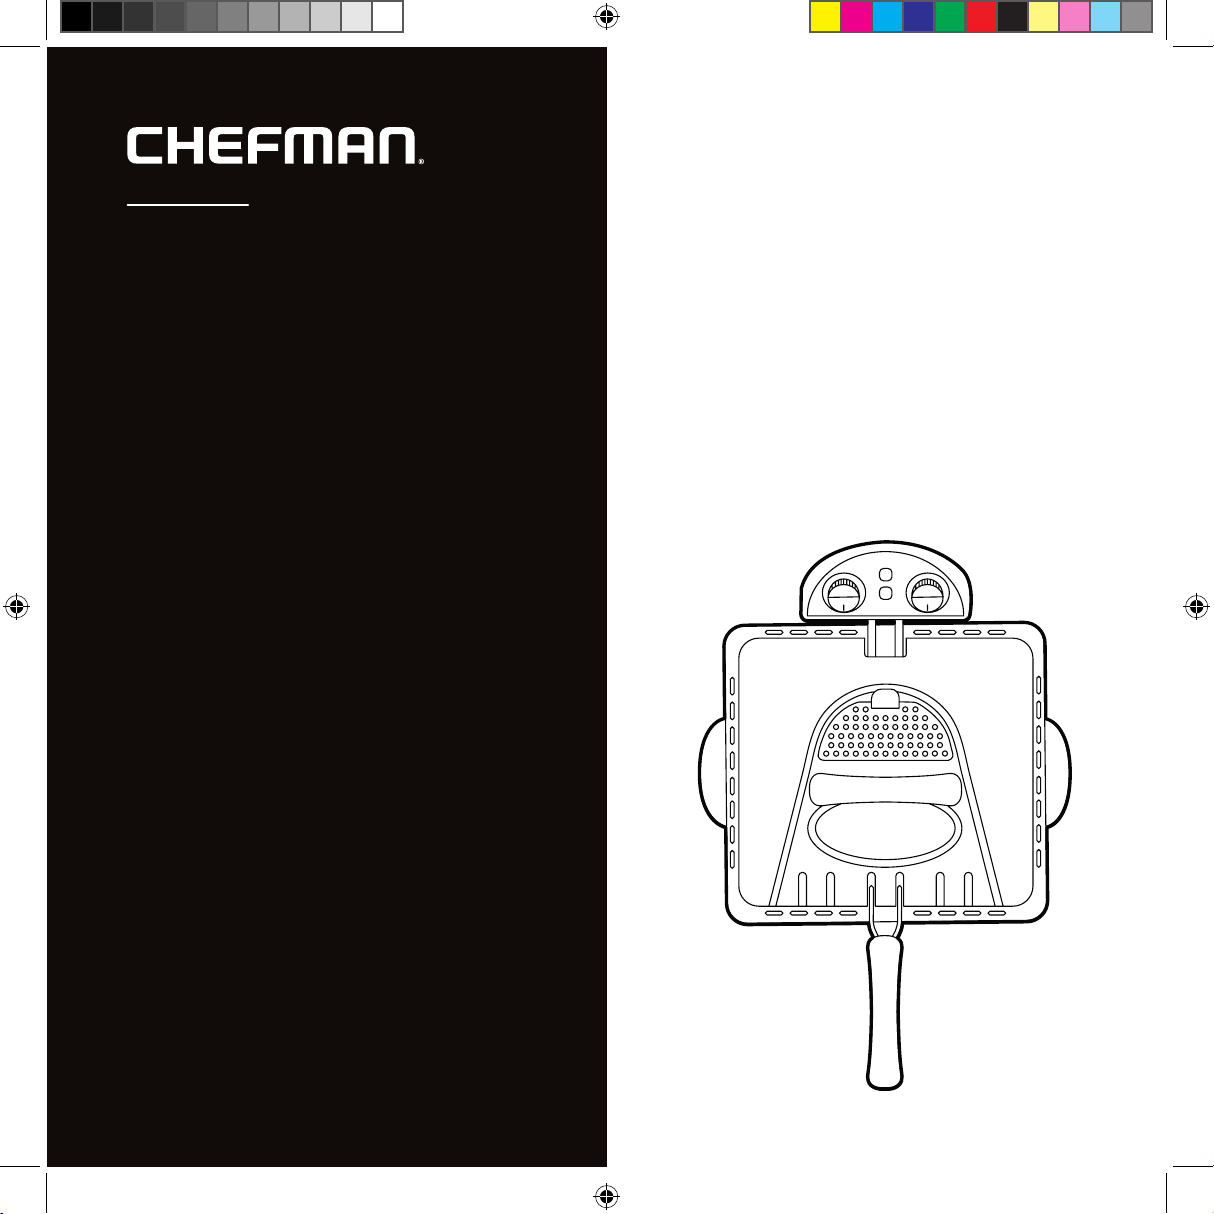
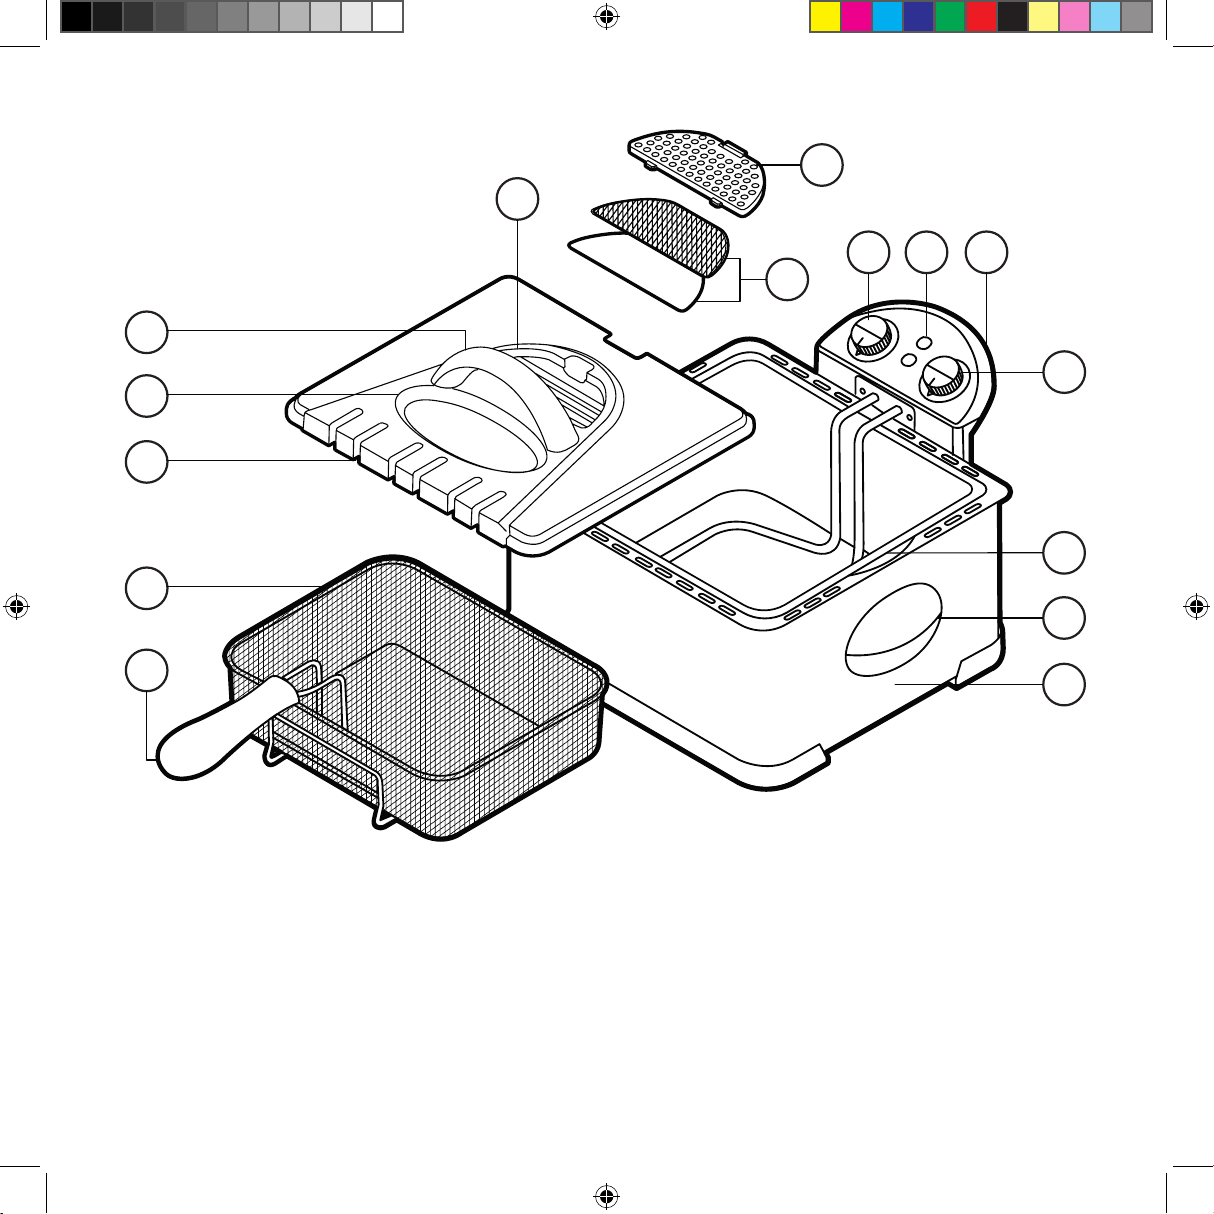
FEATURES
1. Frying basket handle
2. Frying basket with hook
3. Lid
4. Viewing window
5. Lid handle
6. Permanent aluminum
filter
7. Filter cover
8. Removable charcoal
and oil filters
9. Temperature control knob
10. Power on and oil ready
indicator lights
11. Removable control unit
with heating element
12. Timer control knob
13. Removable oil container
14. Side carrying handles
15. Brushed stainless steel
base
16. Breakaway power cord
(not shown)
1
2
3
4
5
6
7
8
9 10 11
12
13
14
15

8
BEFORE FIRST USE
1. Remove the lid, then remove all parts from oil tank, including the removable control
unit with heating element. To remove control unit, lift it straight up. Remove and
discard any plastic bags, cardboard, or other packaging.
2. Wipe the lid and the control unit and heating element with a damp cloth to remove
any packing debris. Never put the lid or the control unit in the dishwasher. Never
immerse the removable control unit in water.
3. Wash the frying basket and the oil container and clean with a sponge and soapy water.
NOTE: The handle comes o the frying basket for easy storage; be sure it’s securely
on before frying.
4. Dry all components thoroughly.
5. Reassemble the deep fryer, making sure the control unit is correctly positioned; the
fryer will not function otherwise. To attach the control unit to the base, align the
guides on the front of the control unit with the tracks on the base. Slide the control
unit down as far as it goes making sure guides are in the tracks.
6. Keep the lid on the fryer when it is not in use.
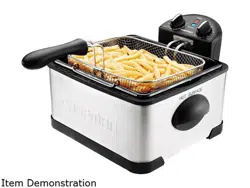
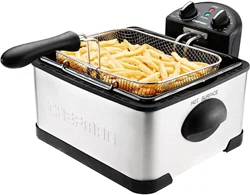
HOW TO FRY
1. Lift o lid covering oil container, remove frying basket, and reattach handle if
necessary. To attach the handle, squeeze the metal bars together, then insert the two
prongs into the holes in the bracket on the basket. Be sure the bars are inside the
metal cus on the bracket.
2. Be sure the removable oil container is in the base and that the removable control unit
is properly positioned on the base.
OPERATING INSTRUCTIONS

9
3. Add enough oil to the oil container to reach between the MIN and MAX marks inside
the oil container. You'll need about 1 gallon of oil to reach the MAX fill line. Do not over-
or underfill and do not use dierent oils. (We recommend using liquid vegetable oil. If
you must use a solid, like vegetable shortening, cut it into small pieces and melt it in a
separate pan before carefully adding it to the oil container.)
4. With the frying basket outside of the unit, put the lid on the fryer.
5. Attach the breakaway cord to the back of the unit, then plug into outlet. NOTE: For
safety reasons, the unit will not turn on until the timer is set. Once timer is set, the red
POWER light will illuminate. Heating will not begin until the temperature is set.
6. Turn the temperature control knob to the desired temperature and set timer to desired
time; the fryer will begin to heat. While the oil heats, the green HEATING light will
remain lit. Once the set temperature is reached, the green heating light will turn o.
(Note that it usually takes at least 10 minutes for oil to heat, so set timer to account for
that as well as the frying time.)
7. Fill the frying basket with the food to be fried. NOTE: Do not overfill the basket. NOTE:
For some foods, especially those with wet batters, it's best to add the food directly to
the oil and not start with it in the basket.
8. When the HEATING light turns o, remove the lid and carefully lower the basket into
the oil. WARNING: Oil may bubble and splatter. Please use caution when lowering food
into hot oil.
9. Put the lid back on over the basket. (You can view progress through
the window.)
10. Fry foods according to your recipe. If necessary, remove the lid to turn or flip food as
directed or desired.
OPERATING INSTRUCTIONS
10
11. Remove the lid and use the frying basket handle to lift the frying basket above the
oil to check if food has reached the desired doneness. (If not, continue cooking.)
If the food is done, carefully lift and hang the basket on the oil container using the
hook. Allow excess oil to drain o the food completely before removing basket and
serving food.
12. If you are frying more food in a second batch, adjust oil level as needed and repeat
frying steps. IMPORTANT: When the timer reaches 0, heating is automatically turned
o. You can add more time as needed by simply turning the knob.
13. When finished frying, unplug the deep fryer and allow the oil to cool completely
(about 3 hours).
14. The same oil can be filtered once cooled and used over again. Once the oil has cooled,
line a sieve set over a bowl with cheesecloth. Grasp each side of the removable oil
container and lift upward. Pour the oil through the sieve to remove food particles,
crumbs, and impurities. Note that filtering is crucial for safety as impurities can increase
the risk of the oil catching fire.
15. DO NOT STORE THE OIL IN THE DEEP FRYER. Store used oil in a clean, airtight
container in a cool, dark place for up to a month.
16. Discard oil that is clouded, starts to foam, or has a bad smell or taste. Do not pour oil
down the drain as it will clog pipes. The safest way to dispose of cooled oil is by pouring
it into a sealable container such as a coee can or gallon milk jug, and then throw the
oil-filled container in the trash according to the local community regulations. Used
cooking oil can also be recycled in some areas.
OPERATING INSTRUCTIONS

11
• Before cleaning, unplug unit and let oil cool completely, at least 3 hours.
• Remove the control unit and heating element and clean both parts with a damp cloth or
sponge. Never submerge the control unit or heating element in water and do not wash
in the dishwasher.
• Remove all cooled oil from unit. Do NOT store oil in unit.
• The basket, handle, oil container, and lid are all dishwasher safe. They may also be
washed by hand with soap and water. Note that you do not need to remove the
removable filters when washing lid by hand or in the dishwasher.
• Wash the metal base as needed with soap and water.
• After cleaning, reassemble the deep fryer. Ensure that all components are dry before
placing them back inside the fryer. For storage, the basket handle as well as the
detachable cord can be removed and stored in oil container.
• Note that the lid is fitted with a permanent metallic filter. In addition, there are two
removable filters within the filter chamber that help filter oil and odors. The deep fryer
comes with two replacement filters. These filters come packaged together and are not
meant to be separated.
• After cleaning, reassemble the deep fryer. Ensure that all components are dry before
placing them back inside the fryer. For storage, the basket handle as well as the
detachable cord can be removed and stored in oil container.
CLEANING AND MAINTENANCE

12
TERMS AND CONDITIONS
Limited Warranty
RJ Brands, LLC d/b/a Chefman® oers a limited 1-year Warranty (the “Warranty”)
available on sales through authorized distributors and retailers only. Please note
that this Warranty becomes valid from the date of initial retail purchase and that the
Warranty is non-transferable and applies only to the original purchaser.
This Warranty is void without proof of purchase within the United States or Canada.
Please be aware that this Warranty supersedes all other warranties and constitutes
the entire agreement between the consumer and Chefman®. Any changes to the
Terms and Conditions of this Warranty must be in writing, signed by a representative
of Chefman®. No other party has the right or ability to alter or change the Terms and
Conditions of this Warranty.
We may ask you to please submit, via email, photos and/or video of the issue you are
experiencing. This is to help us better assess the matter and possibly oer a quick fix.
Photos and/or video may also be required to determine warranty eligibility.
We encourage you to register your product. Registering can make the Warranty
process easier and can keep you informed of any updates or recalls on your product.
To register, follow the directions on the Chefman® Warranty Registration page in the
Chefman® User Guide. Please retain your proof of purchase even after registering.
In the event that you do not have proof of your purchase date, we may declare your
Warranty void or we may, at our sole discretion, apply the date of manufacture as the
purchase date for purposes of this Warranty.

13
TERMS AND CONDITIONS
Limited Warranty
WHAT THE WARRANTY COVERS
• Manufacturer Defects – Chefman® products are warranted against defects in material
and workmanship, under normal household use, for a period of 1 year from the date
of purchase when used in accordance with the directions listed in the Chefman® User
Guide. If your product does not work as it should, please contact Customer Support
at support@chefman.com so that we may assist you.
THIS WARRANTY DOES NOT COVER
• Misuse – Damage that occurs from neglectful or improper use of products, including,
but not limited to, damage that occurs as a result of usage with incompatible voltage,
regardless of whether the product was used with a converter or adapter. See Safety
Instructions in the Chefman® User Guide for information on proper use of product;
• Poor Maintenance – General lack of proper care. We encourage you to take care of your
Chefman® products so that you may continue to enjoy them. Please see Cleaning and
Maintenance directions in the Chefman® User Guide for information on proper maintenance;
• Commercial Use – Damage that occurs from commercial use;
• Normal Wear and Tear – Damage or degradation expected to occur due to normal
use over time;
• Altered Products – Damage that occurs from alterations or modifications by any entity
other than Chefman® such as the removal of the rating label axed to the product;
• Catastrophic Events – Damage that occurs from fire, floods, or natural disasters; or
• Loss of Interest – Claims of loss of interest or enjoyment.
14
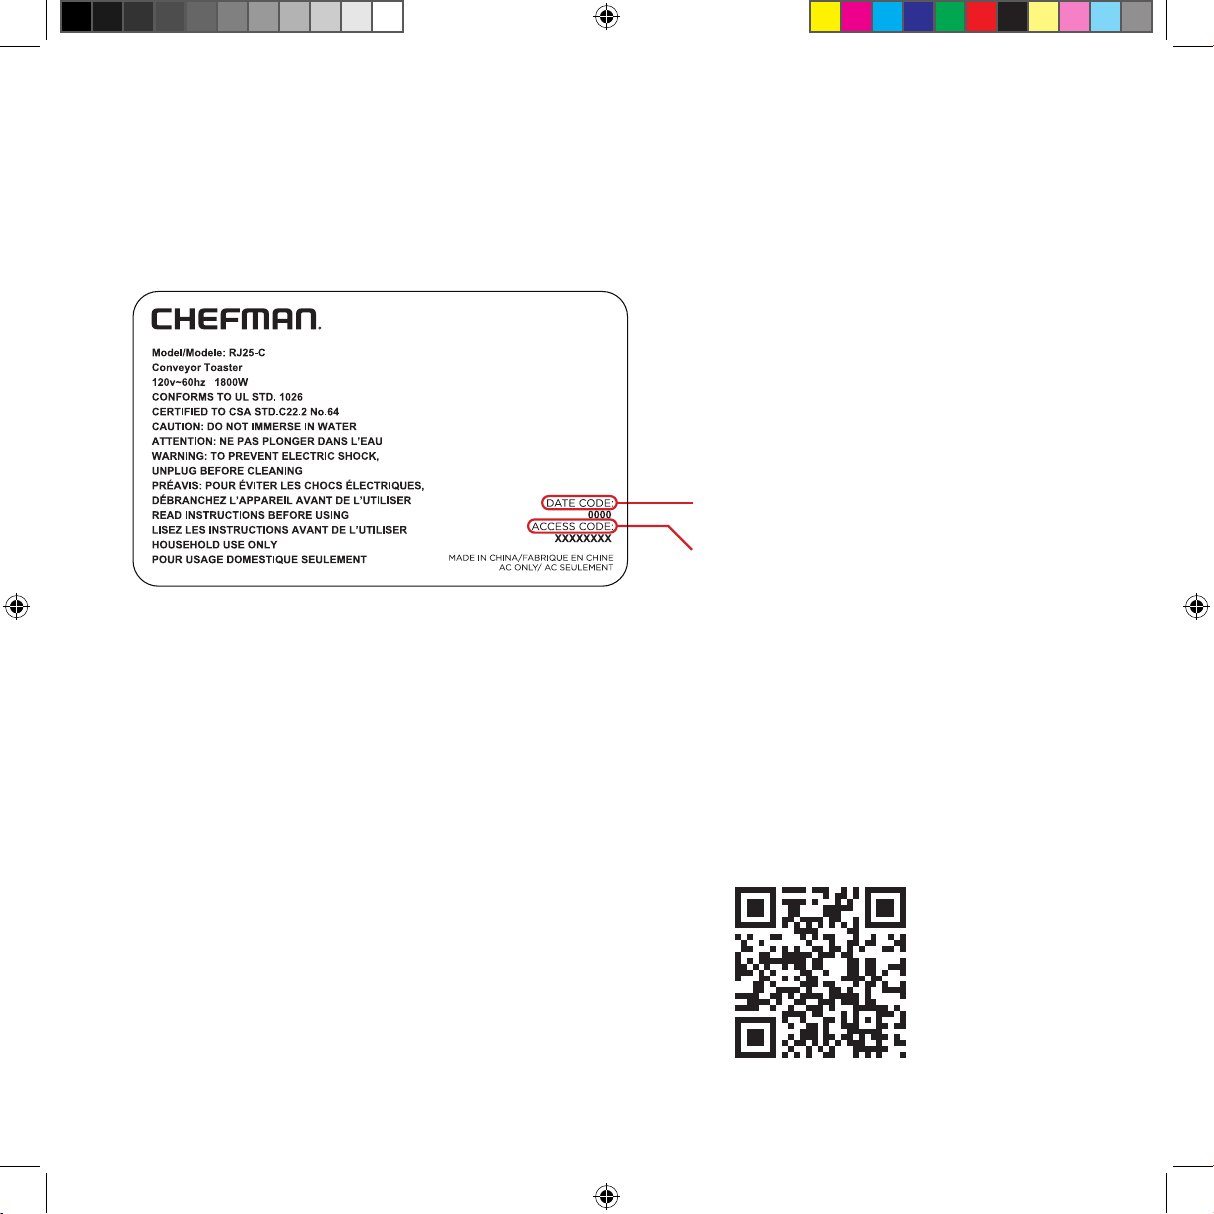
What do I need to register my product?
• Contact Information
• Model Number
• Proof of Purchase
(online confirmation,
receipt, gift receipt)
• Date Code
• Access Code
How do I register my product?
All you need to do is fill out a simple Chefman® registration form. You can easily
access the form in one of the two ways listed below:
1. Visit Chefman.com/register.
2. Scan the QR code to the right to access site:
CHEFMAN
®
WARRANTY REGISTRATION
NOTE: Label depicted here is an example.

15
CHEFMAN
®
WARRANTY REGISTRATION
For product information, visit Chefman.com
EXCEPT WHERE SUCH LIABILITY IS REQUIRED BY LAW, THIS
WARRANTY DOES NOT COVER, AND CHEFMAN
®
SHALL NOT BE
LIABLE FOR, INCIDENTAL, INDIRECT, SPECIAL, OR CONSEQUENTIAL
DAMAGES, INCLUDING WITHOUT LIMITATION, DAMAGE TO, OR LOSS
OF USE OF THE PRODUCT, OR LOST SALES OR PROFITS OR DELAY OR
FAILURE TO PERFORM THIS WARRANTY OBLIGATION. THE REMEDIES
PROVIDED HEREIN ARE THE EXCLUSIVE REMEDIES UNDER THIS
WARRANTY, WHETHER BASED ON CONTRACT, TORT OR OTHERWISE.
Chefman® is a registered trademark of RJ Brands, LLC.
Cooking Forward™ is a trademark of RJ Brands, LLC.
16
©CHEFMAN 2023
RJ07-45-SS-PM_EN_UG_FINAL_LIVE_122823