
Technical Support and E-Warranty Certificate www.vevor.com/support
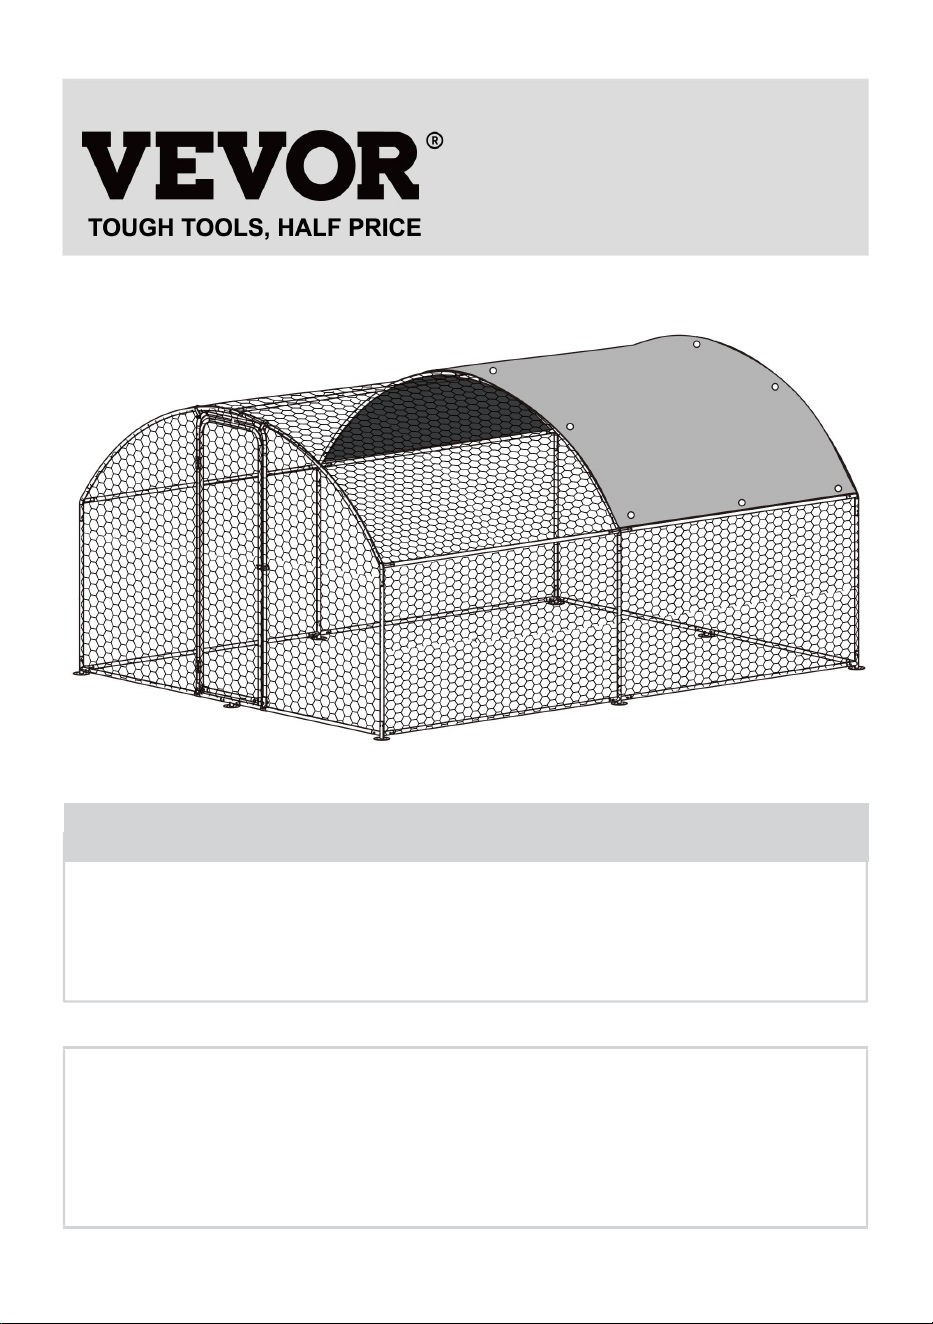
WALK IN CHICKEN COOP
USER MANUAL
We continue to be committed to provide you tools with competitive price.
"Save Half","Half Price" or any other similar expressions used by us only represents an
estimate of savings you might benefit from buying certain tools with us compared to the major
top brands and does not necessarily mean to cover all categories of tools offered by us. You
are kindly reminded to verify carefully when you are placing an order with us if you are
actually saving half in comparison with the top major brands.
1
ACR342
Have product questions? Need technical support? Please feel free to
contact us:
Technical Support and E-Warranty Certificate
www.vevor.com/support
NEED HELP? CONTACT US!
This is the original instruction,please read all manual instructions carefully
before operating. VEVOR reserves a clear interpretation of our user
manual. The appearance of the product shall be subject to the product
you received. Please forgive us that we won't inform you again if there
are any technology or software updates on our product.
WALK IN
CHICKEN COOP

2
Safety precautions
WARNING:
Read this instructions before using this product. Failure to do so can result in
serious injury. the basic precautions should always be followed,including the
following:
1. The walk in chicken coop may not be used or stored in hazardous areas.
It is not allowed to use the appliance in hazardous locations.
2. The walk in chicken coop must be checked to ensure that it is in proper working
order and is operating safely prior to use. Otherwise,the appliance must not be
used.
3. Please clear the roof of the snow regularly, as too much snow will collapse the
tarpaulin.
4. The operator must use the walk in chicken coop properly. He must consider the
local conditions and must pay attention to third parties,in particular children,when
working with the walk in chicken coop.
5. This walk in chicken coop is not intended for use by persons (including children)
with reduced physical,sensory or mental abilities or lacking experience and/or
knowledge,unless they are super- vised by a person responsible for their safety or
are instructed by these persons on the use of the device. Children should be
supervised,to ensure that they do not play with the walk in chicken coop.
SAVE THESE INSTRUCTIONS
3
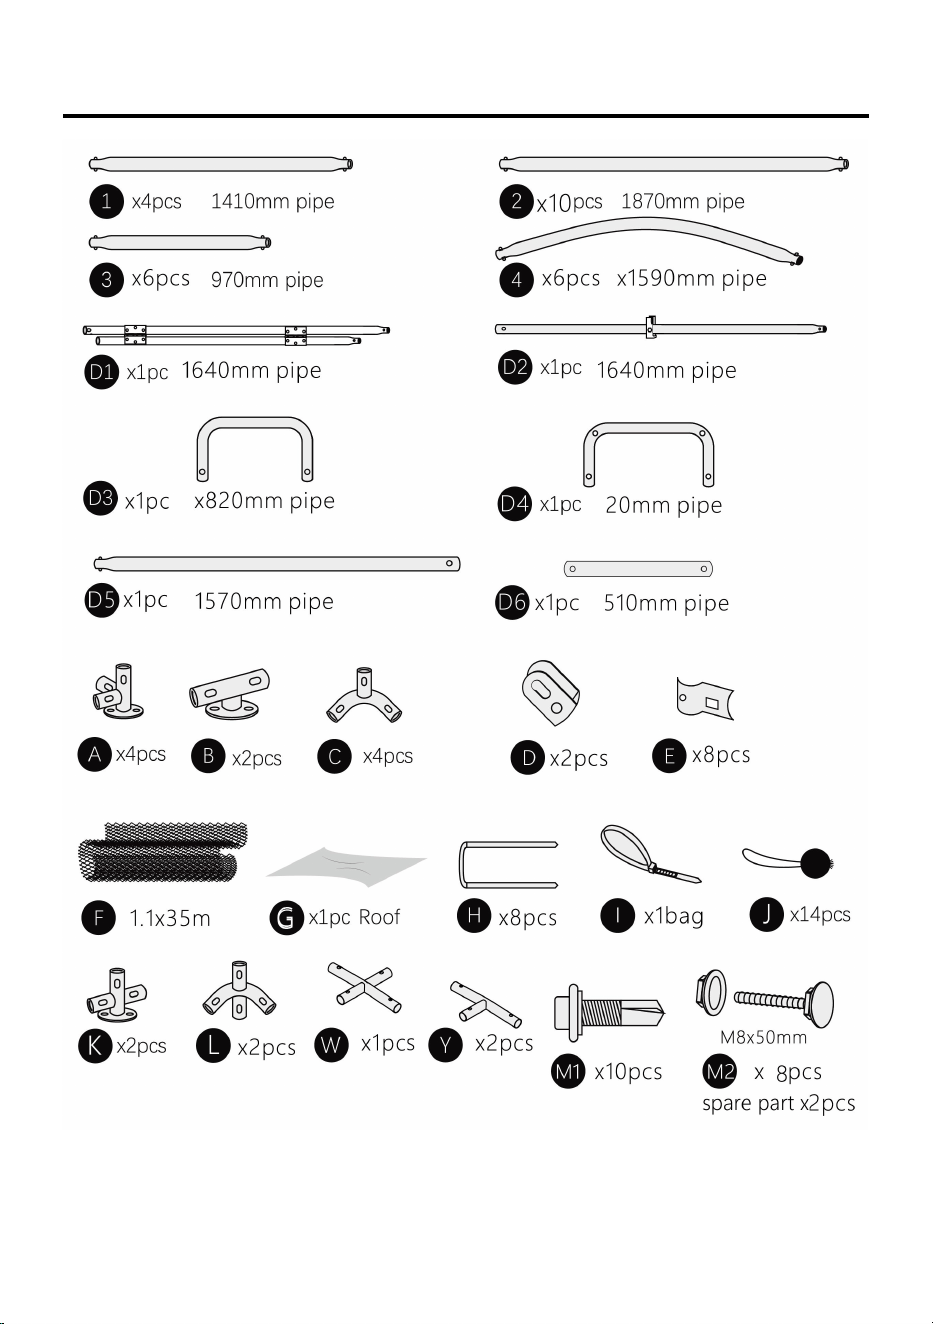
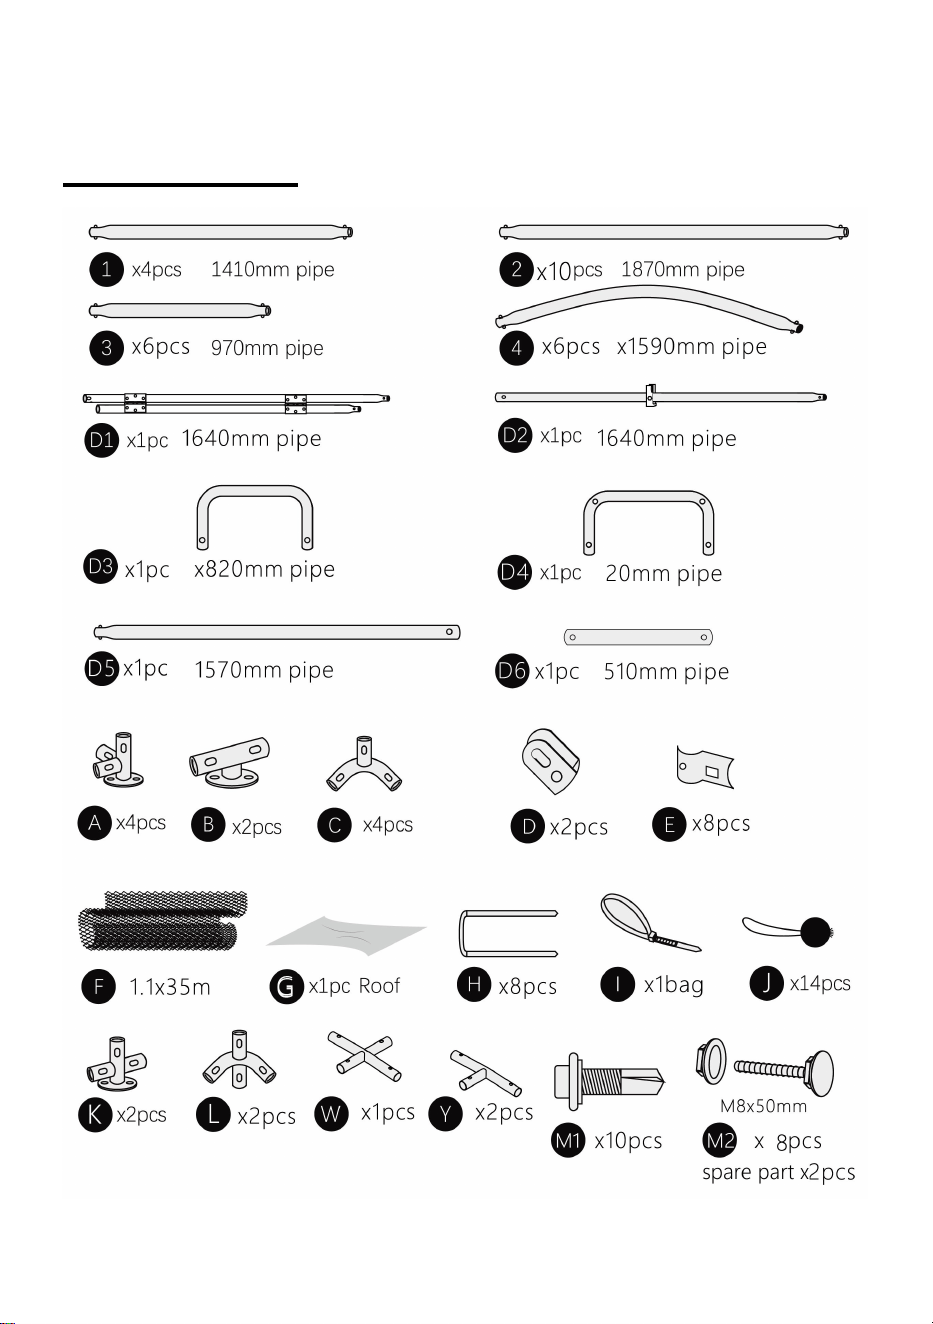
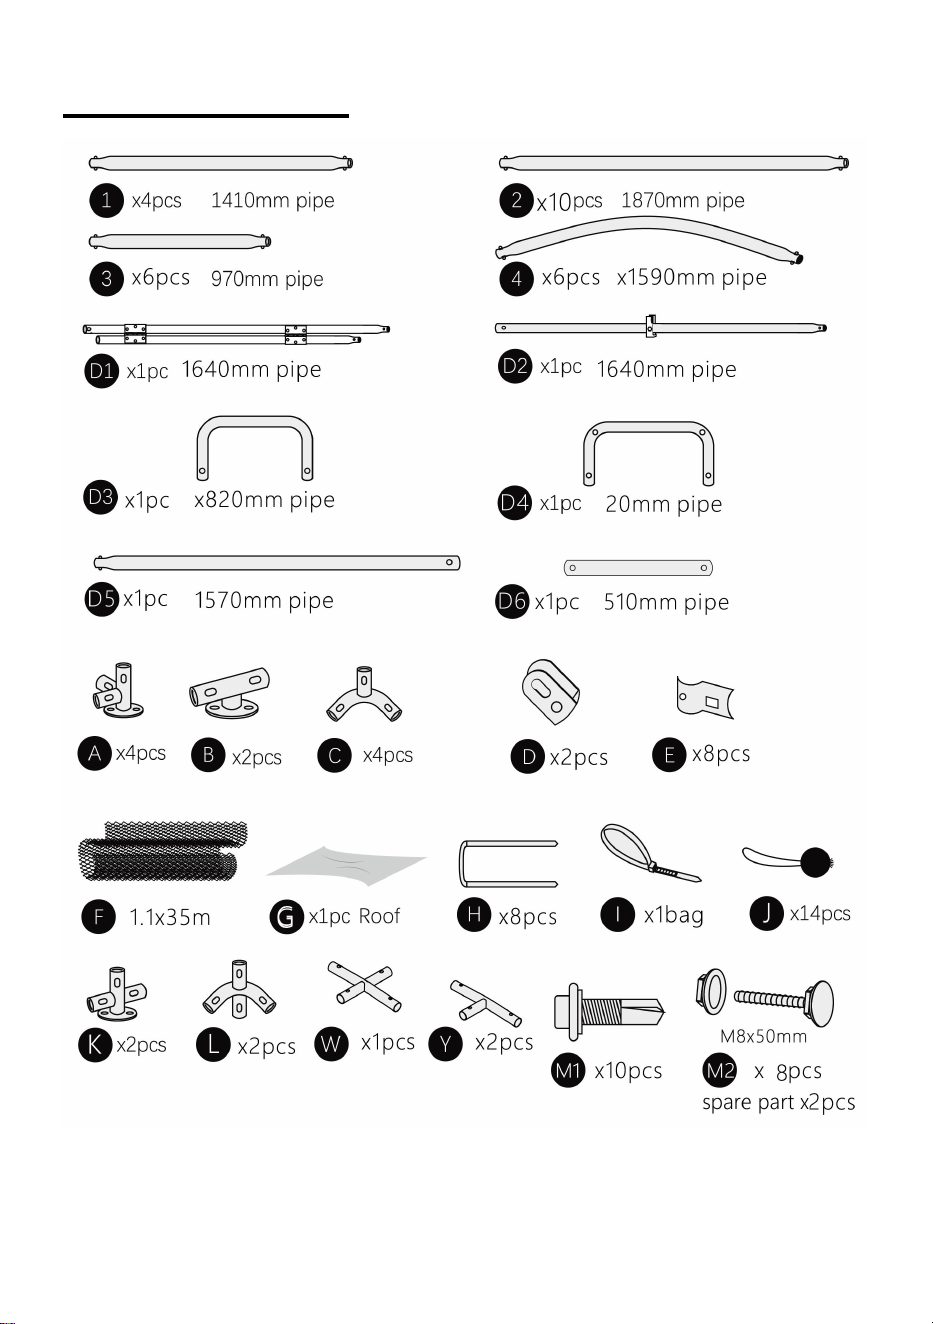
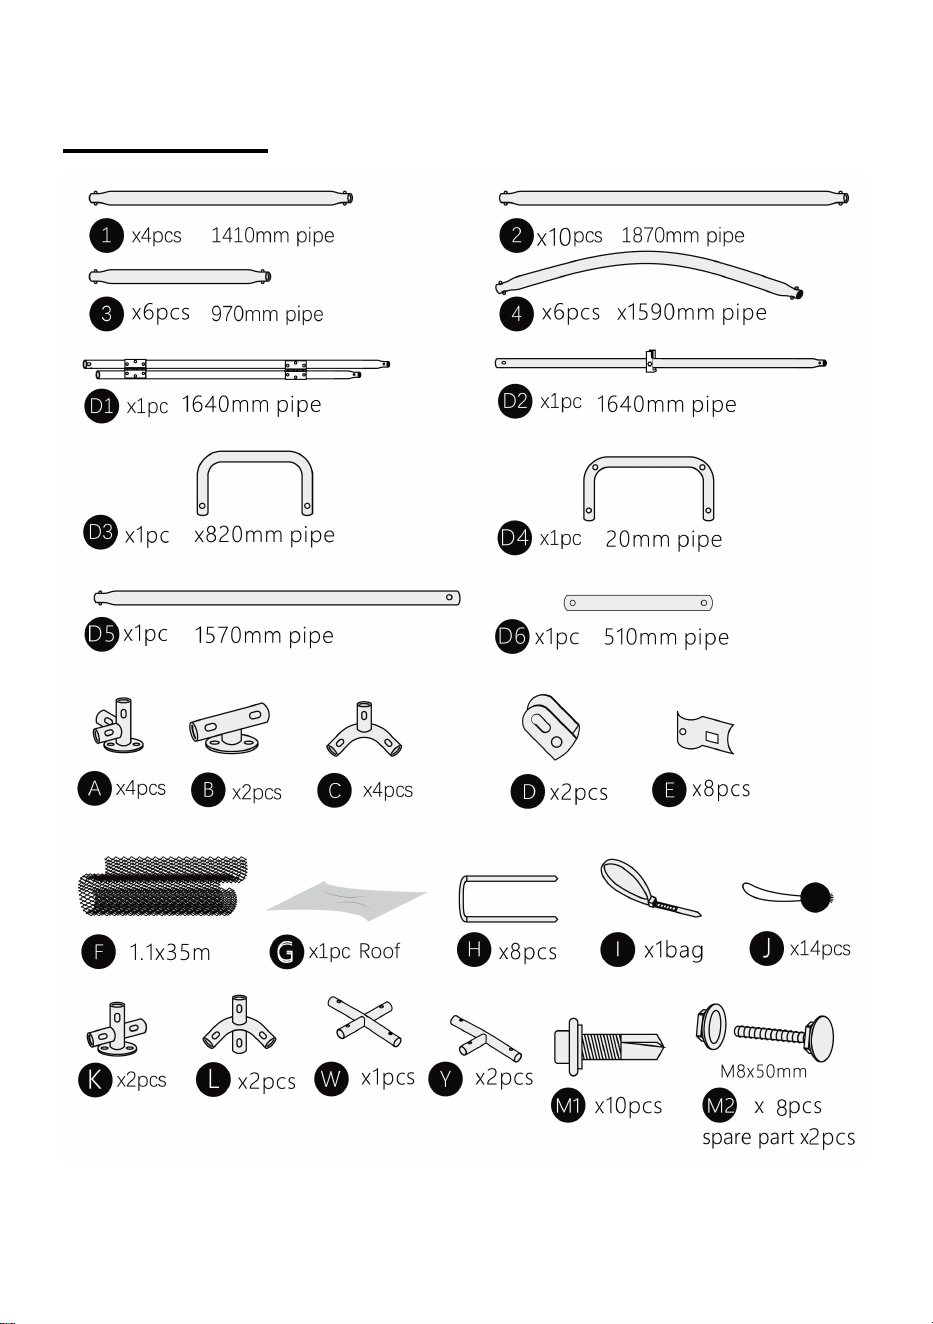
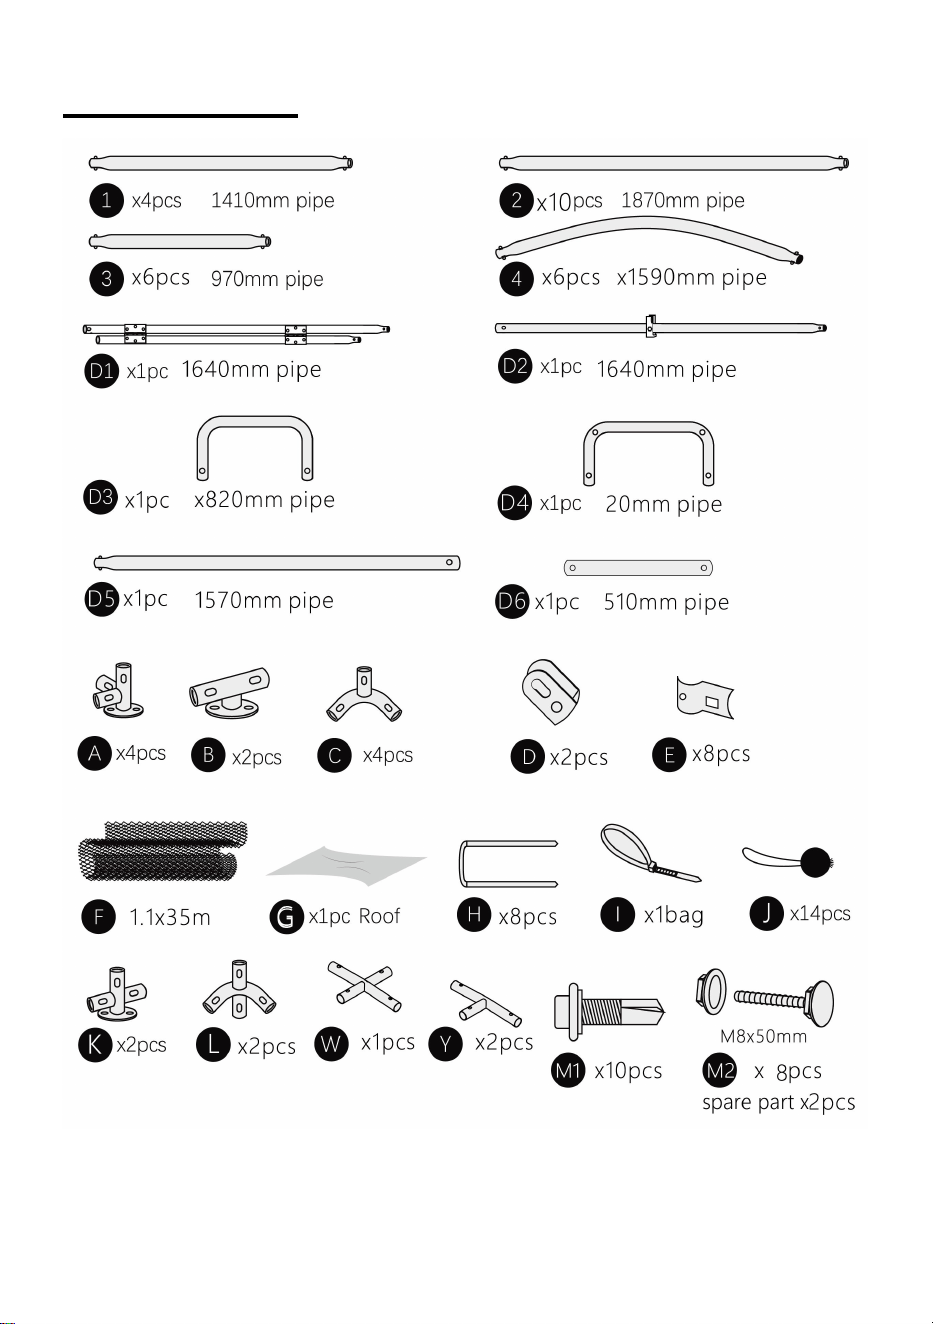
Product List
4
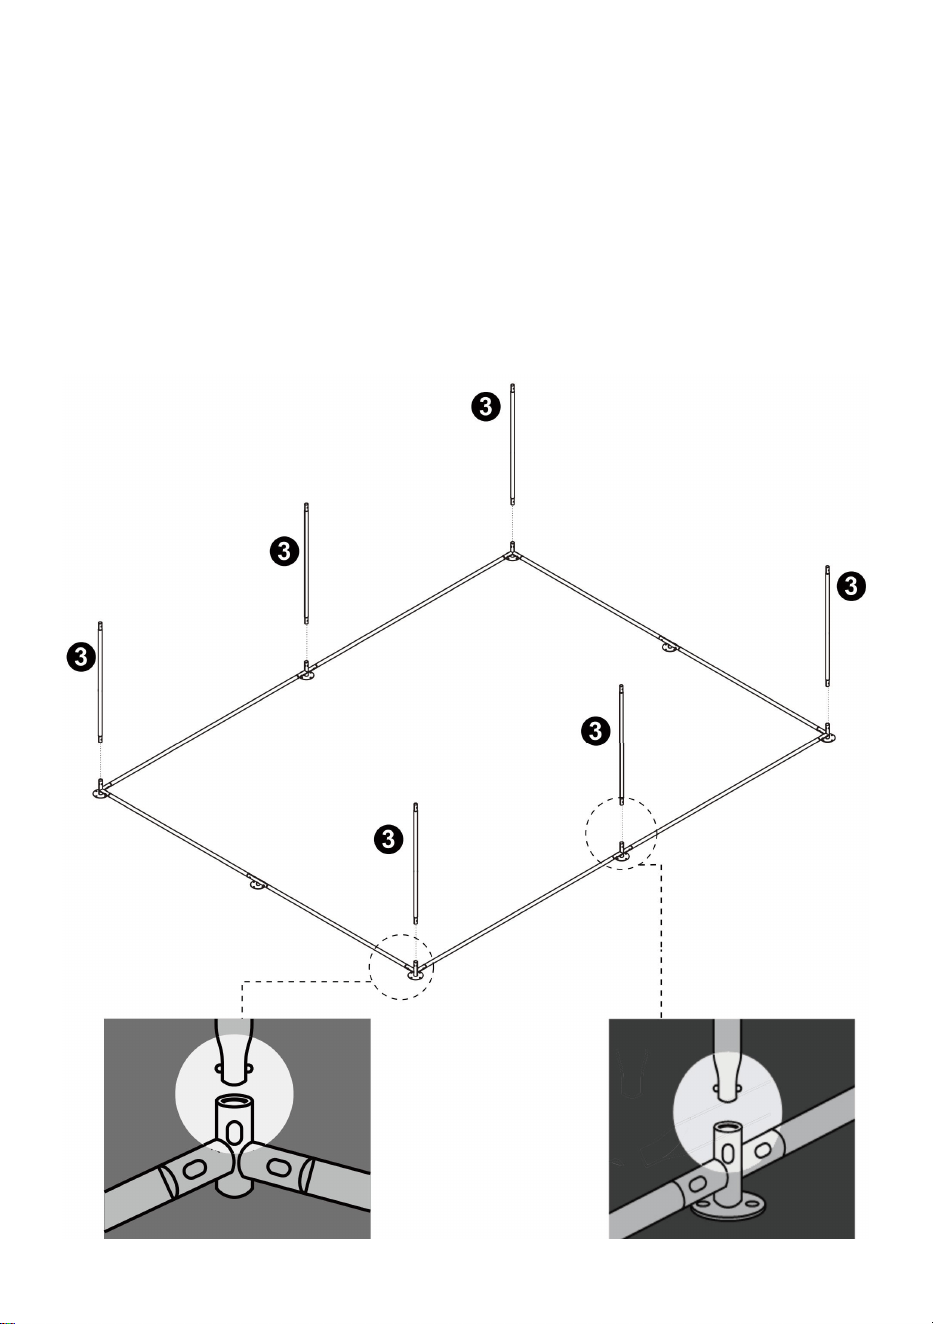
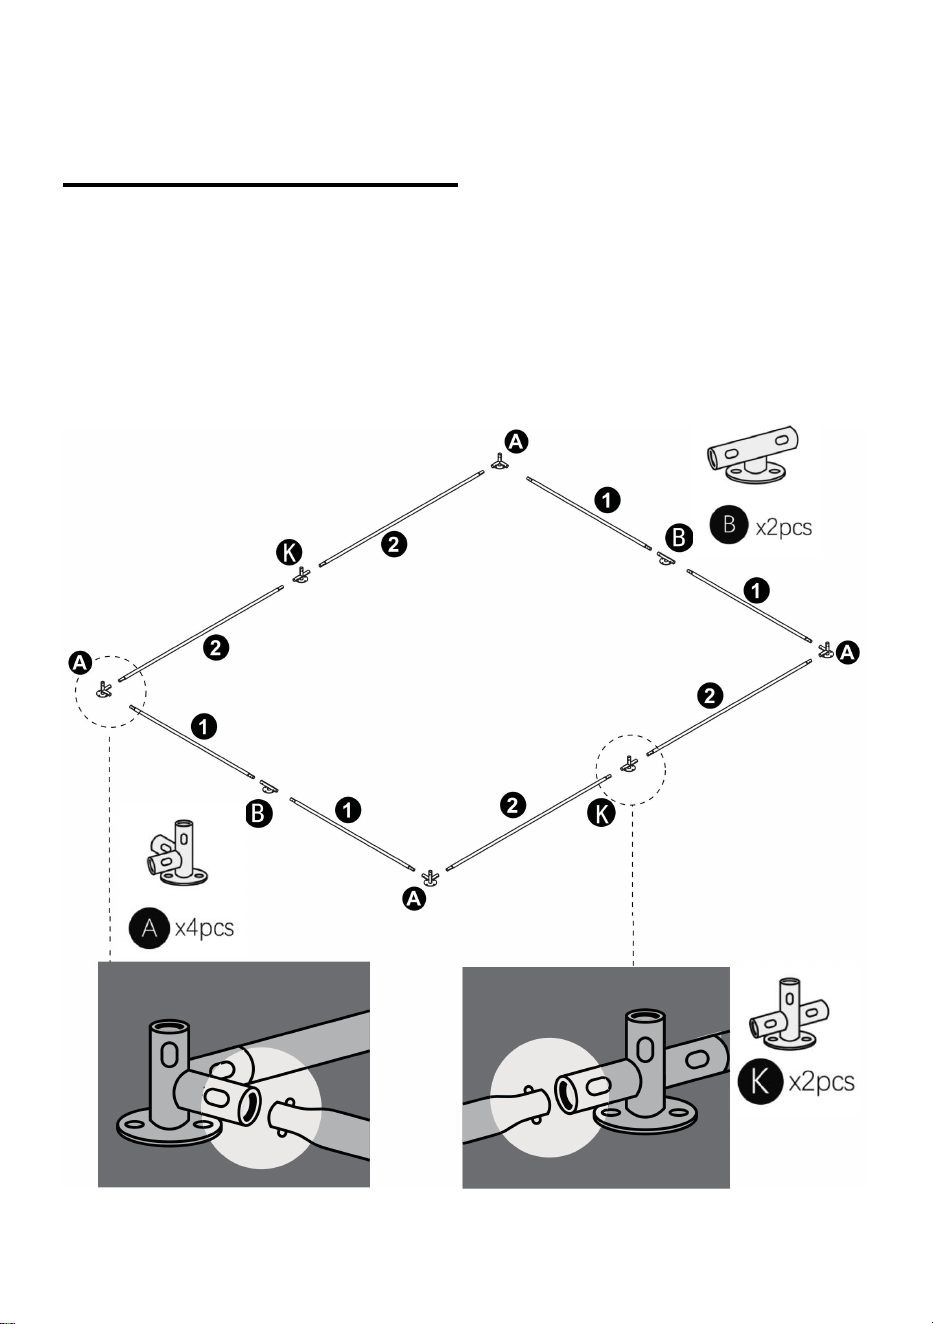
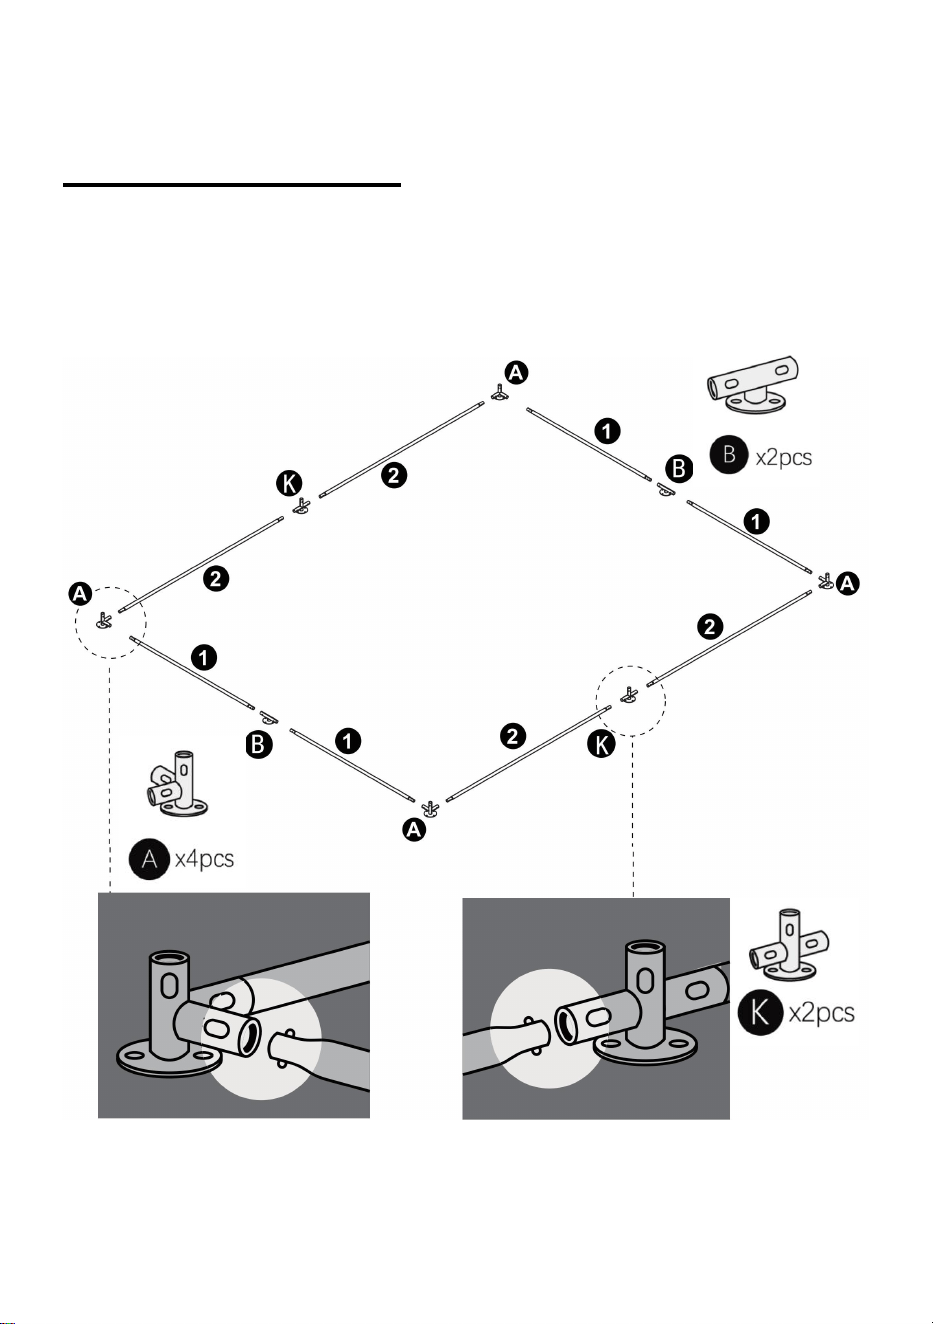
Product Assembly
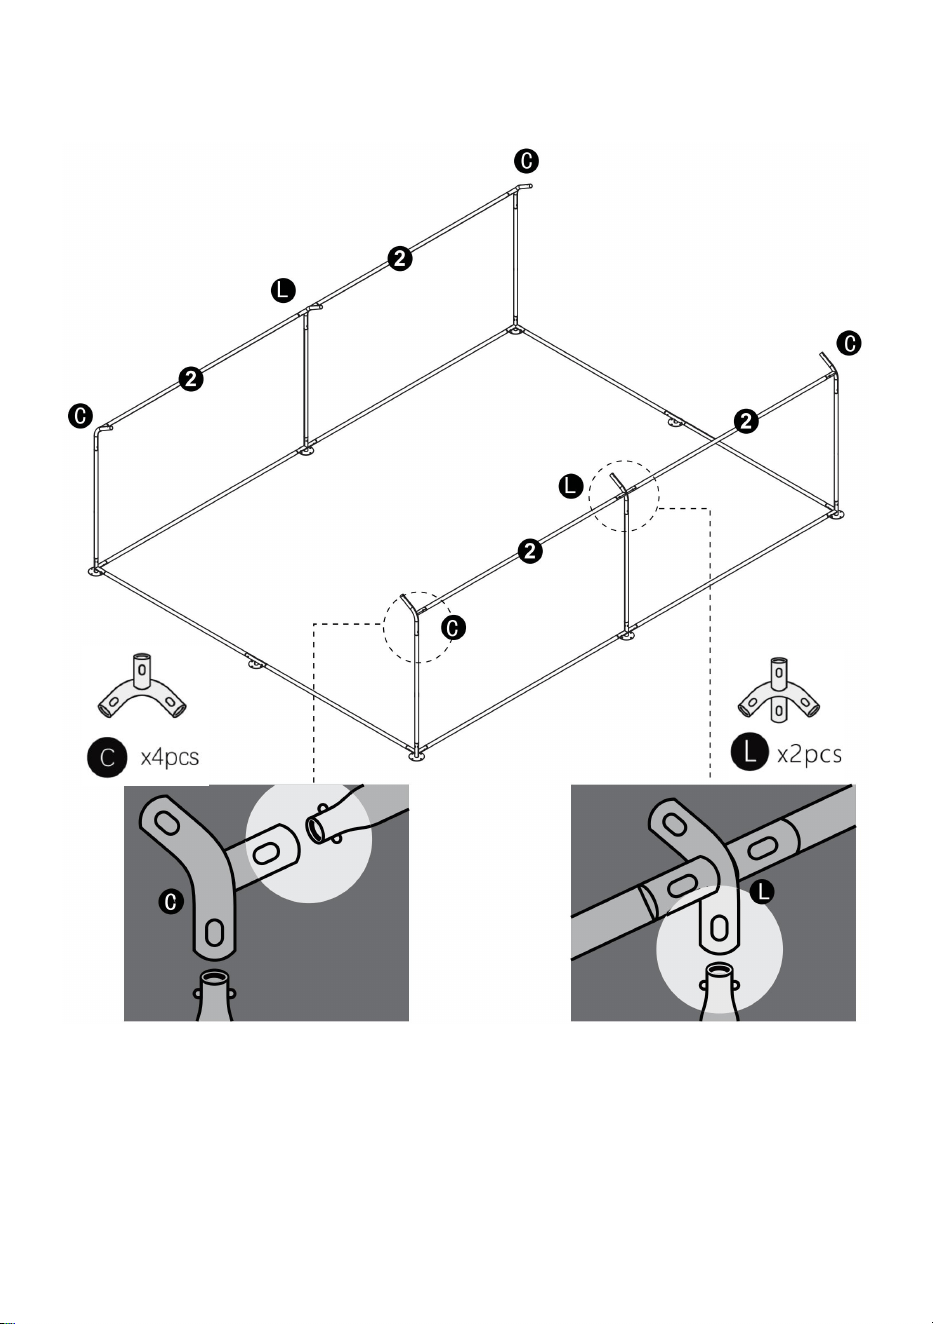
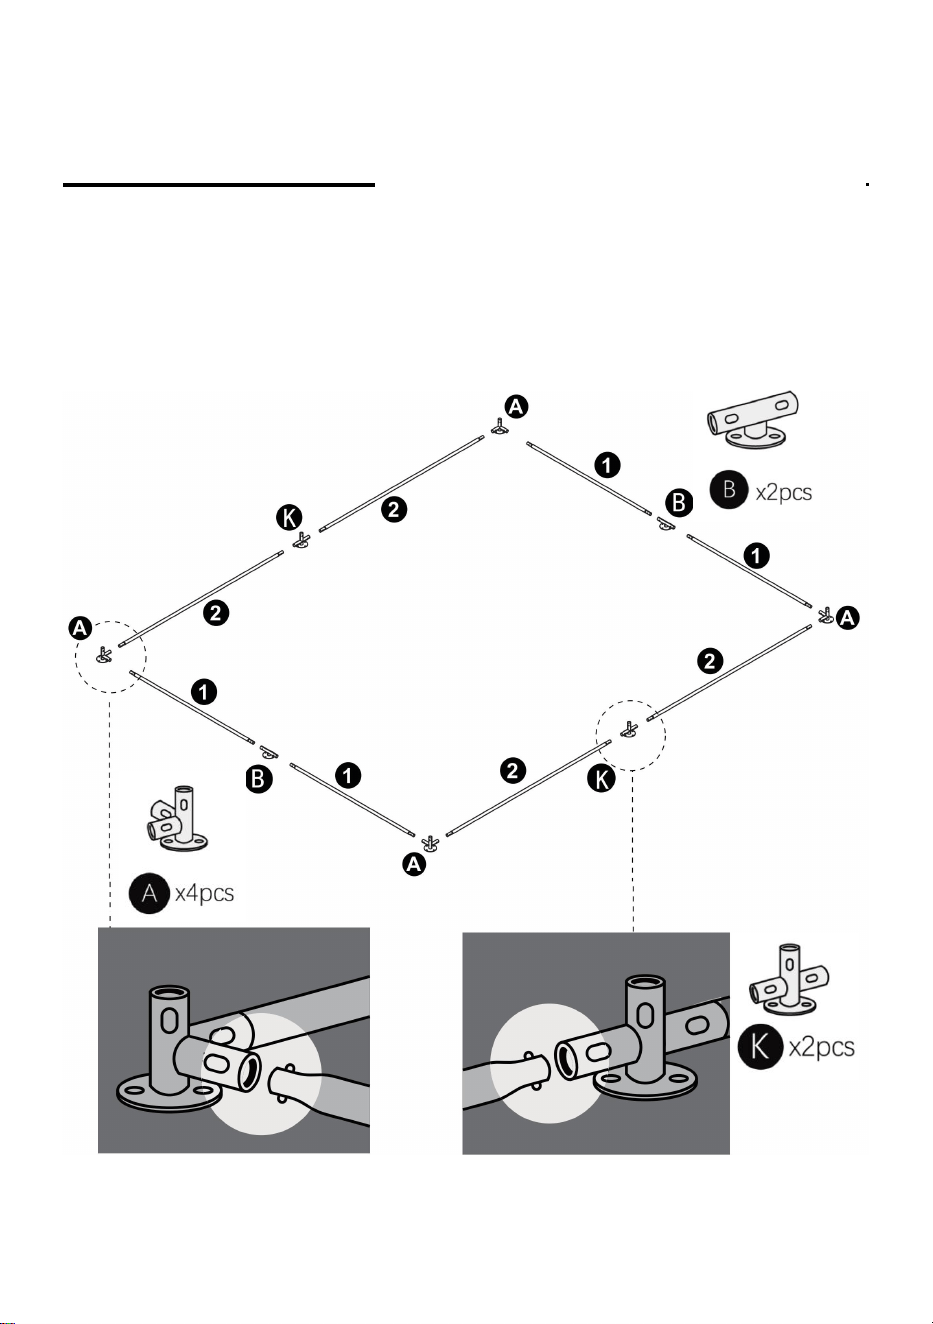
Step 1:Assemble the bottom frame as the bellow drawing. Before you
assemble the frame,please put the plastic connector "Q" x4pcs on the pole
"2" like bellow (note:only for 4 pcs of pole 2 in the corner need this plastic
connectors),then put connector "Q" x4 pcs on the pole "1" like bellow.
5
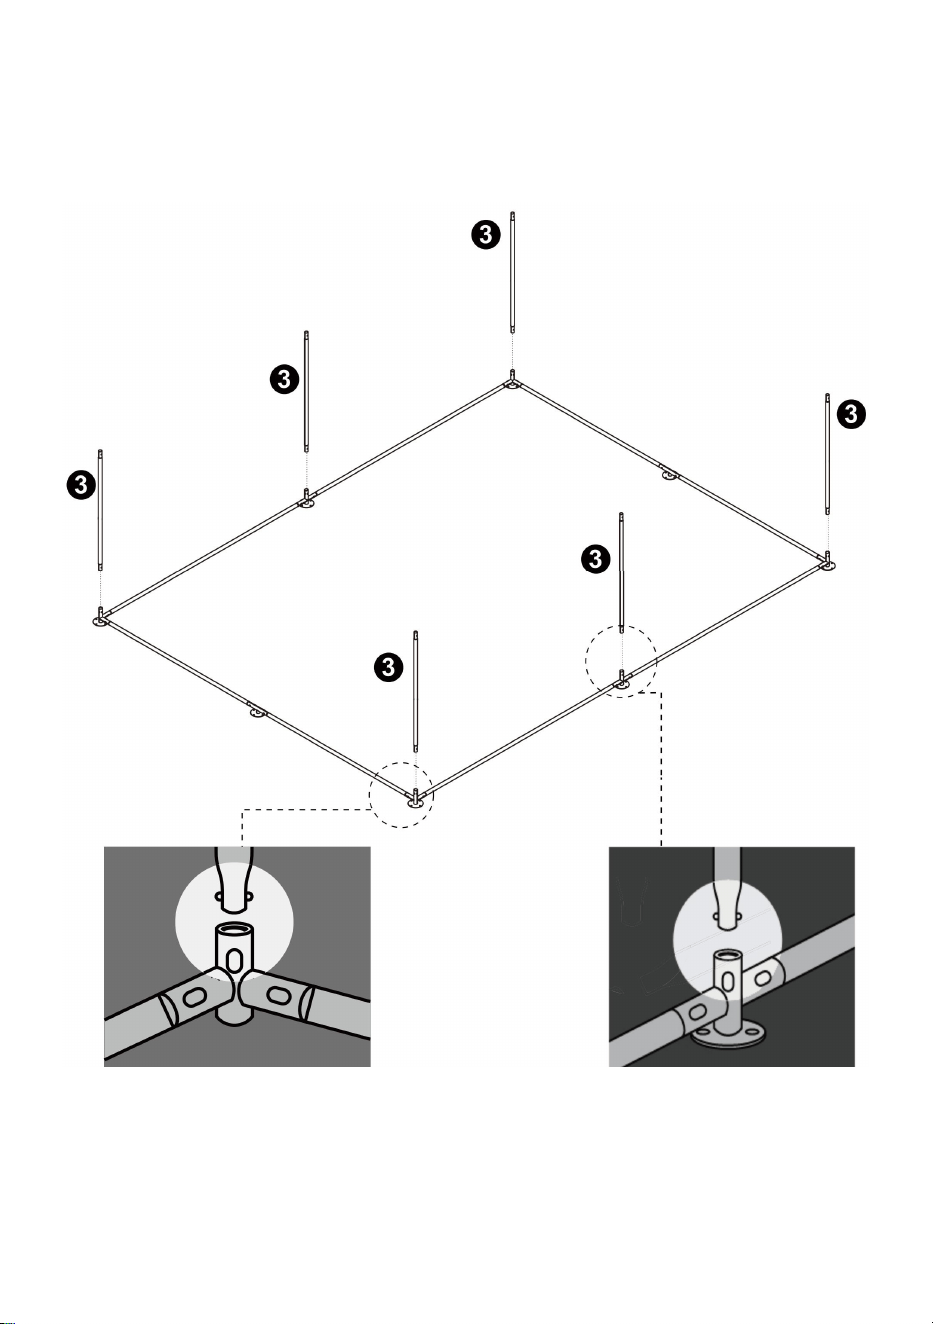
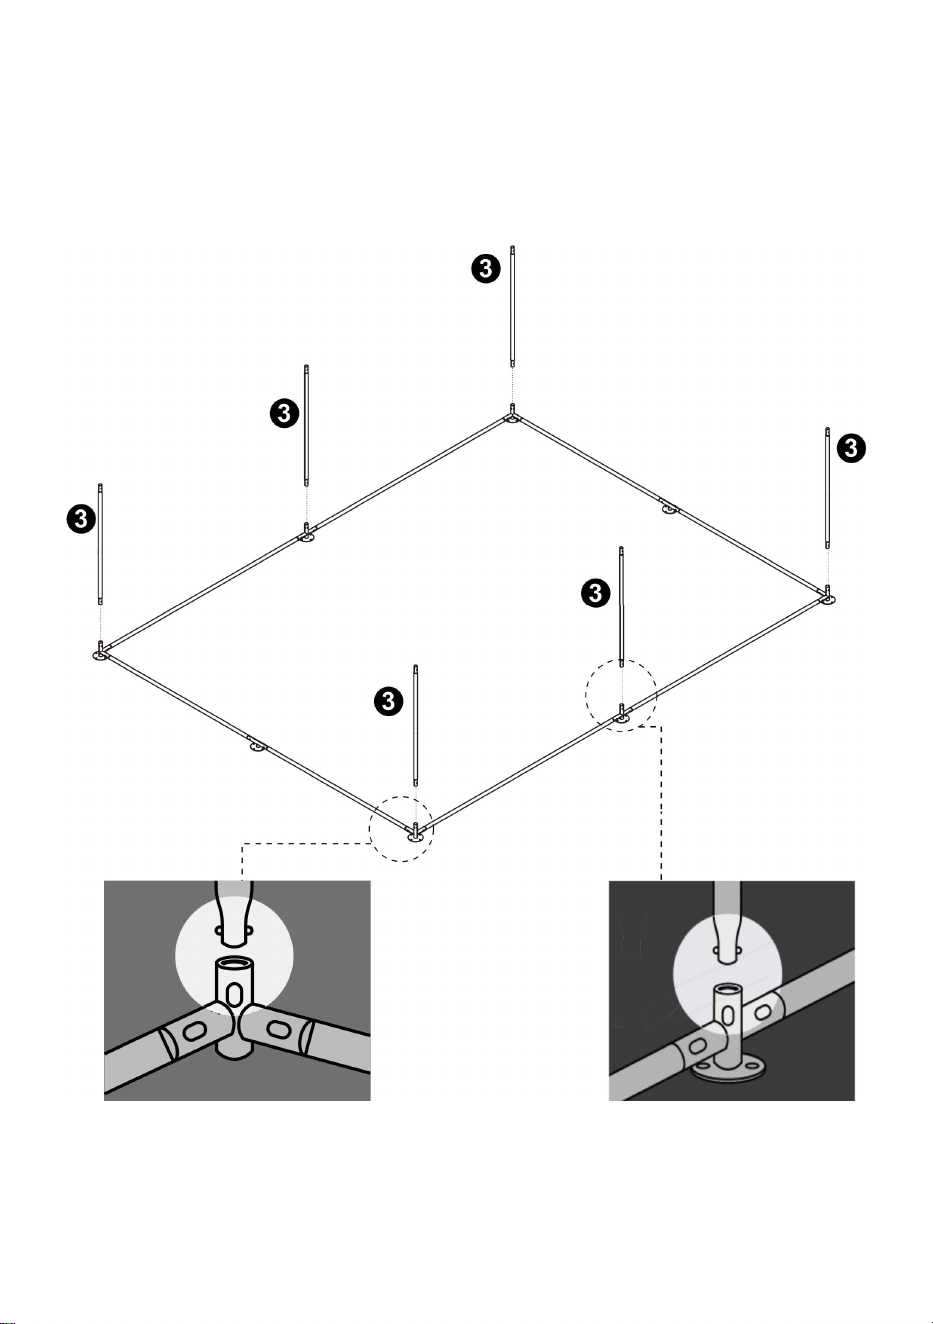
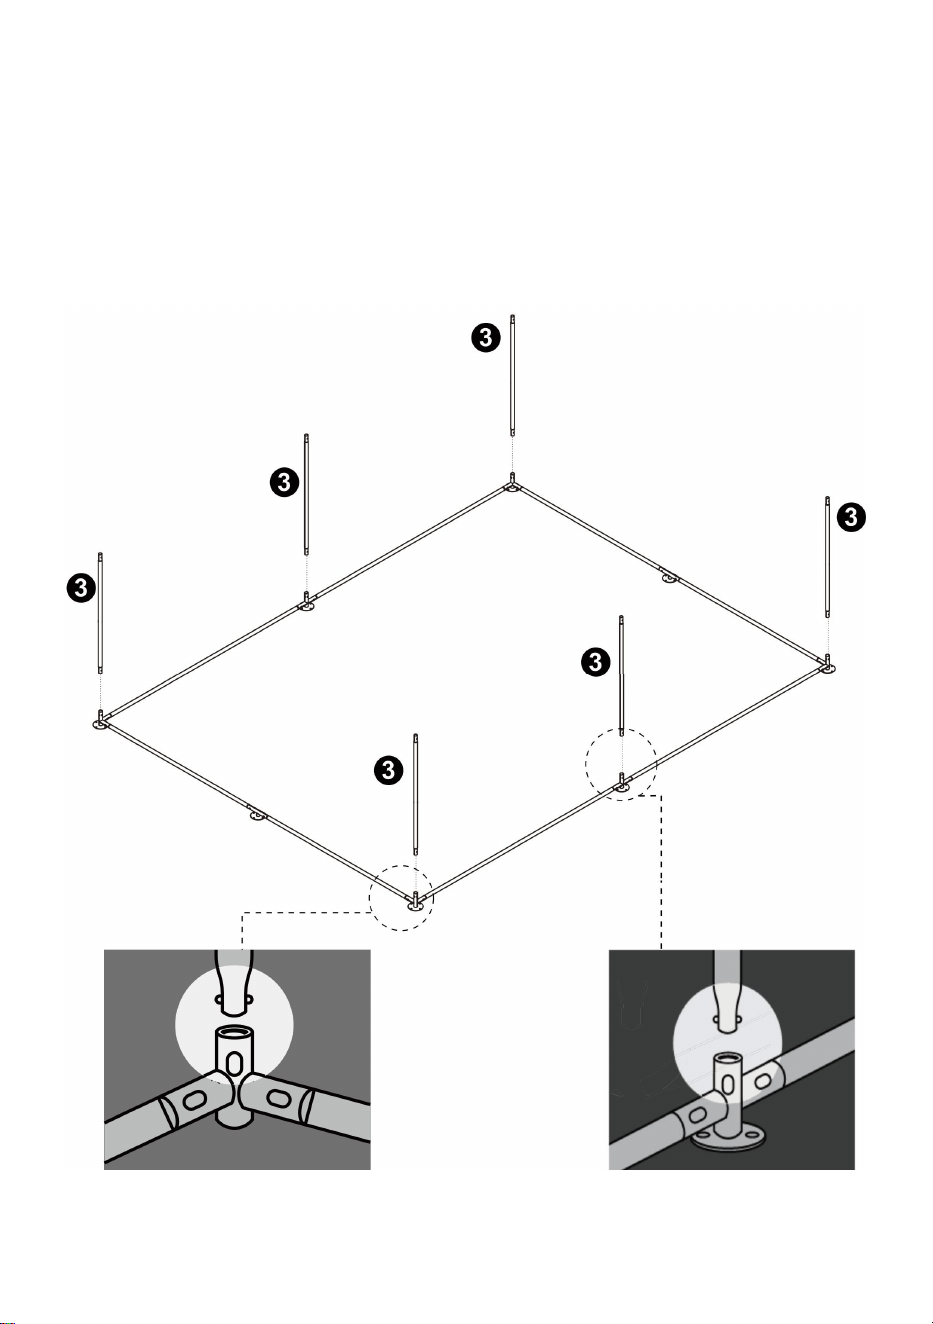
Step 2: Gather pipe "3" x4pcs,insert the pipes into the connertors. Before
this,please put the plastic connector "G" x4pcs on corner of pole "3" x4pcs
like bellow (note:only for 4pcs of pole 3 in the corner need this plastic
connectors) .
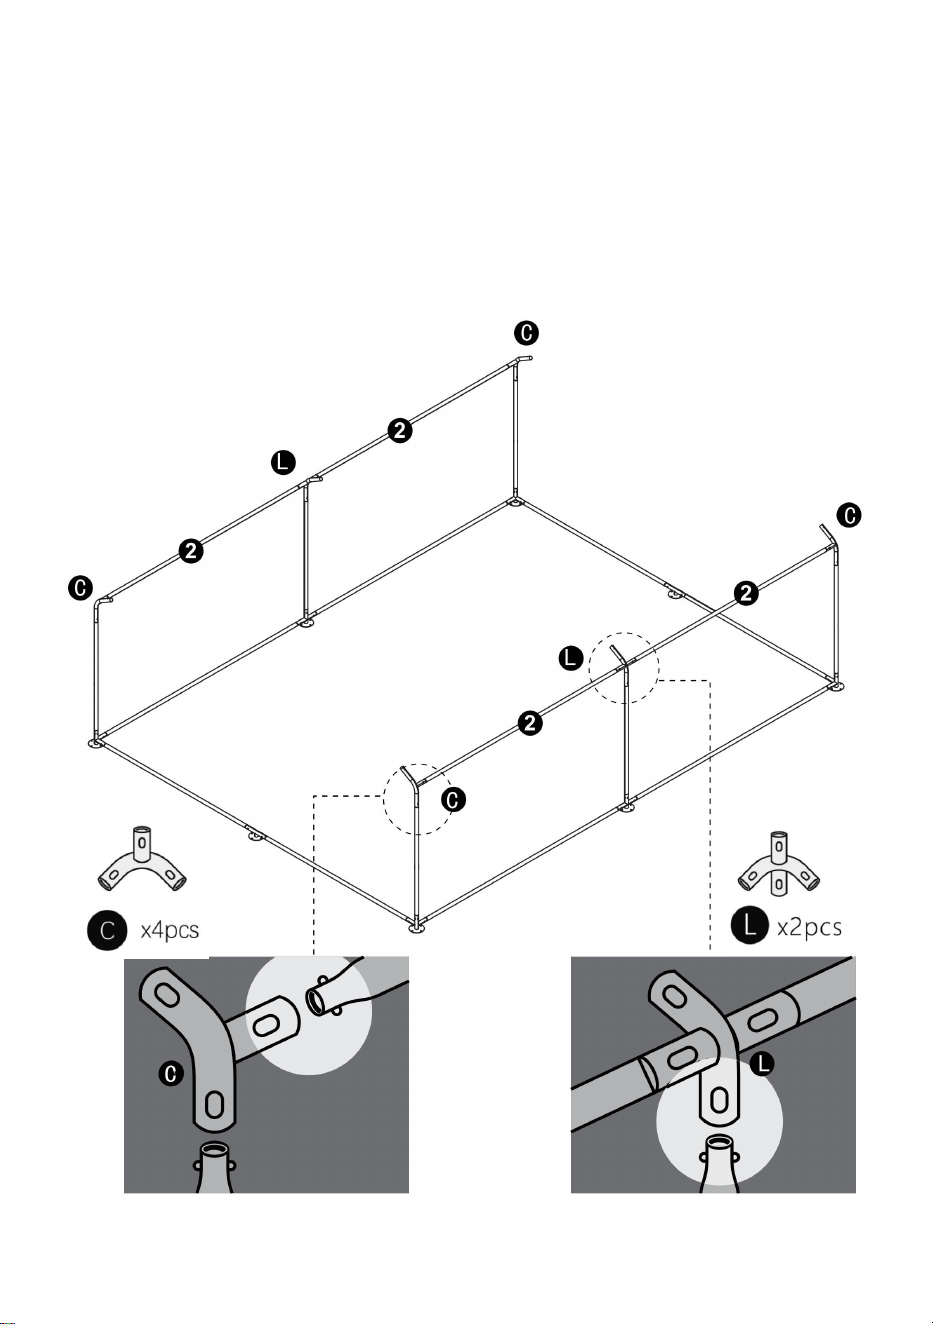
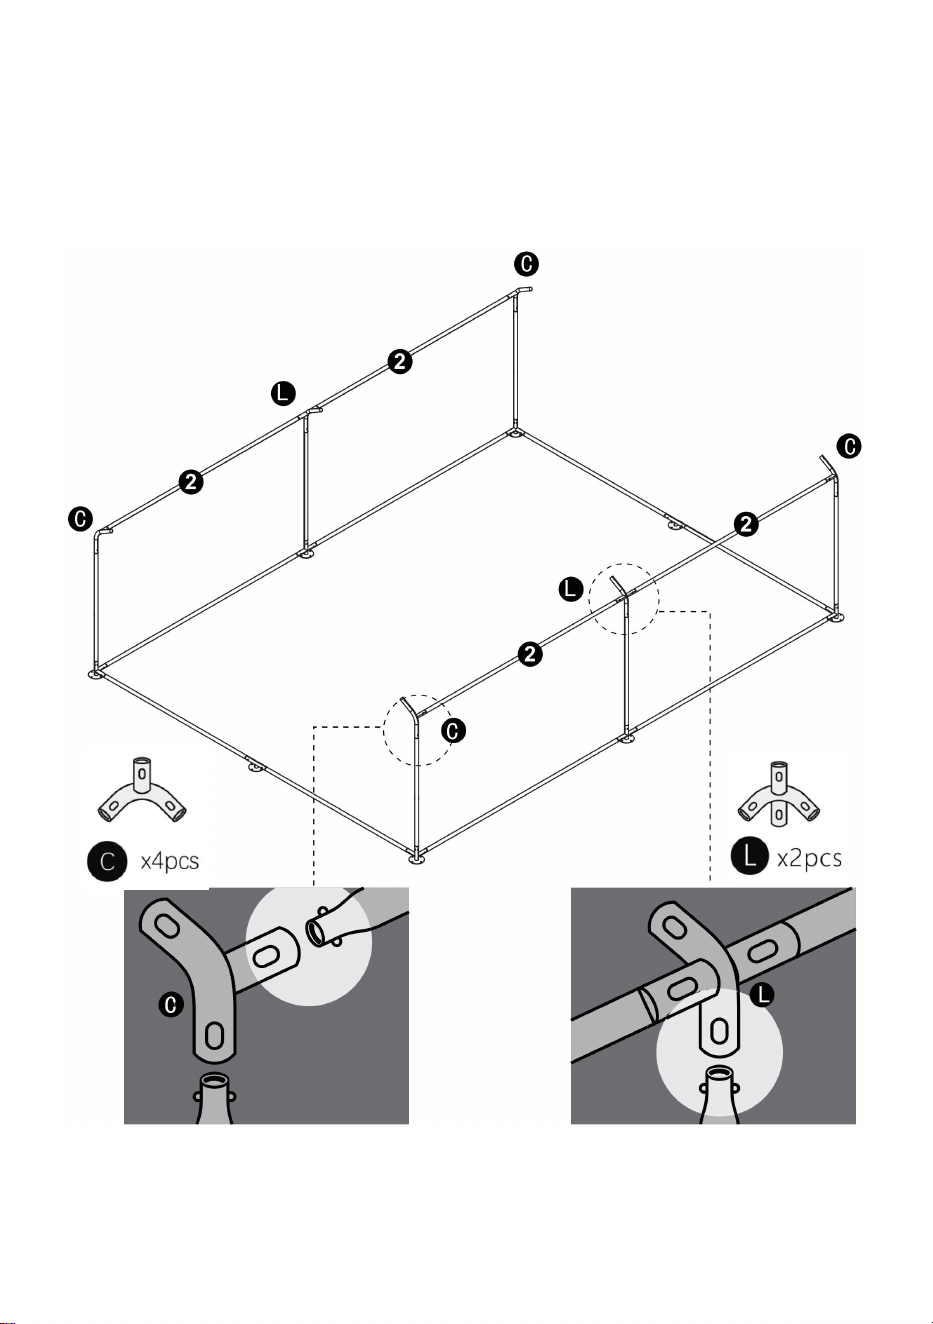
6
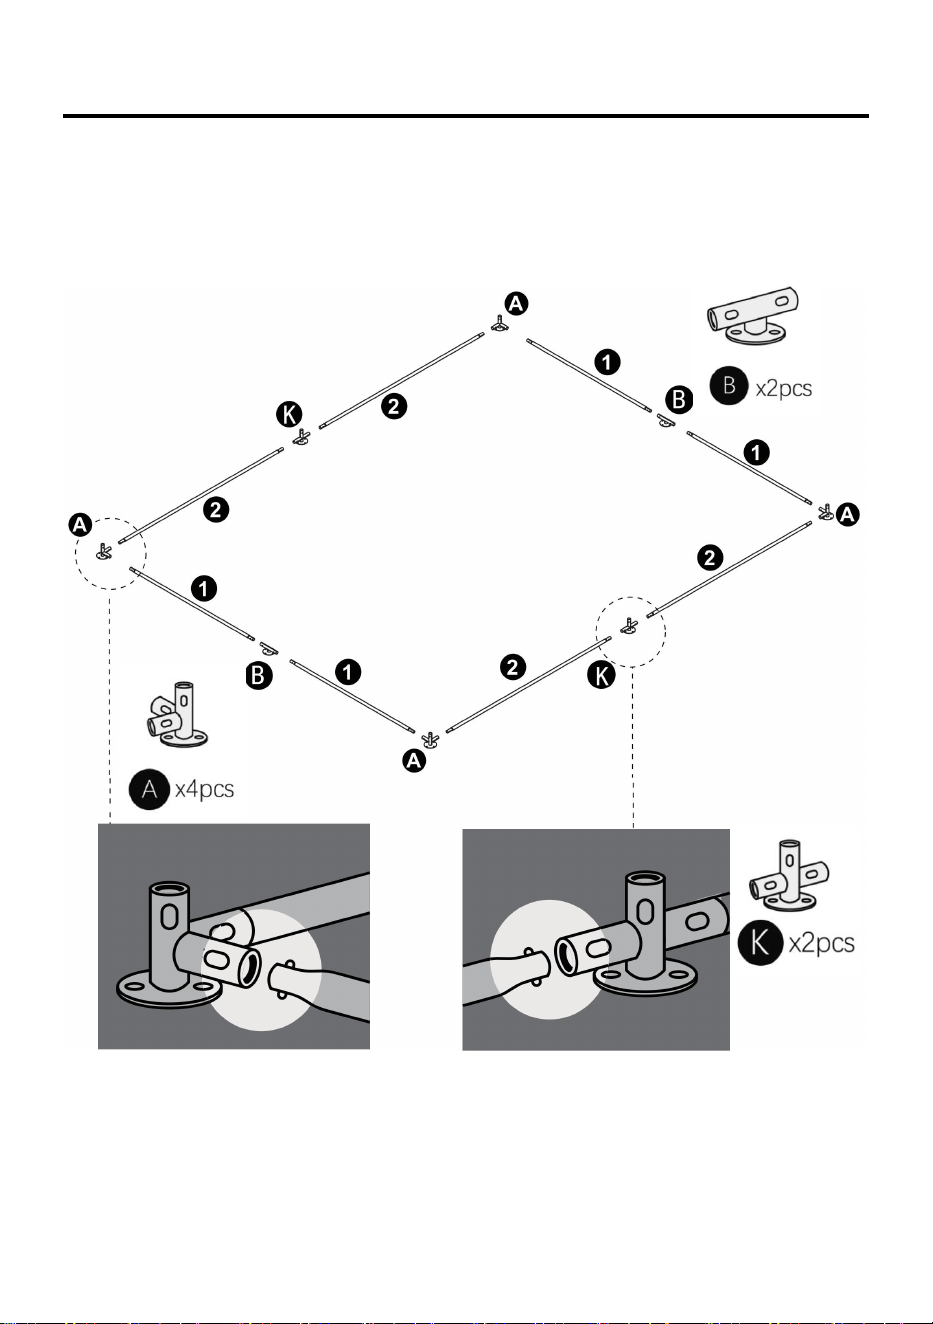
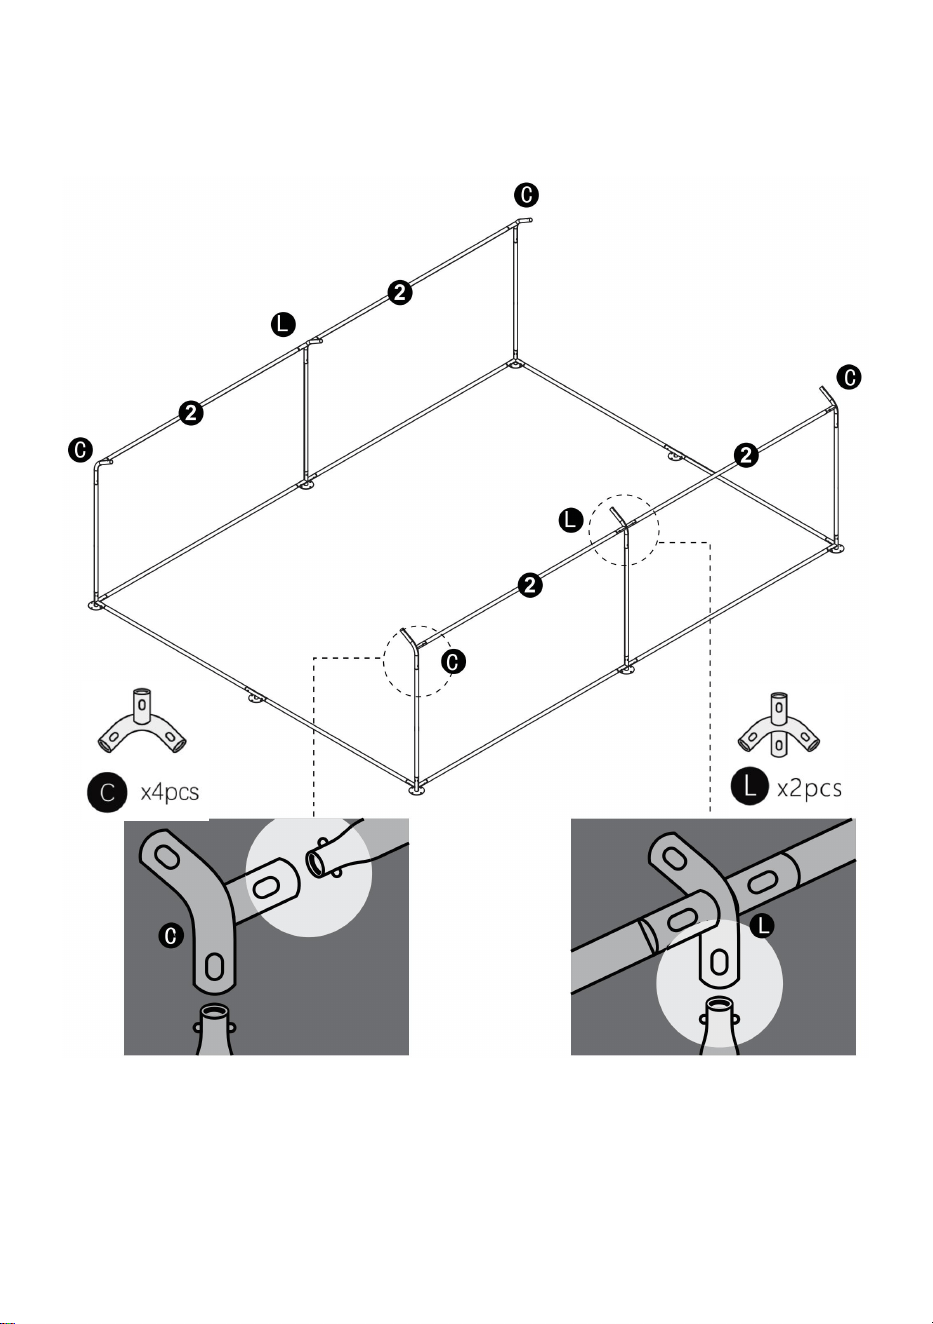
Step 3: Gather connector "A" x4pcs,"B" x4pcs,and pipe"2"x6pcs,assemble
as the below drawing.
7
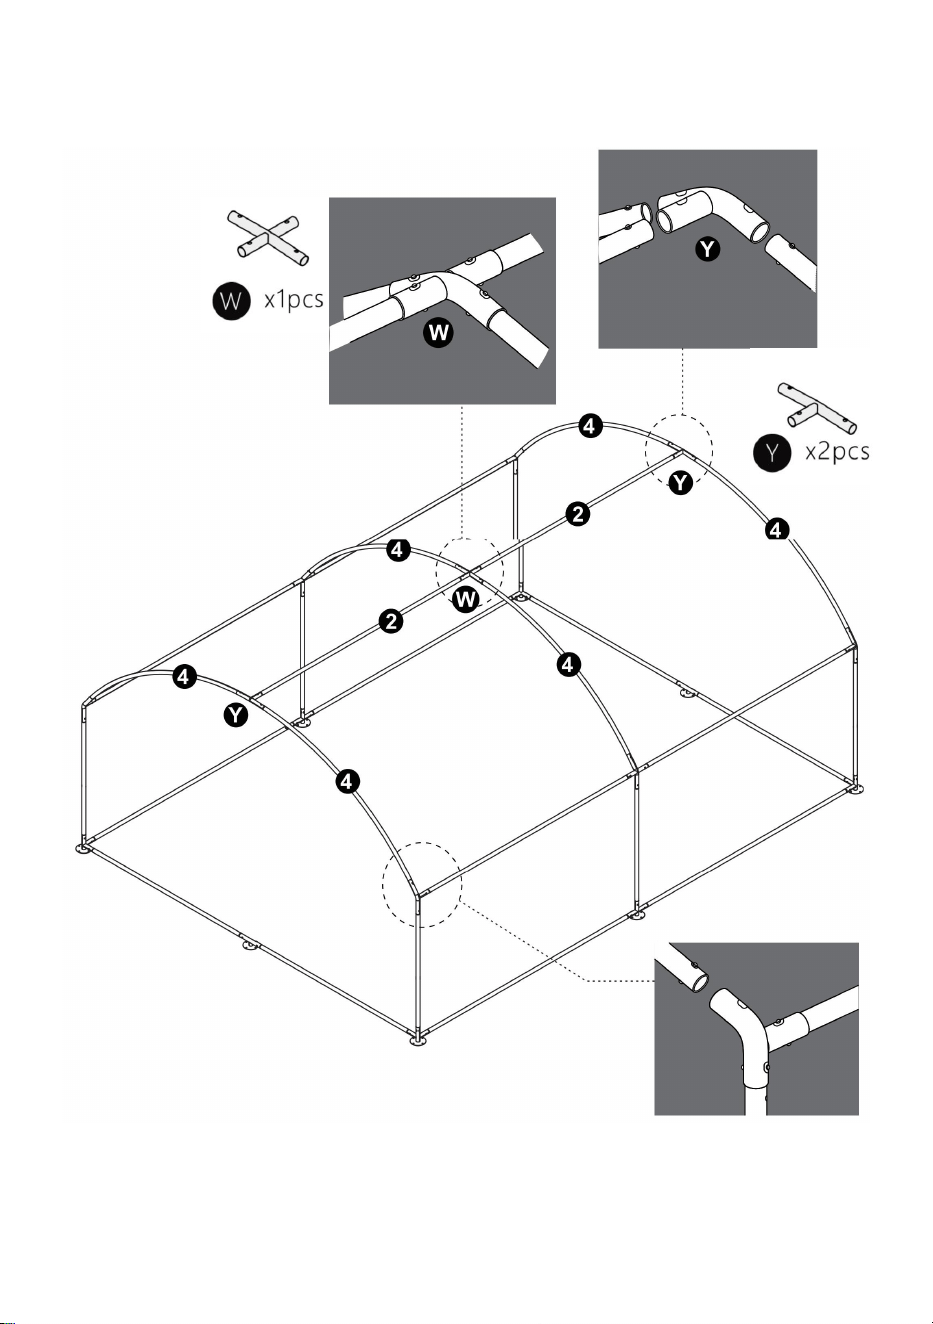
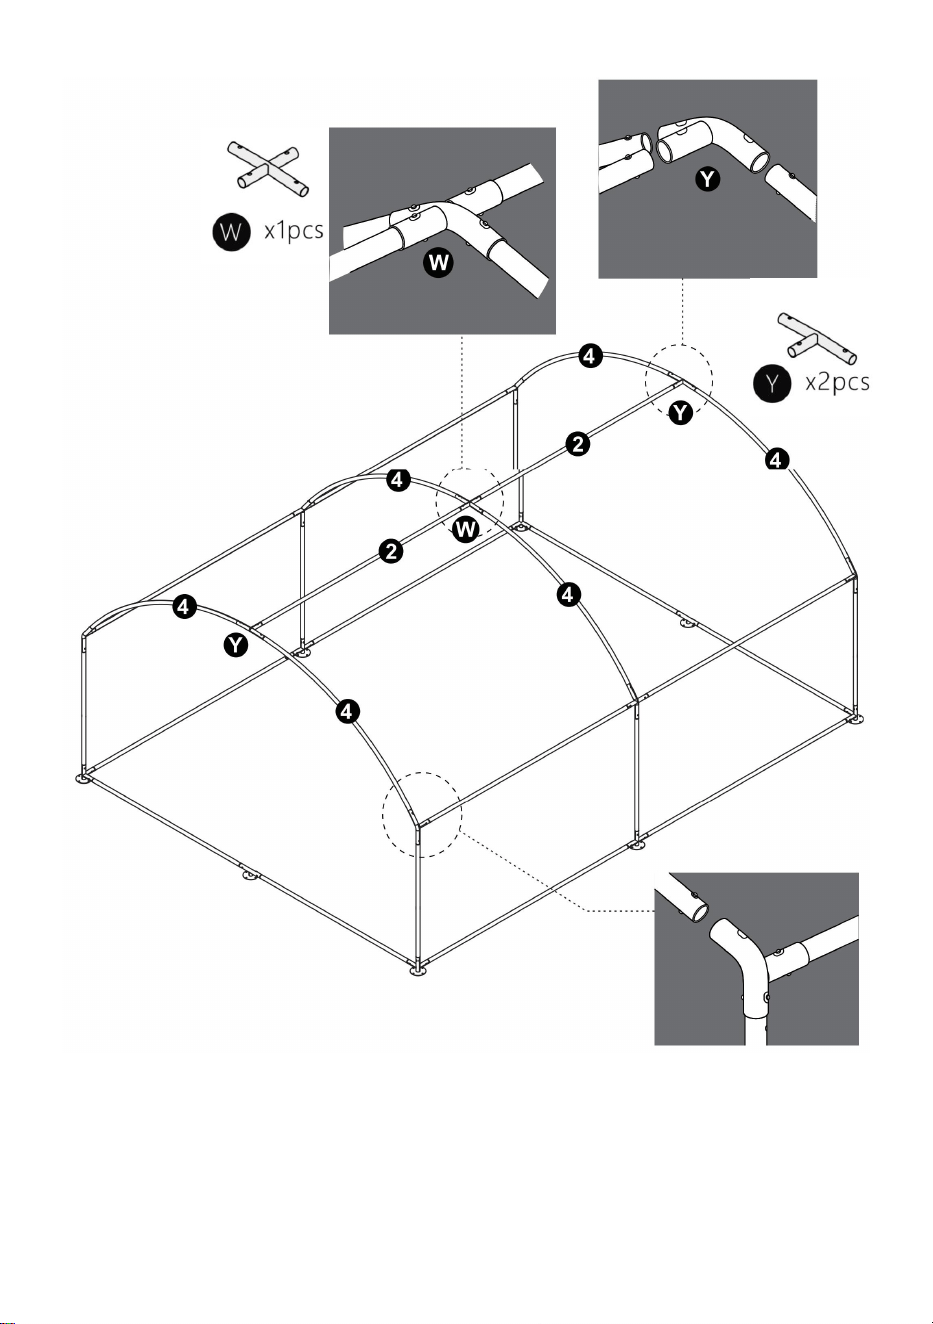
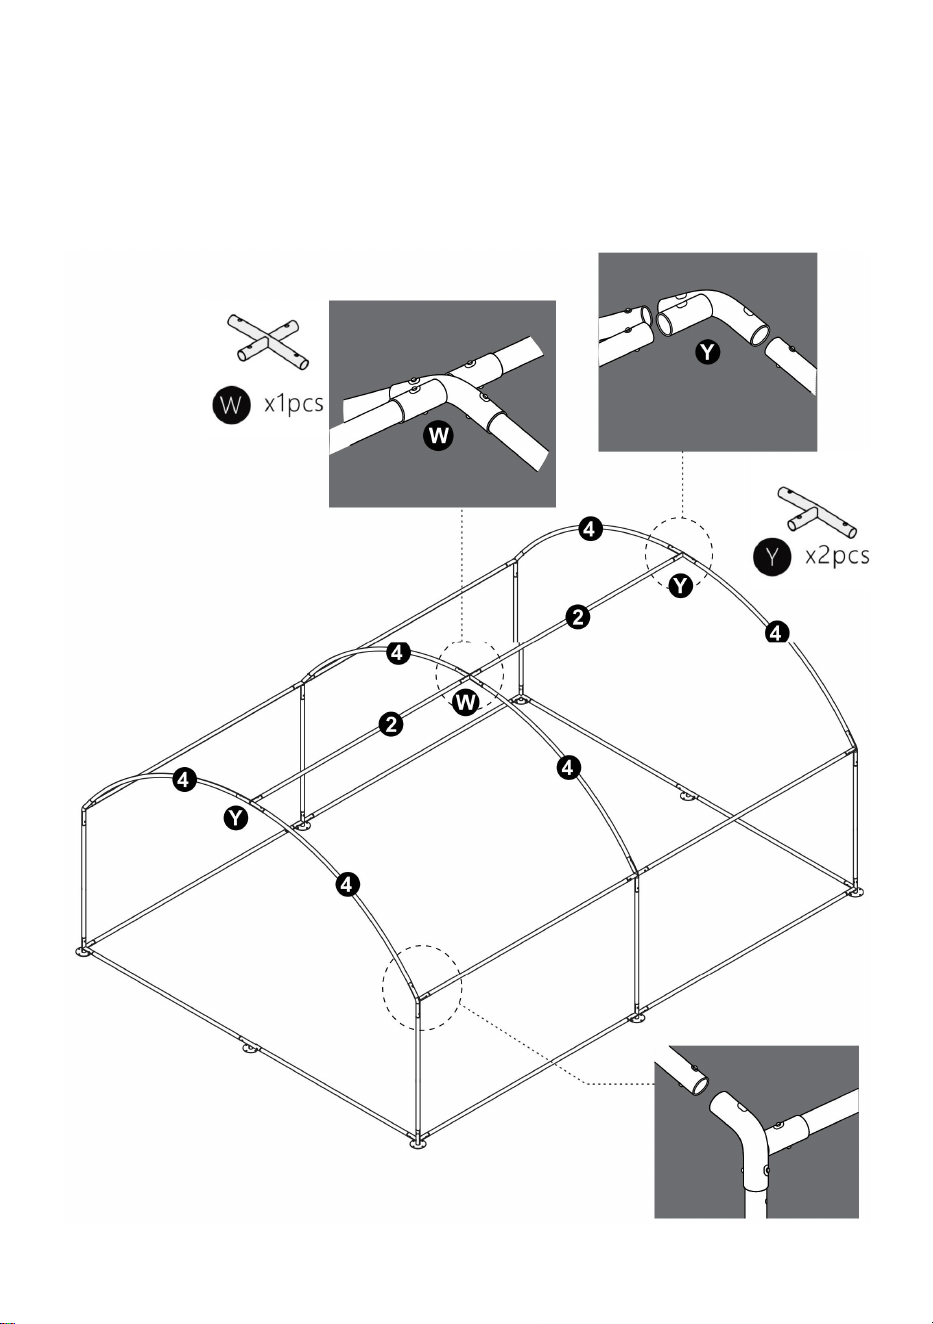
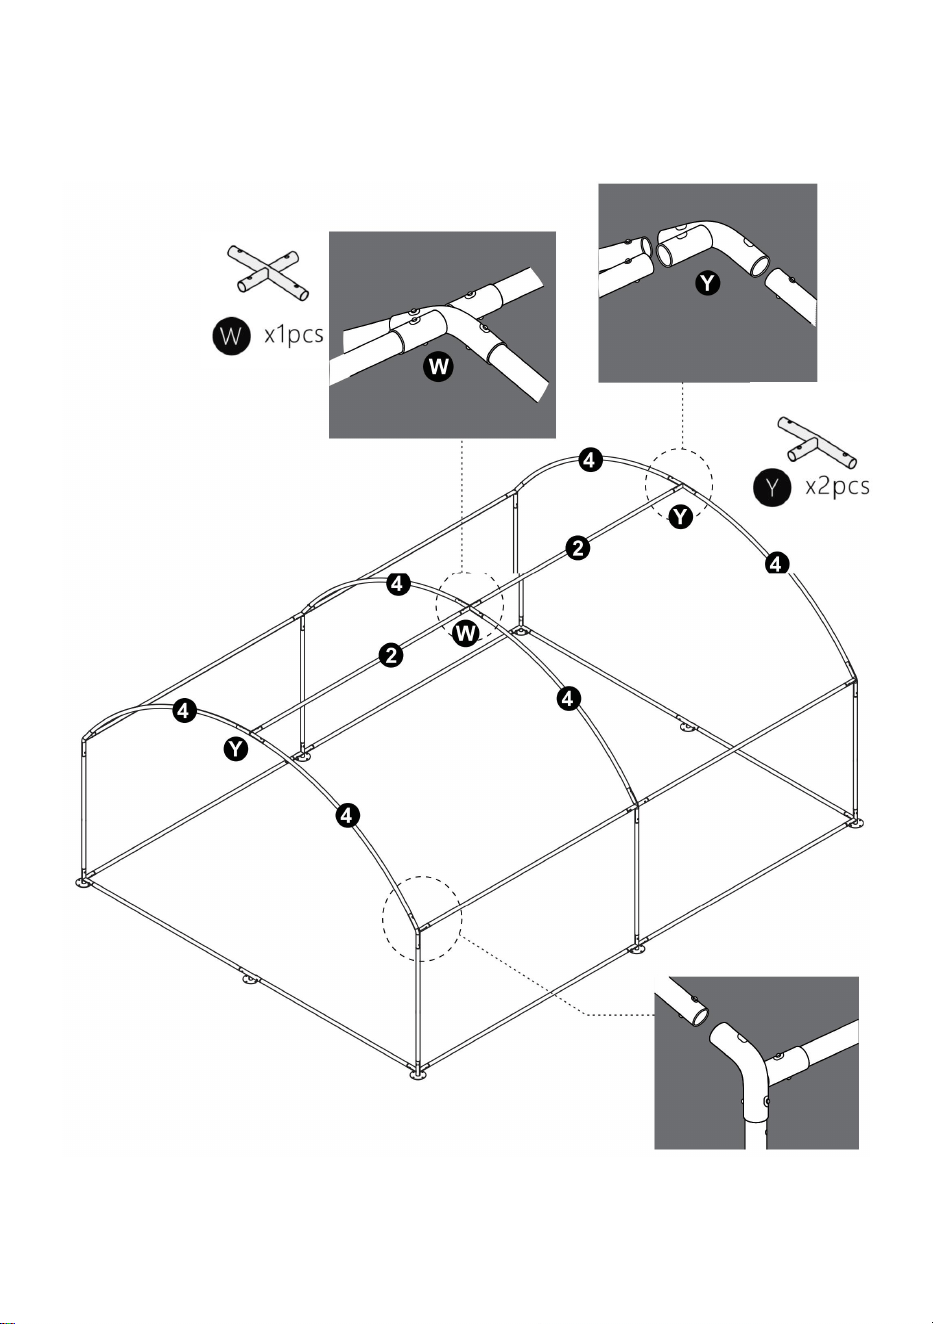
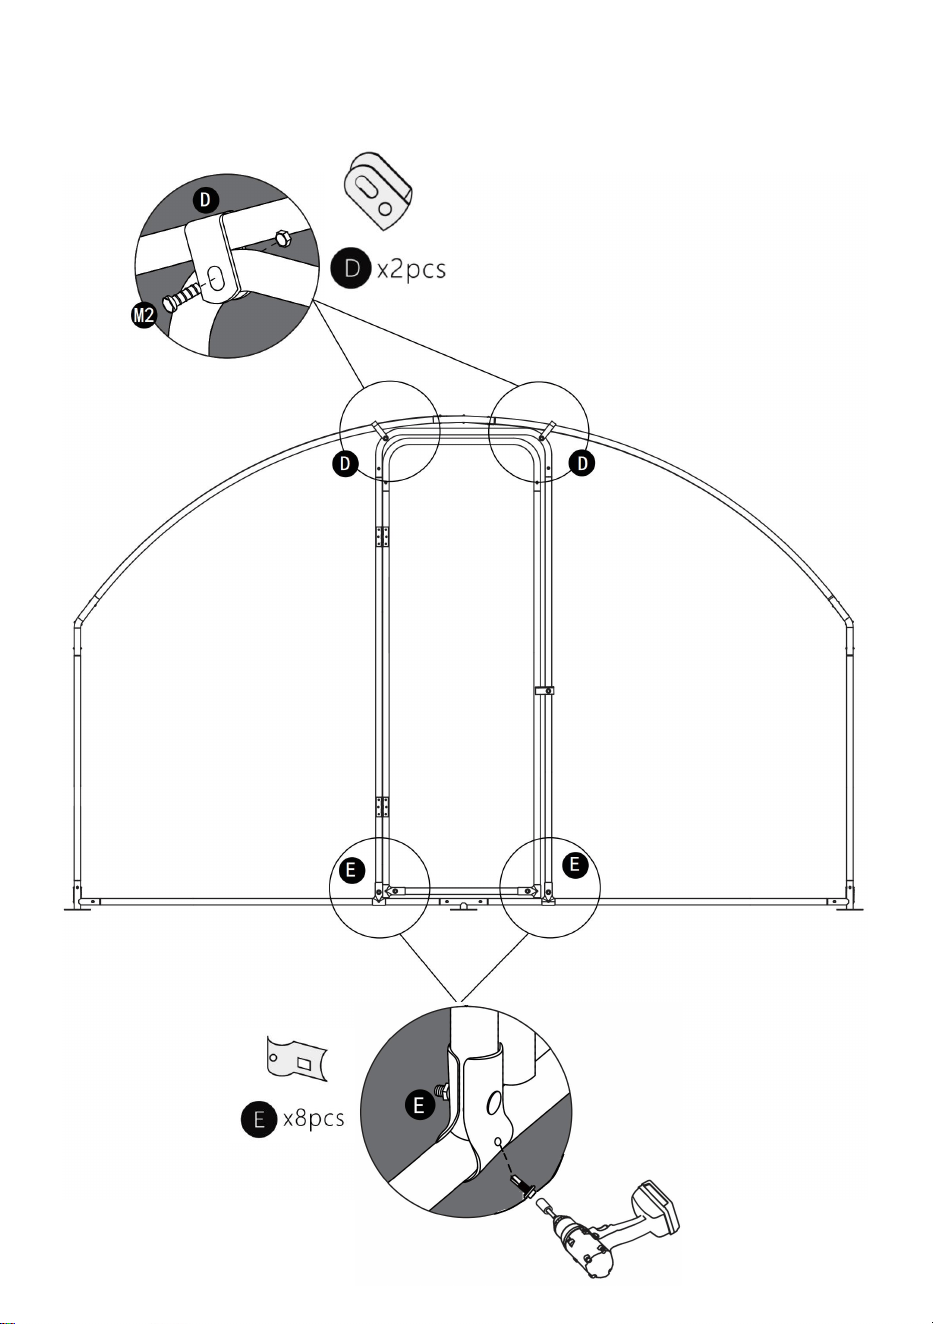
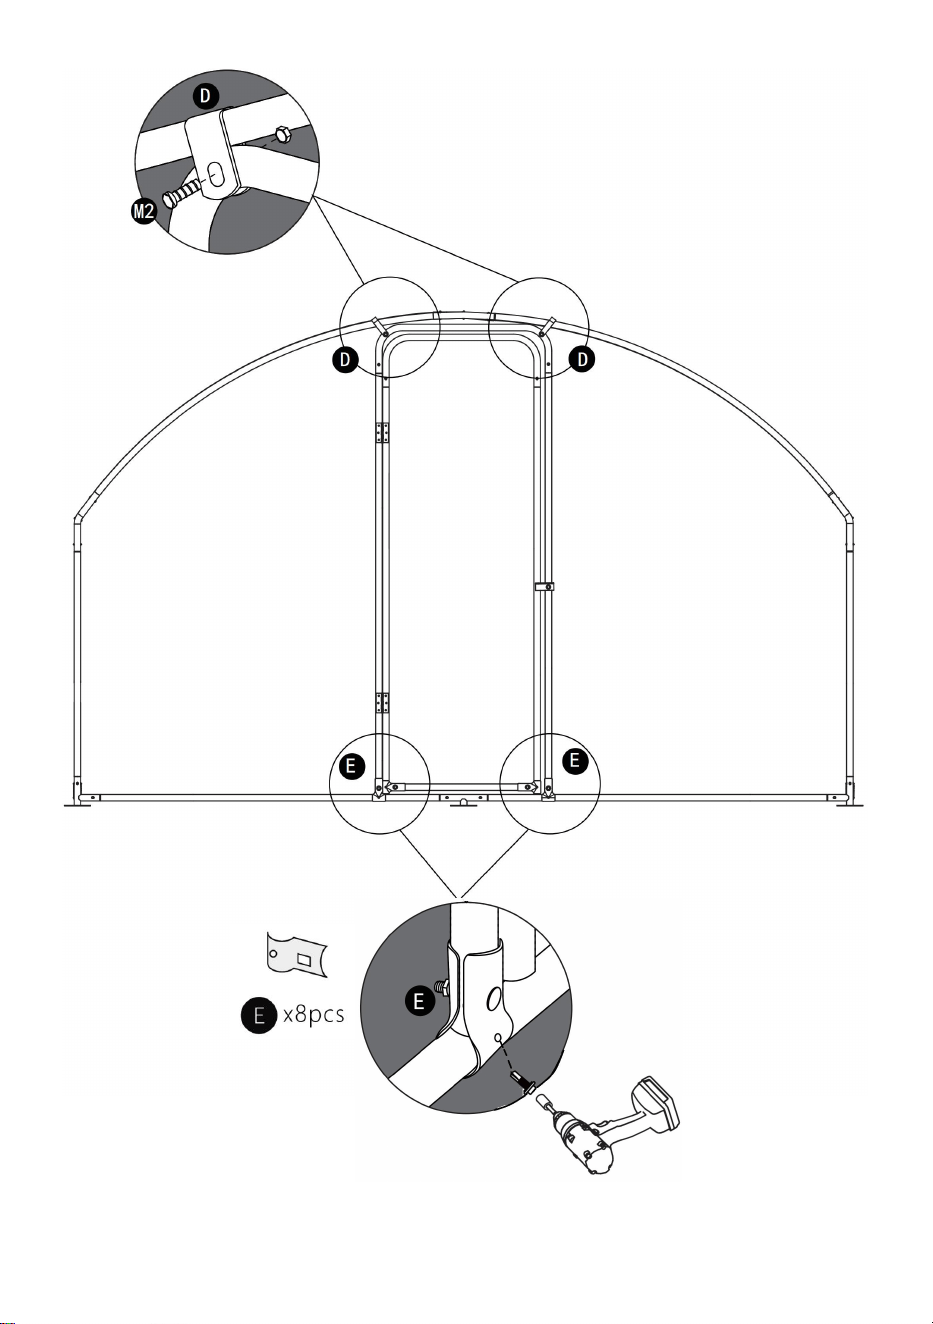
Step 4: Gather connector "Y" x2pcs, "X" x1pc,and pole "2" x3pcs,and pole
"4" x8pcs assemble like bellow.
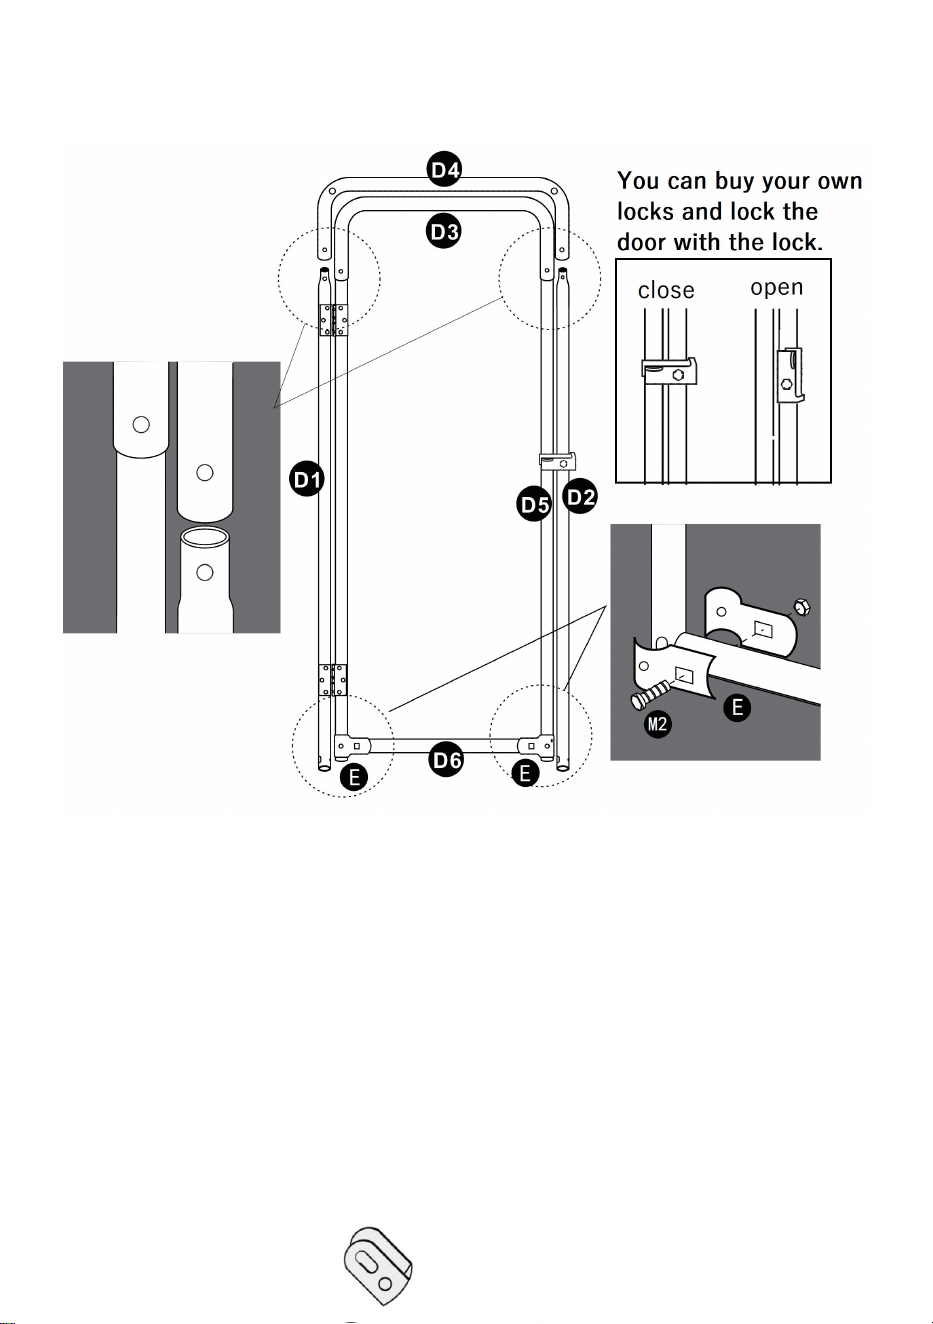
8
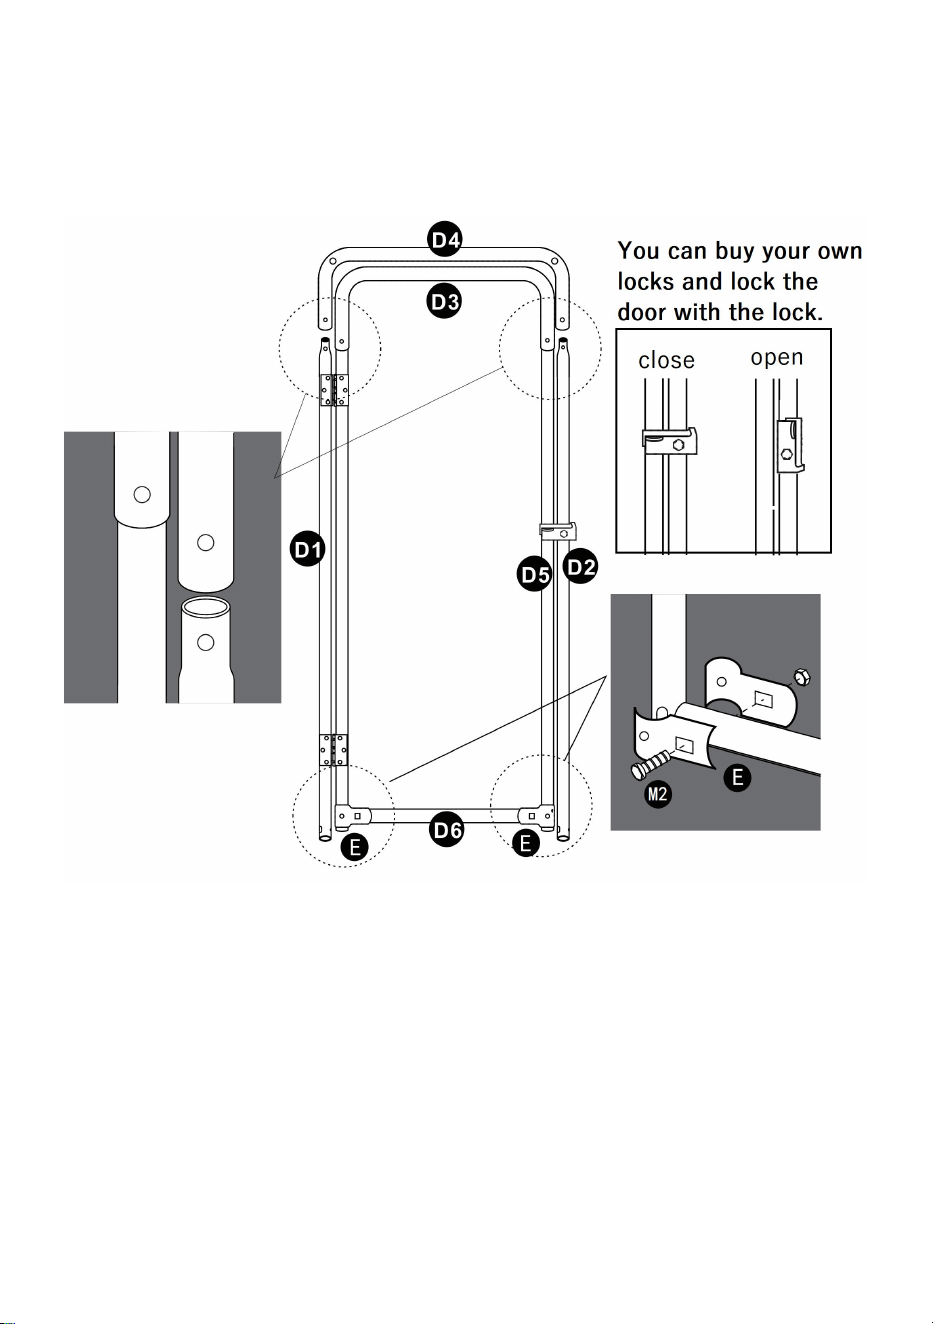
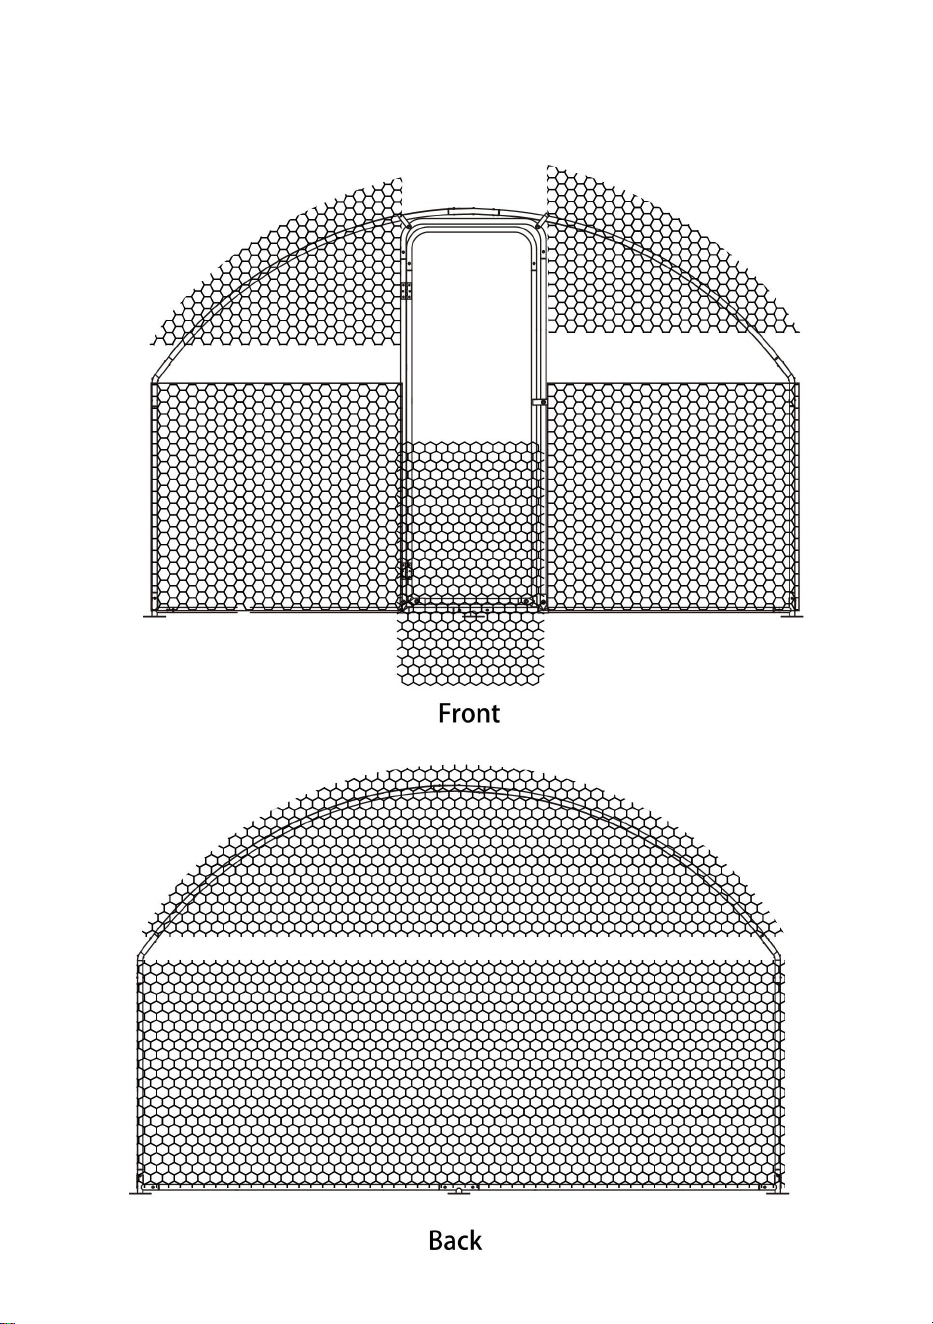
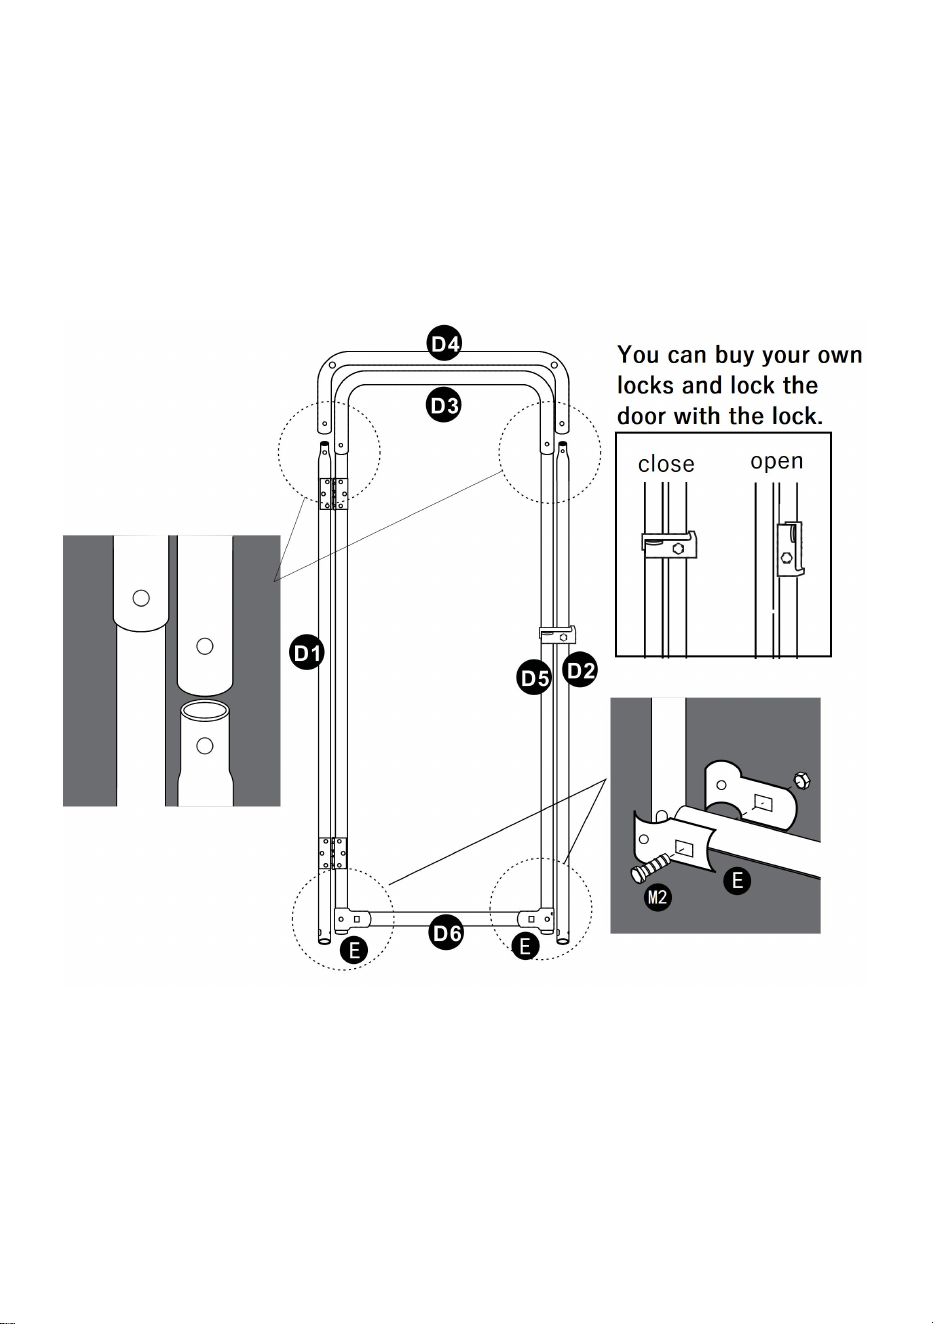
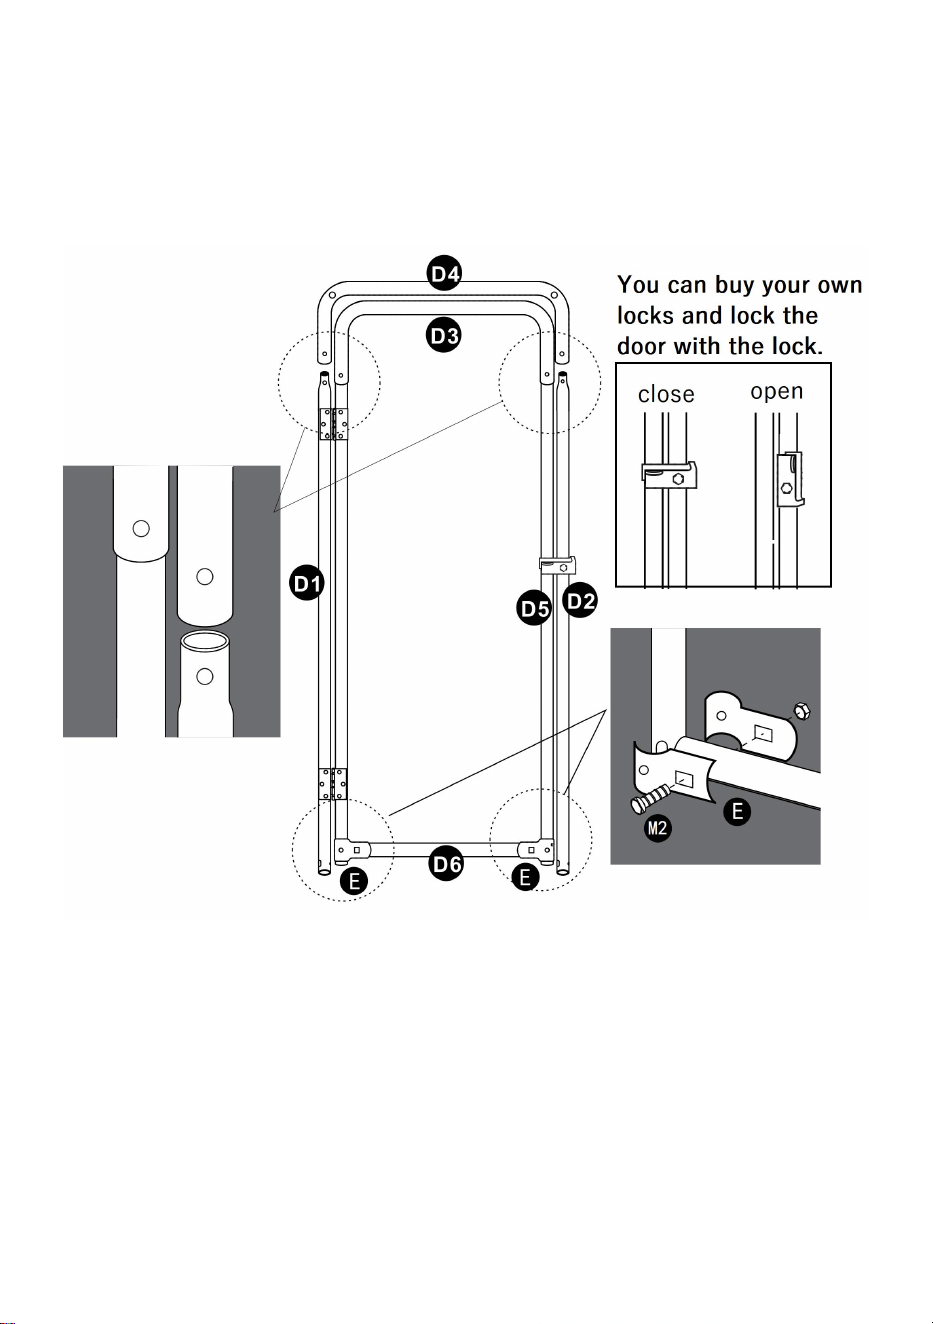
Step 5: Install the chicken coop door frame as shown.
9
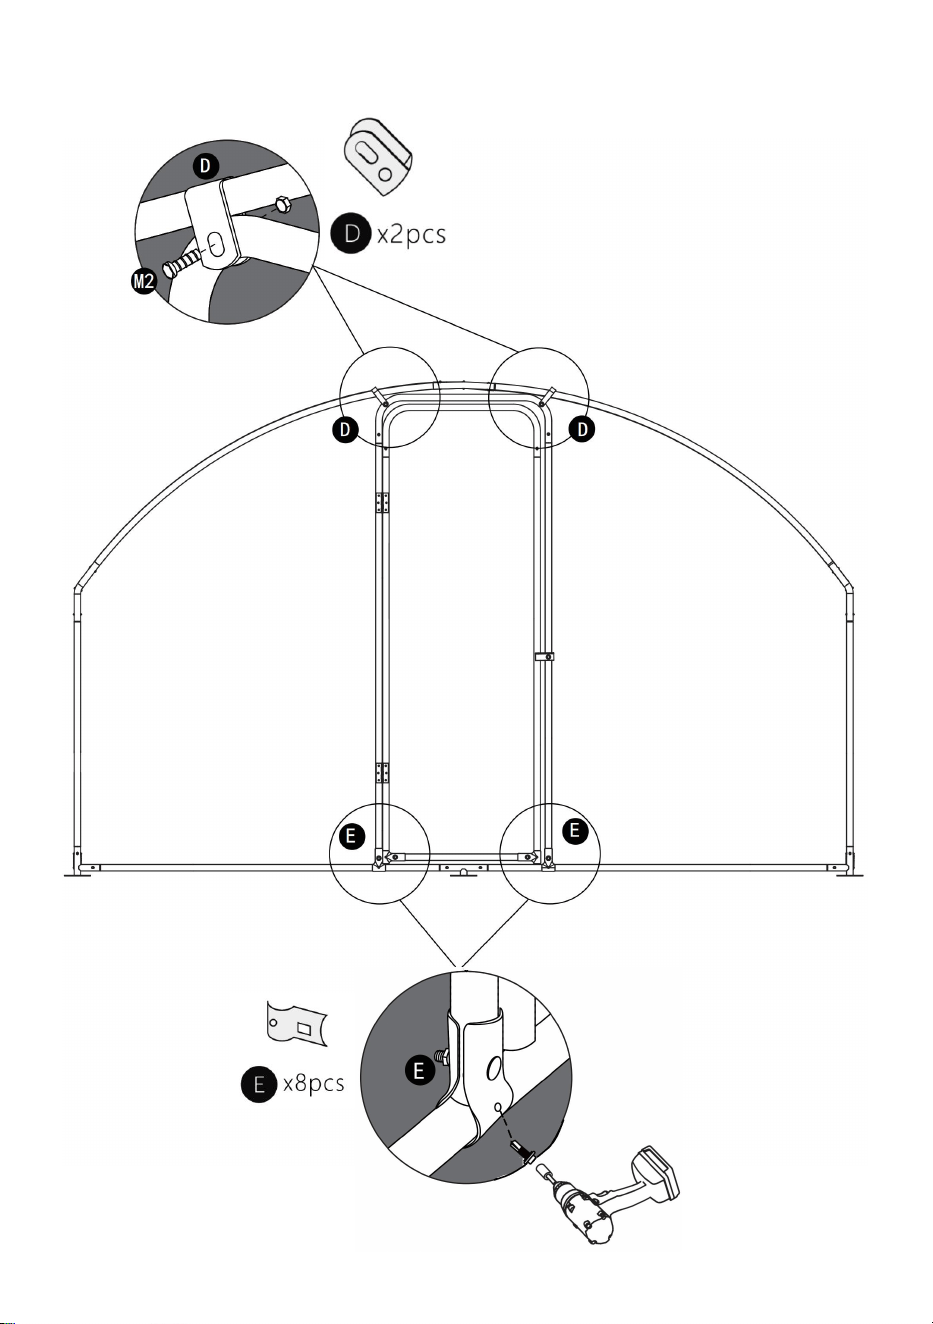
Step 6: Attach the door to the coop door frame.
10
Step 7: Install the chicken ladder to the frame.
2m/6.6ft
11
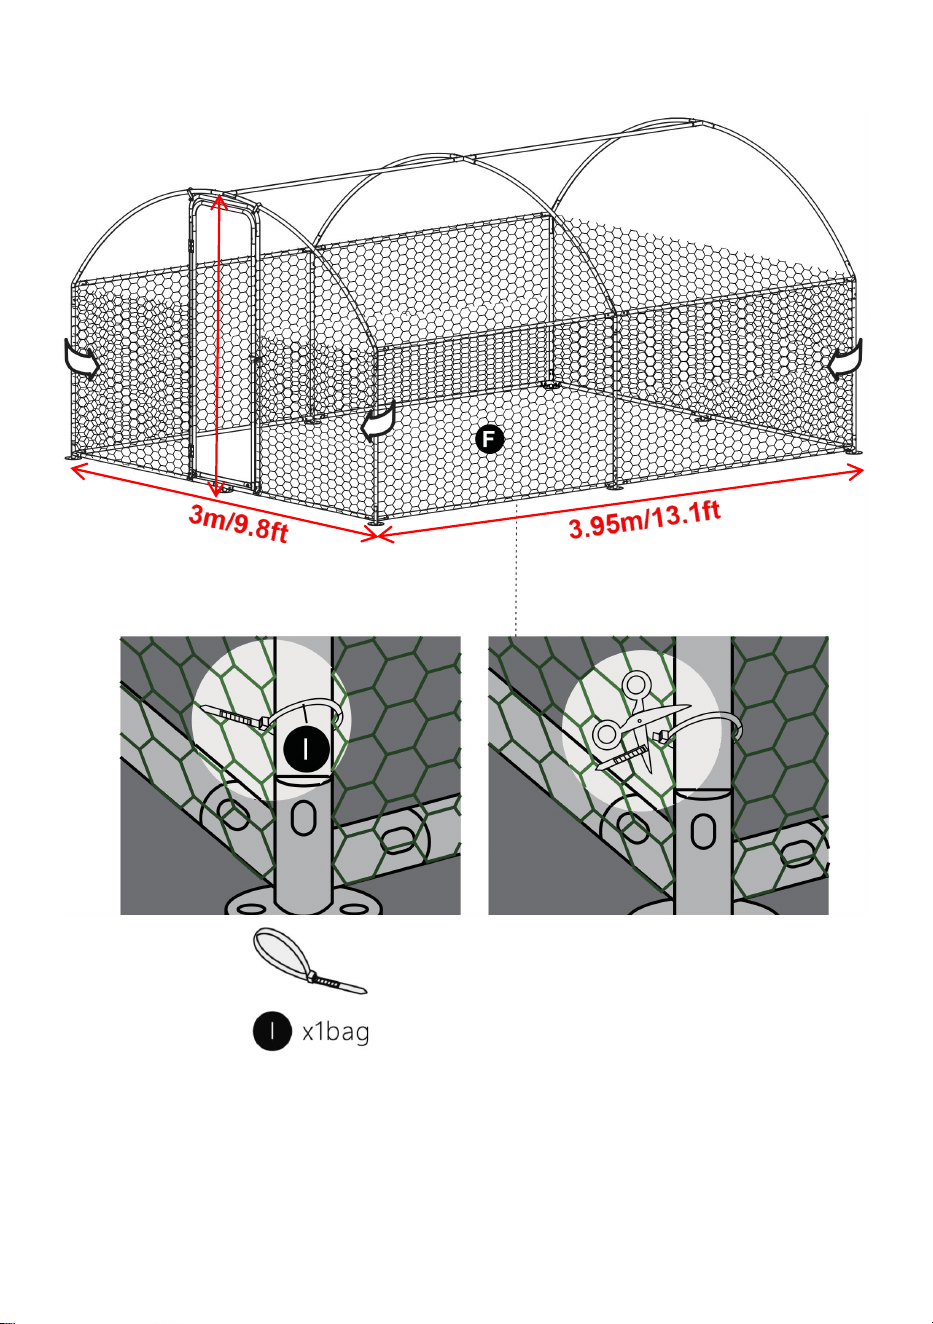
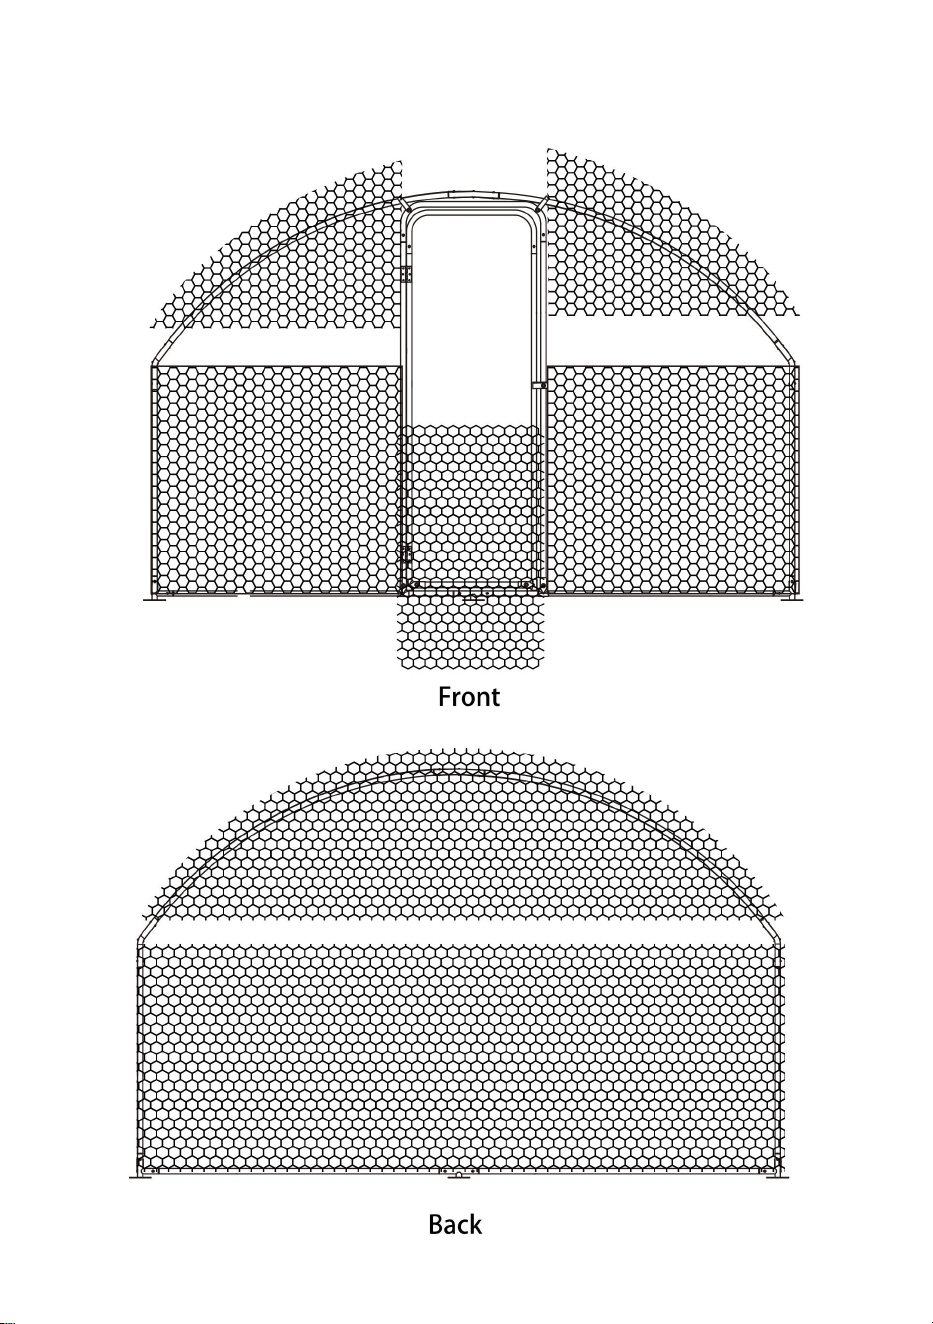
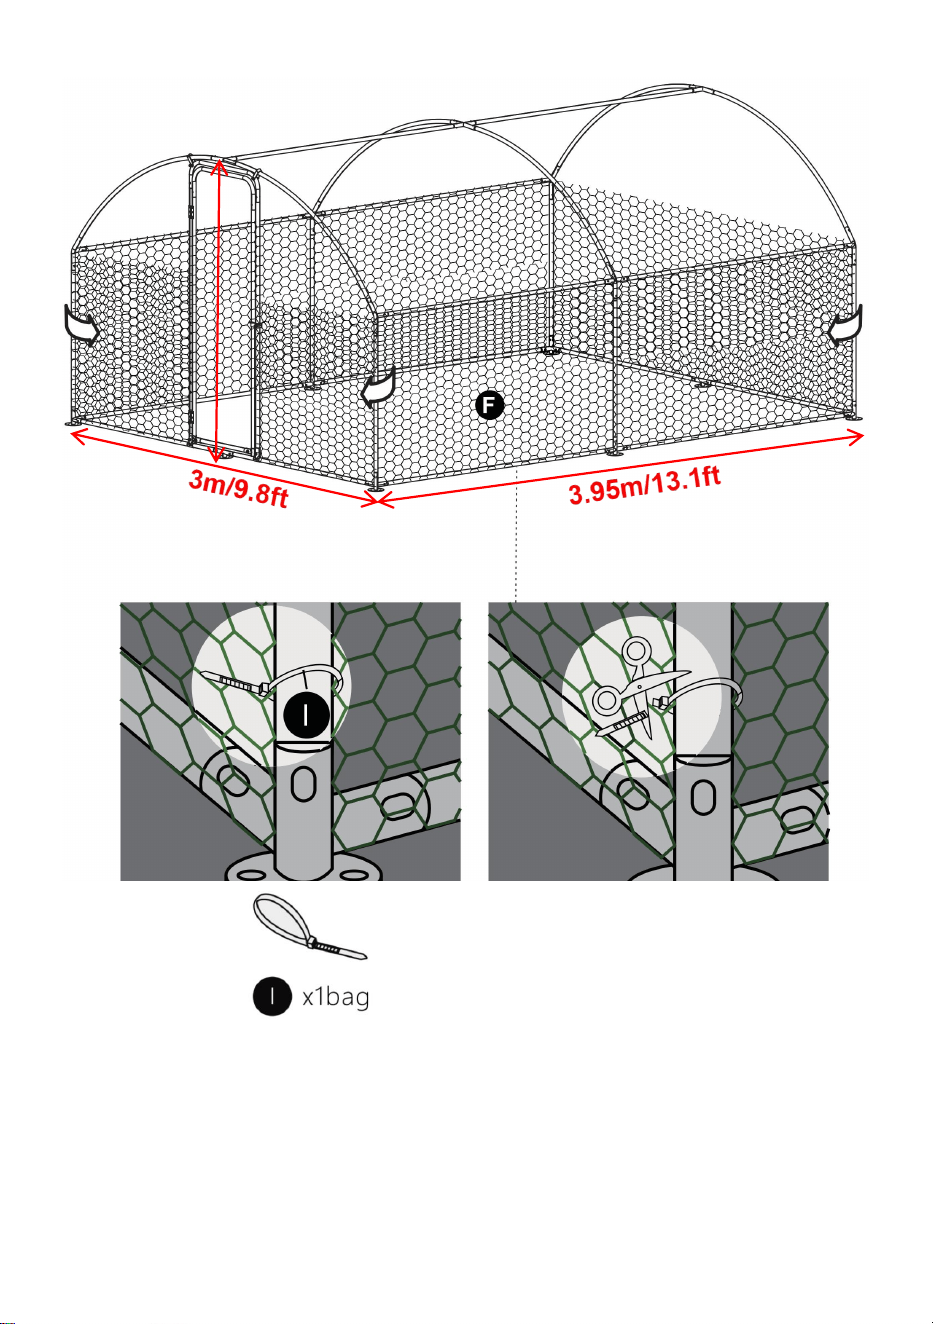
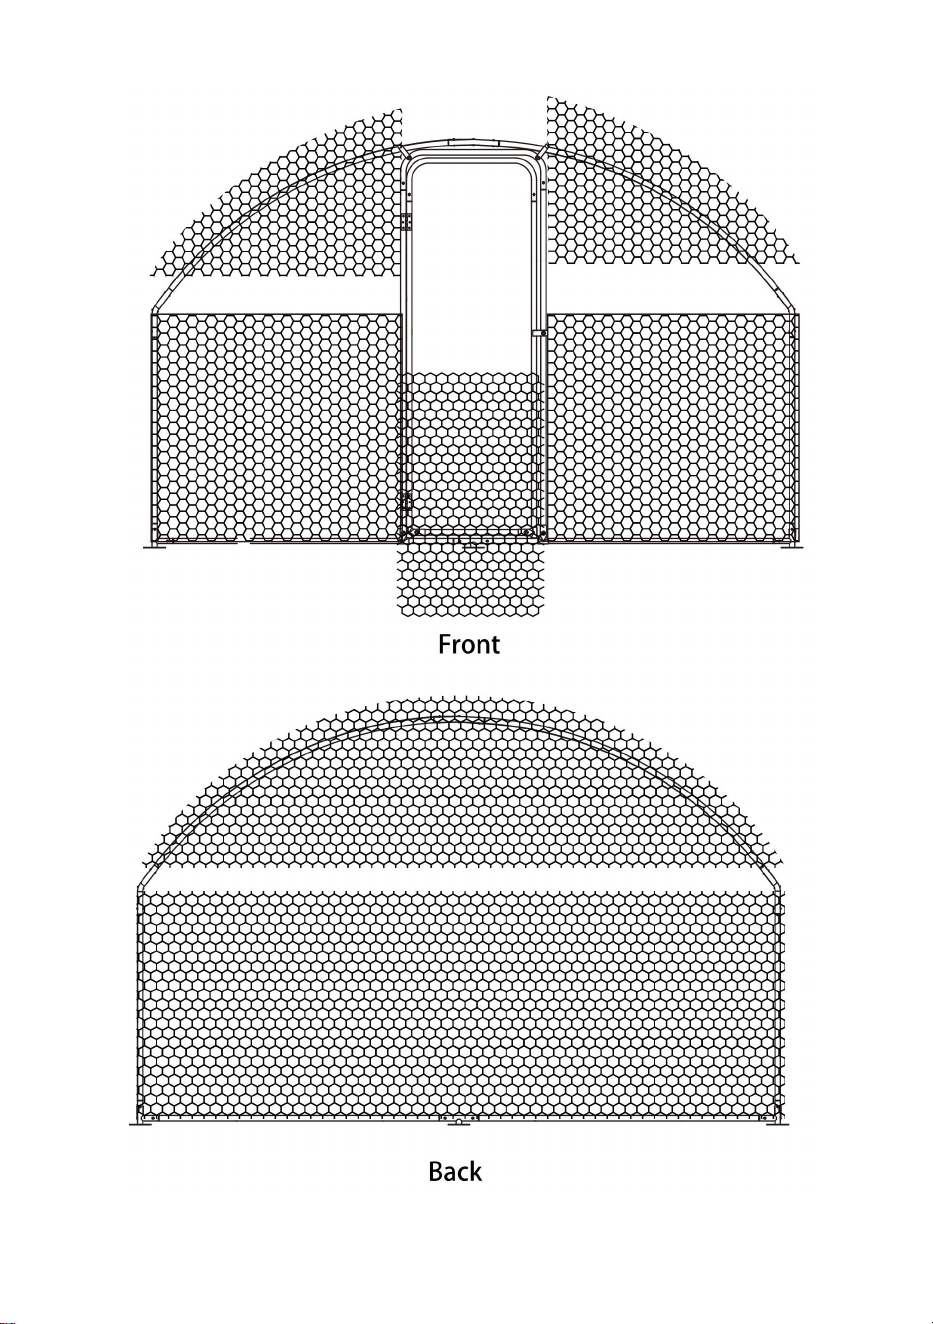
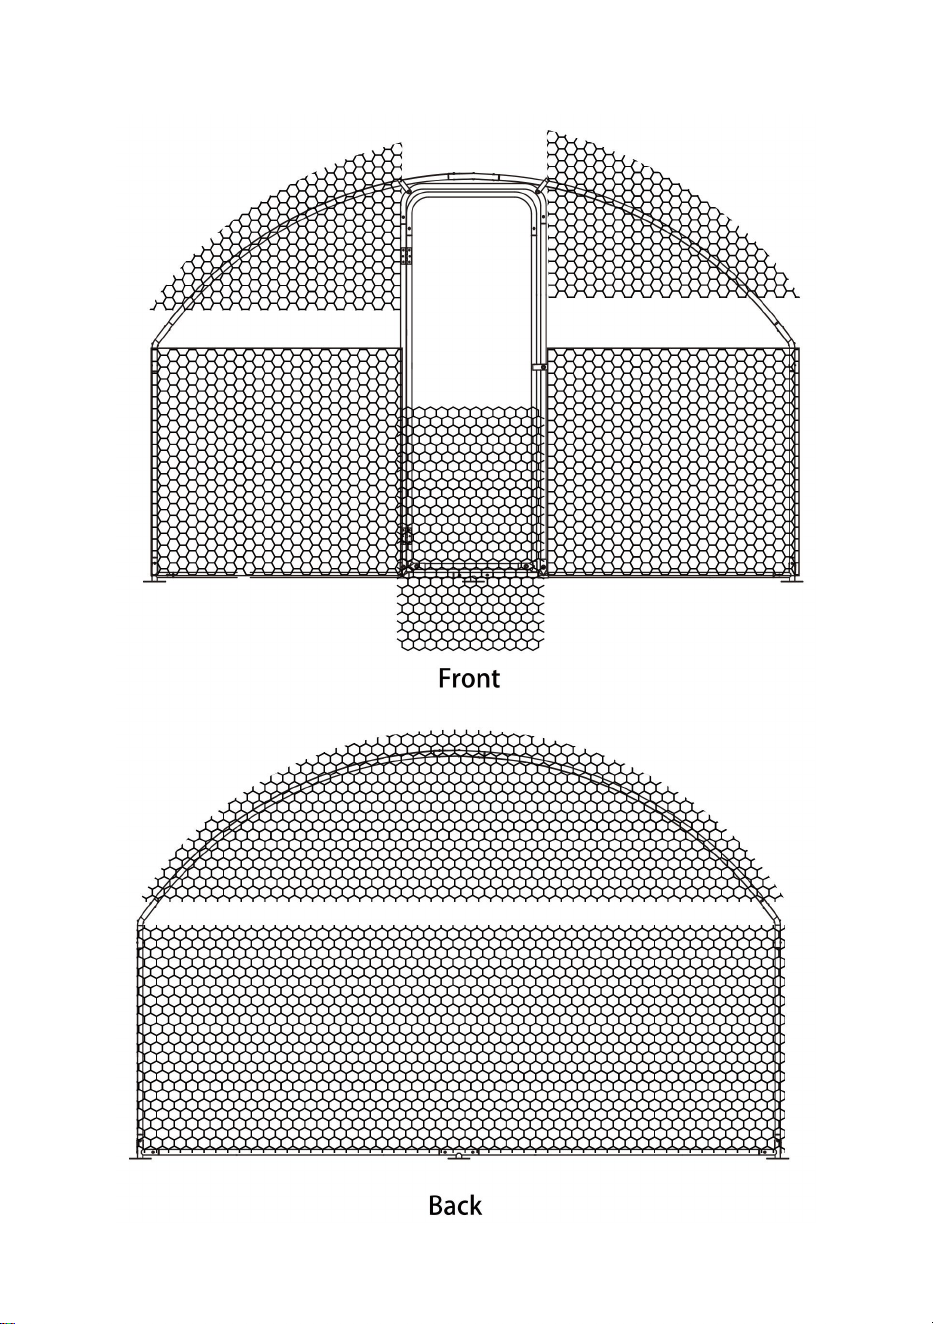
Step 8: For the front and back blanks,cut the wire mesh (F) to the right
shape and then fix it to the coop frame.

12
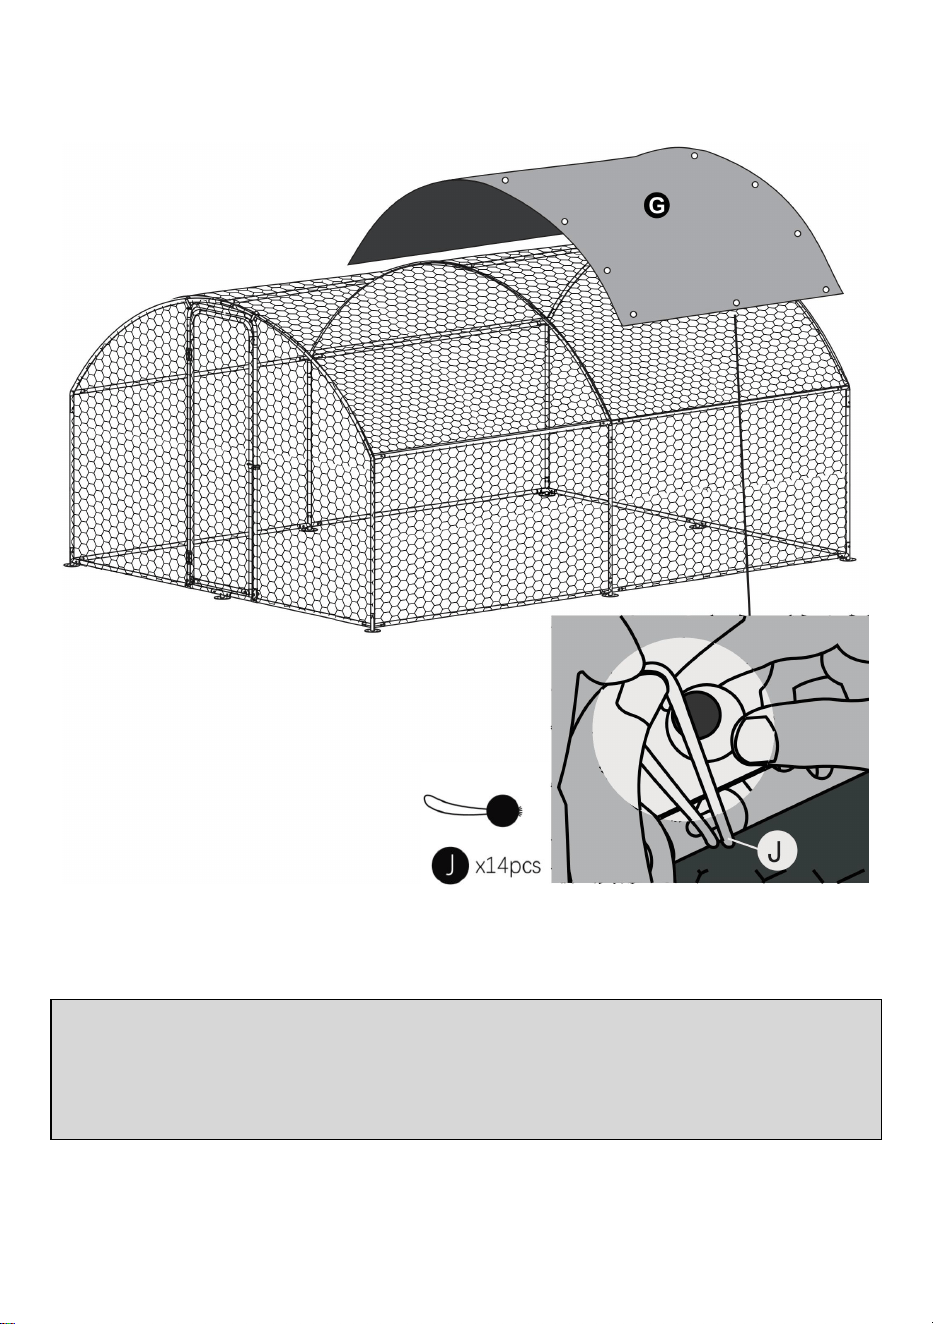
Step 9: Lay the tarpaulin (G) flat over the top of the coop and secure it with
e nae bungees (O) .
Use a bungee cord to pass through the hole in the rain proof
cloth to secure the rain proof cloth.

13
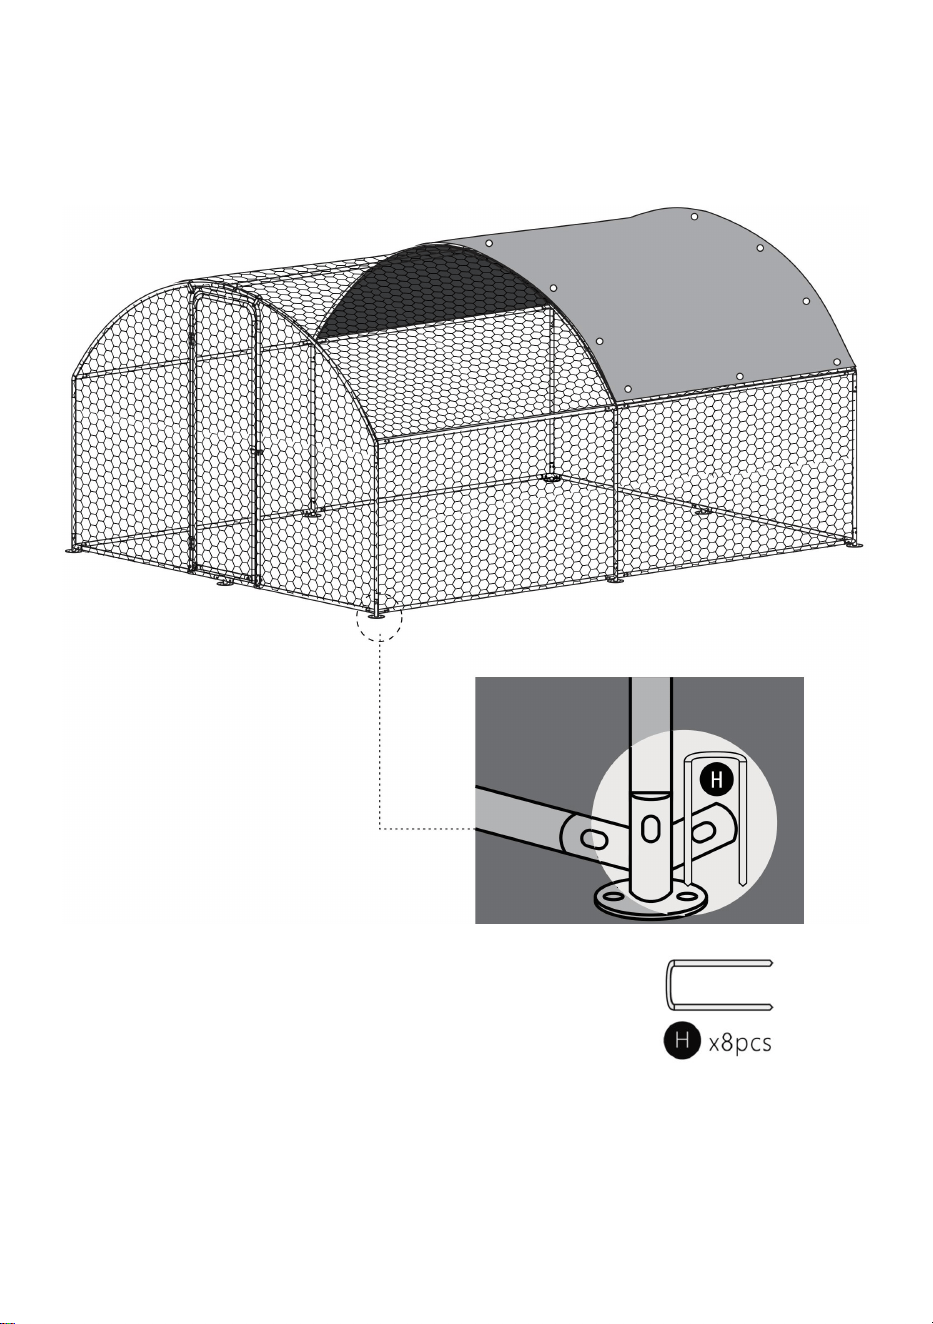
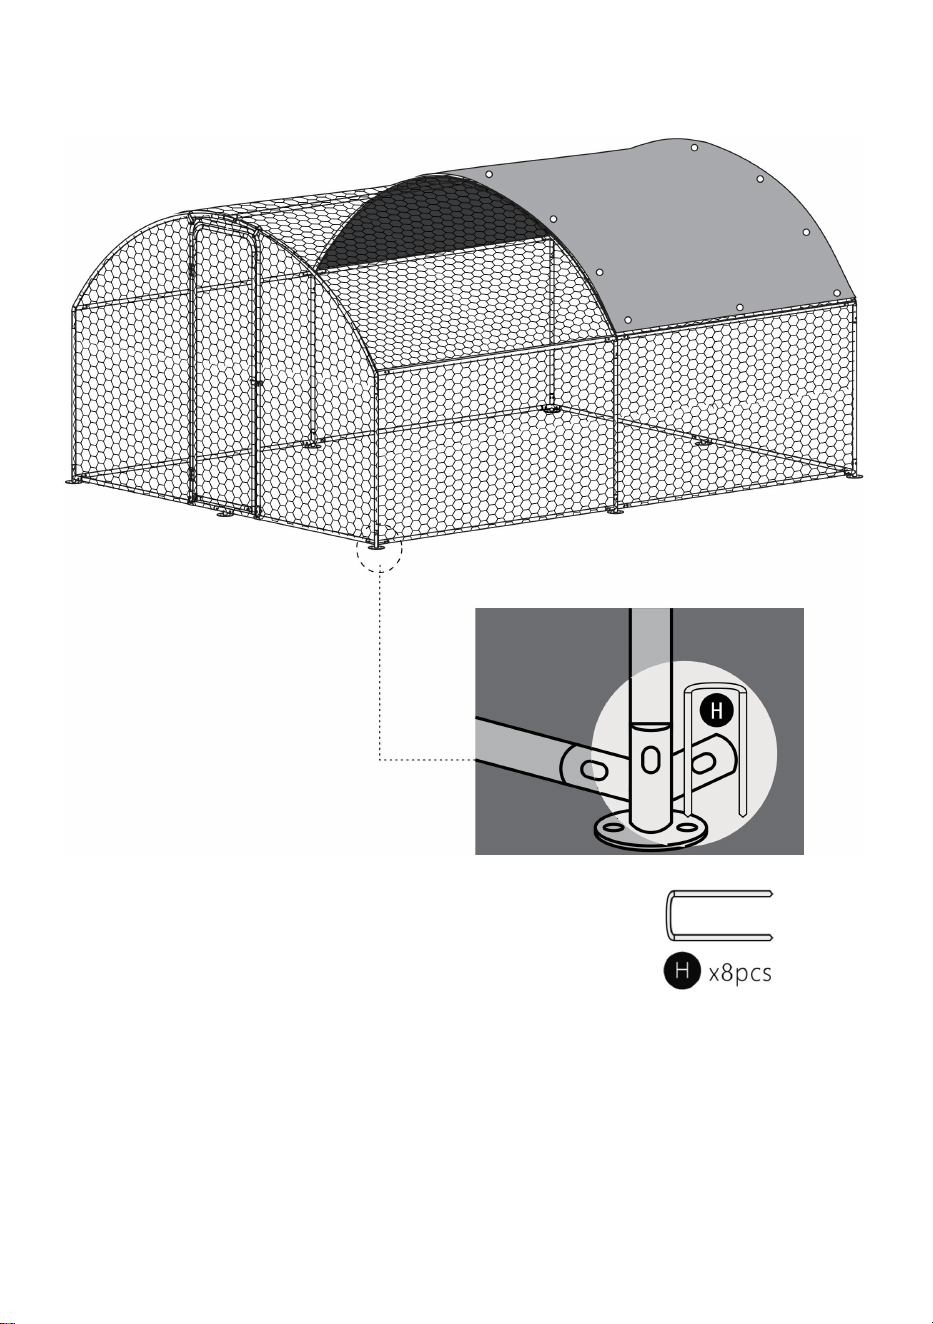
Step 10: Finally,use ground nails (M) to fix the installed chicken coop on
the ground to make it more firm.

14
Address: Baoshanqu Shuangchenglu 803long 11hao 1602A-1609shi Shanghai
Imported to AUS: SIHAO PTY LTD,1 ROKEVA STREETEASTWOOD NSW 2122
Australia
Imported to USA: Sanven Technology Ltd., Suite 250,9166 Anaheim
Place,Rancho Cucamonga,CA 91730
REP
UK
Pooledas Group Ltd
Unit 5 Albert Edward House, The Pavilions
Preston, United Kingdom
REP
EC
SHUNSHUN GmbH
Römeräcker 9 Z2021, 76351
Linkenheim-Hochstetten, Germany
Made in China


Tecnico Supporto e certificato di garanzia elettronica www.vevor.com/support
CAMMINARE NEL POLLAIO
MANUALE D'USO
We continue to be committed to provide you tools with competitive price.
"Save Half","Half Price" or any other similar expressions used by us only represents an
estimate of savings you might benefit from buying certain tools with us compared to the major
top brands and does not necessarily mean to cover all categories of tools offered by us. You
are kindly reminded to verify carefully when you are placing an order with us if you are
actually saving half in comparison with the top major brands.
1
ACR342
Have product questions? Need technical support? Please feel free to
contact us:
Technical Support and E-Warranty Certificate
www.vevor.com/support
NEED HELP? CONTACT US!
This is the original instruction,please read all manual instructions carefully
before operating. VEVOR reserves a clear interpretation of our user
manual. The appearance of the product shall be subject to the product
you received. Please forgive us that we won't inform you again if there
are any technology or software updates on our product.
WALK IN
CHICKEN COOP

2
Misure di sicurezza
AVVERTIMENTO:
Leggere queste istruzioni prima di utilizzare questo prodotto. In caso contrario si
potrebbero causare lesioni gravi. È necessario seguire sempre le precauzioni di
base , incluse le seguenti:
1. Il pollaio non può essere utilizzato o conservato in aree pericolose. Non è
consentito utilizzare l'apparecchio in luoghi pericolosi.
2. Il pollaio deve essere controllato per garantire che sia in condizioni di
funzionamento adeguate e funzioni in modo sicuro prima dell'uso. In caso
contrario l'apparecchio non deve essere utilizzato.
4. Si prega di pulire regolarmente il tetto dalla neve, poiché troppa neve farebbe
crollare il telone.
4. L'operatore deve utilizzare correttamente il pollaio. Deve considerare le
condizioni locali e prestare attenzione ai terzi, in particolare ai bambini, quando
lavora con il pollaio.
6. Questo pollaio da passeggio non è destinato all'uso da parte di persone
(compresi i bambini) con ridotte capacità fisiche, sensoriali o mentali o prive di
esperienza e/o conoscenza, a meno che non siano supervisionate da una persona
responsabile della loro sicurezza o siano istruite da questa persone sull'uso del
dispositivo. I bambini devono essere sorvegliati per assicurarsi che non giochino
con il pollaio.
CONSERVA QUESTE ISTRUZIONI

3
Elenco prodotti

4
Assemblaggio del prodotto
Passaggio 1: assemblare il telaio inferiore come nel disegno a soffietto .
Prima di montare il telaio , posizionare facilmente il connettore di plastica
"Q" x4 pezzi sul palo "2" come sotto (nota: solo per 4 pezzi di palo 2
nell'angolo servono questi connettori di plastica) , quindi inserire il
connettore "Q" x4 pz sul palo "1" come sotto.

5
Passo 2: Raccogli la pipa "3" x4 pezzi , inserire i tubi nei connettori. Prima
di ciò , inserire il connettore di plastica "G" x4 pezzi all'angolo del palo "3"
x4 pezzi come sotto (nota : solo per 4 pezzi Di palo 3 nell'angolo servono
questi connettori di plastica).

6
Passaggio 3: Raccogli il connettore "UN" x4 pezzi , "B" x4 pezzi e il tubo
"2" x6 pezzi , assemblare come nel disegno sottostante g.

7
Passaggio 4: raccogliere il connettore "Y" x2 pezzi , "X" x1pc e polo "2" x3
pezzi e palo "4" x8 pezzi assemblati come sotto.

8
Passaggio 5: installare il telaio della porta del pollaio come mostrato.

9
Passaggio 6: collegare la porta al telaio della porta del pollaio.

10
Passaggio 7: installare la scala per polli sul telaio.
11
Passo 8: Per i pezzi grezzi anteriori e posteriori, tagliare la rete metallica
2m/6.6ft

12
(F) nella forma giusta e poi fissarla al telaio del pollaio.
13
Passaggio 9: adagiare il telone (G) sopra la parte superiore del pollaio e
fissarlo con gli elastici (O).
Usa una corda elastica per passare attraverso il foro nel
panno antipioggia per fissarlo.

14
Passaggio 10: infine, utilizzare i chiodi a terra (M) per fissare il pollaio
installato al terreno per renderlo più solido.

15
Indirizzo: Baoshanqu Shuangchenglu 803long 11hao 1602A-1609shi Shanghai
Importato negli Stati Uniti: SIHAO PTY LTD , 1 ROKEVA STREETEASTWOOD
NSW 2122 Australia
Importato negli Stati Uniti: Sanven Technology Ltd. , Suite 250 , 9166
Anaheim Place , Rancho Cucamonga , CA 91730
REP
UK
Pooledas Group Ltd
Unit 5 Albert Edward House, The Pavilions
Preston, United Kingdom
REP
EC
SHUNSHUN GmbH
Römeräcker 9 Z2021, 76351
Linkenheim-Hochstetten, Germany
Made in China


Techniczny Certyfikat wsparcia i e-gwarancji www.vevor.com/support
CHODZIĆ PO KURNIKU
INSTRUKCJA OBSŁUGI
We continue to be committed to provide you tools with competitive price.
"Save Half","Half Price" or any other similar expressions used by us only represents an
estimate of savings you might benefit from buying certain tools with us compared to the major
top brands and does not necessarily mean to cover all categories of tools offered by us. You
are kindly reminded to verify carefully when you are placing an order with us if you are
actually saving half in comparison with the top major brands.

1
ACR342
Have product questions? Need technical support? Please feel free to
contact us:
Technical Support and E-Warranty Certificate
www.vevor.com/support
NEED HELP? CONTACT US!
This is the original instruction,please read all manual instructions carefully
before operating. VEVOR reserves a clear interpretation of our user
manual. The appearance of the product shall be subject to the product
you received. Please forgive us that we won't inform you again if there
are any technology or software updates on our product.
WALK IN
CHICKEN COOP

2
Środki ostrożności
OSTRZEŻENIE:
Przeczytaj tę instrukcję przed użyciem tego produktu. Niezastosowanie się do
tego może spowodować poważne obrażenia. należy zawsze przestrzegać
podstawowych środków ostrożności , w tym:
1. Kurnika nie można używać ani przechowywać w obszarach niebezpiecznych.
Nie wolno używać urządzenia w miejscach niebezpiecznych.
2. Przed użyciem kurnik należy sprawdzić, czy jest w dobrym stanie i czy działa
bezpiecznie. W przeciwnym razie nie wolno używać urządzenia.
5. Prosimy o regularne odśnieżanie dachu, gdyż jego nadmiar spowoduje
zapadnięcie się plandeki.
4. Operator musi prawidłowo korzystać z kurnika. Podczas pracy z kurnikiem musi
wziąć pod uwagę lokalne warunki i zwracać uwagę na osoby trzecie, w
szczególności na dzieci.
7. Spacer po kurniku nie jest przeznaczony do użytku przez osoby (w tym dzieci)
o ograniczonych zdolnościach fizycznych, sensorycznych lub umysłowych lub
nieposiadające doświadczenia i/lub wiedzy, chyba że znajdują się one pod
nadzorem osoby odpowiedzialnej za ich bezpieczeństwo lub zostały przez nią
poinstruowane. osób na temat korzystania z urządzenia. Dzieci należy
nadzorować, aby mieć pewność, że nie bawią się kurnikiem.
ZACHOWAJ TE INSTRUKCJE

3
Lista produktów

4
Montaż produktu
Krok 1: Zmontuj dolną ramę zgodnie z poniższym rysunkiem . Przed
montażem ramy proszę umieścić plastikowe łączniki „Q ” x 4szt na słupie
„2” jak poniżej (uwaga: tylko dla 4 szt . słupa 2 w rogu potrzebne są te
plastikowe złącza) , następnie włóż złącze „Q” x4 szt na słupie „1” jak
poniżej.

5
Krok 2: Zbierz rurę „3” x 4szt. , włóż rury do złączy. Wcześniej należy
założyć plastikowe złącze "G" x4szt na rogu słupa „3” x4szt jak poniżej
(uwaga : tylko dla 4 sztuk z Polak 3 w rogu potrzebne są te plastikowe
łączniki).

6
Krok 3: Zbierz złącze "A" x4szt , "B" x4szt i rurę „2”x6szt , zmontuj zgodnie
z poniższym rysunkiem .

7
Krok 4: Zbierz złącze „T” x2 szt. , „X” x1 szt. i słupek „2” x3szt i słupek „4”
x8 sztuk montuje się jak poniżej.

8
Krok 5: Zamontuj ościeżnicę drzwi kurnika, jak pokazano.

9
Krok 6: Przymocuj drzwi do ościeżnicy kurnika.

10
Krok 7: Zamontuj drabinkę dla kurczaka na ramie.

11
Krok 8: W przypadku półfabrykatów z przodu i z tyłu przytnij siatkę
2m/6.6ft
12
drucianą (F) do odpowiedniego kształtu, a następnie przymocuj ją do ramy
kurnika.

13
Krok 9: Połóż plandekę (G) płasko na wierzchu kurnika i zabezpiecz ją za
pomocą gumek (O).
Aby przejść, użyj linki bungee przez otwór w tkaninie
przeciwdeszczowej, aby zabezpieczyć tkaninę
przeciwdeszczową.

14
Krok 10: Na koniec użyj szlifowanych gwoździ (M), aby przymocować
zainstalowany kurnik do podłoża, aby był twardszy.

15
Adres: Baoshanqu Shuangchenglu 803long 11hao 1602A-1609shi Szanghaj
Import do AUS: SIHAO PTY LTD , 1 ROKEVA STREETEASTWOOD NSW 2122
Australia
Import do USA: Sanven Technology Ltd. , Suite 250 , 9166 Anaheim
Place , Rancho Cucamonga , CA 91730
REP
UK
Pooledas Group Ltd
Unit 5 Albert Edward House, The Pavilions
Preston, United Kingdom
REP
EC
SHUNSHUN GmbH
Römeräcker 9 Z2021, 76351
Linkenheim-Hochstetten, Germany
Wyprodukowano w Chinach


Technisch Support- und E-Garantie-Zertifikat www.vevor.com/support
SPAZIERGANG IM HÜHNERSTALL
BENUTZERHANDBUCH
We continue to be committed to provide you tools with competitive price.
"Save Half","Half Price" or any other similar expressions used by us only represents an
estimate of savings you might benefit from buying certain tools with us compared to the major
top brands and does not necessarily mean to cover all categories of tools offered by us. You
are kindly reminded to verify carefully when you are placing an order with us if you are
actually saving half in comparison with the top major brands.

1
ACR342
Have product questions? Need technical support? Please feel free to
contact us:
Technical Support and E-Warranty Certificate
www.vevor.com/support
NEED HELP? CONTACT US!
This is the original instruction,please read all manual instructions carefully
before operating. VEVOR reserves a clear interpretation of our user
manual. The appearance of the product shall be subject to the product
you received. Please forgive us that we won't inform you again if there
are any technology or software updates on our product.
WALK IN
CHICKEN COOP

2
Sicherheitsvorkehrungen
WARNUNG:
Lesen Sie diese Anweisungen, bevor Sie dieses Produkt verwenden.
Andernfalls kann es zu schweren Verletzungen kommen. Die grundlegenden
Vorsichtsmaßnahmen sollten immer befolgt werden , einschließlich der folgenden:
1. Der begehbare Hühnerstall darf nicht in explosionsgefährdeten Bereichen
verwendet oder gelagert werden. Es ist nicht gestattet, das Gerät in
explosionsgefährdeten Bereichen zu verwenden.
2. Der begehbare Hühnerstall muss vor der Verwendung überprüft werden, um
sicherzustellen, dass er ordnungsgemäß funktioniert und sicher funktioniert.
Andernfalls darf das Gerät nicht verwendet werden.
6. Bitte räumen Sie das Dach regelmäßig vom Schnee, da zu viel Schnee die
Plane zum Einsturz bringt.
4. Der Betreiber muss den begehbaren Hühnerstall ordnungsgemäß nutzen. Bei
der Arbeit mit dem begehbaren Hühnerstall muss er die örtlichen Gegebenheiten
berücksichtigen und auf Dritte, insbesondere Kinder, Rücksicht nehmen.
8. Dieser begehbare Hühnerstall ist nicht für die Nutzung durch Personen
(einschließlich Kinder) mit eingeschränkten körperlichen, sensorischen oder
geistigen Fähigkeiten oder mangels Erfahrung und/oder Wissen bestimmt, es sei
denn, sie werden durch eine für ihre Sicherheit zuständige Person beaufsichtigt
oder erhalten von dieser Anweisungen Personen im Umgang mit dem Gerät.
Kinder sollten beaufsichtigt werden, um sicherzustellen, dass sie nicht mit dem
begehbaren Hühnerstall spielen.
ANLEITUNG AUFBEWAHREN
3
Produktliste _

4
Produktmontage _
Schritt 1: Montieren Sie den unteren Rahmen gemäß der folgenden
Zeichnung . Bevor Sie den Rahmen zusammenbauen , stecken Sie bitte
den 4-teiligen Kunststoffverbinder „Q“ auf die Stange „2“. wie unten
( Hinweis: Nur für 4 Stangen 2 In der Ecke benötigen Sie diese
Kunststoffverbinder) , dann stecken Sie den Verbinder „Q“ x4 Stck am Pol
„1“ wie unten.
5
Schritt 2: Rohr sammeln "3" x4 Stück , stecken Sie die Rohre in die
Anschlüsse. Setzen Sie vorher bitte den Kunststoffstecker ein "G" x4Stk an
der Ecke der Stange "3" x4 Stück wie unten (Hinweis : nur für 4 Stück von
Pole 3 in der Ecke brauchen diese Kunststoffverbinder).
6
Schritt 3: Stecker sammeln "A" x4 Stück , „B“ x4 Stück und Rohr „2“ x6
Stück , wie in der folgenden Zeichnung dargestellt zusammenbauen .

7
Schritt 4: Stecker zusammenbauen „Y“ x2 Stück , „X“ x1pc und Pol
„2“ x3pcs und Stange „4“ x8 Stück wie unten zusammenbauen.

8
Schritt 5: Installieren Sie den Türrahmen des Hühnerstalls wie abgebildet.
9
Schritt 6: Befestigen Sie die Tür am Türrahmen des Stalls.

10
Schritt 7: Befestigen Sie die Hühnerleiter am Rahmen.

11
Schritt 8: Schneiden Sie für die vorderen und hinteren Zuschnitte das
2m/6.6ft

12
Drahtgeflecht (F) in die richtige Form und befestigen Sie es dann am
Rahmen des Stalls.

13
Schritt 9: Legen Sie die Plane (G) flach über den Stall und sichern Sie sie
mit elastischen Spanngurten (O).
Benutzen Sie zum Passieren ein Bungee-Seil durch das Loch
im Regenschutztuch, um das Regenschutztuch zu
befestigen.
14
Schritt 10: Abschließend fixieren Sie den aufgestellten Hühnerstall mit
Erdnägeln (M) am Boden, um ihn stabiler zu machen.

15
Adresse: Baoshanqu Shuangchenglu 803long 11hao 1602A-1609shi Shanghai
Importiert nach AUS: SIHAO PTY LTD , 1 ROKEVA STREETEASTWOOD NSW
2122 Australien
Importiert nach USA: Sanven Technology Ltd. , Suite 250 , 9166 Anaheim
Place , Rancho Cucamonga , CA 91730
REP
UK
Pooledas Group Ltd
Unit 5 Albert Edward House, The Pavilions
Preston, United Kingdom
REP
EC
SHUNSHUN GmbH
Römeräcker 9 Z2021, 76351
Linkenheim-Hochstetten, Germany
In China hergestellt


Technique Assistance et certificat de garantie électronique
www.vevor.com/support
MARCHER DANS UN POULAILLER
MANUEL DE L'UTILISATEUR
We continue to be committed to provide you tools with competitive price.
"Save Half","Half Price" or any other similar expressions used by us only represents an
estimate of savings you might benefit from buying certain tools with us compared to the major
top brands and does not necessarily mean to cover all categories of tools offered by us. You
are kindly reminded to verify carefully when you are placing an order with us if you are
actually saving half in comparison with the top major brands.

1
ACR342
Have product questions? Need technical support? Please feel free to
contact us:
Technical Support and E-Warranty Certificate
www.vevor.com/support
NEED HELP? CONTACT US!
This is the original instruction,please read all manual instructions carefully
before operating. VEVOR reserves a clear interpretation of our user
manual. The appearance of the product shall be subject to the product
you received. Please forgive us that we won't inform you again if there
are any technology or software updates on our product.
WALK IN
CHICKEN COOP

2
Précautions de sécurité
AVERTISSEMENT:
Lisez ces instructions avant d'utiliser ce produit. Ne pas le faire peut entraîner
des blessures graves. les précautions de base doivent toujours être suivies ,
notamment les suivantes :
1. Le poulailler ne doit pas être utilisé ou stocké dans des zones dangereuses. Il
est interdit d'utiliser l'appareil dans des endroits dangereux.
2. Le poulailler de plain-pied doit être vérifié pour s'assurer qu'il est en bon état de
fonctionnement et qu'il fonctionne en toute sécurité avant utilisation. Sinon,
l'appareil ne doit pas être utilisé.
7. Veuillez déneiger régulièrement le toit, car trop de neige entraînerait
l'effondrement de la bâche.
4. L'opérateur doit utiliser le poulailler de façon appropriée. Il doit tenir compte des
conditions locales et faire attention aux tiers, en particulier aux enfants, lorsqu'il
travaille avec le poulailler ambulant.
9. Ce poulailler promenade n'est pas destiné à être utilisé par des personnes (y
compris des enfants) ayant des capacités physiques, sensorielles ou mentales
réduites ou manquant d'expérience et/ou de connaissances, à moins qu'elles ne
soient supervisées par une personne responsable de leur sécurité ou instruites
par celles-ci. personnes sur l'utilisation de l'appareil. Les enfants doivent être
surveillés pour s'assurer qu'ils ne jouent pas avec le poulailler.
CONSERVEZ CES INSTRUCTIONS
3
Liste de produits
4
Assemblage du produit
Étape 1 : Assemblez le cadre inférieur comme indiqué sur le dessin ci-
dessous . Avant d'assembler le cadre , veuillez mettre facilement le
connecteur en plastique "Q" x4pcs sur le poteau "2" comme ci-dessous
(remarque : uniquement pour 4 pièces de poteau 2 dans le coin il faut ces
connecteurs en plastique) , puis mettre le connecteur "Q" x4 pièces sur le
pôle "1" comme ci-dessous.

5
Étape 2: Rassembler le tuyau "3" x4pcs , insérez les tuyaux dans les
connecteurs. Avant cela , veuillez mettre le connecteur en plastique "G" x4
pièces au coin du poteau "3" x4pcs comme ci-dessous (remarque :
uniquement pour 4 pièces de pôle 3 dans le coin besoin de ces
connecteurs en plastique) .

6
Étape 3: Rassembler le connecteur "UN" x4 pièces , "B" x4pcs et le tuyau
"2" x6pcs , assembler comme le dessin ci-dessous g.

7
Étape 4 : Rassemblez le connecteur "Y" x2 pièces , "X" x1pc et pôle "2"
x3pcs et poteau "4" x8pcs assembler comme ci-dessous.
8
Étape 5 : Installez le cadre de la porte du poulailler comme indiqué.

9
Étape 6 : Fixez la porte au cadre de la porte du poulailler.

10
Étape 7 : Installez l'échelle à poulets sur le cadre.

11
Étape 8 : Pour les flans avant et arrière, coupez le treillis métallique (F) à
2m/6.6ft

12
la bonne forme, puis fixez-le au cadre du poulailler.

13
Étape 9 : Posez la bâche (G) à plat sur le dessus du poulailler et fixez-la
avec des élastiques (O) .
Utilisez un élastique pour passer à travers le trou du tissu
imperméable pour fixer le tissu imperméable.

14
Étape 10 : Enfin, utilisez des clous de sol (M) pour fixer le poulailler installé
au sol afin de le rendre plus ferme.

15
Adresse : Baoshanqu Shuangchenglu 803long 11hao 1602A-1609shi Shanghai
Importé en Australie : SIHAO PTY LTD , 1 ROKEVA STREETESTWOOD NSW
2122 Australie
Importé aux États-Unis : Sanven Technology Ltd. , Suite 250 , 9166
Anaheim Place , Rancho Cucamonga , CA 91730
REP
UK
Pooledas Group Ltd
Unit 5 Albert Edward House, The Pavilions
Preston, United Kingdom
REP
EC
SHUNSHUN GmbH
Römeräcker 9 Z2021, 76351
Linkenheim-Hochstetten, Germany
Fabriqué en Chine


Technisch Ondersteuning en e-garantiecertificaat www.vevor.com/support
LOOP IN KIPPENHOK
HANDLEIDING
We continue to be committed to provide you tools with competitive price.
"Save Half","Half Price" or any other similar expressions used by us only represents an
estimate of savings you might benefit from buying certain tools with us compared to the major
top brands and does not necessarily mean to cover all categories of tools offered by us. You
are kindly reminded to verify carefully when you are placing an order with us if you are
actually saving half in comparison with the top major brands.

1
ACR342
Have product questions? Need technical support? Please feel free to
contact us:
Technical Support and E-Warranty Certificate
www.vevor.com/support
NEED HELP? CONTACT US!
This is the original instruction,please read all manual instructions carefully
before operating. VEVOR reserves a clear interpretation of our user
manual. The appearance of the product shall be subject to the product
you received. Please forgive us that we won't inform you again if there
are any technology or software updates on our product.
WALK IN
CHICKEN COOP

2
Veiligheidsmaatregelen
WAARSCHUWING:
Lees deze instructies voordat u dit product gebruikt. Als u dit niet doet, kan dit
leiden tot ernstig letsel. de basisvoorzorgsmaatregelen moeten altijd worden
gevolgd , waaronder de volgende:
1. Het inloopkippenhok mag niet worden gebruikt of opgeslagen in
explosiegevaarlijke ruimtes. Het is niet toegestaan het apparaat op gevaarlijke
locaties te gebruiken.
2. Het inloopkippenhok moet vóór gebruik worden gecontroleerd om er zeker van
te zijn dat het in goede staat verkeert en veilig functioneert. Anders mag het
apparaat niet worden gebruikt.
8. Maak het dak regelmatig sneeuwvrij, bij teveel sneeuw kan het zeildoek
inzakken.
4. De exploitant moet het inloopkippenhok op de juiste manier gebruiken. Hij moet
rekening houden met de plaatselijke omstandigheden en aandacht besteden aan
derden, vooral kinderen, wanneer hij met het inloopkippenhok werkt.
10. Dit inloopkippenhok is niet bedoeld voor gebruik door personen (inclusief
kinderen) met verminderde lichamelijke, zintuiglijke of geestelijke vermogens of
gebrek aan ervaring en/of kennis, tenzij zij onder toezicht staan van een persoon
die verantwoordelijk is voor hun veiligheid of door deze personen zijn geïnstrueerd.
personen over het gebruik van het apparaat. Kinderen moeten onder toezicht
staan, om ervoor te zorgen dat ze niet met het inloopkippenhok spelen.
BEWAAR DEZE INSTRUCTIES
3
Product lijst
4
Productmontage _
Stap 1: Monteer het onderframe volgens onderstaande tekening . Voordat
u het frame monteert , plaatst u de plastic connector "Q" x 4 stuks op de
paal "2" zoals hieronder (Opmerking: alleen voor 4 stuks paal 2 in de hoek
heb je deze plastic connectoren nodig) en plaats dan connector "Q" x4
stuks op de paal "1" zoals hieronder.

5
Stap 2: Verzamel pijp "3" x4 stuks , steek de buizen in de connectoren.
Plaats daarvoor de plastic connector "G" x4 stuks op de hoek van de paal
"3" x4 stuks zoals hieronder (Opmerking : alleen voor 4 stuks van pool 3 in
de hoek hebben deze plastic connectoren nodig).
6
Stap 3: Verzamel connector "A" x4 stuks , "B" x4 stuks , en pijp "2" x6
stuks , monteer zoals onderstaande tekening g.
7
Stap 4: Verzamel de connector "J" x2 stuks , "X" x1pc , en paal "2" x3pcs ,
en paal "4" x8pcs monteren als hieronder.
8
Stap 5: Installeer het deurkozijn van het kippenhok zoals afgebeeld.

9
Stap 6: Bevestig de deur aan het kozijn van de kippenhokdeur.

10
Stap 7: Installeer de kippenladder aan het frame.

11
Stap 8: Voor de voor- en achterpanelen knipt u het draadgaas (F) in de
2m/6.6ft

12
juiste vorm en bevestigt u het vervolgens aan het kippenhokframe.

13
Stap 9: Leg het zeildoek (G) plat over de bovenkant van het kippenhok en
zet het vast met elastieken (O).
Gebruik een bungeekoord om te passeren door het gat in de
regenbestendige doek om de regenbestendige doek vast te
zetten.

14
Stap 10: Gebruik ten slotte grondspijkers (M) om het geïnstalleerde
kippenhok op de grond te bevestigen, zodat het steviger wordt.

15
Adres: Baoshanqu Shuangchenglu 803long 11hao 1602A-1609shi Shanghai
Geïmporteerd naar AUS: SIHAO PTY LTD , 1 ROKEVA STREETEASTWOOD
NSW 2122 Australië
Geïmporteerd naar de VS: Sanven Technology Ltd. , Suite 250 , 9166
Anaheim Place , Rancho Cucamonga , CA 91730
REP
UK
Pooledas Group Ltd
Unit 5 Albert Edward House, The Pavilions
Preston, United Kingdom
REP
EC
SHUNSHUN GmbH
Römeräcker 9 Z2021, 76351
Linkenheim-Hochstetten, Germany
Gemaakt in China


Teknisk Support och e-garanticertifikat www.vevor.com/support
GÅ I HÖNSHUSET
ANVÄNDARMANUAL
We continue to be committed to provide you tools with competitive price.
"Save Half","Half Price" or any other similar expressions used by us only represents an
estimate of savings you might benefit from buying certain tools with us compared to the major
top brands and does not necessarily mean to cover all categories of tools offered by us. You
are kindly reminded to verify carefully when you are placing an order with us if you are
actually saving half in comparison with the top major brands.
1
ACR342
Have product questions? Need technical support? Please feel free to
contact us:
Technical Support and E-Warranty Certificate
www.vevor.com/support
NEED HELP? CONTACT US!
This is the original instruction,please read all manual instructions carefully
before operating. VEVOR reserves a clear interpretation of our user
manual. The appearance of the product shall be subject to the product
you received. Please forgive us that we won't inform you again if there
are any technology or software updates on our product.
WALK IN
CHICKEN COOP

2
Säkerhetsåtgärder
VARNING:
Läs dessa instruktioner innan du använder denna produkt. Underlåtenhet att
göra det kan resultera i allvarliga skador. de grundläggande
försiktighetsåtgärderna bör alltid följas, inklusive följande:
1. Walk in hönshuset får inte användas eller förvaras i riskområden. Det är inte
tillåtet att använda apparaten på farliga platser.
2. Gången i hönsgården måste kontrolleras för att säkerställa att den är i korrekt
fungerande skick och fungerar säkert före användning. I annat fall får apparaten
inte användas.
9. Rensa taket från snön regelbundet, eftersom för mycket snö kommer att
kollapsa presenningen.
4. Operatören måste använda walk in hönshuset på rätt sätt. Han måste överväga
de lokala förhållandena och måste vara uppmärksam på tredje part, särskilt barn,
när han arbetar med promenaden i hönshuset.
11. Denna promenad i hönsgården är inte avsedd att användas av personer
(inklusive barn) med nedsatt fysisk, sensorisk eller mental förmåga eller som
saknar erfarenhet och/eller kunskap, såvida de inte övervakas av en person som
ansvarar för deras säkerhet eller instrueras av dessa personer om användningen
av enheten. Barn bör övervakas för att säkerställa att de inte leker med
promenaden i hönshuset.
SPARA DESSA INSTRUKTIONER
3
Produktlista _
4
Produktmontering _
Steg 1: Montera den nedre ramen som bälgritningen . Innan du sätter ihop
ramen , sätt gärna plastkontakten "Q" x4st på stolpen "2" som nedan ( obs:
endast för 4 st stolpe 2 i hörnet behöver dessa plastkontakter) , sätt sedan
kontakten "Q" x4 st på stolpen "1" som nedan.
5
Steg 2: Samla ihop röret "3" x4st , sätt in rören i anslutningarna. Sätt i
plastkontakten innan detta "G" x4st i hörnet av stolpen "3" x4st som nedan
(obs : endast för 4 st av Pol 3 i hörnet behöver dessa plastkontakter).
6
Steg 3: Samla kontakten "A" x4st , "B" x4st , och rör "2"x6st , montera
enligt nedanstående ritning .
7
Steg 4: Samla ihop kontakten "Y" x2st , "X" x1st och pol "2" x3st , och
stolpe "4" x8st monteras som nedan.
8
Steg 5: Installera hönshusets dörrkarm enligt bilden.
9
Steg 6: Fäst dörren på dörrkarmen.

10
Steg 7: Installera kycklingstegen på ramen.
2m/6.6ft

11
Steg 8: För de främre och bakre ämnena, klipp av trådnätet (F) till rätt form
och fixera det sedan på koppens ram.
12

13
Steg 9: Lägg presenningen (G) platt över toppen av coop och fäst den
med en bungees (O) .
Använd en bungee-snöre för att passera genom hålet i den
regnsäkra duken för att säkra den regnsäkra duken.

14
Steg 10: Använd slutligen slipade spikar (M) för att fixera det installerade
hönshuset på marken för att göra det mer fast.

15
Shuangchenglu
803long 11hao 1602A-1609shi Shanghai
Importerad till AUS: SIHAO PTY LTD
,
1 ROKEVA STREETEASTWOOD NSW
2122 Australien
Importerad till USA : Sanven Technology Ltd.
REP
UK
Pooledas Group Ltd
Unit 5 Albert Edward House, The Pavilions
Preston, United Kingdom
REP
EC
SHUNSHUN GmbH
Römeräcker 9 Z2021, 76351
Linkenheim-Hochstetten, Germany
Tillverkad i Kina


Técnico Soporte y certificado de garantía electrónica www.vevor.com/support
CAMINAR EN GALLINERO
MANUAL DE USUARIO
We continue to be committed to provide you tools with competitive price.
"Save Half","Half Price" or any other similar expressions used by us only represents an
estimate of savings you might benefit from buying certain tools with us compared to the major
top brands and does not necessarily mean to cover all categories of tools offered by us. You
are kindly reminded to verify carefully when you are placing an order with us if you are
actually saving half in comparison with the top major brands.

1
ACR342
Have product questions? Need technical support? Please feel free to
contact us:
Technical Support and E-Warranty Certificate
www.vevor.com/support
NEED HELP? CONTACT US!
This is the original instruction,please read all manual instructions carefully
before operating. VEVOR reserves a clear interpretation of our user
manual. The appearance of the product shall be subject to the product
you received. Please forgive us that we won't inform you again if there
are any technology or software updates on our product.
WALK IN
CHICKEN COOP

2
Precauciones de seguridad
ADVERTENCIA:
Lea estas instrucciones antes de usar este producto. De lo contrario, se pueden
producir lesiones graves. Siempre se deben seguir las precauciones básicas ,
incluidas las siguientes:
1. El gallinero no se puede utilizar ni almacenar en zonas peligrosas. No está
permitido utilizar el aparato en lugares peligrosos.
2. Se debe revisar el gallinero para caminar para garantizar que esté en buenas
condiciones de funcionamiento y que funcione de manera segura antes de su uso.
De lo contrario, no se debe utilizar el aparato.
10. Limpie la nieve del techo con regularidad, ya que demasiada nieve colapsará
la lona.
4. El operador debe utilizar correctamente el gallinero. Debe tener en cuenta las
condiciones locales y prestar atención a terceros, en particular a los niños, cuando
trabaje con el gallinero.
12. Este gallinero no está diseñado para que lo utilicen personas (incluidos niños)
con capacidades físicas, sensoriales o mentales reducidas o que carezcan de
experiencia y/o conocimientos, a menos que estén supervisados por una persona
responsable de su seguridad o reciban instrucciones de estas personas. personas
sobre el uso del dispositivo. Los niños deben ser supervisados para asegurarse
de que no jueguen con el gallinero.
GUARDA ESTAS INSTRUCCIONES

3
Lista de productos

4
Montaje del producto
Paso 1: Ensamble el marco inferior como se muestra en el siguiente
dibujo . Antes de ensamblar el marco , coloque el conector de plástico "Q"
x4 piezas en el poste "2". como abajo (Nota: solo para 4 piezas de poste 2
en la esquina necesita estos conectores de plástico) , luego coloque el
conector "Q" x4 piezas en el poste "1" como abajo.
5
Paso 2: Recoger tubo "3" x4pcs , inserte los tubos en los conectores.
Antes de esto , coloque el conector de plástico "GRAMO" x4 piezas en la
esquina del poste "3" x4 piezas como abajo (Nota : solo para 4 Uds. de
polo 3 En la esquina se necesitan estos conectores de plástico).

6
Paso 3: Conector de reunión "A" x4 piezas , "B" x4 piezas y el tubo "2" x6
piezas , ensamble como se muestra en el siguiente dibujo .

7
Paso 4: Reúna el conector "Y" x2 piezas , "X" x1pc y poste "2" x3 piezas y
poste "4" x8pcs se ensamblan como se muestra a continuación.

8
Paso 5: Instale el marco de la puerta del gallinero como se muestra.

9
Paso 6: fije la puerta al marco de la puerta del gallinero.
10
Paso 7: Instale la escalera para pollos en el marco.

11
Paso 8: Para los espacios en blanco delantero y trasero, corte la malla de
2m/6.6ft
12
alambre (F) a la forma correcta y luego fíjela al marco del gallinero.

13
Paso 9: Coloque la lona (G) plana sobre la parte superior del gallinero y
asegúrela con e nae bungees (O).
Utilice una cuerda elástica para pasar a través del orificio en
la tela impermeable para asegurar la tela impermeable.
14
Paso 10: Finalmente, use clavos esmerilados (M) para fijar el gallinero
instalado en el suelo para hacerlo más firme.

15
Dirección: Baoshanqu Shuangchenglu 803long 11hao 1602A-1609shi Shanghai
Importado a AUS: SIHAO PTY LTD , 1 ROKEVA STREETEASTWOOD NSW 2122
Australia
Importado a EE. UU.: Sanven Technology Ltd. , Suite 250 , 9166 Anaheim
Place , Rancho Cucamonga , CA 91730
REP
UK
Pooledas Group Ltd
Unit 5 Albert Edward House, The Pavilions
Preston, United Kingdom
REP
EC
SHUNSHUN GmbH
Römeräcker 9 Z2021, 76351
Linkenheim-Hochstetten, Germany
Hecho en china