
20 - PRECAUTIONS 91477B913/D
PRECAUTIONS 20
General safety instructions 20
Installation 23
Appliance purpose 24
This user manual 24
Manufacturer’s liability 25
Identification plate 25
Disposal 25
To save energy 25
Information on power consumption in off/stand-
by mode 25
How to read the user manual 25
DESCRIPTION 26
General description 26
Control panel 26
USE 27
Preliminary operations 27
Basic functions 27
Using the hob 27
Safety features 29
CLEANING AND MAINTENANCE 30
Cleaning the glass ceramic hob 30
What to do if... 30
INSTALLATION 31
Electrical connection 31
Power limitation menu 31
Mounting 33
Fastening to the built-in cabinet 34
Instructions for the installer 34
We advise you to read this manual carefully, which contains all the instructions for
maintaining the appliance’s aesthetic and functional qualities. For further information on the
product: www.smeg.com
PRECAUTIONS
General safety instructions
Risk of personal injury
• During use the appliance
and its accessible parts
become very hot. Keep
children well away from the
appliance.
• Protect hands with heat
resistant gloves during use.
• Never try to put out a fire or
flames with water: Turn off
the appliance and smother
the flames with a fire
blanket or other appropriate
cover.
• This appliance may only be
used by children aged 8
years and over, and by
people of reduced physical,
sensory or mental capacity,
or lacking in experience in
the use of electrical
appliances, provided that
they are supervised or have
been given instructions on
the safe use of the
appliance and of the
hazards associated with it.
• Children must not play with
the appliance.
• Keep children under the age
of eight at a safe distance
unless they are constantly
supervised.
• Keep children under the age
of 8 away from the
appliance when it is in use.
• Cleaning and maintenance
must not be carried out by
unsupervised children.
• Be aware of how rapidly
the cooking zones heat up.
Do not place empty pans on
the heat. Danger of
overheating.
• Activate the controls lock
when you have children or

PRECAUTIONS - 2191477B913/D
e
pets which could reach the
hob.
• Do not touch or clean the
hob surface during
operation or when the
residual heat indicator
lights are still on.
• After use, switch off the
plates. Never rely solely on
the cookware detector.
• Supervise children carefully
as they cannot readily see
the residual heat indication.
After use the cooking zones
remain hot for a certain
period of time even if they
have been turned off. Keep
children away from the
cooking zones.
• The cooking process must
always kept under control.
A short cooking process
must be continuously
monitored.
• WARNING: Cooking foods
containing fat and/or oil
without monitoring them
can be dangerous and can
cause a fire.
• Fats and oils can catch fire
if they overheat. Do not
leave the appliance
unattended while preparing
foods containing oils or fats.
If fats or oils catch fire,
never put water on them.
Place the lid on the pan and
turn off the relevant cooking
zone.
• Do not use the Booster and/
or the Double Booster
functions (if present) to heat
fats or oils. Fire hazard.
• Do not place metal objects,
such as dishes or cutlery, on
the surface of the hob
during cooking as they may
overheat.
• Do not cook foods in closed
tins or containers or plastic
containers.
• Do not use magnetic tins.
• Do not use trivets or other
items between the bottom
of the pan and the glass
ceramic surface. Danger of
burns.
• Do not insert pointed metal
objects (cutlery or utensils)
into the slots in the
appliance.
• Do not use or store
flammable materials near
the appliance or directly
underneath the hob.
• Switch off the appliance
immediately after use.
• Do not pull the cable to
unplug the appliance (if
present).
• DO NOT USE AEROSOLS
IN THE VICINITY OF THIS
APPLIANCE WHILST IT IS
IN USE.
•DO NOT MODIFY THIS
APPLIANCE.
• Always wear personal
protective equipment (PPE)
before carrying out any
work on the appliance
(installation, maintenance,
positioning or moving).
• Do not clean the appliance
if it is still hot or in

22 - PRECAUTIONS 91477B913/D
operation.
• After use the cooking zones
remain hot for a certain
period of time after they
have been turned off. Do
not touch the hob surfaces.
• Before performing any work
on the appliance, switch off
the power supply.
• Do not try to repair the
appliance yourself or
without the assistance of a
qualified technician.
• If the power cable becomes
damaged, contact technical
support immediately to
arrange for it to be replaced
in order to avoid possible
hazards.
• If cracks or fissures form, or
if the glass ceramic cooking
surface breaks, turn off the
appliance immediately.
Disconnect the power
supply and call Technical
Support.
•People who have
pacemakers or other similar
devices fitted must make
sure that the operation of
these devices is not
affected by the induction
field, the frequency range of
which is between 20 and
50 kHz.
Risk of damaging the appliance
• Do not use abrasive or
corrosive detergents (e.g.
scouring powders, stain
removers and metallic
sponges) on glass parts.
• Use wooden or plastic
utensils.
• Do not sit on the appliance.
• Do not use the glass
ceramic cooking surface as
a support surface.
• Do not use the appliance as
a support surface.
• Do not obstruct ventilation
openings and heat
dispersal slots.
• Do not use the hob if the
pyrolytic cycle is taking
place inside any oven
installed below.
• Do not use steam jets to
clean the appliance.
• Never leave the appliance
unattended during cooking
operations where fats or
oils could be released, as
these could then heat up
and catch fire. Be very
careful.
• Fire hazard: Never leave
objects on the cooking
surfaces.
• DO NOT FOR ANY
REASON USE THE
APPLIANCE AS A SPACE
HEATER.
• Cooking vessels or griddle
plates should be placed
inside the perimeter of the
hob.
• All pans must have smooth,
flat bottoms.
• If any liquid does boil over
or spill, remove the excess
from the hob.
• Take care not to spill acid
substances such as lemon

PRECAUTIONS - 2391477B913/D
e
juice or vinegar on the hob.
• Do not spill sugar or sweet
mixtures on the hob during
cooking.
• Do not place materials or
substances that could melt
or catch fire (paper, plastic
or aluminium foil) on the
appliance while it is in use.
• Place the cookware directly
on the glass ceramic
surface.
• Do not put empty pans or
frying pans on switched on
cooking zones.
• Do not use rough or
abrasive materials or sharp
metal scrapers.
• The glass ceramic surface
is highly resistant to impact.
However, prevent hard,
solid objects from falling on
the cooking surface as they
may cause it to break.
• Do not use cleaning
products containing
chlorine, ammonia or
bleach on parts made of
steel or that have metallic
surface finishes (e.g.
anodizing, nickel- or
chromium-plating).
• This appliance is not
intended to be operated by
means of external timer or
separate remote control
system.
• To prevent scratching the
glass surface, avoid sliding
pots across it. Lift them and
place them gently where
needed instead.
Installation
• THIS APPLIANCE MUST
NOT BE INSTALLED IN A
BOAT OR CARAVAN.
• This appliance must not be
installed above a
dishwasher unless the
instructions provided in the
“INSTALLATION” chapter
are complied with.
• Position the appliance into
the cabinet cut-out with the
help of a second person.
• Check that the cabinet has
the required slots.
• Check that the cabinet
material is heat resistant.
• Installation and servicing
should be carried out by
qualified personnel in
accordance with current
standards.
• Have the electrical
connection performed by
authorised technical
personnel.
• The appliance must be
connected to earth in
compliance with electrical
system safety standards.
• Use cables that can
withstand temperatures of
at least 90°C.
• Run the power cable in the
rear part of the unit. Make
sure that it does not come
into contact with the lower
part of the hob or a built-in
oven below it.
• Be careful when connecting
additional electrical
appliances. Connection

24 - PRECAUTIONS 91477B913/D
cables must not come into
contact with hot cooking
zones.
• The tightening torque of the
screws of the terminal
supply wires must be 1.2-
1.5 Nm.
• Do not attach the appliance
too tightly to the unit as this
could cause damage during
use or partially obstruct the
heat dispersal slots.
• The power cable must only
be installed or replaced by a
qualified technician.
• If the power cable becomes
damaged, contact technical
support immediately to
arrange for it to be replaced
in order to avoid possible
hazards.
• Always use any necessary/
required personal
protective equipment (PPE)
before performing any work
on the appliance
(installation, maintenance,
positioning or movement).
• Before performing any work
on the appliance, switch off
the main power supply.
• Allow the appliance to be
disconnected after
installation, via an
accessible plug or a switch
in the case of a fixed
connection.
• Fit the power line with an
all-pole circuit breaker with
a contact separation
distance sufficient to
provide complete
disconnection in category III
overvoltage conditions,
pursuant to installation
regulations.
• If access to the electrical
power supply is limited,
means of disconnection of
all poles must be accessible
and incorporated into the
fixed wiring in accordance
with the wiring regulations.
• This appliance can be used
up to a maximum altitude of
2,000 metres above sea
level.
• Do not set the hob at a
power higher than that
supported by the electrical
system.
Appliance purpose
This appliance is intended for
cooking food in the home
environment. Every other use
is considered improper. It
must also not be used:
• In kitchen areas provided
for employees in shops,
offices and other work
environments.
• in farms/farmhouses.
• By guests in hotels, motels
and other types of
residential environments.
• In bed and breakfasts.
This user manual
• This user manual is an integral part of
the appliance and must therefore be
kept in its entirety and within the user's
reach for the whole working life of the
This appliance may only
be installed and used
indoors.
PRECAUTIONS - 2591477B913/D
e
appliance.
• Read this user manual carefully before
using the appliance.
• The explanations in this manual include
images, which describe all that regularly
appears on the display. However, it
should be kept in mind that the
appliance may be equipped with an
updated version of the system, and as
such, all that appears on the display
may differ from those in the manual.
Manufacturer’s liability
The manufacturer declines all liability for
damage to persons or property caused by:
• use of the appliance other than that
specified;
• failure to comply with the instructions in
the user manual;
• tampering with any part of the
appliance;
• use of non-original spare parts.
Identification plate
The identification plate bears the technical
data, serial number and brand name of the
appliance. Do not remove the identification
plate for any reason.
Disposal
This appliance conforms to the WEEE
European directive (2012/19/EU) and
must be disposed of separately from
other waste at the end of its service life.
The appliance does not contain substances
in quantities sufficient to be considered
hazardous to health and the environment,
in accordance with current European
directives.
To dispose of the appliance:
• Cut the power cable and remove it.
• Deliver the appliance to the appropriate
recycling centre for electrical and
electronic equipment waste, or return it
to the retailer when purchasing an
equivalent product, on a one for one
basis.
Our appliances are packaged in non-
polluting and recyclable materials.
• Deliver the packing materials to the
appropriate recycling centre.
To s ave en er gy
• The diameter of the base of the pan
must not extend beyond the lines
printed on the glass ceramic surface.
• Pans must not be placed outside the
perimeter of the hob or on the display.
• When buying a pan, check whether the
diameter indicated is that of the base or
the top of the pan, as the top is almost
always larger than the base.
• When preparing dishes with long
cooking times, you can save time and
energy by using a pressure cooker,
which also helps to retain vitamins
contained in the food.
• Make sure that the pressure cooker
contains enough liquid as, if there is not
enough and it overheats, this may cause
damage to both the pressure cooker and
the cooking zone.
• If possible, always cover pans with a
suitable lid.
• Choose a pan suitable for the quantity
of food to be cooked. A large, half-
empty saucepan leads to a waste of
energy.
Information on power
consumption in off/stand-by
mode
Technical data on the appliance's power
consumption in off/stand-by mode can be
found at www.smeg.com under the page
corresponding to the product in question.
How to read the user manual
This user manual uses the following reading
conventions:
Power voltage
Danger of electrocution
• Disconnect the mains power supply.
• Unplug the appliance.
Plastic packaging
Danger of suffocation
• Do not leave the packaging or any part
of it unattended.
• Do not let children play with the plastic
bags.
Under certain circumstances, if the
hob and the oven are used at the
same time, the maximum power
limit of the electrical system might
be exceeded.
Warning/Caution
26 - DESCRIPTION 91477B913/D
DESCRIPTION
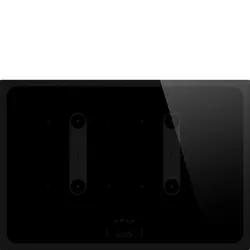
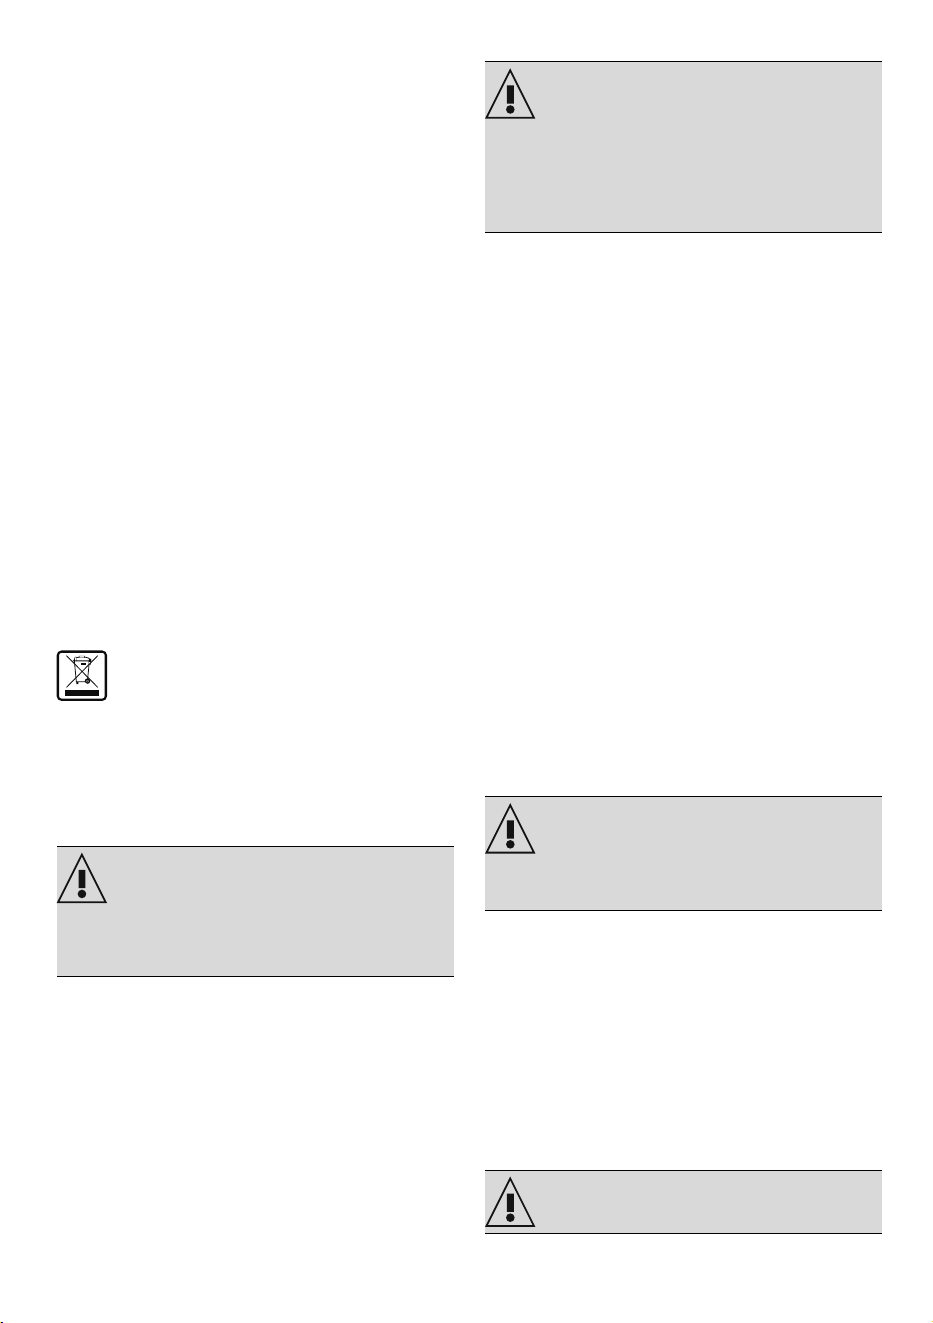
General description
*Power levels are approximate and may vary according to the pan used or the settings
made.
Control panel
1 Cooking zone selection buttons
2 Control lock button
3 On/Off button
4 Increase/decrease / timer button
Advantages of induction cooking
• Energy saving thanks to the direct
transmission of energy to the pan
(suitable magnetisable cookware is
required) compared to traditional
electric cooking.
• Improved safety as the energy is only
transmitted to the pan placed on the
hob.
• High level of energy transmitted from
the induction cooking zone to the base
of the pan.
• Rapid heating speed.
Information/Advice
Zone Dimensions
H x L (mm)
Minimum pan di-
mensions (mm)
Recommended
pan dimensions
(mm)
Max. power draw
(W)*
Power draw in Bo-
oster function (W)
*
1-2
180 x 180 Ø110 Ø180 1500 2000
1+2 (bridge) 180 x 375 Ø160 180 x 375 3000 -
The appliance is equipped with an
induction generator for each cooking
zone. Each generator located under
the glass ceramic cooking surface
creates an electromagnetic field
which induces a thermal current in
the base of the pan. This means the
heat is no longer transmitted from
the hob to the pan but created
directly inside the pan by the
inductive current.
USE - 2791477B913/D
e
• Reduced danger of burns as the cooking
surface is only heated under the base of
the pan; foods which overflow do not
stick.
Power control
The hob is fitted with a power control
module that optimises/limits consumption. If
the overall set power level exceeds the
maximum limit permitted, the electronic
circuit board will automatically manage the
power supplied by the hot plates. The
module tries to maintain the maximum
deliverable power levels. If the symbol
appears it indicates that it is no longer
possible to increase the power level for a
specific cooking zone.
USE
Preliminary operations
• Remove any protective film from the
outside or inside of the appliance,
including any accessories (if present).
• Remove any labels (apart from the
technical data plate).
Cookware suitable for use in induction
cooking
Cookware used on the induction cooking
surface must be made of metal, with
magnetic properties and a sufficiently large
base.
Suitable cookware:
• Enamelled steel cookware with thick
bases.
• Cast iron cookware with an enamelled
base.
• Cookware in multilayer stainless steel,
ferritic stainless steel and aluminium
with a special base.
Unsuitable cookware:
• Copper, stainless steel, aluminium,
fireproof glass, wood, ceramic and
terracotta cookware.
Basic functions
First power connection
When connected to the power supply for
the first time, or after power has been
switched back on after a power failure, an
automatic check is carried out that control
turns on the indicator lights and the
displays for a few seconds. Afterwards, the
appliance can be used normally.
Switching on and off
Press the ON/OFF button to switch on the
appliance. To switch off the appliance, keep
the ON/OFF button pressed until it turns off.
Using the hob
Switching the cooking zones on
After switching on the appliance:
1. Select the cooking zone you wish to
switch on using the zone selection
buttons.
2. Use the and buttons to select
the cooking power from 1 to 9, or else
enable the Booster function.
Switching the cooking zones off
1. Select the cooking zone to switch off.
2. Use the button to bring the power
level to 0 (zero).
If a pan unsuitable for induction cooking is
used on an active zone, or if no pan is
present, the zone will not deliver power and
the corresponding display will alternate
between the symbol and the selected
power level.
Power level table
The power in the cooking zones can be
adjusted to various levels. In the table
below you will find instructions for the
Priority is given to the first zone that
is set in chronological order.
The power control module does not
affect the total power consumption
of the appliance.
See General safety instructions.
• Hold the ON/OFF button down
for at least 2 seconds to switch
off all cooking zones at the same
time.
28 - USE 91477B913/D
different types of cooking.
Booster function
The Booster function allows you to heat a
pan at maximum power for a limited
amount of time. It can be used to bring a
large amount of water to the boil rapidly.
After selecting a zone:
1. Set the power level to 9.
2. Press the button again; the
symbol will be shown on the display.
To deactivate the Booster function, simply
decrease the power level of the cooking
zone or switch off the appliance.
Timed cooking
This function is used to program the
automatic switch-off of each cooking zone
at the end of a period of time set by the user
(from 1 to 99 minutes).
To set timed cooking:
1. Place a pan on a cooking zone and
select a zone power level.
2. Select the required cooking zone.
3. Press the buttons and at the
same time.
4. The display of the selected zone shows
.
5. The symbol appears between the
ON/OFF buttons and .
6. Use the keys and to select the
desired time; press and hold for fast
forward.
7. Press the and buttons at the
same time to cancel the function.
Controls lock
This function is useful when cleaning the
appliance and to prevent accidental
interactions.
To activate the controls block, with at least
one cooking zone active:
1. Press the key for at least one
second.
2. The display LED lights up for 2 seconds
to indicate that the function has been
activated.
To deactivate the controls lock, press the
key for at least one second.
Bridge function
This function allows you to operate two
cooking zones (front and rear) at the same
time when using pans such as fish kettles or
long pans.
To activate the Bridge function:
Power level Suitable for:
0 OFF setting
from 1 to 2
Cooking small amounts of food
(minimum power)
from 3 to 4 Cooking
from 5 to 6
Cooking large quantities of food,
roasting larger portions
from 7 to 8 Roasting, slow frying with flour
9Roasting
P
Bring a large amount of water to
the boil (maximum power, see
"Booster function")
See General safety instructions.
The Booster function remains active
for a maximum of 10 minutes, after
which the power level of the zone
returns to 9.
This function can be activated on
multiple cooking zones at the same
time.
This time can be changed at any
time by following the above
procedure.
The timer cannot be activated if
the power level of the selected
cooking zone is zero (0).
This function is designed to lock all
hob keys.
It is always active when the hob is
switched on.
It locks every other key except itself
and the ON/OFF key.
It always lights up when the hob is
switched on.
This function automatically divides
the power equally between both
zones that are in use.
Set this function before selecting a
power level
USE - 2991477B913/D
e
1. Touch the left or right zone buttons at
the same time; the symbols and
will appear.
2. Select a power level from 1 to 9.
3. The rear zone display shows the
symbol while the front zone display
shows the selected power level.
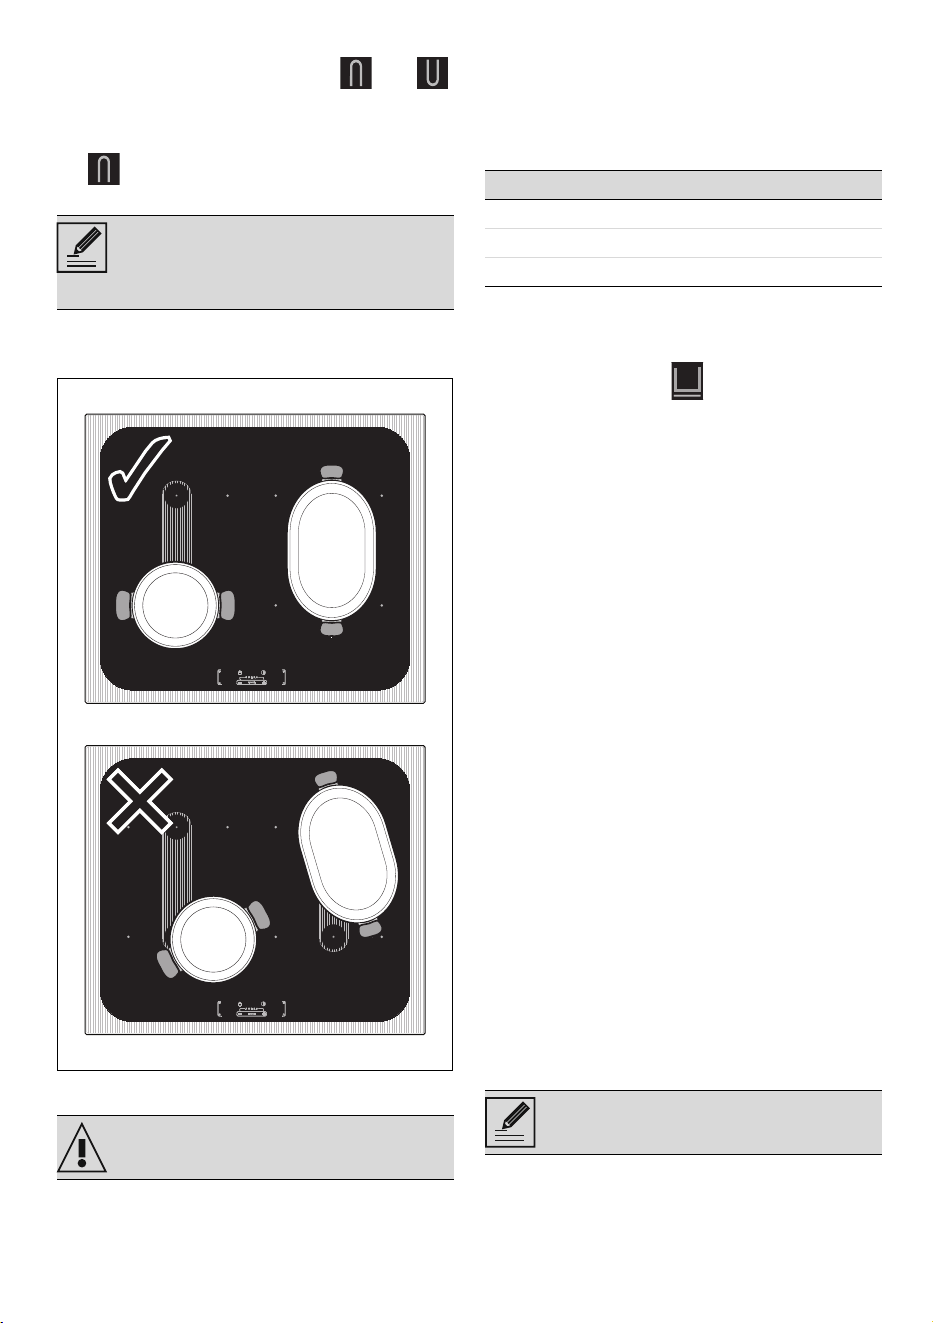
If a large, oval or oblong pan is being used,
make sure that it is placed in the centre of
the cooking zone.
Safety features
Limiting the cooking duration
The appliance has an automatic device that
limits the duration of use.
If the cooking settings for a pan are not
changed, the maximum operation time for
each zone depends on the power level
selected.
Heating is switched off when the device for
limiting the duration of use is activated.
Residual heat indicators
When the cooking zones are switched off, if
their temperature is higher than a certain
safety threshold, the symbol appears on
the display. When the temperature falls
below this threshold, the symbols
disappear.
Protection from overheating
If the hob is used on full power for a long
period, the electronics will have trouble
cooling down if the room temperature is
high.
When certain safety thresholds are
reached, on or more cooking zones are
deactivated. At the end, if the internal
temperature is very high, the appliance is
switched off automatically.
Error warnings
In the event of a malfunction or abnormal
operation, the display shows a message
containing the code associated with the
error.
Error codes always begin with the letter “F”
followed by a digit or letter (e.g. “Ft or F4”).
Errors coded as:
•“Fc”
•“Ft”
•“FE”
Indicate an overheating of the appliance or
part of it, so the appliance must be switched
off immediately, all pans removed and
allowed to cool down.
If these errors persist or different ones are
displayed, the code should be noted and the
Technical Support should be contacted.
It is not possible to activate the
Booster function for the cooking
zones on which the Bridge function
is active.
See General safety instructions.
Power level Maximum cooking time
1 - 8 10 hours
93 hours
Booster (P) 10 minutes
Residual heat indicators are not to
be considered as error codes.
30 - CLEANING AND MAINTENANCE 91477B913/D
CLEANING AND MAINTENANCE
Cleaning the glass ceramic hob
Cleaning the surfaces
To keep the surfaces in good condition, they
should be cleaned regularly after use. Let
them cool first.
Ordinary daily cleaning
Always and only use specific products that
do not contain abrasives or chlorine-based
acids. Pour the product onto a damp cloth
and wipe the surface, rinse thoroughly and
dry with a soft cloth or a microfibre cloth.
Weekly cleaning
Clean and maintain the hob once a week
using an ordinary glass ceramic cleaning
product. Always follow the manufacturer’s
instructions. The silicon in these products
creates a protective, water-repellent
membrane which also resists dirt. All marks
stay on the membrane and can therefore be
removed easily. After cleaning, dry the
surface with a clean cloth. Make sure that
there is no detergent left on the cooking
surface as it might undergo an aggressive
reaction when heated up and could modify
the structure of the cooking surface.
Food stains or residues
Light coloured marks from pans with
aluminium bases can be easily cleaned off
with a cloth moistened in vinegar. Remove
any burnt-on residues after cooking; then
rinse with water and dry thoroughly with a
clean cloth. Dirt, which may have fallen on
the hob while cleaning lettuce or potatoes,
can scratch the hob when moving pans.
Consequently, remove any dirt from the
cooking surface immediately. Changes in
colour do not affect the operation and
stability of the glass. These are not
alterations to the material of the hob but
just residues which have not been removed
and have then carbonised. Shiny surfaces
can form due to the bases of pans,
especially aluminium ones, rubbing on the
surface, and due to the use of unsuitable
detergents. They are difficult to remove
using conventional cleaning products. It
may be necessary to repeat the cleaning
process several times. Use of corrosive
detergents or rubbing of pan bases can
wear away the decoration on the hob over
time and contribute to the formation of
stains.
What to do if...
The hob does not work:
• Make sure that the hob is connected and
that the main switch is turned on.
• Make sure that there is no power failure.
• Make sure that the fuse has not blown.
In this case replace the fuse.
• Make sure that the circuit breaker of the
residential electrical system has not
tripped. In this case, reset the circuit
breaker.
The cooking results are unsatisfactory:
• Make sure that the cooking temperature
is not too high or too low.
• Make sure that the hob is properly
ventilated and that the air inlets are
unobstructed.
• Use cookware that is certified and
tested for induction cooking.
The hob smokes:
• Let the hob cool down and clean it once
cooking is complete.
• Make sure that the food has not spilled
out of the pan and use a larger cooking
vessel, if needed.
The fuses blow or the circuit breaker of the
residential electrical system trips
repeatedly.
• Call Technical Support or an electrician.
There are cracks or fissures in the hob:
• Turn off the appliance immediately,
disconnect the power supply and
contact Technical Support.
See General safety instructions.
In case of stubborn dirt, clean when
cold using a damp kitchen sponge
and neutral detergent; then dry with
a microfibre cloth.
We recommend the use of cleaning
products distributed by the
manufacturer.
After cleaning, dry the appliance
thoroughly to prevent any water or
detergent from interfering with its
operation or creating unsightly
marks.
INSTALLATION - 3191477B913/D
e
INSTALLATION
Electrical connection
General information
Check the mains characteristics against the
data indicated on the plate.
The identification plate bearing the
technical data, serial number and brand
name is visibly positioned on the appliance.
Do not remove this plate for any reason.
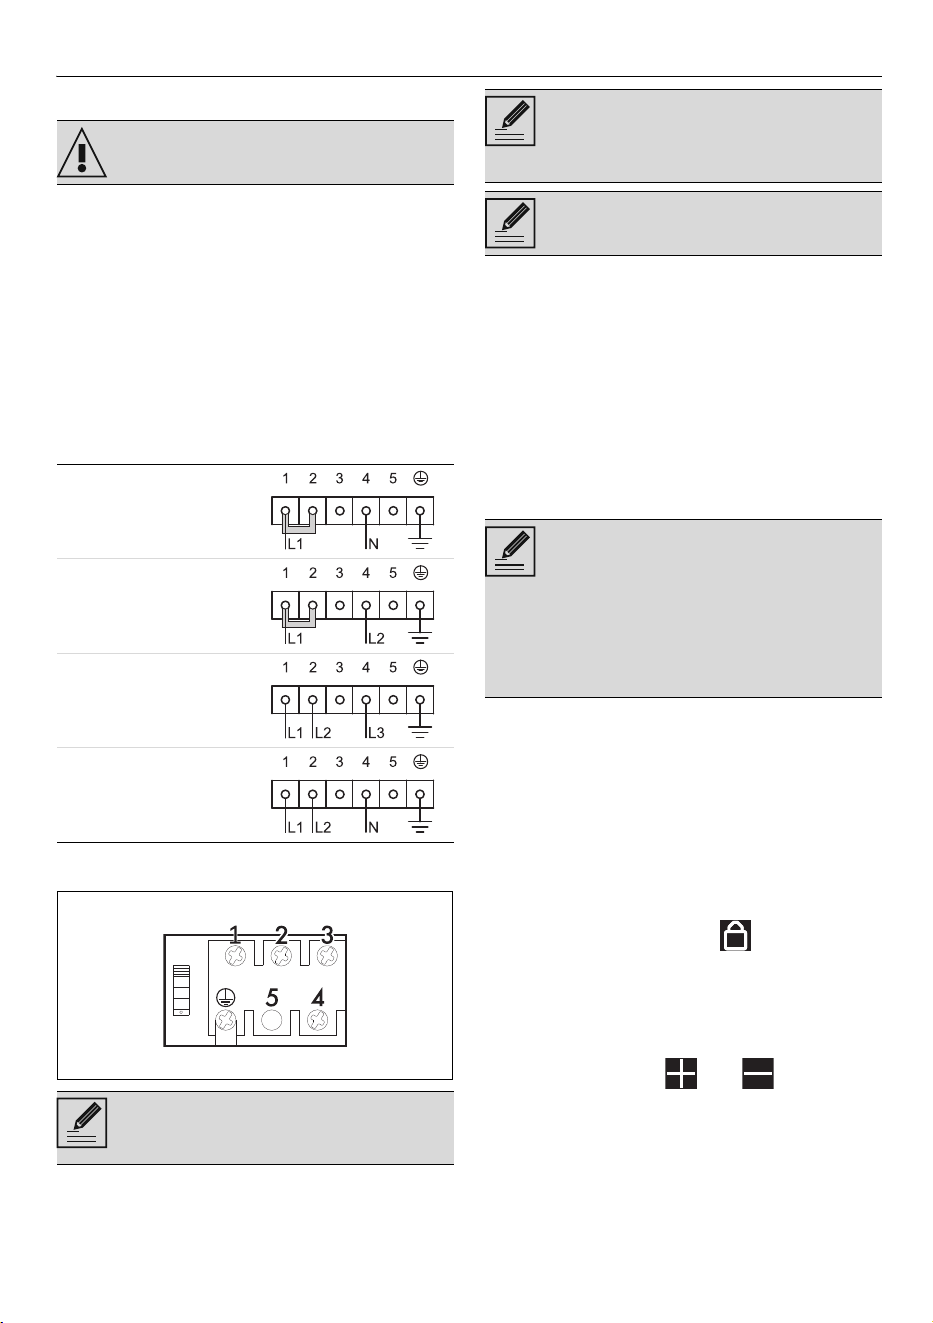
The appliance must be connected to ground
using a wire that is at least 20 mm longer
than the other wires.
The appliance can work in the following
modes:
The diagram below illustrates the terminal
from below, with no cables connected.
Fixed connection
Fit the power line with an all-pole circuit
breaker with a contact separation distance
sufficient to provide complete disconnection
in category III overvoltage conditions,
pursuant to installation regulations.
For the Australian/New Zealand market:
The circuit breaker incorporated in the fixed
connection must comply with AS/NZS 3000.
Power limitation menu
The following procedure allows you to
adjust the maximum power from 7.2 to 2.8
kW (high power range):
1. Before proceeding, switch off all the
plates.
2. Disconnect the appliance from the
power supply.
3. Reconnect the appliance.
Carry out the following procedure within 30
seconds:
4. Hold down the button to unlock the
commands.
5. Press the front cooking zone buttons at
the same time.
• A buzzer will sound and the display will
show the current power level.
6. Use the buttons and to change
the level.
7. To save the new power level, press the
front cooking zone buttons at the same
time; the appliance will switch off and
will need to be switched on again to
operate with the new limitation.
• To avoid saving the changes, simply do
not interact with the display for at least
See General safety instructions.
220-240 V 1N~
3 x 6 mm ²
three-core cable
220-240 V 2~
3 x 6 mm ²
three-core cable
220-240 V 3~
4 x 2.5 mm ²
four-core cable
380-415 V 2N~
4 x 2.5 mm ²
four-core cable
The values indicated refer to the
cross-section of the internal
conductor.
The aforementioned power cables
are sized taking into account the
coincidence factor (in compliance
with standard EN 60335-2-6).
Use the supplied jumper for each
connection, if any
• This function allows you to set
the maximum power level for
your appliance.
• The appliance leaves the factory
set to a maximum power of 7.2
kW, but it can be adjusted to
operate at 6.0, 3.5 and 2.8, 2.2,
1.6 and 1.0 kW.
32 - INSTALLATION 91477B913/D
60 seconds.
The following procedure allows you to
adjust the maximum power from 2.8 to 1.0
kW (high power range):
1. Follow the same instructions shown
earlier up to step 4.
2. Press the front left cooking zone button
and the rear right cooking zone button
at the same time.
• A buzzer will sound and the display will
show the current power level.
3. Use the buttons and to change
the level.
4. To save the new power level, press the
front left cooking zone button and the
rear right cooking zone button at the
same time. The appliance will switch off
and will need to be switched on again to
operate with the new power limitation.
• To avoid saving the changes, simply do
not interact with the display for at least
60 seconds.
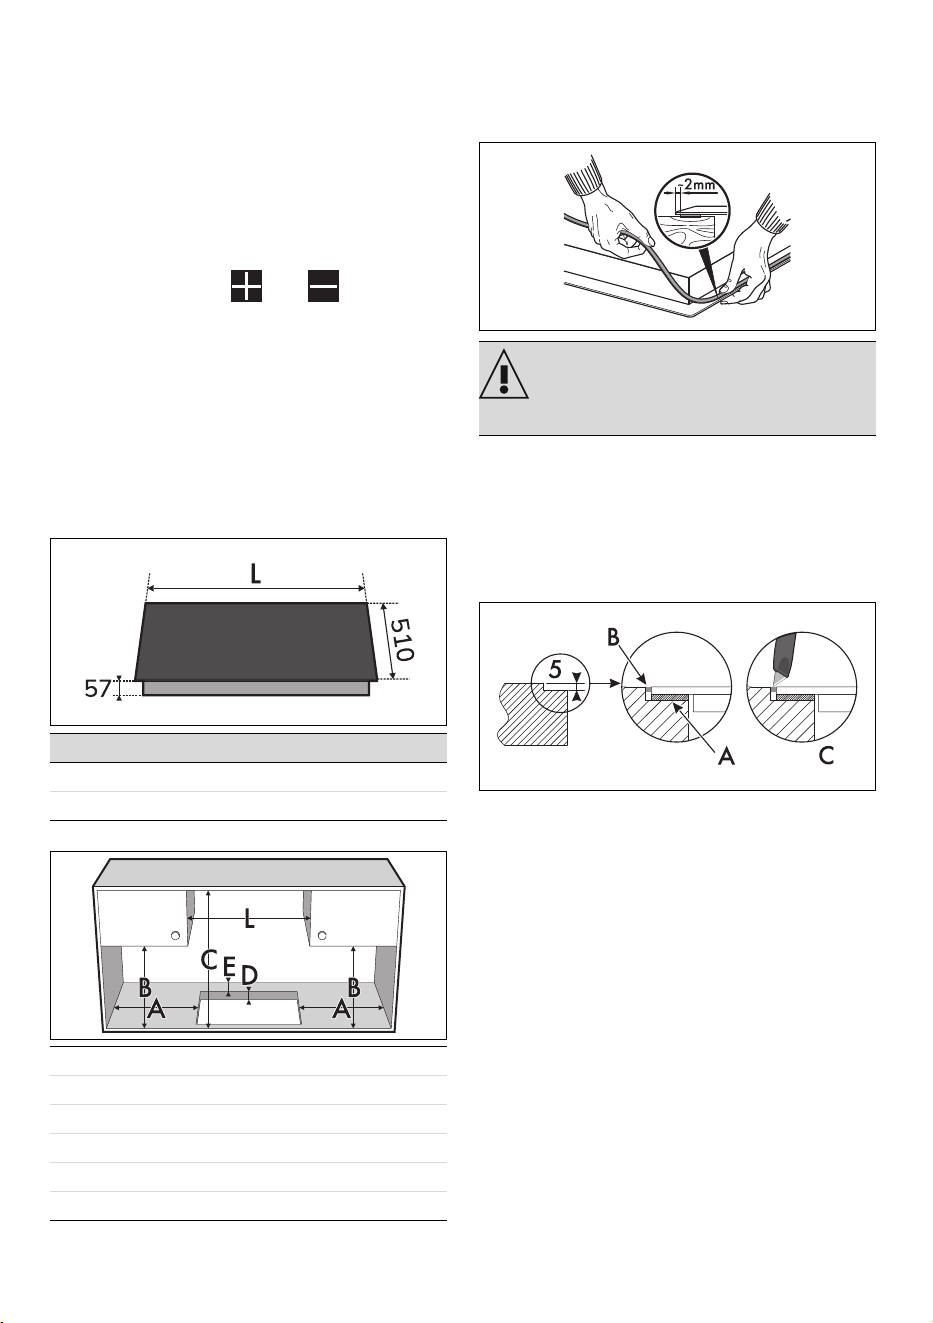
Appliance overall dimensions (mm)
Built-in cabinet dimensions (mm)
Hob seal
To prevent leakage of liquid between the
frame of the hob and the countertop, place
the adhesive seal provided along the entire
outer edge of the hob before assembly.
In the case of flush mounting, after placing
the adhesive seal (A) on the glass surface
and after positioning and securing the hob,
fill the edges with insulating silicone (B) and
wipe off any excess. If for any reason the
hob needs to be removed, cut the silicone
using a cutter before attempting to remove
it (C).
MODELS (cm) L
60 600
70 750
Amin. 150
Bmin. 460
Cmin. 750
D 30 - 50
Emin. 50
L min. 600-700
Do not use silicone to secure the
hob. This would make it impossible
to remove the hob without
damaging it.
INSTALLATION - 3391477B913/D
e
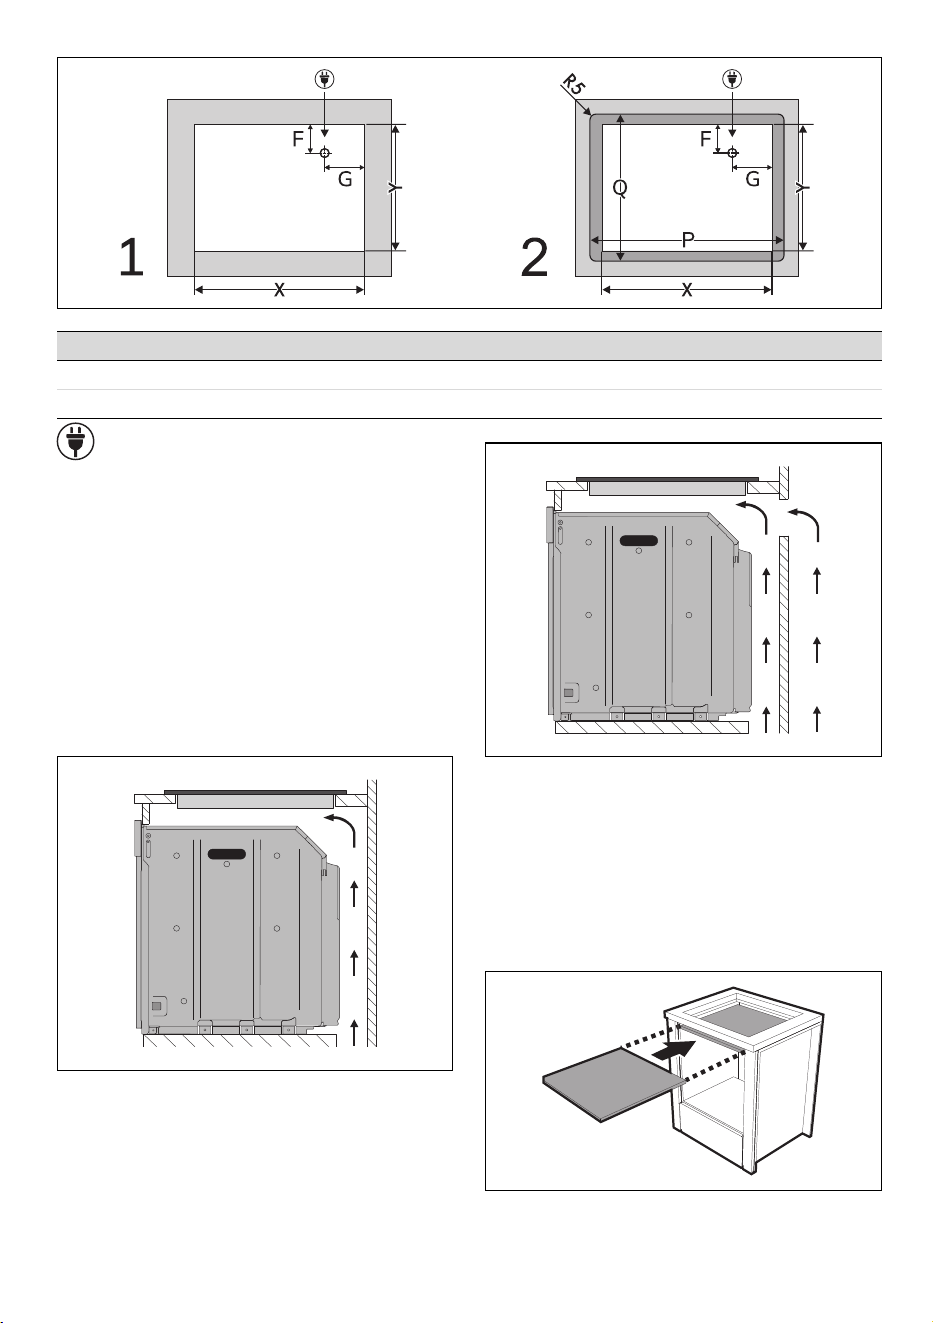
Standard and flush mounting (mm)
Electrical connection
1. Standard mounting
2. Flush built-in model
Mounting
Over built-in oven unit
The clearance between the hob and the
kitchen units or other built-in appliances
must be enough to ensure sufficient
ventilation and air discharge. If installed
above an oven, a space must be left
between the bottom of the hob and the top
of the appliance installed below.
• With opening on bottom:
• With opening on bottom and back:
On top of an empty kitchen unit or
drawers
If there are other pieces of furniture (lateral
walls,
drawers etc.), dishwashers or fridges under
the hob, a double-layer wooden base has to
be installed at least 20 mm from the bottom
of the hob to avoid any accidental contact. It
must only be possible to remove the
double-layer base by using suitable tools.
MODEL (cm) X Y P Q F G
60 555-560 478-482 603 513 88 317
70 555-560 478-482 753 513 88 317
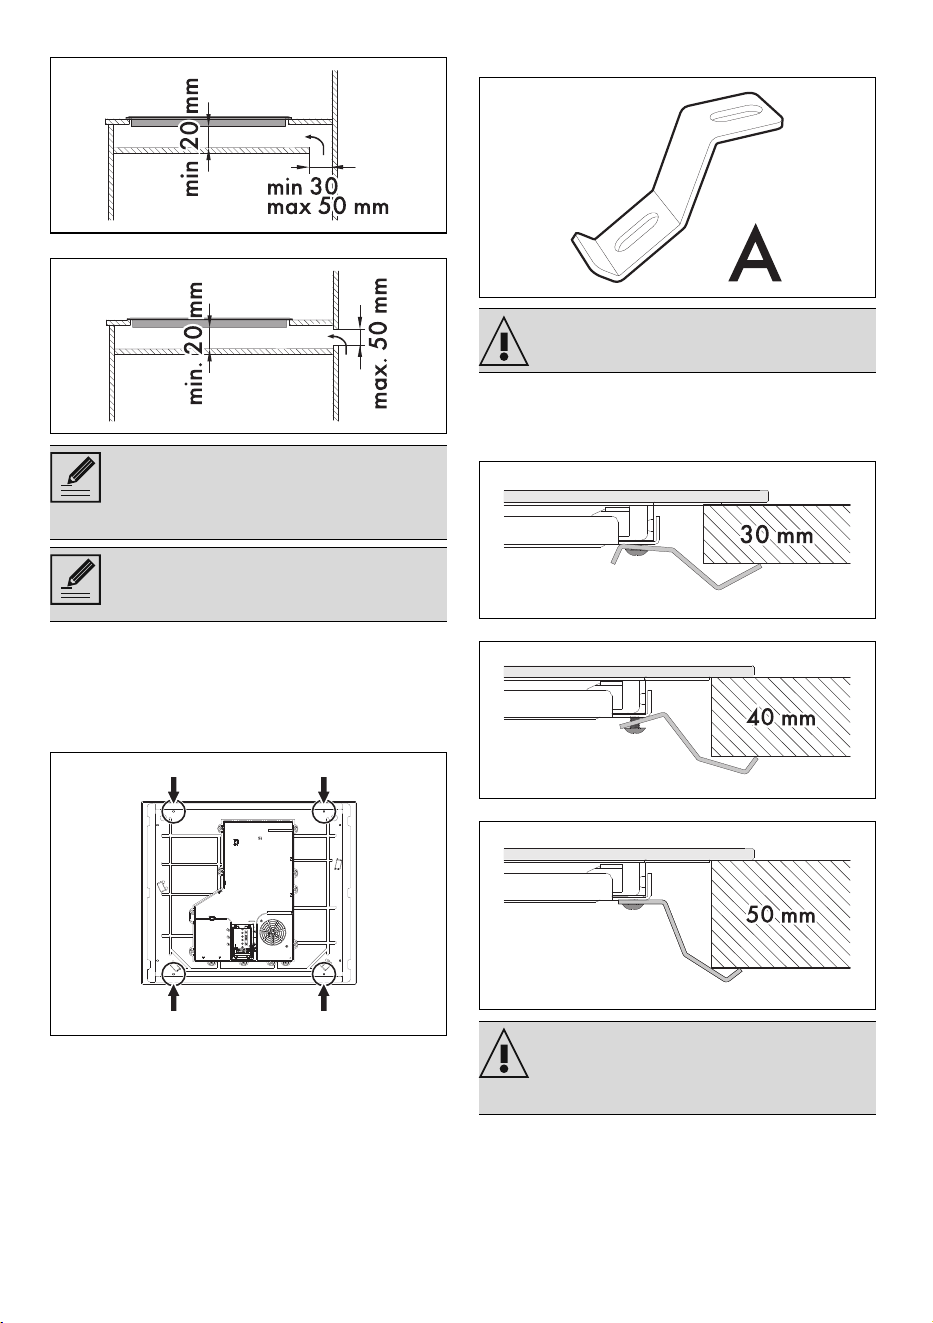
34 - INSTALLATION 91477B913/D
With opening on bottom:
With opening on back:
Fastening to the built-in cabinet
It has to be secured to the cabinet using
front and back screws:
1. Remove the screws from the holes
indicated in the figure below.
2. Fasten the fixing brackets (A) into the
holes marked using the screws that
were removed in order to correctly fix
the hob to the structure.
The fixing brackets should be installed
differently according to the thickness of the
countertop.
• Countertop thickness 30 mm:
• Countertop thickness 40 mm:
• Countertop thickness 50 mm:
Instructions for the installer
• If you use a plug (if present) to connect
to the power supply, the plug must be
accessible after installation.
• Do not bend or trap the power cable.
Failure to install the double-layer
wooden base exposes the user to
possible accidental contact with
sharp or hot parts.
If installed on top of an oven, the
latter must be equipped with a
cooling fan.
If tightened too much the glass may
be strained and crack.
In the case of countertops of less
than 30 mm, an additional spacer
should be used between the bracket
and the top.

INSTALLATION - 3591477B913/D
e
• The appliance must be installed
according to the installation diagrams.
• If the appliance does not work correctly
after having carried out all the checks,
contact your local Authorised Service
Centre.
• Once the appliance has been installed,
please explain to the user how to use it
correctly.
