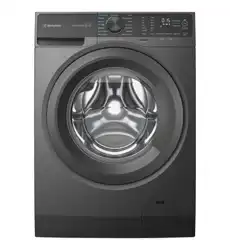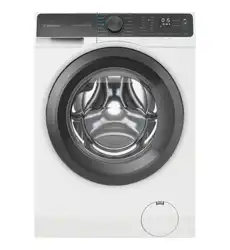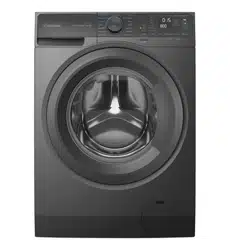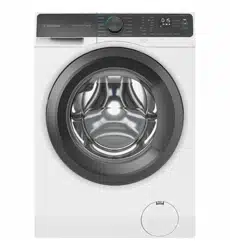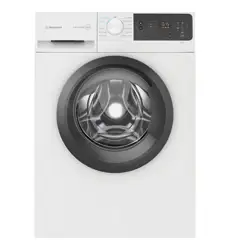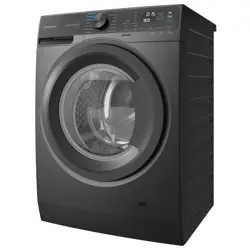
Wash - Dryer
WWW9024M5WAS
WWW9024M5SAS
User Manual 2
2
Visit our website to:
Subject to change without notice.
www.westinghouse.co
3.7
Confirm Start Touchpad
.............. 18
18

3
Loading The Laundry
Using Detergent And Additives
Options Setting
Starting A Cycle ( )
Interruption Of A Program
Changing A Program
Changing The Options
Opening The Door
At The End Of The Program
When The Washing Program
Is Completed, But There Is
Water In The Drum
AUTO Off Mode
................... 19
... 19
............................ 20
................. 21
........... 21
................... 21
................ 21
....................... 21
........ 21
...................... 22
.......................... 22
................................... 39
.................................. 41
................................... 42
........................... 42
................... 44
INTERNATIONAL WASH CODE
SYMBOLS
5.1
5.2
5.3
5.4
5.5
5.6
5.7
5.8
5.9
5.10
5.11
5. DAILY USE - WASHING (Only)
9.1
9.2
9.3
9.4
9.5
Preparing The Drying Cycle
Laundry Not Suitable For Drying
Garment Labels
Drying Cycle Duration
Additional Drying
9. DRYING HINTS
........ 27
. 27
........................... 27
................. 28
......................... 28
12.1
12.2
Possible Failures
Emergency Door Opening
12. TROUBLESHOOTING
......................... 34
........... 38
10.
......................................... 28
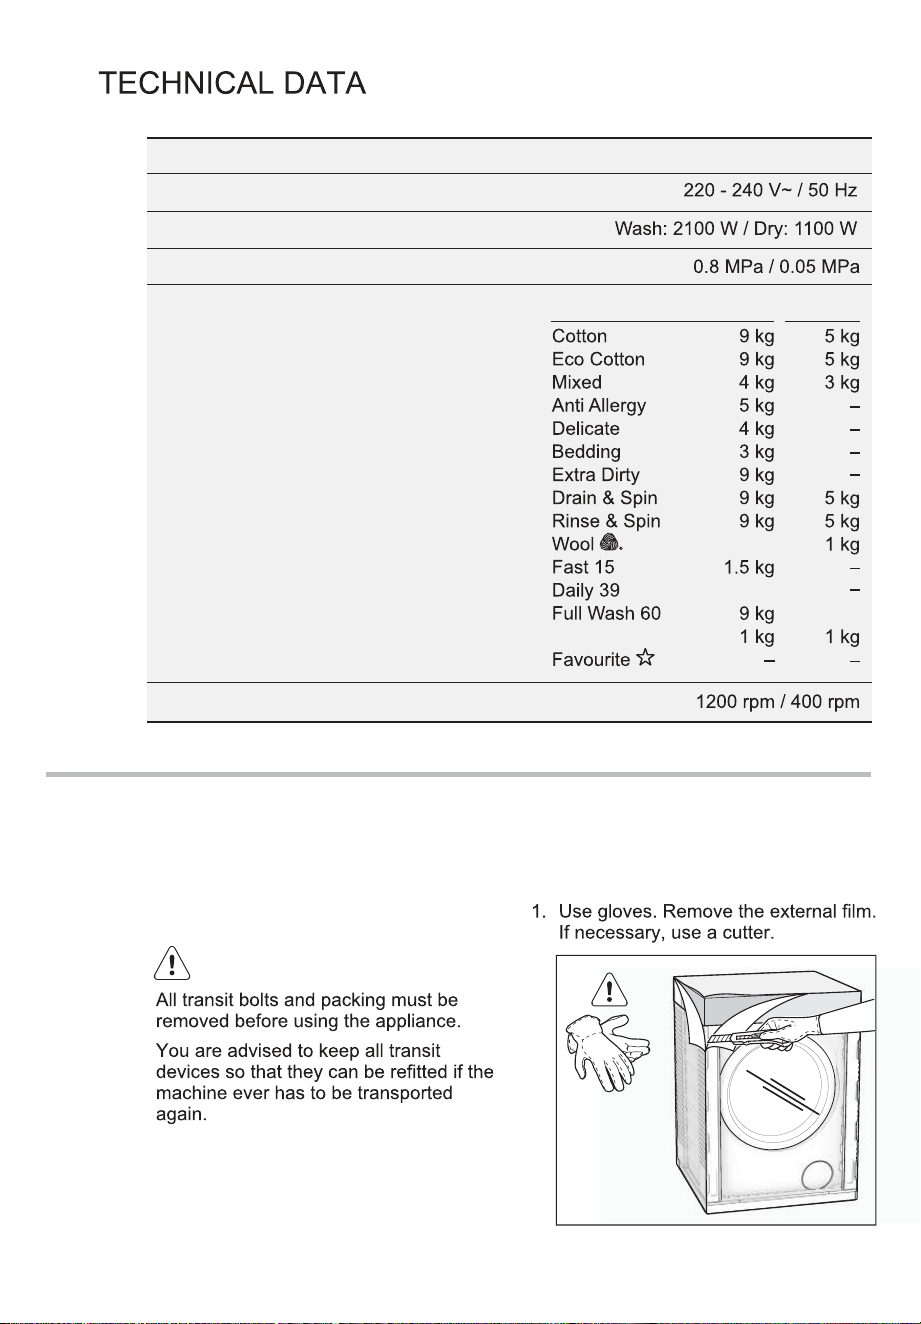
13. TECHNICAL DATA
........................... 39
14.1
14.2
14.3
14.4
14.5
Unpacking
Positioning
Water Inlet
Water Drainage
Electrical Connection
14. INSTALLATION
15.1
15.2
15.3
Packaging Materials
Old Machine
Ecological Hints
.................... 45
................................ 45
........................... 45
15. ENVIRONMENT CONCERNS
7.1
7.2
Washing Program +
“Dryness Level” Option
Washing Program +
“Time Dry ” Option
7. DAILY USE - WASHING & DRYING
(Non-Stop Program)
............. 23
................. 24
6. DAILY USE - DRYING (Only)
.............. 23
11.1
11.2
11.3
11.4
11.5
11.6
11.7
11.8
11.9
External Cleaning
Descaling
After Each Wash
Maintenance Wash
Cleaning The Dispenser Drawer
Cleaning The Drawer Recess
Cleaning The Pump
Cleaning The Water Inlet Filter
Frost Precautions
11. CARE AND CLEANING
........................ 29
.................................... 29
......................... 29
................... 29
. 29
..... 30
..................... 30
... 32
........................ 33
8.1
8.2
8.3
8.4
8.5
8.6
Sorting The Laundry
Temperatures
Before Loading The Laundry
Maximum Loads
Removing Stains
Detergents Type And Quantity
Of Detergent
8. WASHING HINTS
.................... 25
.............................. 25
....... 25
........................... 25
......................... 25
............................... 26
16. WARRANTY....................................... 47

4 www.westinghouse.com.au / www.westinghouse.co.nz
SAFETY INFORMATION
In the interest of your safety and to ensure the correct
use, before installing and first using the appliance, read
this user manual carefully, including its hints and
warnings.
This appliance is intended to be used in household and
similar applications such as:
1.1 Conditions Of Use
To avoid unnecessary mistakes and accidents, it is
important to ensure that all people using the appliance
are thoroughly familiar with its operation and safety
features.
Save these instructions and make sure that they remain
with the appliance if it is moved or sold, so that everyone
using it through its life will be properly informed on
appliance use and safety.
1.
staff kitchen areas in shops, offices and other
working environment;
farm houses;
by clients in hotels, motels, and other residential type
environments;
bed and breakfast type environments;
areas for communal use in blocks of flats or in
launderettes.
WARNING! The appliance must not be supplied
through an external switching device, such as timer,
or connected to a circuit that is regularly switched on
and off by utility.
Ɣ
Ɣ
Ɣ
Ɣ
Ɣ

5
6$)(7<,1)250$7,21
,QWKHLQWHUHVWRI\RXUVDIHW\DQGWRHQVXUHWKHFRUUHFW
XVHEHIRUHLQVWDOOLQJDQGILUVWXVLQJWKHDSSOLDQFHUHDG
WKLVXVHUPDQXDOFDUHIXOO\LQFOXGLQJLWVKLQWVDQG
ZDUQLQJV
7KLVDSSOLDQFHLVLQWHQGHGWREHXVHGLQKRXVHKROGDQG
VLPLODUDSSOLFDWLRQVVXFKDV
IDUPKRXVHV
E\FOLHQWVLQKRWHOVPRWHOVDQGRWKHUUHVLGHQWLDOW\SH
HQYLURQPHQWV
7RDYRLGXQQHFHVVDU\PLVWDNHVDQGDFFLGHQWVLWLV
LPSRUWDQWWRHQVXUHWKDWDOOSHRSOHXVLQJWKHDSSOLDQFH
DUHWKRURXJKO\IDPLOLDUZLWKLWVRSHUDWLRQDQGVDIHW\
IHDWXUHV
6DYHWKHVHLQVWUXFWLRQVDQGPDNHVXUHWKDWWKH\UHPDLQ
ZLWKWKHDSSOLDQFHLILWLVPRYHGRUVROGVRWKDWHYHU\RQH
XVLQJLWWKURXJKLWVOLIHZLOOEHSURSHUO\LQIRUPHGRQ
DSSOLDQFHXVHDQGVDIHW\
×
EHGDQGEUHDNIDVWW\SHHQYLURQWPHQWV
×
DUHDVIRUFRPPXQDOXVHLQEORFNVRIIODWVRULQ
ODXQGHUHWWHV
×
VWDIINLWFKHQDUHDVLQVKRSVRIILFHVDQGRWKHUZRUNLQJ
HQYLURQWPHQW
×
×
7KHDSSOLDQFHPXVWQRWEHVXSSOLHG
WKURXJKDQH[WHUQDOVZLWFKLQJGHYLFHVXFKDVWLPHU
RUFRQQHFWHGWRDFLUFXLWWKDWLVUHJXODUO\VZLWFKHGRQ
DQGRIIE\XWLOLW\
7KLV:DVKHU'U\HULVQRWLQWHQGHGIRUXVHE\\RXQJ
FKLOGUHQRULQILUPSHUVRQVZLWKRXWVXSHUYLVLRQ
<RXQJFKLOGUHQVKRXOGEHVXSHUYLVHGWRHQVXUHWKDW
WKH\GRQRWSOD\ZLWKWKHDSSOLDQFH
7KHSDFNDJLQJFRPSRQHQWVHJSODVWLFILOP
SRO\VW\UHQHFDQEHGDQJHURXVWRFKLOGUHQGDQJHURI
VXIIRFDWLRQ.HHSWKHPRXWRIFKLOGUHQ¶VUHDFK
.HHSDOOGHWHUJHQWVLQDVDIHSODFHRXWRIFKLOGUHQ¶V
UHDFK
1.2 Child Safety
1.3 General Safety
,WLVGDQJHURXVWRDOWHUWKHVSHFLILFD
WLRQVRUDWWHPSWWRPRGLI\WKLVSURGXFW
LQDQ\ZD\
'XULQJKLJKWHPSHUDWXUHZDVK
SURJUDPWKHGRRUJODVVPD\JHWKRW
'RQRWWRXFKLW
0DNHVXUHWKDWVPDOOSHWVGRQRW
FOLPELQWRWKHGUXP7RDYRLGWKLV
SOHDVHFKHFNLQVLGHWKHGUXPEHIRUH
XVLQJWKHDSSOLDQFH
$Q\REMHFWVVXFKDVFRLQVVDIHW\
SLQVQDLOVVFUHZVVWRQHVRUDQ\
RWKHUKDUGVKDUSPDWHULDOFDQFDXVH
H[WHQVLYHGDPDJHDQGPXVWQRWEH
SODFHGLQWRWKHPDFKLQH
2QO\XVHPDQXIDFWXUHU¶V
UHFRPPHQGHGTXDQWLWLHVRIIDEULF
VRIWHQHUDQGGHWHUJHQW'DPDJHWR
WKHIDEULFRUDSSOLDQFHFDQRFFXULI
\RXH[FHHGWKHUHFRPPHQGHG
DPRXQW
:DVKVPDOOLWHPVVXFKDVVRFNV
ODFHVZDVKDEOHEHOWVHWFLQD
ZDVKLQJEDJRUSLOORZFDVHDVLWLV
SRVVLEOHIRUVXFKLWHPVWRVOLSGRZQ
EHWZHHQWKHWXEDQGWKHLQQHUGUXP
'RQRWXVH\RXU:DVKHU'U\HUWR
ZDVKDUWLFOHVZLWKZKDOHERQHV
PDWHULDOZLWKRXWKHPVRUWRUQ
PDWHULDO
0DNHVXUHWKDWFKLOGUHQRUSHWVGRQRWFOLPELQWRWKH
GUXP
7KLVPDFKLQHLVSURYLGHGZLWKFKLOGVDIHW\ORFNRSWLRQ
WRSUHYHQWFKLOGUHQSOD\LQJZLWKWKHFRQWUROSDQHO
VHHSDJH
7KLVDSSOLDQFHLVQRWLQWHQGHGIRUXVH
E\SHUVRQVLQFOXGLQJFKLOGUHQZLWK
UHGXFHGSK\VLFDOVHQVRU\RUPHQWDO
FDSDELOLWLHVRUODFNRIH[SHULHQFHDQG
NQRZOHGJHXQOHVVWKH\KDYHEHHQ
JLYHQVXSHUYLVLRQRULQVWUXFWLRQ
FRQFHUQLQJXVHRIWKHDSSOLDQFHE\D
SHUVRQUHVSRQVLEOHIRUWKHLUVDIHW\
$OZD\VXQSOXJWKHDSSOLDQFHDQGWXUQ
RIIWKHZDWHUVXSSO\DIWHUXVHFOHDQ
DQGPDLQWHQDQFH
Ɣ
Ɣ
Ɣ
Ɣ
Ɣ
Ɣ
Ɣ
Ɣ
Ɣ
Ɣ
Ɣ
Ɣ
Ɣ
Ɣ
Ɣ
6ZZZZHVWLQJKRXVHFRPDXZZZZHVWLQJKRXVHFRQ]
1HYHUXVHWKH:DVKHU'U\HULIWKH
SRZHUVXSSO\FDEOHWKHFRQWURO
SDQHOWKHZRUNLQJVXUIDFHRUWKH
EDVHDUHGDPDJHGVRWKDWWKHLQVLGH
RIWKH:DVKHU'U\HULVDFFHVVLEOH
7KLVDSSOLDQFHLVKHDY\&DUHVKRXOG
EHWDNHQZKHQPRYLQJLW
:KHQXQSDFNLQJWKHDSSOLDQFHFKHFN
WKDWLWLVQRWGDPDJHG,ILQGRXEWGR
QRWXVHLWDQGFRQWDFWWKH6HUYLFH
&HQWUH
$OOSDFNLQJDQGWUDQVLWEROWVPXVWEH
UHPRYHGEHIRUHXVH6HULRXVGDPDJH
FDQRFFXUWRWKHSURGXFWDQGWR
SURSHUW\LIWKLVLVQRWDGKHUHGWR6HH
UHOHYDQWVHFWLRQLQWKHXVHUPDQXDO
8QGHUQRFLUFXPVWDQFHVVKRXOG\RX
DWWHPSWWRUHSDLUWKHPDFKLQH
\RXUVHOI5HSDLUVFDUULHGRXWE\
LQH[SHULHQFHGSHUVRQVPD\FDXVH
LQMXU\RUVHULRXVPDOIXQFWLRQLQJ
&RQWDFW\RXUORFDO6HUYLFH&HQWUH
$OZD\VLQVLVWRQJHQXLQHVSDUHSDUWV
1.4 Installation
$IWHUKDYLQJLQVWDOOHGWKHDSSOLDQFH
FKHFNWKDWLWLVQRWVWDQGLQJRQWKH
LQOHWDQGGUDLQKRVHDQGWKHZRUNWRS
LVQRWSUHVVLQJWKHHOHFWULFDOVXSSO\
FDEOH
,IWKHDSSOLDQFHLVLQVWDOOHGRQD
FDUSHWHGIORRUSOHDVHDGMXVWWKHIHHW
LQRUGHUWRDOORZDLUWRFLUFXODWHIUHHO\
$OZD\VEHVXUHWKDWWKHUHLVQRZDWHU
OHDNDJHIURPKRVHVDQGWKHLU
FRQQHFWLRQVDIWHUWKHLQVWDOODWLRQ
$Q\SOXPELQJZRUNUHTXLUHGWRLQVWDOO
WKLVDSSOLDQFHVKRXOGEHFDUULHGRXW
E\DTXDOLILHGSOXPEHU
$Q\HOHFWULFDOZRUNUHTXLUHGWRLQVWDOO
WKLVDSSOLDQFHVKRXOGEHFDUULHGRXW
E\DTXDOLILHGHOHFWULFLDQ
2QO\ZDVKIDEULFVZKLFKDUH
GHVLJQHGWREHPDFKLQHZDVKHG
)ROORZWKHLQVWUXFWLRQVRQHDFK
JDUPHQWODEHO
'RQRWRYHUORDGWKHDSSOLDQFH6HH
WKHUHOHYDQWVHFWLRQLQWKHXVHU
PDQXDO
%HIRUHZDVKLQJHQVXUHWKDWDOO
SRFNHWVDUHHPSW\DQGEXWWRQVDQG
]LSVDUHIDVWHQHG$YRLGZDVKLQJ
IUD\HGRUWRUQDUWLFOHVDQGWUHDWVWDLQV
VXFKDVSDLQWLQNUXVWDQGJUDVV
EHIRUHZDVKLQJ
*DUPHQWVZKLFKKDYHEHHQLQ
FRQWDFWZLWKYRODWLOHSHWUROHXP
SURGXFWVVKRXOGQRWEHPDFKLQH
ZDVKHG,IYRODWLOHFOHDQLQJIOXLGVDUH
XVHGFDUHVKRXOGEHWDNHQWRHQVXUH
WKDWWKHIOXLGLVUHPRYHGIURPWKH
JDUPHQWEHIRUHSODFLQJLQWKH
PDFKLQH
1HYHUSXOOWKHSRZHUVXSSO\FDEOHWR
UHPRYHWKHSOXJIURPWKHVRFNHW
DOZD\VWDNHKROGRIWKHSOXJLWVHOI
1.5 Use
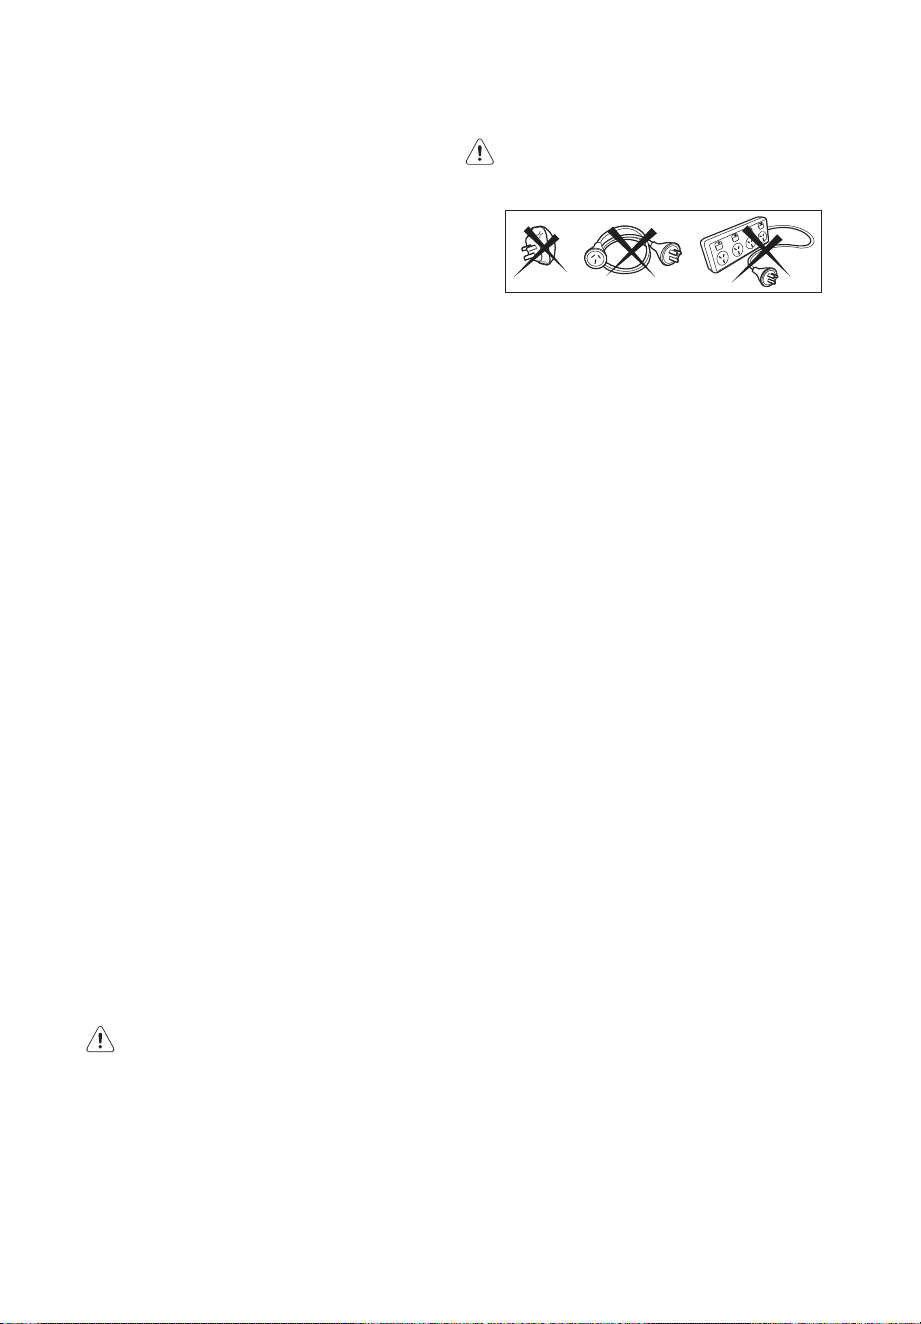
May cause electric shock! if the
machine is not connected to an
earthed/ground system. DO NOT
touch the wet clothes and metal
parts.
For safety reasons do not use
double adaptors, extension
cords and multi-plug adapters.
$VVRPHGXYHWVDQGHLGHUGRZQV
VKRXOGEHZDVKHGGULHGLQODUJH
FRPPHUFLDOPDFKLQHEHFDXVHRIWKHLU
EXONSOHDVHFKHFNZLWKWKHPDQXIDF
WXUHURIWKHLWHPEHIRUHZDVKLQJGU\
LQJLQDGRPHVWLFPDFKLQH
Ɣ
Ɣ
Ɣ
Ɣ
Ɣ
Ɣ
Ɣ
Ɣ
Ɣ
Ɣ
Ɣ
Ɣ
Ɣ
Ɣ
Ɣ
Ɣ

7
1HYHUWXPEOHGU\LWHPVZKLFKKDYH
KDGFRQWDFWZLWKFKHPLFDOVVXFKDV
GU\FOHDQLQJIOXLG7KHVHDUHRI
YRODWLOHQDWXUHDQGFRXOGFDXVHDQ
H[SORVLRQ2QO\WXPEOHGU\LWHPV
ZKLFKKDYHEHHQZDVKHGLQZDWHURU
UHTXLUHDLUULQJ
3ODVWLFGHWHUJHQWGLVSHQVHUVVKRXOG
QRWUHPDLQLQWKHGUXPGXULQJWKH
GU\LQJF\FOHDVWKHSODVWLFXVHGLVQRW
GHVLJQHGWRZLWKVWDQGWKHKHDW,I\RX
ZLVKWRZDVKWKURXJKWRGU\\RX
VKRXOGXVHWKHFRQYHQWLRQDOGHWHUJHQW
GLVSHQVHUGUDZHU
,ILWLVXQDYRLGDEOHWKDWIDEULFVFRQWDLQ
YHJHWDEOHRUFRRNLQJRLORUKDYHEHHQ
FRQWDPLQDWHGE\KDLUFDUHSURGXFWV
EHSODFHGLQZDVKHUGU\HULWVKRXOG
ILUVWEHZDVKHGLQKRWZDWHUZLWKH[WUD
GHWHUJHQWWKLVZLOOUHGXFHEXWQRW
HOLPLQDWHWKHKD]DUG7KH³FRROGRZQ´
F\FOHRIZDVKHUGU\HULVXVHGWR
UHGXFHWKHWHPSHUDWXUHRIWKHLWHPV
,WVKRXOGQRWEHUHPRYHGIURPWKH
ZDVKHUGU\HURUSLOHGRUVWDFNHG
ZKLOHKRW
7KHXVHUVVKRXOGDOZD\VFKHFNWKDW
WKH\KDYHQRWOHIWWKHLUJDVOLJKWHUV
GLVSRVDEOHRURWKHUZLVHLQWKHLU
FORWKLQJ
,WHPVWKDWKDYHEHHQVSRWWHGRU
VRDNHGZLWKYHJHWDEOHRUFRRNLQJRLO
FRQVWLWXWHDILUHKD]DUGDQGVKRXOG
QRWSODFHGLQDZDVKHUGU\HU
2LODIIHFWHGLWHPVFDQLJQLWHVSRQWD
QHRXVO\HVSHFLDOO\ZKHQH[SRVHGWR
KHDWVRXUFHVVXFKDVLQZDVKHUGU\
HU7KHLWHPVEHFRPHZDUPFDXVLQJ
DQR[LGDWLRQFUHDWHVKHDW
,IWKHKHDWFDQQRWHVFDSHWKHLWHPV
FDQEHFRPHKRWHQRXJKWRFDWFKILUH
3LOLQJVWDFNLQJRUVWRULQJRLODIIHFWHG
LWHPVFDQSUHYHQWKHDWIURPHVFDSLQJ
DQGVRFUHDWHDILUHKD]DUG
,WHPVFRQWDLQLQJIRDPUXEEHUDOVR
NQRZQDVODWH[IRDPRUVLPLODUO\
WH[WXUHGUXEEHUOLNHPDWHULDOVVKRXOG
QRWEHGULHGLQDZDVKHUGU\HURQD
KHDWVHWWLQJ
)DEULFVRIWHQHUVRUVLPLODUSURGXFWV
VKRXOGQRWEHXVHGLQDZDVKHUGU\HU
WRHOLPLQDWHWKHHIIHFWVRIVWDWLF
HOHFWULFLW\XQOHVVWKLVSUDFWLFHLV
VSHFLILFDOO\UHFRPPHQGHGE\WKH
PDQXIDFWXUHURIWKHIDEULFVRIWHQHURU
SURGXFW
8QGHUJDUPHQWVWKDWFRQWDLQPHWDO
UHLQIRUFHPHQWVVKRXOGQRWEHSODFHG
LQDZDVKHUGU\HU'DPDJHWRWKH
ZDVKHUGU\HUFDQUHVXOWLIPHWDO
UHLQIRUFHPHQWVFRPHORRVHGXULQJ
GU\LQJ:KHQDYDLODEOHDGU\LQJUDFN
FRXOGEHXVHGIRUVXFKLWPHV
3ODVWLFDUWLFOHVVXFKDVVKRZHUFDSV
RUEDELHV¶ZDWHUSURRIQDSNLQFRYHUV
VKRXOGQRWEHSODFHGLQZDVKHUGU\HU
)RDPUXEEHUPDWHULDOVFDQSURGXFH
ILUHE\VSRQWDQHRXVFRPEXVWLRQZKHQ
KHDWHG
,WHPVWKDWKDYHEHHQSUHYLRXVO\
FOHDQHGLQZDVKHGLQVRDNHGLQRU
VSRWWHGZLWKSHWUROJDVROLQHGU\
FOHDQLQJVROYHQWVRURWKHUIODPPDEOH
RUH[SORVLYHVXEVWDQFHVVKRXOGQRWEH
SODFHGLQZDVKHUGU\HU
+LJKO\IODPPDEOHVXEVWDQFHV
FRPPRQO\XVHGLQGRPHVWLFHQYLURQ
PHQWVLQFOXGHDFHWRQHGHQDWXUHG
DOFRKROSHWUROJDVROLQHNHURVLQHVSRW
UHPRYHUVVRPHEUDQGVWXUSHQWLQH
ZD[HVDQGZD[UHPRYHUV
1HYHUVWRSDZDVKHUGU\HUEHIRUH
WKHHQGRIWKHGU\LQJF\FOHXQOHVV
DOOLWHPVDUHTXLFNO\UHPRYHGDQG
VSUHDGRXWVRWKDWWKHKHDWLV
GLVVLSDWHG
CAUTION!
'RQRWGU\FORWKVLQZDVKHUGU\HU
ZLWKGU\FOHDQVROYHQWV$OVRGRQRW
XVHODXQGU\HQKDQFHPHQWSURGXFWV
GXULQJWKHGU\LQJF\FOH
To minimize the risk of fire in a
washer-dryer, the following should be
observed:
Ɣ
Ɣ
Ɣ
Ɣ
Ɣ
Ɣ
Ɣ
Ɣ
Ɣ
Ɣ
Ɣ
Ɣ

8 www.westinghouse.com.au / www.westinghouse.co.nz
PRODUCT DESCRIPTION2.
Detergent/Softener
Dispenser
(see page 18)
Cabinet
Front Panel
Door
Drain Pump Filter
(see page 29)
Level Adjustment
Feet (Front)
Level Adjustment
Feet (Back)
Water Inlet Hose
(see page 41)
Transit Bolts &
Hose Support
Transit Bolts &
Hose Support
Mains Cable
Water Drain Hose
(see page 41)
2.1 Parts
Worktop
Control Panel
(see page 10)
Transit Bolts
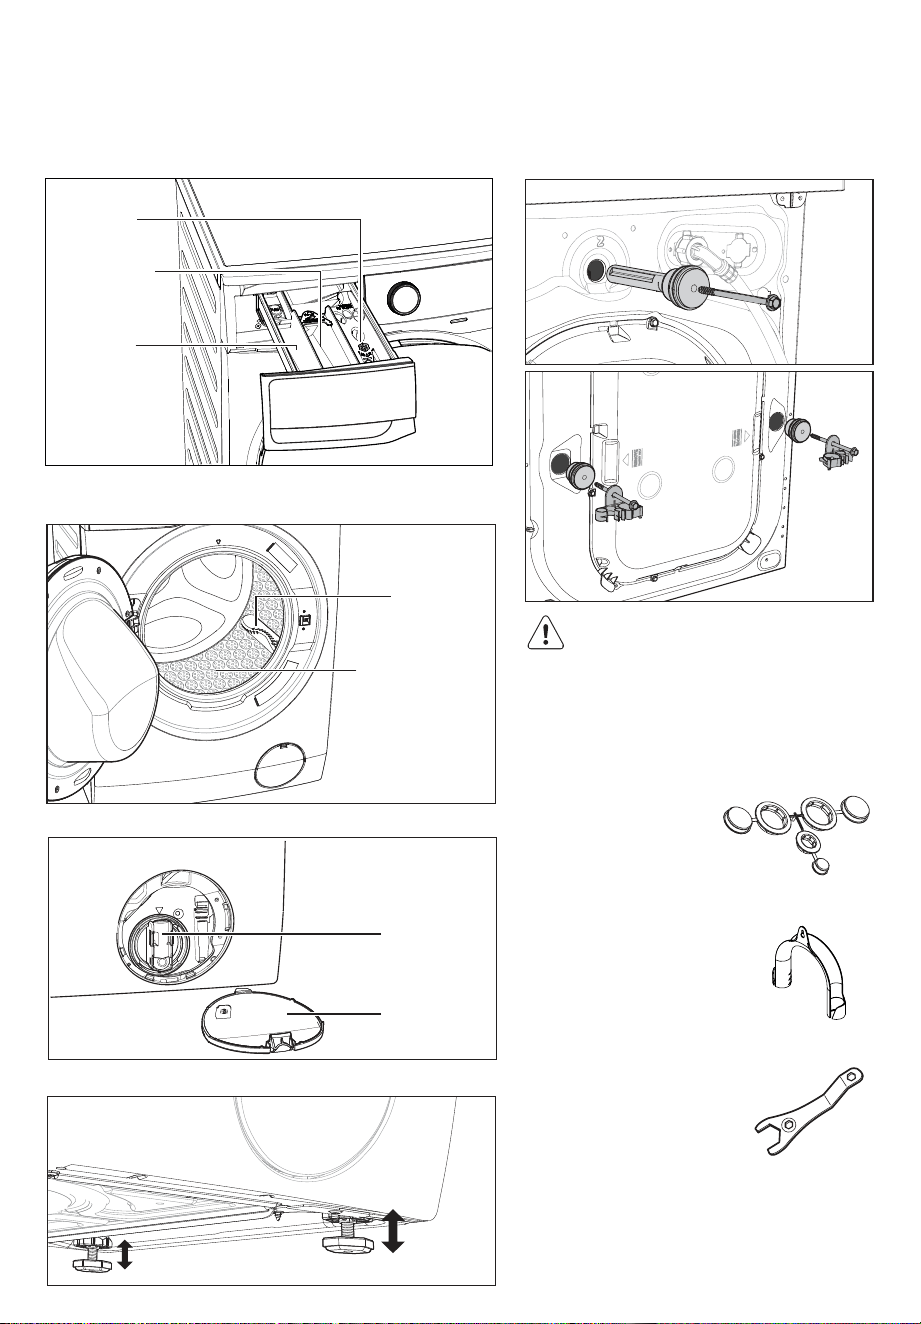
9
Drum Lifter
2.2 Accessories
To connect the drain hose
on the edge of a sink.
To close the holes on
the rear side of the
cabinet after the
removal of the transit
bolts.
Plastic Caps
Plastic Hose Guide
Stainless Steel
Washing Drum
Detergent/Softener Dispenser
(For more informations, see page 18, 28)
Door (when open)
(for more informations, see page 18)
Transit Bolt (when remove)
Transit bolts must be removed
before using the appliance.
Drain Pump Filter (when open)
Level Adjustment Feet
Softener
Prewash
Main Wash
To remove the transit bolts.
To adjust levelling legs.
Spanner
Drain Pump
Filter Door
Drain Pump
Filter
Drain Pump
Filter Door
Drain Pump
Filter
10 www.westinghouse.com.au / www.westinghouse.co.nz
CONTROL PANEL3.
3.1 Control Panel Description
Display
A)
Door Lock Icon
B)
Rinse Hold Icon
C)
Extra Rinse Icon
D)
Spin Speed
E)
Add Clothes Icon
F)
Time Dry Icon
G)
Dryness Level Icon
H)
Anticrease Phase Icon
I)
Program Time
A
I
H
G
E F
B
D
C
Extra dry Cupboard dry
Iron dry
CA DB E
N O
F G H
I J K L M
A
Program knob
I
Display
B
Mode Selection touchpad
J
Time Dry touchpad
C
On/Off button
K
Dryness Level touchpad
D
Temp touchpad
L
Pause to add Clothes option
E
Spin touchpad
M
Start/Pause touchpad
F
Plus Hygiene touchpad
N
Extra Rinse Option
G
Delay Start touchpad
O Favourite program save option
P Prewash Option
H
Confirm Start touchpad
Confirm
Start
Prewash
P

11
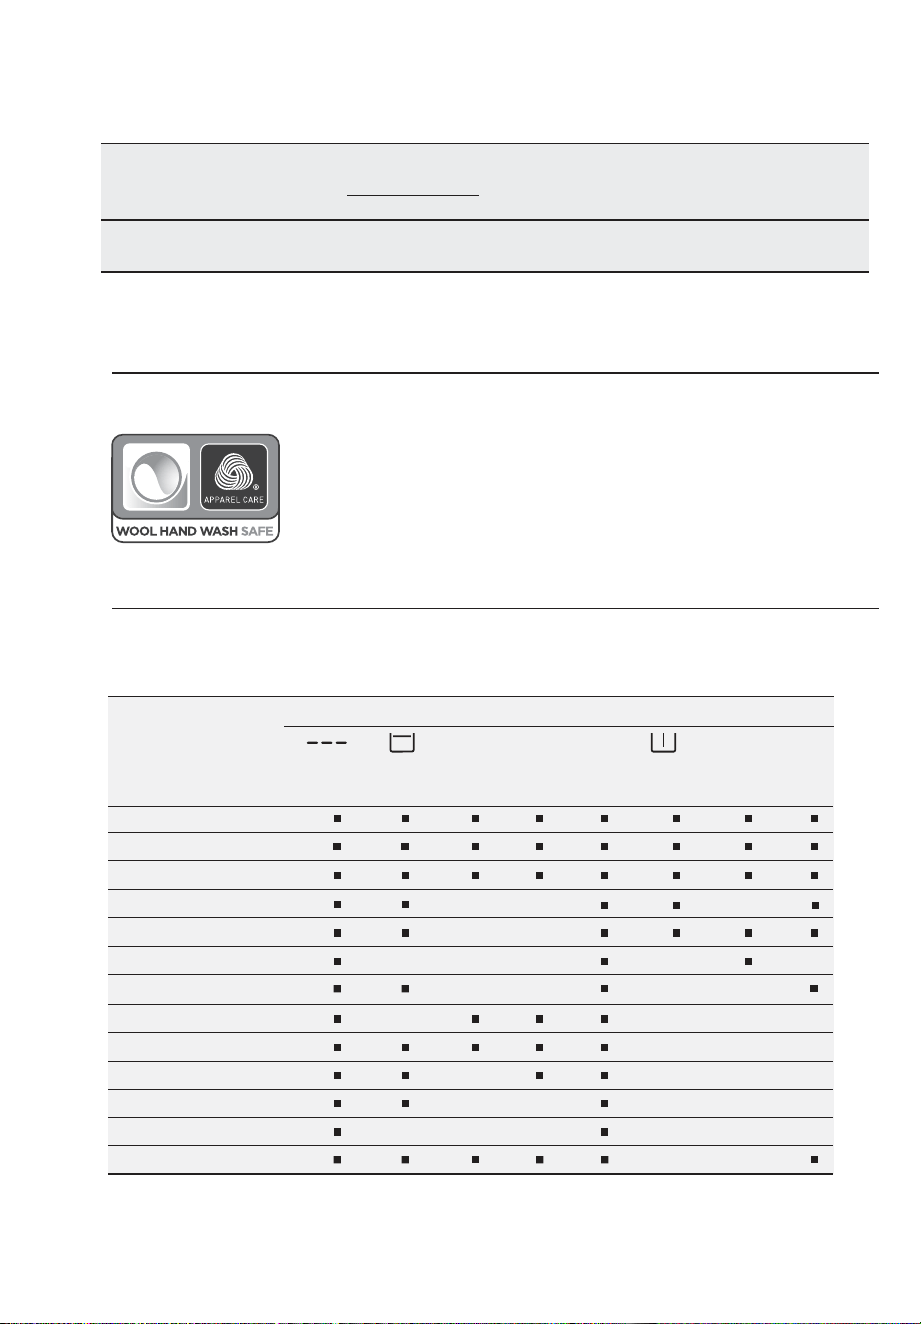
3.2 Program Chart
Program;
Temperature
range
Cold to 90°C
1200
rpm
9 kg 5 kg
9 kg 5 kg
9 kg 5 kg
9 kg
9 kg 5 kg
2 kg 1 kg
5.5 kg
4 kg 3 kg
1200
rpm
800
rpm
3 kg –
–
1200
rpm
1200
rpm
1200
rpm
1200
rpm
1.5 kg
1200
rpm
–
–
Type of load and soil level Max.
Spin
Speed
Max. Load
(Dry Clothes)
Lightly soiled synthetics or mixed fabrics.
Cold to 60°C
1200
rpm
60°C
Cold to 40°C
Cold to 60°C
30°C to 40°C
Bedding; Special program for one synthetic blanket,
duvet, bedspread and so on.
1200
rpm
Cold to 90°C
Extra Dirty; Heavily soiled cotton fabrics.
Rinse & Spin To rinse and spin the laundry.
Drain & Spin To spin the laundry and drain the water in
the drum.
Eco Cotton;
1)
White and colourfast cotton. Set this program
to have a good washing results and decrease
the energy consumption. The time of the
washing program is extended.
Daily wear coloured cotton clothes such as
shirts, blouses, towels and undergarments.
Ideal for low level of soil.
Cotton;
Mixed;
Daily 39;
Fast 15;
White and coloured cotton.
Synthetic or mixed fabric items.
5 k g –
Anti Allergy;
This cycle removes odours and helps to
dewrinkle the laundry
Do not add detergent.
1200
rpm
Cold to 40°C
Cold to 30°C
Specially tested program for woollen
garments bearing the “Pure new woollen,
non-shrink, machine washable” label.
Wool ;
Wash Dry
1200
rpm
4 kg –
Cold to 40°C
Delicate;
Delicate fabrics such as acrylics, viscose,
polyester items.
1 kg
30°C, 40°C
1200
rpm
1 kg
Wash Dry 60;
Non-Stop washing and drying program for
3 - 5 shirts with lightly soil.
9 kg
30°C to 60°C
1200
rpm
4 kg
Full Load 60;
Daily wear coloured cotton clothes such as
shirts, blouses, towels and undergarments.
Ideal for normal level of soil.
12 www.westinghouse.com.au / www.westinghouse.co.nz
Program;
Temperature
range
Type of load and soil level Max.
Spin
Speed
Max. Load
(Dry Clothes)
Wash Dry
1) Eco Cotton Program with 40degC option selected is recommended for a full load of
normally soiled cotton and is the Energy and Water rating label program.
Woolmark Apparel Care - Blue
The wool wash cycle of this machine has been approved by The
Woolmark Company for the washing of wool garments labelled as
“hand wash” provided that the garments are washed according
to the instructions issued by the manufacturer of this machine.
Follow the garment care label for drying and other laundry instructions.
M1361
The Woolmark symbol is a Certification mark in many countries.
– ––
Favourite
Recall you favourite program.
3.3 Program Options Compatibility
Program
Option
Cotton
Mixed
Bedding
Anti Allergy
Eco Cotton
Drain & Spin
Rinse & Spin
Fast 15
Daily 39
Wool
Delicate
1)
2)
3)
2)
Dryness
Level
PrewashTime
Dry
Plus
Hygiene
No
Spin
Rinse
Hold
Delay
Start
Extra
Rinse
Extra Dirty
Full Load 60
13
Temperature Touchpad
Press this touchpad repeatedly to
increase or decrease the wash
temperature if you want your laundry to
be washed at a temperature different
from the one proposed by the
Washer-Dryer.
Spin Selection Touchpad
Press this touchpad repeatedly to
increase or decrease the spin speed or
select Rinse Hold, if you want your
laundry to be spun at a speed different
from the one proposed by the
Washer-Dryer.
3.4 Options
Wash/Dry Mode Touchpad
This touchpad is used to select Program
Mode of your machine. Program mode
available are :
1) Plus Hygiene option can be combined with temperature 40°C to 90°C only .
2) Do not select a spin speed LOWER than that proposed by the appliance to avoid a
too long drying time so saving energy. In any case the reduction of the spin speed is
only possible after selecting drying.
3) This program can select only “Cupboard Dry” option.
Program
Option
Favourite
Wash Dry 60
1)
2) 2)
Dryness
Level
PrewashTime
Dry
Plus
Hygiene
No
Spin
Rinse
Hold
Delay
Start
Extra
Rinse
If a mode is not compatible with
program selected, the symbol “ ”
will flash on display along with
buzzer sound.
Changing a running program mode
is possible only by switching off
the machine.
Wash-Only Mode (default)
Wash + Dry Mode
Dry-Only Mode
●
●
●
●
●
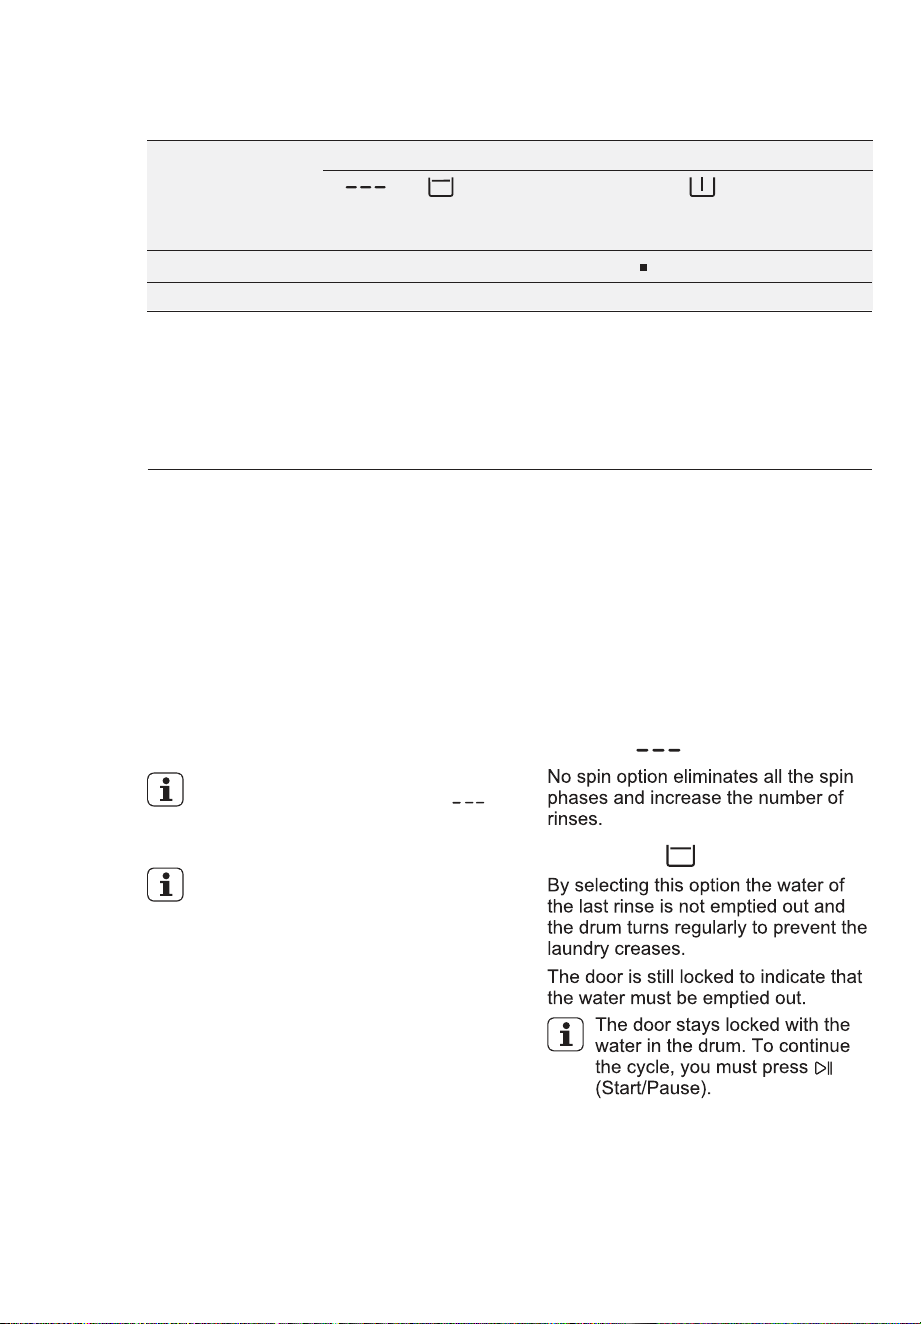
No Spin ( )
Rinse Hold ( )
14
NOTE
NOTE
●
●
●
●
●
●
●
●
●
●
●
15
Ɣ
Ɣ
Ɣ
Ɣ
The drying time can vary according to :
the final spin speed;
dryness level (Extra Dry or Cupboard
Dry or Iron Dry);
the type of laundry;
the size of load.
Duration of the drying cycle
After drying fluffy fabrics, such as new
towels, it is advisable to perform a
“Rinse & Spin” program to ensure that
any residue that may remain in the tub is
completely removed and does not stick to
garments dried afterwards. After each
drying cycle, clean the drain pump filter.
Please refer to care and cleaning in
section 11 “CARE AND CLEANING”.
Fibre residue
Type of fabric
Load
(kg)
Spin Speed
(rpm)
Suggested
Times (Hrs)
Cotton and linen
(bathrobes, bath towels, etc.).
Dry Time Option Guidelines:
Max.
1)
2.5 - 4.5
2
1200
1200
1200
3 - 4
2 - 3
1 - 2
Synthetic or mixed fabric items
( jumpers, blouses, underwear,
household linen, etc.).
Wool and hand washable wool.
3
1
1200
1200
2 - 3
1
1 120
0 2
Dryness Level Touchpad
Press this touchpad to set dryness level
using auto sensing feature. The display
will show the selected option.
Level of dryness Type of fabric Load
Extra Dry
Ideal for towels or similar
Suitable for items to put
away without ironing
Cotton and linen
(bathrobes, bath towels, etc)
up to Max.
1)
kg
Cupboard Dry
Suitable for ironing
Iron Dry
Cotton and linen
(bathrobes, bath towels, etc)
Synthetics and mixed fabrics (jumpers,
blouses, underwear, household linen)
Cotton and linen
(sheets, tablecloths, shirts, etc.)
up to Max.
1)
kg
up to Max.
1)
kg
up to 3 kg
Dryness Option Guidelines:
Extra dry
Cupboard dry
Iron dry
Dryness level settings are based on
wash program selected.
The final time value is the total duration
of the washing + detachment + drying
cycles, calculated on a default load size.
NOTE
At the end of the program the appliance
performs the anti-crease phase for
approximately
10 minutes. During this
time, the display will show time remaining
“ ” and door is locked “ ”.
If you wish to open the door during
the anti-crease phase or interrupt it,
press Start/Pause touchpad.
1) Maximum capacity depended on the model of the Washer Dryer (see defined on the
control panel).
1) Maximum capacity depended on the model of the Washer Dryer (see defined on the
control panel).
Ɣ
Ɣ
Ɣ
Ɣ
Ɣ
Ɣ
16 www.westinghouse.com.au / www.westinghouse.co.nz
To save favourite program, press and
hold “ Delay Start ” touchpad about 2
seconds and you will hear the sound
and “ ” is flashing on the
display.
Save Favourite ( ) Program
3.5 Settings
Program settings that are frequently used
can be saved (e.g. Cotton, 60°C, 1200
rpm, with Prewash and Plus Hygiene).
To program/re-program Favourite with
your own selections and save them,
proceed as follows:
1. Put machine in Stand-By mode.
2. Select your desired wash settings.
To recall the favourite wash program,
turn selector knob to “Favourite ”
program. You will get acknowledgement
on the display when the Favourite
program is loaded.
3.
Additional drying
To prevent the formation of creases
or shrinking of fabrics, avoid
excessive drying.
WARNING!
Should the laundry still be too wet at the
end of the program, set another short
drying cycle.
The final part of a washer - dryer cycle
occurs without heat (cool down cycle).
This ensures the laundry will be left at
a low temperature.
Child Safety Lock ( ) Option
Your appliance is provided with CHILD
SAFETY LOCK which permits you to
leave the appliance unsupervised with
the door closed without having to worry
that children might be injured by or cause
damage to the appliance.
Set this option after pressing the
Start/Pause touchpad.
To activate the function, press and
hold “Delay Start ” and “Confirm Start”
touchpads about 3 seconds until the
display shows the icon “ ”.
To set “Child Lock” option:
To deactivate the function, press and
hold “Delay Start ” and “Confirm Start”hold “Delay Start ” and “Confirm Start”
touchpads about 2 seconds until the
display shows the icon “ ”.
This function remains enabled
even after the appliance is
switched off.
The touchpads are locked
(except for the On/Off button).
If you press any touchpad while
Child Lock is activated, the icon
“ ” will flash on display
3 times along with buzzer sound.
Extra Rinse Option
This option is recommended for people
who are allergic to detergents, and in
areas where the water is very soft. Use
this option to add two rinse phases to a
program.
To activate the option, press and hold
To activate the option, press and hold
“Confirm Start” touchpad about 2 seconds.
“Plus Hygiene” touchpad about 2 seconds
until the display shows the icon “ ”.
To deactivate the option, press and
hold “Plus Hygiene” touchpad about
2 seconds until the icon “ ” goes off.
This option remains enabled even
after the appliance is switched off.
17
Error warning beeps such as critical
faults are not disabled.
To disable the buzzer sound, press
“Temp” and “Spin” touchpads at the
same time about 3 seconds,
the icon “ ” will show on display
along with buzzer sound.
To return to default configuration press
these 2 touchpads at the same time
about 3 seconds, the icon “ ” will
show on display along with buzzer
sound.
This setting permits you to either enable
or disable the buzzer at the end of the
program. As an example, you might wish to
disable this buzzer when you start a wash
when going to bed, so that when the wash
finished approximately 1 hour later, it will
not disturb you through the night.
Enabling/Disabling End-Of-Wash
Buzzer
3.6 Start/Pause ( ) and
Add Clothes ( ) Touchpad
This touchpad has 2 functions:
Start/Pause ( )1.
To interrupt a program which is
running, press this touchpad to pause
the machine, the Start/Pause pilot light
flashes.
To restart the program from the point
at which it was interrupted, press this
touchpad again, the Start/Pause pilot
light will stop flashing.
To start the machine, pressing
"Start/Pause" touchpad is required
as the 1st step action before
pressing "Confirm Start" touchpad
as the 2nd step action.
Add Clothes ( )2.
To add clothes:
Pressing the “Start/Pause”
touchpad to pause the program.
You can only add clothes when
the icon “ ” shown on the
display.
1.
Wait for the machine to come to a
complete stop before opening the
door (wait for door lock “ ” icon
to turn off).
2.
4.
Add clothing and close the door.
3.
Resume the program by press
“Start/Pause” and “Confirm Start”
touchpad again.
BEFORE FIRST USE4.
Ensure that the electrical and water
connections comply with the
installation instructions.
Put 2 litres of water in the detergent
compartment for washing phase. This
activates the drain system.
1.
2.
3.
Select a Cottons cycle at 90 °C,
without any laundry in the machine, to
remove any manufacturing residue
from the drum and tub then start the
machine.
During installation or before first use
you may observe some water in the
machine. This is a residual water left in
the machine after a full functional test
in the factory to ensure the machine is
delivered to customers in perfect
working order and is no cause for
concern.
NOTE
To activate this option:
1. Press the "Start/Pause" touchpad.
The Confirm Start LED will begin
blinking.
2. Within 10 seconds, press the
"Confirm Start" touchpad to begin
the programme.
To comply with the new
Australia and New Zealand
safety regulations, your machine
requires two manual steps to
start a cycle. This feature is
designed to prevent accidental
operation, especially by children
If the "Confirm Start" touchpad is
not pressed within 10 seconds,
the LED will turn off and the
machine will return to
programme setup mode.
This two-step start mechanism
is part of the AS/NZS 60335.2.7
safety standard. Always
supervise children around
appliances
If you have selected
a “Delay End” option, the
countdown will begin and will
be shown on the display after
pressing “Confirm Start” touchpad.
3.7 Confirm Start Touchpad
18 www.westinghouse.com.au / www.westinghouse.co.nz
18ZZZZHVWLQJKRXVHFRPDXZZZZHVWLQJKRXVHFRQ]
'$,/<86(:$6+,1*2QO\5.
3UHVVWKH2Q2IIEXWWRQWRWXUQRQWKH
:DVKHU'U\HU7XUQWKHNQREWRVHWD
SURJUDP7KH:DVKHU'U\HUZLOO
SURSRVHDWHPSHUDWXUHDQGDXWRPDWL
FDOO\VHOHFWWKHVSLQYDOXHSURYLGHGIRU
WKHSURJUDP\RXKDYHFKRVHQ
&KHFNDQGUHPRYHREMHFWVLIWKHUH
DUHDQ\WKDWFRXOGEHWUDSSHGLQWKH
IROG
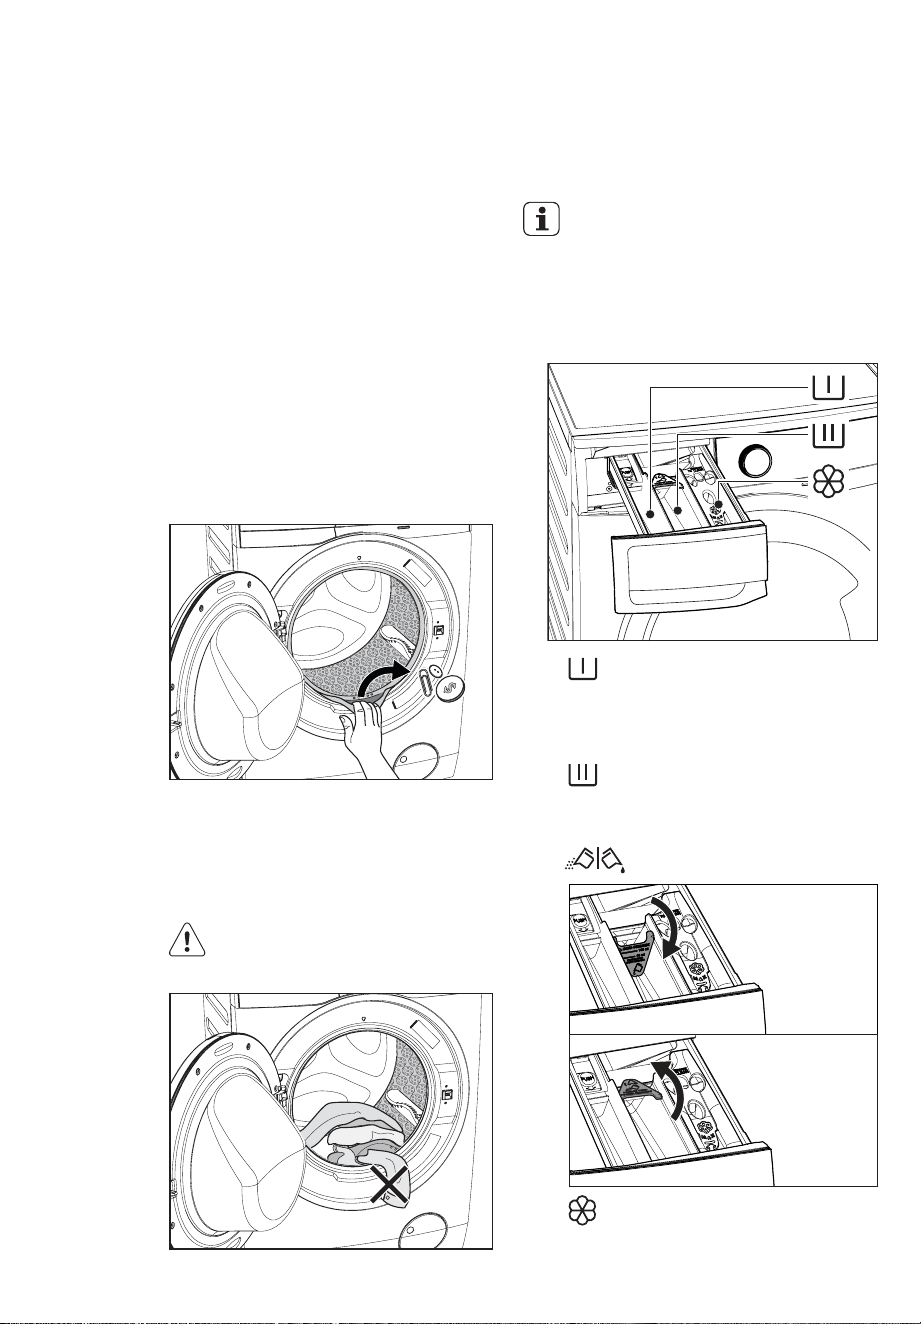
5.1 Loading The Laundry
&RQQHFWWKHPDLQSOXJWRWKHPDLQ
VRFNHW
7XUQWKHZDWHUWDSRQ
3ODFHWKHODXQGU\LQWKHGUXPRQH
LWHPDWDWLPHVKDNLQJWKHPRXWDV
PXFKDVSRVVLEOH5HIHUWRSDJH
³:$6+,1*+,176´
&ORVHWKHGRRU
0DNHVXUHWKDWQRODXQGU\
UHPDLQVEHWZHHQWKHVHDODQG
WKHGRRU
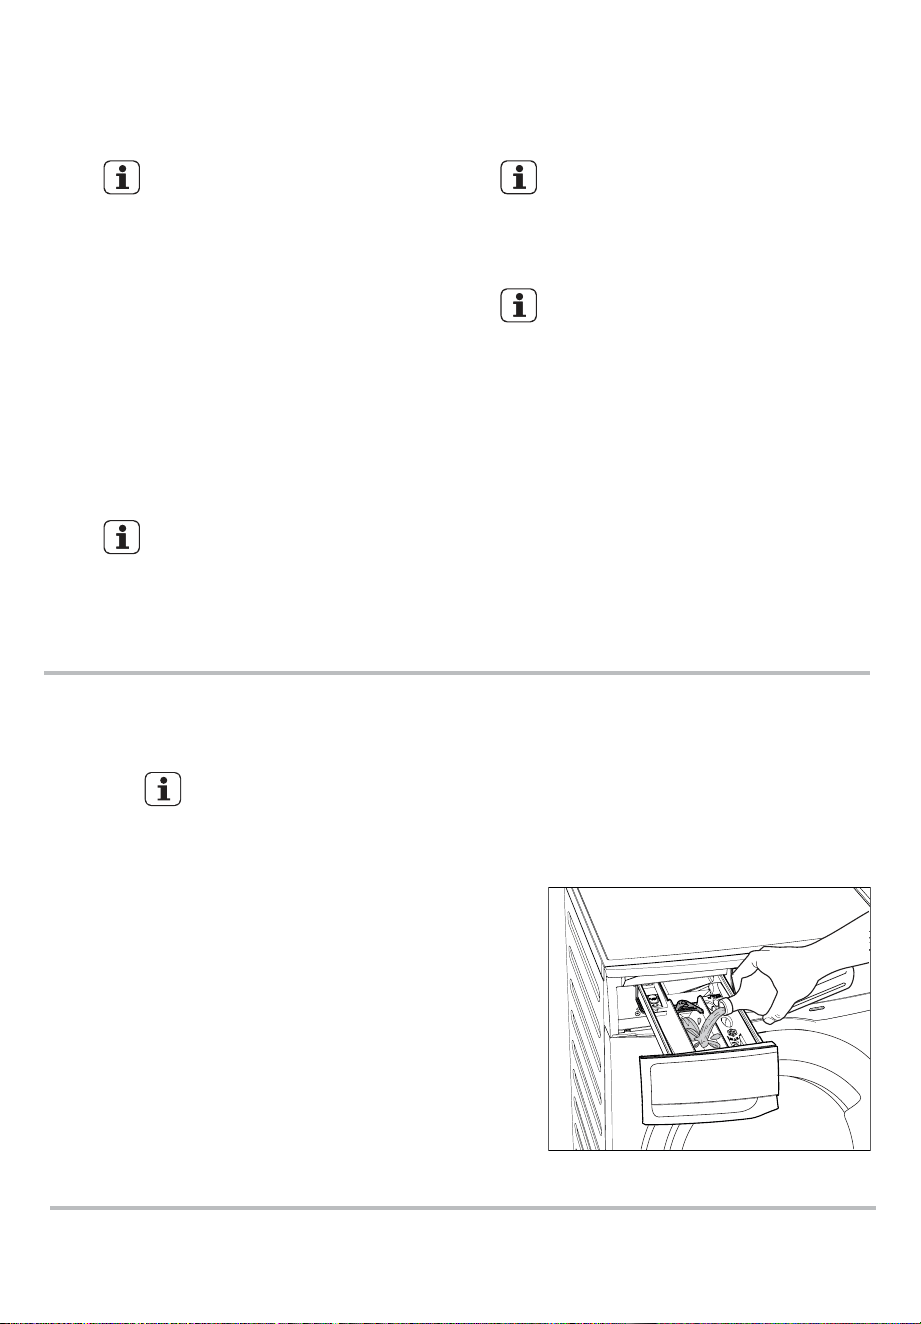
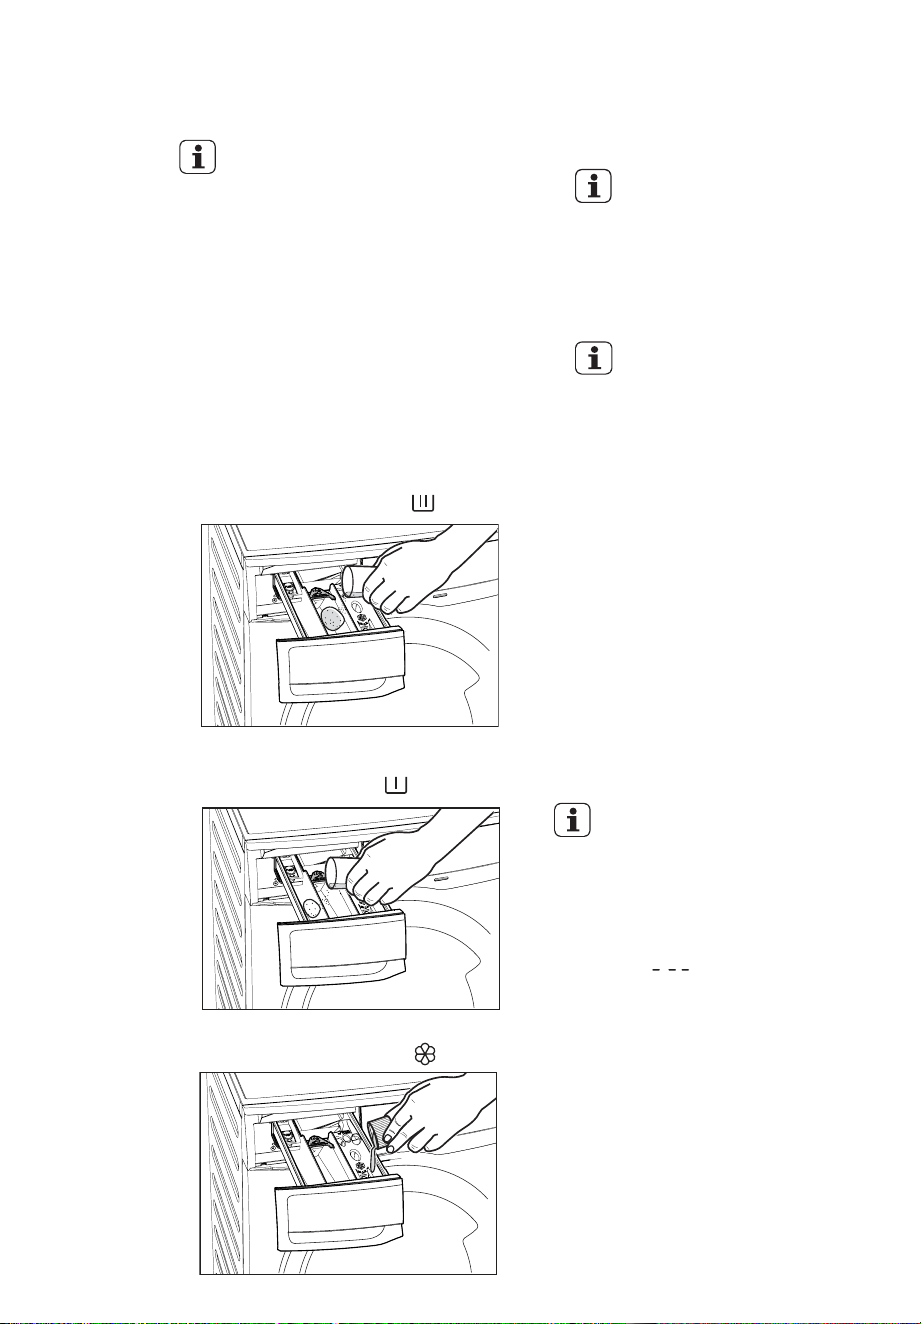
'HWHUJHQW'LVSHQVHU'UDZHU
7KHGHWHUJHQWGLVSHQVHULVGLYLGHG
LQWRWKUHHFRPSDUWPHQWV
Please read “Detergents Type
and Quantity of Detergent”on
page 25 before use.
5.2 Using Detergent And
Additives
&RPSDUWPHQW³35(:$6+´
7KLVFRPSDUWPHQWLVRQO\XVHGIRU
GHWHUJHQWZKHQD³3UHZDVK´RSWLRQ
LVVHOHFWHG
&RPSDUWPHQW³0$,1:$6+´
7KLVFRPSDUWPHQWLVXVHGIRU
GHWHUJHQWRQDOOSURJUDPV
7KHVHOHFWRUNQREFDQEHWXUQHGHLWKHU
FORFNZLVHRUFRXQWHUFORFNZLVH
&RPSDUWPHQW³62)7(1(5´
7KLVFRPSDUWPHQWLVXVHGIRUIDEULF
FRQGLWLRQHUDQGVWDUFKLQJDJHQW
'HWHUJHQWIODS
Position down
IRUOLTXLG
GHWHUJHQW
Position up
IRUSRZGHU
GHWHUJHQW
●
●
●
19
19
0HDVXUHRXWWKHDPRXQWRI
GHWHUJHQWUHTXLUHGSRXULWLQWRWKH
PDLQZDVKFRPSDUWPHQW
'RQRWXVHJHODWLQRXVRUWKLFN
OLTXLGGHWHUJHQWV
'RQRWSXWPRUHOLTXLGWKDQWKH
PD[LPXPOHYHO
'RQRWVHWWKH³'HOD\6WDUW´
'RQRWVHWWKH³3UHZDVK´SKDVH
When you use the liquid
detergent
3XOORXWWKHGLVSHQVHUGUDZHUXQWLO
LWVWRSV
0HDVXUHRXWWKHGHWHUJHQWDQGWKH
IDEULFVRIWHQHU
&ORVHWKHGUDZHUJHQWO\
5HVLGXHVRIGHWHUJHQWVRIWHQHU
DQGZDWHUPD\UHPDLQLQWKH
GLVSHQVHU,WLVUHFRPPHQGHGWR
FOHDQWKHGLVSHQVHUUHJXODUO\WR
UHPRYHDQ\UHVLGXH
7KHVRIWHQHUDPRXQWXVHGPXVW
QRWH[FHHGWKH³0$;´PDUNLQWKH
GUDZHU
,I\RXXVHWKLFNVRIWHQHUVLWLV
UHFRPPHQGHGWRGLOXWHZLWKZDWHU
,I\RXZDQW\RXUODXQGU\WREHVSXQRU
XVHWHPSHUDWXUHGLIIHUHQWIURPWKHRQH
SURSRVHGE\WKH:DVKHU'U\HUSUHVV
³6SLQ´DQG³7HPS´WRXFKSDGV
UHSHDWHGO\WRFKDQJHWKHVSLQVSHHG
DQGWHPSHUDWXUH
3UHVVWKHRSWLRQWRXFKSDGVLI\RX
ZDQW\RXUODXQGU\WREHZDVKHGZLWK
VSHFLDOIXQFWLRQV
'LIIHUHQWIXQFWLRQVFDQEH
FRPELQHGZKLFKLVGHSHQGHQWRQ
WKHSURJUDPVHOHFWHG
,IDQRSWLRQLVQRWFRPSDWLEOHZLWK
WKHZDVKSURJUDPVHOHFWHGWKH
V\PERO³´ZLOOIODVKRQGLVSOD\
DORQJZLWKEX]]HUVRXQG
,I\RXZDQWWRGHOD\WKHVWDUWRIWKH
ZDVKLQJSURJUDPSUHVVWKH
³'HOD\6WDUW´WRXFKSDGUHSHDWHGO\WR
FKRRVH\RXU:DVKHU'U\HUGHOD\
WLPH
5.3 Options Setting
í
í
NOTE
NOTE
NOTE
,I\RXZLVKWRFDUU\RXWWKH
³3UHZDVK´SKDVHSRXULWLQWRWKH
FRPSDUWPHQWPDUNHG
,IUHTXLUHGSRXUIDEULFVRIWHQHULQWR
WKHFRPSDUWPHQWPDUNHG
í
í
20 www.westinghouse.com.au / www.westinghouse.co.nz

21
The appliance will automatically adjust
the selected program duration
according to the type and size of the
load.
-
The display will show adjusted
program duration.
-
5.4 Starting A Cycle ( )
After approx. 15 minutes from the start of
a program:
If you press any touchpad while a
program is operating, the symbol “ ”
will flash on display along with buzzer
sound. (except Start/Pause touchpad and
On/Off button)
To pause, press Start/ Pause.
The indicator will start flashing.
-
-
Changing a running program is possible
only by switching off the appliance.
Press the “On/Off” button to cancel
the program and to turn off the
appliance.
-
5.5 Interruption Of A Program
5.6 Changing A Program
It may be possible to change some of the
options after a program has started.
Press the “On/Off” button again to
start the appliance.
-
5.7 Changing The Options
Press the touchpad Start/Pause. The
indicator will start flashing.
1.
If available change the options that
you wish.
2.
3.
While a program or the Delay Start is
operating, the appliance door is locked
and the display shows the indicator “ ”.
First, set the machine to PAUSE by
pressing the “Start/Pause” touchpad. Wait
until the door lock indicator goes off, then
the door can be opened.
If the door lock indicator “ ” does not
disappear, this means that the machine
is already heating and the water level is
above the bottom edge of the door or the
drum is turning. In this case the door
CAN NOT be opened. If you need to
open it, you must drain the water to open
the door.
In case of emergency please
refer to “Emergency door
opening” on page 37.
5.8 Opening The Door
NOTE
NOTE
The appliance will not drain the water
(except programs; Rinse & Spin,
Drain & Spin)
The appliance stops automatically.
The acoustic signal will operate.
The display will show “ ”.
The indicator of the touchpad
Start/Pause goes off.
-
-
-
-
-
-
-
-
The door lock indicator “ ” goes off.
Remove the laundry from the
appliance. Make sure that the drum is
empty.
Keep the door partly open, to prevent
the mildew and odours.
Turn off the water tap.
5.9 At The End Of The Program
To start a program, press the “Start/Pause”
then follow by “Confirm Start” touchpad
within 10 second. The corresponding pilot
light will stop flashing and a default program
duration will be displayed on the screen.
To start a program, press the “Start/Pause”
then follow by “Confirm Start” touchpad
within 10 second. The corresponding pilot
light will stop flashing and a default program
duration will be displayed on the screen.
Press the “Start/Pause” and
“Confirm Start” again.
The program will continue.
Now you can set a new wash program
and change any available options. Press
“Start/Pause” and “Confirm Start” to start
the new program.
Press
“Start/Pause” and “Confirm Start”
again. The program will continue.
22
5.10 When The Washing
Program Is Completed, But
There Is Water In The Drum
(Option “Rinse Hold ” is used)
You must drain the water to
open the door.
5.11 AUTO Off Mode
NOTE
To drain the water:
Alternatively
NOTE
www.westinghouse.com.au / www.westinghouse.co.nz
23
DAILY USE - DRYING (Only)6.
The water tap must be open
and the drain hose must be
positioned in the sink or
connected to the drain pipe.
Make sure the load size does not
exceed the maximum drying
capacity of the machine.
2.
Press the On/Off button to turn on the
machine.
1.
Turn the knob to set a wash program
which can select drying option (refer
to Program Chart on page 11),
according to your clothes then press
Mode touchpad to switch your
machine to Dry Only Mode.
3.
If you wish to select an automatic
drying, press the “Dryness Level”
option until the icon corresponding to
the required dryness level appears on
the display. (see page 15)
4.
5.
Press “Start/Pause ” and “Confirm Start”
touchpad to start the program. The time
remaining is updated every minute.
6.
If you wish to select a timed drying,
press the “Time Dry ” option
repeatedly until desired drying time
reached. (see page 14)
After anti-crease phase finish, the
door lock indicator “ ” goes off.
The display will show “ ”.
The display will show “ ” and
“Anticrease ( )” icon is lit.
The door lock indicator “ ” is still
on.
The appliance will perform the anti-
crease phase for approximately 10
minutes.
If you wish to open the door
during the anti-crease phase
or interrupt it, press
Start/Pause touchpad.
The acoustic signal will operate.
-
-
-
-
At the end of the program :
7.
Press “On/Off” button to switch the
machine off.
8.
9.
At the end of each drying cycle,
the temperature of your clothing
will be high. For your safety,
please leave the door open to
let your clothes cool before
removing your laundry.
If a program is not compatible
with the drying option selected,
the symbol “ ” will flash on
display.
DAILY USE - WASHING & DRYING (Non-Stop Program)7.
Load the laundry and add detergent
and fabric softener. Make sure the load
size does not exceed the maximum
drying capacity of the machine.
1.
Turn the knob to set a wash program
which can select drying option (refer to
Program Chart on page 11), according
to your clothes then press Mode
touchpad to switch your machine to
Wash + Dry Mode.
2.
Select the required options by
pressing the relevant touchpads. If
possible, do not select a spin speed
lower than that proposed by the
machine to avoid unnecessary longer
drying time therefore saving energy.
3.
Set the dryness level by pressing
“Dryness Level” touchpad.
The display will then show the whole
duration of wash & dry cycle.
4.
Start the program by pressing
“Start/Pause” and “Confirm Start”
touchpad. The time remaining is
updated every minute on the display.
5.
7.1 Washing Program + “Dryness Level” Option
24
●
●
●
●
NOTE
1.
Mode
Wash + Dry Mode
2.
4.
5.
6.
3.
6.
7.2 Washing Program + “Time Dry ” Option
NOTE
●
●
www.westinghouse.com.au / www.westinghouse.co.nz
25
8.
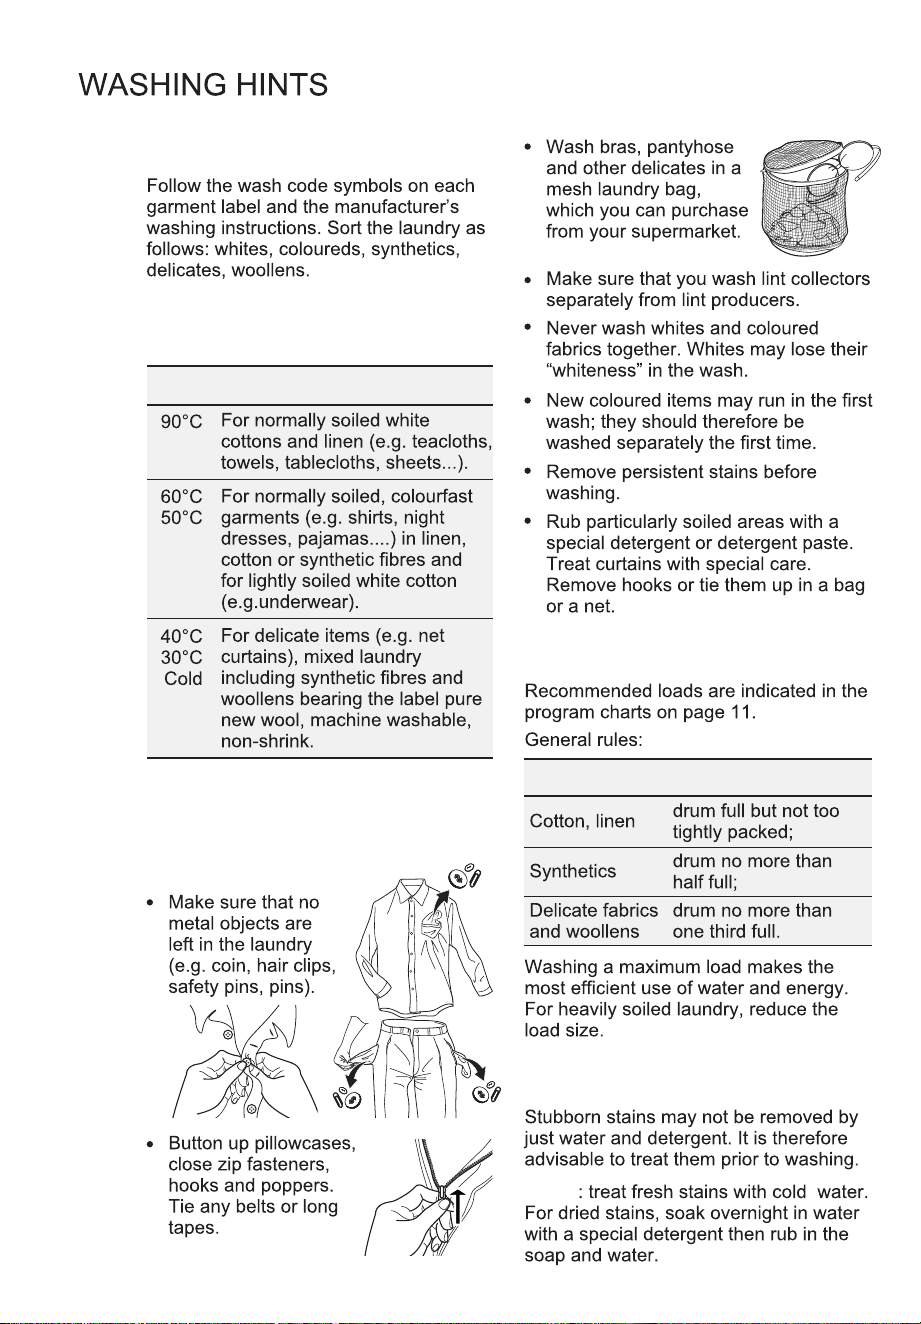
8.1 Sorting The Laundry
8.2 Temperatures
Temp Soil level
8.3 Before Loading The
Laundry
Clothes Load Quantity
8.4 Maximum Loads
Blood
8.5 Removing Stains

26
Oil based paint
Dried grease stains
Rust
Mould stains
Grass
Ball point pen and glue
Lipstick
Red wine
Ink
Tar stains
8.6 Detergents Type And
Quantity Of Detergent
Do not use wrong types of detergent,
such as Top Loading, Handwash
detergent or Soap-Based products in
your frontload Washer-Dryer. This can
result in excessive suds, longer cycle
time, low spin speeds, poor rinsing
and overloading of the motor.
www.westinghouse.com.au / www.westinghouse.co.nz
27
DRYING HINTS9.
the washload to turn grey,
greasy clothes.
oversudsing,
inadequate rinsing.
reduced washing effect,
Not enough detergent causes:
Too much detergent causes:
you are washing a small load,
large amounts of foam during washing.
the laundry is lightly soiled,
Use less detergent if:
As a dryer, the appliance works on
condensation principle.
9.1 Preparing The Drying Cycle
For drying, follow the indications given on
the manufacturer’s labels:
Therefore, the water tap must be open
and the drain hose must drain water into
a sink or into the drain pipe, even during
the drying cycle.
Before starting the drying program.
Make sure the load size does not
exceed the maximum drying capacity
of the machine. In order to obtain
good performances. (Refer page 11)
9.2 Laundry Not Suitable For
Drying
The detergent and any additives must be
placed in the appropriate compartments
of the dispenser drawer before starting
the wash program.
If using liquid detergents, a
program without prewash must
be selected.
Particularly delicate items such as
synthetic curtains, woollen and silk,
garments with metal inserts, nylon
stockings, bulky garments such as
anoraks, bed covers, quilts, sleeping
bags and duvets must not be machine
dried.
Avoid drying dark clothes with light
coloured fluffy items such as towels as
these can attract fluff.
To avoid a static charge when drying
is completed, use either a fabric
softener when you are washing the
laundry or a fabric conditioner
specifically for tumble dryers.
Garments padded with foam-rubber or
materials similar to foam-rubber must
not be machine dried; they represent
a fire hazard.
Also, fabrics containing residue of
setting lotions or hair sprays, nail
solvents or similar solutions must not
be machine dried to avoid formation of
harmful vapours.
Remove the laundry when the
appliance has finished drying.
ATTENTION!
9.3 Garment Labels
= May be tumble dried
= Drying at high temperature
= Drying at reduced temperature
= Do not tumble dry.
Pre-treatment Sprays And
Stain Removers
WARNING!
Pre-treatment sprays and stain remover
can damage plastic components on your
washing machine.
If you use pre-treatment sprays or stain
removers, apply them to the clothing well
away from your washing machine.
The average drying time for a timed
drying are indicated in the “Time Dry ”
option (see page 14). The experience will
help you to dry your laundry in a more
suitable way according to the different
fabrics.
speed of the final spin;
type of laundry;
weight of the load.
dryness level required (Extra dry,
Cupboard dry, Iron dry);
9.4 Drying Cycle Duration
The drying time may vary depending on:
28
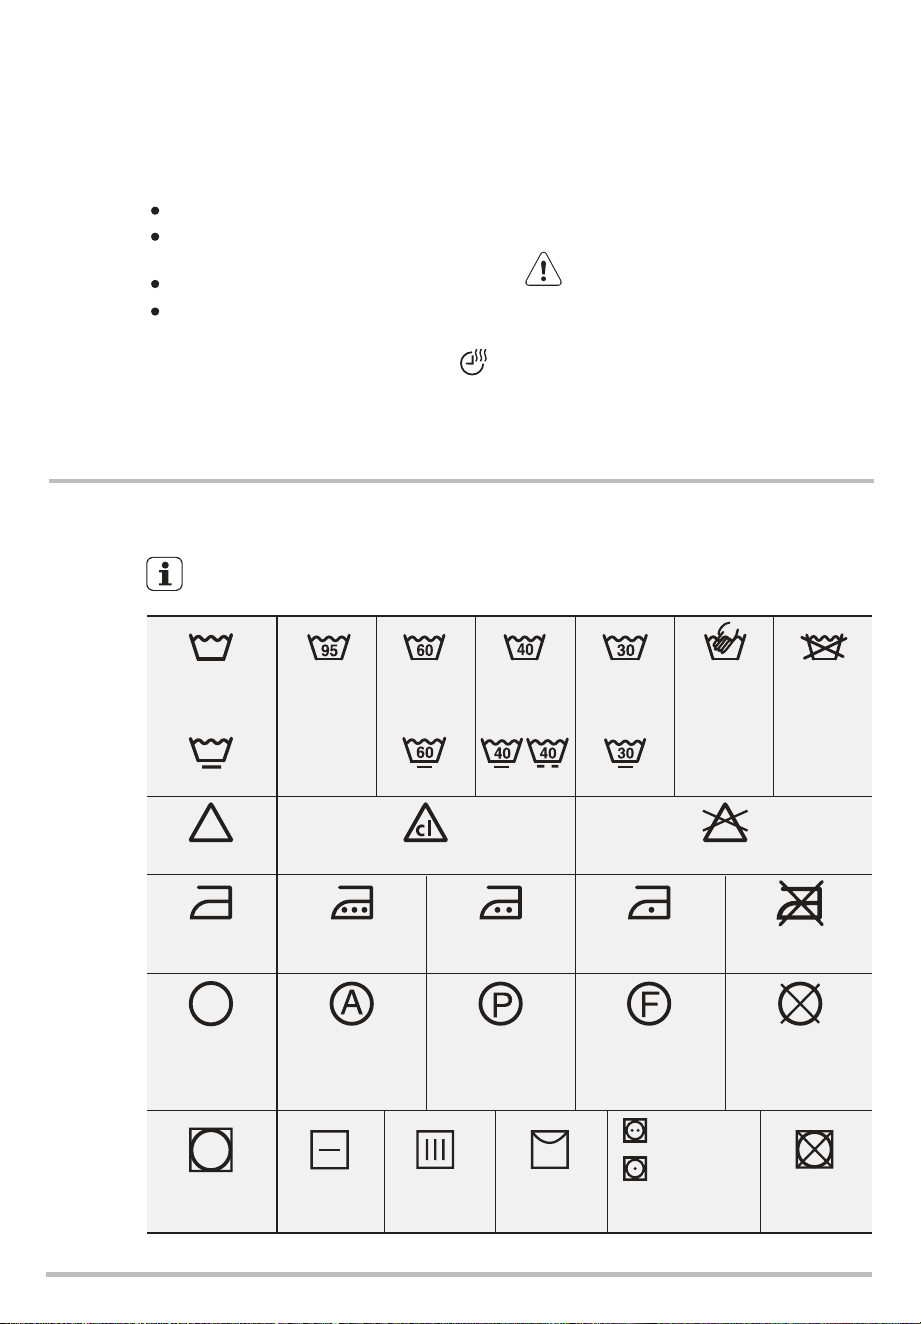
10. INTERNATIONAL WASH CODE SYMBOLS
These symbols appear on fabric labels, in order to help you choose the best
way to treat your laundry.
Bleach in cold water DO NOT bleach
Bleaching
Hand wash
Max. wash
temperature
95 °C
Hot iron
max. 200 °C
Dry cleaning in
all solvents
Dry cleaning in
perchlorethylene,
petrol, pure alcohol,
R 111 & R 113
Dry cleaning in
petrol, pure alcohol
and R 113
DO NOT
dry clean
Warm iron
max. 150 °C
Lukewarm iron
max. 110 °C
DO NOT iron
Max. wash
temperature
60 °C
Max. wash
temperature
40 °C
Max. wash
temperature
30 °C
DO NOT
wash at all
Ironing
Dry cleaning
Drying
Flat Tumble dry DO NOT
tumble dry
High
temperature
Low
temperature
On clothes
hanger
On the line
Energetic
wash
Delicate wash
If the laundry is still damp at the end of
the drying program, select a short drying
cycle again.
Do not over dry the laundry in order to
avoid creasing of fabrics or garments
shrinking.
9.5 Additional Drying
WARNING!
www.westinghouse.com.au / www.westinghouse.co.nz
29
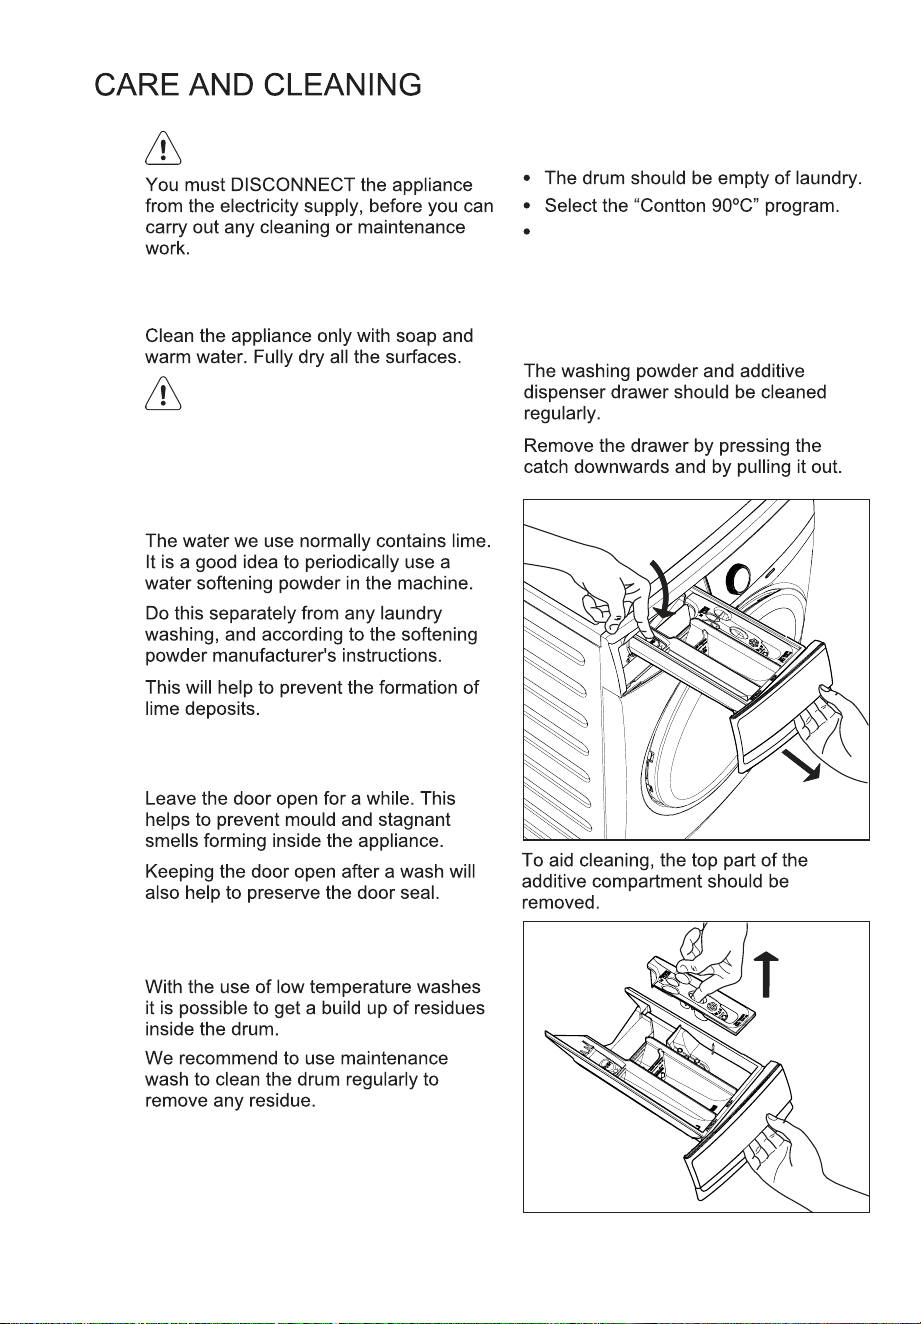
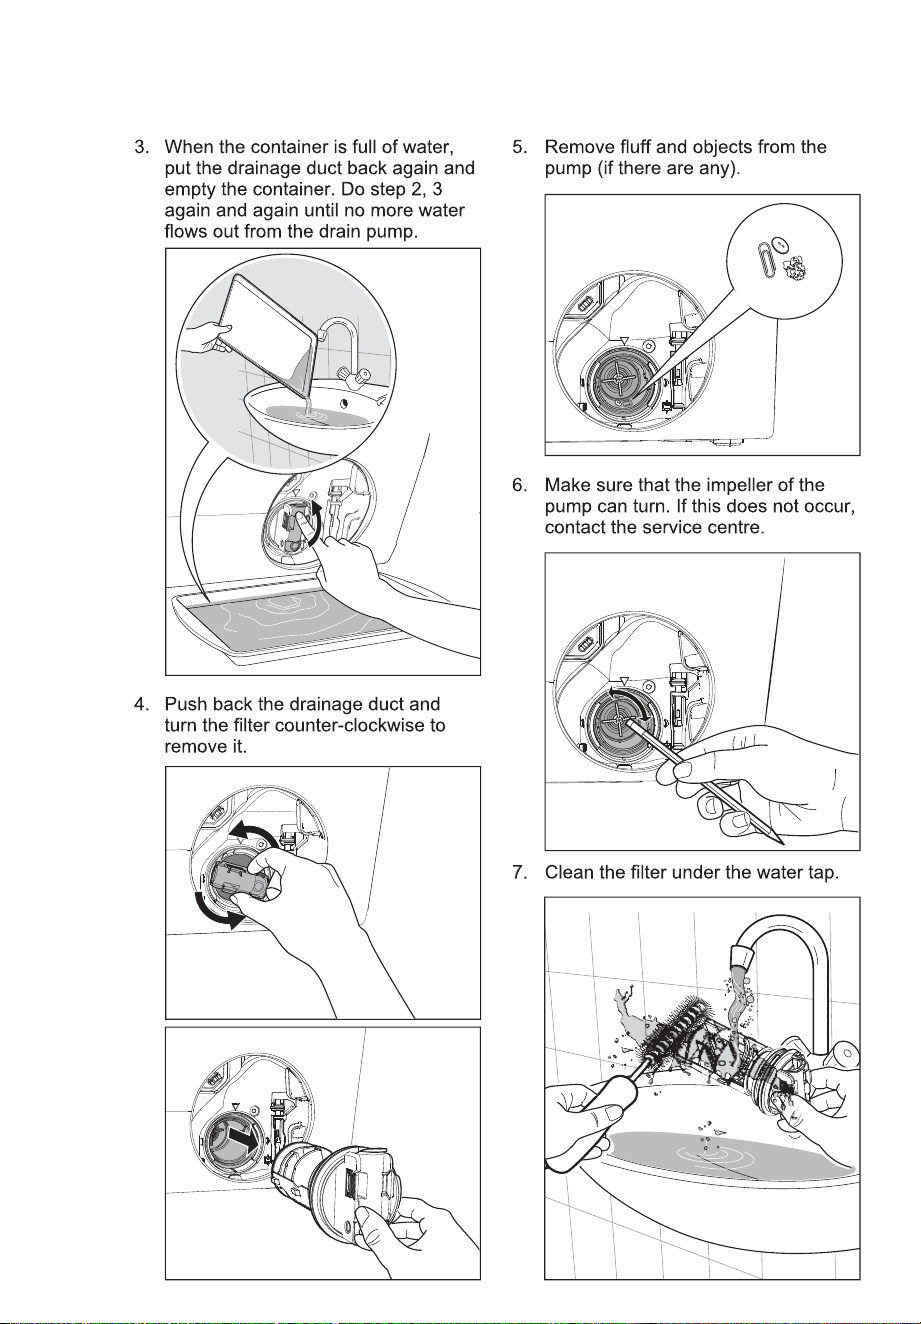
11.
Do not use alcohol, solvents or
chemical products.
11.2 Descaling
11.1 External Cleaning
11.3 After Each Wash
11.5 Cleaning The Dispenser
Drawer
11.4 Maintenance Wash
To run a maintenance wash:
WARNING!
CAUTION!
Press “Start/Pause” and “Confirm Start”
to start the program.
30
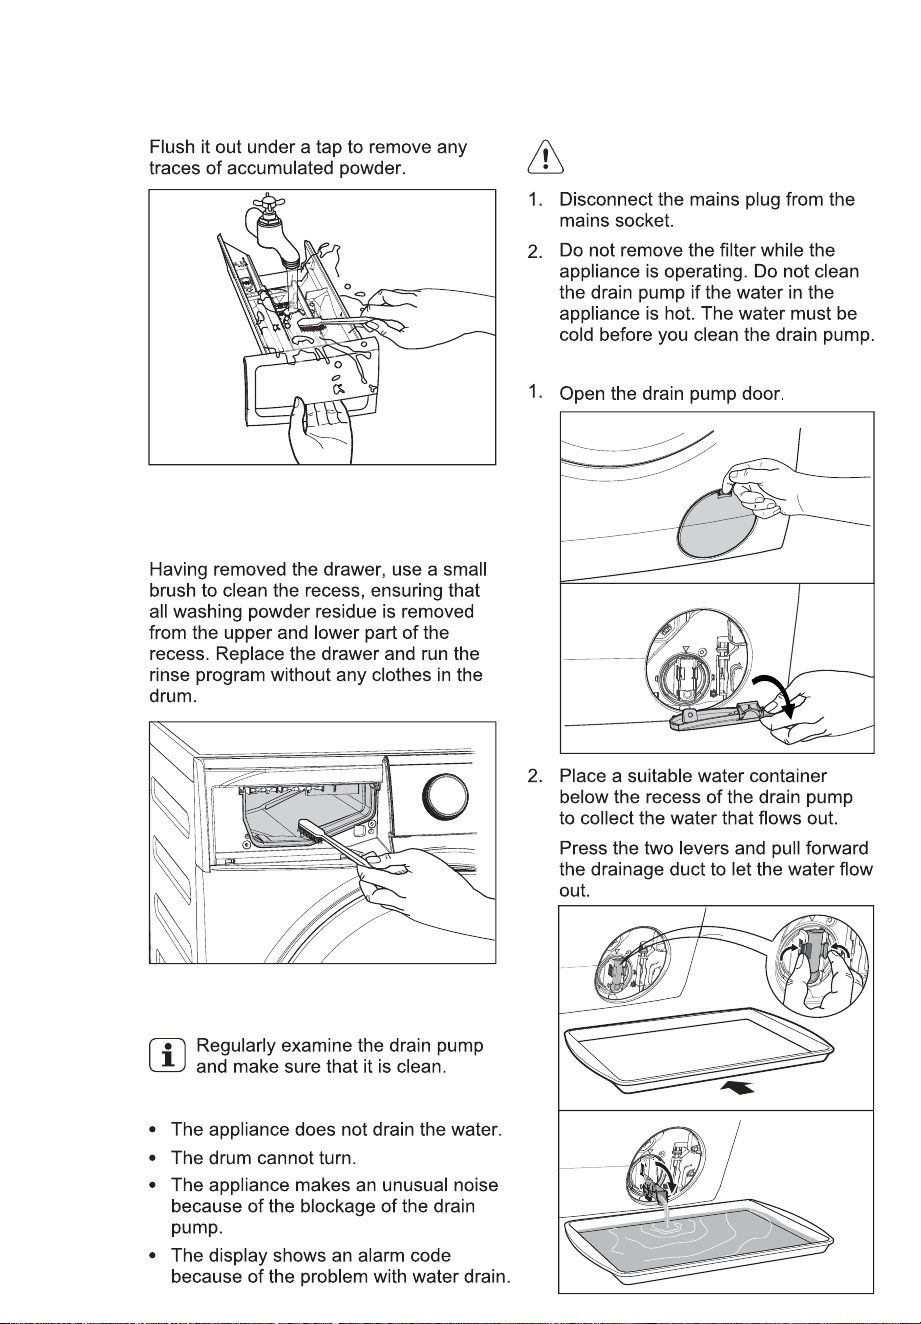
11.6 Cleaning The Drawer
Recess
11.7 Cleaning The Pump
Clean the pump if:
WARNING!
To clean the drain pump:
www.westinghouse.com.au / www.westinghouse.co.nz
31
32
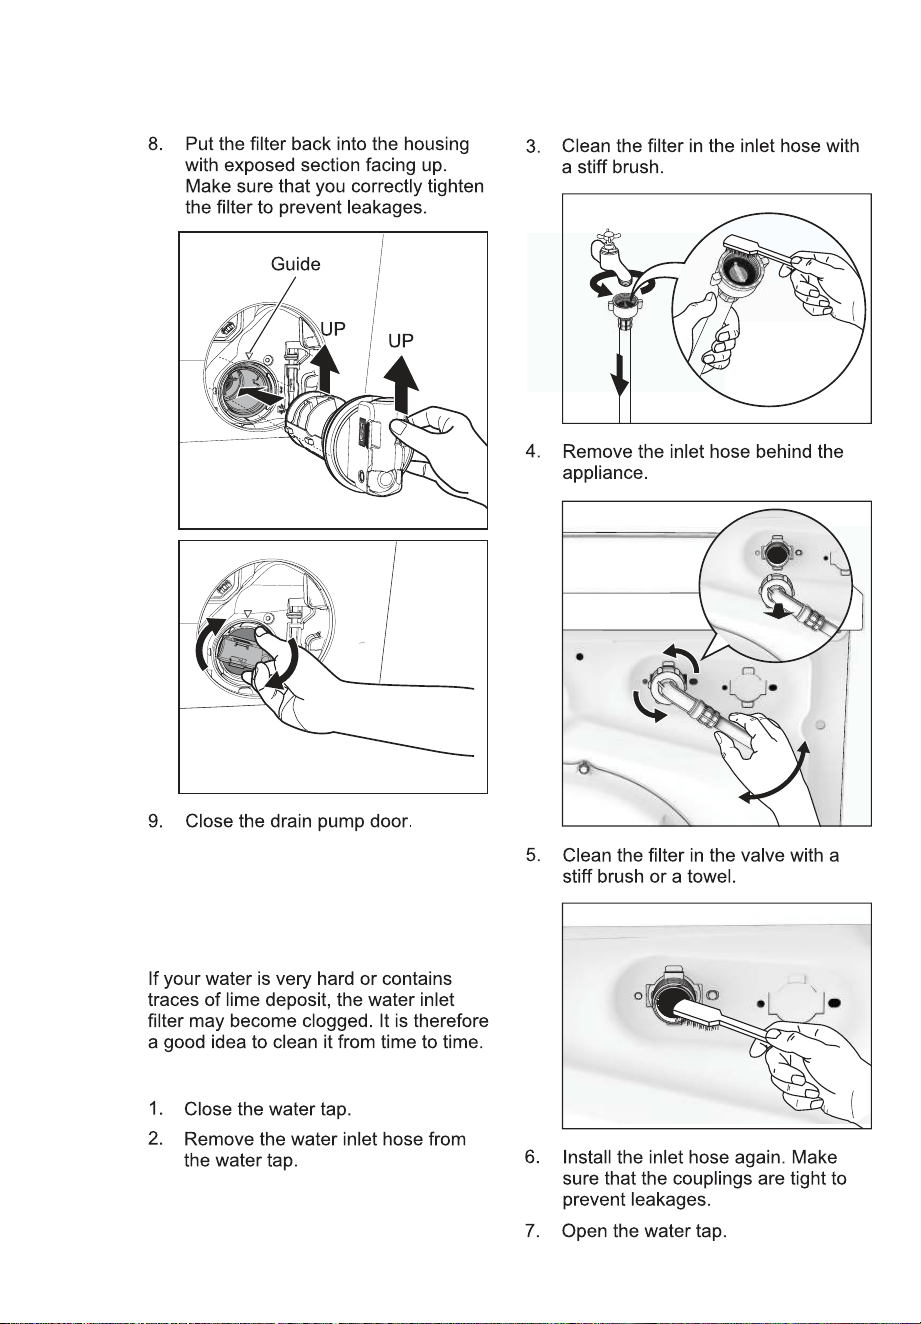
11.8 Cleaning The Water Inlet
Filter
To clean the water inlet filters:
www.westinghouse.com.au / www.westinghouse.co.nz
33
Emergency Drain
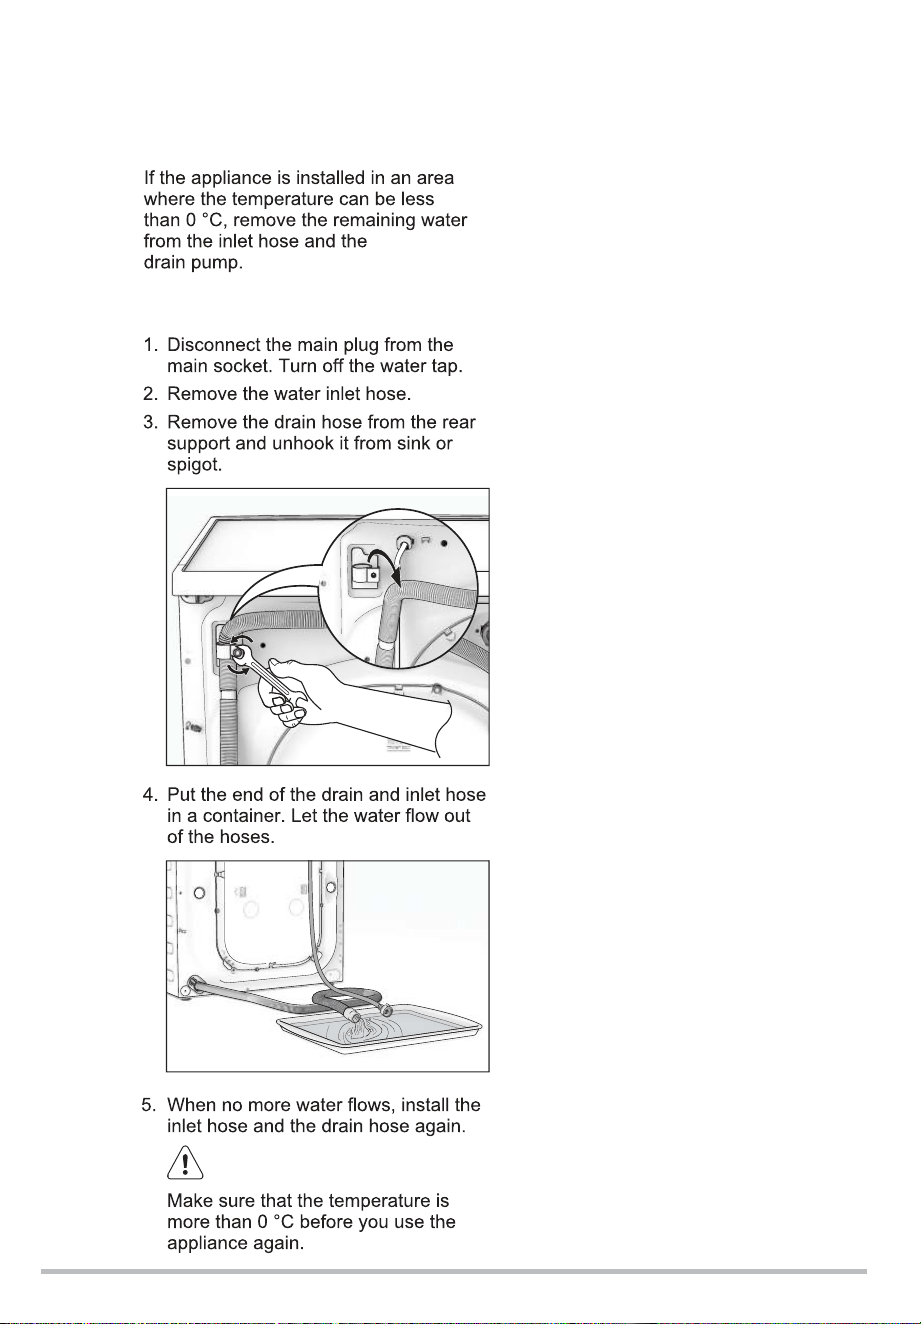
11.9 Frost Precautions
NOTE
34
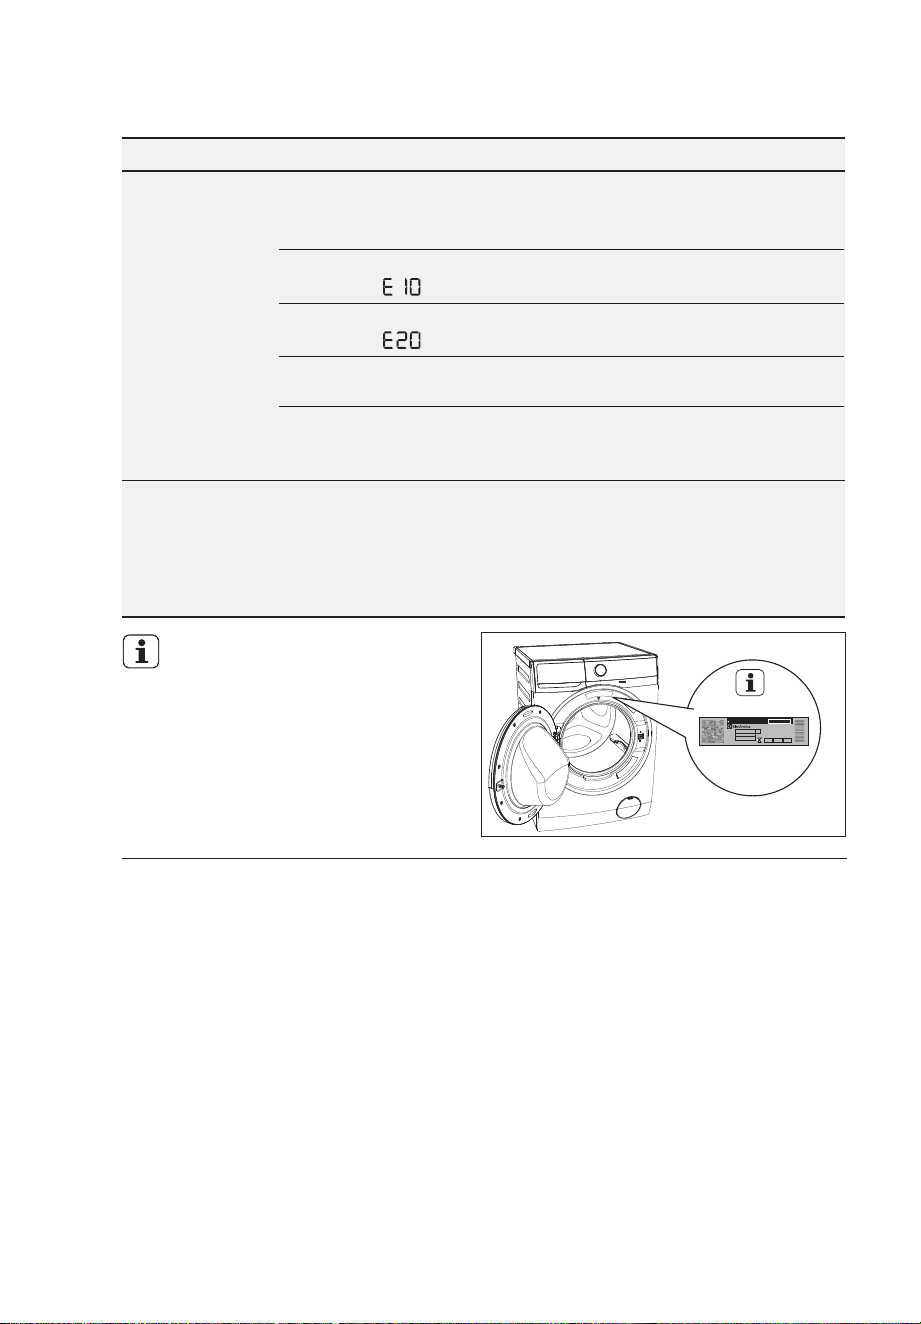
12.1 Possible Failures
12.
WARNING!
Alarm Code:
Machine does
not start:
Machine does
not fill the
water:
Machine fills
then empties
immediately:
Malfunction Possible cause Solution
The Confirm Start touchpad has
not been pressed.
Press the "Confirm Start"
touchpad within 10 seconds.
After pressing “Start/Pause”
touchpad.
www.westinghouse.com.au / www.westinghouse.co.nz
35
Malfunction Possible cause Solution
There is water
on the floor:
Unsatisfac-
tory
washing
results:
The door will
not open:
Machine
does not
empty and/or
does not
spin:
Machine
vibrates or is
noisy:
36
Malfunction Possible cause Solution
Machine
vibrates or is
noisy:
Cycle time
longer than
displayed:
Spinning
starts late
or machine
does not
spin:
Machine
makes an
unusual
noise:
No water is
visible in
the drum:
The cycle is
shorter than
the time
displayed.
www.westinghouse.com.au / www.westinghouse.co.nz
37
Malfunction Possible cause Solution
The “Time Dry” or the “Dryness
Level” degree has not been
selected.
Select the drying time or
the dryness level degree.
The water tap is not turned on.
(Error code: )
Open the water tap.
The drain filter is clogged.
(Error code: )
Clean the drain filter.
The machine is overloaded. Reduce the laundry load in
the drum.
The selected drying program,
time or dryness level was not
suitable for the laundry.
Select the suitable drying
program, time or dryness
level for the laundry.
Machine
does not dry
or does not
dry properly:
Machine is optimizing the drying
cycle according to the laundry type
and load size. It will vary for each
kind of fabric as the water
absorption is different.
This is a normal behavior
of the machine and not a
cause for concern as it
does not compromise its
performance.
Display time
is frozen at
the end of
drying cycle
for more than
30 minutes:
If you are unable to identify or solve the
problem, contact our service centre.
Before calling service centre, make a
note of the model, serial number and
purchase date of your machine: the
Service Centre will require this
information.
NOTE
Mod :
PNC :
S/N :
Scan QR code
Made in Thailand
38
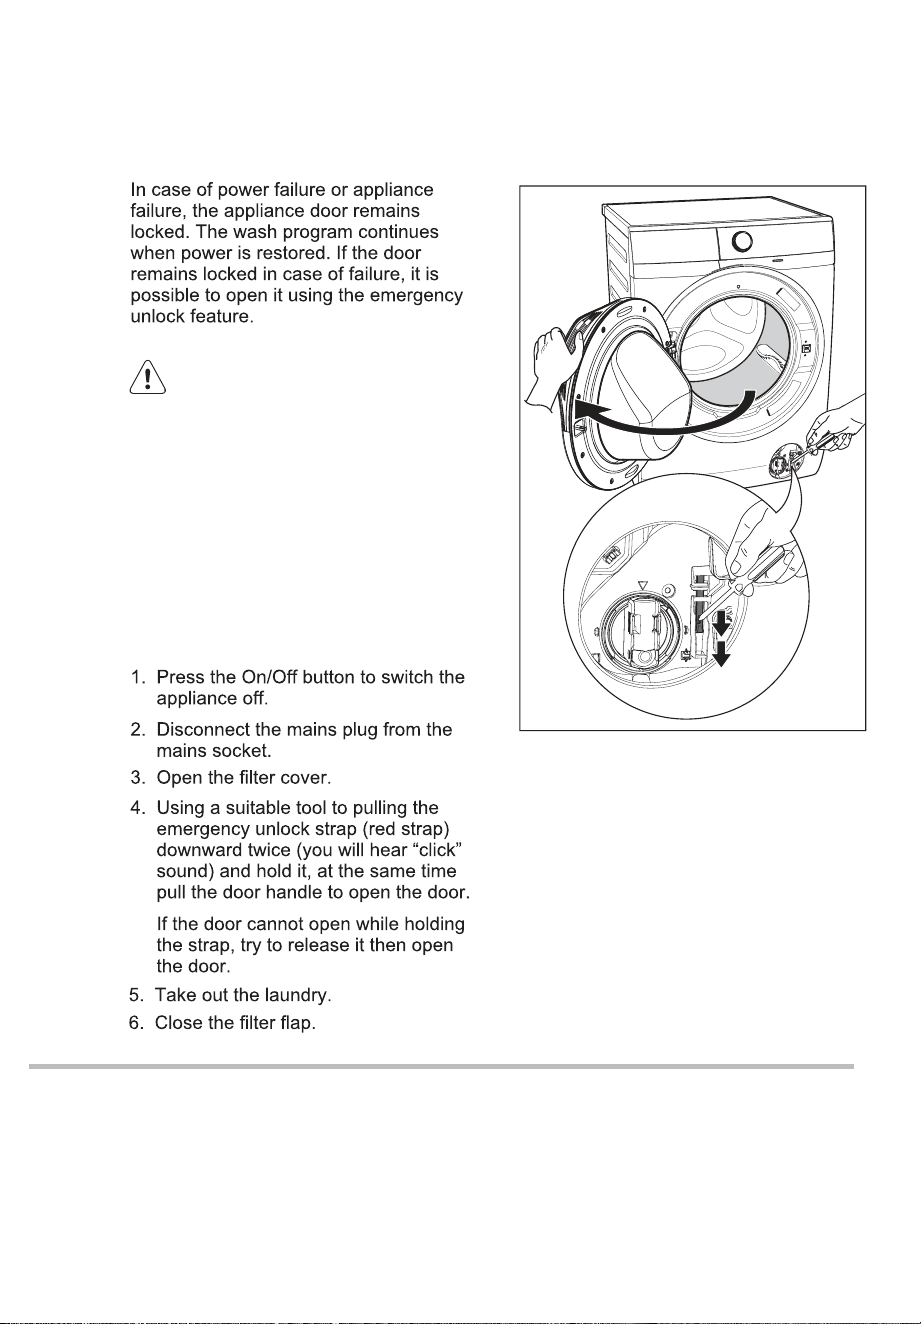
Before opening the door:
12.2 Emergency Door Opening
Make sure that the water temperature
and the laundry are not hot. Wait until
they cool down if necessary.
WARNING!
Make sure that the drum is not
rotating. Wait until the drum stops
rotating if necessary.
Make sure that the water level inside
the drum is not too high. If necessary,
perform an Emergency Drain
(see page 32).
To open the door proceed as follows:
www.westinghouse.com.au / www.westinghouse.co.nz
39
13.
Dimensions (Height / Width / Depth)
Maximum dry
clothes capacity
Spin speed (Maximum / Minimum)
Power supply (Voltage / Frequency)
Total power absorbed
Water supply pressure (Maximum / Minimum)
WashingProgram Drying
850 x 600 x 659 mm
5.5 kg
2 kg
4 kg
Wash Dry 60
CAUTION!
14. INSTALLATION
14.1 Unpacking
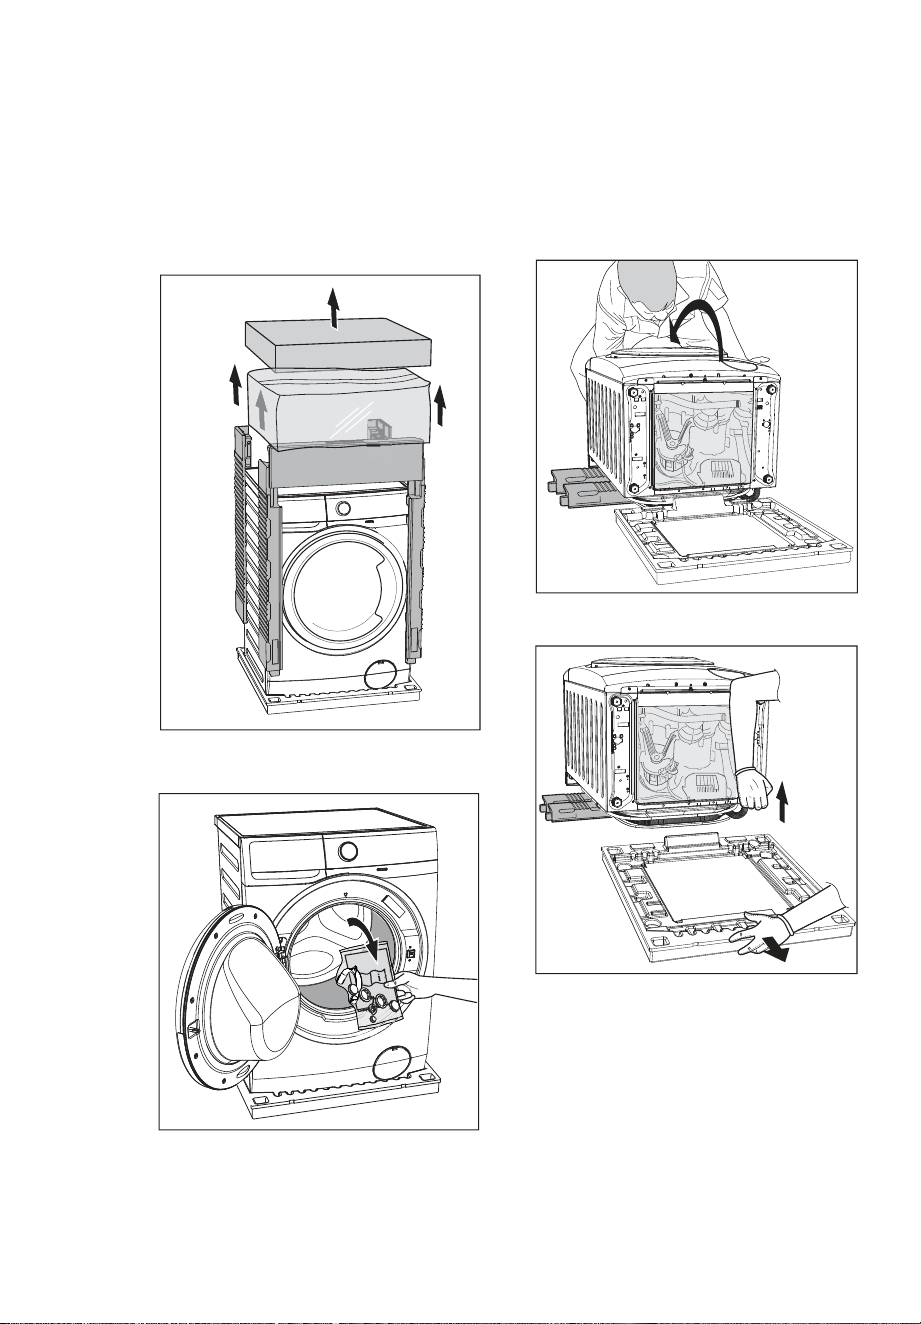
40
6.
7.
Remove the polystyrene base.
8.
Put one of the polystyrene packaging
elements on the floor behind the
appliance. Carefully put down the
appliance with the rear side on it.
Make sure not to damage the hoses.
Pull up the appliance in vertical
position.
Open the door. Remove all the items
from the drum.
5.
9.
Remove the power supply cable and
the drain and inlet hoses from the
hose holders (A) on the rear of the
appliance.
Remove the cardboard top.
2.
Remove the polystyrene packaging
materials.
3.
Remove the plastic bag which cover
the machine.
4.
www.westinghouse.com.au / www.westinghouse.co.nz
41
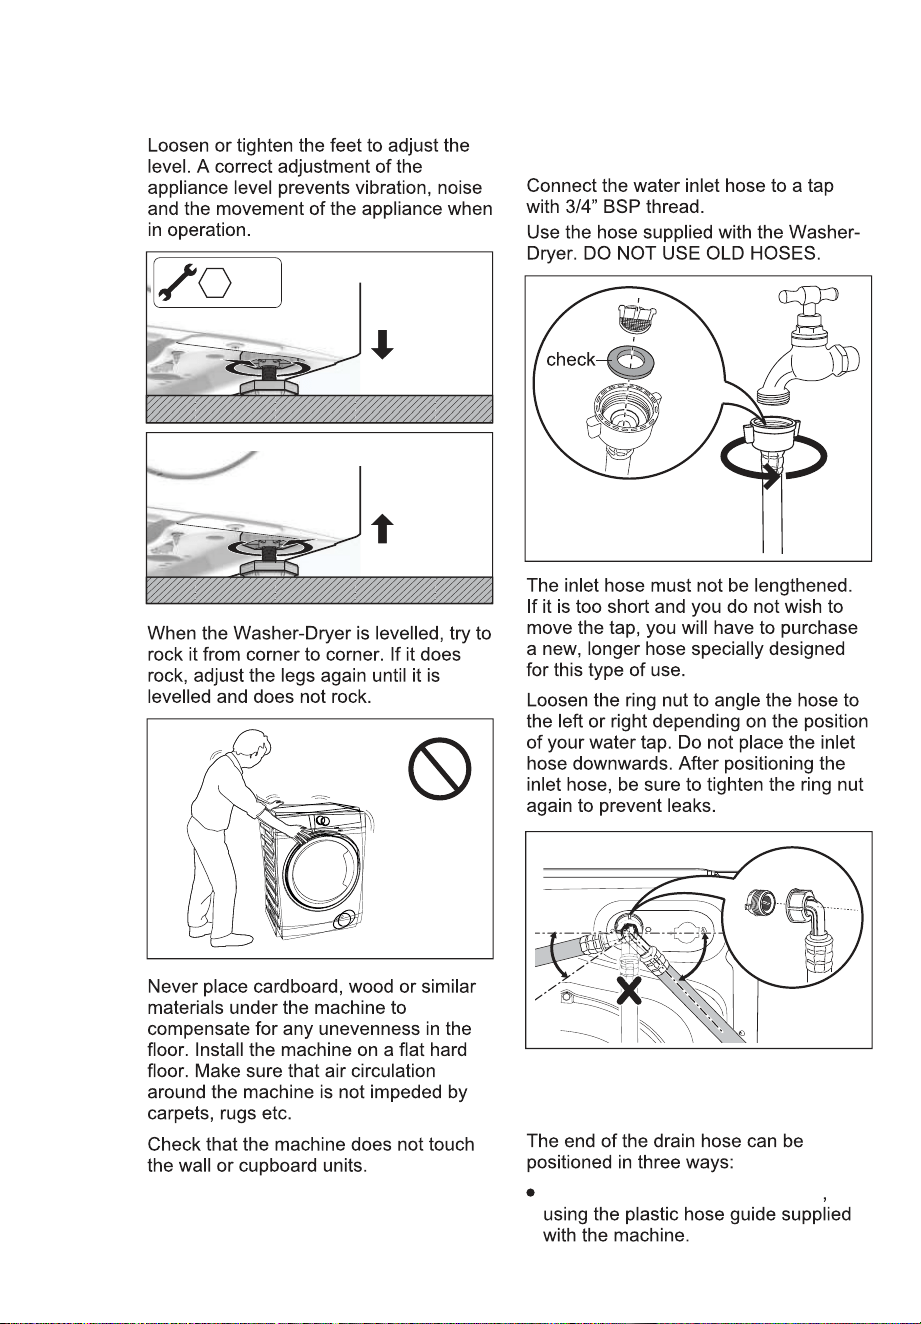
Use a spirit level on the top and side of
the machine to check the levels.
If you do not have a spirit level, as a
guide use the edge of a door frame,
cupboard or bench to check that the
machine is leveled.
It is important that your machine stands
firm and leveled on the floor to ensure
correct operation. The appliance must
not be installed behind a lockable door, a
sliding door or a door with a hinge on the
opposite side to avoid restricting the
machine door.
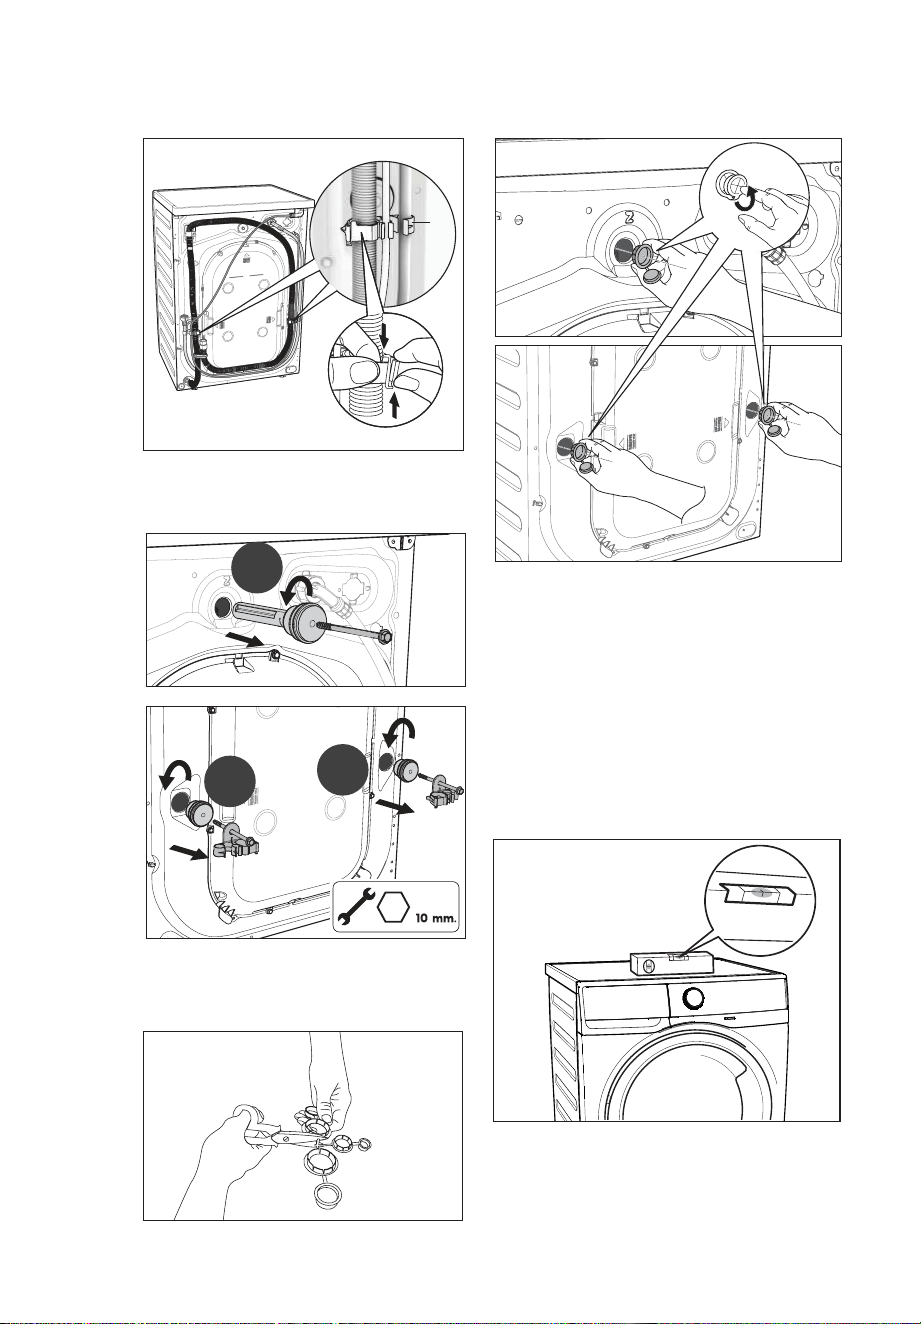
10.
11.
Pull out the plastic spacers.
12.
Put the plastic caps in the holes (X3).
You can find these caps in the user
manual bag.
Remove the three transit bolts.
A
1st
2nd
3rd
14.2 Positioning
2
3
1
42
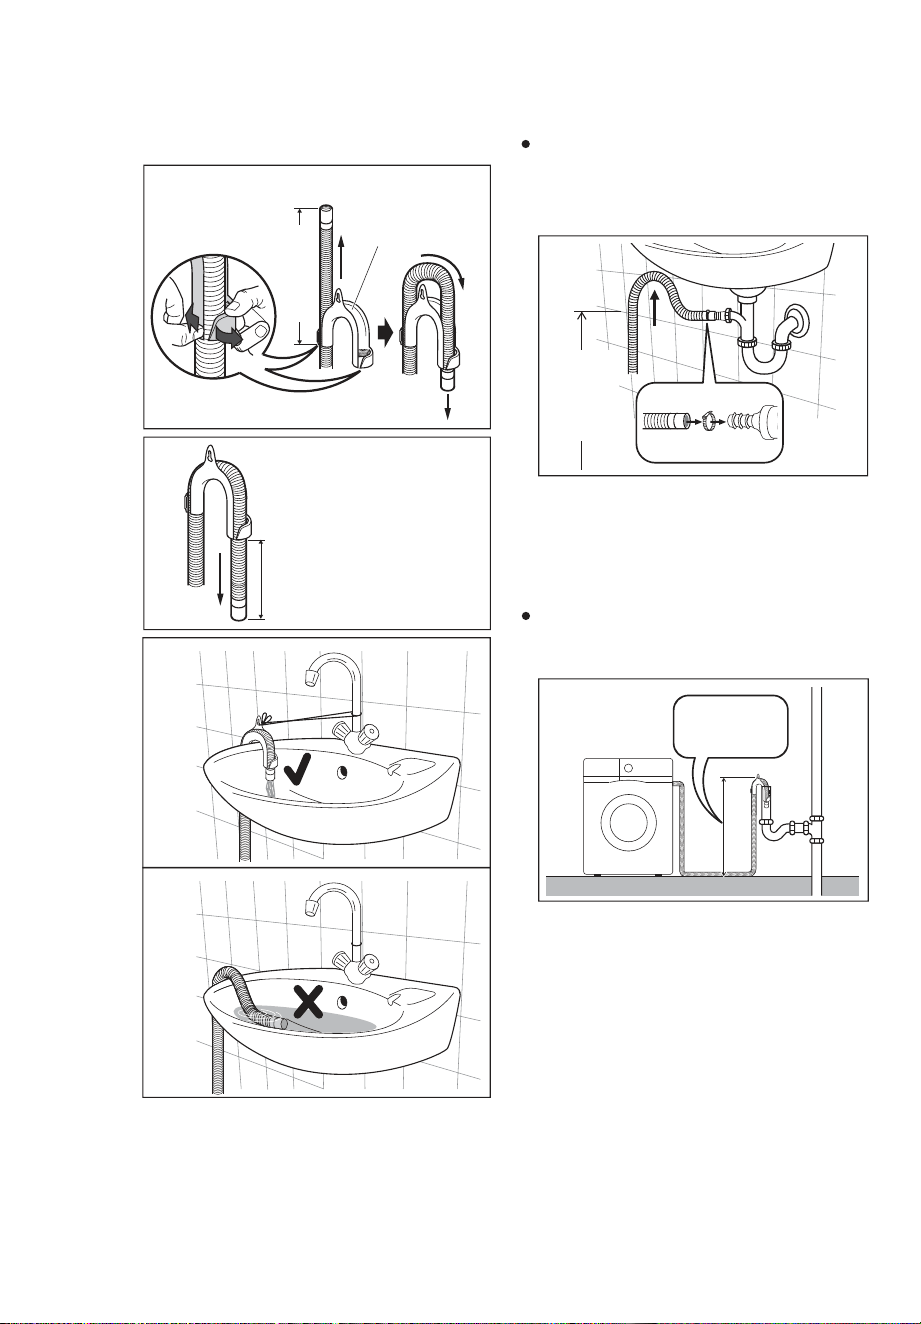
14.3 Water Inlet
Hooked over the edge of a sink
14.4 Water Drainage
45°
35°
clockwise “DOWN”
counter clockwise “UP”
30 mm.
www.westinghouse.com.au / www.westinghouse.co.nz
www.westinghouse.com.au / www.westinghouse.co.nz
43
Fitting Hose Guide
bend
hose
2.
Adjust length to suit
trough.
Pull apart to
insert hose.
pull hose
1.
45 cm approx
.
Hose
Guide
Push the drain hose onto the spigot
and secure with a clamp, ensure a
loop is formed in the drain hose to
prevent waste from the sink entering
the appliance.
In a sink, drain pipe branch.
Directly into a drain pipe, at a height
of not less than 60 cm and not more
than 90 cm.
The end of the drain hose must always
be ventilated, i.e. the inside diameter
of the drain pipe must be larger than
the outside diameter of the drain hose.
The drain hose must not be twisted or
curled. Run it along the floor; only the
part near the drainage point must be
raised.
In this case, make sure the end cannot
come unhooked when the machine will
be emptied. This could be done by tying
it to the tap with a piece of string or
attaching it to the wall.
For the correct functioning of the
machine, the drain hose must remain
hooked on the proper support piece
situated on the top part of back side of
the appliance.
This branch must be above the trap so
that the bend is at least 60 cm above
the ground.
Max.
90 cm
Min.
60 cm
Max. 90 cm
Min. 60 cm
44
14.5 Electrical Connection
The manufacturer declines any
responsibility for damage or
injury through failure to comply
with the above safety precaution.
Should the appliance power
supply cable need to be
replaced, this shall be carried
out by our Service Centre.
Connect the machine to an
earthed socket outlet.
CAUTION!
“An incorrect power supply may void
your warranty.”
www.westinghouse.com.au / www.westinghouse.co.nz
45
15.1 Packaging Materials
15.3 Ecological Hints
15.2 Old Machine
15.

46ZZZZHVWLQJKRXVHFRPDXZZZZHVWLQJKRXVHFRQ]
127(
Warranty
FOR SALES IN AUSTRALIA AND NEW ZEALAND
APPLIANCE: WESTINGHOUSE WASHING MACHINES & WASHER/DRYERS
Important Notice
Before calling for service, please ensure that the steps listed in clause 8 above have been followed.
AUSTRALIA
FOR SERVICE
authorised service centre in Australia
PLEASE CALL 13 13 49
For the cost of a local call
FOR SPARE PARTS
spare parts centre in Australia
PLEASE CALL 13 13 50
For the cost of a local call
NEW ZEALAND
FOR SERVICE
authorised service centre in New Zealand
PLEASE CALL 0800 10 66 10
FOR SPARE PARTS
spare parts centre in New Zealand
PLEASE CALL 0800 10 66 20
W_WMWD_Warr_Feb22
This document sets out the terms and conditions of the product
warranties for Westinghouse Appliances. It is an important document.
Please keep it with your proof of purchase documents in a safe place
for future reference should there be a manufacturing defect in your
Appliance. This warranty is in addition to other rights you may have
under the Australian Consumer Law.
1. In this warranty:
(a) ‘ACL’ or ‘Australian Consumer Law’ means Schedule 2 to the
Competition and Consumer Act 2010;
(b) ‘Appliance’ means any Electrolux product purchased by you and
accompanied by this document;
(c) ‘ASC’ means Electrolux’s authorised serviced centres;
(d) ‘Westinghouse’ is the brand controlled by Electrolux Home Products
Pty Ltd of 163 O’Riordan Street, Mascot NSW 2020, ABN 51 004
762 341 in respect of Appliances purchased in Australia and Electrolux
(NZ) Limited (collectively “Electrolux”) of 3-5 Niall Burgess Road, Mount
Wellington, in respect of Appliances purchased in New Zealand;
(e)
warranty;
(f) ‘you’ means the purchaser of the Appliance not having purchased
the Appliance for re-sale, and ‘your’ has a corresponding meaning.
2. Application: This warranty only applies to new Appliances, purchased
and used in Australia or New Zealand and is in addition to (and does not
exclude, restrict, or modify in any way) other rights and remedies under
a law to which the Appliances or services relate, including any non-
excludable statutory guarantees in Australia and New Zealand.
3. Warranty Period: Subject to these terms and conditions, this warranty
continues for in Australia for a period of 24 months and in New Zealand
for a period of 24 months following the date of original purchase of the
Appliance.
• Inverter motor – Further 8 years
4. Repair or replace warranty: During the Warranty Period, Electrolux
or its ASC will, at no extra charge if your Appliance is readily accessible
for service, without special equipment and subject to these terms and
conditions, repair or replace any parts which it considers to be defective.
Electrolux may, in its absolute discretion, choose whether the remedy
offered for a valid warranty claim is repair or replacement. Electrolux or its
ASC may use refurbished parts to repair your Appliance. You agree that
any replaced Appliances or parts become the property of Electrolux.
5. Travel and transportation costs: Subject to clause 7, Electrolux will
bear the reasonable cost of transportation, travel and delivery of the
Appliance to and from Electrolux or its ASC. Travel and transportation
will be arranged by Electrolux as part of any valid warranty claim.
6. Proof of purchase is required before you can make a claim under this
warranty.
7. Exclusions: You may not make a claim under this warranty unless the
defect claimed is due to faulty or defective parts or workmanship. This
warranty does not cover:
(a)
(b) parts and Appliances not supplied by Electrolux;
(c) cosmetic damage which does not affect the operation of the
Appliance;
(d) damage to the Appliance caused by:
(i) negligence or accident;
(ii) misuse or abuse, including failure to properly maintain or service;
(iii) improper, negligent or faulty servicing or repair works done by
anyone other than an Electrolux authorised repairer or ASC;
(iv) normal wear and tear;
(v) power surges, electrical storm damage or incorrect power supply;
(vi) incomplete or improper installation;
(vii) incorrect, improper or inappropriate operation;
(viii) insect or vermin infestation;
(ix) failure to comply with any additional instructions supplied with
the Appliance;
In addition, Electrolux is not liable under this warranty if:
(a) the Appliance has been, or Electrolux reasonably believes that the
Appliance has been, used for purposes other than those for which
the Appliance was intended, including where the Appliance has
been used for any non-domestic purpose;
(b)
(c) the Appliance’s serial number or warranty seal has been removed
or defaced.
8. How to claim under this warranty: To enquire about claiming under this
warranty, please follow these steps:
(a) carefully check the operating instructions, user manual and the
terms of this warranty;
(b) have the model and serial number of the Appliance available;
(c) have the proof of purchase (e.g. an invoice) available;
(d) telephone the numbers shown below.
9. Australia: For Appliances and services provided by Electrolux in Australia:
Electrolux goods come with guarantees that cannot be excluded under
the Australian Consumer Law. You are entitled to a replacement or
refund for a major failure and for compensation for any other reasonably
foreseeable loss or damage. You are also entitled to have the Appliance
repaired or replaced if the Appliance fails to be
of acceptable quality and
the failure does not amount to a major failure. ‘Acceptable quality’ and
‘major failure’ have the same meaning as referred to in the ACL.
10. New Zealand: For Appliances and services provided by Electrolux in New
Zealand, the Appliances come with a guarantee by Electrolux pursuant to
the provisions of the Consumer Guarantees Act, the Sale of Goods Act
and the Fair Trading Act. Where the Appliance was purchased in New
Zealand for commercial purposes the Consumer Guarantee Act does not
apply.
11.
You accept that if you make a warranty claim, Electrolux
and its agents including ASC may exchange information in relation to you
to enable Electrolux to meet its obligations under this warranty.
47

www.westinghouse.com.au
G0050277-002-A20692058
www.westinghouse.co.nz