EN
PORTABLE FITNESS BLENDER
Translation of the original manual
SBL 131GR
SBL 133OR
SBL 134RD
SBL 131GR
SBL 133OR
SBL 134RD
A
1
2
3
4
5
6
7
8
9
11
12
10
B
1
2
3
4
5
6
7
9
10
12
11
Max 400 ml
Auto Stop
30s
2x
8
1
2
3
4
5
6
7
9
10
12
11
Max 400 ml
Auto Stop
30s
2x
8
1
2
3
4
5
6
7
9
10
12
11
Max 400 ml
Auto Stop
30s
2x
8
1
2
3
4
5
6
7
9
10
12
11
Max 400 ml
Auto Stop
30s
2x
8
C
+
+
- 1 -
12/2023
2023
EN Portable Fitness Blender
Important Safety Instructions
READ CAREFULLY AND STORE FOR FUTURE USE.
General Warnings
• This appliance may be used by persons with physical,
sensory, mental impairments or by inexperienced persons,
if they are properly supervised or have been informed
about how to use of the product in a safe manner and
understand the potential dangers.
• This appliance is not to be used by children. Keep the
appliance out of the reach of children.
• Children must not play with the appliance.
• Cleaning and maintenance performed by the user must
not be performed by unsupervised children.
Warning:
Incorrect use may lead to injuries.
• Take extra care when handling the base of the appliance
to avoid injury from thechopping blade, especially when
assembling the appliance, when removing the base of the
blender andduring cleaning.
• Clean the food contact surfaces of the appliance and its
accessories according to the instructions in this manual.
• The time of food processing is described in thechapter
USING THE FITNESS BLENDER.
- 2 -
12/2023
2023
• Always switch off the appliance when leaving it
unattended and before dismantling or cleaning.
• Always disconnect the appliance from the USB power
source when left unattended, after charging and before
using, cleaning or moving it.
• A damaged USB charging cable must be replaced with
a new cable of the same type. Do not use a damaged
charging cable.
Other important safety instructions foruse of the appliance
• Use the appliance and its accessories in accordance with the instructions in this manual.
• This appliance is designed for domestic use only. Do not use it for commercial purposes or for purposes other than those for which it is intended.
• Use, charge andstore the appliance at an ambient temperature of 10 to 35 °C.
• It is forbidden to modify the surface of the appliance in any way, e.g. using self-adhesive foil, etc.
• Do not expose the appliance or its accessories to the outside, extreme temperatures, direct sunlight or an overly dusty environment.
• Always place the appliance on a clean, flat, dry and stable surface.
• The appliance may vibrate during operation. Do not place it on the edge of the table to prevent it from falling.
• Do not place the appliance or its accessories on or near an electric or gas hob. Keep it at a sufficient distance from open fire, heating elements
andother sources of heat. Do not place it or any part of it into the freezer.
• Only use the appliance with original accessories from the manufacturer.
Warning:
The use of non-original accessories can lead to a dangerous situation.
• Do not charge the appliance when it is wet or if the base of the blender is damaged in any way.
• Before charging, the base of the blender must be completely dry. Charge the appliance with the supplied USB charging cable. The appliance must
be supervised during charging. After charging, disconnect the appliance from the power source and close the USB-C port with the silicone cover.
Disconnect the charging cable from the base of the blender by pulling the connector. Do not pull the charging cable.
• The blender base USB-C port is designed to connect to the USB charging cable. Do not insert objects that do not belong in it. Keep the USB
charging cable dry.
• Do not charge the appliance near flammable materials or objects or at high ambient temperatures.
• Before use, always make sure that no part of the appliance is damaged.
• Before putting into operation, properly attach the upper lid to theblending container. The lid must remain closed during operation.
Warning:
Do not put your hands, fingers or items such as spoons, forks, etc. into the blending container while it is attached to thebase of the
blender.
• Do not turn on the appliance when it is empty. Improper use can adversely affect the life of the appliance.
• To avoid a dangerous situation, do not use the blender to process hard ingredients such as nutshells, hard pits of apricots, peaches, mangoes, etc.
• Take extra care when handling hot liquids and food. Hot steam or splashes of hot liquids or food can cause scalding.
• The blending container is temperature resistant up to 80°C. Never put food into it or pour liquids at higher temperatures. There is a risk of the
blending container bursting and scalding. For added safety, allow hot liquids and foods to cool sufficiently before placing them in the blending
container.
• Placing warm food or pouring warm liquids into the blending container causes the surface of the bowl to heat up. Take extra care when handling
heated surfaces.
• Never mix hot foods or liquids. Sealing hot liquids or foods in the blending container can cause more hot steam to build up inside the container and
pressurise it. When opening the container, there is a risk of splashing the hot contents of the container.
• The maximum continuous operation time of the appliance is 30 seconds. Let the appliance cool down for a few minutes before using it again.
• None of the components of this appliance are intended for use ina microwave or electric oven, etc.
• Never use the blending container as a drinking bottle while the base is attached toit. The blending container can only be used as a drinking bottle
after you have removed the base fromit andclosed it with the bottom lid.

- 3 -
12/2023
2023
• Never submerge the base of the blender in water or wash it in the dishwasher to prevent it from being damaged. Other components of the appliance
are also not intended for washing in a dishwasher.
• Do not disinfect any part of the appliance in a microwave oven or with hot water above 80 °C.
• Do not use the appliance if it is not working properly, if the base of the blender has been immersed in water or shows any signs of damage. Take it to
an authorised service centre for inspection or repair.
• Do not attempt to disassemble or modify the blender base in any way. This could cause the batteries to overheat or release hazardous substances.
• Do not repair the appliance yourself. Have all repairs or adjustments performed at an authorised service centre. Tampering with the appliance during
the warranty period may void the warranty.
• Store the appliance in a dry and clean environment out of the reach of children and animals.
- 4 -- 4 -
12/2023
2023
• Thank you for purchasing our SENCOR product; we hope you will be
satisfied with it.
• Before using this appliance, please familiarise yourself with the user’s
manual, even if you are already familiar with using similar types of
appliances. Use the appliance only as described in this user's manual.
Keep the manual for future reference.
• It is recommended to keep the original shipping carton, packing
material, receipt and confirmation of the extent of the seller's liability
or warranty certificate at least for the duration of the legal right of
defective performance or quality guarantee. When transporting the
appliance, we recommend packaging it again in the original box
provided by the manufacturer.
. . . . . . . . . . . . . . . . . . . . . . . . . . . . . . . . . . . . . . . . . . . . . . . . . . . . . . . . . . . . . . . . . . . .
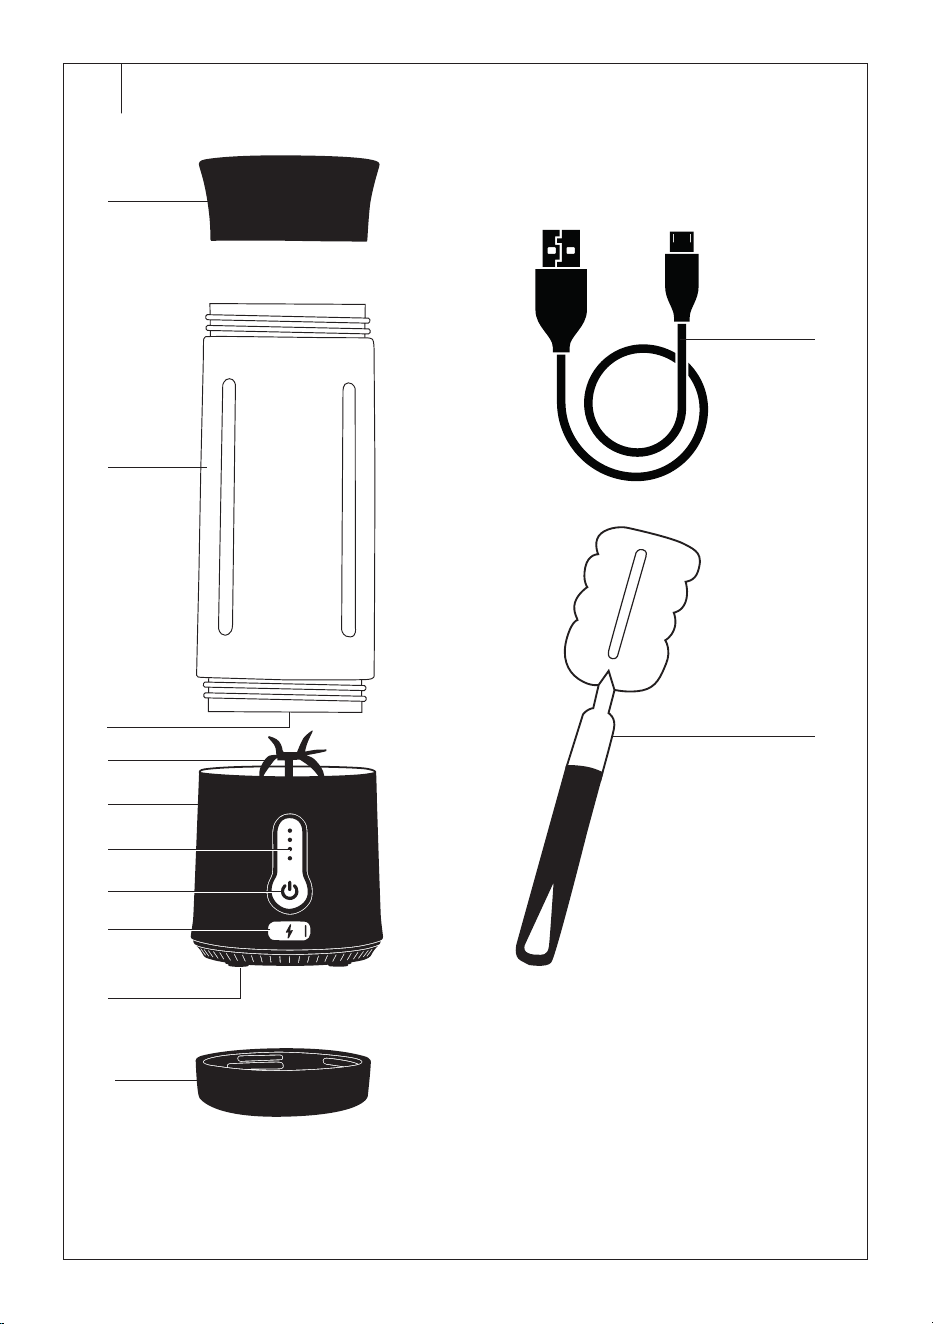
DESCRIPTION OF THE APPLIANCE AND ITS ACCESSORIES (Fig. A)
A1 Top cap withsealing
A2 Blending container with
measuring cup 500 ml /
drinking bottle
A3 Magnet
A4 Blades unit
with 6 chopping blades
A5 Wireless base for blender
A6 LED indicators
indicate the operation of the
blender, battery charge status
andpossible problems.
A7 On/off button
A8 USB-C port with silicone
cover
A9 Anti-slip feet
A10 Bottom cap withsealing
A11 Charging cable with
USB-AandUSB-C
connectors
A12 Cleaning brush
. . . . . . . . . . . . . . . . . . . . . . . . . . . . . . . . . . . . . . . . . . . . . . . . . . . . . . . . . . . . . . . . . . . .
THE PURPOSE OF USING THE APPLIANCE
• Witha portable fitness blender, you can easily andquickly prepare
smoothies or protein drinks, milkshakes andbaby blended fruit or
vegetable snacks wherever andwhenever you need them.
. . . . . . . . . . . . . . . . . . . . . . . . . . . . . . . . . . . . . . . . . . . . . . . . . . . . . . . . . . . . . . . . . . . .
CHARGING THE BATTERIES
• The blender is equipped with 2 built-in Li-Ion batteries (7.4 V ,
2× 2,000 mAh), which enable its wireless operation.
• Before charging, the blender must be completely dry.
• Use the USB charging cable A11 and USB power supply to charge the
built-in batteries.
Note:
USB power supply not supplied with the appliance.
Use a USB charging adapter with a 5 V output
voltage, which you normally use to charge your
mobile phone, tablet, etc., or power bank.
• To avoid a dangerous situation, only use a USB power supply that
meets all the safety and technical requirements set by the legislation
that applies to it. When using a USB charging adapter or power bank,
follow the manufacturer’s instructions for use.
• Connect the USB charging cable A11 to a power supply with an output
voltage of 5 V
. If you used a USB charging adapter, plug it into
apower outlet.
• Remove the silicone cap from the USB-C port A8 and connect the
USB charging cable A11 to the USB-C port A8 to start charging the
batteries.
• Charging the batteries is indicated by the LED indicators A6.
Dependingon the battery charge level, the corresponding number of
LED indicators A6 flashes blue, see the chapter BATTERY CHARGE
LEVEL INDICATION. Charge the batteries for 3 to 5 hours before
first use.
• A full charge of the batteries is indicated by the flashing of all LED
indicators A6. After charging, disconnect the charging cable A11
from the base of the blender A5 and close the USB-C port A8 with a
silicone cap. Do not leave the blender A5 base connected to the USB
power supply longer than is necessary tofully charge the batteries.
Note:
If you used a USB charging adapter for power, be sure
to unplug it from the power outlet.
• The batteries can withstand up to 20 blending cycles per single full
charge.
• To keep the life of the Li-Ion batteries as long as possible, use, store
and charge the blender at room temperature. Do not fully discharge
the batteries. It is better to recharge the batteries before they are
completely discharged. If you do not use the blender for a long time,
keep the batteries charged to about half their capacity.
. . . . . . . . . . . . . . . . . . . . . . . . . . . . . . . . . . . . . . . . . . . . . . . . . . . . . . . . . . . . . . . . . . . .
BATTERY CHARGE LEVEL INDICATION
Battery charge level
Number of LED indicators A6 flashing /
illuminated in blue
75−100 % 4
50−74 % 3
25−49 % 2
1−24 % 1
• In charging mode, the corresponding number of LED indicators A6
flashes blue depending on the battery charge level.
• In idle mode, verify the state of charge of the batteries by pressing
button A7 once. Dependingon the battery charge level, the
corresponding number of LED indicators A6 will light in blue. If the
batteries are discharged, the LED indicators A6 do not turn on at all.
. . . . . . . . . . . . . . . . . . . . . . . . . . . . . . . . . . . . . . . . . . . . . . . . . . . . . . . . . . . . . . . . . . . .
BEFORE FIRST USE
• Charge the built-in batteries according to the instructions inchapter
CHARGING THE BATTERIES.
• Seal the A8 USB-C port with a silicone cover to prevent water or
moisture from entering.
• Wash the blending container A2, the upper andlower lids A1 andA10,
the blades unit A4 and the space around it that comes into contact
with food thoroughly with warm water using a small amount of
dishwashing detergent. Then rinse everything under running water,
wipe dry with a kitchen towel or allow to dry freely.
Warning:
When cleaning the base A5, take extra care not to
cut yourself on the blade of the blade unit A4. Do not
touch the chopping blades.
Do not immerse the blender base A5 in water.
The blender and its accessories are not dishwasher
safe.
. . . . . . . . . . . . . . . . . . . . . . . . . . . . . . . . . . . . . . . . . . . . . . . . . . . . . . . . . . . . . . . . . . . .
FOOD PREPARATION
• Cut the food into same-sized pieces of approx. 2.5 cm.
• The size of frozen food (ice cubes, strawberries, mangoes etc.) should
also not exceed 2.5 cm.
• Remove hard kernels, e.g. fromapricots, peaches, mangoes, etc., or
hard seeds.
EN
Portable Fitness Blender
User’s Manual
- 5 -- 5 -
12/2023
2023
• Forselected fruits andvegetables, remove inedible peels. Remove
the central part of the pineapple in addition to the peel. Otherwise,
the blender may be damaged. Process only the flesh and water from
the coconut.
. . . . . . . . . . . . . . . . . . . . . . . . . . . . . . . . . . . . . . . . . . . . . . . . . . . . . . . . . . . . . . . . . . . .
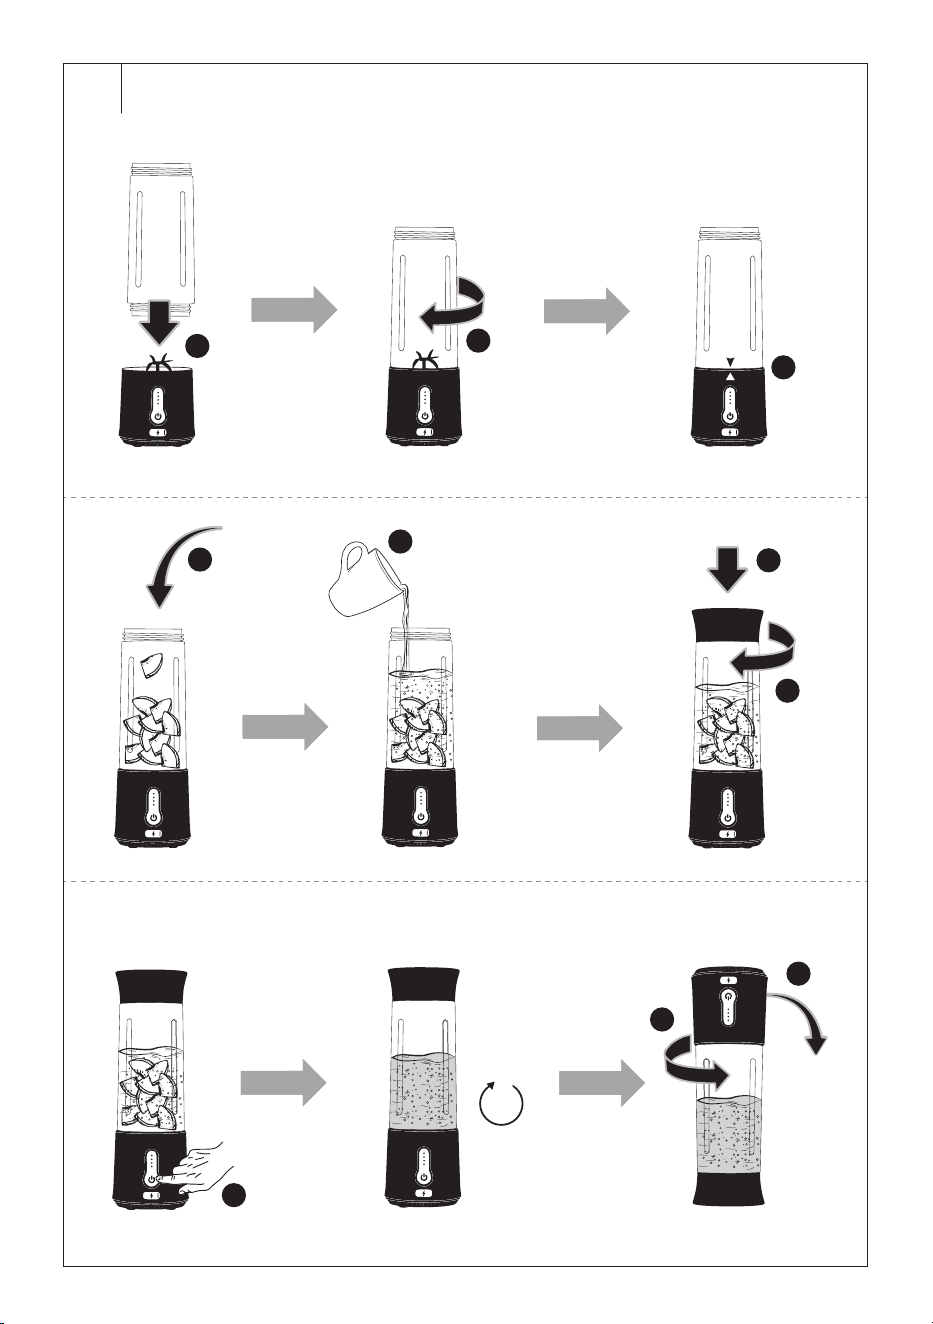
USING THE FITNESS BLENDER (Fig. B)
• Make sure the blender is charged before use. Attach the blending
container A2 to the base of the blender A5. Tighten the container A2
properly toalign the magnet A3 withthe button A7.
• Place the blender on a flat and stable surface. Fill the blending
container A2 with prepared food up to about 60% of its capacity, i.e.
300 ml.
• Add a sufficient amount of liquids (e.g. water, milk, etc.) to
approximately 80% of the capacity of the blending container A2, i.e.
400 ml.
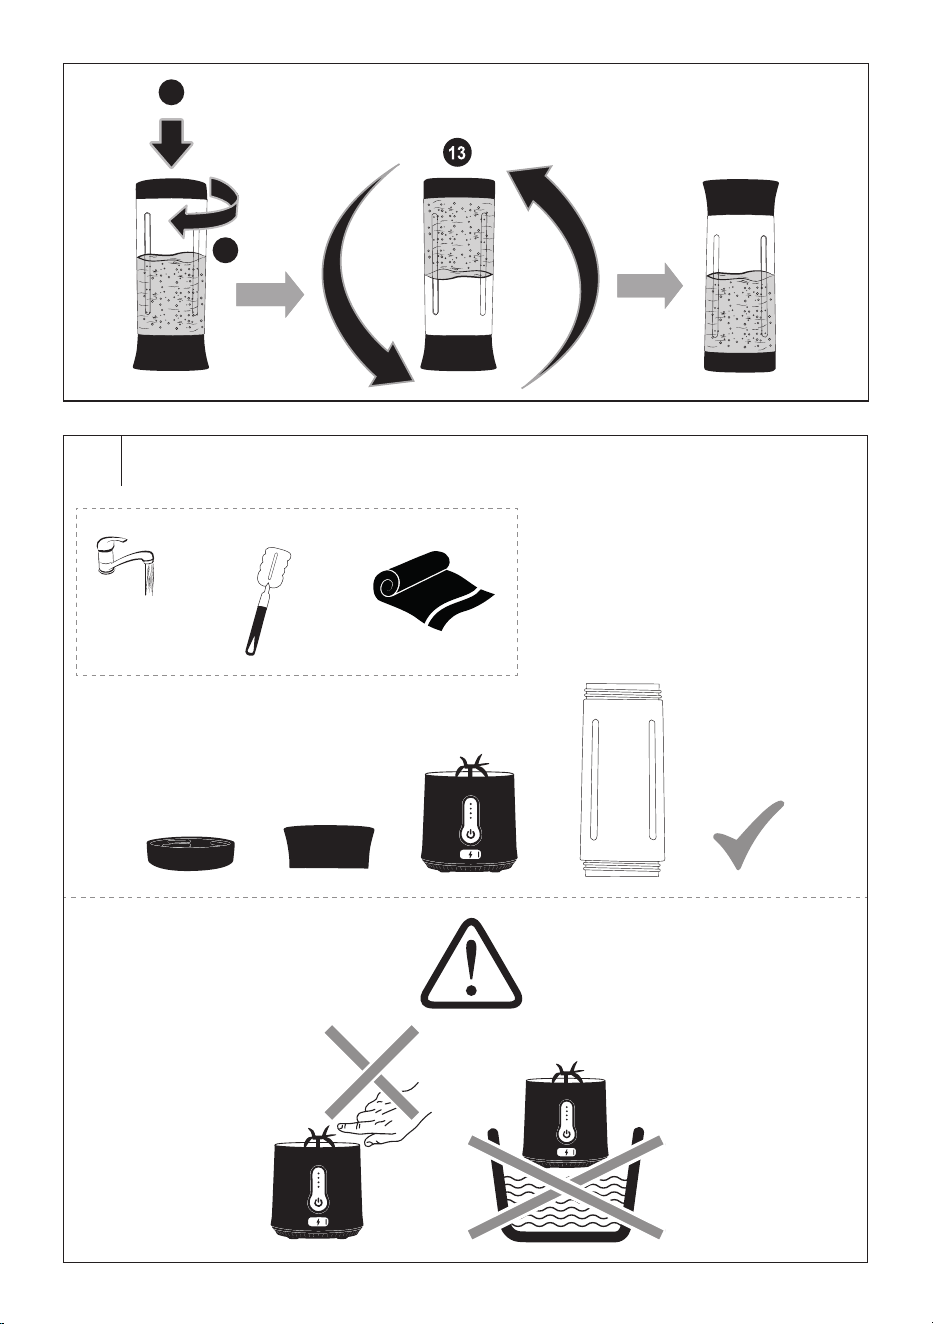
• Close the blending container A2 with the upper lid A1 and tighten it
properly. Tilt the blender several times from side to side to release food
that could be stuck under the blades unit A4.
• Press the button A7 twice to start the blender. All LED indicators A6
will flash blue from bottom to top. During operation, it is recommended
to hold the blender with one hand from above.
Note:
The safety lock will not allow the blender to start if
the blending container A2 is not properly attached to
thebase of the blender A5.
• After 30 seconds, the blender stops automatically. All LED indicators
A6 flash 5 times in magenta. If you want to end the operation of the
blender sooner, press button A7 once.
• Turn the top lid A1 downwards. Hold the blending container A2 with
one hand and carefully unscrew the base A5 with the other. Set the
base A5 aside (do not place it on its side or on the blade unit) and
close the container A2 with the lower cap A10. Tighten the cap A10
properly to prevent the contents of container A2 from leaking out.
Turn container A2 down with the lower lid A10. Now you can use the
container A2 as a drinking bottle.
• After each use, clean the parts that came into contact withfood
properly.
. . . . . . . . . . . . . . . . . . . . . . . . . . . . . . . . . . . . . . . . . . . . . . . . . . . . . . . . . . . . . . . . . . . .
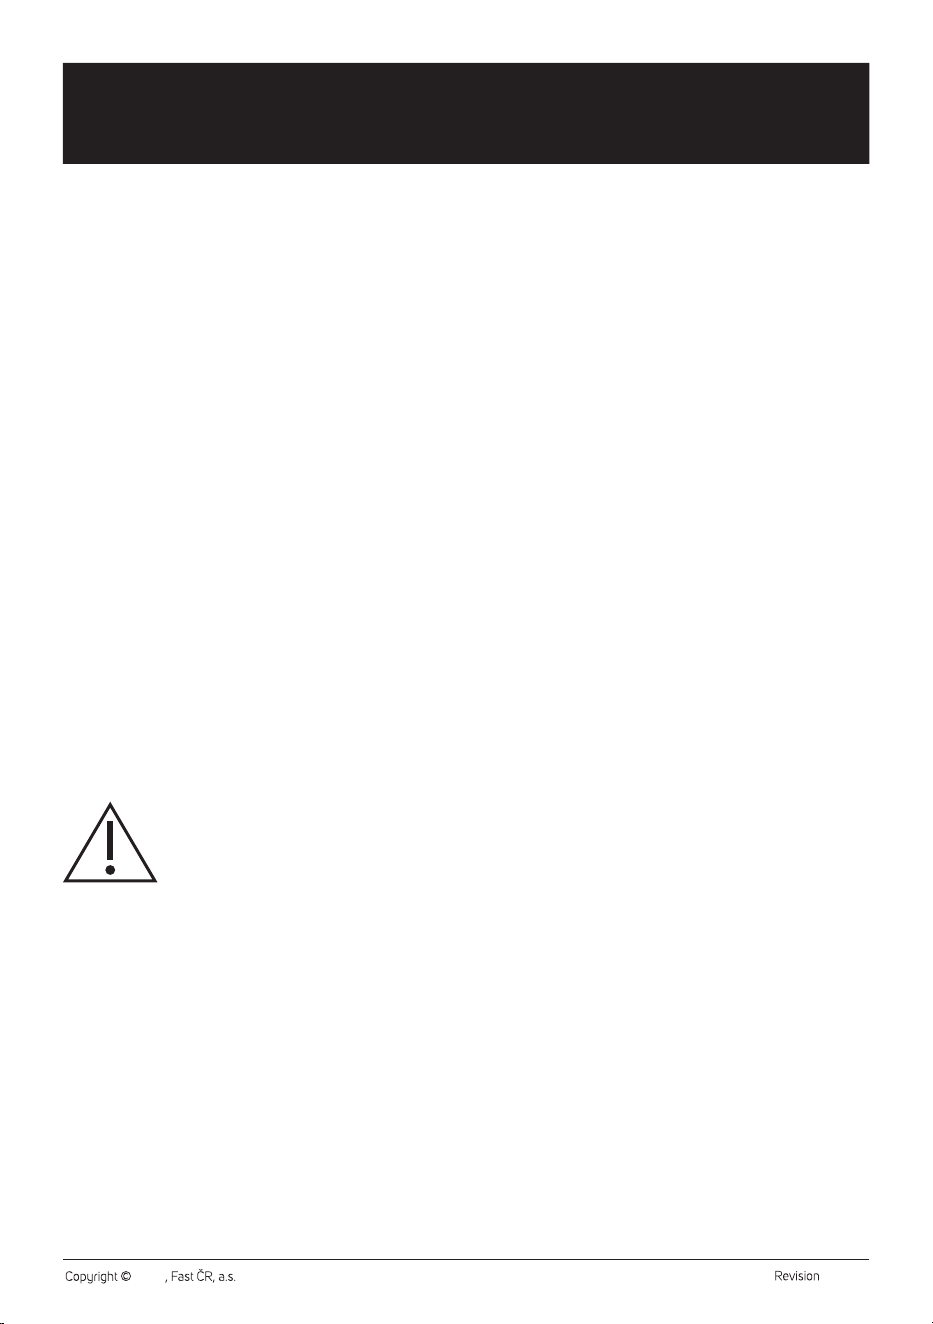
CLEANING AND MAINTENANCE (Fig. C)
• Seal the A8 USB-C port with a silicone cover to prevent water or
moisture from entering.
• Wash the blending container A2, the upper andlower lids A1 andA10,
the blades unit A4 and the space around it that comes into contact
with food thoroughly with warm water using a small amount of
dishwashing detergent. Use the included brush A12 to remove any
food residue. Finally, rinse the individual parts under flowing water
andwipe them dry with a kitchen towel or allow them to dry freely.
Warning:
When cleaning the base A5, take extra care not to
cut yourself on the blade of the blade unit A4. Do not
touch the chopping blades.
The blender and its accessories are not dishwasher
safe.
• The blender can also be cleaned by putting it into operation according
to the instructions in the chapter of USING THE FITNESS BLENDER
with the container A2 half filled with clean water with a drop of hand
dishwashing detergent. This will release most of the food remains. At
the end of the blending cycle, unscrew the upper lid A1 andempty
the contents of the container A2. Carefully unscrew and remove the
blending container A2 from the base A5. Then rinse the individual
components that come into contact with food under running water and
allow them to dry freely.
• Never use scouring pads or abrasive cleaners for cleaning to avoid
scratching or damaging the surface of the blender.
. . . . . . . . . . . . . . . . . . . . . . . . . . . . . . . . . . . . . . . . . . . . . . . . . . . . . . . . . . . . . . . . . . . .
STORAGE
• Clean the blender and its accessories according to the instructions
in the chapter CLEANING AND MAINTENANCE. Before storing, the
blender andits accessories must be clean anddry.
• Store the blender and its accessories in a clean, dry place out of the
reach of children and pets.
. . . . . . . . . . . . . . . . . . . . . . . . . . . . . . . . . . . . . . . . . . . . . . . . . . . . . . . . . . . . . . . . . . . .
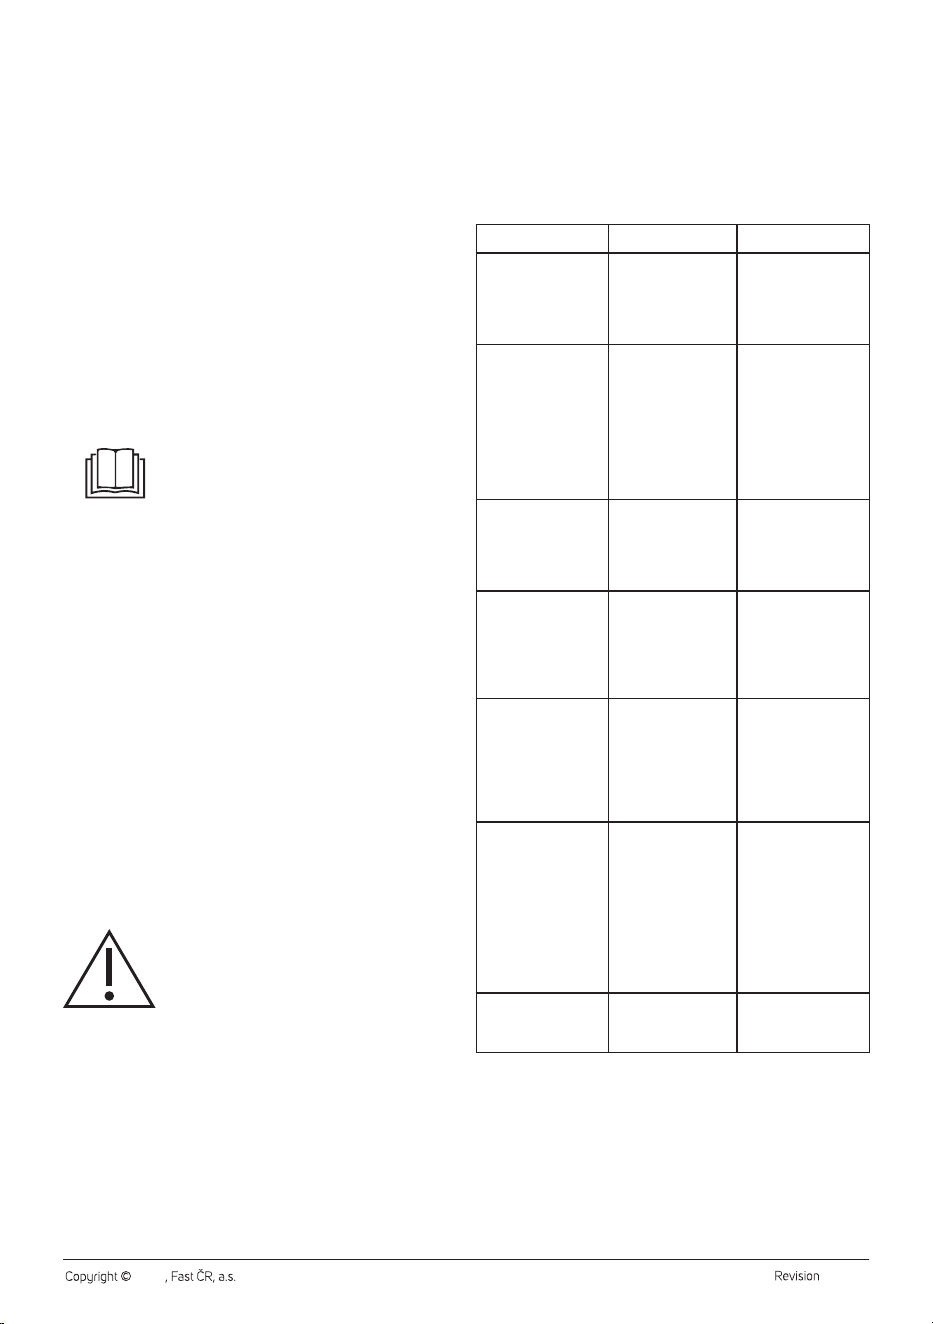
TROUBLESHOOTING
Problem Possible cause Solution
The blender cannot
be turned on. All LED
indicators A6 will
be red or will not be
lit at all.
The batteries are
flat.
Charge the
batteries. Follow the
instructions in the
section CHARGING
THE BATTERIES.
The blender cannot
be turned on. All the
LED indicators A6
will flash magenta.
Container A2 is not
properly attached
tobase A5.
Tighten the container
A2 so that the
magnet A3 is aligned
withthe button
A7. The location of
the magnet A3 is
indicated by an arrow
inthe bottom part of
the container A2.
During operation, all
LED indicators A6
are flashing red.
Low battery charge. Charge the
batteries. Follow the
instructions in the
section CHARGING
THE BATTERIES.
The blender has
stopped after 5
seconds of operation.
The blender is
empty.
Place the ingredients
in the container A2.
Proceed according to
the chapter USING
THE FITNESS
BLENDER.
The blender has
stopped. All LED
indicators A6 are
flashing red ata fast
interval of approx. 5
seconds.
Processed foods
are stuck under the
blade unit A4 or are
too dense. There's
been an overload.
Tilt the blender
several times from
side to side torelease
jammed food.
Add liquids or use
ingredients cut into
smaller pieces.
Frozen foods or ice
cubes cannot be
processed into the
required consistency.
There is little or no
fluid in container A2.
Add liquids to the
blending container
A2. Frozen foods
and ice cubes should
be processed with
asufficient amount
of liquids. Proceed
according to the
chapter USING THE
FITNESS BLENDER.
The contents of the
bottle A2 are leaking.
The sealing ring is
not properly located
in its location.
Place the sealing
ring in its place.
. . . . . . . . . . . . . . . . . . . . . . . . . . . . . . . . . . . . . . . . . . . . . . . . . . . . . . . . . . . . . . . . . . . .
- 6 -- 6 -
12/2023
2023
TECHNICAL SPECIFICATIONS
Batteries ..................................................................Li-Ion, 7.4 V , 2× 2,000 mAh
Charging voltage/current ............................................................................5 V , 1 A
Protection level ....................................................................................................... IP65
Noise level ....................................................................................................... 82 dB(A)
Operating cycle .......................................................................................................30 s
The declared noise emission level of the appliance is 82 dB(A), which
represents a level A of acoustic power with respect to a reference acoustic
power of 1 pW.
. . . . . . . . . . . . . . . . . . . . . . . . . . . . . . . . . . . . . . . . . . . . . . . . . . . . . . . . . . . . . . . . . . . .
Glossary of technical terms
Protection level IP65
• The first digit indicates the degree of protection against the ingress of
solid foreign bodies. The digit 6 means that the device is dust-tight.
• The second digit indicates the degree of protection against water
ingress. The digit 5 means that the device is protected against
low-pressure water jets.
Changes to text and technical parameters are reserved.
. . . . . . . . . . . . . . . . . . . . . . . . . . . . . . . . . . . . . . . . . . . . . . . . . . . . . . . . . . . . . . . . . . . .
INSTRUCTIONS AND INFORMATION ON DISPOSAL OF USED
PACKAGING MATERIAL
Dispose of used packaging material in the designated waste disposal area
determined by the municipality
DISPOSAL OF USED BATTERIES
Ensure that the built-in batteries are removed from the product before
taking it to the designated collection point.
Removal of the batteries is ensured by an authorised service centre.
Never attempt to remove the batteries yourself. If the product has
been disassembled once due to its ecological disposal, it must not be
reassembled, charged or used.
This symbol means that used accumulators and
batteries do not belong in normal municipal waste.
Take used accumulators and batteries to designated
collection points for proper disposal. Proper disposal of
accumulators and batteries will help prevent negative
impacts on the environment and human health.
Disposal in Other Countries Outside the European Union
This symbol is valid in the European Union. If you want to dispose of used
batteries and accumulators, ask your local authorities or your dealer for
the necessary information on the correct disposal method.
DISPOSING OF USED ELECTRICAL AND ELECTRONIC EQUIPMENT
This symbol on products or original documents means that
used electric or electronic products must not be added to
ordinary municipal waste. For proper disposal and recycling
of these products, deliver them to designated collection
points. Alternatively, in some European Union states or
other European countries the products can be returned to
the local retailer when buying an equivalent new product.
By properly disposing of this product, you help preserve
valuable natural resources and contribute to preventing potential negative
impacts on the environment and human health resulting from improper
waste disposal. For further details, contact your local authorities or the
nearest collection point.
Fines may be imposed for improper disposal of this type of waste in
accordance with national regulations.
For Business Entities in European Union States
If you want to dispose of electric or electronic devices, ask your retailer or
supplier for the necessary information.
Disposal in Other Countries Outside the European Union
This symbol is valid in the European Union. If you wish to dispose of this
product, request the necessary information about the correct disposal
method from the local council or from your retailer.
This product complies with all the essential requirements of
the applicable EU directives.