EN
PORTABLE VACUUM FITNESS BLENDER
Translation of the original manual
SBL 150WH
SBL 151BK

SBL 150WH
SBL 151BK
A
4
1
2
3
5
6
9
10
11
12
8
7

B
1
2
3
4
5
MAX
330 ml
6
2x
21s
Auto Stop
7
2x
8
30s
Auto Stop
9
10
11
12
13
3-5s
C
+
+
+
- 1 -
02/2024
2024
EN Portable Vacuum Fitness Blender
Important Safety Instructions
READ CAREFULLY AND STORE FOR FUTURE USE.
General Warnings
• This appliance may be used by persons with physical,
sensory or mental impairments or by inexperienced
persons, if they are properly supervised or have been
informed about how to use of the product in asafe manner
and understand the potential dangers.
• This appliance is not to be used by children. Keep the
appliance out of the reach of children.
• Children must not play with the device.
• Cleaning and maintenance performed by the user must
not be performed by unsupervised children.
Warning:
Incorrect use may lead to injuries.
• Take extra care when handling the appliance to avoid
injury from thechopping blade, especially when
assembling the appliance, when removing the lid and
during cleaning.
• Clean the food contact surfaces of the appliance and its
accessories according to the instructions in this manual.
• The processing time for food is given in the OPERATING
THE PORTABLE VACUUM BLENDER chapter.
- 2 -
02/2024
2024
• Always switch off the appliance when leaving it
unattended and before dismantling or cleaning.
• Always disconnect the appliance from the USB power
source when left unattended, after charging and before
using, cleaning or moving it.
• Adamaged USB charging cable must be replaced with
anew cable of the same type. It is forbidden to use
adamaged charging cable.
Other important safety instructions foruse of the appliance
• Use the appliance and its accessories in accordance with the instructions in this manual.
• This appliance is designed for domestic use only. Do not use it for commercial purposes or for purposes other than those for which it is intended.
• Use, charge andstore the appliance at an ambient temperature of 10 to 35 °C.
• It is forbidden to modify the surface of the appliance in any way, e.g. using self-adhesive foil, etc.
• Do not expose the appliance or its accessories to the outdoor environment, extreme temperatures, rapid temperature fluctuations, direct sunlight or
excessive dust.
• Always place the appliance on aclean, flat, dry and stable surface.
• The appliance may vibrate during operation. Do not place it on the edge of the table to prevent it from falling.
• Do not place the appliance or its accessories on or near an electric or gas hob. Keep it at asufficient distance from open fire, heating elements
andother sources of heat. Do not place it or any part of it into the freezer.
• Only use the appliance with original accessories from the manufacturer.
Warning:
The use of non-original accessories can lead to adangerous situation.
• Moisture or water on the charging port can cause corrosion. Always remove moisture or water as soon as possible using aclean dry wiping cloth.
• Do not charge the appliance if it is wet, if it has moisture on it or if the lid is damaged in any way. Before charging, all parts of the appliance must be
completely dry.
• Charge the appliance with the supplied USB charging cable. Keep the USB charging cable dry. Before connecting the charging cable to thecharging
port, make sure that the charging port and the connector of the charging cable are completely clean anddry.
• The charging cable connector, which is designed to connect to thecharging port, is magnetic. It may only be connected to the charging port in one
direction. Do not try to connect it backwards.
• The appliance must be supervised during charging. Disconnect the charging cable from the lid of the appliance by pulling the connector. Do not pull
the charging cable. Only handle the charging cable with dry andclean hands.
• Do not use the charging cable that comes withthis appliance for other types of appliances.
• Do not charge the appliance near flammable materials or objects or at high ambient temperatures.
• Before use, always make sure that no part of the appliance is damaged.
• Properly attach the lid to the blender container before putting it into operation. The appliance is equipped with asafety lock that will not allow it to
start unless it is properly assembled. Do not remove the lid during operation.
Warning:
When handling the lid, take extra care not to injure yourself on the chopping blades.
• Before removing the lid, make sure that the knife unit has stopped.
• Do not idle the appliance or subject it to excessive loads. Improper use can adversely affect the life of the appliance.
• To avoid adangerous situation, do not use the blender to process hard ingredients such as nutshells, hard pits of apricots, peaches, mangoes, bones,
etc.
• This appliance is not intended for preparing dough or mashed potatoes, whipping egg whites or grinding raw meat, etc.
• Do not mix ingredients such as carbonated drinks, baking soda, baking powder, yeast, etc.
• Do not fill the blender container above the maximum mark on the inside of the container.
• Take extra care when handling hot liquids and food. Hot steam or splashes of hot liquids or food can cause scalding.

- 3 -
02/2024
2024
• Do not put hot food or pour hot liquids into the mixing container. There is arisk of the mixing container bursting and scalding. Allow hot liquids
andfoods to cool down to room temperature before placing them in the blender container.
• Do not mix hot foods or liquids.
• The mixing cycle lasts 30 seconds. Let the appliance cool down for afew minutes before using it again.
• None of the components of this appliance are intended for use inamicrowave or electric oven, etc.
• To avoid adangerous situation, never submerge the lid of the blender in water or wash it in thedishwasher. The mixer container is also not intended
for washing in adishwasher.
• Do not use the appliance if it is not working properly, if the blender lid has been immersed in water or if it shows any signs of damage (cracked or
broken container, damaged lid, etc.). Take it to an authorised service centre for inspection or repair.
• Do not attempt to modify or disassemble the blender lid in any way. This could cause the batteries to overheat or release hazardous substances.
• Do not repair the appliance yourself. Have all repairs or adjustments performed at an authorised service centre. Tampering with the appliance during
the warranty period may void the warranty.
• Store the appliance in adry and clean environment out of the reach of children and animals.
- 4 -- 4 -
02/2024
2024
• Thank you for purchasing our SENCOR product; we hope it will serve
to your satisfaction.
• Before using this appliance, please familiarise yourself with the
user’smanual, even if you are already familiar with using similar
types of appliances. Use the appliance only as described in this
user'smanual. Keep the manual for future reference.
• It is recommended to keep the original shipping carton, packing
material, receipt and confirmation of the extent of the seller'sliability
or warranty certificate at least for the duration of the legal right of
defective performance or quality guarantee. When transporting the
appliance, we recommend packaging it again in the original box
provided by the manufacturer.
. . . . . . . . . . . . . . . . . . . . . . . . . . . . . . . . . . . . . . . . . . . . . . . . . . . . . . . . . . . . . . . . . . . .
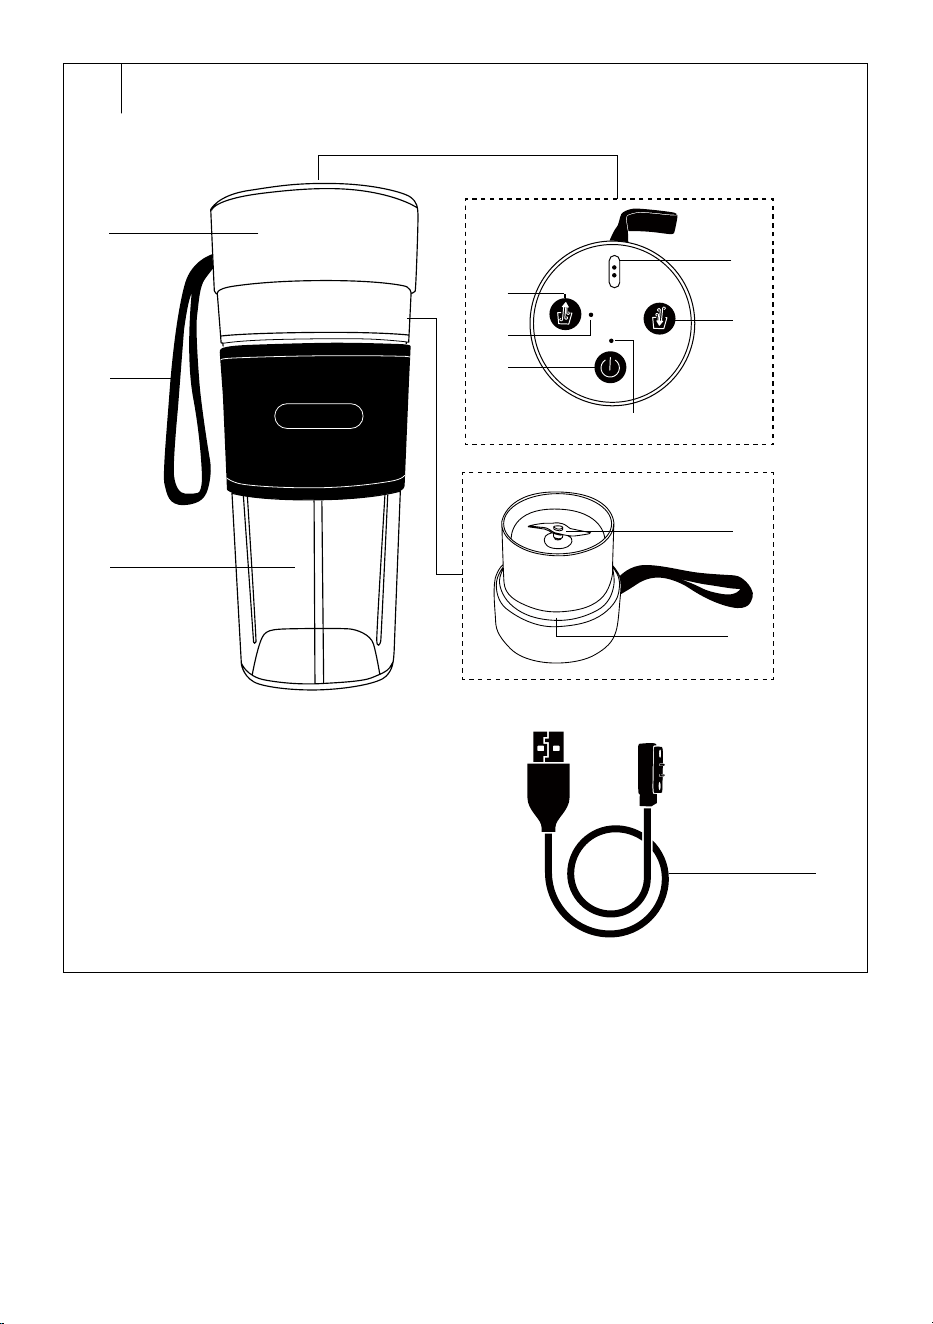
DESCRIPTION OF THE APPLIANCE AND ITS ACCESSORIES (Fig. A)
A1 Lid withcontrol panel
andblade unit
A2 Carry loop
A3 Container with amaximum
filling capacity of 330 ml
A4 Charging port
A5 Vacuum mode start/stop
button
A6 LED indicator for vacuum
mode
A7 Button for pressure
equalization in the container
A8 LED blender operation/
charging indicator
A9 Blending mode start/stop
button
A10 Blade unit
A11 Gasket ring
A12 USB charging cable
. . . . . . . . . . . . . . . . . . . . . . . . . . . . . . . . . . . . . . . . . . . . . . . . . . . . . . . . . . . . . . . . . . . .
THE PURPOSE OF USING THE APPLIANCE
• Withthe portable vacuum blender, you can easily andquickly prepare
smoothies or protein drinks, milkshakes andsome types of baby
blended food.
. . . . . . . . . . . . . . . . . . . . . . . . . . . . . . . . . . . . . . . . . . . . . . . . . . . . . . . . . . . . . . . . . . . .
CHARGING THE BATTERIES
• The blender is equipped with built-in Li-Ion batteries, which enable its
wireless operation.
• Make sure the A4 charging port is completely clean and dry before
charging.
• Use the A12 USB charging cable to charge the built-in batteries.
• The appliance may be connected to aUSB charging socket in the
wall that allows power to be supplied to terminal devices using aUSB
charging cable type A, or to aUSB charging adapter 5 V
, 1A.
Note:
USB power supply not supplied with the appliance.
• To avoid ahazardous situation, use only acertified type of USB power
supply that meets all safety and technical requirements set by the
legislation that applies to it.
• Connect the A12 USB charging cable to aUSB charging socket in
the wall or to aUSB charging adapter, which you then plug into an
electrical outlet. When using the USB charging adapter, follow the
manufacturer'sinstructions in the user manual.
• To start charging the batteries, connect the magnetic connector of the
A12 USB charging cable to the A4 charging port.
• Charge the batteries for approximately 2 hours before first use. During
charging, the A8 LED indicator will be red. The end of charging is
indicated by the A8 white LED indicator.
• When charging is complete, disconnect the A12 USB charging cable
from the A4 charging port. Disconnect the other end of the A12 USB
charging cable from the USB charging socket in the wall or unplug
the USB charging adapter from the power outlet. Do not leave the
blender connected to the USB power supply longer than it takes to
fully charge the batteries.
• The batteries can withstand up to 10 mixing cycles per single full
charge.
• To keep the life of the Li-Ion batteries as long as possible, use, store
and charge the blender at room temperature. Do not fully discharge
the batteries. It is better to recharge the batteries before they are
completely discharged. If you do not use the blender for along time,
keep the batteries partially charged.
. . . . . . . . . . . . . . . . . . . . . . . . . . . . . . . . . . . . . . . . . . . . . . . . . . . . . . . . . . . . . . . . . . . .
BEFORE FIRST USE
• Charge the built-in batteries according to the instructions inchapter
CHARGING THE BATTERIES.
• Remove the blender lid A1 from thecontainer A3. Wash the underside
of the A1 lid with the A10 blade unit, the A11 gasket ring and the A3
container thoroughly with warm water using asmall amount of hand
dishwashing detergent. Then rinse all these parts under running water
to remove any detergent residue.
• Wipe the top of the A1 lid with adamp cloth.
• After cleaning, wipe the A1 lid and the A3 container dry with akitchen
towel. Always wipe off any water or moisture on the A4 charging port
immediately after cleaning the blender.
Warning:
When cleaning the A1 blender lid, take extra care not
to cut yourself on the blade of the A10 blade unit.
Do not touch the chopping blades.
Do not immerse the A1 blender lid in water.
A1 lid and A3 container are not dishwasher safe.
. . . . . . . . . . . . . . . . . . . . . . . . . . . . . . . . . . . . . . . . . . . . . . . . . . . . . . . . . . . . . . . . . . . .
FOOD PREPARATION
• This blender is designed to prepare smoothies or protein beverages,
milkshakes and some types of baby blended food of a more liquid
consistency.
• Soft and juicy fruits such as oranges, mandarins, kiwis, blueberries,
tomatoes, etc. can be processed separately in the blender. It depends
on the ripeness and juiciness of the fruit. Sufficient fluids should be
added to less juicy or harder fruits or vegetables. This group includes
bananas, apricots, strawberries, mangoes, pineapples, apples,
cucumbers, beetroot, etc. Hard vegetables such as carrots can be
processed in smaller quantities in combination with softer and juicier
fruits or vegetables and sufficient liquids.
• Use fresh and ripe fruit and vegetables for processing. Always wash
fruit and vegetables properly.
• Remove the peel from citrus fruits and fruits with inedible or too hard
skin, such as pineapple, mango, etc. Remove the central part of the
pineapple in addition to the peel.
• Fruit with hard seeds or stones, such as apricots, peaches, mangoes,
etc., should be stripped of their hard stones or seeds. Remove the
cores and stems from fruits such as apples, pears, etc. Remove the
stems and leaves from the strawberries.
• Always process only the flesh and water from the coconut.
• Cut the food into evenly sized pieces of approximately 2 cm.
• The blender is not designed to blend dry foods such as nuts, etc., or
ice cubes.
. . . . . . . . . . . . . . . . . . . . . . . . . . . . . . . . . . . . . . . . . . . . . . . . . . . . . . . . . . . . . . . . . . . .
EN
Portable Vacuum Fitness Blender
User’sManual

- 5 -- 5 -
02/2024
2024
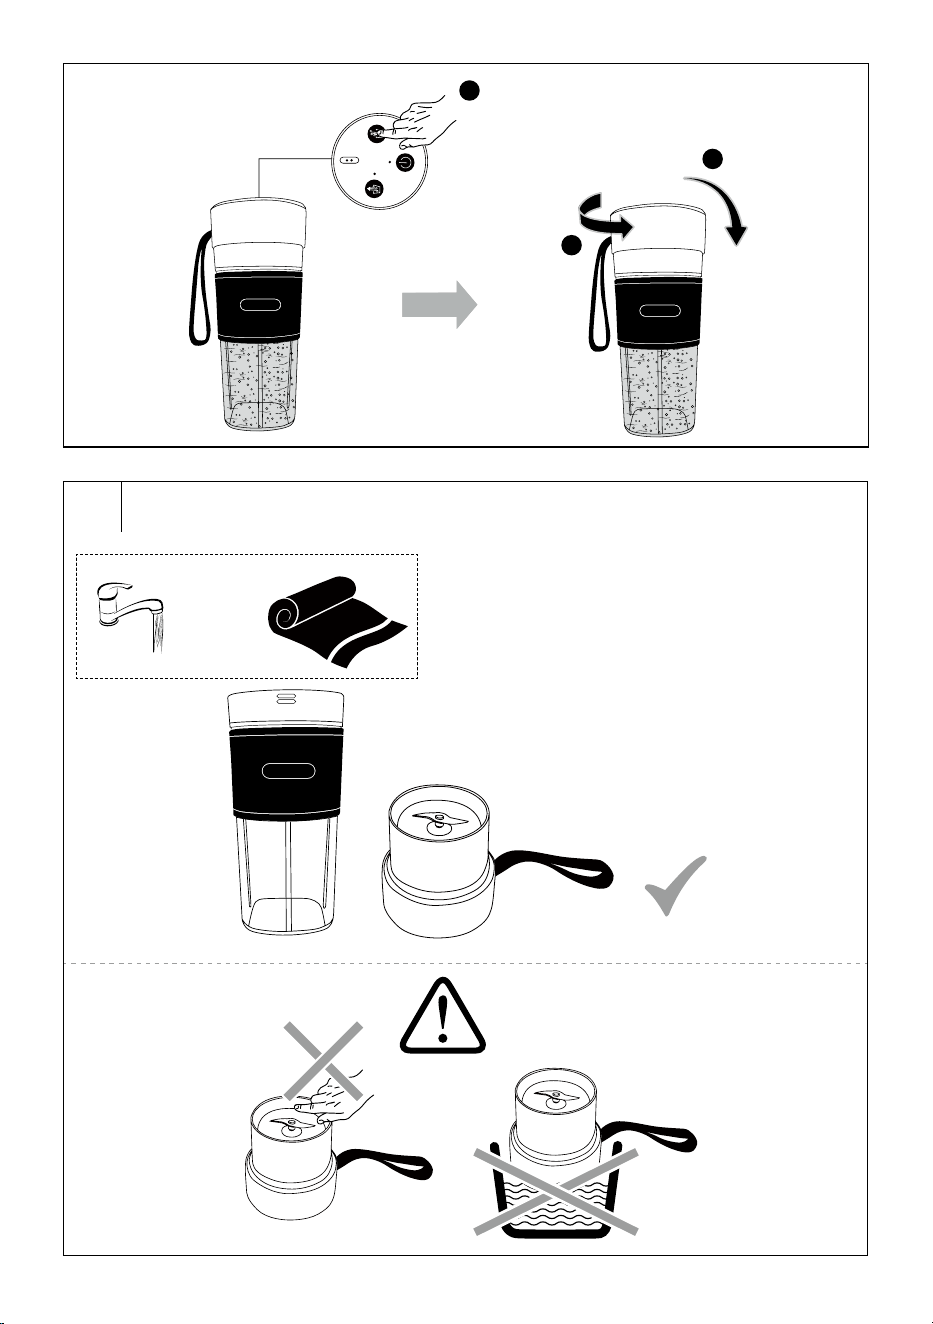
OPERATING THE PORTABLE VACUUM BLENDER (Fig. B)
• Place the A3 container on aflat and stable surface. Place the prepared
foods in the A3 container and add enough liquid to them. Do not cross
the MAX mark on the inside of the A3 container.
• Verify that the A11 gasket ring is in its location. Close the A3 container
with the A1 lid. Tighten A1 lid properly to align the symbol
marked
on A1 lid with the ▲ symbol on A3 container.
Note:
The safety lock will not allow the blender to start if
the A1 blender lid is not properly secured to the A3
container.
• The blender is equipped with avacuum function. Air is extracted from
the A3 container to slow down the oxidation process, thus reducing
the loss of vitamins in the food you will be processing. Press the A5
button twice to start the vacuuming process. The A6 LED indicator
lights up. Do not tilt the blender during the vacuuming process.
The blender is equipped with afunction to automatically stop the
vacuuming process if the blender is tilted (angle of 25° or more) to
prevent the ingredients from being sucked into the pump. For the
same reason, do not use the A5 button even after the blending
is finished, when the underside of the A1 lid is contaminated with
processed ingredients. The vacuuming process will stop automatically
after 21 seconds.
Note:
After the air has been extracted from the A3 container,
the A1 lid of the blender can be loosened only with
difficulty or not at all because the pressure inside the
A3 container is lower than the ambient pressure.
The vacuuming process can be stopped by pressing
the A5 button once.
If you do not want to use the vacuum function, leave
out the above instructions.
• To start the blending mode, press the A9 button twice. The A8 LED
indicator lights up white. Turn the blender with the A1 lid downwards
to blend the ingredients inside the A3 container. Hold the blender with
one hand during operation. Gently tilt the blender from side to side
afew times to loosen any ingredients that may have become trapped
under the A10 blade unit. The blending mode will stop automatically
after 30seconds. The A8 LED indicator flashes three times. Blending
can be stopped prematurely by pressing the A9 button.
• Turn the blender with the A1 lid upwards. You can keep the blended
ingredients in avacuum for several hours. Do not use the blender
forprolonged food storage.
• Press and hold the A7 button for 3 to 5 seconds to equalize the
pressure in the A3 container with the ambient pressure. Do not tilt or
turn the blender upside down.
Note:
If you have not used the vacuum function, leave out
the above mentioned step.
• Carefully remove the A1 lid from the A3 container and set it aside with
the control buttons facing downwards.
• Empty the A3 container and properly clean all parts that have come
into contact with food according to the instructions in the chapter
CLEANING AND MAINTENANCE.
. . . . . . . . . . . . . . . . . . . . . . . . . . . . . . . . . . . . . . . . . . . . . . . . . . . . . . . . . . . . . . . . . . . .
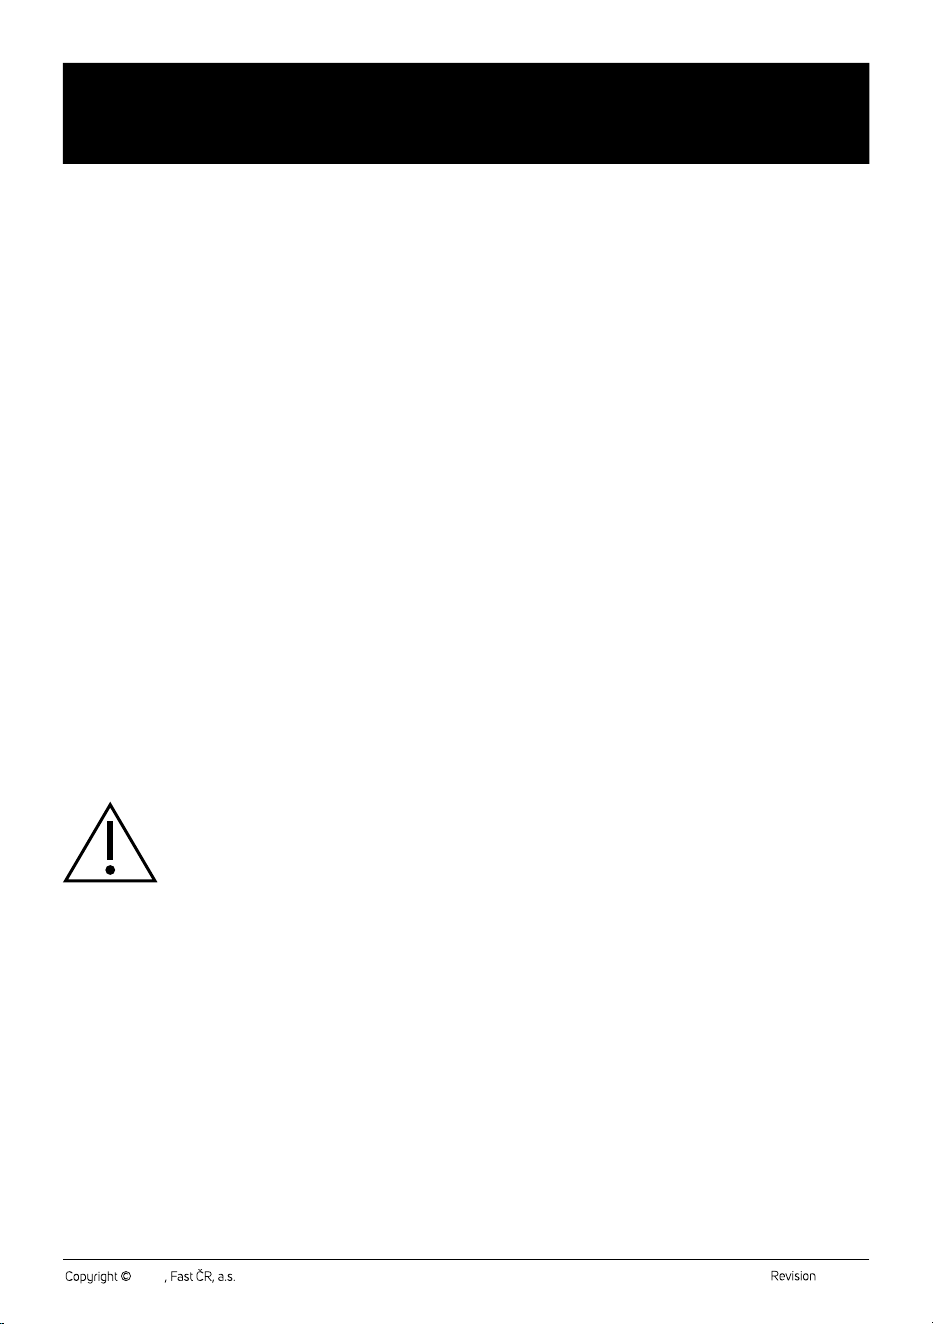
CLEANING AND MAINTENANCE (Fig. C)
• Remove the blender lid A1 from thecontainer A3. Wash the underside
of the A1 lid with the A10 blade unit, the A11 gasket ring and the A3
container thoroughly with warm water using asmall amount of hand
dishwashing detergent. Then rinse all these parts under running water
to remove any detergent residue.
Warning:
When cleaning the A1 blender lid, take extra care not
to cut yourself on the blade of the A10 blade unit.
Do not touch the chopping blades.
Do not immerse the A1 blender lid in water.
A1 lid and A3 container are not dishwasher safe.
• You can also clean the blender by putting it into operation (without
using the vacuum function) according to the instructions in the
chapter of OPERATING THE PORTABLE VACUUM BLENDER with
the A3 container about half full of clean water with adrop of hand
dishwashing detergent. This will release most of the food remains.
When the blending cycle is complete, turn the blender with the A1
lid upwards. Unscrew the A1 lid and empty the contents of the A3
container. Rinse the underside of the lid A1 and the container A3 under
clean running water to remove any food residue and detergent.
• Make sure that no dirt remains on the A11 gasket ring. To remove them
you can use asoft toothbrush.
• Use adamp cloth to remove dirt from the top of the A1 lid.
• After cleaning, wipe the A1 lid and the A3 container dry with akitchen
towel. Always wipe off any water or moisture on the A4 charging port
immediately after cleaning the blender.
• Never use metal dishwashers or abrasive cleaners for cleaning to
avoid scratching or damaging the surface of the blender.
. . . . . . . . . . . . . . . . . . . . . . . . . . . . . . . . . . . . . . . . . . . . . . . . . . . . . . . . . . . . . . . . . . . .
STORAGE
• Clean the blender and its accessories according to the instructions in
the chapter CLEANING AND MAINTENANCE. All parts of the blender
must be clean and dry before storage.
• Store the blender and its accessories in aclean, dry place out of the
reach of children and pets.
. . . . . . . . . . . . . . . . . . . . . . . . . . . . . . . . . . . . . . . . . . . . . . . . . . . . . . . . . . . . . . . . . . . .
TROUBLESHOOTING
Problem Possible cause Solution
Unable to start
vacuuming
process. When
the A5 button is
pressed twice, the
A6 LED indicator
flashes white three
times.
The A1 lid is not
properly attached
to the blender
container A3.
Tighten the A1 lid so
that the symbol
marked on the A1 lid
is aligned with the
symbol
▲ on the A3
blender container.
The blender is tilted
(angle 25° and
more).
Place the blender flat.
Do not tilt it or turn it
with the A1 lid down.
The blender cannot
be turned on. When
the A9 button is
pressed twice, the
A8 LED flashes
white three times.
The A1 lid is not
properly attached
to the blender
container A3.
Tighten the A1 lid so
that the symbol
marked on the A1 lid
is aligned with the
symbol
▲ on the A3
blender container.
The blender cannot
be turned on. When
the A9 button is
pressed twice, the
A8 LED indicator
flashes red three
times.
The batteries are
flat.
Recharge the batteries
according to the
instructions in the
chapter CHARGING
THE BATTERIES.
. . . . . . . . . . . . . . . . . . . . . . . . . . . . . . . . . . . . . . . . . . . . . . . . . . . . . . . . . . . . . . . . . . . .
- 6 -- 6 -
02/2024
2024
TECHNICAL SPECIFICATIONS
Batteries ........................................................................... Li-Ion, 7.4 V
, 700 mAh
Charging voltage/current .......................................................................... 5 V , 1 A
Protection level ........................................................................................................IP54
Noise level ........................................................................................................ 85 dB(A)
Operating cycle (mixing mode) ..........................................................................30 s
The declared noise emission level of the appliance is 85 dB(A), which
represents alevel Aof acoustic power with respect to areference acoustic
power of 1 pW.
. . . . . . . . . . . . . . . . . . . . . . . . . . . . . . . . . . . . . . . . . . . . . . . . . . . . . . . . . . . . . . . . . . . .
Glossary of technical terms
Protection level IP54
• The first digit indicates the degree of protection against the ingress of
solid foreign bodies. The number 5 means that the device is resistant
to dust ingress.
• The second digit indicates the degree of protection against water
ingress. The number 4 means that the device is protected against
splashing water from all angles.
Changes to text and technical parameters are reserved.
. . . . . . . . . . . . . . . . . . . . . . . . . . . . . . . . . . . . . . . . . . . . . . . . . . . . . . . . . . . . . . . . . . . .
INSTRUCTIONS AND INFORMATION ON DISPOSAL OF USED
PACKAGING MATERIAL
Dispose of used packaging material in the designated waste disposal area
determined by the municipality.
DISPOSAL OF USED BATTERIES
Ensure that the built-in batteries are removed from the product before
taking it to the designated collection point.
Removal of the batteries is ensured by an authorised service centre.
Never attempt to remove the batteries yourself. If the product has
been disassembled once due to its ecological disposal, it must not be
reassembled, charged or used.
This symbol means that used accumulators and
batteries do not belong in normal municipal waste.
Take used accumulators and batteries to designated
collection points for proper disposal. Proper disposal of
accumulators and batteries will help prevent negative
impacts on the environment and human health.
Disposal in Other Countries Outside the European Union
This symbol is valid in the European Union. If you want to dispose of used
batteries and accumulators, ask your local authorities or your dealer for
the necessary information on the correct disposal method.
DISPOSAL OF USED ELECTRICAL AND ELECTRONIC EQUIPMENT
This symbol on products or original documents means that
used electric or electronic products must not be added to
ordinary municipal waste. For proper disposal and recycling
of these products, deliver them to designated collection
points. Alternatively, in some European Union states or
other European countries the products can be returned to
the local retailer when buying an equivalent new product.
By properly disposing of this product, you help preserve
valuable natural resources and contribute to preventing potential negative
impacts on the environment and human health resulting from improper
waste disposal. For further details, contact your local authorities or the
nearest collection point.
Fines may be imposed for improper disposal of this type of waste in
accordance with national regulations.
For Business Entities in European Union States
If you want to dispose of electric or electronic devices, ask your retailer or
supplier for the necessary information.
Disposal in Other Countries Outside the European Union
This symbol is valid in the European Union. If you wish to dispose of this
product, request the necessary information about the correct disposal
method from the local council or from your retailer.
This product complies with all the essential requirements of
the applicable EU directives.

FAST ČR, a.s.
U Sanitasu 1621
CZ-251 01 Říčany
www.sencor.eu