
Read all instructions before
assembling and using product.
IMPORTANT - Keep instructions for
future use.
0522R1-6113
Owner’s Manual
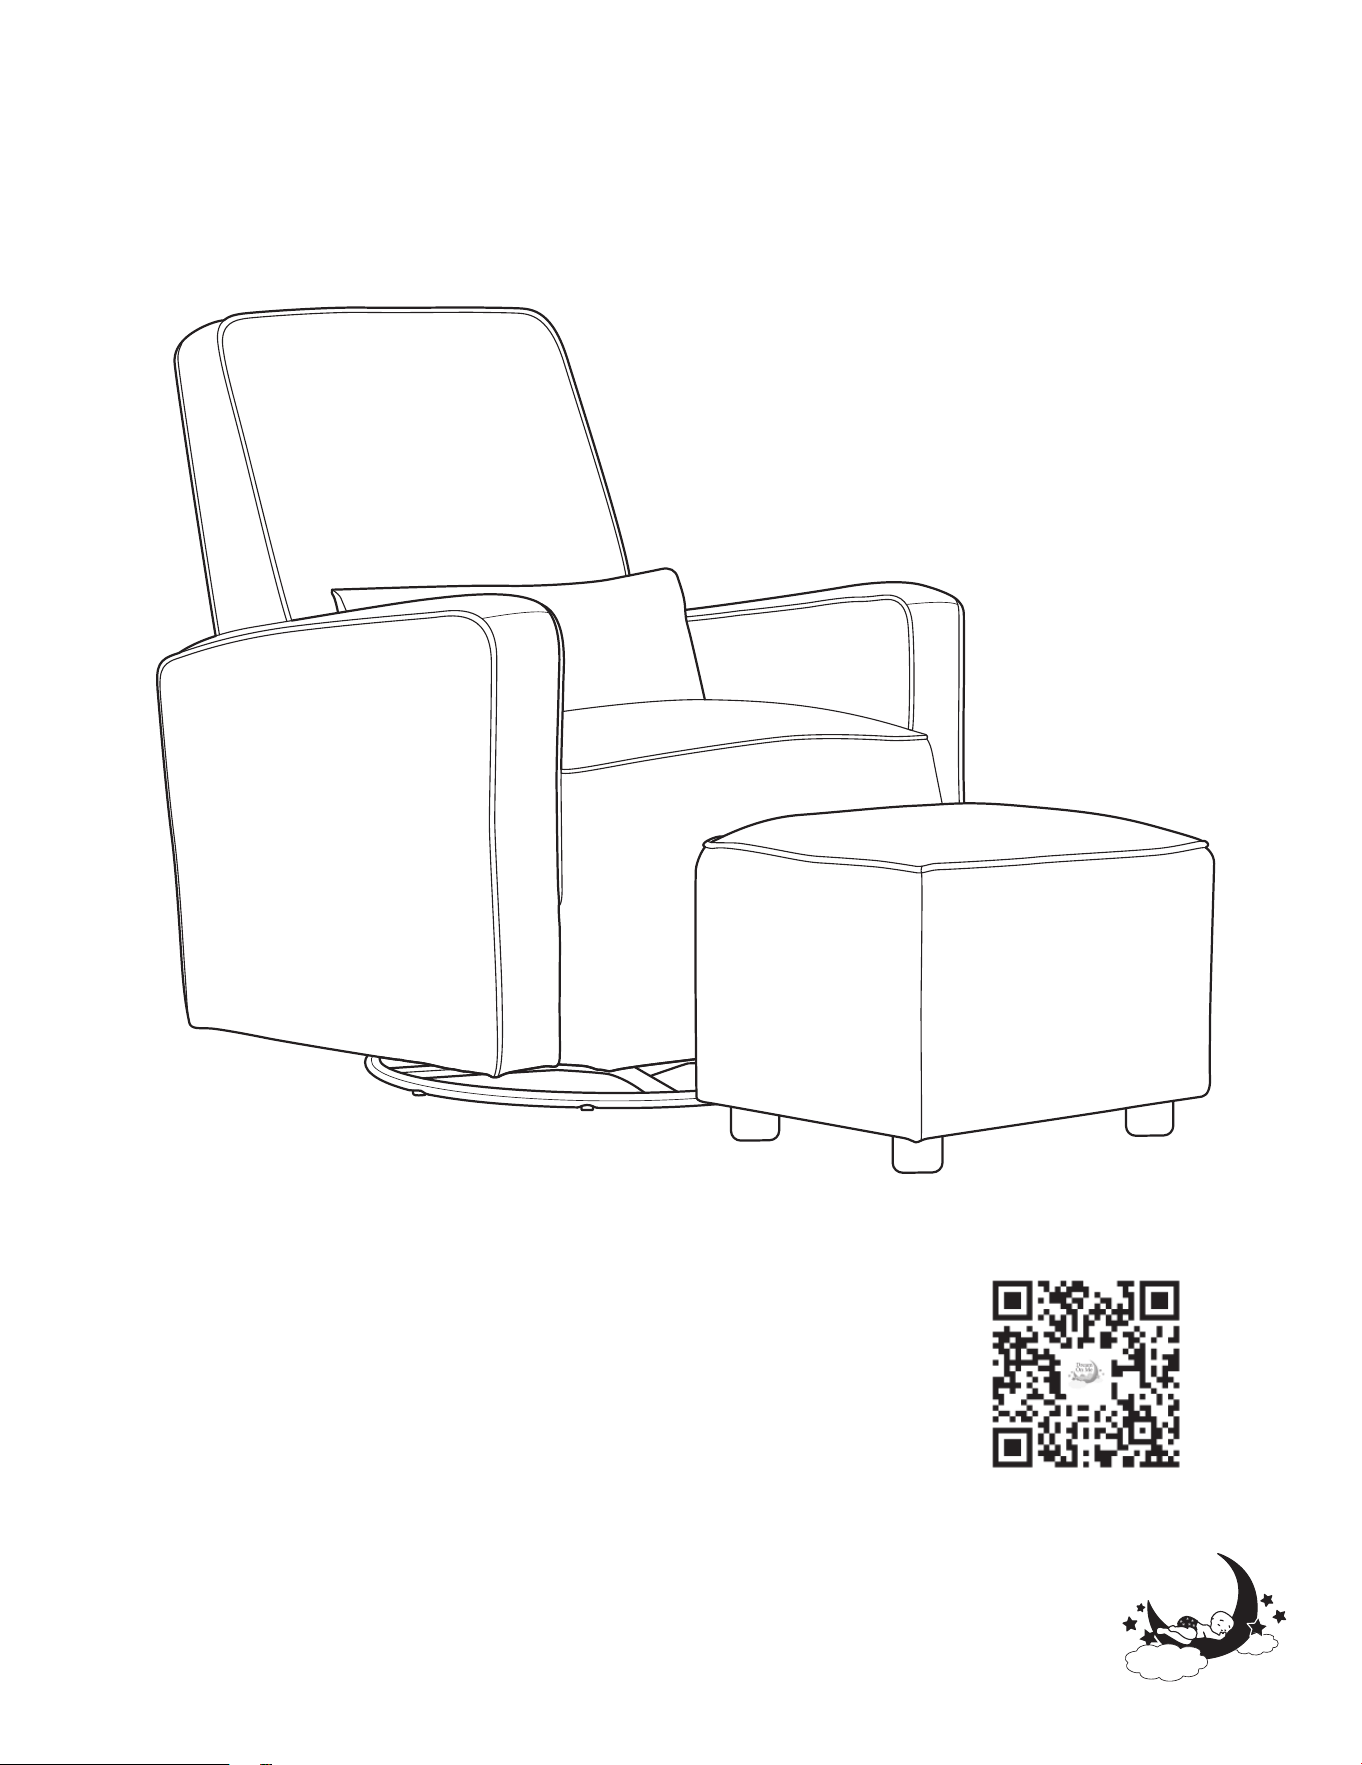
HOLLAND GLIDER W/ OTTOMAN
Scan the QR code to register your product
https://dreamonme.com/customercare/registration/
2
www.dreamonme.com/help
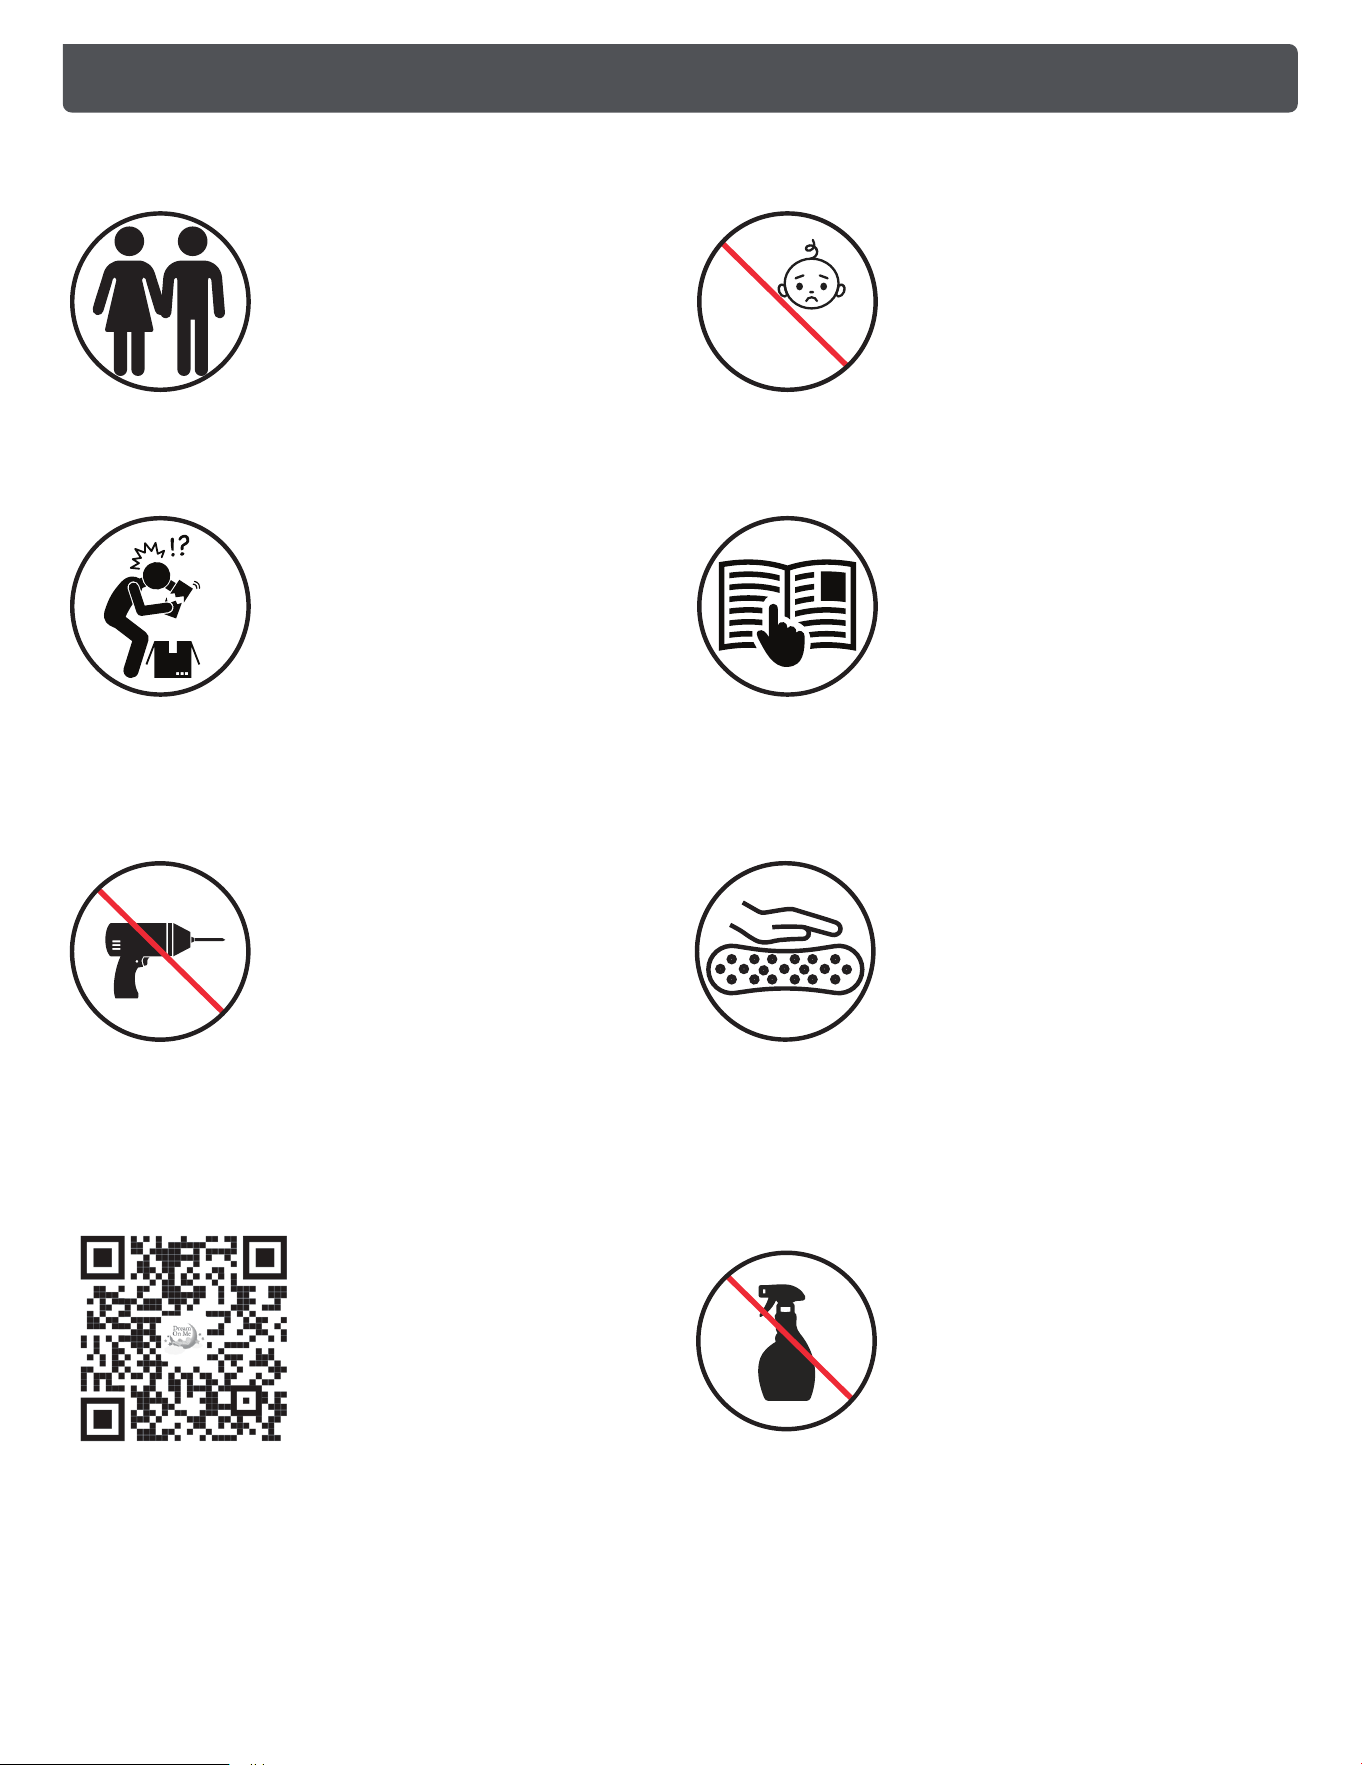
SAFETY TIPS
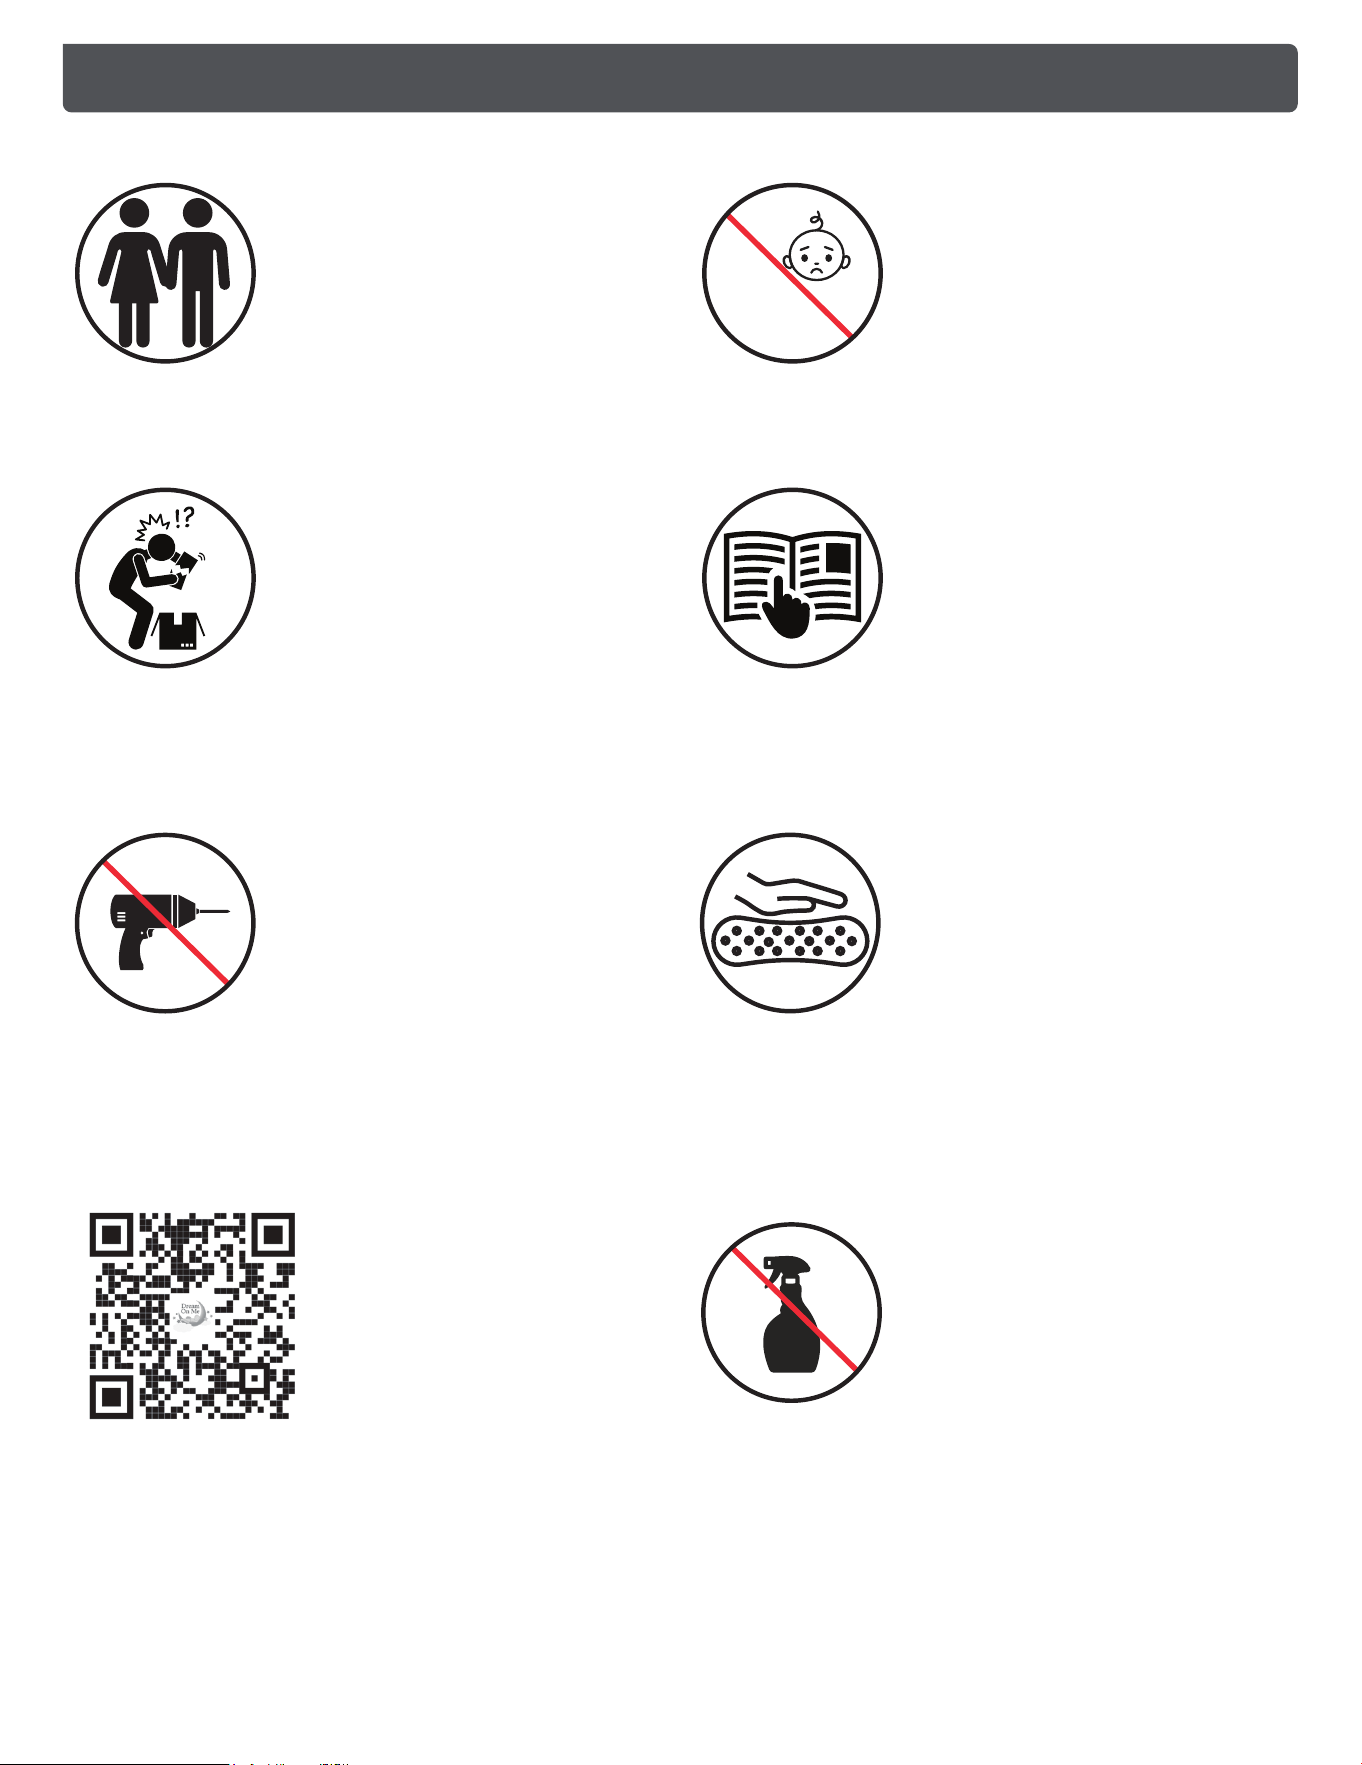
Adult Assembly
Required.
DO NOT use the
product if it is
damaged, broken,
and/or components are
missing or broken.
To protect your parts
during assembly, please
place them on a soft
surface.
Small parts may
present choking
hazard prior to
assembly.
Please read the
instructions
thoroughly. Identify all
parts & hardware.
Do Not Use Power
Drills or Drivers.
Spot clean the fabric of
the glider with shampoo
foam or dry cleaning
solvents. Do not use
harsh detergents as it
could damage the fabric.
0-6
Contact Dream On
Me Inc in case of
any assistance
needed.

3
www.dreamonme.com/help
…. for choosing Dream On Me and congratulations on joining our family;
a family that has been transforming lives for over 30+ years!
We appreciate your feedback and wish you the very best in the
coming years with your new addition. If you have any questions
or concerns please don’t hesitate to reach out to us. One of our
trusted Customer Care representatives will be happy to assist you.
Thank you again for entrusting us to provide you with safe
and affordable baby products and accessories.
THANK YOU...
LIMITED WARRANTY:
• Dream On Me warrants its product to be free from defects in material and
workmanship and agrees to remedy any such defect.
• This warranty covers 1 year from the date of original purchase.
• This warranty is valid only upon presentation of proof of purchase.
• This is solely limited to the repair or replacement of defective furniture
components and no assembly labor is included.
• This warranty does not apply to any product which has been improperly
assembled, subjected to misuse or abuse or which has been altered or
repaired in any way.
• This warranty gives you specific legal rights and you may also have other
rights which vary from State to State.

4
www.dreamonme.com/help
WARNINGS
• FAILURE TO FOLLOW THESE WARNINGS AND ASSEMBLY INSTRUCTIONS
COULD RESULT IN SERIOUS INJURY OR DEATH.
• CHECK THIS PRODUCT FOR DAMAGED HARDWARE, LOOSE JOINTS,
MISSING PARTS OR SHARP EDGES BEFORE AND AFTER ASSEMBLY AND
FREQUENTLY DURING USE.
• DO NOT USE THIS GLIDER IF ANY PARTS ARE MISSING, DAMAGED OR
BROKEN.
• CONTACT DREAM ON ME - 1532 S. WASHINGTON AVE, PISCATAWAY, NJ
08854 FOR REPLACEMENT PARTS.
• DO NOT ALLOW CHILDREN TO PLAY OR USE THIS GLIDER
UNSUPERVISED.
• CHECK CONNECTING POINTS PERIODICALLY TO ENSURE NONE HAVE
COME LOOSE DURING USE.
• DO NOT USE THE GLIDER IF NOT ASSEMBLED PROPERLY.
5
www.dreamonme.com/help
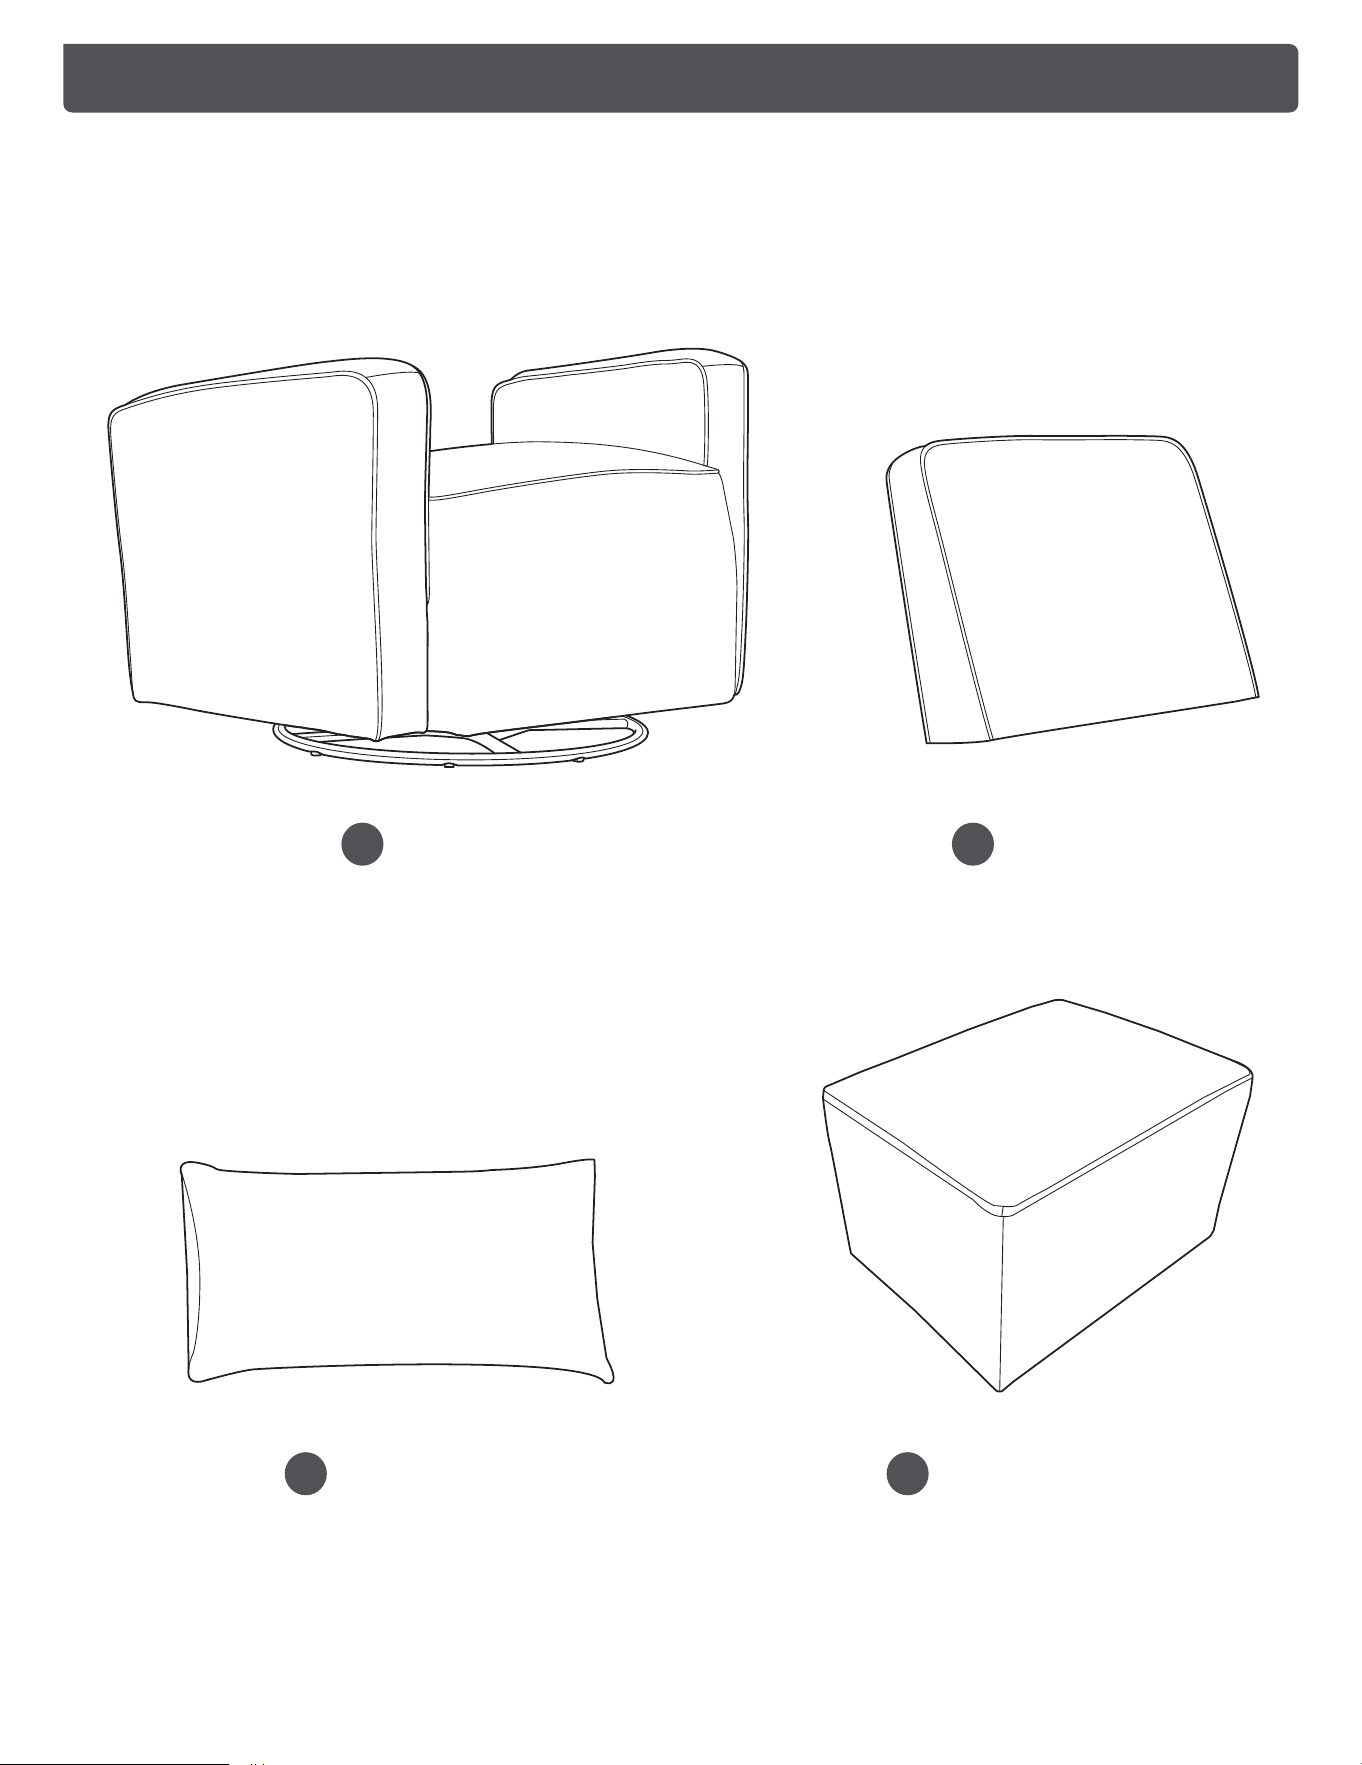
PARTS
If there are any missing parts, please contact Dream On Me before using the
product.
Seat
1
Back Rest
2
Cushion
3
Pedals (Ottoman)
4

6
www.dreamonme.com/help
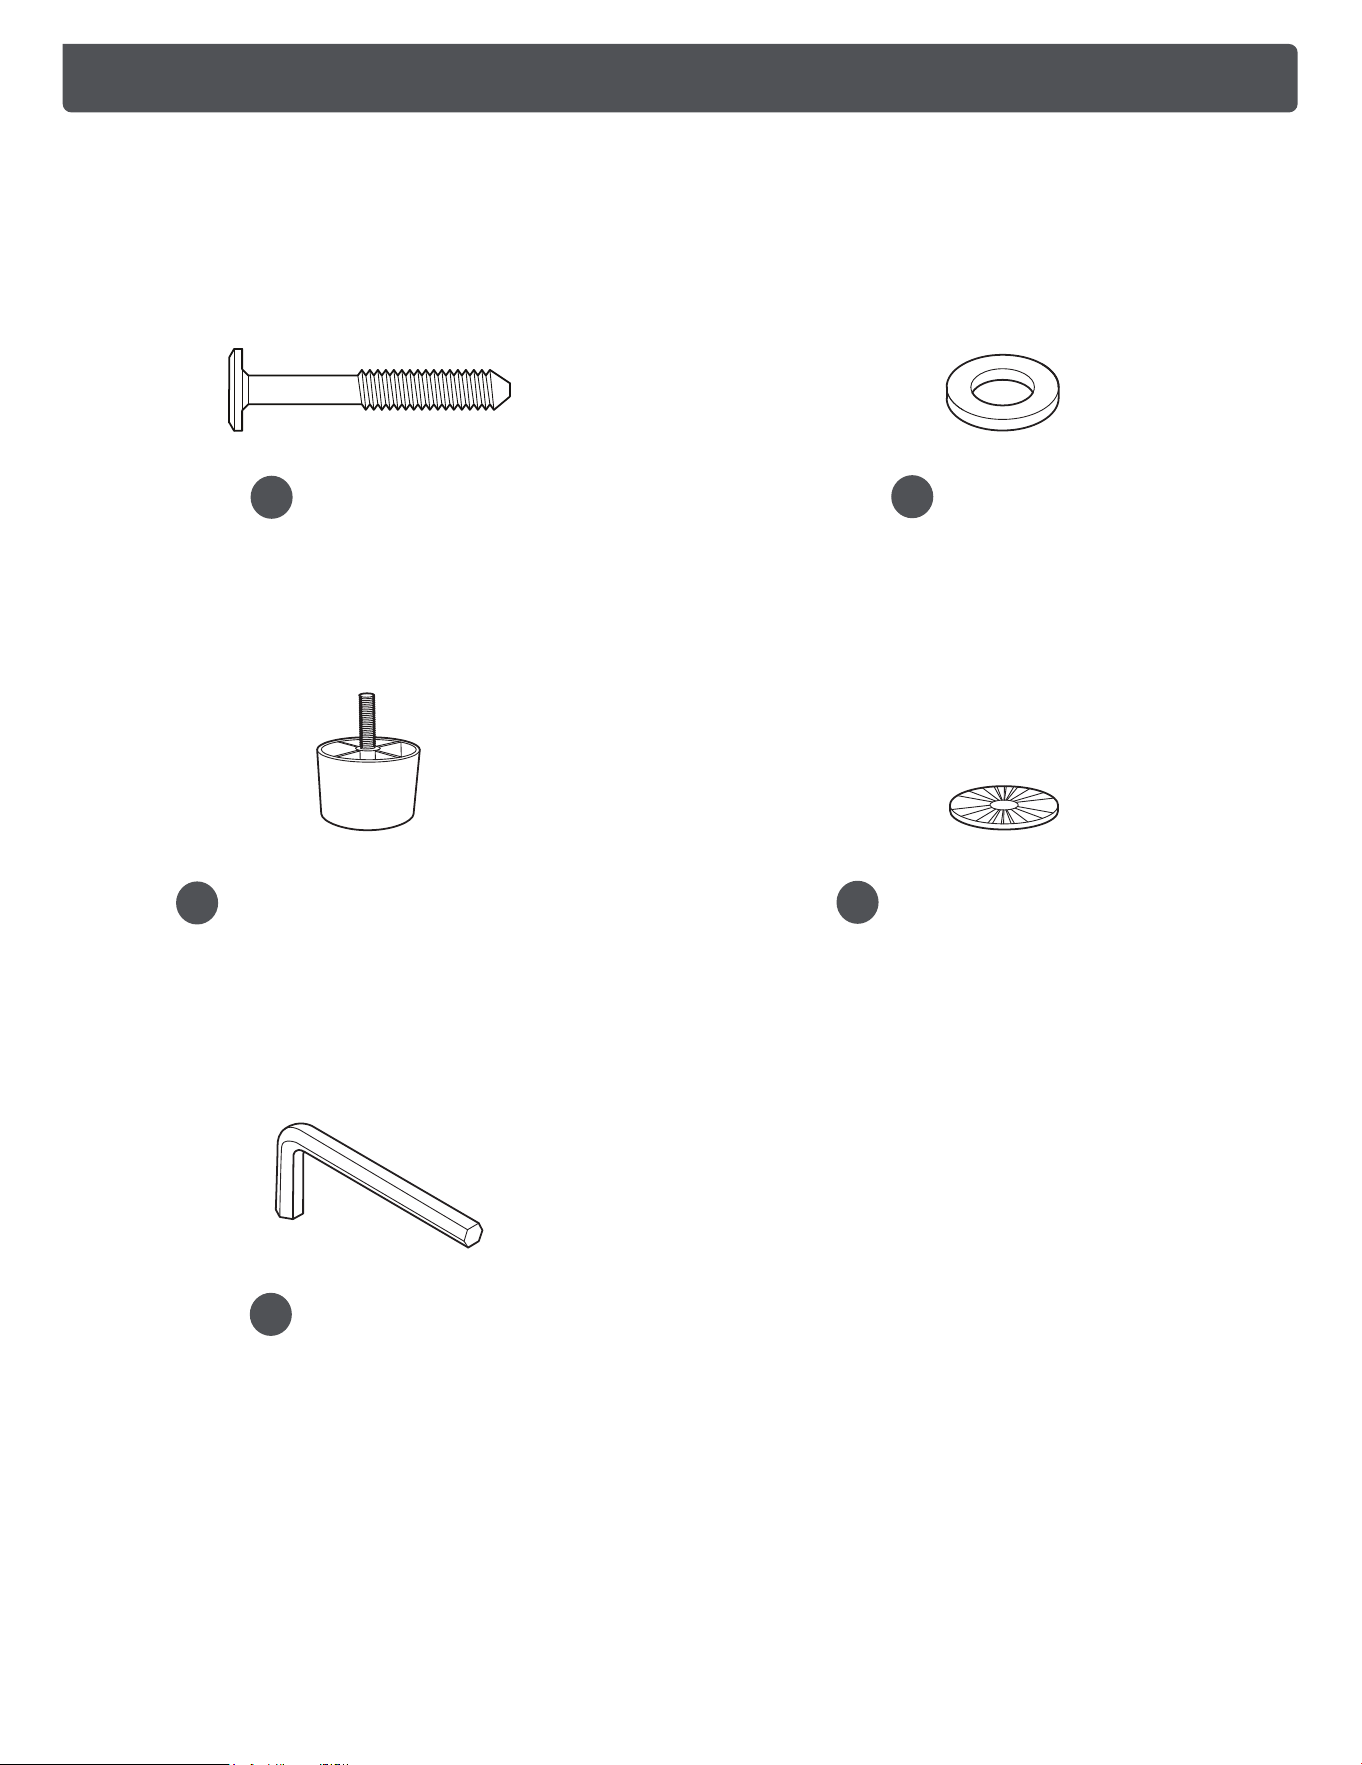
HARDWARE
If there are any missing parts, please contact Dream On Me before using the
product.
Bolt (x2)
A
Washer (x2)
B
Ottoman Leg (x4)
C
Gasket (x4)
D
Allen Key
E
7
www.dreamonme.com/help
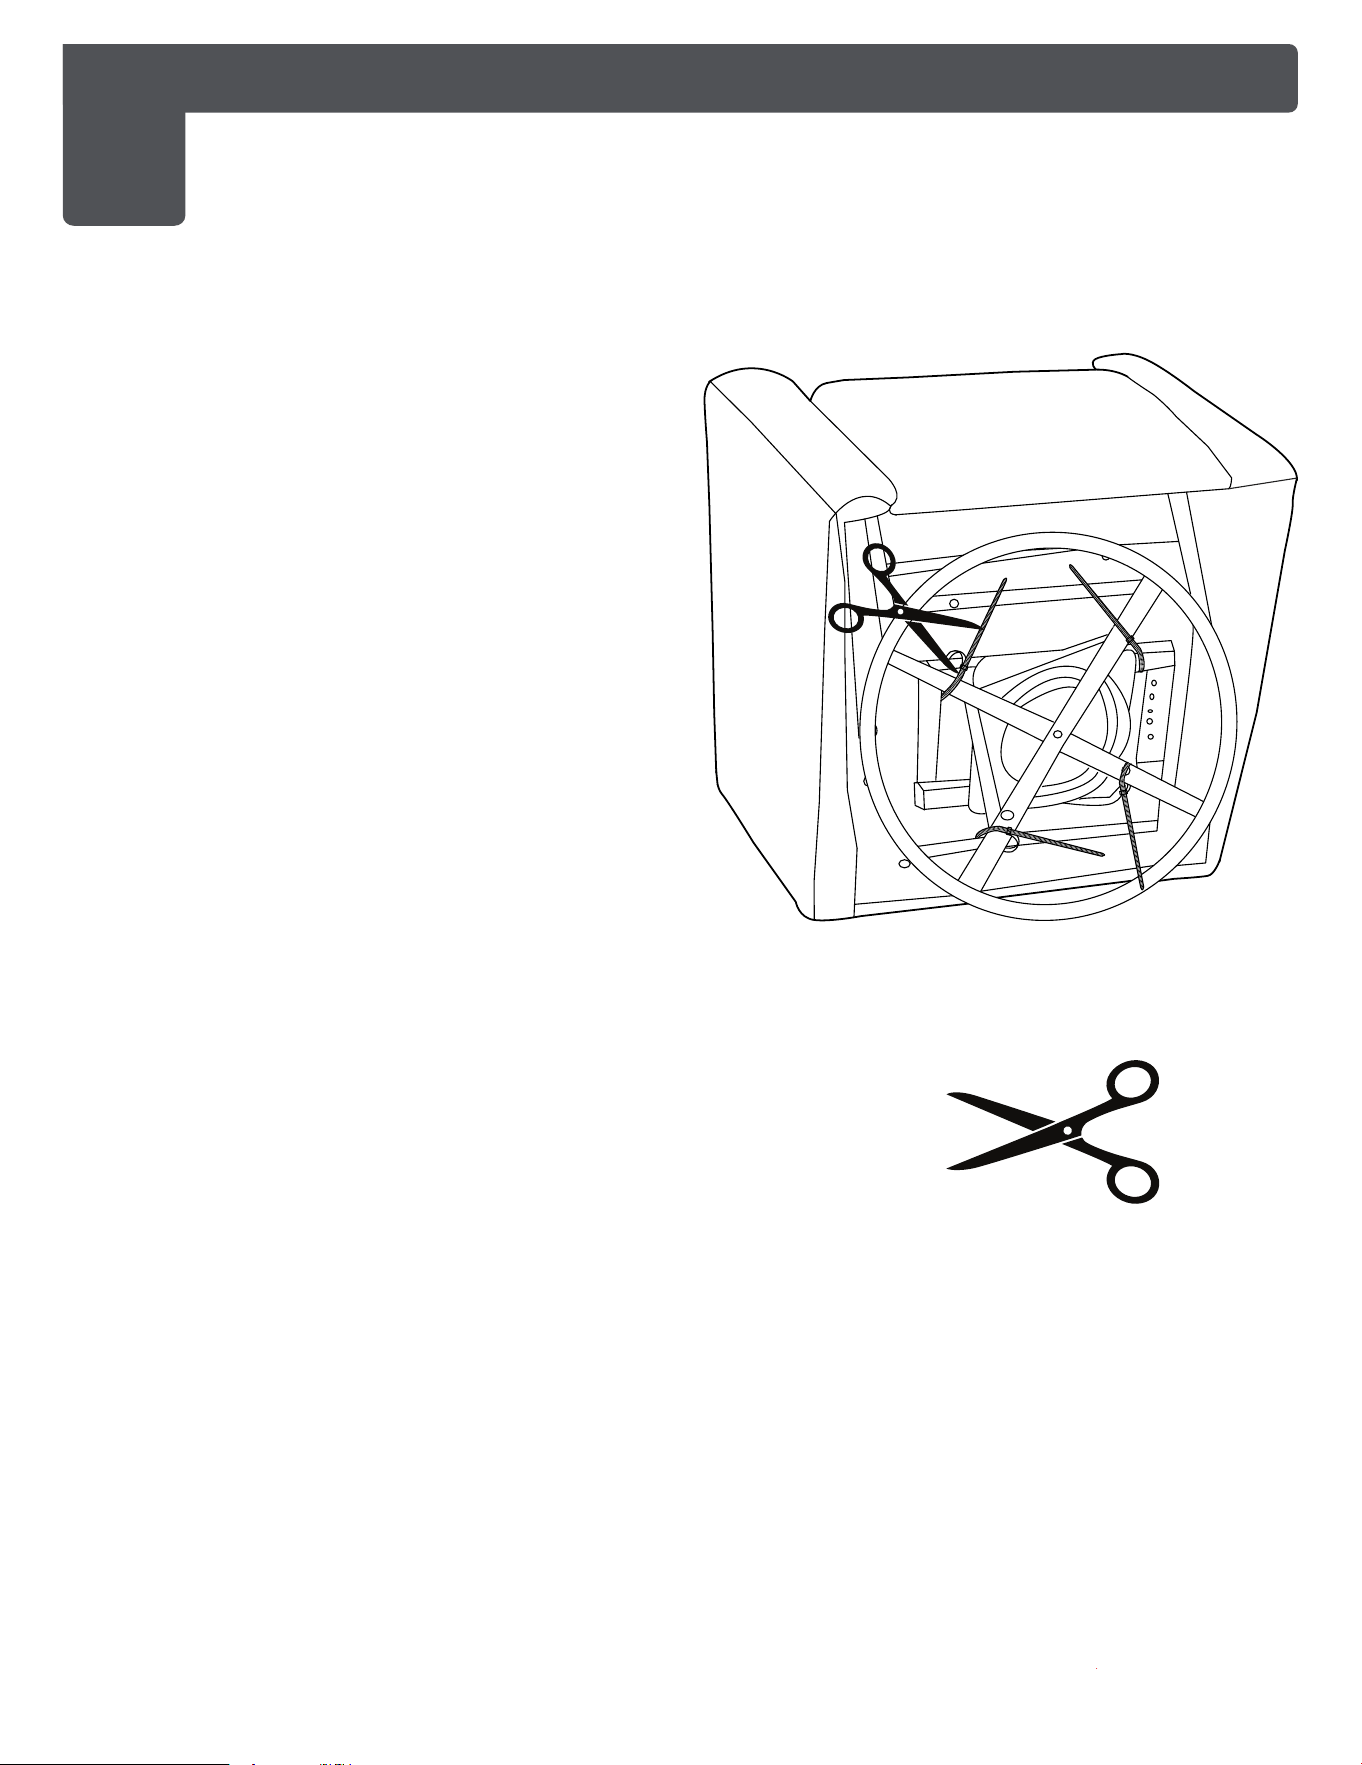
1
GLIDER ASSEMBLY - BASE SETUP
Scissors
(NOT INCLUDED)
(1)
1a. Assemble and use the glider on a
soft, level surface.
1b. As shown in the illustration,
carefully cut the straps wrapped
around the metal swivel underneath
the Glider (1).
8
www.dreamonme.com/help
(2)
(1)
(A)
(A)
(B)
(B)
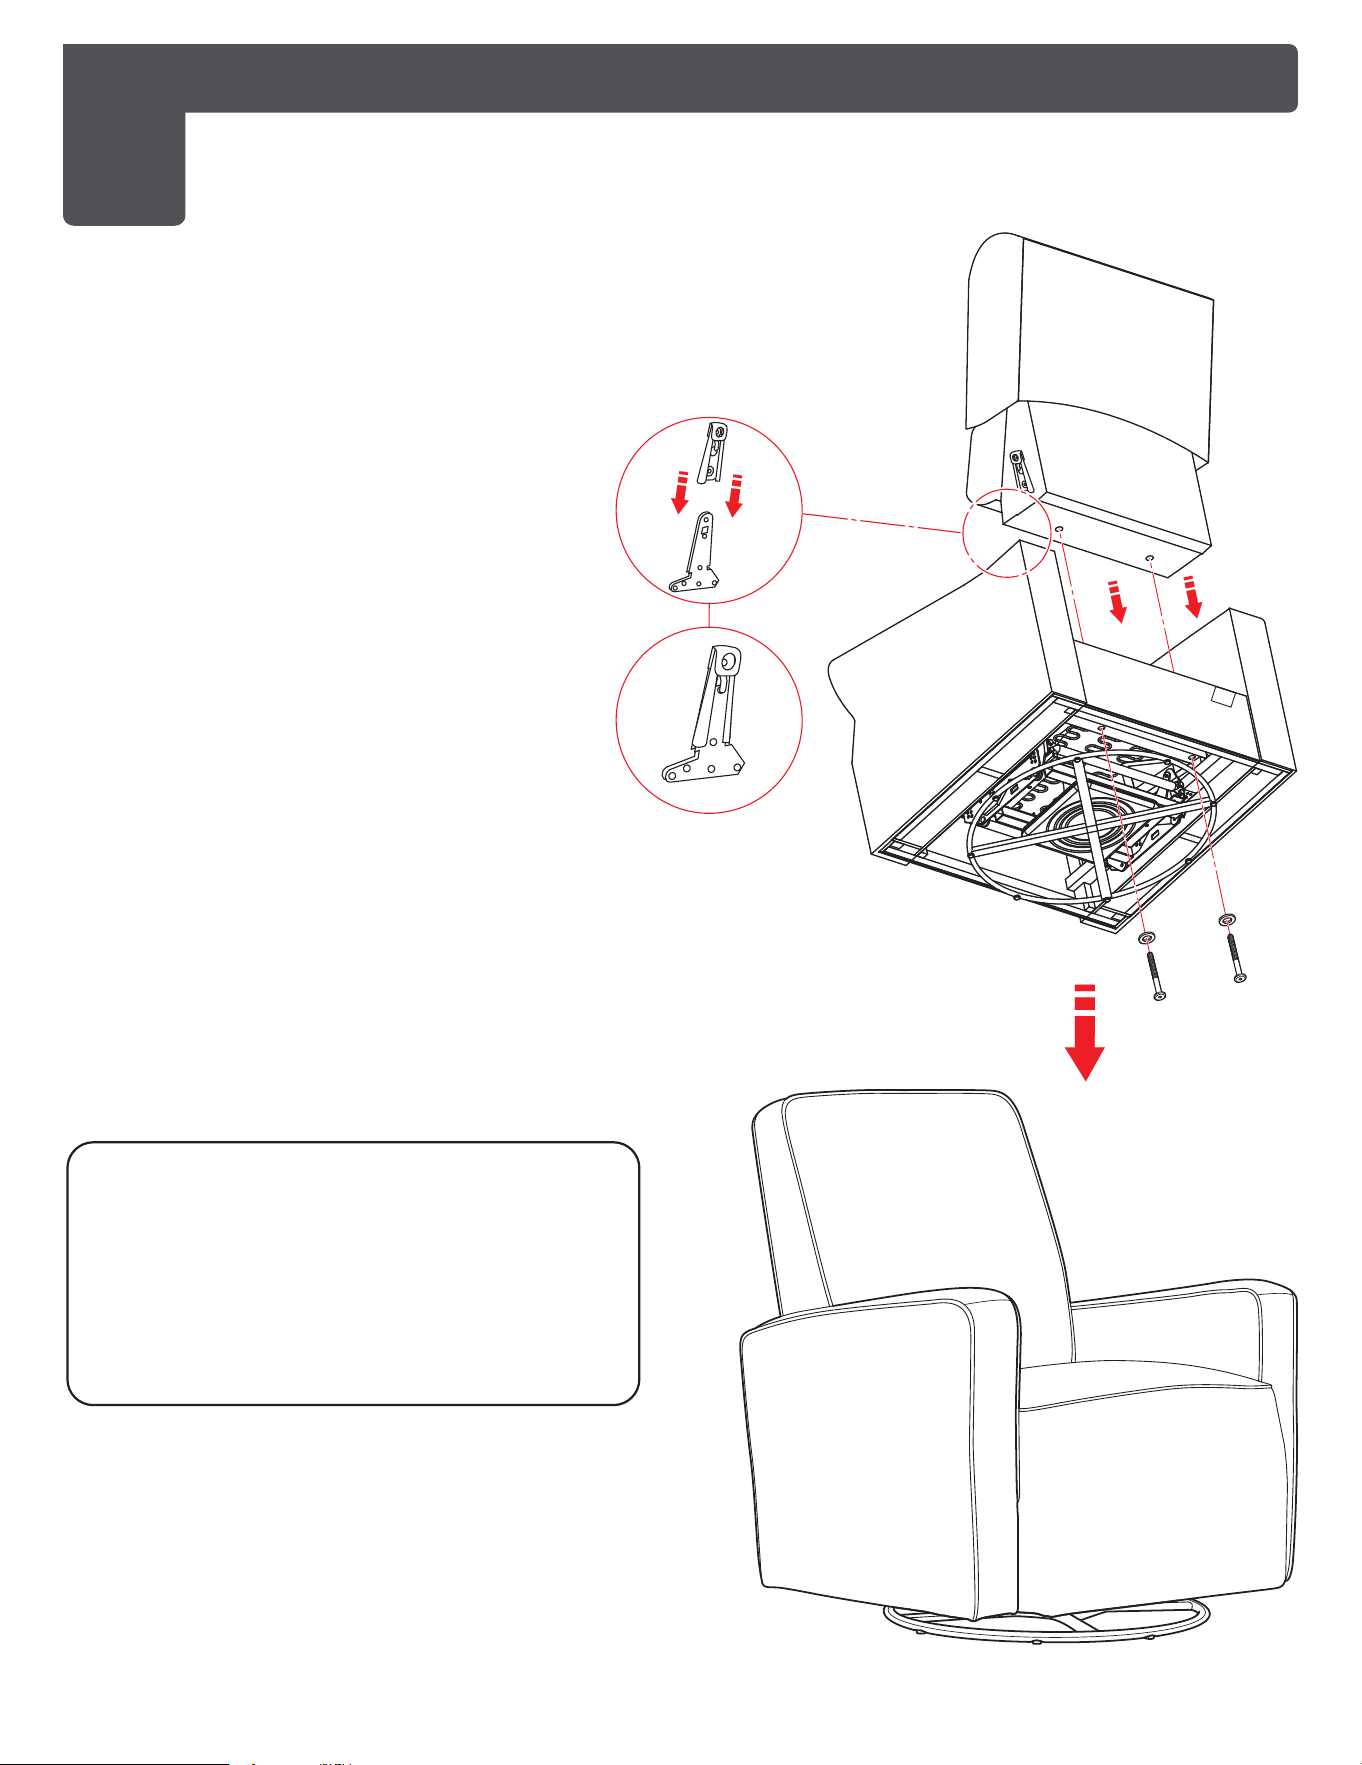
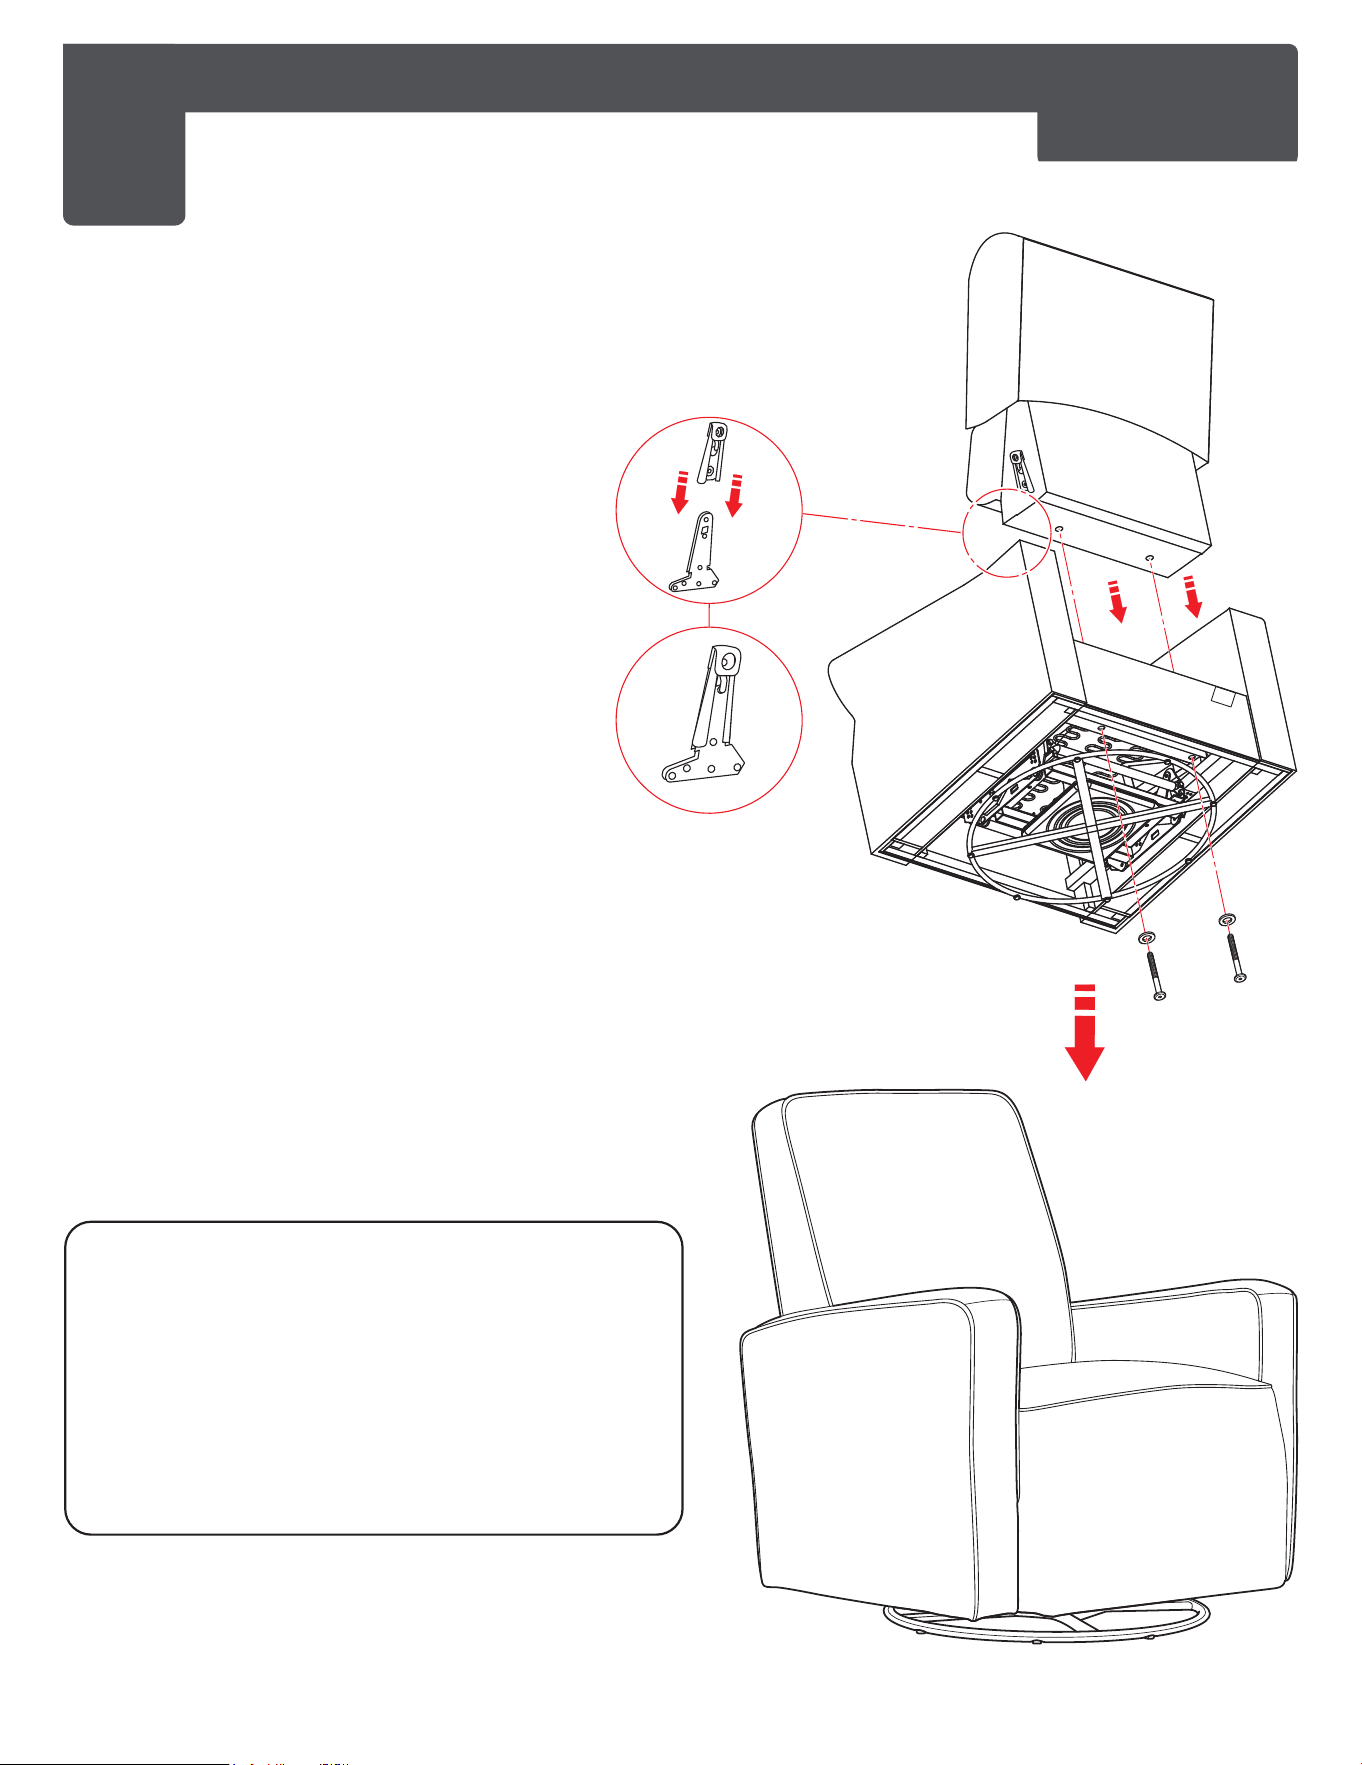
2
2a. Align the Metal Channel on the
Back Rest (2) to the Metal
Prongs on the Seat (1).
2b. Slide the metal channel into the
metal prongs on the seat frame.
2c. Please ensure that the back
metal channel goes into the
base metal prongs until it clicks
and locks itself.
2d. After clicking the back into
position, raise the glider's base
and attach the Washers (B) and
Bolts (A) to the insertions on
the glider base connecting the
back rest to the seat.
2e. Pull the back rest upward to
ensure that it is fully secured,
and then use the recliner.
GLIDER ASSEMBLY - BACK SEAT SETUP
WARNING:
• Make sure the glider's back is
securely attached to the seat.
• Improper installation may result in
injuries due to fall hazards from a
loose back.
9
www.dreamonme.com/help
(3)
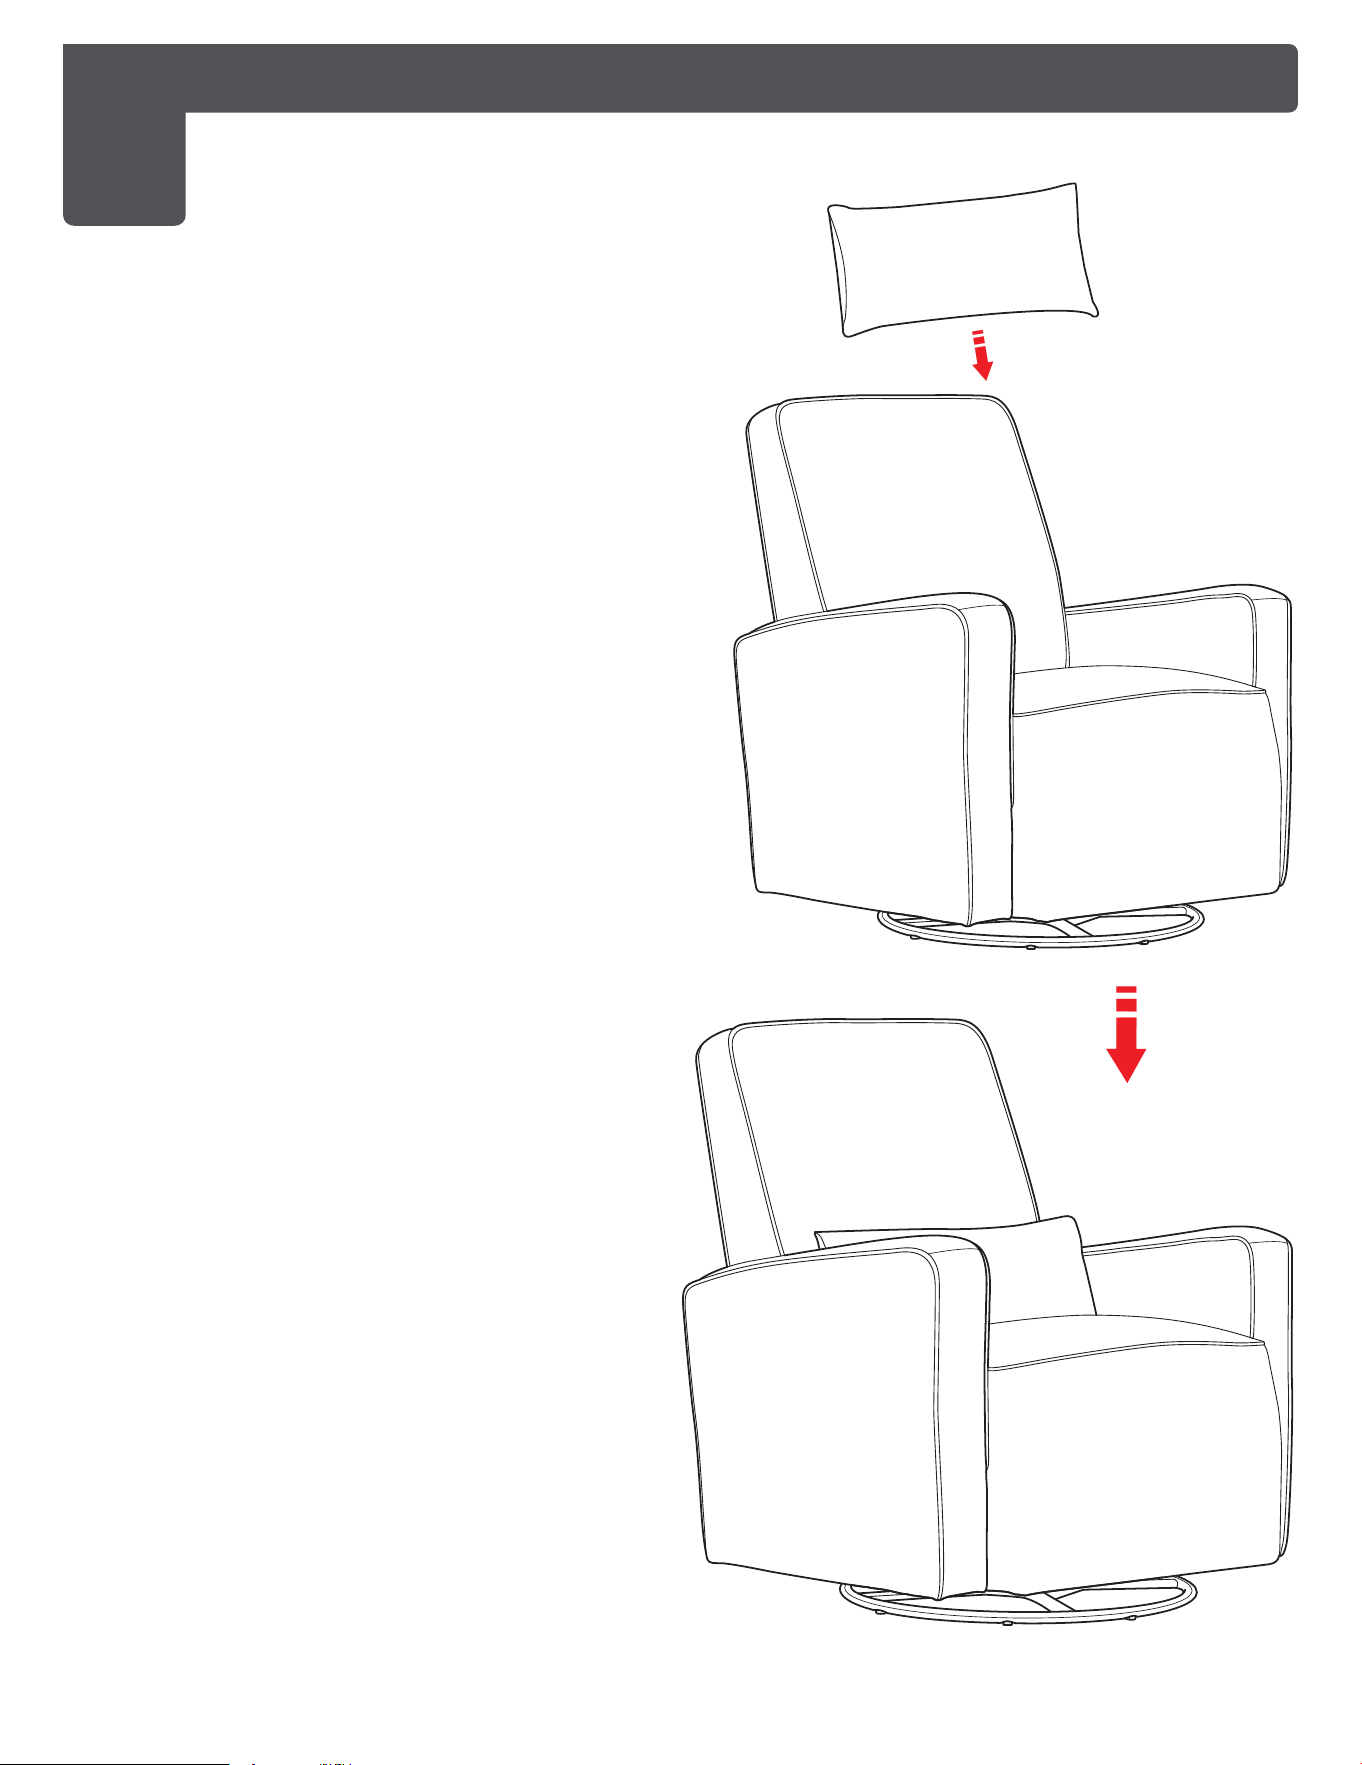
3
3a. Place the Cushion (3) on the
seat of the glider resting
against the backrest as shown
in the illustration.
GLIDER ASSEMBLY - CUSHION SETUP

10
www.dreamonme.com/help
4
GLIDER ASSEMBLY - OTTOMAN SETUP
(C)
(D)
(C)
(D)
(C)
(D)
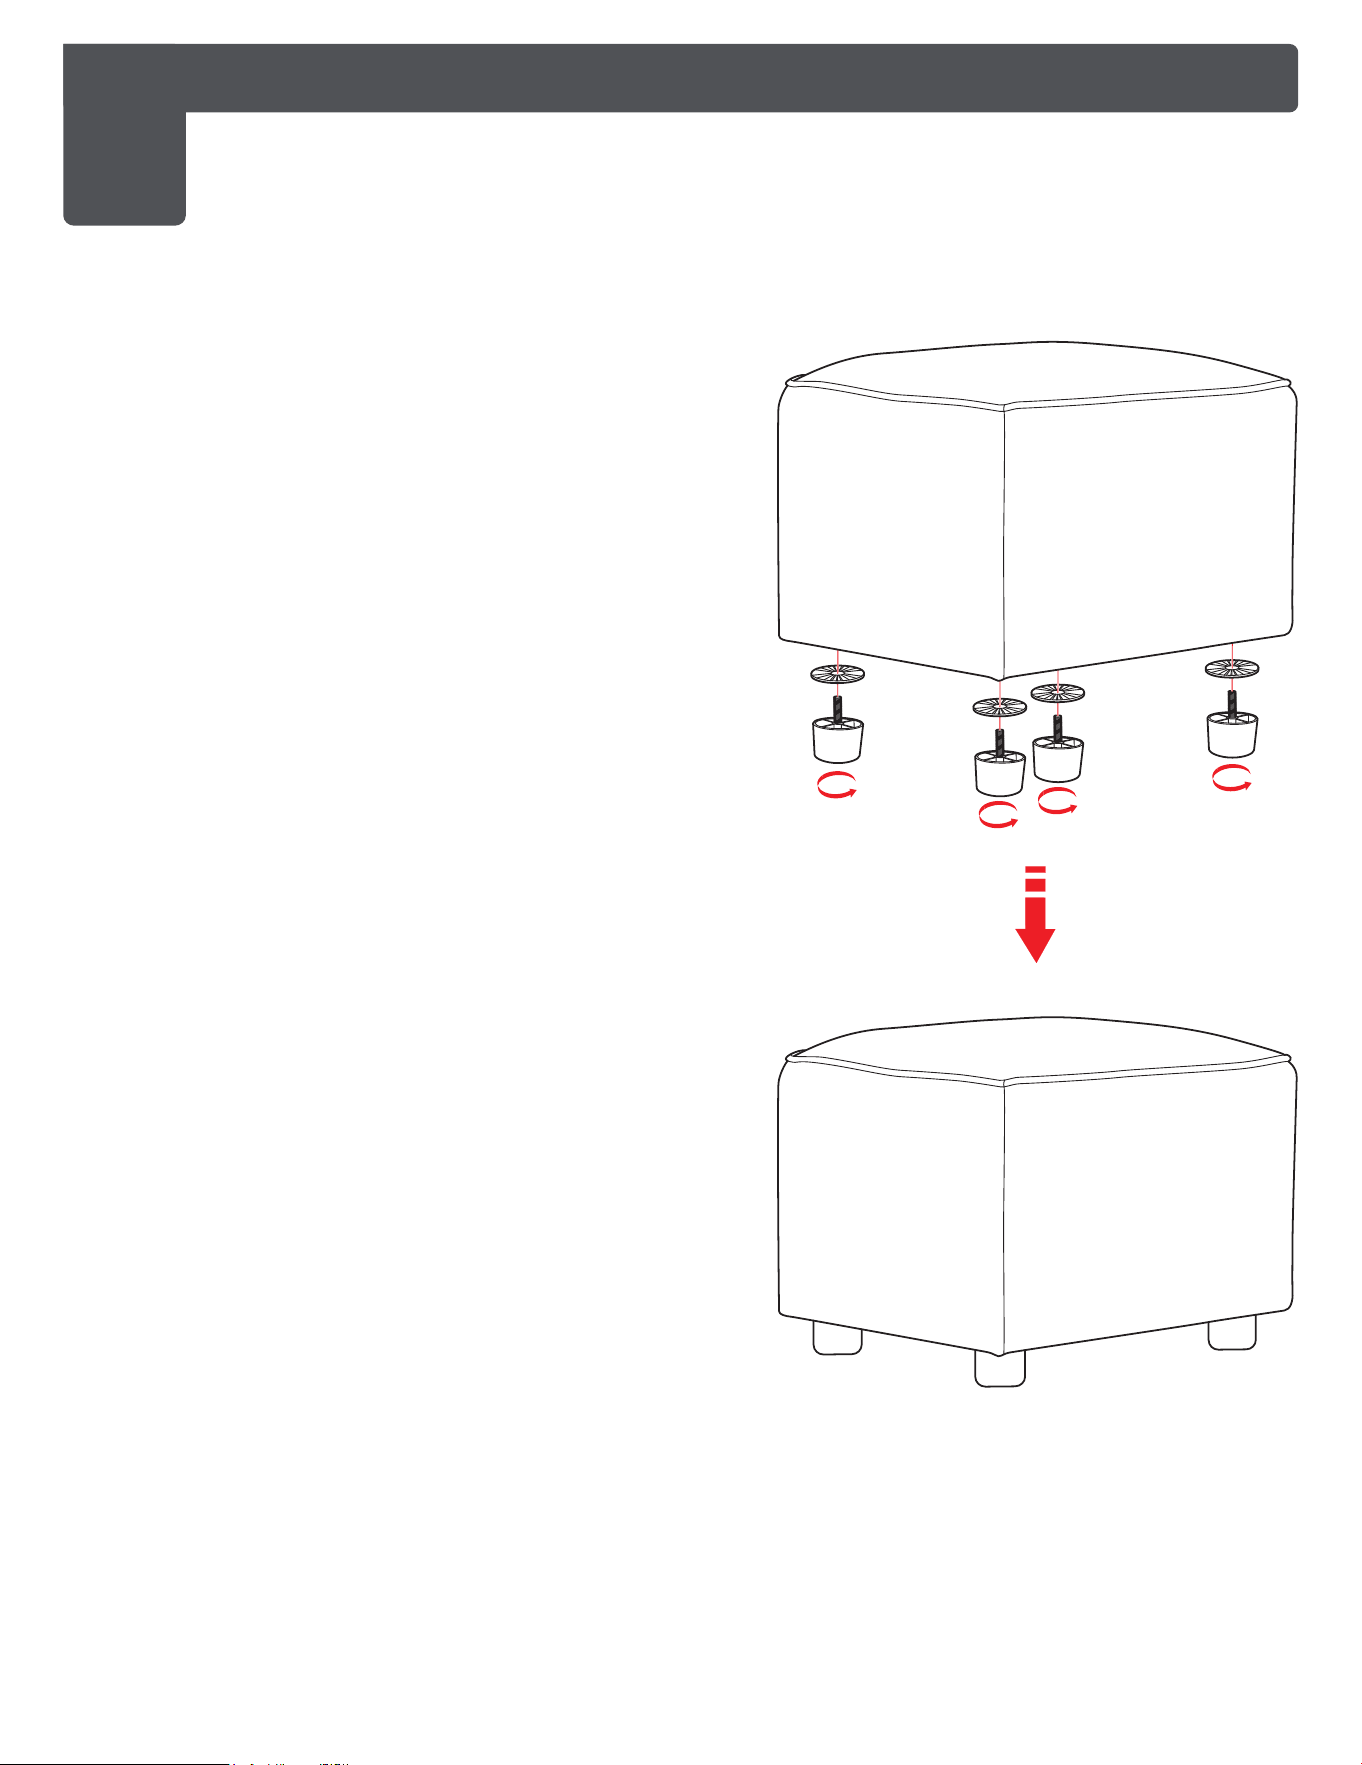
(4)
(C)
(D)
4a. Install the Gaskets (D) on the base
of the Pedals (Ottoman) (4),
followed by the Ottoman Legs (C).
4b. Fix the Ottoman Legs onto the
base of the pedal firmly as shown
in the illustration.

11
www.dreamonme.com/help
FURNITURE CARE INSTRUCTIONS
• PROTECT GLIDER SURFACES FROM HOT OR EXTREMELY COLD ITEMS.
• PROTECT FABRIC SURFACES OF THE GLIDER FROM PENS, MARKERS AND
CRAYONS.
• OILS FROM POTPOURRI AND OTHER SCENTED ITEMS CAN STAIN AND DAMAGE
THE FABRIC OF THE GLIDER.
• DO NOT DRAG ITEMS ACROSS THE SURFACE OF THE GLIDER.
• CLEAN USING ONLY MILD, WATER-FREE CLEANING SOLVENTS. NEVER USE
WATER. TAP WATER CONTAINS MINERALS THAT MAY CAUSE RINGS OR FADING.
• DO NOT USE BLEACH TO CLEAN THE GLIDER. DO NOT DRY CLEAN INDIVIDUAL
PARTS.
• DO NOT SCRATCH OR CHIP THE FINISH.
• INSPECT THE PRODUCT PERIODICALLY, CONTACT DREAM ON ME FOR
REPLACEMENT PARTS OR QUESTIONS.
• DO NOT STORE THE PRODUCT OR ANY PARTS IN EXTREME TEMPERATURES
AND CONDITIONS SUCH AS A HOT ATTIC OR A DAMP, COLD BASEMENT. THESE
EXTREMES CAN CAUSE A LOSS OF STRUCTURAL INTEGRITY.
• DO NOT SPRAY CLEANERS DIRECTLY ONTO FURNITURE.
• LIFT SLIGHTLY WHEN MOVING ON CARPETING TO PREVENT SWIVEL BREAKAGE.
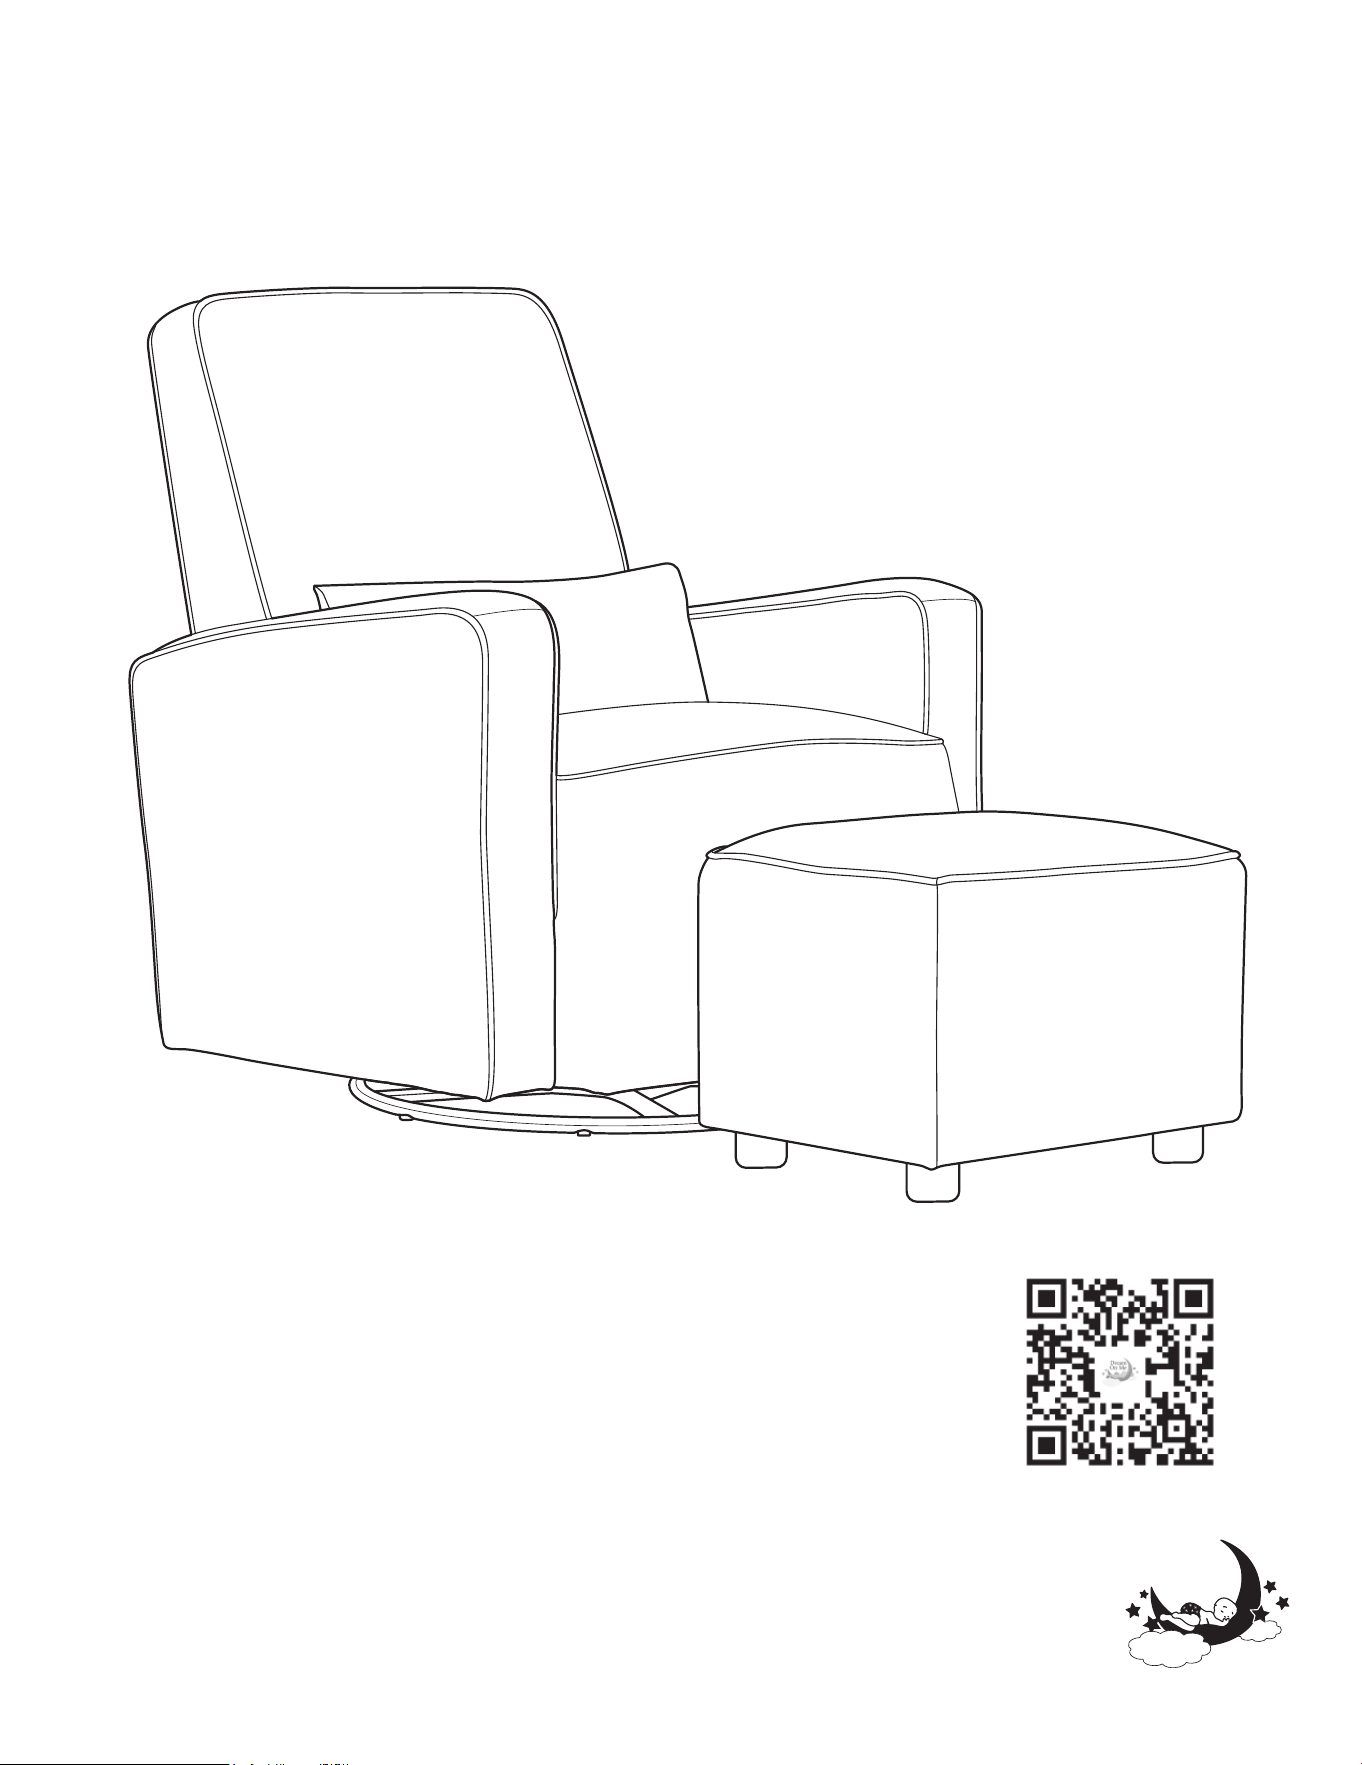
YOU DID IT!
Congratulations !
It's time to pamper yourself. A safe, elegant glider designed
to provide full comfort to your body.
www.dreamonme.com
Follow Us @dreamonmeinc
to get your nursery featured on our social media.
Enter our monthly giveaway!
Scan the QR code to register.
Chat with us!
Scan the QR code to Live Chat.
1532 S. WASHINGTON AVE STE1
PISCATAWAY, NJ 08854-9908.
61 HYMUS BOUL.
POINTE-CLAIRE, QC H9R 1E2.
+1(438)600-1248
E-mail: [email protected]
0522R1-6113
HOLLAND GLIDER W/ OTTOMAN
Manuel d'utilisation
Lisez toutes les instructions avant
d'assembler et d'utiliser le produit.
IMPORTANT - Conservez les instructions
pour une utilisation ultérieure.
Scannez le code QR pour enregistrer votre produit.
https://dreamonme.com/customercare/registration/
2
www.dreamonme.com/help
CONSEILS DE SÉCURITÉ
Assemblage par un
adulte requis.
N'utilisez PAS le produit
s'il est endommagé,
cassé, et/ou si des
composants sont
manquants ou cassés.
Pour protéger vos
pièces pendant
l'assemblage, veuillez
les placer sur une
surface souple.
Contactez Dream
On Me Inc en cas
de besoin
d'assistance.
Les petites pièces
peuvent présenter
un risque
d'étouffement avant
l'assemblage.
Veuillez lire
attentivement les
instructions. Identifiez
toutes les pièces et le
matériel.
N'utilisez pas de
perceuse ou de
visseuse électrique.
Nettoyez le tissu du
planeur avec de la
mousse de shampoing
ou des solvants pour
nettoyage à sec.
N'utilisez pas de
détergents agressifs car
ils pourraient
endommager le tissu.
0-6

3
www.dreamonme.com/help
.... d'avoir choisi Dream On Me et félicitations pour avoir rejoint notre famille ;
une famille qui a transformé des vies depuis plus de 30 ans !
Nous apprécions vos commentaires et nous vous souhaitons le meilleur dans
les années à venir avec votre nouvel enfant. années à venir avec votre nouvel
enfant. Si vous avez des questions ou des préoccupations, n'hésitez pas à
nous contacter. L'un de nos L'un de nos représentants du service clientèle
se fera un plaisir de vous aider.
Merci encore de nous avoir fait confiance pour vous fournir des produits et
accessoires pour bébés sûrs et abordables.
produits et accessoires pour bébés sûrs et abordables
MERCI...
GARANTIE LIMITÉE:
• Dream On Me garantit que son produit est exempt de tout défaut de
matériel et de fabrication et accepte de remédier à tout défaut de ce type.
• Cette garantie couvre 1 an à partir de la date d'achat originale.
• Cette garantie n'est valable que sur présentation d'une preuve d'achat.
• Elle se limite uniquement à la réparation ou au remplacement des
composants défectueux du meuble défectueux et aucun travail de
montage n'est inclus.
• Cette garantie ne s'applique pas à un produit qui a été assemblé de
manière incorrecte, soumis à une mauvaise utilisation ou à un abus ou qui
a été modifié ou réparé de quelque manière que ce soit.
• Cette garantie vous donne des droits légaux spécifiques et vous pouvez
également avoir d'autres droits qui varient d'un État à l'autre droits qui
varient d'un État à l'autre.

4
www.dreamonme.com/help
AVERTISSEMENTS
• LE NON-RESPECT DE CES AVERTISSEMENTS ET INSTRUCTIONS DE
MONTAGE PEUT ENTRAÎNER DES BLESSURES GRAVES OU LA MORT.
• AVANT ET APRÈS L'ASSEMBLAGE ET FRÉQUEMMENT PENDANT
L'UTILISATION, VÉRIFIEZ QUE CE PRODUIT NE PRÉSENTE PAS DE
MATÉRIEL ENDOMMAGÉ, DE JOINTS L CHES, DE PIÈCES MANQUANTES
OU DE BORDS TRANCHANTS.
• N'UTILISEZ PAS CE PLANEUR SI DES PIÈCES SONT MANQUANTES,
ENDOMMAGÉES OU CASSÉES.
• CONTACTEZ DREAM ON ME - 1532 S. WASHINGTON AVE, PISCATAWAY,
NJ 08854 POUR OBTENIR DES PIÈCES DE RECHANGE.
• NE LAISSEZ PAS LES ENFANTS JOUER OU UTILISER CE PARAPENTE
SANS SURVEILLANCE.
• VÉRIFIEZ RÉGULIÈREMENT LES POINTS D'ATTACHE POUR VOUS
ASSURER QU'AUCUN NE S'EST DÉTACHÉ PENDANT L'UTILISATION.
• N'UTILISEZ PAS LE PARAPENTE S'IL N'EST PAS ASSEMBLÉ
CORRECTEMENT.

5
www.dreamonme.com/help
PARTS
S'il y a des pièces manquantes, veuillez contacter Dream On Me avant d'utiliser
le produit.
siège
1
Dossier
2
Coussin
3
Pédales (Ottoman)
4
6
www.dreamonme.com/help
HARDWARE
S'il y a des pièces manquantes, veuillez contacter Dream On Me avant d'utiliser
le produit.
Boulon (x2)
A
Lave-linge (x2)
B
Pied de l'ottoman (x4)
C
Joint d'étanchéité (x4)
D
Clé Allen
E

7
www.dreamonme.com/help
1
ASSEMBLAGE DU PLANEUR - CONFIGURATION DE LA BASE
Ciseaux
(NON COMPRIS)
(1)
1a. Assemblez et utilisez le planeur sur
une surface souple et plane.
1b. Comme indiqué sur l'illustration,
coupez soigneusement les sangles
enroulées autour de l'émerillon
métallique situé sous le planeur (1).
8
www.dreamonme.com/help
(2)
(1)
(A)
(A)
(B)
(B)
2
2a. Alignez le canal métallique du
dossier (2) sur les griffes
métalliques du siège (1).
2b. Faites glisser le canal métallique
dans les griffes métalliques du
cadre du siège.
2c. Veillez à ce que le canal
métallique du dossier s'insère
dans les fourchons métalliques
de la base jusqu'à ce qu'il
s'enclenche et se verrouille.
2d. Après avoir cliqué le dossier en
position, soulevez la base du
planeur et fixez les rondelles (B)
et les boulons (A) aux insertions
de la base du planeur reliant le
dossier au siège.
2e. Tirez le dossier vers le haut pour
vous assurer qu'il est bien fixé,
puis utilisez le fauteuil.
ASSEMBLAGE DU PLANEUR - CONFIGURATION DU SIÈGE
ARRIÈRE
AVERTISSEMENT:
• Assurez-vous que le dossier du
planeur est solidement fixé au siège.
• Une installation incorrecte peut
entraîner des blessures dues aux
risques de chute d'un dossier mal
fixé.

9
www.dreamonme.com/help
(3)
3
3a. Placez le coussin (3) sur le siège
du planeur en l'appuyant contre
le dossier comme indiqué sur
l'illustration.
ASSEMBLAGE DU PLANEUR - INSTALLATION DU COUSSIN
10
www.dreamonme.com/help
4
ASSEMBLAGE DU PLANEUR - INSTALLATION DU POUF
(C)
(D)
(C)
(D)
(C)
(D)
(4)
(C)
(D)
4a. Installer les joints (D) sur la base de
la pédale (4), puis les pieds de
l'Ottoman (C).
4b. Fixez fermement les jambes de
l'Ottoman sur la base de la pédale
comme indiqué sur l'illustration.

11
www.dreamonme.com/help
INSTRUCTIONS D'ENTRETIEN DU MOBILIER
• PROTÉGER LES SURFACES DU PLANEUR DES OBJETS CHAUDS OU
EXTRÊMEMENT FROIDS.
• PROTÉGER LES SURFACES EN TISSU DU PLANEUR CONTRE LES STYLOS, LES
MARQUEURS ET LES CRAYONS.
• LES HUILES DES POTS-POURRIS ET AUTRES ARTICLES PARFUMÉS PEUVENT
TACHER ET ENDOMMAGER LE TISSU DU PLANEUR.
• NE FAITES PAS GLISSER D'OBJETS SUR LA SURFACE DU PLANEUR.
• NE NETTOYEZ QU'AVEC DES SOLVANTS DOUX ET SANS EAU. N'UTILISEZ
JAMAIS D'EAU. L'EAU DU ROBINET CONTIENT DES MINÉRAUX QUI PEUVENT
PROVOQUER DES CERNES OU UNE DÉCOLORATION.
• N'UTILISEZ PAS D'EAU DE JAVEL POUR NETTOYER LE PLANEUR. NE NETTOYEZ
PAS LES PIÈCES INDIVIDUELLES À SEC.
• NE PAS RAYER OU ÉCAILLER LA FINITION.
• INSPECTEZ LE PRODUIT PÉRIODIQUEMENT, CONTACTEZ DREAM ON ME POUR
DES PIÈCES DE RECHANGE OU DES QUESTIONS.
• NE STOCKEZ PAS LE PRODUIT OU SES PIÈCES DANS DES TEMPÉRATURES ET
DES CONDITIONS EXTRÊMES TELLES QU'UN GRENIER CHAUD OU UN SOUS-SOL
HUMIDE ET FROID. CES CONDITIONS EXTRÊMES PEUVENT ENTRAÎNER UNE
PERTE D'INTÉGRITÉ STRUCTURELLE.
• NE PAS VAPORISER LES NETTOYANTS DIRECTEMENT SUR LES MEUBLES.
• SOULEVEZ LÉGÈREMENT L'APPAREIL LORSQUE VOUS LE DÉPLACEZ SUR UN
TAPIS AFIN D'ÉVITER QUE LE PIVOT NE SE BRISE.
VOUS L'AVEZ FAIT !
Félicitations !
C'est le moment de se faire plaisir. Un planeur sûr et élégant
conçu pour offrir un confort total à votre corps.
1532 S. WASHINGTON AVE STE1
PISCATAWAY, NJ 08854-9908.
61 HYMUS BOUL.
POINTE-CLAIRE, QC H9R 1E2.
+1(438)600-1248
www.dreamonme.com
Courriel : [email protected]
Suivez-nous @dreamonmeinc
pour que votre crèche soit présentée sur nos médias sociaux.
Participez à notre concours mensuel !
Scannez le code QR pour vous inscrire.
Chattez avec nous !
Scannez le code QR pour chatter en direct.