LIV - Live in Vibes Series
LIV-K01 / LIV-M01 / LIV-B01
Digital Piano User’s
Manual


hÔ©òç İøę ÍøĈ İøęĈ ĄęĈ·Ô©Č øÍ ēÔ×Č ½×Ï×ē©ê çÂݵø©Ĉ½Ȓ hÔ×Č ½×Ï×ē©ê
çÂݵø©Ĉ½ ×Č ÂêÂÏ©òē ©ò½ ĈÂŔò½Ȓ ·øðµ×ò½ ĄÂĈÍ·ēêİ Ī×ēÔ ēÔ ԩò½êÂ
©ò½ē×ðµĈÂøÍēĈ©½×ē×øò©êçÂݵø©Ĉ½Č©ò½ēÔÂê©ēÂČēÂê·ēĈøò×·ē·ÔòøêøÏİ
øÍēÔÂĄĈÂČÂòē©ÏÂȒ
ÂÍøĈ ęČ×òÏēÔ×ČðęČ×·©ê ×òČēĈęðÂòēȓ İøę ČÔøęê½ Ĉ©½ ēÔ×Č ð©òę©ê
µøøç ×ò ½Âē©×êȒ Ąê©Č çÂÂĄ ©êê ęČÂĈ ŔêÂČ ĄĈøĄÂĈêİ ©Č ēø êøøç ęĄ ĪÔÂò
ò½½×ò½©İČēø·øðÂȒ
µČ×ēÂȔÔēēĄČȔȱȱŕ©ēČøòČ©ę½×øȒ·øð
ð©×êȔČÂĈĩ×·ÂΆŕ©ēČøòČ©ę½×øȒ·øð
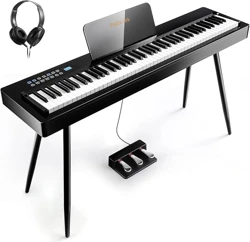
Welcome To Use
Flatsons Digital Piano

CONTENTS
Function List .....................................................................................02
Function introduction.....................................................................03
Safety Caution .................................................................................04
Smoke, Peculiar Smell, Overheat ...................................................04
AC Transformer ................................................................................04
Volume...............................................................................................04
Piano Assembly ...............................................................................05
Assembly List....................................................................................05
1.Piano Stand Installation................................................................06
2.Music Stand Installation...............................................................07
3.Pedal Installation...........................................................................07
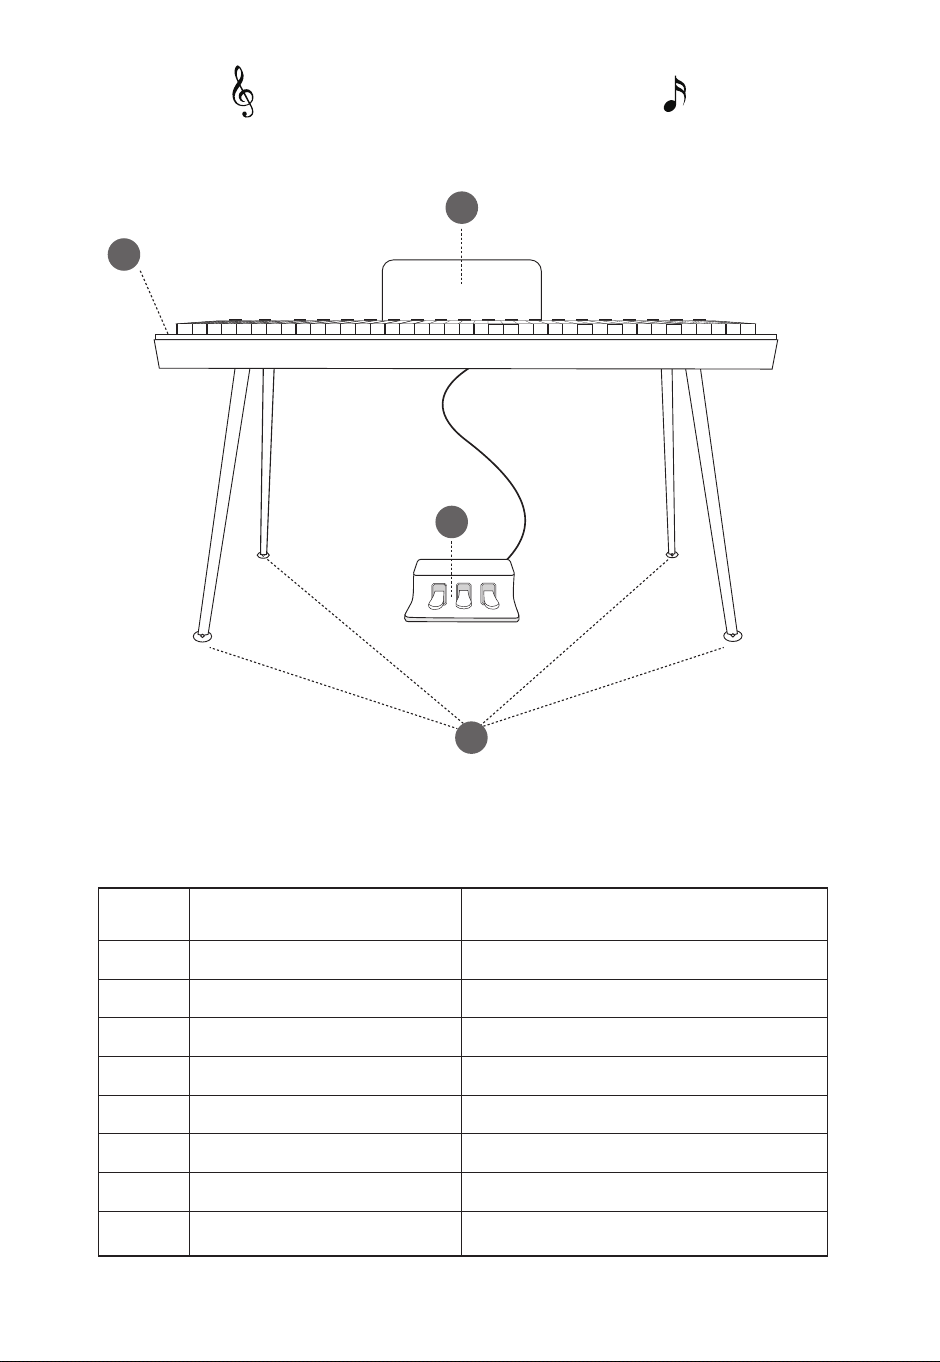
Panel Instruction .............................................................................08
Bottom Panel ....................................................................................08
Triple Pedal Socket...........................................................................09
Control Panel ....................................................................................11
Appendix ...........................................................................................19
Maintenance ....................................................................................25
Troubleshooting...............................................................................26
aĄÂ·×Ŕ·©ē×øòČ...................................................................................27
01

Function List
džLJǍēøòÂČ
džDžDžĈÔİēÔðČ
ǍǍ½ÂðøČ×òēÔÂê×µĈ©Ĉİ
?½×ČĄê©İ
E©ČēÂĈĩøêęðÂȱ©··ĩøêęð·øòēĈøê
hÂðĄø·øòēĈøêȱēĈ©òČĄøČ·øòēĈøê
ÔøĈ½Íęò·ē×øò
··øðĄ©ò×ðÂòēČİò·ÔĈøò×Ķ©ē×øò
høę·Ô·øòēĈøêȱēĈ©òČÍÂĈðÂēĈøòøðÂ
E//·©Ą©µ×ê×ēİ
,©½ĄÔøòÂä©·çȱČēÂĈÂø©ę½×ø×òĄęē
02

Function introduction
It adopts dream source, with digitization sampling, which provides a vivid
acoustical experience for your performance.
Appealing tone
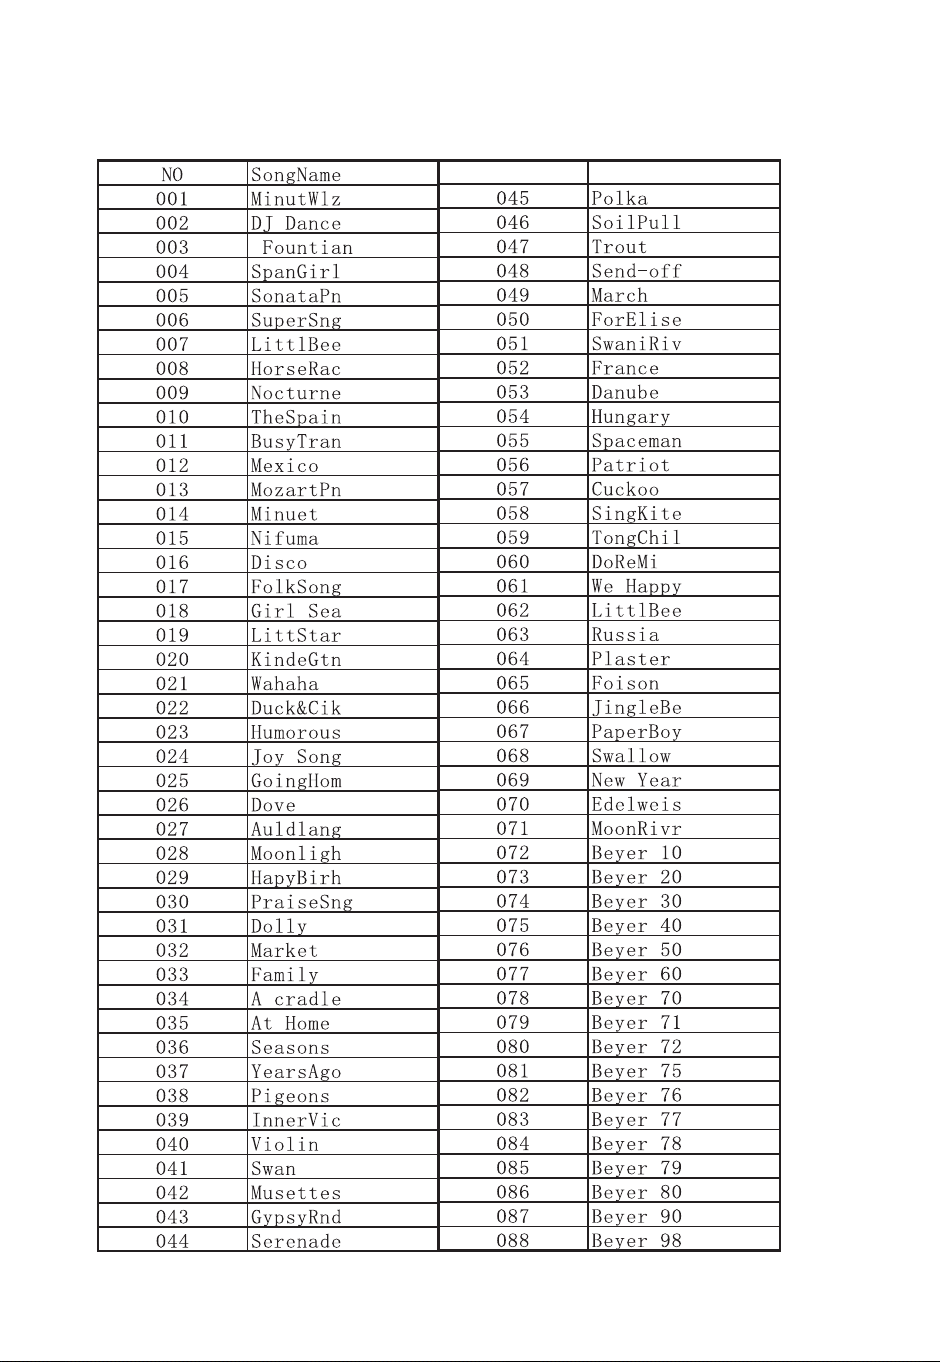
88 demos of various styles are selected with great care to be played.
ǍǍÂðøČøòÏČ
Use USB or MIDl terminal, and you can connect it to the computer or other MlDl
devices for interaction and creation quickly and conveniently.
USB MIDl terminal
Turn on the Bluetooth function of the mobile phone.
Turn on the app and select Settings.
Select " Flatsons Piano " bluetooth connection.
then you can use it directly or connect MlDI interface with data.
Wireless connection
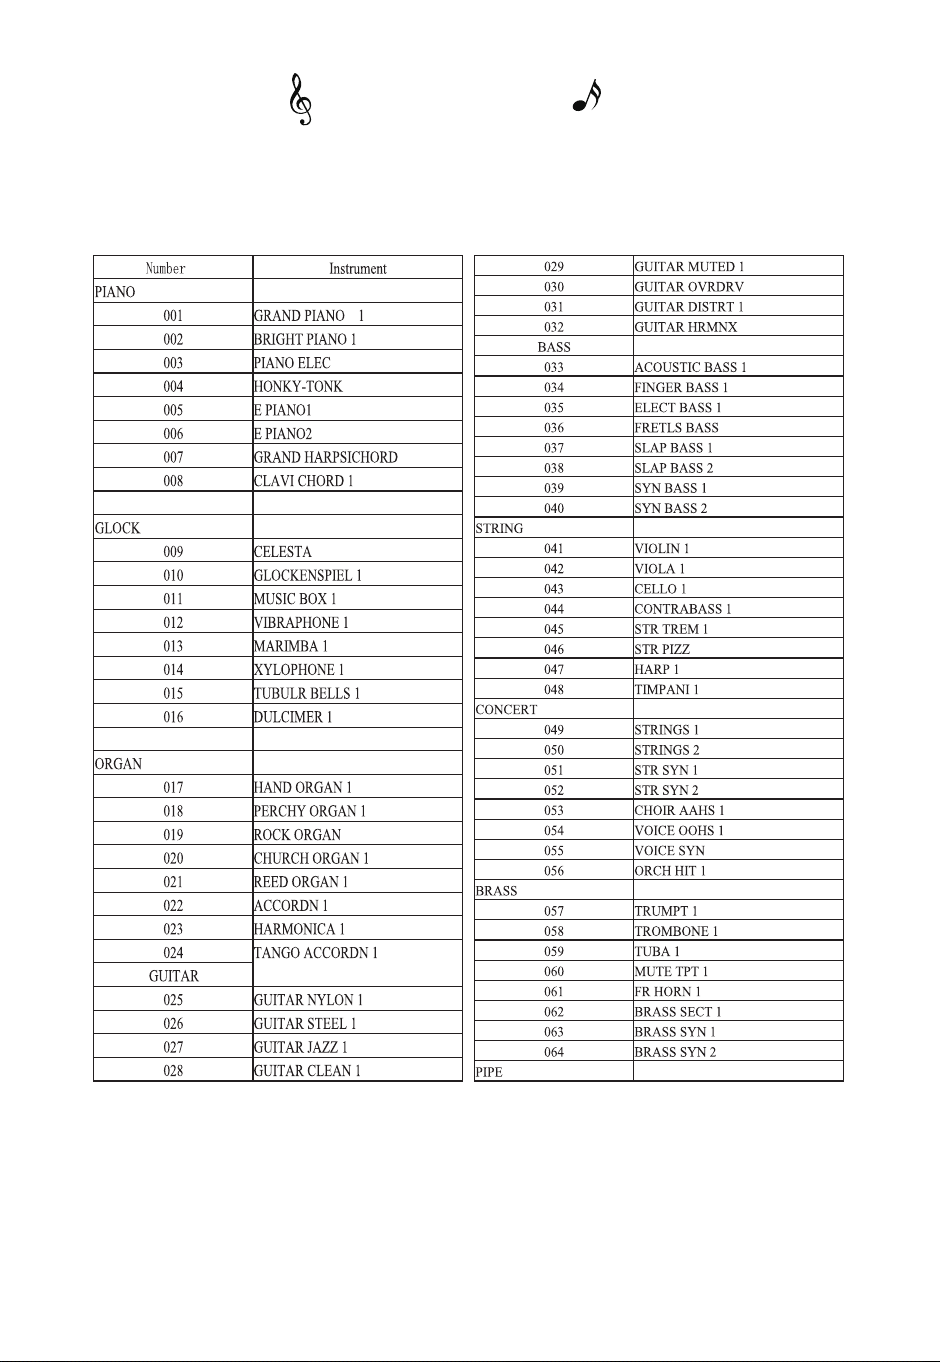
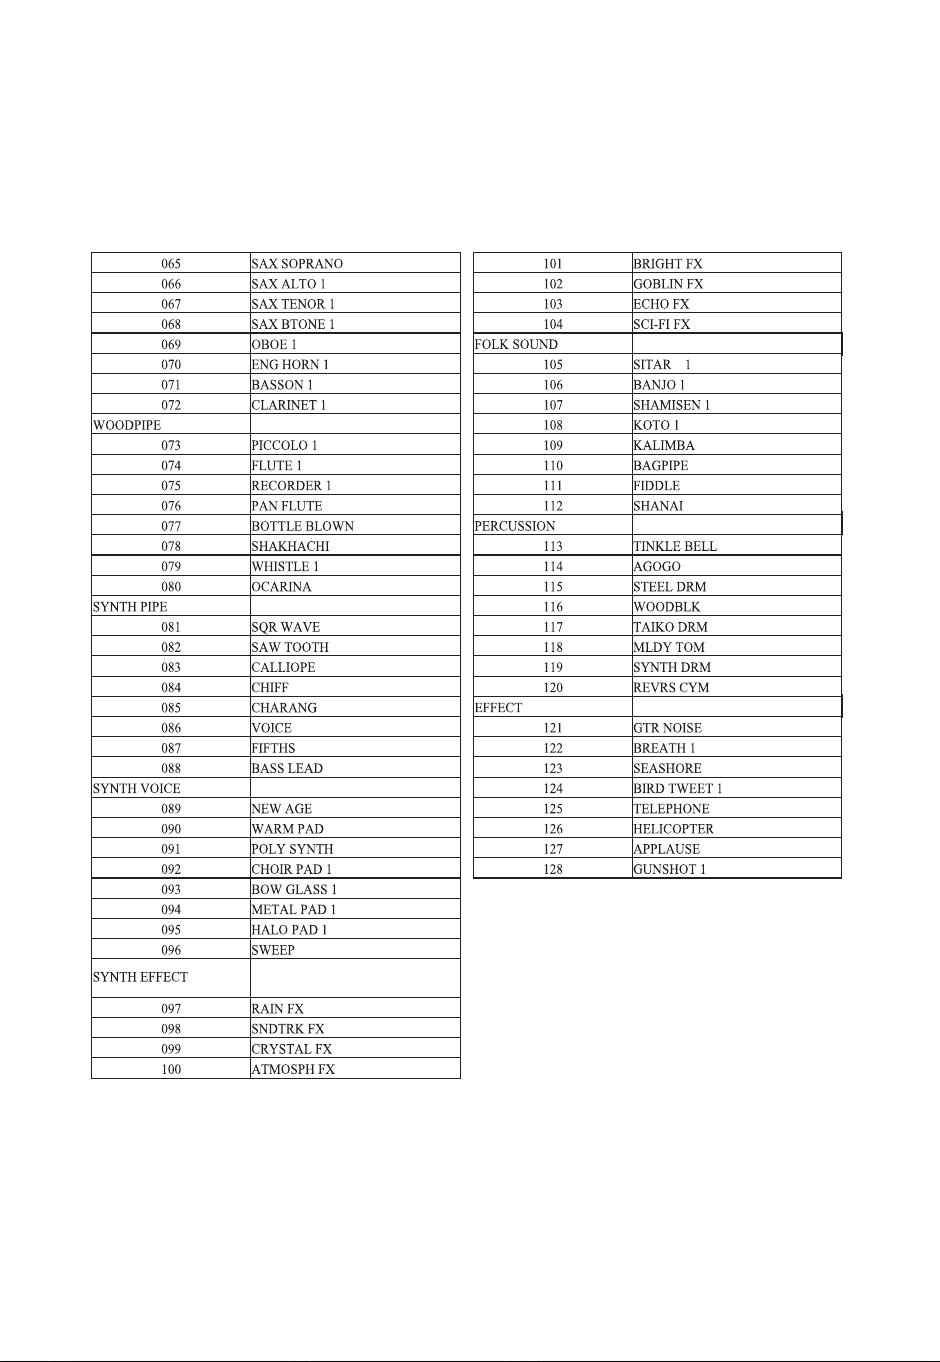
Which includes 128 standard GM tones.
džLJǍhøòÂČēÔ©ē©ĈÂĄêÂòē×Íęê©ò½ēøĄÏĈ©½Â
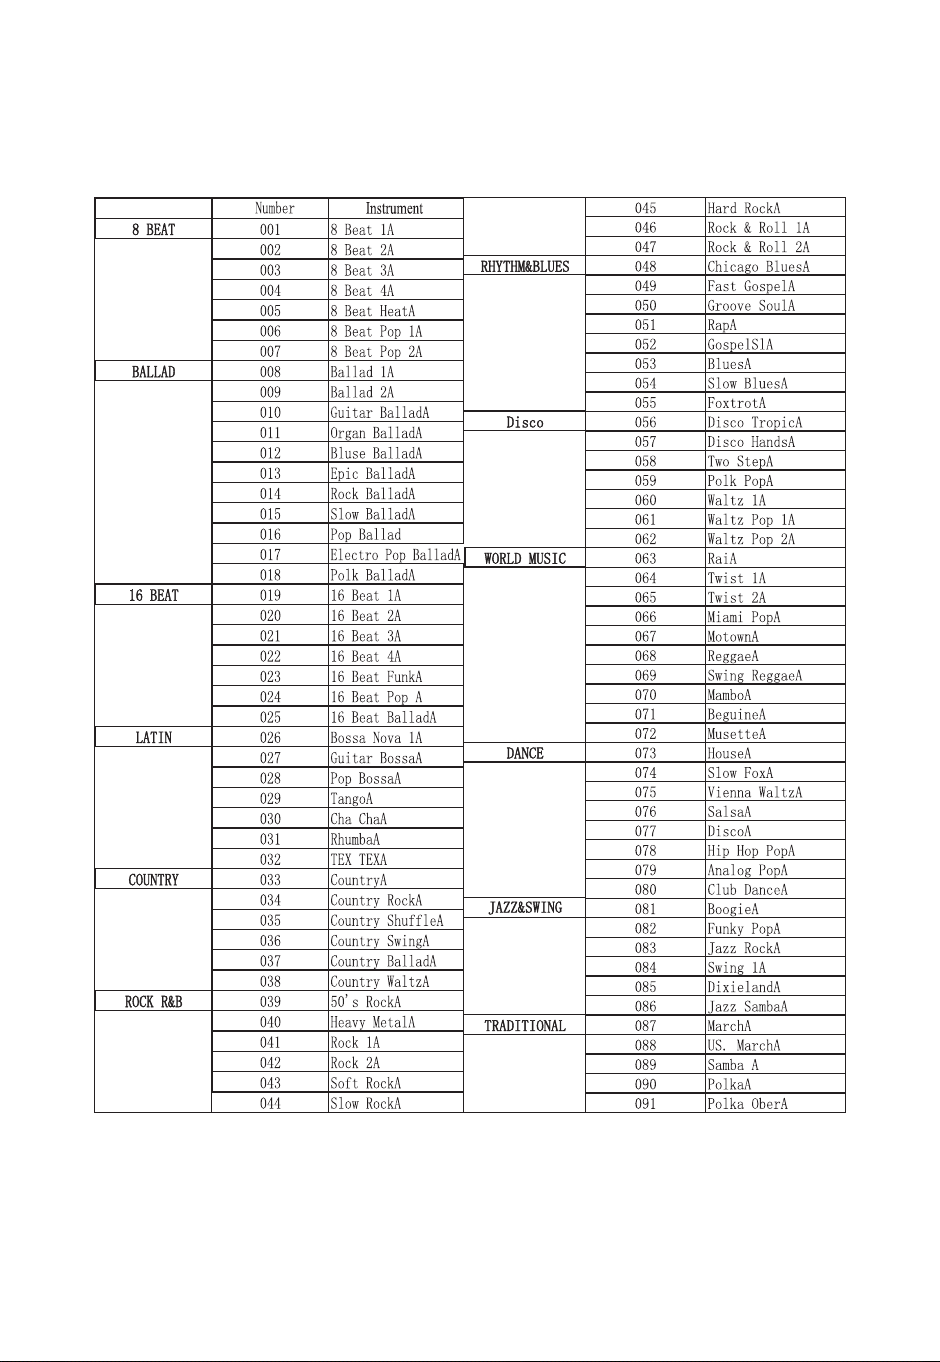
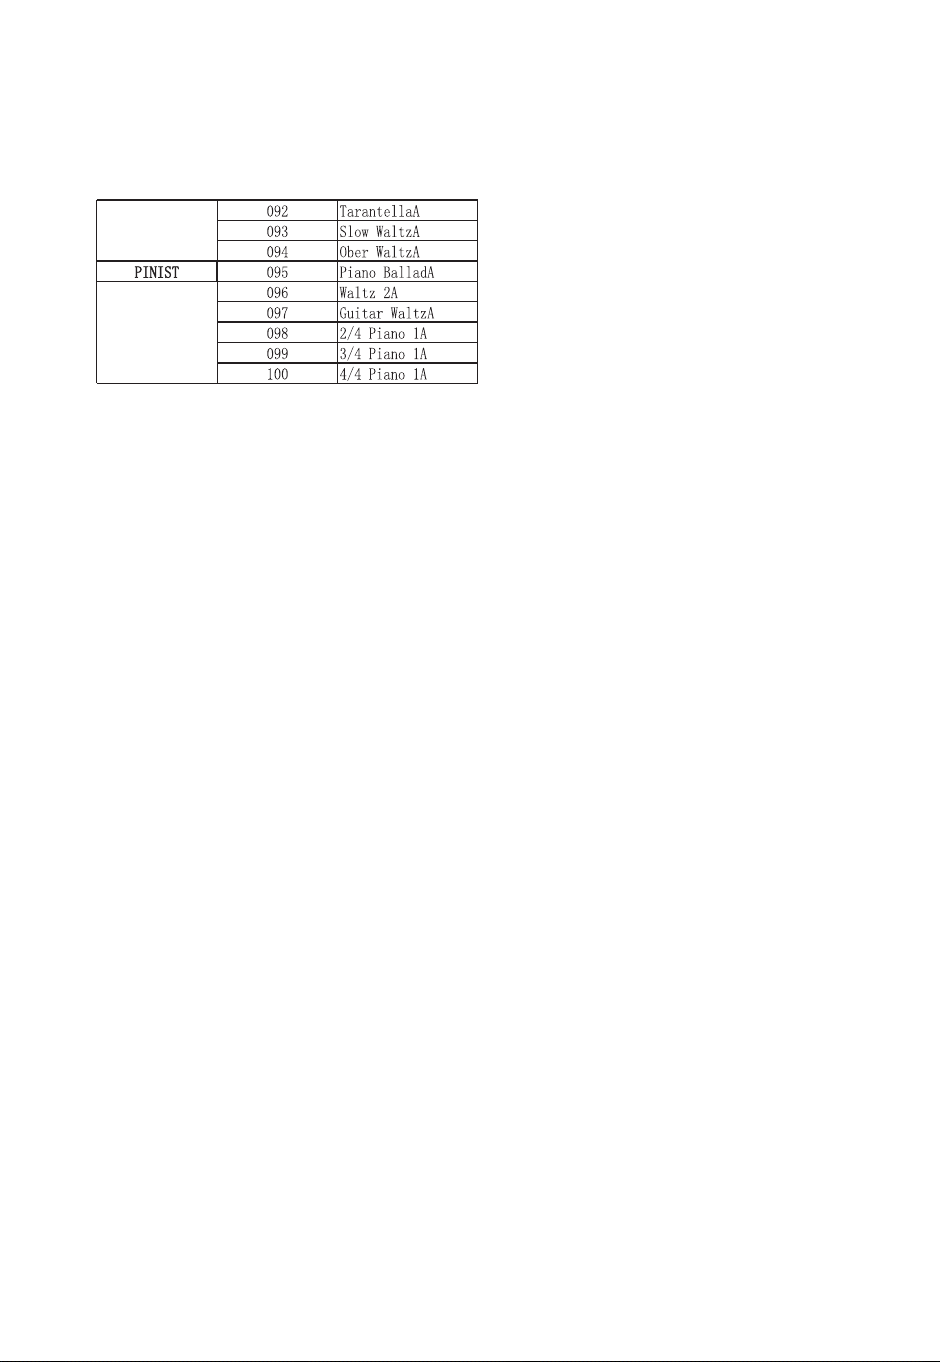
There are 100 rhythms, including all sorts of accompaniments, ranging from
rock and roll to pop music andiazz, which enable you to experience various
feelings.
džDžDžYĈÂČÂēĈÔİēÔðČ
03

Safety Caution
AC Transformer
Volume
hÔÂð×Č©ĄĄê×·©ē×øòøÍēÔÂēĈ©òČÍøĈðÂĈð©İĈÂČęêē×òŔĈ©ò½Âê·ēĈ×·ČÔø·çȒøę
shall abide by the following caution notes.
džȒøęČÔ©êêęČÂȥ·שêēĈ©òČÍøĈðÂĈ©ĄĄø×òē½ÍøĈēÔ×ČĄĈø½ę·ēȒ
LJȒøęČÔ©êêęČ©òĄøĪÂĈČꥥêİĪÔøČÂøęēĄęēĩøêē©ÏÂ×ČĪ×ēÔ×òēÔÂĈ©òÏÂøÍēÔÂ
voltage rating marked on the AC transformer.
LjȒøęČÔ©êêòøēð©çÂēÔÂøęēêÂē©ò½ĄøĪÂĈÂįēÂòČ×øòê×òÂøĩÂĈêø©½Ȓ
øęČÔ©êêòÂĩÂĈēøę·ÔēÔÂēĈ©òČÍøĈðÂĈĪ×ēÔ©ĪÂēÔ©ò½ȓøēÔÂĈĪ×ČÂȓ×ēð©İĈÂČęêē
in electric shock.
Ąê©ČÂęČ©òēĈ©òČÍøĈðÂĈēÔ©ēð©İòøēēøę·ÔĪ©ēÂĈȒ©ēÂĈð©İĈÂČęêē×òŔĈ©ò½
electric shock.
øęČÔ©êêòÂĩÂĈĄê©·Â©ĩ©ČÂøĈ©òİøēÔÂĈ·øòē©×òÂĈČĪ×ēÔĪ©ēÂĈøòēÔÂēĈ©òČÍøĈð-
ÂĈȒ©ēÂĈð©İĈÂČęêē×òŔĈ©ò½Âê·ēĈ×·ČÔø·çȒ
øęČÔ©êêòÂĩÂĈĄê©İðęČ×·©ēÔ×ÏÔĩøêęðÂÍøĈ©êøòÏē×ðÂȒÔÂòęČ×òÏ
©ĈĄÔøòÂČȓİøęČÔ©êêē©çÂĄ©Ĉē×·ęê©Ĉ·©ĈÂȒhøøÔ×ÏÔ©ĩøêęðÂð©İÔ©Ĉð
İøęĈÔ©Ĉ×òÏȒ
1. tun the power of.
2. please unplug the plug of the AC transformer from the outlet.
3. contact your dealer.
When this musical instrument smokes, gives off a peculiar smell, or is overheated,
·øòē×òę×òÏ×òČÂĈĩ×·Âð©İĈÂČęêē×òŔĈ©ò½Âê·ēĈ×·ČÔø·çȒÔÂòēÔ©µøĩ·©ČÂČ
occur, you shall carry out the following operations immediately.
aðøçÂȓY·ęêשĈaðÂêêȓMĩÂĈÔ©ē
04
Piano Assembly
Assembly List
05
Piano Stand
Piano Body
Music Stand
Triple-Pedal
Power Adapter
Piano Stand Screw M6x15
Music Stand Thumb Knob
Allen wrench
4PC
1PC
1PC
1PC
1PC
16PCS+2PCS For Replacement
2PCS +1PCS For Replacement
1 PCS
dž
LJ
3
4
5
6
7
Ǎ
GMȒ Name Quantity
2
3
4
1
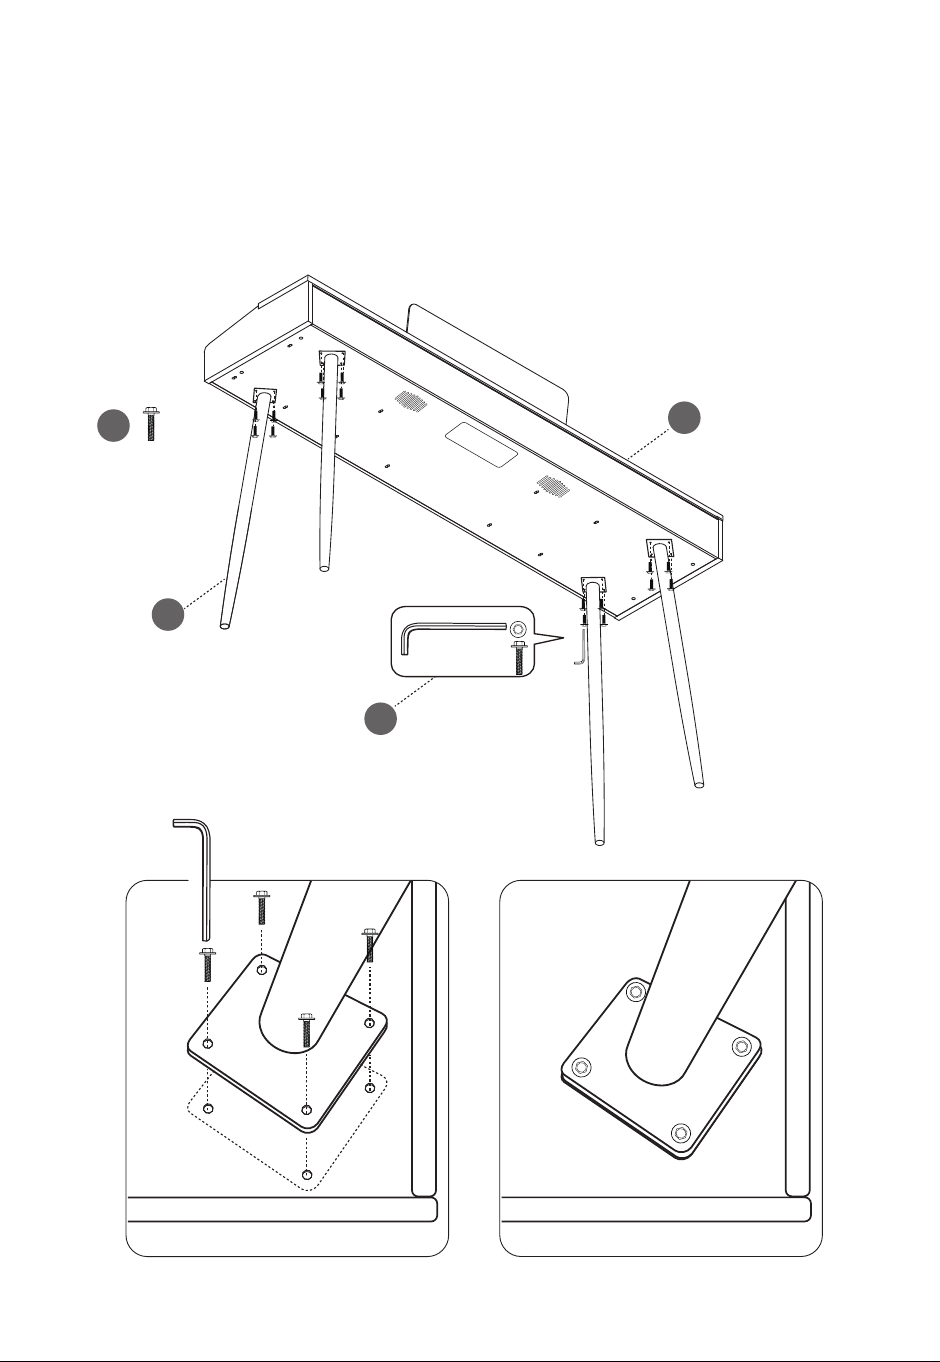
Carefully turn the piano over and align the piano stand with the pre-drilled screw
holes on the piano body. Use an Allen wrench to tighten the M6x15 screws,
Č·ęĈ×òÏēÔ¥שòøČē©ò½ŔĈðêİēøēÔ¥שòøµø½İȒ
džȒYשòøaē©ò½/òČē©êê©ē×øò
06
6
8
1
2
× 16

Align the music stand with the pre-drilled holes and tighten the music stand thumb
knob securely.
LJȒEęČ×·aē©ò½/òČē©êê©ē×øò
07
Connect the triple pedal unit to the pedal socket located on the bottom panel.
LjȒY½©ê/òČē©êê©ē×øò
2
3
7
4
AUX IN
nMnh
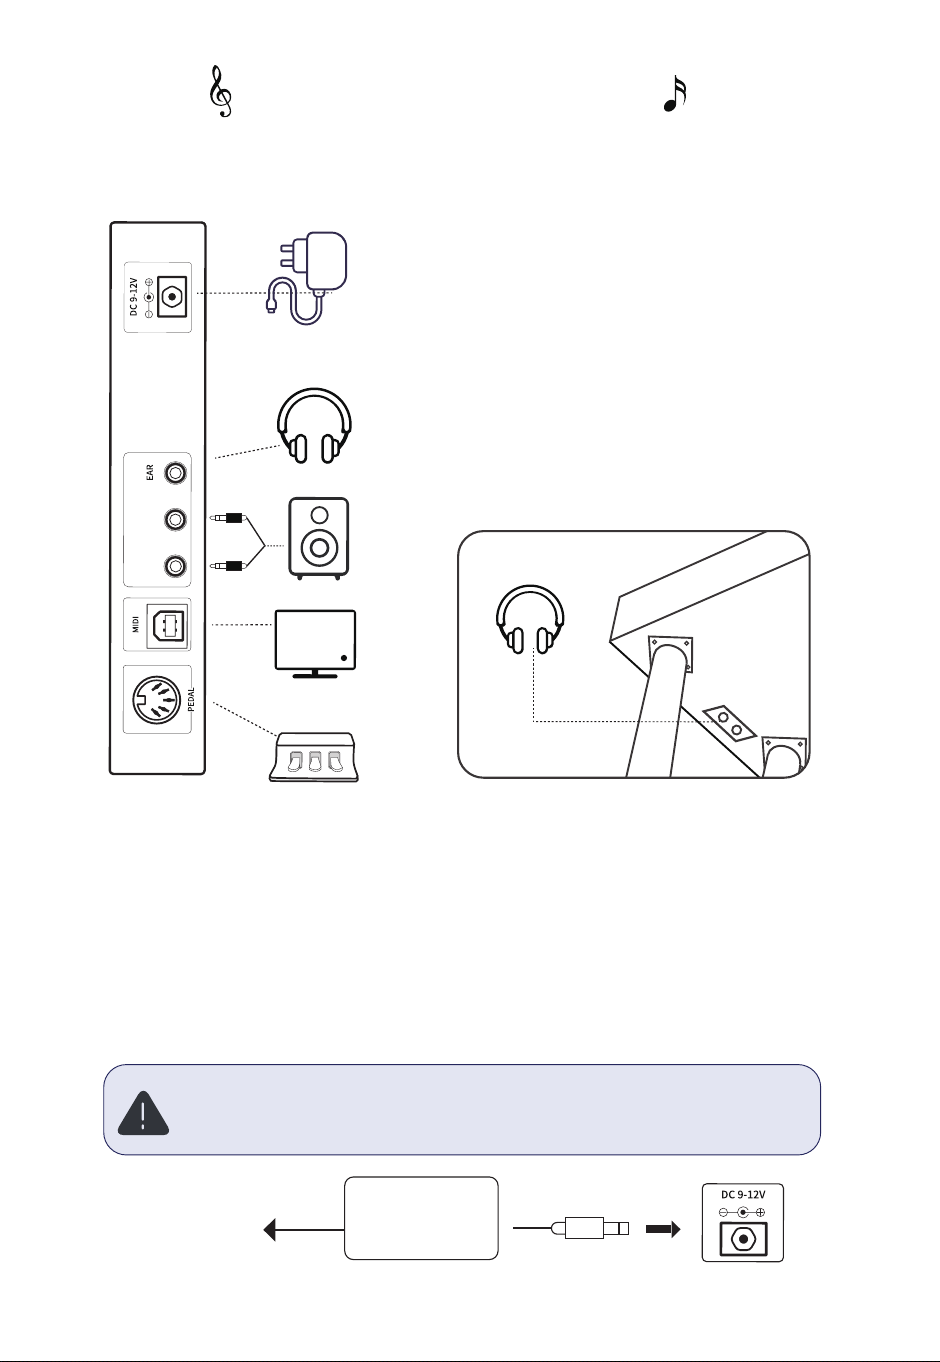
Connect the power cord when using. Insert one end of the cord into the
power socket behind the piano and plug the other end of power adapter
into the 100V-220V domestic power socket.
Power Input Port
08
Note:
Please unplug the power cord and save it in an appropriate way when it
is not used for a long time.
Panel Instruction
Bottom Panel
Connection Panel ę©êNjȒLjNJðð,©½ĄÔøòÂ
;©·ç
AUX IN
nMnh
AC
power adapter
AC
power socket

LjȒNJðð,©½ĄÔøòÂ;©·ç
The output of electronic keyboard built-in speakers will be automatically cut
off when headphone is connected so as not disturb others when playing.
30
09
Note:
hÔÂøĈ×Ï×ò©êÔ©½ĄÔøòÂĄêęÏ×ČLjȒNJððȒøę·©òĈÂðøĩÂēÔÂNjȒLjNJð𩽩ĄēÂĈēø
connect directly to this jack.
ę½×ø/òĄęēȱMęēĄęēaø·çÂēČ
The input / output socket on the back panel can be used in connecting to
stereo audio system, mixer, recorder or other audio devices.
Note:
Yê©ČµÂČęĈÂēÔÂĄøĪÂĈČꥥêİøÍ©êêēÔÂÂćęץðÂòēÔ©ĩµÂÂòēęĈò½øÍÍ
before connecting or disconnecting other devices.
hęĈò½øĪòēÔÂĩøêęðÂøÍ©êê½Âĩ×·ÂČēø©ð×ò×ðęðµÂÍøĈÂēęĈò×òÏøòēÔÂ
power of devices.
AUX IN nMnh
IN OUT
ah]MaahE
hĈץêÂY½©êaø·çÂē
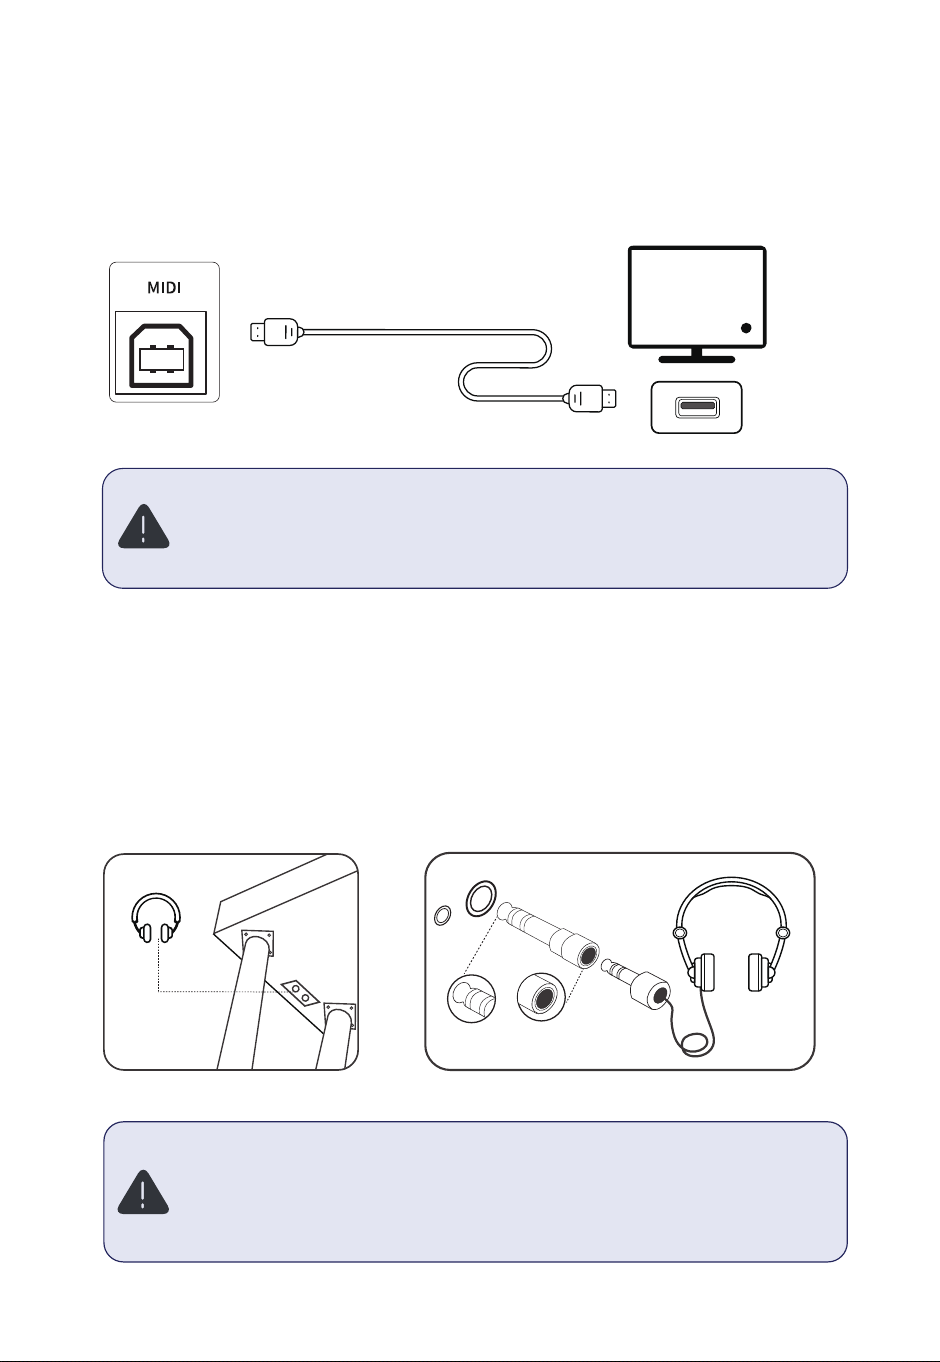
Connect the triple pedal unit to the pedal jack located on the bottom panel.
The Soft Pedal reduces volume, the Sostenuto Pedal sustains currently played
notes, and the Sustain Pedal holds notes after releasing the keys.
The output of electronic keyboard built-in speakers will be automatically cut off
when headphone is connected so as not disturb others when playing.
ę©êNjȒLjNJðð,©½ĄÔøòÂ;©·ç
GMhȔ
Yê©Č©ĩø×½Ī©Ĉ×òÏÔ©½ĄÔøòÂČÍøĈ©êøòÏē×ðÂ×òÔ×ÏÔĩøêęðÂȓĄĈÂĩÂòē×òÏ
hearing damage.
ÂĄĈøĩ×½ÂÔ©½ĄÔøòÂČĪ×ēÔ©LjȒNJððĄêęÏ©ò½©NjȒLjNJð𩽩ĄēÂĈȒ%øĈÍĈÂćęÂòē
use, the 6.35mm jack on the left offers easier access compared to the 3.5mm jack
located below.
10
6.35mm 3.5mm
MIDI USB Port
Connect the digital piano to a computer via MIDI to perform, compose, and store
music using software. Play or accompany edited music through the piano.
Note:
ĩø×½ČÂēē×òÏēÔÂE//©ę½×ø½Âĩ׷©ȵøēÔ/òĄęē·MęēĄęēēøĄĈÂĩÂòēČøęò½
overlap.
øòøēęČ©naÔęµĪÔÂò·øòò·ē×òÏĩש©E//na©µêÂȒ
hÔ×Č·Ô©ĄēÂĈĪ×êê×òēĈø½ę·ÂēÔÂÍęò·ē×øò©êøÍēÔ¥שòø·ĈÂê©ē½·øòēÂòēȵÂÍøĈÂ
performance to you. Before turning the power on, be sure to read the following
contents.
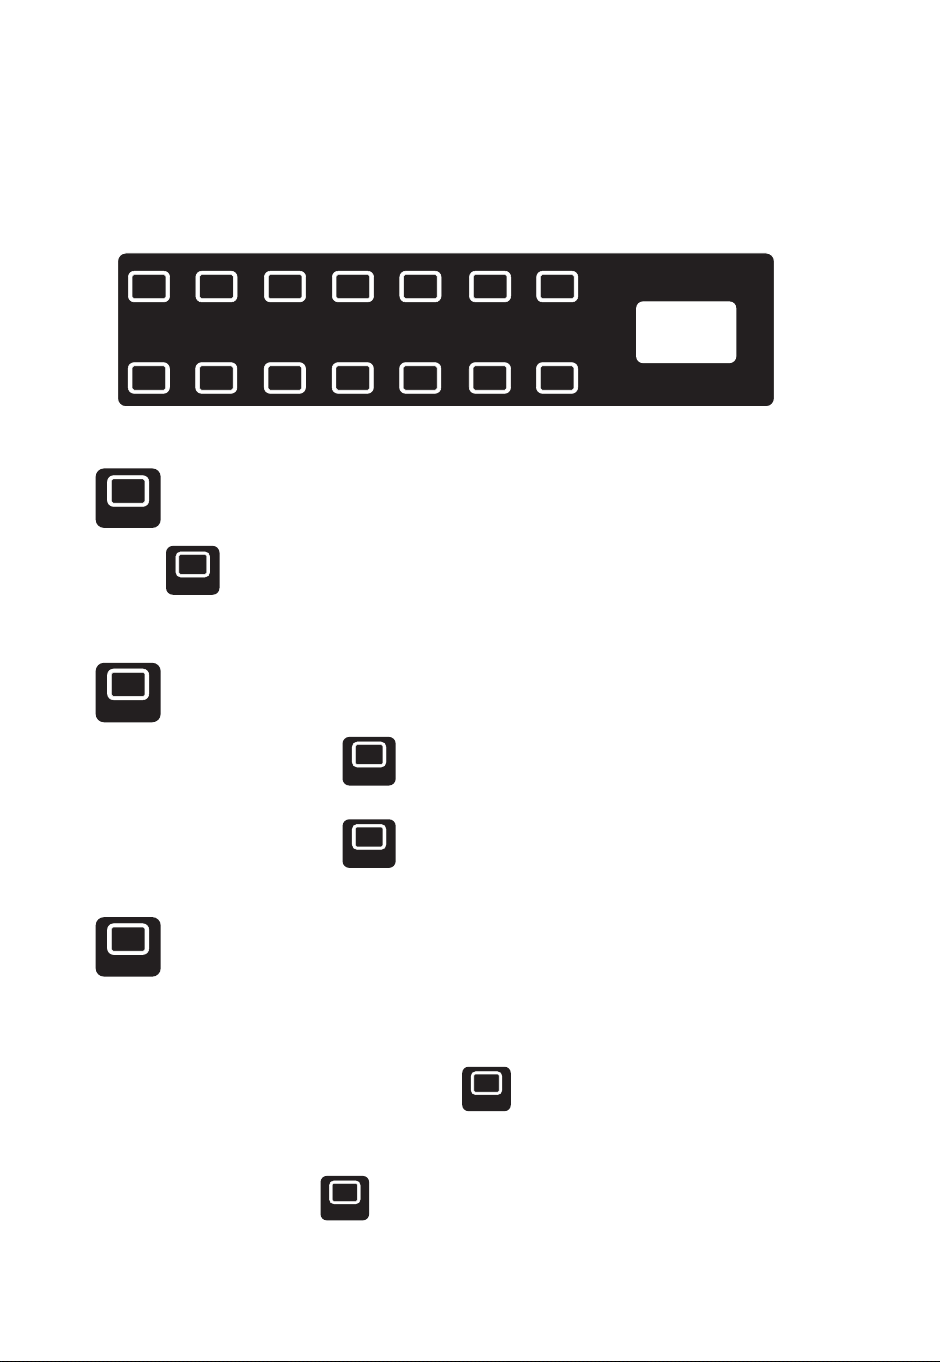
Control Panel
džȒMGȱM%%
Tap the ON/OFF icon to display '001' on the screen, and you can then start
playing music on the piano keys.
LJȒaē©ĈēȱaēøĄ
LjȒaİò·ÔĈøòøęČaē©Ĉē
(1). Start Playback: Tap the Start/Stop icon to begin playing the selected
rhythm.
(2). Stop Playback: Tap the Start/Stop icon again to stop playback.
(1). Select Rhythm and Speed: Choose your desired rhythm and speed settings.
ɑLJɒȒ·ē×ĩ©ēÂaİò·ÔĈøòøęČaē©ĈēȔh©ĄēÔÂaG×·øòēøÂò©µêÂČİò·ÔĈøòøęČ
start mode.
(3). Play Chords: Tap the CHORD icon, the accompaniment will start playing
automatically when you play chords on the left side of the keyboard.
11
ON/OFF
ON/OFF
ON/OFF
ȱ
ȱ
ȱ
ȱ
aG
aG
aG
CHORD ~M/ȱ],h,E SELECT+ SELECT-
RESET SETTINGS DEMO/SONG METRONOME ]ȱY? VOL+ VOL-
?/aY?
CHORD
(4). Cancel Synchronization: Tap the Start/Stop icon to exit the
synchronization mode.
ljȒÔøĈ½··øðĄ©ò×ðÂòē
(2). Activate Chord Mode: Tap the CHORD icon to enable chord
accompaniment.
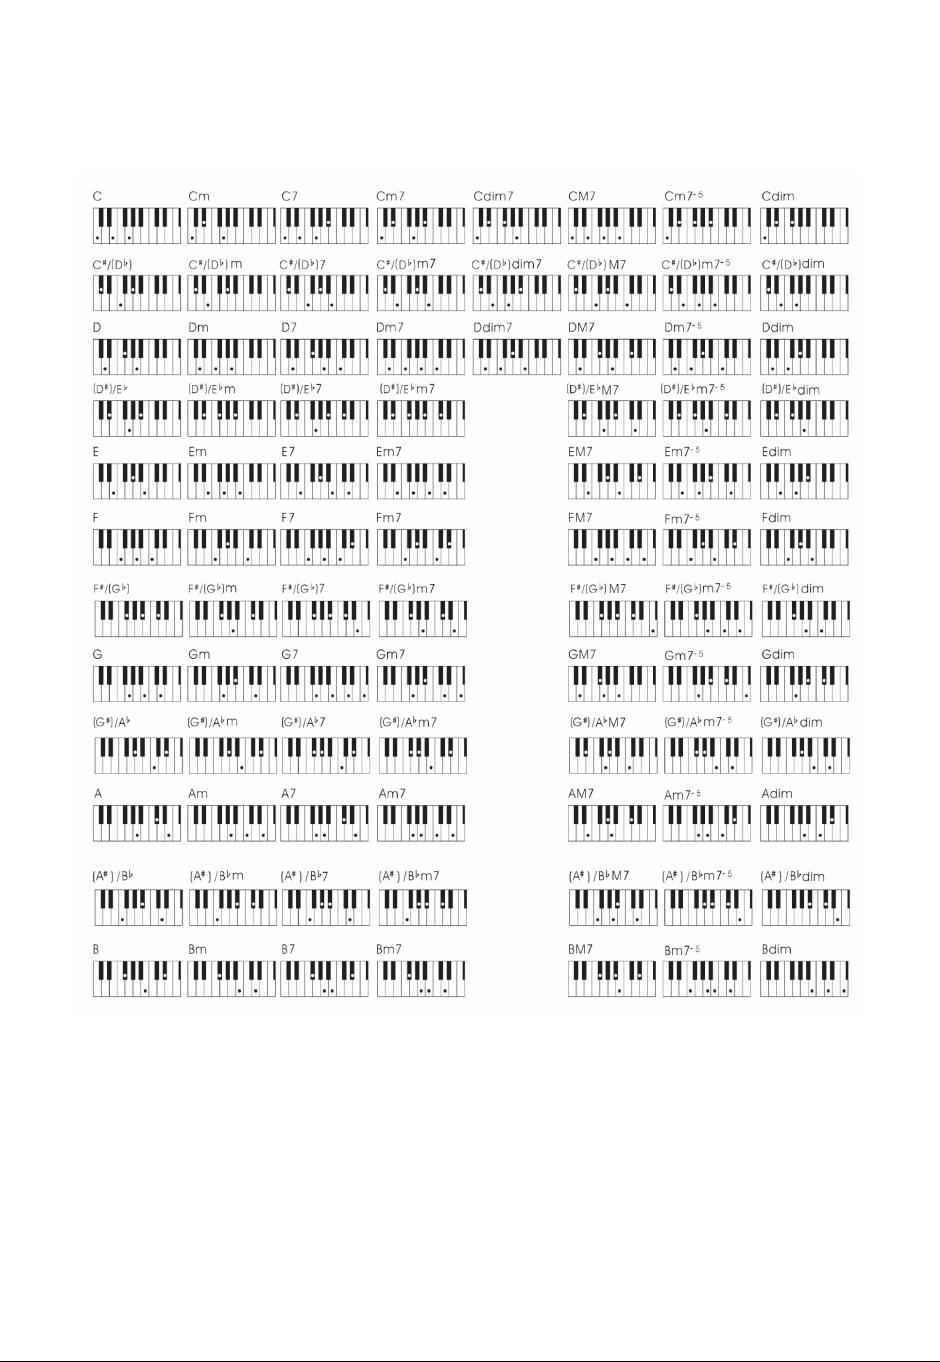
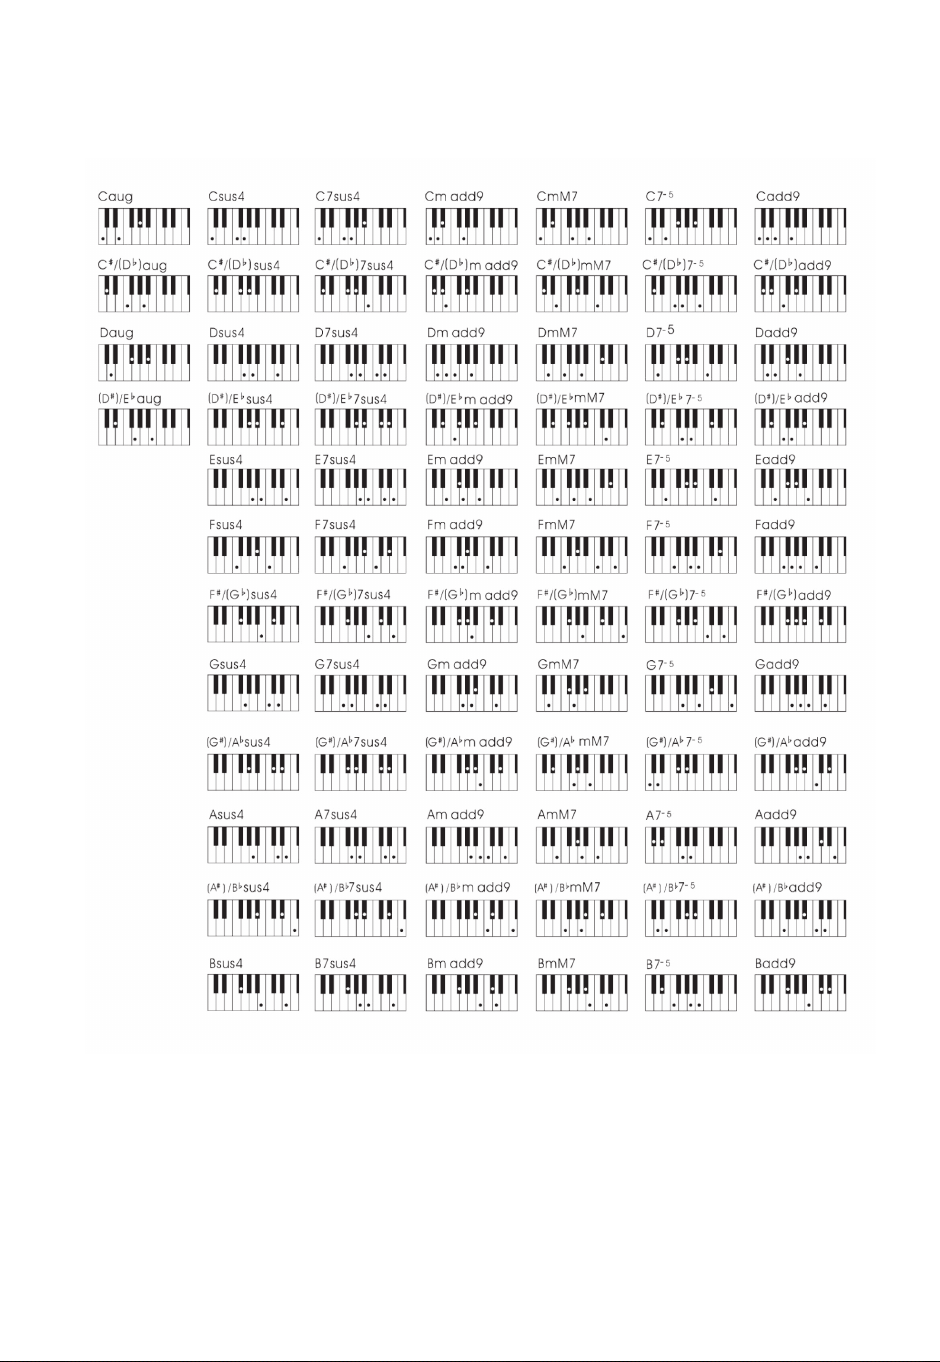
(3). Play Chords: Use the left-hand section of the keyboard (keys 1-34) to play
different chords.
(4). Deactivate Chord Mode: Tap the CHORD icon again to turn off the chord
function.
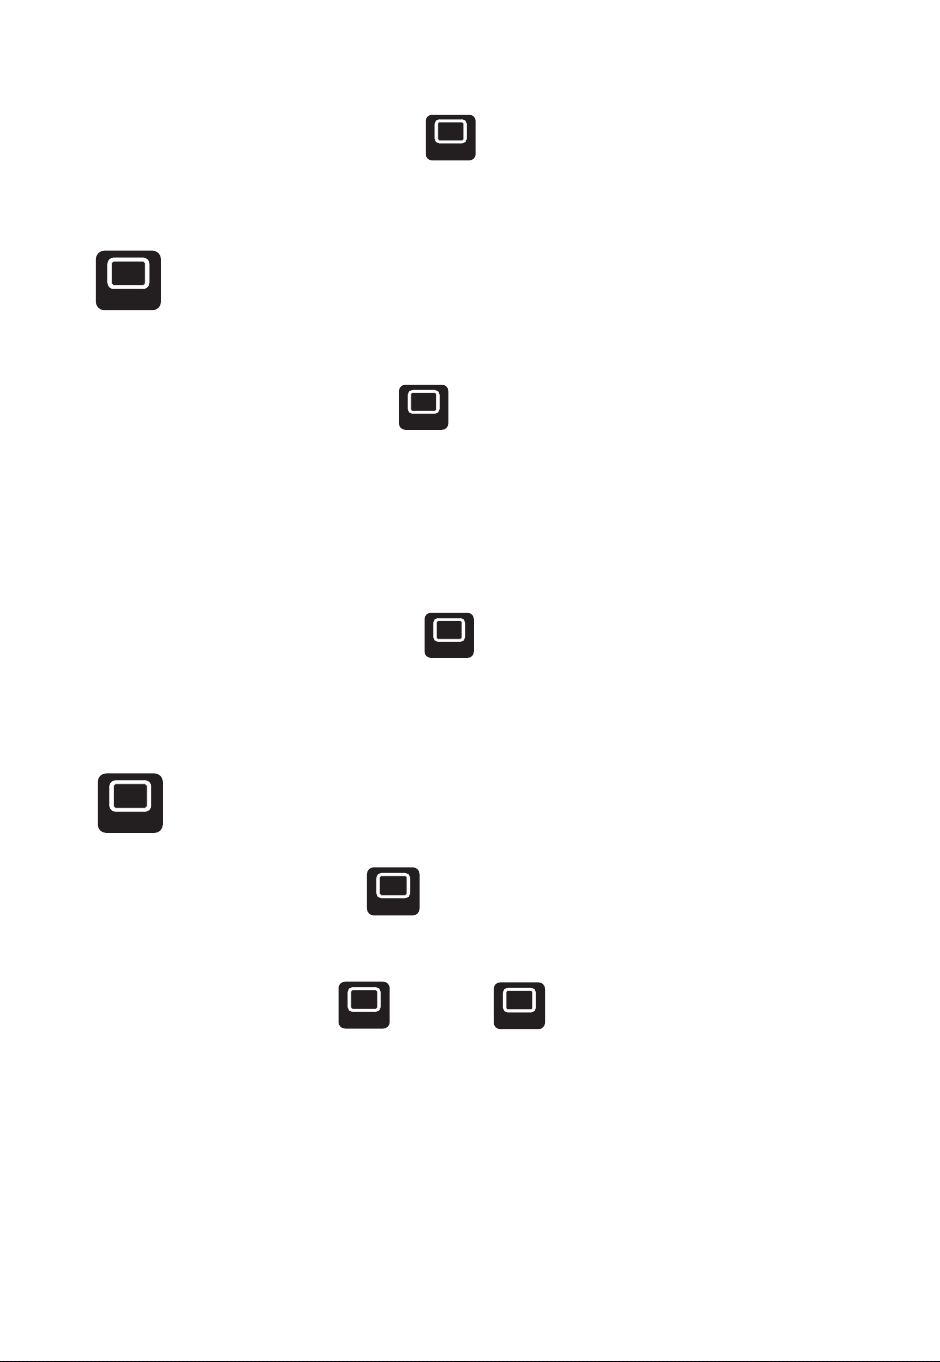
NJȒ~ø×·ÂaÂê·ē×øò
ɑdžɒȒòēÂĈ~ø×·ÂEø½ÂȔh©ĄēÔÂ~M/ȱ],h,E×·øòēø©··ÂČČēÔÂĩø×·Â
selection mode.
(2). Select a Voice: Use the Select + or Select - icons to choose a voice.
The selected voice number will be displayed on the screen.
(3). Default voice: The piano voice is selected by default when the power is turned
on.
12
CHORD
~M/ȱ],h,E
~M/ȱ],h,E
SELECT+
SELECT -
CHORD
CHORD
ȱ
(1). Select Rhythm: Choose the rhythm you want to play with.
njȒaÂê·ē˗·aÂê·ēʍ
Tap or icon to adjust voice, rhythm , metronome, demo, or settings
ǍȒ]ÂČ·ē
(1). Short tap the RESET icon, the device will shut down and restart
immediately.
(2). Long tap the RESET icon for 1-2 seconds will delete all user settings and
restore to factory settings, please use with caution.
NjȒ]ÔİēÔðaÂê·ē×øò
ɑdžɒȒòēÂĈ]ÔİēÔðEø½ÂȔh©ĄēÔÂ~M/ȱ],h,E×·øò©Ï©×òēøČĪ×ē·Ôēø
rhythm selection mode.
(2). Select a Rhythm: Use the Select + or Select - icons to choose a
rhythm. The corresponding rhythm number will be displayed on the screen.
13
Note:
When the piano is restarted after restoring factory defaults, the factory default
"001 Grand Piano" sound should be selected automatically..
~M/ȱ],h,E
~M/ȱ],h,E
SELECT+ SELECT -
RESET
SELECT+
SELECT -
RESET
RESET
SELECT+
ȱ
SELECT -
(3). Start/Stop Rhythm: Tap the Start/Stop icon to begin or stop playing the
selected rhythm.
Tap the Select + or Select - icons to set the tempo from 20 to 280 BPM.
The default is 120 BPM.
ǎȒaÂēē×òÏČ
ɑdžɒȒ½äęČēhÂðĄøȔ
Tap the Select + or Select - icons to adjust the accompaniment volume
level from 0 to 32. The default level is 24.
ɑLJɒȒ··øðĄ©ò×ðÂòē~øêęðÂȔ
Tap the Select + or Select - icons to use the transposition function to
ČÔ×ÍēēÔÂĄ×ē·ÔøÍēÔÂçÂݵø©Ĉ½Ī×ēÔøęē©êēÂĈ×òÏēÔÂŔòÏÂĈ×òÏĄøČ×ē×øòČȒ
ɑLjɒȒhĈ©òČĄøČÂȔ
Tap the Select + or Select – icons to adjust the touch sensitivity to More
Hard, Hard, Normal, Soft, More Soft, or turn off.
ɑljɒȒ=Âİhøę·ÔaÂòČ×ē×ĩ×ēİȔ
Modify the low and high ranges from 0 to 127 using the Select + or
Select - icons. The default is set to 96.
ɑNJɒȒ©ČČ\·hĈµêÂ\Ȕ
Tap the SETTINGS icon to browse the Tempo, Accompaniment Volume,
Transpose, Key Touch Sensitivity, Bass EQ, Treble EQ, Press Chor Save in turn.
14
SETTINGS
SELECT+
SELECT+
SELECT -
SELECT -
SELECT+ SELECT -
SELECT+ SELECT -
SELECT+ SELECT -
SETTINGS
(1). Play Demo: Tap the DEMO icon to display and play the current demo
song.
džDžȒę×êēʍ×òÂðøaøòÏ
(1). Activate/Change Metronome Setting: Tap the Metronome icon to turn it
on. Each subsequent tap will switch to the next metronome pattern, displaying four
options in sequence.
ɑLJɒȒ©·ē×ĩ©ēÂEÂēĈøòøðÂȔh©ĄēÔÂEÂēĈøòøðÂ×·øò©ŔÍēÔē×ðÂēøēęĈòøÍÍ
the metronome function.
dždžȒEÂēĈøòøðÂ%©ēęĈÂČ
When you are on the Press Chor Save screen, tap the CHORD icon, the
current settings can be saved directly to the piano's memory, allowing the player's
ĄĈÂÍÂĈĈ½·øòŔÏęĈ©ē×øòēøµÂ©ęēøð©ē×·©êêİČÂê·ē½ĪÔÂòēÔ¥שòø×ČēęĈò½øòȒ
Press and hold RESET icon to restore factory defaults, and the settings will
be cleared.
YĈÂÍÂĈĈ½·øòŔÏęĈ©ē×øòČēÔ©ē·©òµÂ·Ô©òϽȔ
~ø×·Âȓ]ÔİēÔðȓÂðøȓ©ò½×òaÂēē×òÏČ=Âİhøę·ÔaÂòČ×ē×ĩ×ēİȓ©ČČ\·hĈµêÂ\ȓ
Accompaniment Volume, Transpose.
ɑNjɒȒYĈÂČČÔøĈa©ĩÂȔ
15
Note:
When the piano is restarted after restoring factory defaults, the factory default
"001 Grand Piano" sound should be selected automatically..
DEMO/SONG
METRONOME
CHORD
RESET
SELECT+
SELECT -
DEMO/SONG
DEMO/SONG
METRONOME
METRONOME
(2). Change Demo: Use the Select + or Select - icons to choose
different demo songs.
(3). Stop Demo: Tap the DEMO icon again to stop playback.
ɑdžɒȒaē©Ĉē]·øĈ½×òÏȔ?øòÏē©ĄēÔÂ]ȱY?×·øòȒhÔÂaG©ò½EÂēĈøòøðÂ
×ò½×·©ēøĈČĪ×êêê×ÏÔēęĄȓČ×Ïò©ê×òÏēÔ©ēĈ·øĈ½×òÏðø½Â×Č©·ē×ĩ©ē½Ȓøę·©òĈ·øĈ½
up to 5,000 notes.
ɑLJɒȒaēøĄ]·øĈ½×òÏȔh©ĄēÔÂ]ȱY?×·øò©Ï©×òȒhÔÂaG©ò½EÂēĈøòøðÂ
indicators will turn off, indicating that recording has stopped.
džLJȒ]·øĈ½×òÏȱYê©İµ©·ç]·øĈ½×òÏ
Tap or icon to increase or decrease the master volume until you are
Č©ē×ČŔ½Ȓ
džLjȒ~øêęð½äęČēðÂòē
16
]ȱY?
VOL+ VOL -
VOL+ VOL -
]ȱY?
]ȱY?
]ȱY?
ɑLjɒȒYê©İ]·øĈ½×òÏȔh©ĄēÔÂ]ȱY?×·øòøò·ÂðøĈÂēøµÂÏ×òĄê©İµ©·çøÍ
the recorded notes.
~M/?/ah
Appendix
17
11
18
],h,E?/ah
19
20
21
EM?/ah
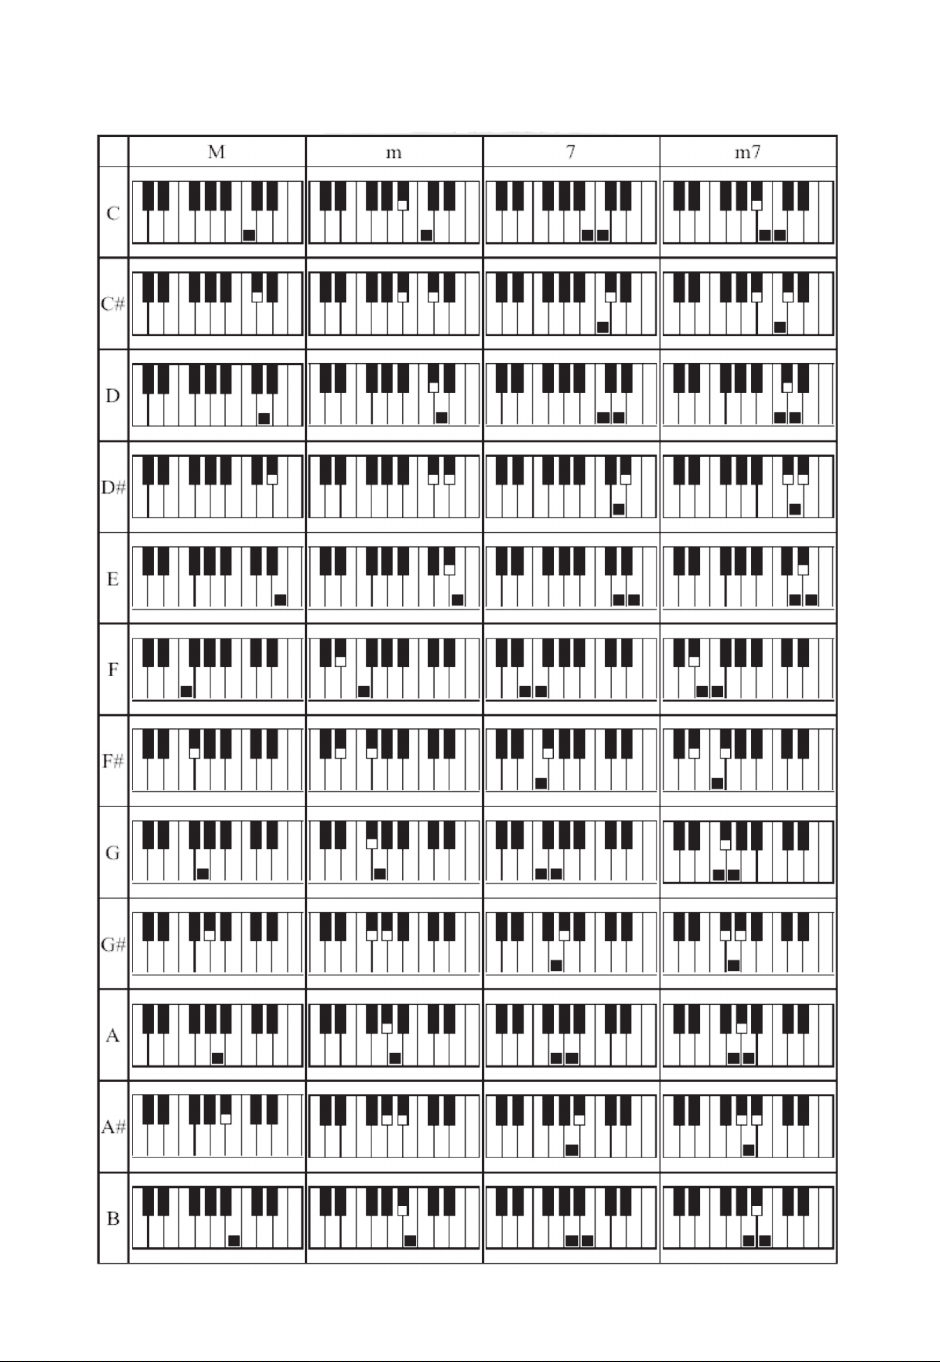
Single Finger Chord List
22
23
Eęêē×ʍŔòÏÂĈÔøĈ½?×Čē
24
25
Maintenance
26
There was no sound
on the keyboard.
1. Volume Controller Set at
Minimum Position.
3. The power supply is not
connected, or the piano is
off.
2. Headphones or Plug
Converters insert
headphone jack.
1. Turn the volume to the
right maximum volume.
3. Turn on the power supply
and tap the ON / OFF.
2. Remove the original
connector form the
headphone jack.
1. Plug the pedal cord into
the piano jack.
LJȒÔ·çēø·øòŔĈðĪÔÂēÔÂĈēÔÂ
plug at tone end of the pedal
connection is loose or not, and
then tighten it.
The pedals don't
work.
1. Connecting line jack of
pedal is not plugged into
piano.
When the piano
power is turned on or
off there is a
murmuring sound.
Normal phenomenon
This is a normal phenomenon,
indicating that the current
enters the machine currently.
The piano is noisy
when using a mobile
phone.
Abnormal tone or
rhythm.
Under the same
timbre, the quality of
a note is different
from that of a note.
Connecting
Computer, not
recognized
Radio interference
Power shortage
Normal phenomenon
USB plug loose
Using a mobile phone near a
piano can generate radiation.
To avoid this situation, you can
turn off the mobile phone or
use it away from the piano.
Power shortage.
Check power stability.
This is a normal phenomenon.
This machine adopts AWM
sound source mode. This kind of
sound source is sampled and
recorded in the whole keyboard
area, so the quality of the two
notes is slightly different.
No need to install extra drives.
lf the piano isn't recognized by
computer, please check if the
USB cords are connected
securely or try to connect
another USB socket of the
computer.
Troubleshooting
Issue ]©Čøò Solution
2. Pedal plug loose.
27
88
Weighted, Graded Hammer Action
Soft 1/2, Normal, Hard 1/2
128
128
100
88
2 x 1/4", 1 x 1/8"
2 x 1/8"
In / Out
Triple Pedal Socket
ÂČ
LCD
Number of Keys
Type of Keys
Touch Sensitivity
Polyphony
Voice
]ÔİēÔð
ÂðøȱaøòÏ
,©½ĄÔøòÂČ;©·ç
ę½×ø/òĄęēČȱMęēĄęēČ
MIDI USB
Pedal Inputs
ę×êēʍ×òaĄÂ©çÂĈČ
Display
aĄÂ·×Ŕ·©ē×øòČ
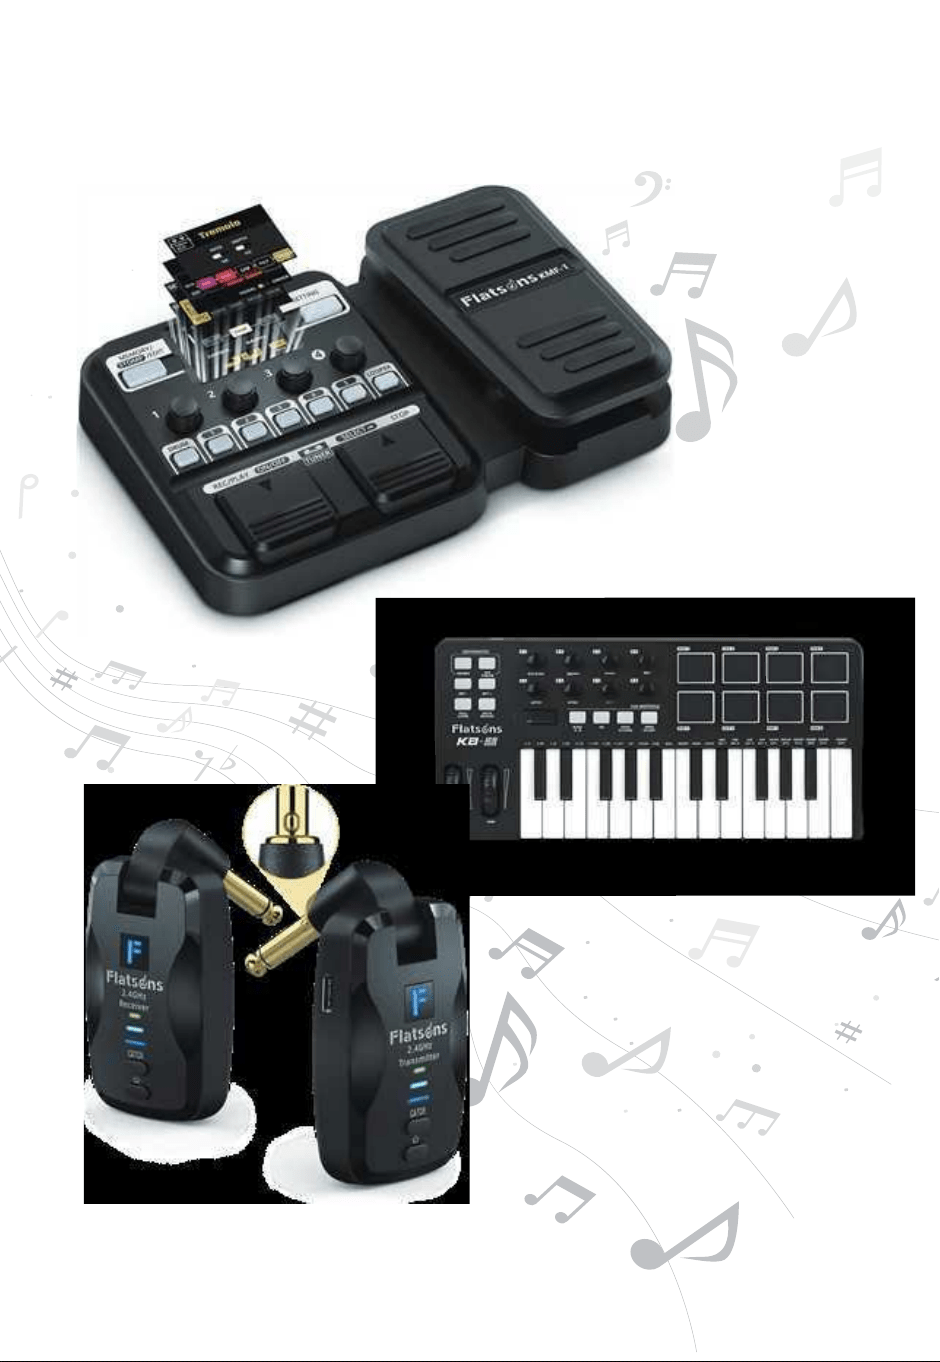
įĄêøĈÂMęĈYĈÂð×ęð
Music Gear Collection
Eęêē×ÍÍ·ēČ
Guitar Pedal
Controller
Keyboard
Wireless
Guitar System