
Driver Download:
https://plustek.com/us/products/film-photo-scanners/ephoto-z300/support.php
Please contact us directly if you have any questions
Tel: (714) 670-7713, Mon-Fri 9:00AM~5:30PM, PST
eMail: [email protected]
Or fill out a technical support form at
https://plustek.com/us/support/technical-support-form.php

ScannerUser’sGuide
ePhoto

Trademarks
© 2021 Plustek Inc. All rights are reserved. No portion of this document may be
reproducedwithoutpermission.
All trademarks and brand names mentioned in this publication are property of
theirrespectiveowners.
Liability
While all efforts have been made to ensure the accuracy of all contents in this
manual,weassume noliabilityforerrorsoromissionsorbystatementsofanykind
in this manual, whether such errors are omissions or statements resulting from
negligence,accidents,oranyothercause.Thecontentsof
thismanualaresubject
tochangewithoutnotice.Wewillnotshoulderanylegalliability,ifusersfailedto
followtheoperationinstructionsinthismanual.
Copyright
The scanning of certain documents, for example checks, bank notes, I.D. cards,
governmentbonds,orpublicdocuments,maybeprohibitedbylawand/orsubject
to criminal prosecution. We recommend you to be responsible and respectful of
the copyrights laws when you are scanning books, magazines, journals and other
materials.
EnvironmentalInformation
Recycle or disposal at end‐of‐life information, please ask local distributors or
suppliers for recycle and disposal information. The product is designed and
produced to achieve sustainable environmental improvement. We strive to
produce products in compliance with global environmental standards. Please
consultyourlocalauthoritiesforproperdisposal.
Theproduct
packagingisrecyclable.
Attentionforrecycling(ForEUcountryonly)
Protectyour environment!Thisproduct should not be thrown intothehousehold
wastecontainer.Pleasegiveittothefreecollectingcenterinyourcommunity.
ScreenExamplesinThisManual
The screen shots in this guide were made with Windows 7. If you are using
Windows8/10,yourscreenwilllooksomewhatdifferentbutfunctionsthesame.

TableofContents
INTRODUCTION.................................................................................................................................. 1
HOWTOUSETHISGUIDE............................................................................................................................... 1
ANOTEABOUTICONS ...................................................................................................................................2
SAFETYPRECAUTIONS....................................................................................................................................2
SYSTEMREQUIREMENTS ................................................................................................................................3
BOXCONTENTS ............................................................................................................................................4
SCANNEROVERVIEW .....................................................................................................................................5
LEDINDICATOR ...........................................................................................................................................6
POWERSAVE ...............................................................................................................................................6
CHAPTERI.INSTALLINGTHESCANNER ............................................................................................... 7
INSTALLINGANDSETTINGUPTHESCANNER .......................................................................................................8
WindowsInstallation ..........................................................................................................................8
MacOSXInstallation..........................................................................................................................9
UPDATETHELATESTDRIVER(ONLYFORZ300)................................................................................................11
CHAPTERII.OPERATINGTHESCANNER ............................................................................................. 12
STEP1.TURNONYOURSCANNER .................................................................................................................12
STEP2.LAUNCHPLUSTEKEPHOTO ................................................................................................................12
STEP3.SCAN ............................................................................................................................................13
CHAPTERIII.CAREANDMAINTENANCE............................................................................................. 14
CLEANINGTHESCANNER ..............................................................................................................................14
CleaningMaterials............................................................................................................................14
CleaningtheScanner ........................................................................................................................14
CALIBRATINGTHESCANNER ..........................................................................................................................16
USAGE&MAINTENANCETIPS ......................................................................................................................17
APPENDIXA:SPECIFICATIONS ...........................................................................................................18
APPENDIXB:EPHOTOHOTKEYS ........................................................................................................20
APPENDIXC:CUSTOMERSERVICEANDWARRANTY .......................................................................... 22
SERVICE&SUPPORTINFORMATION(FOREUCOUNTRYONLY)............................................................................22
STATEMENTOFLIMITEDWARRANTY ..............................................................................................................23
FCCRADIOFREQUENCYSTATEMENT .............................................................................................................24

Introduction
Welcome to the world of Plustek scanners – the ultimate in computer imaging. Your
new scanner willimprove the professionalism of your day‐to‐day computing tasks by
allowingyoutoinputimagesintoyourcomputersystem.
Like all of our products, your new scanner is thoroughly tested and backed by
our
reputationforunsurpasseddependabilityandcustomersatisfaction.
Thankyouforchoosingusasyourscanner supplier.Wehopeyouwillcontinuetoturn
tousforadditionalqualityproductsasyourcomputingneedsandinterestsgrow.
HowtoUseThisGuide
ThisUser’sGuideprovidesinstructions andillustrationsonhowtoinstallandoperate
yourscanner.ThisguideassumestheuserisfamiliarwithMicrosoftWindows.Ifthisis
notthecase,wesuggestyoulearnmoreaboutMicrosoftWindowsbyreferringtoyour
MicrosoftWindowsmanualbeforeusingyourscanner.
The
Introduction section of this manual describes the box contents and minimum
computer requirements to use this scanner. Before you start installing your scanner,
checktheboxcontentstomakesure allpartsareincluded.If anyitemsare damaged
or missing, please contact the vendor where you purchased your scanner
or our
customerservicedirectly.
Chapter I. Installing the Scanner describes how to install scanner’s software and
connectthescannertoyourcomputer.
ChapterII.OperatingtheScannerdescribeshowtooperatethescanner.
ChapterIII.CareandMaintenancedescribeshowtomaintainandcleanyourscanner.
AppendixA:Specificationscontains
theSpecificationsofthescanneryoupurchased.
Appendix B: ePhoto Hotkeys contains general shortcuts information in the ePhoto
program.
AppendixC:CustomerServiceandWarrantycontainsourlimitedwarrantyagreement
andFCCstatementconcerningtheproduct.
1

ANoteaboutIcons
This guide uses the following icons to point out information that deserves special
attention.
Warning
Warning: A procedure that must be followed carefully to
preventinjury,oraccidents.
Attention
Attention: Instructions that are important to remember and
maypreventmistakes.
Information
Information:Optionaltipsforyourreference.
SafetyPrecautions
Beforeusingthisdevice,pleasereadthefollowingimportantinformationtoeliminate
orreduceanypossibilityofcausingdamageandpersonalinjury.
1. Usage,the productisforindooruseindrylocations.Moisturecondensationmay
occurinsidethisdeviceandcausemalfunctionattheseconditions:
• whenthisdeviceis
moveddirectlyfromacoldtoawarmlocation;
• afteracoldroomisheated;
• whenthisdeviceisplacedinadamproom.
To avoid the moisture condensation, you are recommended to follow the
procedure:
i. Sealthisdeviceinaplasticbagforittoadapttoroom
conditions.
ii.Waitfor1‐2hoursbeforeremovingthisdevicefromthebag.
2. DousethepoweradapterandUSB cableprovidedwiththescanner.Useofother
poweradapterandcablesmayleadtomalfunction.
3. Keep the space around the AC adapter clear in case you
need to quickly unplug
theACadapterduringemergencies.
4. Damagedwire could causefire orelectrical shock. Keep the power cord straight
andwithoutbeingtwisted,bended,orscraped.
5. Unplugthis deviceifyoudon’tneedto use for a certainperiodoftime,suchas,
duringnightor
longweekend,toavoidanyrisksofcausingfire.
6. Donotattempttodisassemblethescanner.Thereisdangerofanelectricalshock
andopeningyourscannerwillvoidyourwarranty.
7. Besurenottobumporknockthescannerasitisfragileandcouldbreak.
2

8. Before installing the device drivers, please disconnect all other imaging devices
(otherscanners,printers,digitalcameras,webcameras)fromthePC.
9. Save the Setup/Application DVD. You may need to reinstall the driver and
software in the future. Save the Calibration Sheet in case you need to calibrate
the
scannerinthefuture.
SystemRequirements
1
Windows
2GHzCPUorabove
2GBRAM(4GBRAMrecommended)
10GBFreeHardDiskSpace
DVDDriveorInternetConnection
USBPort
Microsoft Windows 7 / 8 / 10
(Specifications are subject to change without notification, for
moreinformationpleasecheckourofficialwebsite.)
Macintosh
2GHzCPUorabove(INTELbasedCPU,NOPowerPC)
2GBRAM(4GBRAMrecommended)
10GBFreeHardDiskSpace
DVDDriveorInternetConnection
USBPort
Mac OS X 10.8.x, 10.9.x, 10.10.x, 10.11.x, 10.12.x, 10.13.x, 10.14.x, 10.15.x
(Specifications are subject to change without notification, for more information please check our
officialwebsite.)
1
Higher requirements might be needed when you scan or edit a large quantity of image data. The
system requirements here are only a guideline, as in general the better the computer (motherboard,
processor,harddisk,RAM,videographiccard),thebettertheresults.
3
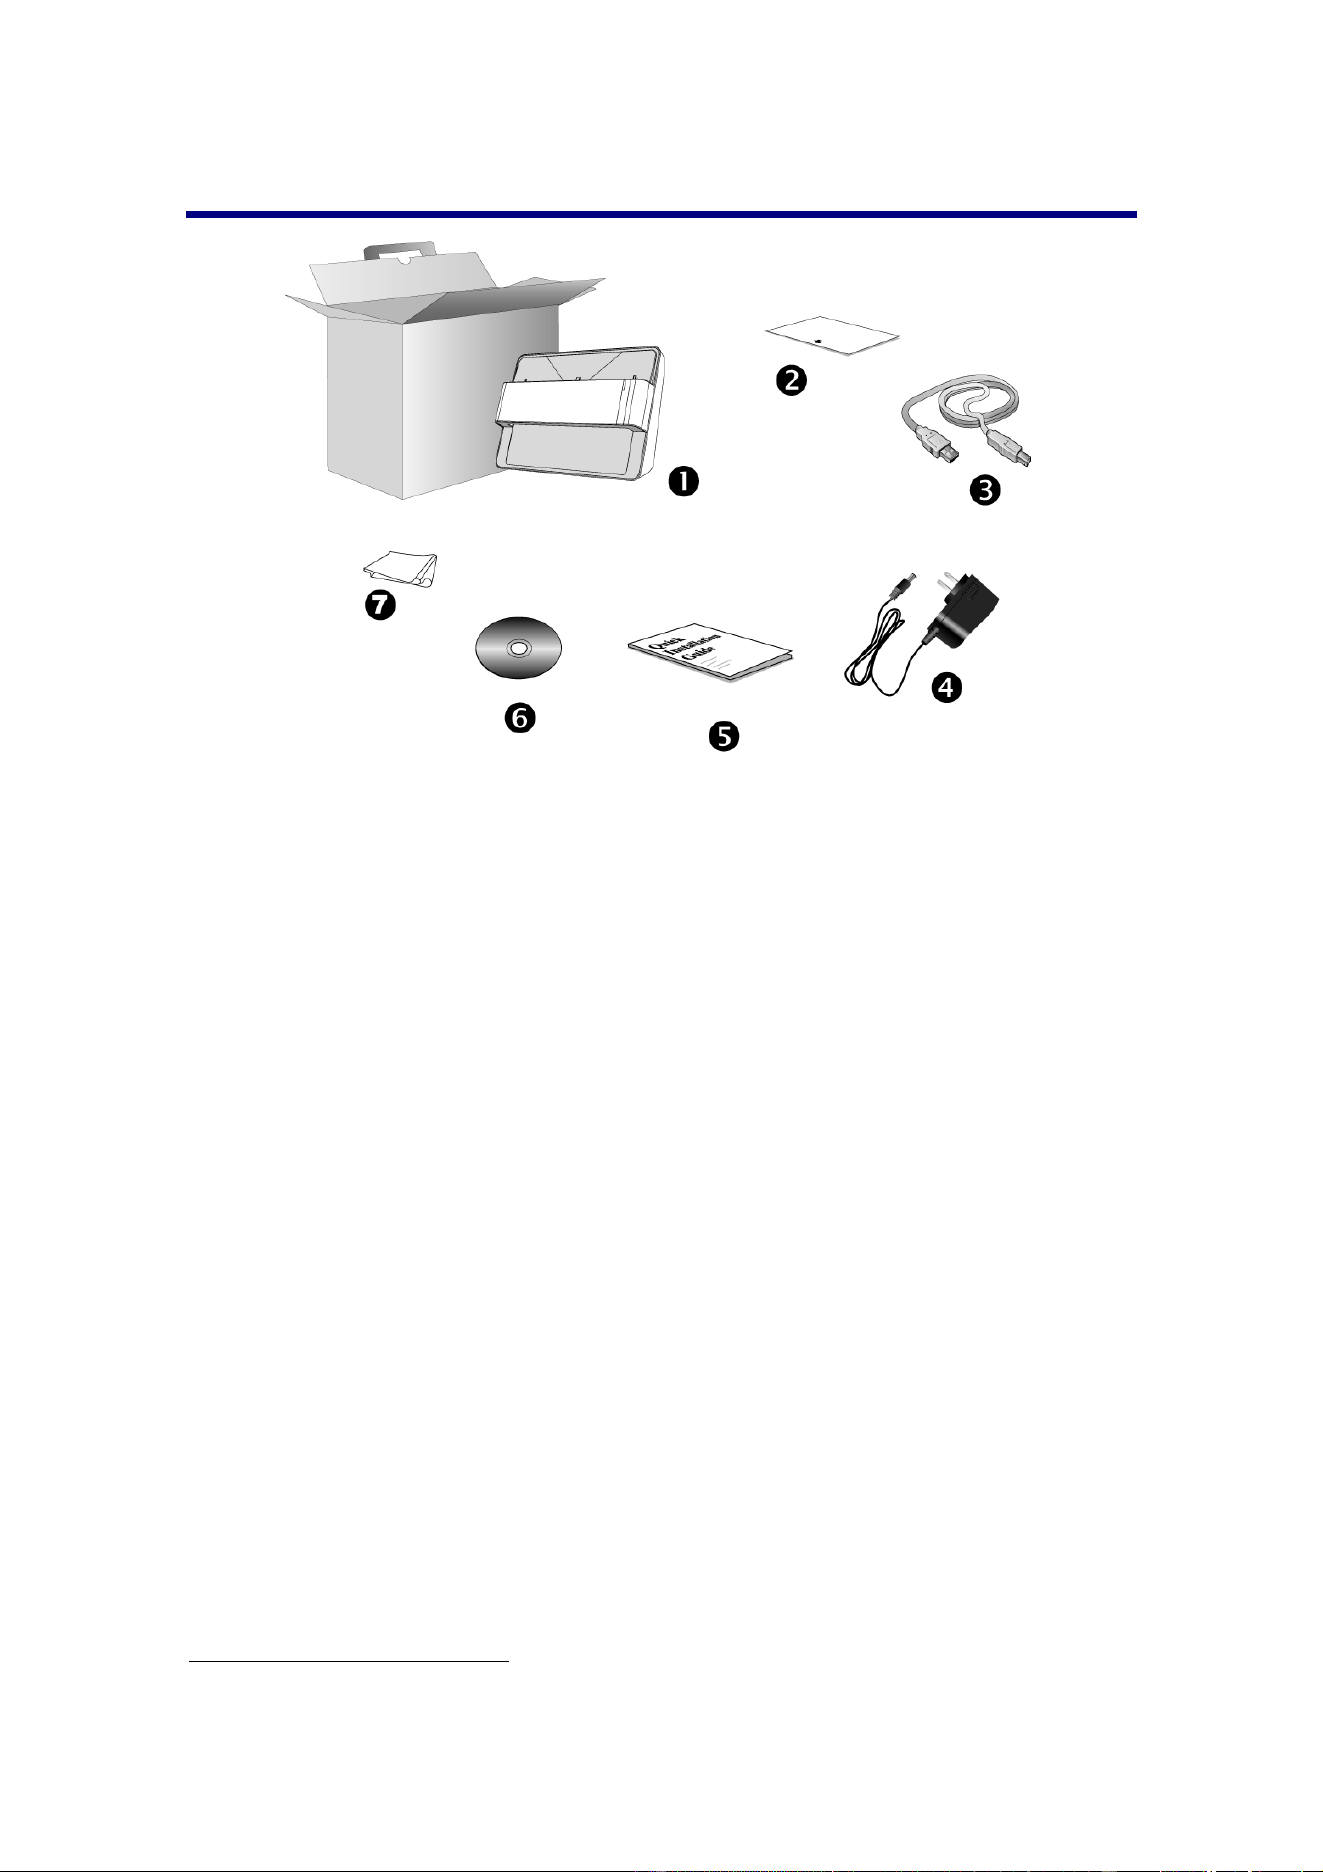
BoxContents
2
1. Scanner
2. CalibrationSheet
3. USBCable
4. PowerAdapter
5. QuickGuide
6. PlustekSetup/ApplicationDVD‐ROM
7. CleansingCloth
2
Savetheboxandpackingmaterialsincaseyouneedtotransportthisscannerinthefuture.
Boxcontentsmaychangeatanytimewithoutpriornotice.
4

ScannerOverview
1. CalibrationAlignmentMark
Alwaysaligntheedgesofthecalibrationsheettobothcalibrationalignmentmarks.
2. MaximumScanAreaMark
Pleaseplacetheedgesofyourphoto/documentbetweenbothmaximumscanareamarks.
3. PageFeedSlot
Feedthe photo / document intothe scannerfrom thisslot.You can feel the photo / document
beinggrabbedbythescanner.
4. ScanAlignmentMark
Alwaysalignthecenterofyourphoto/documentedgetothisalignmentmark .
5. LEDIndicator
Itindicatesthescanner’scurrentstatus.
6. USBPort
ItconnectsthescannertoaUSBportonyourcomputerbytheincludedUSBcable.
7. PowerReceptor
ItconnectsthescannertoastandardACpoweroutletbytheincludedpoweradapter.
8. Powerswitch
UsethistoturnthescannerONorOFF.
9. HandHolder
Itisergonomicallydesignedforyoutocarrythescannerwithease.
10. KensingtonSecuritySlot
Usedforattachinglock‐and‐cableapparatusestopreventdevicetheft.
5

LEDIndicator
TheLEDindicatesdifferentscannerstatus.
Light Status
Orange Thescanneristurnedon.
Blue
The Plustek ePhoto is activated. The scanner is
readytoscan.
BlinkingBlue Thescannerisscanning.
Off
Thescanner is off, eitherbecausethepowerisnot
turned on, or because the AC adapter is not
properlypluggedintoanACpoweroutlet.
PowerSave
Tosavepowerconsumption,thescannerlightsourcealwaysautomaticallyturnsitself
offafterthescanningprocessisfinished.
6
ChapterI.InstallingtheScanner
Before installing your scanner, please verify that you have all of the proper
components.AlistofthepackagecontentsisprovidedintheBoxContentssectionof
thisguide.
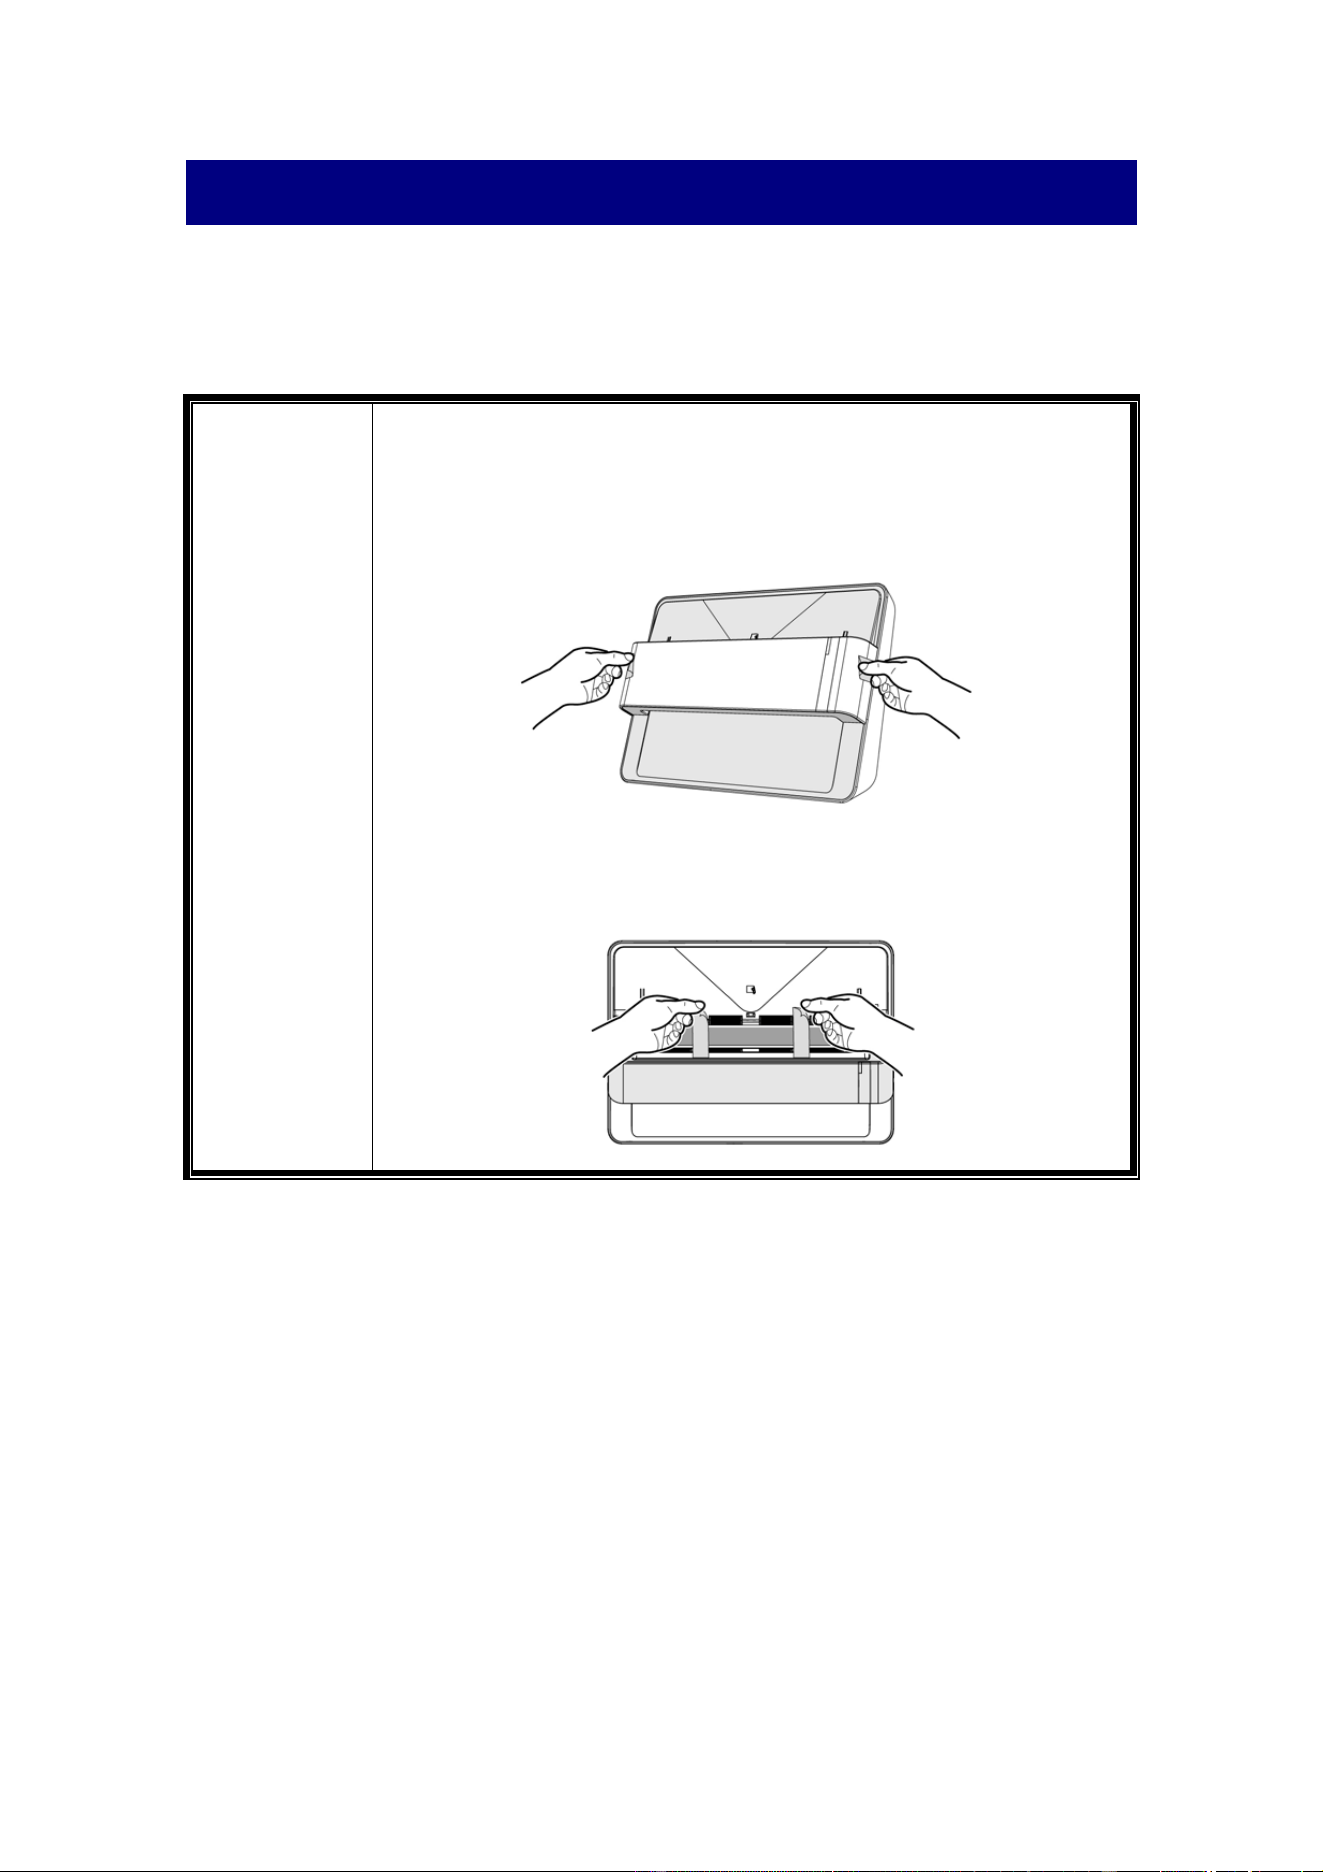
Information
Beforeinstallingthescanner,pleaseremembertodothe
followings:
1. Tearoffthestickersonbothsidesofthescanner.
2. Openthecoverofthescanner,thentearoffthestickersandthe
p
rotectiveEPEstripinsidethescanner.
7

InstallingandSettinguptheScanner
Pleasefollowthestep‐by‐stepproceduresdescribedbelowtoinstalltheUSBscanner.
WindowsInstallation
1. Insert the Setup/Application DVD‐ROM, included
withyourscanner,intoyourDVD‐ROMdrive.
2. Click [Run install.exe] in the [AutoPlay] window. If
the installation does not start automatically, browse
yourDVD‐ROMdriveandmanuallyrunthe[install.exe]
file. Click on the [Yes] button if the [User Account
Control]dialogpopsup.
3. Follow the on‐screen instructions to install all
softwarethatyournewUSBscannerrequires.
4. Plugthepoweradapterintothescanner’spower
receptor.Plugtheotherendofthepower adapterinto
astandardACpoweroutlet.Plugthesquareendofthe
included USB cable to the USB port at the rear of the
scanner. Plug the rectangular end of the USB
cable to
theUSBportonthebackofyour computer.Switchthe
scannerpoweron.Whenthescanner isdetectedbythe
operationsystem,theconnectioniscompleted.
5.Afterthesoftwareisinstalled,youwillbe prompted
to perform the scanner calibration. Insert the special
calibrationsheet,includedwiththescanner,facedown
intothepagefeedofthescanner.Alignthecalibration
sheettothecalibrationalignmentmarkonthescanner.
Follow the on‐screen instructions to
complete the
scanner calibration. Save the Calibration Sheet in case
you need to calibrate the scanner in the future. If you
are not prompted to perform the scanner calibration,
pleaseskiptoprocedure6.
6. After the software is installed, close all open
applications and click on the [Finish] button to restart
yourcomputer.
8

MacOSXInstallation
1.InserttheSetup/ApplicationDVD‐ROM,included
withyourscanner,intoyourDVD‐ROMdriveanda
[PlustekScanner]icon
willshowonthedesktopof
yourMacOSX.Double‐clickontheicon,anda
windowwillpopupdisplayingthefilefolder.
2.Double‐clickontheappfile,andtheScanner
Installerwillstarttoguideyouthroughthe
installation.Followtheon‐screenguidein
theinstaller
window.
9

Attention
For Windows 8 / 10, please follow the on‐screen installation
instructionsafterconnectingthescanner.
Information
ForWindowsOS:
Ifyouarefacingdifficultyininstallingthescannerdriver,
pleasetrymanuallyinstallingthesoftware.
1. Please open [Start] > [Control Panel] > [System] > [Hardware] >
[Device Manager]. In the [Device Manager] window, right‐click
onthisscannerunder[Otherdevices]and select[UpdateDriver
Software]fromthepop‐upmenu.
2. Click [Browse my computer for driver software] in the window
that appears, and click the [Browse] button. In the [Browse For
Folder] window, select the folder or the DVD‐ROM drive that
containsthisscanner’sdriverandclickthe[OK]buttontoreturn
to the previous screen. Click the [Next]
button and click [Install
this driver software anyway] if the [Windows Security] window
appears.
3. Browse your DVD‐ROM drive and manually run the [install.exe]
file.Clickonthe[Yes]buttonifthe [UserAccountControl]dialog
popsup.Followtheon‐screeninstructionstoinstallallsoftware
thatyour
newUSBscannerrequires.
10
UpdatetheLatestDriver(OnlyforZ300)
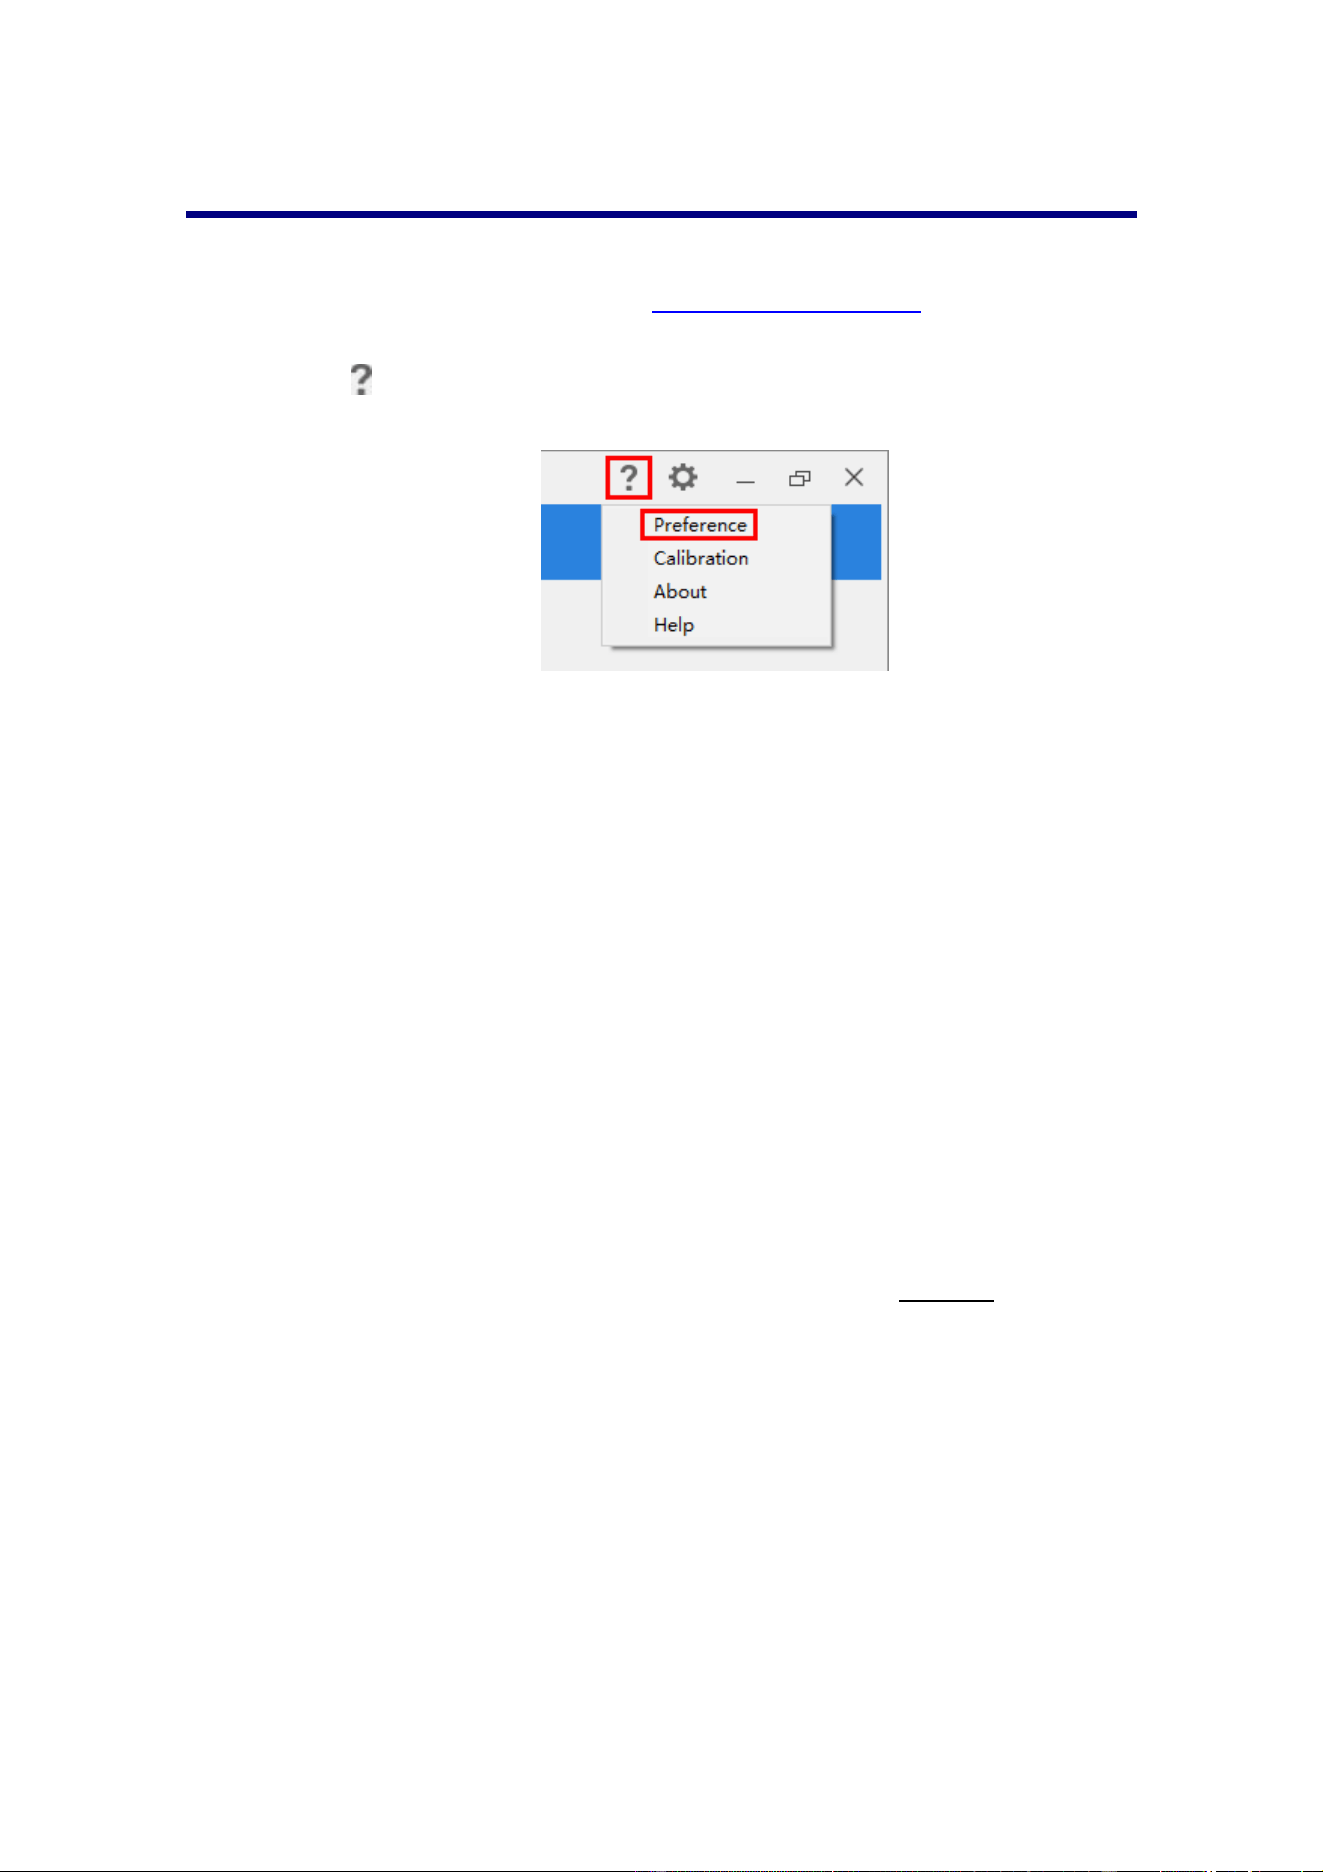
1. Dooneofthefollowingtocheckanddownloadthelatestdriver:
Please visit our official website
http://www.plustek.com, and go to ePhoto
productpagetocheckifthereisanyupdate.
Click
button in the toolbar of the ePhoto interface, select Preference to
openthePreferencedialog.
ClicktheCheckforUpdatesbuttontocheckifthereisanyupdate.
2. If you have already installed the ePhoto software, please uninstall the current
versionbeforeupdatingthelatestdriver.
If you have not installed the ePhoto software yet, simply unzip the downloaded
installer,followtheon‐screeninstructionstocompletetheinstallation.
11

ChapterII.OperatingtheScanner
Yourscanneracceptsphotosanddocuments.However,some softwareprogramshave
limitations as to the information they can handle. The capacity of the computer’s
memoryandfreespaceonyourharddrive canalsolimitthe physicalsizeofthephoto
/documentthatyouscan.
Your scannercomes with the
advanced and feature rich scanning application Plustek
ePhoto.Thisstandaloneprogramallowsyoutoperformadvancedscanningfeatures.
Step1.TurnonYourScanner
Pleasemakesurethescanner’sUSBandpowercablesareproperlyconnectedandthat
thescanneristurnedon.TheLEDwillturnontoindicatethatthedeviceispoweredon.
Step2.LaunchPlustekePhoto
LaunchPlustekePhotousingthePlustekePhotoshortcutonyourDesktop.Adjustthe
scan settings. Click the
button within the Plustek ePhoto window for more
informationaboutthesettings.
12

Step3.Scan
Insert the photo / document face down into the scanner. Always align the center of
your photo / document edge to this alignment mark . Please place the edges of
yourphoto/documentbetweenbothmaximumscanareamarks.Thescanningstarts
immediately. The scanned images are displayed in Plustek ePhoto, and you may
performtheimageeditingtasks.Toscanmorephotosordocuments,pleasewaituntil
the blue light LED stop blinking,
and then place another photo / document into the
scannertocontinuethescanning.
13

ChapterIII.CareandMaintenance
Your scanner is designed to be maintenance‐free. However, constant care and
maintenancecankeepyourscannerworkingsmoothly.
CleaningtheScanner
Paper powder, dust, ink and toner from paper being scanned may make the inner
scanner dirty, which leads to poor image quality or document‐feeding errors. How
oftentocleanyourscannerdependsonthetypeofpaperandnumberofpagesbeing
scanned.
Perform the following procedures to clean the
scanner. Gently wipe locations
describedherein.Donotrubtoohard.
Warning
Beforecleaningthescanner,turnoffthescanneranddisconnect
the scanner’s power cable and USB cable, and then wait a few
minutes for the glass and/or the inner scanner to cool to
ambienttemperature.
Washyourhandswithsoapandwateraftercleaningthescanner.
CleaningMaterials
Havethefollowingcleaningmaterialsreadytocleanthescanner:
soft,dry,lint‐freecloth(oracottonswab)
non‐abrasivecleaner—Isopropylalcohol(95%).DONOTusewater.
Attention
Alternatively you can use glass cleaner or neutral detergent for
windowscleaningtocleanthescannerglass.
However,DONOTuseeitherofthemtocleanthefeedroller.
Useofothercleaningmaterialscoulddamageyourscanner.
CleaningtheScanner
1. Openthescannercovergently.
14

2. Gentlywipethefollowingareaswiththeclothdampenedwiththecleaner.Be
carefulNOTtoscratchtheirsurfaces.
CleanFeedRoller:
Wipe the Feed Roller from side to side and then rotate it. Repeat this until its
entiresurfaceiscleaned.
CleanScannerGlass:
Attention
Do not spray cleaner directly onto the scanner glass. Excess liquid
residuemayfogordamagethescanner.
3. Waitforcleanedareastodrycompletely.
4. Closethecoverbypushingitbackdownuntilitsnapsbackintoplace.
15
CalibratingtheScanner
Calibrate the scanner if colors appear in areas that should be white, or colors of the
scanned image and the original vary a lot. This allows you to adjust and compensate
forvariationsthatcanoccurintheopticalcomponentovertimebyitsnature.
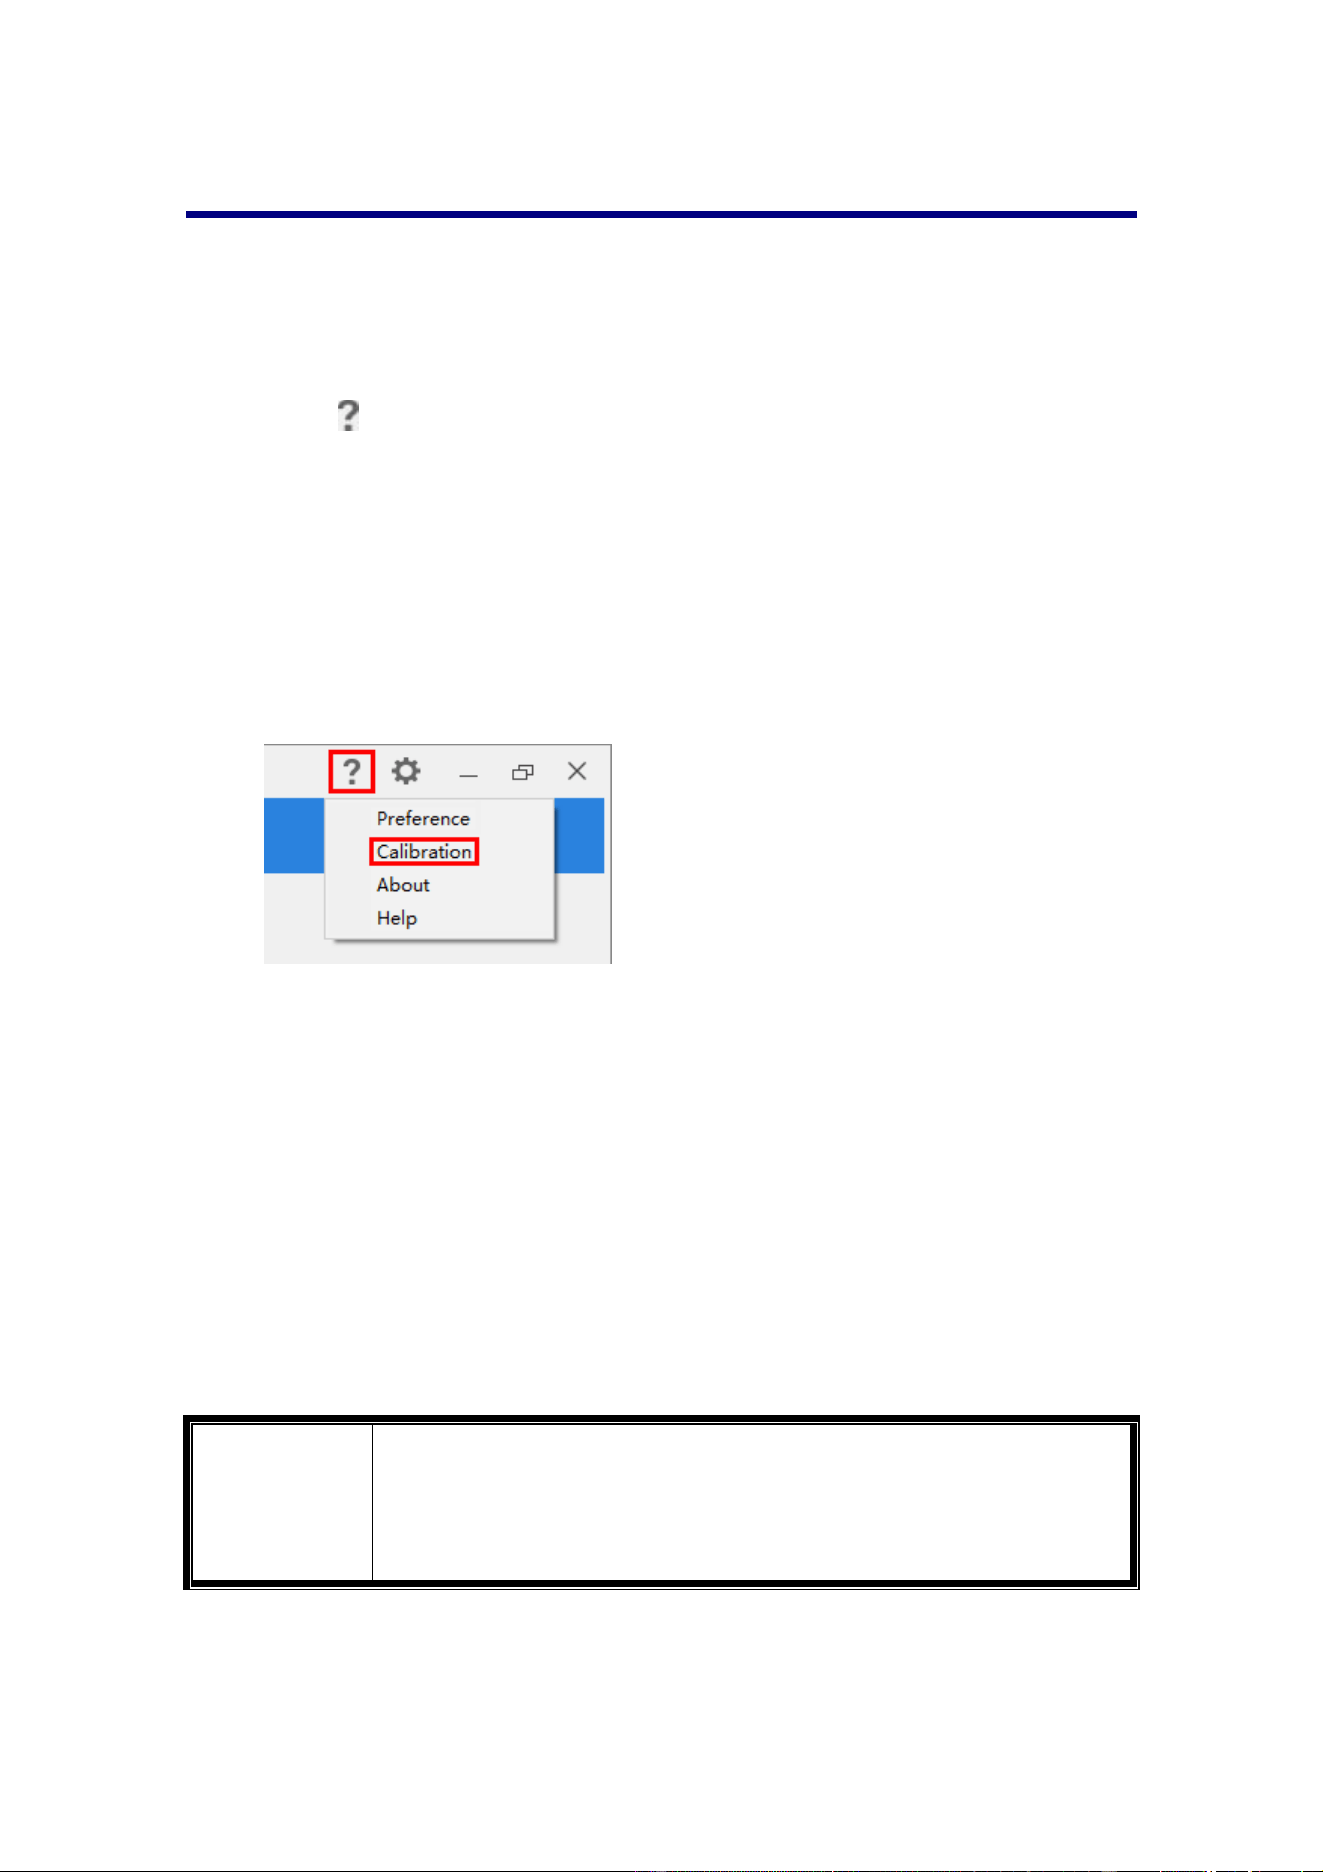
Thefollowingdescribeshowtocalibrate
thescanner:
1. Click
button in the toolbar of the ePhoto interface, select Calibration to
opentheCalibrationdialog.
2. Insert the special calibration sheet face down into the page feed slot of the
scanner.Alignthecalibration sheet to the calibration alignmentmark onthe
scanner.
Attention
Please insert the special calibration sheet included with the
scanner.
Save the Calibration Sheet in case you need to calibrate the
scannerinthefuture.
3. ClickontheStartbuttontobeginthecalibrationprocess.
4. Thescannerpullsthecalibrationsheetthroughthescanner,whichcompletes
thisscannercalibration.Afterthecalibrationiscomplete,clickOK.
16

Usage&MaintenanceTips
Information
Tokeepyourscannerworkingsmoothly,takeamomenttoreview
thefollowingmaintenancetips.
Avoid using the scanner in a dusty environment. When it is not in use, keep the
scannercovered.Dustparticlesandotherforeignobjectsmaydamagetheunit.
Do not attemptto disassemble the scanner. There is danger ofan electrical shock
andopeningyourscannerwillvoidyourwarranty.
Do not subject the scanner to excessive vibration. It may damage the internal
components.
Yourscanneroperatesbest in temperatures between 10
°Cto40°C(50°Fto104°
F).
17

AppendixA:Specifications
3
ePhotoZ300
ImageSensor ColorCCD
LightSource LED
OpticalResolution 300dpi/600dpi
ScanModes
Color:Input48‐bit,Output24‐bit
Grayscale:Input16‐bit,Output8‐bit
ScanningSpeed
4"x6"Photo:Approx.2sec.
Document(A4):Approx.5sec.
ScanningArea(WxL)
Min.:1"x1"
Max.:8.5"x11.7"
AcceptablePaperWeight
(Thickness)
Non‐embossed:0.76mmorless
PowerSupply 24Vdc/0.75A
Interface USB2.0
NetWeight 1.48Kg(3.26Lbs)
Dimensions(WxDxH) 289.9mmx160.6mmx158mm(11.4"x6.3"x6.2")
3
Hardwarespecificationsmaychangeatanytimewithoutpriornotice.
18

ePhotoZ600
ImageSensor ColorCCD
LightSource LED
OpticalResolution 300dpi/600dpi
ScanModes
Color:Input48‐bit,Output24‐bit
Grayscale:Input16‐bit,Output8‐bit
ScanningSpeed
4"x6"Photo:Approx.2sec.
Document(A4):Approx.3sec.
ScanningArea(WxL)
Min.:1"x1"
Max.:8.5"x36"
AcceptablePaperWeight
(Thickness)
Non‐embossed:0.76mmorless
DailyDutyScan(Sheets) 500
PowerSupply 24Vdc/0.75A
Interface USB2.0
NetWeight 1.48Kg(3.26Lbs)
Dimensions(WxDxH) 289.9mmx160.6mmx158mm(11.4"x6.3"x6.2")
19

AppendixB:ePhotoHotkeys
ForWindowsOS
KeyboardShortcuts
ThefollowingtablecontainsgeneralkeyboardshortcutsintheScanscreen.
Pressthiskey Todothis
Ctrl Selectnon‐consecutiveimages
Shift Selectaconsecutivegroupofimages
Ctrl+Z Undoanaction(Includingtheoperationofrotate,delete,etc.)
Ctrl+Y Redoanaction(Includingtheoperationofrotate,delete,etc.)
Ctrl+A Selectallimages
Ctrl+S Saveallimages
Delete Deletetheselectedimage(s)
→RightArrow
Movetheselectionrightbyoneimage
←LeftArrow
Movetheselectionleftbyoneimage
↑UpArrow
Movetheselectionupbyoneimage
↓DownArrow
Movetheselectiondownbyoneimage
ThefollowingtablecontainsgeneralkeyboardshortcutsintheEditscreen.
Pressthiskey Todothis
Ctrl+Z Undoanaction(Includingtheoperationofrotate,delete,etc.)
Ctrl+Y Redoanaction(Includingtheoperationofrotate,delete,etc.)
Delete Deletetheselectedimage(s)
→RightArrow
Movetheselectionrightbyoneimage
←LeftArrow
Movetheselectionleftbyoneimage
MouseControl
Action Todothis
Clickontheimage Selecttheimage,youmayusethekeyboardhotkeyto
selectmultipleimages.
Double‐clickontheimage EntertheEditscreen.
Clickanddragtheimage Move the image to Cabinet folder or reorder the
sequenceoftheimages.
Click on the blank area and
drag
Selectallimagesintherectangularselectionarea.
20

ForMacOS
KeyboardShortcuts
ThefollowingtablecontainsgeneralkeyboardshortcutsintheScanscreen.
Pressthiskey Todothis
Command Selectnon‐consecutiveimages
Shift Selectaconsecutivegroupofimages
Command‐Z Undoanaction(Includingtheoperationofrotate,delete,etc.)
Command‐Y Redoanaction(Includingtheoperationofrotate,delete,etc.)
Command‐A Selectallimages
Command‐S Saveallimages
Delete Deletetheselectedimage(s)
RightArrow Movetheselectionrightbyoneimage
LeftArrow Movetheselectionleftbyoneimage
UpArrow Movetheselectionupbyoneimage
DownArrow Movetheselectiondownbyoneimage
ThefollowingtablecontainsgeneralkeyboardshortcutsintheEditscreen.
Pressthiskey Todothis
Command‐Z Undoanaction(Includingtheoperationofrotate,delete,etc.)
Command‐Y Redoanaction(Includingtheoperationofrotate,delete,etc.)
Delete Deletetheselectedimage(s)
RightArrow Movetheselectionrightbyoneimage
LeftArrow Movetheselectionleftbyoneimage
MouseControl
Action Todothis
Clickontheimage Selecttheimage,youmayusethekeyboardhotkeyto
selectmultipleimages.
Double‐clickontheimage EntertheEditscreen.
Clickanddragtheimage Move the image to Cabinet folder or reorder the
sequenceoftheimages.
Click on the blank area and
drag
Selectallimagesintherectangularselectionarea.
21

AppendixC:CustomerServiceand
Warranty
Please visit our website www.plustek.com formore customer service information.To
avoiddelays,pleasehavethefollowinginformationavailable:
Scannernameandmodelnumber
Scannerserialnumber
ScannerDVDversionandpartnumber
Adetaileddescriptionoftheproblem
Yourcomputermanufactureranditsmodelnumber
ThespeedofyourCPU
Your
currentoperatingsystemandBIOS(optional)
Nameofsoftwarepackage(s),versionorreleasenumberandmanufacturerofthe
software
OtherUSBdevicesinstalled
Service&SupportInformation(ForEUcountryonly)
Where appropriate, the period of availability of spare parts and the possibilities of
upgrading products information. Please ask local distributors and suppliers for spare
partsinformationandproductupgradeinformation.
Information requested by relevant Implementing Measure. Please ask local
distributors and suppliers for the related information of Implementing Measure test
report.
Donotdisposeanythingofproductsbeforeyouasklocal distributorsandsuppliersto
getcorrectinformationfordecreasesofenvironmentalimpactwithrightmethodsand
procedures.
Ifyouwanttodisposalstheproductand/oranaccessory,pleaseasklocaldistributors
andsupplierstogetthecontactinformationofnearest
disposalmanufactures.
Ifyouhaveanymaintenanceinquiry,pleaseasklocal distributorsandsupplierstoget
thecontactinformationofnearestmaintenancecenterinordertoextendtheproduct
usagelifetime.
If you want to maintain and clearance the product, please ask local distributors and
supplierstogettheright
informationofneareststores.
22

StatementofLimitedWarranty
ThisStatementofLimitedWarrantyappliesonlytotheoptionsyouoriginallypurchase
foryouruse,andnotforresale,fromanauthorizedreseller.
The manufacturer warranty includes all parts and labor, and is not valid without the
receipt of original purchase. To obtain warranty service, you may contact the
authorized
dealerordistributor,orvisitourwebsitetocheckouttheavailableservice
information,orsendarequestviaE‐mailforfurtherhelp.
Ifyoutransfer this product to another user, warranty service isavailable to thatuser
fortheremainderofthewarrantyperiod.Youshouldgiveyour
proofofpurchase and
thisstatementtothatuser.
We warrant that this machine will be in good working order and will conform to its
functional descriptions in the documentation provided. Upon provision of proof of
purchase,replacementpartsassumetheremainingwarrantyofthepartstheyreplace.
Beforepresentingthis
productforwarrantyservice,youmustremoveallprogrammes,
data and removable storage media. Products returned without guides and software
willbereplacedwithoutguidesandsoftware.
This Limited Warranty service does not provide for carry‐in exchange when the
problem results from accident, disaster, vandalism, misuse, abuse, unsuitable
environment,
programme modification, another machine or non‐vendor modification
forthisproduct.
If this product is an optional feature, this Limited Warranty applies only when the
featureisusedinamachineforwhichitwasdesigned.
IfyouhaveanyquestionsaboutyourLimitedWarranty,contacttheapprovedretailer
fromwhom
youboughttheproductorthemanufacturer.
THIS LIMITED WARRANTY REPLACES ALL OTHER WARRANTIES, EXPRESS OR IMPLIED,
INCLUDING, BUT NOT LIMITED TO, THE IMPLIED WARRANTIES OF MERCHANTABLITY
AND FITNESS FOR A PARTICULAR PURPOSE. HOWEVER, SOME LAWS DO NOT ALLOW
THE EXCLUSION OF IMPLIED WARRANTIES.IF THESE LAWSAPPLY, THEN ALL
EXPRESS
AND IMPLIED WARRANTIES ARE LIMITED IN DURATION TO THE WARRANTY PERIOD.
NOOTHERWARRANTIESAPPLYAFTERTHATPERIOD.
Somejurisdictions do not allowlimitations on how longan implied warranty lasts,so
theabovelimitationmaynotapply.
Undernocircumstancesareweliableforanyofthefollowing:
Thirdpartyclaimsagainstyouforlossesordamages.
Lossof,ordamageto,yourrecordsordata;or
Economicconsequentialdamages(includinglostprofitsorsavings)orincidental
damages,evenifweareinformedoftheirpossibility.
23

Some jurisdictions do not allow the exclusion or limitations of incidental or
consequentialdamages,sotheabovelimitationorexclusionmaynotapplytoyou.
This Limited Warranty gives you specific legal rights, and you may also have other
rightsthatvaryfromjurisdictiontojurisdiction.
Toobtainthewarranty
service,youmay:
contacttheauthorizeddealerordistributor.
visitourwebsitetocheckouttheup‐to‐dateservice.
sendarequestviaE‐mailforfurtherhelp.
FCCRadioFrequencyStatement
This equipment has been tested and found to comply with the limits for a Class B
digital device, pursuant to part 15 of the FCC rules. These limits are designed to
providereasonableprotectionagainstharmfulinterferenceinaresidentialinstallation.
This equipment generates, uses and can radiate radio frequency energy
and, if not
installedandusedinaccordancewiththeinstructions,maycauseharmfulinterference
to radio communications. However, there is no guarantee that interference will not
occur in a particular television reception (which can be determined by turning the
equipmentoffandon),theuserisencouragedtotry
tocorrecttheinterferencebyone
ormoreofthefollowingmeasures:
Reorientorrelocatethereceivingantenna.
Increasetheseparationbetweentheequipmentandreceiver.
Connect the equipment to an outlet on a circuit different from that which the
receiverisconnected.
Shieldedinterconnectcablesandshieldedpower
cordwhicharesuppliedwiththis
equipment must be employedwiththis equipment to ensurecompliance with the
pertinentRFemissionlimitsgoverningthisdevice.
Consultthedealeroranexperiencedradio/TVtechnician forhelpifthe conditions
persist.
Changes or modifications not expressly approved by the manufacturer or
authorizedservicecentercouldvoidtheuser’sauthoritytooperatethisequipment.
24

Toolbar
The Scan Screen
The Edit Screen
Scan Images

ePhoto: Table of Contents
Part I
Introduction
2
Part II
User Interface Overview
2
................................................................................................................................... 3
1
Toolbar
................................................................................................................................... 5
2
Cabinet
................................................................................................................................... 6
3
The Scan Screen
................................................................................................................................... 8
4
The Edit Screen
.......................................................................................................................................................... 9
Adjust (For images and documents)
.......................................................................................................................................................... 10
Adjust (For images)
.......................................................................................................................................................... 11
Adjust (For documents)
Part III
Working with this program
12
................................................................................................................................... 12
1
Scan Images
IContents
I
All Rights Reserved.

ePhoto Help2
All Rights Reserved.
1
Introduction
This program is a specialized image scanning program that allows you to conveniently
scan and edit
photos and documents
, and automatically save their electronic files in the
designated folder. This program, seamlessly integrating the operation of your scanner
with your computer, provides a quick and convenient way to perform various functions.
This help file will familiarize you with the program's user interface and related functions.
We will also walk you through practical applications to your daily work step by step. The
programs included on the Setup/Application CD must be installed on your computer in
order for the scanner functions in this program to work properly.
This help assumes the user is familiar with Microsoft Windows / Mac OS. If this is not the
case, we suggest you learn more about Microsoft Windows / Mac OS by referring to your
Microsoft Windows / Mac OS manual before using your scanner. The screen shots in this
online help were made with Windows 7. If you are using Mac OS, yo
ur screen will look
somewhat different but functions the same.
2
User Interface Overview
The user interface contains the following components:
·
The Scan screen
: The
Scan
screen is where you set your scanning parameters.
You
may select one or multiple images to edit, share or delete.
·
The Edit screen
: The
Edit
screen is where you can apply various filter effects and
make more detailed adjustments to your images.
To launch the program, you can do one of the following:
For Windows OS:
1.
Click on the
Plustek ePhoto
shortcut from the Windows
Start
menu >
All
Programs
>
Your Scanner Model Name
folder. (For Windows 8.1 users: Point your
mouse cursor to the upper or lower right corner of your screen to open the
Charm
bar. Click on the
Start
charm, then click on the downwards arrow button in the lower
left corner of the screen. The
Apps
screen will be shown. Move your cursor to the
right edge of the screen to scroll right until you find
Your Scanner Model Name
, and
then click on
Plustek ePhoto
.)
2.
Double-click the icon
on the desktop.
For Mac OS:

User Interface Overview 3
All Rights Reserved.
1.
Double-click the icon
in
Finder
>
Applications
>
Plustek
>
Your scanner
model name
.
2.
Click the icon
in the Dock.
To close the program, please click the
Close
button
in the upper right corner of the
program window. Right-click the
ePhoto
icon in the system tray, and select
Exit
from the pop-up menu to exit the program.
2.1
Toolbar
The Toolbar features frequently-needed functions to make working with this program
faster and easier.
The following toolbar buttons are available.

ePhoto Help4
All Rights Reserved.
Click on this button to open a context menu with the following items:
o
Preference
: Select this item to open the
Preference
dialog.
·
Start application when I start Windows
: Activate this checkbox to start
the ePhoto program automatically when you boot the Windows computer.
·
Scan and save directly to
: Activate this checkbox to scan and save the
images directly to the specific folder without opening the program window.
Click on the
Browse
button
and use the dialog to select the folder
where you wish to store your scanned images. For example, the default
saving path in Windows 7 is
Users
>
Public
>
Public Pictures
>
Plustek
Photo
.
·
Auto Update
: Activate this checkbox and select a value from the drop-
down list to set how often this program should automatically check for
updates. Click the
Check for Updates
button to check if there is any
update.
(This function may or may not be available depending on the
scanner model you purchase.)
·
JPEG Quality
: Adjust the quality settings of JPEG file format.
·
ICC Profile
: Activate this checkbox and select a profile from the drop-
down list to set device output color standard.
o
Calibration
: Select this item to open the calibration dialog. Follow the on-
screen instructions to complete the scanner calibration.
Save the Calibration
Sheet in case you need to calibrate the scanner in the future.
o
About
: Select this item to open the program information dialog.
·
Go to website
: Click this button to launch the Plustek
website in your
default web browser.
o
Help
: Select this item to launch the on-line help file.
Click on this button to open a
Settings
dialog. You may adjust settings in this
dialog.
·
Color
: Select a desired color mode from the drop-down list.
·
Resolution
: Select a desired resolution from the drop-down list. The higher
the resolution, the more detailed the scan and the resulting file will be.
·
File
name
: Enter the desired file name into the field. The default uses your
computer's date and time.
·
OCR Language
: Select a desired OCR language from the drop-down list.
·
Scan as
: Select a desired scan type from the drop-down list.
·
Auto Crop & Auto Deskew
: Tick this check box to have ePhoto automatically
identify the dimensions of the image you scanned and straighten the skewed
image after auto crop is done. The crop shape will be a square or rectangle
and it will not trace the edges of oddly-shaped images.
·
Apply Quick Fix
:
Tick this check box to apply quick fix function, optimize the
scanned images.
Click on this button to minimize this program to the task bar.
Click on this button to enlarge this program to the full screen.
Click on this button to close this program.

User Interface Overview 5
All Rights Reserved.
2.2
Cabinet
Click on the
Cabinet
button to display the setting panel, you may add
folders, find the recent folders and quick search for the desired folders. You may also
create your own slideshow here. Click on the
Cabinet
button again to close
the setting panel.
·
Go back
: Click on this button to go back to the previous folder.
·
Go forward
: Click on this button to go forward to the next folder.
·
New folder
: Click on this button to add new folder. You may name the folder in the
blank. You may sort your scanned images by drag and drop to the desired folders here.
·
Recent folders
: Click on this button to display recently visited folders.
·
Quick search
: Click on this button to quick search the desired folders.
·
Slideshow
: Click on this button to popup the Slideshow dialog.
You will be prompted to download the FFMpeg program.

ePhoto Help6
All Rights Reserved.
*
Save to
: Click on the gray column to select the desired saving folder for
your slideshow.
*
Music
: Click on the gray column to add music to your slideshow. The
music file should be shorter than 5 minutes.
*
Add images
: Click on this button to select the desired images for your
slideshow. The maximum values is 60 images. You may transpose the
desired image by drag-and-drop operation to re-arrange the image order.
*
Create
: Click on this button to create your own
slideshow.
2.3
The Scan Screen
Insert the photo / document face down into the scanner. Always align the center of your
photo / document edge to this alignment mark
. Please place the edges of your
photo / document between both maximum scan area marks. The scanning starts
immediately. The scanned images are displayed in Plustek ePhoto, and you may
perform the image editing tasks. The maximum scan images at a time for Windows OS
is 50, and that for Mac OS is 60.

User Interface Overview 7
All Rights Reserved.
You may select one or multiple images to edit, share or delete. Simply click an image to
select the desired image, you may use the
Shift
button in the keyboard to select multi-
images. Selected images will be highlighted with a blue rectangle around the images.
Click on the blank area to de-select the images.
·
Save
:
Click on this button to save images.
·
Add existing photos
: Click on this button to import existing images to the
ePhoto.
·
File output
: Click on this button to output the selected images to the desired
destinations. You may share the images to the most popular social media or cloud
services, print the images by connected printer, or send the images by email.
·
Delete
: Click on this button to delete the selected images.
·
Rotate counterclockwise
: Click on this button to rotate the selected images in a
counterclockwise direction.
·
Rotate clockwise
: Click on this button to rotate the selected images in a
clockwise direction.
·
File format
: Click on this button to save the images in other file format. Select the
desired format from the dropdown list.
·
Sequence
: Click on this button to arrange the scanned images in ascending order
or in descending order.
·
Full screen view
: Click this button to switch to the full screen display mode.
·
Zoom out
: Click this button to shrink the thumbnail of the scanned images.
·
Zoom in
: Click this button to enlarge the thumbnail of the scanned images.

ePhoto Help8
All Rights Reserved.
2.4
The Edit Screen
Double click on the selected images bring you to the
Edit
screen.
The
Edit
screen is where you can apply various filter effects and make more detailed
adjustments to your images. To help you visualize the effects and adjustments, you can
switch to "Dual-view" mode. All changes can be undone and redone step by step and
you can also reset the image back to its original state.
·
Back
:
Click on this button to bring you back to the
Scan
screen.
·
File output
: Click on this button to output the selected images to the desired
destinations. You may share the images to the most popular social media or cloud
services, print the images by connected printer, or send the images by email.
·
Delete
: Click on this button to delete the selected images.
·
Rotate counterclockwise
: Click on this button to rotate the selected images in
a counterclockwise direction.
·
Rotate clockwise
: Click on this button to rotate the selected images in a
clockwise direction.
·
Reset
: Click on this button to reset the selected images to their original state.
·
Undo
: Click on this button to undo the last effect or adjustment.
·
Redo
: Click on this button to redo the last effect or adjustment.
·
Dual-view
: Click on this button to switch to the dual-view mode.

User Interface Overview 9
All Rights Reserved.
·
Scale to fit
: Click on this button to view the scanned image in fit window size
.
·
Zoom out
: Click this button to zoom out of the currently selected image. You can
also use mouse wheel down to perform the same action.
·
Zoom in
: Click this button to zoom in on the currently selected image. You can
also use mouse wheel up to perform the same action.
2.4.1
Adjust (For images and documents)
Click on the
tab to view all available adjustments you can apply to your
images and documents. Click on any adjustment to apply it to the currently selected
image. If the adjustment has sub-items you can select, it will be expanded when you
click on it. Select the desired adjustments and click on the
Apply
button to apply the
adjustment or click on the
Cancel
button to close the adjustment sub-items.
·
Quick Fixes
: You may click on
Exposure
button to get auto exposure image, click
on
White Balance
button to perform auto white balance, or click on
Optimization
button to see the optimized result of the selected image.
·
Photo Restoration
: You may click on
Auto Correction
button to see the auto
correction result, click on
Auto Contrast
button to perform auto contrast, or click on
Auto Color
button to get auto color image.
·
Rotate
: You may click on the desired rotation method here.
·
Crop
: You may click on the desired cropping ratio here.
·
Arbitrary
: You may adjust the image angle if necessary.

ePhoto Help10
All Rights Reserved.
·
Resize
: Enter the desired
Width
,
Height
and
Resolution
to resize the scanned
image.
·
Border
: Select to set the border inward or outward, configure the
Thickness
and/or
Round Corner
values, and select the border color.
·
Auto Descreen
: You may click on
General
,
Newspaper
or
Magazine
button to see
the respective result.
·
Advanced
: You may adjust the
Contrast
,
Brightness
,
Saturation
,
Hue
and
Gamma
of the scanned image.
2.4.2
Adjust (For images)
Click on the
tab to view all available adjustments you can apply to your
images. Click on any adjustment to apply it to the currently selected image. If the
adjustment has sub-items you can select, it will be expanded when you click on it. Select
the desired adjustments and click on the
Apply
button to apply the adjustment or click on
the
Cancel
button to close the adjustment sub-items.
·
Faded Photo Restoration
: You may select the desired restoration method for your
faded photo images.
·
Sharpen
: You may configure the sharpness strength here.
·
Blur
: You may adjust the blur level here.
·
Anti RedEye
: You may click on
Auto
or
Manual
button to see the respective result.

User Interface Overview 11
All Rights Reserved.
·
Collage
: You may create your own collage photo here. Select the desired images
value and the collage layout. Then adjust the
Scale
of the images, and configure the
border
Thickness
,
Round Corner
and
Color
.
·
Merge
: Select the desired layout to merge your images.
·
Effects
: Click on any category title to expand that category's list. Use your mouse
wheel to scroll through the list of available effects, then select a desired effect with a
mouse click. The selected effect will be laid over your images to better visualize the
effect for you.
2.4.3
Adjust (For documents)
Click on the
tab to view all available adjustments you can apply to your
documents. Click on any adjustment to apply it to the currently selected image. If the
adjustment has sub-items you can select, it will be expanded when you click on it. Select
the desired adjustments and click on the
Apply
button to apply the adjustment or click on
the
Cancel
button to close the adjustment sub-items.
·
Foreground Boldness
: You may enhance characters of the scanned image by
adjusting the foreground boldness.
·
Background
: You may select to perform
Background fill
or
Edge fill
with the
background color or your selected color.
·
Remove Dots
: You may adjust the strength of
Remove Dots
.

ePhoto Help12
All Rights Reserved.
·
Remove Punch Hole
: You may select to fill the punch holes with background color
or your selected color.
·
Density
: You may adjust the strength of
Density
to improve the visual appearance of
the scanned image.
3
Working with this program
This section covers the most frequent how-tos you may want to know with this program.
We'll walk you through these practical applications step by step.
·
Scan Images
: Scan and save one or more images without processing them. The
scanned images will be saved in the file format and folder of your choice.
3.1
Scan Images
Follow the steps described below:
1.
To launch the program, you can do one of the following:
For Windows OS:
·
Click on the
Plustek ePhoto
shortcut from the Windows
Start
menu >
All
Programs
>
Your Scanner Model Name
folder. (For Windows 8.1 users: Point
your mouse cursor to the upper or lower right corner of your screen to open the
Charm
bar. Click on the
Start
charm, then click on the downwards arrow button
in the lower left corner of the screen. The
Apps
screen will be shown. Move
your cursor to the right edge of the screen to scroll right until you find
Your
Scanner Model Name
, and then click on
Plustek ePhoto
.)
·
Double-click the icon
on the desktop.
For Mac OS:
·
Double-click the icon
in
Finder
>
Applications
>
Plustek
>
Your scanner
model name
.
·
Click the icon
in the Dock.
2.
You will be greeted by the
Scan
screen. If it is necessary, adjust the scan settings by
clicking the
Setting
button in the toolbar
.
3.
Insert the photo / document face down into the scanner. Always align the center of
your photo / document edge to this alignment mark
. Please place the edges of

Working with this program 13
All Rights Reserved.
your photo / document between both maximum scan area marks. The scanning
starts immediately
.
4.
The scanned images are displayed in Plustek ePhoto, and you may perform the
image editing tasks
.
5.
Click on the
Save
button, your images are already saved and can be found in the
folder you set under
Scan and save directly to
in the
Preference
dialog
.
You may select one or multiple images to delete, rotate or share at the same time.
Simply click an image to select the desired image. Selected images will be highlighted
with a blue rectangle around the images. Double click on the selected images bring you
to the
Edit
screen, you may apply various filter effects and make more detailed
adjustments to your images
.