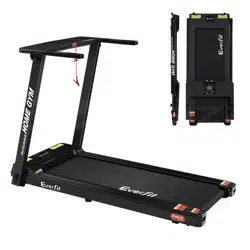
MODEl:TMILL-CHI-450-M610
TREADMILL

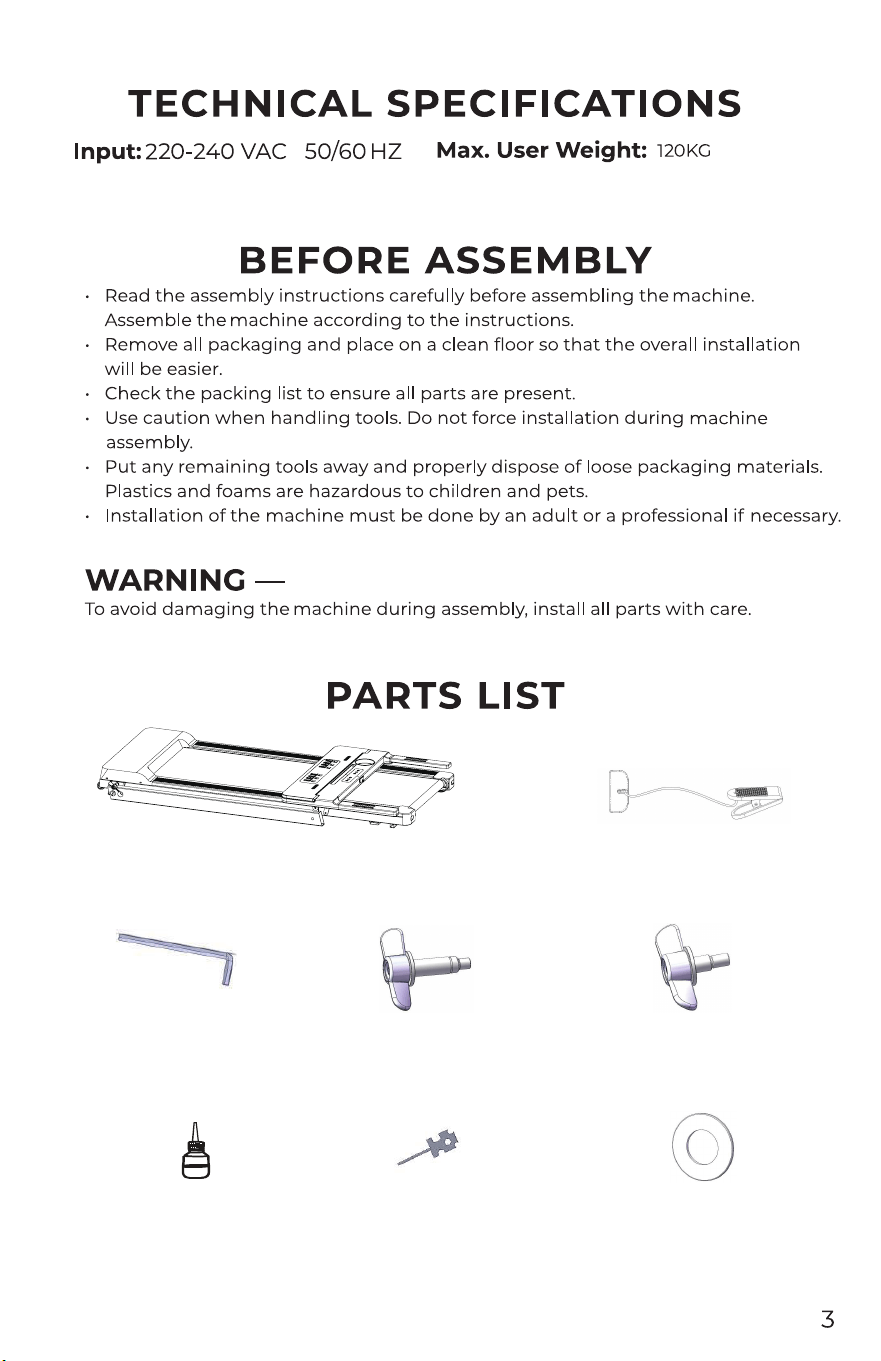
Overview Safety Switch
6m L-type Allen
wrench 1pc
Oil 1pc Multi-function open
end wrench 1pc
4 plastic gaskets
Long knobs 2pcs Short knobs 2pcs
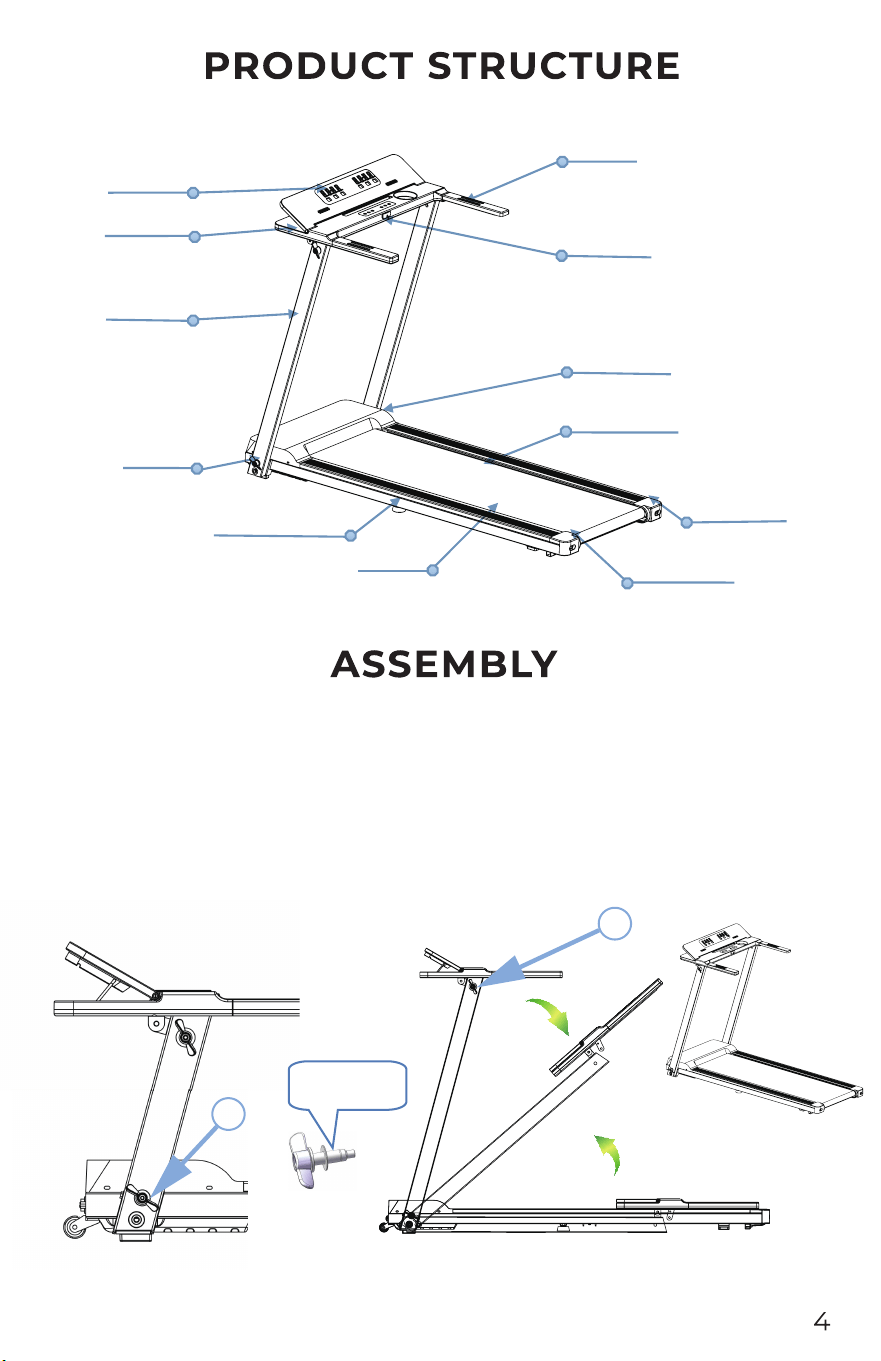
Meter
Adjustment pad
Heart rate
Sidebar
Running belt
Stander
Back cover-R
Back cover-L
Motor cover
Safety lock
Display
Knob
Step 1: Install the machine
A:) Lift the machine out of the package and put it on the ground. Hold the column tube with your
hand and set it up. Place the aluminum knoblong on the plastic gasket, then thread it into the
column and fasten it clockwise (as shown bothside).
n bothside).
B:) Hold the instrument panel with your hand and rotate it backwards. Put the aluminum
knob
short
on the plastic gasket, and then screw it into the column and the instrument frame to fix it
clockwise (as show
Plastic gasket
A
B
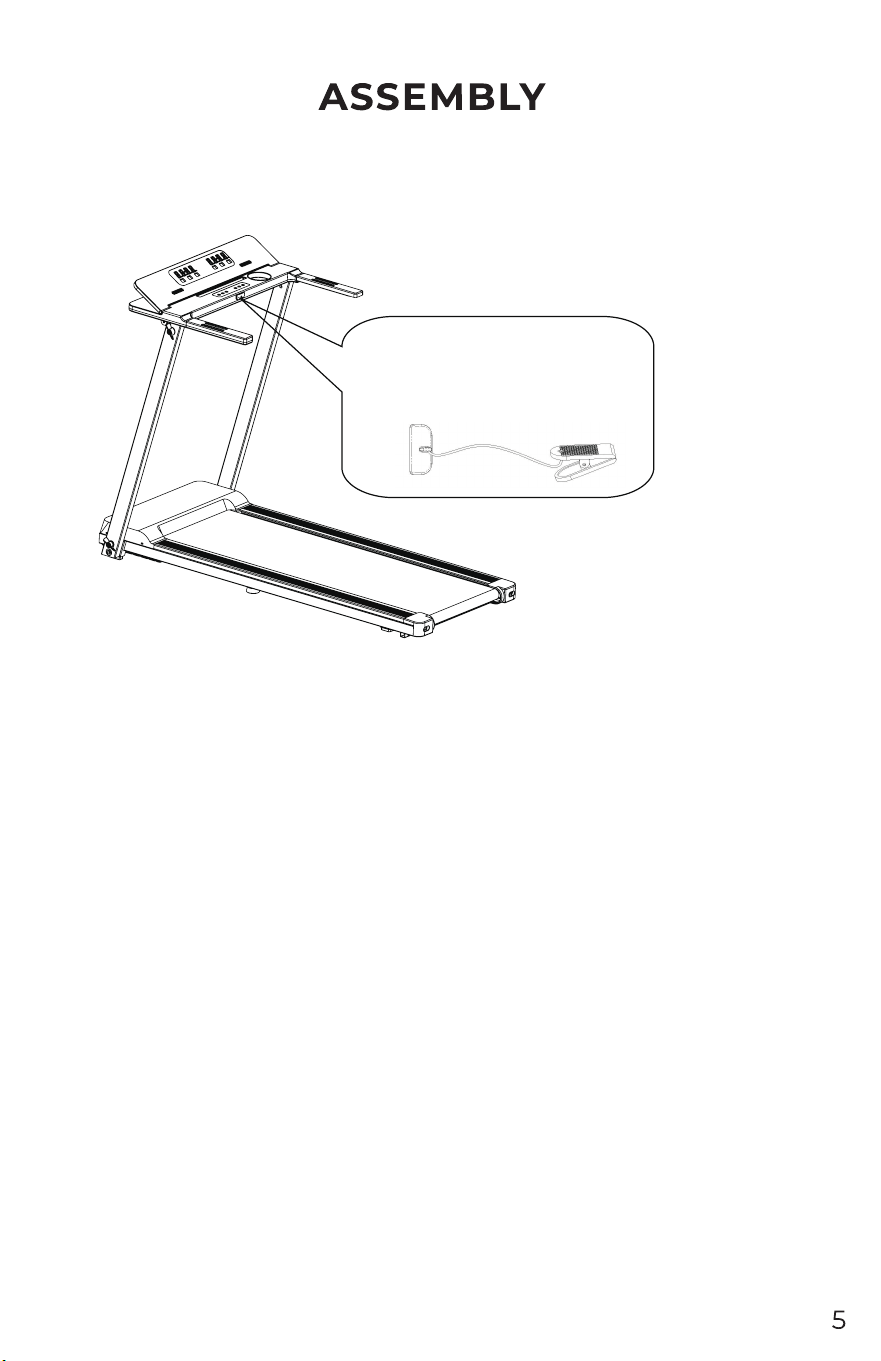
Step 2: Place the red safety switch magnet end on the yellow label position in the middle of the
instrument. The whole machine is assembled.
Important: Locate the red safety switch in the
kit, place the end of the magnet on the yellow
label on the meter, and press the start button
to run.
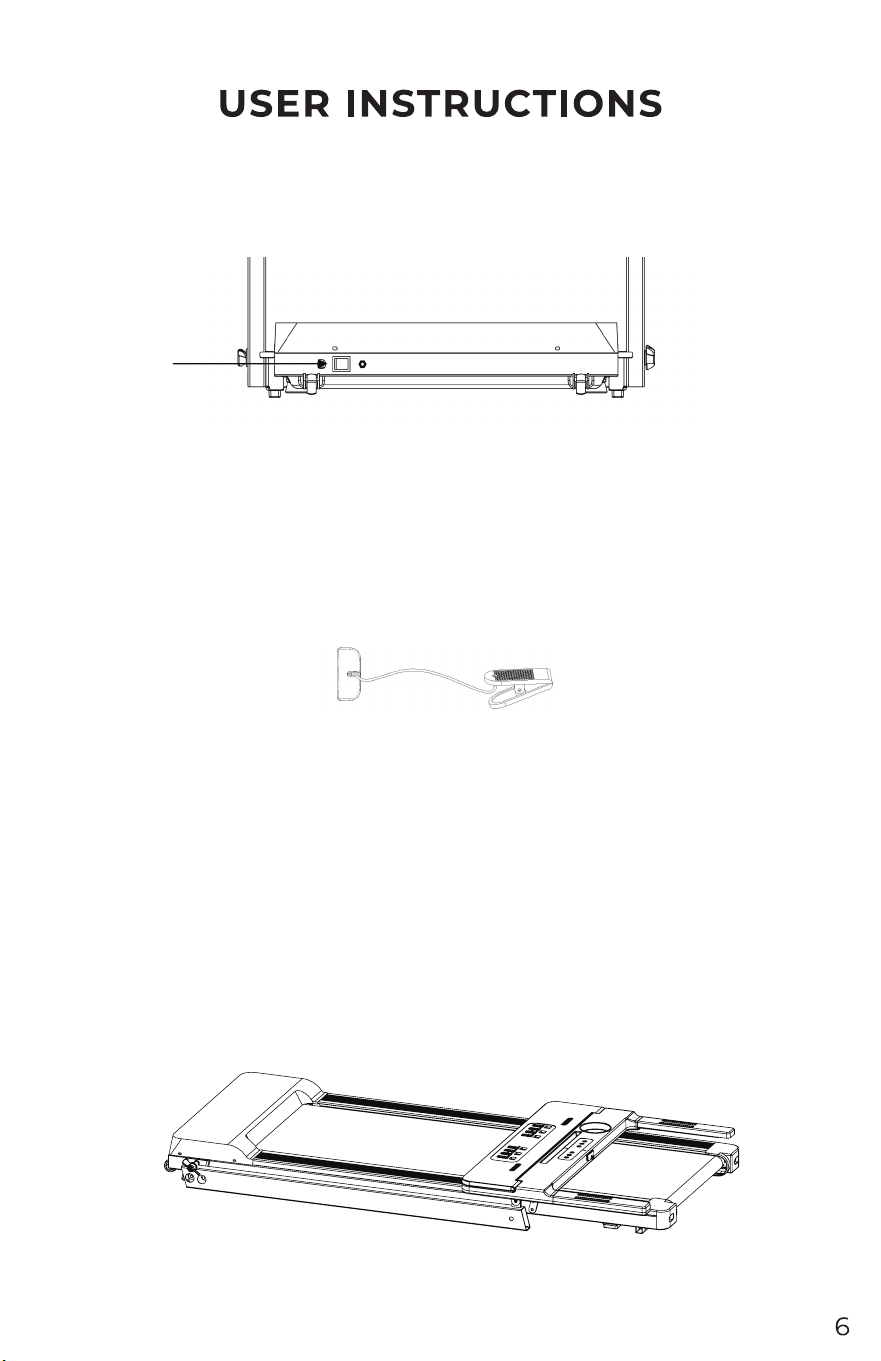
Use the treadmill
Plug in the power, turn on the switch (1), the switch will light up, then you will hear a "click" and
the meter will light up.
Safety switch
Place the end of the maget of safety switch on the yellow label on the meter .Clip the other end of the
safety switch to your clothes. When the safety switch
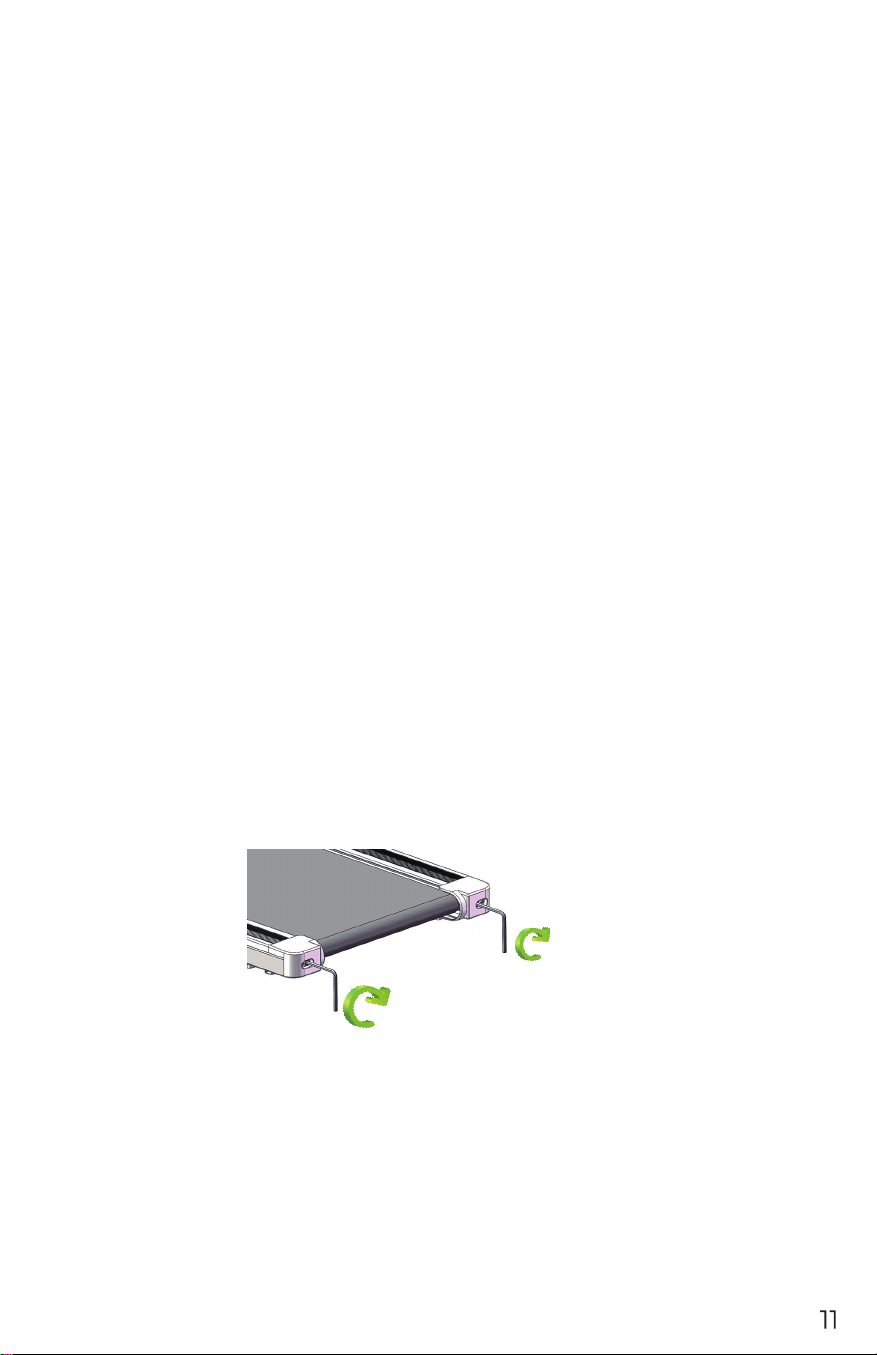
FOLDING INSTRUCTIONS
Folding treadmill
Folding the treadmill saves space.
Before folding, turn off the power switch and unplug the power cord.
Loosen the upper and lower aluminum knobs in the opposite direction, and fold the column and the
instrument (as shown below).
1
is pulled off and the window displays the "E-7"
buzzer bi-bi-bi. If the motor is running, the motor is stopped urgently. At this time, the treadmill
cannot perform any
other operations except the shutdown. After the safety is correctly
reinstalled, the treadmill re-enters the standby state and waits for an input command.
switch
START/STOP
MODE
PROGRAM
3/6/9/12
Metric system
START/STOP
TIME
SPEED
DISTANCE
CALORIE Heart Rate
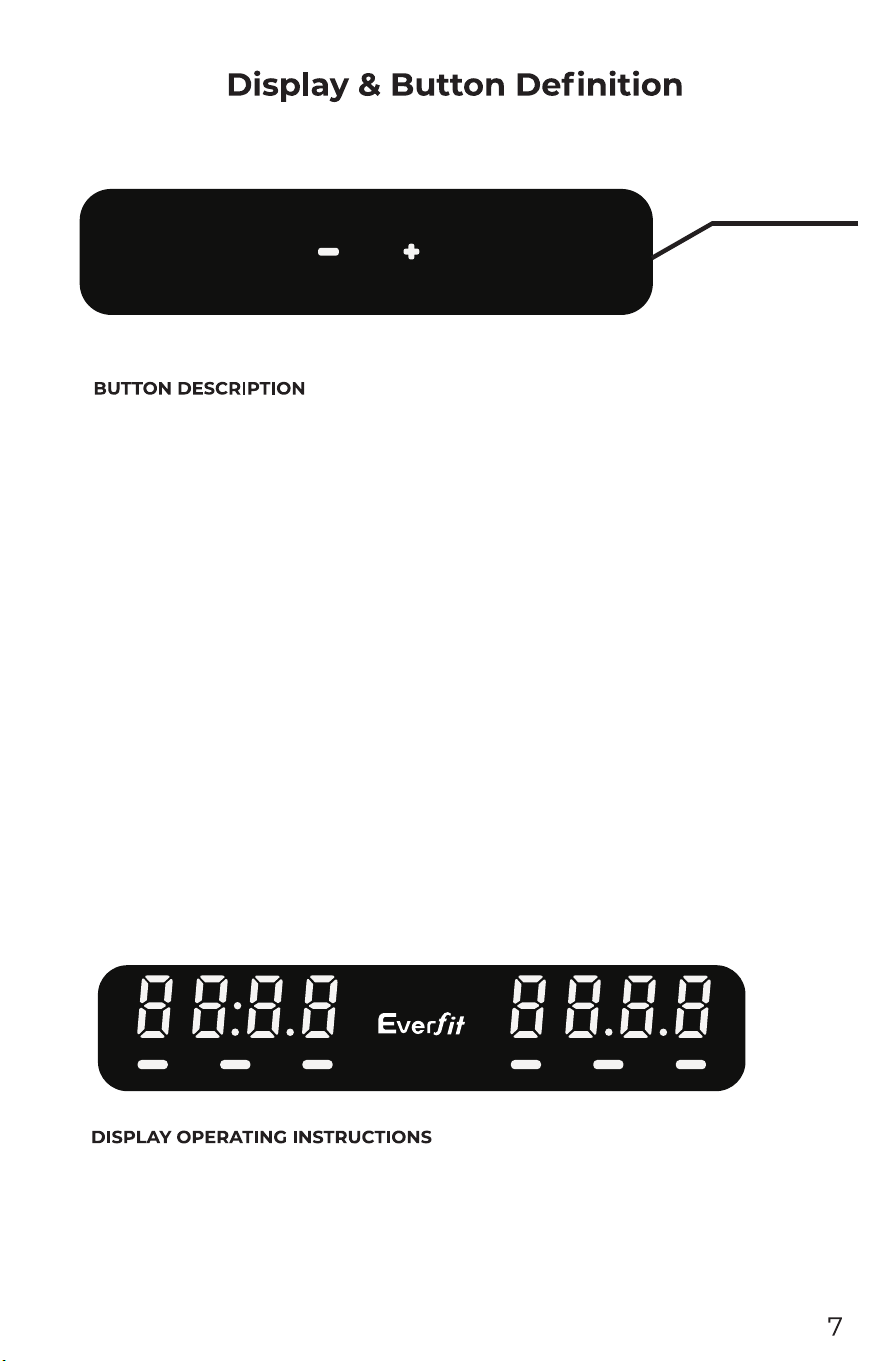
A large LED window displays the following functions: time, distance, calories, heart rate,
speed.
1: Function buttons: program, mode, start, stop, speed plus, speed reduction.
2: Function button description:
a: Program key: In the stop state, press the program key to cycle through the program: manual
mode->P01->P02->P03->...P11->P12.
b: mode key: when the manual mode is selected to the manual mode, the speed window displays
the initial value of 0.0, and the mod
e key can be cycled to select the countdown mode
window
display in the manual mode. 30:00->countdown distance mode window display
5.0-> Countdown Calorie Mode Window Display100->Normal Mode.
c: Start: Press this button in the stop state, the window will display 333, 222, 111 will start the
motor.
d: Stop: When the treadmill is running, pressing this button will stop running.
e: Speed plus: In the setting state, the button will increase the set value. In the motor
running st
ate, the button will increase the speed.
g: Quick speed button: When use machine , press 3KM/H,6KM/H,9KM/H,12KM/H may help
you set the machine speed to accordance .
h: Heart rate : When you put your both hands on the handlebar metal area ,then your heart rate will
show in the screen.
f: Speed reduction: In the setting state, the button will decrease the set value. When the
motor is running, the button will decrease the speed.
Numerical display range
initial
starting
setting range
showing range
Time(min:scd)
0:00
30:00
5:00-99:00
0:00-99:59
Speed
0.0
N/A
N/A
1.0-14.0
Distance
0.00
5.0
0.5
-
99.0
0.0
-
99.9
Calorie(Kcal)
0
1000
20
-
990
0
-
999
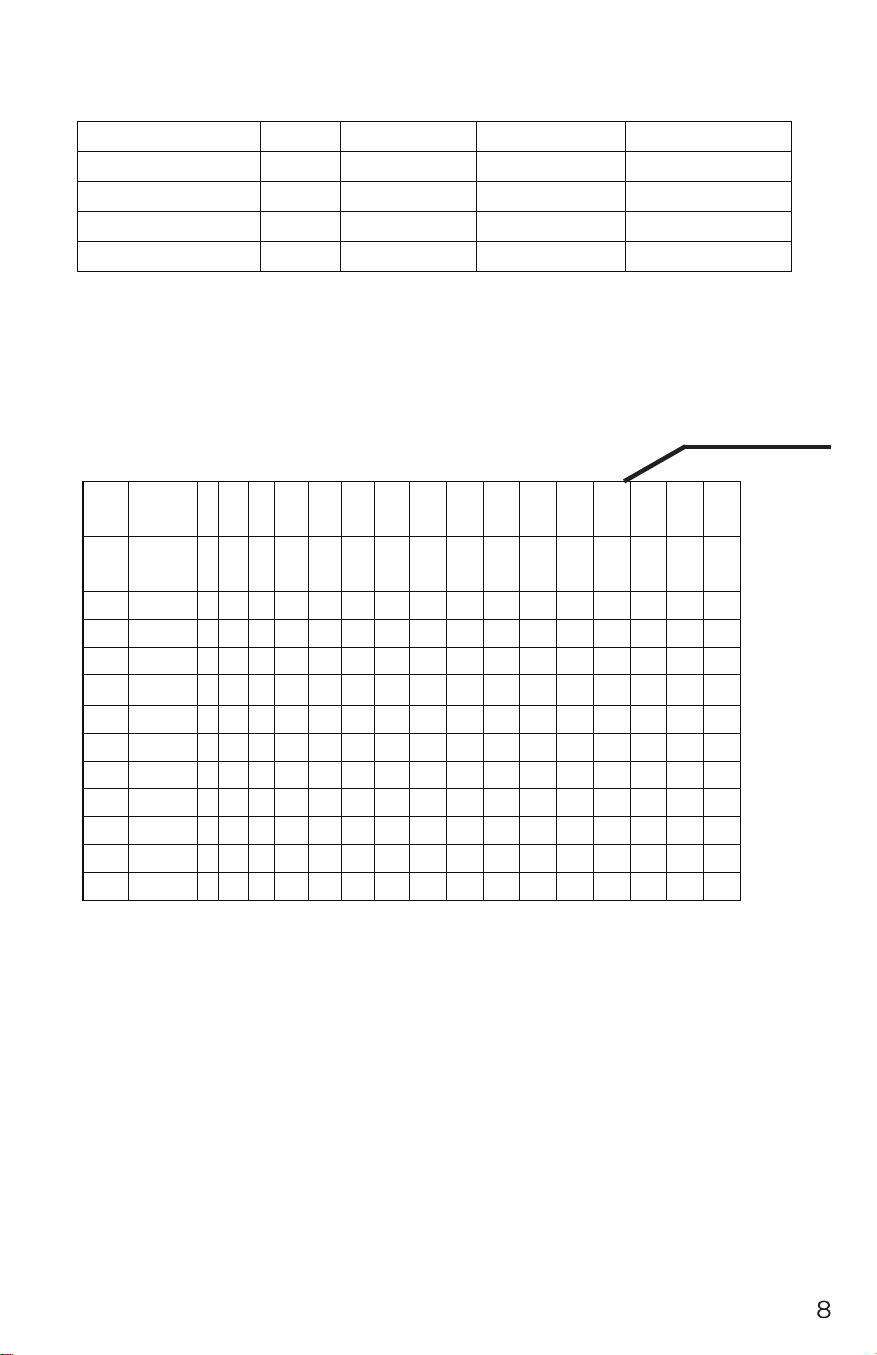
Schedule 1: P1-P12 program motion diagram
Sege
ments
1 2 3 4 5 6
7 8 9 10 11 12 13 14 15 16
P1 speed
Speed
4 6
10
10 6 4 8 10 12 12 10 8 10 10 6 4
P2 speed 2 4 6 4 6 6 4 6 6 8 10 8 6 8 4 2
P3 speed 4 6 8 10 6 4 6 8 10 12 8 4 10 10 6 4
P4 speed 2 2 6 10 6 4 6 10 6 4 6 10 8 6 4 2
P5 speed 4 4 8 10 8 6 8 10 8 6 6 10 8 6 4 2
P6 speed 4 6 8 8 8 8 10 8 8 6 6 6 6 6 6 4
P7 speed 6 4 2 4 6 8 10 10 12 12 10 10 8 6 4 4
P8 speed 4 6 8 10 10 10 10 10 10 8 6 6 6 4 2 2
P9 speed 2 4 4 4 6 6 4 6 4 4 4 4 2 4 6 2
P10 speed 2 4 4 4 6 6 4 6 4 4 4 4 2 4 6 2
P11 speed 4 4 6 6 4 6 6 8 8 6 6 6 6 8 6 4
P12 speed 4 4 6 8 10 12 10 12 10 8 10 12 12 10 8 6
Metric system

3)
Startup instructions
1: Attach the safety switch switchto the safety position on the panel, turn on the main power switch,
all LED segments will be displayed for 2 seconds, then the software version number will be
displayed. Then enter the manual normal mode.
2: Press the start key, the display window will display: 333-222-111, and each time the buzzer is
sounded, the motor will start.
Program Description
1: manual program, including: normal mode, manual mode, time countdown, distan
ce
countdown, calorie countdown mode.
2: 12 speed programs: P1, P2, P3, P4, P5, P6...P11, P12.
3: How to enter manual mode:
a: Turn on the power switch and go directly to the normal mode in manual mode.
b: In the stop state, press the program key to enter the normal mode in the manual mode.
c : Three setting functions in manual mode: time setting, distance setting, calorie setting.
When entering the manual mode, it is in the normal mode first, and all parameters are initial
values.
1)
In the manual normal mode, press the mode button, then enter the time countdown mode, the
time bar displays 30:00 and flashes, press the speed plus or minus button to set the countdown
time. Time setting range: 5:00-99:00.
2) In the time countdown mode, press the mode button to enter the distance countdown mode. The
distance bar displays: 5.0 and flashes. Press the speed plus or minus button to set the distance. The
setting range is 0.5-99.0
In the distance countdown mode: press t
he mode button to enter the calorie countdown mode,
the calorie bar displays 100 and flashes, press the speed plus or minus button to set the calorie
setting range: 20-990 kcal.
4: Manual mode operation:
a. Press the start button and the motor will start running.
b. Press the speed plus or minus button to adjust the speed.
c. Press the stop button again, the speed will slowly decrease until it stops;
d. When the set time is decremented to zero, the speed slowly decreases until it stop
s.
e. When the set distance is decremented to zero, the speed slowly decreases until it stops.
f. When the calorie setting is decremented to zero, the speed slowly decreases until it stops.
Program
1. The initial time is set to 30 minutes. Only the time can be set. The time setting range is
5:00-99:00. Press the speed plus or minus button to adjust the set value.
2 Press START motor to start running, the speed is according to the programmed speed.
3 Press the speed plus or minus butto
n to adjust the speed.
4 Each program is divided into 16 segments, each of which runs at 1/16 of the set time.
5 will beep when switching between segments and segments.
6 When the set time is decremented to zero, the speed slowly decreases until it stops.
g: Quick speed button: When use machine , press 3KM/H,6KM/H,9KM/H,12KM/H may help
you set the machine speed to accordance .
h: Heart rate : When you put your both hands on the handlebar metal area ,then your heart rate will
show in the screen.

Sleep function
Troubleshooting
Sleep function
When there is no operation for more than 10 minutes at the stop, the system turns off all displays
and goes to sleep. Press any key to wake up.
The following is the error code and solution for the electronic watch:
E01: The information fed back to the electronic watch by the controller is blocked.
S
olution: Check if the connector of the 4-wire cable connected to the controller is loose or
damaged.
E02: The controller does not detect the voltage on the motor line.
S
olution: Check if the positive and negative motor wires are securely connected to the terminals on
the controller.
E05: The current is too high when the motor is running, exceeding the rated current.
S
olution: Please check the motor for damage or contact the after-sales service personnel for
technical support.
E07: The MTC did not detect the signal of the safety lock.
S
olution: Please check if the safety switch is fastened, fasten one end of the safety switch to the
treadmill and the other end to the user's clothes.
E09: MTC communication is interrupted.
S
olution: Please turn off the power and restart the treadmill. If the problem persists, please contact
the after-sales engineer.
Daily maintenance
Electric treadmill maintenance
Proper maintenance is the only way to keep your treadmill at its best. Wrong maintenance can hurt
or shorten the life of your treadmill.
Important reminder:
- Do not use sandpaper or solvents to clean the treadmill. The controller part of the treadmill should
not be exposed to direct sunlight or moisture
to avoid damage.
- Always check and lock all parts of the treadmill, replace those defective parts immediately and/or
leave the equipment idle for repair.
Adjusting the running belt
Adjusting the run has two functions: elastic adjustment and running center position adjustment. The
running belt has been adjusted at the factory, but after use, the running belt will be stretched, which
will cause the running belt to rub against the center strip and the rear cover to be damaged
. It is
normal for the running belt to be stretched during use.
Adjust the running belt
If you are running with a treadmill that is slippery or not smooth, you can adjust the tightness of the
running belt to improve.
How to adjust the running belt
1. Insert the 6mm hex wrench into the adjustment screw on the left side of the running belt and turn
the wrench 1/4 turn clockwise to adjust the rear roller to tighten the running belt.
2. Repeat step 1 to adjust the right screw. It must be determined that the adjustment screw rotates
the same distance so that the rear roller is adjusted parallel to the frame.
3. Repeat steps 1 and 2 until the running belt does not slip.
4. Note that the running belt cannot be adjusted too tightly. This will break the running belt,
increase the pressure of the front/rear drum, cause damage to the roller bearing, etc., causing
abnormal sound or other problems.
If you want to reduce the tension of the running belt, turn the wrench counterclockwise, paying
attention to the same distance between the left and right sides.
Run to the middle
When you use the treadmill, the pressure on the two belts is not the same when running, and the
pressure on the run
ning belt is unbalanced, causing the running belt to deviate from the center. This
deviation is normal, and when no one runs on the run, it will return to the center. If you don't get
back to the center, you will need to bring the belt back to the center.
1. Run the treadmill at no load and adjust the speed to 6km/H or 3.7miles/H.
2. Observe the distance from the running belt to the left and right side bars
If it is to the left, use a hex wrench and turn the left screw 1/4 turn clockwise
If it is to the right,
use a hex wrench and turn the screw on the right clockwise 1/4 turn
If the running belt is still not in the middle, repeat the above action until it is adjusted to the
middle.
3. After adjusting the running belt to the middle, adjust the speed to 12KM/H or 7.4miles/H
and observe the deviation of the running belt and the smooth running condition. If there is any
deviation, repeat the adjustment steps.
caveat! Do not overtighten the rollers! This will result in permanent bearing damage!
If the ab
ove steps do not work, you will need to tighten the running belt.
lubricating oil
When the treadmill is shipped from the factory, it is lubricated. However, the treadmill's lubricity is
often checked to help keep the treadmill in optimal use. The treadmill must be lubricated after one
year of use or 100 hours of operation.
After 30 hours or 30 days of use, pull up the running belt from the side and reach the surface of the
running platform as far as possible. If you feel silicone oil
, you don't need to add lubricating oil; if
T
L
L
T

you touch the surface, it has a strong feeling of dryness. Please follow the instructions below for
lubrication.
Please use non-petroleum silicone oil
◆
How to add lubricant to th e treadmill
1. The position of the refueling is in the running position of the lower surface of the running belt.
(As shown below)
2. Cut the mouth of the oil bottle into a small mouth, not too big, to be able to inject.
3. Lift the running belt to extend the oil bottle to the bottom of the running belt and inj
ect the oil
into the middle of the running board. Put down the running belt, press the oil part by hand, turn the
running belt, and spread the oil evenly on the running belt;
4. After turning on the machine, wait a minute for the oil to be applied evenly and then use the
treadmill.
Clean up
Clean up frequently to ensure the life of the treadmill.
Warning: When cleaning the treadmill, the power must be cut off and the power cord must be
disconnected from the outlet.
After each use: Wipe t
he instrument and other parts with sweat and debris with a clean towel or a
damp cloth.
Note: Do not use corrosive materials, do not use liquid materials, so as not to damage electronic
components. Do not expose the electronic components to the sun.
Every week: Clean the ground once a week, and clean the dirt and other debris on the ground.
save
Place your treadmill in a clean, dry environment, making sure the power switch is off and the plug
is not on the power outlet.
Move and fold
W
heels are installed to facilitate the movement of the treadmill. Be sure to disconnect the power
and fold the body before moving.

Failure analysis and processing
Fault problem and handling
The product is designed to be reliable and easy to use. If you have problems, please read the
following questions carefully.
Problem: Meter does not display
Solution: Check if the power cord is plugged in, the plug is loose, and the power switch is turned
on.
Problem: Sudden power outage during use
Solution: Check if the power cord is securely connected and the overcurrent protector is
disconnected.
Problem: Running belt is not in the middle
Solution: Check if the treadmill is placed on a flat surface and the running belt is adjusted. Refer to
the adjustment process of the running belt.
If the problem is not within the above, and you are not sure how to solve it, please contact us in
time, please do not handle it privately.
Important matters
Warning
Before using this product, please consult your doctor and have a complete health check. You should
obtain a doctor's permission before frequen
t and intense exercise. If you experience any discomfort
with this product, please stop using it and consult your doctor. This product should be used in the
correct way. Please read the manual carefully before exercise.
If this product is left unattended or in use, please keep children and pets close to each other.
Wear appropriate clothing, including sports shoes, while exercising. Do not loosen your clothes
during exercise to avoid being caught by the machine.
Make sure a
ll bolts and nuts are tightened when using the device. To maintain good use, all sports
equipment must be maintained on a regular basis.
Before you start using:
How to get started with a fitness program depends on your physical condition. If you haven't
exercised for years, or you are overweight, you must slowly and gradually increase your exercise
time, such as a few minutes per week.
At the beginning you may only be able to exercise for a few minutes at the target heart rate range.
In any case, your aerobic fitness will improve in about six to eight weeks. If it takes a long time to
improve, don't be discouraged. It is very important to exercise according to your personal pace. One
day you will be able to continue exercising for thirty minutes. Your aerobic fitness
• Consult your doctor before starting a exercise or training program, ask your doctor to review the
training and diet plan, and advise on your exercise plan.
• Set your goals with your doctor to ensure that the plan is realistic and you can start your training
program with ease.
• You can add some aerobics to your exercise plan, such as walking, jogging, swimming, dancing or
cycling. Always check the pulse. If you do not have an electronic heartbeat monitor, ask your
doctor how to
measure the pulse from your wrist or neck. In addition, you must set the target heart
rate based on your age and physical condition.
Drink plenty of water during exercise. You must replenish moisture lost from excessive exercise to
prevent dehydration. Avoid drinking plenty of ice water or beverages. Drinking water or beverages
should be at room temperature.
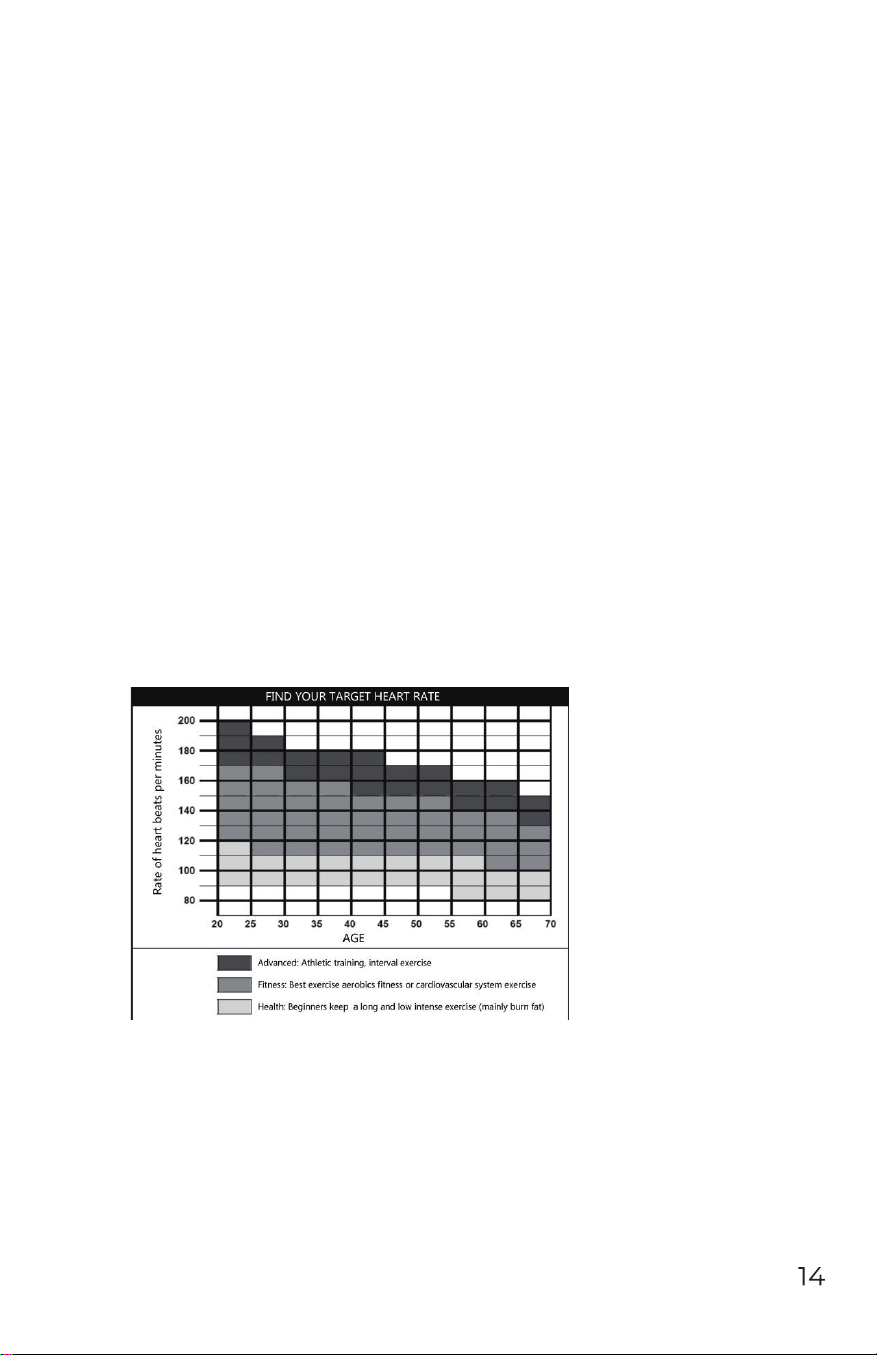
target heart rate
Measuring pulse:
To determine if your heartbeat is within the target heart rate, you must first kn
ow how to measure
the heart rate. The easiest way is to measure the carotid pulse between the trachea and the neck
muscles on both sides of the neck. Count the pulse for a few times in ten seconds, then multiply the
number by six, which is the number of heartbeats per minute.
How fast should your heartbeat be when doing aerobic exercise? It is fast enough to reach and
maintain the “target heart rate range”, which can be set by your age and physical condition. You can
find out the range o
f your target heart rate from the chart we provide below.
Little knowledge:Aerobic exercise?
Refers to any continuous exercise in which oxygen can be delivered to your body through your
cardiopulmonary effects. Aerobic exercise can improve your heart and lungs: this is the most
important muscle in your body. Aerobic fitness can be enhanced by exercising your body's large
muscle groups - including hands, feet or hips. During the process, your heart beats faster and your
breathing worsens. Aerobics should be an important part o
f your exercise program.
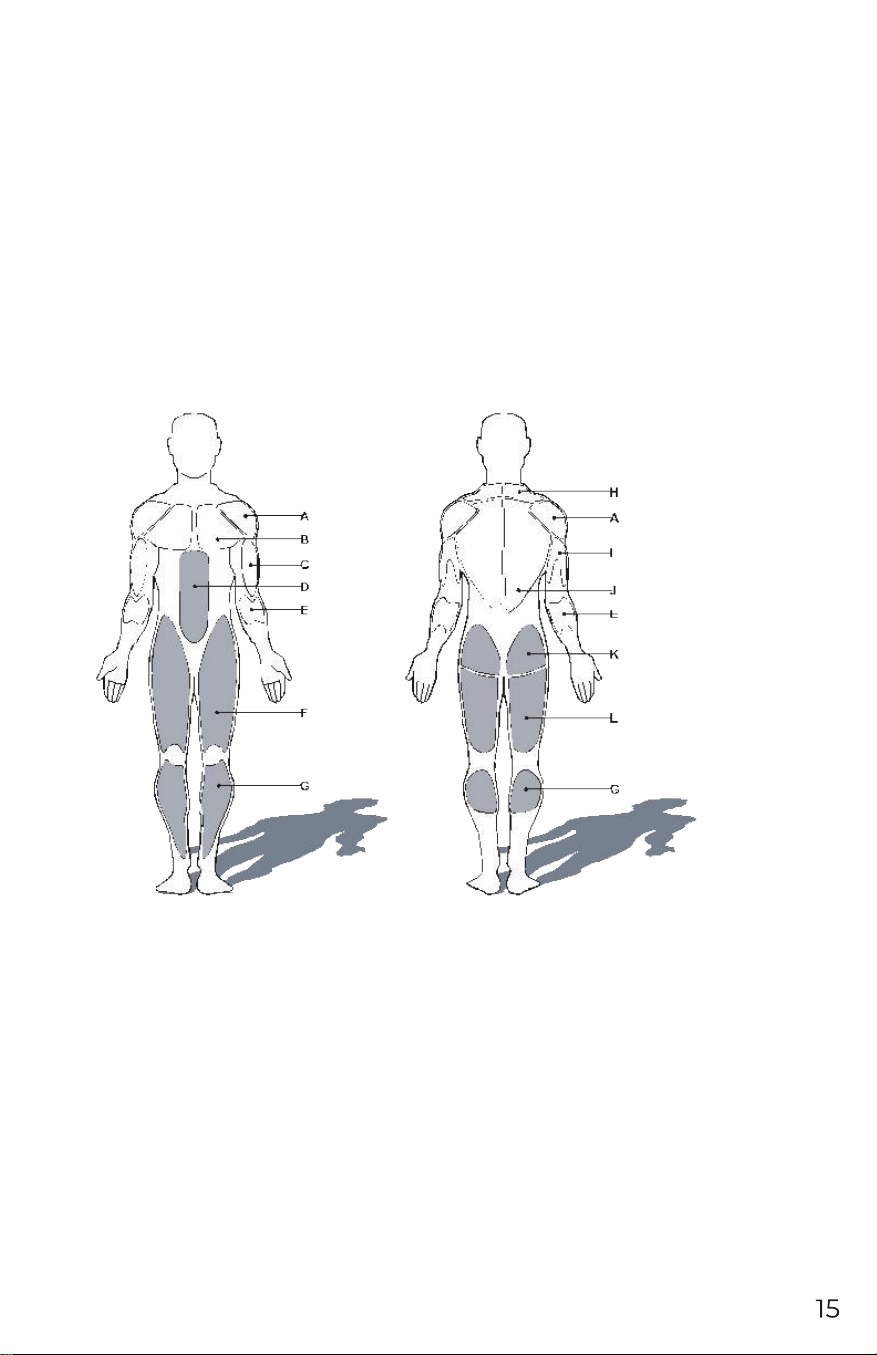
Whole body muscle distribution map
Target muscle group:
The muscles that are used in this product are mainly the lower body muscle groups, which are
shown in gray in the figure below.
A: shoulder muscles G: Muscles of leg
B: Pectoral muscles H: Cowl-muscles
C: Biceps brachii I: Triceps
D: Abdominal muscles J: Dorsal muscles
E: Forearm muscles K: Hip muscles
F: Quadriceps L: Thighs muscles
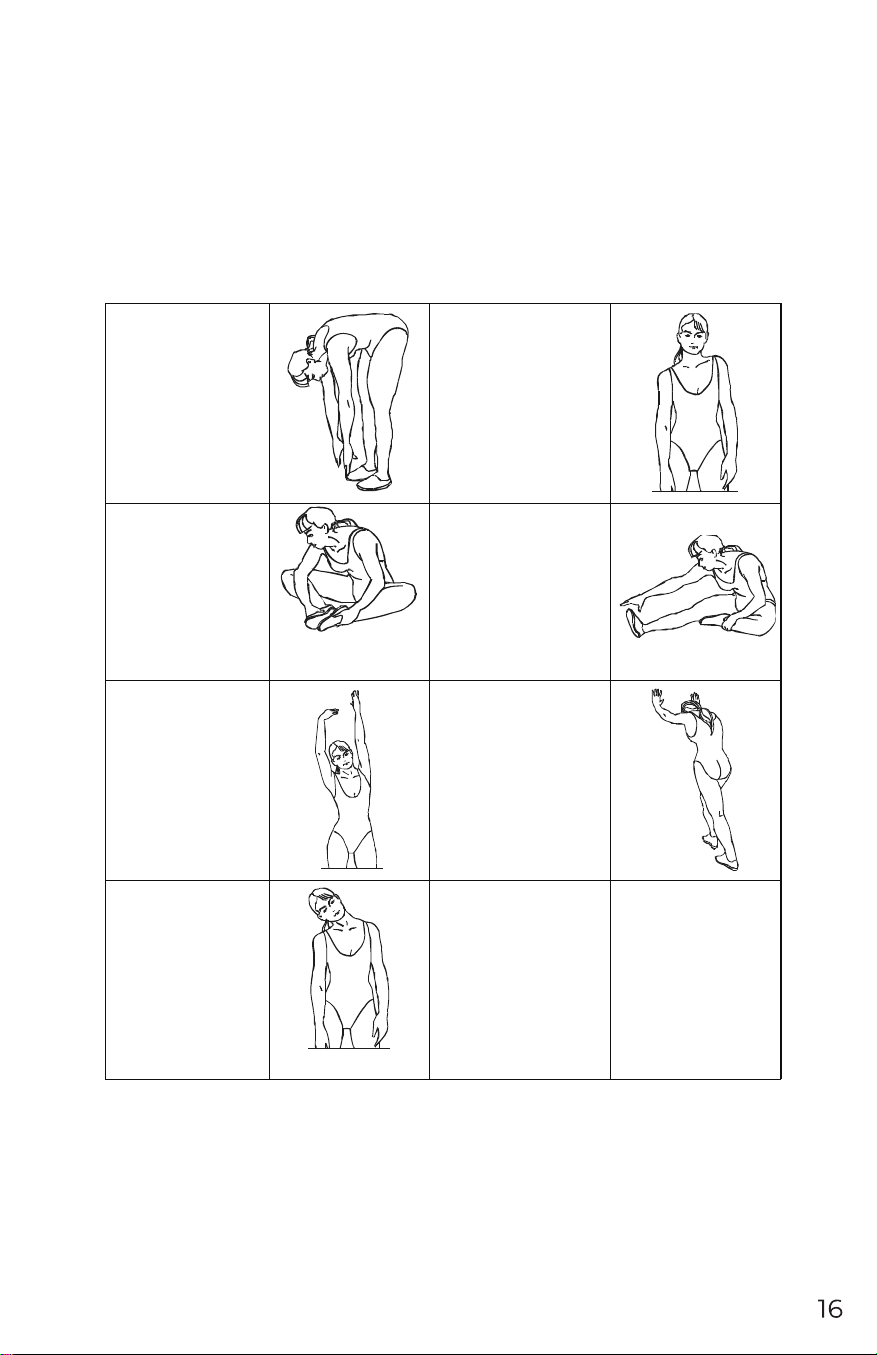
Stretching exercises
A successful exercise plan must include warmth, aerobic and soothing exercise. The number of
movements is at least two or three times a week, one day after a day of exercise, and after a few
months you can increase the number of sports to one to four to five days.
Warm-up is a very important part of your fitness exercise, before each exercise must first warm-up,
moderate warm-up allows your body to prepare the next more intense exercise, because warm-up
can
help muscle heating and stretching, Improve blood circulation to increase the pulse, the more
oxygen into the muscle. And after the end of aerobic exercise, repeated warm-up exercise can also
reduce muscle soreness. We recommend the following warmth and soothing exercise.
TOUCH TOES:
Bend your body slowly, and
relax back & shoulder. Try
your best to bend as low as
you can, and then keep still
for 15 seconds.
SHOULDER EXERCISE:
Raise right shoulder to right ear,
count 1, release. In the
meantime, raise the left
shoulder to left ear, count 2.
STRETCH INNER
THIGHS:
Sit on the floor, bend legs as
in pic, foot to foot. Try to
bend knees to floor, keep
still for 15 seconds.
STRETCH THIGHS:
Sit on the floor, keep right leg
straight. Bend left leg and make
it close to inner right leg. Try
best to stretch body close to
right toes, keep still for 15
seconds. Then do the same to
left legs.
WAIST EXTENDED:
Extend arms to right & left,
and then raise slowly, up to
head. Extend right arm to
ceiling, keep still for 1
second, feel the extension of
right arm. Then do the same
to left arm.
Extend of Shank:
Forward the body, hands against
the wall, step forward the left
leg. Keep right leg straight, left
foot against the floor; and then
bend left leg, move hip against
the wall. Keep still for a while
and do the same to the other
shank.
HEAD EXERCISE:
Head to the right, count
1, feel the extension of
the left side of neck;
then head back, let the
jaw to ceiling and open
your mouth, count 2;
head to left side, count 3,
Turn back your head.