

SRM 2000WH
EN
LOW CARB RICE COOKER
Translation of the original manual

SRM 2000WH
A
1
2
3
6
7
10
11
4
5
8
9
12 13
B
1
2
3
2
4 5 6 7

– 1 –
01/2025
2025, .
EN Low Carb Rice Cooker
Important Safety Instructions
READ CAREFULLY AND STORE FOR FUTURE USE.
• This appliance may be only used by children aged 8
years and older and by persons with physical, sensory or
mental impairments or lack of experience and knowledge,
if they are supervised or have been instructed on the safe
use of the appliance and understand the potential hazards.
• Children must not play with the appliance.
• Cleaning and user maintenance shall not be done
by children unless they are older than 8 years and
supervised.
• Children under 8 years of age must be kept away from the
appliance and its power cord.
• Keep the appliance and its power cord out of reach of
children younger than 8 years of age.
• If the power cable is damaged, have it replaced in
aprofessional service centre in order to prevent
adangerous situation. It is forbidden to use the appliance
with the power cable damaged.
• Do not immerse the appliance for cleaning.
• Use the appliance only withthe supplied power cable.
Do not use any other power cable, and do not use the
supplied power cable to power any other appliance.
LOW CARB RICE COOKER

– 2 –
01/2025
2025, .
• Wash the cooking pot, spatula, measuring cup, and
steaming attachment in warm water with alittle dish
washing detergent. Rinse in clean water and wipe dry.
• When filling the cooking pot with water andingredients,
observe the maximum fill lines marked here.
• This appliance is not intended to be operated via an
external timer or remote control.
• This appliance is intended for household use only. It is also
suitable for personal non-commercial use in spaces such
as:
– kitchenettes in shops, offices and other workplaces;
– spaces in agriculture;
– hotels, motels, andother residential areas where guests
may use it;
– bed and breakfast establishments.
WARNING: Avoid spilling on the plug.
WARNING: Improper use may result in potential injury.
• The surface of the heating element contains residual heat
after use.
• Before connecting the appliance to apower socket, make sure the voltage stated on the product'srating label corresponds to the voltage in the
power socket.
• Connect the appliance only to aproperly earthed socket. Do not use an extension cord.
• Never connect the appliance to the power socket until it is fully assembled.
• Unwind the power cable in full before use.
• Do not connect or disconnect the appliance power cable to or from the power socket with wet hands.
• Make sure that the fork of the power cable does not come into contact with water or moisture.
• Do not disconnect the appliance from the power socket by pulling the power cable. This could damage the power cable or the power socket.
Disconnect the cable from the power socket by gently pulling the plug of the power cable.
• Do not place heavy objects on the power cable. Make sure that the power cable does not hang over the edge of the table or touch hot surfaces or
sharp objects.
• To avoid the risk of electric shock, never immerse the appliance casing, power cable or plug in water or any other liquid.
• Always switch off and unplug the appliance after use, when left unattended, before moving, cleaning or other maintenance and handling.
• This appliance is designed forcooking various types of rice, stewing dishes or preparing soups or porridge. Do not use it for any other purposes than
those for which it was designed.
• Use the appliance only with the original accessories supplied with it. The use of non-original accessories can lead to adangerous situation.
• Do not use the appliance if it malfunctions, has been dropped on the floor, immersed in water or damaged in any way. Take it to an authorised
service centre for inspection or repair.
• Do not switch on the appliance when it is empty.

– 3 –
01/2025
2025, .
• Do not place any objects between the heating plate inside the appliance and the removable cooking pot. Ensure that the outer bottom of the cooking
pot is clean anddry before placing it into the appliance.
• Only the cooking pot is intended for food preparation. Do not pour water or place food directly into the inner space of the appliance.
• Use the appliance only on aflat, dry, clean, stable and heat-resistant surface.
• Do not place the appliance on the edge of atable, on the sink draining board, on unstable, tilted or uneven surfaces, on or near electric or gas
cookers and other heat sources.
• Do not use the appliance on aheat-sensitive surface as it may cause damage to such asurface.
• Adequate space must be ensured for air circulation above and around the pot during operation. Do not cover or block the ventilation openings of the
appliance.
• Make sure that the steam exhaust outlet does not point towards heat sensitive materials or you or other people. Hot steam may cause severe
scalding.
• Do not touch areas where hot steam escapes; there is arisk of burns and scalds.
• Allow the appliance to cool completely before cleaning.
• Use oven mitts when removing the cooking pot after cooking.
• Exercise extreme caution when moving the appliance if it contains hot food and liquids.
• Use plastic or wooden kitchen tools for stirring and scooping food, as metal tools can damage the surface of the cooking pot.
• Clean the appliance regularly after each use according to the instructions in the Cleaning and Maintenance section. Follow all instructions inthis
section.
• No part of the appliance is suitable for dishwasher use.
• Do not use the appliance if any part of it is damaged, cracked or not working properly. Contact an authorised service centre.
• To avoid the danger of injury by electrical shock, do not repair the appliance yourself or make any adjustments to it. Have all repairs or adjustments
of the appliance performed at an authorised service centre. Tampering with the appliance during the warranty period may void the warranty.
– 4 –
01/2025
2025, .
• Thank you for purchasing our SENCOR product; we hope it will serve
to your satisfaction.
• Before using this appliance, please familiarise yourself with the user
manual, even if you are already familiar with using similar types of
appliances. Use the appliance only as described in this user manual.
Keep the manual for future reference.
• It is recommended to keep the original packaging, packing material,
receipt and confirmation of the extent of the seller'sliability or warranty
certificate at least for the duration of the legal right of defective
performance or quality guarantee. When transporting the appliance,
we recommend packaging it again in the original box provided by the
manufacturer.
. . . . . . . . . . . . . . . . . . . . . . . . . . . . . . . . . . . . . . . . . . . . . . . . . . . . . . . . . . . . . . . . . . . .
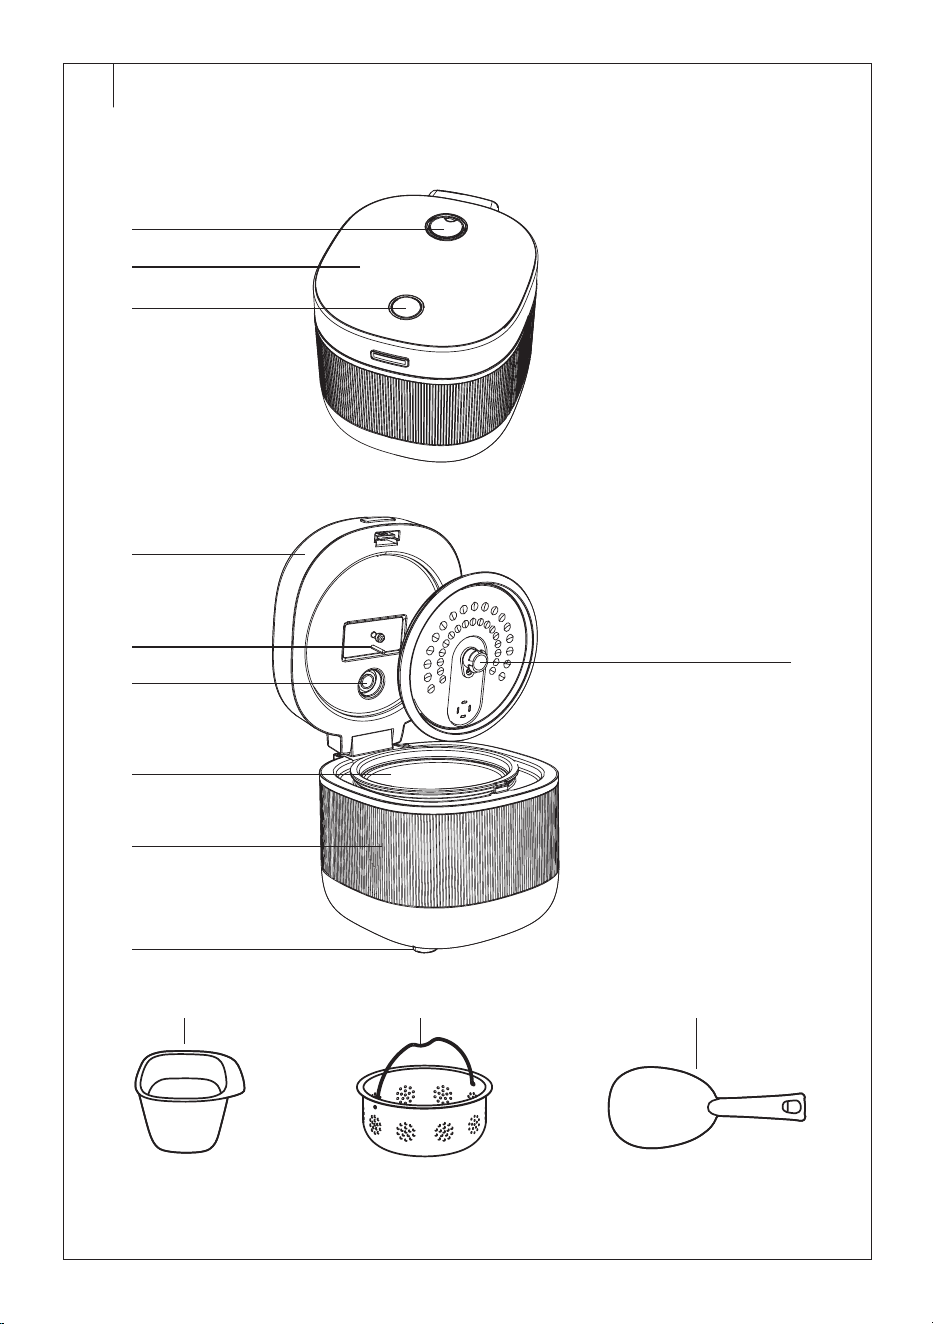
DESCRIPTION OF THE RICE COOKER
A1 Steam outlet
A2 Control panel
A3 Lid open button
A4 Rice cooker lid
A5 Temperature sensor
A6 Steam outlet opening
A7 Stainless steel cooking pot
A8 Rice cooker body
A9 Feet
A10 Removable inner lid cover
A11 Rice measuring cup
A12 Steaming attachment / inner
basket
A13 Rice spatula
. . . . . . . . . . . . . . . . . . . . . . . . . . . . . . . . . . . . . . . . . . . . . . . . . . . . . . . . . . . . . . . . . . . .
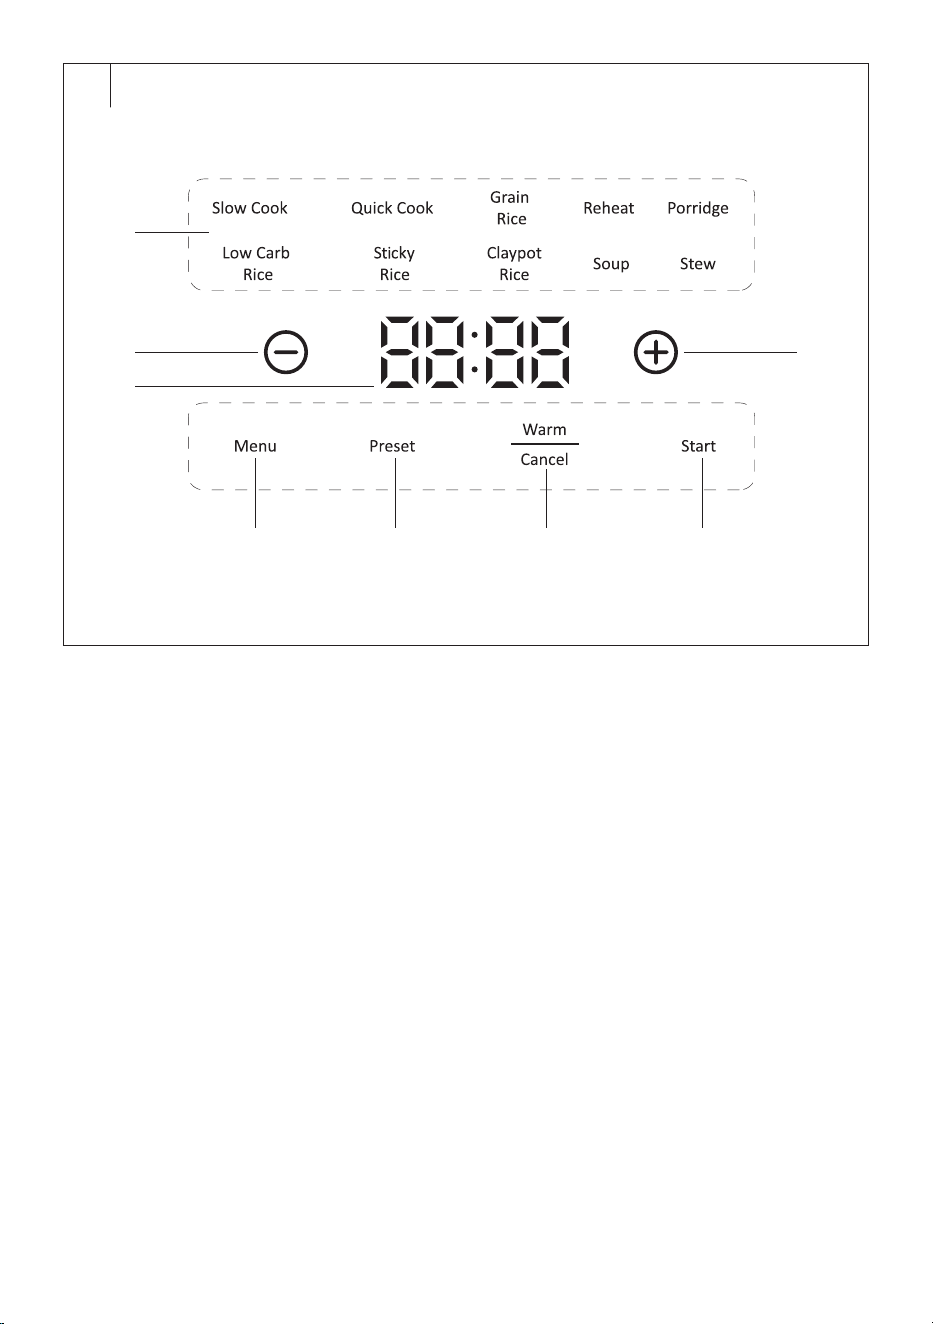
DESCRIPTION OF THE CONTROL PANEL
B1 Cooking mode icons
B2 +/– button
B3 Numeric display
B4 Menu button
B5 Preset button
B6 Warm/Cancel button
B7 Start button
. . . . . . . . . . . . . . . . . . . . . . . . . . . . . . . . . . . . . . . . . . . . . . . . . . . . . . . . . . . . . . . . . . . .
PURPOSE OF USE
The Sencor SRM 2000WH rice cooker is designed forcooking various
types of rice, forstewing dishes or forpreparing soups or porridge.
. . . . . . . . . . . . . . . . . . . . . . . . . . . . . . . . . . . . . . . . . . . . . . . . . . . . . . . . . . . . . . . . . . . .
BEFORE FIRST USE
• Before first use, remove the appliance and its accessories form the
packaging and discard all promotional labels and tags. Check that
neither the appliance nor any of its components is damaged.
• Press the button toopen the lid andremove the cooking pot.
• Wash the cooking pot, spatula, measuring cup, and steaming
attachment in warm water with alittle dish washing detergent. Rinse in
clean water and wipe dry.
• Before reinserting the cooking pot into the rice cooker, ensure that the
outer bottom of the pot is clean and dry.
• Wipe the outer surface of the rice cooker and the heating element with
aslightly damp sponge and wipe dry.
RECOMMENDATION:
We recommend pouring water (approximately 1 l) into the cooking pot
before the first use and running the rice cooker on the Soup or Stew mode
for 1 hour. This will burn the heating element. During this time you may
notice aslight smell and faint smoke. This is anormal phenomenon that
usually disappears with this step.
. . . . . . . . . . . . . . . . . . . . . . . . . . . . . . . . . . . . . . . . . . . . . . . . . . . . . . . . . . . . . . . . . . . .
PLACEMENT
Place the rice cooker horizontally on afirm, dry, and flat surface, such as
atable worktop. Ensure there is enough space around the rice cooker, at
least 10 cm on each side and50 cm above the appliance lid.
Keep the rice cooker at asufficient distance from heat and moisture-
sensitive materials (e.g., curtains or drapes), other appliances, heat
sources (e.g., stoves or heaters). Do not expose the rice cooker to direct
sunlight.
. . . . . . . . . . . . . . . . . . . . . . . . . . . . . . . . . . . . . . . . . . . . . . . . . . . . . . . . . . . . . . . . . . . .
OPERATION
Standard Use
1. Press the button toopen the lid and place rice or food you want to
prepare into the cooking pot. Wipe any spilled water or other liquids
from theedge ofthe cooking pot.
2. Close the lid and press gently until you hear aclick.
3. Insert the plug of the power cord into the mains socket. You will hear
asound alert and the control panel will light up.
4. Press the Menu button repeatedly to select one of thepreset cooking
modes. The selected mode will start blinking.
5. For selected modes, you can adjust the cooking time using the +
and - buttons.
6. Press the Start button, ashort beep will sound and the selected
mode will start. First the preheating starts and then the cooking
starts. It is common for the countdown to appear in the remaining 10
minutes depending on the weight, water content of the ingredients,
etc. Until then, only adashed line is displayed around the perimeter
of the display.
7. Once cooking is complete, an audible warning sounds (3 long
beeps) and the rice cooker automatically switches to temperature
retention mode. The Warm/Cancel button will light up.
8. Press the Warm/Cancel button to cancel the Keep Warm mode.
9. Press the button toopen the lid andremove the cooking pot. Always
use oven mitts when removing. The cooking pot andits contents are
very hot.
10. Clean the rice cooker according to the instructions in the "Cleaning
and Maintenance" section.
Warning:
Be careful when opening the lid to avoid scalding
from escaping steam. We recommend holding the lid
from the rear before pressing the button toopen the
lid. Allow the steam to escape before fully opening
the lid.
Note:
We recommend stirring cooked rice after completion to
prevent excessive sticking and to keep it moist.
EN
Low Carb Rice Cooker
User Manual
– 5 –
01/2025
2025, .
Note:
The cooking time for each mode may vary slightly as it
is calculated automatically based on the amount of rice
andwater added.
Delayed Start
This function allows you to postpone the start-up time and finish the
cooking after the time you set. The delayed start time thus includesthe
cooking itself.
1. Place rice or food you want to prepare into the cooking pot. Close the
cover.
2. Insert the plug of the power cord into the mains socket. You will hear
asound alert and the control panel will light up.
3. Press the Menu button repeatedly to select one of thepreset cooking
modes. The selected mode will start blinking.
4. Press the Preset button, and using the + and– buttons, set the
delay start time after which the rice cooker will start. The default
delayed start time is 4 hours. You can set the delayed start time from
2 to 24 hours.
5. Press the Start button. At the same time, the countdown of the set
time will start.
6. Depending on the selected mode and the set cooking time and
delayed start time, the rice cooker will start at acertain point.
If you need to cancel the delay start, press the Cancel button.
Do not use this function when using fresh ingredients (e.g. milk, eggs,
etc.). It may lead to their deterioration.
In summer months, it is recommended to set the delay start time to
amaximum of 8 hours to avoid the deterioration of the used ingredients.
Keep Warm Function
The Keep Warm function is available for all modes and is automatically
activated when cooking is completed. The elapsed time since switching to
the Keep Warm mode is displayed on the screen.
This mode ensures that the prepared dish remains warm, so it periodically
reheats the food to the optimal temperature.
If you need to switch it on manually, press the Warm/Cancel button and
the rice cooker will start.
The maximum Keep Warm time is 12 hours. After that, the rice cooker
turns off.
If you need to cancel the temperature retention mode, press the Warm/
Cancel button again.
Rice Cooking Tips
• When preparing rice, it is necessary to choose the correct ratio of rice
to water. The recommended rice to water ratio is written on the rice
package and is therefore important to follow. The resulting texture
andtaste depend on several factors, namely the freshness of the
rice, storage conditions, brand, origin and, last but not least, personal
preferences.
• The basic ratio of rice to water is 1 : 1.1. Round grain rice usually
requires more water. The water temperature should be between 5 and
35 °C. Use tapwater. Do not use distilled or filtered water.
• Always use the same measuring cup when measuring rice andwater.
• This cooker is designed to prepare amaximum of 3 cups of rice.
• When measuring water, you can also use lines on the inner wall of the
cooker. Here you will find the lines for making rice and porridge.
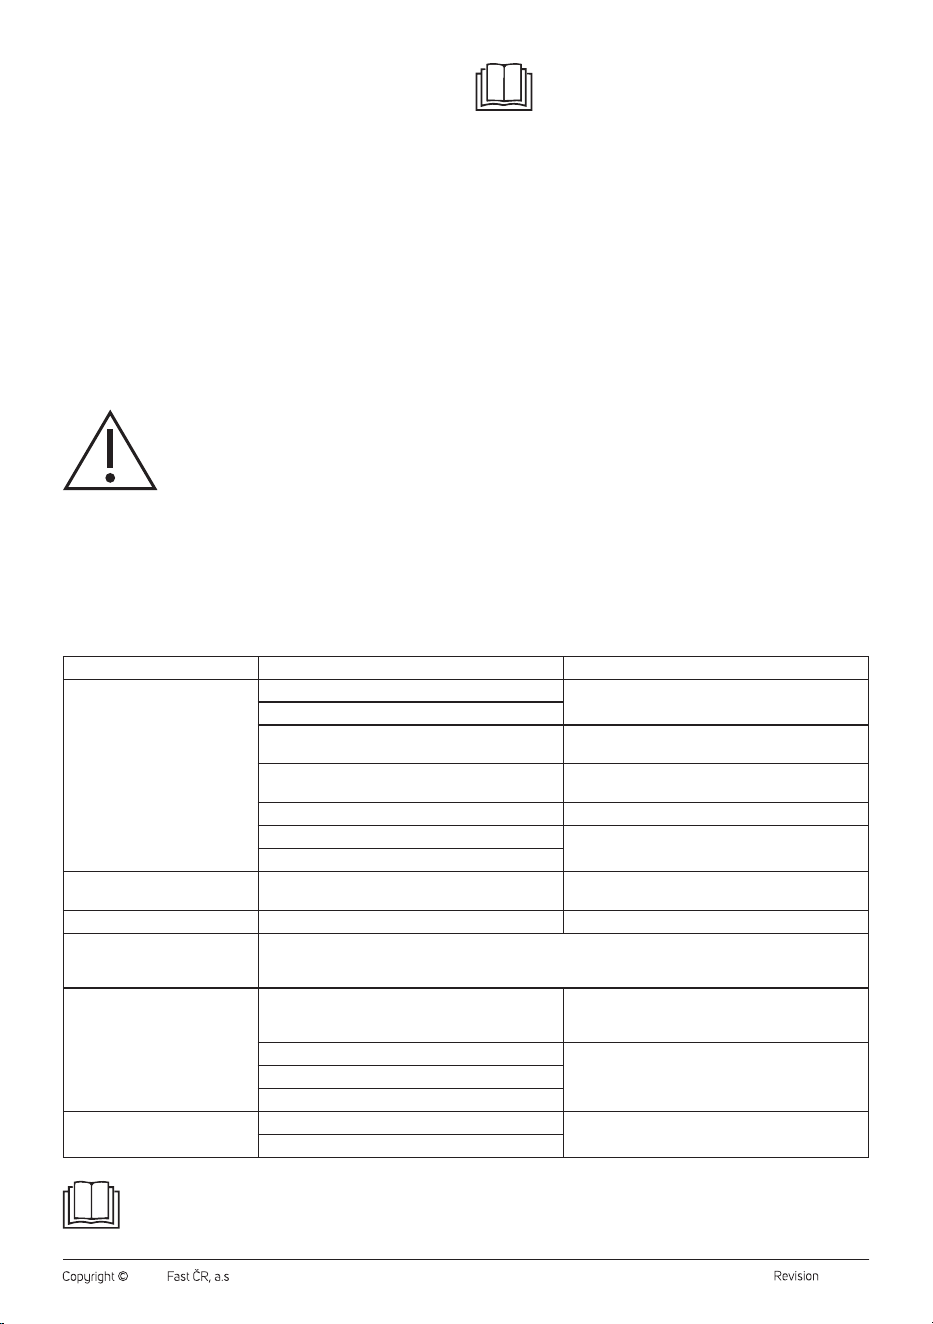
Rice Cooker Modes
Mode
Default
cooking time
Cooking Time
Adjustment
Keep Warm
Function
Delayed Start Note
Slow Cook
00:45 --
Yes
max. 12 hours
Yes
2 to 24 hours
Mode for slow cooking of ingredients.
Quick Cook
00:35 --
Accelerated rice cooking mode. We
recommend using rice withashort cooking
time.
Grain Rice
01:10 01:00–02:00
Mode for cooking cereals (millet, groats, etc.)
Before cooking, we recommend soaking
cereals in cold water for 2 to 4 hours.
Reheat
00:30 00:20–00:40 Mode forwarming food.
Porridge
01:00 01:00–01:30–02:00
Mode forpreparation of porridge.
The maximum volume when preparing rice is
1scoop. The recommended ratio of rice to water
is 1 : 8 to 1 : 10.
When preparing cereal porridges, it is
recommended to soak the cereals 2 to 4 hours
before cooking.
Low Carb
00:50 --
Mode forcooking special low-calorie rice.
Always prepare in thesteaming attachment.
Sticky rice
00:50 --
Mode forcooking special sticky rice. Always
prepare in thesteaming attachment.
Claypot rice
01:10 01:00–01:10–01:20
Mode forcooking the so-called claypot rice
(rice fromapot).
Always fill the water to the mark on the inside
wall of the cooking pot.
You can add the sausage, raw eggs andother
ingredients 40 minutes after you start cooking
the rice. Put the raw meat right at the beginning
of cooking. Before adding the ingredients, we
recommend brushing the bottom of the cooking
pot with alittle oil.
Soup
02:00 01:00–01:30–02:00 Mode forpreparing soups.
Stew
01:00 01:00–02:00
Mode for the preparation of stewed meat
dishes, dishes from one pot with water/broth
content. This mode is not suitable for rice
cooking.
– 6 –
01/2025
2025, .
• Before cooking, it is recommended to rinse the rice thoroughly (for at
least 10 minutes) under cold running water to remove excess starch
andany dirt.
• After cooking, it is recommended to stir the rice to remove
accumulated steam andheat.
LowCarb Mode
Low-calorie rice for the LowCarb mode must be prepared inthe steaming
attachment, which you insert into the cooking pot. Inthis mode you can
prepare amaximum of 1 cup of rice.
Pour rinsed rice into the steaming attachment and add water up to the “1”
line indicated on the steaming attachment.
. . . . . . . . . . . . . . . . . . . . . . . . . . . . . . . . . . . . . . . . . . . . . . . . . . . . . . . . . . . . . . . . . . . .
CLEANING AND MAINTENANCE
• Before cleaning, unplug the power cable from the socket and allow the
appliance to cool down.
• Do not use abrasive cleaning agents, solvents, or any substances to
clean any parts of the appliance that could damage the surface of the
appliance. None of the components of this appliance is dishwasher
safe.
Warning:
To prevent the risk of electric shock, do not immerse
the appliance, power cable, or plug into water or any
other liquid.
Cooking Pot andOther Accessories
Wash the cooking pot, spatula, measuring cup, and steaming attachment
in warm water with alittle dish washing detergent. Rinse in clean water
and wipe dry.
If ingredients are burnt onto the bottom of the cooking pot, pour warm water
into it and add alittle dish washing detergent. Let is sit andthen wash.
Before reinserting the cooking pot into the rice cooker, ensure that the
outer bottom of the pot is clean and dry.
Note:
During use, white spots, slight discolouration and possibly
small stains may form on the surface of the cooking pot
due to water quality, high temperature and other conditions.
This is anormal phenomenon and does not affect
functionality.
External Surface
Wipe the outer surface of the rice cooker and the heating element with
aslightly damp sponge and wipe dry.
Inner Lid
Press the inner lid release button andremove it from therice cooker.
Wash the inner lid in warm water with alittle dish washing detergent.
Rinse in clean water and wipe dry.
Wipe the area where the inner lid is located using adry cloth.
Put the inner lid back on. When attaching the lid, ensure that the holes in
the lid are aligned with the steam vent.
. . . . . . . . . . . . . . . . . . . . . . . . . . . . . . . . . . . . . . . . . . . . . . . . . . . . . . . . . . . . . . . . . . . .
STORAGE
• If you are not going to use the appliance for an extended period of
time, unplug it from the power socket, allow it to cool down and clean
it according to the instructions in the “Cleaning and Maintenance”
section.
• Before storing, ensure that the appliance and all accessories are
thoroughly clean and dry.
• Store the appliance in adry, clean, and well-ventilated place away
from extreme temperatures and out of the reach of children or pets.
. . . . . . . . . . . . . . . . . . . . . . . . . . . . . . . . . . . . . . . . . . . . . . . . . . . . . . . . . . . . . . . . . . . .
TROUBLESHOOTING
Problem Possible Cause Solution
Rice is not cooked, it is
overcooked or undercooked.
Too long or too short cooking time.
Measure the water to rice ratio well so that the cooking
time is set correctly.
Incorrect rice to water ratio.
The cooking pot is not positioned correctly.
Turn the container so that it sits correctly on the
heating element.
There is aforeign object between the cooking pot and
the heating element.
Remove foreign object.
The cooking pot is deformed. Purchase anew cooking pot.
Motherboard failure.
Contact an authorised service centre.
Sensor malfunction.
The contents of the pot
overflowed.
There are many liquids in the pot. Reduce the amount of liquids.
The control panel is off. The power plug is not plugged into the socket. Insert the power plug into the power socket.
The surface of the inner container
has changed colour with use.
This is anormal occurrence and does not affect the proper functioning of the coffee machine. During use, white
spots, slight discolouration and possibly small stains may form on the surface of the cooking pot due to water
quality, high temperature and other conditions.
The heating element is not
heating.
The socket is not live.
Plug the rice cooker into adifferent socket, check the
circuit breaker or contact your electricity supplier to see
if there has been an outage.
Motherboard failure.
Contact an authorised service centre.The fuse is burned out.
Heating element failure.
The control panel is lit, but the
heating element is not heating.
Motherboard failure.
Contact an authorised service centre.
Heating element failure.
Note:
If the above problem persists or is not listed, stop using the rice cooker andcontact an authorised service centre.
. . . . . . . . . . . . . . . . . . . . . . . . . . . . . . . . . . . . . . . . . . . . . . . . . . . . . . . . . . . . . . . . . . . . . . . . . . . . . . . . . . . . . . . . . . . . . . . . . . . . . . . . . . . . . . . . . . . . . . . . . . . . . . . . . . . . . . . . . . . .
– 7 –
01/2025
2025, .
TECHNICAL SPECIFICATIONS
Rated voltage range ..............................................................................220−240 V~
Rated frequency ..........................................................................................50–60 Hz
Rated input ........................................................................................................... 500 W
Maximum filling volume of the cooking pot ....................................................... 2 l
We reserve the right to change the text and technical specifications.
. . . . . . . . . . . . . . . . . . . . . . . . . . . . . . . . . . . . . . . . . . . . . . . . . . . . . . . . . . . . . . . . . . . .
INSTRUCTIONS AND INFORMATION ON DISPOSAL OF USED
PACKAGING MATERIAL
Dispose of used packaging material in the designated waste disposal area
determined by the municipality.
DISPOSAL OF USED ELECTRICAL AND ELECTRONIC EQUIPMENT
This symbol on the products or accompanying documents
indicates that used electrical and electronic products
should not be disposed of with regular municipal waste.
For proper disposal and recycling of these products, deliver
them to designated collection points. Alternatively, in some
European Union states or other European countries the
products can be returned to the local retailer when buying
an equivalent new product. By properly disposing of this
product, you help preserve valuable natural resources and contribute to
preventing potential negative impacts on the environment and human
health resulting from improper waste disposal. For further details, contact
your local authorities or the nearest collection point. Fines may be
imposed for improper disposal of this type of waste in accordance with
national regulations.
For Business Entities in European Union States
If you want to dispose of electric or electronic devices, ask your retailer or
supplier for the necessary information.
Disposal in Other Countries Outside the European Union
This symbol is valid in the European Union. To dispose of this product
elsewhere, request necessary information on the correct disposal method
from local authorities or your retailer.
This product complies with all the essential requirements of
the applicable EU directives.
. . . . . . . . . . . . . . . . . . . . . . . . . . . . . . . . . . . . . . . . . . . . . . . . . . . . . . . . . . . . . . . . . . . .
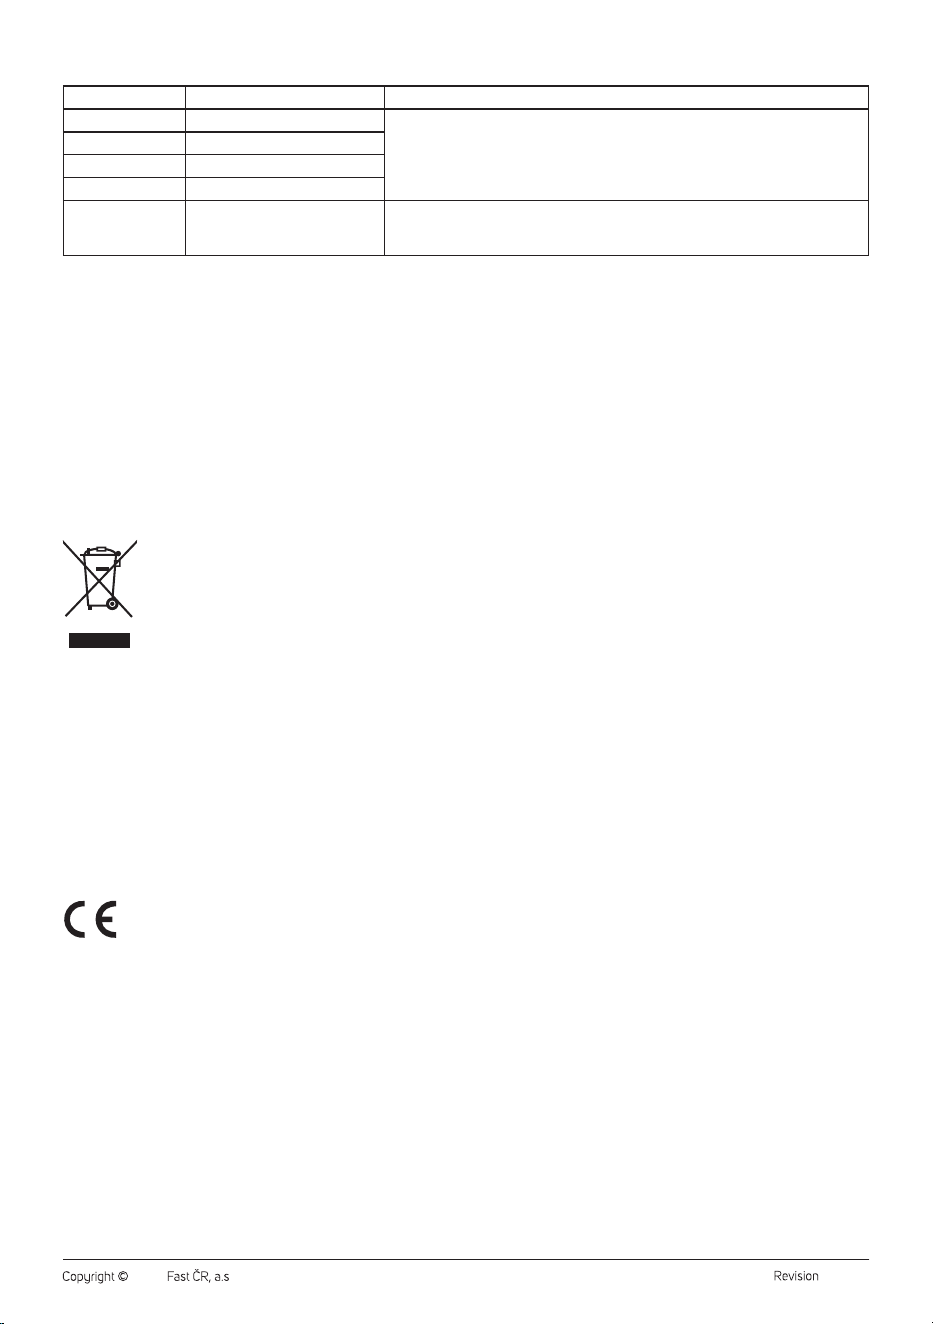
ERROR MESSAGES
Error message Meaning Solution
E1 Lower sensor short-circuit
Turn off the rice cooker, disconnect it from the power source, wait awhile andthen
reconnect it to the power source andturn it on.
If the message persists, please contact aservice centre.
E2 Broken lower sensor circuit
E3 Upper sensor short-circuit
E4 Broken upper sensor circuit
E5 Overheating protection
The temperature at the bottom exceeded 150°C. Turn off the rice cooker, disconnect it
from the power supply andallow it to cool down.
If the message persists, please contact aservice centre.
. . . . . . . . . . . . . . . . . . . . . . . . . . . . . . . . . . . . . . . . . . . . . . . . . . . . . . . . . . . . . . . . . . . . . . . . . . . . . . . . . . . . . . . . . . . . . . . . . . . . . . . . . . . . . . . . . . . . . . . . . . . . . . . . . . . . . . . . . . . .

– 8 –
01/2025
2025, .
QUICK RICE WITHCHICKEN
Cooking time: 35–45 minutes
Ingredients:
1 medium onion
2 cloves of garlic
1.5 cup of rice
2 tablespoons of butter
2 cups of chicken or vegetable broth
400 g of chopped tomatoes (canned)
450 g of chicken breasts, sliced into strips
pinch of ground cumin
pinch of rosemary
salt and pepper for seasoning
Procedure:
1. Finely chop the onion, cut the garlic into small pieces and put
everything into the cooking pot.
2. Add well rinsed rice, butter and pour chicken broth. Stir.
3. Add the sliced tomatoes from the can and the chicken.
4. Season with rosemary, cumin, salt and pepper and mix thoroughly.
5. Close the lid andselect Slow Cook mode. After cooking, serve
immediately.
Tip:
For amore intense flavour, you can replace ameasuring cup of broth with
ameasuring cup of white wine.
. . . . . . . . . . . . . . . . . . . . . . . . . . . . . . . . . . . . . . . . . . . . . . . . . . . . . . . . . . . . . . . . . . . .
PORRIDGE WITH APPLES AND CINNAMON
Cooking time: 10–15 minutes
Ingredients:
1 apple
1 cup of oatmeal
1/2 teaspoon of cinnamon
1 tablespoon of honey
1 and 3/4 cups water
Procedure:
1. Pour water over the oatmeal and season with grated apple,
cinnamon or honey.
2. Close the lid andselect the Porridge mode (approx. 10–15 min) until
the desired consistency is achieved.
3. Then turn the rice cooker off manually (it is not necessary to wait for
the end of the set time) and season the porridge if necessary.
Tip:
Apples can also be replaced by other fruits to your taste, such as
raspberries.
. . . . . . . . . . . . . . . . . . . . . . . . . . . . . . . . . . . . . . . . . . . . . . . . . . . . . . . . . . . . . . . . . . . .
PEA SOUP
Cooking time: 70 minutes
Ingredients:
450 g of frozen peas
1 medium onion
1 leek (only the white part)
600 ml of poultry or vegetable broth
100 g English bacon
salt and pepper for seasoning
Procedure:
1. Finely chop the onion, cut the leek into thin strips, dice the bacon
and put everything in acontainer.
2. Stir in the frozen peas and pour in the poultry or vegetable stock.
Season to taste with salt and pepper.
3. Close the lid and select the Soup mode (60 min).
4. At the end of cooking, transfer everything to another container or pot
and blend with astick blender.
Tip:
We recommend serving withbread croutons.