Quick Start Guide
Smart Presence Sensor
7100001647 REV1.1.0
Images may dier from actual products.
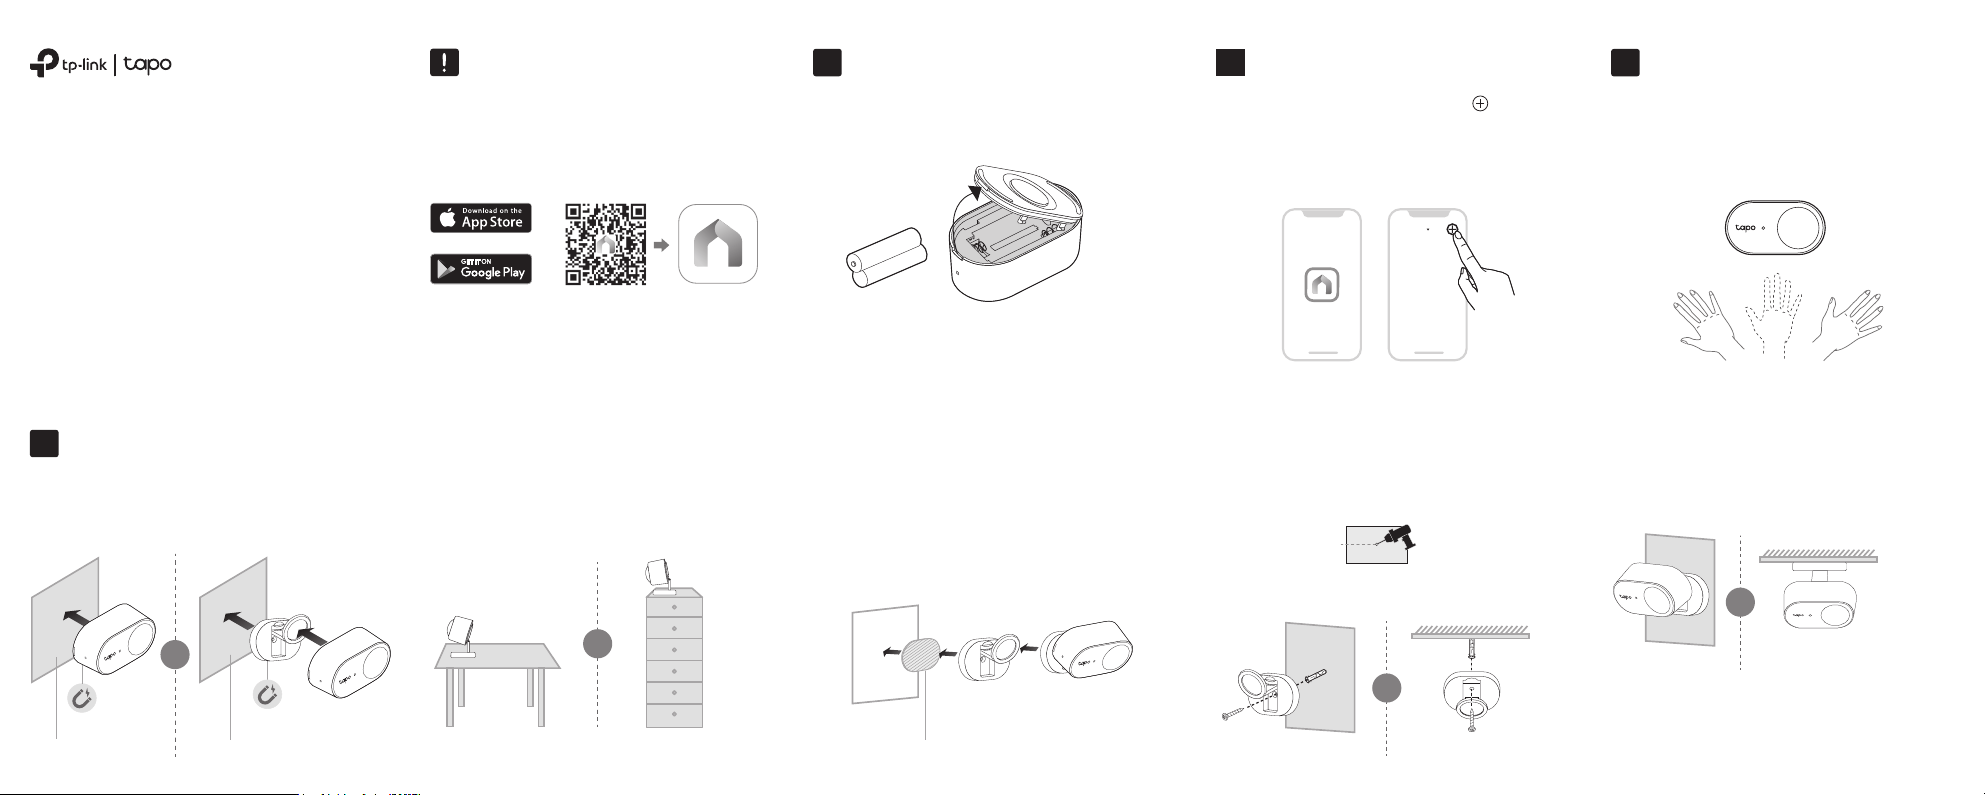
Before You Start
A Tapo Hub is required. Make sure your
Tapo Hub’s rmware is updated to the
latest version and successfully set up via
the Tapo app.
OR
Remove the back cover and insert the
batteries. The front LED should blink.
1. Power Up Your Sensor
1
Open the Tapo app and tap the button.
Select Sensors, then choose your model.
Follow the app instructions to complete
setup.
2. Set Up Your Sensor2
My Home
Take your sensor to the preferred location
and wave your hand in front of the sensor
to test it. The Tapo app should show if the
sensor is triggered.
3. Test Your Sensor3
4. Install Your Sensor4
Option 1: Attach to metallic surfaces
Magnetically attach to metallic objects.
Metallic Object
Metallic Object
OR
Option 2: Set on a table or shelf
Place the sensor on your desired table or shelf.
OR
Option 3: Stick to a clean wall
1) Stick the base with the adhesive to the clean wall,
and press it down for 15s to ensure the base is
rmly attached.
2) Attach the sensor to the base.
Adhesive
3M
1) Drill a 6mm diameter screw hole.
Option 4: Wall/Overhang mounting
Φ=6 mm (15/64 in.)
3) Attach the sensor to the base.
2) Insert the anchor into the hole, then use the
mounting screw to ax the base over the anchor.
Wall Mounting Overhang Mounting
Wall Mounting Overhang Mounting
OR
OR
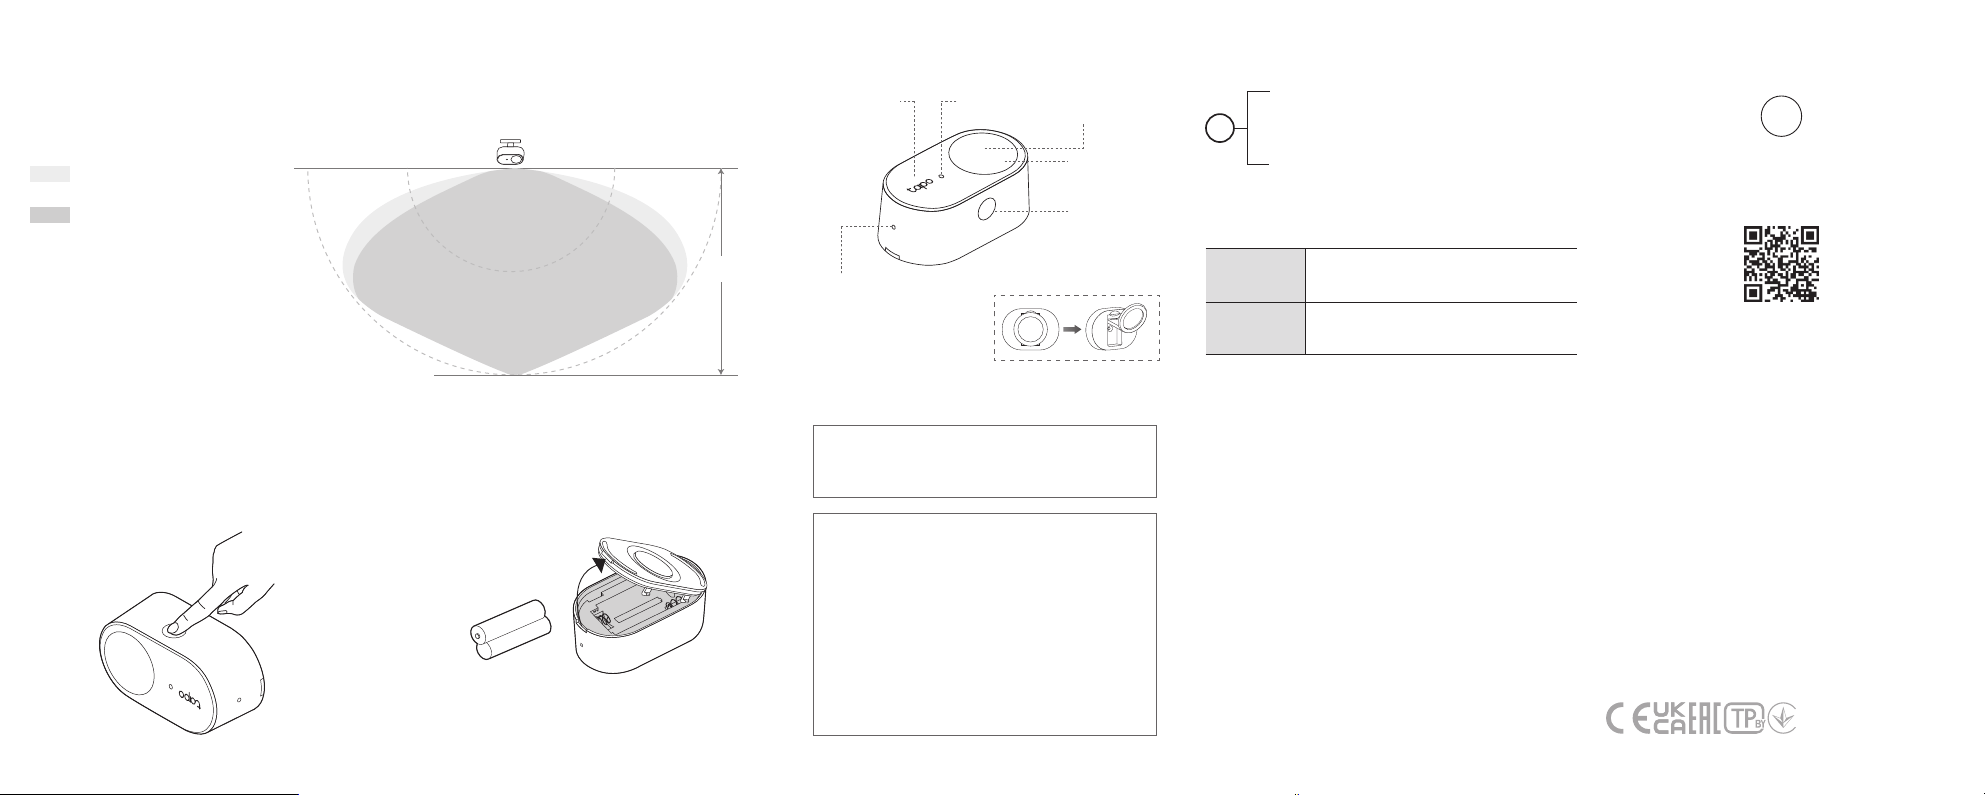
Detection Area
The sensor detects human presence and motion, making it easier to automate your space.
3m3m 6m 6m
6m
Detection Area
(Radar Mode)
Detection Area
(Hybrid Mode (Radar + PIR))
Press and hold the Control button for 5
seconds until the front LED starts blinking.
How to reset and enter pairing mode
5s
1) Remove the back cover.
2) Replace with the new batteries (AAA/LR03).
How to replace the battery
The installation height should not be higher than 2 meters.
Safety Information
• Keep the device away from water, re, humidity or hot
environments.
• Do not attempt to disassemble, repair, or modify the device.
• Do not use the device where wireless devices are not
allowed.
• If you need service, please contact us.
• Use of the Works with Apple badge means that an
accessory has been designed to work specically with the
technology identied in the badge and has been certied
by the developer to meet Apple’s performance standards.
Apple is not responsible for the operation of this device or
its compliance with safety and regulatory standards.
Please read and follow the above safety information when
operating the device. We cannot guarantee that no
accidents or damage will occur due to improper use of the
device. Please use this product with care and operate at your
own risk.
TP-Link hereby declares that the smart presence sensor is in
compliance with the essential requirements and other
relevant provisions of directives 2014/53/EU, 2011/65/EU
and (EU) 2015/863.
The original EU declaration of conformity may be found at
https://www.tapo.com/support/ce/
TP-Link hereby declares that the smart presence sensor is
in compliance with the essential requirements and other
relevant provisions of the Radio Equipment Regulations
2017.
The original UK declaration of conformity may be found at
https://www.tapo.com/support/ukca/
For EU/UK Region:
Operating Frequency / Nominal Operating Frequency /
Max Output Power:
863~865MHz / 863.35MHz / 25mW (e.r.p)
863~865MHz / 864.35MHz / 25mW (e.r.p)
868~868.6MHz / 868.35MHz / 25mW (e.r.p)
Avoid replacement of a battery with an incorrect type
that can defeat a safeguard.
Avoid disposal of a battery into re or a hot oven, or
mechanically crushing or cutting of a battery, that can
result in an explosion.
Do not leave a battery in an extremely high
temperature surrounding environment that can result
in an explosion or the leakage of ammable liquid or
gas; Do not leave a battery subjected to extremely low
air pressure that may result in an explosion or the
leakage of ammable liquid or gas.
Warning
Risk of explosion if the battery is replaced by an
incorrect type.
Warning
Operating Temperature: 0℃ (32℉) - 50℃ (122℉)
©2025 TP-Link
Need some help?
Visit https://www.tapo.com/support/
for technical support, the user guide,
FAQs, warranty & more
?
Control Button Explanation
LED Explanation
Double press
Test connection with the hub by
checking if the hub sounds an alarm.
Press and hold for 5 seconds
Reset and enter pairing mode.
Blinking
Blinks once*
Resetting and entering pairing mode;
Updating rmware
Human presence/motion detected
Appearance
Ambient Light
Sensor
Temperature
and Humidity
Sensor
PIR Motion
Sensor
Control Button
Radar Sensor
LED
Foldable Magnetic Base
*You can enable this LED status in the Tapo app.