Collector Cross Section
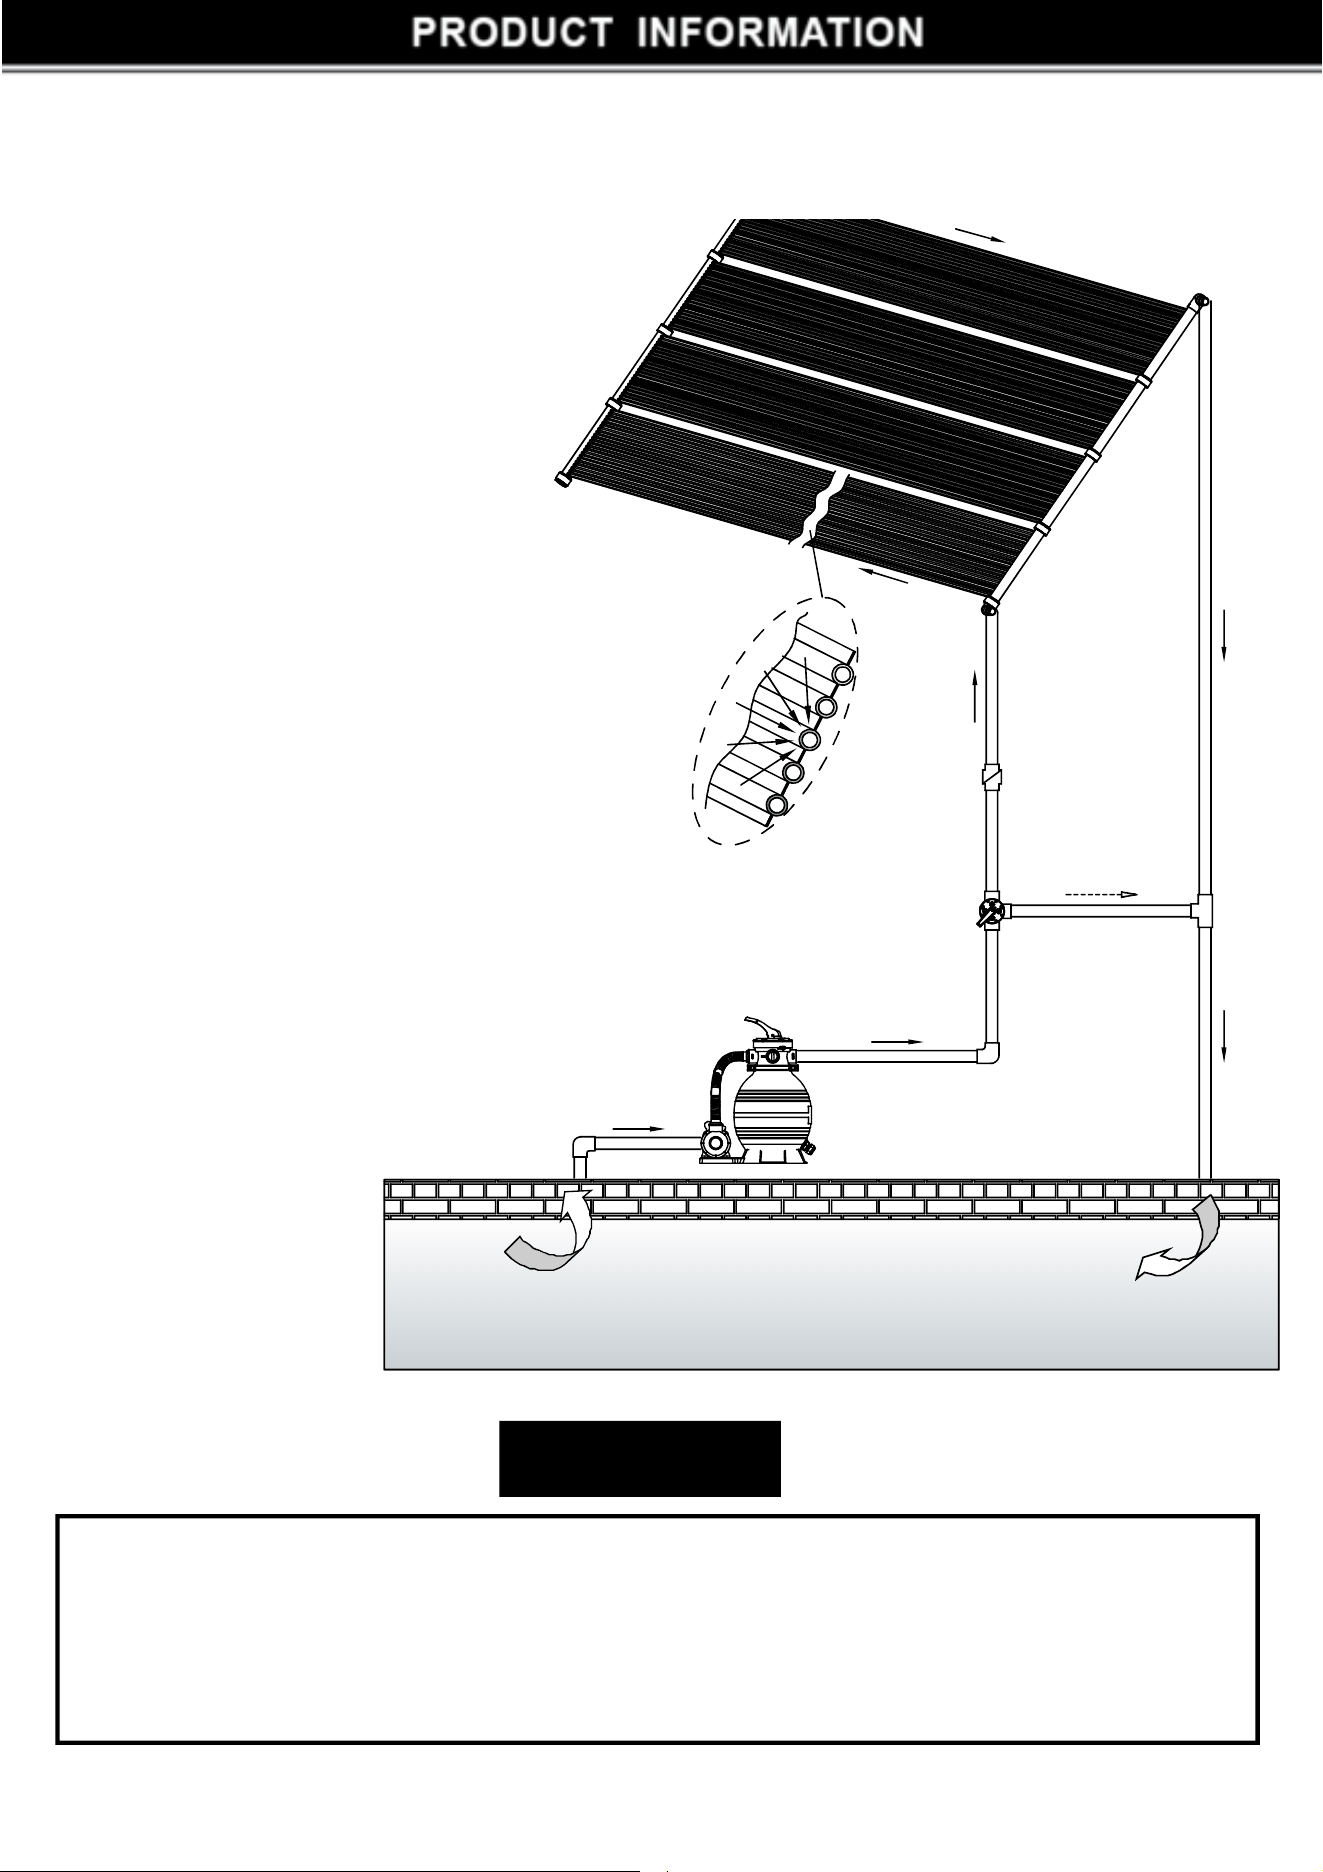
How Solar Panel Works
Using your pool pump, water is automatically
pumped through the solar collectors. The
water is then heated by the sun as it
moves
through the collectors. The heated
water is returned back to the pool, through
your return lines. You can enjoy your own
heated pool with no fuel costs.
PERFORMANCE
The design of the solar panel is so good that
it could reach the most heating area,
longest heating time and the best heating
affection. As the solar panel is made of PE
material, it won't rust, corrode or scale.
Plus, the panel is reversible which increases
its using life.
COOL
WARM
WHEN YOU CHOOSE YOUR SOLAR PANEL, YOU HAVE TO KNOW YOUR
POOL AND FILTRATION SYSTEMS WELL, WHEN YOU USE PUMP
GREATER THAN 0.5HP, YOU HAVE TO USE DIVERTER KIT
TO SHUNT FLOW, OR IT WILL AFFECT THE PRODUCT
LIFE.
(REFER TO
PAGE 3 FIGURE 2)
CAUTION
1

IMPORTANT
READ THIS ENTIRE MANUAL BEFORE STARTING
How Well Does Solar Heating Work?
A properly sized and installed system will raise pool temperatures up to 100F during the
season. You will only want to circulate water through the solar collector when the sun is
shining. When it's cloudy or rainy, solar won't work as well (and you probably won't be
swimming during those times), but your water will be back up to temperature after one or two
warm days.
Where Can I Put The Solar Collectors?
Anywhere you get at least 6 hours of full sun during the day. The longer the collectors are in full
sun, the better they will work.
If you are mounting the solar on an angle (like a roof or rack), the collectors should face in a
southerly direction. For roof or rack
What additional parts will I need to install the solar system on a roof?
You have to choose different additional kit components for your systems installation, and buy
the Diverter Kit and roof mounting kit
IF MOUNTING ON A RA
CK PLACED ON THE GROUND, POSITION THE RACK SO
THAT IT DOES NOT PROVIDE ACCESS TO THE POOL FOR CHILDREN.
PLEASE READ THIS MANUAL CAREFULLY. YOUR ENJOYMENT OF YOUR
SOLAR HEATED POOL AND YOUR WARRANTY ARE AFFECTED BY HOW
YOUR SOLAR HEATING SYSTEM IS INSTALLED
CAUTION: a) solar collectors are often installed on the roofs of buildings.
Unless you are very familiar with working on roofs and have the proper ladders
and safety equipment for such work, you should hire someone with the
necessary experience to do the installation. Failure to observe safe practices
on a roof or other elevated structure may result in falling, leading to serious
injury to you.
b) When installing collectors on the ground, do not build a rack support that
could allow children access into the pool.
WARNING!
2
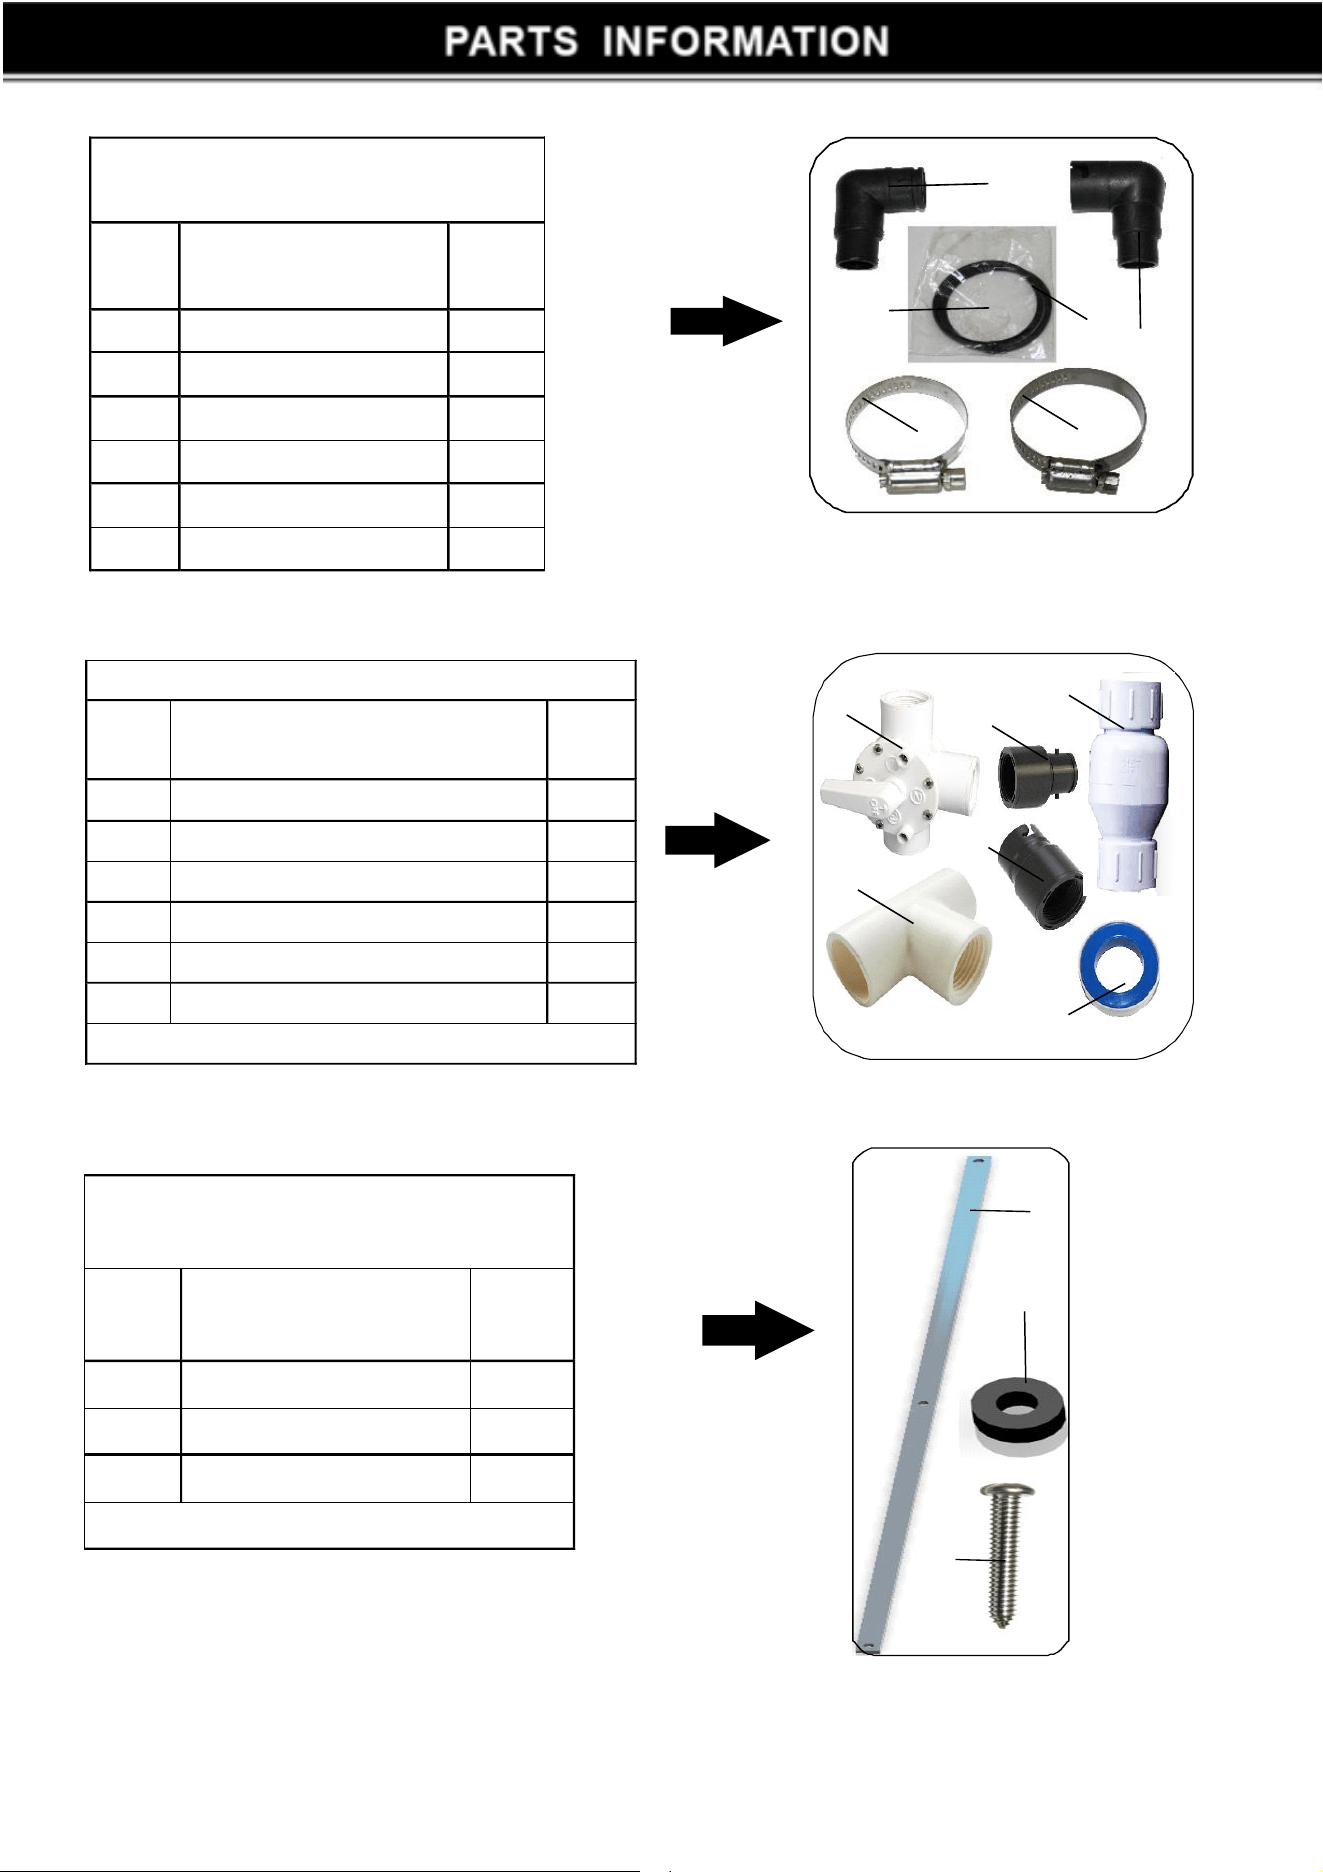
DIVERTERSET
ITEM
NO
DESCRIPTION QTY
1 3WAYVALVE 1
2
11/2"ThreadedCheckValve 1
3
TELPONTAPE 1
4
11/2"threadedtee 1
5
11/2Threadedmaleconnector 1
6 11/2Threadedfemaleconnectors 1
PURCHASEDSEPERATELY
STANDARD COMPONENTS
ITEM
NO
DESCRIPTION QTY
1.
ORING 2
2. SILICONLUBRICANT 1
3.
1-1/2” S.S.CLAMPS 2
4. 1-3/4” S.S.CLAMPS 2
5.
SMALLELBOW 1
6.
BIGELBOW 1
ROOFMOUNTING KIT
ITEM
NO
DESCRIPTION QTY
1
ALUMINUMFRAME 6
2 RUBBERGASKET 18
3
SCREWS 18
PURCHASEDSEPERATELY
1
2
3
5
6
4
1
1
2
3
2
4
3
5
6
FIGURE 1
FIGURE 2
FIGURE 3
3
CAUTION:
Unless you are familiar with working on roofs and have the proper ladders and safety equipment for such work, you
should hire someone with the necessary experience to do the installation. Failure to observe safe practices on a
roof
WARNING: DO NOT WALK ON THE SOLAR COLLECTORS
ROOF INSTALLATIONS: It is suggested that you use rigid PVC pipe for roof installations. The collector s
hould slope
slightly toward the inlet point (where the water enters the collectors) to allow for drainage.
COOL
WARM
4
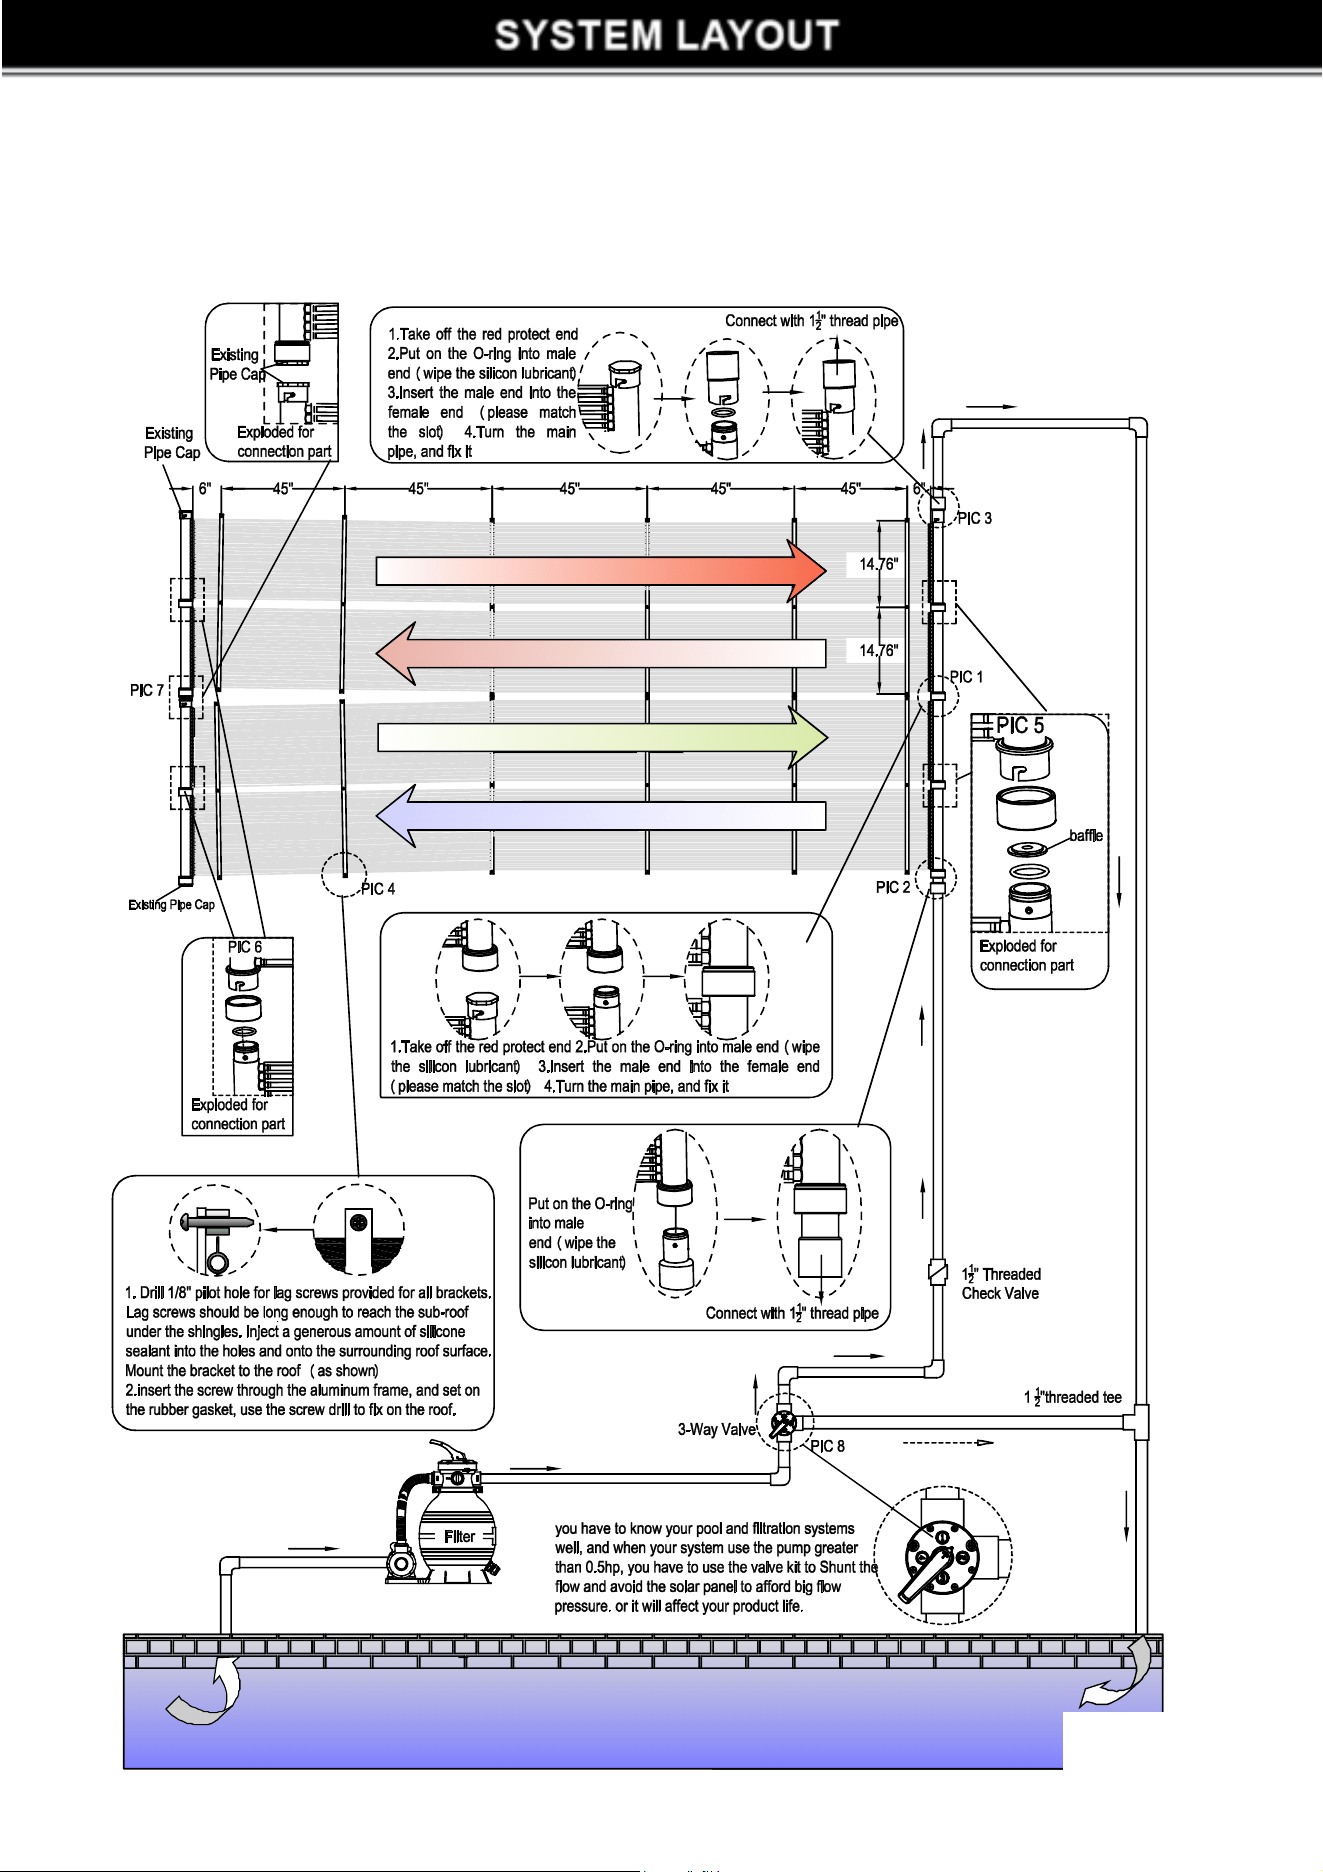
If your pump is greater than 0.5HP, please use the diverter kit (see page component kit) to shunt the flow
SYSTEM LAYOUT
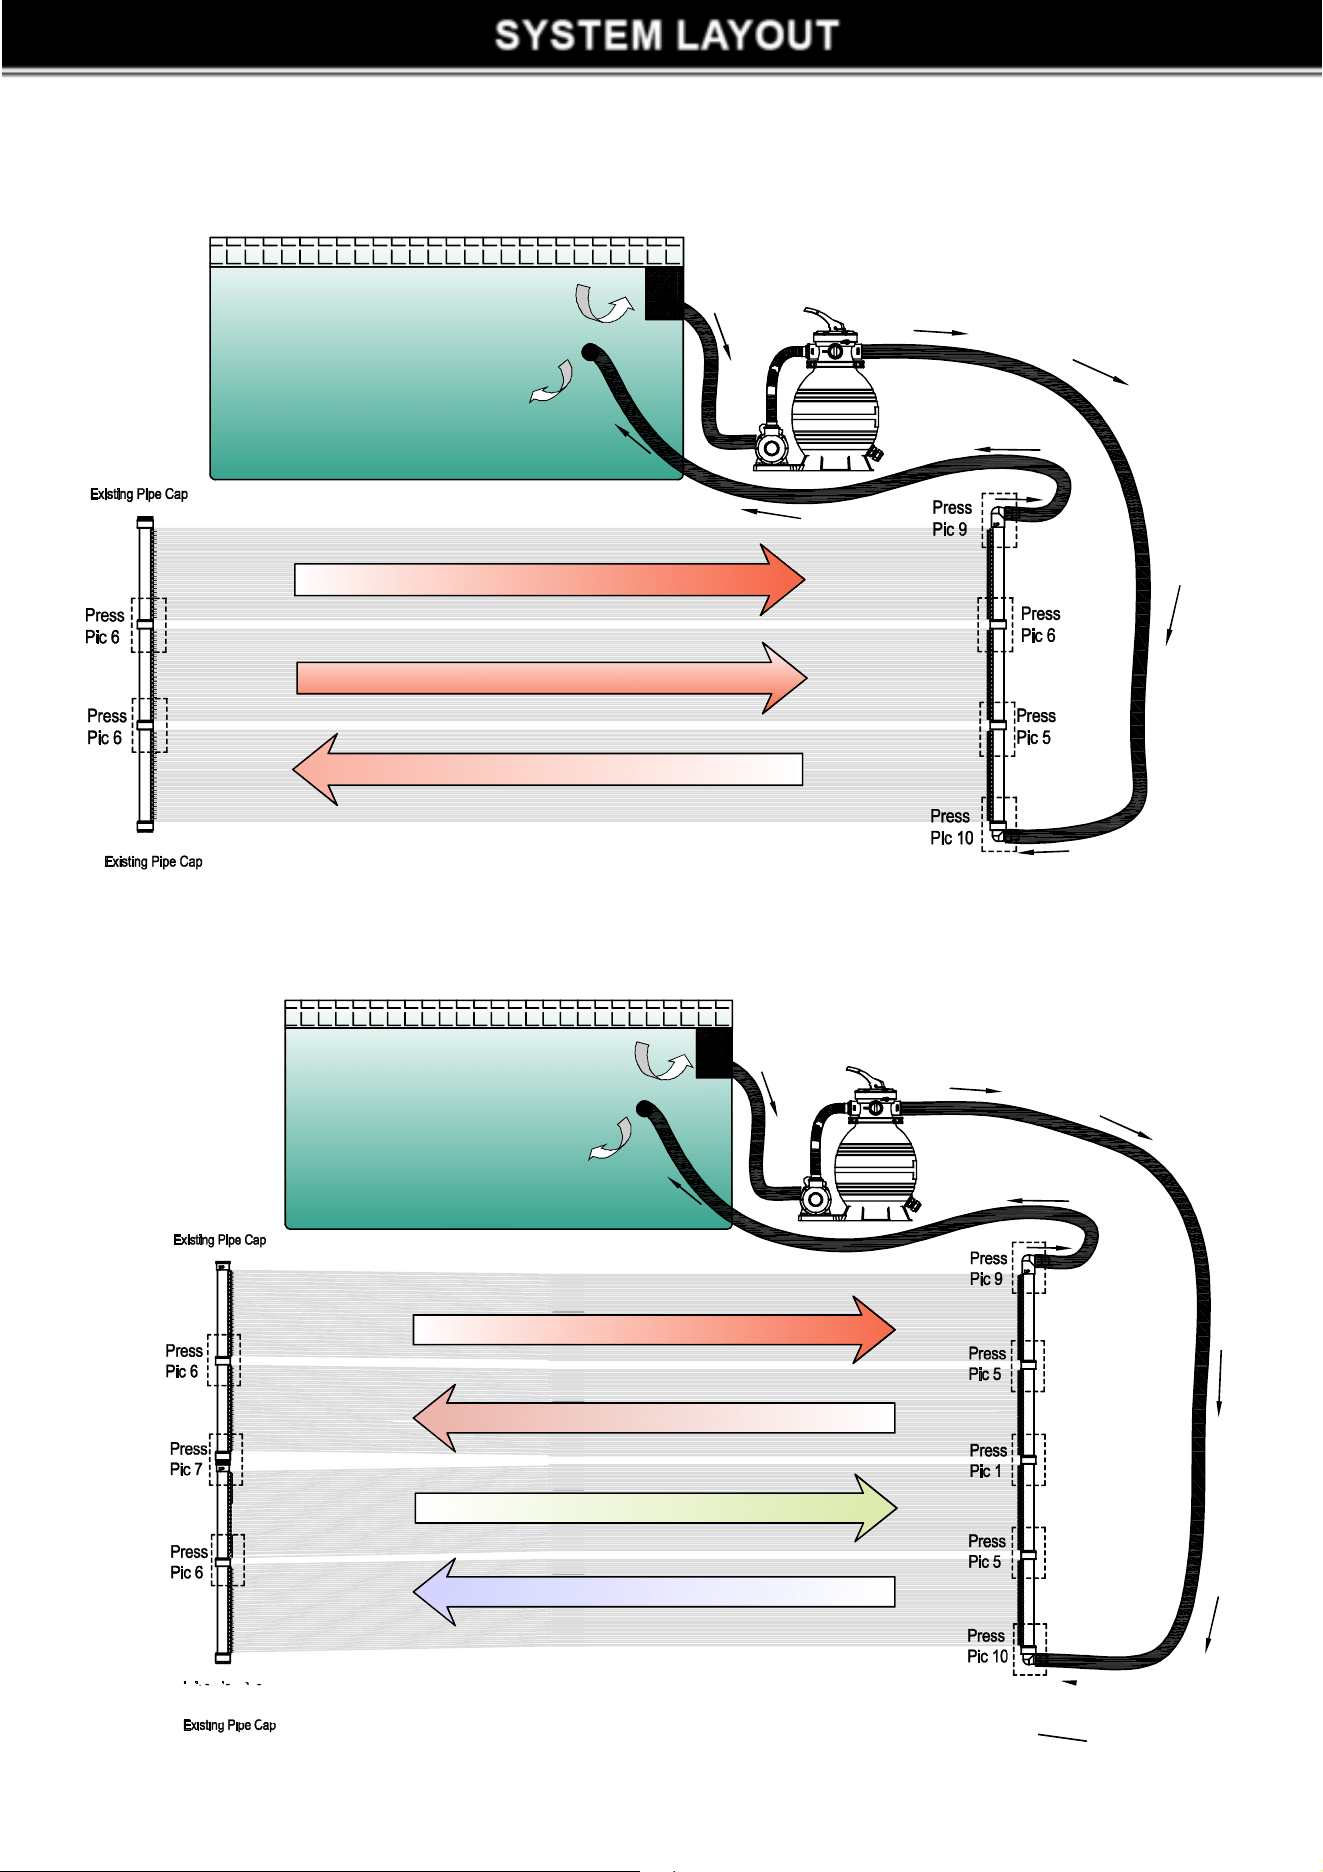
If your systems use the pump less than 0.5HP, please according the following picture to
connect the panel in the systems
WARM
WARM
COOL
COOL
5
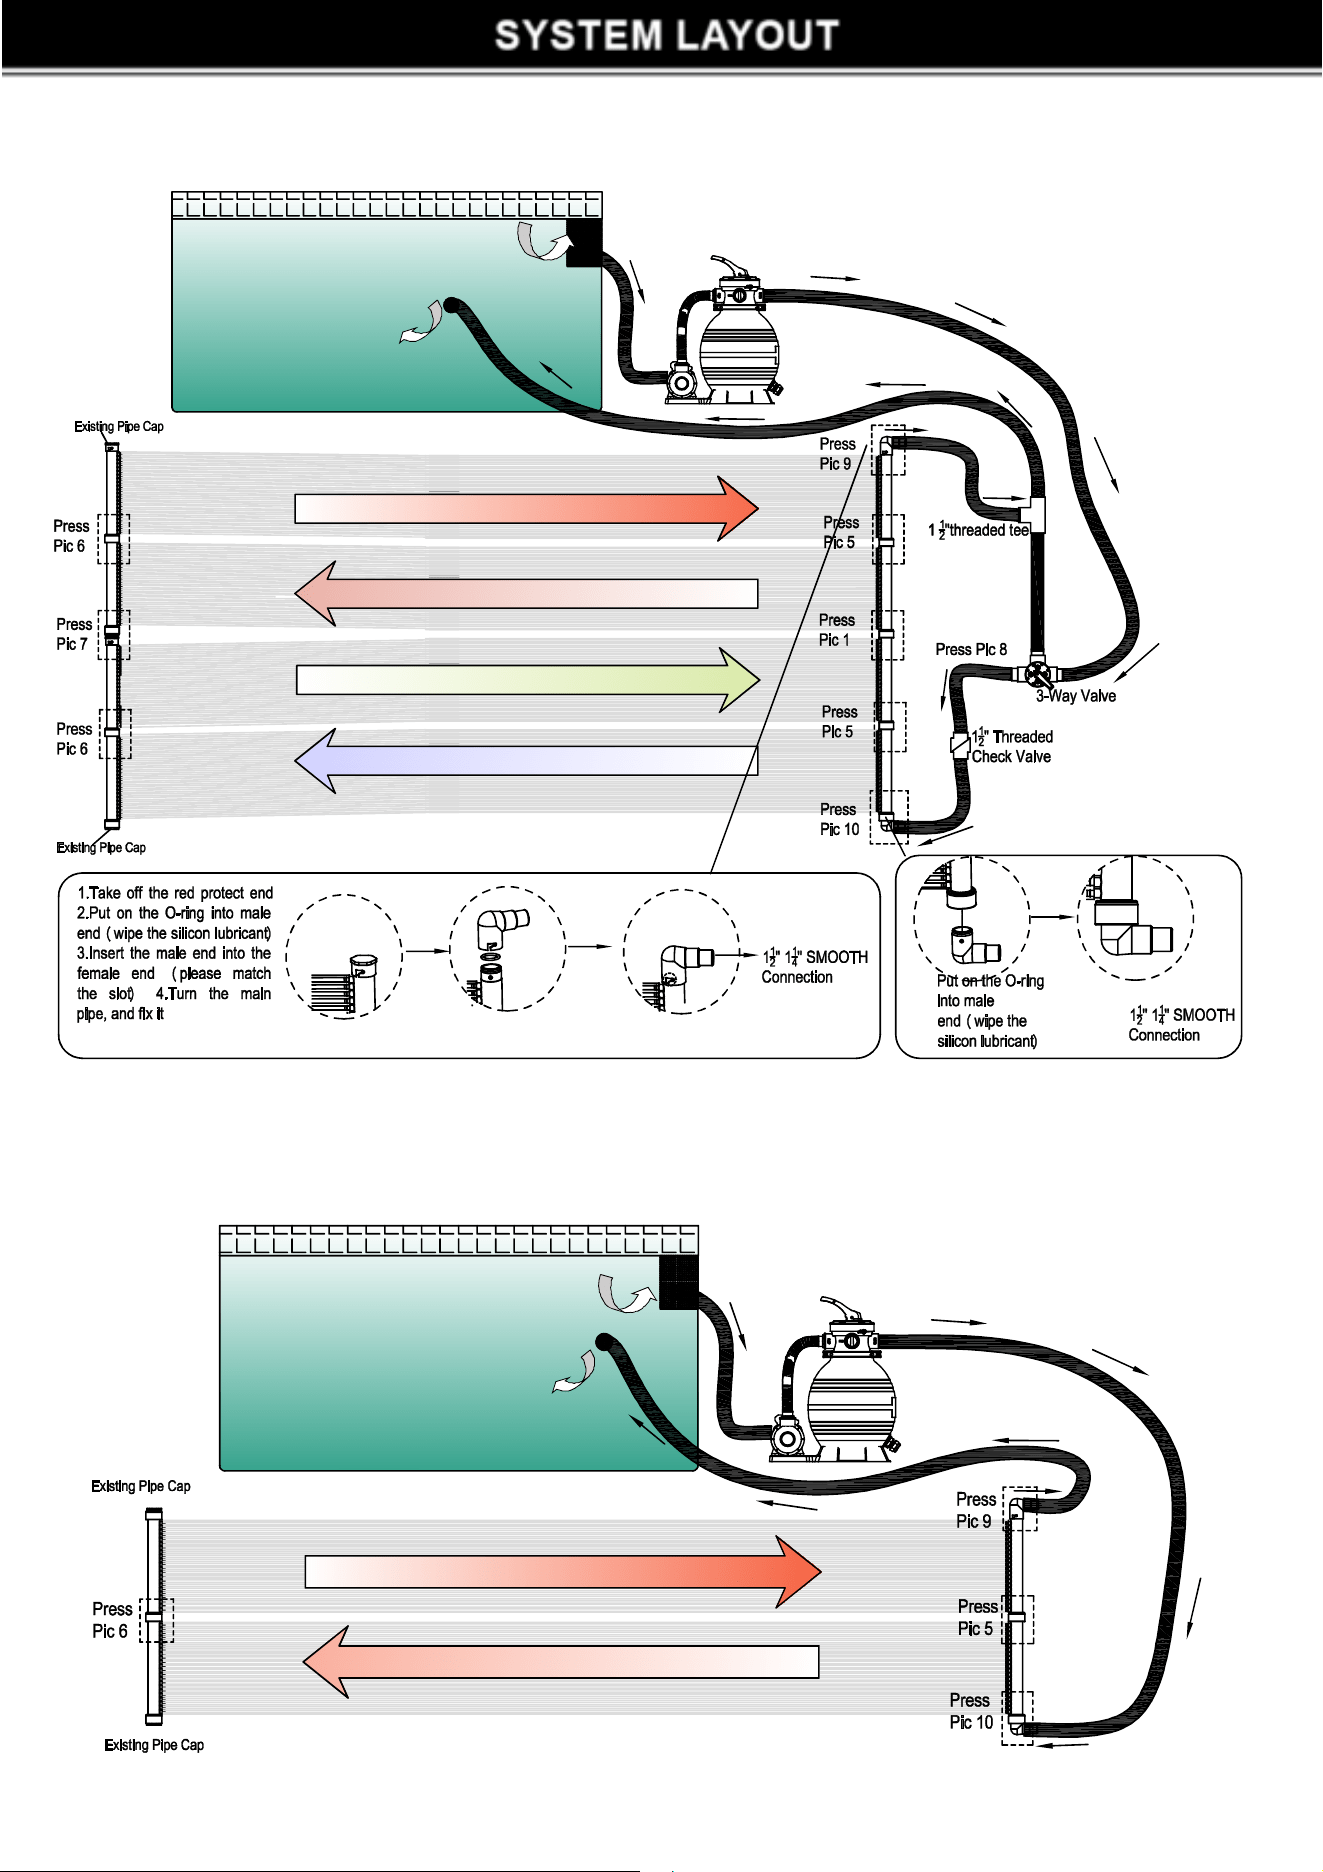
SYSTEM LAYOUT
When you
use the pump greater than 0.5HP, please refer the following connection way.
installation for 3pcs panel with pump 0.5HP or less than 0.5HP
WARM
COOL
WARM
COOL
6

Operation
1. The collectors should feel cool to the touch when the sun is shinning on
them and water is passing through. This means that the heat is being
transferred to the water.
2. The water returning to your pool will be a few degrees (3-5degrees) warmer
than the pool itself. This is the most efficient way to heat a large body of water
like a pool. Keep circulating the water, which adds a few degrees each pass.
3. Circulate water though the solar collectors at least 6 hours per day during
the daylight hours on sunny days. If you circulate water through it at night,
when it's overcast or on chilly days, you will cool your pool water rather than
heat it. If you need to run your pump at night, divert the water directly back to
the pool and bypass the solar system. An automatic controller will sense the
water temperature and available radiation from the sun and automatically turn
the 3-Way Valve to direct the flow of water accordingly.
WINTERIZATION
YOUR SOLAR SYSTEM MUST BE DRAINED FOR WINTERIZATION. FREEZE
DAMAGE IS NOT COVERED UNDER WARRANTY! YOU MUST DRAIN YOUR
SOLAR COLLECTORS JUST LIKE YOU DRAIN THE REST OF YOUR POOL
EQUIPMENT.
Remove the vacuum relief valve at the top of the solar system. Remove the
rubber end cap at the bottom and be sure ALL the water is drained out of the
system. Replace end caps and blow pressurized air in the reverse direction of
normal water flow. This is the most effective way to drain your system. You can
leave the collectors in place (as long as they are completely drained) and they
will withstand even the harshest winters. Of course, you can store your
collectors inside in a warm dry place. if you like.
7
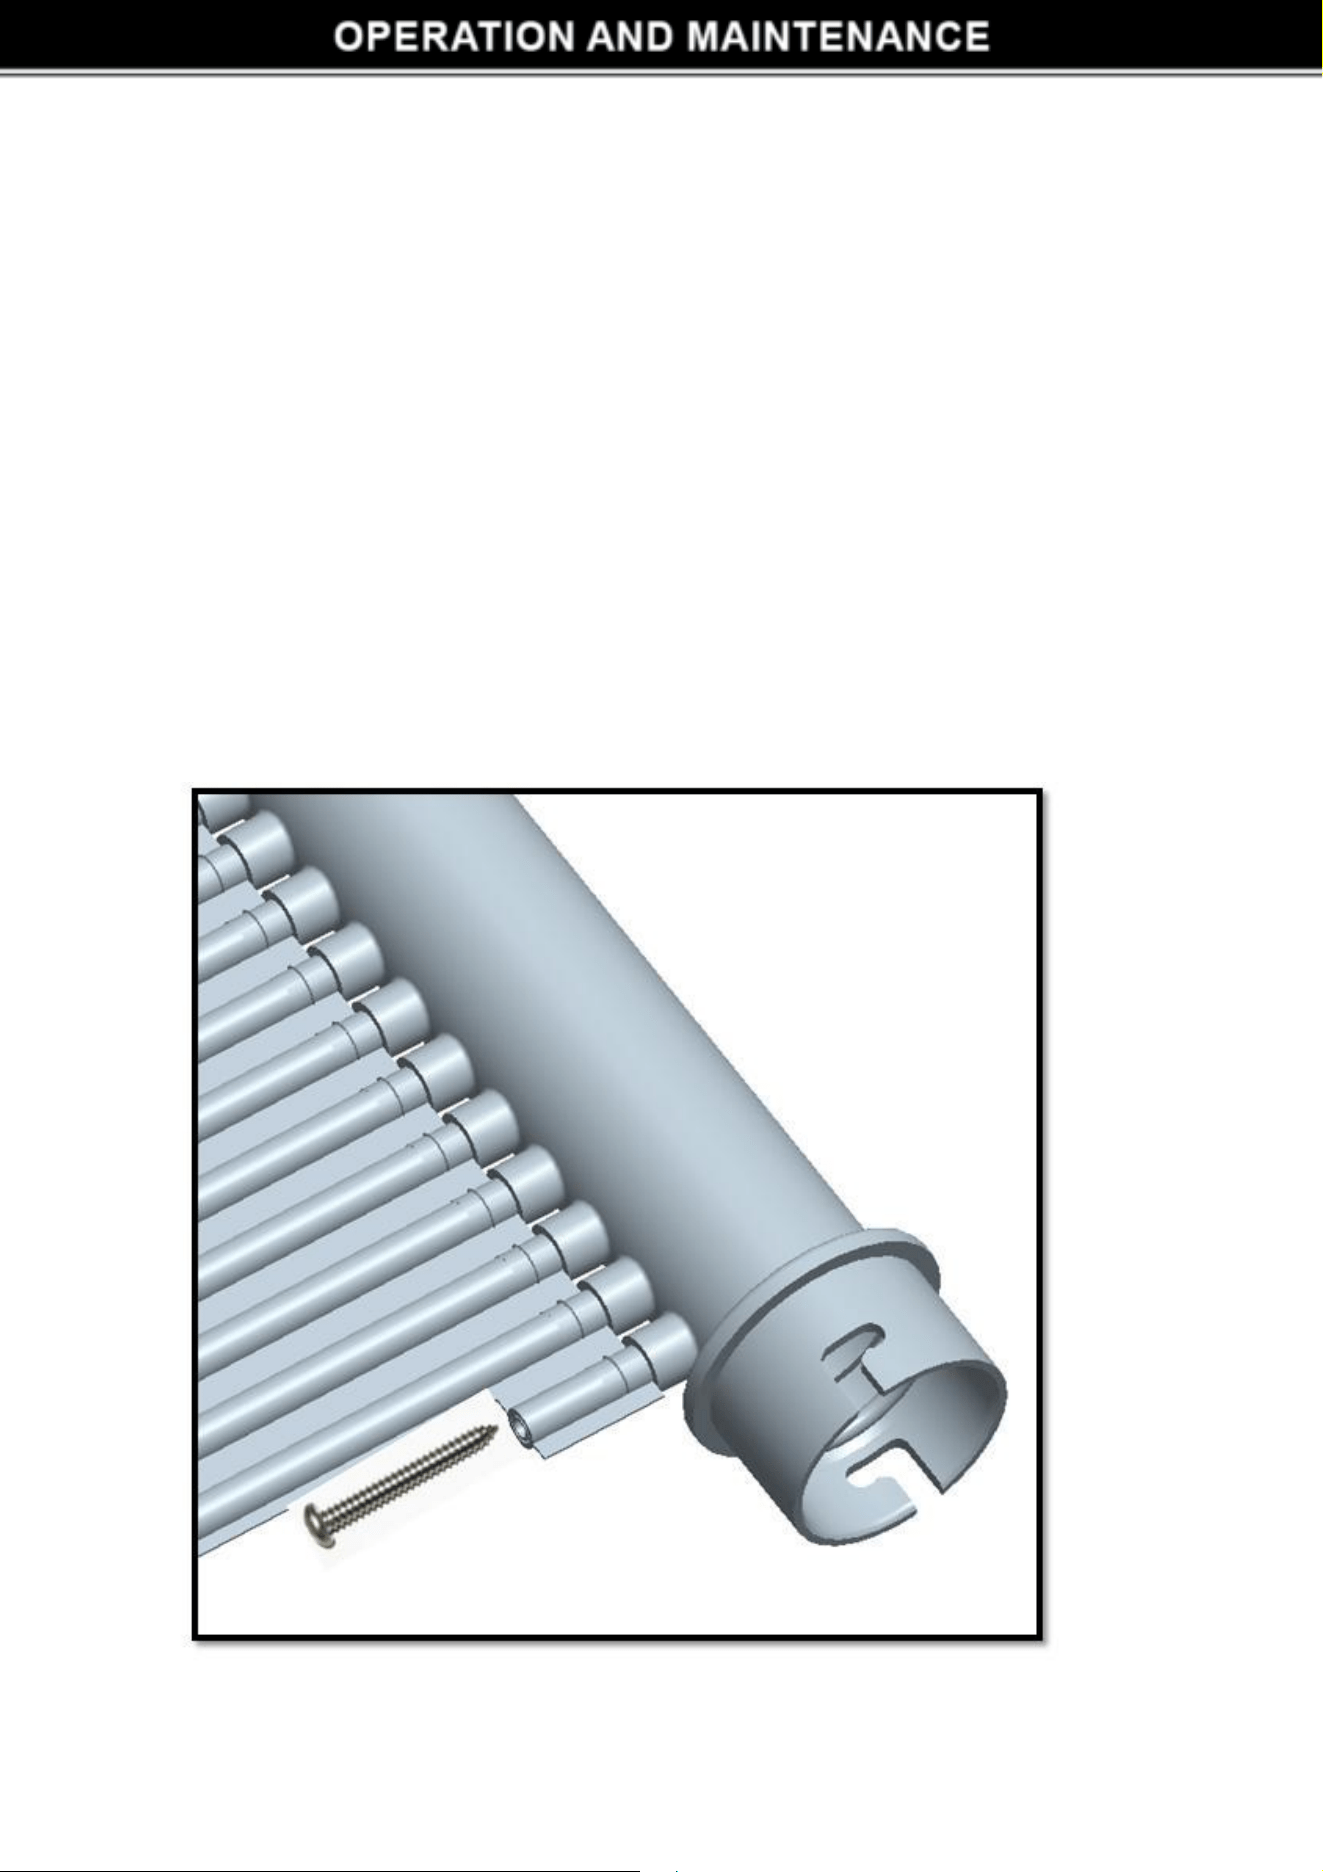
COLLECTOR REPAIR
IF A COLLECTOR DEVELOPS A LEAK
If a leak develops for any other reason, you may us
e the repair method shown.
The collectors are not warranted against freeze damage.
SOLAR COLLECTOR REPAIR
This method allows for an easy and permanent, on-site repair of a collector by
isolating the leading riser tube. Referring to the figure at the right, locate the
tube to be isolated. (End tube has been shown for clarity). Using a sharp utility
knife, very carefully cut away approximately 1" of the tube at both headers.
Drive a #10 sheet metal screw, preferably stainless, into the hole in the header.
The screw must be between 1/2" and 3/4" long.
DO NOT OVERTIGHTEN! If the screw strips out, or if the repair leaks,
use a #12 screw. This repair method will not void the collector warranty.
With proper care and winterization, you will enjoy your solar collectors for many
years.
8
9
