PERFORMANCE · QUALITY · CUSTOMER SERVICE
REVISED: FEBRUARY 18, 2025
© 2 0 2 3 T R A D E - W I N D M A N U F A C T U R I N G , L L C
P R O V E R B S 2 2 : 2 9
I N S T A L L A T I O N I N S T R U C T I O N S
& P R O D U C T S P E C I F I C A T I O N S
T R A D E - W I N D ® D A M P E R S
DPR006
DPR007
DPR008
DPR010
6"
7"
8"
10"
MODEL
DIAMETER
HEIGHT
2 ¼"
2 ¼"
2 ¼"
2 ¼"
Before beginning installation, please thoroughly read and become familiar with these instructions. Installation and
service must be completed by a qualified installer. Failure to properly install this product may void the warranty. Always
observe local building codes.
READ AND SAVE THESE INSTRUCTIONS
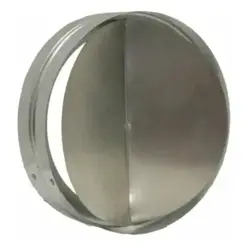
DESCRIPTION:
Trade-Wind® backdraft dampers are designed with a galvanized steel collar and lightweight aluminum damper blades that are
spring loaded for positive closure to a neoprene seal.
INSTALLATION DETAILS:
Select a mounting location. We recommend that the damper be installed just above the perimeter of the heated space (the
ceiling). This reduces the amount of cold or hot air traveling down the duct into the kitchen. For horizontal duct installations, the
damper must be installed so that the axis of the damper blade is vertical. For vertical duct installations, the damper can be
installed with the damper blade axis pointing in either direction. In slanted or angled installations, the damper axis must point to
the high side and low side of the duct. Because of gravity, mounting the damper in an inverted or incorrect axis position will
prevent the blades from closing. The preferred installation is in a section of vertical duct.
IMPORTANT: Dampers must always be installed so that the air flow direction will open the butterfly blades. If the
damper is installed between the range hood and an in-line blower, the blades should open toward the fan. If the damper
is installed between the fan and a roof or wall cap, the blades will open away from the fan. Insert the damper into the
ducting at the selected location. Always install with duct tape. Please verify that no screws are blocking the damper
blades.
8 0 0 W E S T G R A N T S T R E E T
P H O E N I X , A Z 8 5 0 0 7
1 - 8 0 0 - 9 5 5 - 5 7 3 7
6 0 2 - 9 0 0 - 8 5 0 0
T - W U S A . C O M
For more information, please contact your dealer or your TRADE-WIND® representative.
