by
Sanibel
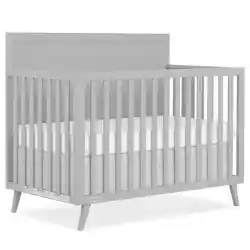
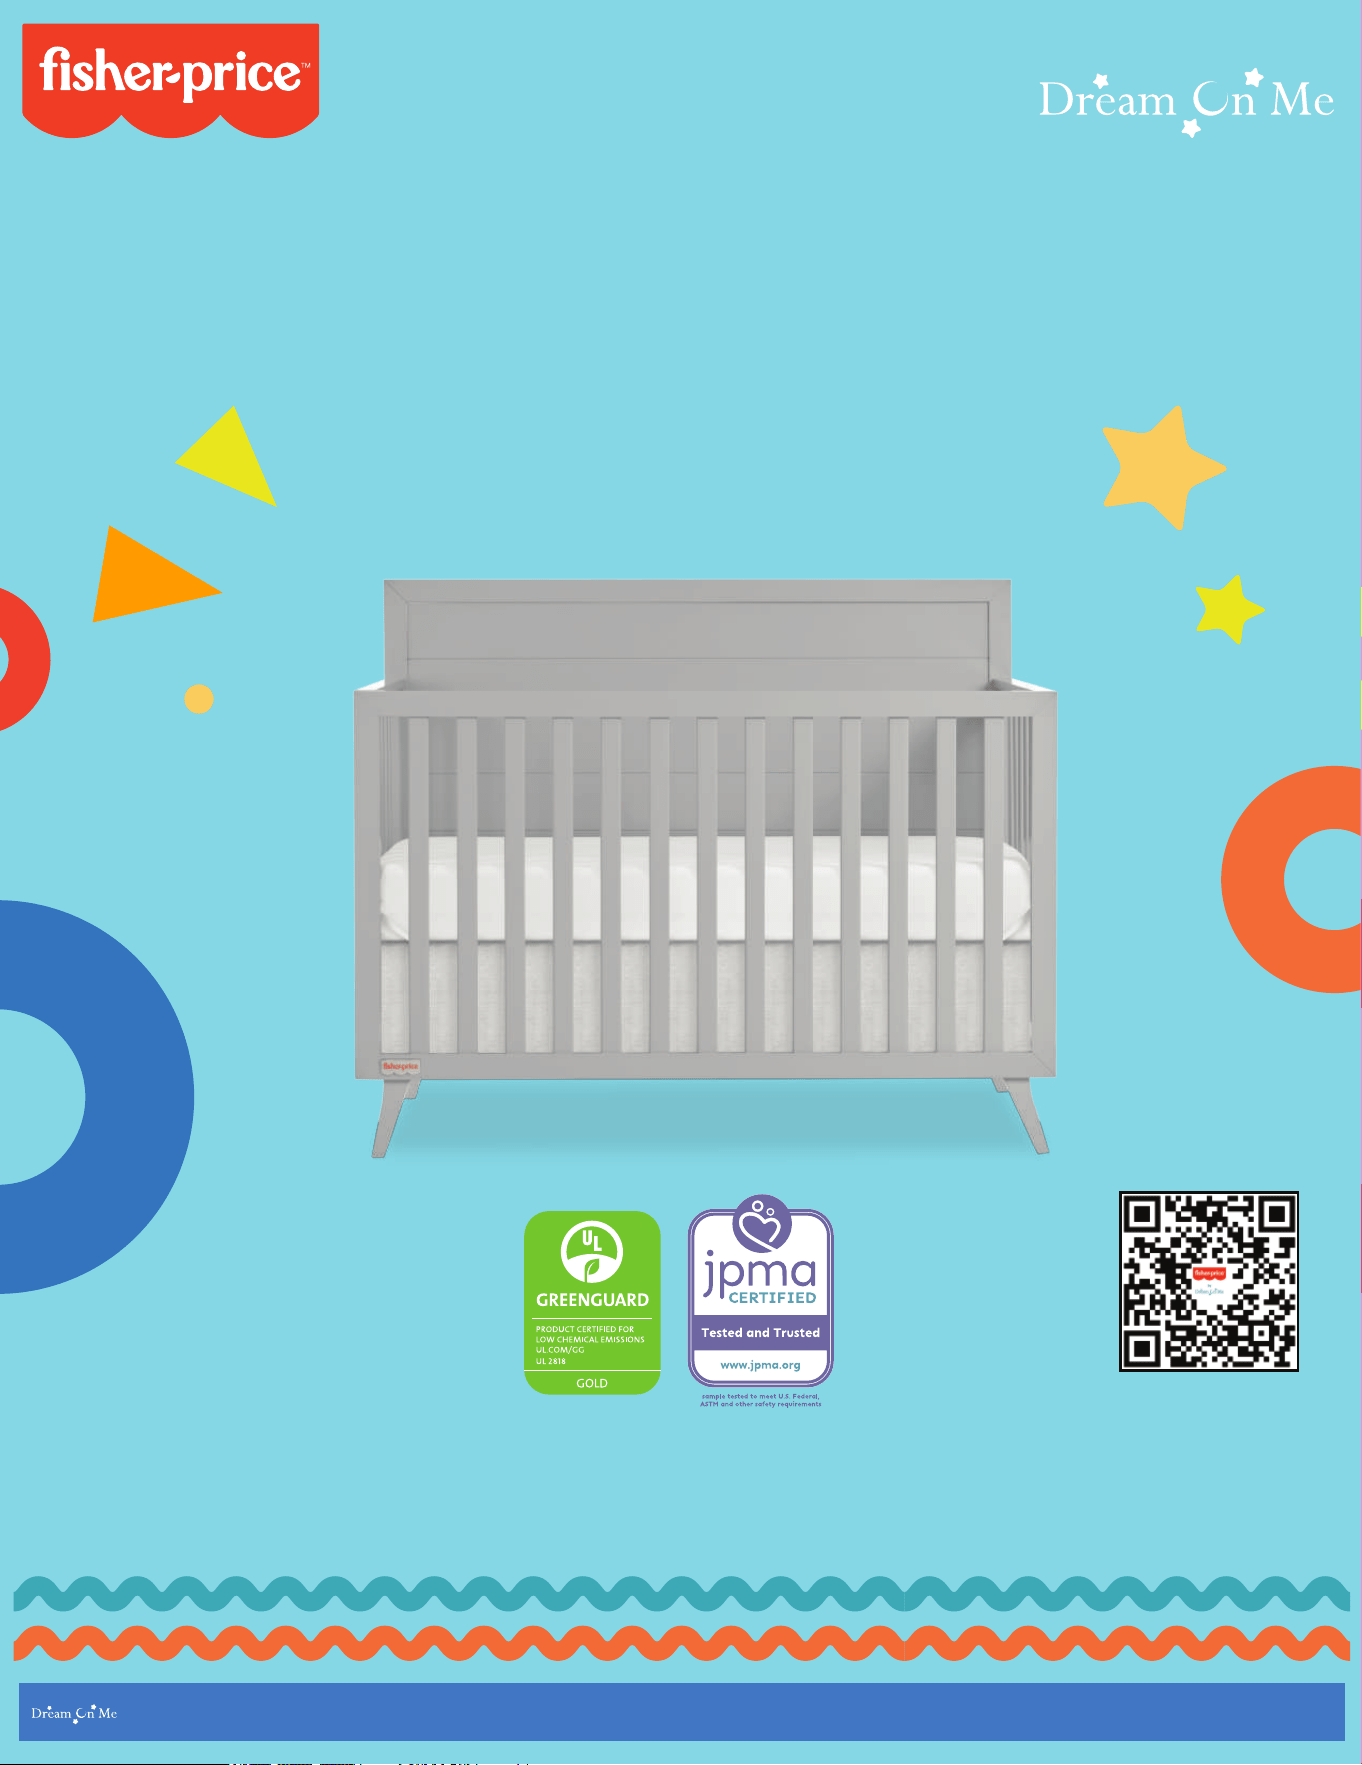
5 in 1 Convertible Crib
0323R1-SKU 789FP
Scan the QR code to
register your product
Scannez le code QR pour
enregistrer votre produit
Escanee el código QR para
registrar su producto
Read all instructions before
assembling and using product.
IMPORTANT - Keep instructions
for future use.
Lisez toutes les instructions avant avant
d'assembler et d'utiliser le produit.
IMPORTANT - Conservez les instructions
pour pour une utilisation ultérieure.
Lea todas las instrucciones antes
de montar y utilizar el producto.
IMPORTANTE - Guarde las
instrucciones para uso futuro.
OWNER’S MANUAL
MANUEL DU PROPRIÉTAIRE MANUAL DEL USUARIO
©2023 Mattel.
By

From mealtime to downtime, step to crawl, the Fisher-Price by Dream On Me collection
enables the modern parent to create experiences with multipurpose pieces.
Offering an entire range of nursery must-haves for infants to toddlers, each piece is playful, fun and aims to
ensure that every child’s imagination is always at play… wherever, whenever.
Say HELLO to the
Collection!
by
From mealtime to downtime, step to crawl, the Fisher-Price by Dream On Me collec
tion
enables the modern parent to create experiences with multipurpose pieces.
Offering an entire range of nursery must-haves for infants to toddlers, each piece is playful, fun and aims to
ensure that every child’s imagination is always at play… wherever, whenever.
2
By

De l'heure du repas à celle du repos, de la marche à la marche à quatre pattes, la collection
Fisher-Price by Dream On Me permet aux parents modernes de créer des expériences avec des
pièces polyvalentes.
La collection !
par
By
Dites bonjour à la
Où
L'imagination
Jeux
3
Proposant une gamme complète d'articles de puériculture pour les nourrissons et les jeunes enfants,
chaque pièce est ludique et amusante et vise à garantir que l'imagination de chaque enfant est toujours à
l'œuvre. l'imagination de chaque enfant... où qu'il soit, quand il le souhaite.

De la hora de comer al tiempo de descanso, del paso al gateo, la colección Fisher-Price by
Dream On Me permite a los padres modernos crear experiencias con piezas multiusos.
Con una gama completa de artículos indispensables para la guardería, desde bebés hasta niños pequeños,
cada pieza es lúdica, divertida y tiene como objetivo garantizar que la imaginación de cada niño esté siem-
pre en juego... donde sea y cuando sea.
¡Colección!
por
4
By
Saluda al
Dónde
Imaginación
Reproduce
SAFE SLEEP TIPS
5
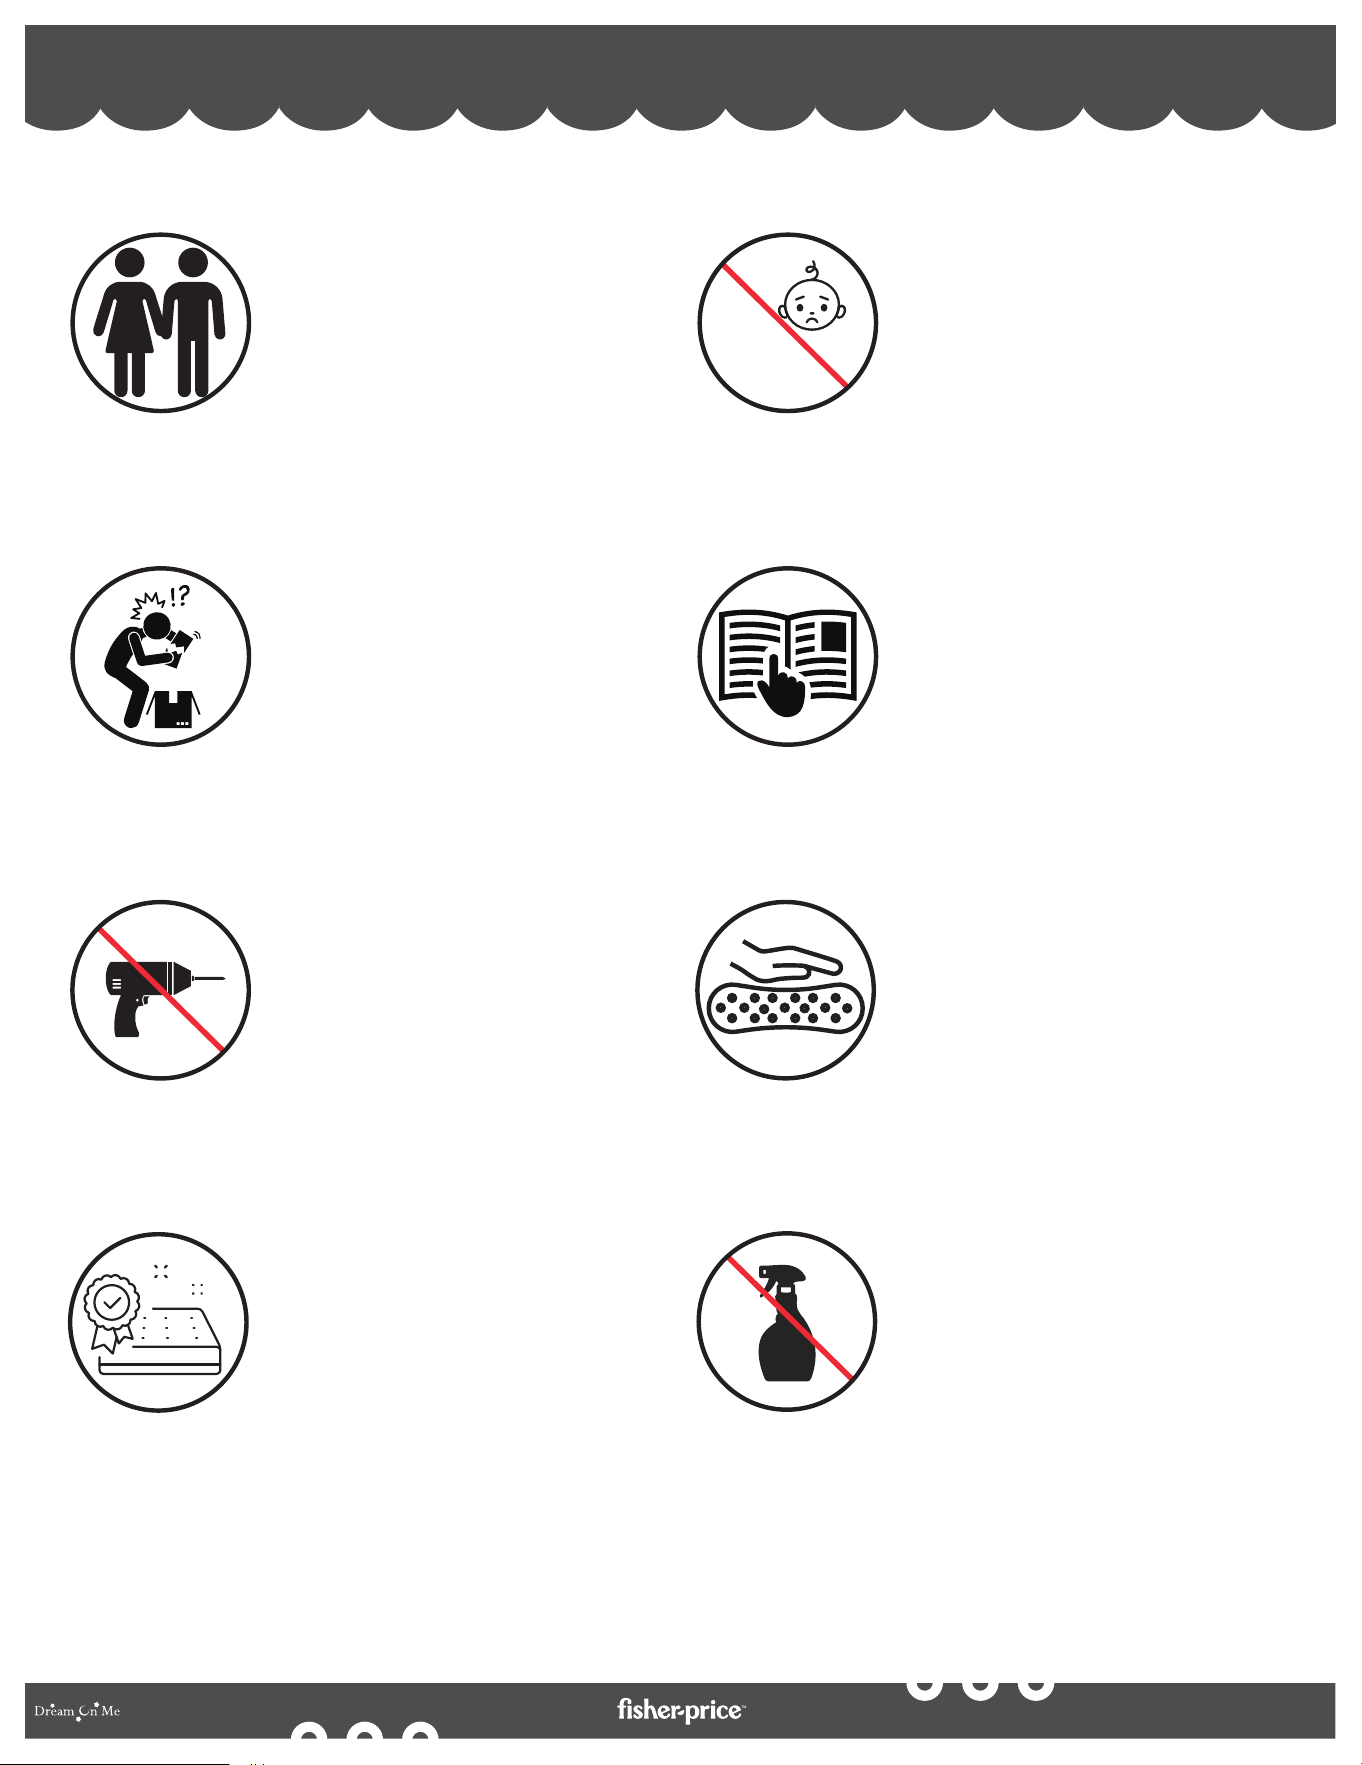
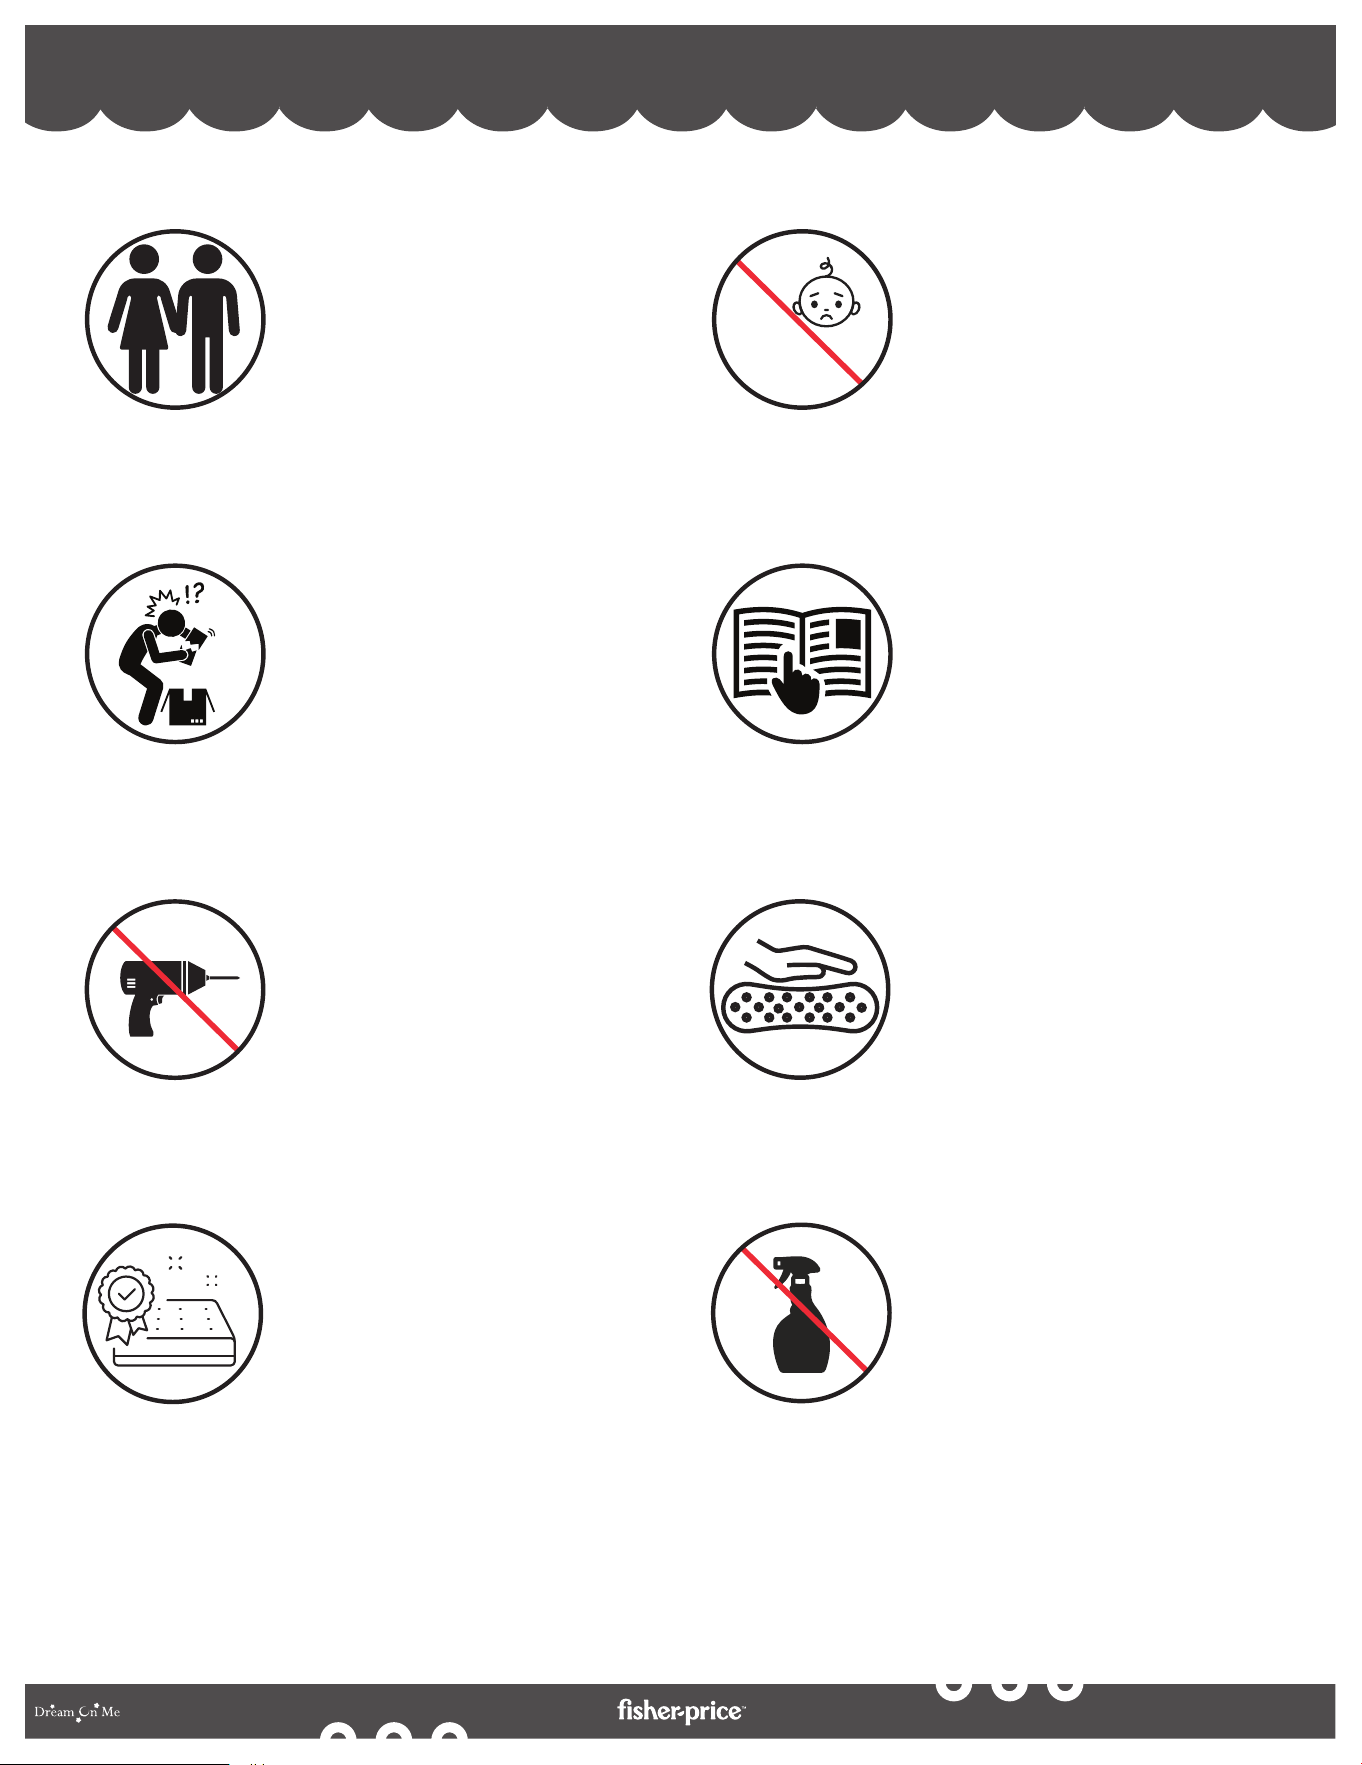
By
Adult Assembly Required.
DO NOT use the product if
it is damaged, broken,
and/or components are
missing or broken.
To protect your parts during
assembly, please place
them on a soft surface.
Small parts may present
choking hazard prior to
assembly.
Please read the instructions
thoroughly. Identify all parts
& hardware.
Do Not Use Power
Drills or Drivers.
To clean surface, use only
water on a damp cloth. Do
not use window cleaner or
cleaning abrasive as it will
scratch the surface and
could damage the
protective coating.
For a Safe and comfortable
Sleep experience, we
suggest using Dream On
Me or Evolur Greenguard
Gold Certified Full-Size
Mattress.
0-6

CONSEILS POUR UN SOMMEIL SÛR
6
By
Un assemblage par un
adulte est requis.
NE PAS utiliser le produit
s'il est endommagé, cassé,
et/ou si des composants
sont manquants ou cassés.
Pour protéger vos pièces
pendant l'assemblage,
veuillez les placer sur une
surface souple.
Les petites pièces
peuvent présenter un
risque d'étouffement
avant l'assemblage.
Veuillez lire attentivement
les instructions. Identifiez
toutes les pièces et le
matériel.
N'utilisez pas de
perceuse ou de
visseuse électrique.
Pour nettoyer la surface,
utilisez uniquement de l'eau
sur un chiffon humide.
N'utilisez pas de nettoyant
pour vitres ou d'abrasif de
nettoyage, car cela rayerait
la surface et pourrait
endommager le revêtement
protecteur.
Pour une expérience de
sommeil sûre et
confortable, nous vous
suggérons d'utiliser un
matelas pleine grandeur
certifié Greenguard Gold
de Dream On Me/Evolur.
0-6
7
CONSEJOS PARA DORMIR CON SEGURIDAD
By
Se requiere el montaje
por parte de un adulto.
NO utilice el producto si
está dañado, roto y/o faltan
componentes o están rotos.
Para proteger las piezas
durante el montaje,
colóquelas sobre una
superficie blanda.
Las piezas pequeñas
pueden presentar peligro
de asfixia antes del
montaje.
Lea detenidamente las
instrucciones. Identifique
todas las piezas y herrajes.
No utilice taladros o
atornilladores
eléctricos.
Para limpiar la superficie,
utilice sólo agua en un paño
húmedo. No utilice
limpiacristales o productos
de limpieza abrasivos, ya
que rayarán la superficie y
podrían dañar el
revestimiento protector.
Para una experiencia de
sueño segura y
confortable, sugerimos
usar el colchón de tamaño
completo Dream On
Me/Evolur Greenguard
Gold Certified.
0-6

8
By
WARNINGS
• FAILURE TO FOLLOW THESE WARNINGS AND ASSEMBLY INSTRUCTIONS COULD RESULT IN SERIOUS INJURY
OR DEATH.
• TO REDUCE THE RISK OF SIDS (SUDDEN INFANT DEATH SYNDROME), PEDIATRICIANS RECOMMEND HEALTHY
INFANTS BE PLACED ON THEIR BACKS TO SLEEP, UNLESS OTHERWISE ADVISED BY THEIR PHYSICIAN.
• CHECK THIS PRODUCT FOR DAMAGED HARDWARE, LOOSE JOINTS, MISSING PARTS, OR SHARP EDGES
BEFORE AND AFTER ASSEMBLY AND FREQUENTLY DURING USE.
• DO NOT USE THIS CRIB IF ANY PARTS ARE MISSING, DAMAGED, OR BROKEN. CONTACT DREAM ON ME - 45
VERONICA AVENUE SOMERSET NEW JERSEY 08873, 5375 BOULEVARD DES GRANDES PRAIRIES ST LEONARD,
QUÉBEC H1R 1B1 FOR REPLACEMENT PARTS.
• DO NOT USE A WATER MATTRESS WITH THIS CRIB.
• IF REFINISHING, USE A NON-TOXIC FINISH SPECIFIED FOR CHILDREN’S PRODUCTS.
• ENSURE A SAFE ENVIRONMENT FOR THE CHILD BY CHECKING REGULARLY, BEFORE PLACING THE CHILD IN
THE CRIB, THAT EVERY COMPONENT IS PROPERLY AND SECURELY IN PLACE.
• TO AVOID HEAD INJURY, DO NOT ALLOW ANY CHILD TO PLAY UNDERNEATH THE CRIB.
• NEVER ADD AN ACCESSORY SUCH AS A BASSINET OR CHANGING TABLE THAT EXTENDS OVER THE
SLEEPING AREA.
• IN CANADA, ONLY USE A CRIB MATTRESS THAT IS NO THICKER THAN 15 CM AND IS OF SUCH A SIZE THAT,
WHEN IT IS PUSHED FIRMLY AGAINST ANY SIDE OF THE CRIB, IT DOES NOT LEAVE A GAP OF MORE THAN 3
CM BETWEEN THE MATTRESS AND ANY PART OF THE SIDES OF THE CRIB.
• DO NOT USE THIS CRIB FOR A CHILD WHO CAN CLIMB OUT OF IT OR WHO IS TALLER THAN 90 CM.
STRANGULATION HAZARD:
• STRINGS CAUSE STRANGULATION! DO NOT PLACE ITEMS WITH A STRING AROUND A CHILD’S NECK, SUCH AS
HOOD STRINGS OR PACIFIER CORDS. DO NOT SUSPEND STRINGS OVER A CRIB OR ATTACH STRINGS TO
TOYS.
• TO HELP PREVENT STRANGULATION TIGHTEN ALL FASTENERS. A CHILD CAN TRAP PARTS OF THE BODY OR
CLOTHING ON LOOSE FASTENERS.
• DO NOT PLACE A CRIB NEAR A WINDOW WHERE CORDS FROM BLINDS OR DRAPES MAY STRANGLE A CHILD.
• INFANTS CAN SUFFOCATE ON SOFT BEDDING.
• NEVER ADD A PILLOW, COMFORTER, OR PADDING.
• NEVER PLACE ADDITIONAL PADDING UNDER THE INFANT.
• NEVER USE PLASTIC SHIPPING BAGS OR ANY PLASTIC FILM AS MATTRESS COVERS, BECAUSE THEY CAN
CAUSE SUFFOCATION.
• INFANTS CAN SUFFOCATE IN GAPS BETWEEN CRIB SIDES AND A MATTRESS THAT IS TOO SMALL.
• ANY MATTRESS USED IN THIS CRIB MUST BE AT LEAST 27-1/4 IN (69 CM) BY 51-5/8 IN (131 CM), WITH A
THICKNESS NOT EXCEEDING 6 IN (15 CM) AND A MINIMUM THICKNESS OF 4 IN (10 CM). THE DIMENSIONS OF
THE MATTRESS SHALL BE TAKEN FROM SEAM TO SEAM OR EDGE TO EDGE WHERE APPROPRIATE.
FALL HAZARD:
• WHEN THE CHILD IS ABLE TO PULL TO A STANDING POSITION, SET THE MATTRESS TO THE LOWEST
POSITION AND REMOVE BUMPER PADS, LARGE TOYS, AND OTHER OBJECTS THAT COULD SERVE AS STEPS
FOR CLIMBING OUT. AFTER RAISING THE SIDE, MAKE SURE THE LATCHES ARE SECURE (DISREGARD FOR
NON-DROP SIDE CRIB).
• DO NOT LEAVE THE CHILD IN THE CRIB WITH THE SIDES LOWERED. BE SURE THE SIDE IS IN RAISED AND
LOCKED POSITION WHENEVER THE CHILD IS IN CRIB (DISREGARD FOR NON-DROP SIDE CRIB).
• STOP USING THE CRIB WHEN THE CHILD BEGINS TO CLIMB OUT OR REACHES THE HEIGHT OF 35 IN (89 CM).
• WHEN STORING A CRIB USE CAUTION AS EXTREME CHANGES IN TEMPERATURE OR HUMIDITY CAN
COMPROMISE THE CRIB MAKING IT EXTREMELY DANGEROUS TO YOUR CHILD.
• USE CAUTION WHEN A VAPORIZER OR HUMIDIFIER IS IN USE. ALWAYS AIM VAPOR AWAY FROM THE CRIB AS
WELL AS ANY OTHER WOODEN FURNITURE. PROLONGED PERIODS OF HUMIDITY IN STORAGE AS WELL AS IN
THE HOME CAN COMPROMISE THE CRIB.
• AVOID USING VAPORIZERS AND HUMIDIFIERS FOR PROLONGED PERIODS OF TIME.
• FOLLOW WARNINGS ON ALL PRODUCTS IN CRIB.
9
By
WARNINGS (cont.)
WARNING:
WARNING
CAUTION
TODDLER BED
Failure to follow these warnings and the instructions could result in serious injury or death.
INFANTS HAVE DIED IN TODDLER BEDS FROM ENTRAPMENT.
Openings in and between bed parts can entrap head and neck of a small child.
NEVER use bed with children younger than 15 months.
ALWAYS follow assembly instructions.
The maximum user weight is 50Ibs(22.7kg)
STRANGULATION HAZARD
NEVER place bed near windows where cords from blinds or drapes may strangle a child.
NEVER suspend strings over a bed.
NEVER place items with a string,cord,or ribbon,such as hood strings or pacifier cords,
around a child’s neck. These items may catch on bed parts.
ENTRAPMENT HAZARD
To avoid dangerous gaps, any mattress used in this bed shall be a full-size crib mattress
at least 51 5/8 in (1310mm) in length, 27 1/4 (690mm) in width and a max thickness of
5 in(125mm).
NOTES ON ASSEMBLY:
• During the assembly process whenever using screws or bolts, check each by placing the
screw/bolt on the diagram of the item which is drawn actual size and design. Be sure to
use the proper size and shape specified in the instructions.
• To assemble this unit you may be required to place the unit on it’s side and face. It is
strongly recommended that assembly is done on a soft, non-abrasive surface to avoid
damaging the finish.
NOTES ON USE:
• Keep children and others safe by following these simple rules:
• Do not allow any child to play on furniture.
• Do not allow climbing on any piece of furniture.
• Do not allow hanging from any piece of furniture.
• Always monitor your child’s activity when in the nursery.

• LE NON-RESPECT DE CES AVERTISSEMENTS ET DES INSTRUCTIONS D'ASSEMBLAGE PEUT ENTRAÎNER DES
BLESSURES GRAVES, VOIRE MORTELLES.
• POUR RÉDUIRE LE RISQUE DE SIDS (SYNDROME DE MORT SUBITE DU NOURRISSON), LES PÉDIATRES
RECOMMANDENT DE COUCHER LES NOURRISSONS EN BONNE SANTÉ SUR LE DOS POUR DORMIR, SAUF AVIS
CONTRAIRE DU MÉDECIN.
• VÉRIFIEZ QUE LE PRODUIT N'EST PAS ENDOMMAGÉ, QU'IL N'Y A PAS DE JOINTS L CHES, DE PIÈCES MANQUANTES OU
D'ARÊTES VIVES AVANT ET APRÈS L'ASSEMBLAGE, ET FRÉQUEMMENT PENDANT L'UTILISATION.
• N'UTILISEZ PAS CE LIT SI DES PIÈCES SONT MANQUANTES, ENDOMMAGÉES OU CASSÉES. CONTACTEZ DREAM ON
ME - 45 VERONICA AVENUE SOMERSET NEW JERSEY 08873, 5375 BOULEVARD DES GRANDES PRAIRIES ST LEONARD,
QUÉBEC H1R 1B1 POUR OBTENIR DES PIÈCES DE RECHANGE.
• NE PAS UTILISER DE MATELAS D'EAU AVEC CE LIT D'ENFANT.
• EN CAS DE RÉNOVATION, UTILISER UN PRODUIT DE FINITION NON TOXIQUE SPÉCIFIÉ POUR LES PRODUITS DESTINÉS
AUX ENFANTS.
• ASSUREZ UN ENVIRONNEMENT SÛR POUR L'ENFANT EN VÉRIFIANT RÉGULIÈREMENT, AVANT DE PLACER L'ENFANT
DANS LE LIT, QUE CHAQUE ÉLÉMENT EST CORRECTEMENT ET SOLIDEMENT EN PLACE.
• POUR ÉVITER LES BLESSURES À LA TÊTE, NE LAISSEZ PAS UN ENFANT JOUER SOUS LE LIT.
• N'AJOUTEZ JAMAIS UN ACCESSOIRE TEL QU'UN COUFFIN OU UNE TABLE À LANGER QUI DÉPASSE DE L'AIRE DE
COUCHAGE.
• AU CANADA, N'UTILISEZ QU'UN MATELAS DE LIT D'ENFANT DONT L'ÉPAISSEUR NE DÉPASSE PAS 15 CM ET DONT LA
TAILLE EST TELLE QUE, LORSQU'IL EST POUSSÉ FERMEMENT CONTRE L'UN DES CÔTÉS DU LIT, IL NE LAISSE PAS UN
ESPACE DE PLUS DE 3 CM ENTRE LE MATELAS ET N'IMPORTE QUELLE PARTIE DES CÔTÉS DU LIT.
• N'UTILISEZ PAS CE LIT POUR UN ENFANT QUI PEUT GRIMPER HORS DU LIT OU QUI MESURE PLUS DE 90 CM.
RISQUE DE STRANGULATION:
• LES FICELLES SONT UN FACTEUR DE STRANGULATION ! NE PLACEZ PAS D'OBJETS MUNIS D'UNE FICELLE AUTOUR DU
COU DE L'ENFANT, TELS QUE LES CORDONS DE LA CAPUCHE OU DE LA SUCETTE. NE SUSPENDEZ PAS DE FICELLES
AU-DESSUS DU LIT DE L'ENFANT ET N'ATTACHEZ PAS DE FICELLES AUX JOUETS.
• POUR ÉVITER LA STRANGULATION, SERREZ TOUTES LES ATTACHES. UN ENFANT PEUT COINCER DES PARTIES DE
SON CORPS OU DE SES VÊTEMENTS DANS DES ATTACHES MAL SERRÉES.
• NE PLACEZ PAS LE BERCEAU PRÈS D'UNE FENÊTRE OÙ LES CORDONS DES STORES OU DES RIDEAUX PEUVENT
ÉTRANGLER L'ENFANT.
• LES NOURRISSONS PEUVENT SUFFOQUER SUR UNE LITERIE MOLLE.
• N'AJOUTEZ JAMAIS D'OREILLER, D'ÉDREDON OU DE REMBOURRAGE.
• NE JAMAIS PLACER DE REMBOURRAGE SUPPLÉMENTAIRE SOUS LE NOURRISSON.
• N'UTILISEZ JAMAIS DE SACS D'EXPÉDITION EN PLASTIQUE OU DE FILMS PLASTIQUES COMME HOUSSES DE MATELAS,
CAR ILS PEUVENT PROVOQUER UN ÉTOUFFEMENT.
• LES ENFANTS PEUVENT SUFFOQUER DANS LES ESPACES ENTRE LES CÔTÉS DU LIT ET UN MATELAS TROP PETIT.
• TOUT MATELAS UTILISÉ DANS CE LIT D'ENFANT DOIT MESURER AU MOINS 69 CM SUR 131 CM, AVEC UNE ÉPAISSEUR
MAXIMALE DE 15 CM ET UNE ÉPAISSEUR MINIMALE DE 10 CM. LES DIMENSIONS DU MATELAS DOIVENT ÊTRE PRISES
D'UNE COUTURE À L'AUTRE OU D'UN BORD À L'AUTRE, LE CAS ÉCHÉANT.
RISQUE DE CHUTE:
• LORSQUE L'ENFANT EST CAPABLE DE SE METTRE DEBOUT, PLACEZ LE MATELAS DANS LA POSITION LA PLUS BASSE
ET RETIREZ LES PARE-CHOCS, LES GROS JOUETS ET LES AUTRES OBJETS QUI POURRAIENT SERVIR DE
MARCHEPIEDS POUR SORTIR. APRÈS AVOIR RELEVÉ LE CÔTÉ, ASSUREZ-VOUS QUE LES LOQUETS SONT BIEN FIXÉS
(NE PAS TENIR COMPTE DES BERCEAUX À CÔTÉ NON ABAISSABLE).
• NE LAISSEZ PAS L'ENFANT DANS LE LIT LORSQUE LES CÔTÉS SONT ABAISSÉS. ASSUREZ-VOUS QUE LE CÔTÉ EST
EN POSITION RELEVÉE ET VERROUILLÉE CHAQUE FOIS QUE L'ENFANT EST DANS LE LIT (SAUF POUR LES LITS À CÔTÉ
NON ABAISSABLE).
• CESSEZ D'UTILISER LE LIT LORSQUE L'ENFANT COMMENCE À GRIMPER OU ATTEINT LA TAILLE DE 89 CM (35 IN).
• LORSQUE VOUS RANGEZ UN LIT D'ENFANT, SOYEZ PRUDENT CAR DES CHANGEMENTS EXTRÊMES DE TEMPÉRATURE
OU D'HUMIDITÉ PEUVENT COMPROMETTRE LE LIT ET LE RENDRE EXTRÊMEMENT DANGEREUX POUR VOTRE ENFANT.
• SOYEZ PRUDENT LORSQUE VOUS UTILISEZ UN VAPORISATEUR OU UN HUMIDIFICATEUR. ÉLOIGNEZ TOUJOURS LA
VAPEUR DU LIT D'ENFANT ET DE TOUT AUTRE MEUBLE EN BOIS. DES PÉRIODES PROLONGÉES D'HUMIDITÉ DANS
L'ENTREPÔT OU DANS LA MAISON PEUVENT COMPROMETTRE LE LIT D'ENFANT.
• ÉVITER D'UTILISER DES VAPORISATEURS ET DES HUMIDIFICATEURS PENDANT DES PÉRIODES PROLONGÉES.
• RESPECTER LES AVERTISSEMENTS FIGURANT SUR TOUS LES PRODUITS UTILISÉS DANS LE LIT D'ENFANT.
10
By
AVERTISSEMENTS
11
By
AVERTISSEMENTS (suite)
AVERTISSEMENT:
AVERTISSEMENT
AVERTIR
LIT BÉBÉ
Le non-respect de ces avertissements et des instructions peut entraîner des blessures graves ou la mort.
DES NOURRISSONS SONT MORTS DANS DES LITS D'ENFANTS SUITE AU PIÉGEAGE.
Les ouvertures dans et entre les parties du lit peuvent coincer la tête et le cou d'un petit enfant.
NE JAMAIS utiliser le lit avec des enfants de moins de 15 mois.
Suivez TOUJOURS les instructions de montage.
Le poids maximum de l'utilisateur est de 50 lb (22,7 kg)
RISQUE D'ÉTRANGLEMENT
NE JAMAIS placer le lit près des fenêtres où les cordons des stores ou des rideaux pourraient étrangler un
enfant.
NE JAMAIS suspendre de cordes au-dessus d'un lit.
Ne placez JAMAIS d'articles avec une ficelle, un cordon ou un ruban, tels que des ficelles de capuche ou
des attaches de tétine, autour du cou d'un enfant. Ces articles peuvent s'accrocher aux pièces du lit.
RISQUE DE PIÉGEAGE
Pour éviter les vides dangereux, tout matelas utilisé dans ce lit doit être un matelas de berceau pleine grandeur
au moins 51 5/8 po (1310 mm) de longueur, 27 1/4 (690 mm) de largeur et une épaisseur maximale de
5 po (125 mm).
REMARQUES SUR LE MONTAGE :
• Pendant le processus d'assemblage, chaque fois que vous utilisez des vis ou des
boulons, vérifiez chacun en plaçant la vis/le boulon sur le diagramme de l'article qui est
dessiné à la taille et à la conception réelles. Assurez-vous d'utiliser la taille et la forme
appropriées spécifiées dans les instructions.
• Pour assembler cet appareil, vous devrez peut-être placer l'appareil sur le côté et le
visage. Il est fortement recommandé d'effectuer l'assemblage sur une surface douce et
non abrasive pour éviter d'endommager la finition.
REMARQUES SUR L'UTILISATION :
• Protégez les enfants et les autres en suivant ces règles simples :
• Ne laissez aucun enfant jouer sur les meubles.
• Ne laissez pas grimper sur un meuble.
• Ne pas accrocher à un meuble.
• Surveillez toujours l'activité de votre enfant lorsqu'il est à la crèche.

12
By
ADVERTENCIAS
• EL INCUMPLIMIENTO DE ESTAS ADVERTENCIAS E INSTRUCCIONES DE MONTAJE PUEDE PROVOCAR LESIONES
GRAVES O LA MUERTE.
• PARA REDUCIR EL RIESGO DE SIDS (SÍNDROME DE MUERTE SÚBITA DEL LACTANTE), LOS PEDIATRAS RECOMIENDAN
COLOCAR A LOS LACTANTES SANOS BOCA ARRIBA PARA DORMIR, A MENOS QUE EL MÉDICO ACONSEJE LO •
CONTRARIO.
• COMPRUEBE QUE ESTE PRODUCTO NO TIENE HERRAJES DAÑADOS, JUNTAS SUELTAS, PIEZAS QUE FALTEN O
BORDES AFILADOS ANTES Y DESPUÉS DEL MONTAJE Y CON FRECUENCIA DURANTE EL USO.
• NO UTILICE ESTA CUNA SI FALTA ALGUNA PIEZA, ESTÁ DAÑADA O ROTA. PÓNGASE EN CONTACTO CON DREAM ON
ME - 45 VERONICA AVENUE SOMERSET NEW JERSEY 08873, 5375 BOULEVARD DES GRANDES PRAIRIES ST LEONARD,
QUÉBEC H1R 1B1 PARA OBTENER PIEZAS DE REPUESTO.
• NO UTILICE COLCHONES DE AGUA CON ESTA CUNA.
• EN CASO DE RENOVACIÓN DEL ACABADO, UTILICE UN ACABADO NO TÓXICO ESPECIFICADO PARA PRODUCTOS
INFANTILES.
• GARANTICE UN ENTORNO SEGURO PARA EL NIÑO COMPROBANDO REGULARMENTE, ANTES DE COLOCAR AL NIÑO
EN LA CUNA, QUE TODOS LOS COMPONENTES ESTÁN COLOCADOS CORRECTAMENTE Y DE FORMA SEGURA.
• PARA EVITAR LESIONES EN LA CABEZA, NO PERMITA QUE NINGÚN NIÑO JUEGUE DEBAJO DE LA CUNA.
• NO AÑADA NUNCA UN ACCESORIO COMO UN MOISÉS O UN CAMBIADOR QUE SE EXTIENDA POR ENCIMA DE LA ZONA
DE DESCANSO.
• EN CANADÁ, UTILICE ÚNICAMENTE UN COLCHÓN DE CUNA QUE NO SUPERE LOS 15 CM DE GROSOR Y QUE SEA DE
UN TAMAÑO TAL QUE, AL EMPUJARLO FIRMEMENTE CONTRA CUALQUIER LADO DE LA CUNA, NO DEJE UN HUECO DE
MÁS DE 3 CM ENTRE EL COLCHÓN Y CUALQUIER PARTE DE LOS LADOS DE LA CUNA.
• NO UTILICE ESTA CUNA PARA UN NIÑO QUE PUEDA SALIR DE ELLA TREPANDO O QUE MIDA MÁS DE 90 CM.
PELIGRO DE ESTRANGULACIÓN:
• ¡LAS CUERDAS PROVOCAN ESTRANGULAMIENTO! NO COLOQUE OBJETOS CON CUERDA ALREDEDOR DEL CUELLO
DEL NIÑO, COMO CUERDAS DE CAPOTAS O CHUPETES. NO CUELGUE CUERDAS SOBRE LA CUNA NI FIJE CUERDAS A
LOS JUGUETES.
• PARA EVITAR EL ESTRANGULAMIENTO, APRIETE TODOS LOS CIERRES. UN NIÑO PUEDE ATRAPAR PARTES DEL
CUERPO O DE LA ROPA EN CIERRES SUELTOS.
• NO COLOQUE LA CUNA CERCA DE UNA VENTANA DONDE LAS CUERDAS DE LAS PERSIANAS O CORTINAS PUEDAN
ESTRANGULAR AL NIÑO.
• LOS NIÑOS PUEDEN ASFIXIARSE CON ROPA DE CAMA BLANDA.
• NO AÑADA NUNCA UNA ALMOHADA, UN EDREDÓN O UN RELLENO.
• NO COLOQUE NUNCA RELLENO ADICIONAL DEBAJO DEL BEBÉ.
• NO UTILICES NUNCA BOLSAS DE PLÁSTICO DE TRANSPORTE NI LÁMINAS DE PLÁSTICO PARA CUBRIR EL COLCHÓN,
YA QUE PUEDEN PROVOCAR ASFIXIA.
• LOS BEBÉS PUEDEN ASFIXIARSE EN LOS HUECOS ENTRE LOS LATERALES DE LA CUNA Y UN COLCHÓN DEMASIADO
PEQUEÑO.
• CUALQUIER COLCHÓN QUE SE UTILICE EN ESTA CUNA DEBE MEDIR AL MENOS 69 CM (27-1/4 PULG.) POR 131 CM
(51-5/8 PULG.), CON UN GROSOR NO SUPERIOR A 15 CM (6 PULG.) Y UN GROSOR MÍNIMO DE 10 CM (4 PULG.). LAS
DIMENSIONES DEL COLCHÓN SE TOMARÁN DE COSTURA A COSTURA O DE BORDE A BORDE CUANDO PROCEDA.
RIESGO DE CAÍDA:
• CUANDO EL NIÑO SEA CAPAZ DE PONERSE DE PIE, COLOQUE EL COLCHÓN EN LA POSICIÓN MÁS BAJA Y RETIRE LOS
PROTECTORES, LOS JUGUETES GRANDES Y OTROS OBJETOS QUE PUEDAN SERVIR DE ESCALONES PARA SALIR.
DESPUÉS DE ELEVAR EL LATERAL, ASEGÚRESE DE QUE LOS PESTILLOS ESTÁN BIEN SUJETOS (NO TENER EN
CUENTA EN LAS CUNAS SIN LATERAL ABATIBLE).
• NO DEJE AL NIÑO EN LA CUNA CON LOS LATERALES BAJADOS. ASEGÚRESE DE QUE EL LATERAL ESTÉ LEVANTADO
Y BLOQUEADO SIEMPRE QUE EL NIÑO ESTÉ EN LA CUNA (NO SE APLICA A LAS CUNAS SIN LATERAL ABATIBLE).
• DEJE DE UTILIZAR LA CUNA CUANDO EL NIÑO EMPIECE A TREPAR O ALCANCE LA ALTURA DE 35 PULGADAS (89 CM).
• TENGA CUIDADO CUANDO GUARDE LA CUNA, YA QUE LOS CAMBIOS EXTREMOS DE TEMPERATURA O HUMEDAD
PUEDEN COMPROMETER LA CUNA Y HACERLA EXTREMADAMENTE PELIGROSA PARA SU HIJO.
• TENGA CUIDADO CUANDO UTILICE UN VAPORIZADOR O HUMIDIFICADOR. DIRIJA SIEMPRE EL VAPOR LEJOS DE LA
CUNA, ASÍ COMO DE CUALQUIER OTRO MUEBLE DE MADERA. LOS PERIODOS PROLONGADOS DE HUMEDAD TANTO
EN EL ALMACÉN COMO EN EL HOGAR PUEDEN PONER EN PELIGRO LA CUNA.
• EVITE EL USO DE VAPORIZADORES Y HUMIDIFICADORES DURANTE PERIODOS PROLONGADOS.
• SIGA LAS ADVERTENCIAS DE TODOS LOS PRODUCTOS DE LA CUNA.
13
By
ADVERTENCIAS (suite)
ADVERTENCIA:
ADVERTENCIA
PRECAUCIÓN
CAMA PARA NIÑO
El incumplimiento de estas advertencias y de las instrucciones podría provocar lesiones graves o la muerte.
INFANTES HAN MUERTO EN CAMAS PARA NIÑOS POR ATRAPAMIENTO.
Las aberturas en y entre las partes de la cama pueden atrapar la cabeza y el cuello de un niño pequeño.
NUNCA use la cama con niños menores de 15 meses.
Siga SIEMPRE las instrucciones de montaje.
El peso máximo del usuario es de 50 libras (22,7 kg)
PELIGRO DE ESTRANGULACIÓN
NUNCA coloque la cama cerca de ventanas donde los cordones de las persianas o cortinas puedan
estrangular a un niño.
NUNCA cuelgue cuerdas sobre una cama.
NUNCA coloque artículos con una cuerda, un cordón o una cinta, como las cuerdas de una capucha o de
un chupete, alrededor del cuello de un niño. Estos artículos pueden engancharse en las partes de la cama.
PELIGRO DE ATRAPAMIENTO
Para evitar espacios peligrosos, cualquier colchón que se use en esta cama debe ser un colchón de cuna de
tamaño completo al menos 51 5/8 in (1310 mm) de largo, 27 1/4 (690 mm) de ancho y un espesor
máximo de 5 pulgadas (125 mm).
NOTAS SOBRE EL MONTAJE:
• Durante el proceso de ensamblaje, siempre que use tornillos o pernos, verifique cada
uno colocando el tornillo/perno en el diagrama del elemento que tiene el tamaño y el
diseño reales dibujados. Asegúrese de usar el tamaño y la forma adecuados
especificados en las instrucciones.
• Para ensamblar esta unidad, es posible que deba colocarla de lado y de frente. Se
recomienda encarecidamente que el montaje se realice sobre una superficie suave y no
abrasiva para evitar dañar el acabado.
NOTAS SOBRE EL USO:
• Mantenga seguros a los niños y a otras personas siguiendo estas sencillas reglas:
• No permita que ningún niño juegue en los muebles.
• No permita subirse a ningún mueble.
• No permita que cuelgue de ningún mueble.
• Controle siempre la actividad de su hijo cuando esté en la guardería.
14
By
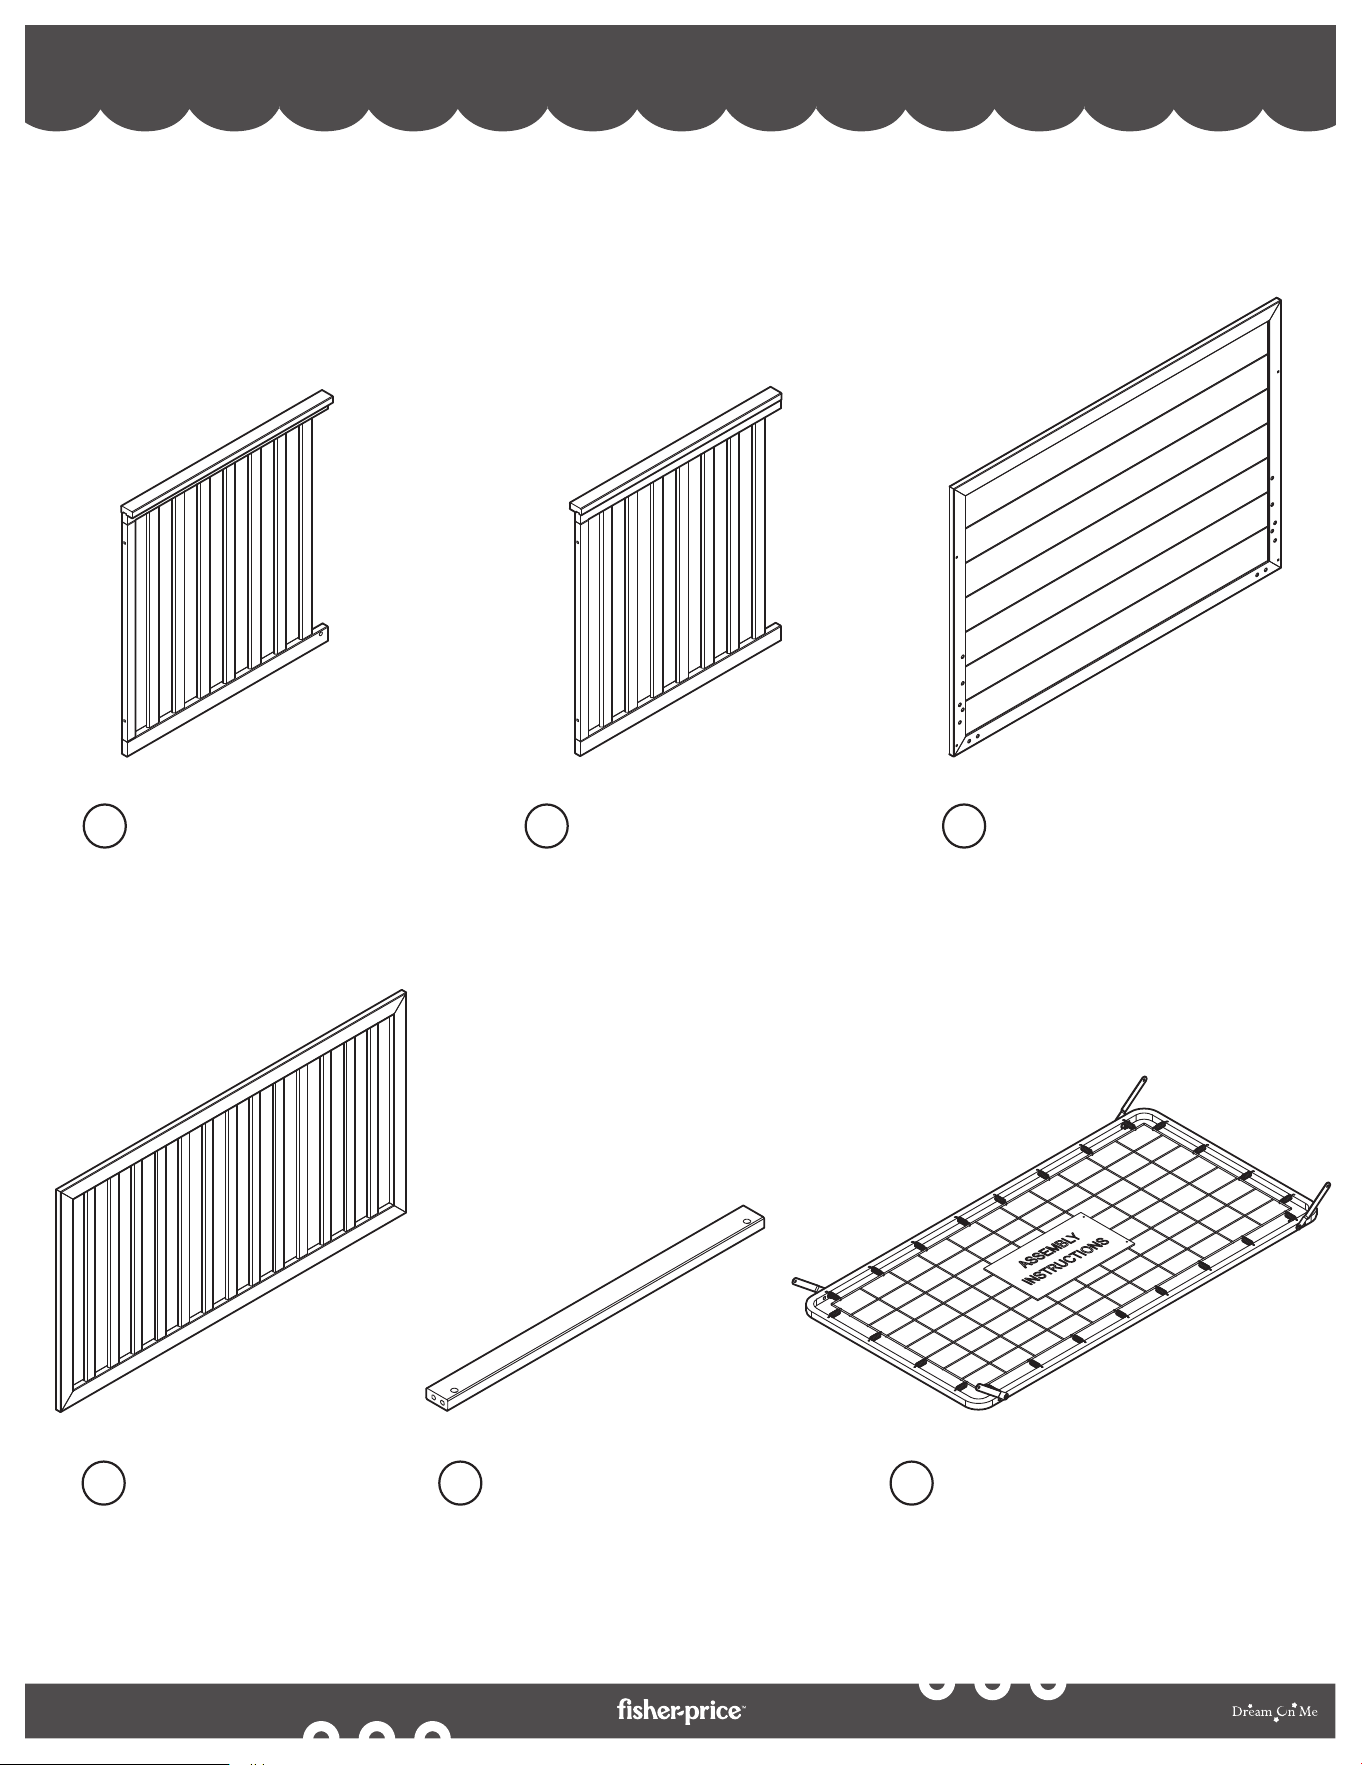
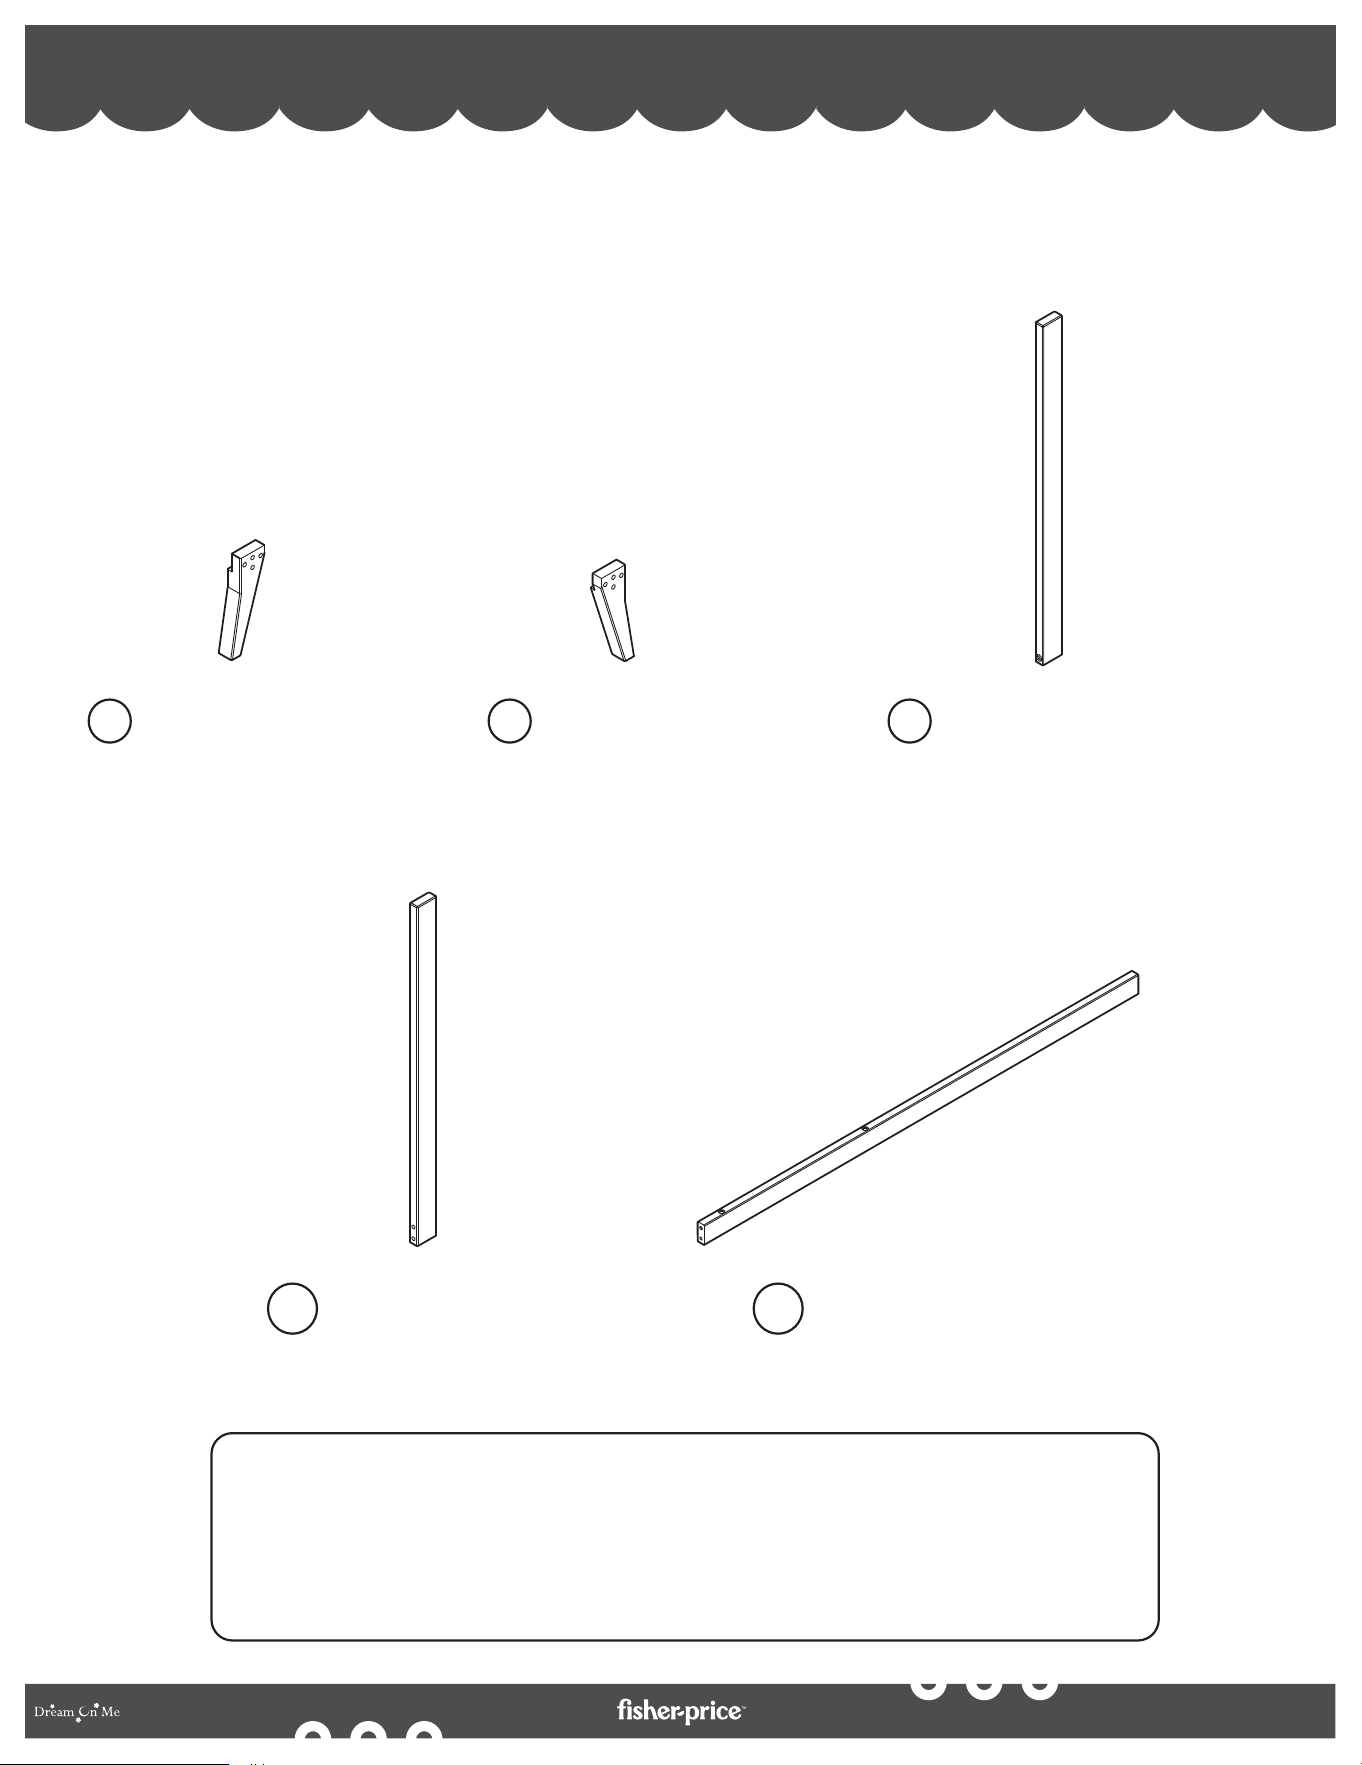
PARTS PIÈCES PARTES
If there are any missing parts, please contact Dream On Me before using the product.
S'il y a des pièces manquantes, veuillez contacter Dream On Me avant d'utiliser le produit.
Si falta alguna pieza, póngase en contacto con Dream On Me antes de utilizar el producto.
Left Side Panel
Panneau latéral gauche
Panel lateral izquierdo
1
Right Side Panel
Panneau latéral droit
Panel lateral derecho
2
Headboard
Tête de lit
Cabecero
3
Footboard
Marchepied
Pie de cama
4
Center Base Rail (x2)
Rail de base central (x2)
Riel base central (x2)
5
Mattress Support Panel
Panneau de support du matelas
Panel de soporte del colchón
6
15
By
If there are any missing parts, please contact Dream On Me before using the product.
S'il y a des pièces manquantes, veuillez contacter Dream On Me avant d'utiliser le produit.
Si falta alguna pieza, póngase en contacto con Dream On Me antes de utilizar el producto.
PARTS PIÈCES PARTES
Left Feet (x2)
Pieds gauches (x2)
Pies izquierdos (x2)
7
Right Front Leg
Jambe avant droite
Pierna delantera derecha
10
Stabilizer Bar
Barre stabilisatrice
Barra estabilizadora
11
Right Feet (x2)
Pieds droits (x2)
Pies derechos (x2)
8
Left Front Leg
Jambe avant gauche
Pierna delantera izquierda
9
Note: Keep parts 9,10,11 for future conversion to day bed and toddler bed
Remarque : Conservez les pièces 9, 10, 11 pour une future conversion en lit
de jour et lit pour tout-petit.
Nota: Conserve las piezas 9, 10 y 11 para futuras conversiones a cama de
día y cama para niños pequeños
16
By
If there are any missing parts, please contact Dream On Me before using the product.
S'il y a des pièces manquantes, veuillez contacter Dream On Me avant d'utiliser le produit.
Si falta alguna pieza, póngase en contacto con Dream On Me antes de utilizar el producto.
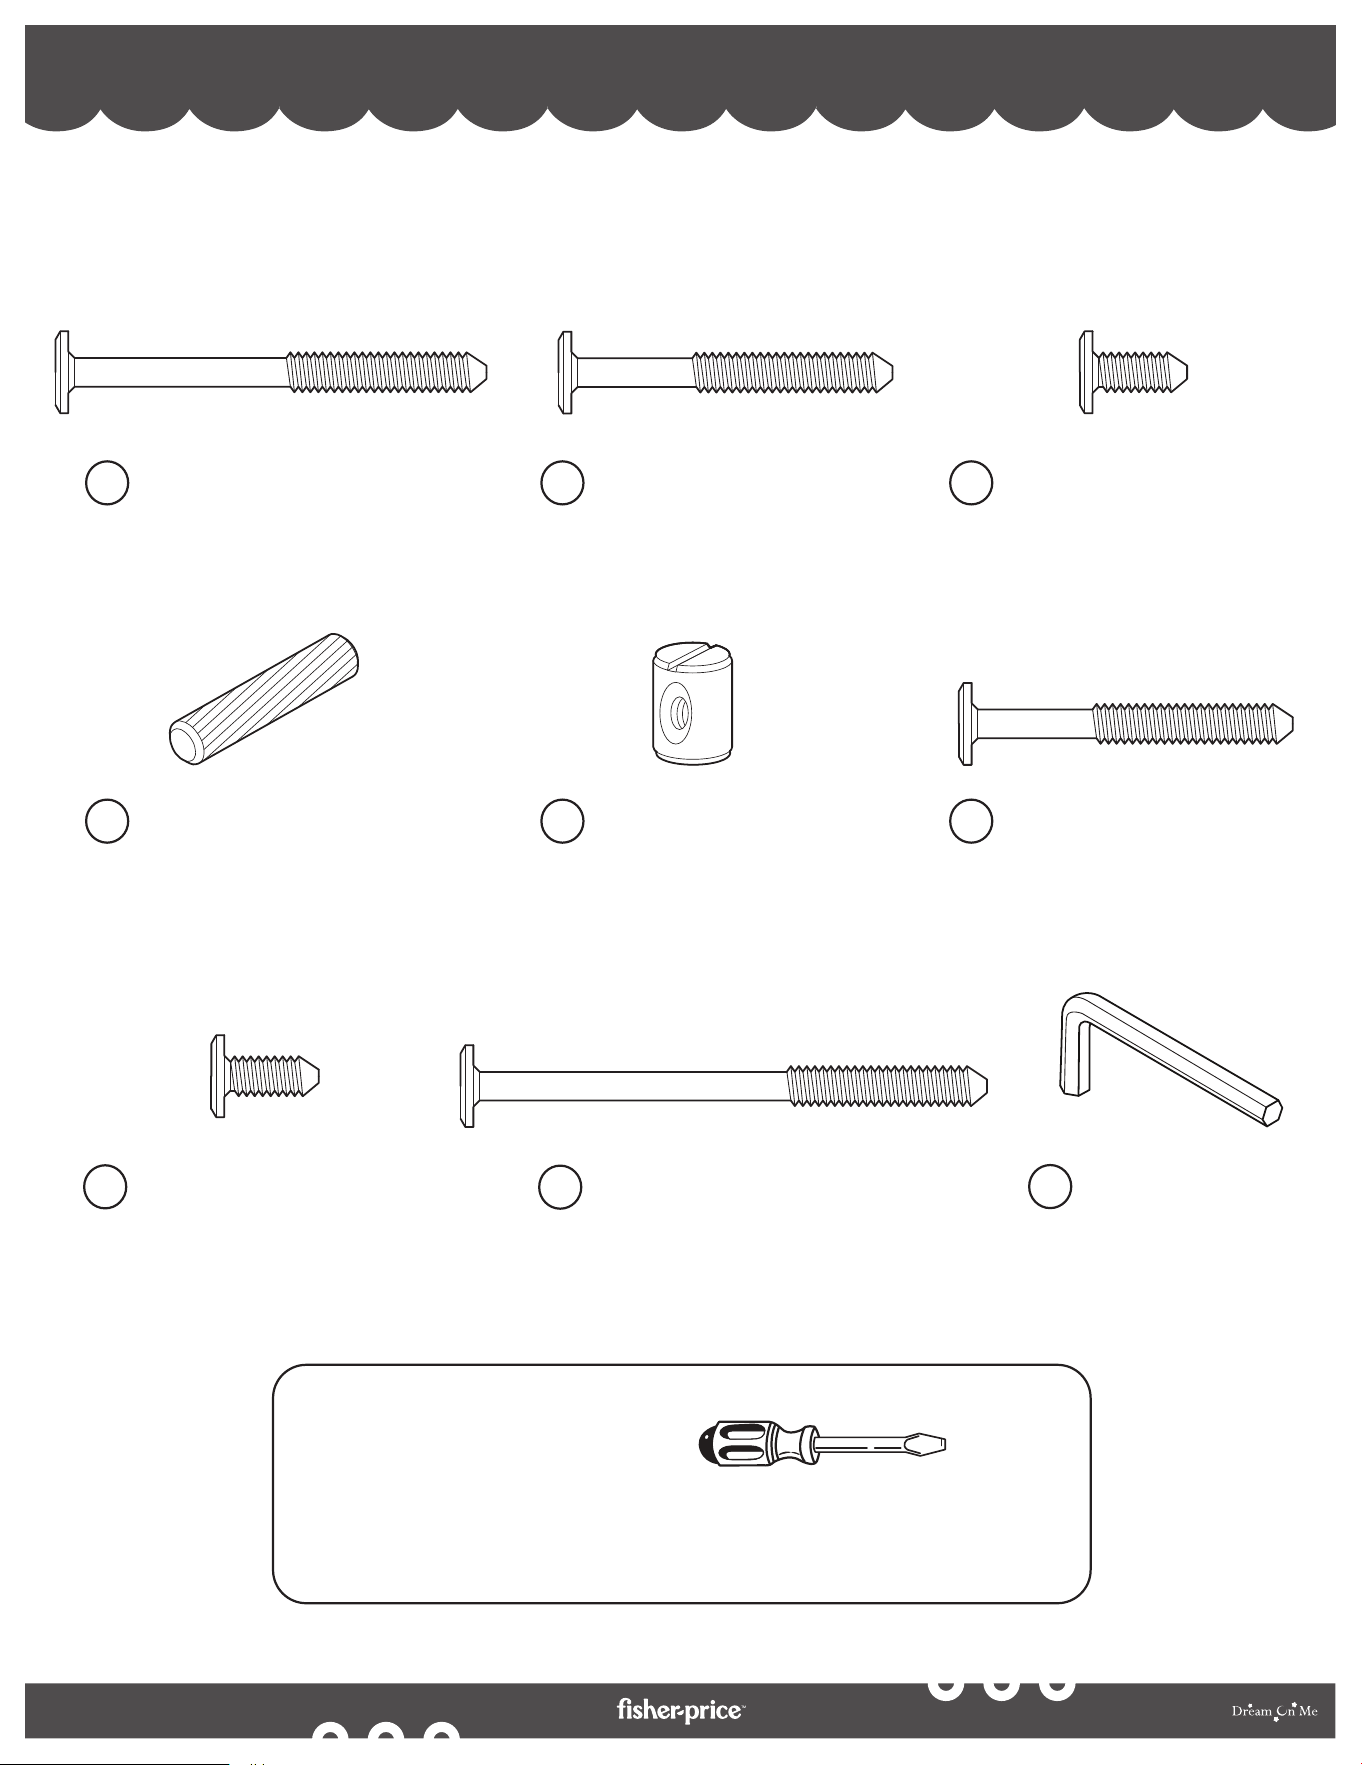
HARDWARE MATÉRIEL
Bolt M6 X 55mm (x8)
Boulon M6 X 55mm (x8)
Perno M6 X 55mm (x8)
A
Bolt M6 X 40mm (x4)
Boulon M6 X 40mm (x4)
Perno M6 X 40mm (x4)
B
Bolt M6 X 17mm (x4)
Boulon M6 X 17mm (x4)
Perno M6 X 17mm (x4)
C
Wooden Dowel (×6)
Cheville en bois (×6)
Clavija de madera (×6)
D
Bolt M6 X 30mm (x8)
Boulon M6 X 30mm (x8)
Perno M6 X 30mm (x8)
F
Allen Key (x1)
Clé Allen (x1)
Llave Allen (x1)
J
Barrel Nut (x10)
Écrou de baril (×10)
Tuerca de barril (×10)
E
Bolt M6 X 80mm (x2)
Boulon M6 X 80mm (x2)
Perno M6 X 80mm (x2)
H
Flat Head Screw Driver (NOT INCLUDED)
Tournevis à tête plate (NON INCLUS)
Destornillador de cabeza plana (NO INCLUIDO)
Tools Needed:
Outils nécessaires:
Herramientas necesarias:
Bolt M6 X 17mm (x8)
Boulon M6 X 17mm (x8)
Perno M6 X 17mm (x8)
G
17
By
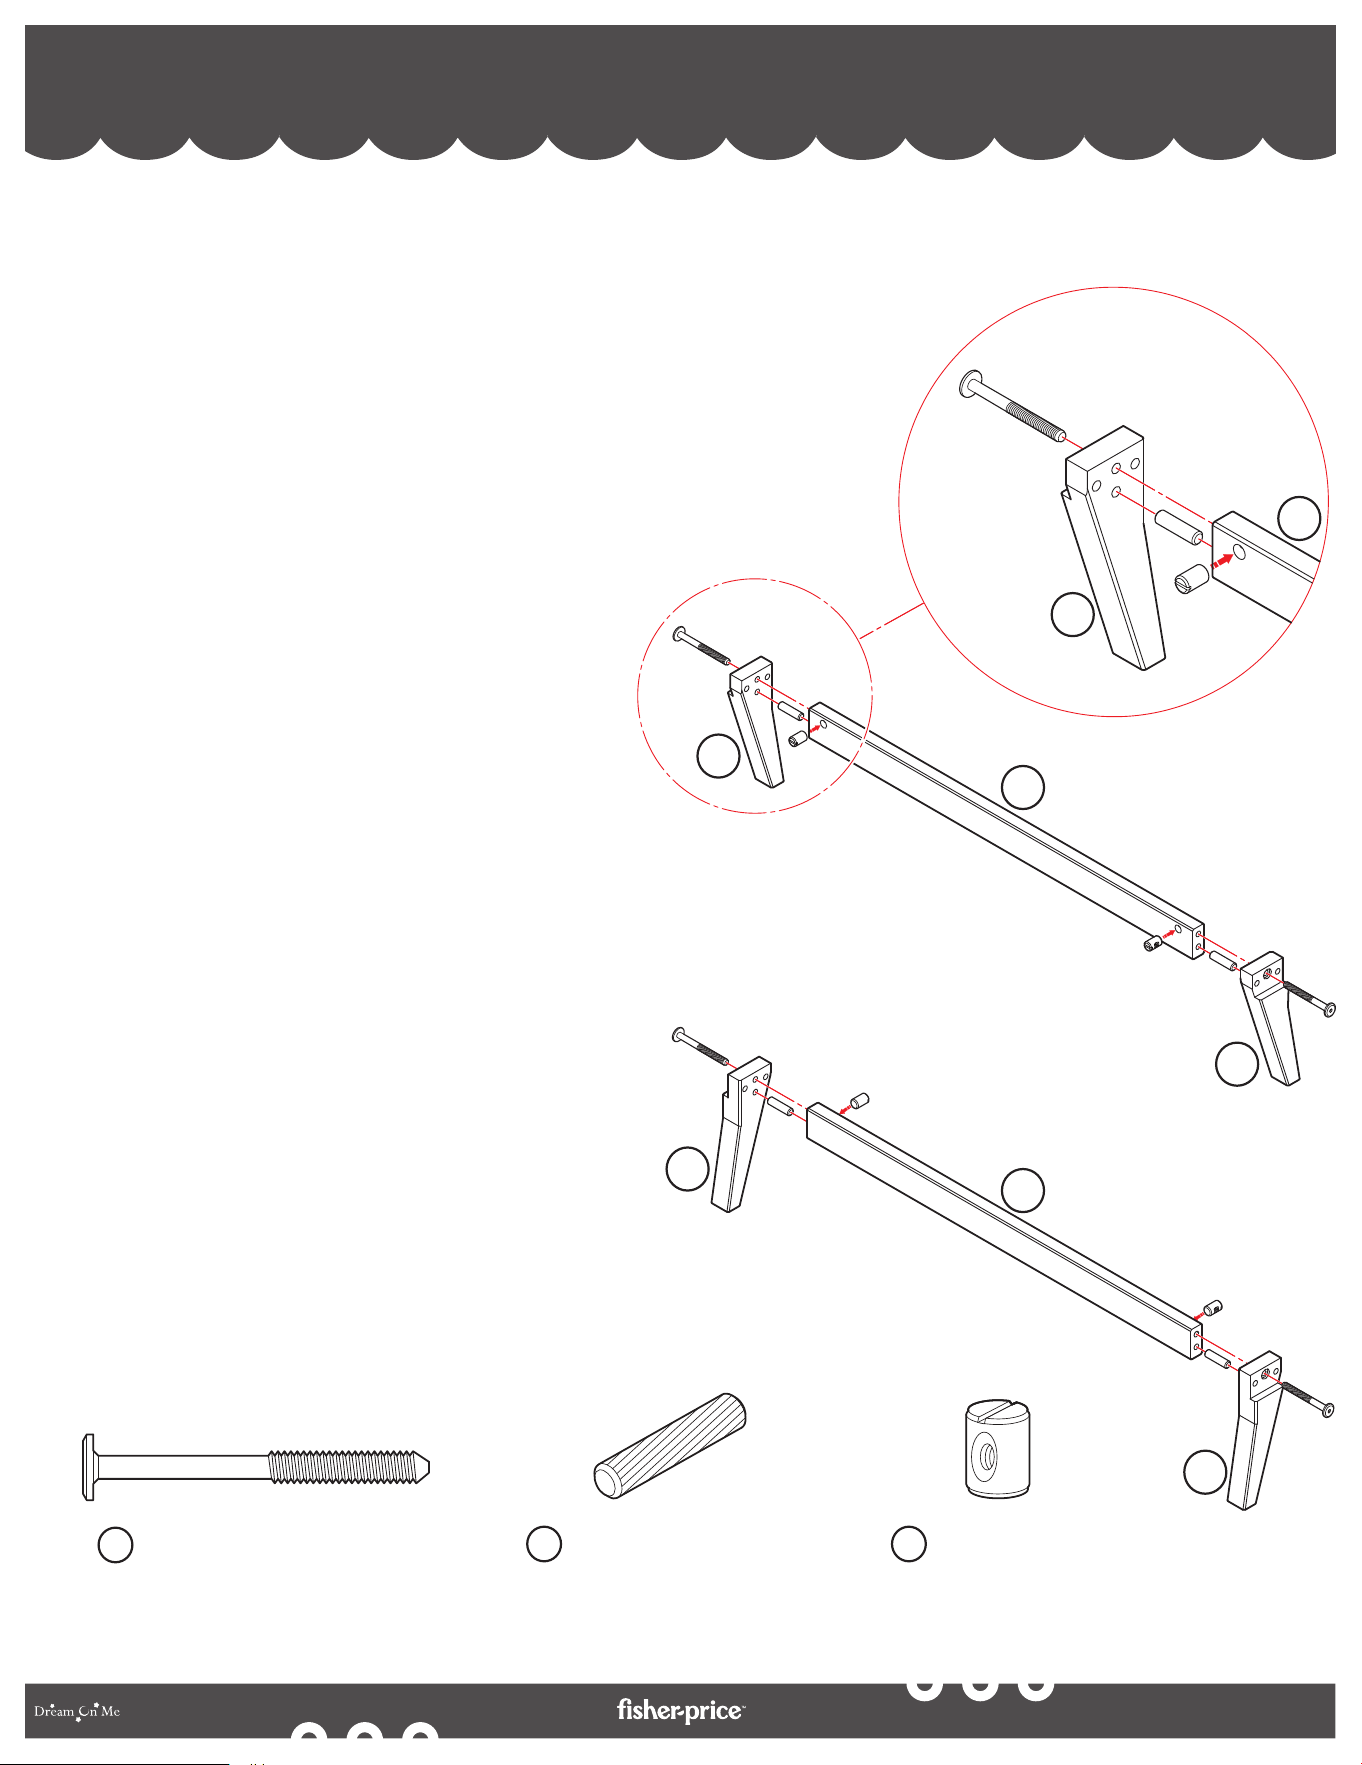
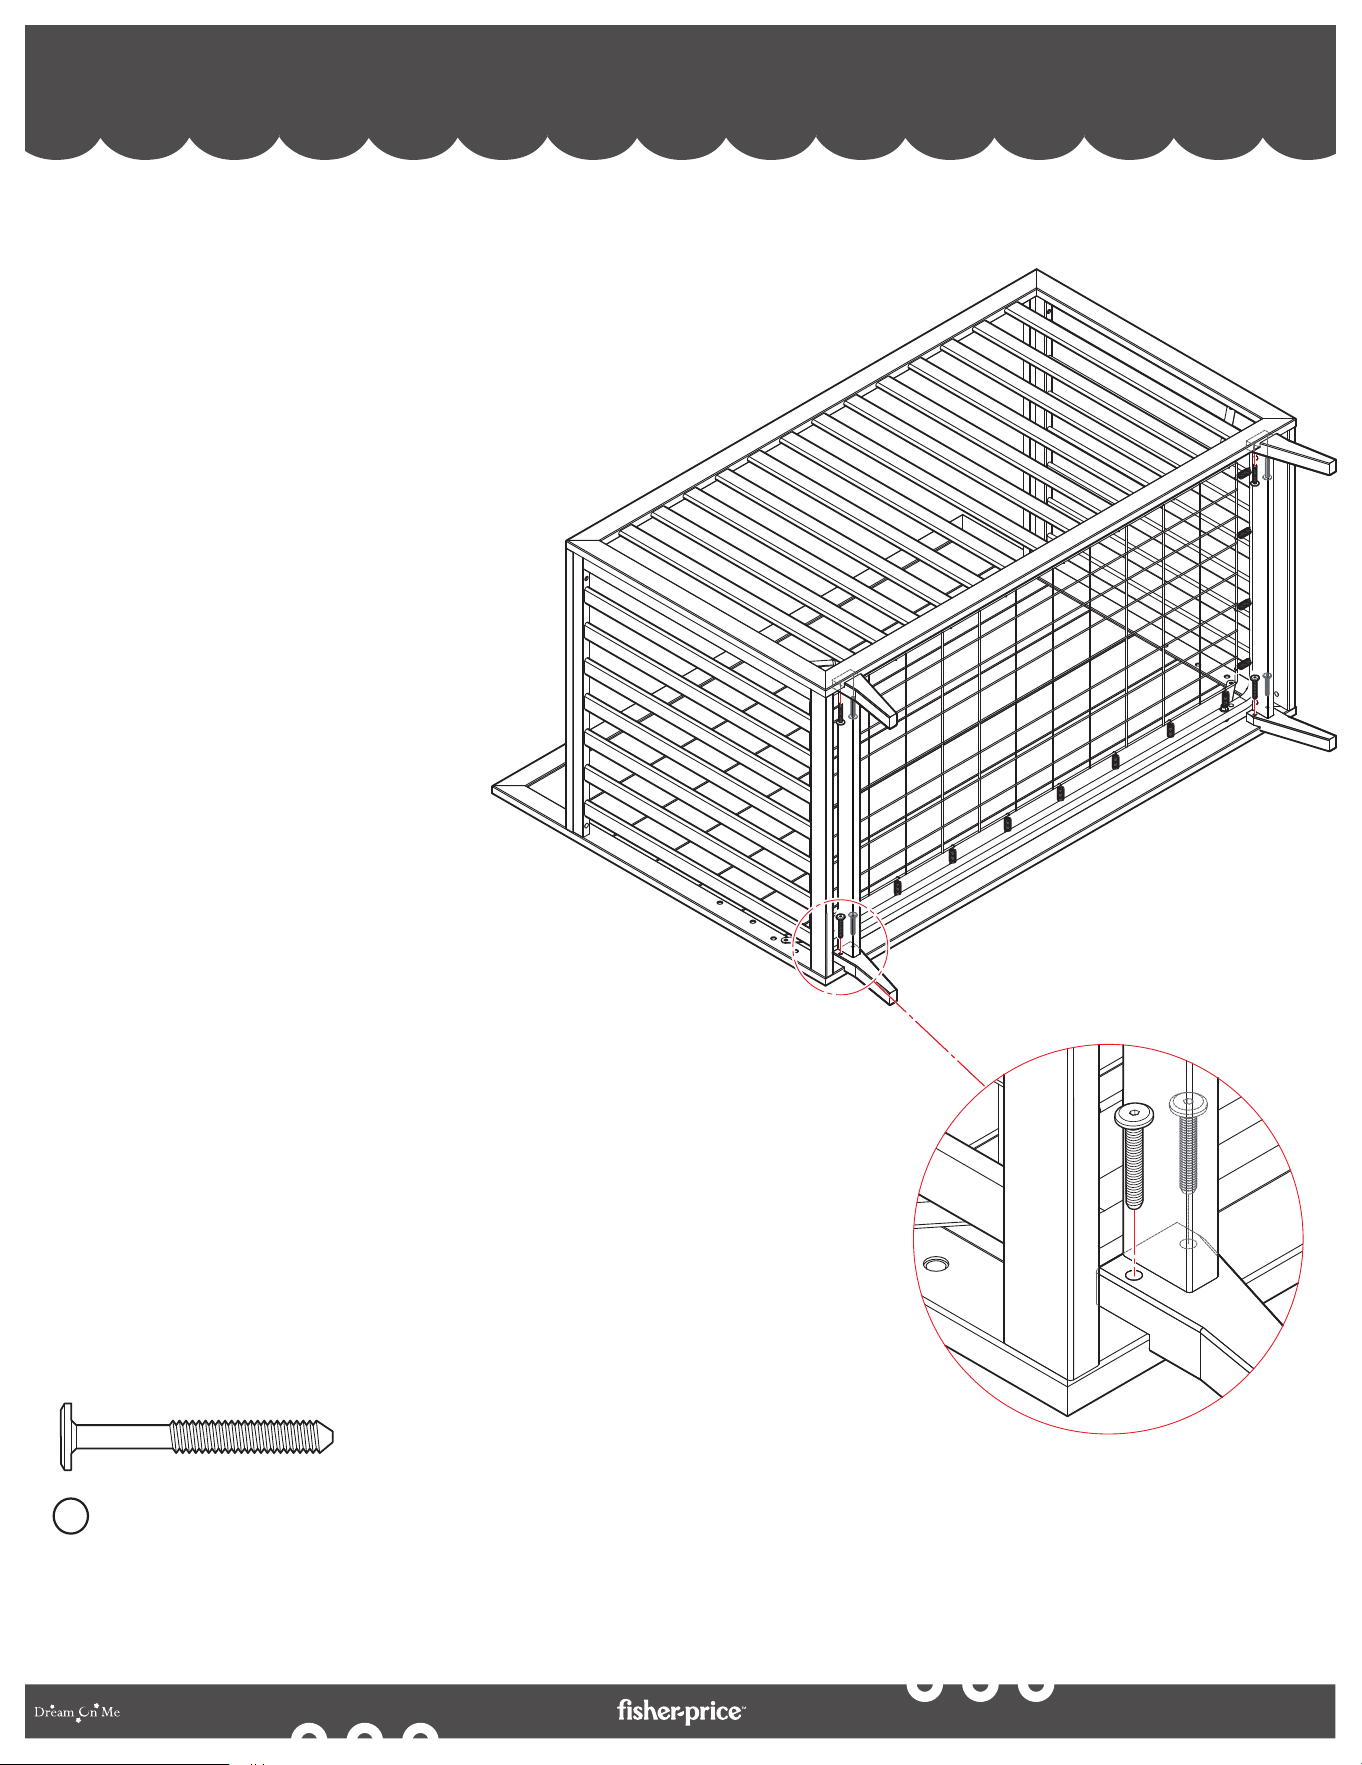
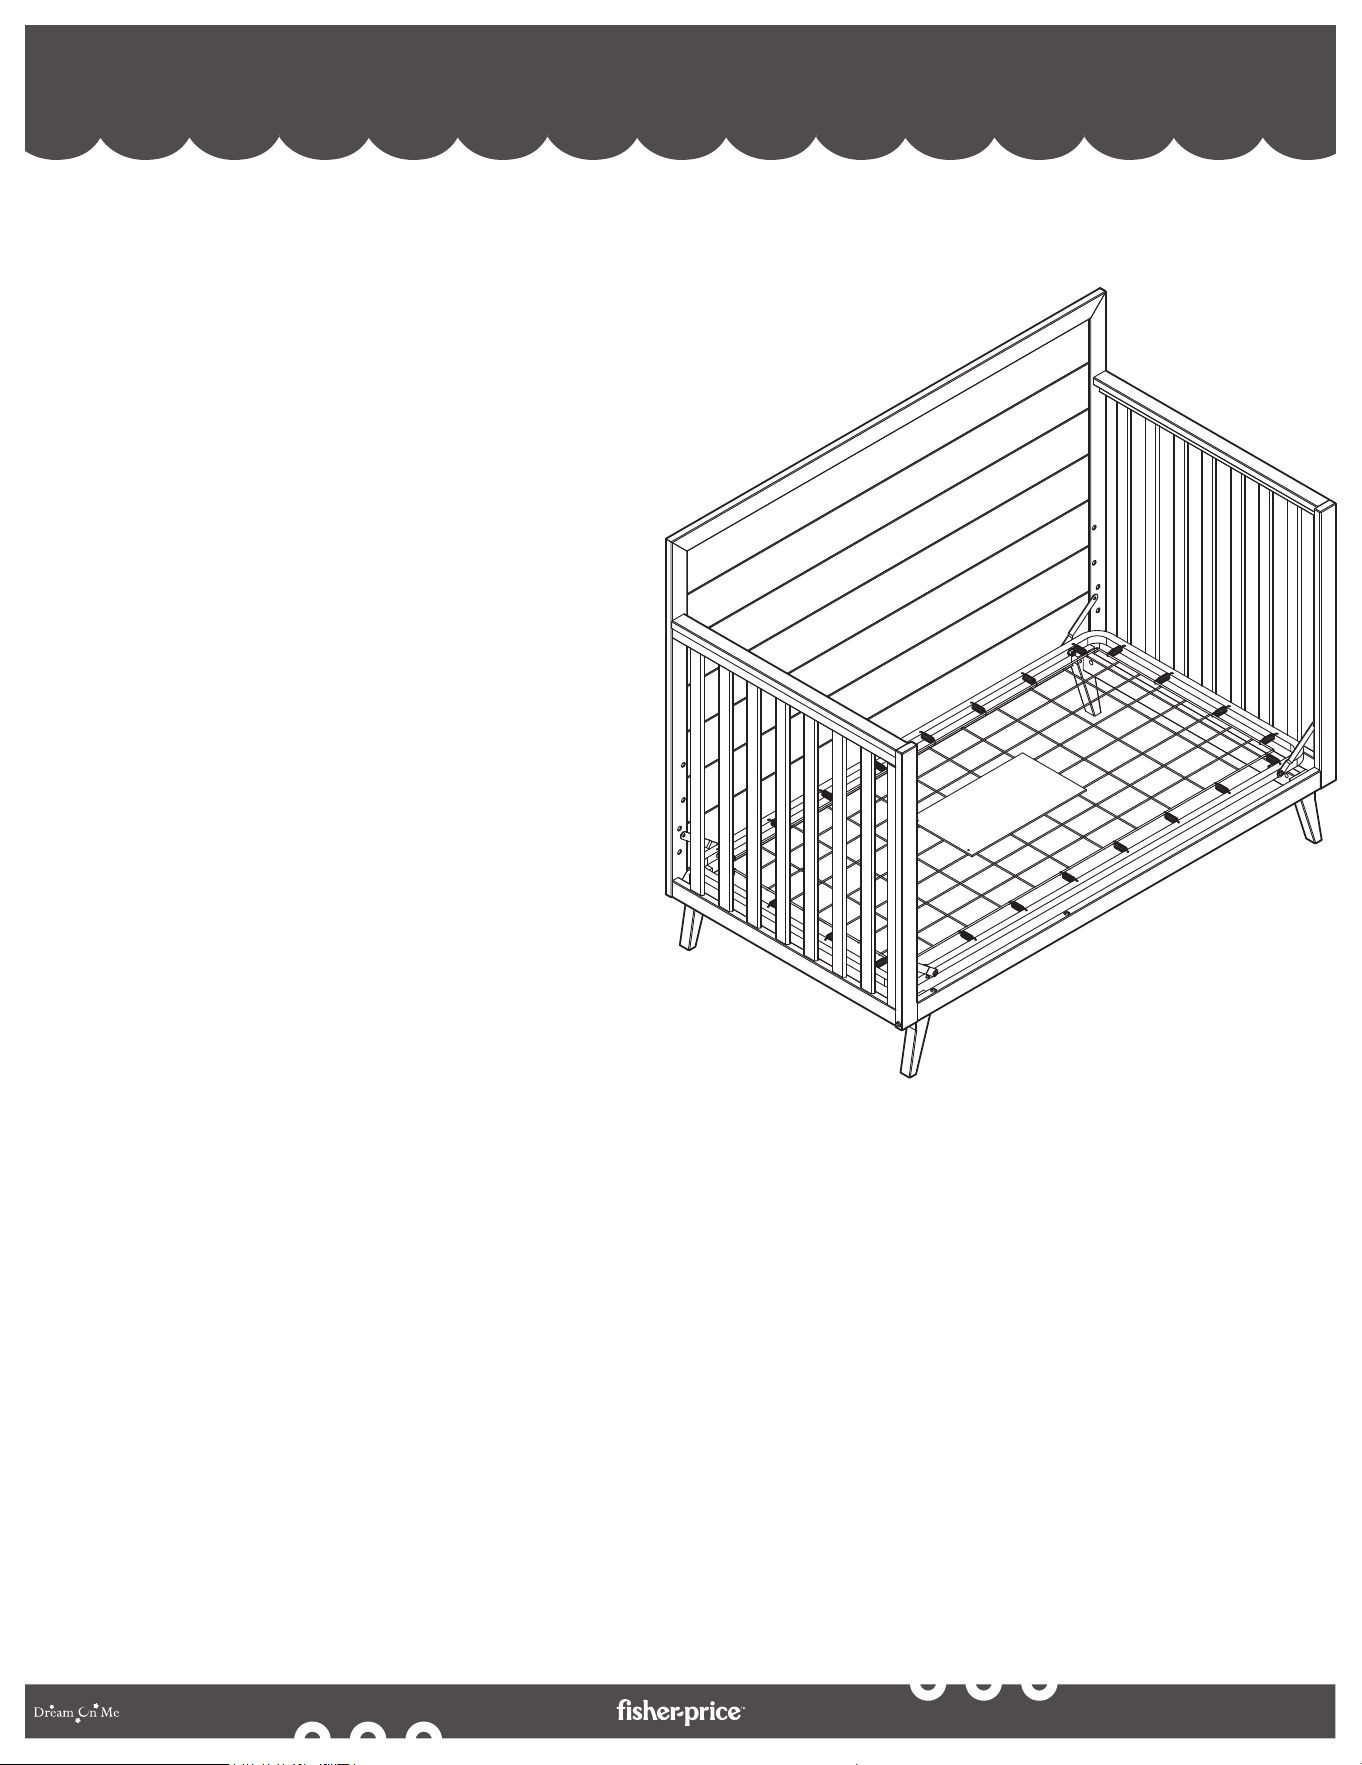
CRIB ASSEMBLY - LEGS ASSEMBLY
ASSEMBLAGE DU LIT - ASSEMBLAGE DES PIEDS
MONTAJE DE LA CUNA - MONTAJE DE LAS PATAS
1
(A)
(A)
(A)
(A)
(A)
(D)
(D)
(D)
(D)
(D)
(E)
(E)
(E)
(E)
(E)
7
8
8
8
7
5
5
5
Bolt M6 X 55mm (x4)
Boulon M6 X 55mm (x4)
Perno M6 X 55mm (x4)
A
Wooden Dowel (×4)
Cheville en bois (×4)
Clavija de madera (×4)
D
Barrel Nut (x4)
Écrou de baril (×4)
Tuerca de barril (×4)
E
1a. Place the parts on a soft, horizontal surface prior to assembly.
1b. Align the Left Leg (7) and Right leg (8) to the Center Base Rail (5) as
shown in the illustration.
1c. Position the Wooden Dowels (D) between the bottom insertions of the
legs and the rail.
1d. Position the Barrel Nuts (E) in the insertions provided on the rail. Attach
the Bolts (A) in the top insertions of the legs to fix them to the rail.
1e. Use the Allen Key (J) to tighten the bolts in the barrel nuts as shown in
the illustration.
NOTE: Do not overtighten the bolts.
1a. Placer les pièces sur une surface souple et horizontale
avant l'assemblage.
1b. Alignez le pied gauche (7) et le pied droit (8) sur le rail
de base central (5) comme indiqué sur l'illustration.
1c. Positionnez les chevilles en bois (D) entre les insertions
inférieures des pieds et le rail.
1d. Positionnez les écrous cylindriques (E) dans les
insertions prévues sur le rail. Fixez les boulons (A) dans
les insertions supérieures des pieds pour les fixer au rail.
1e. Utilisez la clé Allen (J) pour serrer les boulons dans les
écrous cylindriques comme indiqué sur l'illustration.
REMARQUE : Ne serrez pas trop les boulons.
1a. Coloque las piezas sobre una superficie blanda y
horizontal antes del montaje.
1b. Alinee la pata izquierda (7) y la pata derecha (8) con el
riel central de la base (5) como se muestra en la
ilustración.
1c. Coloque los tacos de madera (D) entre las inserciones
inferiores de las patas y el raíl.
1d. Coloque las tuercas cilíndricas (E) en las inserciones del
riel. Coloque los pernos (A) en las inserciones
superiores de las patas para fijarlas al riel.
1e. Utilice la Llave Allen (J) para apretar los Pernos en las
Tuercas de Barril como se muestra en la ilustración.
NOTA: No apriete demasiado los pernos.
18
By
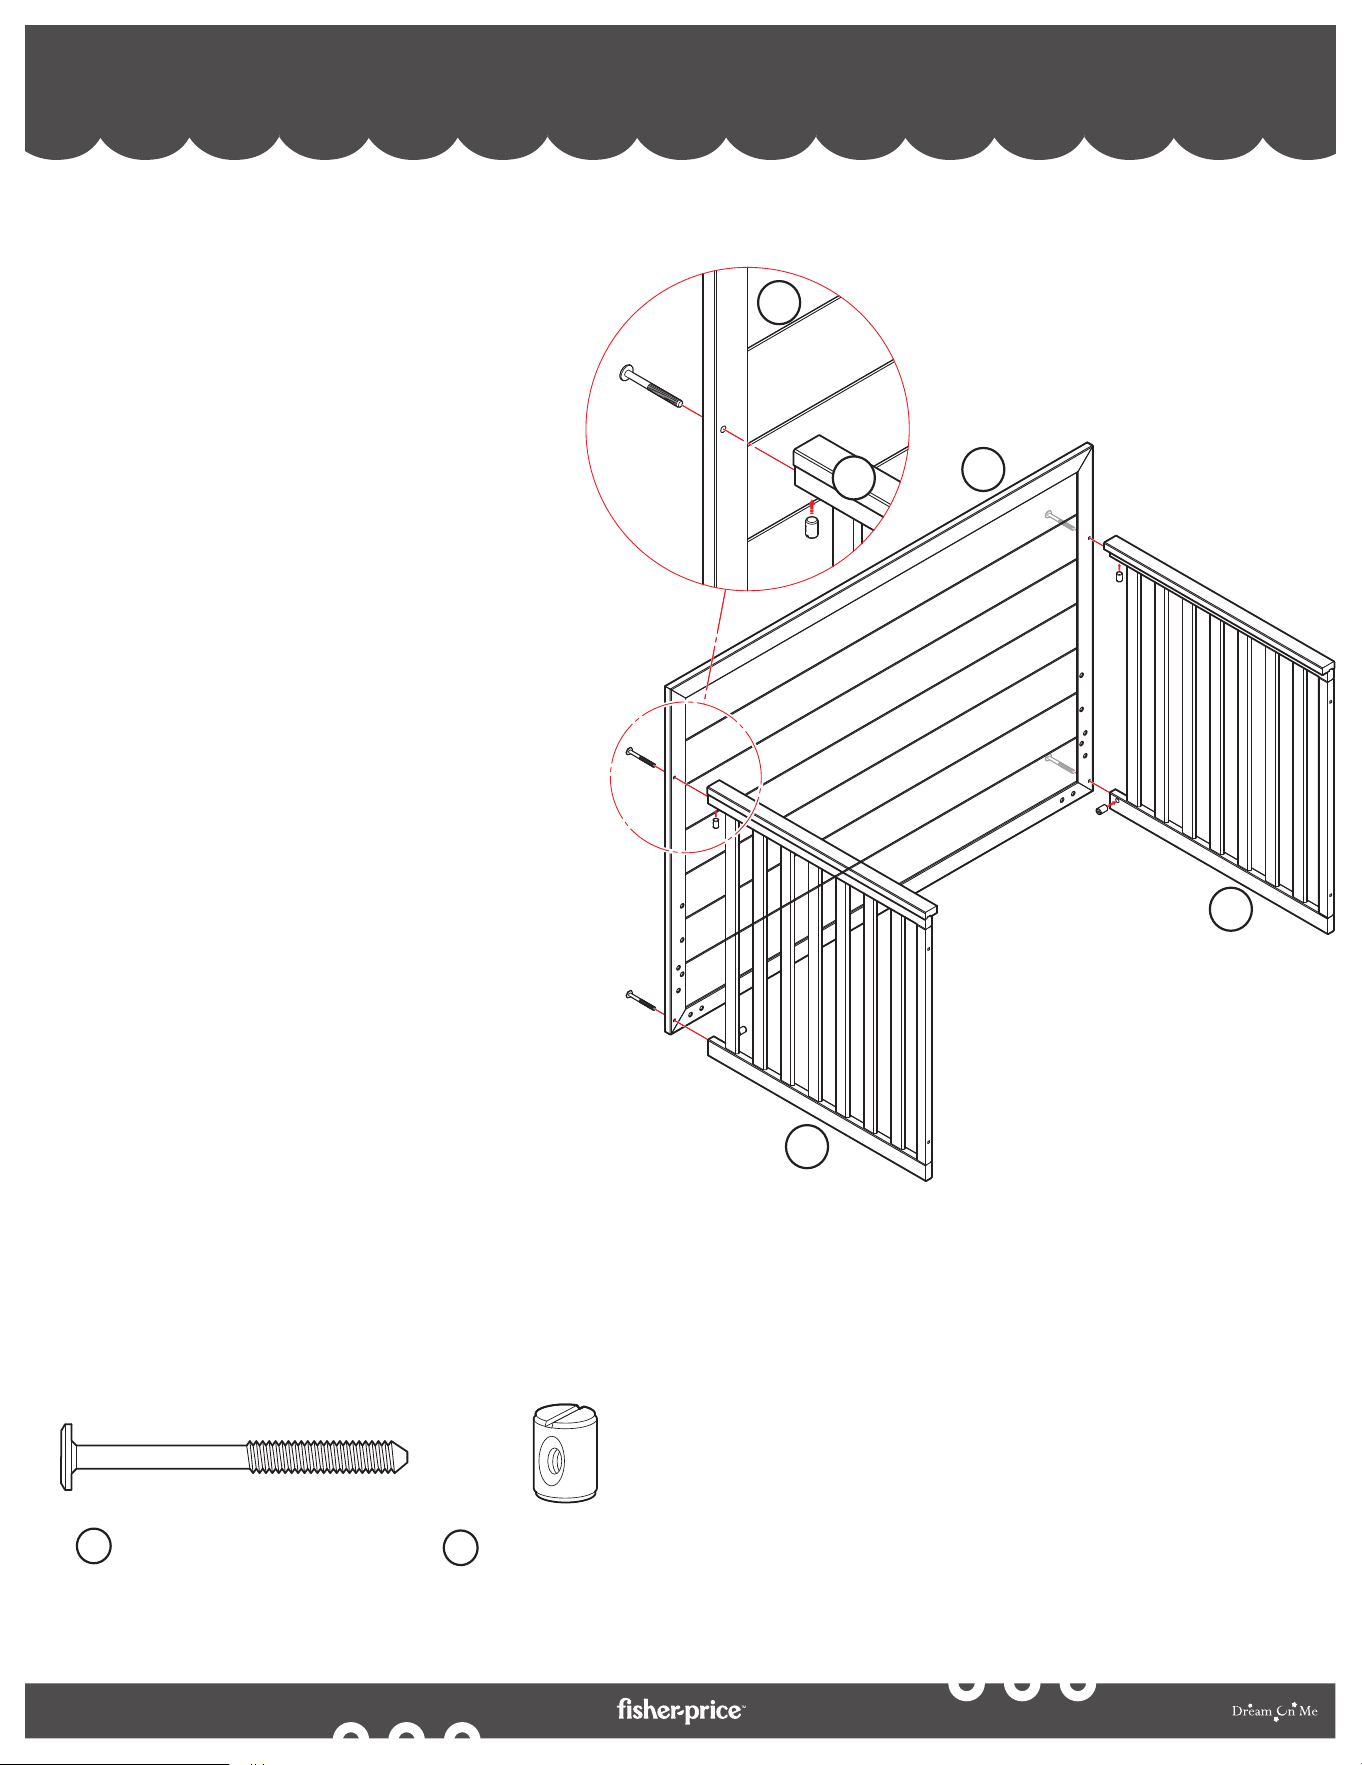
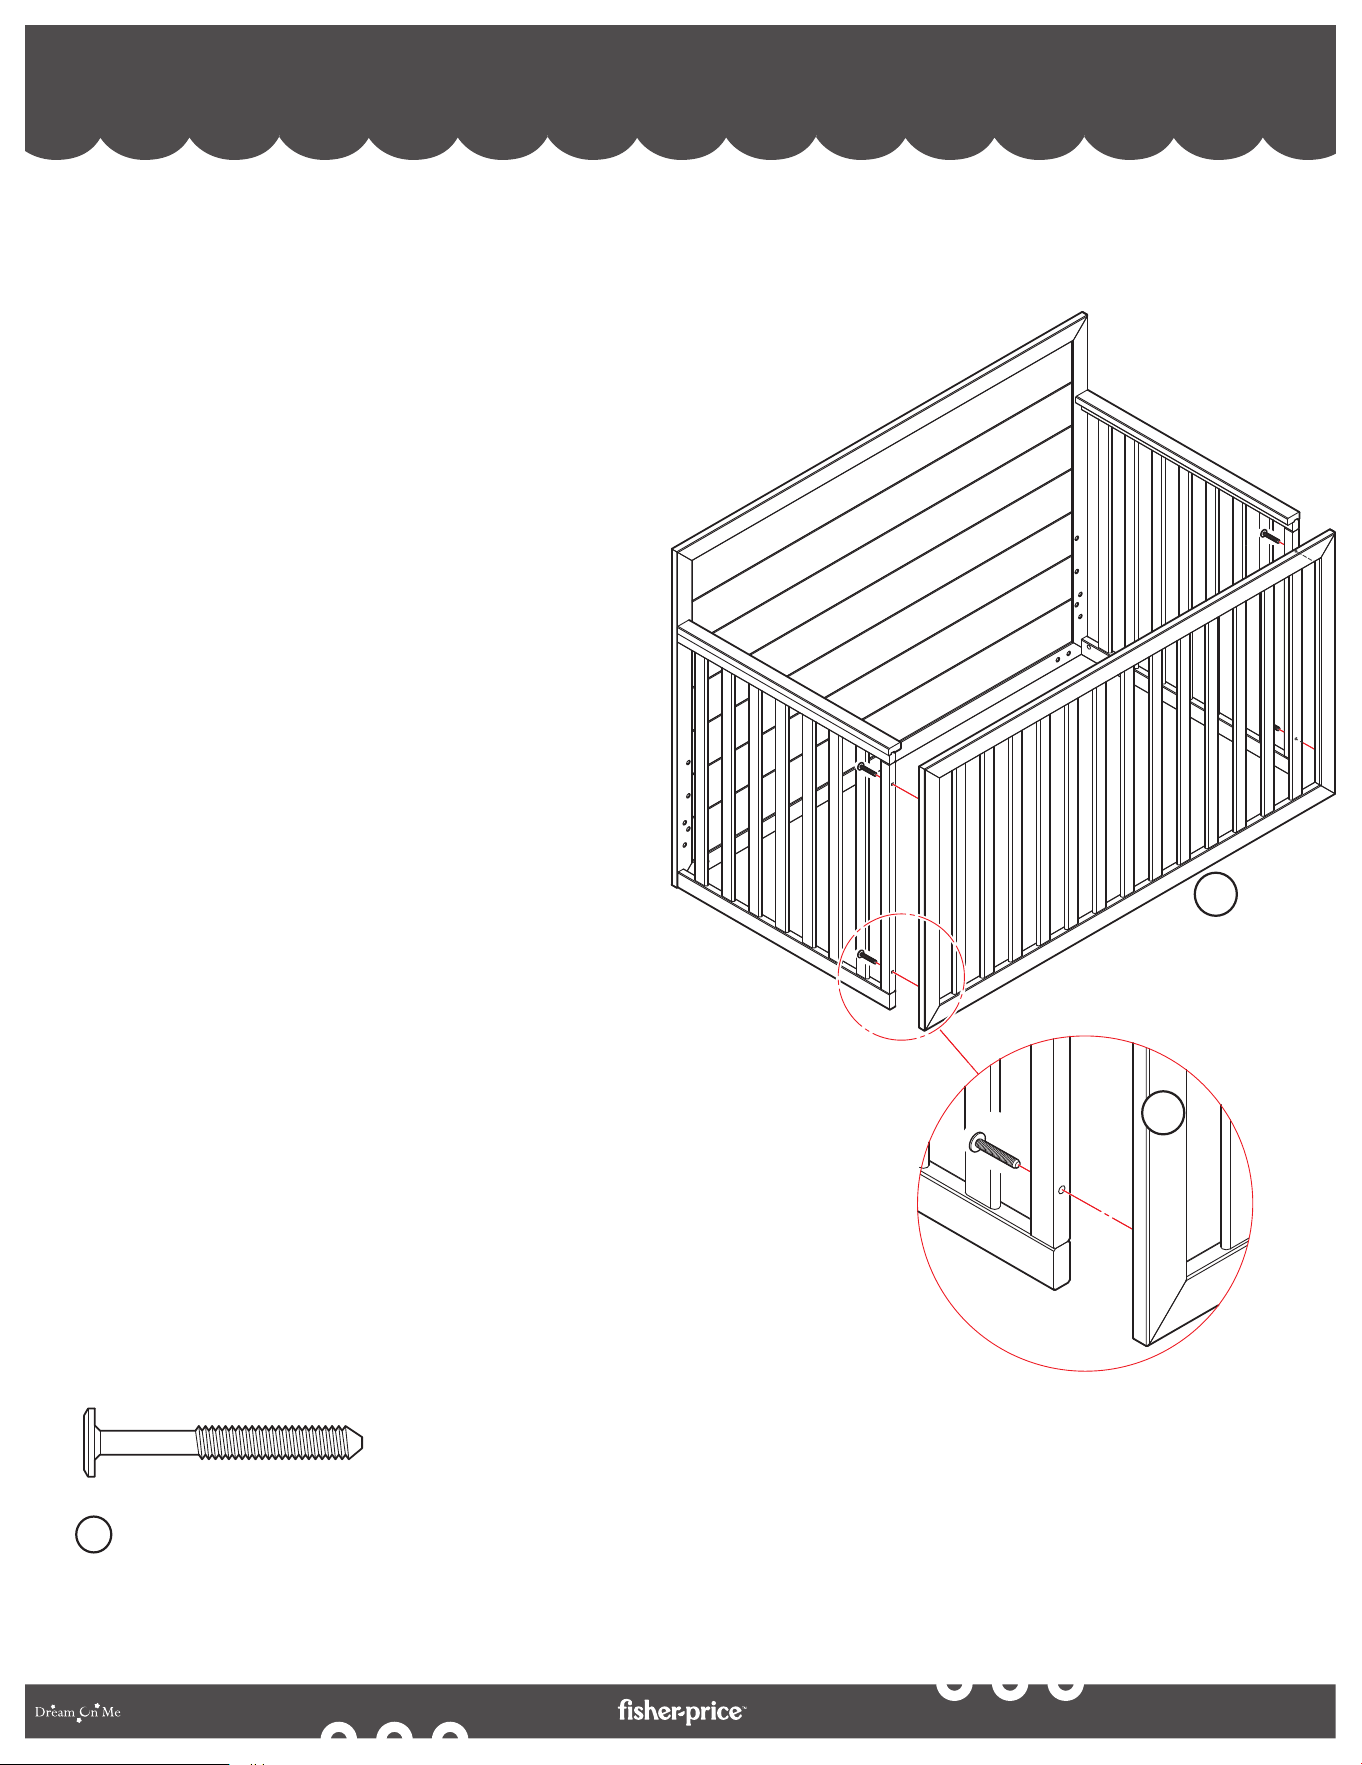
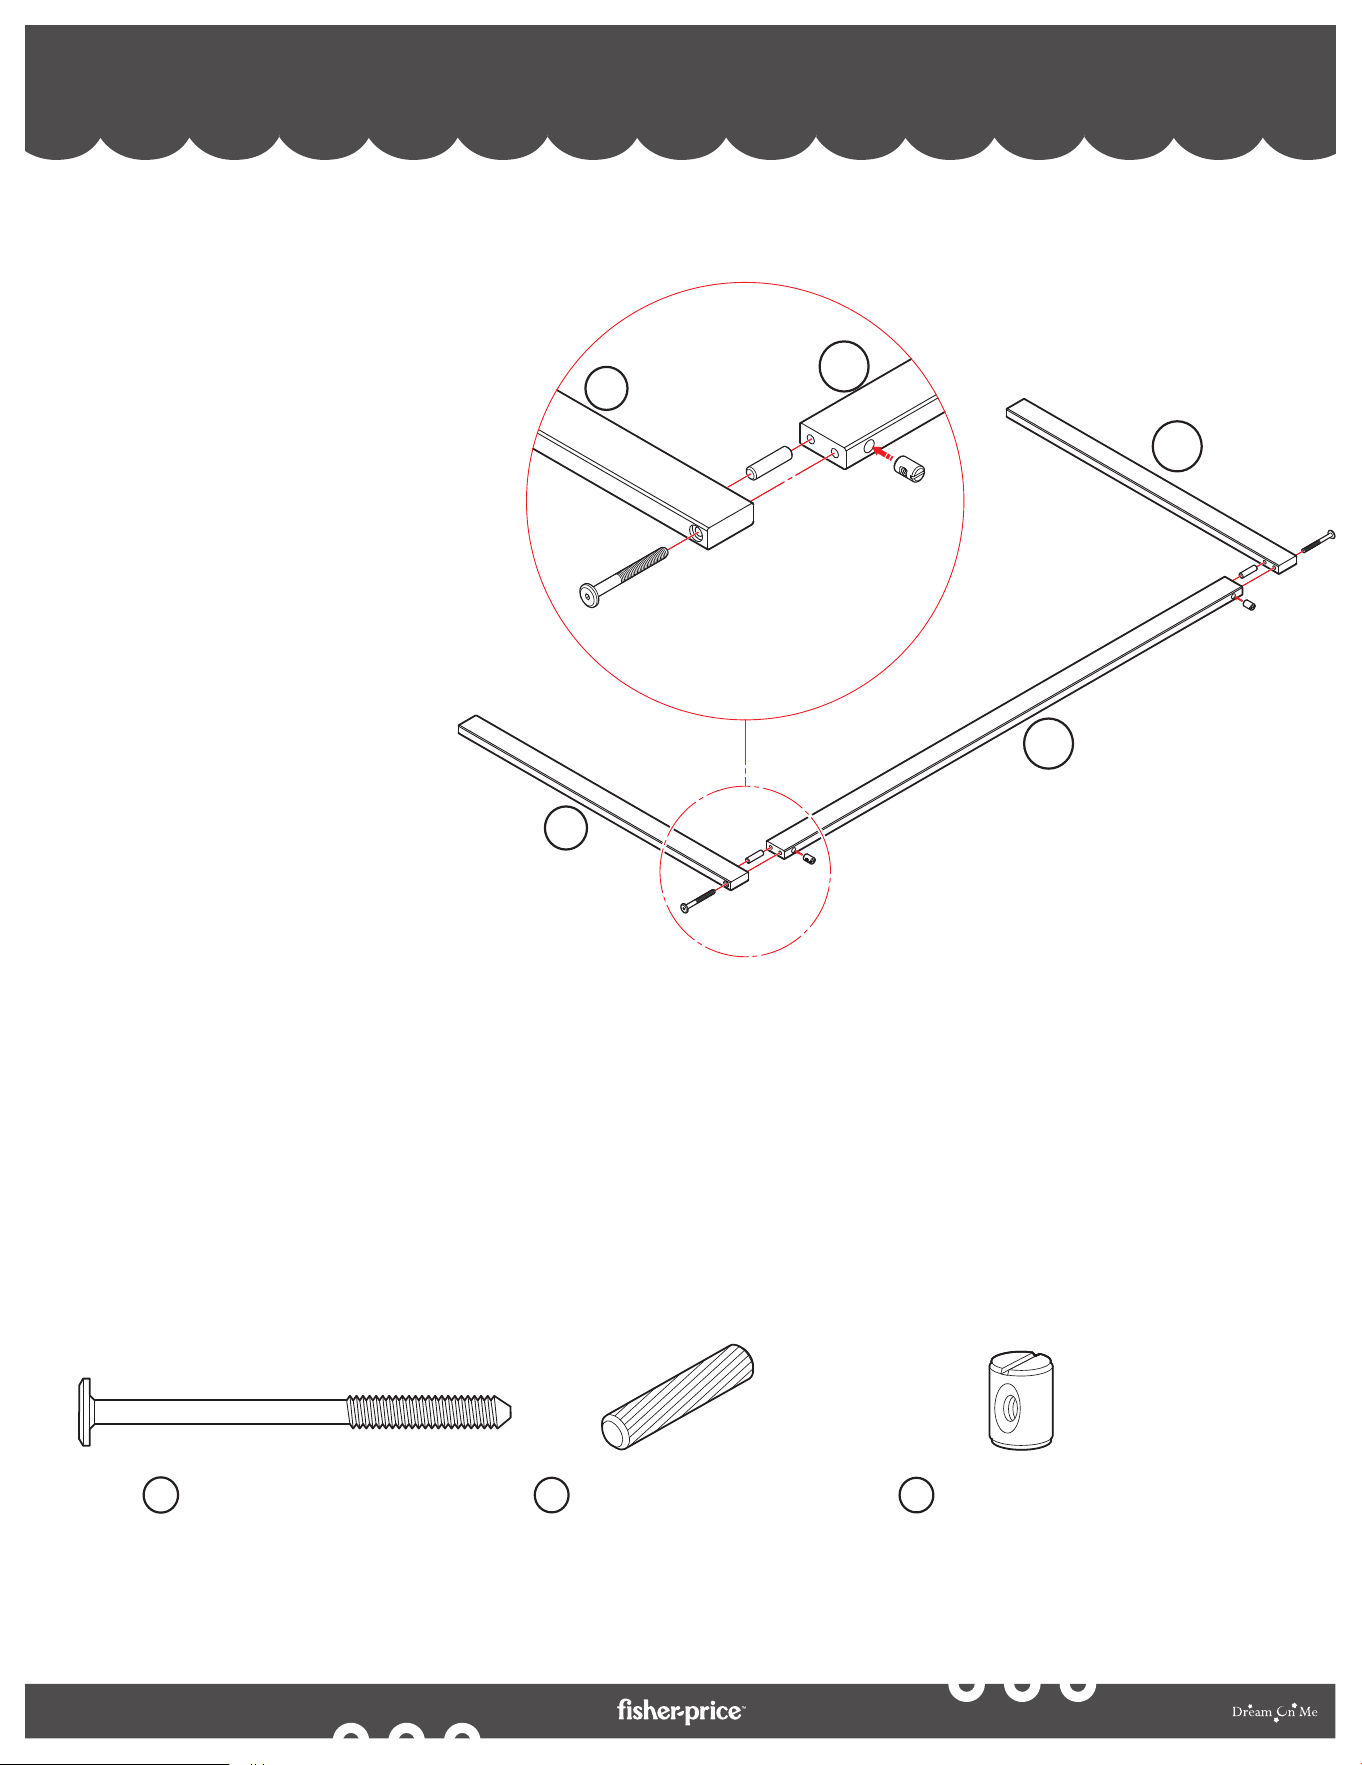
CRIB ASSEMBLY - HEADBOARD AND SIDE PANEL ASSEMBLY
ASSEMBLAGE DU LIT D'ENFANT - ASSEMBLAGE DE LA TÊTE DE LIT ET DES PANNEAUX LATÉRAUX
MONTAJE DE LA CUNA - MONTAJE DE LA CABECERA Y DEL PANEL LATERAL
(A)
(E)
2
1
2
3
3
Bolt M6 X 55mm (x4)
Boulon M6 X 55mm (x4)
Perno M6 X 55mm (x4)
A
Barrel Nut (x4)
Écrou de baril (×4)
Tuerca de barril (×4)
E
1
2a. Align the Left Side Panel (1) and the Right
Side Panel (2) to the Headboard (3) as
shown in the illustration.
2b. Position the Barrel Nuts (E) in the insertions
provided on the top and bottom of the side
panels. Similarly, attach the Bolts (A) in the
insertions provided on the ends of the
headboard, fixing it to the side panels.
2c. Use the Allen Key (J) to tighten the bolts
into the barrel nuts.
2a. Alignez le panneau latéral gauche (1) et le
panneau latéral droit (2) sur la tête de lit (3)
comme indiqué sur l'illustration.
2b. Positionnez les écrous cylindriques (E) dans
les insertions prévues en haut et en bas des
panneaux latéraux. De la même manière, fixez
les boulons (A) dans les insertions prévues
aux extrémités de la tête de lit, en la fixant
aux panneaux latéraux.
2c. Utilisez la clé Allen (J) pour serrer les
boulons dans les écrous cylindriques.
2a. Alinee el panel lateral izquierdo (1) y el panel
lateral derecho (2) con el cabecero (3) como
se muestra en la ilustración.
2b. Coloque las tuercas cilíndricas (E) en las
inserciones de la parte superior e inferior de
los paneles laterales. De la misma forma,
coloque los Pernos (A) en las inserciones
previstas en las extremidades de la cabecera,
fijándola a los paneles laterales.
2c. Utilice la llave Allen (J) para apretar los
pernos en las tuercas de barril.
19
By
CRIB ASSEMBLY - FOOTBOARD ASSEMBLY
ASSEMBLAGE DU LIT D'ENFANT - ASSEMBLAGE DU PIED DE LIT
MONTAJE DE LA CUNA - MONTAJE DEL ESTRIBO`
3
4
4
Bolt M6 X 40mm (x4)
Boulon M6 X 40mm (x4)
Perno M6 X 40mm (x4)
B
(B)
3a. Align the Footboard (4) to the side panels
as shown in the illustration.
3b. Attach the Bolts (B) in the insertions
provided on the Footboard.
3c. Tighten the bolts using the Allen Key (J)
provided.
3a. Alignez le pied de lit (4) sur les panneaux
latéraux comme indiqué sur l'illustration.
3b. Fixez les boulons (B) dans les encoches
prévues à cet effet sur le pied de lit.
3c. Serrez les boulons à l'aide de la clé Allen (J)
fournie.
3a. Alinee el estribo (4) con los paneles laterales
como se muestra en la ilustración.
3b. Fije los pernos (B) en las inserciones
previstas en el estribo.
3c. Apriete los tornillos con la llave Allen (J)
suministrada.
20
By
6
6
Bolt M6 X 17mm (x4)
Boulon M6 X 17mm (x4)
Perno M6 X 17mm (x4)
C
Bolt M6 X 17mm (x8)
Boulon M6 X 17mm (x8)
Perno M6 X 17mm (x8)
G
(C)
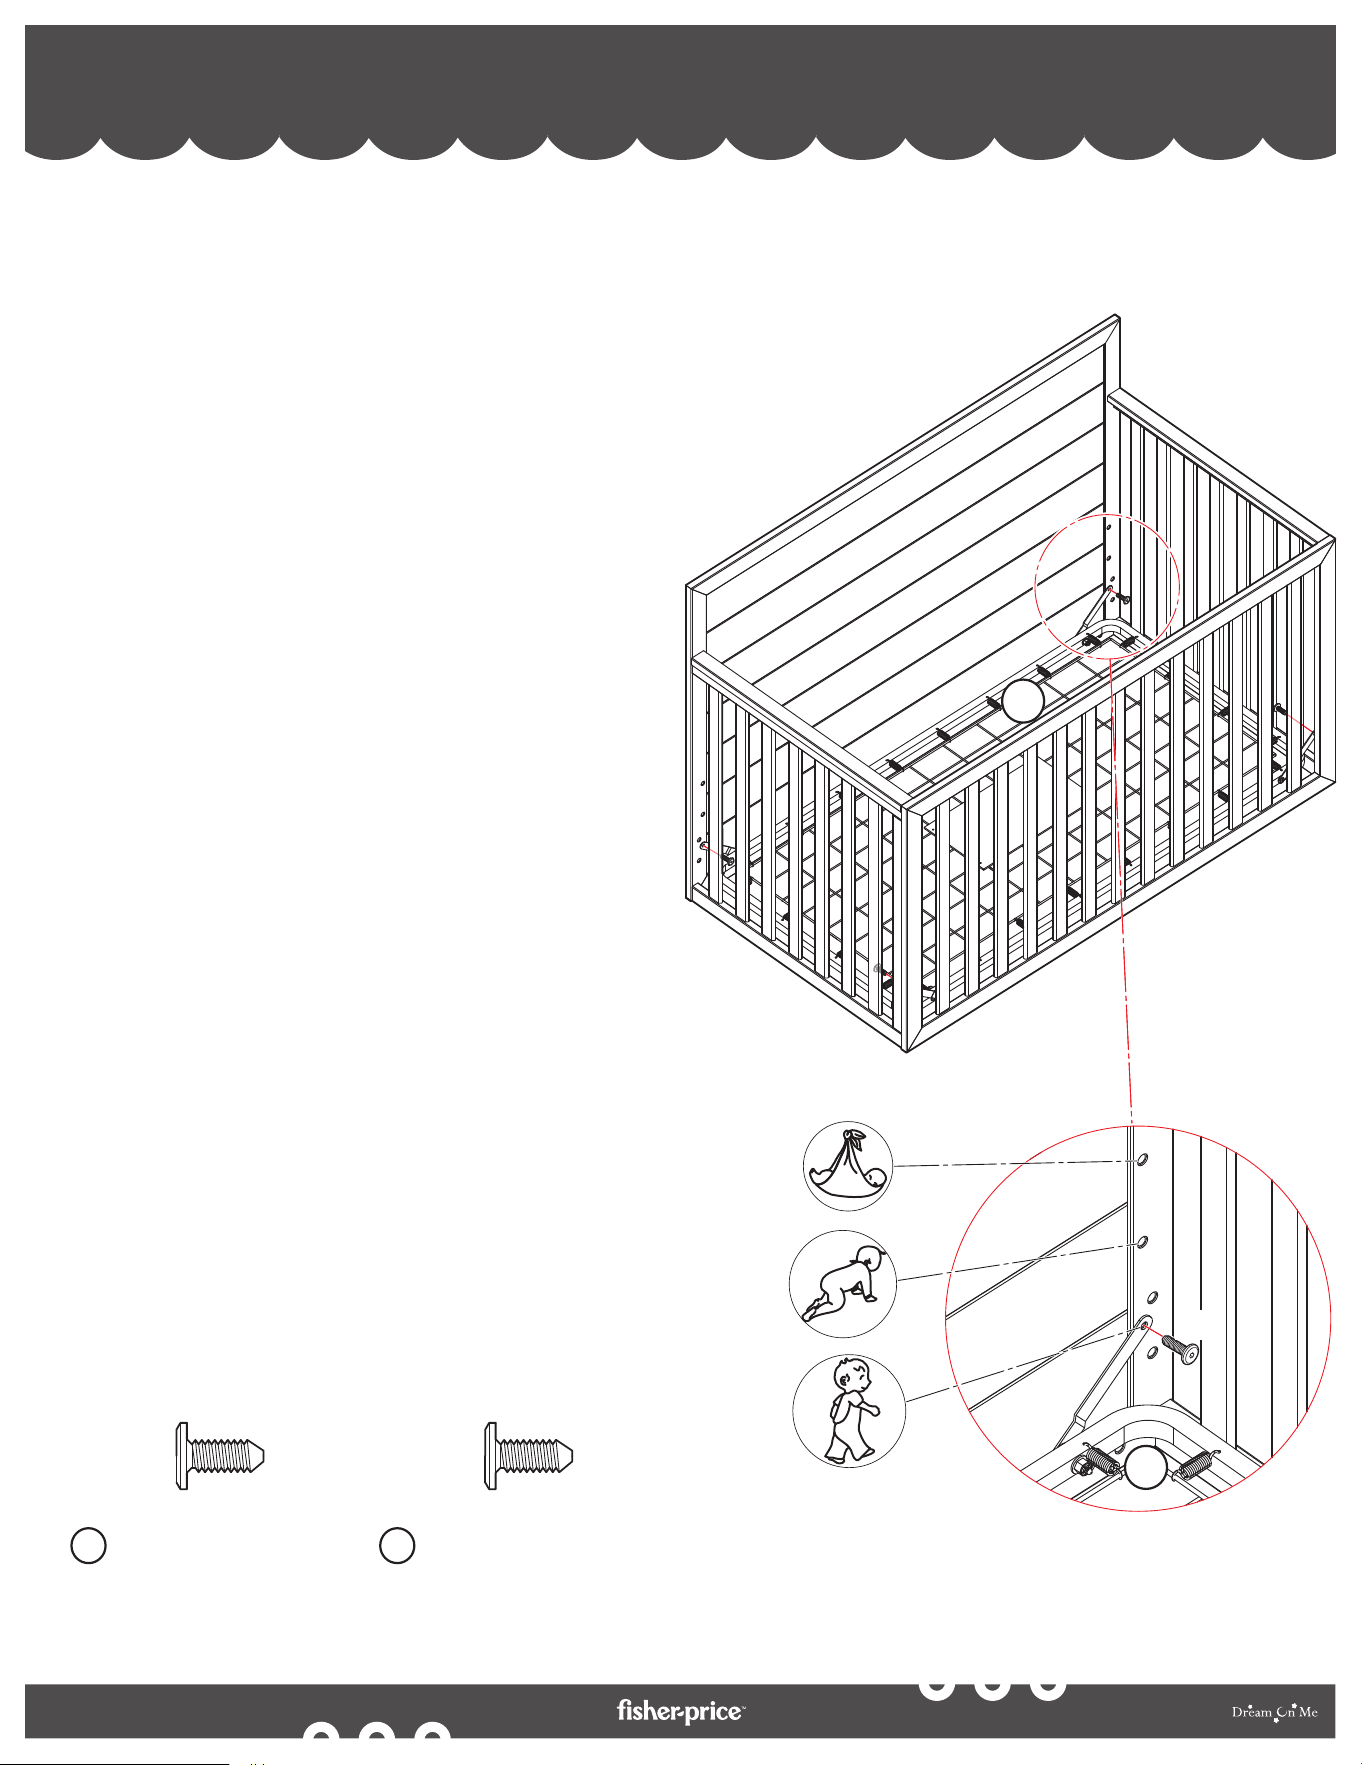
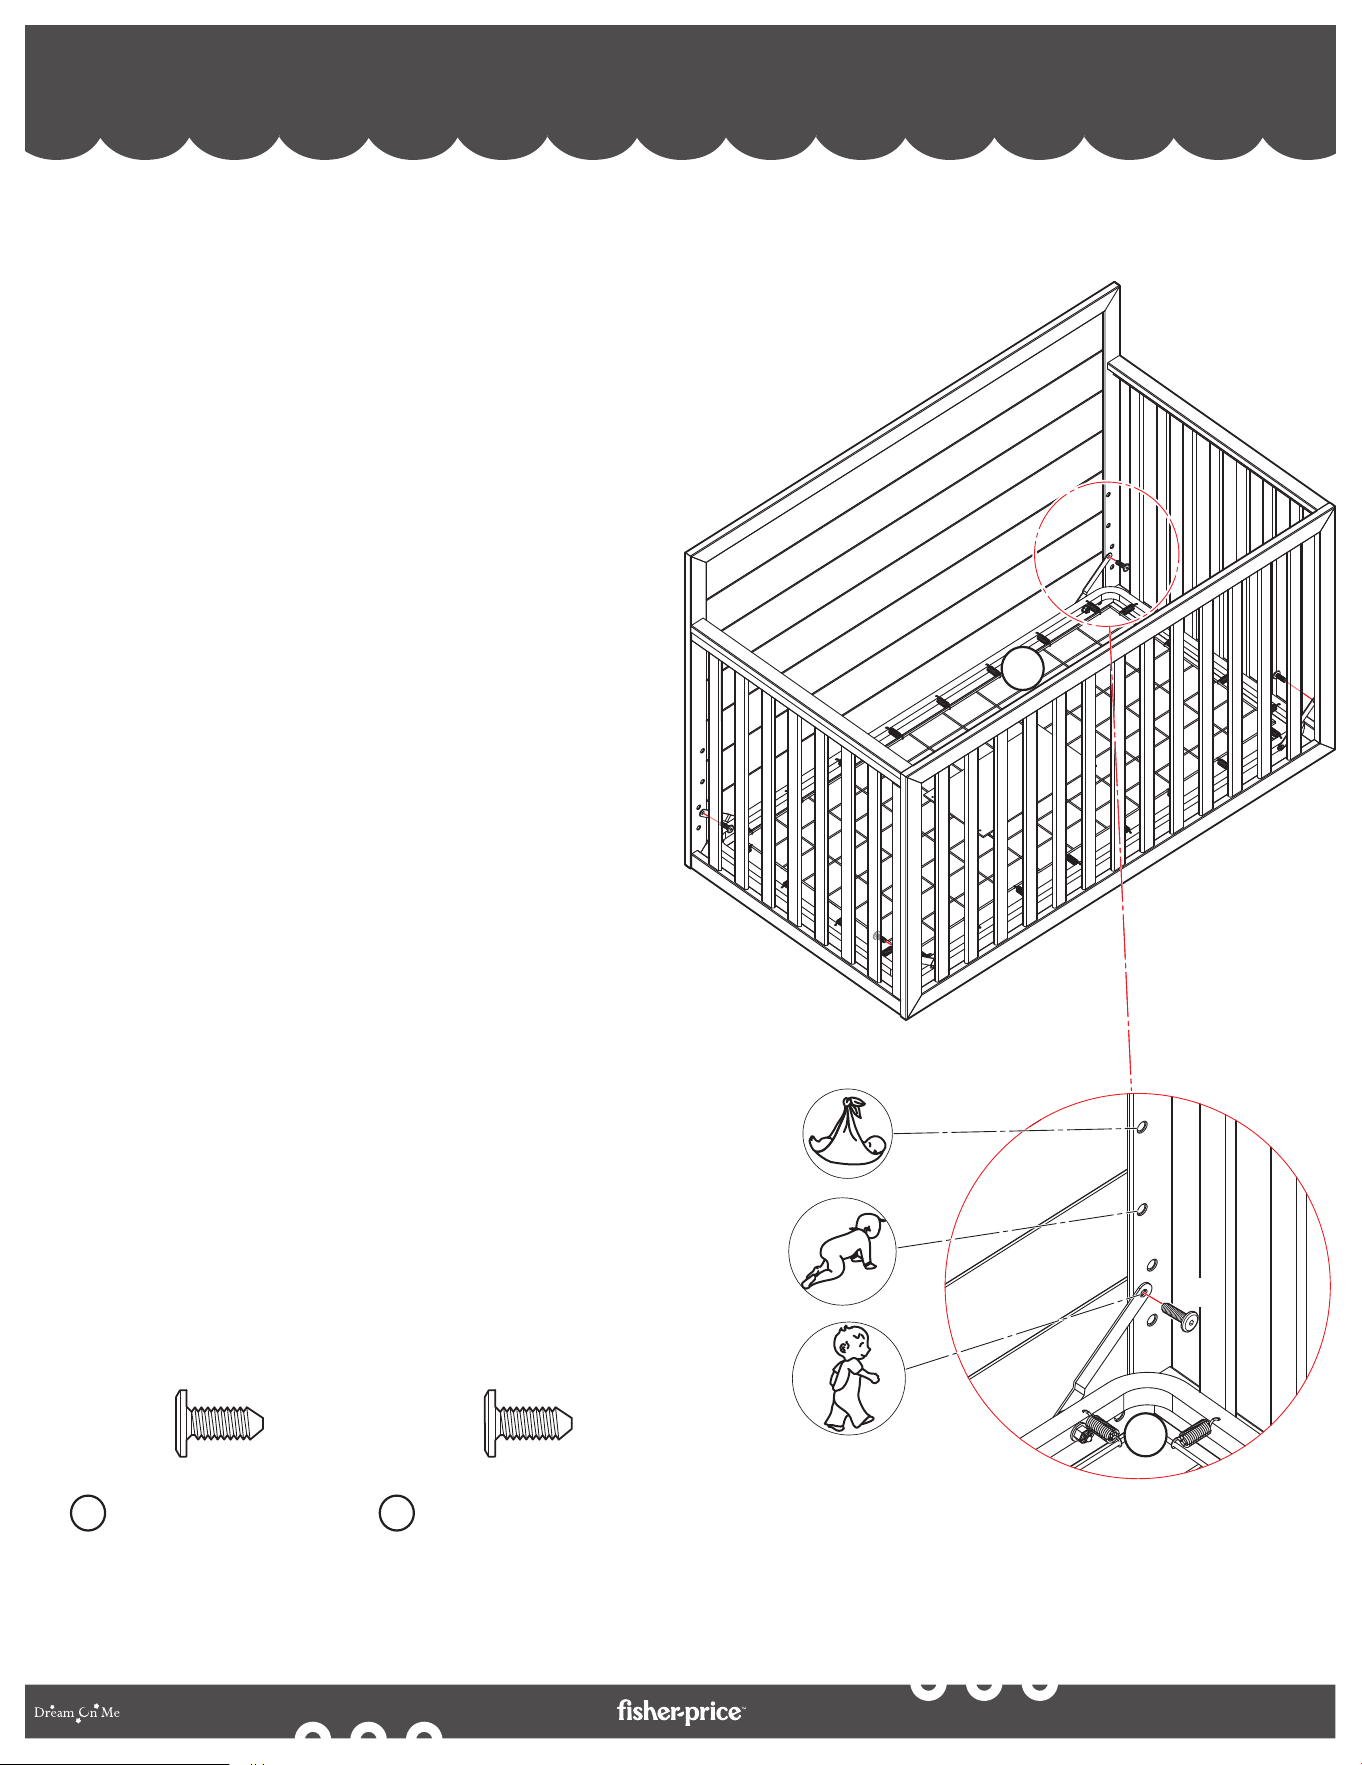
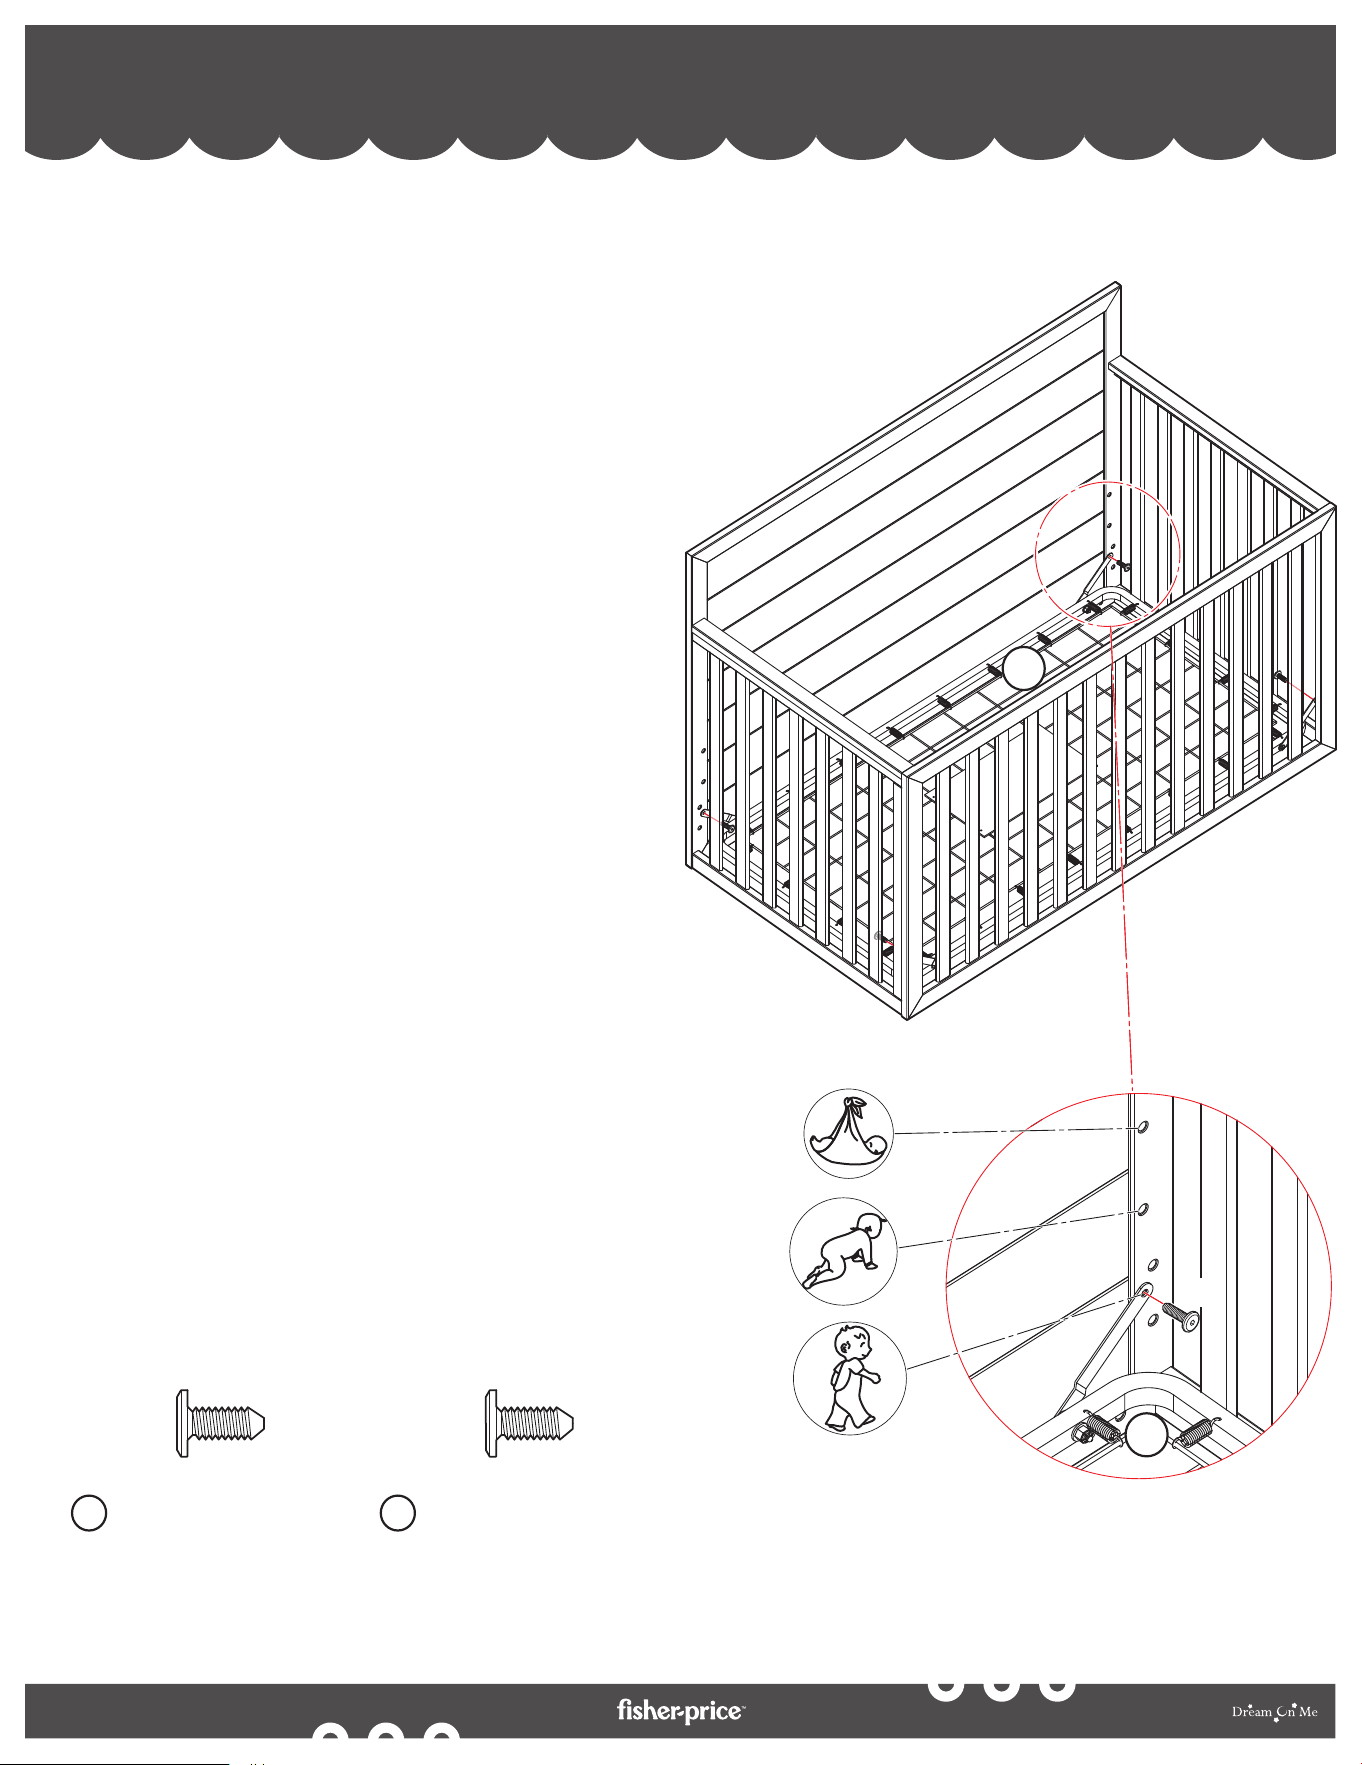
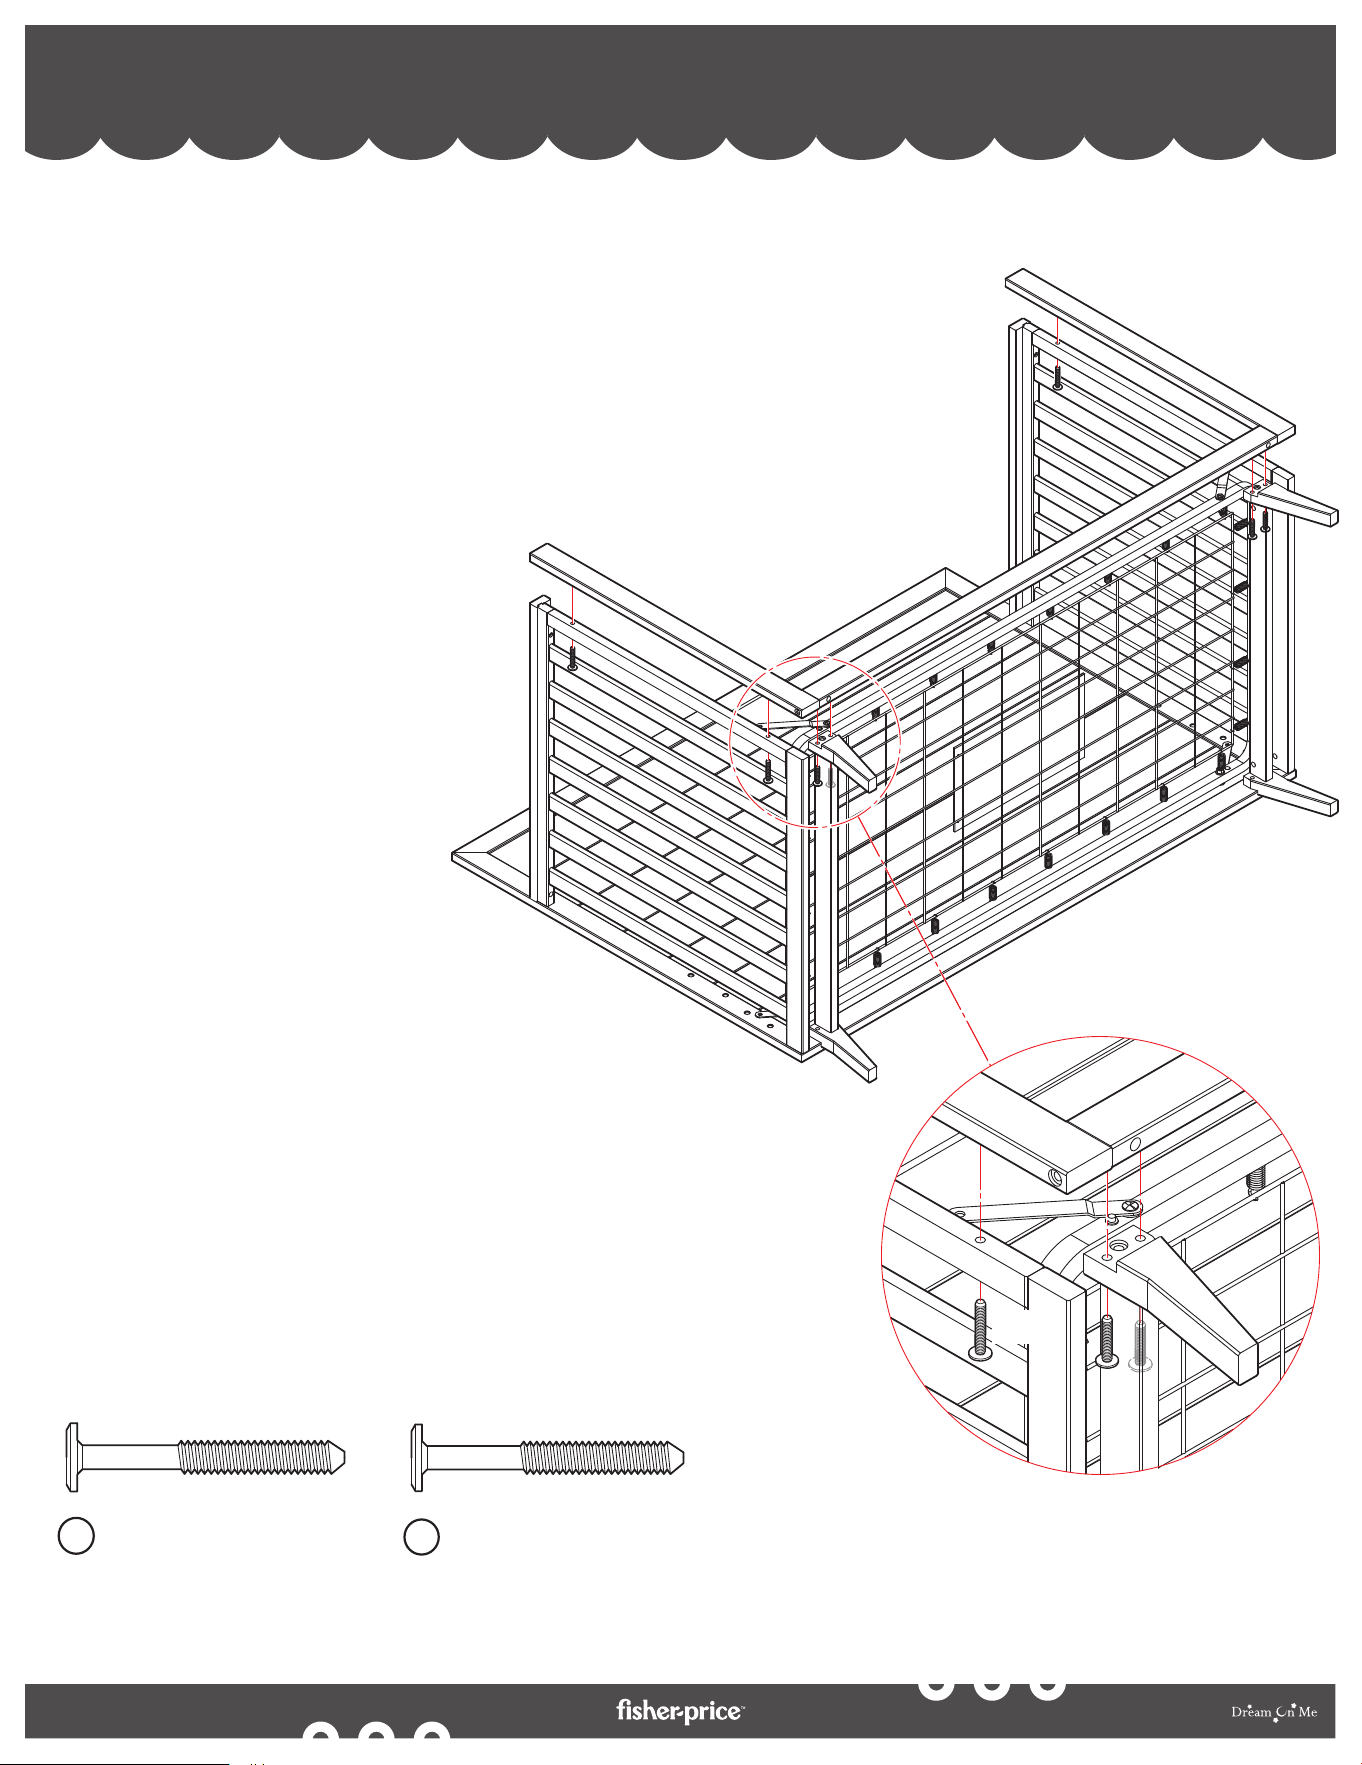
CRIB ASSEMBLY - MATTRESS SUPPORT PANEL ASSEMBLY
4
4a. Align the Mattress Support Panel (6) to all
the corners of the crib as shown in the
illustration.
4b. Use the Bolt (C) to attach the Mattress
Support Panel to the corners of the crib.
Tighten the Bolts using Allen Key (J)
provided.
4c. Note that the Lowest position of the
Mattress Support Panel will be for
Toddlers (babies who can stand up and
walk), the Mid position is for infants
(babies who start to turn and sit up) and
the Highest Position is for newborn
babies.
4d. Ensure that the Mattress Support Panels
are flat side up and not at a slant.
WARNING:
Fall Hazard: When a child is able to stand,
set the mattress at the lowest position
and remove bumper pads, large toys, and
other items that could serve as steps.
NOTE:
Please use the Bolt (G) to cover the extra
holes for different heights of the mattress
support. To ensure correct assembly, the
warnings on the pouch of the mattress
support panel must face up.
21
By
4
ASSEMBLAGE DU LIT D'ENFANT - ASSEMBLAGE DU
PANNEAU DE SUPPORT DU MATELAS
6
6
Bolt M6 X 17mm (x4)
Boulon M6 X 17mm (x4)
Perno M6 X 17mm (x4)
C
Bolt M6 X 17mm (x8)
Boulon M6 X 17mm (x8)
Perno M6 X 17mm (x8)
G
(C)
4a. Alignez le panneau de support du matelas (6) sur
tous les coins du lit comme indiqué sur
l'illustration.
4b. Utilisez le boulon (C) pour fixer le panneau de
support du matelas aux coins du lit. Serrez les
boulons à l'aide de la clé Allen (J) fournie.
4c. Notez que la position la plus basse du panneau
de soutien du matelas est destinée aux
tout-petits (bébés qui peuvent se lever et
marcher), la position intermédiaire est destinée
aux nourrissons (bébés qui commencent à se
tourner et à s'asseoir) et la position la plus haute
est destinée aux nouveau-nés.
4d. Veillez à ce que les panneaux de soutien du
matelas soient placés à plat et non de biais.
AVERTISSEMENT:
Risque de chute : Lorsque l'enfant est capable
de se tenir debout, placez le matelas dans la
position la plus basse et retirez les pare-chocs,
les gros jouets et autres objets qui pourraient
servir de marchepieds.
REMARQUE:
Veuillez utiliser le boulon (G) pour couvrir les
trous supplémentaires pour les différentes
hauteurs du support de matelas. Pour garantir
un assemblage correct, les avertissements sur la
pochette du panneau du support de matelas
doivent être orientés vers le haut.
22
By
MONTAJE DE LA CUNA - MONTAJE DEL PANEL DE
SOPORTE DEL COLCHÓN
4
6
6
Bolt M6 X 17mm (x4)
Boulon M6 X 17mm (x4)
Perno M6 X 17mm (x4)
C
Bolt M6 X 17mm (x8)
Boulon M6 X 17mm (x8)
Perno M6 X 17mm (x8)
G
(C)
4a. Alinee el panel de soporte del colchón (6) con
todas las esquinas de la cuna como se muestra
en la ilustración.
4b. Utilice el perno (C) para fijar el panel de soporte
del colchón a las esquinas de la cuna. Apriete los
pernos con la llave Allen (J) suministrada.
4c. Tenga en cuenta que la posición más baja del
panel de soporte del colchón será para niños
pequeños (bebés que pueden ponerse de pie y
caminar), la posición media es para bebés
(bebés que empiezan a girarse y sentarse) y la
posición más alta es para recién nacidos.
4d. Asegúrese de que los paneles de soporte del
colchón estén planos y no inclinados.
ADVERTENCIA:
Peligro de caída: Cuando el niño pueda ponerse
de pie, coloque el colchón en la posición más
baja y retire los protectores, los juguetes
grandes y otros objetos que puedan servir de
escalones.
NOTA:
Utilice el perno (G) para cubrir los orificios
adicionales para diferentes alturas del soporte
del colchón. Para garantizar un montaje
correcto, las advertencias de la bolsa del panel
del soporte del colchón deben estar orientadas
hacia arriba.
23
By
(F)
Bolt M6 X 30mm (x8)
Boulon M6 X 30mm (x8)
Perno M6 X 30mm (x8)
F
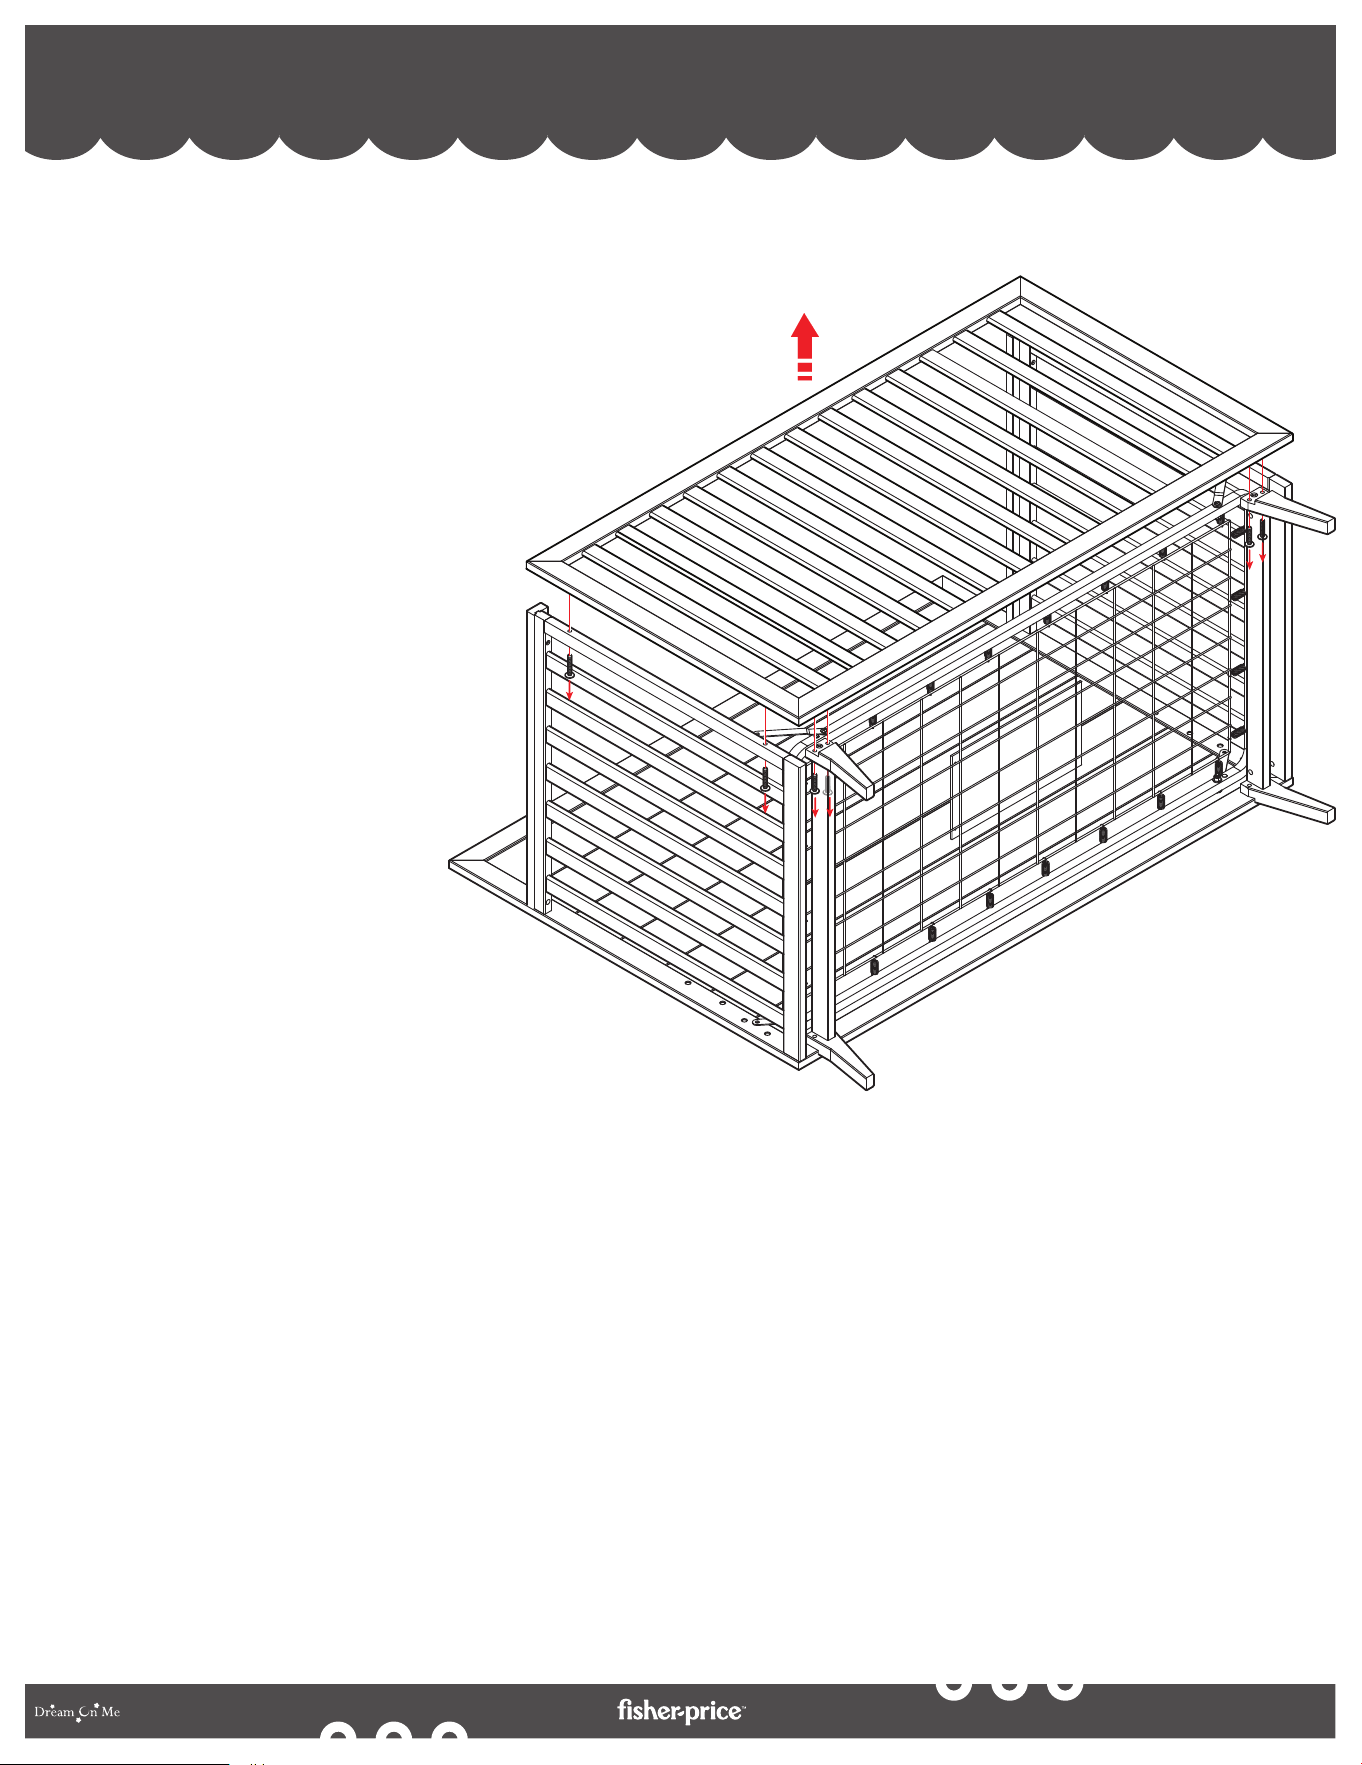
CRIB ASSEMBLY - ASSEMBLING LEGS
ASSEMBLAGE DU LIT D'ENFANT - ASSEMBLAGE DES PIEDS
MONTAJE DE LA CUNA - MONTAJE DE LAS PATAS
5
5a. Place the half-assembled crib on its back
as shown in the illustration.
5b. Align the assembled legs to the bottom
of the crib. Attach the Bolts (F) in the
insertions of the legs to fix them to the
crib.
5c. Tighten the bolts using the Allen key (J).
5a. Placez le berceau à moitié
assemblé sur son dos comme
indiqué sur l'illustration.
5b. Alignez les pieds assemblés sur le
fond du lit. Fixez les boulons (F)
dans les insertions des pieds pour
les fixer au lit.
5c. Serrez les boulons à l'aide de la
clé Allen (J).
5a. Coloque la cuna a medio armar boca
arriba como se muestra en la ilustración.
5b. Alinee las patas montadas con la parte
inferior de la cuna. Coloque los pernos
(F) en las inserciones de las patas para
fijarlas a la cuna.
5c. Apriete los tornillos con la llave Allen (J).
24
By
9
9
10
11
11
Bolt M6 X 80mm (x2)
Boulon M6 X 80mm (x2)
Perno M6 X 80mm (x2)
H
Wooden Dowel (×2)
Cheville en bois (×2)
Clavija de madera (×2)
D
Barrel Nut (x2)
Écrou de baril (×2)
Tuerca de barril (×2)
E
(H)
(D)
(E)
TODDLER/DAY BED ASSEMBLY - LEG AND STABILIZER BAR ASSEMBLY
ASSEMBLAGE DU LIT POUR TOUT-PETITS - ASSEMBLAGE DES PIEDS ET DE LA BARRE STABILISATRICE
MONTAJE DE LA CAMA PARA NIÑOS PEQUEÑOS - MONTAJE DE LAS PATAS Y LA BARRA ESTABILIZADORA
1
1a. Align the Left Front Leg (9) and the
Right Front Leg (10) to the Stabilizer
Bar (11) as shown in the illustration.
1b. Position the Wooden Dowels (D)
between the legs and the stabilizer bar.
1c. Position the Barrel Nuts (E) in the
insertions provided on the stabilizer bar.
Attach the Bolts (H) in the top insertions
of the legs to fix them to the rail.
1d. Use the Allen Key (J) to tighten the bolts
in the barrel nuts as shown in the
illustration.
1a. Aligner le pied avant gauche (9) et le
pied avant droit (10) sur la barre
stabilisatrice (11) comme indiqué sur
l'illustration.
1b. Positionner les chevilles en bois (D)
entre les pieds et la barre
stabilisatrice.
1c. Positionnez les écrous cylindriques
(E) dans les insertions prévues sur la
barre stabilisatrice. Fixez les boulons
(H) dans les insertions supérieures
des pieds pour les fixer au rail.
1d. Utilisez la clé Allen (J) pour serrer les
boulons dans les écrous cylindriques
comme indiqué sur l'illustration.
1a. Alinee la pata delantera izquierda (9) y la pata delantera derecha (10) con la barra
estabilizadora (11) como se muestra en la ilustración.
1b. Coloque los tacos de madera (D) entre las patas y la barra estabilizadora.
1c. Coloque las tuercas de barril (E) en las inserciones previstas en la barra estabilizadora.
Coloque los pernos (H) en las inserciones superiores de las patas para fijarlas a la barra.
1d. Utilice la llave Allen (J) para apretar los pernos en las tuercas de barril como se muestra en
la ilustración.
25
By
TODDLER/DAY BED ASSEMBLY - DISASSEMBLE THE FOOTBOARD
ASSEMBLAGE DU LIT D'ENFANT/DE JOUR - DEMONTAGE DU PIED DE LIT
MONTAJE DE LA CAMA DE DÍA/NIÑO PEQUEÑO - DESMONTE EL PIECERO
2
2a. Detach the Bolts (B) from the
insertions on the Footboard using
the Allen Key (J) provided.
2b. Store away all the hardware and
the footboard safely.
2a. Détachez les boulons (B) des
insertions du pied de lit à l'aide
de la clé Allen (J) fournie.
2b. Rangez toutes les pièces de
quincaillerie et le pied de lit en
lieu sûr.
2a. Retire los pernos (B) de las
inserciones del piecero
utilizando la llave Allen (J)
suministrada.
2b. Guarde todos los herrajes y
el piecero de forma segura.
26
By
Bolt M6 X 40mm (x4)
Boulon M6 X 40mm (x4)
Perno M6 X 40mm (x4)
B
Bolt M6 X 30mm (x8)
Boulon M6 X 30mm (x8)
Perno M6 X 30mm (x8)
F
(F)
(B)
TODDLER/DAY BED ASSEMBLY - FRONT LEGS AND STABILIZER BAR ASSEMBLY
ASSEMBLAGE DU LIT DE BÉBÉ/DE JOUR - ASSEMBLAGE DES PIEDS AVANT ET DE LA BARRE STABILISATRICE
MONTAJE DE LA CAMA DE DÍA/NIÑO PEQUEÑO - MONTAJE DE LAS PATAS DELANTERAS Y LA BARRA ESTABILIZADORA
3
3a. Align the pre-assembled legs and
stabilizer bar to the side panels as
shown in the illustration.
3b. Attach the Bolts (B) in the insertions
of the side panels and Bolts (F) in
the insertions of the legs to fix them
to the front legs and stabilizer bar.
3d. Use the Allen Key (J) to tighten the
bolts as shown in the illustration.
3a. Alignez les pieds et la barre
stabilisatrice pré-assemblés sur
les panneaux latéraux comme
indiqué sur l'illustration.
3b. Fixez les boulons (B) dans les
insertions des panneaux
latéraux et les boulons (F) dans
les insertions des pieds pour les
fixer aux pieds avant et à la
barre stabilisatrice.
3d. Utilisez la clé Allen (J) pour
serrer les boulons comme
indiqué sur l'illustration.
3a. Alinee las patas premontadas y la barra
estabilizadora con los paneles laterales
como se muestra en la ilustración.
3b. Coloque los pernos (B) en las inserciones
de los paneles laterales y los pernos (F) en
las inserciones de las patas para fijarlas a
las patas delanteras y a la barra
estabilizadora.
3d. Utilice la llave Allen (J) para apretar los
pernos como se muestra en la ilustración.
27
By
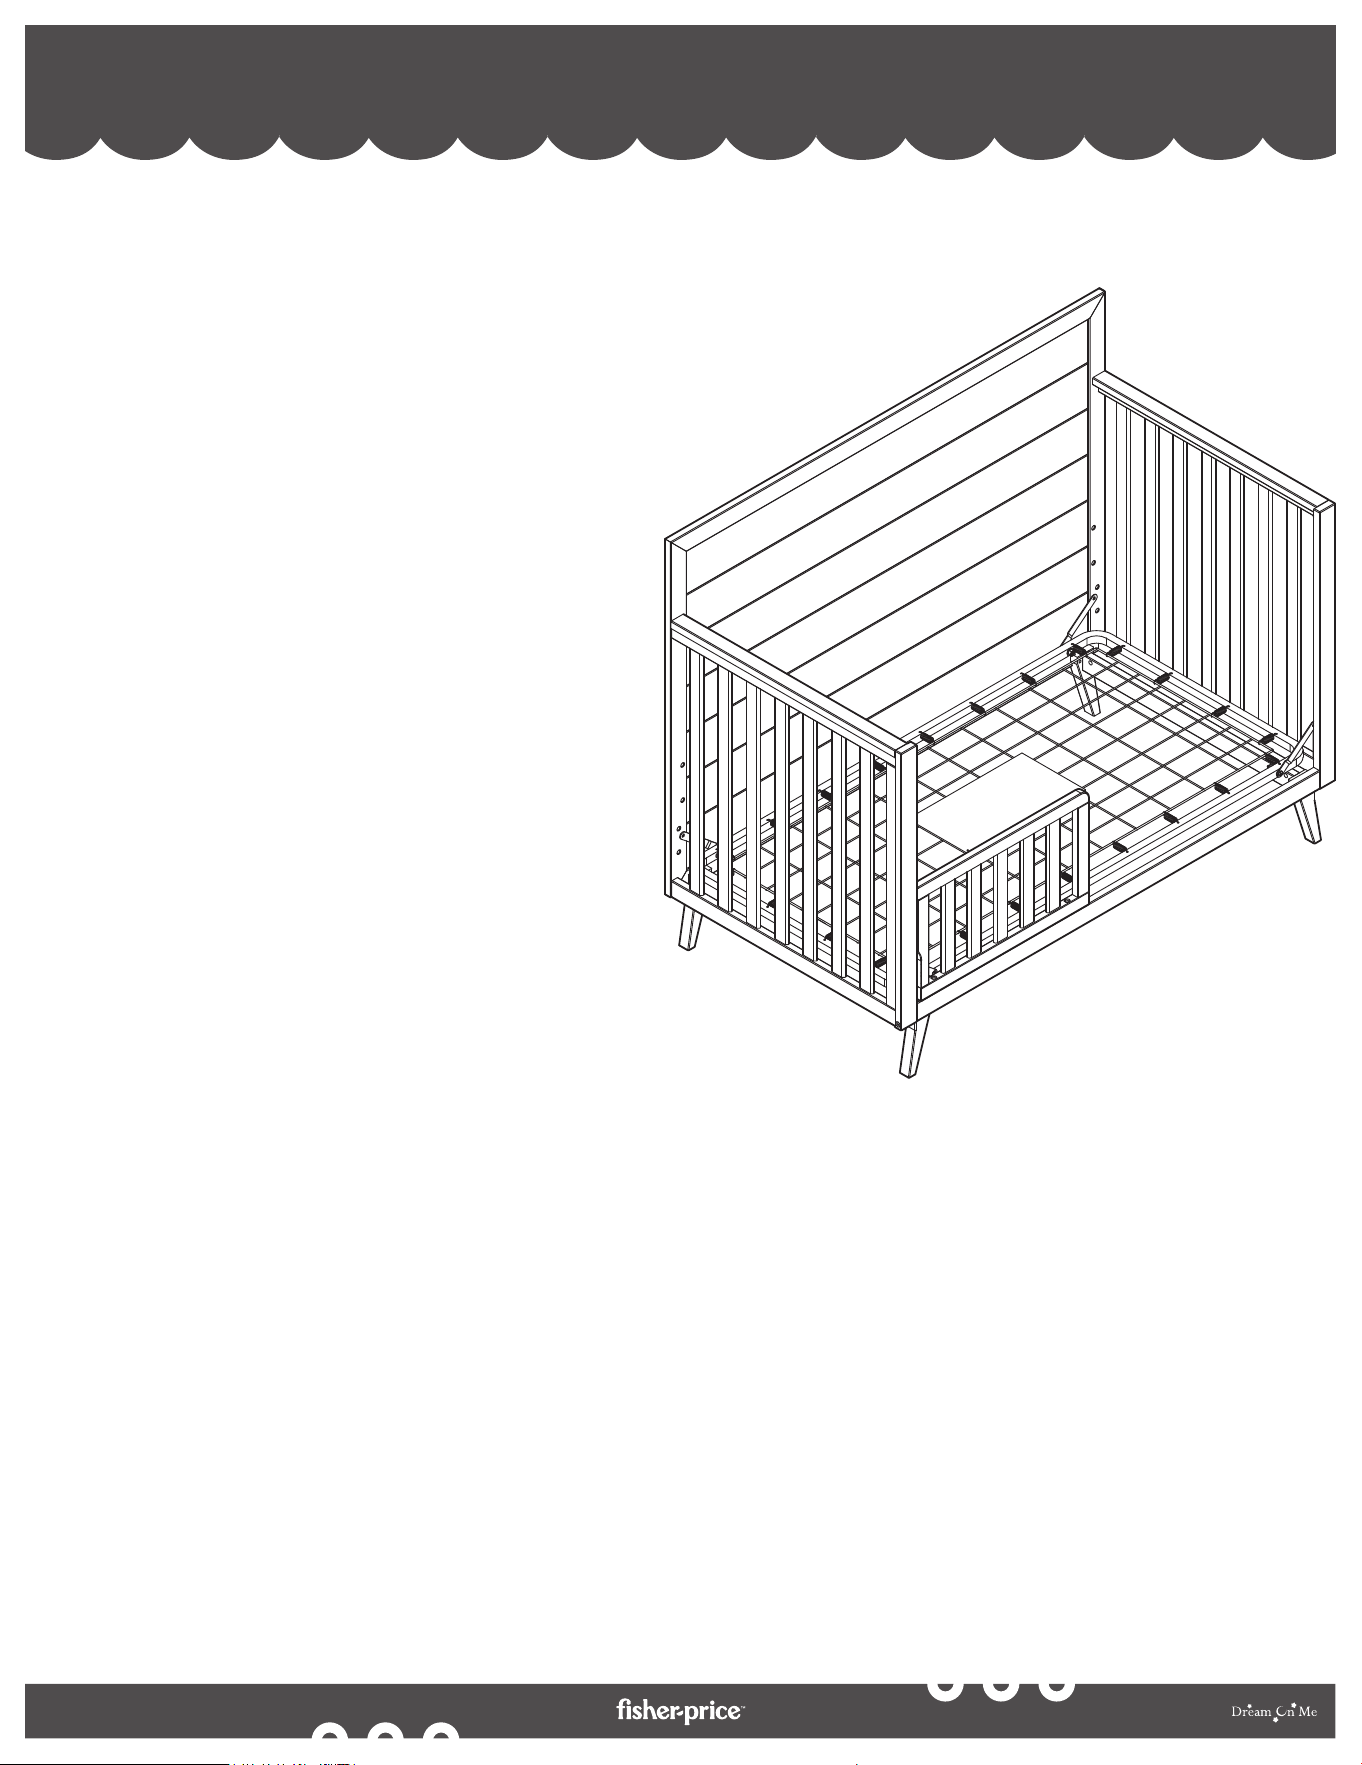
CONVERSION MODE - DAYBED ASSEMBLY
MODE DE CONVERSION - ASSEMBLAGE DU LIT DE JOUR
MODO CONVERSIÓN - MONTAJE DEL DAYBED
4
4a. To convert the crib to a Daybed,
you must remove the footboard of
the crib and ensure the stabilizer
bar is installed.
NOTE:
* Make sure the mattress support
panel is at the lowest position.
4a. Pour convertir le lit d'enfant en lit
d'appoint, vous devez retirer le pied
du lit et vous assurer que la barre
stabilisatrice est installée.
REMARQUE :
* Assurezous que le panneau de
support du matelas est à la position
la plus basse.
4a. Para convertir la cuna en un
Daybed, debe retirar el piecero de
la cuna y asegurarse de que la
barra estabilizadora está instalada.
NOTA:
* Asegúrese de que el panel de
soporte del colchón está en la
posición más baja.
28
By
CONVERSION MODE - TODDLER BED ASSEMBLY
MODE DE CONVERSION - ASSEMBLAGE DU LIT D'ENFANT
MODO CONVERSIÓN - MONTAJE DE LA CAMA INFANTIL
5
5a. To convert the crib to a Toddler Bed, you must
remove the footboard of the crib and ensure the
stabilizer bar is installed.
5b. Install a toddler bed guard rail (Instructions will
be provided with the guard rail). Make sure to
use the Dream on me Convertible Crib Toddler
Guard Rail (SKU - 692) to convert the crib into a
toddler bed.
NOTE:
* This crib uses Style #692 toddler bed guard rail.
* Please see your Crib Retailer, visit
www.dreamonme.com, or contact Consumer
Care for more information.
5a. Pour convertir le lit de bébé en lit d'enfant, vous
devez retirer le pied du lit et vous assurer que la
barre stabilisatrice est installée.
5b. Installez un garde-corps pour lit d'enfant (les
instructions seront fournies avec le garde-corps).
Veillez à utiliser le garde-corps pour lit d'enfant
convertible Dream on me (SKU - 692) pour
convertir le lit d'enfant en lit d'enfant.
REMARQUE :
* Ce lit d'enfant utilise la barre de protection pour lit
d'enfant de Style #692.
* Veuillez consulter votre détaillant de lits d'enfant,
visitez le site www.dreamonme.com ou
communiquez avec le Service à la clientèle pour
obtenir de plus amples renseignements.
5a. Para convertir la cuna en una cama para niños pequeños, debe retirar el
piecero de la cuna y asegurarse de que la barra estabilizadora está
instalada.
5b. Instale una barandilla de seguridad para la cama de los niños pequeños (las
instrucciones se suministran con la barandilla). Asegúrese de utilizar la
barandilla Dream on me Convertible Crib Toddler Guard Rail (SKU - 692)
para convertir la cuna en una cama para niños pequeños.
NOTA:
* Esta cuna utiliza la barandilla para cama infantil Style #692.
* Consulte a su distribuidor de cunas, visite www.dreamonme.com o
póngase en contacto con Atención al cliente para obtener más
información.
29
By
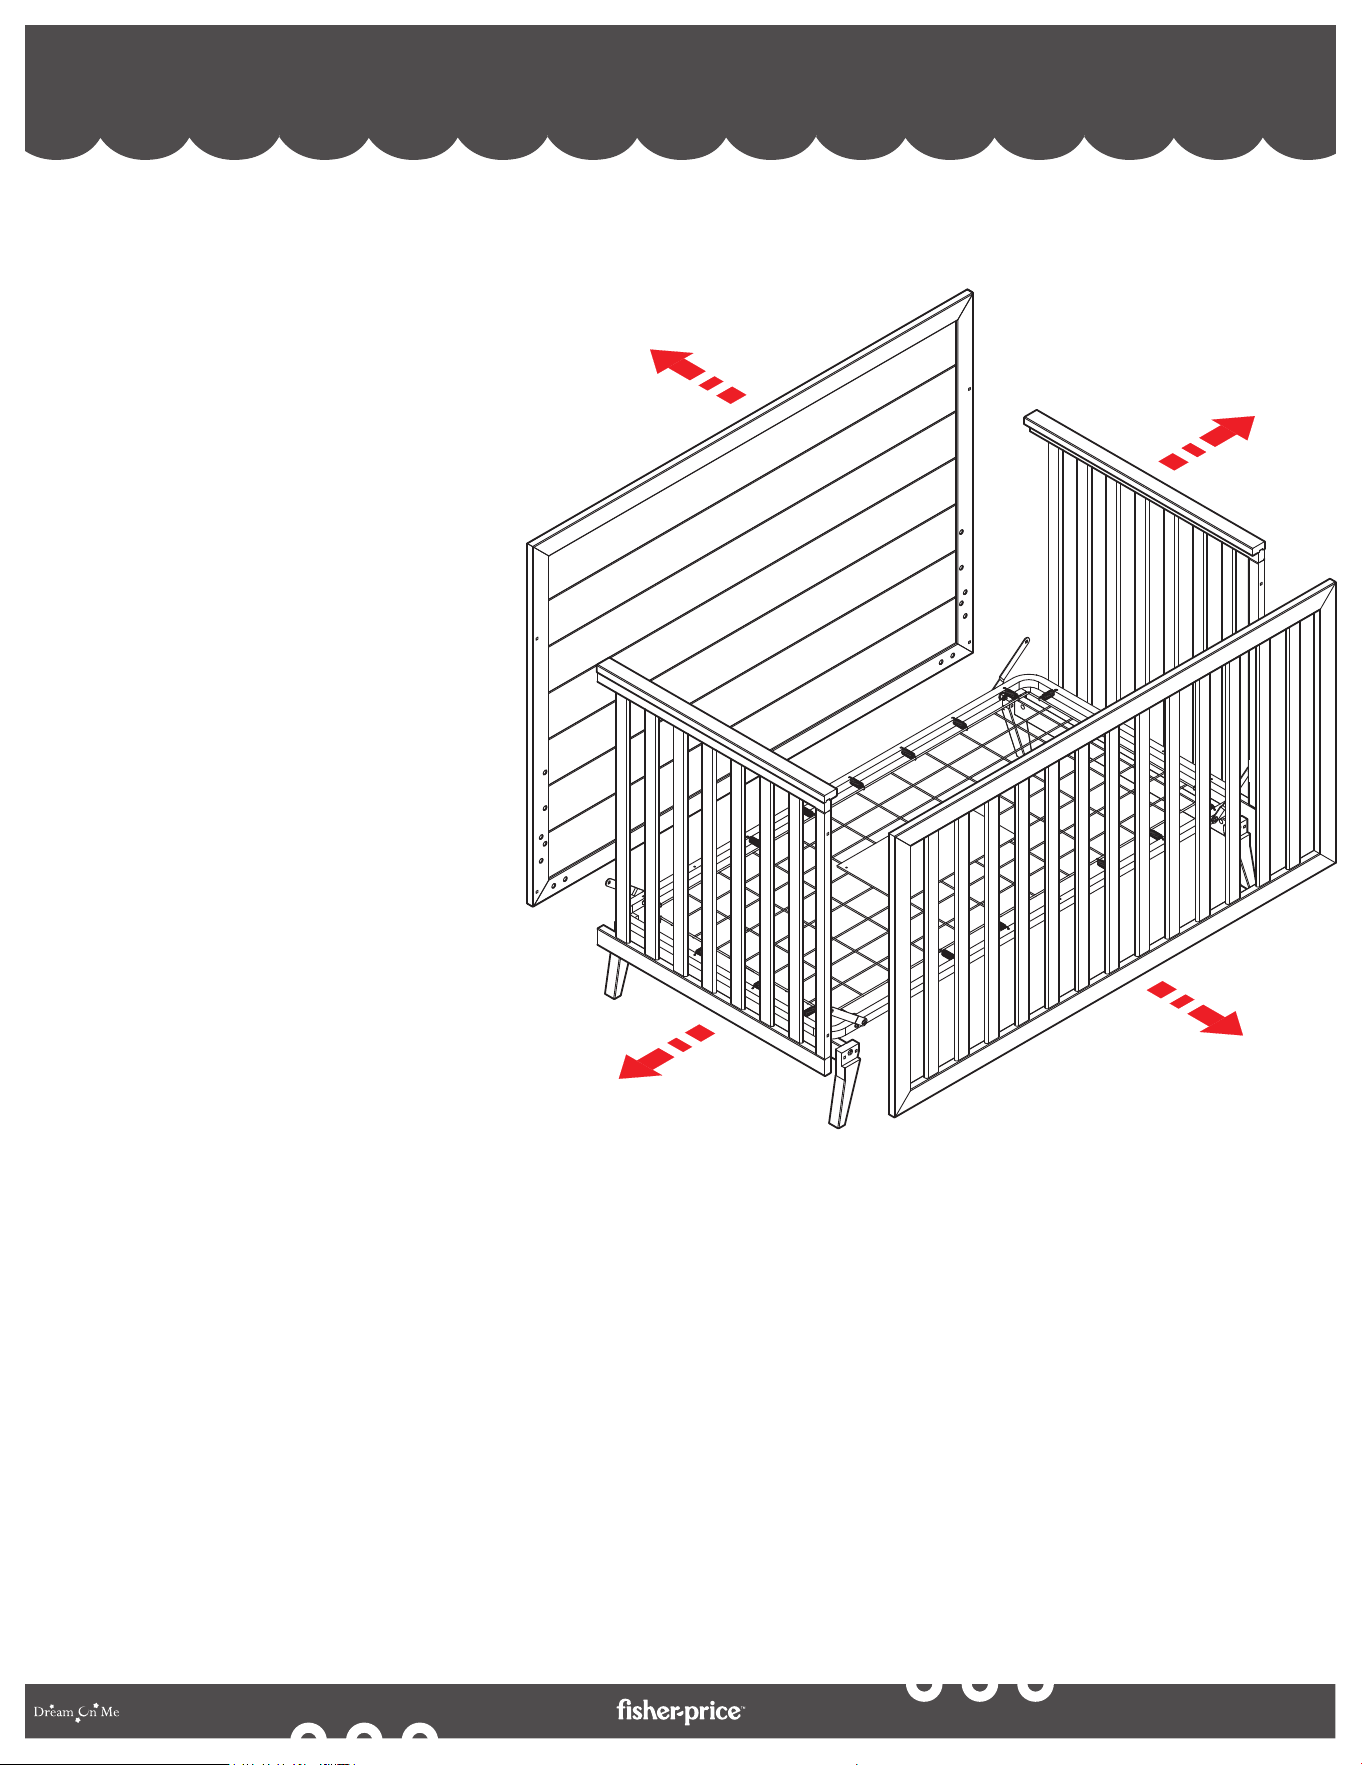
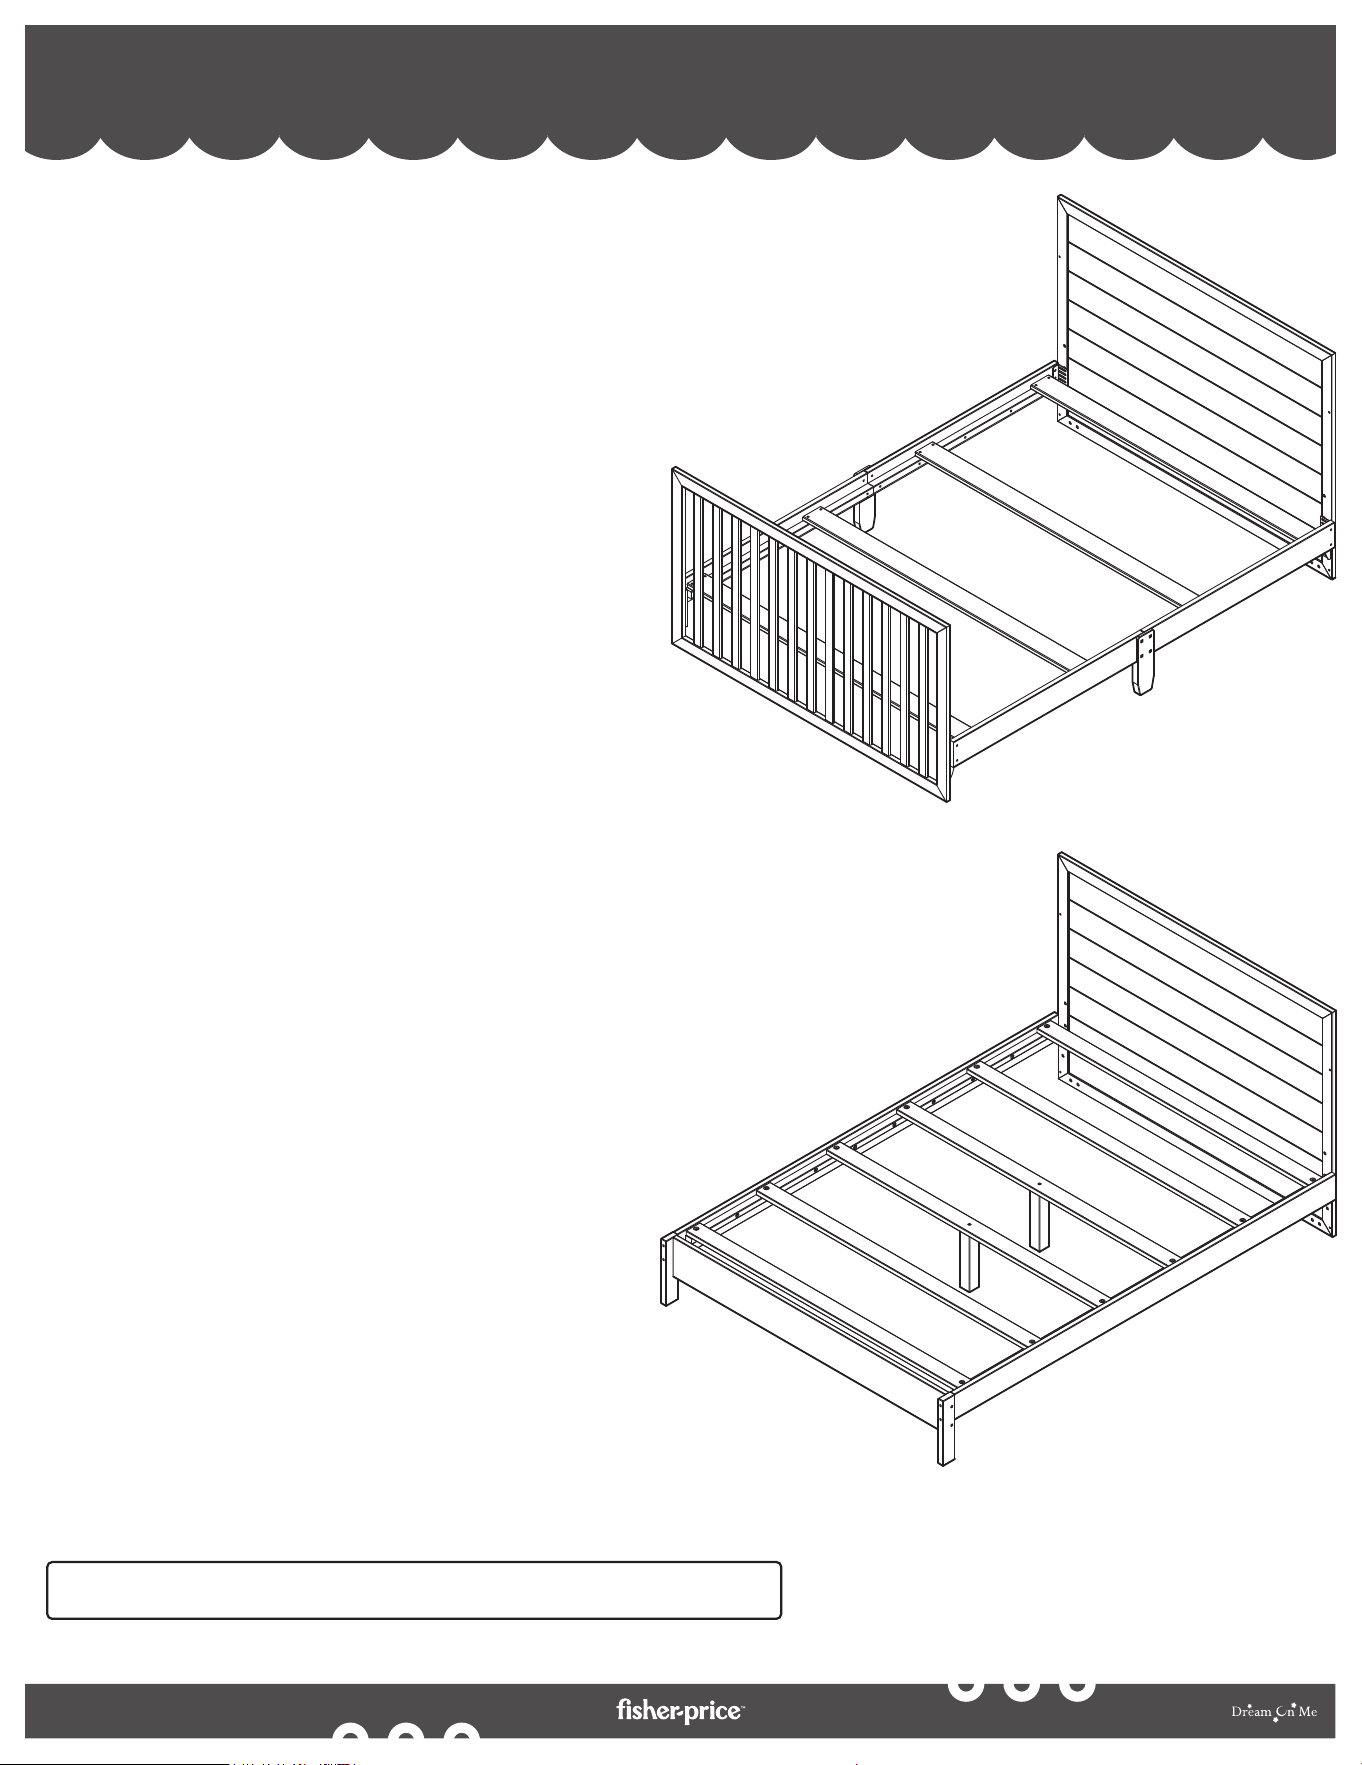
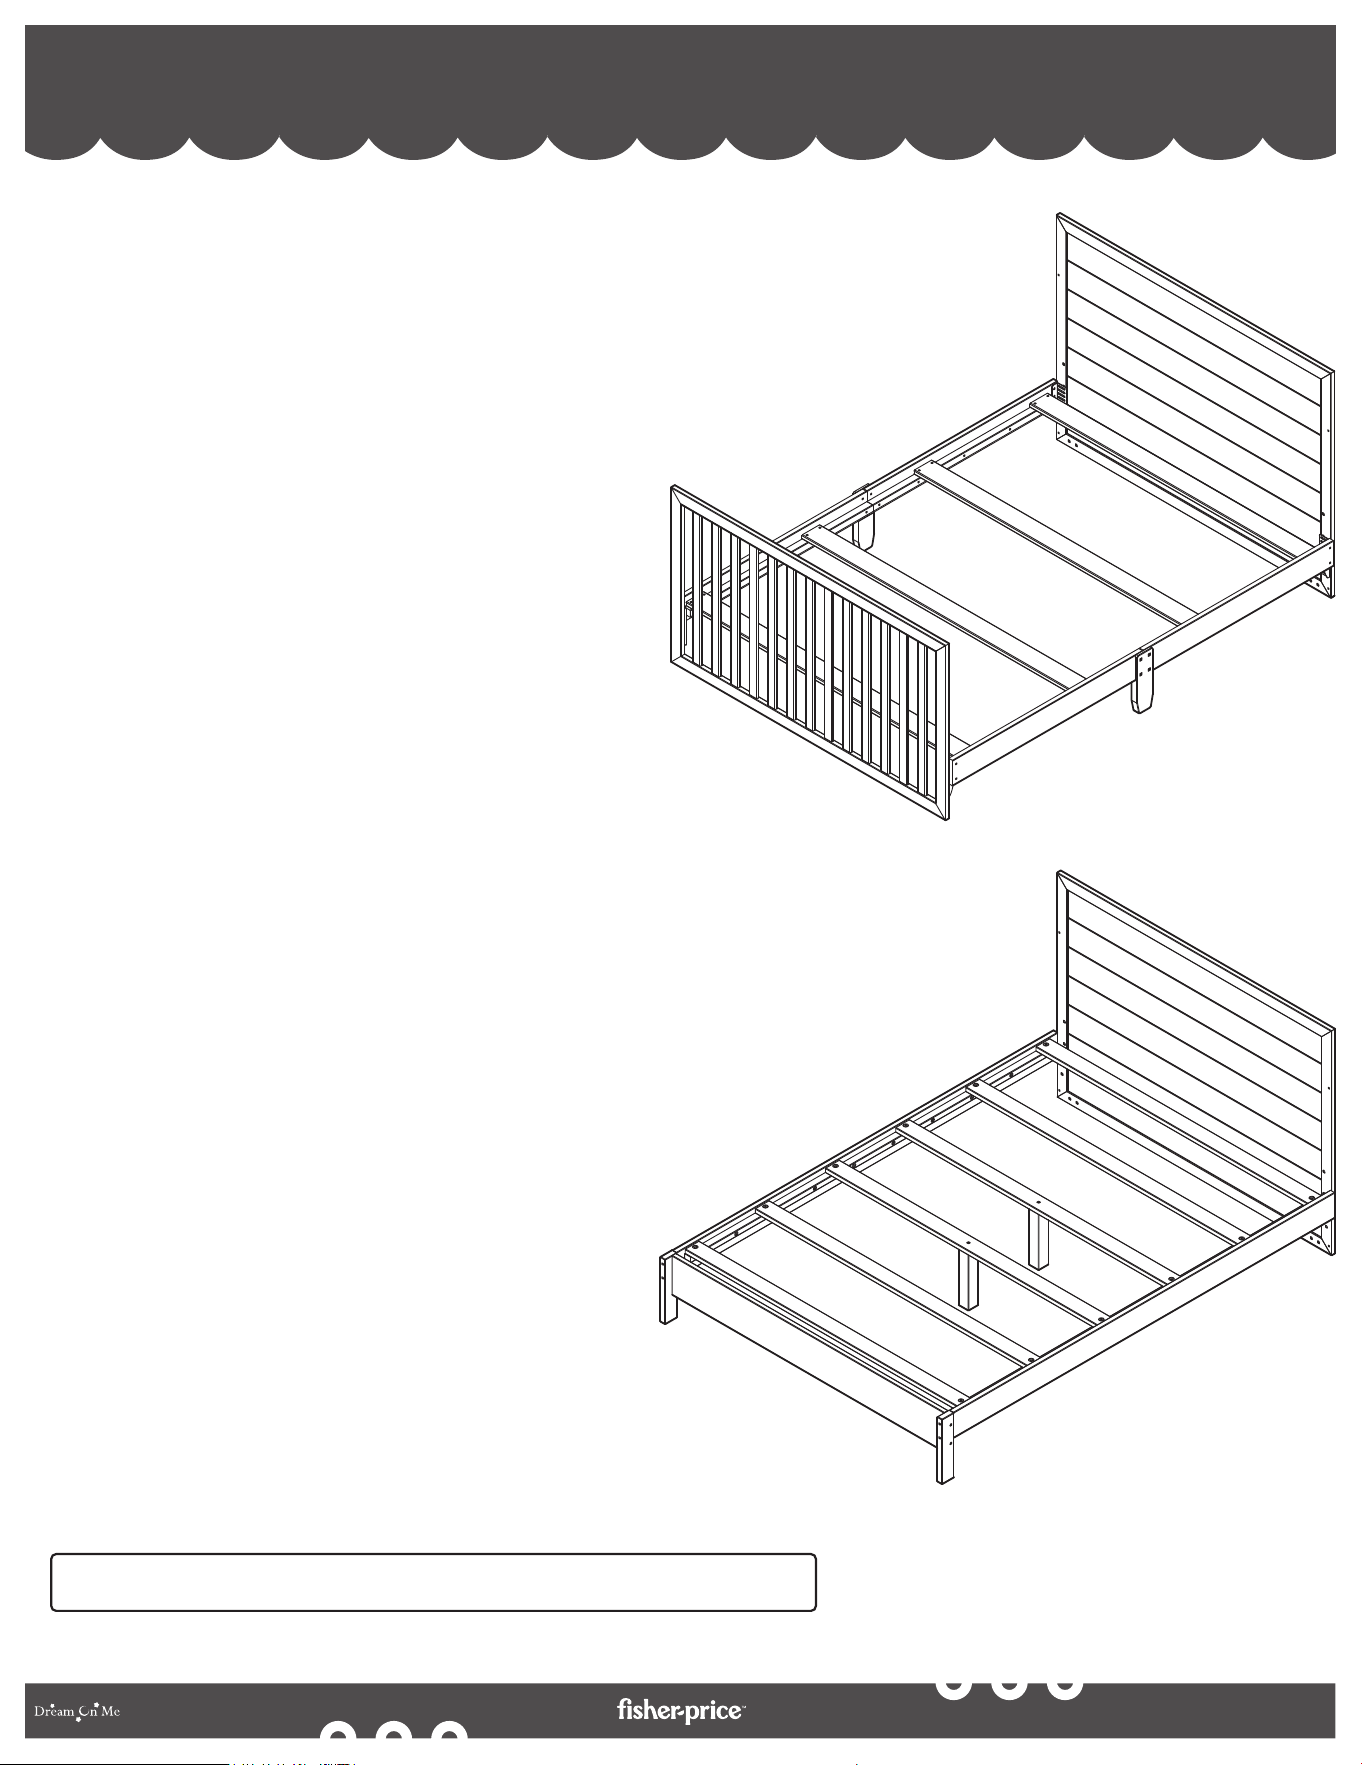
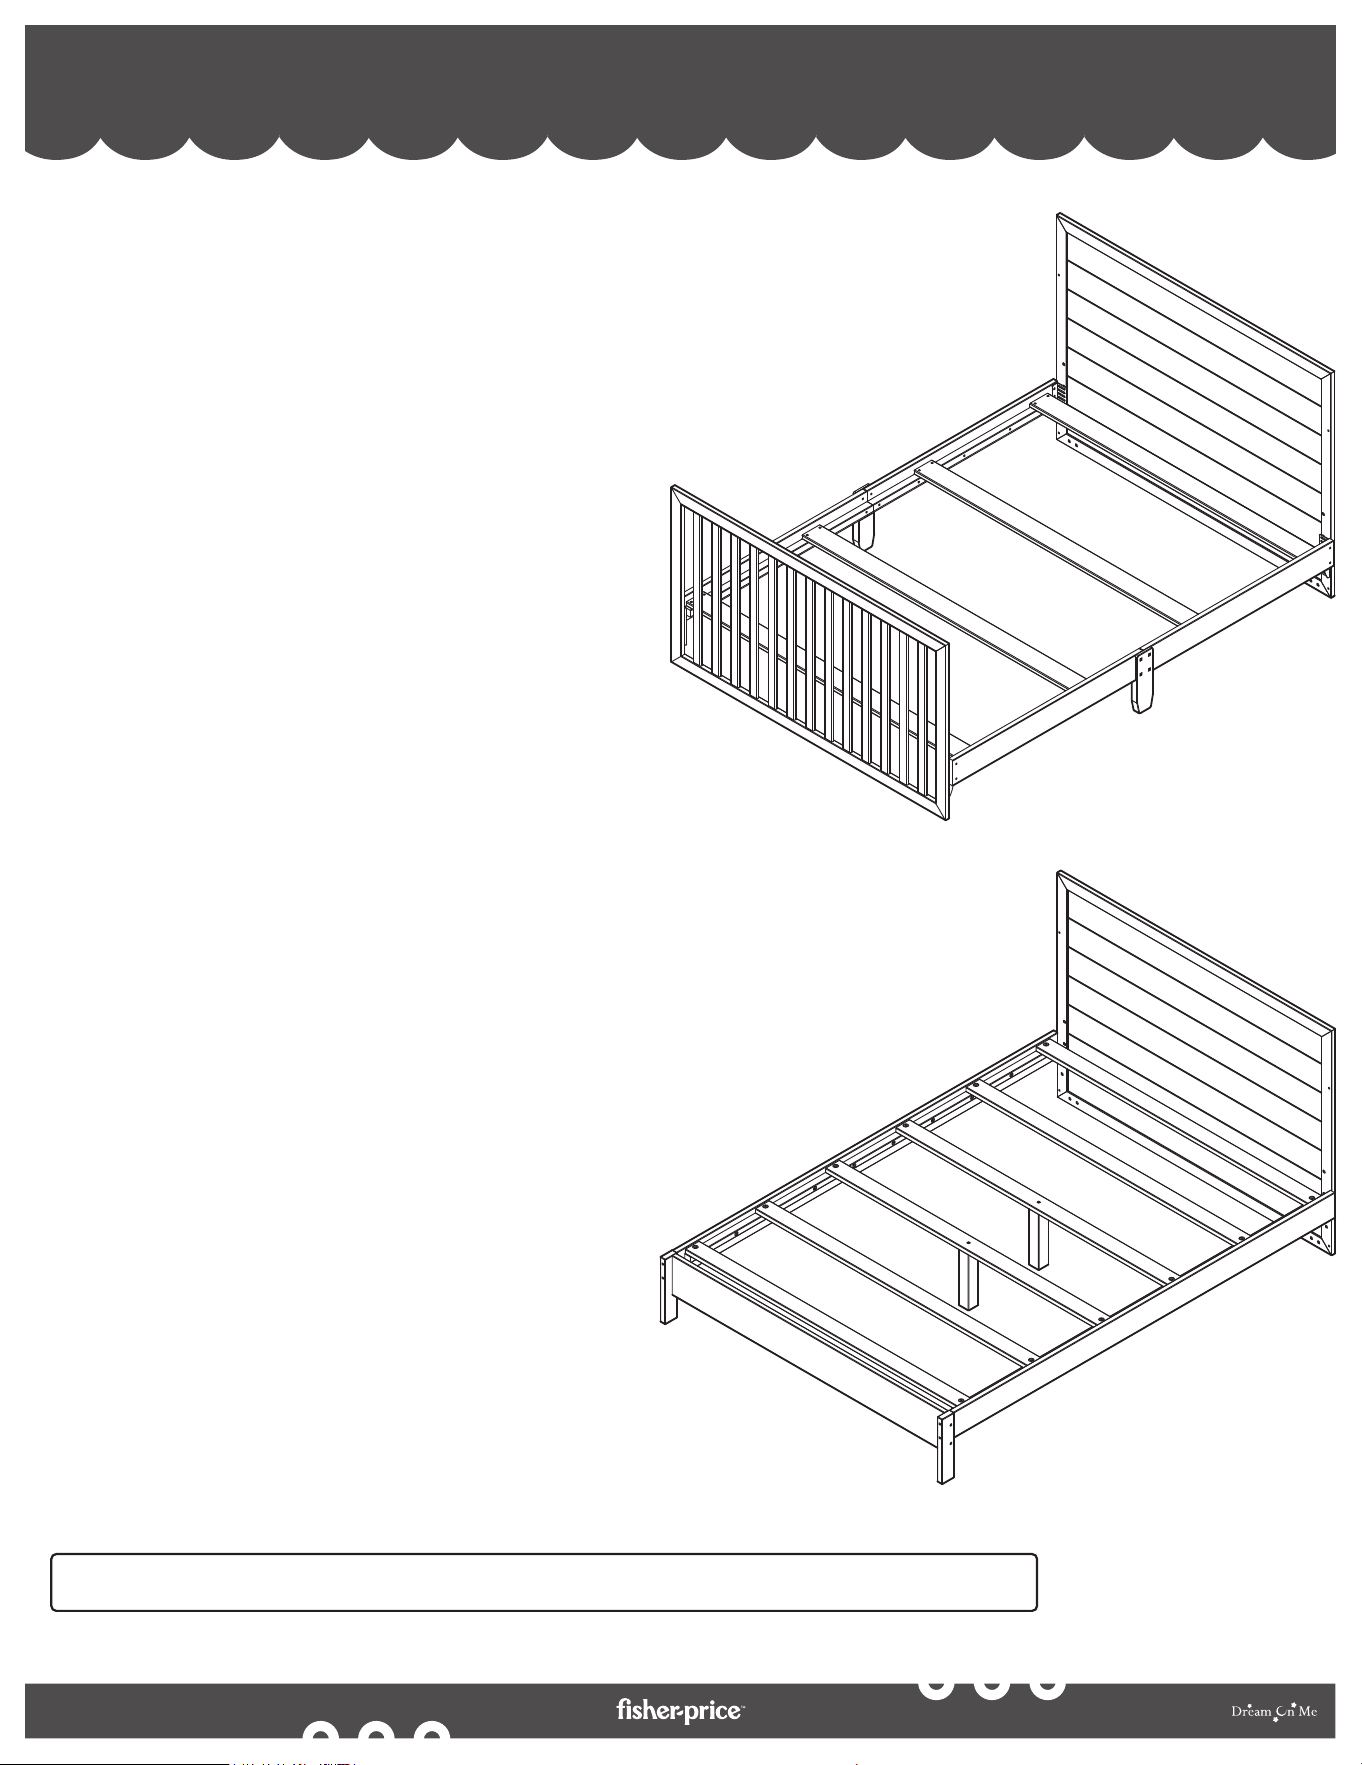
CONVERSION MODES - FULL-SIZE BED ASSEMBLY
MODES DE CONVERSION - ASSEMBLAGE DU LIT COMPLET
MODOS DE CONVERSIÓN - MONTAJE DE LA CAMA DE MATRIMONIO
6
6a. In order to convert the crib to a
Full-Size bed, you must first
disassemble the Footboard and
Headboard of the crib. Use the
Allen Key (J) provided.
6b. Remove the Mattress Support
Panel, followed by the Left and
Right Side Panels.
6c. Store all parts and hardware in a
safe place.
6a. Pour convertir le lit d'enfant en lit
complet, vous devez d'abord
démonter le pied et la tête de lit du
lit. tête de lit du lit d'enfant. Utilisez
la clé Allen (J) fournie.
6b. Retirez le panneau de support du
matelas, puis les panneaux latéraux
gauche et droit.
6c. Rangez toutes les pièces et la
quincaillerie dans un endroit sûr.
6a. Para convertir la cuna en una cama
de matrimonio, primero debe
desmontar el piecero y el cabecero
de la cuna. Utilice la llave Allen (J)
suministrada.
6b. Retire el panel de soporte del
colchón, seguido de los paneles
laterales izquierdo y derecho.
6c. Guarde todas las piezas y herrajes
en un lugar seguro.
30
By
6
OPTION 1:
6d. To convert the crib to a Full-Size
Bed, you need the Headboard and
Footboard of the crib.
6e. NOTE: Make sure to follow the
complete instructions provided
with Bed Rails (SKU - 849) to
convert the crib to a full-size bed.
OPTION 2:
6f. To convert the crib to a Full-Size
Bed, you need the Headboard of
the crib.
6g. NOTE: Make sure to follow the
complete instructions provided
with Bed Rails (SKU - 849) to
convert the crib to a full-size bed.
NOTE:
* Make sure to use the Dream On Me
Universal Bed Rails (SKU-849) in
order to convert the crib to a
Full-Size Bed with Footboard.
* Do not put the mattress directly on
the wooden slats, use either a
Bunky Board, Particleboard, or
low-profile Box Spring before
placing the mattress.
CONVERSION MODES - FULL-SIZE BED ASSEMBLY (Contd.)
Bed Rails (NOT INCLUDED, SOLD SEPARATELY)
31
By
OPTION 1 :
6d. Pour convertir le lit d'enfant en lit
complet, vous avez besoin de la tête
et du pied de lit du lit d'enfant.
6e. REMARQUE : Assurezous de suivre
les instructions complètes fournies
avec les barrières de lit (SKU - 849)
pour convertir le lit d'enfant en un lit
de taille normale.
OPTION 2 :
6f. Pour convertir le lit d'enfant en lit
complet, vous avez besoin de la tête
de lit du lit d'enfant.
6g. REMARQUE : Assurezous de suivre
les instructions complètes fournies
avec les barrières de lit (SKU - 849)
pour convertir le lit d'enfant en un lit
de taille normale.
REMARQUE :
* Assurezous d'utiliser les rails de lit
universels Dream On Me (SKU-849)
pour convertir le lit d'enfant en un lit
pleine grandeur avec pied de lit.
* Ne placez pas le matelas directement
sur les lattes de bois, utilisez une
planche de bois, un panneau de
particules ou un sommier à ressorts à
profil bas avant de placer le matelas.
MODES DE CONVERSION - ASSEMBLAGE D'UN LIT DE
TAILLE NORMALE (suite)
6
Rails de lit (NON INCLUS, VENDUS SÉPARÉMENT)
32
By
OPCIÓN 1:
6d. Para convertir la cuna en una cama de
matrimonio, necesita el cabecero y el
piecero de la cuna.
6e. NOTA: Asegúrese de seguir las
instrucciones completas
proporcionadas con los largueros de
la cama (SKU - 849) para convertir la
cuna en una cama de tamaño normal.
OPCIÓN 2:
6f. Para convertir la cuna en una Cama de
Tamaño Completo, necesita el
Cabecero de la cuna.
6g. NOTA: Asegúrese de seguir las
instrucciones completas
proporcionadas con los largueros de
la cama (SKU - 849) para convertir la
cuna en una cama de tamaño normal.
NOTA:
* Asegúrese de utilizar los Rieles de
Cama Universales Dream On Me
(SKU-849) para convertir la cuna en
una Cama de Tamaño Completo con
Piecero.
* No coloque el colchón directamente
sobre los listones de madera, utilice
un tablero Bunky, un tablero de
partículas o un somier de perfil bajo
antes de colocar el colchón.
MODOS DE CONVERSION - MONTAJE DE CAMA COMPLETA
(Cont.)
6
Raíles de la cama (NO INCLUIDOS, SE VENDEN POR SEPARADO)

FURNITURE CARE INSTRUCTIONS
33
By
ROOM CLIMATE CONTROL:
• Wood, when first cut contains more than 50 percent water. When it is prepared for
furniture construction it is placed in a Kiln and the moisture content is brought
down to 8 to 10 percent. Wood is porous and responds to its environment. If the
room has high humidity it will absorb it and expand and if the humidity is low it will
lose moisture and shrink.
• It is important that the humidity levels in the room be controlled from extremes of
too much humidity or too little. Furniture should not be placed close to the
air-conditioning outlets, fire places, radiators, space heaters, humidifiers or
dehumidifiers. Exposure to extreme variations of temperature and humidity can
damage any fine wood product.
THE IDEAL ENVIRONMENT FOR FINE FURNITURE:
• Fine wood furniture will have fewer problems when its environment is controlled at
a temperature between 65 and 75 degrees and a relative humidity between 35 and
40 percent. Wood placed in an environment outside of those limits can and will
shrink or expand and may develop some small cracks which are not material or
structural defects.
STICKING DOORS AND DRAWERS:
• With the minor changes in temperature and humidity, doors and drawers may swell
and be difficult to open or close. Tolerances have been built into the units but
extreme conditions may still cause sticking. This will adjust back to normal over
time but until it does consider using a dehumidifier or rub candle wax or paraffin
on sides that stick.
AVOID DIRECT SUNLIGHT:
• Keep the furniture out of direct sunlight. Ultraviolet rays will fade colors and in
some cases darken them. It can also cause crazing or hair line cracks in the finish.
White finishes will yellow naturally over time and exposure to direct sunlight will
hasten this natural process along with some woods darkening naturally over time;
this is not considered to be a quality defect.
PROPER STORAGE:
• If you need to put your furniture in storage for any period of time do not store
them in a damp basement or hot dry attic. Allow air movement around the furniture
and do not stack anything on it.

FURNITURE CARE INSTRUCTIONS (cont.)
34
By
IN GENERAL:
• Protect furniture surface from hot or extremely cold items.
• Use coasters under hot or cold beverages.
• Do not use synthetic fabric under accessories or lamps.
• Protect tops from pens, markers and crayons.
• Oils from potpourri and other scented items can damage the finish of the furniture.
• Do not drag items across the surface of the furniture.
• Allow the surface to breath by rotating your accessories and lamps.
• Do not over polish the furniture, do it only two or three times a year. Over polishing can
distort the natural finish of the product.
• Do not wax the furniture, as wax build up can destroy natural finish of the product.
• When moving furniture always lift the unit. Do not push or drag it to avoid damage to legs.
• Keep the furniture level so doors and drawers open and close freely.
• Clean with a damp, not wet, cloth. Use only a mild soap. Do not use the abrasive cleaners.
• Do not scratch or chip the finish.
• Inspect the product periodically, contact Dream on me for replacement parts or questions.
• Do not store the product or any parts in extreme temperatures and conditions such as a
hot attic or a damp, cold basement. These extremes can cause a loss of structural
integrity.
• To preserve the luster of the high-quality finish on your product, it is recommended to
place a doily or felt pad under any items you place on the finish.
• Clean with a damp cloth, then a dry cloth to preserve the original luster and beauty of this
fine finish.
• Do not use abrasive chemicals.
• Do not spray cleaners directly onto furniture.
• Lift slightly when moving on carpeting to prevent leg breakage.
• Use of a vaporizer near furniture will cause wood to swell and to peel.
YOU DID IT!
Congratulations Mom & Dad!
It's time to create your dream nursery. A safe, elegant
handcrafted crib that grows with your little one.

INSTRUCTIONS D'ENTRETIEN DU MOBILIER
35
By
CONTRÔLE DU CLIMAT DE LA PIÈCE :
• Le bois, lorsqu'il est coupé, contient plus de 50 % d'eau. Lorsqu'il est préparé pour la
construction de meubles, il est placé dans un four et son taux d'humidité est ramené à 8
ou 10 %. Le bois est poreux et réagit à son environnement. Si l'humidité de la pièce est
élevée, il l'absorbera et se dilatera et si l'humidité est faible, il perdra de l'humidité et
rétrécira.
• Il est important que le taux d'humidité de la pièce soit contrôlé pour éviter qu'il ne soit
trop élevé ou trop bas. Les meubles ne doivent pas être placés près des sorties d'air
conditionné, des cheminées, des radiateurs, des appareils de chauffage, des
humidificateurs ou des déshumidificateurs. L'exposition à des variations extrêmes de
température et d'humidité peut endommager tout produit en bois fin.
L'ENVIRONNEMENT IDÉAL POUR LES MEUBLES DE QUALITÉ :
• Les meubles en bois fin auront moins de problèmes si leur environnement est contrôlé à
une température comprise entre 65 et 75 degrés et une humidité relative comprise entre
35 et 40 pour cent. Le bois placé dans un environnement en dehors de ces limites peut
et va se rétracter ou se dilater et peut développer quelques petites fissures qui ne sont
pas des défauts matériels ou structurels.
LE COLLAGE DES PORTES ET DES TIROIRS :
• Avec les changements mineurs de température et d'humidité, les portes et les tiroirs
peuvent gonfler et être difficiles à ouvrir ou à fermer. Des tolérances ont été intégrées
dans les unités, mais des conditions extrêmes peuvent tout de même provoquer des
coincements. Ce phénomène reviendra à la normale avec le temps, mais en attendant,
pensez à utiliser un déshumidificateur ou à frotter de la cire de bougie ou de la paraffine
sur les côtés qui collent.
ÉVITEZ LA LUMIÈRE DIRECTE DU SOLEIL :
• Gardez les meubles à l'abri de la lumière directe du soleil. Les rayons ultraviolets
décolorent les couleurs et, dans certains cas, les assombrissent. Ils peuvent également
provoquer des craquelures ou des fissures dans le fini. Les finitions blanches jaunissent
naturellement avec le temps et l'exposition à la lumière directe du soleil accélère ce
processus naturel, de même que certains bois s'assombrissent naturellement avec le
temps ; ceci n'est pas considéré comme un défaut de qualité.
STOCKAGE APPROPRIÉ :
• Si vous devez entreposer vos meubles pour une certaine période, ne les entreposez pas
dans un sous-sol humide ou un grenier chaud et sec. Laissez l'air circuler autour du
meuble et n'empilez rien dessus.

INSTRUCTIONS D'ENTRETIEN DES MEUBLES (suite)
36
By
EN GÉNÉRAL :
• Protégez la surface des meubles contre les objets chauds ou extrêmement froids.
• Utilisez des sous-verres sous les boissons chaudes ou froides.
• Ne pas utiliser de tissu synthétique sous les accessoires ou les lampes.
• Protégez les dessus des stylos, marqueurs et crayons.
• Les huiles des pots-pourris et autres articles parfumés peuvent endommager la finition des meubles.
• Ne faites pas glisser d'objets sur la surface du meuble.
• Laissez la surface respirer en faisant tourner vos accessoires et lampes.
• Ne polissez pas trop les meubles, ne le faites que deux ou trois fois par an. Un polissage excessif
peut dénaturer la finition naturelle du produit.
• Ne cirez pas les meubles, car l'accumulation de cire peut détruire la finition naturelle du produit.
• Lorsque vous déplacez des meubles, soulevez toujours le meuble. Ne le poussez pas et ne le traînez
pas pour éviter d'endommager les pieds.
• Maintenez le meuble de niveau afin que les portes et les tiroirs s'ouvrent et se ferment librement.
• Nettoyez avec un chiffon humide, non mouillé. Utilisez uniquement un savon doux. N'utilisez pas de
nettoyants abrasifs.
• Ne rayez pas et n'écrasez pas la finition.
• Inspectez le produit périodiquement, contactez Dream on me pour des pièces de rechange ou des
questions.
• Ne stockez pas le produit ou des pièces dans des températures et des conditions extrêmes, comme
un grenier chaud ou un sous-sol humide et froid. Ces conditions extrêmes peuvent entraîner une
perte d'intégrité structurelle.
• Pour préserver le lustre de la finition de haute qualité de votre produit, il est recommandé de placer
un napperon ou un tampon de feutre sous tous les articles que vous posez sur la finition.
• Nettoyez à l'aide d'un chiffon humide, puis d'un chiffon sec pour préserver le lustre et la beauté
d'origine de ce fini de qualité.
• N'utilisez pas de produits chimiques abrasifs.
• Ne vaporisez pas de nettoyants directement sur les meubles.
• Soulevez légèrement les meubles lorsque vous les déplacez sur un tapis afin d'éviter qu'ils ne se
cassent les pieds.
• L'utilisation d'un vaporisateur près d'un meuble fera gonfler le bois et le fera peler.
VOUS AVEZ RÉUSSI !
Félicitations à maman et papa !
Il est temps de créer la chambre de bébé de vos rêves. Un
berceau sûr, élégant et fabriqué à la main qui grandit avec
votre petit.

INSTRUCCIONES PARA EL CUIDADO DE LOS MUEBLES
37
By
CLIMATIZACIÓN DE LA HABITACIÓN:
• La madera, cuando se corta por primera vez, contiene más del 50% de agua. Cuando
se prepara para la construcción de muebles, se coloca en un horno y el contenido de
humedad se reduce a un 8 o 10 por ciento. La madera es porosa y responde a su
entorno. Si la habitación tiene mucha humedad, la absorberá y se expandirá, y si la
humedad es baja, perderá humedad y se encogerá.
• Es importante que los niveles de humedad en la habitación se controlen para evitar
los extremos de demasiada o poca humedad. Los muebles no deben colocarse cerca
de las salidas de aire acondicionado, chimeneas, radiadores, calefactores,
humidificadores o deshumidificadores. La exposición a variaciones extremas de
temperatura y humedad puede dañar cualquier producto de madera fina.
EL ENTORNO IDEAL PARA LOS MUEBLES FINOS:
• Los muebles de madera fina tendrán menos problemas cuando su entorno esté
controlado a una temperatura de entre 65 y 75 grados y una humedad relativa de
entre 35 y 40 por ciento. La madera colocada en un ambiente fuera de esos límites
puede y se encogerá o expandirá y puede desarrollar algunas pequeñas grietas que
no son defectos materiales o estructurales.
PEGADO DE PUERTAS Y CAJONES:
• Con los pequeños cambios de temperatura y humedad, las puertas y los cajones
pueden hincharse y ser difíciles de abrir o cerrar. Se han incorporado tolerancias en
las unidades, pero las condiciones extremas pueden seguir causando atascos. Esto
volverá a la normalidad con el tiempo, pero hasta que lo haga, considere el uso de un
deshumidificador o frote con cera de vela o parafina los lados que se peguen.
EVITE LA LUZ SOLAR DIRECTA:
• Mantenga los muebles fuera de la luz solar directa. Los rayos ultravioleta destiñen los
colores y en algunos casos los oscurecen. También pueden causar grietas o rayas en
el acabado. Los acabados blancos amarillean de forma natural con el tiempo y la
exposición a la luz solar directa acelera este proceso natural junto con el
oscurecimiento natural de algunas maderas con el tiempo; esto no se considera un
defecto de calidad.
ALMACENAMIENTO ADECUADO:
• Si necesita guardar sus muebles durante algún tiempo, no los almacene en un sótano
húmedo o en un ático seco y caliente. Permita el movimiento de aire alrededor de los
muebles y no apile nada sobre ellos.

38
By
INSTRUCCIONES PARA EL CUIDADO DE LOS MUEBLES (cont.)
EN GENERAL:
• Proteja la superficie de los muebles de objetos calientes o extremadamente fríos.
• Utilice posavasos debajo de las bebidas calientes o frías.
• No utilice telas sintéticas debajo de accesorios o lámparas.
• Proteja la parte superior de bolígrafos, rotuladores y lápices de colores.
• Los aceites de popurrí y otros artículos perfumados pueden dañar el acabado de los muebles.
• No arrastre objetos por la superficie del mueble.
• Deje que la superficie respire girando los accesorios y las lámparas.
• No pula demasiado los muebles, hágalo sólo dos o tres veces al año. Un pulido excesivo puede
distorsionar el acabado natural del producto.
• No encere los muebles, ya que la acumulación de cera puede destruir el acabado natural del
producto.
• Cuando traslade los muebles, levante siempre el mueble. No lo empuje ni lo arrastre para evitar
daños en las patas.
• Mantenga el mueble nivelado para que las puertas y cajones se abran y cierren libremente.
• Limpie con un paño húmedo, no mojado. Utilice sólo un jabón suave. No utilice limpiadores
abrasivos.
• No raye ni astille el acabado.
• Inspeccione el producto periódicamente, póngase en contacto con Dream on me para obtener
piezas de repuesto o hacer preguntas.
• No almacene el producto ni ninguna de sus partes en temperaturas y condiciones extremas como
un ático caliente o un sótano húmedo y frío. Estos extremos pueden causar una pérdida de la
integridad estructural.
• Para preservar el brillo del acabado de alta calidad de su producto, se recomienda colocar una
servilleta o una almohadilla de fieltro debajo de cualquier elemento que coloque sobre el acabado.
• Limpie con un paño húmedo y luego con un paño seco para conservar el brillo y la belleza originales
de este fino acabado.
• No utilice productos químicos abrasivos.
• No rocíe limpiadores directamente sobre los muebles.
• Levántese ligeramente cuando se mueva sobre la moqueta para evitar que se rompan las patas.
• El uso de un vaporizador cerca de los muebles hará que la madera se hinche y se despegue.
¡LO HAN HECHO!
¡Felicidades mamá y papá!
Ha llegado el momento de crear la guardería de tus sueños.
Una cuna segura, elegante y hecha a mano que crece con
tu pequeño.
45 VERONICA AVENUE
SOMERSET NEW JERSEY 08873
5375 BOULEVARD DES GRANDES
PRAIRIES ST LEONARD, QUÉBEC H1R 1B1
FISHER-PRICE™ and associated trademarks are owned by
and used under license from Mattel. ©2023 Mattel.
FISHER-PRICEMC ainsi que les marques et les logos
afférents appartiennent à Mattel Europa B.V. et sont utilisés
sous licence. © 2023 Mattel.
FISHER-PRICE™ y las marcas comerciales asociadas son
propiedad de Mattel y se usan bajo licencia de Mattel.
©2023 Mattel.
www.dreamonme.com
by
Scan the QR code to register your product
Scannez le code QR pour enregistrer votre produit
Escanee el código QR para registrar su producto
