INSTRUCTION MANUAL
MANUAL DE INSTRUCCIONES
Cordless Pole Saw
Sierra de Extensión Inalámbrica
XAU03
IMPORTANT: Read Before Using.
IMPORTANTE: Lea antes de usar.

2 ENGLISH
ENGLISH (Original instructions)
SPECIFICATIONS
Model: XAU03
Overall length (without guide bar and attachment) 1620 mm / 2520 mm
(63-3/4″ / 99″)
Rated voltage D.C. 18 V
Net weight 3.2 - 3.5 kg
(7.1 - 7.7 lbs)
Standard guide bar length 200 mm
(8″)
Recommended guide bar
length
with 80TXL 200 mm
(8″)
Applicable saw chain type
(refer to the table below)
80TXL
Standard sprocket Number of teeth 7
Pitch 0.325″
Chain speed 6.7 m/s
(402 m/min)
(1320 ft/min)
Chain oil tank volume 55 cm
3
(1.9 oz)
• Due to our continuing program of research and development, the specications herein are subject to change
without notice.
• Specications may dier from country to country.
• The weight may dier depending on the attachment(s), including the battery cartridge. The lightest and heavi-
est combination, according to EPTA-Procedure 01/2014, are shown in the table.
Applicable battery cartridge and charger
Battery cartridge BL1815N / BL1820B / BL1830B / BL1840B / BL1850B / BL1860B
Charger DC18RC / DC18RD / DC18SD / DC18SE / DC18SF / DC18SH /
DC18WC
• Some of the battery cartridges and chargers listed above may not be available depending on your region of
residence.
WARNING: Only use the battery cartridges and chargers listed above. Use of any other battery cartridges
and chargers may cause injury and/or re.
Recommended cord connected power source
Portable power pack PDC01
• The cord connected power source(s) listed above may not be available depending on your region of residence.
• Before using the cord connected power source, read instruction and cautionary markings on them.

3 ENGLISH
Saw chain, guide bar, and sprocket combination
Saw chain type 80TXL
Number of drive links 38
Guide bar Guide bar length 200 mm
(8″)
Cutting length 185 mm
(7-1/4″)
Pitch 0.325″
Gauge 1.1 mm
(0.043″)
Type Sprocket nose bar
Sprocket Number of teeth 7
Pitch 0.325″
WARNING: Use appropriate combination of the guide bar and saw chain. Otherwise personal injury may
result.
SAFETY WARNINGS
Important safety instructions
WARNING: Do not operate near electrical
power lines. The unit has not been designed to
provide protection from electric shock in the
event of contact with overhead electric lines,
Consult local regulations for safe distances from
overhead electric power lines and ensure that the
operating position is safe and secure before oper-
ating the saw chain pole pruner.
WARNING: When using electric gardening
appliances, basic safety precautions should
always be followed to reduce the risk of re,
electric shock, and personal injury, including the
following:
READ ALL INSTRUCTIONS.
1. Avoid Dangerous Environment - Do not use
appliances in damp or wet locations.
2. Don’t Use In Rain.
3. Keep Children Away - All visitors should be kept
at a distance from work area.
4. Dress Properly - Do not wear loose clothing or
jewelry. They can be caught in moving parts. Use
of rubber gloves and substantial footwear is rec-
ommended when working outdoors. Wear protec-
tive hair covering to contain long hair.
5. Use Safety Glasses – Always use face or dust
mask if operation is dusty.
6. Use Right Appliance - Do not use appliance for
any job except that for which it is intended.
7. Avoid Unintentional Starting - Do not carry
appliance with nger on switch. Be sure switch is
o before inserting battery pack.
8. Do not grasp the exposed cutting blades or
cutting edges when picking up or holding the
appliance.
9. Do not Force Appliance - It will do the job better
and with less likelihood of a risk of injury at the
rate for which it was designed.
10. Do not Overreach - Keep proper footing and
balance at all times.
11. Stay Alert - Watch what you are doing. Use com-
mon sense. Do not operate appliance when you
are tired.
12. Store Idle Appliances Indoors - When not in use,
appliances should be stored indoors in dry, and
high or locked-up place out of reach of children.
13. Maintain Appliance With Care - Keep cutting
edge sharp and clean for best performance and
to reduce the risk of injury. Follow instructions for
lubricating and changing accessories. Keep han-
dles dry, clean, and free from oil and grease.
14. Check Damaged Parts - Before further use of the
appliance, a guard or other part that is damaged
should be carefully checked to determine that
it will operate properly and perform its intended
function. Check for alignment of moving parts,
binding of moving parts, breakage of parts, mount-
ing, and any other condition that may aect its
operation. A guard or other part that is damaged
should be properly repaired or replaced by an
authorized service center unless indicated else-
where in this manual.
15. Keep all parts of the body away from the saw
chain. Do not remove cut material or hold
material to be cut when blades are moving.
Make sure the switch is o when clearing
jammed material. Saw chain continues to move
after the switch is turned o. A moment of inatten-
tion while operating the extended-reach pruner
may result in serious personal injury.
16. Carry the pole pruner by the handle with the
saw chain stopped. When transporting or stor-
ing the pole pruner, always t the saw chain
device cover. Proper handling of the pole pruner
will reduce possible personal injury from the saw
chain.
17. Hold the pole pruner by insulated gripping
surfaces only, because the saw chain may
contact hidden wiring. A saw chain contacting a

4 ENGLISH
″live″ wire may make exposed metal parts of the
pole pruner ″live″ and could give the operator an
electric shock.
18. Do not use the pole pruner in bad weather
conditions, especially when there is a risk of
lightning. This decreases the risk of being struck
by lightning.
19. To reduce the risk of electrocution, never use
near any electrical power lines. Contact with or
use near power lines may cause serious injury or
electric shock resulting in death.
20. Always use two hands when operating the pole
pruner. Hold the pole pruner with both hands
to avoid loss of control.
21. Always use head protection when operating
the pole pruner overhead. Falling debris can
result in serious personal injury.
22. When replacing batteries, all batteries should
be replaced at the same time in case the
tool employs more than one battery. Mixing
fresh and discharged batteries could increase
internal cell pressure and rupture the discharge
battery(ies).
23. Remove or disconnect battery before ser-
vicing, cleaning or removing material from
the appliance. Such preventive safety mea-
sures reduce the risk of starting the appliance
accidentally.
24. Use only the battery(ies) listed in
“SPECIFICATIONS”. Use of any other batteries
may create a risk of re.
25. Exercise care in handling batteries in order not
to short the battery with conducting materials
such as rings, bracelets, and keys. The battery
or conductor may overheat and cause burns.
26. A battery operated appliance with integral
batteries or a separate battery pack must be
recharged only with the specied charger for
the battery. A charger that may be suitable for one
type of battery may create a risk of re when used
with another battery.
27. Remove adjusting keys or wrenches before
turning the appliance on. A wrench or a key that
is left attached to a rotating part of the appliance
may result in personal injury.
28. When battery pack is not in use, keep it away
from other metal objects like: paper clips,
coins, keys, nails, screws, or other small metal
objects that can make a connection from one
terminal to another. Shorting the battery termi-
nals together may cause sparks, burns, or a re.
29. Under abusive conditions, liquid may be
ejected from the battery; avoid contact. If con-
tact accidentally occurs, ush with water. If
liquid contacts eyes, additionally seek medical
help. Liquid ejected from the battery may cause
irritation or burns.
30. Use only accessories that are recom-
mended by the manufacturer for your model.
Accessories that may be suitable for one appli-
ance may create a risk of injury when used on
another appliance.
31. Appliance service must be performed only by
qualied repair personnel. Service or mainte-
nance performed by unqualied personnel may
result in a risk of injury.
32. When servicing an appliance, use only identi-
cal replacement parts. Follow instructions in
the Maintenance section of this manual. Use of
unauthorized parts or failure to follow Maintenance
instructions may create a risk of shock or injury.
33. This appliance is not intended for use by per-
sons (including children) with reduced phys-
ical, sensory or mental capabilities, or lack of
experience and knowledge. Children should be
supervised to ensure that they do not play with
the appliance.
34. Do not operate appliances in explosive atmo-
spheres, such as in the presence of ammable
liquids, gases, or dust. Appliances create sparks
which may ignite the dust or fumes.
General precautions
1. Before starting the tool, read this instruction
manual to become familiar with the handling of
the tool.
2. Do not lend the tool to a person with insu-
cient experience or knowledge regarding han-
dling of the tool.
3. When lending the tool, always attach this
instruction manual.
4. Do not allow children or young persons under
18 years old to use the tool. Keep them away
from the tool.
5. Handle the tool with the utmost care and
attention.
6. Never use the tool after consuming alcohol or
drugs, or if feeling tired or ill.
7. Never attempt to modify the tool.
8. Do not use the tool in bad weather conditions,
especially when there is a risk of lightning.
This decreases the risk of being struck by
lightning.
9. National regulations may restrict of the use of
the tool. Follow the regulations about handling
of the tool in your country.
Personal protective equipment
1. Wear safety helmet, protective goggles and
protective gloves to protect yourself from
ying debris or falling objects.
2. Wear ear protection such as ear mus to pre-
vent hearing loss.
3. Wear proper clothing and shoes for safe
operation, such as a work overall and sturdy,
non-slip shoes. Do not wear loose clothing or
jewelry. Loose clothes, jewelry or long hair can be
caught in moving parts.
4. When handling the saw chain or adjusting the
chain tension, wear protective gloves. Saw
chain can cut bare hands severely.
Work area safety
1. Keep the tool at least 15 m (50 ft) away from
electric lines and communication cables
(including any branches contacting them).
Touching or approaching high-voltage lines
with the tool can result in death or serious
injury. Watch power lines and electrical
fences around the work area before starting
operation.

5 ENGLISH
2. Operate the tool under good visibility and day-
light conditions only. Do not operate the tool in
darkness or fog.
3. During operation, never stand on an unstable
or slippery surface or a steep slope. During
the cold season, beware of ice and snow and
always ensure secure footing.
4. During operation, keep bystanders or animals
at least 15 m (50 ft) away from the tool. Stop
the tool as soon as someone approaches.
5. When working with two or more people, keep
a distance of at least 15 m (50 ft) or more
between each other, and put a supervisor.
6. Before operation, examine the work area for
wire fences, walls, or other solid objects. They
can damage the saw chain.
Preparation
1. Before assembling or adjusting the tool,
switch o the tool and remove the battery
cartridge.
2. Before handling the saw chain or adjusting the
chain tension, wear protective gloves.
3. Before starting the tool, inspect the tool for
damages, loose screws/nuts or improper
assembly. Sharpen blunt saw chain. If the saw
chain is bent or damaged, replace it. Check all
control levers and switches for easy action.
Clean and dry the grips.
4. Never attempt to start the tool if the tool is
damaged or not fully assembled. Otherwise
serious injury may result.
5. Adjust the shoulder harness to suit the opera-
tor’s body size.
6. Adjust the chain tension properly. Rell the
chain oil, if necessary.
Starting the tool
1. Wear the personal protective equipments
before starting the tool.
2. Before starting the tool, make sure that there
is no person or animal in the work area.
3. When installing the battery cartridge, keep
the saw chain and guide bar clear of your
body and other object, including the ground.
The saw chain may move when starting and may
cause serious injury or damage to the saw chain
and/or property.
4. Place the tool on rm ground. Maintain good
balance and secure footing.
Operation
1. In the event of an emergency, switch o the
tool immediately.
2. If you notice any unusual condition (e.g. noise,
vibration) during operation, switch o the tool.
Do not use the tool until the cause is recog-
nized and solved.
3. The saw chain continues to move for a short
period after switching o the tool. Don’t rush
to contact the saw chain.
4. During operation, use the shoulder harness.
Keep the tool on your right side rmly.
5. Hold the front grip with your left hand and the
rear grip with your right hand, no matter you
are right-hander or left-hander. Wrap your
ngers and thumbs around the grips.
6. Hold the tool by insulated gripping surfaces
only, because the saw chain may contact hid-
den wiring. A saw chain contacting a “live” wire
may make exposed metal parts of the extend-
ed-reach pruner “live” and could give the operator
an electric shock.
7. Never attempt to operate the tool with one
hand. Loss of control may result in serious or
fatal injury. To reduce the risk of injury, keep
your hands and feet away from the saw chain.
8. Do not overreach. Keep proper footing and
balance at all times. Watch for hidden obsta-
cles such as tree stumps, roots and ditches
to avoid stumbling. Clear fallen branches and
other objects away.
9. Never work on a ladder or tree to avoid loss of
control.
10. If the tool gets heavy impact or fall, check the
condition before continuing work. If there is
any damage or doubt, ask Makita authorized
service center for the inspection and repair.
11. Do not touch the head of the tool. The head of
the tool becomes hot during operation.
12. Take a rest to prevent loss of control caused
by fatigue. We recommend to take a 10 to
20-minute rest every hour.
13. When you leave the tool, even if it is a short
time, always switch o the tool and remove the
battery cartridge. The running and unattended
tool may be used by unauthorized person and
cause serious accident.
14. When operating the tool, do not raise your
right hand above your shoulder height.
15. During operation, never hit the saw chain
against hard obstacles such stones and nails.
Take particular care when cutting branches
next to walls, wire fences or the like.
16. If branches get caught in the tool, always stop
the tool and remove the battery cartridge.
Otherwise unintentional start may cause serious
injury.
17. If the saw chain becomes clogged, always
switch o the tool and remove the battery
cartridge before cleaning.
18. Before cutting limbs, keep an escape area
away from the falling limb. First, clear
obstructs such as limbs and branches from
the work area. Move all tools and goods from
the escape area to another safe place.
19. Before cutting branches and limbs, check
the falling direction of them, considering the
condition of branches and limbs, adjoining
trees, wind direction, etc. Pay full attention to
the falling direction, and the rebound of the
branch, which hit the ground.
20. Never hold the tool at an angle of more than
60°. Otherwise falling objects can hit the oper-
ator and cause serious injury. Never stand
underneath the limb being cut.
21. Pay attention to broken or bent branches. They
may bounce back in cutting, causing unexpected
injury.

6 ENGLISH
22. Before cutting limbs that you intend to cut,
remove branches and leaves around them.
Otherwise the saw chain may be caught by them.
23. To prevent the saw chain from being caught in
the kerf, do not release the lever before pulling
the saw chain out of the kerf.
24. If the saw chain is bound in the kerf, immedi-
ately stop the tool, carefully move the branch
to open the kerf and release the saw chain.
25. Avoid kickback (rotational reactive force
towards the operator). To prevent kickback,
never use the guide bar nose or perform a
penetrating cut. Always beware of the position
of the guide bar nose.
26. Check the chain tension frequently. When
checking or adjusting the chain tension,
switch o the tool and remove the battery
cartridge. If the tension is loose, tighten it.
Vibration
1. Exposing to excessive vibration injures blood
vessels or nervous system of the operator and
causes the following symptoms in the ngers,
hands or wrists: “Falling asleep” (numbness),
tingling, pain, stabbing sensation, or alteration
of skin color or of the skin. If any of these
symptoms occur, see a physician.
To reduce the risk of “white nger disease”,
keep your hands warm during operation and
well maintain the tool and accessories.
For operating time, follow your local regula-
tions or physician’s advice.
Transport
1. Before transporting the tool, switch o the tool
and remove the battery cartridge. Always t
the guide bar cover during transportation.
2. When transporting the tool, carry it in a hori-
zontal position by holding the grip.
Maintenance
1. Have your equipment serviced by our autho-
rized service center, always using only genu-
ine replacement parts. Incorrect repair and poor
maintenance can shorten the life of the tool and
increase the risk of accidents.
2. Before doing any maintenance or repair work
or cleaning the tool, always switch o the tool
and remove the battery cartridge. Wait until the
tool cools down.
3. Always wear protective gloves when handling
the saw chain.
4. After each use, tighten all screws and nuts,
except for adjustment screws.
5. Keep the saw chain sharp. If the saw chain
has become blunt and cutting performance is
poor, ask Makita authorized service center to
sharpen it or replace it with new one.
6. Do not attempt any maintenance or repair
not described in this instruction manual. Ask
Makita authorized service center for such
work.
7. Always use Makita genuine spare parts and
accessories only. Using parts or accessories
supplied by a third party may result in the tool
breakdown, property damage and/or serious
injury.
Battery tool use and care
1. Prevent unintentional starting. Ensure the
switch is in the o-position before connecting
to battery pack, picking up or carrying the
machine. Carrying the machine with your nger
on the switch or energizing machine that have the
switch on invites accidents.
2. Disconnect the battery pack from the machine
before making any adjustments, changing
accessories, or storing machine. Such preven-
tive safety measures reduce the risk of starting the
machine accidentally.
3. Recharge only with the charger specied by
the manufacturer. A charger that is suitable for
one type of battery pack may create a risk of re
when used with another battery pack.
4. Use machines only with specically desig-
nated battery packs. Use of any other battery
packs may create a risk of injury and re.
5. When battery pack is not in use, keep it away
from other metal objects, like paper clips,
coins, keys, nails, screws or other small metal
objects, that can make a connection from one
terminal to another. Shorting the battery termi-
nals together may cause burns or a re.
6. Under abusive conditions, liquid may be
ejected from the battery; avoid contact. If con-
tact accidentally occurs, ush with water. If
liquid contacts eyes, seek medical help. Liquid
ejected from the battery may cause irritation or
burns.
7. Do not use a battery pack or machine that is
damaged or modied. Damaged or modied
batteries may exhibit unpredictable behaviour
resulting in re, explosion or risk of injury.
8. Do not expose a battery pack or machine to
re or excessive temperature. Exposure to re
or temperature above 130°C (265°F) may cause
explosion.
9. Follow all charging instructions and do not
charge the battery pack or machine outside of
the temperature range specied in the instruc-
tions. Charging improperly or at temperatures
outside of the specied range may damage the
battery and increase the risk of re.
10. Have servicing performed by a qualied repair
person using only identical replacement parts.
This will ensure that the safety of the product is
maintained.
11. Do not modify or attempt to repair the machine
or the battery pack except as indicated in the
instructions for use and care.
Electrical and battery safety
1. Do not dispose of the battery(ies) in a re.
The cell may explode. Check with local codes for
possible special disposal instructions.
2. Do not open or mutilate the battery(ies).
Released electrolyte is corrosive and may cause
damage to the eyes or skin. It may be toxic if
swallowed.
3. Do not charge battery in rain, or in wet
locations.
4. Do not charge the battery outdoors.
7 ENGLISH
5. Do not handle charger, including charger plug,
and charger terminals with wet hands.
6. Avoid dangerous environment. Don't use the
machine in damp or wet locations or expose it
to rain. Water entering the machine will increase
the risk of electric shock.
Storage
1. Before storing the tool, perform full cleaning
and maintenance. Fit the guide bar cover.
Remove the battery cartridge. Drain the chain
oil after the tool cools down.
2. Store the tool in a dry and high or locked loca-
tion out of reach of children.
3. Do not prop the tool against something, such
as a wall. Otherwise it may fall suddenly and
cause an injury.
SAVE THESE INSTRUCTIONS.
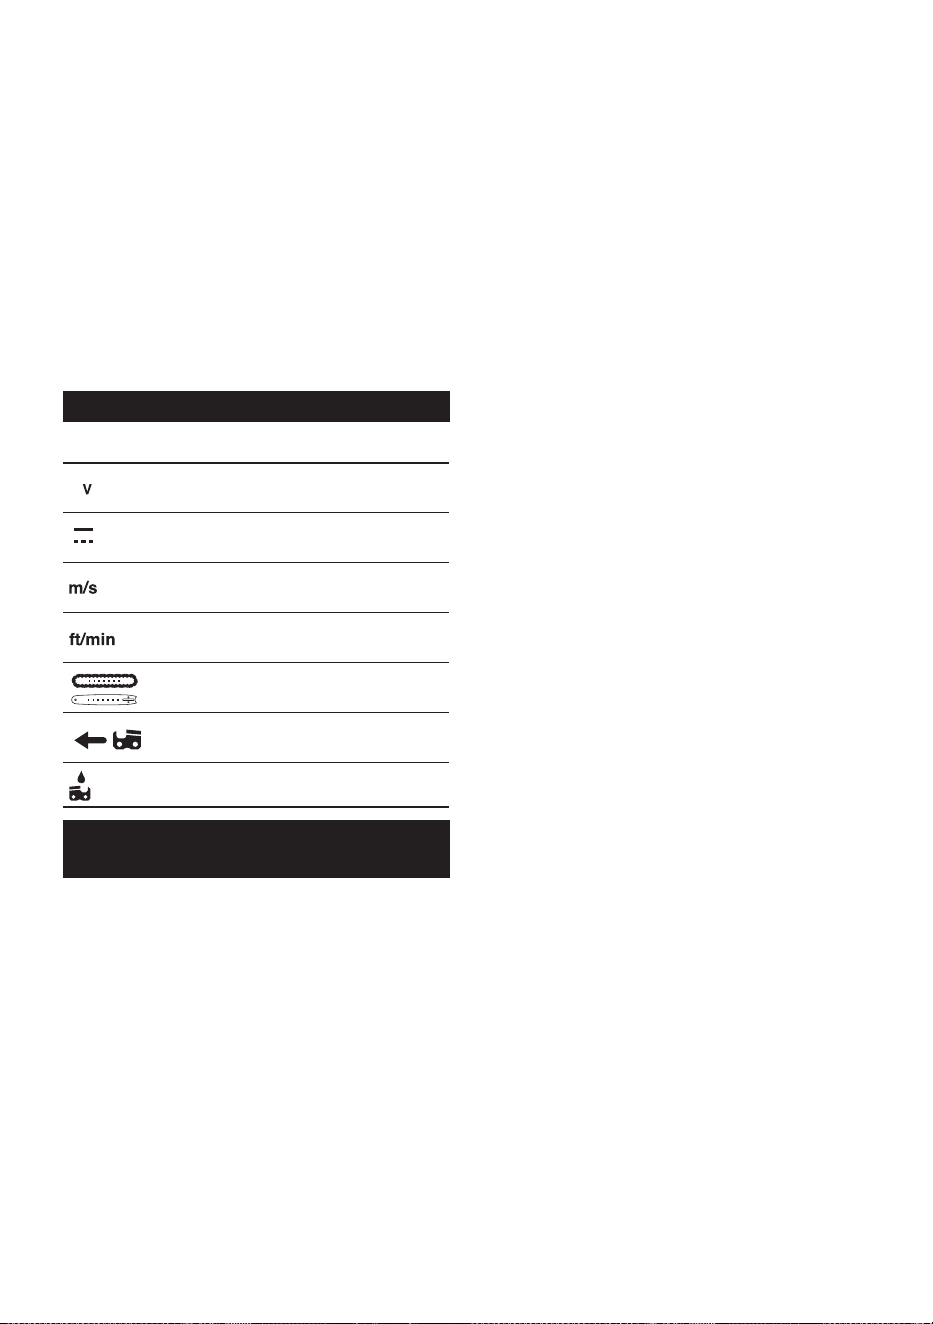
Symbols
The followings show the symbols used for tool.
volts
direct current
meter per second
feet per minute
parts number of applicable saw chain and
guide bar
Direction of chain travel
Chain oil tank
Important safety instructions for
battery cartridge
1. Before using battery cartridge, read all instruc-
tions and cautionary markings on (1) battery
charger, (2) battery, and (3) product using
battery.
2. Do not disassemble or tamper with the battery
cartridge. It may result in a re, excessive heat,
or explosion.
3. If operating time has become excessively
shorter, stop operating immediately. It may
result in a risk of overheating, possible burns
and even an explosion.
4. If electrolyte gets into your eyes, rinse them
out with clear water and seek medical atten-
tion right away. It may result in loss of your
eyesight.
5. Do not short the battery cartridge:
(1) Do not touch the terminals with any con-
ductive material.
(2) Avoid storing battery cartridge in a con-
tainer with other metal objects such as
nails, coins, etc.
(3) Do not expose battery cartridge to water
or rain.
A battery short can cause a large current
ow, overheating, possible burns and even a
breakdown.
6. Do not store and use the tool and battery car-
tridge in locations where the temperature may
reach or exceed 50 °C (122 °F).
7. Do not incinerate the battery cartridge even if
it is severely damaged or is completely worn
out. The battery cartridge can explode in a re.
8. Do not nail, cut, crush, throw, drop the battery
cartridge, or hit against a hard object to the
battery cartridge. Such conduct may result in a
re, excessive heat, or explosion.
9. Do not use a damaged battery.
10. The contained lithium-ion batteries are subject
to the Dangerous Goods Legislation require-
ments.
For commercial transports e.g. by third parties,
forwarding agents, special requirement on pack-
aging and labeling must be observed.
For preparation of the item being shipped, consult-
ing an expert for hazardous material is required.
Please also observe possibly more detailed
national regulations.
Tape or mask o open contacts and pack up the
battery in such a manner that it cannot move
around in the packaging.
11. When disposing the battery cartridge, remove
it from the tool and dispose of it in a safe
place. Follow your local regulations relating to
disposal of battery.
12. Use the batteries only with the products
specied by Makita. Installing the batteries to
non-compliant products may result in a re, exces-
sive heat, explosion, or leak of electrolyte.
13. If the tool is not used for a long period of time,
the battery must be removed from the tool.
14. During and after use, the battery cartridge may
take on heat which can cause burns or low
temperature burns. Pay attention to the han-
dling of hot battery cartridges.
15. Do not touch the terminal of the tool imme-
diately after use as it may get hot enough to
cause burns.
16. Do not allow chips, dust, or soil stuck into the
terminals, holes, and grooves of the battery
cartridge. It may cause heating, catching re,
burst and malfunction of the tool or battery car-
tridge, resulting in burns or personal injury.
17. Unless the tool supports the use near
high-voltage electrical power lines, do not use
the battery cartridge near high-voltage electri-
cal power lines. It may result in a malfunction or
breakdown of the tool or battery cartridge.
18. Keep the battery away from children.
SAVE THESE INSTRUCTIONS.

8 ENGLISH
CAUTION: Only use genuine Makita batteries.
Use of non-genuine Makita batteries, or batteries that
have been altered, may result in the battery bursting
causing res, personal injury and damage. It will
also void the Makita warranty for the Makita tool and
charger.
Tips for maintaining maximum
battery life
1. Charge the battery cartridge before completely
discharged. Always stop tool operation and
charge the battery cartridge when you notice
less tool power.
2. Never recharge a fully charged battery car-
tridge. Overcharging shortens the battery
service life.
3. Charge the battery cartridge with room tem-
perature at 10 °C - 40 °C (50 °F - 104 °F). Let
a hot battery cartridge cool down before
charging it.
4. When not using the battery cartridge, remove
it from the tool or the charger.
5. Charge the battery cartridge if you do not use
it for a long period (more than six months).
9 ENGLISH
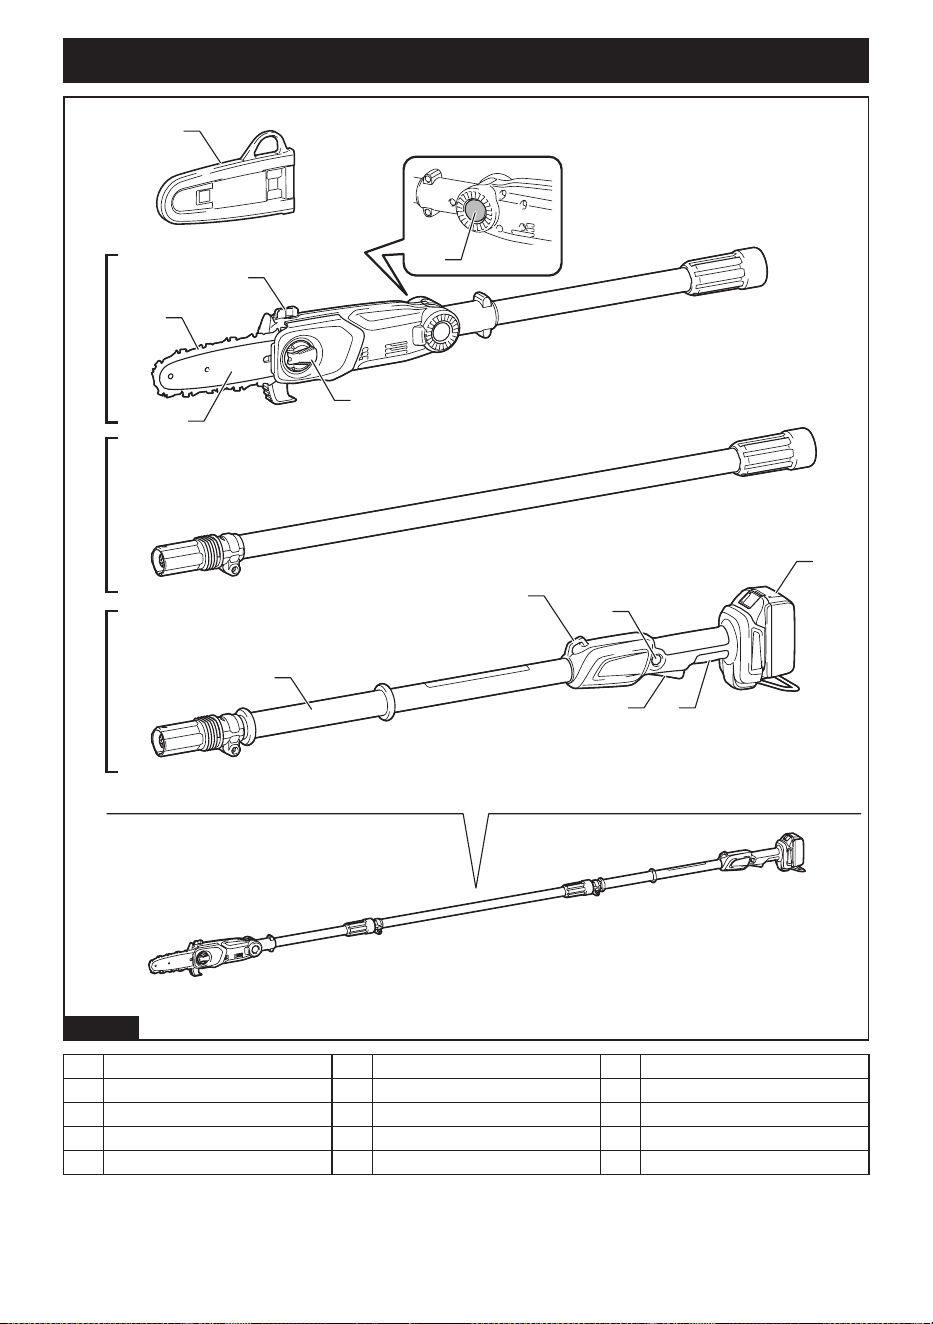
PARTS DESCRIPTION
5
6
7
8
9
10
11
12
14
15
3
2
1
13
4
Fig.1
1 Handle module 2 Center extension pole 3 Saw head module
4 Hanger 5 Lock-o button 6 Battery cartridge
7 Switch trigger 8 Rear grip 9 Saw chain
10 Guide bar 11 Oil tank cap 12 Lever
13 Head angle adjustment button 14 Guide bar cover 15 Front grip
10 ENGLISH
FUNCTIONAL
DESCRIPTION
CAUTION: Always be sure that the tool is
switched o and the battery cartridge is removed
before adjusting or checking function on the tool.
Installing or removing battery
cartridge
CAUTION: Always switch o the tool before
installing or removing of the battery cartridge.
CAUTION: Hold the tool and the battery car-
tridge rmly when installing or removing battery
cartridge. Failure to hold the tool and the battery
cartridge rmly may cause them to slip o your hands
and result in damage to the tool and battery cartridge
and a personal injury.
To install the battery cartridge, align the tongue on the
battery cartridge with the groove in the housing and slip
it into place. Insert it all the way until it locks in place
with a little click. If you can see the red indicator as
shown in the gure, it is not locked completely.
To remove the battery cartridge, slide it from the tool
while sliding the button on the front of the cartridge.
1
2
3
Fig.2
► 1. Red indicator 2. Button 3. Battery cartridge
CAUTION: Always install the battery cartridge
fully until the red indicator cannot be seen. If not,
it may accidentally fall out of the tool, causing injury to
you or someone around you.
CAUTION: Do not install the battery cartridge
forcibly. If the cartridge does not slide in easily, it is
not being inserted correctly.
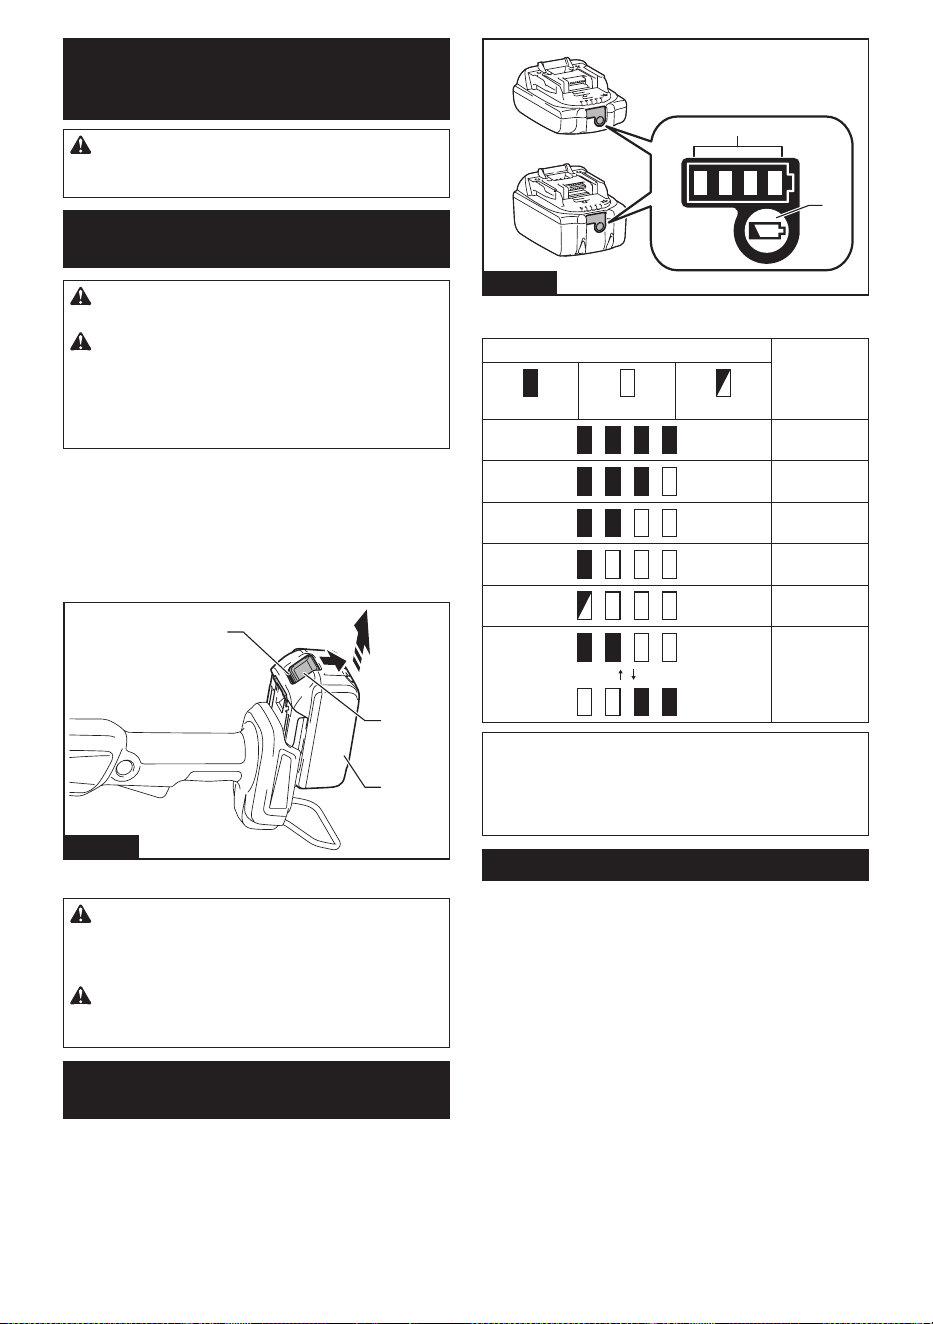
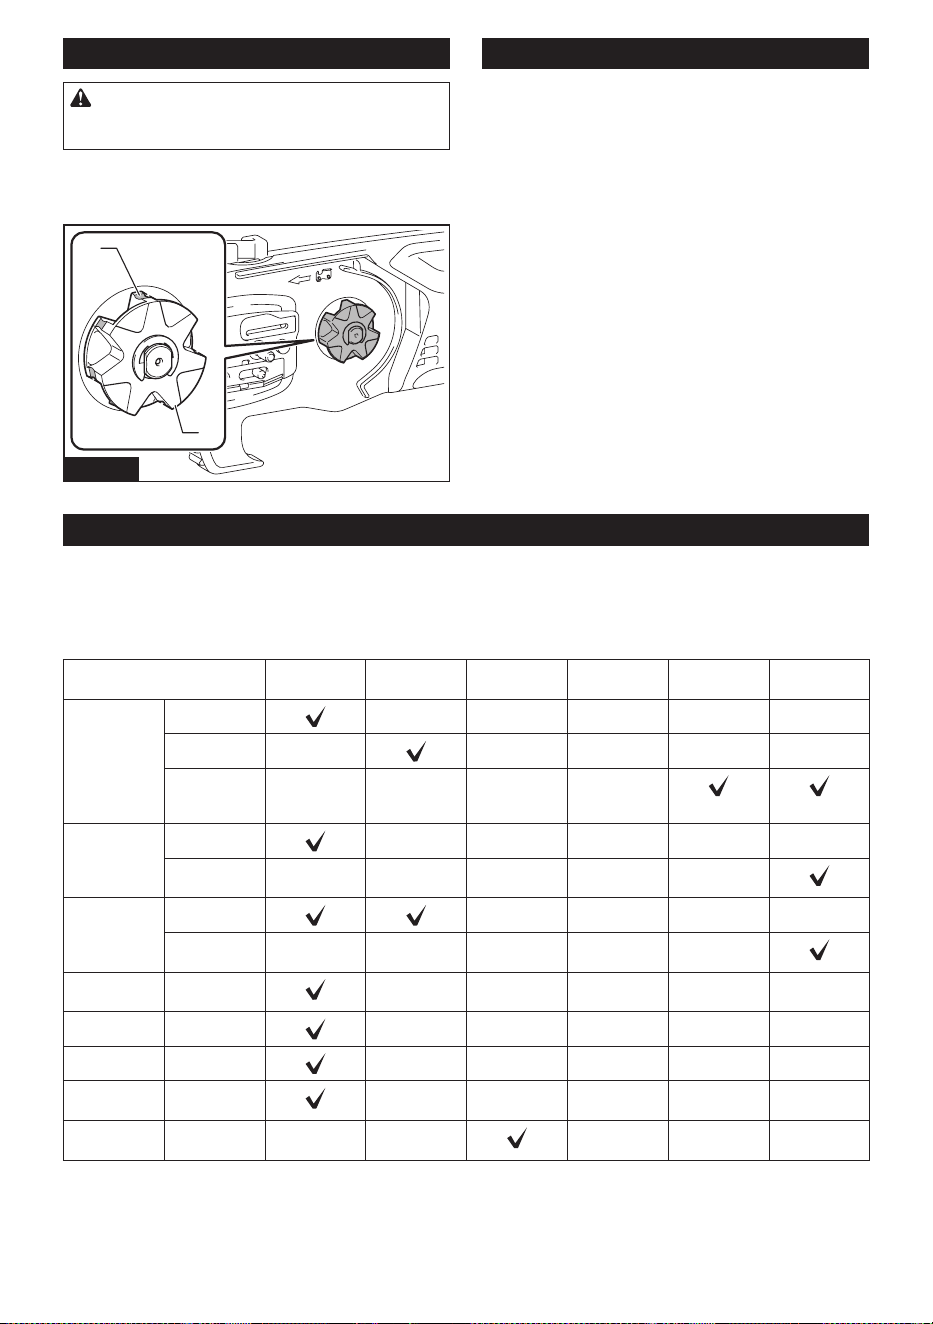
Indicating the remaining battery
capacity
Only for battery cartridges with the indicator
Press the check button on the battery cartridge to indi-
cate the remaining battery capacity. The indicator lamps
light up for a few seconds.
1
2
Fig.3
► 1. Indicator lamps 2. Check button
Indicator lamps Remaining
capacity
Lighted O Blinking
75% to 100%
50% to 75%
25% to 50%
0% to 25%
Charge the
battery.
The battery
may have
malfunctioned.
NOTE: Depending on the conditions of use and the
ambient temperature, the indication may dier slightly
from the actual capacity.
NOTE: The rst (far left) indicator lamp will blink when
the battery protection system works.
Tool / battery protection system
The tool is equipped with a tool/battery protection sys-
tem. This system automatically cuts o power to the
motor to extend tool and battery life. The tool will auto-
matically stop during operation if the tool or battery is
placed under one of the following conditions:
Overload protection
When the battery is operated in a manner that causes
it to draw an abnormally high current, the tool automat-
ically stops. In this situation, release the switch trigger
to stop and avoid the application that caused the tool to
become overloaded. Then depress the lock-o button
and pull the switch trigger to restart.
Overheat protection
When the tool or battery is overheated, the tool stops
automatically. In this case, let the tool and battery cool
before restarting the tool again.
11 ENGLISH
NOTE: In a high temperature environment, over-
heat protection is likely to activate and stop the tool
automatically.
Overdischarge protection
When the battery capacity is not enough, the tool stops
automatically. In this case, remove the battery from the
tool and charge the battery.
Switch action
WARNING: For your safety, this tool is
equipped with lock-o button which prevents the
tool from unintended starting. NEVER use the tool
if it runs when you simply pull the switch trigger
without pressing the lock-o button. Return the
tool to our authorized service center for proper
repairs BEFORE further usage.
WARNING: NEVER tape down or defeat pur-
pose and function of lock-o button.
CAUTION: Before installing the battery car-
tridge into the tool, always check to see that the
switch trigger actuates properly and returns to
the "OFF" position when released.
NOTICE: Do not pull the switch trigger hard with-
out pressing the lock-o button. This can cause
switch breakage.
To prevent the switch trigger from being accidentally
pulled, a lock-o button is provided. To start the tool,
depress the lock-o button and pull the switch trigger.
Release the switch trigger to stop.
1
2
Fig.4
► 1. Switch trigger 2. Lock-o button
Electronic function
The tool is equipped with electronic functions for easy
operation.
• Electric brake
This tool is equipped with an electric brake. If
the tool consistently fails to quickly stop after the
switch trigger is released, have the tool serviced at
a Makita service center.
ASSEMBLY
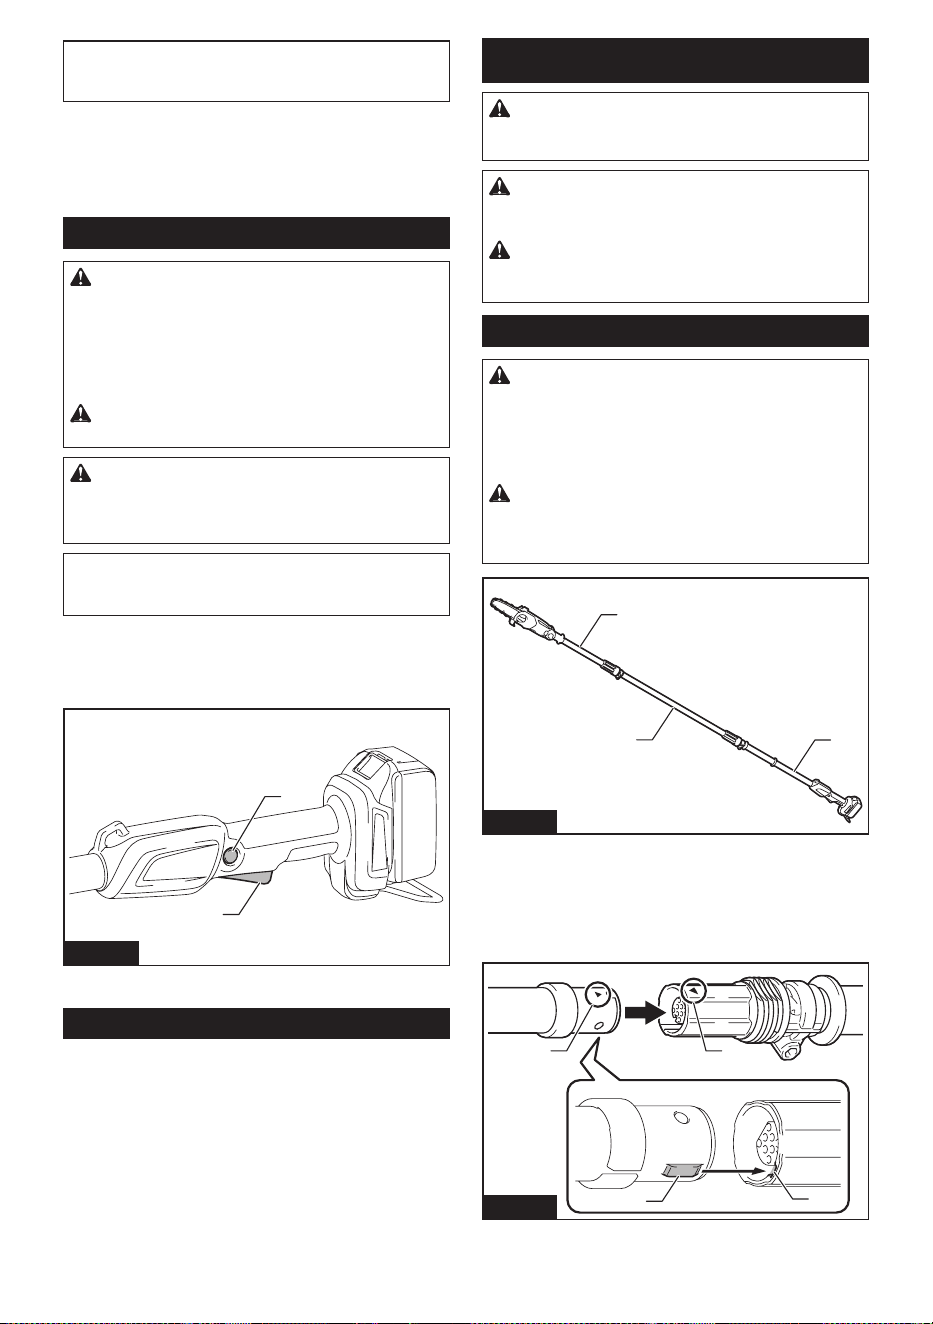
WARNING: Never connect two or more shaft
extension attachments. Otherwise loss of control
may cause serious injury.
CAUTION: Always be sure that the battery
cartridge is removed before carrying out any work
on the tool.
CAUTION: Do not touch the saw chain with
bare hands. Always wear gloves when handling
the saw chain.
Assembling the modules
CAUTION: When assembling the saw head
module, center extension pole, and handle
module, place the modules on the ground. If the
module is assembled in an upright position, it may
fall and hit surrounding objects or people, causing an
accident or injury.
CAUTION: Always make sure that the sleeve
is threaded completely. Not threading the sleeve
completely may cause the assemblies to discon-
nect and cause personal injury.
1
2
3
Fig.5
► 1. Saw head module 2. Center extension pole
3. Handle module
1. Align the triangular marks on the modules and
insert one into the other.
The tongue will t into the groove.
1
2
3
1
Fig.6
► 1. Triangle mark 2. Tongue 3. Groove
12 ENGLISH
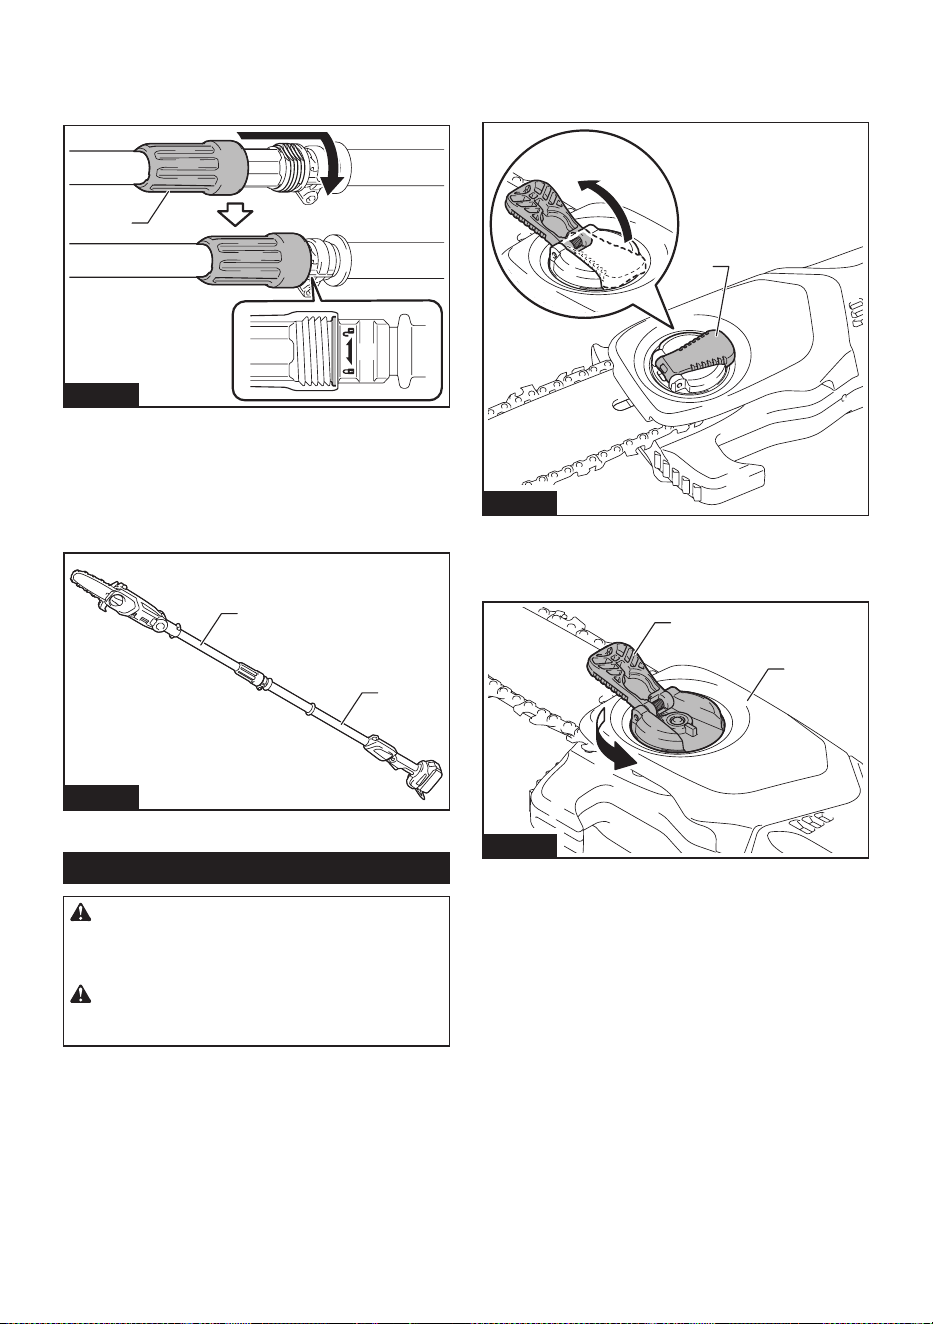
2. Slide the sleeve to the threads and rotate the
sleeve clockwise until it stops.
The end of the threads must be completely covered with
the sleeve as shown in the gure.
1
Fig.7
► 1. Sleeve
Shortening the tool
To shorten the tool, join the saw head module and han-
dle module directly without the center extension pole as
shown in the gure.
1
2
Fig.8
► 1. Saw head module 2. Handle module
Removing or installing saw chain
CAUTION: The saw chain and the guide bar
are still hot just after operation. Let them cool
down enough before carrying out any work on
the tool.
CAUTION: Carry out the procedure of install-
ing or removing the saw chain in a clean place
free from sawdust and the like.
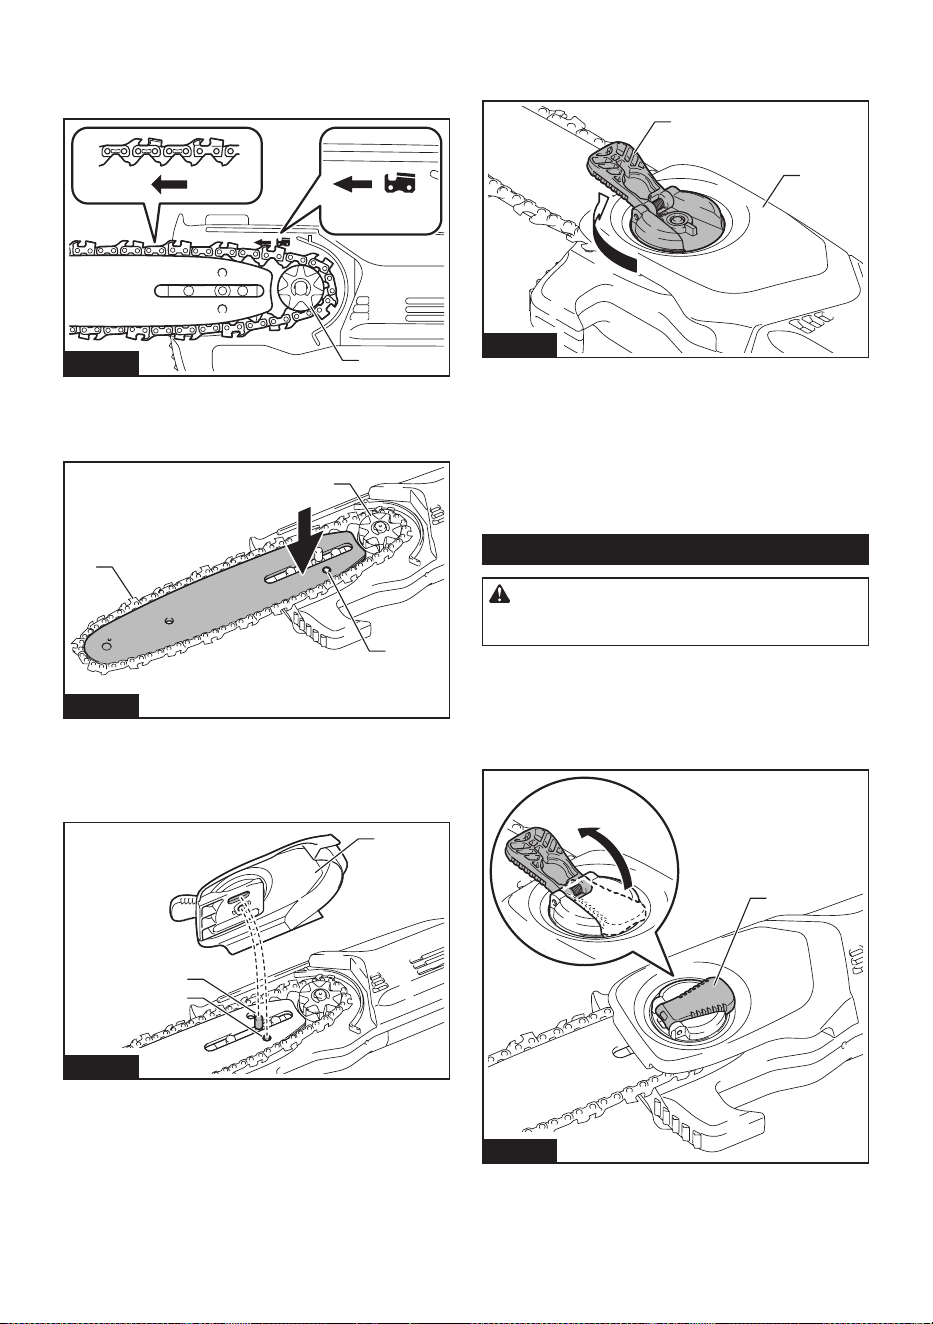
Removing the saw chain
To remove the saw chain, perform the following steps:
1. Pull the lever up.
1
Fig.9
► 1. Lever
2. Turn the lever counterclockwise until the sprocket
cover comes o.
2
1
Fig.10
► 1. Lever 2. Sprocket cover
3. Remove the sprocket cover then remove the saw
chain and guide bar from the tool body.
13 ENGLISH
Installing the saw chain
To install the saw chain, perform the following steps:
1. Pull the lever up.
1
Fig.11
► 1. Lever
2. Turn the lever counterclockwise until the sprocket
cover comes o.
2
1
Fig.12
► 1. Lever 2. Sprocket cover
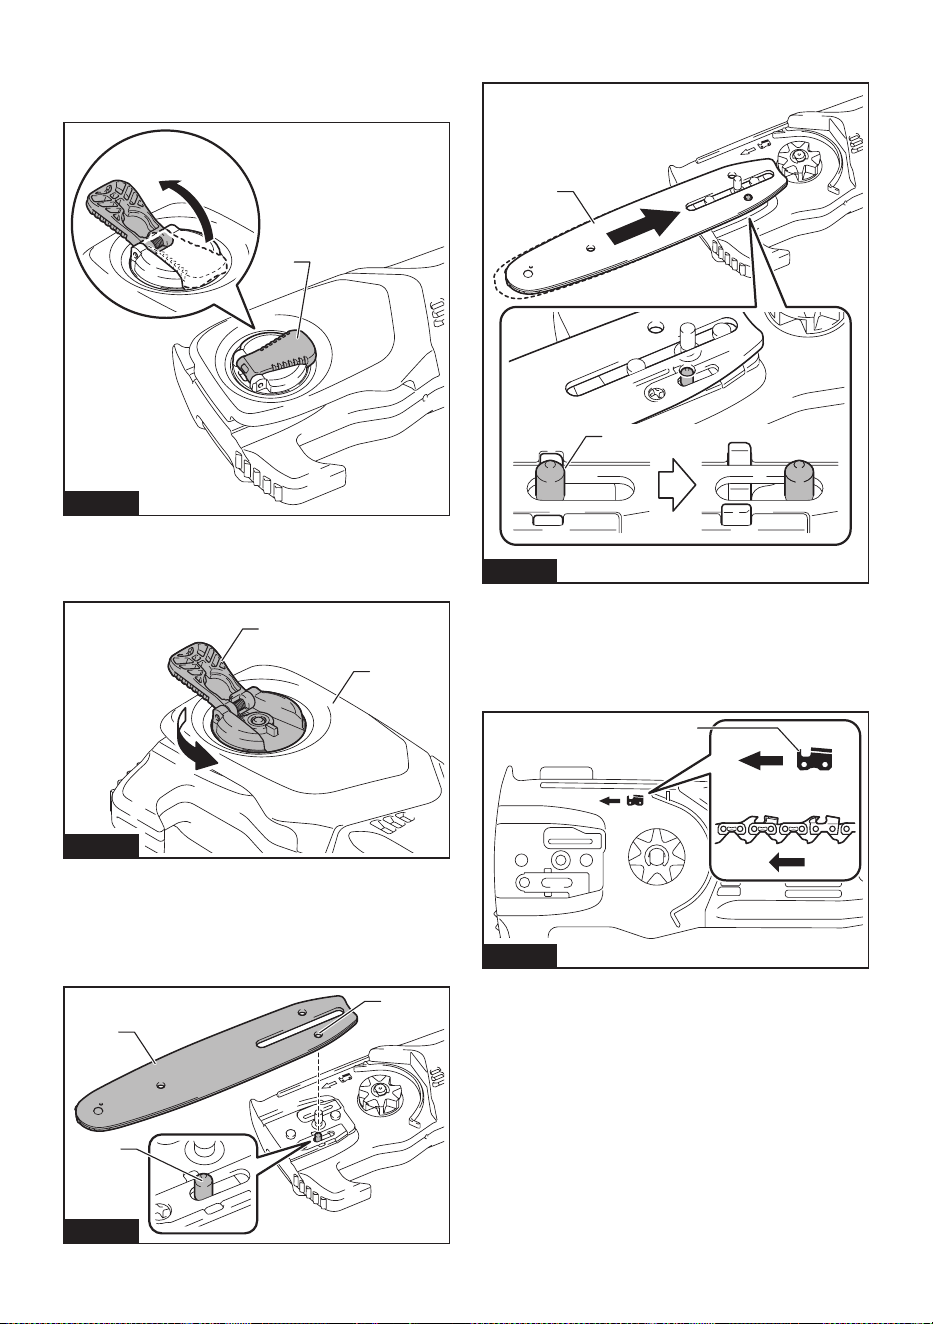
3. Remove the sprocket cover.
4. Align the hole on the guide bar with the pin on the
tool body, and then place the guide bar as shown in the
gure.
1
2
3
Fig.13
► 1. Guide bar 2. Hole 3. Pin
5. Slide the guide bar toward the sprocket to lock the
pin.
1
2
Fig.14
► 1. Guide bar 2. Pin
6. Remove the guide bar from the tool body.
7. Check the direction of the saw chain. Match the
direction of the saw chain with that of the mark on the
tool body.
1
Fig.15
► 1. Mark on tool body
8. Fit one end of the saw chain on the top of the
guide bar.
14 ENGLISH
9. Fit the other end of the saw chain around the
sprocket, then attach the guide bar to the tool body so
that the hole on the guide bar is aligned with the pin on
the body.
1
Fig.16
► 1. Sprocket
Press the guide bar against the tool body to release the
pin. The saw chain tension is automatically adjusted.
1
2
3
Fig.17
► 1. Saw chain 2. Pin 3. Sprocket
10. Place the sprocket cover so that the bolt and pin
on the tool body meet their counterparts on the sprocket
cover.
1
2
3
Fig.18
► 1. Sprocket cover 2. Bolt 3. Pin
11. Turn the lever clockwise and tighten rmly to
secure the sprocket cover, then return it to the original
position.
1
2
Fig.19
► 1. Lever 2. Sprocket cover
Make sure that the drive link of the saw chain is
securely seated on the sprocket and that the saw chain
is properly seated in the rail groove of the guide bar.
Make sure that the saw chain is not loose and the saw
chain can be moved smoothly back and forth. If neces-
sary, adjust the tension of the saw chain by referring to
the section for adjusting saw chain tension.
Adjusting saw chain tension
CAUTION: A chain which is too loose can
jump o the bar and may cause an injury or
accident.
The saw chain may become loose after many hours
of use. From time to time check the saw chain tension
before use.
If the saw chain is loose, adjust the saw chain tension.
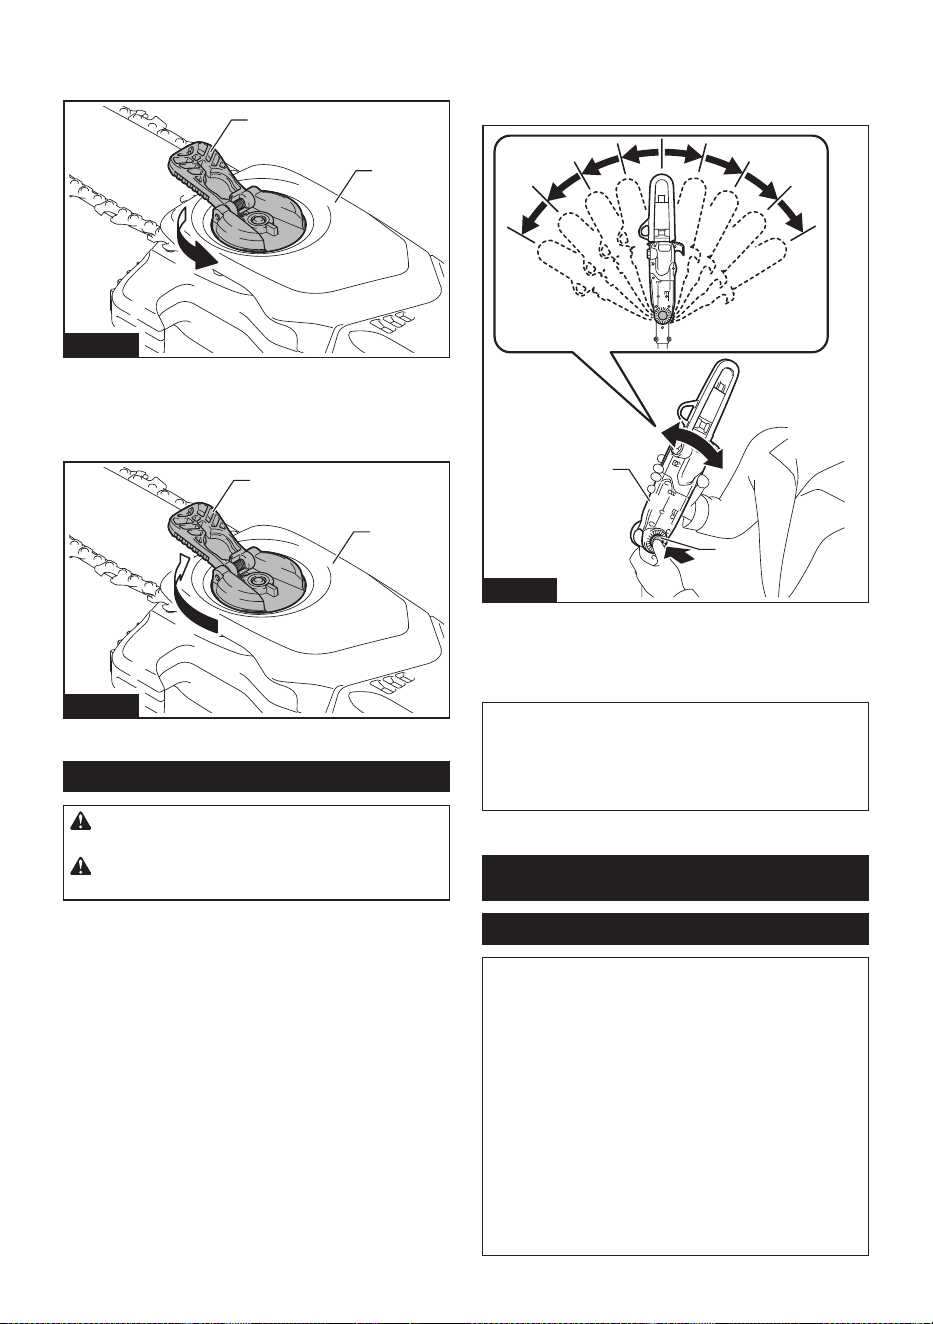
1. Pull the lever up.
1
Fig.20
► 1. Lever
15 ENGLISH
2. Turn the lever counterclockwise a little to loosen
the sprocket cover slightly. The chain tension is
adjusted automatically.
2
1
Fig.21
► 1. Lever 2. Sprocket cover
3. Turn the lever clockwise and tighten rmly to
secure the sprocket cover, then return it to the original
position.
1
2
Fig.22
► 1. Lever 2. Sprocket cover
Adjusting the head angle
CAUTION: When adjusting the head angle,
attach the guide bar cover to avoid injury.
CAUTION: Be careful not to get your ngers
caught between the head and the rod.
The head can be adjusted in 9 angles. Follow these steps:
1. Hold the tool as shown in the gure, and while
pressing the head angle adjustment button, adjust the
head to your desired angle.
1
2
Fig.23
► 1. Head angle adjustment button 2. Head
2. Release the head angle adjustment button and
make sure the head angle adjustment button returns to
its original position.
NOTICE: If the head angle adjustment button
does not return to its original position, move the
head slightly until it clicks into the place.
NOTICE: Make sure the head is securely xed
before use.
OPERATION
Lubrication
NOTICE: When lling the chain oil for the rst
time, or relling the tank after it has been com-
pletely emptied, add oil up to the bottom edge of
the ller neck. The oil delivery may otherwise be
impaired.
NOTICE: Use the saw chain oil exclusively for
Makita chain saws or equivalent oil available in
the market.
NOTICE: Never use oil including dust and parti-
cles or volatile oil.
NOTICE: When pruning trees, use botanical oil.
Mineral oil may harm trees.
NOTICE: Before the cutting operation, make sure
that the oil tank cap is tightened securely.
16 ENGLISH
The Saw chain is automatically lubricated when the tool
is in operation. Check the amount of remaining oil in the
oil tank periodically.
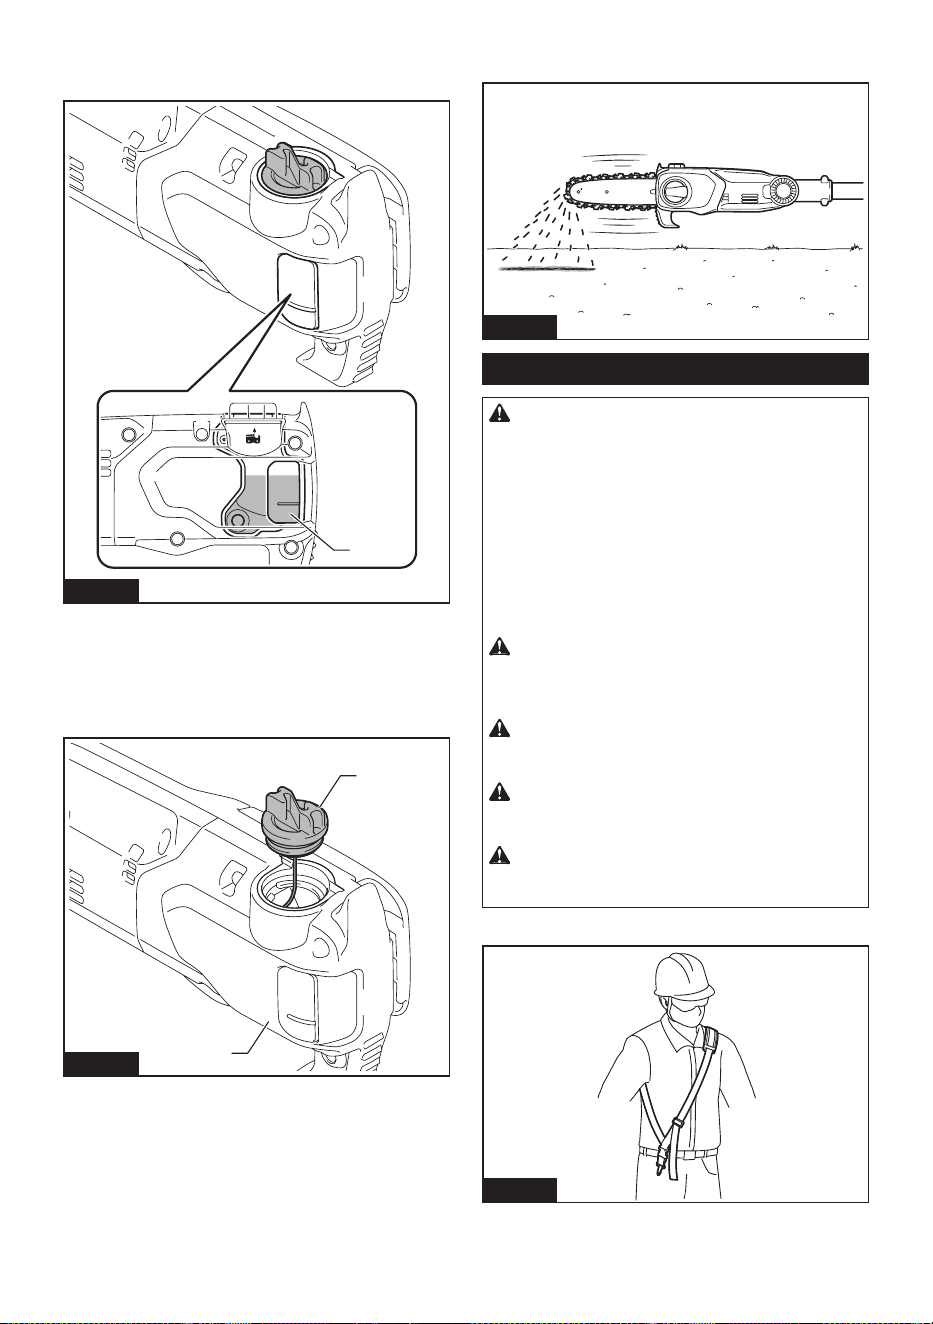
1
Fig.24
► 1. Oil tank
To rell the tank, place the tool on a at surface, then
remove the oil tank cap by turning it.
The proper amount of oil is 55 cm
3
(1.9 oz). After rell-
ing the tank, make sure that the oil tank cap is tightened
securely.
1
2
Fig.25
► 1. Oil tank cap 2. Oil tank (translucent)
After relling, hold the tool away from the tree. Start it
and wait until the saw chain is adequately lubricated.
Fig.26
Attaching the shoulder harness
CAUTION: When you use the tool in combi-
nation of the backpack-type power supply such
as portable power pack, do not use the shoulder
harness included in the tool package, but use the
hanging band recommended by Makita.
If you put on the shoulder harness included in the
tool package and the shoulder harness of the back-
pack-type power supply at the same time, removing
the tool or backpack-type power supply is dicult in
case of an emergency, and it may cause an accident
or injury. For the recommended hanging band, ask
Makita Authorized Service Centers.
CAUTION: Always use the shoulder harness
attached to the tool. Before operation, adjust the
shoulder harness according to the user size to
prevent fatigue.
CAUTION: Before operation, make sure that
the shoulder harness is properly attached to the
hanger on the tool.
CAUTION: Before operation, make sure that
the buckle of the shoulder harness is fastened
rmly.
CAUTION: Always use the shoulder harness
dedicated to this tool. Do not use other shoulder
harnesses.
1. Wear the shoulder harness on your left shoulder.
Fig.27
17 ENGLISH
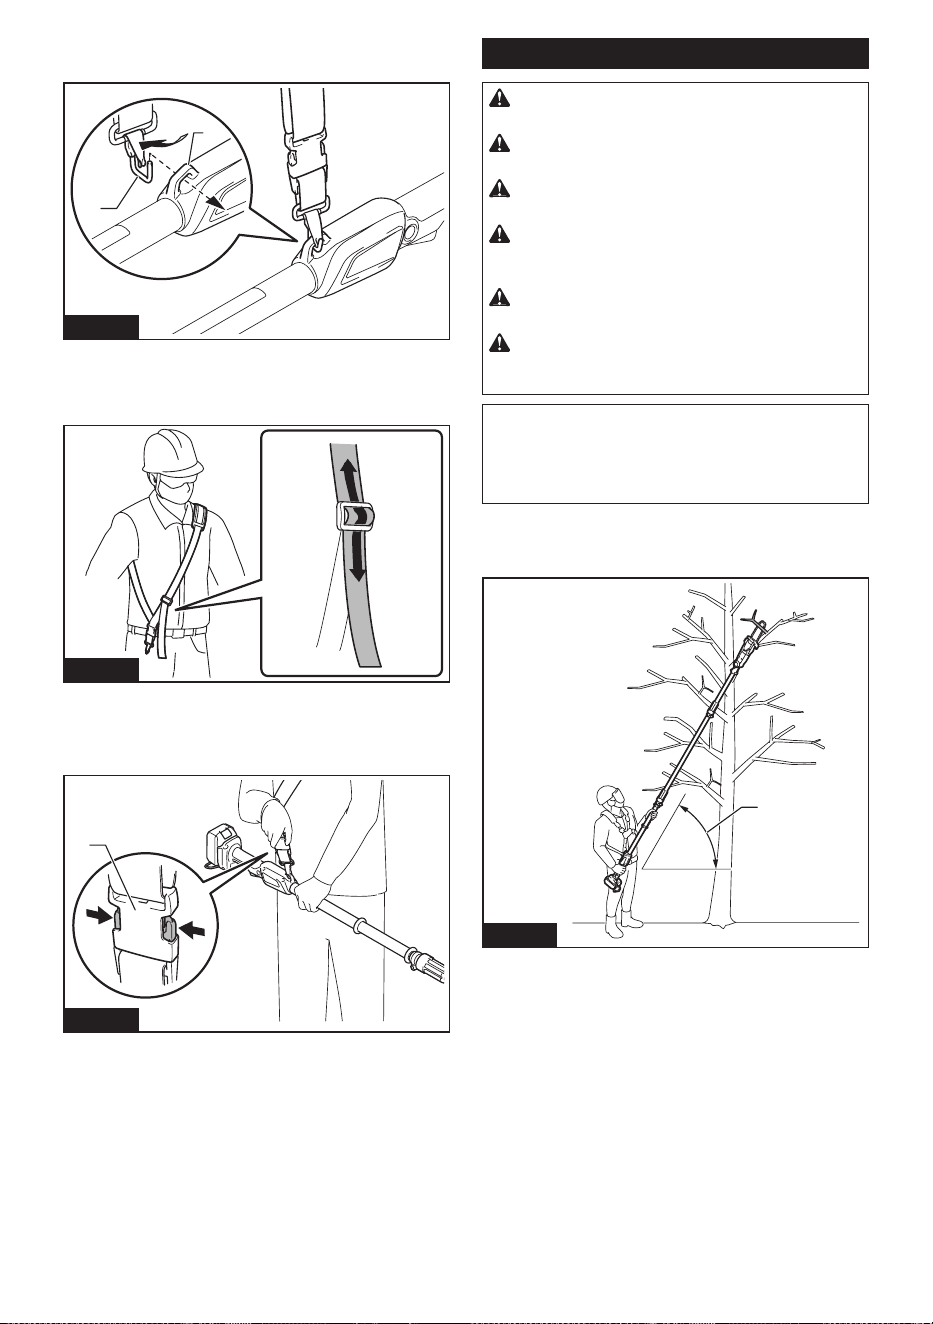
2. Clasp the hook on the shoulder harness to tool's
hanger.
1
2
Fig.28
► 1. Hook 2. Hanger
3. Adjust the shoulder harness to a comfortable
working position.
Fig.29
The shoulder harness features a means of quick
release.
Simply squeeze the sides of the buckle to release the
tool from the shoulder harness.
1
Fig.30
► 1. Buckle
Working with the tool
CAUTION: Keep all parts of the body away
from the saw chain when the motor is operating.
CAUTION: Hold the tool rmly with both
hands when the motor is running.
CAUTION: Do not overreach. Keep proper
footing and balance at all times.
CAUTION: When cutting through branches,
be careful not to lose your balance due to the
weight of the tool head.
CAUTION: Always keep escape route in case
a cut branch falls towards the operator.
CAUTION: Never use the tip of the guide bar
for cutting. Otherwise, dangerous kickback may
occur, and it may result in personal injury.
NOTICE: Never toss or drop the tool.
NOTICE: Do not cover the vents of the tool.
NOTICE: Do not force the tool. Otherwise, it may
damage the tool.
Stand on a stable surface, and hold the tool away from
the branches so that the angle of the tool becomes 60°
or less against the horizontal ground.
1
Fig.31
► 1. 60° or less
18 ENGLISH
Start the tool, and then press the saw chain onto the
branch lightly.
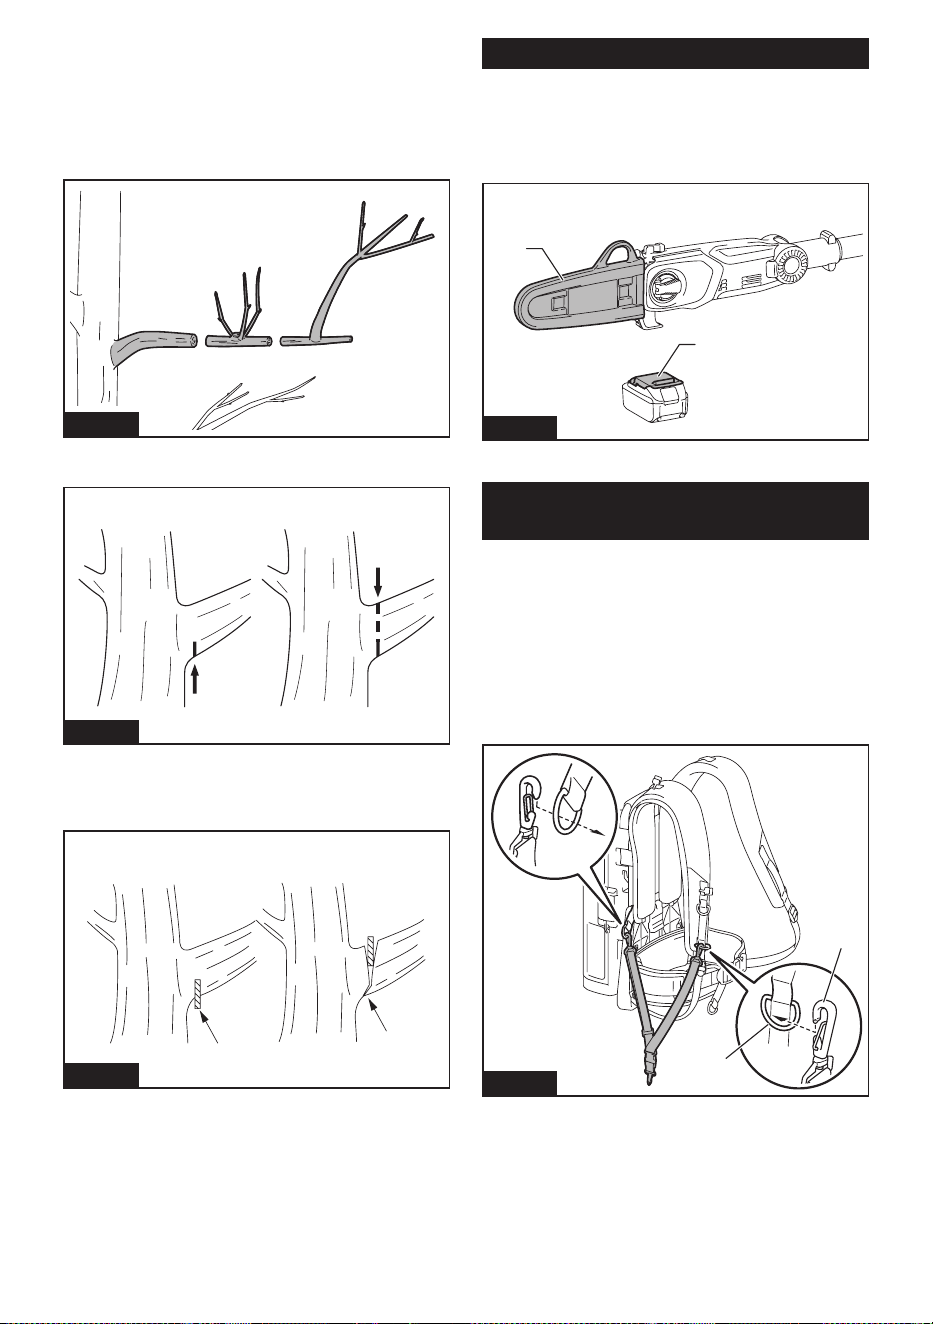
When cutting long branches, in order to control the drop
position of cut branches, divide the branch in sections
and cut the branch from the tip. Pay attention to the
falling branches since they may bounce in the direction
of the operator after hitting the ground.
Fig.32
When cutting thick branches, rst make a shallow
undercut and then make the nish cut from the top.
1
2
Fig.33
If you try to cut o thick branches from the bottom, the
branch may close in and pinch the saw chain in the cut.
If you try to cut o thick branches from the top without a
shallow undercut, the branch may splinter.
Fig.34
Carrying tool
Before carrying the tool, always remove the battery
cartridges from the tool, and then attach the guide bar
cover. Also cover the battery cartridge with the battery
cover.
Do not touch the switch trigger when carrying the tool.
1
2
Fig.35
► 1. Guide bar cover 2. Battery cover
Using the tool with portable power
pack
Optional accessory
Use the hanging band when you use the tool with porta-
ble power pack.
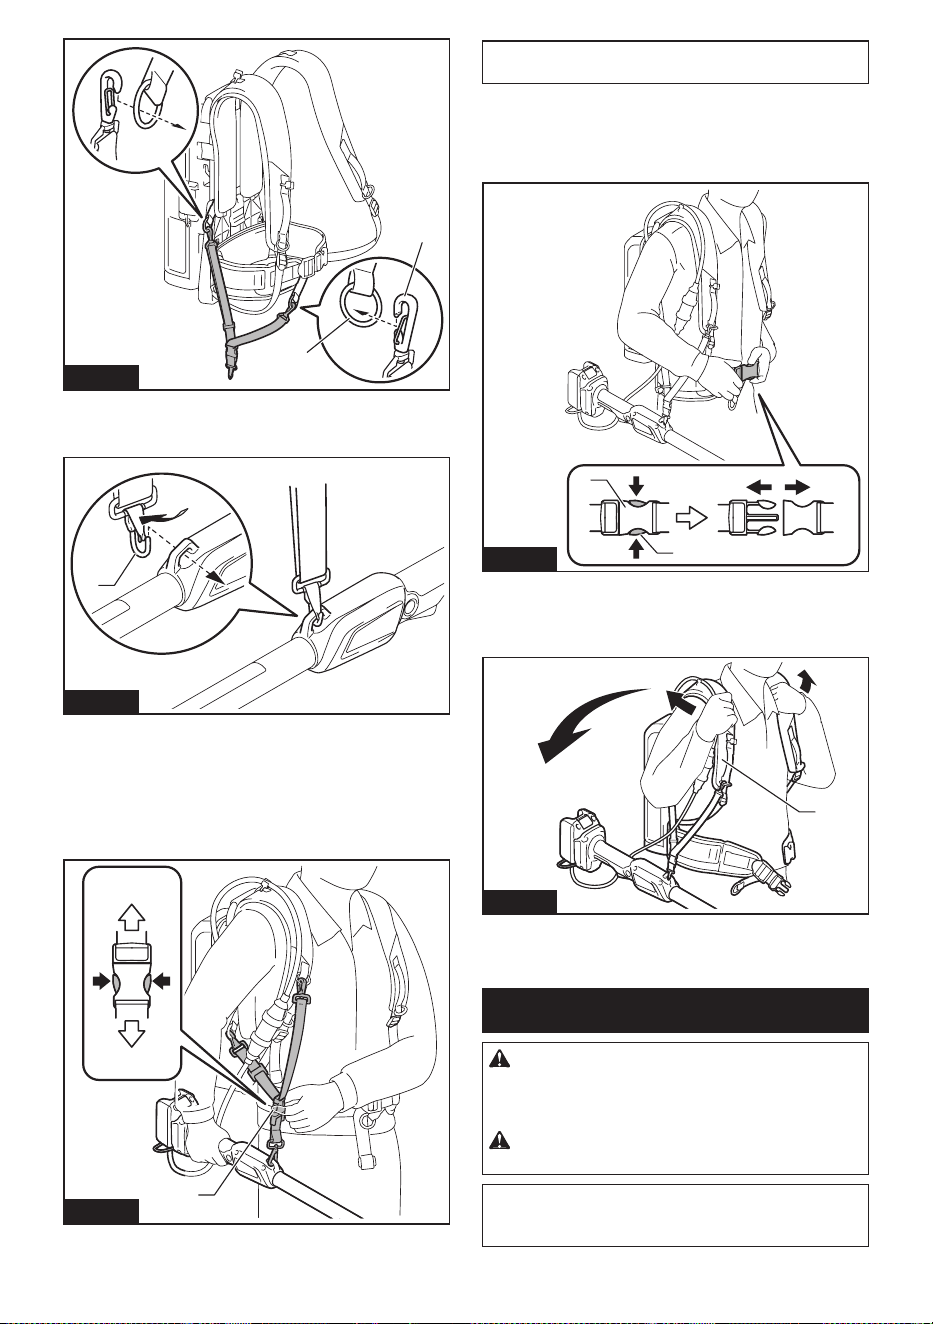
Attaching the hanging band
1. Attach the hooks of the hanging band to the rings
of the shoulder harness or waist belt as shown in the
gure. Select the type of band and the connecting
method appropriate for your usage.
1
2
Fig.36
► 1. Ring 2. Hook
19 ENGLISH
1
2
Fig.37
► 1. Ring 2. Hook
2. Attach the hook to the tool.
1
Fig.38
► 1. Hook
Detaching the tool
When setting down the tool, unlock the buckle on the
hanging band with one hand while holding the tool with
the other hand.
1
Fig.39
► 1. Buckle
NOTE: The buckle is not equipped depending on the
type of band.
If you need to release the tool quickly, follow the steps
below.
1. Push the levers on the buckle of the waist belt to
unlock the buckle.
1
2
Fig.40
► 1. Buckle 2. Lever
2. Take o the shoulder harness to release the tool
and the unit.
1
Fig.41
► 1. Shoulder harness
MAINTENANCE
CAUTION: Always be sure that the tool is
switched o and the battery cartridge is removed
before attempting to perform inspection or
maintenance.
CAUTION: Always wear gloves when perform-
ing any inspection or maintenance.
NOTICE: Never use gasoline, benzine, thinner,
alcohol or the like. Discoloration, deformation or
cracks may result.
20 ENGLISH
To maintain product SAFETY and RELIABILITY,
repairs, any other maintenance or adjustment should
be performed by Makita Authorized or Factory Service
Centers, always using Makita replacement parts.
Sharpening the saw chain
Sharpen the saw chain when:
• Mealy sawdust is produced when damp wood is
cut;
• The chain penetrates the wood with diculty, even
when heavy pressure is applied;
• The cutting edge is obviously damaged;
• The saw pulls to the left or right in the wood.
(caused by uneven sharpening of the saw chain or
damage to one side only)
Sharpen the saw chain frequently but a little each time.
Two or three strokes with a le are usually sucient for
routine resharpening. When the saw chain has been
resharpened several times, have it sharpened in our
authorized service center.
Sharpening criteria:
WARNING: An excessive distance between
the cutting edge and depth gauge increases the
risk of kickback.
22
1
1
3
1
Fig.42
► 1. Cutter length 2. Distance between cutting edge
and depth gauge 3. Minimum cutter length (3 mm
(1/8″))
— All cutter length must be equal. Dierent cutter
lengths prevent the saw chain from running
smoothly and may cause the saw chain to break.
— Do not sharpen the chain when the cutter length
has reached 3 mm (1/8″) or shorter. The chain
must be replaced with new one.
— The chip thickness is determined by the distance
between the depth gauge (round nose) and the
cutting edge.
— The best cutting results are obtained with following
distance between cutting edge and depth gauge.
• Chain blade 80TXL: 0.65 mm (0.025″)
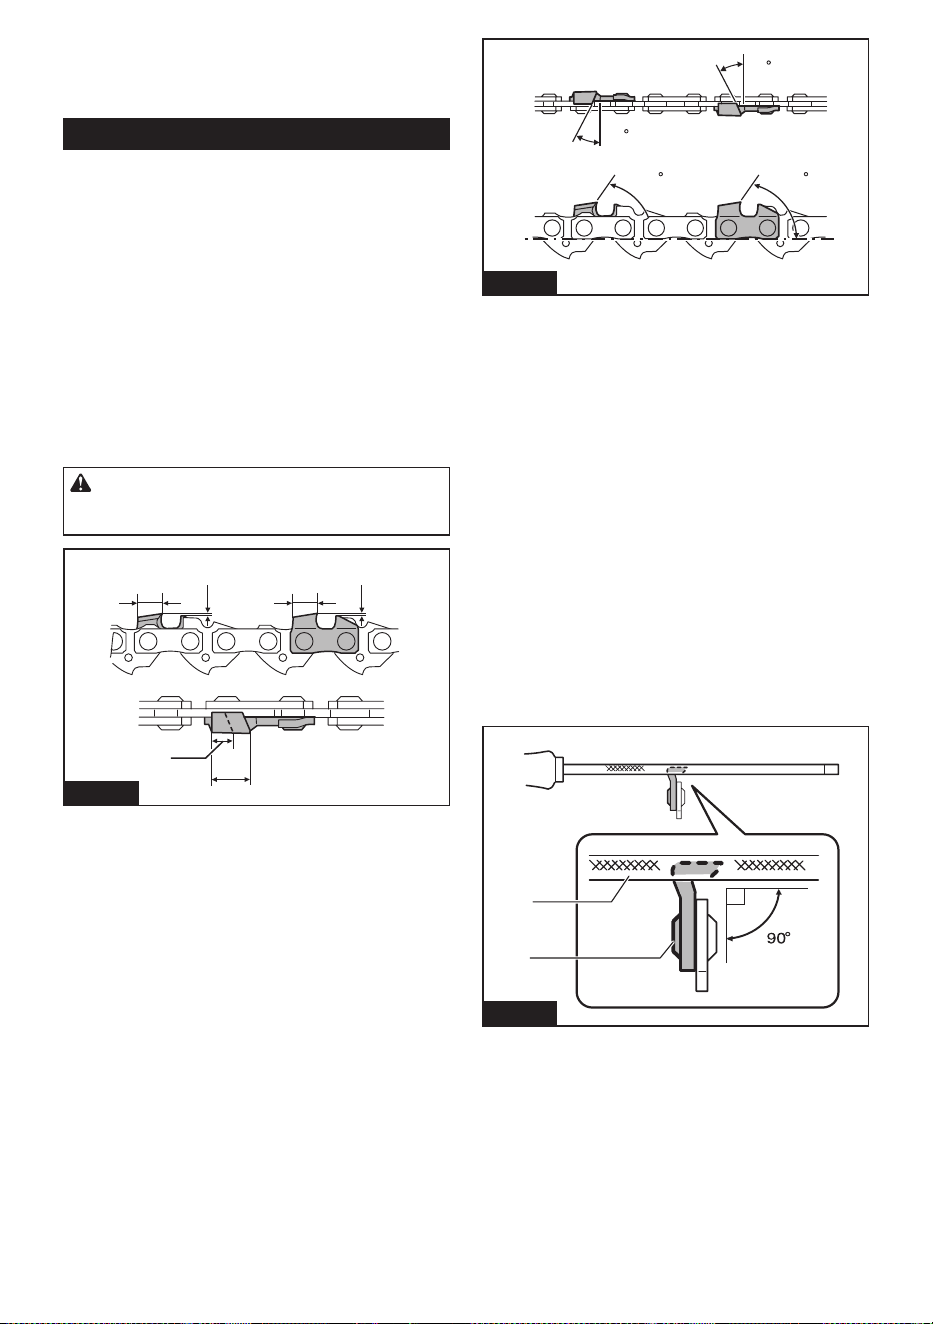
30
30
55
55
Fig.43
— The sharpening angle of 30° must be the same on
all cutters. Dierent cutter angles cause the chain
to run roughly and unevenly, accelerate wear, and
lead to chain breaks.
— Use a suitable round le so that the proper sharp-
ening angle is kept against the teeth.
• Chain blade 80TXL : 55°
File and le guiding
— Use a special round le (optional accessory) for
saw chains to sharpen the chain. Normal round
les are not suitable.
— Diameter of the round le for each saw chain is as
follows:
• Chain blade 80TXL : 4.0 mm (5/32″)
— The le should only engage the cutter on the for-
ward stroke. Lift the le o the cutter on the return
stroke.
— Sharpen the shortest cutter rst. Then the length
of this shortest cutter becomes the standard for all
other cutters on the saw chain.
— Guide the le as shown in the gure.
1
2
Fig.44
► 1. File 2. Saw chain
21 ENGLISH
— The le can be guided more easily if a le holder
(optional accessory) is employed. The le holder
has markings for the correct sharpening angle of
30° (align the markings parallel to the saw chain)
and limits the depth of penetration (to 4/5 of the
le diameter).
30
1/5
1
Fig.45
► 1. File holder
— After sharpening the chain, check the height of the
depth gauge using the chain gauge tool (optional
accessory).
Fig.46
— Remove any projecting material, however small,
with a special at le (optional accessory).
— Round o the front of the depth gauge again.
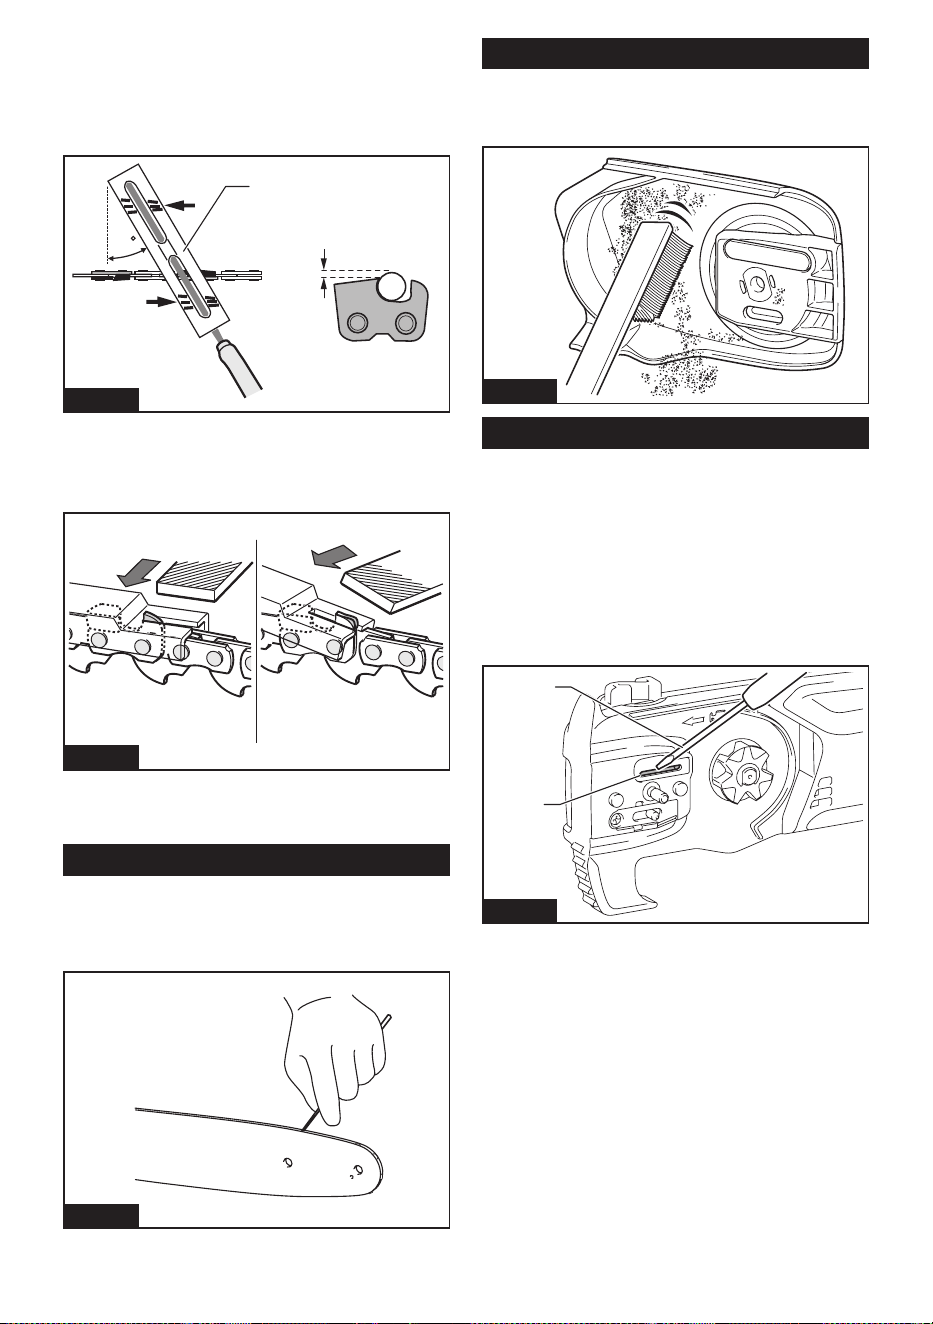
Cleaning the guide bar
Chips and sawdust will build up in the guide bar groove.
They may clog the bar groove and impair the oil ow.
Clean out the chips and sawdust every time when you
sharpen or replace the saw chain.
Fig.47
Cleaning the sprocket cover
Chips and saw dust will accumulate inside of the
sprocket cover. Remove the sprocket cover and saw
chain from the tool then clean the chips and saw dust.
Fig.48
Cleaning the oil discharge hole
Small dust or particles may be built up in the oil dis-
charge hole during operation. These dust or particles
may impair the oil to ow and cause an insucient
lubrication on the whole saw chain. When a poor chain
oil delivery occurs at the top of guide bar, clean the oil
discharge hole as follows.
1. Remove the sprocket cover and saw chain from
the tool.
2. Remove the small dust or particles using a slotted
screwdriver or the like.
1
2
Fig.49
► 1. Slotted screwdriver 2. Oil discharge hole
3. Insert the battery cartridge into the tool. Pull the
switch trigger to ow built-up dust or particles o the oil
discharge hole by discharging chain oil.
4. Remove the battery cartridge from the tool.
Reinstall the sprocket cover and saw chain on the tool.
22 ENGLISH
Replacing the sprocket
CAUTION: A worn sprocket will damage a
new saw chain. Have the sprocket replaced in this
case.
Before tting a new saw chain, check the condition of
the sprocket. If the sprocket is worn or damaged, ask
Makita Authorized Service Centers for replacement.
2
1
Fig.50
► 1. Sprocket 2. Areas to be worn out
Storing the tool
1. Clean the tool before storing. Remove any chips
and sawdust from the tool after removing the sprocket
cover.
2. After cleaning the tool, run it under no load to lubri-
cate the saw chain and guide bar.
3. Cover the guide bar with the guide bar cover.
4. Empty the oil tank.
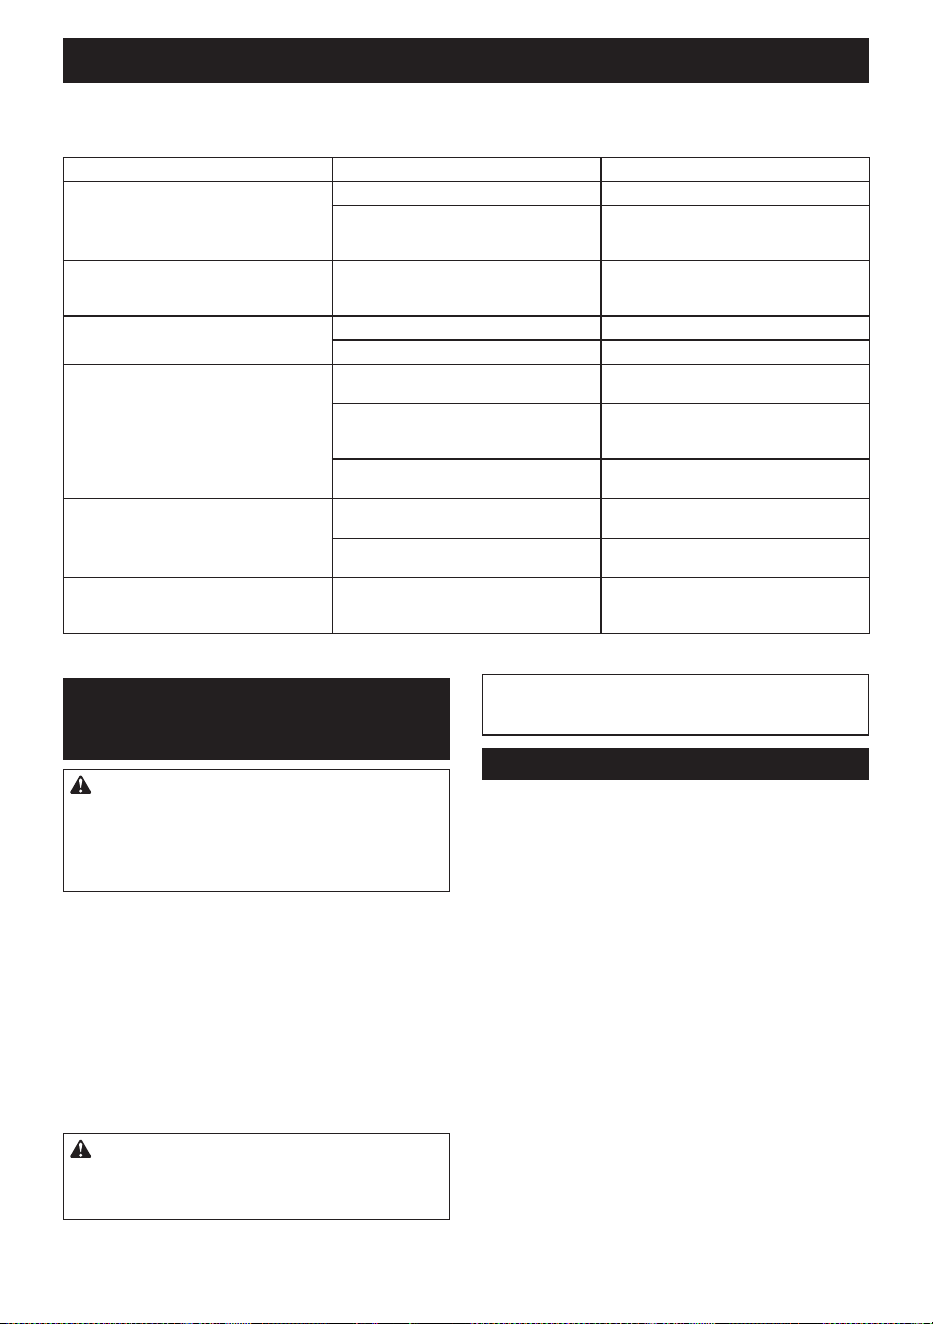
Instructions for periodic maintenance
To ensure long life, prevent damage and ensure the full functioning of the safety features, the following maintenance
must be performed regularly. Warranty claims can be recognized only if this work is performed regularly and properly.
Failure to perform the prescribed maintenance work can lead to accidents! The user of the tool must not perform
maintenance work which is not described in the instruction manual. All such work must be carried out by our autho-
rized service center.
Check item / Operating time Before
operation
Everyday Every week Every 3
month
Annually Before
storage
Entire tool Inspection.
- - - - -
Cleaning. -
- - - -
Check at
authorized
service center.
- - - -
Saw chain Inspection. - - - - -
Sharpening if
necessary.
- - - - -
Guide bar Inspection. - - - -
Remove from
the tool.
- - - - -
Chain
lubrication
Check the oil
feed rate.
- - - - -
Switch trigger Inspection.
- - - - -
Lock-o button Inspection.
- - - - -
Oil tank cap Check
tightness.
- - - - -
Screws and
nuts
Inspection. - -
- - -
23
TROUBLESHOOTING
Before asking for repairs, conduct your own inspection rst. If you nd a problem that is not explained in the manual,
do not attempt to dismantle the tool. Instead, ask Makita Authorized Service Centers, always using Makita replace-
ment parts for repairs.
Malfunction status Cause Action
The tool does not start. Battery cartridge is not installed. Install a charged battery cartridge.
Battery problem (low voltage). Recharge the battery cartridges. If recharg-
ing is not eective, replace the battery
cartridge.
The motor stops running after a little use. Battery's charge level is low. Recharge the battery cartridges. If recharg-
ing is not eective, replace the battery
cartridge.
No oil on the chain. Oil tank is empty. Fill the oil tank.
Oil guide groove is dirty. Clean the groove.
The tool does not reach maximum RPM. Battery cartridge is installed improperly. Install the battery cartridges as described
in this manual.
Battery power is dropping. Recharge the battery cartridge. If recharg-
ing is not eective, replace the battery
cartridge.
The drive system does not work correctly. Ask the authorized service center in your
region for repair.
Abnormal vibration:
Stop the tool immediately!
Loose guide bar or saw chain. Adjust the guide bar and saw chain
tension.
Tool malfunction. Ask the authorized service center in your
region for repair.
The saw chain cannot be installed. The combination of saw chain and
sprocket is not correct.
Use the correct combination of saw chain
and sprocket by referring to the section for
specications.
OPTIONAL
ACCESSORIES
CAUTION: These accessories or attachments
are recommended for use with your Makita tool
specied in this manual. The use of any other
accessories or attachments might present a risk of
injury to persons. Only use accessory or attachment
for its stated purpose.
If you need any assistance for more details regard-
ing these accessories, ask your local Makita Service
Center.
• Saw chain
• Guide bar
• Guide bar cover
• File
• Shoulder strap
• Chain oil
• Sprocket
• Makita genuine battery and charger
WARNING: If you purchase a guide bar of
dierent length from the standard guide bar, also
purchase a suitable guide bar cover together. It
must t and fully cover the guide bar on the tool.
NOTE: Some items in the list may be included in the
tool package as standard accessories. They may
dier from country to country.
MAKITA LIMITED WARRANTY
Please refer to the annexed warranty sheet for the
most current warranty terms applicable to this product.
If annexed warranty sheet is not available, refer to the
warranty details set forth at below website for your
respective country.
United States of America: www.makitatools.com
Canada: www.makita.ca
Other countries: www.makita.com
ENGLISH

24 ESPAÑOL
ESPAÑOL (Instrucciones originales)
ESPECIFICACIONES
Modelo: XAU03
Longitud total (sin la barra de guía y el aditamento) 1620 mm / 2520 mm
(63-3/4″ / 99″)
Tensión nominal 18 V c.c.
Peso neto 3,2 kg - 3,5 kg
(7,1 lbs - 7,7 lbs)
Longitud de la barra de guía estándar 200 mm
(8″)
Longitud recomendada de la
barra de guía
con 80TXL 200 mm
(8″)
Tipo de cadena de la sierra aplicable
(consulte la tabla a continuación)
80TXL
Pieza dentada estándar Número de dientes 7
Paso 0,325″
Velocidad de la cadena 6,7 m/s
(402 m/min)
(1320 ft/min)
Volumen del tanque de aceite de la cadena 55 cm
3
(1,9 oz)
• Debido a nuestro continuo programa de investigación y desarrollo, las especicaciones aquí incluidas están
sujetas a cambio sin previo aviso.
• Las especicaciones pueden variar de país a país.
• El peso puede variar en función de los accesorios, incluido el cartucho de batería. En la tabla se muestra la
combinación de peso más ligero y más pesado conforme al procedimiento 01/2014 de EPTA.
Cartucho de batería y cargador aplicables
Cartucho de batería BL1815N / BL1820B / BL1830B / BL1840B / BL1850B / BL1860B
Cargador DC18RC / DC18RD / DC18SD / DC18SE / DC18SF / DC18SH /
DC18WC
• Algunos de los cartuchos de batería y cargadores enumerados arriba podrían no estar disponibles depen-
diendo de su área de residencia.
ADVERTENCIA: Use únicamente los cartuchos de batería y los cargadores indicados arriba. El uso de
cualquier otro cartucho de batería y cargador podría ocasionar una lesión y/o un incendio.
Fuente de alimentación conectada por cable recomendada
Unidad portátil de alimentación eléctrica PDC01
• La o las fuentes de alimentación conectadas por cable enumeradas arriba podrían no estar disponibles depen-
diendo de su área de residencia.
• Antes de utilizar la fuente de alimentación conectada por cable, lea las instrucciones e indicaciones de precau-
ción sobre ellas.

25 ESPAÑOL
Combinación de cadena de la sierra, barra de guía y pieza dentada
Tipo de cadena de la sierra 80TXL
Número de eslabones impulsores 38
Barra de guía Longitud de la barra de guía 200 mm
(8″)
Longitud de corte 185 mm
(7-1/4″)
Paso 0,325″
Calibre 1,1 mm
(0,043″)
Tipo Barra dentada
Pieza dentada Número de dientes 7
Paso 0,325″
ADVERTENCIA: Utilice una combinación apropiada de la barra de guía y cadena de la sierra. De lo contra-
rio, esto podría ocasionar una lesión personal.
ADVERTENCIAS DE
SEGURIDAD
Instrucciones importantes de
seguridad
ADVERTENCIA: No la opere cerca de cables
eléctricos. La unidad no ha sido diseñada para
brindar protección contra descargas eléctricas
en caso de contacto con líneas eléctricas aéreas.
Consulte las leyes locales para conocer las dis-
tancias seguras de las líneas de energía eléctrica
aéreas, y asegúrese de que la posición de opera-
ción sea segura y rme antes de operar la poda-
dora de extensión con cadena de la sierra.
ADVERTENCIA: Al utilizar aparatos eléc-
tricos de jardinería, siempre deben tomarse en
cuenta las precauciones básicas de seguridad
a n de reducir el riesgo de incendio, descarga
eléctrica y lesiones personales, incluyendo lo
siguiente:
LEA TODAS LAS
INSTRUCCIONES.
1. Evite los entornos peligrosos - No utilice los
aparatos en lugares húmedos o mojados.
2. No usar bajo la lluvia.
3. Mantenga a los niños alejados - Todos los visi-
tantes deberán ser mantenidos a cierta distancia
del área de trabajo.
4. Lleve una vestimenta adecuada - No use ropa
oja ni alhajas. Éstas podrían engancharse en las
piezas móviles. Cuando se trabaje en exteriores
es recomendable usar guantes de hule y un cal-
zado resistente. Lleve protección en el cabello
para cubrirlo en caso de tenerlo largo.
5.
Use gafas de seguridad: siempre utilice careta o
máscara contra polvo si la operación es polvorienta.
6. Use el aparato indicado - No utilice el aparato
para cualquier trabajo excepto para el que ha sido
diseñado.
7. Evite el encendido accidental - No transporte
el aparato con el dedo puesto en el interruptor.
Asegúrese de que el interruptor esté apagado
antes de insertar la batería.
8. No agarre las cuchillas ni los bordes de corte
expuestos al levantar o sostener el aparato.
9. No fuerce el aparato - Éste realizará la tarea
mejor y con menos probabilidad de ocasionar una
lesión a la velocidad para la que fue diseñado.
10. No utilice el aparato donde no alcance -
Mantenga los pies sobre suelo rme y el equilibrio
en todo momento.
11. Manténgase alerta - Preste atención a lo que
está haciendo. Utilice su sentido común. No utilice
el aparato cuando esté cansado.
12. Guarde los aparatos que no use en interiores -
Cuando no se estén utilizando, los aparatos debe-
rán guardarse en interiores en un lugar seco, alto
o cerrado con llave lejos del alcance de los niños.
13. Dé un mantenimiento cuidadoso al aparato:
mantenga el borde de corte alado y limpio para
lograr un desempeño óptimo y reducir así el
riesgo de lesiones. Siga las instrucciones para
lubricar y cambiar los accesorios. Mantenga los
mangos secos, limpios, y libres de aceite y grasa.
14. Inspeccione las piezas dañadas - Si un protec-
tor u otra pieza están dañados, antes de seguir
utilizando el aparato deberá revisarlos cuidado-
samente para cerciorarse de que van a funcionar
correctamente y realizar el trabajo para el que
fueron diseñados. Revise que no haya piezas
móviles desalineadas o estancadas, piezas rotas,
la instalación y cualquier otra condición que pueda
afectar su funcionamiento. Cualquier protector o
pieza dañada deberá ser debidamente reparada o
reemplazada por un centro de servicio autorizado,
aunque no se indique en este manual.
15. Mantenga todas las partes del cuerpo alejadas
de la cadena de la sierra. No retire ni sostenga
el material que va a cortar cuando las cuchi-
llas estén en movimiento. Asegúrese de que

26 ESPAÑOL
el interruptor se encuentre apagado antes de
despejar el material atascado. La cadena de la
sierra continúa moviéndose después de apagar el
interruptor. Un momento de distracción mientras
opera la podadora de alcance extendido podría
ocasionar lesiones personales graves.
16. Cargue la podadora de extensión por el mango
y que la cadena de la sierra esté detenida.
Cuando transporte o almacene la podadora
de extensión, siempre coloque la cubierta del
dispositivo de la cadena de la sierra. La mani-
pulación adecuada de la podadora de extensión
reducirá la posibilidad de lesiones personales
ocasionadas por la cadena de la sierra.
17. Sujete la podadora de extensión solamente
por las supercies de asimiento aisladas, ya
que la cadena de la sierra podría entrar en
contacto con cableado oculto. Si una cadena
de la sierra entra en contacto con un cable con
corriente, las piezas metálicas expuestas de la
podadora de extensión se podrían cargar también
de corriente y el operador podría recibir una des-
carga eléctrica.
18. No utilice la podadora de extensión en condi-
ciones de mal clima, especialmente cuando
exista riesgo de rayos. Esto disminuye el riesgo
de ser golpeado por un rayo.
19. Para reducir el riesgo de choque eléctrico,
nunca lo utilice cerca de ningún cable eléc-
trico. El contacto con cables eléctricos o su uso
cerca de ellos puede causar lesiones graves
o descargas eléctricas, que pueden causar la
muerte.
20. Utilice siempre ambas manos cuando opere la
podadora de extensión. Sostenga la podadora
de extensión con las dos manos para evitar la
pérdida de control.
21. Utilice siempre protección para la cabeza
cuando opere la podadora de extensión por
encima de su cabeza. Los restos que caigan
pueden ocasionar graves lesiones personales.
22. Para reemplazar las baterías, en caso de que la
herramienta utilice más de una, deberá reem-
plazarlas todas al mismo tiempo. Mezclar bate-
rías nuevas con descargadas podría aumentar
la presión en las celdas y romper la(s) batería(s)
descargada(s).
23. Retire o desconecte la batería antes de dar ser-
vicio, limpiar o retirar materiales del aparato.
Tales medidas de seguridad preventiva reducirán
el riesgo de que el aparato pueda ser puesto en
marcha accidentalmente.
24. Utilice únicamente la(s) batería(s) indicada(s)
en la sección “ESPECIFICACIONES”. El uso de
cualquier otra batería puede ocasionar riesgo de
incendio.
25. Tenga cuidado al manipular las baterías a n
de evitar un cortocircuito en la batería con
materiales conductores tales como anillos,
pulseras y llaves. La batería o conductor podrían
sobrecalentarse y causar quemaduras.
26. Un aparato que funciona con batería y que
cuenta con baterías integradas o baterías por
separado deberá recargarse solamente con el
cargador especicado para dichas baterías.
Un cargador que es adecuado para un solo tipo
de batería puede generar riesgo de incendio al ser
utilizado con otra batería.
27. Retire las llaves de ajuste y de apriete antes de
encender el aparato. Una llave de ajuste o llave
de apriete que sea dejada puesta en una parte
giratoria del aparato podrá ocasionar lesiones
personales.
28. Cuando no se esté usando la batería, mantén-
galo alejado de otros objetos metálicos, como
sujetapapeles (clips), monedas, llaves, clavos,
tornillos u otros objetos pequeños de metal
que puedan crear una conexión entre una
terminal y otra. Causar un cortocircuito en las
terminales de la batería puede provocar chispas,
quemaduras o incendio.
29. En condiciones abusivas, podrá escapar
líquido de la batería; evite tocarlo. Si lo toca
accidentalmente, enjuague con agua. Si hay
contacto del líquido con los ojos, busque asis-
tencia médica. Puede que el líquido expulsado
de la batería cause irritación o quemaduras.
30. Utilice solamente accesorios recomendados
por el fabricante para su modelo. Los acceso-
rios que pueden ser apropiados para un aparato
podrían ocasionar riesgo de lesiones si se utilizan
con otro aparato.
31. El servicio del aparato debe ser realizado sólo
por personal de reparaciones calicado. El ser-
vicio o mantenimiento realizados por personal no
calicado pueden ocasionar riesgo de lesiones.
32. Cuando haga el servicio a un aparato, utilice
solamente piezas de repuesto idénticas. Siga
las instrucciones en la sección de manteni-
miento de este manual. El uso de piezas no
autorizadas o el no seguir las instrucciones de
mantenimiento podrá ocasionar riesgo de descar-
gas eléctricas o lesiones.
33. Este aparato no está diseñado para ser utili-
zada por personas (incluidos niños) con dis-
capacidades físicas, sensoriales o mentales, o
que carezcan de experiencia y conocimientos.
Hay que asegurarse de que los niños no jue-
guen con el aparato.
34. No utilice los aparatos en atmósferas explo-
sivas, tal como en la presencia de líquidos,
gases o polvo inamables. Los aparatos crean
chispas que pueden prender fuego al polvo o los
humos.
Precauciones generales
1. Antes de poner en marcha la herramienta, lea
este manual de instrucciones para familiari-
zarse con el manejo de la herramienta.
2. No preste la herramienta a ninguna persona
que no tenga experiencia o conocimientos en
relación con el manejo de la herramienta.
3. Cuando preste la herramienta, hágalo junto
con este manual de instrucciones.
4. No permita que los niños o jóvenes meno-
res de 18 años utilicen la herramienta.
Manténgalos alejados de la herramienta.
5. Maneje la herramienta con extremo cuidado y
atención.

27 ESPAÑOL
6. Nunca utilice la herramienta después de haber
consumido alcohol o drogas, o si se siente
cansado o enfermo.
7. Nunca intente modicar la herramienta.
8. No utilice la herramienta en condiciones de
mal clima, especialmente cuando exista riesgo
de rayos. Esto disminuye el riesgo de ser gol-
peado por un rayo.
9. Los reglamentos nacionales podrían restringir
el uso de la herramienta. Siga los reglamentos
relativos al manejo de la herramienta en su
país.
Equipo de protección personal
1. Use casco de seguridad, gafas protectoras y
guantes protectores para protegerse de los
residuos que salgan volando u objetos que
caen.
2. Utilice protección para los oídos tal como
orejeras para evitar la pérdida auditiva.
3. Use ropa y zapatos adecuados para una ope-
ración segura, como un overol de trabajo y
zapatos resistentes y antideslizantes. No use
ropa oja ni alhajas. Las prendas de vestir hol-
gadas, las alhajas y el cabello largo suelto podrían
engancharse en las piezas móviles.
4. Cuando manipule la cadena de la sierra o
ajuste la tensión de la cadena, use guantes
protectores. La cadena de la sierra podría provo-
car cortaduras graves en las manos descubiertas.
Seguridad en el área de trabajo
1. Mantenga la herramienta a una distancia de
al menos 15 m (50 ft) lejos de cables eléctri-
cos y de cables de comunicación (incluidas
ramas que estén en contacto con los mismos).
Tocar o acercarse a las líneas de alta tensión
con la herramienta puede provocar la muerte
o lesiones graves. Esté al pendiente de los
cables eléctricos y cercas eléctricas alrede-
dor del área de trabajo antes de comenzar la
operación.
2. Opere la herramienta únicamente en condi-
ciones de buena visibilidad y a la luz del día.
No opere la herramienta en la oscuridad o la
niebla.
3. Durante la operación, nunca se coloque sobre
una supercie inestable o resbalosa o una
pendiente inclinada. Durante las estaciones
de frío, tenga cuidado con el hielo y la nieve y
siempre asegúrese de pisar sobre suelo rme.
4. Durante la operación, mantenga a las perso-
nas o animales alrededor a por lo menos 15 m
(50 ft) de distancia de la herramienta. Detenga
la herramienta en cuanto alguien se acerque.
5. Cuando trabaje con dos o más personas, man-
tenga una distancia de por lo menos 15 m (50
ft) o más entre sí, y ponga un supervisor.
6. Antes de la operación, examine el área de
trabajo para ver si hay alambrados, paredes
u otros objetos sólidos. Estos pueden dañar la
cadena de la sierra.
Preparación
1. Antes de ensamblar o ajustar la herramienta,
apague la herramienta y extraiga el cartucho
de batería.
2. Antes de manipular la cadena de la sierra o de
ajustar la tensión de la cadena, use guantes
protectores.
3. Antes de arrancar la herramienta, inspecció-
nela para ver que no haya daños, tornillos/
tuercas ojos o un ensamblado incorrecto.
Ale la cadena de la sierra desalada. Si la
cadena de la sierra está doblada o dañada,
reemplácela. Verique que todas las palancas
de control e interruptores se accionen fácil-
mente. Limpie y seque las empuñaduras.
4. Nunca intente arrancar la herramienta si está
dañada o no se encuentra completamente
ensamblada. De lo contrario, esto podría ocasio-
nar lesiones graves.
5. Ajuste el arnés para hombro para adaptarlo al
tamaño del cuerpo del operador.
6. Ajuste la tensión de la cadena adecuada-
mente. Rellene el aceite de la cadena, de ser
necesario.
Arranque de la herramienta
1. Póngase el equipo de protección personal
antes de arrancar la herramienta.
2. Antes de arrancar la herramienta, asegúrese
de que no haya ninguna persona o animal en
el área de trabajo.
3. Cuando instale el cartucho de batería, man-
tenga la cadena de la sierra y la barra de guía
alejadas de su cuerpo y de otros objetos,
incluyendo el suelo. La cadena de la sierra
podría moverse en el arranque, y podría ocasio-
nar lesiones graves o daños a la cadena de la
sierra o a la propiedad.
4. Coloque la herramienta en suelo rme.
Mantenga un buen equilibrio y los pies sobre
suelo rme.
Operación
1. En caso de emergencia, apague la herramienta
de inmediato.
2. Si se percata de cualquier condición inusual
(p. ej., ruido o vibración) durante la operación,
apague la herramienta. No utilice la herra-
mienta hasta que la causa haya sido recono-
cida y resuelta.
3. La cadena de la sierra continúa moviéndose
por un período breve después de apagar la
herramienta. No se apresure a tocar la cadena
de la sierra.
4. Durante la operación, utilice el arnés para
hombro. Mantenga la herramienta de su lado
derecho con rmeza.
5. Sujete la empuñadura delantera con su mano
izquierda y la empuñadura trasera con su
mano derecha, sin importar si es derecho o
zurdo. Rodee las empuñaduras con sus dedos
y pulgares.
6.
Sujete la herramienta solamente por las super-
cies de asimiento aisladas, ya que la cadena
de la sierra podría entrar en contacto con
cableado oculto. Si una cadena de la sierra entra
en contacto con un cable con corriente, las piezas
metálicas expuestas de la podadora de alcance
extendido se podrían cargar también de corriente y
el operador podría recibir una descarga eléctrica.

28 ESPAÑOL
7. Nunca intente operar la herramienta con una
mano. La pérdida de control podría ocasio-
nar lesiones graves o fatales. Para reducir el
riesgo de lesiones, mantenga sus manos y
pies alejados de la cadena de la sierra.
8. No utilice la herramienta donde no alcance.
Pise rmemente y mantenga el equilibrio en
todo momento. Observe si hay obstáculos
ocultos tales como cepas de árboles, raíces y
zanjas para evitar tropezar. Quite del paso las
ramas caídas y otros objetos.
9. Nunca trabaje sobre una escalera o en un
árbol, para evitar la pérdida de control.
10. Si la herramienta recibe un golpe fuerte o
se cae, revise su estado antes de continuar
el trabajo. En caso de haber daños o dudas,
solicite la inspección y reparación al centro de
servicio autorizado de Makita.
11. No toque el cabezal de la herramienta. El
cabezal de la herramienta se calienta durante la
operación.
12. Tome un descanso para evitar la pérdida de
control a causa de la fatiga. Recomendamos
tomar de 10 a 20minutos de descanso cada hora.
13. Cuando vaya a dejar la herramienta desaten-
dida, aunque sea por poco tiempo, apague
siempre la herramienta y retire el cartucho de
batería. La herramienta desatendida y en fun-
cionamiento podría utilizarla alguna persona no
autorizada y provocar un accidente grave.
14. Cuando opere la herramienta, no eleve su
mano derecha por encima de la altura de su
hombro.
15. Durante la operación, nunca golpee la cadena
de la sierra contra obstáculos duros, como
piedras y clavos. Tenga especial cuidado
cuando corte ramas cercanas a las paredes,
alambrados o similares.
16. Si las ramas quedan atrapadas en la herra-
mienta, detenga siempre la herramienta y
extraiga el cartucho de batería. De lo contrario,
un arranque accidental podría causar alguna
lesión grave.
17. Si la cadena de la sierra se obstruye, apague
siempre la herramienta y extraiga el cartucho
de batería antes de limpiarla.
18. Antes de cortar ramas, mantenga un área de
escape alejada de la rama que caiga. Primero,
despeje las obstrucciones del área de trabajo,
como tallos y ramas. Mueva todas las herra-
mientas y artículos del área de escape a otro
lugar seguro.
19. Antes de cortar tallos y ramas, compruebe la
dirección de caída de los mismos, conside-
rando la condición de las ramas y tallos, los
árboles cercanos, la dirección del viento, etc.
Ponga total atención a la dirección de caída,
así como al rebote de la rama que golpee el
suelo.
20. Nunca sostenga la herramienta en un ángulo
de más de 60°. De lo contrario, los objetos
que caigan podrían golpear al operador y
ocasionar una lesión grave. Nunca se pare por
debajo de una rama que se esté cortando.
21. Ponga atención a las ramas rotas o dobladas.
Podrían rebotar cuando las corta, y causar una
lesión inesperada.
22. Antes de cortar tallos que pretenda recortar,
quite las ramas y hojas alrededor de los mis-
mos. De lo contrario, la cadena de la sierra podría
quedar atrapada entre ellas.
23. Para evitar que la cadena de la sierra quede
atrapada en el corte de sierra, no suelte la
palanca antes de extraer la cadena de la sierra
del corte de sierra.
24.
Si la cadena de la sierra está pegada al corte de
sierra, detenga inmediatamente la herramienta,
mueva cuidadosamente la rama para abrir el
corte de sierra y libere la cadena de la sierra.
25. Evite el retroceso brusco (la fuerza de reac-
ción giratoria hacia el operador). Para evitar
el retroceso brusco, nunca utilice la punta de
la barra de guía o realice un corte penetrante.
Siempre esté al pendiente de la posición de la
punta de la barra de guía.
26. Verique constantemente la tensión de la
cadena. Cuando verique o ajuste la tensión
de la cadena, apague la herramienta y extraiga
el cartucho de batería. Si la tensión es oja,
apriétela.
Vibración
1. La exposición a una vibración excesiva podría
dañar los vasos sanguíneos o el sistema
nervioso del operador y causar los siguien-
tes síntomas en dedos, manos o muñecas:
“Adormecimiento” (entumecimiento), hor-
migueo, dolor, sensaciones de punzadas, o
alteraciones en la piel o en el color de esta. Si
cualquiera de estos síntomas ocurre, ¡vaya a
ver a un médico.
Para reducir el riesgo de la “enfermedad del
dedo blanco”, mantenga sus manos calientes
durante la operación y mantenga en buen
estado la herramienta y los accesorios.
Para conocer el tiempo de funcionamiento,
siga las normativas locales o los consejos de
su médico.
Transporte
1. Antes de transportar la herramienta, apáguela
y extraiga el cartucho de batería. Siempre
coloque la cubierta de la barra de guía durante
el transporte.
2. Cuando transporte la herramienta, cárguela en
posición horizontal sujetando la empuñadura.
Mantenimiento
1. El servicio de su equipo deberá ser realizado
por un centro de servicio autorizado usando
siempre piezas de repuesto genuinas sola-
mente. Una reparación incorrecta y un manteni-
miento deciente pueden acortar la vida útil de la
herramienta y aumentar el riesgo de accidentes.
2. Antes de realizar cualquier trabajo de mante-
nimiento, reparación o limpieza de la herra-
mienta, apáguela siempre y retire el cartucho
de batería. Espere hasta que la herramienta se
enfríe.
3. Use siempre guantes protectores cuando
manipule la cadena de la sierra.

29 ESPAÑOL
4. Después de cada uso, apriete todos los torni-
llos y tuercas, excepto los tornillos de ajuste.
5. Mantenga la cadena de la sierra alada. Si
la cadena de la sierra ha perdido su lo y el
desempeño de corte es deciente, pregunte al
centro de servicio autorizado de Makita para
que la alen o la reemplacen con una nueva.
6. No intente realizar ningún tipo de manteni-
miento o reparación que no esté descrito en
este manual de instrucciones. Solicite este
tipo de trabajo al centro de servicio autorizado
de Makita.
7. Siempre utilice piezas de repuesto y acceso-
rios originales de Makita solamente. El uso de
piezas o accesorios suministrados por un tercero
podría provocar fallas en la herramienta, daños
materiales y/o lesiones graves.
Uso y cuidado de la herramienta a batería
1. Evite una puesta en marcha accidental.
Asegúrese de que el interruptor esté en
la posición apagada antes de conectar el
paquete de baterías, levantar la herramienta o
cargarla. Cargar la herramienta con su dedo en el
interruptor o pasar energía a la herramienta con el
interruptor encendido puede propiciar accidentes.
2. Desconecte el paquete de baterías de la herra-
mienta antes de hacer cualquier ajuste, cam-
biar accesorios o almacenar la herramienta.
Estas medidas de seguridad preventivas reducen
el riesgo de poner en marcha la herramienta
accidentalmente.
3. Recargue sólo con el cargador especicado
por el fabricante. Un cargador que sea adecuado
para un tipo especíco de paquete de batería
puede generar un riesgo de incendio al usarse
con un paquete de batería distinto.
4.
Use las herramientas únicamente con los paque-
tes de baterías designados especícamente para
ellas. El uso de otros paquetes de baterías puede
generar riesgo de lesiones e incendio.
5. Cuando no se esté usando el paquete de
batería, manténgalo alejado de otros objetos
metálicos, como sujetapapeles (clips), mone-
das, llaves, clavos, tornillos u otros objetos
pequeños de metal que puedan crear una
conexión entre una terminal y otra. Causar un
cortocircuito en las terminales de la batería puede
provocar quemaduras o incendio.
6. En condiciones de mal uso, podría escapar
líquido de la batería; evite el contacto. Si toca
el líquido accidentalmente, enjuague con agua.
Si hay contacto del líquido con los ojos, soli-
cite atención médica. El líquido expulsado de la
batería puede causar irritación o quemaduras.
7. No utilice un paquete de baterías o una herra-
mienta que esté dañado/dañada o haya sido
modicado/modicada. Las baterías dañadas
o modicadas podrían comportarse de manera
impredecible causando un incendio, explosión
o riesgo de lesión.
8. No exponga un paquete de baterías o una
herramienta al fuego o a una temperatura
excesiva. La exposición al fuego a una tempe-
ratura superior a 130 °C (265 °F) podría causar
una explosión.
9. Siga todas las instrucciones relativas a la
carga y no cargue el paquete de baterías o la
herramienta fuera del rango de temperatura
especicado en las instrucciones. Cargar de
manera inapropiada o a temperaturas fuera del
rango especicado podría dañar la batería e incre-
mentar el riesgo de incendio.
10. Pida que el servicio lo realice un técnico en
reparaciones calicado y que utilice única-
mente piezas de repuesto idénticas a las
originales. Esto garantizará que se mantenga la
seguridad del producto.
11. No modique ni intente reparar la herramienta
ni el paquete de baterías salvo como se indi-
que en las instrucciones para el uso y cuidado.
Seguridad eléctrica y de la batería
1. No deseche la(s) batería(s) donde haya fuego.
La celda podría explotar. Consulte los códigos
locales para ver si hay instrucciones especiales
relativas al desecho.
2. No abra ni dañe la(s) batería(s). Los electrolitos
liberados son corrosivos y pueden ocasionar
daños en los ojos o la piel. Éstos pueden ser
tóxicos si se llegan a tragar.
3. No cargue la batería bajo la lluvia ni en lugares
mojados.
4. No cargue la batería en exteriores.
5. No manipule el cargador, incluida la clavija
del cargador, ni los terminales con las manos
mojadas.
6.
Evite los entornos peligrosos. No utilice la
máquina en lugares húmedos o mojados ni
la exponga a la lluvia. El agua que ingrese a la
máquina incrementará el riesgo de descarga eléctrica.
Almacenamiento
1.
Antes de almacenar la herramienta, realice
una limpieza completa y dele mantenimiento.
Coloque la cubierta de la barra de guía. Retire el
cartucho de batería. Drene el aceite de la cadena
después de que la herramienta se enfríe.
2. Almacene la herramienta en un lugar seco, en
alto o bajo llave fuera del alcance de los niños.
3. No apoye la herramienta contra algún objeto,
tal como una pared. De lo contrario, podría caer
repentinamente y causar una lesión.
GUARDE ESTAS
INSTRUCCIONES.
Símbolos
A continuación se muestran los símbolos utilizados
para la herramienta.
volts o voltios
corriente directa o continua
metros por segundo
pies por minuto
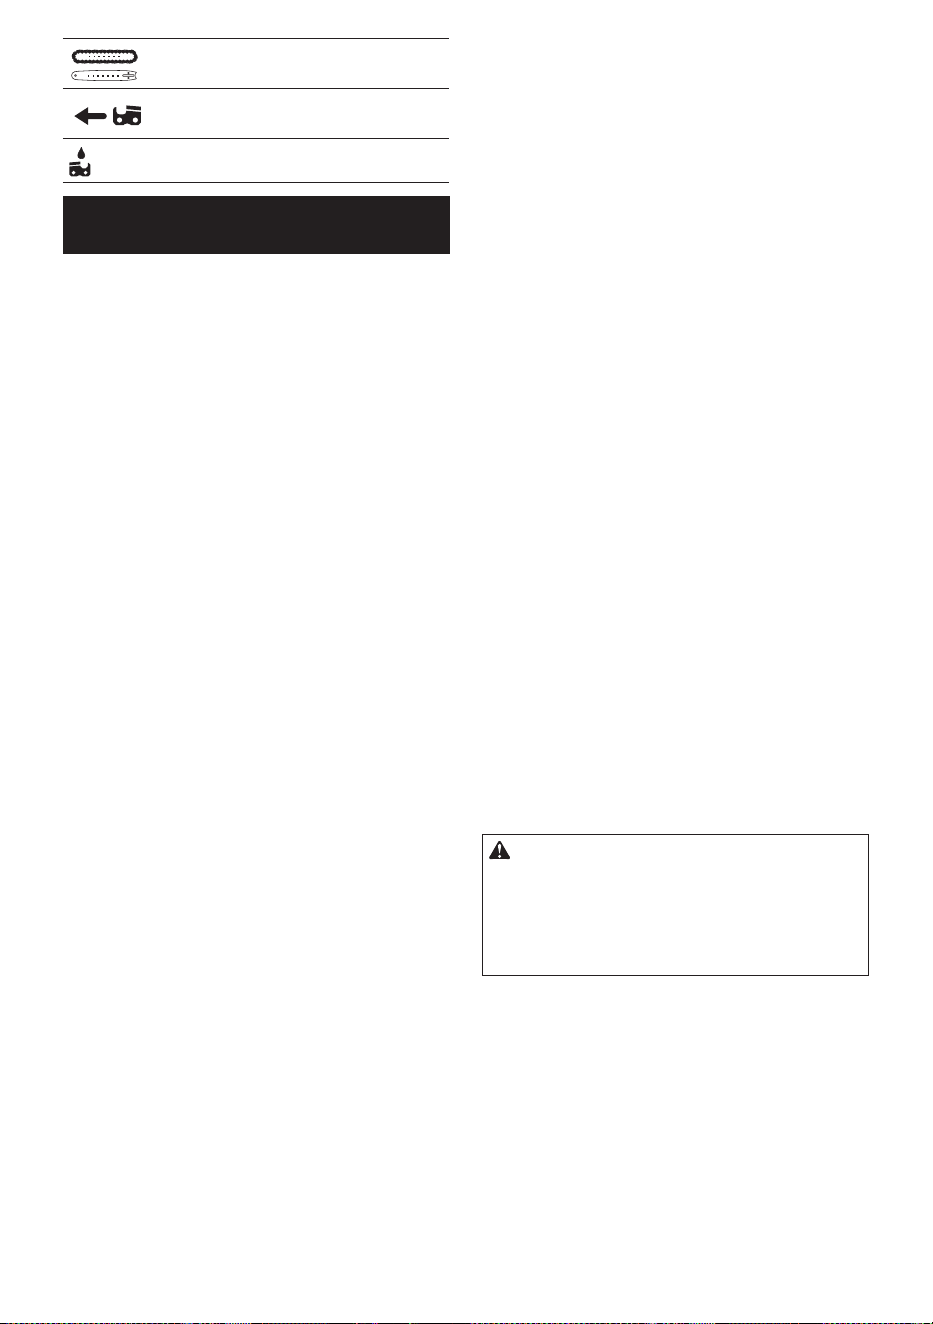
30 ESPAÑOL
número de piezas de la cadena de la sierra
y la barra de guía aplicables
Dirección de desplazamiento de la cadena
Tanque de aceite de la cadena
Instrucciones importantes de
seguridad para el cartucho de batería
1. Antes de utilizar el cartucho de batería, lea
todas las instrucciones e indicaciones de
precaución en el (1) el cargador de batería, (2)
la batería, y (3) el producto con el que se utiliza
la batería.
2. No desarme ni modique el cartucho de bate-
ría. Podría ocurrir un incendio, calor excesivo o
una explosión.
3. Si el tiempo de operación se ha acortado en
exceso, deje de operar de inmediato. Podría
correrse el riesgo de sobrecalentamiento,
posibles quemaduras e incluso explosión.
4. En caso de que ingresen electrolitos en sus
ojos, enjuáguelos bien con agua limpia y con-
sulte de inmediato a un médico. Esto podría
ocasionar pérdida de visión.
5. Evite cortocircuitar el cartucho de batería:
(1) No toque las terminales con ningún mate-
rial conductor.
(2) Evite guardar el cartucho de batería en un
cajón junto con otros objetos metálicos,
tales como clavos, monedas, etc.
(3) No exponga el cartucho de batería al
agua o la lluvia.
Un cortocircuito en la batería puede causar
un ujo grande de corriente, sobrecalenta-
miento, posibles quemaduras e incluso una
descompostura.
6. No guarde ni utilice la herramienta y el cartu-
cho de batería en lugares donde la tempera-
tura pueda alcanzar o exceder los 50 °C (122
°F).
7. Nunca incinere el cartucho de batería incluso
en el caso de que esté dañado seriamente o
ya no sirva en absoluto. El cartucho de batería
puede explotar si se tira al fuego.
8. No clave, corte, aplaste, lance o deje caer el
cartucho de batería, ni golpee un objeto sólido
contra el cartucho de batería. Dicha acción
podría resultar en un incendio, calor excesivo o en
una explosión.
9. No use una batería dañada.
10. Las baterías de ión de litio están sujetas a los
requisitos reglamentarios en materia de bie-
nes peligrosos.
Para el trasporte comercial, por ej., mediante
terceros o agentes de transporte, se deben tomar
en cuenta los requisitos especiales relativos al
empaque y el etiquetado.
Para efectuar los preparativos del artículo que se
va a enviar, se requiere consultar a un experto en
materiales peligrosos. Si es posible, consulte ade-
más otras regulaciones nacionales más detalladas.
Pegue o cubra con cinta adhesiva los contactos
abiertos y empaque la batería de manera que ésta
no pueda moverse dentro del paquete.
11. Para deshacerse del cartucho de batería,
sáquelo de la herramienta y deséchelo en un
lugar seguro. Siga las regulaciones locales
relacionadas al desecho de las baterías.
12. Utilice las baterías únicamente con los pro-
ductos especicados por Makita. Instalar las
baterías en productos que no cumplan con los
requisitos podría ocasionar un incendio, un calen-
tamiento excesivo, una explosión o una fuga de
electrolito.
13. Si no se utiliza la herramienta por un
período largo, debe extraerse la batería de la
herramienta.
14. El cartucho de batería podría absorber calor
durante y después de su uso, lo que ocasiona-
ría quemaduras o quemaduras a baja tempe-
ratura. Tenga cuidado con la manipulación de
los cartuchos de batería que estén calientes.
15. No toque el terminal de la herramienta inme-
diatamente después de su uso, ya que el
mismo podría estar lo sucientemente caliente
como para provocarle quemaduras.
16. No permita que las rebabas, el polvo o la tierra
queden atrapados en los terminales, oricios
y ranuras del cartucho de batería. Podría pro-
vocar calentamiento, incendio, explosión y mal
funcionamiento de la herramienta o del cartucho
de batería, lo que resultaría en quemaduras o
lesiones personales.
17. No utilice el cartucho de batería cerca de
cables eléctricos de alto voltaje, a menos que
la herramienta sea compatible con el uso cer-
cano a estos cables eléctricos de alto voltaje.
Esto podría ocasionar una avería o descompos-
tura de la herramienta o del cartucho de batería.
18. Mantenga la batería alejada de los niños.
GUARDE ESTAS
INSTRUCCIONES.
PRECAUCIÓN: Utilice únicamente baterías
originales de Makita. El uso de baterías no origina-
les de Makita, o de baterías alteradas, puede ocasio-
nar que las baterías exploten causando un incendio,
lesiones personales y daños. Asimismo, esto inva-
lidará la garantía de Makita para la herramienta y el
cargador Makita.
Consejos para alargar al máximo
la vida útil de la batería
1.
Cargue el cartucho de batería antes de que
se descargue completamente. Pare siempre
la operación y cargue el cartucho de batería
cuando note menos potencia en la herramienta.
2. No cargue nunca un cartucho de batería que
esté completamente cargado. La sobrecarga
acortará la vida de servicio de la batería.
3. Cargue el cartucho de batería a una tempera-
tura ambiente de 10 °C - 40 °C (50 °F - 104 °F).
Si un cartucho de batería está caliente, déjelo
enfriar antes de cargarlo.
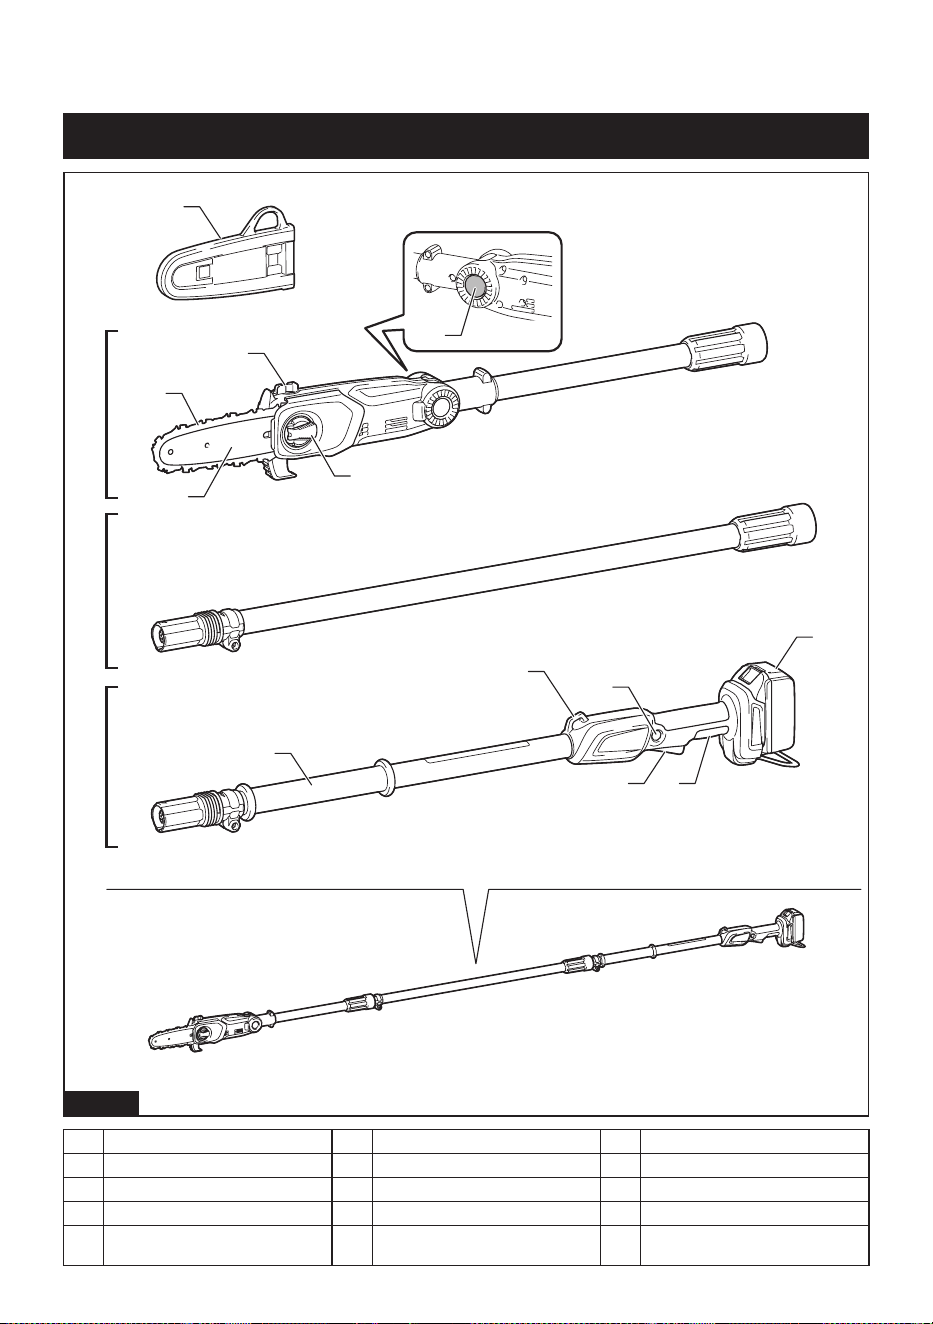
31 ESPAÑOL
4. Cuando no utilice el cartucho de batería,
sáquelo de la herramienta o del cargador.
5.
Cargue el cartucho de batería si no va a utilizarlo
durante un período prolongado (más de seis meses).
DESCRIPCIÓN DE LAS PIEZAS
5
6
7
8
9
10
11
12
14
15
3
2
1
13
4
Fig.1
1 Módulo del mango 2 Poste de extensión central 3 Módulo de la cabeza de la sierra
4 Colgador 5 Botón de desbloqueo 6 Cartucho de batería
7 Gatillo interruptor 8 Empuñadura trasera 9 Cadena de la sierra
10 Barra de guía 11 Tapa del tanque de aceite 12 Palanca
13 Botón de ajuste del ángulo de la
cabeza
14 Cubierta de la barra de guía 15 Empuñadura delantera
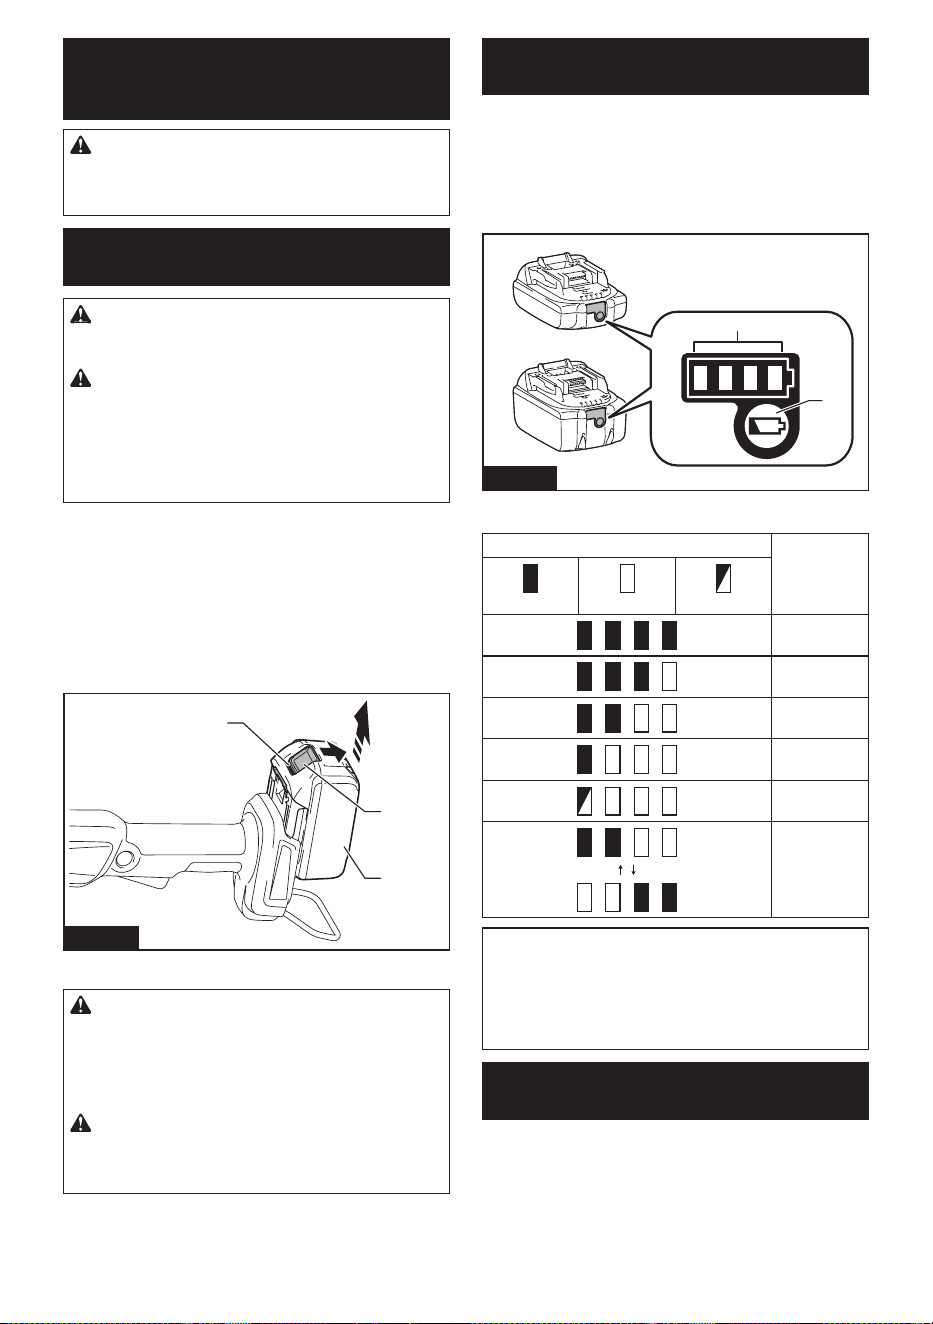
32 ESPAÑOL
DESCRIPCIÓN DEL
FUNCIONAMIENTO
PRECAUCIÓN: Asegúrese siempre de que la
herramienta esté apagada y el cartucho de batería
haya sido extraído antes de realizar cualquier
ajuste o comprobación en la herramienta.
Instalación o extracción del
cartucho de batería
PRECAUCIÓN: Apague siempre la herra-
mienta antes de colocar o quitar el cartucho de
batería.
PRECAUCIÓN: Sujete la herramienta y el car-
tucho de la batería con rmeza al colocar o quitar
el cartucho de batería. Si no se sujeta con rmeza la
herramienta y el cartucho de batería, puede ocasio-
nar que se resbalen de sus manos causando daños
a la herramienta y al cartucho de batería, así como
lesiones a la persona.
Para instalar el cartucho de batería, alinee la lengüeta
sobre el cartucho de batería con la ranura en la carcasa
y deslícela hasta su lugar. Insértelo por completo hasta
que se je en su lugar con un pequeño clic. Si puede
ver el indicador rojo como se muestra en la ilustración,
este no ha quedado asegurado por completo.
Para quitar el cartucho de batería, deslícelo de la herra-
mienta mientras desliza el botón sobre la parte delan-
tera del cartucho.
1
2
3
Fig.2
► 1. Indicador rojo 2. Botón 3. Cartucho de batería
PRECAUCIÓN: Introduzca siempre com-
pletamente el cartucho de batería hasta que
el indicador rojo no pueda verse. Si no, podría
accidentalmente salirse de la herramienta y caer al
suelo causando una lesión a usted o alguien a su
alrededor.
PRECAUCIÓN: No instale el cartucho de
batería a la fuerza. Si el cartucho no se desliza al
interior fácilmente, se debe a que no está siendo
insertado correctamente.
Indicación de la capacidad restante
de la batería
Únicamente para cartuchos de batería con el
indicador
Oprima el botón de vericación en el cartucho de la
batería para que indique la capacidad restante de la
batería. Las luces indicadoras se iluminarán por algu-
nos segundos.
1
2
Fig.3
► 1. Luces indicadoras 2. Botón de vericación
Luces indicadoras Capacidad
restante
Iluminadas Apagadas Parpadeando
75% a 100%
50% a 75%
25% a 50%
0% a 25%
Cargar la
batería.
La batería
pudo haber
funcionado
mal.
NOTA: Dependiendo de las condiciones de uso y
la temperatura ambiente, la indicación podrá diferir
ligeramente de la capacidad real.
NOTA: La primera luz indicadora (extrema izquierda)
parpadeará cuando el sistema de protección de
batería esté en funcionamiento.
Sistema de protección para la
herramienta/batería
La herramienta está equipada con un sistema de pro-
tección de la herramienta/batería. Este sistema corta
en forma automática el suministro de energía al motor
para prolongar la vida útil de la herramienta y la batería.
La herramienta se detendrá automáticamente durante
la operación si la herramienta o la batería se someten a
una de las siguientes condiciones:
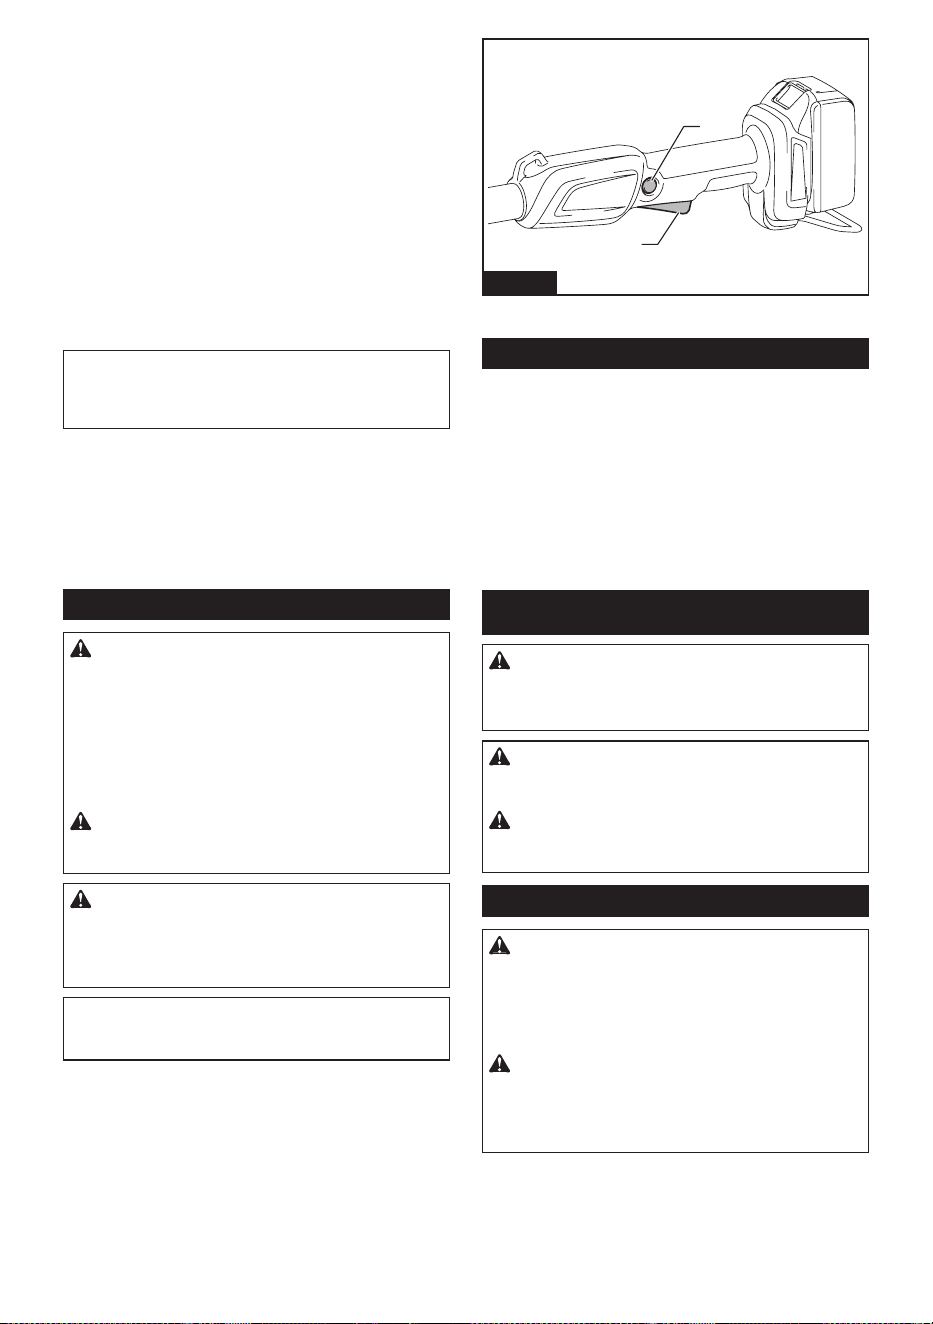
33 ESPAÑOL
Protección contra sobrecarga
Cuando la batería se esté usando de una manera
que cause que consuma una cantidad de corriente
anormalmente alta, la herramienta se detendrá auto-
máticamente. En este caso, libere el gatillo interruptor
para detener y evitar la aplicación que causó que la
herramienta se sobrecargara. Luego, oprima el botón
de desbloqueo y jale el gatillo interruptor para reiniciar.
Protección contra
sobrecalentamiento
Cuando la herramienta o la batería se sobrecalienten,
la herramienta se detendrá automáticamente. En este
caso, permita que la herramienta y la batería se enfríen
antes de volver a arrancar la herramienta nuevamente.
NOTA: En un entorno donde la temperatura sea
alta, es probable que la protección contra sobreca-
lentamiento se active y la herramienta se detenga
automáticamente.
Protección en caso de
sobredescarga
Cuando la capacidad de la batería no sea suciente,
la herramienta se detendrá automáticamente. En este
caso, extraiga la batería de la herramienta y cargue la
batería.
Accionamiento del interruptor
ADVERTENCIA: Por su seguridad, esta
herramienta está equipada con un botón de
desbloqueo para prevenir que la herramienta
se active accidentalmente. NUNCA use la herra-
mienta si se activa simplemente al jalar el gatillo
interruptor sin que requiera presionar el botón
de desbloqueo. Lleve la herramienta a nuestro
centro de servicio autorizado para una reparación
adecuada ANTES de seguir usándola.
ADVERTENCIA: NUNCA tape con cinta
ni anule el propósito y función del botón de
desbloqueo.
PRECAUCIÓN: Antes de insertar el cartucho
de batería en la herramienta, compruebe siem-
pre y cerciórese de que el gatillo interruptor se
acciona debidamente y que vuelve a la posición
“OFF” (apagado) cuando lo suelta.
AVISO: No jale fuerte el gatillo interruptor sin
presionar el botón de desbloqueo. Esto puede
causar rotura del interruptor.
Para evitar que el gatillo interruptor sea jalado acciden-
talmente, se proporciona un botón de desbloqueo. Para
arrancar la herramienta, oprima el botón de desbloqueo
y jale el gatillo interruptor. Suelte el gatillo interruptor
para parar la herramienta.
1
2
Fig.4
► 1. Gatillo interruptor 2. Botón de desbloqueo
Funcionamiento electrónico
La herramienta está equipada con funciones electróni-
cas para facilitar la operación.
• Freno eléctrico
Esta herramienta está equipada con un freno
eléctrico. Si de manera consistente la herramienta
no logra detenerse rápidamente después de
soltar el gatillo interruptor, lleve la herramienta
a un centro de servicio Makita para que le den
mantenimiento.
MONTAJE
ADVERTENCIA: Nunca conecte dos o más
accesorios de extensión del eje. De lo contrario,
la pérdida de control podría provocar lesiones
graves.
PRECAUCIÓN: Siempre asegúrese de que el
cartucho de batería haya sido extraído antes de
realizar cualquier trabajo en la herramienta.
PRECAUCIÓN: No toque la cadena de la
sierra con las manos descubiertas. Siempre use
guantes al manipular la cadena de la sierra.
Armado de los módulos
PRECAUCIÓN: Al ensamblar el módulo de la
cabeza de la sierra, el poste de extensión central
y el módulo del mango, coloque los módulos en el
suelo. Si el módulo se ensambla en posición vertical,
podría caerse y golpear objetos o personas circun-
dantes, provocando un accidente o lesiones.
PRECAUCIÓN: Asegúrese siempre de que
el manguito esté completamente enroscado.
No enroscar completamente el manguito podría
causar que los ensamblados se desconecten y
causar lesiones personales.
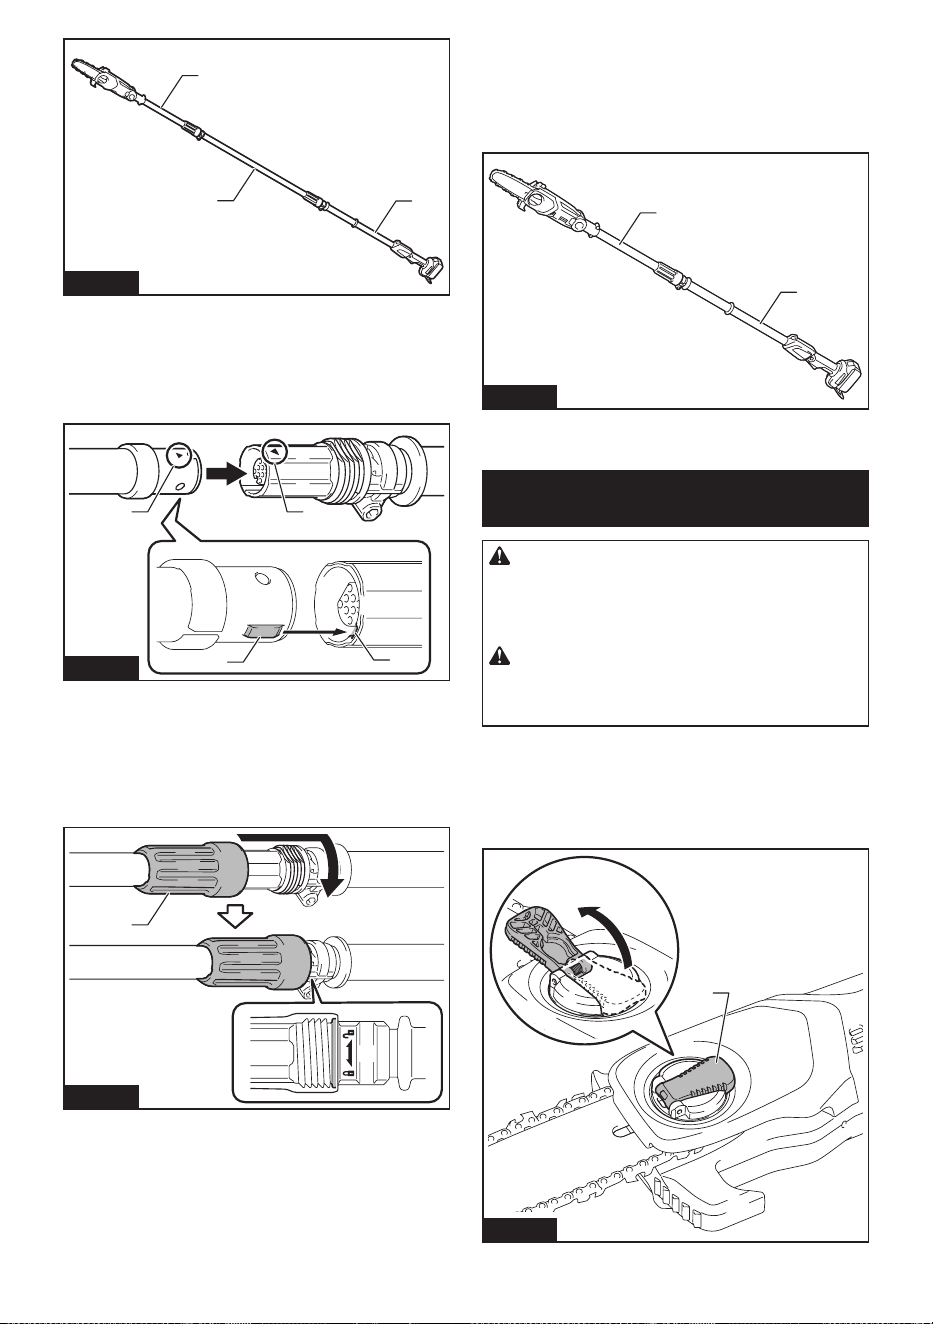
34 ESPAÑOL
1
2
3
Fig.5
► 1. Módulo de la cabeza de la sierra 2. Poste de
extensión central 3. Módulo del mango
1. Alinee las marcas triangulares de los módulos, e
inserte uno dentro del otro.
La lengüeta cabrá dentro de la ranura.
1
2
3
1
Fig.6
► 1. Marca de triángulo 2. Lengüeta 3. Ranura
2. Deslice el manguito hacia las roscas y gírelo en
el sentido de las manecillas del reloj, hasta que se
detenga.
El extremo de las roscas debe quedar completamente
cubierto con el manguito, como se muestra en la gura.
1
Fig.7
► 1. Manguito
Acortado de la herramienta
Para acortar la herramienta, una el módulo de la
cabeza de la sierra y el módulo del mango directamente
sin el poste de extensión central, como se muestra en
la gura.
1
2
Fig.8
► 1. Módulo de la cabeza de la sierra 2. Módulo del
mango
Extracción o instalación de la
cadena de la sierra
PRECAUCIÓN: La cadena de la sierra y la
barra de guía siguen estando calientes justo
después de la operación. Permita que se enfríen
lo suciente antes de realizar cualquier trabajo en
la herramienta.
PRECAUCIÓN: Realice el procedimiento de
instalación o extracción de la cadena de la sierra
en un lugar limpio, libre de aserrín y residuos
similares.
Extracción de la cadena de la sierra
Para extraer la cadena de la sierra, siga los pasos a
continuación:
1. Tire de la palanca hacia arriba.
1
Fig.9
► 1. Palanca
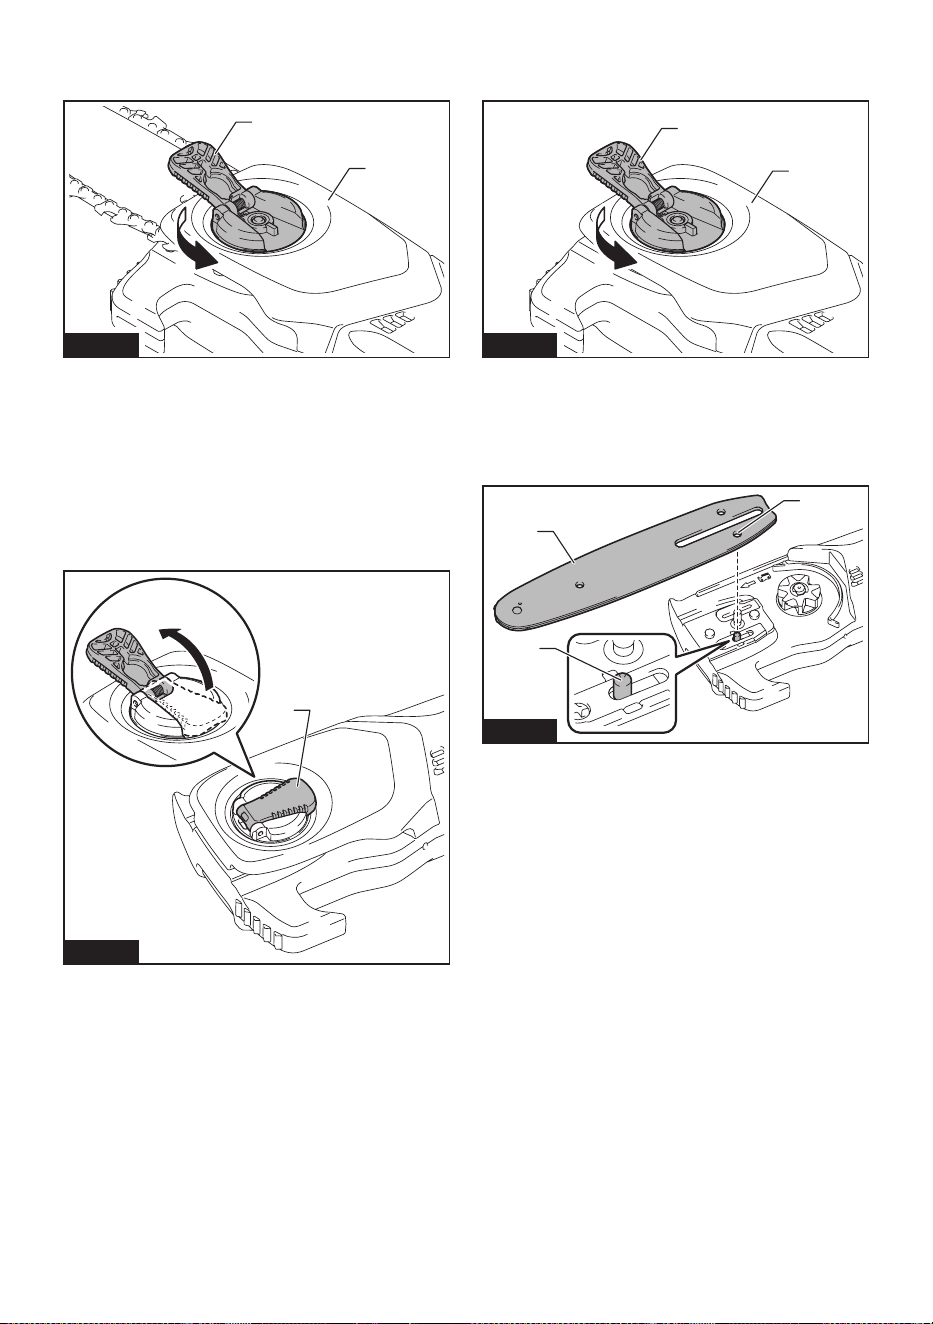
35 ESPAÑOL
2. Gire la palanca en sentido inverso al de las mane-
cillas del reloj hasta que la cubierta de la pieza dentada
se desprenda.
2
1
Fig.10
► 1. Palanca 2. Cubierta de la pieza dentada
3. Retire la cubierta de la pieza dentada, luego
extraiga la cadena de la sierra y la barra de guía del
cuerpo de la herramienta.
Instalación de la cadena de la sierra
Para instalar la cadena de la sierra, realice los siguien-
tes pasos:
1. Tire de la palanca hacia arriba.
1
Fig.11
► 1. Palanca
2. Gire la palanca en sentido inverso al de las mane-
cillas del reloj hasta que la cubierta de la pieza dentada
se desprenda.
2
1
Fig.12
► 1. Palanca 2. Cubierta de la pieza dentada
3. Retire la cubierta de la pieza dentada.
4. Alinee el oricio de la barra de guía con el pasa-
dor del cuerpo de la herramienta y luego coloque la
barra de guía como se muestra en la gura.
1
2
3
Fig.13
► 1. Barra de guía 2. Oricio 3. Pasador
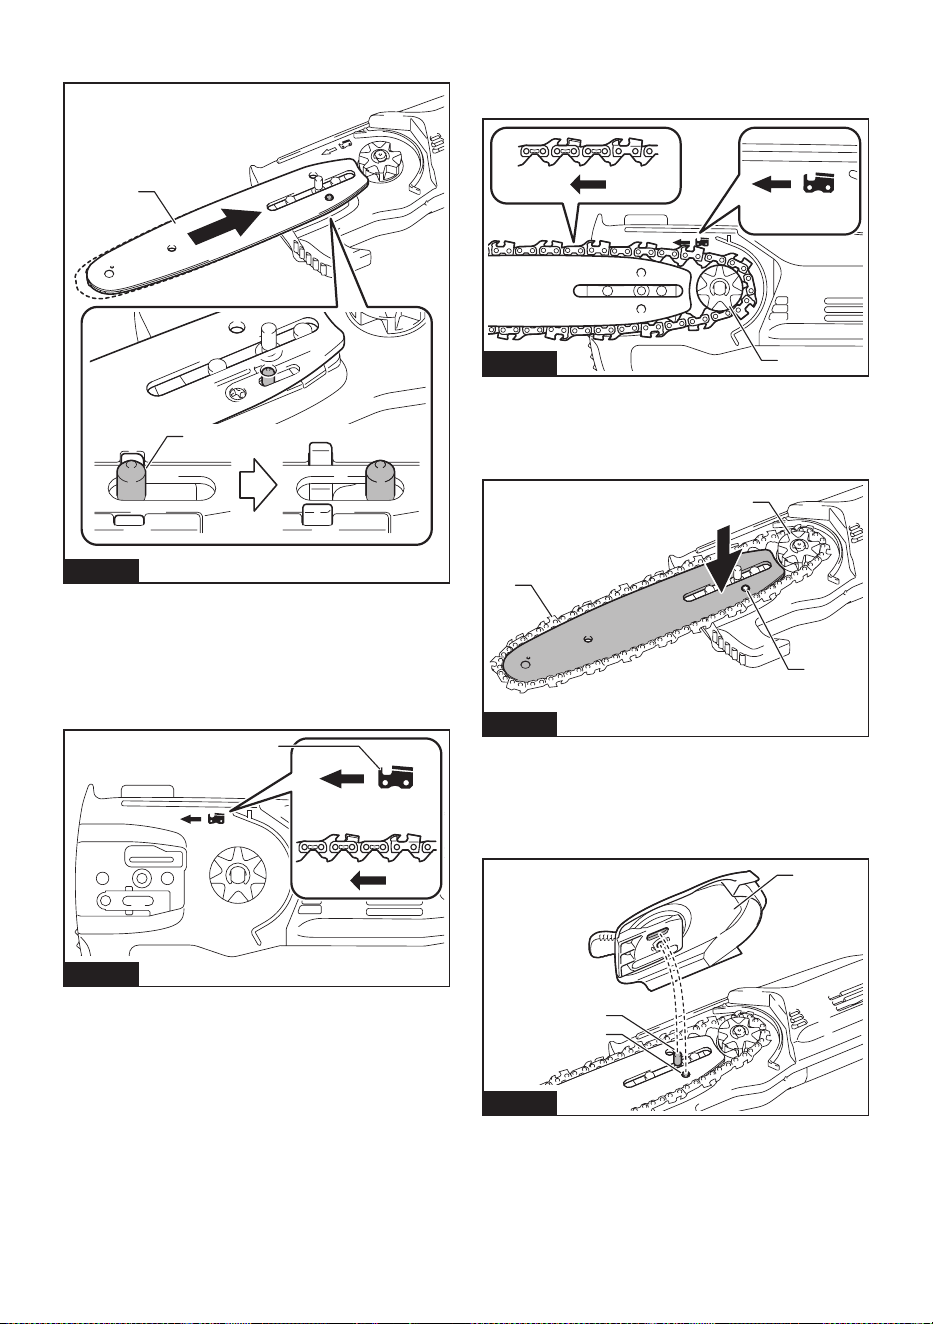
36 ESPAÑOL
5. Deslice la barra de guía hacia la pieza dentada
para bloquear el pasador.
1
2
Fig.14
► 1. Barra de guía 2. Pasador
6. Retire la barra de guía del cuerpo de la
herramienta.
7. Verique la dirección de la cadena de la sierra.
Iguale la dirección de la cadena de la sierra con la de la
marca del cuerpo de la herramienta.
1
Fig.15
► 1. Marca del cuerpo de la herramienta
8. Coloque un extremo de la cadena de la sierra en
la punta de la barra de guía.
9. Coloque el otro extremo de la cadena de la sierra
alrededor de la pieza dentada, luego je la barra de
guía al cuerpo de la herramienta, para que el oricio de
la barra de guía se alinee con el pasador del cuerpo.
1
Fig.16
► 1. Pieza dentada
Presione la barra de guía contra el cuerpo de la herra-
mienta para liberar el pasador. La tensión de la cadena
de la sierra se ajusta automáticamente.
1
2
3
Fig.17
► 1. Cadena de la sierra 2. Pasador 3. Pieza dentada
10. Coloque la cubierta de la pieza dentada para que
el perno y el pasador del cuerpo de la herramienta se
junten con sus contrapartes de la cubierta de la pieza
dentada.
1
2
3
Fig.18
► 1. Cubierta de la pieza dentada 2. Perno 3. Pasador
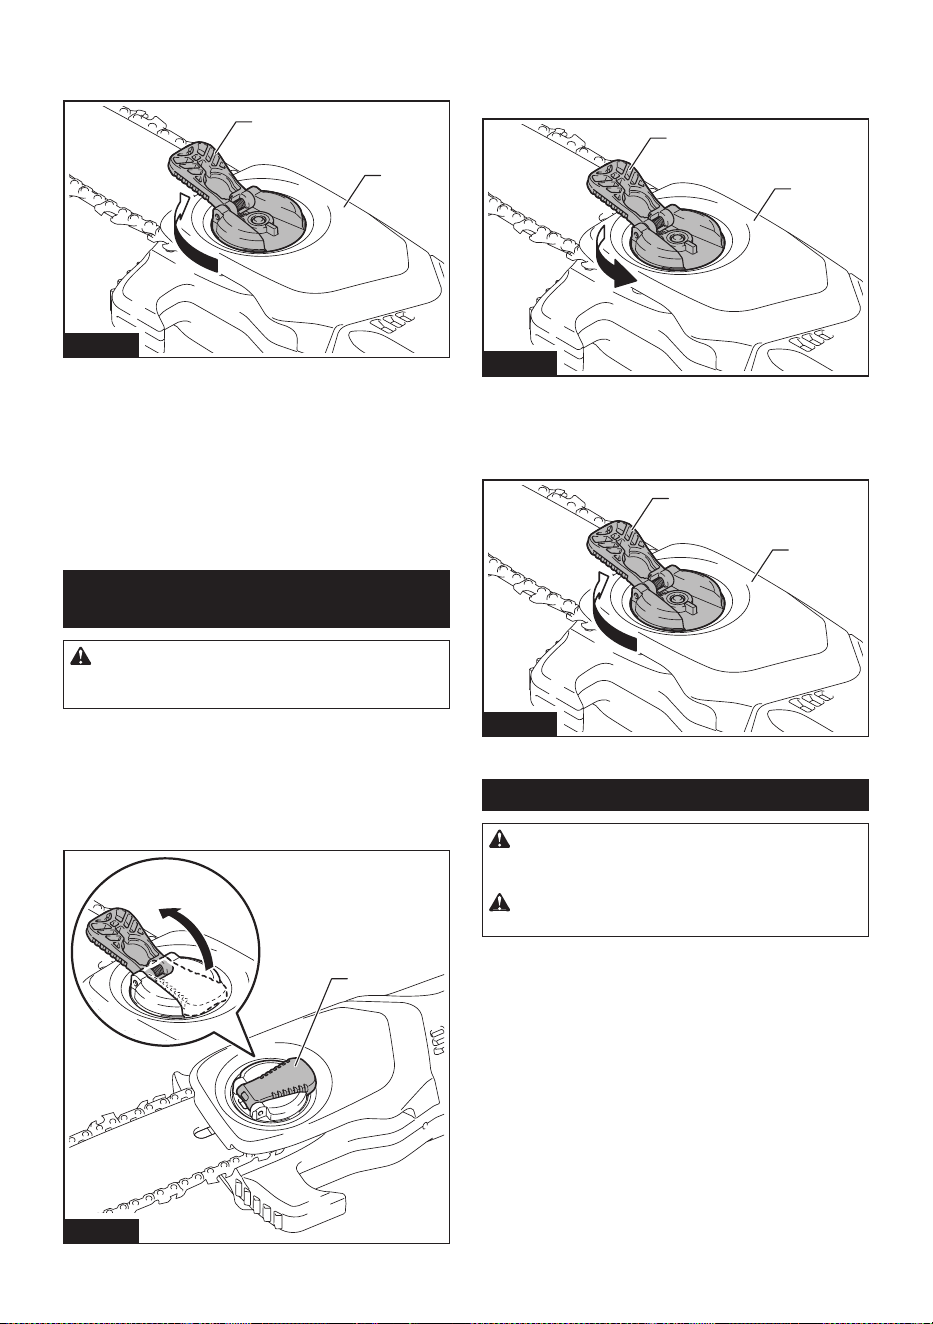
37 ESPAÑOL
11. Gire la palanca en el sentido de las manecillas del
reloj y apriétela rmemente para asegurar la cubierta de
la pieza dentada, luego regrésela a la posición original.
1
2
Fig.19
► 1. Palanca 2. Cubierta de la pieza dentada
Asegúrese de que el eslabón impulsor de la cadena de
la sierra esté asentado rmemente en la pieza dentada,
y que la cadena de la sierra esté asentada correcta-
mente en la ranura del riel de la barra de guía.
Asegúrese de que la cadena de la sierra no se aoje, y
que la cadena de la sierra se pueda mover suavemente
hacia adelante y hacia atrás. Si es necesario, ajuste la
tensión de la cadena de la sierra consultando la sección
para ajustar la tensión de la cadena de la sierra.
Ajuste de la tensión de la cadena de
la sierra
PRECAUCIÓN: Una cadena demasiado
suelta puede salirse de la barra y ocasionar lesio-
nes o un accidente.
La cadena de la sierra puede aojarse tras varias
horas de uso. De vez en cuando revise la tensión de la
cadena de la sierra antes de usarla.
Si la cadena de la sierra está oja, ajuste la tensión de
la cadena de la sierra.
1. Tire de la palanca hacia arriba.
1
Fig.20
► 1. Palanca
2. Gire la palanca ligeramente en sentido inverso
al de las manecillas del reloj para aojar un poco la
cubierta de la pieza dentada. La tensión de la cadena
se ajusta automáticamente.
2
1
Fig.21
► 1. Palanca 2. Cubierta de la pieza dentada
3. Gire la palanca en el sentido de las manecillas del
reloj y apriétela rmemente para asegurar la cubierta de
la pieza dentada, luego regrésela a la posición original.
1
2
Fig.22
► 1. Palanca 2. Cubierta de la pieza dentada
Ajuste del ángulo de la cabeza
PRECAUCIÓN: Al ajustar el ángulo de la
cabeza, coloque la cubierta de la barra de guía
para evitar lesiones.
PRECAUCIÓN: Tenga cuidado de no pillarse
los dedos entre la cabeza y la varilla.
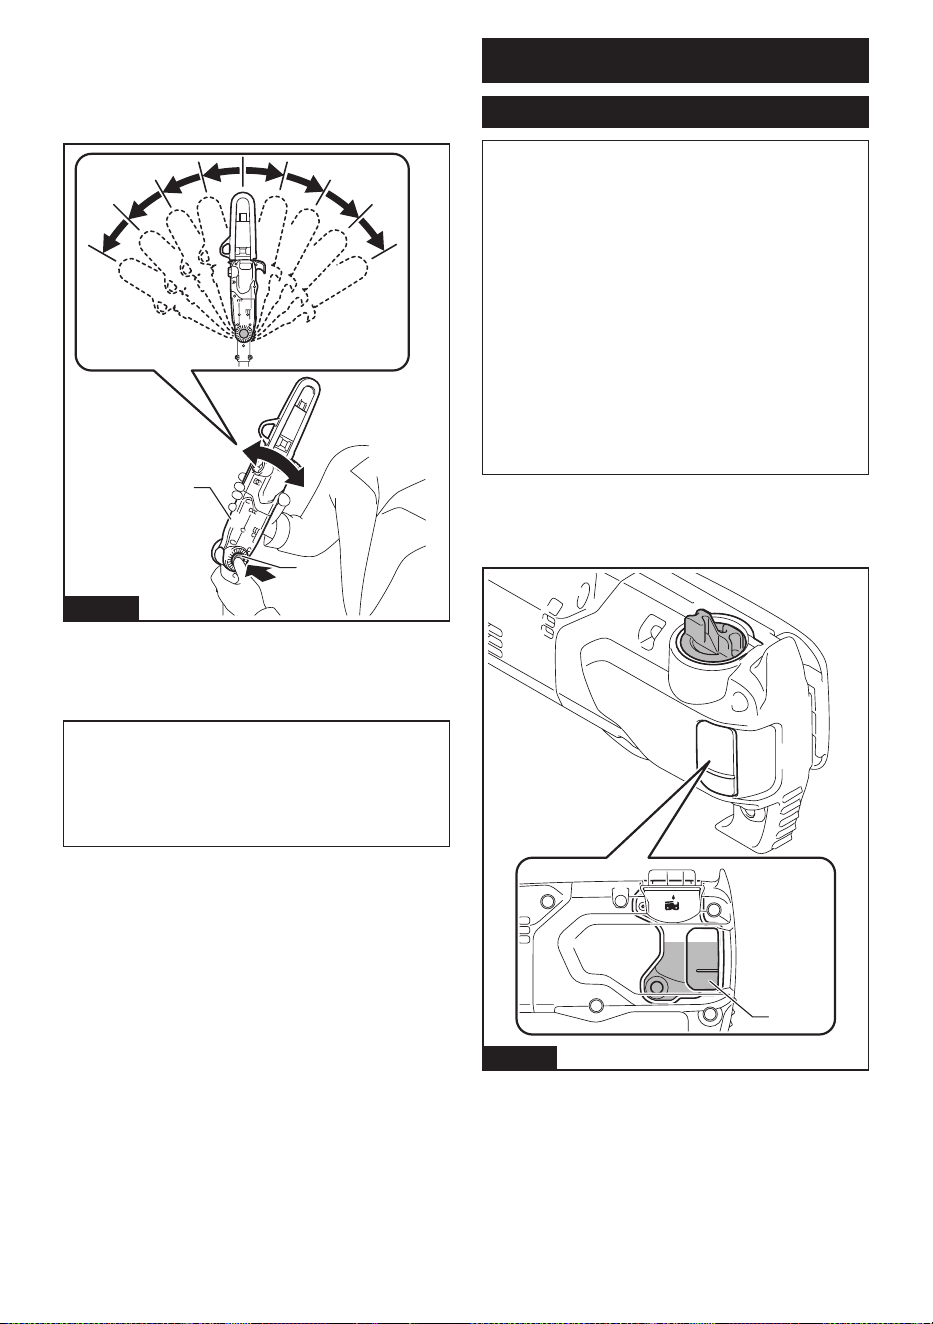
38 ESPAÑOL
La cabeza puede ajustarse en 9 ángulos. Siga estos
pasos:
1. Sostenga la herramienta como se muestra en la
gura y, mientras presiona el botón de ajuste del ángulo
de la cabeza, ajuste la cabeza al ángulo deseado.
1
2
Fig.23
► 1. Botón de ajuste del ángulo de la cabeza
2. Cabeza
2. Suelte el botón de ajuste del ángulo de la cabeza,
y asegúrese de que vuelva a su posición original.
AVISO: Si el botón de ajuste del ángulo de la
cabeza no regresa a su posición original, mueva
la cabeza ligeramente hasta que encaje en su
lugar.
AVISO: Asegúrese de que la cabeza esté bien
jada antes del uso.
OPERACIÓN
Lubricación
AVISO: Cuando llene el aceite para la cadena por
primera vez, o al reabastecer el tanque después
de haberse vaciado por completo, añada el aceite
hasta el borde inferior del cuello de la abertura
de suministro. De lo contrario, el suministro de
aceite podría ser deciente.
AVISO: Utilice el aceite para la cadena de la sie-
rra exclusivamente para sierras eléctricas Makita
o un aceite equivalente disponible en el mercado.
AVISO: Nunca use aceite que tenga polvo y partí-
culas, ni aceite volátil.
AVISO: Cuando pode árboles, use aceite vegetal.
El aceite mineral puede dañar los árboles.
AVISO: Antes de la operación de corte, asegú-
rese de que la tapa del tanque de aceite provista
se encuentre atornillada en su lugar.
La cadena de la sierra se lubrica automáticamente
cuando la herramienta está en funcionamiento.
Verique periódicamente la cantidad de aceite restante
en el tanque de aceite.
1
Fig.24
► 1. Tanque de aceite
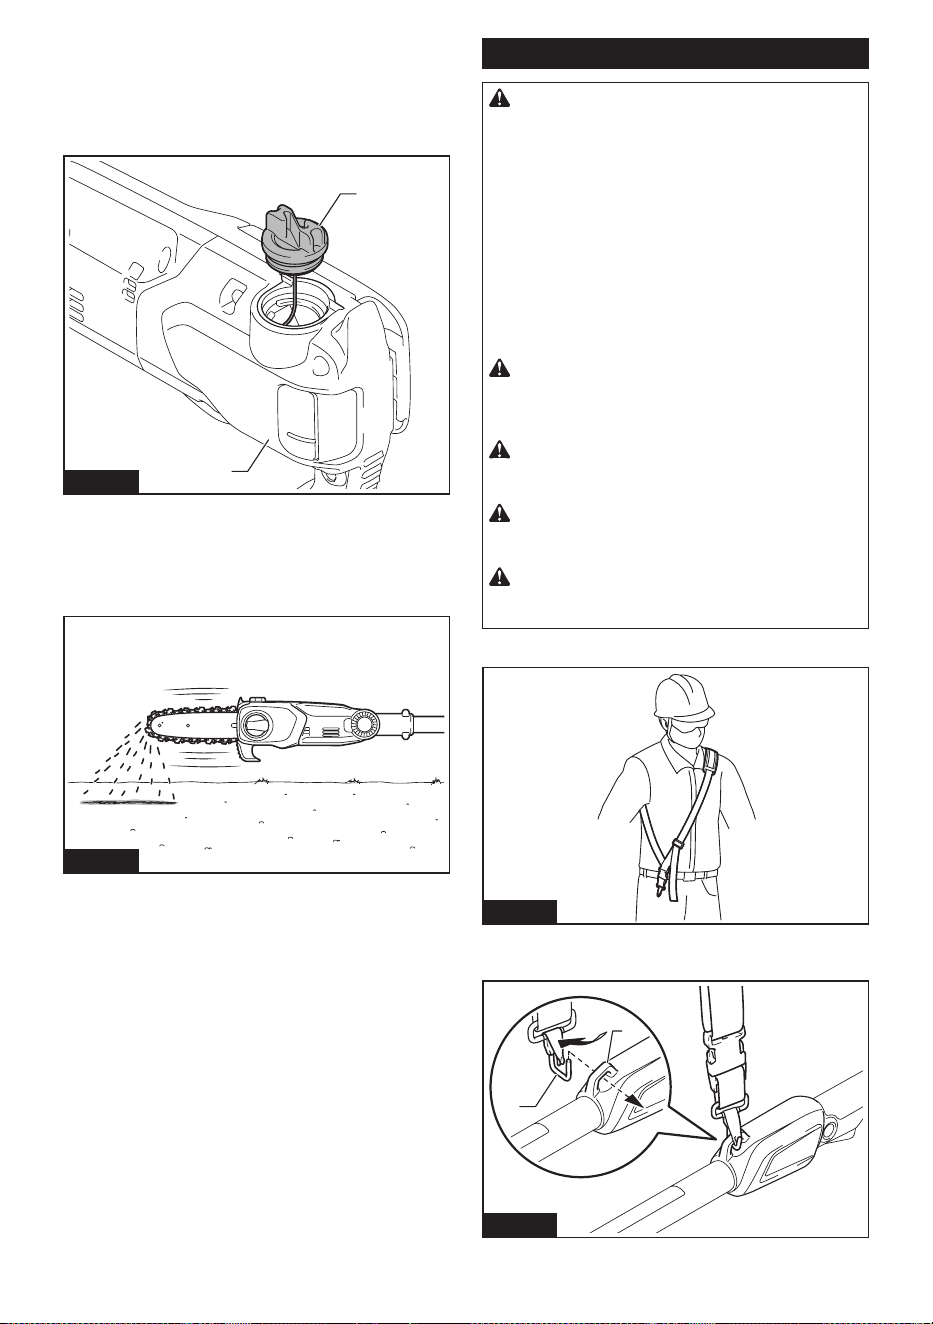
39 ESPAÑOL
Para rellenar el tanque, coloque la herramienta sobre
una supercie plana, y luego retire la tapa del tanque
de aceite girándola.
La cantidad correcta de aceite son 55 cm
3
(1,9 oz).
Después de reabastecer el tanque, asegúrese de que
la tapa del tanque de aceite sea apretada rmemente.
1
2
Fig.25
► 1. Tapa del tanque de aceite 2. Tanque de aceite
(translúcido)
Después del reabastecimiento, sostenga la herramienta
lejos del árbol. Póngala en marcha y espere hasta que
la cadena de la sierra se lubrique adecuadamente.
Fig.26
Instalación del arnés para hombro
PRECAUCIÓN:
Cuando utilice la herramienta
en combinación con la fuente de alimentación tipo
mochila, como la unidad portátil de alimentación
eléctrica, no utilice el arnés para hombro incluido
en el paquete de la herramienta, sino más bien la
banda para colgado recomendada por Makita.
Si se pone el arnés para hombro incluido en el
paquete de la herramienta y el arnés para hombro
de la fuente de alimentación tipo mochila al mismo
tiempo, se dicultará quitarse la herramienta o la
fuente de alimentación tipo mochila en caso de emer-
gencia, y podría causar un accidente o lesión. Para
la banda para colgado recomendada, pregunte a los
centros de servicio autorizados de Makita.
PRECAUCIÓN:
Siempre lleve puesto el arnés
para hombro colocado en la herramienta. Antes
de la operación, ajuste el arnés para hombro de
acuerdo al tamaño del usuario para evitar la fatiga.
PRECAUCIÓN: Antes de la operación, asegú-
rese de que el arnés para hombro esté colocado
correctamente al colgador en la herramienta.
PRECAUCIÓN: Antes de la operación, asegú-
rese de que la hebilla del arnés para hombro esté
sujeta rmemente.
PRECAUCIÓN: Siempre lleve puesto el arnés
para hombro especíco para esta herramienta. No
utilice otros arneses para hombro.
1.
Colóquese el arnés para hombro en su hombro izquierdo.
Fig.27
2. Abroche el gancho en el arnés para hombro en el
colgador de la herramienta.
1
2
Fig.28
► 1. Gancho 2. Colgador
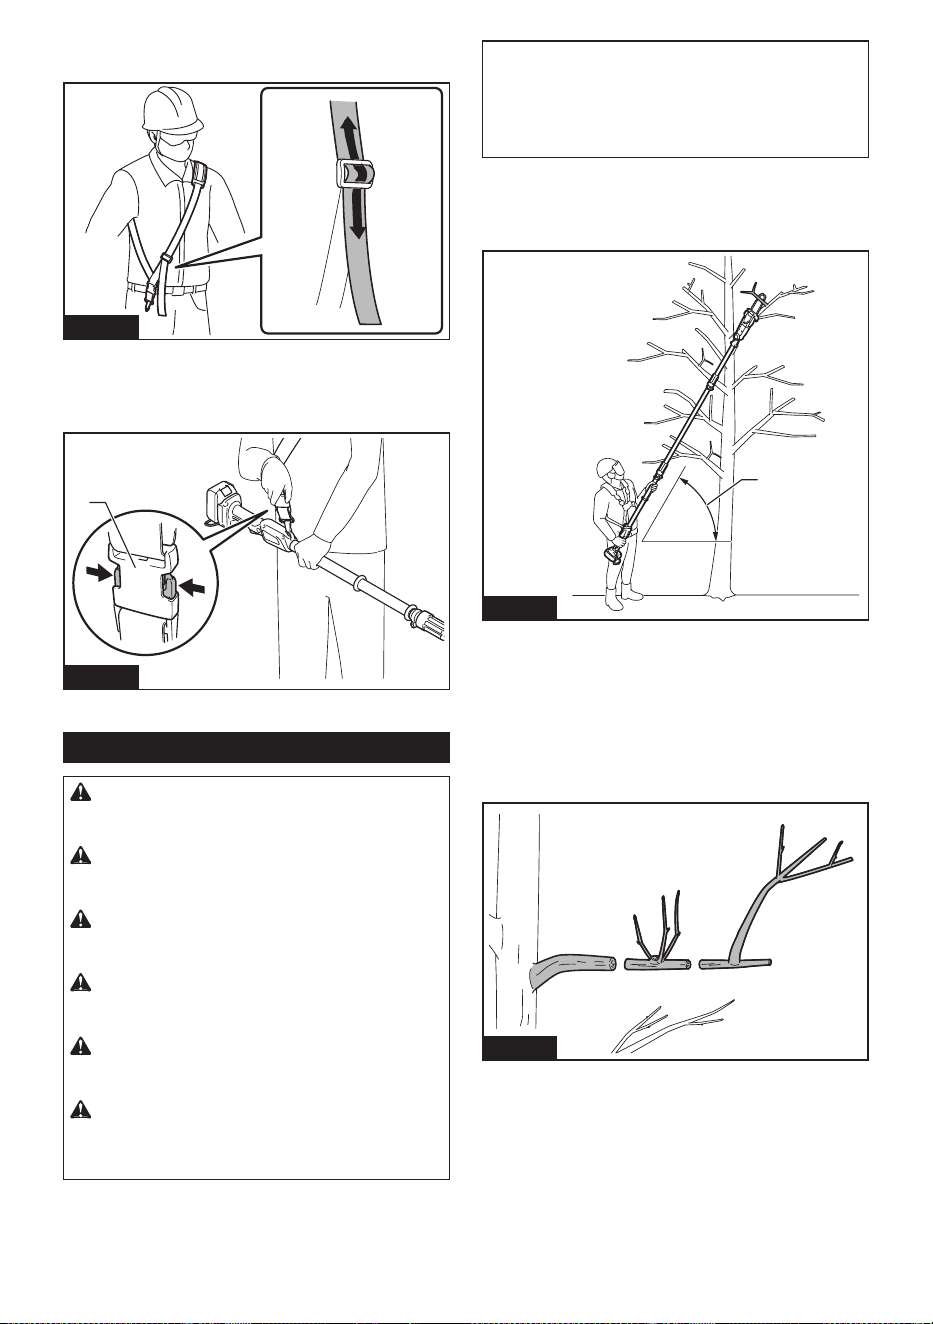
40 ESPAÑOL
3. Ajuste el arnés para hombro en una posición
cómoda para trabajar.
Fig.29
El arnés para hombro cuenta con un medio de libera-
ción rápida.
Simplemente apriete los lados de la hebilla para liberar
la herramienta del arnés para hombro.
1
Fig.30
► 1. Hebilla
Operación con la herramienta
PRECAUCIÓN: Mantenga todas las partes
del cuerpo alejadas de la cadena de la sierra
cuando el motor esté funcionando.
PRECAUCIÓN: Sostenga la herramienta
rmemente con ambas manos cuando el motor
esté en marcha.
PRECAUCIÓN: No utilice la herramienta
donde no alcance. Pise rmemente y mantenga el
equilibrio en todo momento.
PRECAUCIÓN: cuando corte ramas, tenga
cuidado de no perder el equilibrio debido al peso
del cabezal de la herramienta.
PRECAUCIÓN: Mantenga siempre una ruta
de escape en caso de que caiga una rama cortada
en dirección del operador.
PRECAUCIÓN: Nunca use la punta de la
barra de guía para cortar. De lo contrario, podría
ocurrir un retroceso brusco y peligroso, que
podrían resultar en una lesión personal.
AVISO: Nunca tire ni deje caer la herramienta.
AVISO: No cubra las rejillas de ventilación de la
herramienta.
AVISO: No fuerce la herramienta. De lo contrario,
esto podría dañar la herramienta.
Párese sobre una supercie estable, y sostenga la
herramienta lejos de las ramas, de manera que el
ángulo de la herramienta sea de 60° o menos en com-
paración con el suelo horizontal.
1
Fig.31
► 1. 60° o menos
Arranque la herramienta, luego presione la cadena de
la sierra contra la rama ligeramente.
Al cortar ramas largas, para controlar la posición de
caída de las ramas cortadas, divida la rama en seccio-
nes y corte la rama desde la punta. Preste atención a
las ramas que caen, ya que pueden rebotar en la direc-
ción del operador después de golpear el suelo.
Fig.32
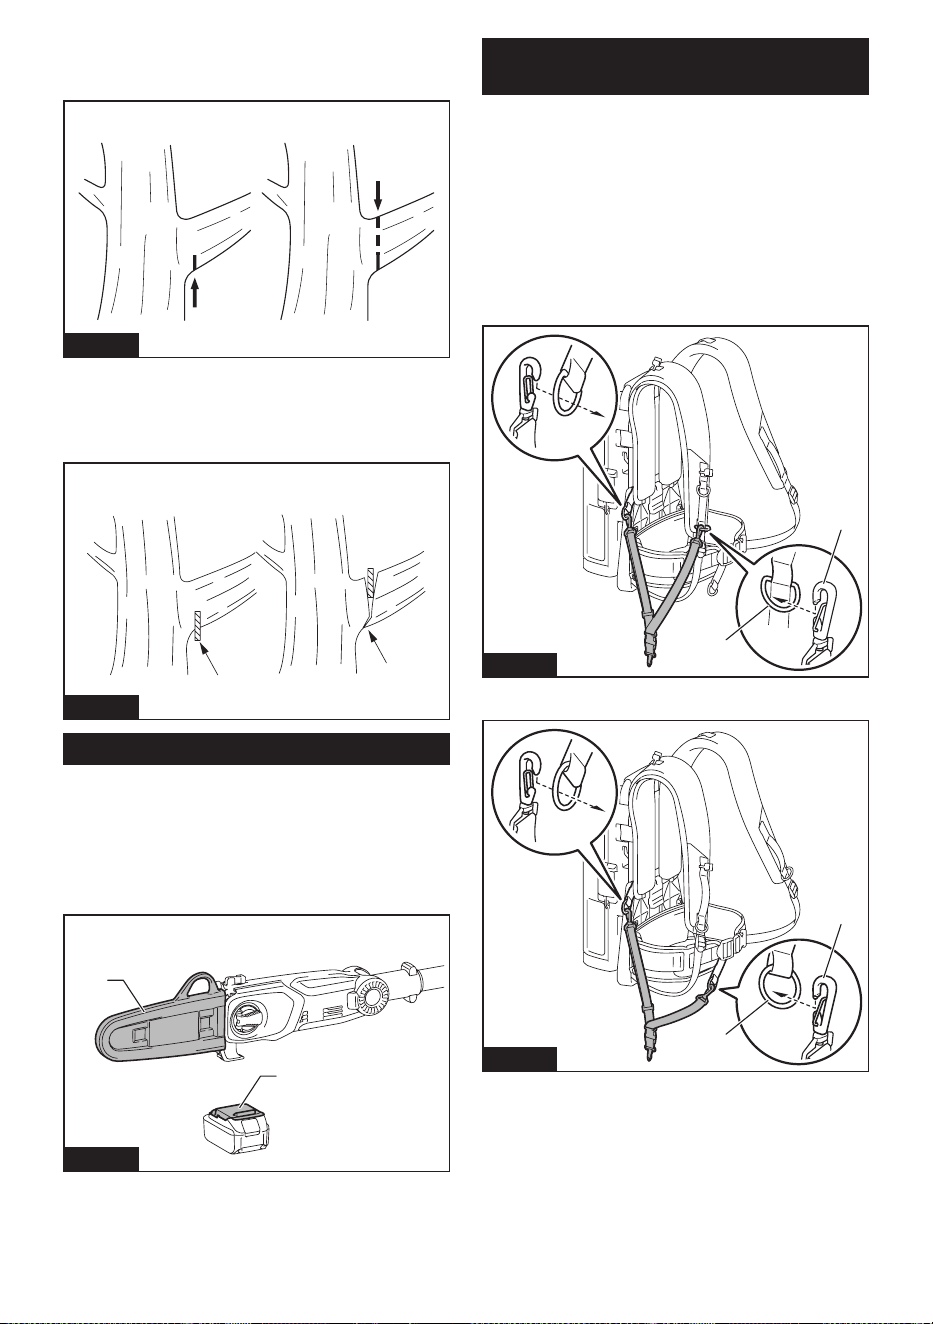
41 ESPAÑOL
Al cortar ramas gruesas, primero haga un corte super-
cial en la parte inferior de la rama y luego termine el
corte por la parte superior.
1
2
Fig.33
Si intenta cortar ramas gruesas desde su lado inferior,
puede que la rama se doble hacia adentro atrapando la
cadena de la sierra en el corte. Si intenta cortar ramas
gruesas desde el lado superior sin un corte supercial
en el lado inferior, puede que la rama se desgarre.
Fig.34
Transporte de la herramienta
Antes de transportar la herramienta, extraiga siempre
los cartuchos de batería de la herramienta, y luego
coloque la cubierta de la barra de guía. Asimismo,
cubra el cartucho de batería con la cubierta de la
batería.
Cuando transporte la herramienta, no toque el gatillo
interruptor.
1
2
Fig.35
► 1. Cubierta de la barra de guía 2. Cubierta de la
batería
Uso de la herramienta con la unidad
portátil de alimentación eléctrica
Accesorio opcional
Use la banda para colgado cuando use la herramienta
con la unidad portátil de alimentación eléctrica.
Acoplamiento de la banda para
colgado
1. Acople los ganchos de la banda para colgado a
los anillos del arnés para hombros o del cinturón, tal y
como se ilustra en la gura. Seleccione el tipo de banda
y el método de conexión apropiado para su uso.
1
2
Fig.36
► 1. Anillo 2. Gancho
1
2
Fig.37
► 1. Anillo 2. Gancho
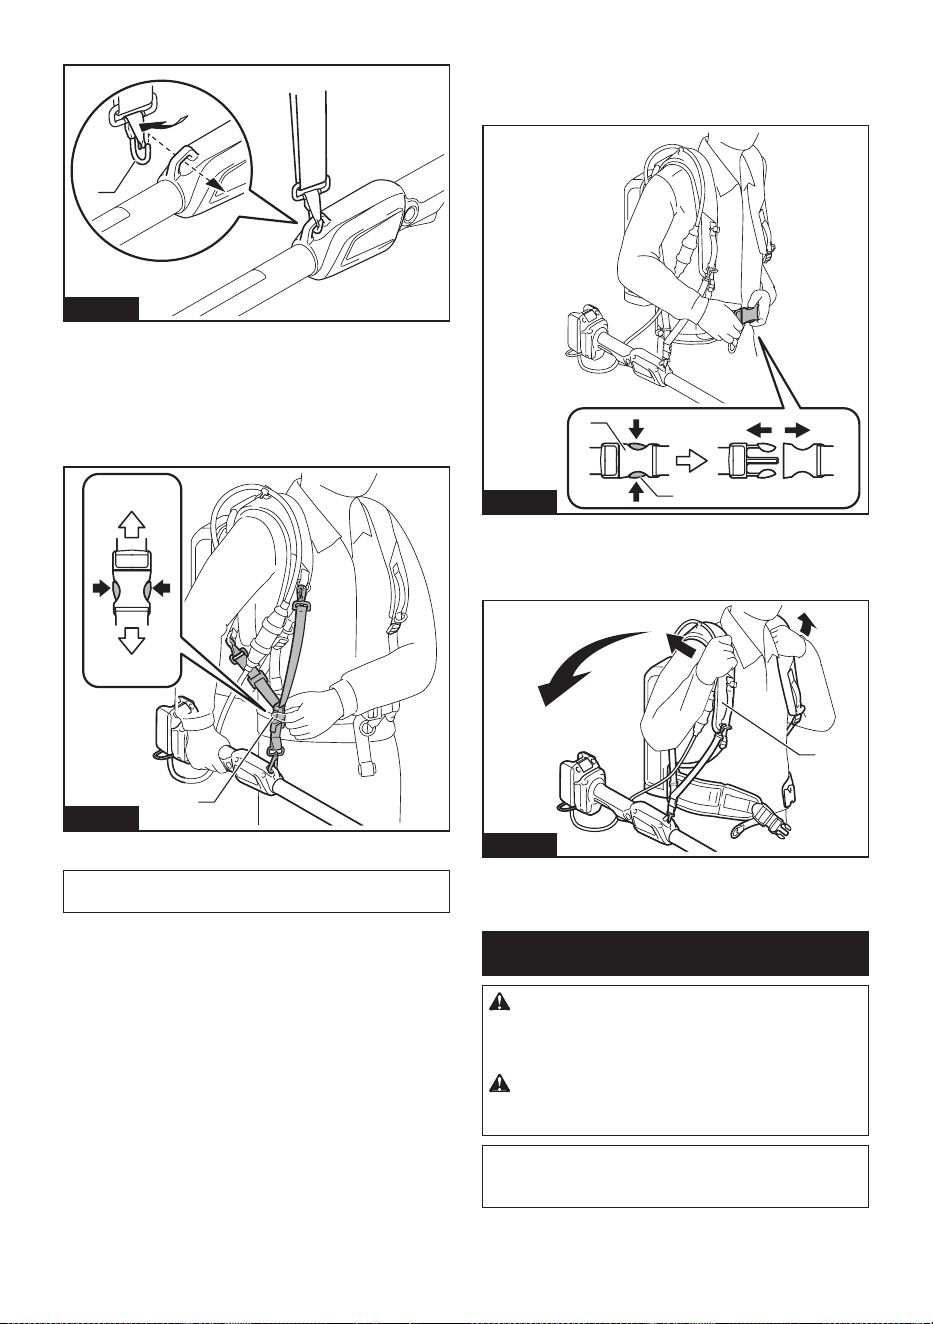
42 ESPAÑOL
2. Acople el gancho a la herramienta.
1
Fig.38
► 1. Gancho
Desacople de la herramienta
Al dejar la herramienta sobre el suelo, destrabe la hebi-
lla de la banda para colgado con una mano, mientras
sostiene la herramienta con la otra mano.
1
Fig.39
► 1. Hebilla
NOTA: La hebilla no se suministra, dependiendo del
tipo de banda.
Si necesita soltar la herramienta rápidamente, siga los
pasos a continuación.
1. Oprima las lengüetas en la hebilla del cinturón
para desbloquearla.
1
2
Fig.40
► 1. Hebilla 2. Lengüeta
2. Quítese el arnés para hombros para liberar la
herramienta y la unidad.
1
Fig.41
► 1. Arnés para hombros
MANTENIMIENTO
PRECAUCIÓN: Asegúrese siempre de que la
herramienta esté apagada y el cartucho de batería
extraído antes de intentar realizar una inspección
o mantenimiento.
PRECAUCIÓN: Siempre use guantes
cuando realice cualquier trabajo de inspección o
mantenimiento.
AVISO: Nunca use gasolina, bencina, diluyente
(tíner), alcohol o sustancias similares. Puede que
esto ocasione grietas o descoloramiento.
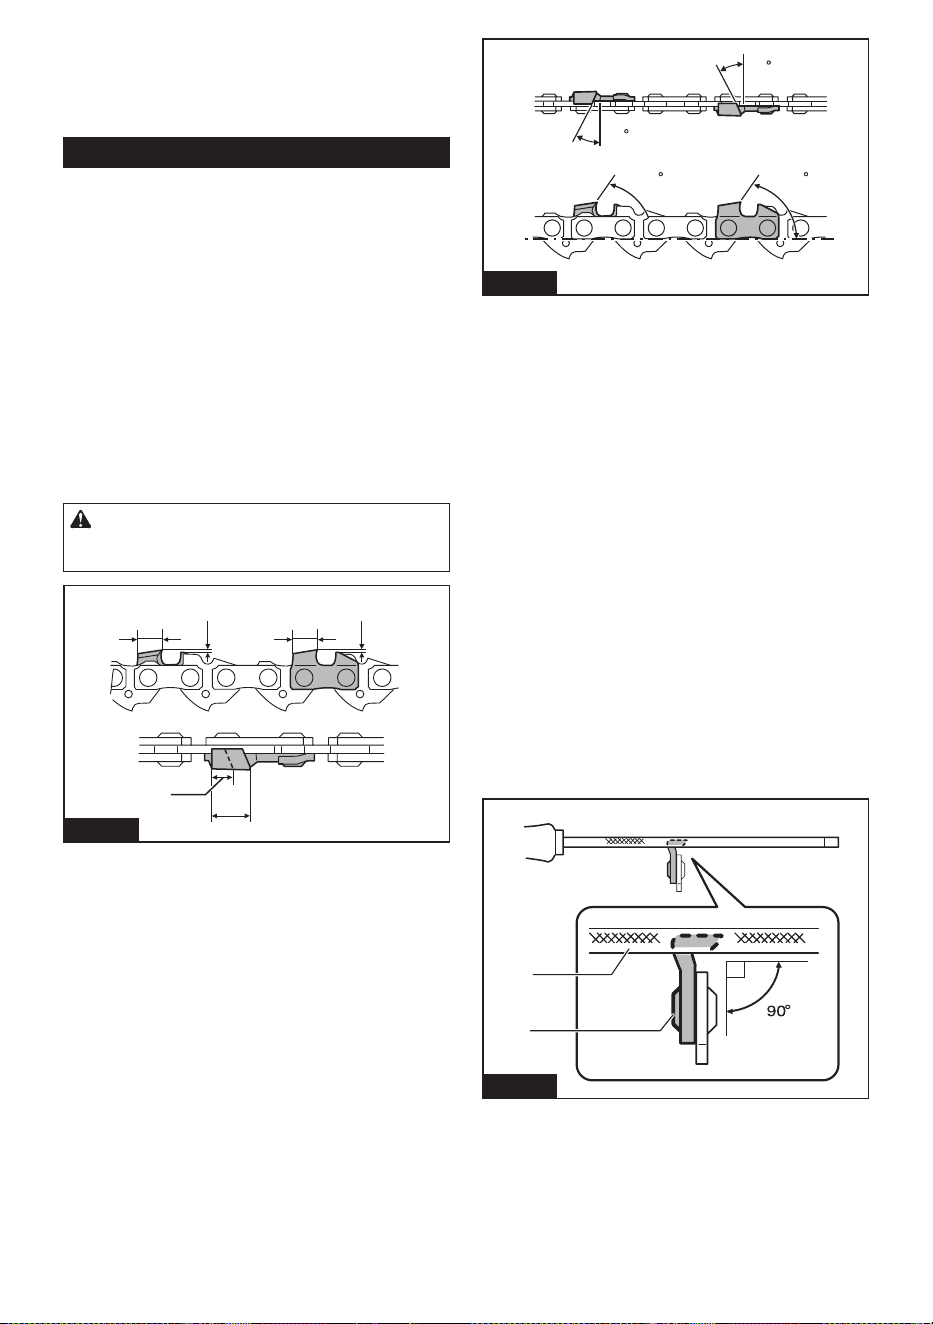
43 ESPAÑOL
Para mantener la SEGURIDAD y FIABILIDAD del pro-
ducto, las reparaciones, y cualquier otra tarea de man-
tenimiento o ajuste deberán ser realizadas en centros
de servicio autorizados o de fábrica Makita, empleando
siempre repuestos Makita.
Alado de la cadena de la sierra
Ale la cadena de la sierra cuando:
• Se produzca aserrín con consistencia harinosa al
cortar madera húmeda;
• La sierra penetre la madera con dicultad, incluso
al aplicar una gran presión;
• El borde de corte esté evidentemente dañado;
• La sierra se desvíe hacia la izquierda o la derecha
en la madera. (a causa de un alado no uniforme
de la cadena de la sierra o daño en sólo uno de
los lados)
Ale la cadena de la sierra con frecuencia pero sólo un
poco cada vez. Por lo general sólo dos o tres pasadas con
una lima son sucientes para un realado de rutina. Cuando
la cadena de la sierra haya sido realada varias veces,
llévela a alar a nuestro centro de servicio autorizado.
Criterios de alado:
ADVERTENCIA: Una distancia excesiva
entre el borde de corte y el calibrador de profun-
didad aumenta el riesgo de un retroceso brusco.
22
1
1
3
1
Fig.42
► 1. Longitud de la parte cortadora 2. Distancia entre
el borde de corte y el calibrador de profundidad
3. Longitud mínima de la parte cortadora (3 mm
(1/8″))
— Todas las partes cortadoras deberán tener la
misma longitud. El que las partes cortadoras ten-
gan diferentes longitudes impide que la cadena de
la sierra se accione fácilmente y puede ocasionar
que ésta se rompa.
— No ale la cadena cuando la longitud de la parte
cortadora haya alcanzado 3 mm (1/8″) o menos.
La cadena deberá ser reemplazada con una
nueva.
— El grosor de las virutas es determinado por la
distancia entre el calibrador de profundidad (nariz
redonda) y el borde de corte.
— Los mejores resultados de corte se obtienen con
la distancia siguiente entre el borde de corte y el
calibrador de profundidad.
• Cuchilla de la cadena 80TXL: 0,65 mm
(0,025″)
30
30
55
55
Fig.43
— El ángulo de alado de 30° deberá ser el mismo
en todas las partes cortadoras. Las diferencias de
ángulos en las partes cortadoras causan que la
cadena corra de forma brusca e irregular, acelera
el desgaste y provocan la rotura de la cadena.
— Utilice una lima redonda adecuada de manera que
el ángulo de alado correcto se mantenga contra
el diente.
• Cuchilla de la cadena 80TXL: 55°
Lima y guiado del limado
— Use una lima redonda especial (accesorio
opcional) para cadenas de la sierra para alar
la cadena. Las limas redondas comunes no son
apropiadas.
— El diámetro de la lima redonda para cada cadena
de la sierra es:
• Cuchilla de la cadena 80TXL: 4,0 mm (5/32″)
—
La lima sólo deberá embonar en la parte cortadora en
la pasada hacia adelante. Levante la lima para ale-
jarla de la parte cortadora en la pasada de regreso.
— Ale la parte cortadora más pequeña primero.
Después la longitud de esta parte más pequeña
se volverá el estándar para todas las demás
partes cortadoras en la cadena de la sierra.
— Guíe la lima tal como se muestra en la ilustración.
1
2
Fig.44
► 1. Lima 2. Cadena de la sierra
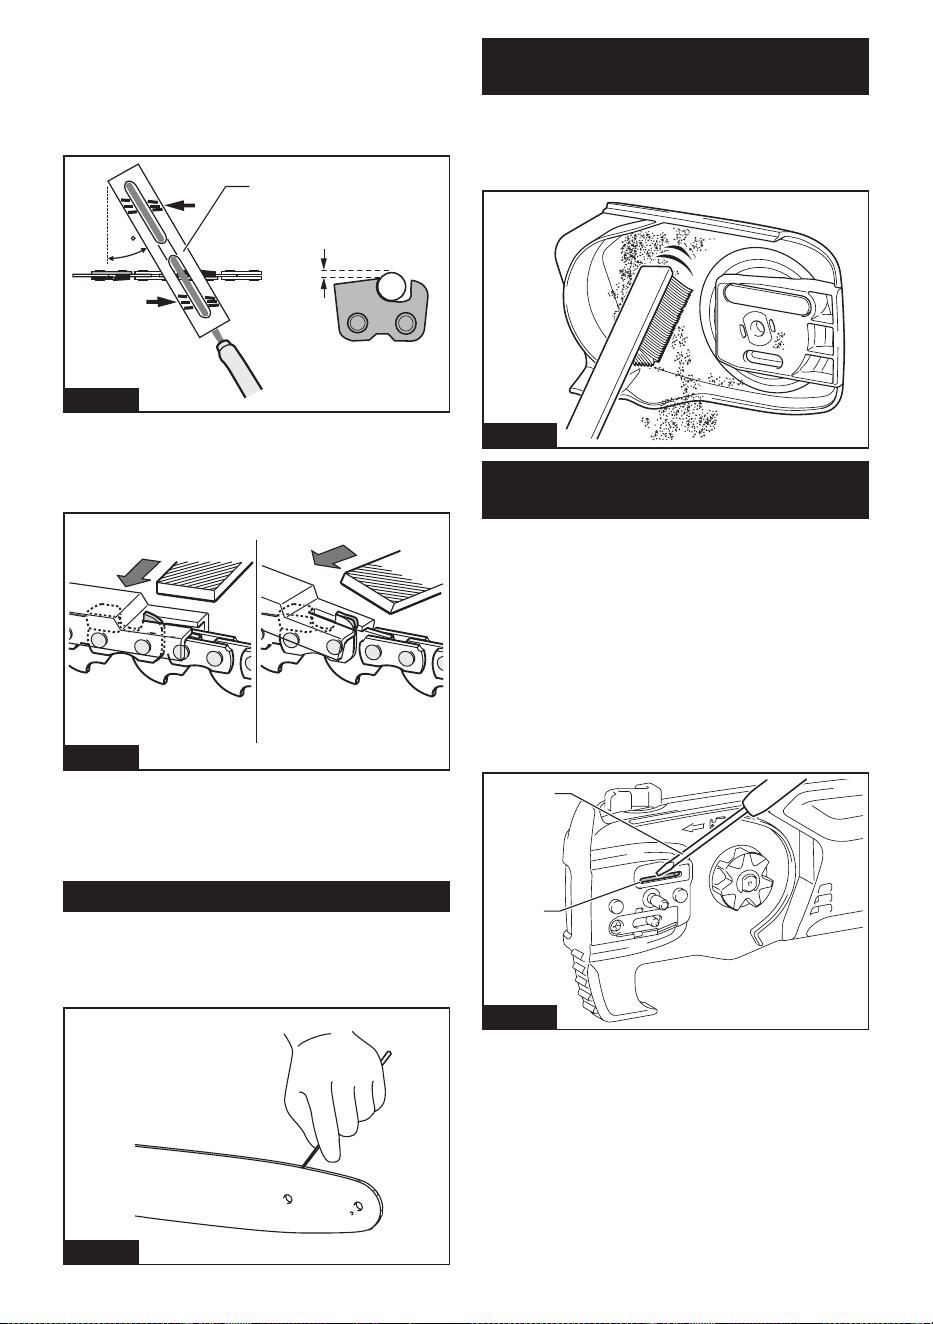
44 ESPAÑOL
—
La lima puede guiarse más fácilmente si se emplea
un sujetador de limas (accesorio opcional). El suje-
tador de limas cuenta con marcas para el ángulo de
alado correcto de 30° (alinee las marcas paralelas
a la cadena de la sierra) y limita la profundidad de
penetración (a 4/5 del diámetro de la lima).
30
1/5
1
Fig.45
► 1. Sujetador de limas
— Tras el alado de la cadena, verique la altura del
calibrador de profundidad usando la herramienta
de calibración de la cadena (accesorio opcional).
Fig.46
— Elimine cualquier material protuberante, indepen-
diente de cuán pequeño sea, con una lima plana
especial (accesorio opcional).
— Redondee la parte delantera del calibrador de
profundidad de nuevo.
Limpieza de la barra de guía
En la ranura de la barra de guía se acumularán astillas
y aserrín. Éstas pueden obstruir la ranura de la barra y
afectar el ujo de aceite. Limpie las astillas y el aserrín
cada vez que ale o reemplace la cadena de la sierra.
Fig.47
Limpieza de la cubierta de la pieza
dentada
En el interior de la cubierta de la pieza dentada se acu-
mularán astillas y aserrín. Retire la cubierta de la pieza
dentada y la cadena de la sierra de la herramienta y
luego limpie las astillas y el aserrín.
Fig.48
Limpieza del oricio de descarga de
aceite
En el oricio de descarga de aceite se pueden acumu-
lar polvo y pequeñas partículas durante la operación.
Este polvo o partículas pueden afectar el ujo de aceite
y causar una lubricación insuciente en toda la cadena
de la sierra. Cuando haya un suministro deciente de
aceite en la parte superior de la barra de guía, limpie
el oricio de descarga de aceite como se indica a
continuación.
1. Retire la cubierta de la pieza dentada y la cadena
de la sierra de la herramienta.
2. Elimine polvo y partículas de tamaño pequeño
usando un destornillador plano o similar.
1
2
Fig.49
► 1. Destornillador plano 2. Oricio de descarga de
aceite
3. Inserte el cartucho de batería en la herramienta.
Jale el gatillo interruptor para eliminar la acumulación
de polvo o partículas del oricio de descarga de aceite
descargando el aceite de la cadena.
4. Retire el cartucho de batería de la herramienta.
Reinstale la cubierta de la pieza dentada y la cadena de
la sierra en la herramienta.
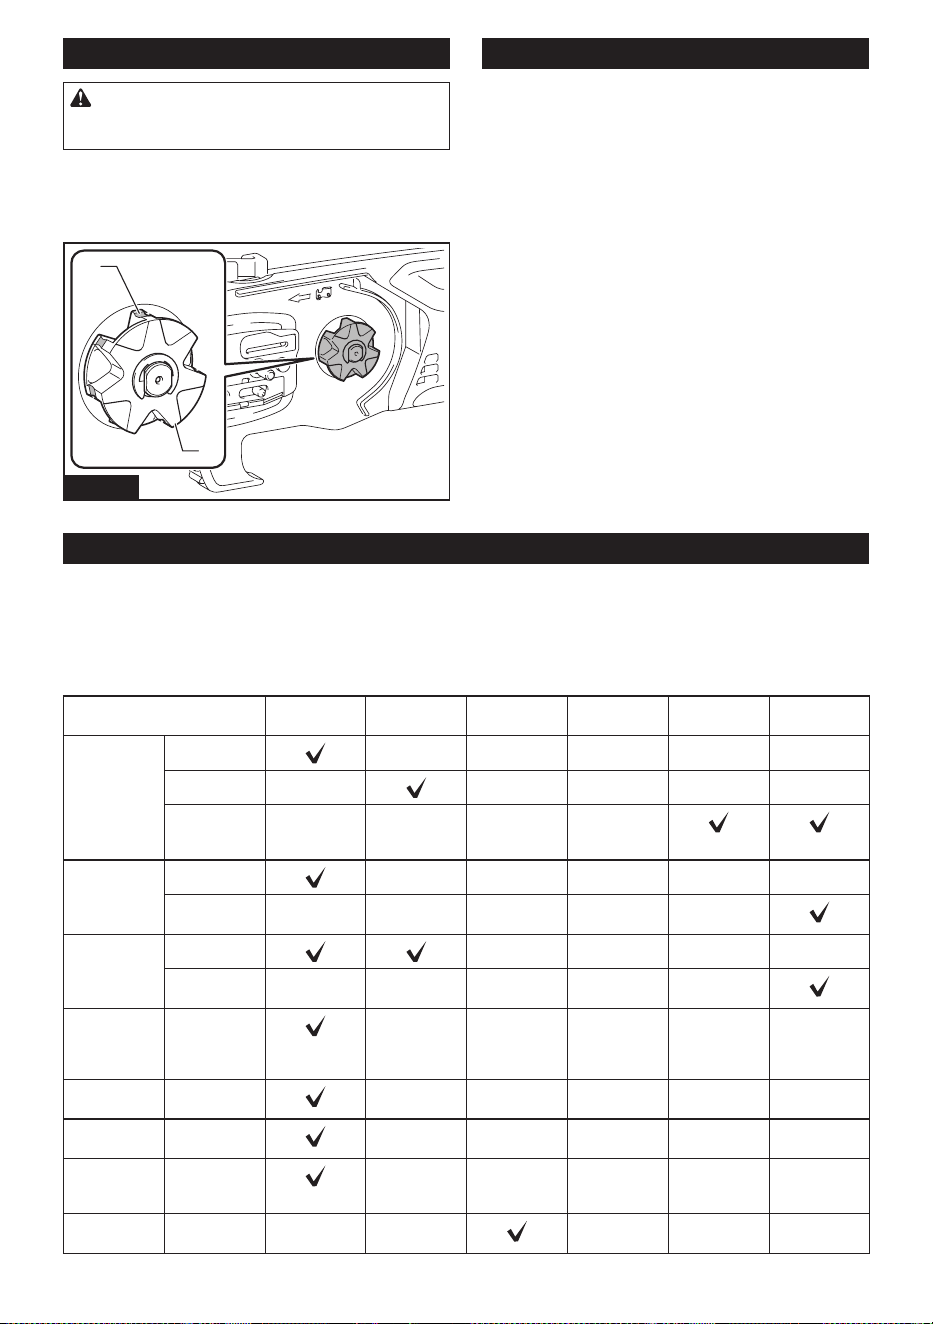
45 ESPAÑOL
Reemplazo de la pieza dentada
PRECAUCIÓN: Una pieza dentada desgas-
tada dañará una cadena nueva de la sierra. En
este caso, reemplace la pieza dentada.
Antes de instalar una nueva cadena de la sierra, veri-
que la condición de la pieza dentada. Si la pieza den-
tada se daña o se desgasta, solicite el reemplazo a los
centros de servicio autorizado de Makita.
2
1
Fig.50
► 1. Pieza dentada 2. Áreas a desgastarse
Almacenamiento de la herramienta
1. Limpie la herramienta antes de almacenarla.
Retire cualquier astilla y aserrín de la herramienta
después de quitar la cubierta de la pieza dentada.
2. Después de limpiar la herramienta, hágala fun-
cionar sin carga para lubricar la cadena de la sierra y la
barra de guía.
3. Cubra la barra de guía con la cubierta de la barra
de guía.
4. Vacíe el tanque de aceite.
Instrucciones para el mantenimiento periódico
Para asegurar una vida útil prolongada, prevenga el daño y asegure un funcionamiento total de las funciones de
seguridad, efectuando el siguiente programa de mantenimiento de forma periódica. Las reclamaciones de garantía
podrán ser reconocidas solamente si este programa de mantenimiento es realizado periódicamente y como corres-
ponde. ¡El no seguir el programa de mantenimiento indicado puede provocar accidentes! El usuario de la herra-
mienta no deberá realizar ningún trabajo de mantenimiento que no esté descrito en el manual de instrucciones. Todo
este tipo de trabajo deberá ser realizado por nuestro centro de servicio autorizado.
Elemento a revisar / Tiempo
de operación
Antes de la
operación
Diariamente Semanal-
mente
Cada 3 meses Anualmente
Antes del alma-
cenamiento
Herramienta
completa
Inspección. - - - - -
Limpieza. -
- - - -
Inspección en el
centro de servi-
cio autorizado.
- - - -
Cadena de la
sierra
Inspección. - - - - -
Alamiento en
caso necesario.
- - - - -
Barra de guía Inspección. - - - -
Retirar de la
herramienta.
- - - - -
Lubricación de
la cadena
Revisar el
caudal de
alimentación
de aceite.
- - - - -
Gatillo
interruptor
Inspección.
- - - - -
Botón de
desbloqueo
Inspección.
- - - - -
Tapa del
tanque de
aceite
Revisar que
esté bien
apretado.
- - - - -
Tornillos y
tuercas
Inspección. - -
- - -
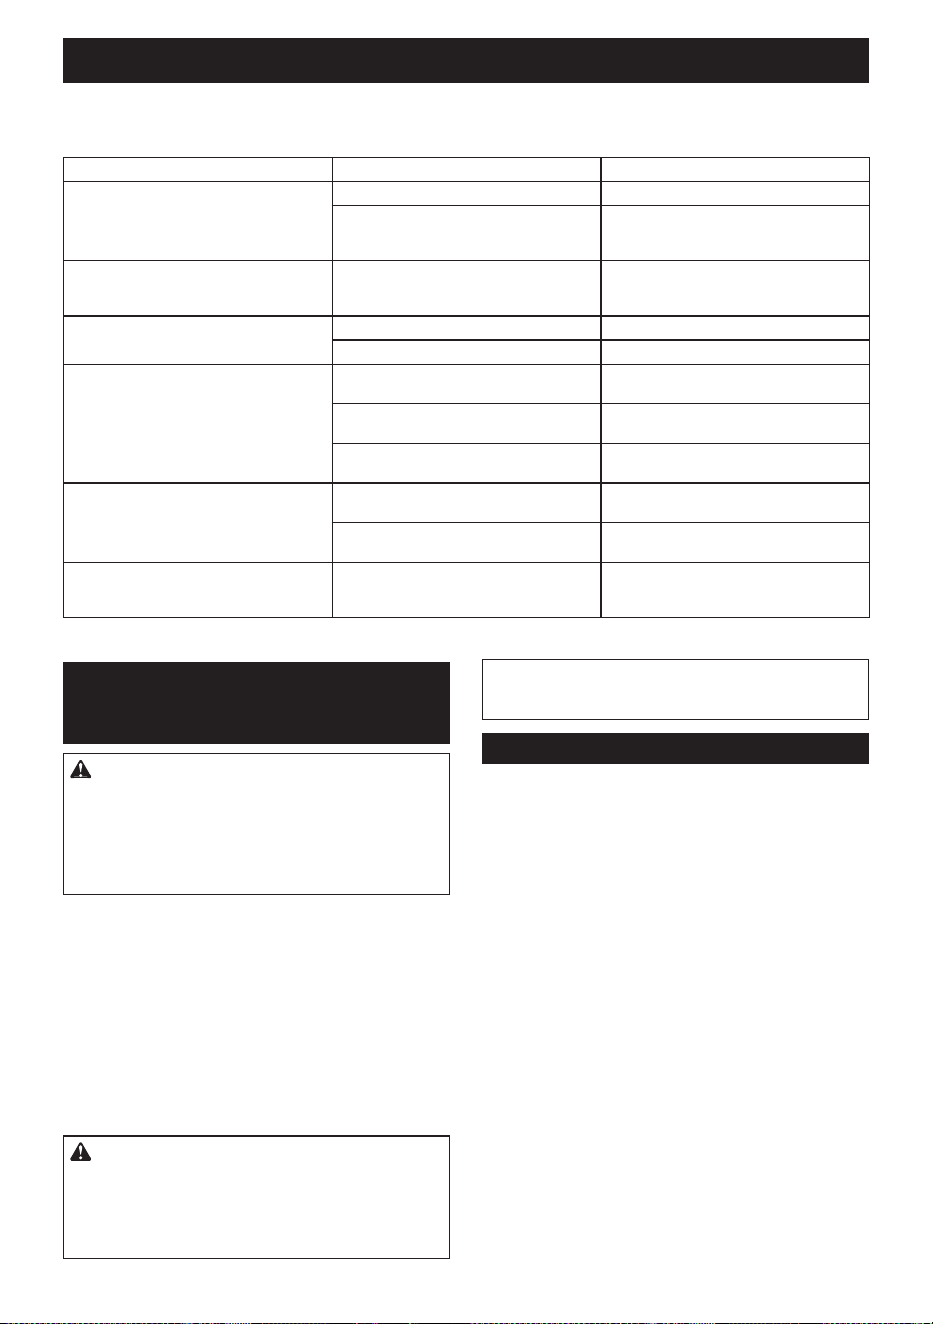
46 ESPAÑOL
RESOLUCIÓN DE PROBLEMAS
Antes de solicitar alguna reparación, primero realice una inspección por su cuenta. Si detecta algún problema que
no esté explicado en el manual, no intente desensamblar la herramienta. En vez de esto, solicite la reparación a un
centro de servicio autorizado de Makita, usando siempre piezas de repuesto Makita.
Estado de la avería Causa Solución
La herramienta no arranca. El cartucho de batería no está instalado. Instale un cartucho de batería cargado.
Problema con la batería (bajo voltaje). Recargue los cartuchos de batería. Si la
recarga no resulta ecaz, reemplace el
cartucho de batería.
El motor deja de funcionar al poco tiempo
de uso.
El nivel de carga de la batería es bajo. Recargue los cartuchos de batería. Si la
recarga no resulta ecaz, reemplace el
cartucho de batería.
La cadena no tiene aceite. El tanque de aceite está vacío. Llene el tanque de aceite.
La ranura de la guía de aceite está sucia. Limpie la ranura.
La herramienta no alcanza el nivel máximo
de RPM.
El cartucho de batería está instalado
incorrectamente.
Instale los cartuchos de batería tal como
se describe en este manual.
La potencia de la batería está
disminuyendo.
Recargue el cartucho de batería. Si la recarga no
resulta ecaz, reemplace el cartucho de batería.
El sistema de accionamiento no funciona
correctamente.
Solicite la reparación en el centro de
servicio autorizado de su región.
Vibración anormal:
¡Detenga la herramienta
inmediatamente!
La barra de guía o la cadena de la sierra
están sueltas.
Ajuste la barra de guía o la tensión de la
cadena de la sierra.
Avería de la herramienta. Solicite la reparación en el centro de
servicio autorizado de su región.
La cadena de la sierra no puede instalarse. La combinación de cadena de la sierra y la
pieza dentada no es correcta.
Utilice la combinación correcta de cadena
de la sierra y la pieza dentada; consulte la
sección de especicaciones.
ACCESORIOS
OPCIONALES
PRECAUCIÓN: Estos accesorios o aditamen-
tos están recomendados para utilizarse con su
herramienta Makita especicada en este manual.
El empleo de cualquier otro accesorio o aditamento
puede conllevar el riesgo de lesiones personales.
Utilice los accesorios o aditamentos solamente para
su n establecido.
Si necesita cualquier ayuda para más detalles en
relación con estos accesorios, pregunte a su centro de
servicio local Makita.
• Cadena de la sierra
• Barra de guía
• Cubierta de la barra de guía
• Lima
• Correa para hombro
• Aceite de la cadena
• Pieza dentada
• Batería y cargador originales de Makita
ADVERTENCIA: Si usted adquiere una barra
de guía de una longitud distinta a la de la barra de
guía estándar, también adquiera junto con ésta
una cubierta de la barra de guía adecuada. Ésta
debe quedarle y cubrir completamente la barra de
guía en la herramienta.
NOTA: Algunos de los artículos en la lista pueden
incluirse en el paquete de la herramienta como acce-
sorios estándar. Éstos pueden variar de país a país.
GARANTÍA LIMITADA DE MAKITA
Ésta Garantía no aplica para México
Consulte la hoja de la garantía anexa para ver los
términos más vigentes de la garantía aplicable a este
producto. En caso de no disponer de esta hoja de
garantía anexa, consulte los detalles sobre la garantía
descritos en el sitio web de su país respectivo indicado
a continuación.
Estados Unidos de América: www.makitatools.com
Canadá: www.makita.ca
Otros países: www.makita.com

47

Some dust created by power sanding, sawing, grinding, drilling, and other
construction activities contains chemicals known to the State of California
to cause cancer, birth defects or other reproductive harm. Some examples
of these chemicals are:
• lead from lead-based paints,
• crystalline silica from bricks and cement and other masonry products, and
• arsenic and chromium from chemically-treated lumber.
Your risk from these exposures varies, depending on how often you do this
type of work. To reduce your exposure to these chemicals: work in a well
ventilated area, and work with approved safety equipment, such as those
dust masks that are specially designed to filter out microscopic particles.
WARNING
< USA only >
ADVERTENCIA
Algunos polvos creados por el lijado, aserrado, esmerilado, taladrado y
otras actividades de la construcción contienen sustancias químicas
reconocidas por el Estado de California como causantes de cáncer, defectos
de nacimiento y otros peligros de reproducción. Algunos ejemplos de estos
productos químicos son:
• plomo de pinturas a base de plomo,
• sílice cristalino de ladrillos y cemento y otros productos de albañilería, y
• arsénico y cromo de maderas tratadas químicamente.
El riesgo al que se expone varía, dependiendo de la frecuencia con la que
realice este tipo de trabajo. Para reducir la exposición a estos productos
químicos: trabaje en un área bien ventilada y póngase el equipo de seguridad
indicado, tal como las máscaras contra polvo que están especialmente
diseñadas para filtrar partículas microscópicas.
< Sólo en los Estados Unidos >
Makita Corporation
3-11-8, Sumiyoshi-cho,
Anjo, Aichi 446-8502 Japan
www.makita.com
885A81-946
XAU03-1
EN, ESMX
20240531
