
SSM 9860BK
EN
SANDWICH MAKER (6IN1)
Translation of the original manual

SSM 9860BK
A
4
5
1
3
2
6
9
7
8
A
10
11
12
13
14
15


- 1 -
07/2025
2025, .
EN
Sandwich Maker (6in1)
User Manual
IMPORTANT SAFETY INSTRUCTIONS
READ CAREFULLY AND STORE FOR FUTURE USE.
• This appliance may be used by children 8 years of age
and older and by persons with physical, sensory or mental
impairments or by inexperienced persons, if they are
properly supervised or have been informed about how to
use of the product in asafe manner and understand the
potential dangers.
• Children must not play with the appliance.
• If the power cord is damaged, have it replaced in
aprofessional service centre in order to prevent
adangerous situation. Never use the appliance if the
power cord is damaged.
• Cleaning and user maintenance shall not be done
by children unless they are older than 8 years and
supervised.
• Children under 8 years of age must be kept away from the
appliance and its power cord.
• Surfaces that come into contact withfood should be
cleaned regularly. Follow the instructions in the Cleaning
and Maintenance chapter.
• This appliance is not designed to be controlled using
aprogrammed device, external timer switch or remote
control.
SANDWICH MAKER (6IN1)

- 2 -
07/2025
2025, .
Caution: Hot Surface
The temperature of accessible surfaces may be
higher if the appliance is in operation. Such surfaces
can become hot during use. Do not touch the hot
surface. This could cause skin burns. Use the
handles to open and close the appliance.
. . . . . . . . . . . . . . . . . . . . . . . . . . . . . . . . . . . . . . . . . . . . . . . . . . . . . . . . . . . . . . . . . . . . . . . . . . . . . . . . . . . . . . . . . . . . . . . . . . . . . . . . . . . . . . . . . . . . . . . . . . . . . . . . . . . . . . . . . . . .
Additional Important Safety Instructions forUse of the Appliance
• Before connecting the appliance to apower socket check that the technical specifications on the appliance'srating label match the electrical voltage
in the socket.
• Connect the appliance only to aproperly earthed socket.
• This product is designed for household use only. Do not use this appliance for commercial purposes.
• Do not use the appliance in industrial surroundings or outdoors.
• Do not use the appliance for any other purposes than those intended.
• Do not place the appliance on or near an electric or gas stove or other sources of heat.
• Do not place the appliance at the edge of aworkbench or on an unstable surface. The appliance must be located on astable and even surface.
• When the appliance is connected to the mains socket, the cooking surfaces and the outer casing of the appliance are heated. Do not touch the
hot surface. To close and open the top baking plate use the thermally insulated handle and for removing the finished meal use awooden or heat
resistant plastic spatula.
• Allow adequate air circulation around the appliance when in use. Do not place any objects on the heated surface of the appliance.
• Food may catch on fire during the cooking process, therefore check the sandwich maker regularly. If you notice smoke, disconnect the power plug
from the socket and extinguish the fire.
• Always disconnect the appliance from the power socket when leaving it unattended or when not in use or before cleaning.
• Allow the appliance to fully cool down before moving, cleaning and storing.
• Clean the grilling surfaces after each use, see the chapter Maintenance and cleaning.
• To avoid any injury by electrical shock, do not clean the appliance under running water and do not submerge in water or any liquid.
• Ensure that the power cord does not come into contact with water or moisture or aheated surface.
• Do not disconnect the appliance from the power socket by pulling on the power cord. This could damage the power cord or the power socket.
Disconnect the cord from the power socket by gently pulling the plug of the power cord.
• To avoid the danger of injury by electrical shock, do not repair the appliance yourself or make any adjustments to it.
• Have all repairs or adjustments of the appliance performed at an authorised service centre. Tampering with the appliance during the warranty period
may void the warranty.
. . . . . . . . . . . . . . . . . . . . . . . . . . . . . . . . . . . . . . . . . . . . . . . . . . . . . . . . . . . . . . . . . . . . . . . . . . . . . . . . . . . . . . . . . . . . . . . . . . . . . . . . . . . . . . . . . . . . . . . . . . . . . . . . . . . . . . . . . . . .
EXPLANATION OF SYMBOLS PLACED ON THE PRODUCT OR INTHE ACCOMPANYING DOCUMENTATION
The product meets all the basic requirements of the applicable EU directives.
This symbol on products or accompanying documents means that used electric or electronic products must not be added to ordinary
municipal waste.
This symbol warns of ahot surface.
. . . . . . . . . . . . . . . . . . . . . . . . . . . . . . . . . . . . . . . . . . . . . . . . . . . . . . . . . . . . . . . . . . . . . . . . . . . . . . . . . . . . . . . . . . . . . . . . . . . . . . . . . . . . . . . . . . . . . . . . . . . . . . . . . . . . . . . . . . . .
- 3 -
07/2025
2025, .
• Thank you for purchasing our SENCOR product; we hope it will serve
to your satisfaction.
• Prior to using this appliance, please read the user manual thoroughly,
even in cases when you are already familiar with the use of similar
types of appliances. Use the appliance only as described in this
user manual. Keep the manual for future reference. If you pass the
appliance on to another person, ensure that this user manual is
included.
• Carefully unpack the appliance and make sure not to discard any part
of the packaging material until you have removed all its components.
It is recommended that you keep the original packaging, packing
material, receipt and confirmation of the extent of the seller'sliability
or warranty certificate at least for the duration of the legal right to
file adefect claim or the quality warranty. When transporting the
appliance, we recommend repackaging it in the original box provided
by the manufacturer.
. . . . . . . . . . . . . . . . . . . . . . . . . . . . . . . . . . . . . . . . . . . . . . . . . . . . . . . . . . . . . . . . . . . .
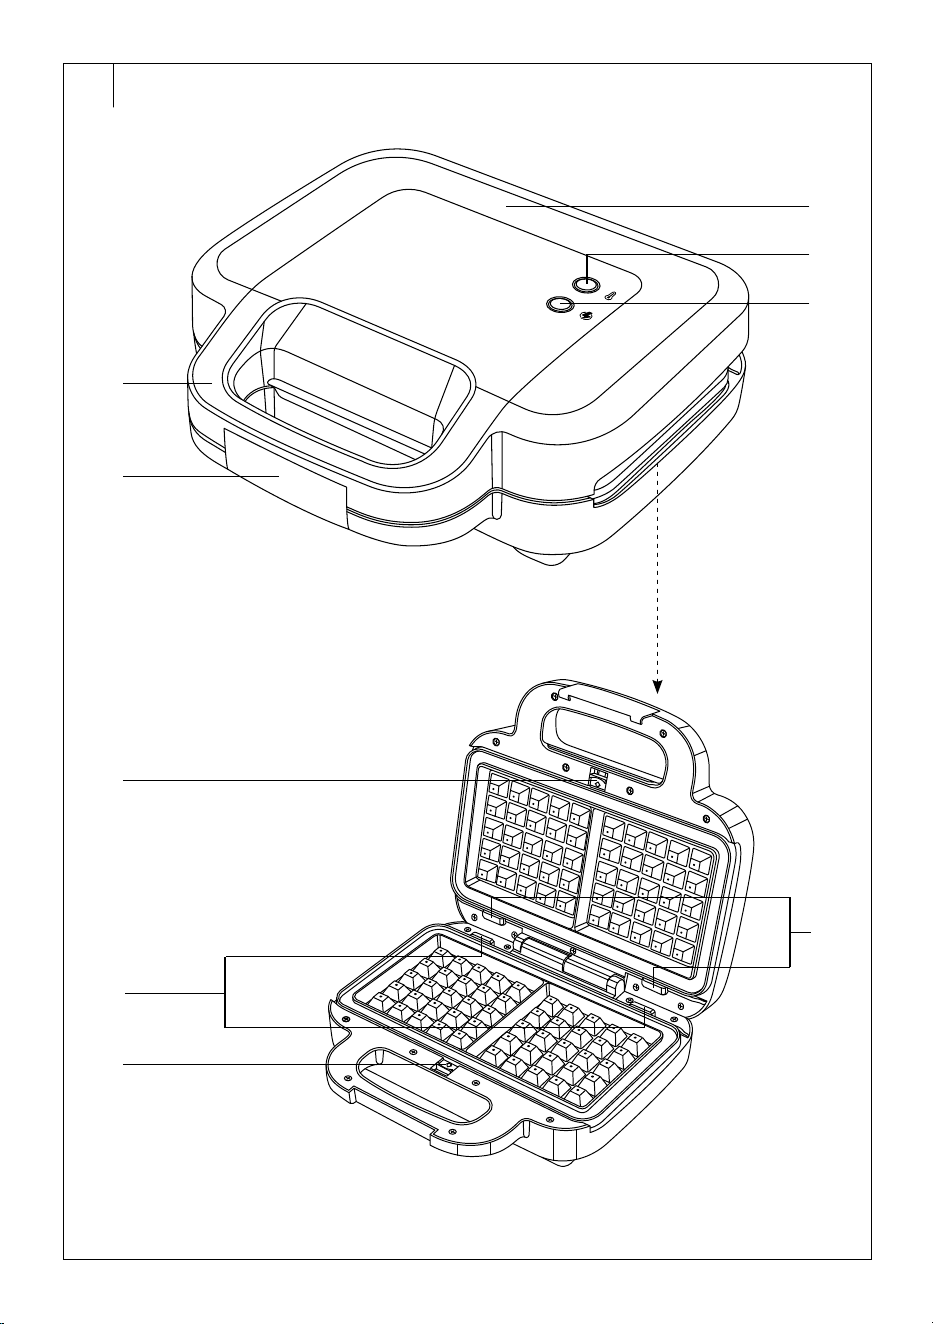
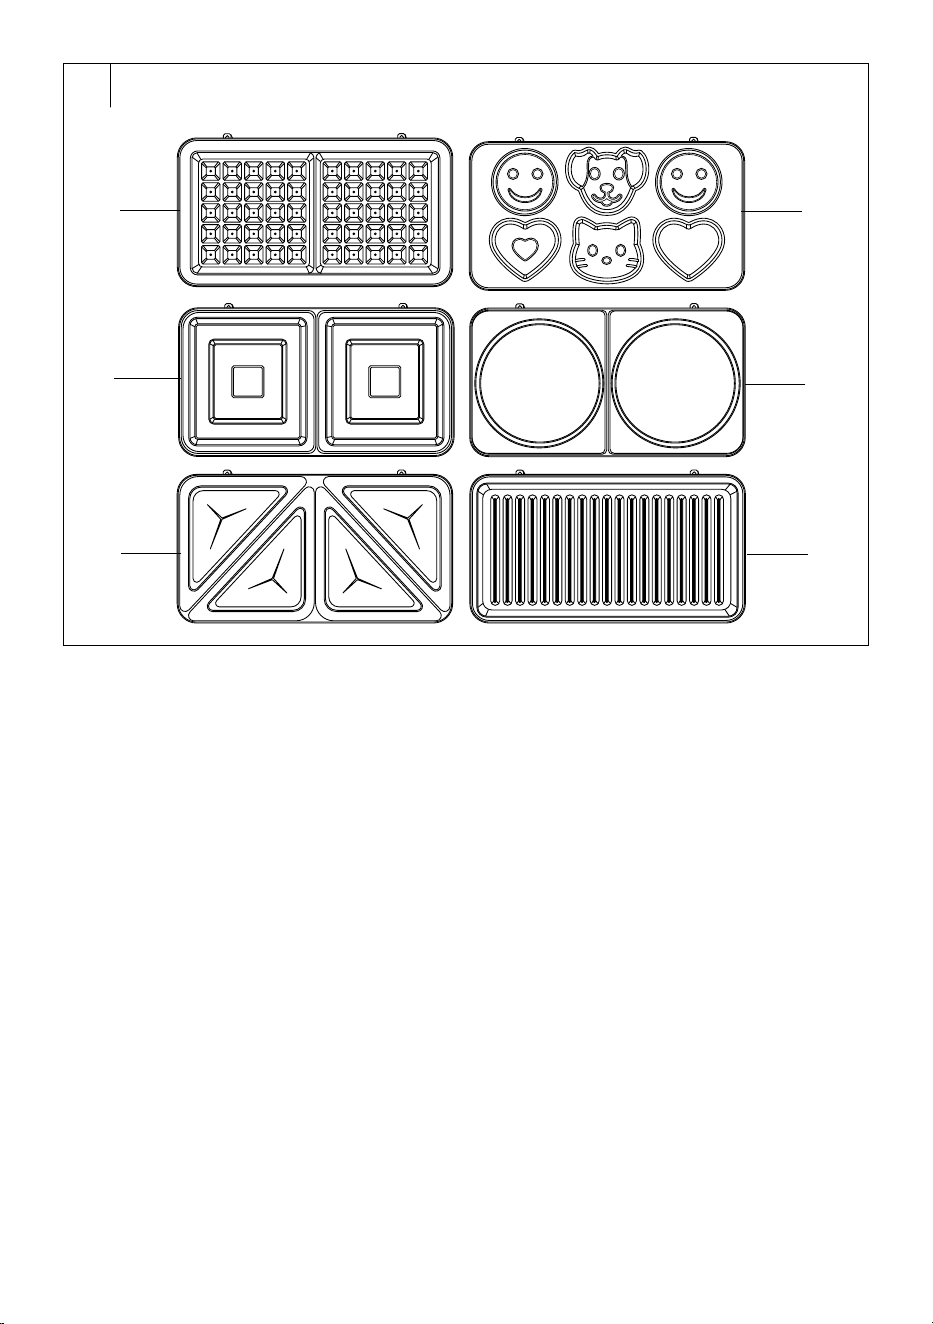
DESCRIPTION OF THE APPLIANCE
A1 Upper cover
A2 Green indicator light – signals
that the sandwich maker is
ready for use
A3 Red indicator light – signals
connection to the mains
power supply
A4 Thermally insulated handles
A5 Lock
A6 Upper baking plate release
button
A7 Top plate hinges
A8 Bottom plate hinges
A9 Bottom baking plate release
button
A10 Waffle baking plates
A11 Baking plates for square
sandwiches
A12 Baking plates for triangular
sandwiches
A13 Pancake plates
withachildren'smotif
A14 Pancake plates
A15 Panini baking plates
. . . . . . . . . . . . . . . . . . . . . . . . . . . . . . . . . . . . . . . . . . . . . . . . . . . . . . . . . . . . . . . . . . . .
BEFORE FIRST USE
• Before first use, remove the appliance and its accessories from the
packaging and discard all promotional labels and tags. Check that
neither the appliance nor any of its components is damaged.
• Open the top cover of the sandwich maker andremove the inserted
baking plates. Wipe all the baking plates using asoft sponge slightly
moistened with warm water. Then wipe dry with aclean cloth. Make
sure the plates are clean and dry.
• Before use, we recommend applying asmall amount of vegetable
oil to both plates and spreading it evenly. Remove excess oil using
apaper kitchen towel.
Note:
If you turn on the sandwich maker for the first time, you
may notice aslight smoke or aslight smell. This is anormal
occurrence which disappears with use.
Inserting/replacing the baking plates
Before inserting or replacing the baking plates, make sure that the power
cord fork is disconnected from the mains socket and the baking plates
are completely cooled down.
Removing the baking plate: press the A6 top plate release button in the
direction of the arrow marked on the button. This will release the baking
plate and allow you to take it out. In the same way release and remove
the bottom plate.
Installing the baking plate: insert the baking plate protrusions into the
hinges of the A7 top plate. Fold the plate down and push in towards the
casing of the sandwich maker until you hear an audible click. In the same
way, insert the baking plate into the hinges of the A8 bottom plate.
. . . . . . . . . . . . . . . . . . . . . . . . . . . . . . . . . . . . . . . . . . . . . . . . . . . . . . . . . . . . . . . . . . . .
OPERATING THE APPLIANCE
• Plug the power cord into the mains socket. The red indicator light
comes on and the sandwich maker starts to heat up.
• While the sandwich maker is heating up, prepare the sandwiches,
pancake batter, waffle batter or panini for baking.
• As soon as the green light turns off, the sandwich maker is ready for
use.
• Release the lock and lift the upper lid using the handle. Place the
prepared sandwiches onto the cooking plates.
• Carefully close the upper lid. Avoid applying excessive force to prevent
damage to the appliance. Secure the handles using the lock.
• Allow the sandwiches to toast for 2–3 minutes as required. Check the
state of browning regularly.
• Once the food is toasted, lift the upper lid using the handle and
carefully remove the sandwiches using awooden spatula or suitable
heat-resistant plastic utensil. Never use metal or sharp objects. You
could scratch the non-stick surface of the cooking plates.
• Repeat the process with the remaining food.
Note:
During the toasting process, the green indicator light will
turn on and off intermittently. This is normal. The sandwich
maker heats up to operating temperature.
• Once you have finished using the sandwich maker, unplug the power
cord from the mains socket and allow the appliance to cool down
before cleaning it.
Tips for Preparing Sandwiches
• Always allow the sandwich maker to heat up to its operating
temperature.
• Use smaller slices of bread when preparing sandwiches with asoft
filling.
• To enhance the flavour of your sandwich, use flavoured butters.
• Brush bacon sandwiches with bacon drippings. The sandwiches will
be more delicious.
• For garnish, we recommend using lettuce leaves, mint leaves, garden
cress, pickled olives, sliced onion, tomatoes, and similar ingredients.
• If you are preparing sweet sandwiches with afruit filling, sprinkle
alittle sugar on the outside of the sandwich. This will make the
sandwich crispier and give it acaramelised flavour.
. . . . . . . . . . . . . . . . . . . . . . . . . . . . . . . . . . . . . . . . . . . . . . . . . . . . . . . . . . . . . . . . . . . .
CLEANING AND MAINTENANCE
• Before cleaning, disconnect the power plug from the mains socket and
allow the appliance to cool down.
• Do not use abrasive cleaning agents, solvents, etc. to clean any parts
of the appliance, as these could damage the surface.
• Do not use scouring pads or sponges with abrasive surfaces to clean
the cooking plates. No part of this appliance is suitable for cleaning in
adishwasher.
Caution:
To prevent the risk of electric shock, do not immerse
the appliance, power cable, or plug into water or any
other liquid.
• Release the lock and lift the upper lid using the handle. Take out the
baking plates.
• Wipe the used baking plates using asoft sponge slightly moistened
with warm water. Then wipe dry with aclean cloth. Make sure the
plates are clean and dry.
EN
Sandwich Maker (6in1)
User Manual
- 4 -
07/2025
2025, .
• Wipe the appliance outer surface with asoft sponge slightly
moistened in warm water. Then wipe dry with aclean cloth.
• After cleaning, we recommend applying asmall amount of vegetable
oil to both plates and spreading it evenly. Remove excess oil using
apaper kitchen towel.
Storage
• If the appliance will not be used for an extended period, unplug it
from the power socket, let it cool down, and clean it following the
instructions provided above.
• Before storing, ensure that the appliance and all accessories are
thoroughly clean and dry.
• Store the appliance in adry, clean, and well-ventilated place away
from extreme temperatures and out of the reach of children or pets.
. . . . . . . . . . . . . . . . . . . . . . . . . . . . . . . . . . . . . . . . . . . . . . . . . . . . . . . . . . . . . . . . . . . .
TECHNICAL SPECIFICATIONS
Rated voltage range ..............................................................................220–240 V~
Rated frequency ...........................................................................................50/60 Hz
Rated power input ............................................................................................1000 W
. . . . . . . . . . . . . . . . . . . . . . . . . . . . . . . . . . . . . . . . . . . . . . . . . . . . . . . . . . . . . . . . . . . .
Values provided according to Commission Regulation EU
2023/826
Off mode
Power consumption in off mode 0 W
Time needed for the equipment to automatically reach
off mode
0 min
Standby Mode
Power consumption in standby mode –
Time needed for the equipment to automatically reach
standby mode
–
Networked standby mode (Wi-Fi)
Power consumption in networked standby –
Time needed for the equipment to automatically reach
networked standby mode
–
. . . . . . . . . . . . . . . . . . . . . . . . . . . . . . . . . . . . . . . . . . . . . . . . . . . . . . . . . . . . . . . . . . . .
INSTRUCTIONS AND INFORMATION ON DISPOSAL
OF USED PACKAGING MATERIAL
Dispose of used packaging material at the designated municipal waste
disposal site.
. . . . . . . . . . . . . . . . . . . . . . . . . . . . . . . . . . . . . . . . . . . . . . . . . . . . . . . . . . . . . . . . . . . .
DISPOSAL OF USED ELECTRICAL AND ELECTRONIC
EQUIPMENT
Used electrical andelectronic products must not be disposed of in
ordinary municipal waste. To enable the proper disposal, renewal and
recycling of these products, deliver them to the designated collection
points. Alternatively, in some European Union states or other European
countries the products can be returned to the local retailer when buying
an equivalent new product. By disposing of this product correctly, you
help to conserve valuable natural resources and prevent any potential
adverse impact on the environment and human health that could result
from improper waste disposal. For more details, contact your local
authority or nearest collection point. Fines may be imposed for the
improper disposal of this type of waste as per national regulations.
For business entities in European Union States
If you wish to dispose of electrical and electronic equipment, please
request the necessary information from your retailer or supplier.
Disposal in other countries outside the European Union
To dispose of this product elsewhere, request the necessary information
on the correct disposal method from local authorities or your retailer.
. . . . . . . . . . . . . . . . . . . . . . . . . . . . . . . . . . . . . . . . . . . . . . . . . . . . . . . . . . . . . . . . . . . .
Changes to text and technical parameters are reserved.