Please read all the instructions before using and keep it well for future reference.
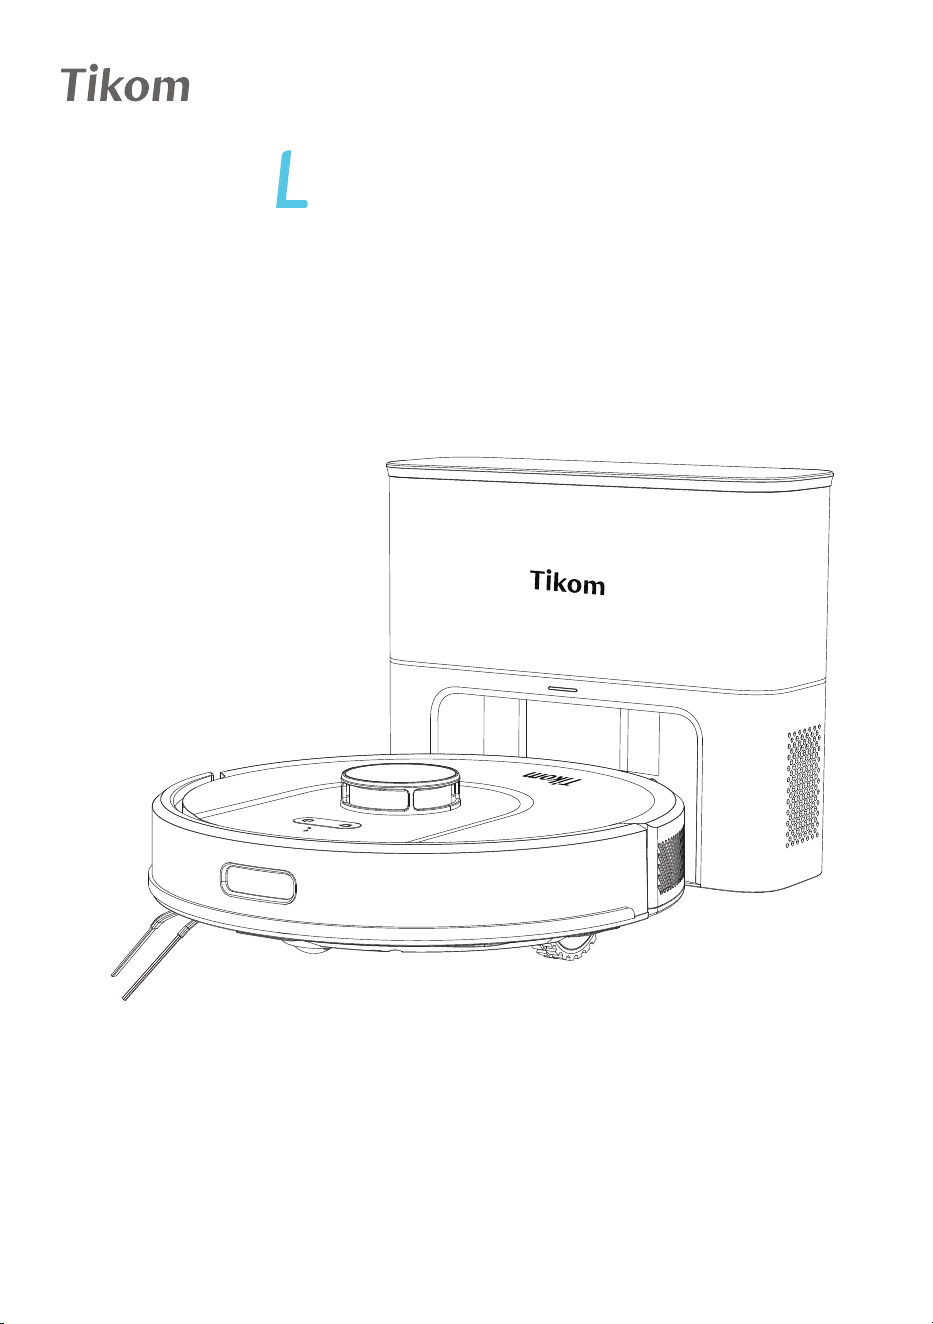
User Manual
Robot Vacuum Cleaner
8000 Plus
Support & Rewards
CONTENTS
1. Important Safety Instructions
2. About Robot
2.1 What’s in the Box
2.2 Product Overview
2.2.1 Robot Overview
2.2.2 Dust Bin & Water Tank
2.2.3 Self-Empty Base Overview
2.3 LED Indication
2.3.1 Robot Status Light
2.3.2 Wi-Fi Status Light
2.3.3 Self-Empty Base Status Light
3. Using Robot
3.1 Getting Started
3.2 Important Tips Before Usage
3.3 Power On/Off Robot
3.4 Connect Robot with App
3.4.1 App Downloading and Installation
3.4.1.1 App Downloading
3.4.1.2 App Registration and Login
3.4.2 Wi-Fi Connection Requirements
3.4.2.1 Mobile Device Requirements
3.4.2.2 Robot Requirements
3.4.2.3 Wi-Fi Requirements
3.4.3 Wi-Fi Status Light
3.4.4 Connect Robot with Wi-Fi
01
04
04
05
05
06
07
09
09
10
10
11
11
15
17
18
18
18
18
19
19
19
19
20
20
3.4.4.1 Connect Wi-Fi with Quick Mode
3.4.4.2 Connect Wi-Fi with AP Mode
3.5 APP Page Introduction
3.5.1 Robot Map Page
3.5.2 Robot Functional Setting Page
3.6 Whole Home Cleaning
3.6.1 Smart Cleaning
3.6.1.1 First time cleaning (No map in APP)
3.6.1.2 Smart Cleaning with map in APP
3.6.2 Map Edit
3.6.3 Customized Cleaning
3.6.4 Restricted Zone Setting
3.6.5 Map Management
3.6.6 Suction Power Setting
3.6.7 Spot Clean
3.6.8 Select Room Cleaning
3.6.9 Custom Area Cleaning
3.6.10 Schedule Cleaning
3.6.11 Do-Not-Disturb Mode
3.6.12 Carpet Boost
3.6.13 Resume Cleaning
3.6.14 Work with Amazon Alexa or Google Assistant
3.6.15 Firmware Update
3.7 Start with Tuya Smart APP
3.8 Charging
3.9 Mopping the Floor
21
21
24
24
26
28
28
28
29
30
36
39
44
45
45
46
47
47
47
47
47
48
50
51
53
54
3.11 Sleep Mode
3.12 Error
3.13 Restart Robot
3.14 How to Trigger Dust Collection on Demand
3.15 How to Set the Dust Collection Frequency
4. Maintenance and Care
4.1 Cleaning and Replacement Frequency
4.2 Clean Dust Bin, Filter & Water Tank
4.3 Clean Mopping Cloth
4.4 Clean Main Brush
4.5 Clean Side Brush
4.6 Replace the Dust Bag
4.7 Clean Sensor and Charging Contacts
4.8 Clean Caster Wheel
5. Troubleshooting
5.1 Error & Voice Alarm
5.2 Frequently Asked Question
5.3 Wi-Fi Connection
5.3.1 Wi-Fi Setup Requirement
5.3.1.1 Mobile Device Requirement
5.3.1.2 Robot Requirement
5.3.1.3 Wi-Fi Requirement
5.3.2 Wi-Fi Connection troubleshooting
6. Specifications
7. Customer Service
3.10 Standby Mode
57
57
57
58
59
60
61
61
63
64
66
67
68
69
71
72
72
76
86
86
86
86
86
87
89
90

1.Important Safety Instructions
PLEASE READ CAREFULLY BEFORE USE • FOR HOUSEHOLD USE ONLY
To reduce the risk of injury or damage, read these safety instructions carefully and keep
them at hand when setting up, using, and maintaining this device.
This robot could be used by users aged from 8 years and above, but for the persons
with reduced physical, sensory or mental capability, or by people who are lack of
related experience and knowledge, only if they have received proper supervision or
instructions by a professional who knows how to use the robot in a safe way and
understand the hazards involved.
DO NOT let children or your pet play with the robot. Do not allow them to sit or
stand on the robot either.
DO NOT let the robot to clean a room where an infant or child is unattended.
DO NOT handle any part of the robot with wet hands.
DO NOT operate the robot on the wet surfaces, or in a bathroom, or near a pool.
DO NOT spill any water on the robot, or expose it to any moisture, rain or snow.
DO NOT allow robot to clean anything wet, like paint, chemicals, etc.
DO NOT utilize the robot to clean flammable or combustible liquids, such as petrol,
perfume.
DO NOT utilize the robot to pick up anything that is burning or smoking, such as
cigarettes, matches, or hot ashes, etc., to avoid catching fire.
DO NOT operate the robot in the room where there are open fireplaces, lit candles
or fragile objects on the floor or where there are candles on candlesticks, tables, etc.,
which may accidentally hit or bump into, thus leading to fire or causing damage to
the appliance.
DO NOT place anything on the robot or hit against the robot.
NEVER use the power cable or plug that partly damaged.
DO NOT operate this robot in areas where exist exposed electrical outlets on the
floor.
DO NOT operate the robot on waxed floor, which may result in the damage to the
robot or the floor. It's recommended to use the robot on any hard or carpeted floors.
This robot is designed to be used on floors without scratching them. Before cleaning
your whole house, it's advised to perform a pre-test on your floor to ensure that no
scratches are made.
Ensure that everyone in the room is aware of the robot when cleaning to avoid
stepping on it or the tripping hazard.
Make sure the Dust Bin or the Filter are in place before using this robot.
Remove all power cords and other items that could get tangled in the robot from the
area to be cleaned before use.
Before cleaning, please pick up some objects like loose clothing or paper due to the
limited size of the openings. Otherwise, the openings may be blocked.
Keep the robot free of line, hair, and anything that may reduce airflow.
Clean the robot with a dry or damp cloth.
02
01

The Power Adapter of Self-Empty Base must be removed from the socket before
cleaning robot or maintaining robot.
Cleaning and maintenance shall not be done by the children without any adult
supervision.
Unplug the Self-Empty Base when not in use for extended periods.
DO NOT use the accessories or replacement parts from unauthorized channels. Only
use the ORIGINAL parts provided by Tikom. Please directly contact us whenever they
are needed.
We assume no liability or responsibility for any fire, explosion or electrical shock
caused by improper operation.
BATTERY
A rechargeable Li-ion battery is installed in the robot.
DO NOT attempt to disassemble or replace the battery in the robot by yourself as the
incorrect operation might cause overheating, fire or injury.
DO NOT expose the battery pack inside of the robot to any fire, heat source, direct
sunlight or high temperature, which may result in the risk of explosion.
DO NOT dispose of this robot or the battery pack in fire, any water or other liquids to
avoid the risk of explosion.
The Li-ion battery in the robot should be serviced or recycled by an authorized
service provider, and must be recycled or disposed of separately from household
waste. Dispose of the battery according to your local environmental laws and
regulations.
FCC Caution
Any Changes or modifications not expressly approved by the party responsible for
compliance could void the user's authority to operate the equipment.
This device complies with part 15 of the FCC Rules. Operation is subject to the following
two conditions:
This device may not cause harmful interference.
this device must accept any interference received, including interference that may
cause undesired operation.
02
02

Note:
This equipment has been tested and found to comply with the limits for a Class B digital
device, pursuant to part 15 of the FCC Rules. These limits are designed to provide
reasonable protection against harmful interference in a residential installation. This
equipment generates, uses and can radiate radio frequency energy and, if not installed
and used in accordance with the instructions, may cause harmful interference to radio
communications. However, there is no guarantee that interference will not occur in a
particular installation. If this equipment does cause harmful interference to radio or
television reception, which can be determined by turning the equipment off and on, the
user is encouraged to try to correct the interference by one or more of the following
measures:
—Reorient or relocate the receiving antenna.
—Increase the separation between the equipment and receiver.
—Connect the equipment into an outlet on a circuit different from that to which the
receiver is connected.
—Consult the dealer or an experienced radio/TV technician for help.
This equipment complies with FCC radiation exposure limits set forth for an uncontrolled
environment .This equipment should be installed and operated with minimum distance
20cm between the radiator&your body.
This transmitter must not be co-located or operating in conjunction with any other
antenna or transmitter.
ISED Warning
Le present appareil est conforme aux CNRd'Industrie Canada applicables aux appareils
radio exempts de licence. Sexploitation est autorisee aux deux conditions suivantes:
The device is compliance with RF exposure guidelines, users can obtain Canadian
information on RF exposure and compliance.The minimum distance from body to use
the device is 20cm. Le present appareil est conforme Apres examen de ce materiel
auxconformite ou aux limites d'intensite de champ RF, les utilisateurs peuventsur T
exposition aux radiofrequences et la conformite and compliance d'acquerir les
informations correspondantes.
La distance minimale du corps a utiliser le dispositif est de 20cm.
This device complies with Industry Canada licence-exempt RSS standard(s). Operation is
subject to the following two conditions:
this device may not cause interference,
this device must accept any interference, including interference that may cause
undesired operation of the device.
I'appareil ne doit pas produire de brouillage,
I'utilisateur de I'appareil doit accepter tout brouillage radioelectrique subi, meme si le
brouillage est susceptible d'en compromettre lefonctionnement.
02
03
2. About Robot
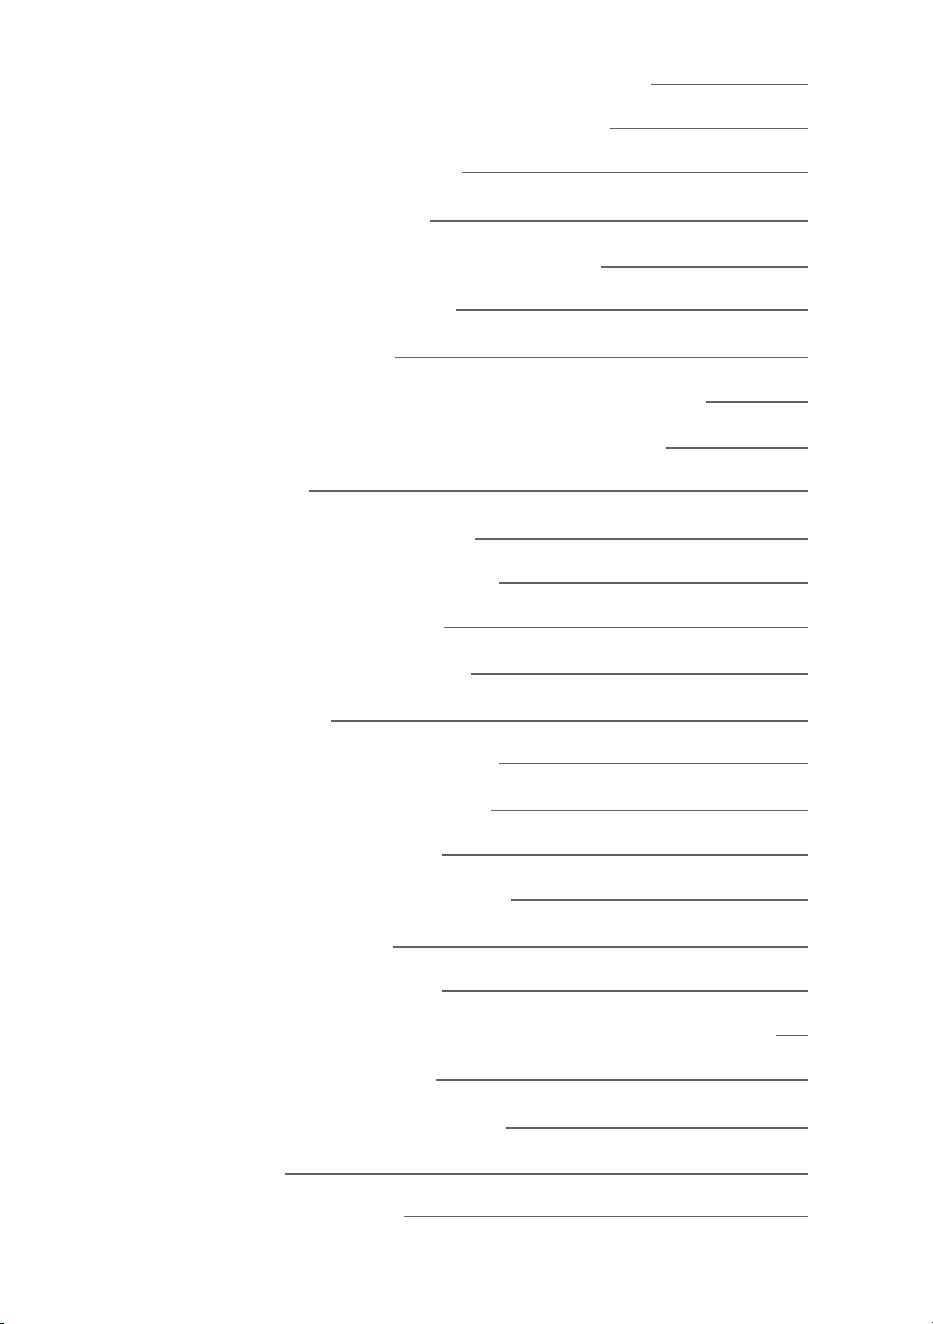
2.1 What’s in the Box
Side Brushes x 2
( In the Self-Empty Base )
Quick Start GuideUser Manual
Robot Vacuum Cleaner Self-Empty Base
Cleaning Brush
( In the Self-Empty Base )
Spare HEPA Filter & Sponge
( In the Self-Empty Base )
Mopping Cloth Holder
Spare Mopping Cloth
( In the Self-Empty Base )
Cable Ties x 5
( In the Self-Empty Base )
Spare Dust Bag
( In the Self-Empty Base )
Spare Dust Bin Transparent
Blocking Plate x2
(In the Self-Empty Base)
Figures and illustrations are for reference only and may differ from actual product appearance.
Product design and specifications are subject to changes without notice.
Notes:
02
04
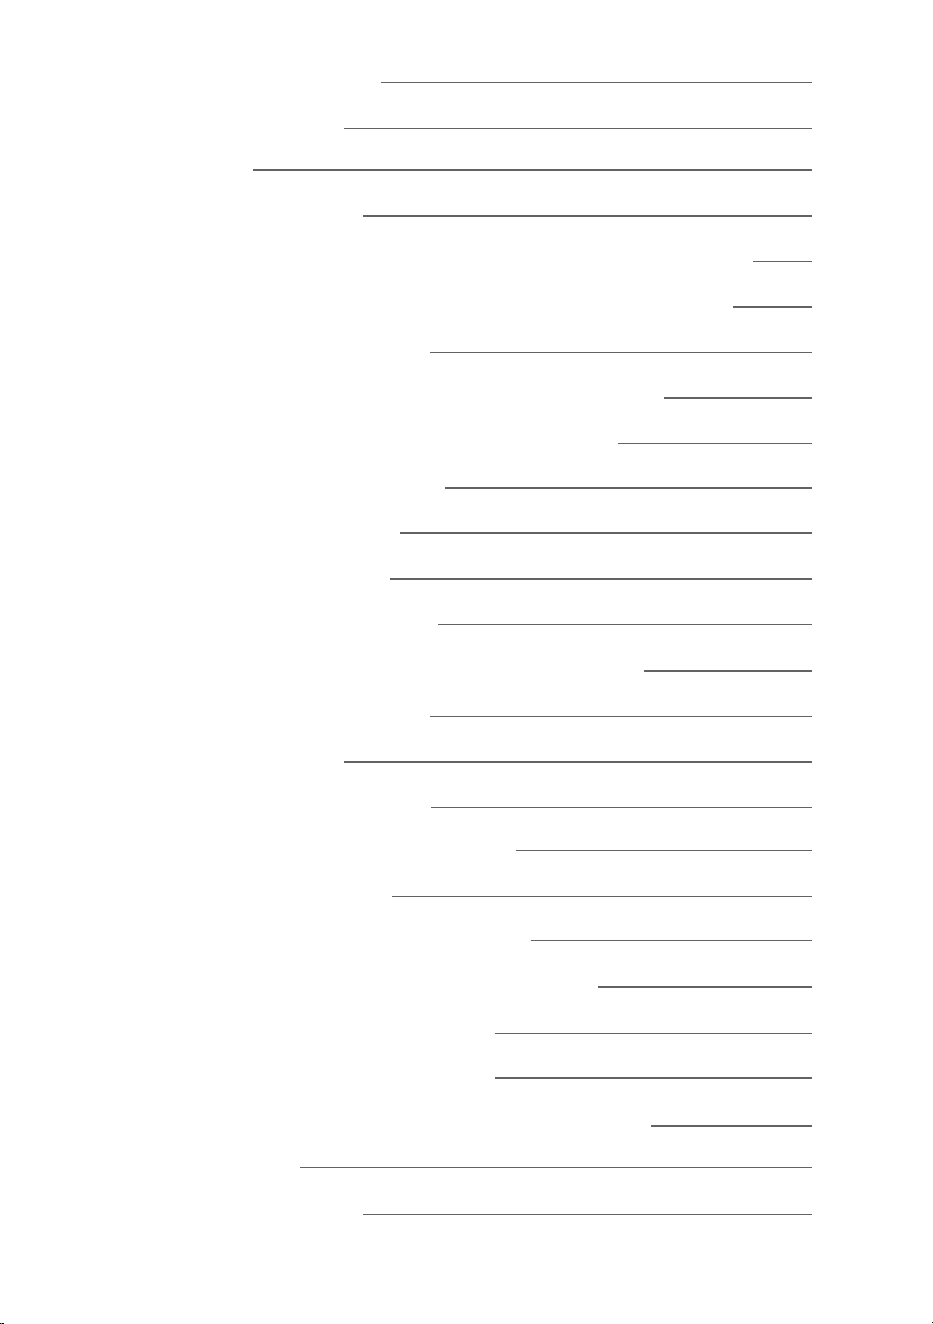
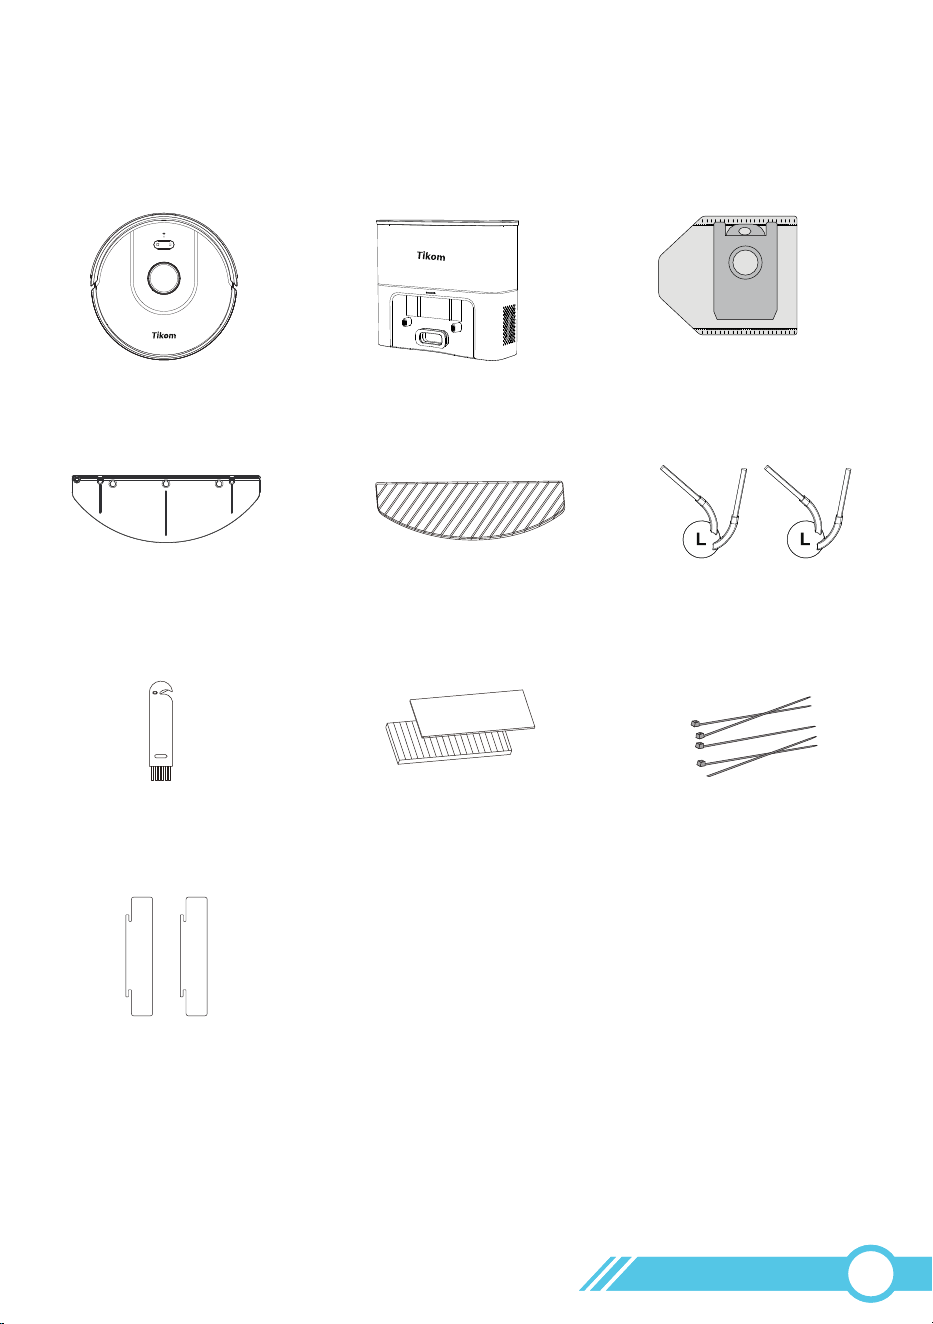
2.2 Product Overview
Front Bumper
Release Button of Dust Bin
Dust Bin & Water Tank
Mopping Cloth Holder
Laser Distance Sensor (LDS)
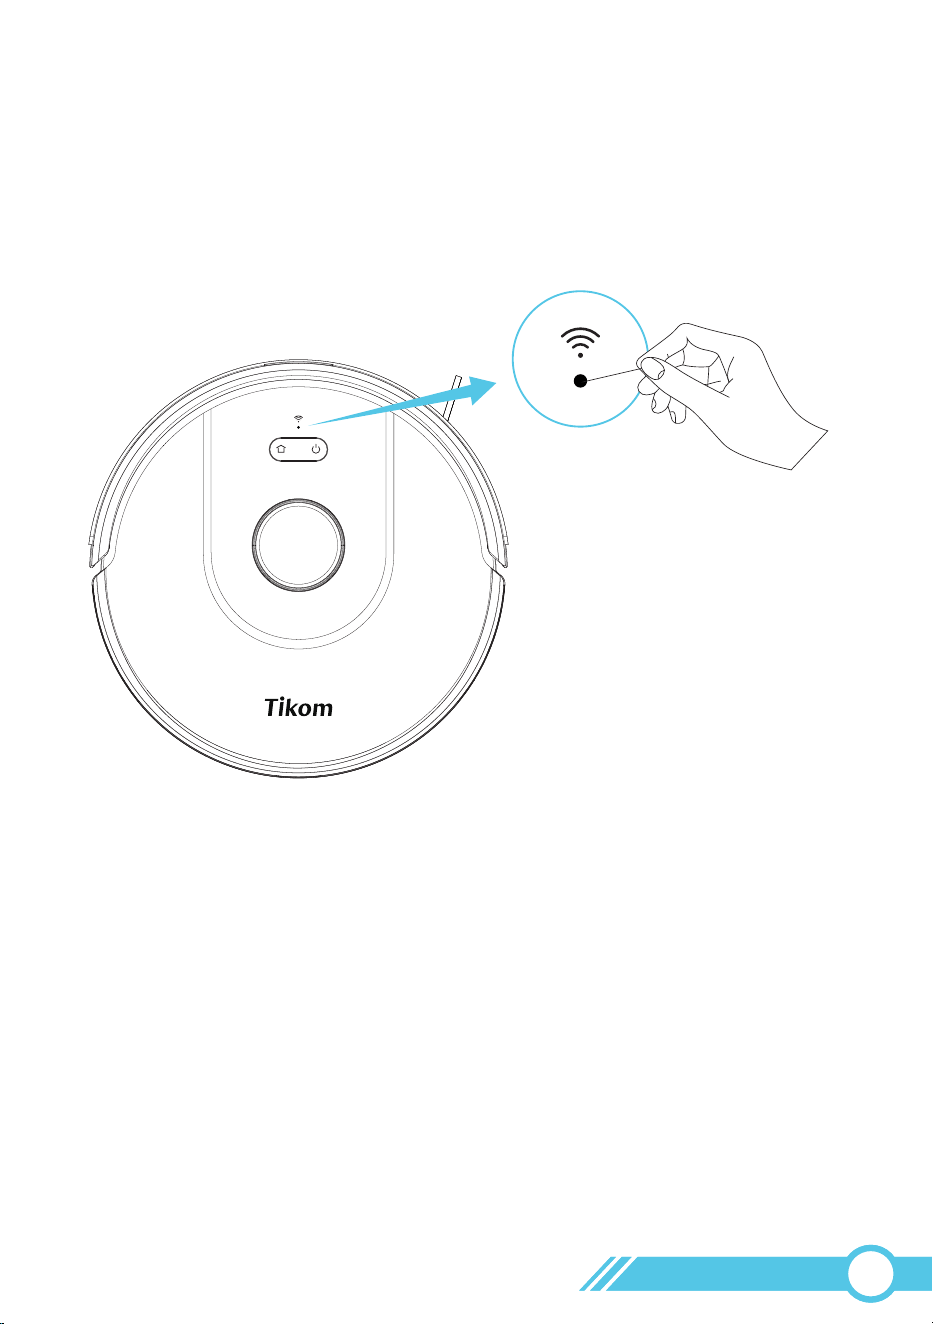
Wi-Fi Status Light & Reset Button
ON :Wi-Fi Connected
Flash :Wi-Fi not connected
Off :Sleep Mode or Power off
Reset Robot : Use a needle
to press this Wi-Fi LED Status Light
Clean/Power Button
Power on or Power off Robot :
Press and hold this button 3s.
Start / Stop Cleaning :Short press this button.
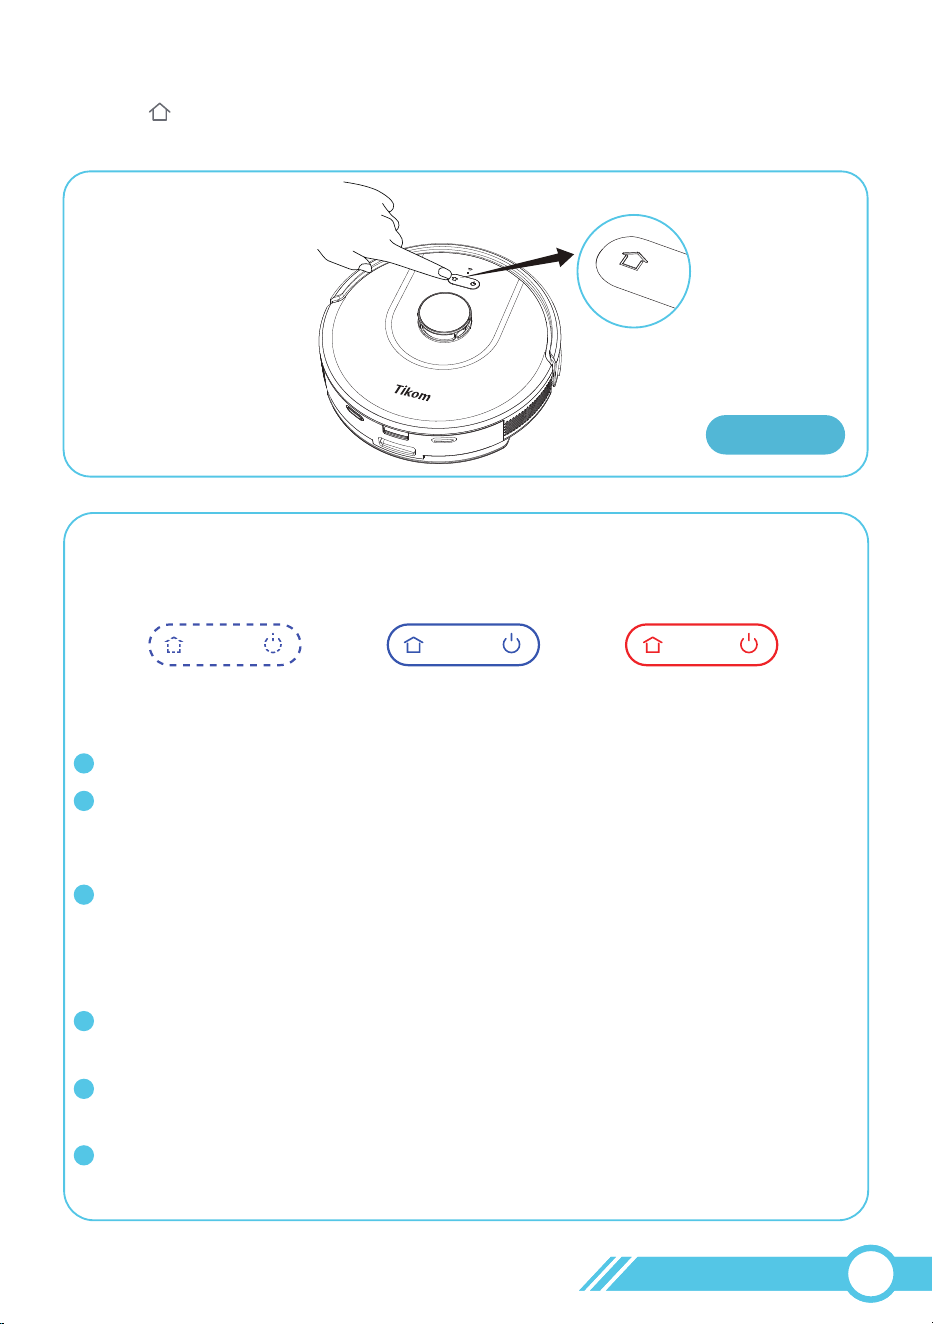
Home Button
Return to Self-Empty Base :
Short press this button.
Reset Wi-Fi :
Press and hold and buttons for 3s in the same time.
Robot Status Light
SolidBlue :FullCharged (OnSelf-Empty Base)
Normal(NotonSelf-Empty Base)
FlashBlue :Charging(OnSelf-Empty Base)
SolidRed :LowBattery
FlashRed :Abnormal
Off :Power Off or Sleep Mode
2.2.1 Robot Overview
Status Light
Side View
02
05
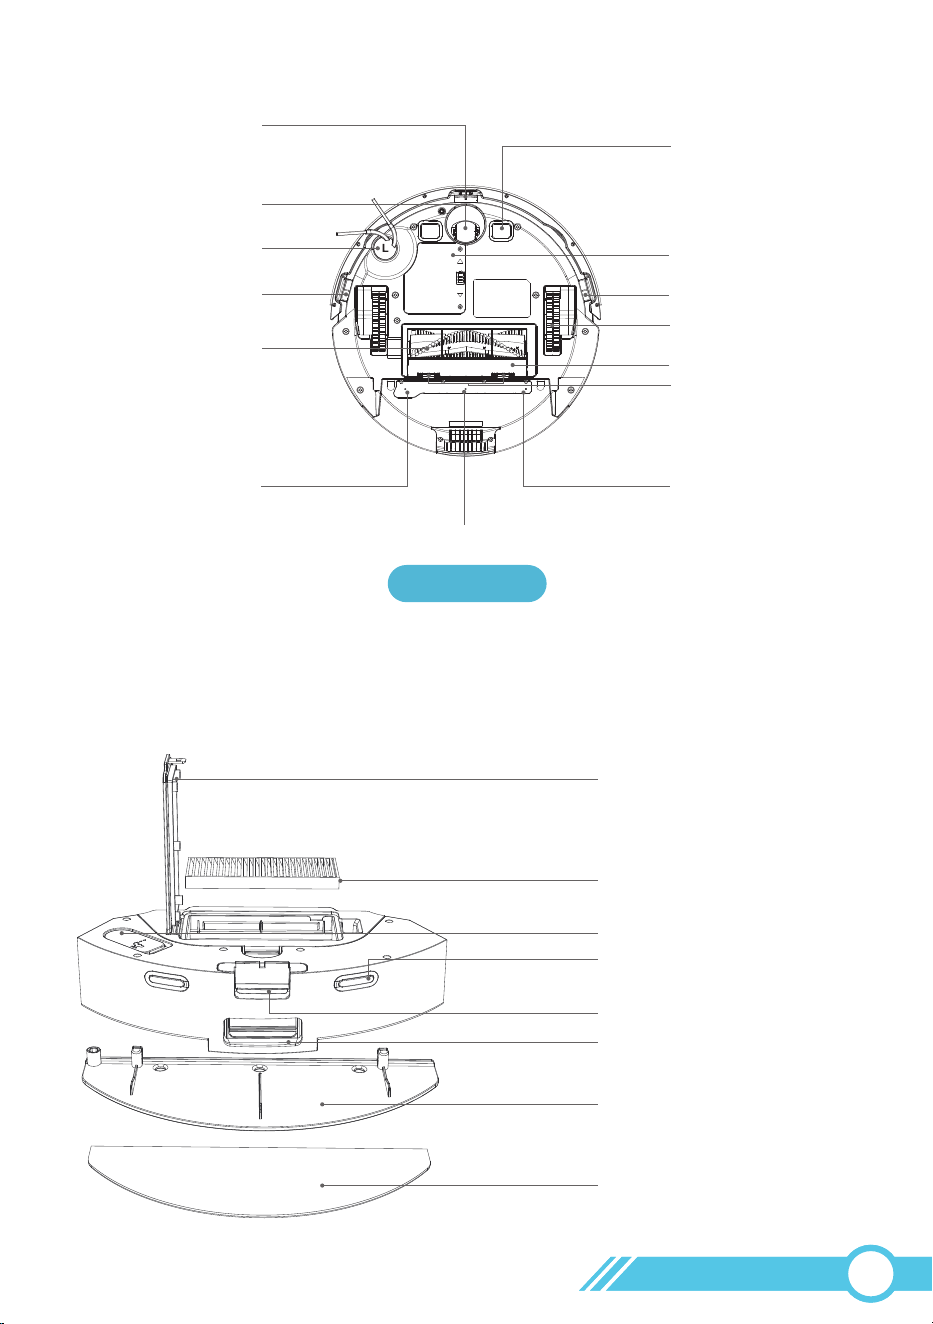
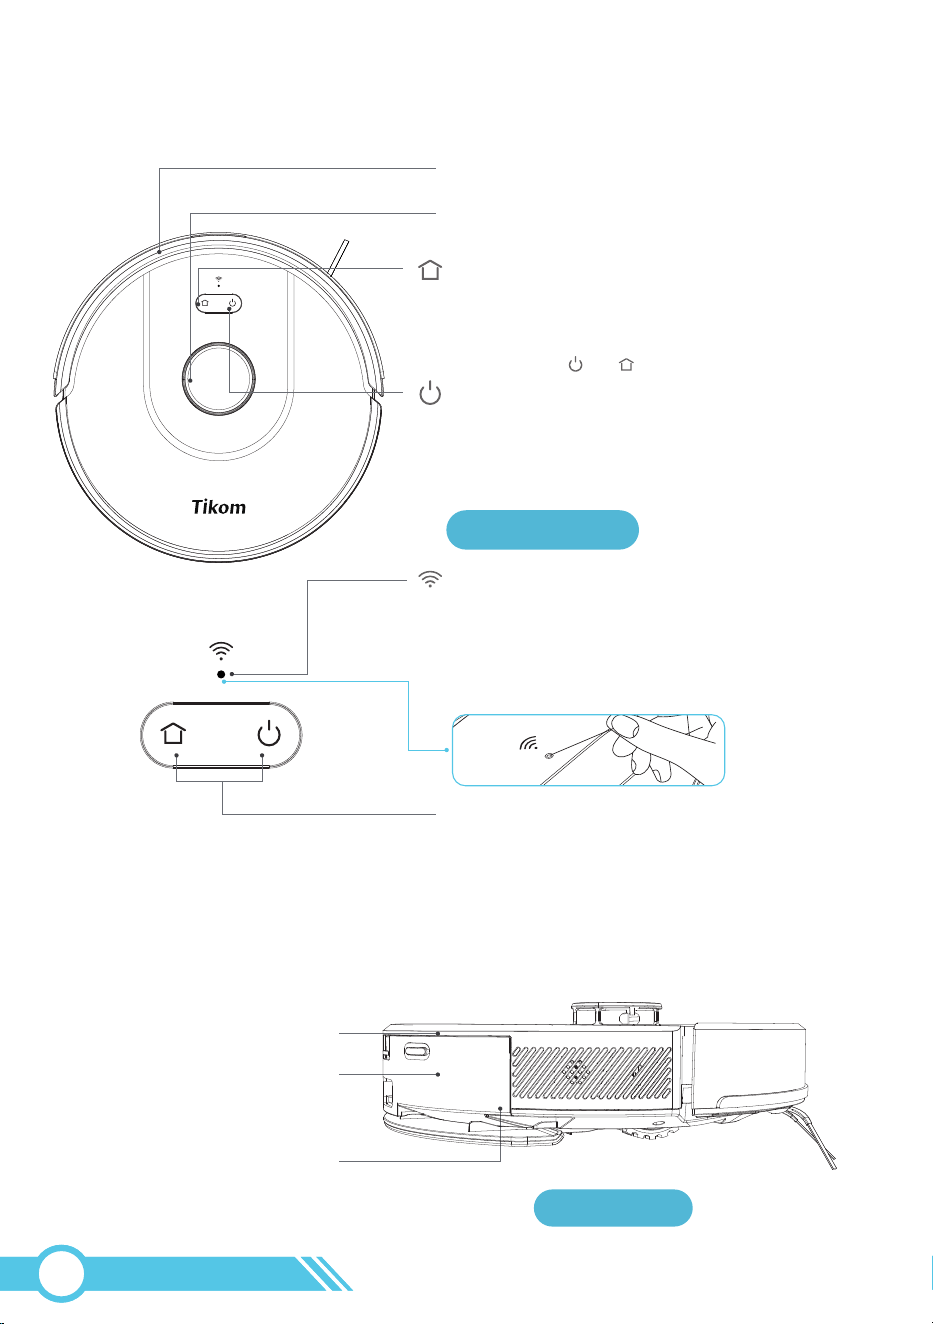
Filter Cover
HEPA Filter
Water Inlet
Dust Outlet Port to
Self-Empty Base
Charging Contacts on Dust Bin
(For Self-Empty Base)
Dust Bin Release Button
Mopping Cloth Holder
Mopping Cloth
Anti-drop Sensor
Prevent robot from tumbling down stairs
Anti-drop Sensor
Anti-drop Sensor
Caster Wheel
Side Brush
Main Brush
Water Outlet
Water Outlet
Water Outlet
Wheel
Brush Guard
Charging Contact
Battery Compartment
Release Switch
of Brush Guard
2.2.2 Dust Bin & Water Tank
Bottom View
02
06
Water Control Contact
Dust Bin Transparent Blocking Plate
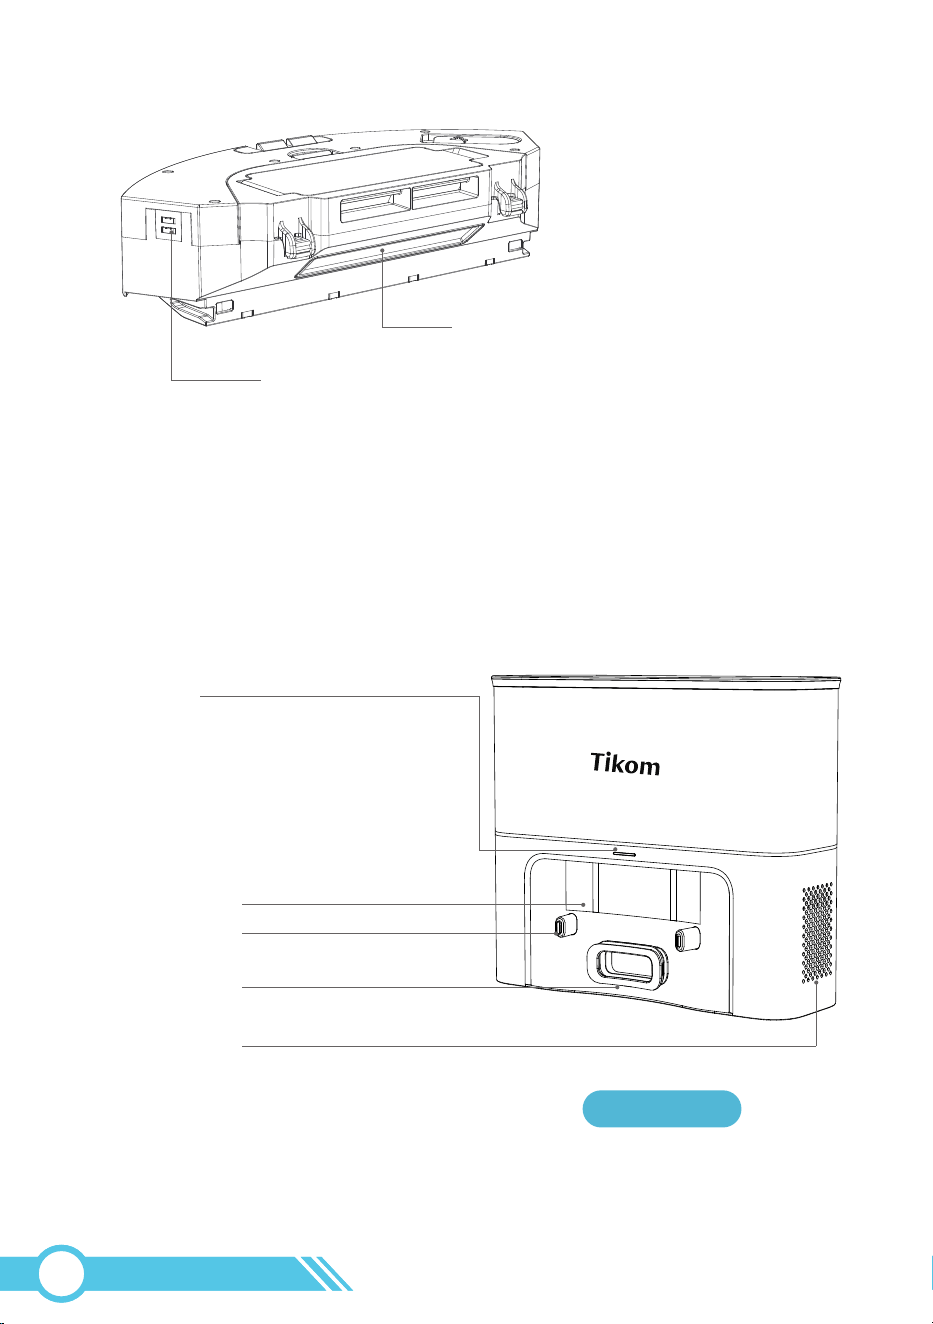
2.2.3 Self-Empty Base Overview
Front View
Charging Contact
Infrared Sensor
LED Indicator
Vacuuming Port
Exhaust Vent
Solid White: Robot not connected to station
Blinking White: Robot docking in progress
Off: Not receiving power
Solid Red: Dust bag not installed or improperly
installed
02
07
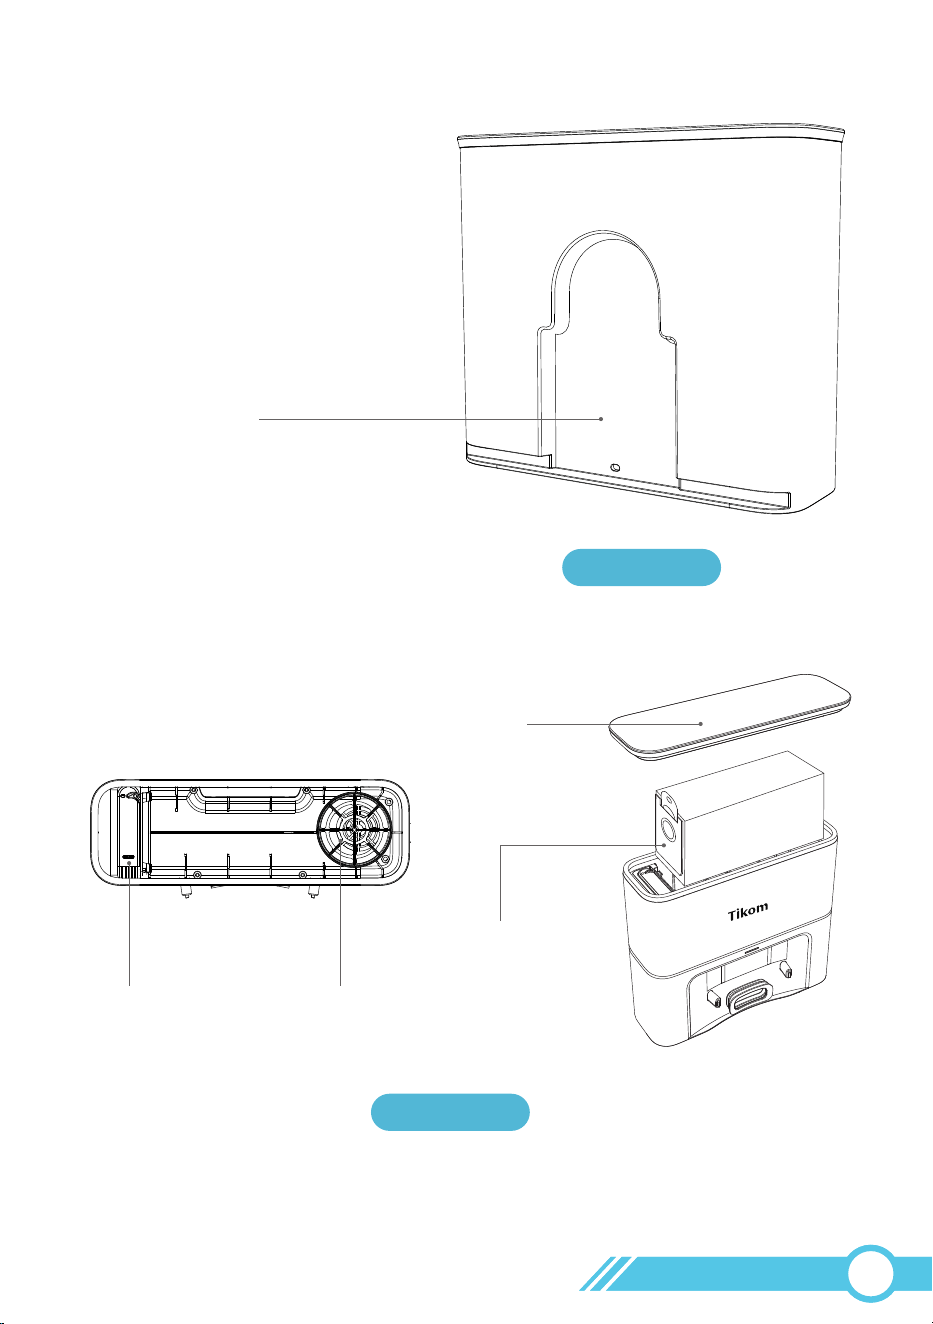
Back View
Top View
Top Cover
Disposable Dust Bag
Fan FilterCleaning Brush
Cord Tidy Slot
02
08
2.3 LED Indication
On Self-Empty Base Fully charged.
Cleaning In cleaning mode.
In standby mode;
Manually stopped by user.
The robot automatically returns to its
Self-Empty Base to recharge when either :
1. Cleaning is completed
2. Commanded by the user
Back to
Self-Empty Base
Stop & Not on
Self-Empty Base
Solid blue
Robot Status Light Robot Condition
Not in use and
not on the
Self-Empty Base
Status
1. When the robot stops cleaning and
encounters errors, it will enter Standby Mode.
2. If the robot remains in Standby Mode for
10 minutes, it will then enter Sleep Mode.
3. To awaken the robot, you can either:
-Short press the power button
-Use the Tuya Smart App
In sleep mode:
Off
1. The robot automatically returns to its
Self-Empty Base to recharge when the
battery level is low.
2. If the "Resume Cleaning" function on the
Tuya Smart App is enabled, the robot will
resume cleaning from the point where it had
previously stopped once its battery level
reaches above 80% after charging.
Back to
Self-Empty Base
Solid red
1. The robot will display an error message and
provide a voice prompt to alert you to the
specific issue.
2. Alternatively, you can use the Tuya Smart
App to identify the exact error.
3. For more detailed troubleshooting
information on errors, please refer to Section
5.1 "Error & Voice Alarm" on Page 72.
StopFlash red
Charging.
On Self-Empty Base
Flash blue
2.3.1 Robot Status Light
02
09
Meanings
1. After pressing and holding the and
buttons simultaneously for 3 seconds, the
robot will announce, “Wi-Fi reset, ready for
Wi-Fi connection”.
2. Follow the instructions provided in the Tuya
Smart App for connecting to Wi-Fi.
3. For further information on Wi-Fi connection,
please refer to section “3.4 Connect Robot
with App” on page 18.
1. If the robot's Wi-Fi connection fails,
please reset the Wi-Fi connection or restart
the robot.
2. If the robot broadcasts the message “Wi-Fi
connection successful” and flashes blue,
it indicates that the robot has successfully
connected to your home router but not to
the Tuya Smart App server. Please wait for
a few hours before rechecking.
The robot has successfully connected to both
Wi-Fi and the App server.
The robot is in sleep mode or powered off.
Robot Condition
During Wi-Fi setup
Robot power on
Robot power on
/
Wi-Fi Status Light
Off
Flash Blue
Solid Blue
2.3.2 Wi-Fi Status Light
2.3.3 Self-Empty Base Status Light
02
10
No dust bag installed or improperly installed.
The Self-Empty Base is not receiving power.
White
Red
Off
Self-Empty Base ConditionsSelf-Empty Base Status Light
Solid White: Robot not connected to station
Blinking White: Robot docking in progress
3. Using Robot
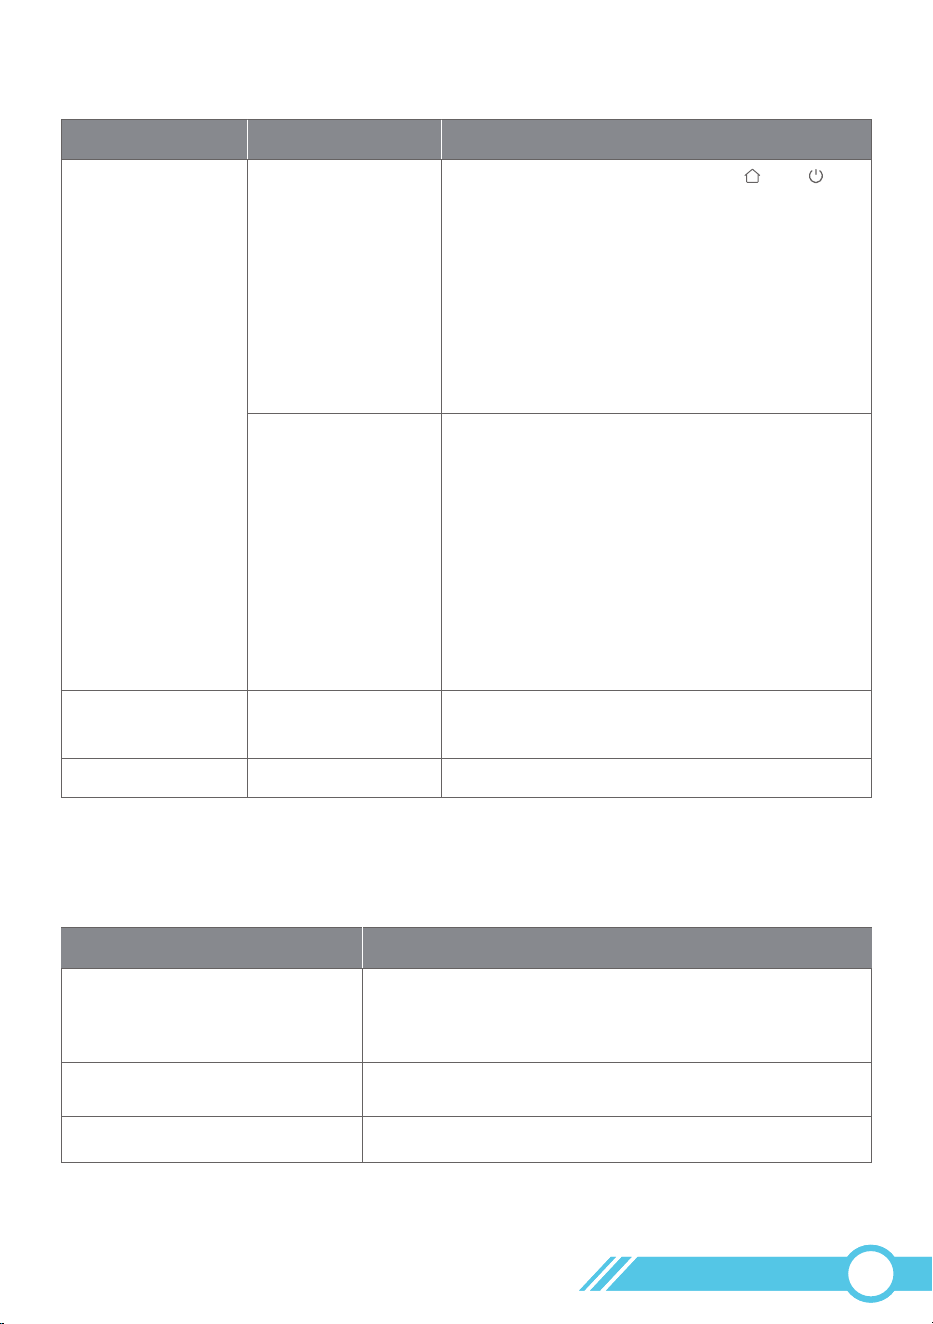
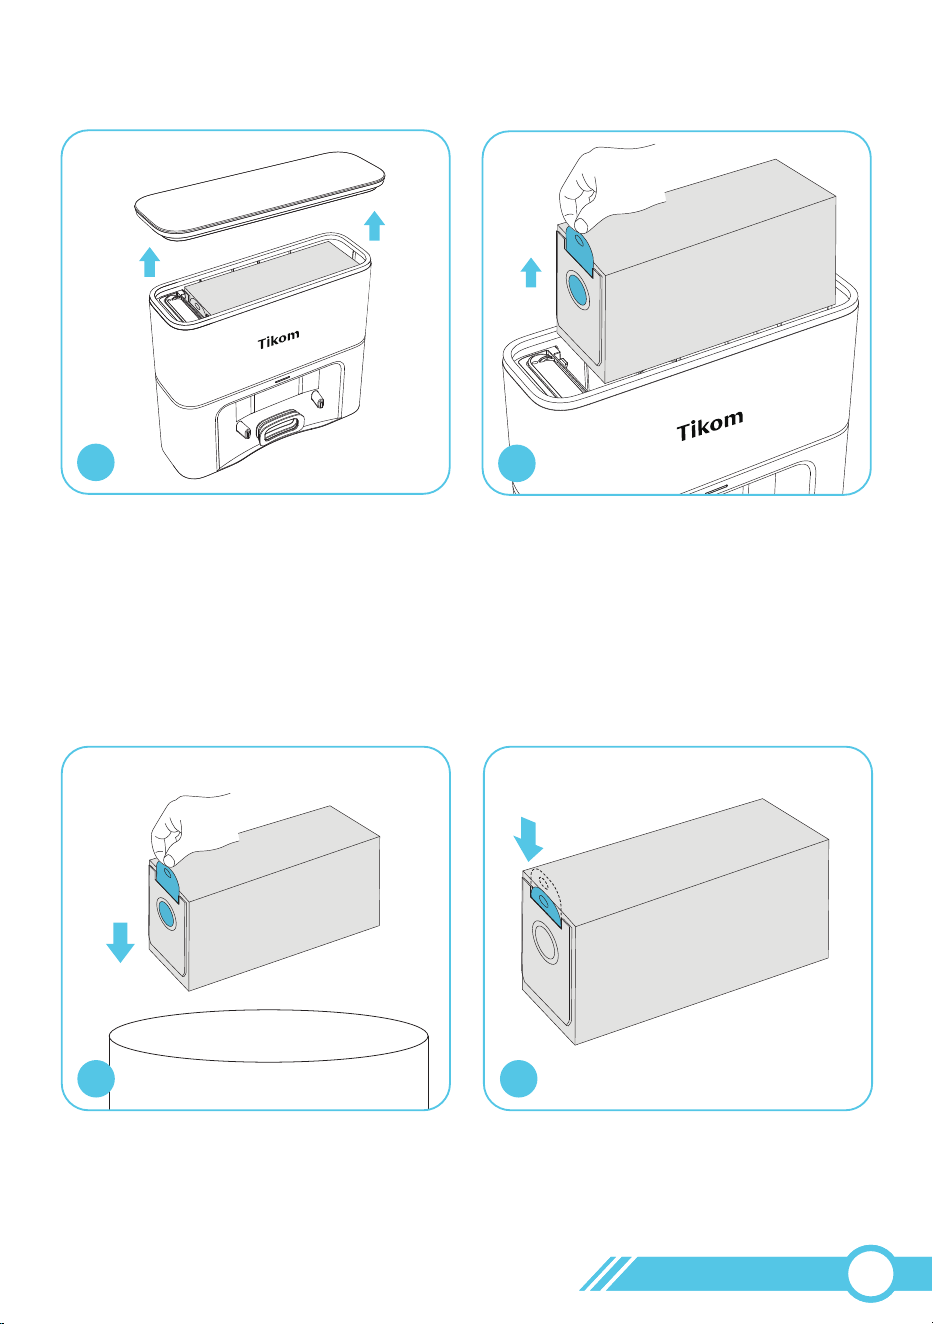
1. Before use, please remove the accessory pack from the Self-Empty Base. It contains
the side brush, HEPA Filter, Cable Ties, Mopping Cloth, and Dust Bin Transparent
Blocking Plate.
1
3.1 Getting Started
Accessories Pack
Accessories Pack
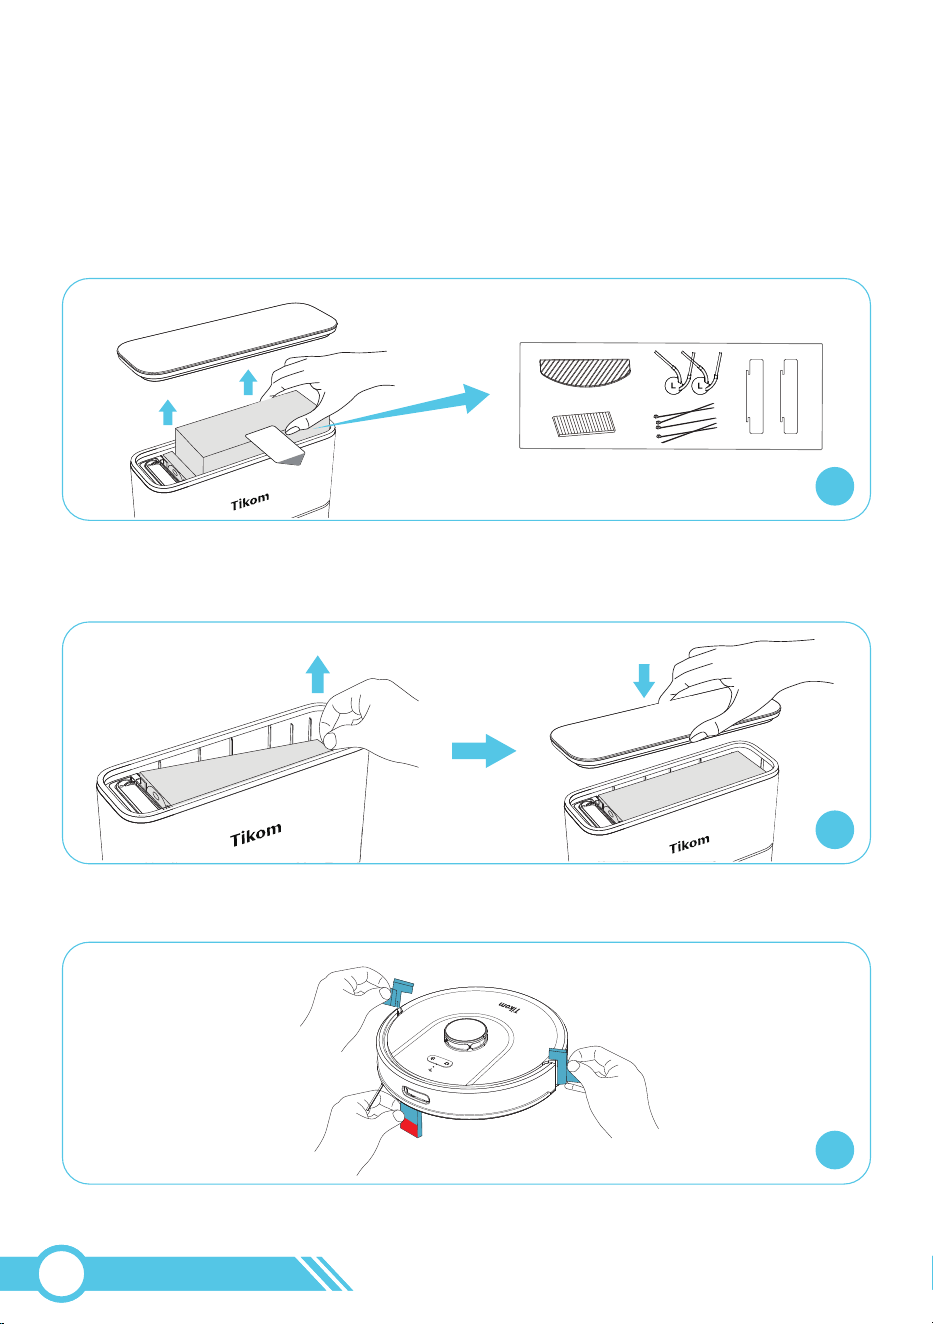
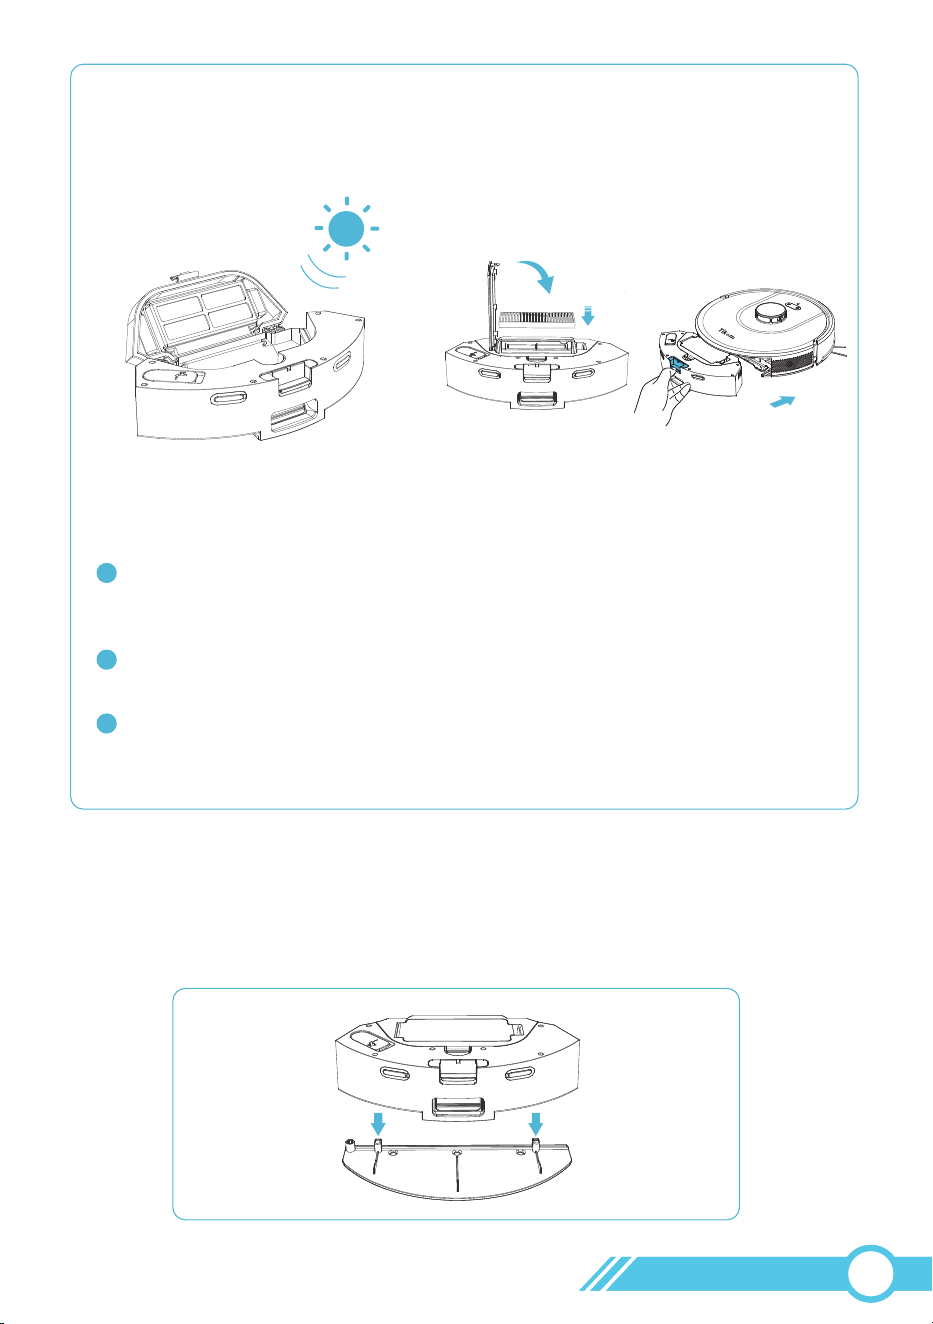
2. After removing the accessory pack, pull open the pre-installed dust bag at the bottom
to spread it out. Then close the Self-Empty Base cover.
2
Dust Bag
Dust Bag
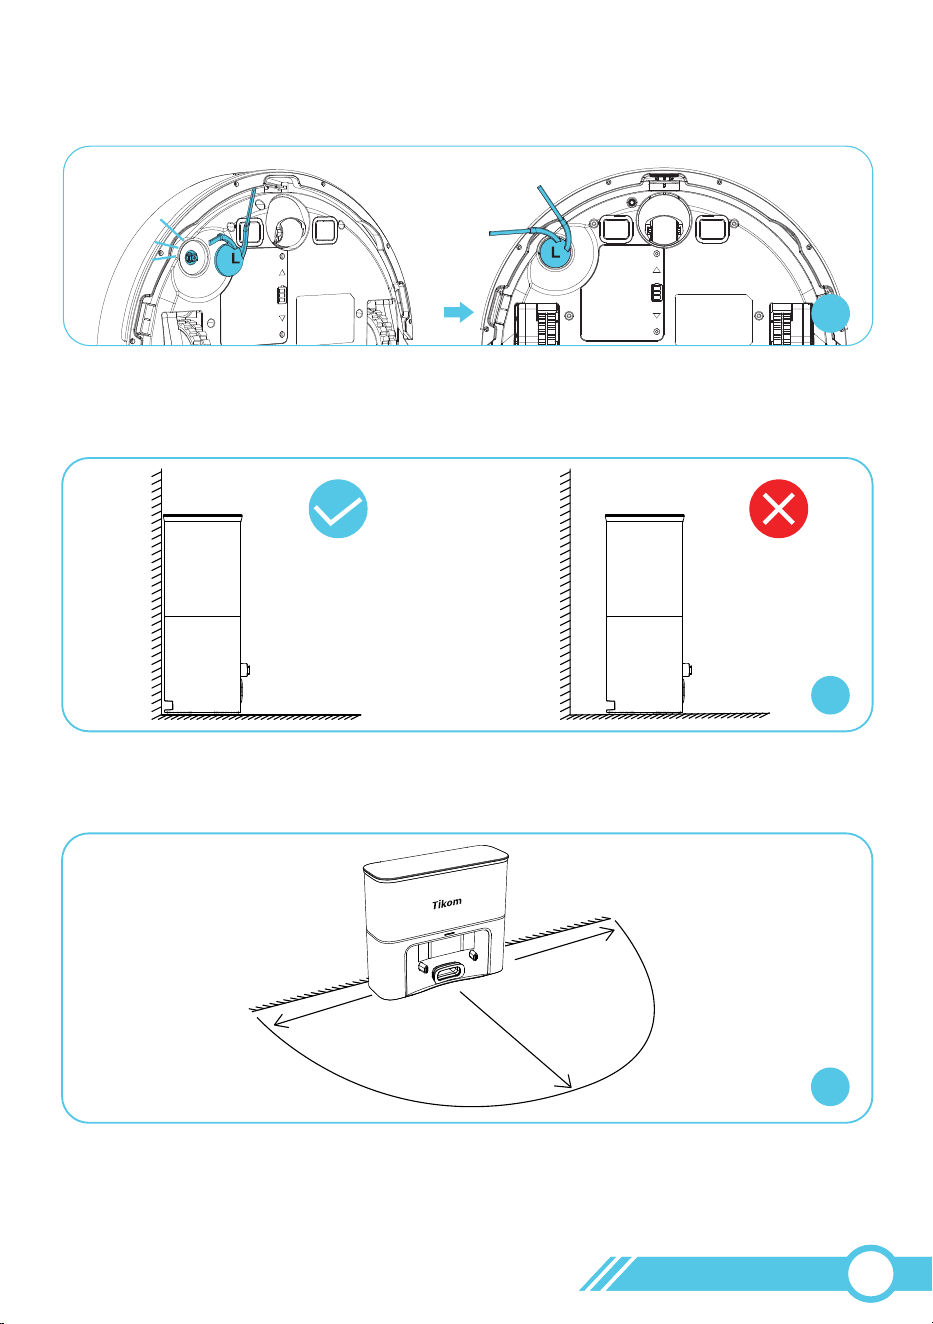
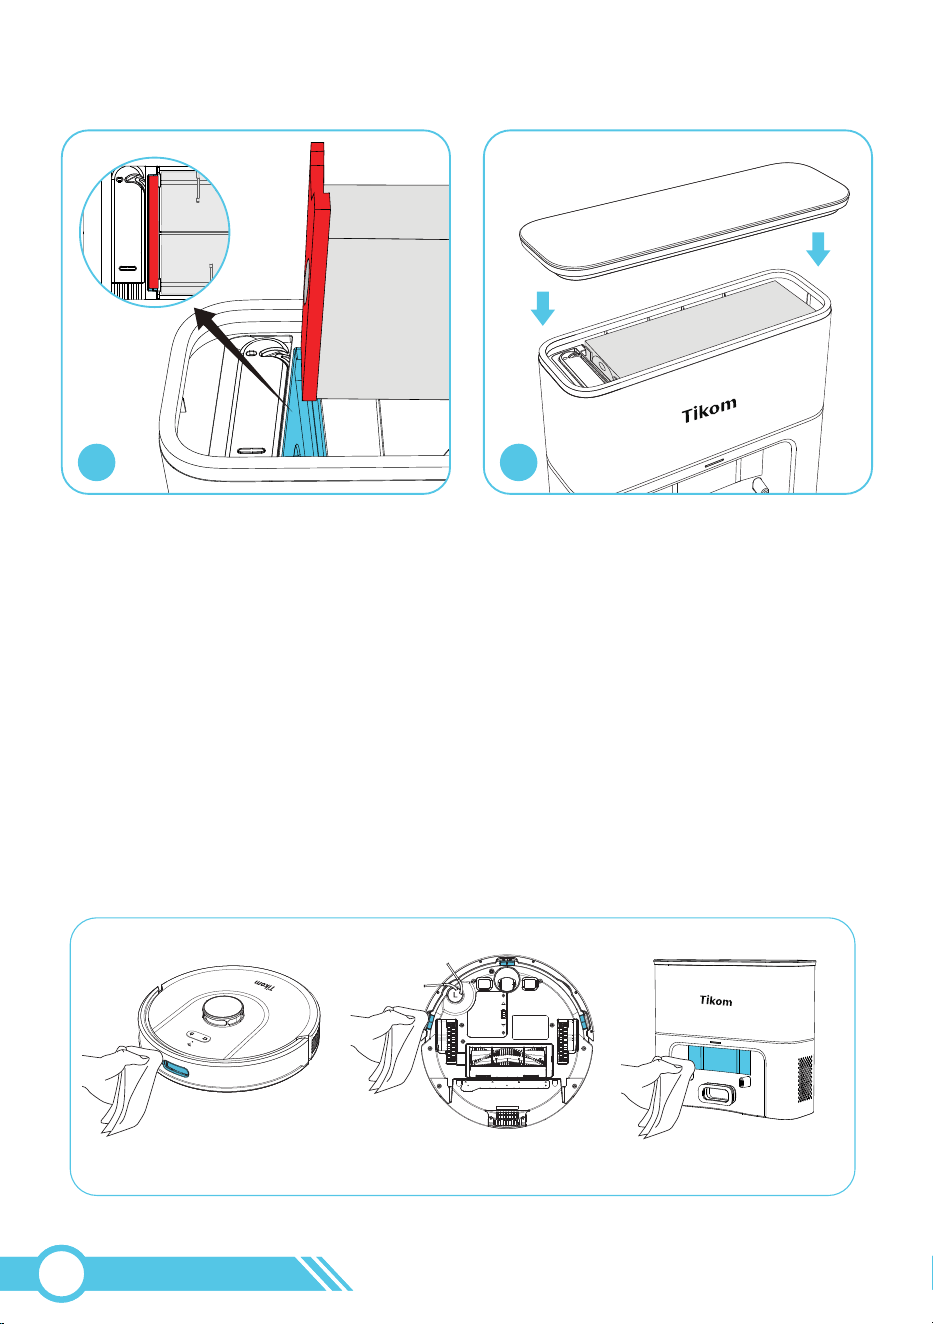
3. Remove the protective materials from all three sides of the robot.
3
Rem ove
Remove
Accessory Pack
Remove
02
11
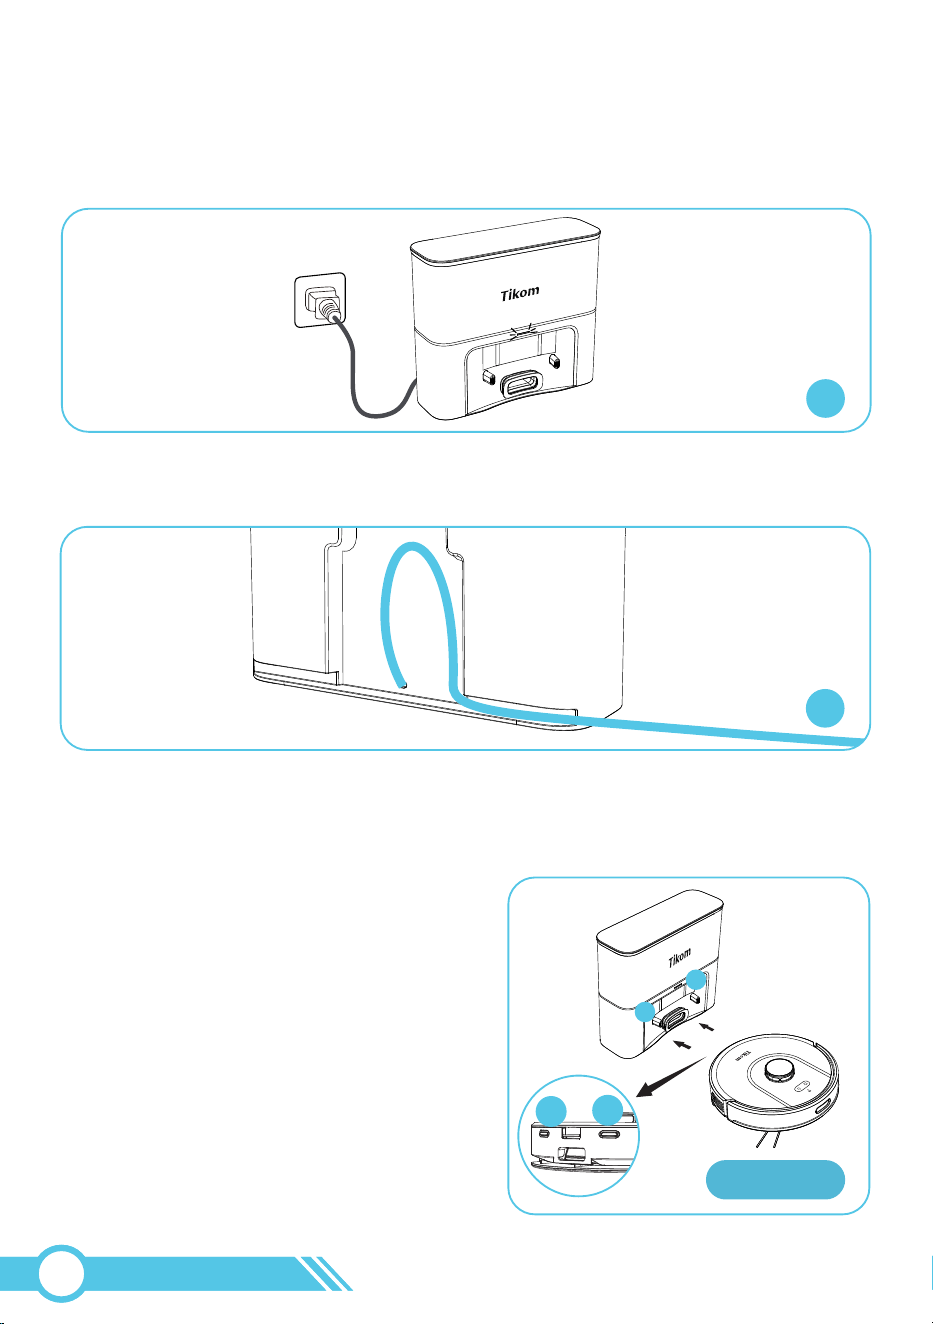
5. It is recommended to place the Self-Empty Base against a wall, and on a hard-level
surface rather than on rugs or carpets, as this may cause recharge failure.
4. Please install the side brush before usage, press the side brush until there’s a “click”
sound, that means side brush’s installation is successful.
Click
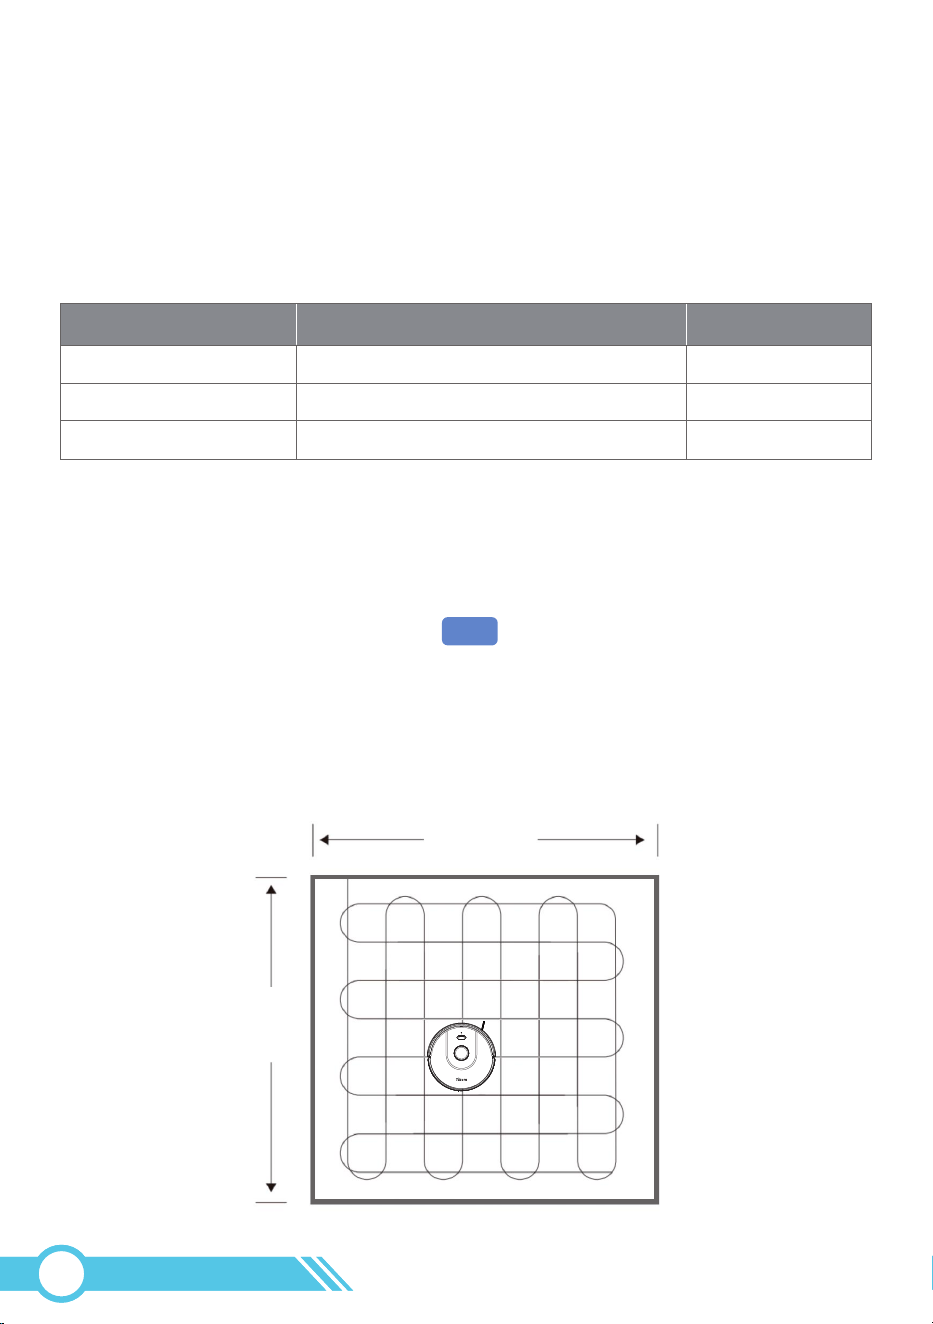
6. Please remove objects within 1.6 ft / 0.5 m of the left and right sides,
and within 4.9 ft / 1.5 m in front of the Self-Empty Base.
4.9 ft / 1.5 m
1.6 ft / 0.5 m
1.6 ft / 0.5 m
4
5
6
02
12
7. Plug the Self-Empty Base power plug into a wall outlet. When connected to
AC power, the Power Status Light on the Self-Empty Base will be illuminated.
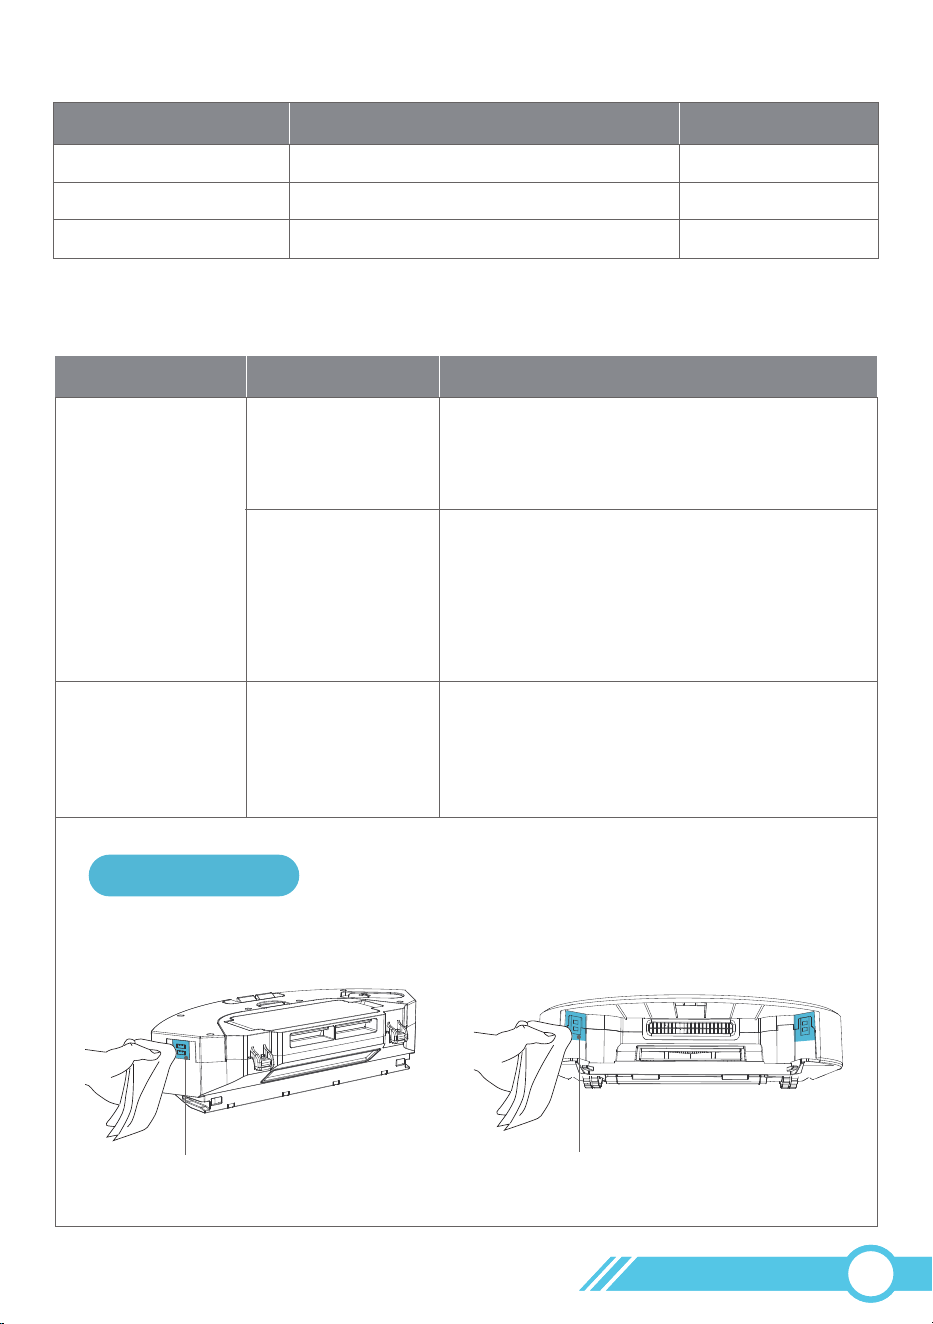
8. Store any spare cables in the cord tidy slot on the back of the Self-Empty Base to
prevent entanglement with the robot.
9. Ensure the robot is fully charged before first use.
Keep the Self-Empty Base plugged in to ensure the robot can automatically return
and recharge when the battery is low.
Method 1
Attach Robot to the Self-Empty Base by
aligning its Charging Contacts with the
Charging Contacts on the Self-Empty Base.
Once the robot is successfully connected
to the Self-Empty Base, it will say
”start charging”.
Method 1:
2
1
2
1
7
8
02
13
Press the button on the robot to allow it to return to the Self-Empty Base automatically.
Once the robot is successfully connected to the Self-Empty Base, it will say ”start charging”.
Method 2:
Flash Blue
Charging
Status Light for Battery
Full Charged Low Battery
Solid Blue Solid Red
Notes:
The robot requires 6 to 6.5 hours to fully charge.
The robot will locate and return to the Self-Empty Base when the battery level
is low. If the robot is unable to move due to critically low battery levels, please
manually place it on the Self-Empty Base to recharge.
When the robot is not actively cleaning, it is recommended to keep it docked
at the Self-Empty Base to maintain a full charge. This will ensure the robot is
ready for cleaning whenever needed.
Once the robot is fully charged, the Self-Empty Base has low power consumption.
The Self-Empty Base is equipped with circuit protection, ensuring it is safe to
keep the robot docked on it at all times.
To prolong the battery's lifespan, please recharge the robot at least once every
3 months if not in use for an extended period.
If the robot is unable to charge, please contact [email protected] for
further assistance.
1
2
3
4
5
6
Method 2
02
14
3.2 Important Tips Before Usage
1 2 3
4
5
2.56 in / 65 mm
— 3.74 in / 95 mm
No-Go Zone
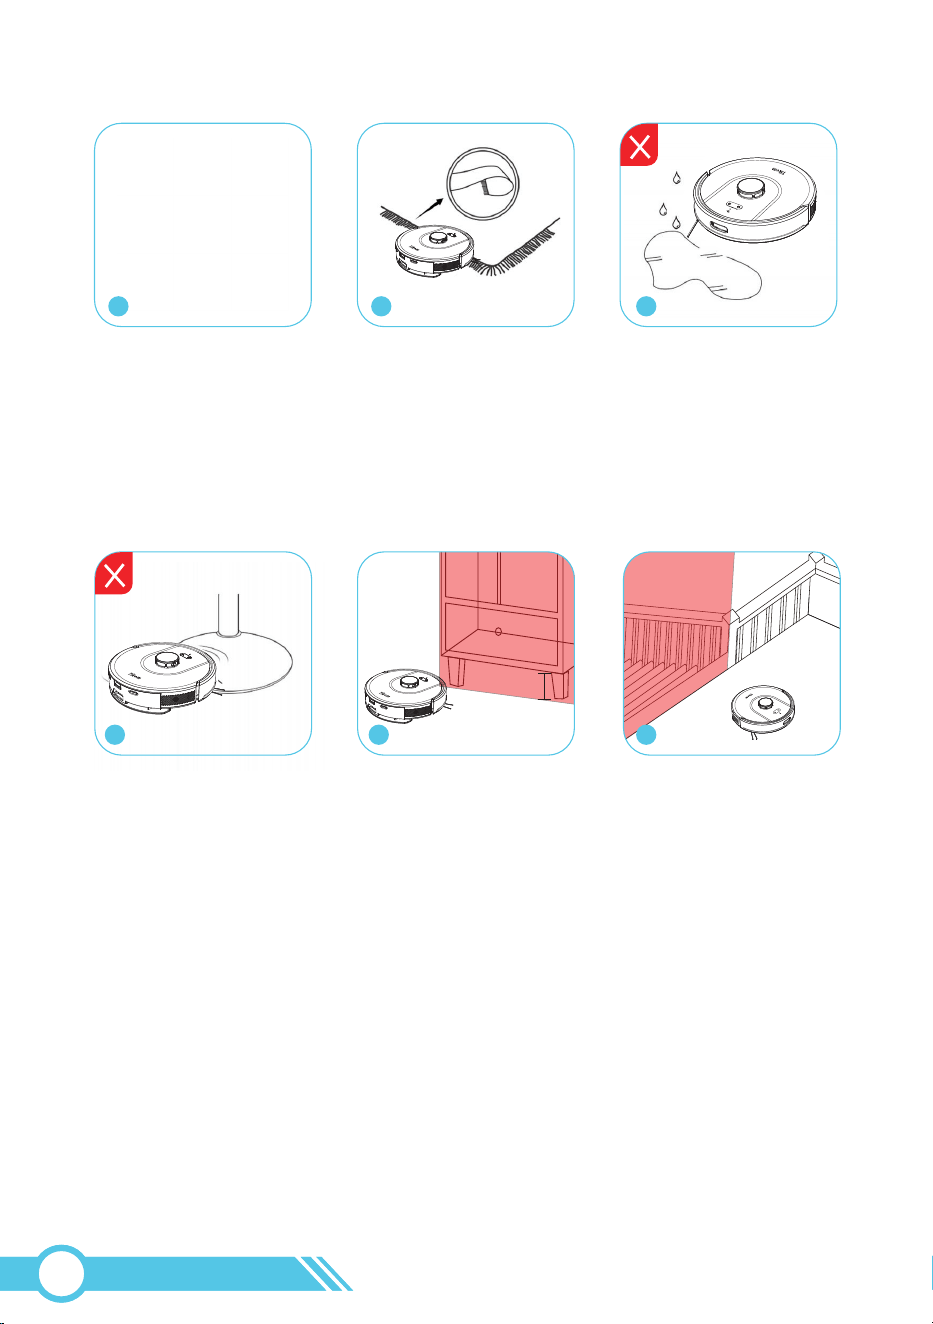
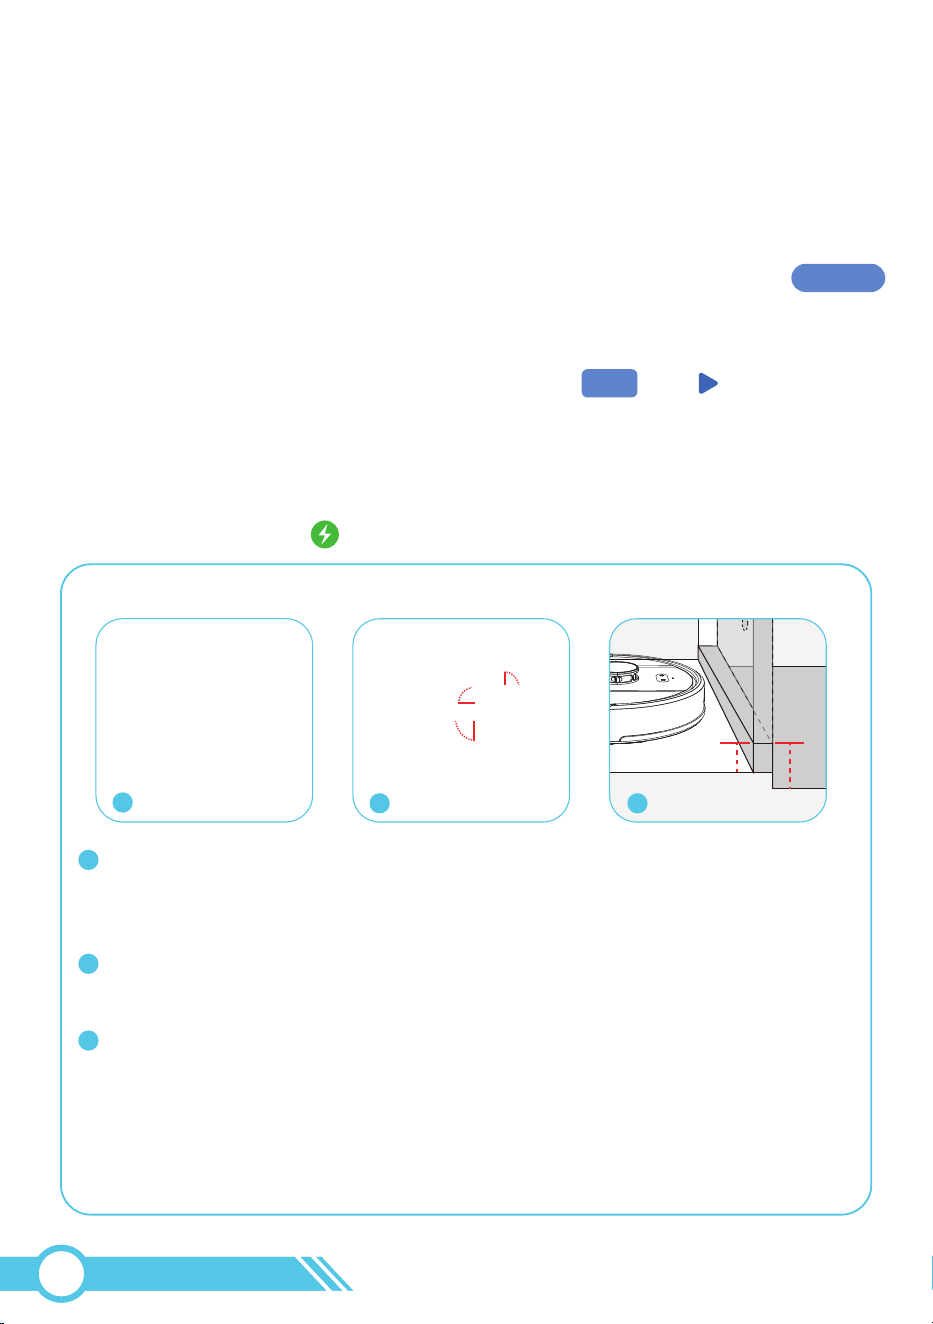
4. The round base of some Bar Chairs, Pedestal Tables, Pedestal Fans and Floor Lamps
which robot could climb will affect robot mapping & navigation. So when robot
cleaning, please remove these Bar Chairs, Pedestal Tables, Pedestal Fans and Floor
Lamps with round base, or set this place as “No-Go Zone” or set “Virtual Wall” on
Tuya smart APP as instructed on page 39.
5. The bottom clearance of the furniture should be less than 2.56 in (65 mm) or greater
than 3.74 in (95 mm) from the ground. Clearances within this range may cause the
robot to get stuck, such as under sofas, cabinets, or other furniture. Please set such
areas as "No-Go Zones" or configure "Virtual Walls" using the instructions on page 39,
to prevent the robot from becoming trapped.
6. The anti-drop sensors are designed to prevent the robot from falling down stairs or
steep drops in most scenarios. However, they may be less effective if dirty or used on
carpeted, reflective, or very dark-colored floors. It is advisable to set them as
"No-Go Zones" or configure "Virtual Walls" using the instructions on page 39,
to prevent the robot from falling in those locations.
1. Please remove any objects from floor that may entangle robot vacuum, such as pet
poop, socks, cloths, tissue, toys, slippery and power cords. You can use provided
Cable Ties to organize your wires and power cords.
2. Before using the robot on a rug with tasseled edges, please fold edges under the rug.
3. Keep robot away from wet areas, such as kitchen or bathing room. Robot would be
damaged by water.
6
No-Go Zone
02
15
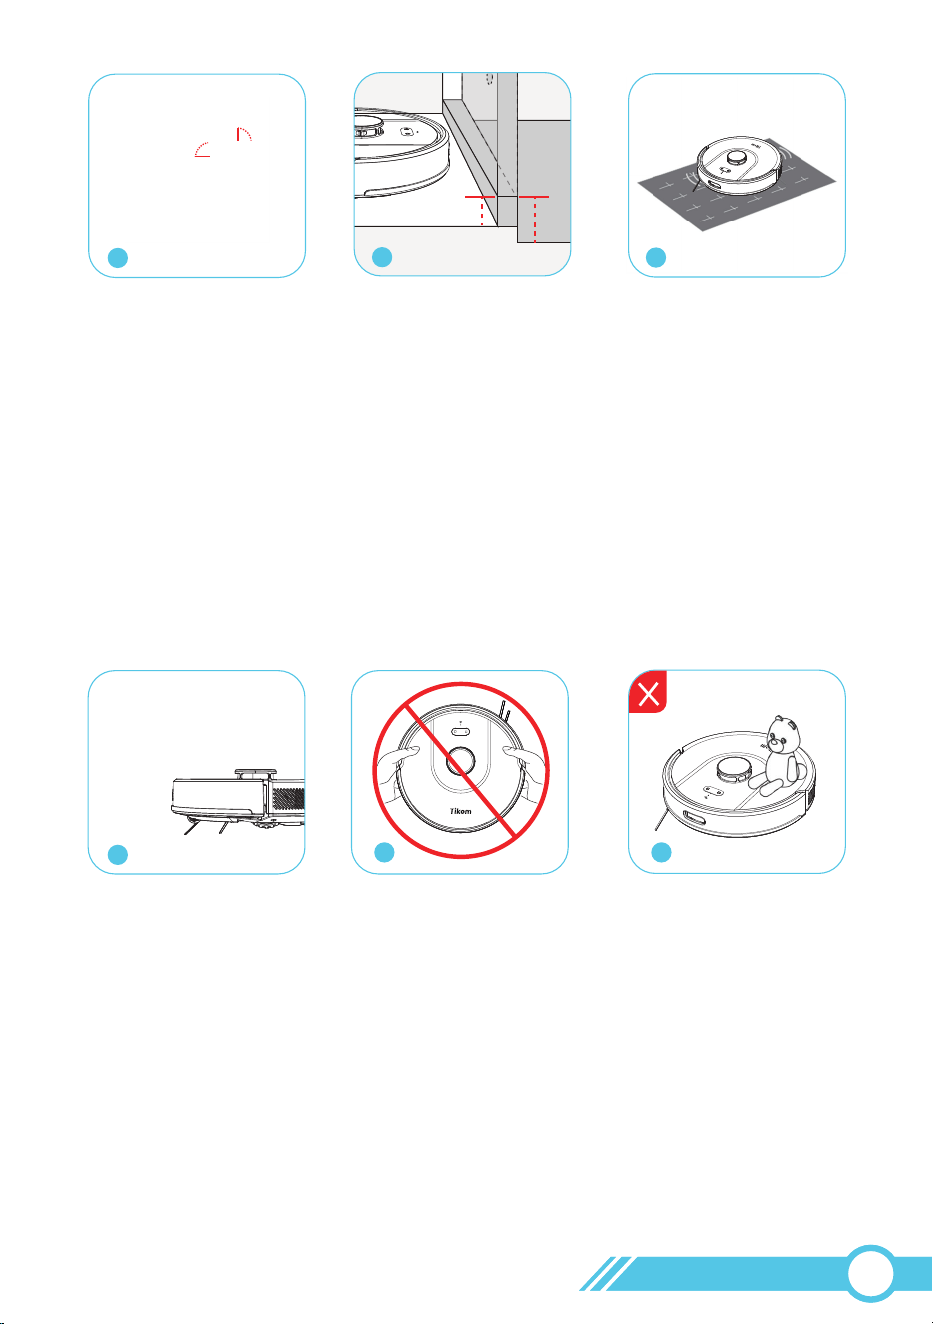
10
11
10. Avoid cleaning high-pile rugs thicker than 0.78 in / 20 mm, as they may cause
the robot to malfunction.
11. While the robot is cleaning, refrain from picking it up or moving it, as well as
relocating the Self-Empty Base, as this could disrupt the robot's mapping process or
its return to the Self-Empty Base.
12. Please ensure no toys or objects obstruct the Laser Distance Sensor (LDS), as this
could interfere with the robot's navigation system by blocking the laser signal.
12
9
7. Ensure that each room door is open during the first use to allow the robot to fully
explore your house.
8. Since the robot can cross thresholds up to 0.6 in / 15 mm high, if any room's outer
threshold is less than 0.6 in / 15 mm, but the threshold measured from the inside of
the room is higher than 0.6 in / 15 mm due to height differences, the robot may enter
but not exit the room, potentially becoming trapped. In such cases, set up a
"No-Go Zone" or "Virtual Wall" for this room as instructed on page 39 to prevent
the robot from being trapped in this room.
9. The robot may not operate on certain darker black surfaces since the anti-drop
sensors may mistake black color for an edge or stair, preventing cleaning in those
areas.
5
<
0.6 in
<
0.6 in
8
7
02
16
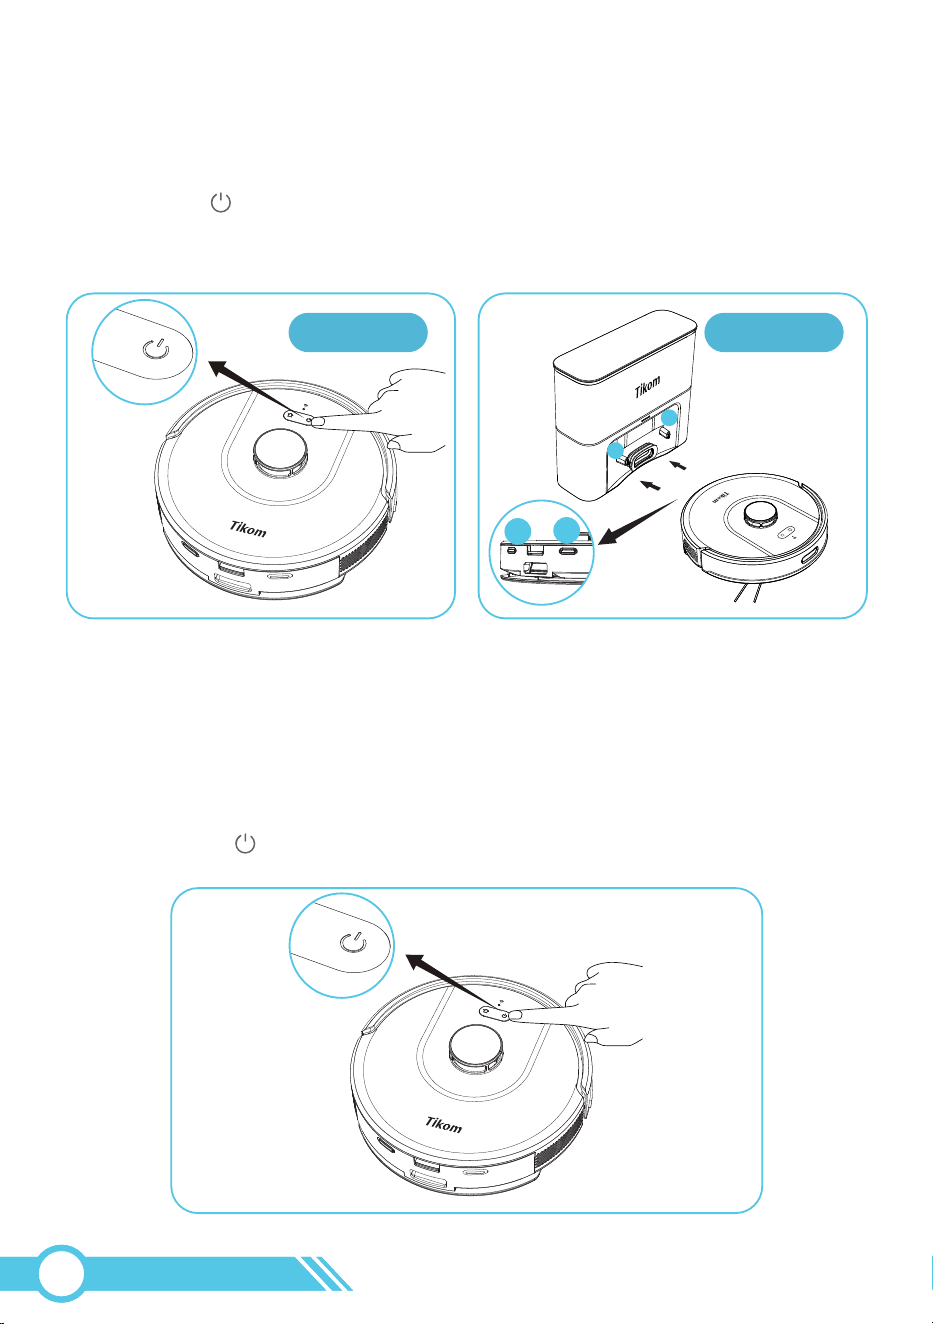
Press and hold button on robot for 3
seconds.
3.3 Power On/Off Robot
Power On Robot
Method 1: Method 2:
Attach the robot to the Self-Empty Base
manually, the robot will power on
automatically.
1. Move the robot away from the Self-Empty Base.
2. Press and hold button on robot for 3 seconds.
Power Off Robot
Method 2Method 1
Notes:
When the Robot is powered on, the Robot Status light will turn on and flash.
The Robot requires approximately 15 seconds to power on the entire system,
and the Status light will become solid. Then the Robot will say "Power on".
2
1
2
1
02
17

To enjoy all available features, it is recommended to control your Robot via the
Tuya Smart App.
Option 2:
Scan the QR codes on the robot or below to download and install it on your
mobile device.
3.4 Connect Robot with App
3.4.1 App Download and Installation
3.4.1.1 App Download
Option 1:
Search for Tuya Smart on the App Store/Google Play, then download and install
it on your mobile device.
Notes:
To ensure a successful connection, please grant the Tuya Smart App permission to use your
WLAN & Cellular Data while running.
3.4.1.2 App Registration and Login
Open the Tuya Smart App, register an account using your mobile phone number
or a valid email address during your first use, then log in.
02
18

3.4.2 Wi-Fi Connection Requirements
3.4.2.1 Mobile Device Requirements
Ensure that your smartphone or tablet is connected to a Wi-Fi network.
Ensure that Bluetooth on your smartphone or tablet is turned ON.
3.4.2.2 Robot Requirements
3.4.2.3 Wi-Fi Requirements
1. The Wi-Fi Status Light on the Robot should be flashing blue.
2. The Robot must be connected to the Self-Empty Base to ensure it has sufficient
power during setup.
1. Ensure that the robot and your mobile device are in close proximity to the router
during the connection process.
2. Enter the correct Wi-Fi name and password when connecting.
3. Avoid using emojis, special characters, or symbols in your Wi-Fi name and password.
4. Avoid using a VPN (Virtual Private Network) or Proxy Server.
5. When connecting to a hidden network, ensure that you enter the correct network
name (SSID) and connect to a wireless network.
6. When using a network extender/repeater, ensure that the network name (SSID) and
password match those of your primary network.
7. Your Wi-Fi router should support 802.11b/g/n and the IPv4 protocol.
8. Use WPA and WPA2 with TKIP, PSK, AES/CCMP encryption.
9. WEP EAP (Enterprise Authentication Protocol) is not supported.
10. Use Wi-Fi channels 1-11 in North America and channels 1-13 outside North
America (refer to local regulatory agencies for guidance).
02
19
There are two ways to connect the robot to Wi-Fi using the Tuya Smart app:
Quick Mode or AP Mode.
Quick Mode is the default connection option, if robot’s Wi-Fi connection fails in
Quick Mode, please try with connection in AP mode.
3.4.3 Wi-Fi Status Light
3.4.4 Connect Robot with Wi-Fi
Meanings
1. If the robot's Wi-Fi connection fails,
please reset the Wi-Fi connection or
restart the robot.
2. If the robot broadcasts the message “Wi-Fi
connection successful” and flashes blue,
it indicates that the robot has successfully
connected to your home router but not to
the Tuya Smart App server. Please wait for
a few hours before rechecking.
The robot has successfully connected to both
Wi-Fi and the App server.
The robot is in sleep mode or powered off.
Robot Condition
During Wi-Fi setup
Robot power on
Robot power on
/
Wi-Fi Status Light
Flash blue
Solid blue
OFF
1. After pressing and holding the and
buttons simultaneously for 3 seconds, the
robot will announce, “Wi-Fi reset, ready for
Wi-Fi connection”.
2. Follow the instructions provided in the Tuya
Smart App for connecting to Wi-Fi.
3. For further information on Wi-Fi connection,
please refer to section “3.4 Connect Robot
with App” on page 18.
02
20
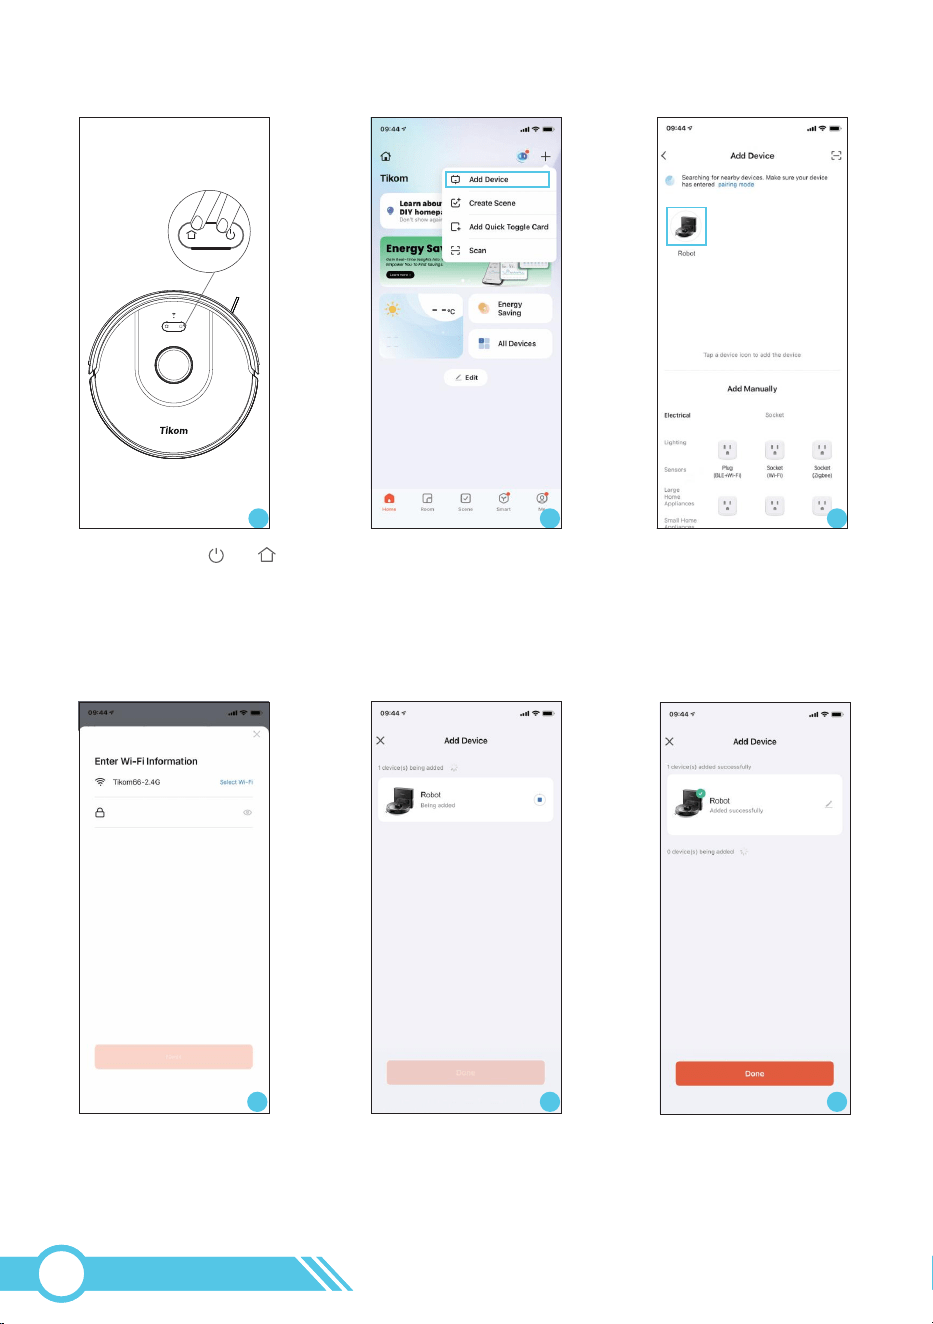
3.4.4.1 Connect Wi-Fi with Quick Mode
1. Press and hold and
buttons on the robot at the
same time for 3 seconds,
Robot will say “Wi-Fi reset,
ready for Wi-Fi connection”,
and Wi-Fi Status Light will Fast
Flash.
1 2 3
2. Open TuyaSmart app,
Tap “+” and then “Add
Device” at the upper right
corner.
3. Robot is discovered,
then tap Robot appeared.
4. Select the same router's
Wi-Fi as mobile phone and
enter the correct password.
Tap ”Next”
5. Connecting to Wi-Fi.
Robot will say “Connecting
to Wi-Fi”.
6. Connection successful,
and Robot will say “Wi-Fi
Connection Successful”,
and Wi-Fi Status light will
be solid.
54 6
02
21
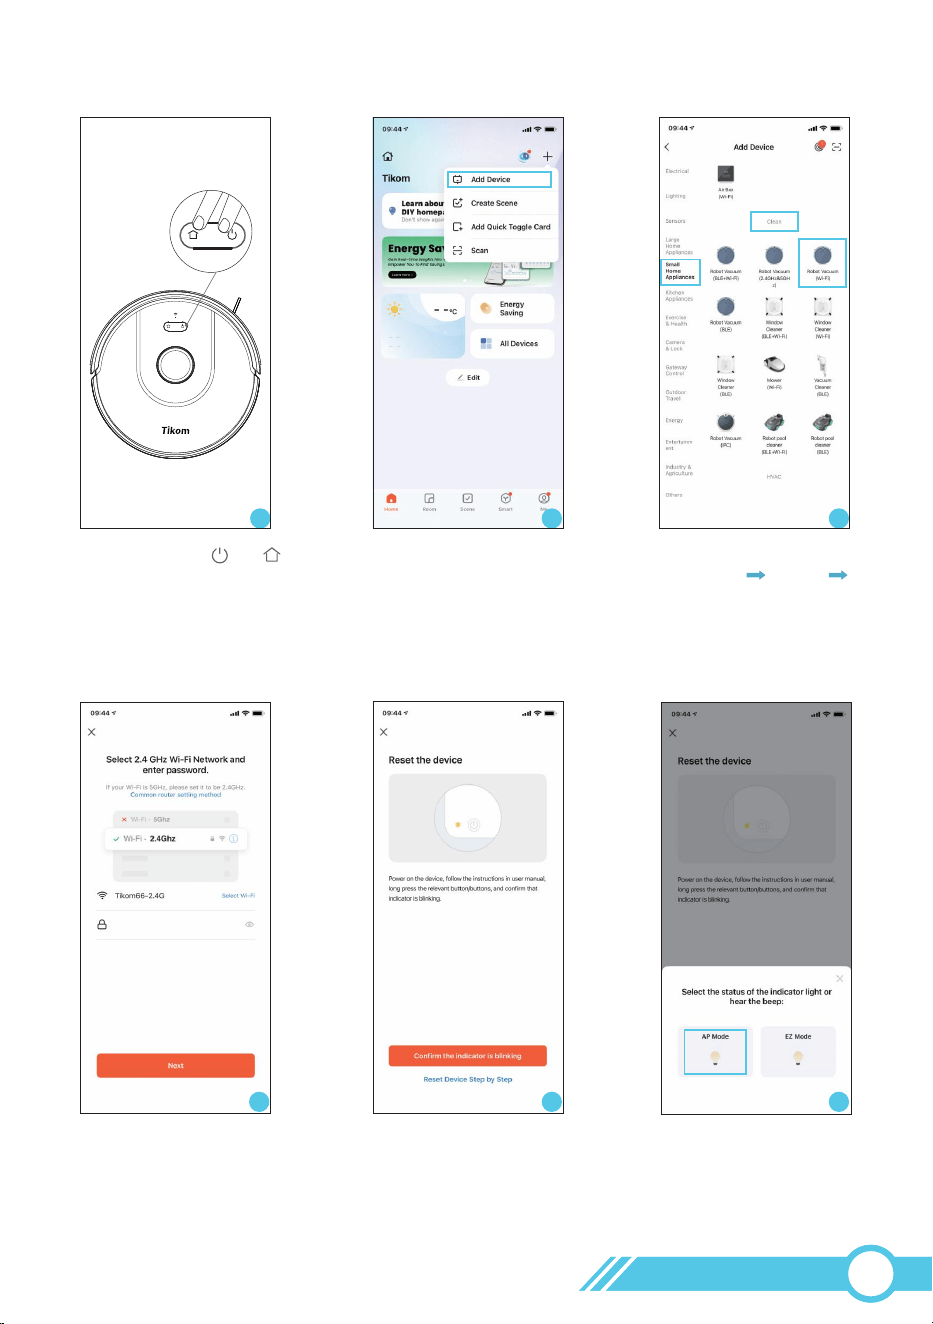
3.4.4.2 Connect Wi-Fi with AP Mode
1. Press and hold and
buttons on the robot at the
same time for 3 seconds,
Robot will say “Wi-Fi reset,
ready for Wi-Fi connection”,
and Wi-Fi Status Light will Fast
Flash.
2 3
2. Open TuyaSmart app,
Tap “+” and then “Add
Device” at the upper right
corner.
3. Choose “Small Home
Appliance” “Clean”
“Robot Vacuum(Wi-Fi)".
4. Select the same router's
Wi-Fi as mobile phone and
enter the correct password.
5. Choose “Confirm the
indicator is blinking”.
6. Choose “AP Mode”.
54 6
1
02
22

11
7. Choose “Go to Connect”.
87 9
8. Choose “WLAN”. 9. Connect to the Robot’s AP
hot-spot “SmartLife-XXXX”
or “SL-XXXX” in Wi-Fi list.
10. Go back to Tuya Smart
APP, APP will automatically
start to connect robot, and
robot will say “Connecting to
Wi-Fi”.
11. Connection successful,
and Robot will say “Wi-Fi
Connection Successful”,
and Wi-Fi Status light will
be solid.
10
02
23
1
2
3
4
5
6
9
10
11 12 13
14 15
7
8
3.5 APP Page Introduction
3.5.1 Robot Map Page
After finishing setting up the robot vacuum's Wi-Fi, you can control the robot vacuum
through the app using your mobile phone in any way you prefer, not limited to just the
Wi-Fi used during the setup process.
In essence, once the robot vacuum's Wi-Fi setup is complete, your mobile phone can
utilize either 2.4GHz/5GHz Wi-Fi or 3G/4G/5G cellular data to control the robot vacuum
through the Tuya Smart App from anywhere and at any time.
Notes:
02
24
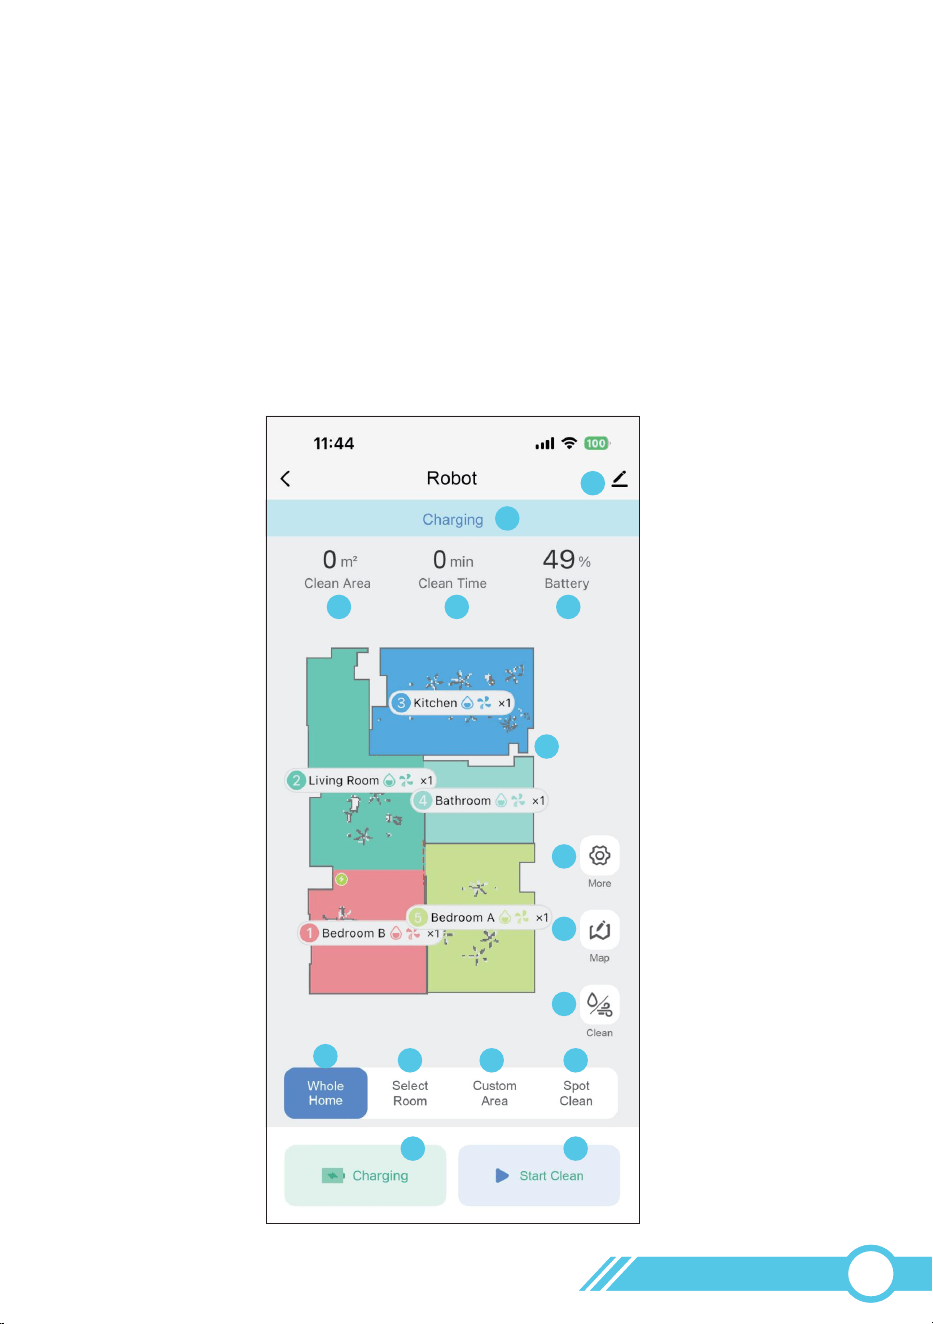
1
2
3
4
5
6
7
8
9
10
11
12
13
14
15
Go to Robot Non-Functional Setting Page
Robot Status
Cleaning Area
Cleaning Time
Remaining Battery
Real-time Map
More Settings
Map Edit
Cleaning Settings
Whole house cleaning
Selected Room Cleaning
Custom Area Cleaning
Spot Cleaning
Recharge Button
Clean Button
/
/
/
/
/
/
/
Page 30
/
Page 51
Page 46
Page 47
/
/
/
Detail InformationFunctionNumber
02
25
16
17
18
19
20
21
22
23
24
25
26
27
28
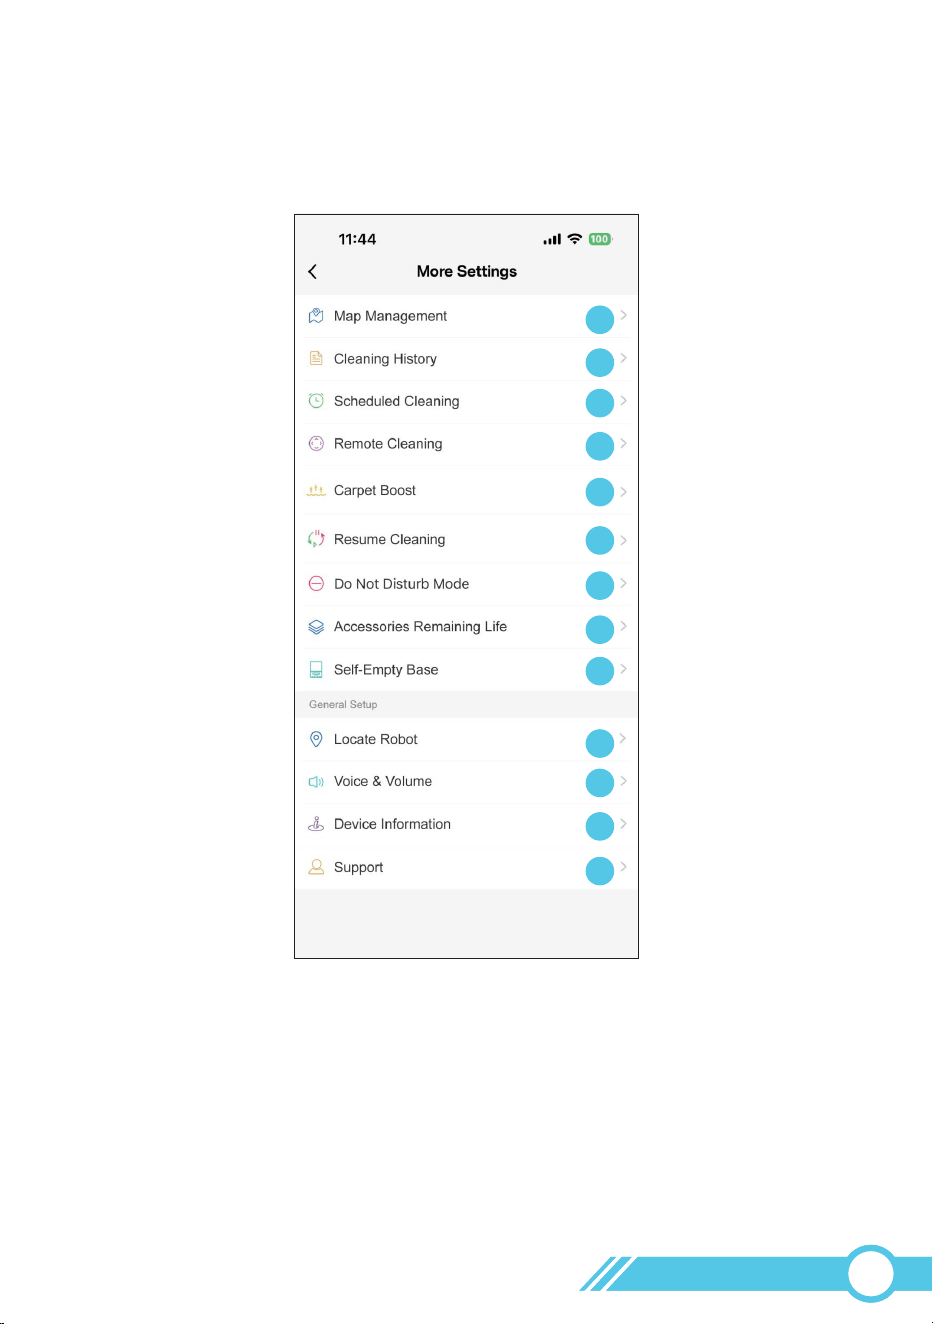
Map Management
Cleaning History
Set Scheduled Cleaning
Remote Cleaning
Carpet Boost Function
Resume Cleaning Function
Do Not Disturb Mode
Accessories Remaining Life
Self-Empty Base
Locate Robot
Voice language & Volume Setting
Device Information
Support
Page 44
/
Page 47
/
Page 47
Page 47
Page 47
/
/
/
/
/
/
Detail InformationFunctionNumber
02
27
Quick Map
1. Quick Map: When no map exists, the main screen will display a 'Quick Map'
button in the center. Tapping this button initiates the mapping process. Upon
completion, the robot will automatically return to the Self-Empty Base to recharge.
2. Whole Home Cleaning: If you select "Whole Home" and start clean,
the robot will first create a map and then immediately begin cleaning after mapping is
finished.
Whole
Home
5
3.6 Whole Home Cleaning
Most functions can be accessed through the Tuya App.
For the first cleaning, the robot vacuum does not have a map. Please use one of the
following two methods to start mapping and cleaning:
3.6.1 Smart Cleaning
3.6.1.1 First time cleaning (No map in APP)
Notes:
During the initial cleaning, ensure that each room's door is open to assist the
robot in fully exploring your house.
Since the robot can cross thresholds up to 0.6 in / 15 mm high, if any room's
outer threshold is less than 0.6 in / 15 mm, but the threshold measured from
the inside of the room is higher than 0.6 in / 15 mm due to height differences,
the robot may enter but not exit the room, potentially becoming trapped. In such
cases, set up a "No-Go Zone" or "Virtual Wall" for this room as instructed on
page 39 to prevent the robot from being trapped in this room.
Please remove any objects from the floor that may entangle the robot vacuum,
such as pet waste, socks, clothing, tissues, toys, slippery items, and power cords.
You can utilize the provided Cable Ties to organize your wires and power cords.
2
3
1
Recommendation: Before starting the mapping process, place the robot on the
Self-Empty Base and initiate the operation from there. This ensures that the
Self-Empty Base's location is correctly updated on the map after mapping is complete.
<
0.6 in
<
0.6 in
1
32
02
28
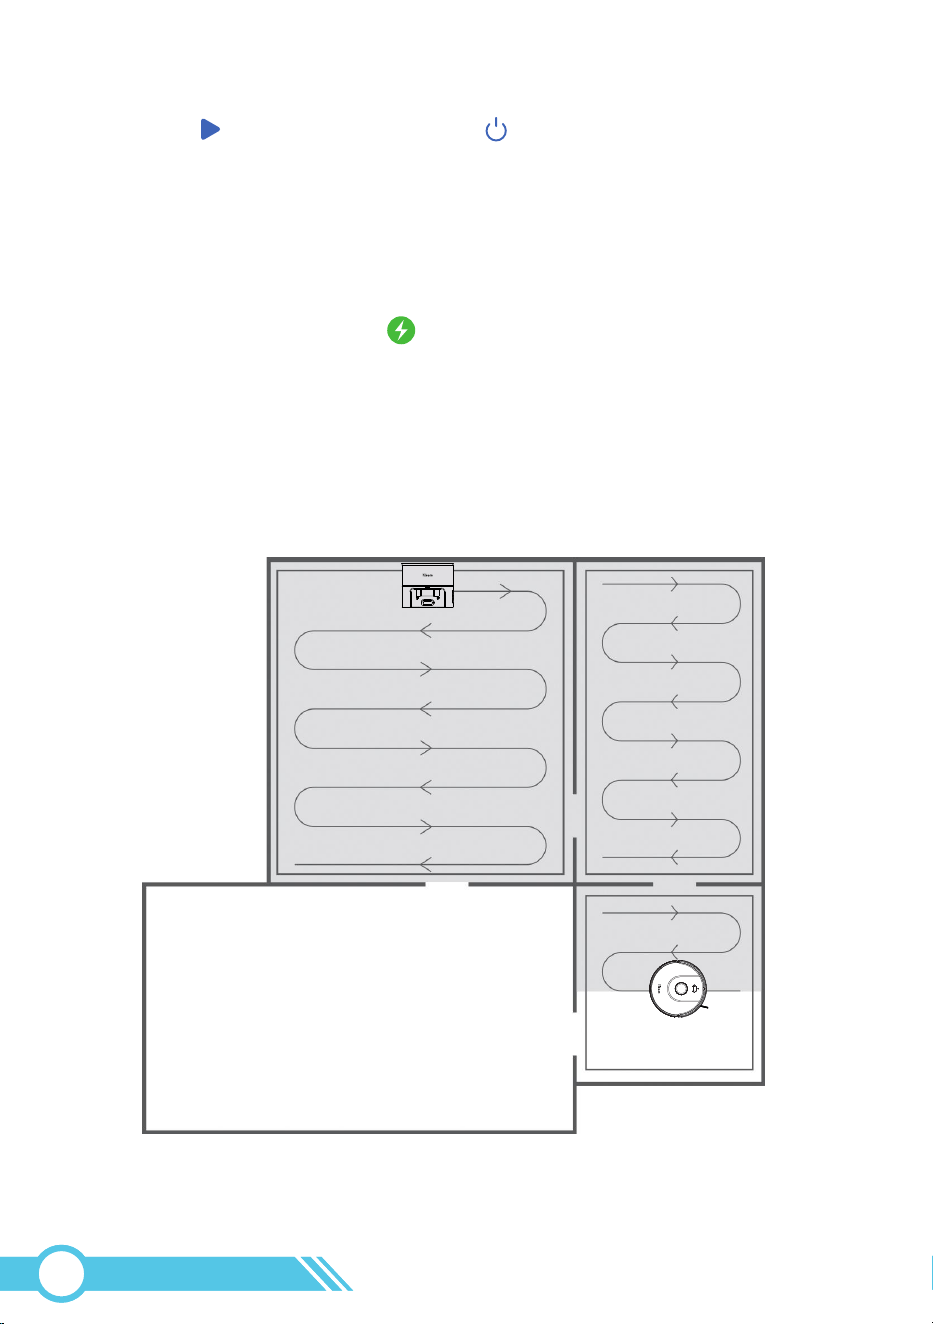
3.6.1.2 Smart Cleaning Using App Map
After pressing Button on APP or pressing on Robot, robot will plan its cleaning
order and route based on map in APP. It will clean edges of one room first, then Robot
will clean this room all accessible space in Zig-Zag route. Afterward, robot would drive
to next room do the same cleaning until every room has been efficiently cleaned.
Once cleaning is complete or battery is low, robot will return to Self-Empty Base
automatically.
If “Resume Cleaning” function is active in Tuya Smart APP, once robot battery level
is charged above 80%, robot will continue cleaning from the place where robot
pauses cleaning to recharging because of low power last time.
Room 1--Cleaned
Room 4-- Next
Room 2-- Cleaned
Room 3 --
In Progress
Self-Empty Base will be marked as sign on the map.
02
29
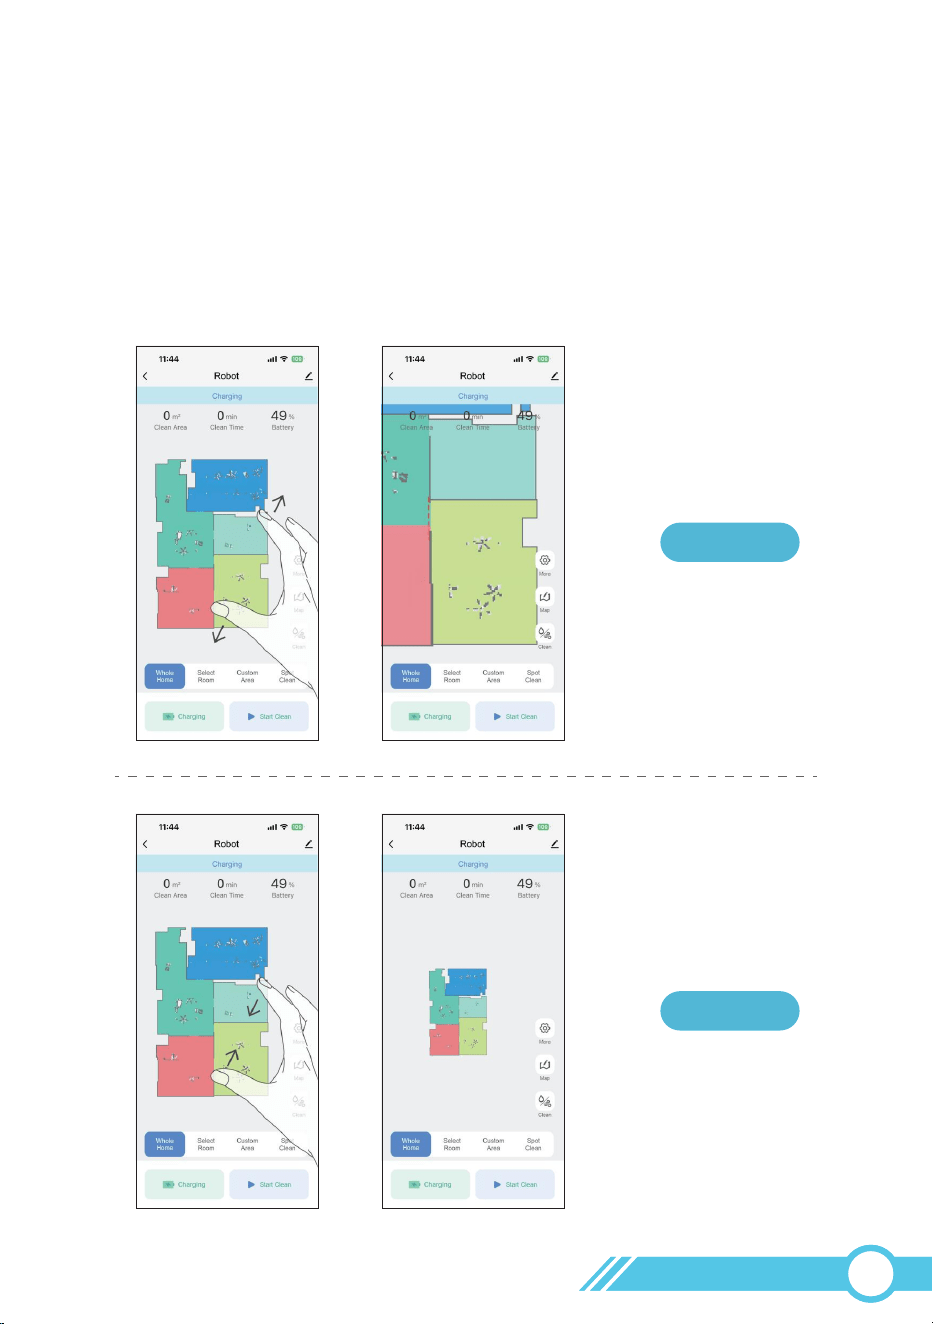
3.6.2 Map Edit
Flexible Map Editing Tips
1. On the map page, press and hold the screen with your finger, then move your finger
(without lifting it off the screen), to drag the map in the desired direction.
2. On the map page, place two fingers on the screen, then move the two fingers apart
to zoom in on the map, or move the two fingers closer together to zoom out
(without lifting the fingers off the screen).
zoom in
zoom out
02
30
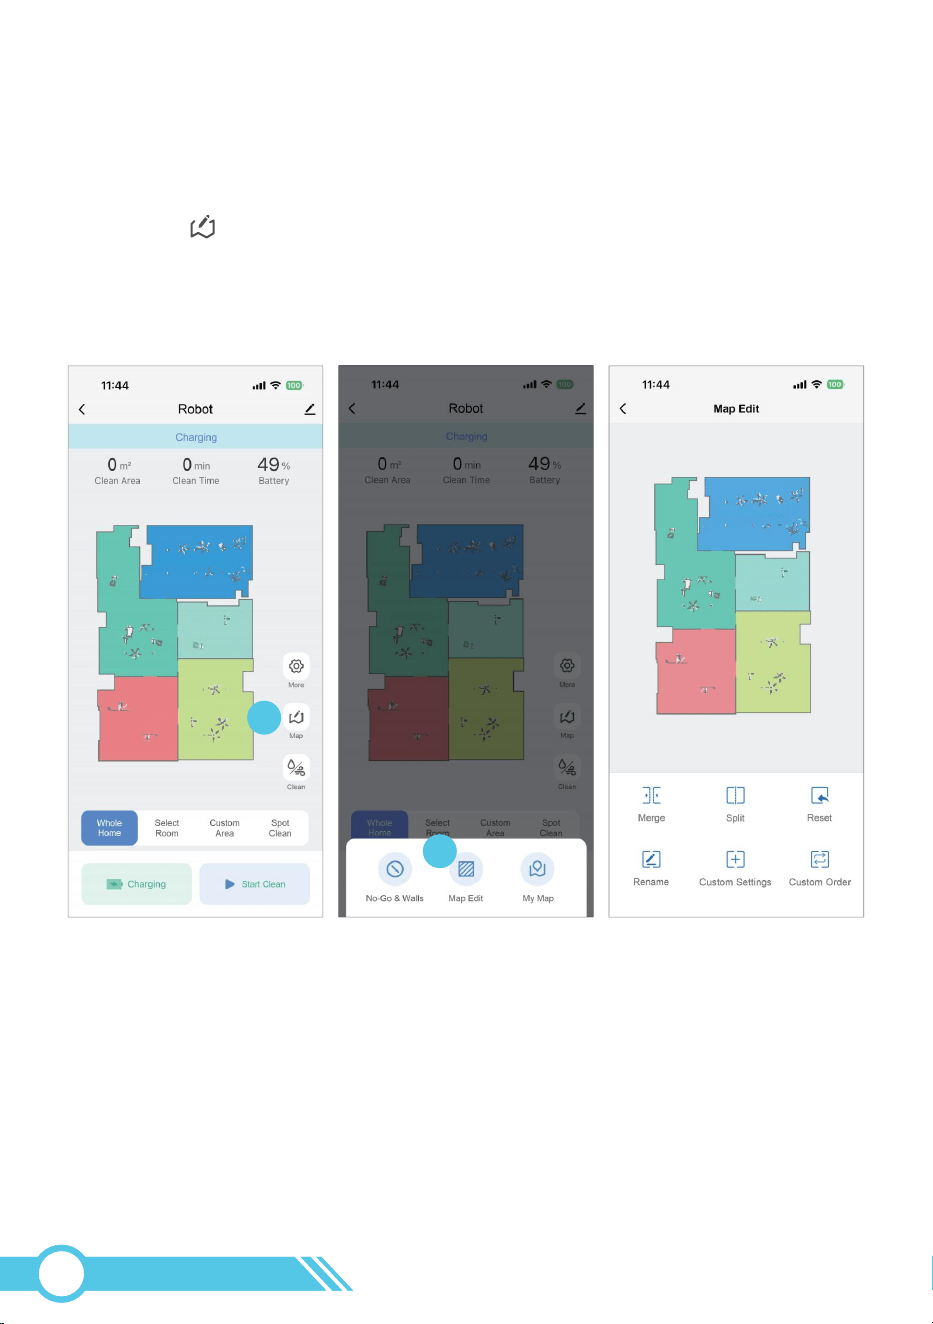
1
2
Map Edit Settings
After the robot completes the first cleaning, the map will appear on the page.
Clicking the " Map" button will enter the map editing page, where you can perform
the following functions:
02
31
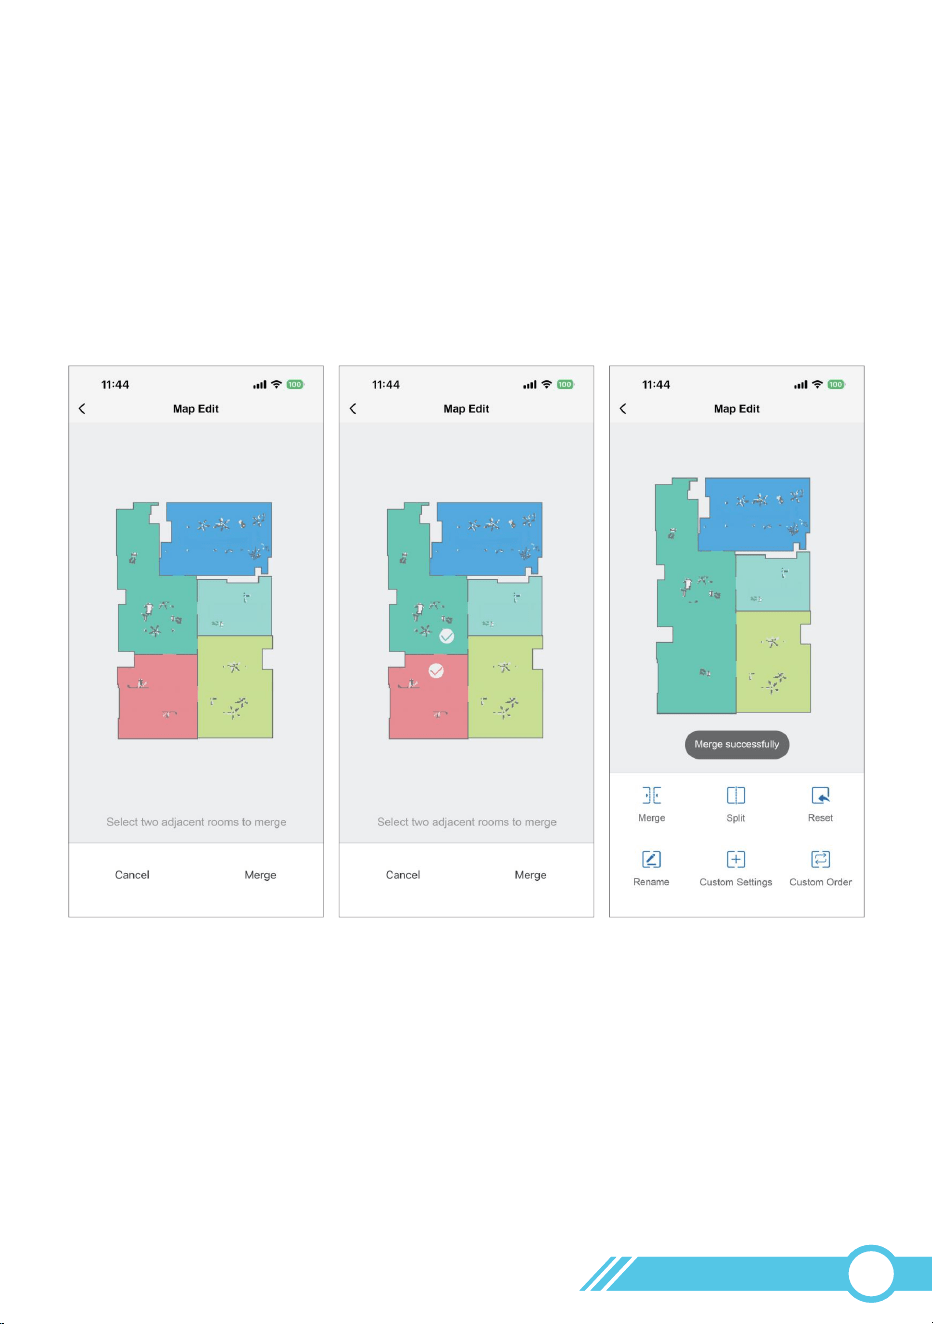
Merge:
You can merge two adjacent rooms into one room.
Click on two adjacent rooms with different colors, after selecting them, both rooms will
have a √ icon.
Click the "Merge" button to merge the two selected rooms into one.
02
32
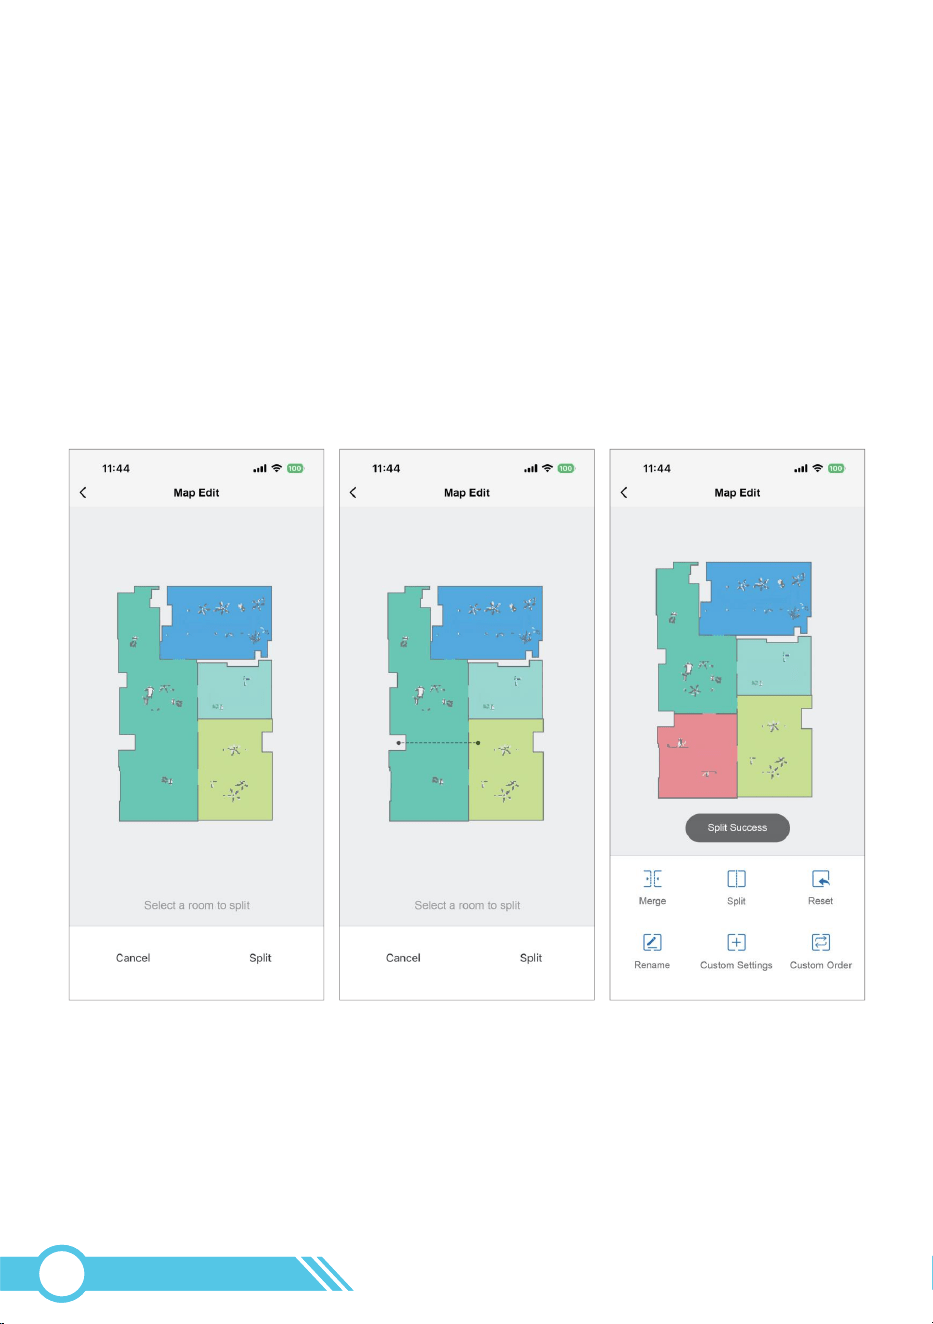
Split:
You can split a room into two rooms.
1. Click on the room you want to split, the selected room will have a √ icon, and a
black editable line will be generated within the room.
2. There are two circles at the direct ends of the line, both of which can be held and
dragged to extend or shorten the line.
Moving away from the other end black circle will extend the line, and moving closer
to the other end black circle will shorten the line.
3. Click the “Split” button to split the room into two.
Notes:
If the split fails, please check if the area to be split is too small, and if the current
network connection is smooth.
02
33
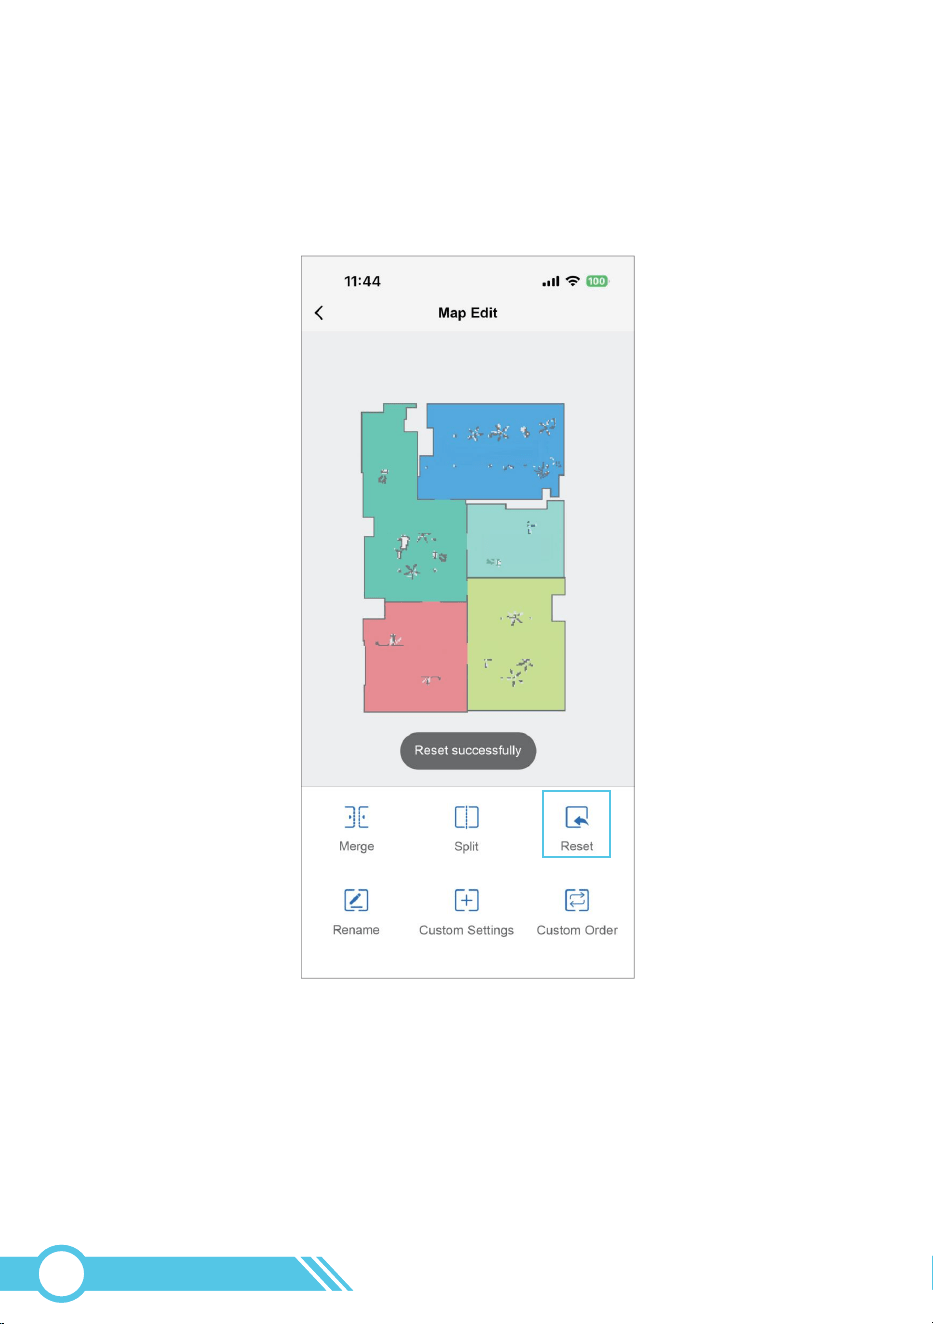
Reset:
You can reset all the current map settings in the Map Edit page.
02
35
1
1. Tap the Clean button on the main page.
2. In the Cleaning Settings pop-up window, first toggle on the "Custom Mode" switch.
3. Once activated, tap the "Go Set It Up" button to enter the configuration interface.
2
3
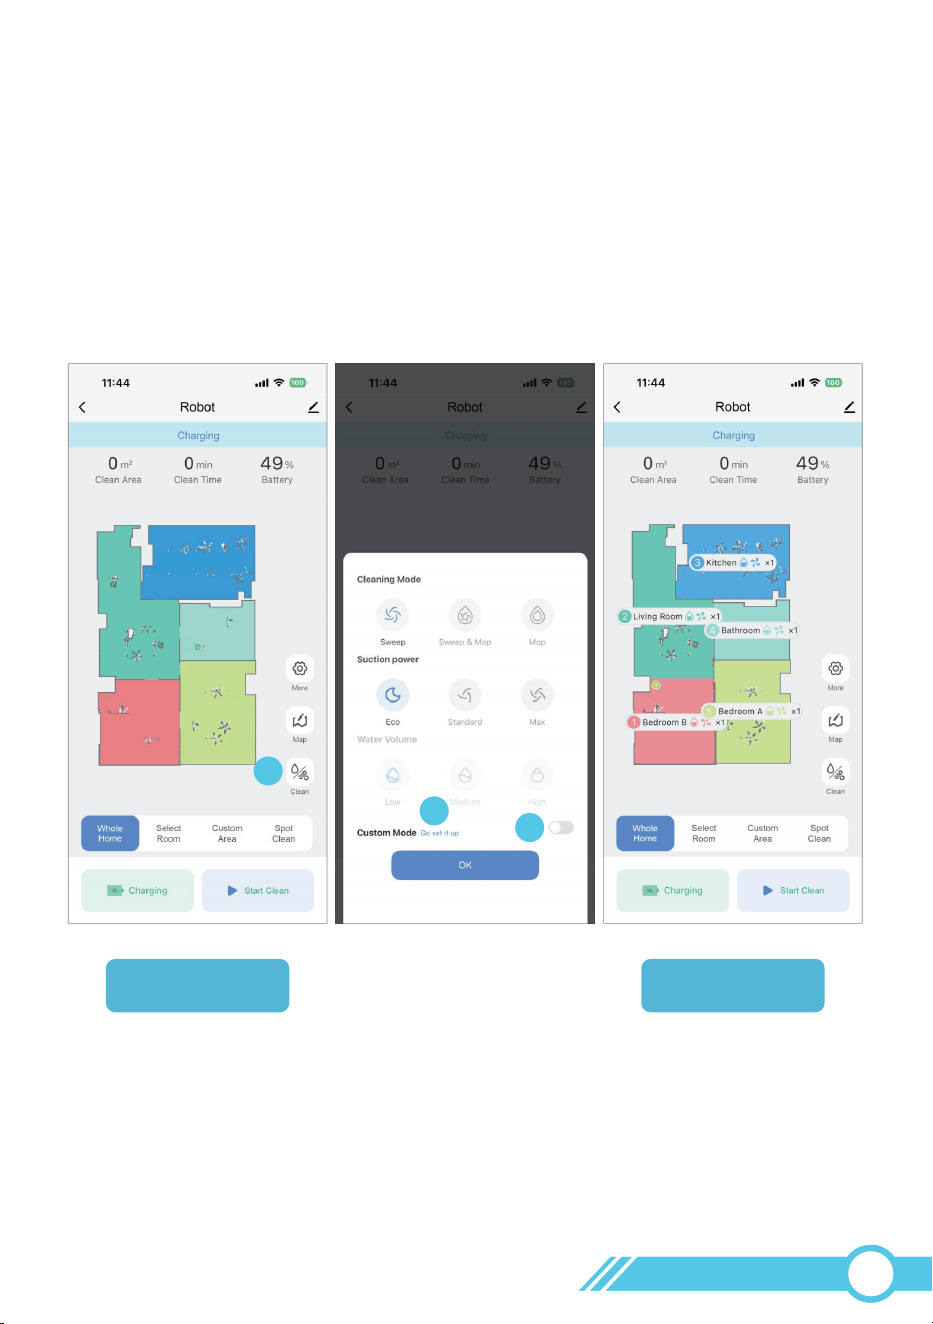
3.6.3 Customized Cleaning
Customized Cleaning allows you to set the suction power, water flow level, number of
cleaning passes, and room cleaning order for each individual area.
To enable and configure this function, follow these steps:
Before Custom
Mode Activation
After Custom
Mode Activation
Notes:
When Custom Mode is activated, the map will display the default suction and water
level settings for each room, which are set to Standard (suction) and Medium
(water level) by default.
02
36
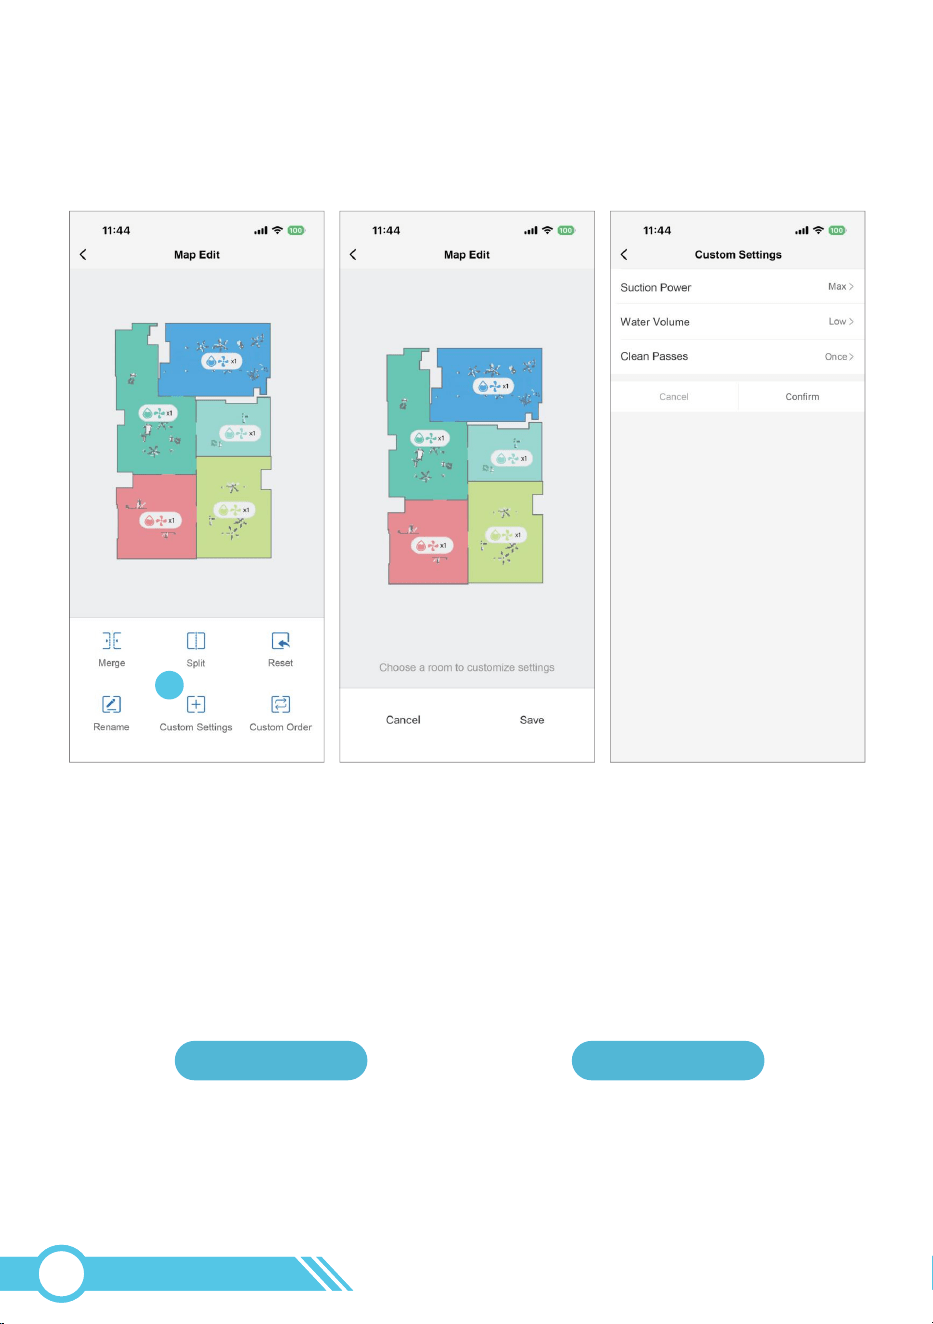
4
4. After tapping "Custom Settings", you can select any room on the map to
configure its suction power, water level, and number of cleaning passes.
Eco Standard Max Low Medium High
Suction Power Water Volume
Notes:
The map will display the suction power and water flow level settings for each room.
The corresponding icon meanings are shown in the figure below.
02
37
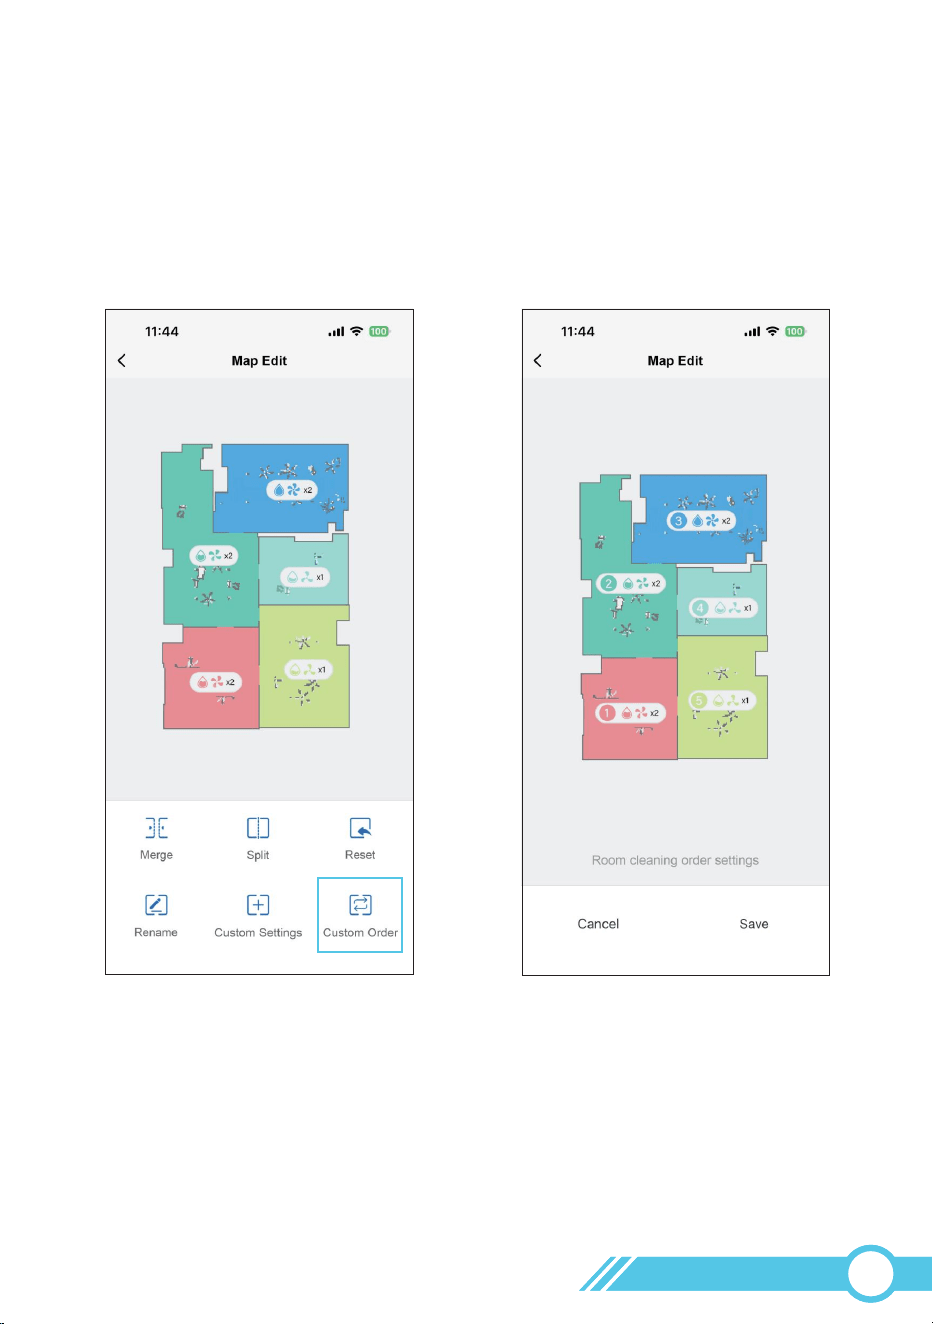
5. When you tap "Custom Order", you can set the robot's cleaning sequence by
clicking on rooms in your preferred order.
Each room's cleaning order will be indicated by a number prefixed to its name,
the first room selected will be the first area to be cleaned.
6. With "Custom Mode" enabled, the robot will consistently follow your
configured settings from the Map Edit page for every cleaning cycle.
02
38
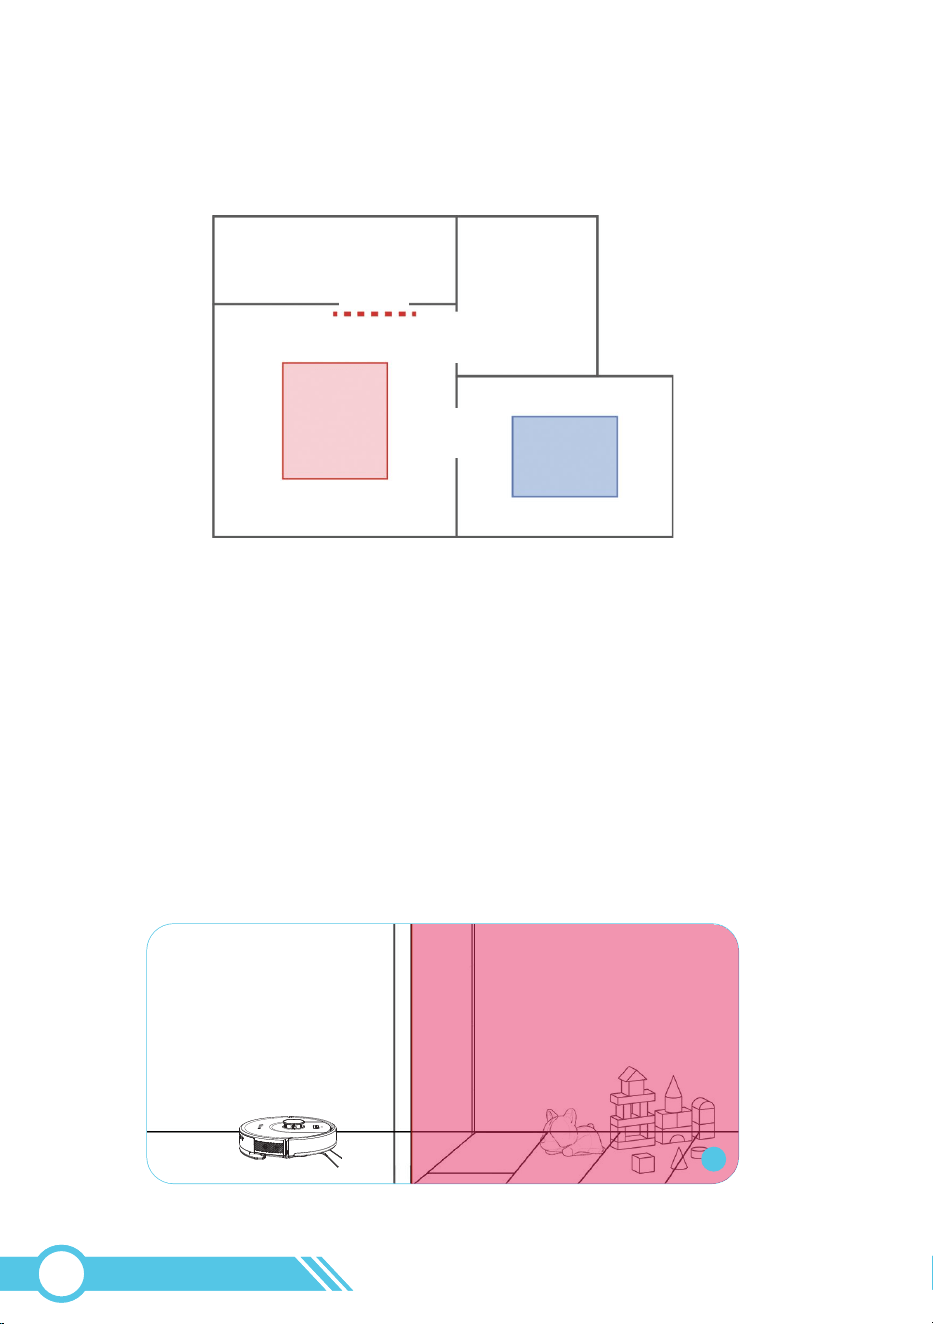
3.6.4 Restricted Zone Setting
The Restricted Zone Setting comprises "No-Go Zone" "No-Mop Zone" and
"Virtual Wall".
No-Go Zones
No-Mop Zones
Virtual Wall
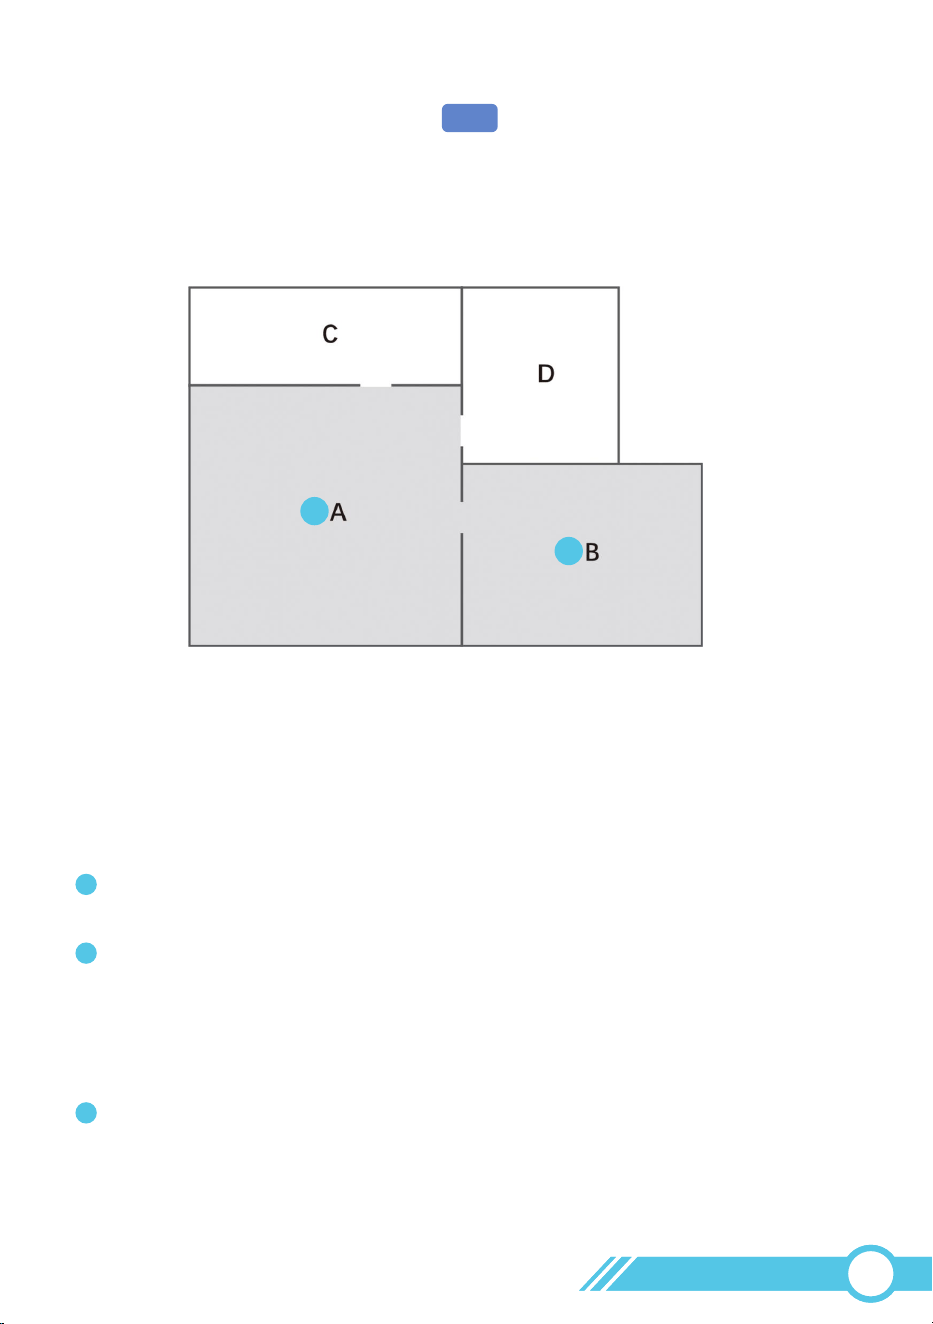
A
“No-Go Zone”
The robot is prohibited from entering this zone, meaning it cannot
sweep or mop within this area.
“No-Go Zone” :
This feature is useful for areas where the robot should not clean, where it might get
stuck or trapped, or where entry is undesired. Examples are provided below:
It is recommended to use a combination of "No-Go Zones", "No-Mop Zones", and
"Virtual Walls" to prevent the robot from getting stuck or trapped in your house, avoid
mopping on carpets, and ensure it automatically returns to the Self-Empty Base after
completing cleaning.
02
39
The total number of No-Go zones and No-Mop zones that can be set must
not exceed 14.
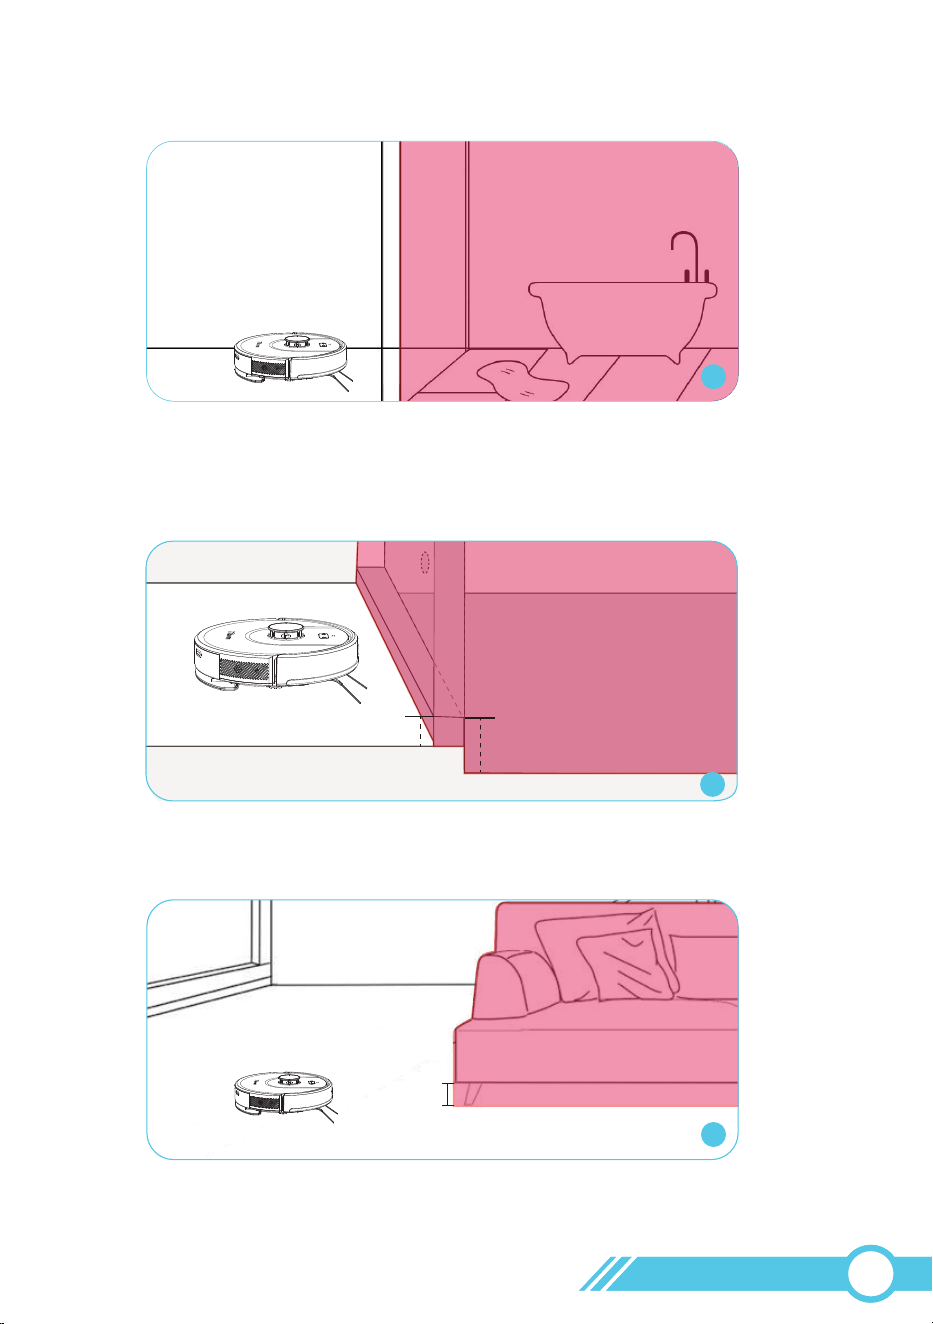
B. Bathroom: where there is excessive water on the floor, posing a risk of damage to
the robot.
5
B
C. Specific Room: where the inner threshold is too high (> 0.6 in / 15 mm), allowing
the robot to enter but preventing it from exiting. The robot may become trapped in
this room.
D. Certain furniture: Set No-Go Zones for 2.56-3.74 inch (65-95mm) clearances, as
they may trap the robot.
D
2.56 in / 65 mm—3.74 in / 95 mm
“No-Go Zone”
“No-Go Zone”
Notes:
>0.6 in / 15 mm
<0.6 in / 15 mm
C
“No-Go Zone”
02
40
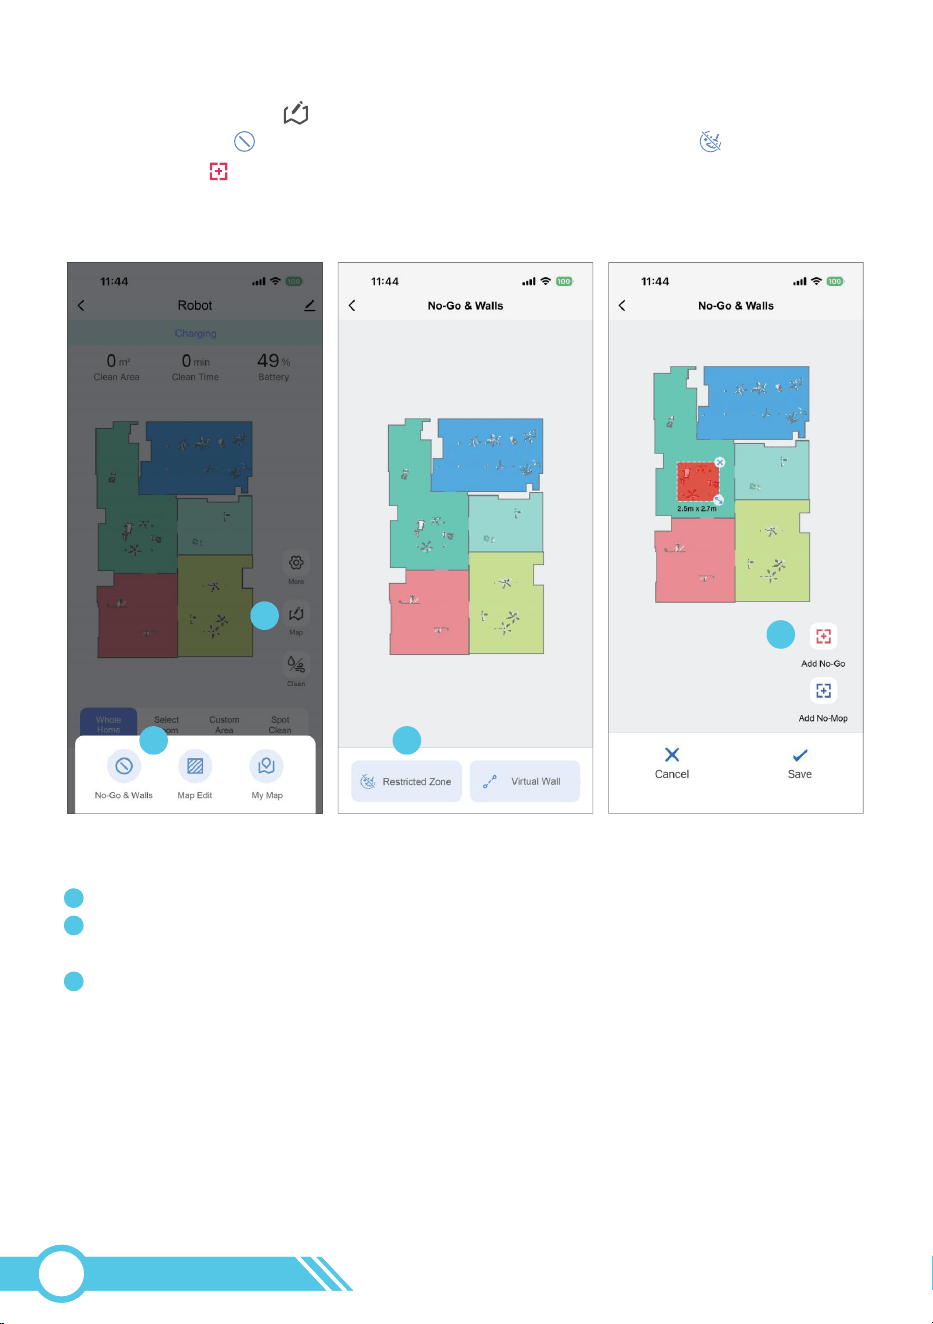
1. Please click the Map button on the right side of the main page to see the
No-Go & Wall , then click to enter and select Restricted Zone .
2. Clicking the " Add No-Go" button will create a red semi-transparent editable
block on the map. This is the No-Go Zone.
1
2 3
4
The "X" button is the delete button, pressing it will remove the zone.
The double-arrow button is the resize button, press and hold it to adjust the size of
the zone.
To move the No-Go Zone, press and hold the colored block in the restricted zone
settings page and drag it to the desired location.
If the robot does not have the mopping cloth holder installed, it will only have the
sweeping function and can sweep within this zone.
Robot can’t mop within this area.
“No-Mop Zone” :
How to configure No-Go Zone:
1
2
3
Notes:
02
41
1
2 3
4
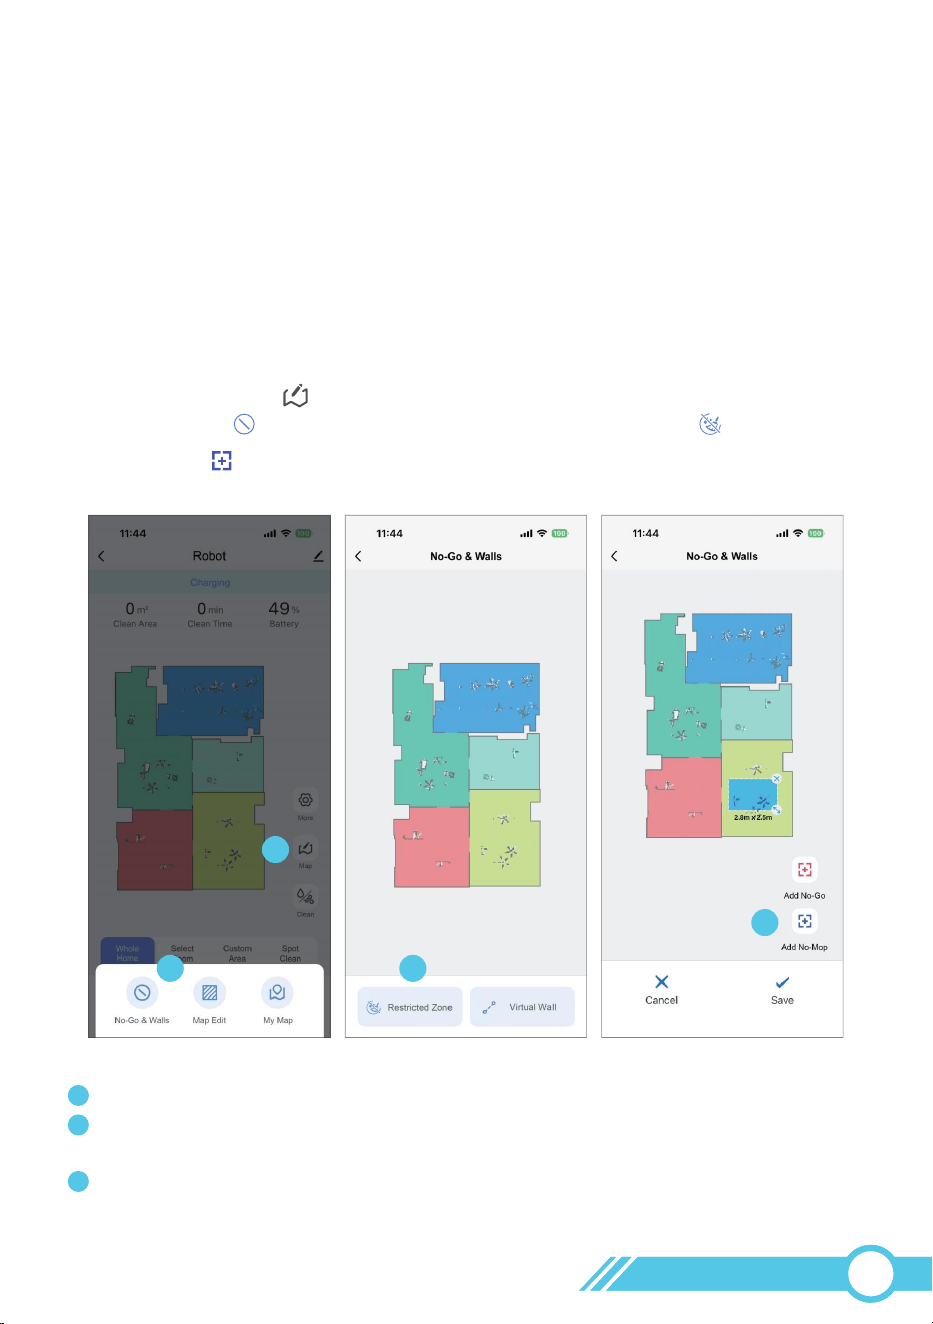
2. Clicking the " Add No-Mop" button will create a blue semi-transparent editable
block on the map. This is the No-Mop Zone.
The "X" button is the delete button, pressing it will remove the zone.
The double-arrow button is the resize button, press and hold it to adjust the size of
the zone.
To move the No-Mop Zone, press and hold the colored block in the restricted
zone settings page and drag it to the desired location.
Once the robot has the mopping cloth holder installed, it will automatically switch to
"sweep&mop" mode, performing both sweeping and mopping simultaneously. It will
then avoid entering this zone.
Since carpets cannot be mopped, the "No-Mop Zone" is typically designated as the
Carpet Zone.
How to configure No-Mop Zone:
Notes:
Note:
1
2
3
The total number of No-Go zones and No-Mop zones that can be set
must not exceed 14.
1. Please click the Map button on the right side of the main page to see the
No-Go & Wall , then click to enter and select Restricted Zone .
02
42
1
2 3
4
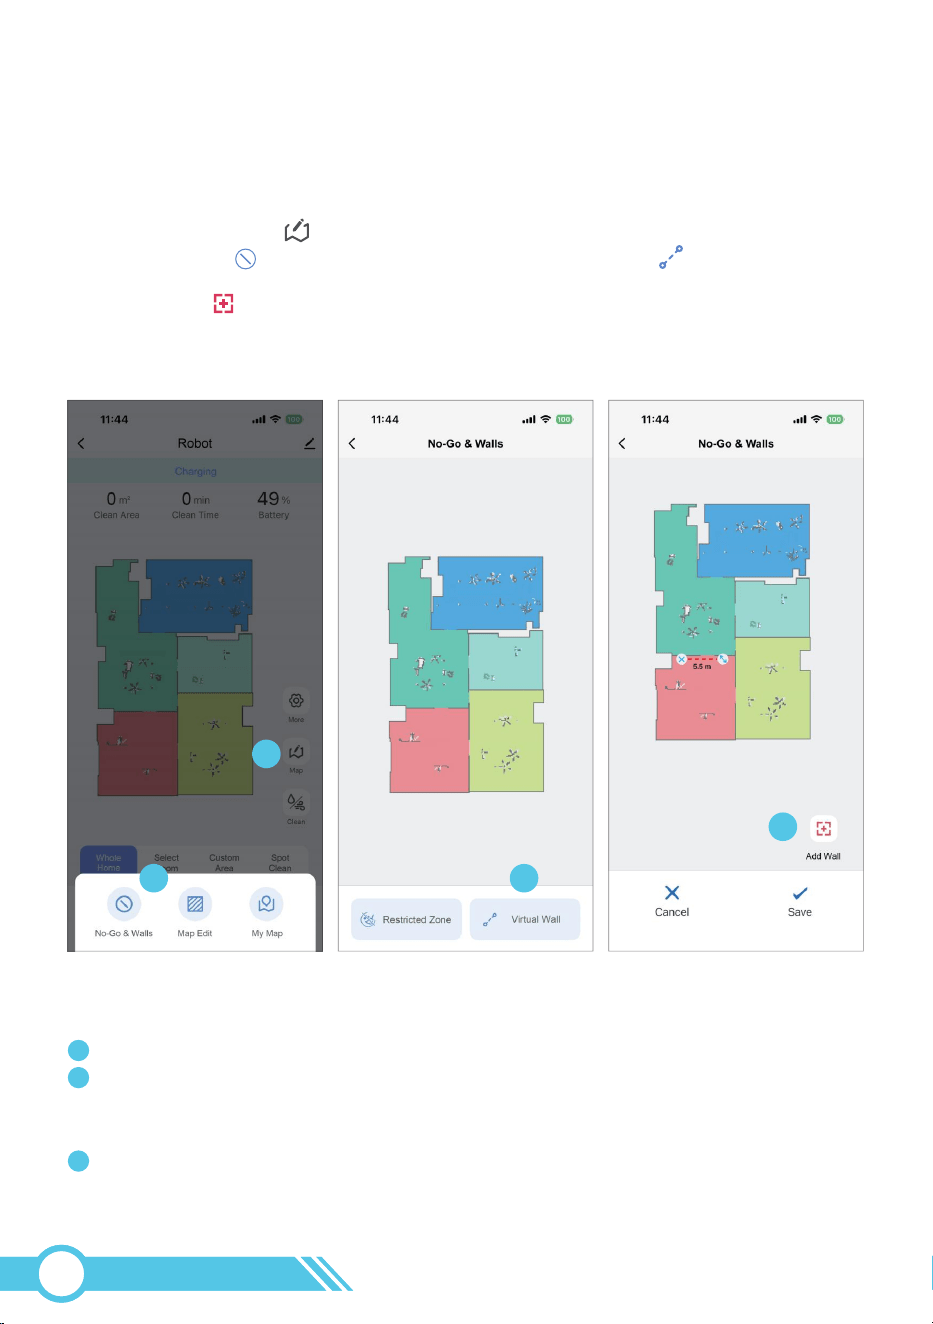
2. Tapping the " Add Wall" button in the bottom right will create a red dashed
editable line on the map. This is the Virtual Wall.
The "X" button is the delete button, pressing it will remove the virtual wall.
The double-arrow button is the adjustment button, press and hold it to change the
direction and length of the virtual wall. Moving the dashed line away from the "X"
button will extend the wall, moving it closer will shorten the wall.
To move the Virtual Wall, press and hold the dashed line in the restricted zone
settings page and drag it to the desired location.
How to configure virtual wall:
The maximum number of "Virtual Walls" that can be set is 20.
The "Virtual Wall" serves a similar function to the "No-Go Zone".
When a "Virtual Wall" is set, the robot is restricted from crossing it.
“Virtual Wall” :
Note:
1
2
3
Notes:
1. Please click the Map button on the right side of the main page to see the
No-Go & Wall , then click to enter and select Virtual Wall .
02
43
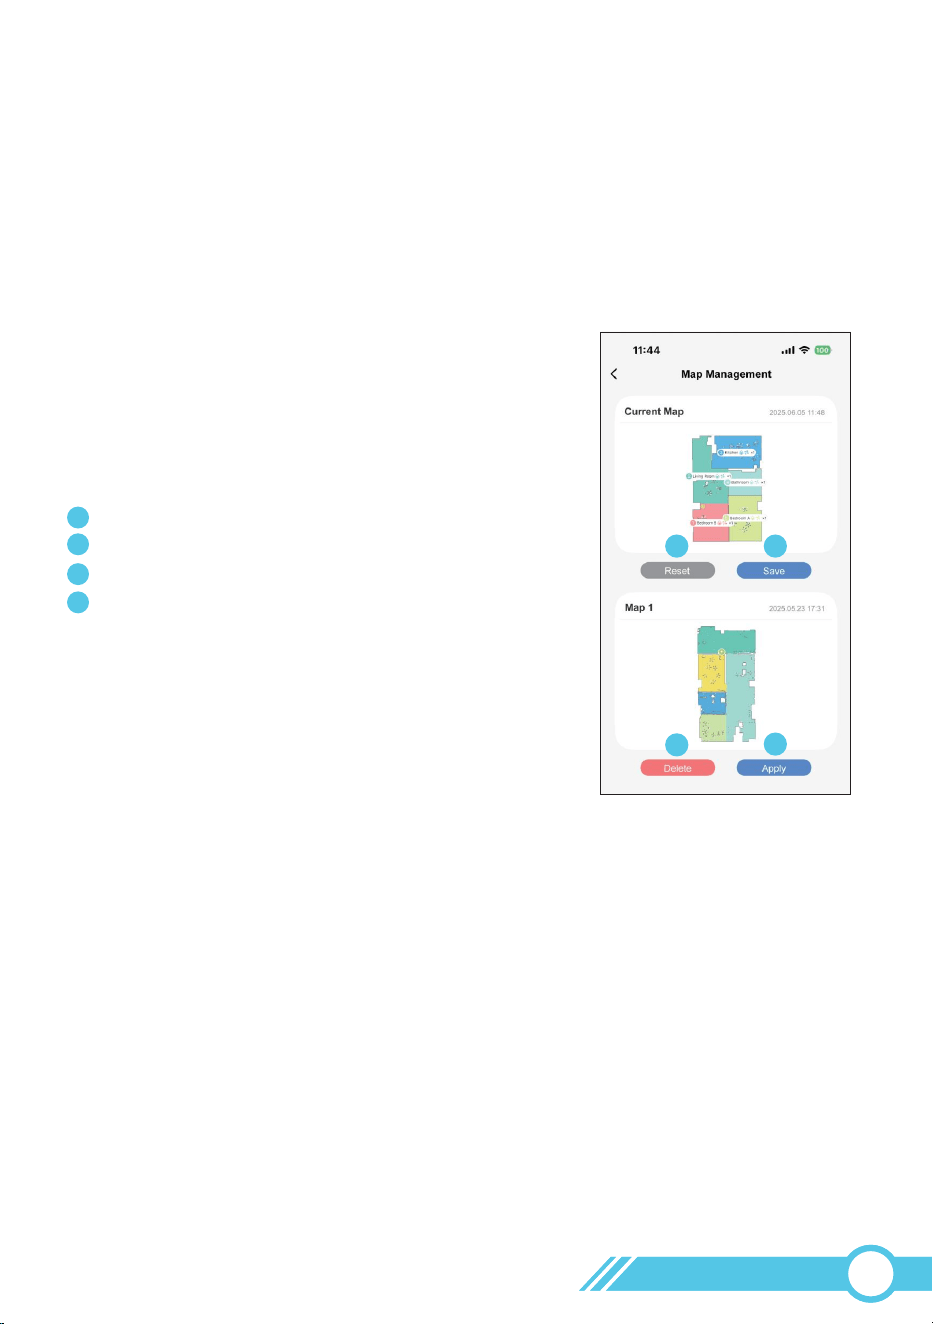
3.6.5 Map Management
After editing the map and setting Restricted Zones, it is recommended to save the
current map in Map Management.
In the future, if the working map in the Tuya smart APP is missing or incorrect for any
reason, you can retrieve the correct map from the map list.
The maximum number of maps that can be stored in the list is 5.
When the stored map count reaches 5 and a new map is saved, the oldest map in the
list will be automatically removed.
Reset current map
Save current map in the map management list
Recover the current map with this map
Delete this map in the map management list
1
1
2
3
4
2
3
4
1. Automatic Map Handling
How to Get the Robot to Clean Different Floors
-After the first full clean on each floor:
1. Go to Map Management in the app.
2. Save the map.
-When switching floors:
1. Place the robot on the desired floor.
2. Open Map Management and select the correct pre-saved map.
3. Start cleaning.
2. Save Time with Pre-Saved Maps
When moved to a new floor, the robot will first try to relocate.
If it detects a completely new environment, it will clear the old map and create a new
one automatically.
Without pre-saving maps, the robot must remap every time, increasing cleaning time.
02
44
3.6.7 Spot Clean
1. On the main page, select "Spot Clean" .
2. Tap any location on the map to generate a red marker. The robot will move to that
area and clean within a 5.2ft×5.2ft (1.6m×1.6m) square.
3. During Spot Cleaning, the robot automatically switches to Max Suction Power.
4. After completion, it will return to the charging dock automatically.
5.2ft(1.6m)
5.2ft(1.6m)
Spot
Clean
3.6.6 Suction Power Setting
The Suction Power can be adjusted in the "Clean" , there’re three levels:
Eco / Standard / Max.
Each suction power level varies in runtime, cleaning performance, and noise.
After a full charge, the app will display the robot's battery level as 100%.
The estimated cleaning time for each suction power level are as follows:
Please note that the indicated cleaning times are provided for reference and may
decrease with prolonged use.
Suction Power
Eco
Sound Indicator after setting
Runtime
150 min1 “Beep”
2 “Beep”
3 “Beep”
Standard 120 min
Max 90 min
02
45
3.6.8 Select Room Cleaning
1. On the main page, tap "Select Room" .
2. Choose rooms on the map in your preferred cleaning order.
3. The robot will clean the selected rooms sequentially, starting with the first room you
selected.
My app page displays the message "Unable to reach the target point, start
recharging" when I choose to Select Room cleaning.
It's possible that the route to that room is obstructed by a door, so please open
any closed doors along the path to that room.
Please check your restricted zone settings, as there may be a restricted zone set
up along the route to the target room. Alternatively, the route may be too
narrow for the robot to pass. Ensure that the channel width is at least 1.5 times
the robot diameter. Remove the restricted zone and try again. Refer to the
instructions in "3.6.4 Restricted Zone Setting" on page 39.
If the issue persists, please contact [email protected] for further assistance.
1
1
2
2
3
Select
Room
02
46

3.6.11 Do-Not-Disturb Mode
When robot’s Do-Not-Disturb mode function is active, some other functions can not
be active, such as “Resume Cleaning”, “Voice” and “Dust Collection”.
Do-Not-Disturb mode could be disable in “Settings” page.
3.6.12 Carpet Boost
When this function is enabled in the app, the robot automatically increases the suction
power to Max when on carpet to provide a deeper clean.
On hard surfaces, the robot will revert to the default suction power setting to conserve
energy.
This feature helps reduce the overall cleaning time but may result in increased noise
levels. If you prefer shorter cleaning times or lower noise levels, you can disable this
function in the app.
3.6.13 Resume Cleaning
During cleaning, if the robot's battery falls below 15%, it will stop cleaning and return
to the Self-Empty Base.
If the "Resume Cleaning" option is set, once the robot's battery level reaches above
80%, it will continue cleaning from where it stopped due to low power during the last
cleaning session.
3.6.9 Custom Area Cleaning
1. On the main interface, select "Custom Area" .
2. Tap "+Zone" to create an adjustable blue zone on the map.
3. Customize your cleaning by:
- Drag & move the zone to any position
- Resize by pulling the edges
- Set desired cleaning passes
The robot will clean only within the blue zone area when starting
3.6.10 Schedule Cleaning
After setting schedule cleaning time, robot will clean when the schedule time is up and
return to the Self-Empty Base once cleaning is complete.
You can also set the cleaning frequency of each week, cleaning times and plan
cleaning area.
Custom
Area
02
47

However, this feature will be disabled if the Do-Not-Disturb Mode is activated, and
the "Resume Cleaning" time falls within the Do-Not-Disturb period.
3.6.14 Work with Amazon Alexa or Google Assistant
Amazon Alexa or Google Assistant serves as smart voice control devices that allow you
to command the robot using your voice. Before getting started, ensure that:
5.Your Amazon Alexa-enabled device is registered on the Amazon Alexa App or your
Google Assistant-enabled device is registered on the Google Home App.
4.The Amazon Alexa App or Google Home App is installed on your smart device,
and you have an account set up.
3.You have an Amazon Alexa-enabled device (e.g., Amazon Echo, Echo Dot, Amazon
Tap, Echo Show, Echo Spot) or a device with Google Assistant (e.g., Google Home,
Google Home Mini). These devices are sold separately.
2.The robot is successfully connected to the Tuya Smart App.
1.The robot is docked at the Self-Empty Base to ensure it has sufficient power.
Notes:
When the "Resume Cleaning" function is turned on, in our robot program, the
"Do-Not-Disturb" mode is also automatically turned on at the same time, in order to
avoid disturbing the user when the robot resumes cleaning at night.
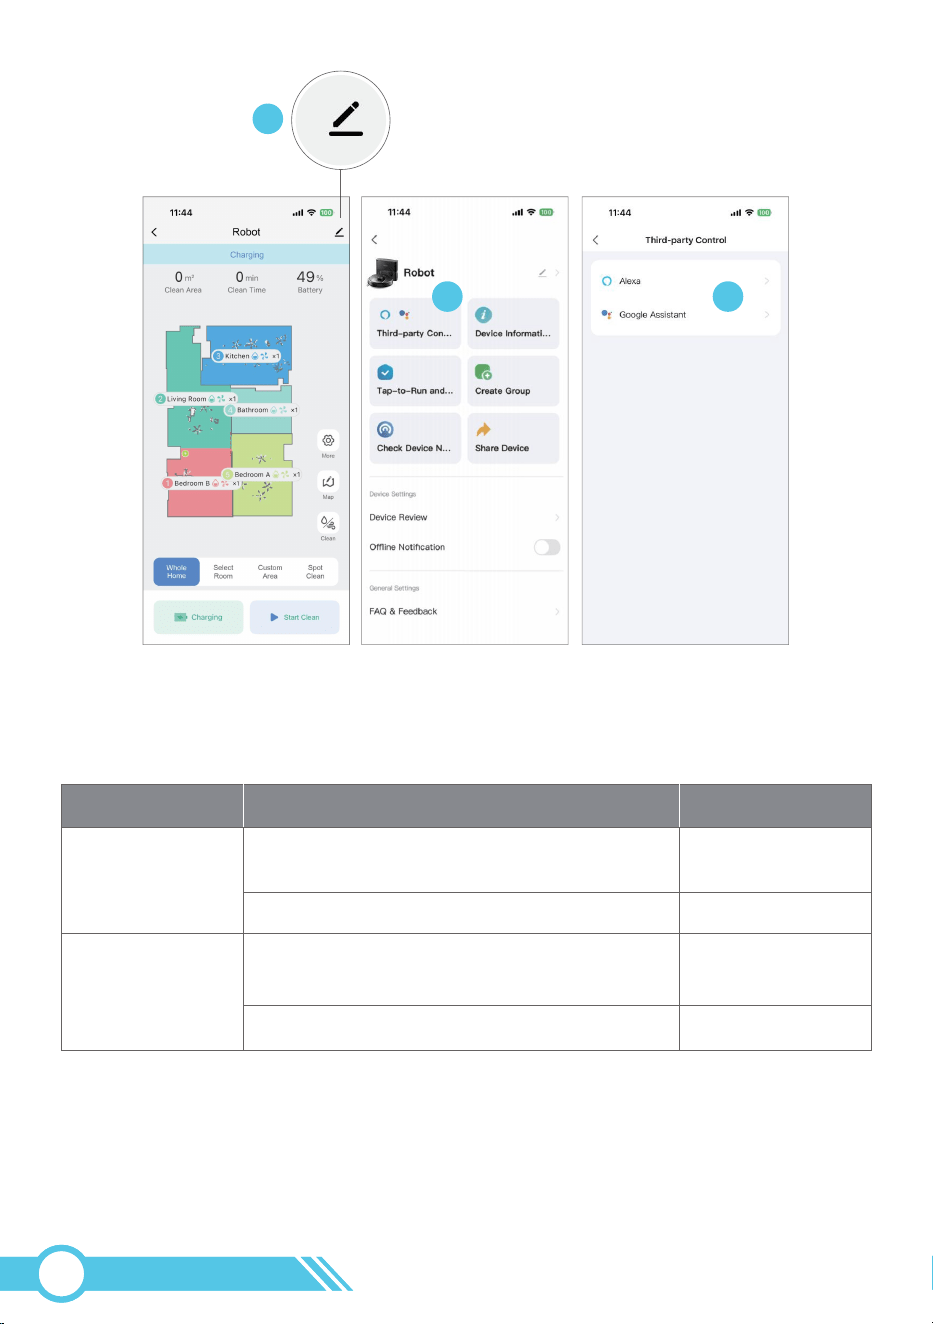
To control the robot using Amazon Alexa or Google Assistant:
Step 1: Open the Tuya Smart App, go to the robot's page, and tap the top-right Pen icon;
Step 2: Tap on the "Third-Party control";
Step 3: Tap on the Amazon Alexa icon or Google Home icon to link with Alexa or
Google Home.
Follow the app instructions to add your robot to the Amazon Alexa App or Google
Home App.
02
48
1
2 3
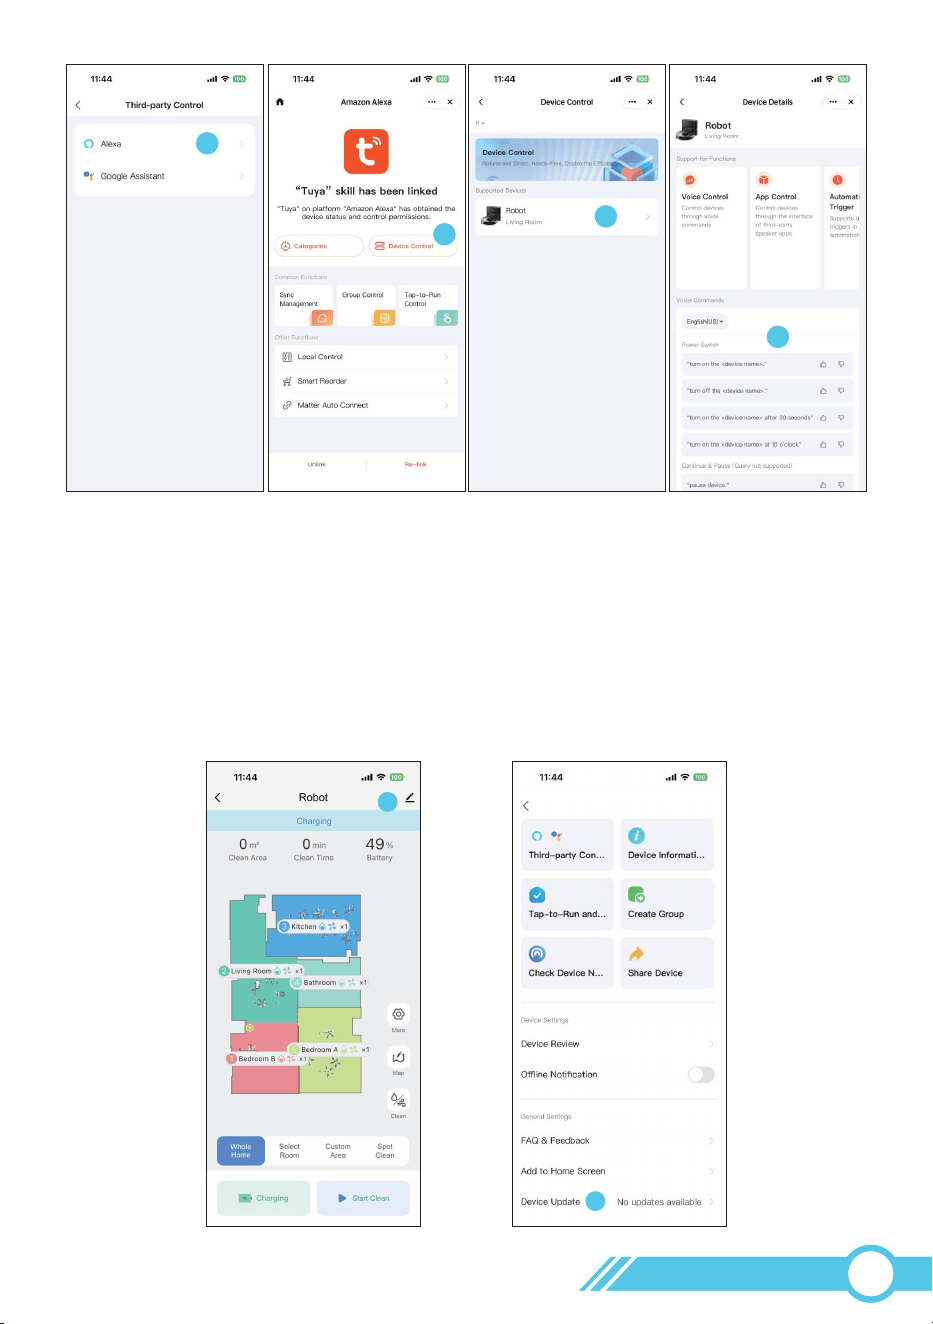
To get the latest voice commands (using Amazon Alexa as an example, the
steps are the same for Google Assistant):
You can use the following voice instructions to control your robot through an
Amazon Alexa-enabled device or Google Assistant-enabled device.
1. Tap Alexa, then tap the Device Control button.
2. In the Device Control interface, find the robot vacuum and tap to enter.
3. In the Device Details interface, you can view the available Voice Commands.
Voice instruction of Amazon Alexa or Google Home device
Device
Amazon Alexa
Google home
Voice Instruction
"Alexa, turn on robot (or your robot's name
if you changed the robot name)".
"Alexa, turn off robot".
"OK Google, turn on robot(or your robot's
name if you changed the robot name)".
"OK Google, turn off robot".
Meaning
Auto Cleaning
Start Recharging
Auto Cleaning
Start Recharging
02
49
1
2
3.6.15 Firmware Update
Update robot firmware thru Tuya Smart App as below pics.
To upgrade the firmware, please ensure that the battery power must be equal or
higher than 50%, and the robot is connected to your network.
It is recommended that robot is docked at the Self-Empty Base to ensure it has
sufficient power for upgrading.
1
2
3
4
02
50
Quick Map
1. Quick Map: When no map exists, the main screen will display a 'Quick Map'
button in the center. Tapping this button initiates the mapping process. Upon
completion, the robot will automatically return to the Self-Empty Base to recharge.
2. Whole Home Cleaning: If you select "Whole Home" and start clean,
the robot will first create a map and then immediately begin cleaning after mapping is
finished.
Whole
Home
Recommendation: Before starting the mapping process, place the robot on the
Self-Empty Base and initiate the operation from there. This ensures that the
Self-Empty Base's location is correctly updated on the map after mapping is complete.
For the first cleaning, the robot vacuum does not have a map. Please use one of the
following two methods to start mapping and cleaning:
To easily use Tuya Smart App, please follow the steps below:
Step 1: Mapping whole house layout
3.7 Start with Tuya Smart APP
02
51
Notes:
During the initial cleaning, ensure that each room's door is open to assist the
robot in fully exploring your house.
Since the robot can cross thresholds up to 0.6 in / 15 mm high, if any room's
outer threshold is less than 0.6 in / 15 mm, but the threshold measured from
the inside of the room is higher than 0.6 in / 15 mm due to height differences,
the robot may enter but not exit the room, potentially becoming trapped. In such
cases, set up a "No-Go Zone" or "Virtual Wall" for this room as instructed on
page 39 to prevent the robot from being trapped in this room.
Please remove any objects from the floor that may entangle the robot vacuum,
such as pet waste, socks, clothing, tissues, toys, slippery items, and power cords.
You can utilize the provided Cable Ties to organize your wires and power cords.
2
3
1
5
<
0.6 in
<
0.6 in
1
32
Regardless of whether the robot is cleaning or mapping, you have the ability to pause
the robot and establish "No-Go Zone" "No-Mop Zone" or "Virtual Wall" in the Tuya
Smart App's "Restricted Zone Setting" as needed.
"No-Go Zone" and "Virtual Wall" are designed to prevent the robot from entering
specific areas for sweeping and mopping.
"No-Mop Zone" prevents the robot from mopping in designated areas; If there is no
mopping cloth holder attached, the robot will only sweep in these zones.
While the robot is mapping or cleaning for the first time, it is advisable for the user to
monitor the robot closely to set restricted zones whenever necessary. If the robot gets
stuck or trapped during this initial phase, it will halt at those problematic locations and
alert an error. You can easily identify these problematic spots on the house map and
set up "Restricted Zones" for future cleaning sessions. This proactive approach ensures
that the robot avoids getting stuck or trapped again, completes all cleaning tasks
independently, and automatically returns to the Self-Empty Base.
For instance, if the robot gets stuck behind a cabinet or trapped in a room during
mapping or cleaning, you can halt the robot and set up "No-Go Zone" or "Virtual Wall"
in the "Restricted Zone Setting" on the Tuya Smart App for that specific cabinet or room.
This prevents the robot from getting trapped in those areas again. Move the robot to a
safe location, then press the power button on the robot or tap the Start Clean
button on the app to resume mapping or cleaning.
Step 2: Set Restricted Zone
After completing the initial cleaning and configuring the "Restricted Zone Setting"
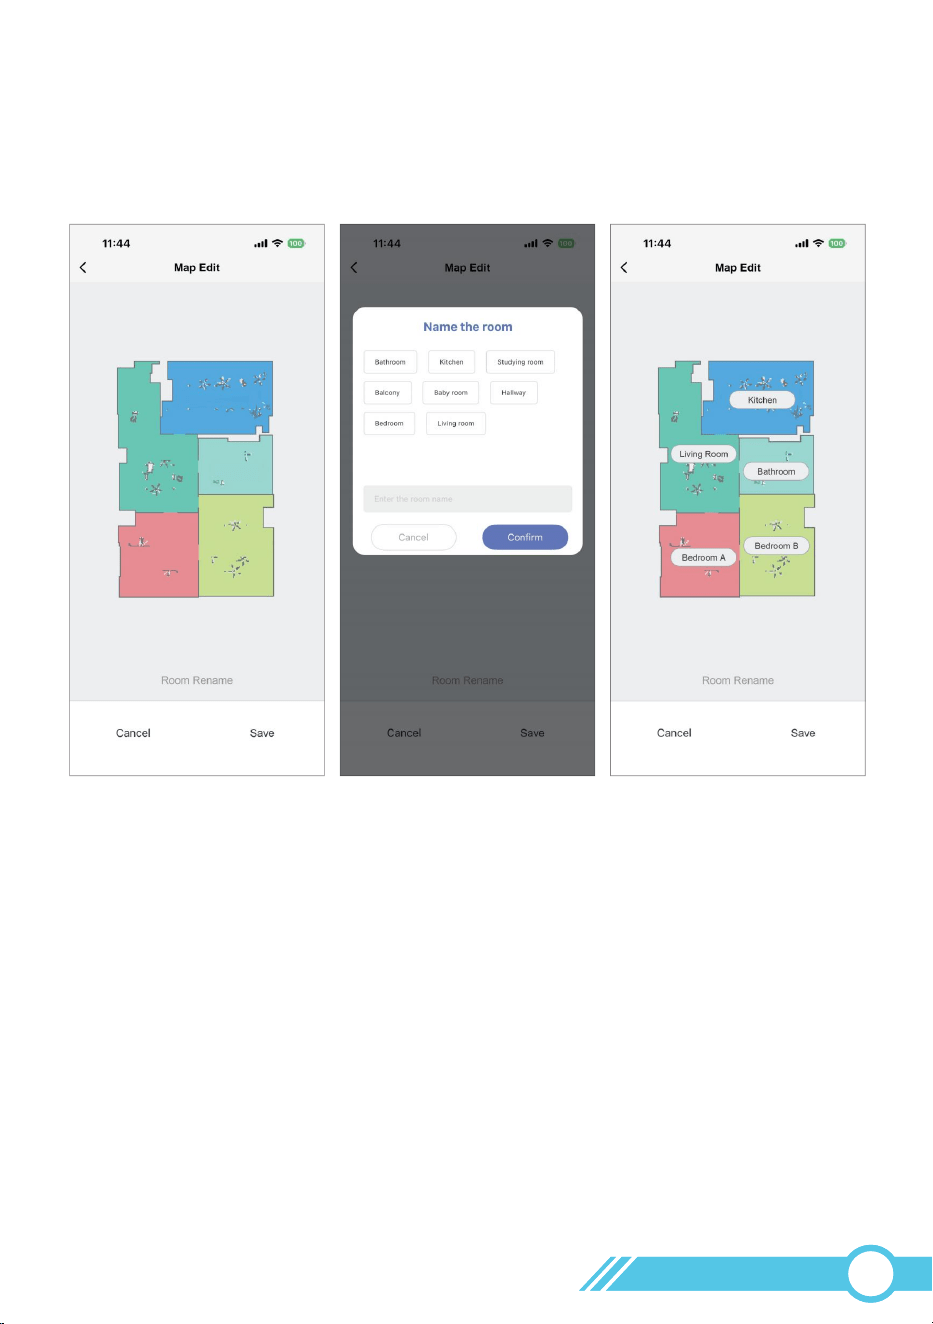
access "Map Edit" in the app to merge, split, and rename each room to align the map
with your house layout.
Step 3: Edit room layout on APP
Enter “Map Management” to store current Map, in case the working map in the Tuya
Smart App goes missing or is incorrect, you can retrieve the correct map from the
map list.
Step 4: Enter “Map Management” to store current Map
02
52

3.8 Charging
1. When the battery is low or cleaning is complete, the robot will automatically
return to the Self-Empty Base for recharging.
2.
During idle periods, keep the robot docked to ensure it is fully charged and ready for
use at any time. The Self-Empty Base uses minimal power once charging is complete.
3.
The Self-Empty Base features built-in circuit protection for safe docking at all times.
4. If the robot is blocked or stuck and cannot find the Self-Empty Base, place it manually
onto the base to begin charging.
Auto Charging
Method 1:
Align the robot's charging pins with those on the Self-Empty Base and attach the robot.
Upon successful attachment, a voice prompt will announce "Start Charging".
Manual Charging:
Method 1
2
1
2
1
02
53
Recharge
Method 2:
Press on the robot or on App to let the robot start automatic returning to
the Self-Empty Base. Once successfully docked, a voice prompt will announce
"Start Charging".
Method 2
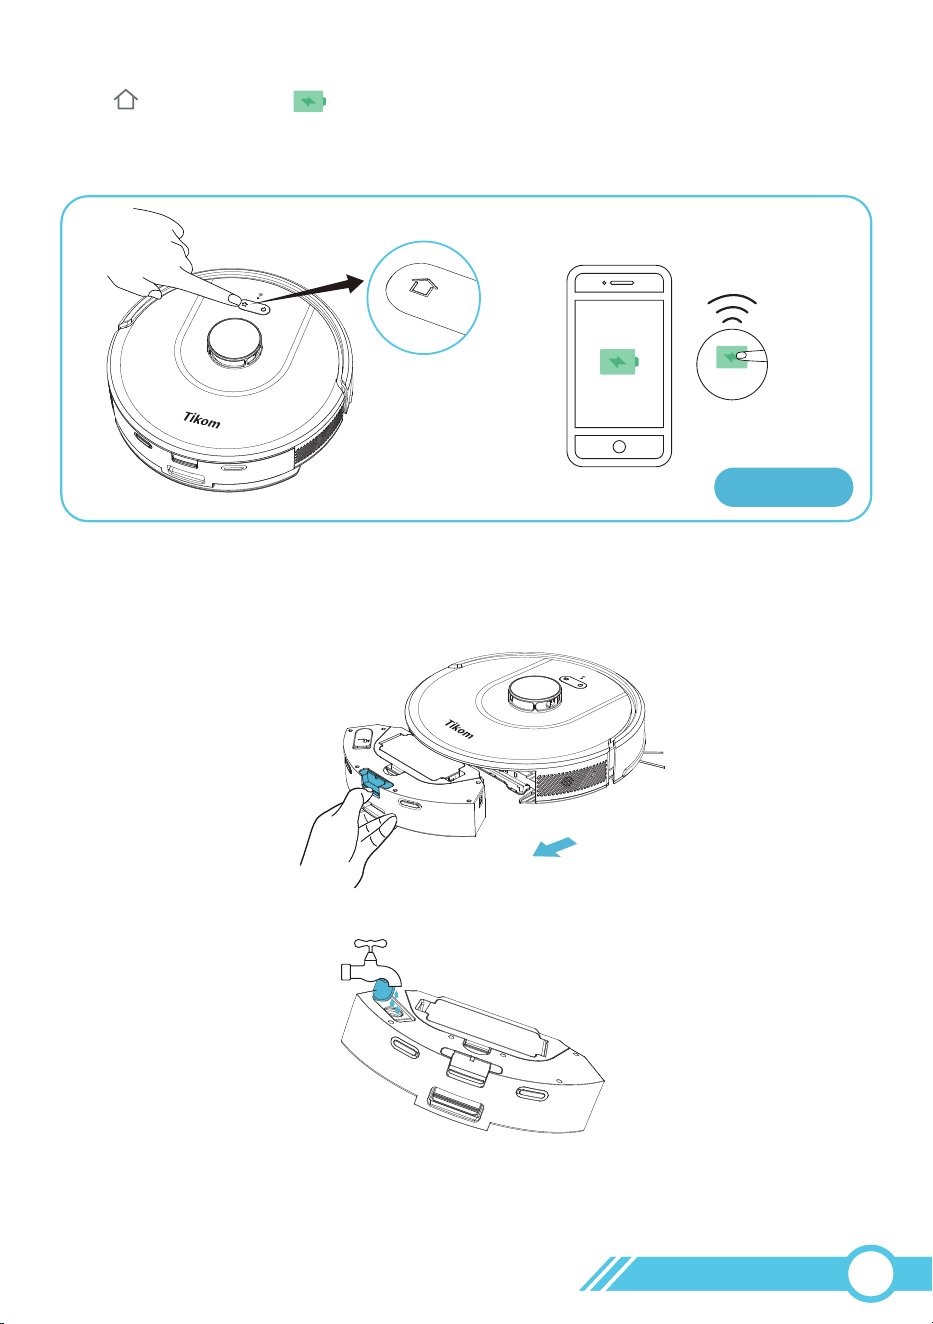
3.9 Mopping the Floor
1. Take out the Water Tank.
2. Open the water tank cover, fill it with water, and reseal it carefully.
Floor cleaners or disinfectants may damage the water tank. Do not add them to the
water tank.
Only clean water is recommended.
Notes:
Recharge
02
54
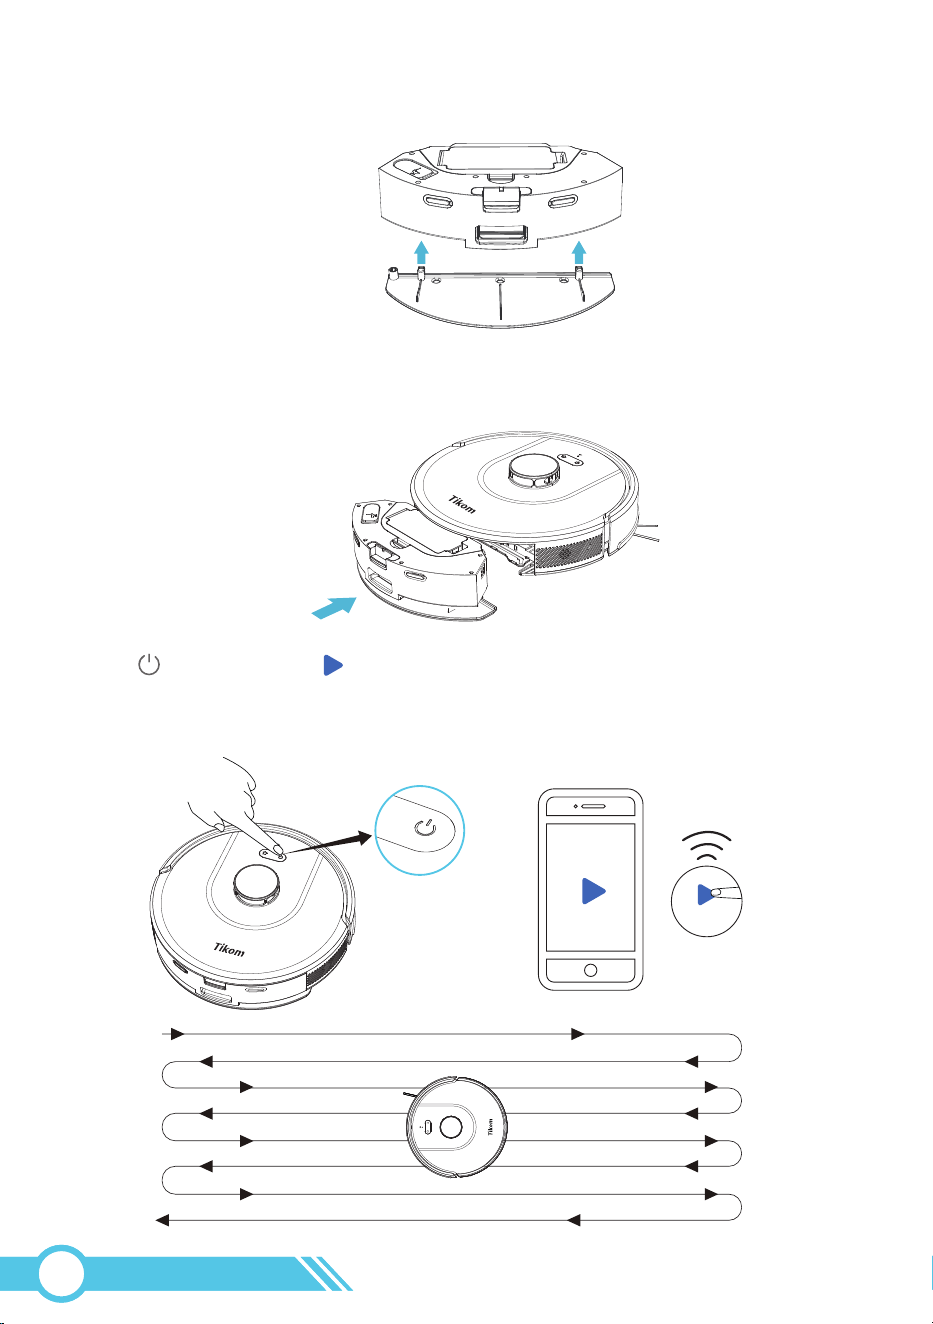
5. Press on the Robot or on APP to start mopping. The voice announces
“Start Sweeping and Mopping”. In this time, robot will sweep and mop in the
same time.
3. Attach the mopping cloth holder to the water tank.
4. Reinstall the water tank back onto the robot.
Start Clean
Start Clean
02
55
Water Volume Level
Low
Sound Indicator after setting
Mopping Time
120 min1 “Beep”
2 “Beep”
3 “Beep”
Middle 90 min
High 60 min
Water Volume Control and Mopping Time
If no water is dispensed during mopping, please check as follows:
Action
This indicates that the mopping cloth holder
is not installed properly. Please assist in
re-installing the mopping cloth holder.
This indicates that the robot has detected the
mopping cloth. Please check:
If the signal from the robot to the water tank
is weak, clean the signal contacts with a dry
cloth.
1. Please make sure that the rubber water
inlet cover has been well closed.
2. Please adjust the "Water Volume" setting
in the app to Low.
Robot Voice
Start Sweeping
Start Sweeping
and Mopping
/
Mopping Problem
No or Little Water
Too much water
Water Control Contact
Water Control Contact
Use a dry cloth to clean the metal contacts on the side of the water tank.
Clean the contacts
02
56
1
2
To prevent a foul odor from dirty mopping cloths, it is recommended to wash the
mopping cloth after each use and air-dry it for the next mopping session. Refer to
page 64 for instructions on washing the mopping cloth.
For effective mopping with a dry mopping cloth, dampen the cloth before mopping.
3
Since carpets cannot be mopped, set a "No-Mop Zone" in carpeted areas on the app.
When the robot is equipped with a mopping cloth holder, it will avoid sweeping and
mopping in this designated area. If the robot does not have the mopping cloth holder
installed, it will sweep this "No-Mop Zone". Refer to page 42 for an introduction to
setting up "No-Mop Zones".
Notes:
3.12 Error
3.11 Sleep Mode
3.10 Standby Mode
In case of an error, the Robot Status Light will flash red, accompanied by a voice prompt
and an error displayed on the app.
The robot will stop automatically and enter Standby Mode. Refer to section
"5.1 Error & Voice Alarm" on page 72 for troubleshooting.
After 10 minutes in Standby Mode, the robot will enter in Sleep Mode, indicated by all
lights being turned off.
To conserve battery power, the robot will enter Sleep Mode if it remains in Standby
Mode for 10 minutes. In Sleep Mode, all lights on the robot will be off.
Press the power button on the robot or Start Clean button on the app to
wake the robot up.
The robot will be in Standby Mode under the following conditions:
1. When cleaning is stopped via the power button on the robot or app.
2. If the robot encounters an error and stops cleaning.
Flash Red On Robot Error Pop-up On Tuya Smart APP
02
57
If the robot experiences any malfunction, follow these steps to restart it:
1. Remove the robot from the Self-Empty Base.
2. Use a needle to press the Reset button (Wi-Fi LED status light) located at the top
of the robot.
3. Long-press the power button or place the robot back on the Self-Empty Base to
power it on.
3.13 Restart Robot
02
58
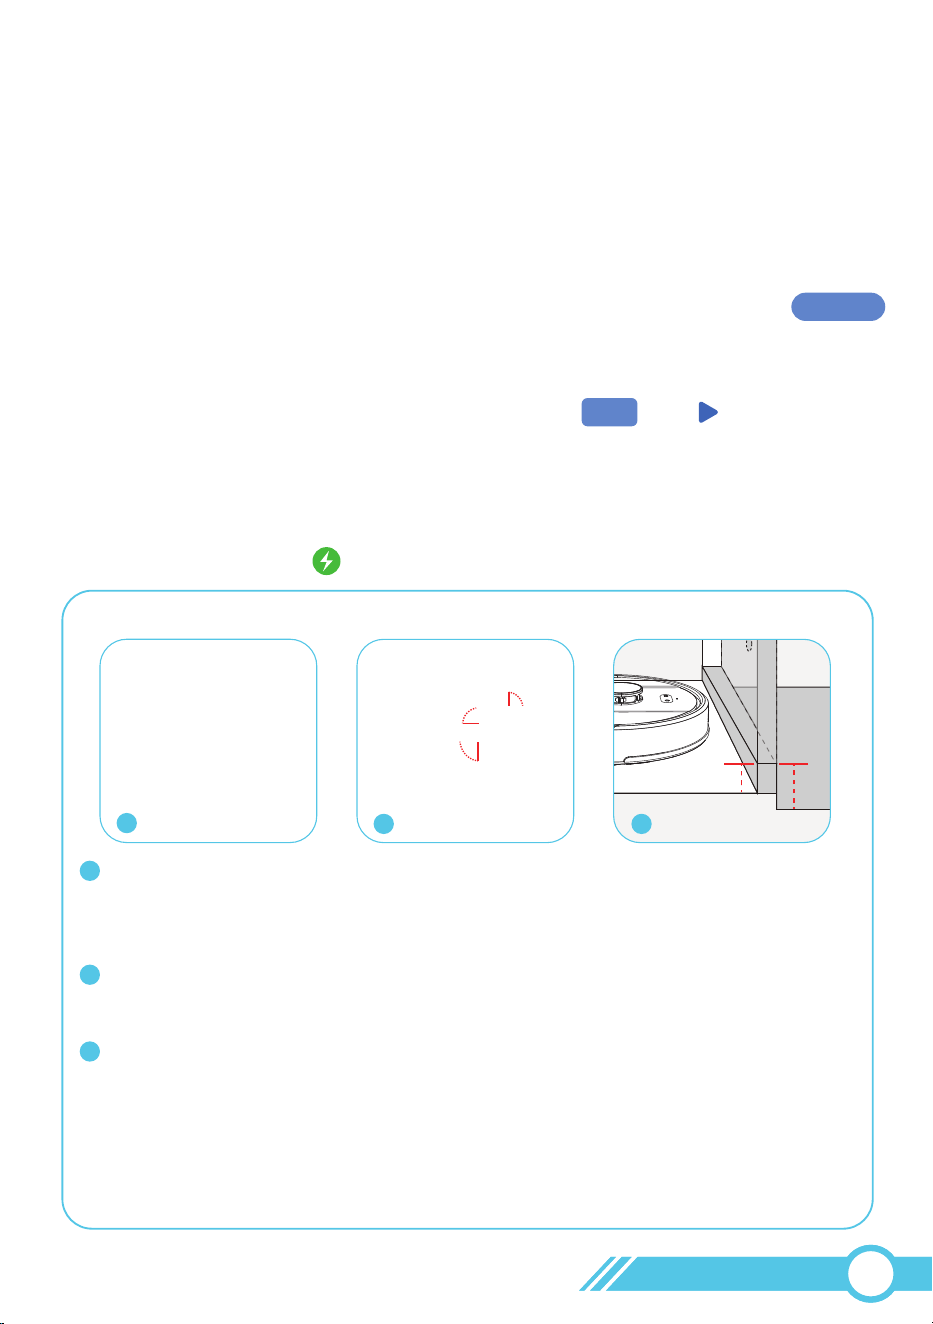
3.14 How to Trigger Dust Collection on Demand
Note:
If you want to initiate an additional
dust collection cycle, press the
button on the robot when the
robot is charging.
This will prompt the Self-Empty Base
to collect dust one more time
when the robot docks.
When the robot vacuum
cleaner and the Self-Empty Base are
connected for charging, the
and buttons will flash.
Method 1: Thru Button on Robot
Follow the steps shown in the images below to locate the "Collect Dust Now" button
in the Tuya Smart app. which will initiate a dust collection cycle for the robot vacuum
that is currently charging on the Self-Empty Base.
Method 2: Thru Tuya Smart APP
2
1
3
02
59
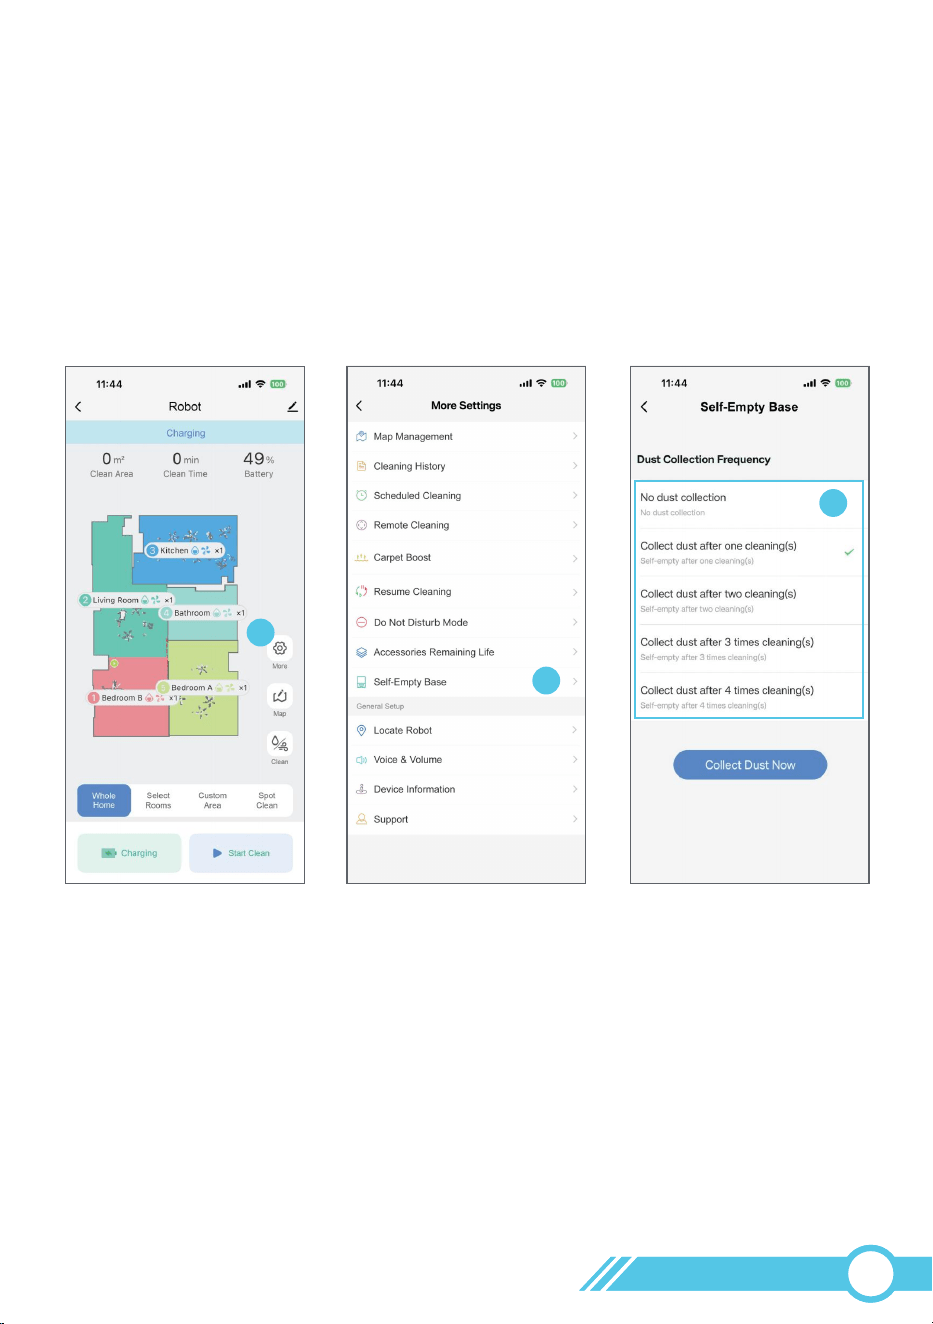
Note:
If there is a lot of dust and hair accumulation in your home, we recommend
you select our default setting, which starts the dust collection after each cleaning
session to avoid any unpleasant odors from the robot vacuum's dust bin.
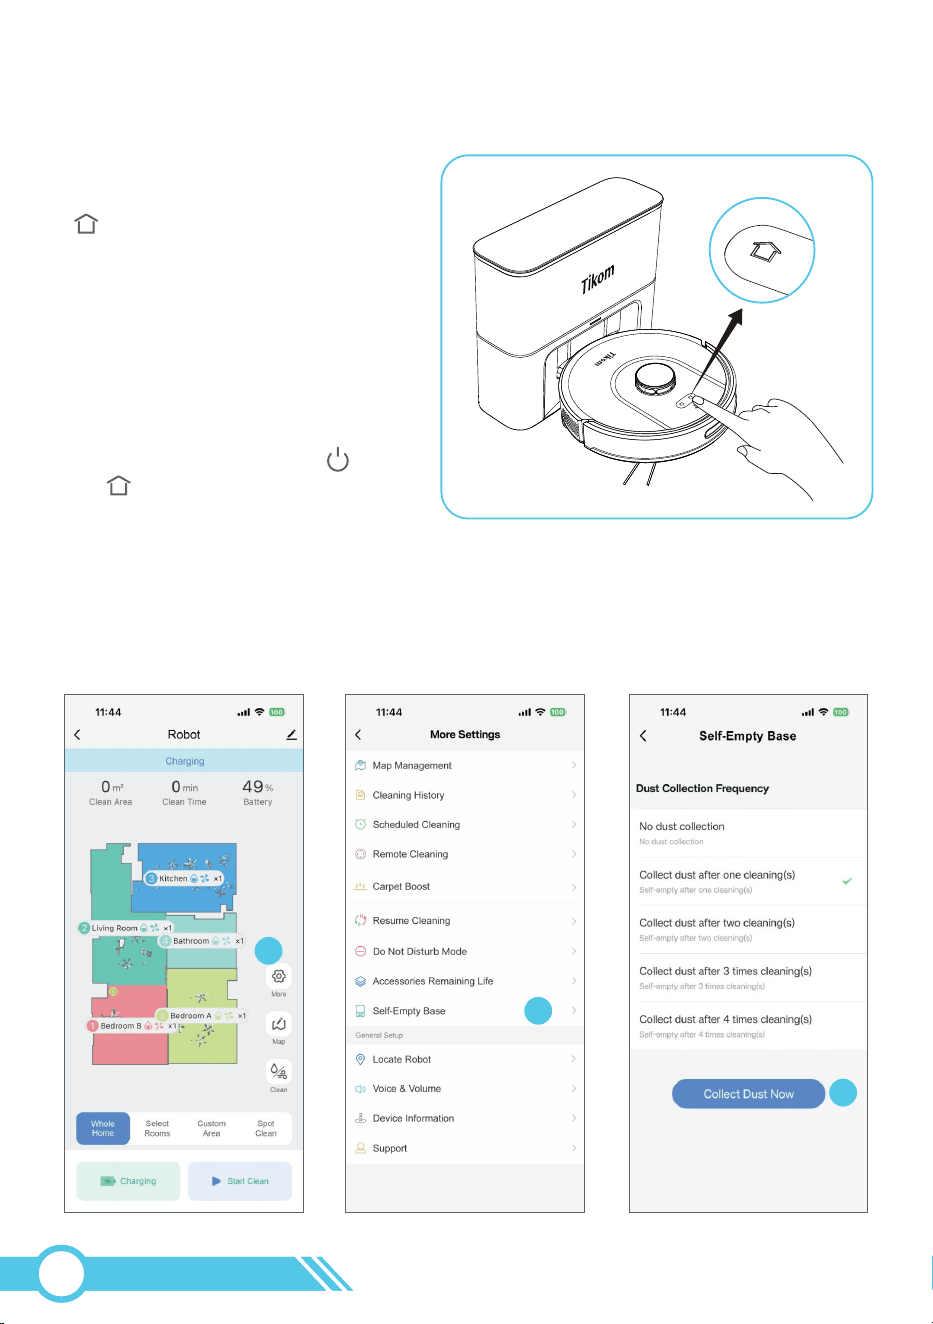
3.15 How to Set the Dust Collection Frequency
Our default setting is to start dust collection after each cleaning session.
You can adjust the settings here to specify how many cleaning cycles should occur
before initiating dust collection.
2
1
3
02
60
4. Maintenance and Care
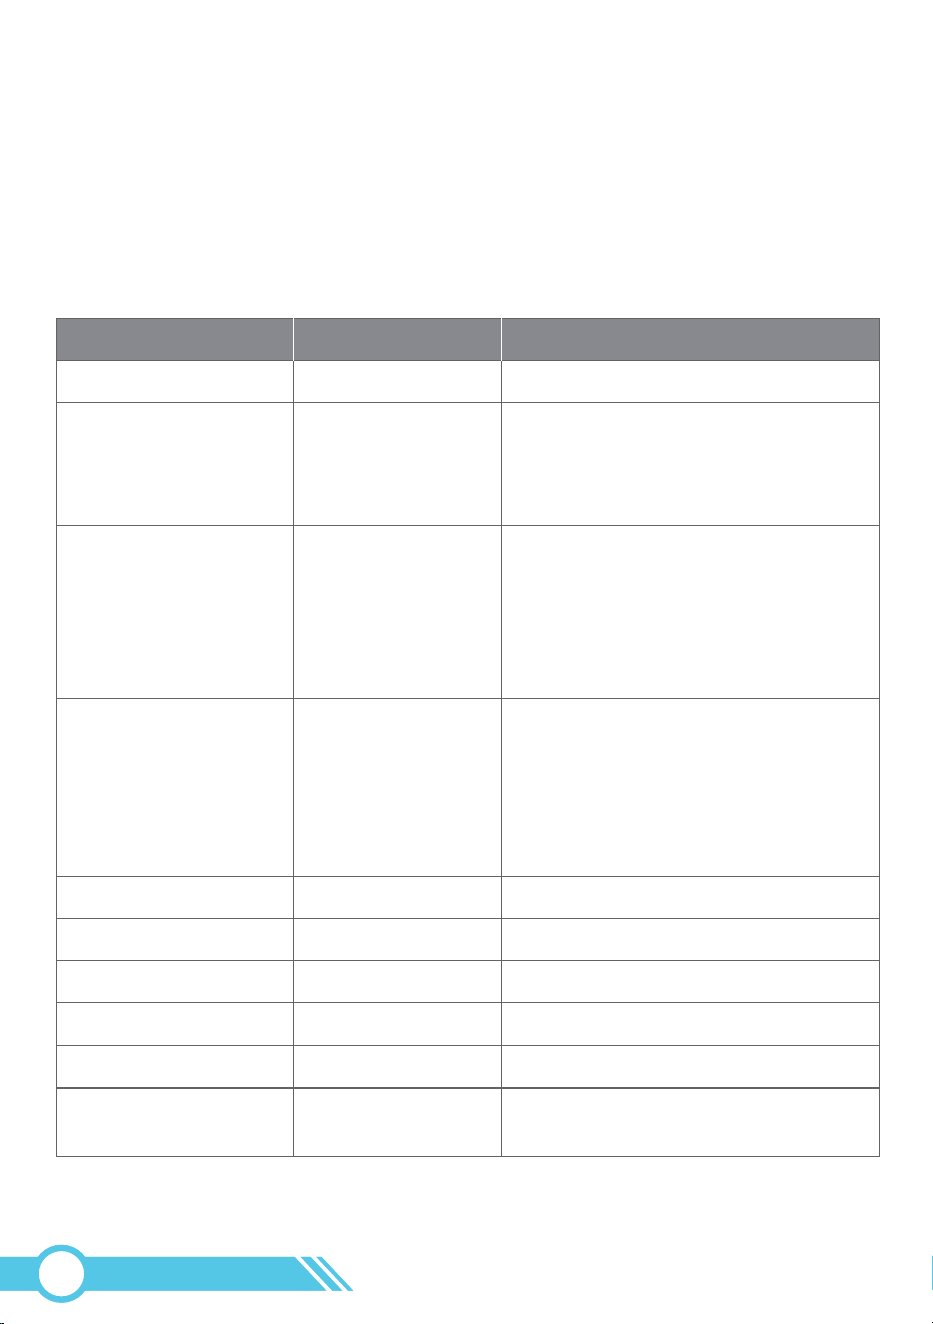
4.1 Cleaning and Replacement Frequency
To enhance your robot's performance, it is recommended to conduct regular
maintenance and cleaning on certain parts of the robot.
Main Brush
Brush Guard
Sensors
Charging Contacts
Caster Wheel
Mopping Cloth
Dust bag
Once a week
Once a month
Once a month
Once a month
Once a month
After every use
/
/
/
/
/
When it shows visible signs of wear.
Every 3 months or when the
dust bag is full.
1. Every 6-12 months.
2. When it shows visible signs of wear.
3. If the Main Brush life time on the app
has expired, replace the Main Brush
under any of the conditions
mentioned above.
CLEANING AND REPLACEMENT FREQUENCY
Part
Dust Bin & Water Tank
HEPA Filter
Side Brush
Cleaning Frequency
Once a week
(Twice a week if you
have pets)
Once a week
After every use
Replacement Frequency
/
1. Every 3-6 months.
2. If the Filter life time on the app has
expired, replace the filter under any
of the conditions mentioned above.
1. Every 3-6 months.
2. When it shows visible signs of wear.
3. If the Side Brush life time on the app
has expired, replace the Side Brush
under any of the conditions
mentioned above.
02
61
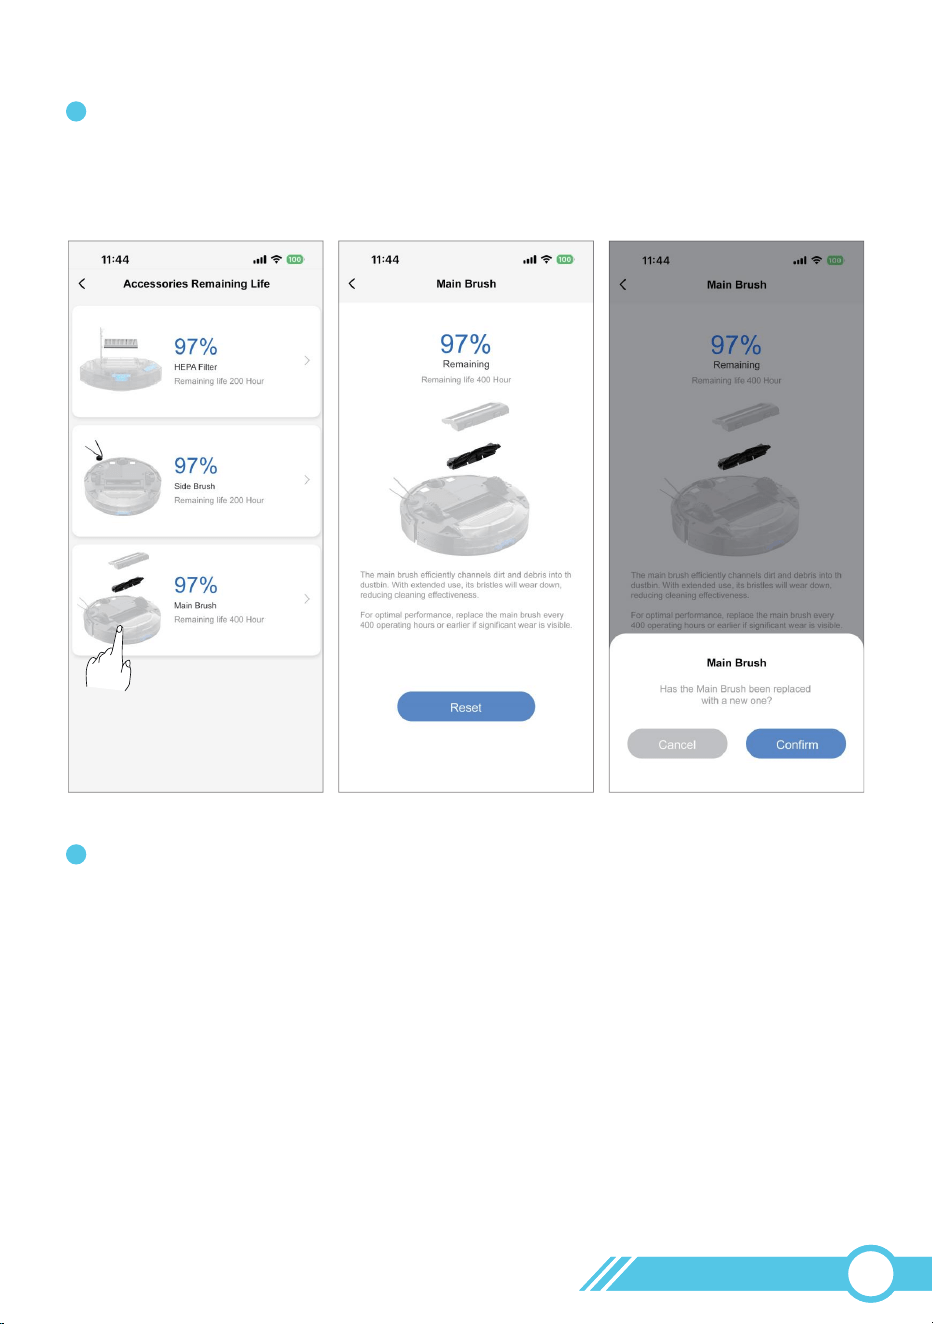
Tikom offers a range of replacement parts and accessories. For more information on
replacement parts, please contact Customer Service at [email protected].
When the Tuya Smart app page displays the message "Please check the remaining life
of accessories and replace them in time!", please check the current remaining life of
your accessories and replace them in a timely manner.
Resetting the part's remaining time in the Tuya Smart app will close the reminder pop-up.
Note:
1
2
02
62
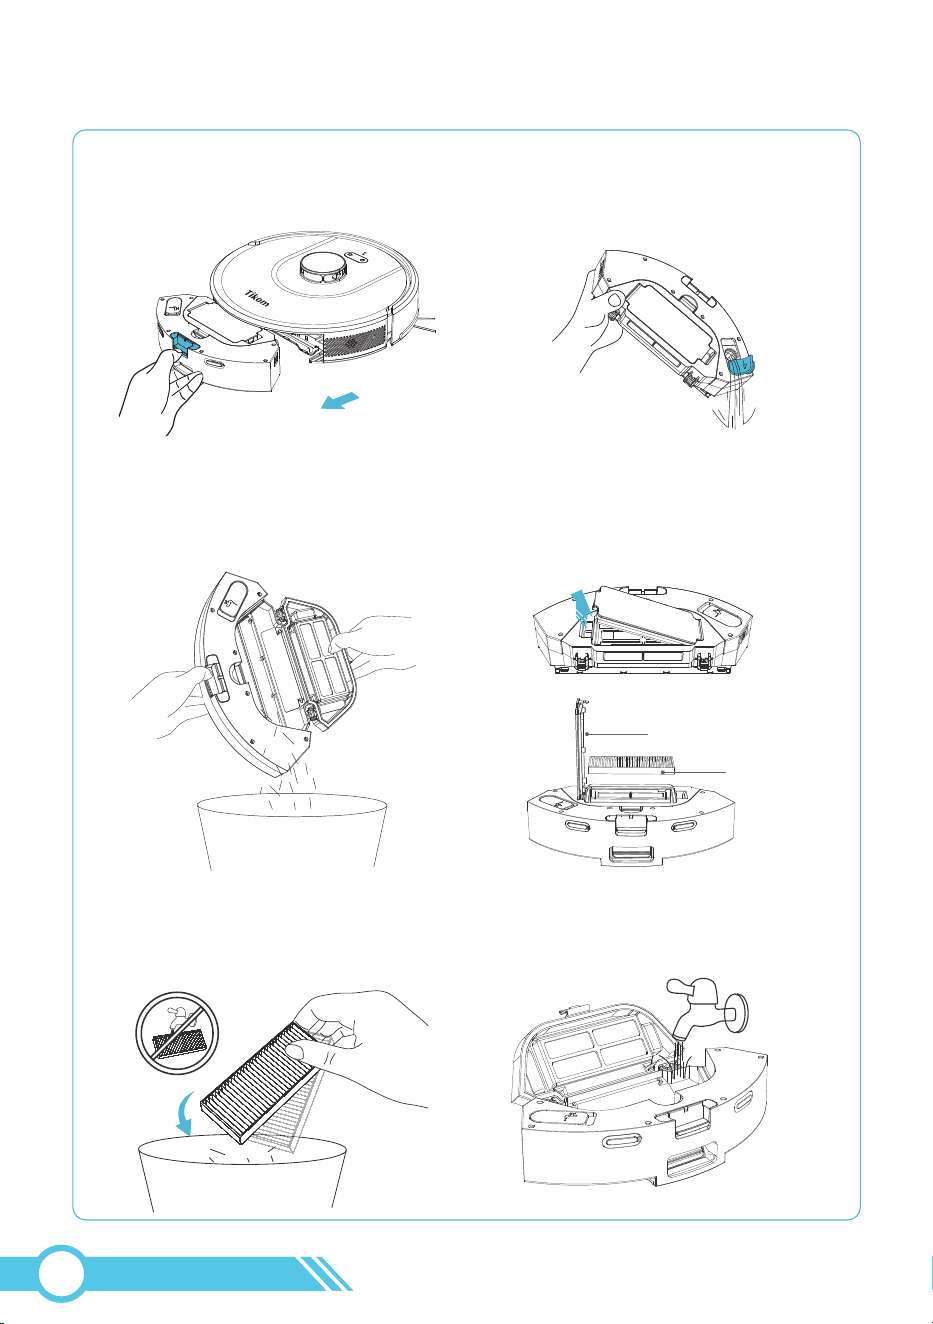
Do not wash the HEPA filter with water.
Note:
5. Gently tap the HEPA filter to remove
any dust that has accumulated on it.
6. Rinse the dust bin with clean water,
without using any detergent.
4.2 Clean Dust Bin, Filter & Water Tank
1. Take out the Dust Bin and
Water Tank from the Robot.
2. Open the rubber cover of the
Water Inlet and empty any remaining
water from the water tank.
3. Press the Release Button on the
Dust Bin Cover to open the
Dust Bin and empty the dust into
a trash bin.
4. Open the filter cover of the dust bin,
then remove the HEPA filter.
Filter Cover
HEPA Filter
02
63
7. Dry the dust bin thoroughly
before using them.
8. Reinstall the HEPA Filter into the
Filter Compartment, then place the
dust bin back into the robot.
The filters efficiently prevent dust and dirt from entering the interior of the
robot, safeguarding its ventilation system and preventing secondary air
pollution.
You can wash the Dust Bin & Water Tank with clean water.
Ensure they are completely air-dried before reassembling.
1
2
Avoid washing the HEPA Filter with water, as this may damage the filter and
reduce suction power.
3
Notes:
4.3 Clean Mopping Cloth
1. Remove the Mopping Cloth Holder from the Robot.
02
64
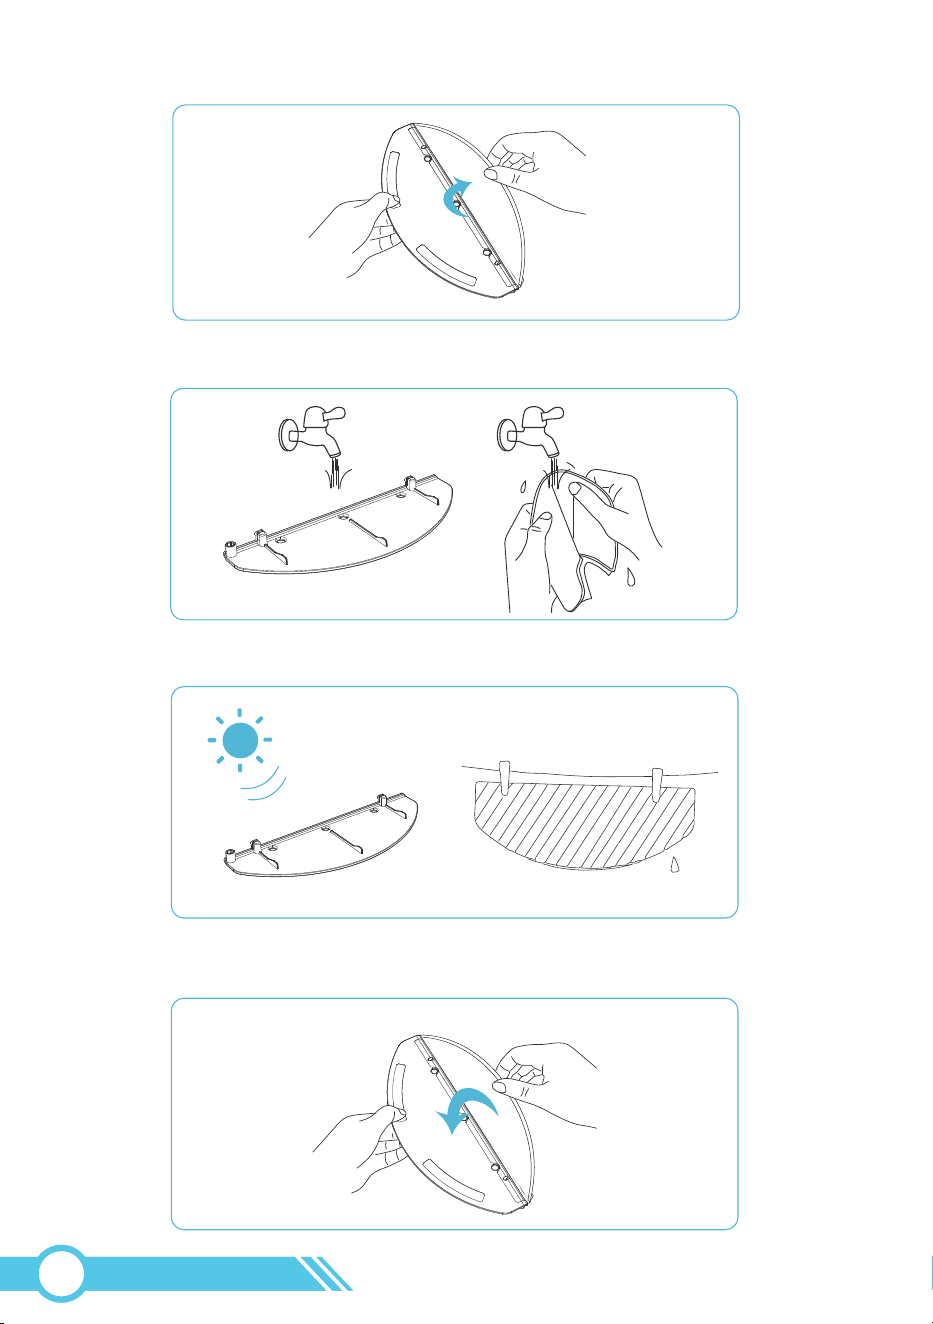
3. Wash the Mopping Cloth and Mopping Cloth Holder with clean water.
4. Dry the mop and the mopping cloth holder in the sun.
2. Remove the Mopping Cloth from the Mopping Cloth Holder.
5. Affix the Mopping Cloth to the Mopping Cloth Holder.
02
65
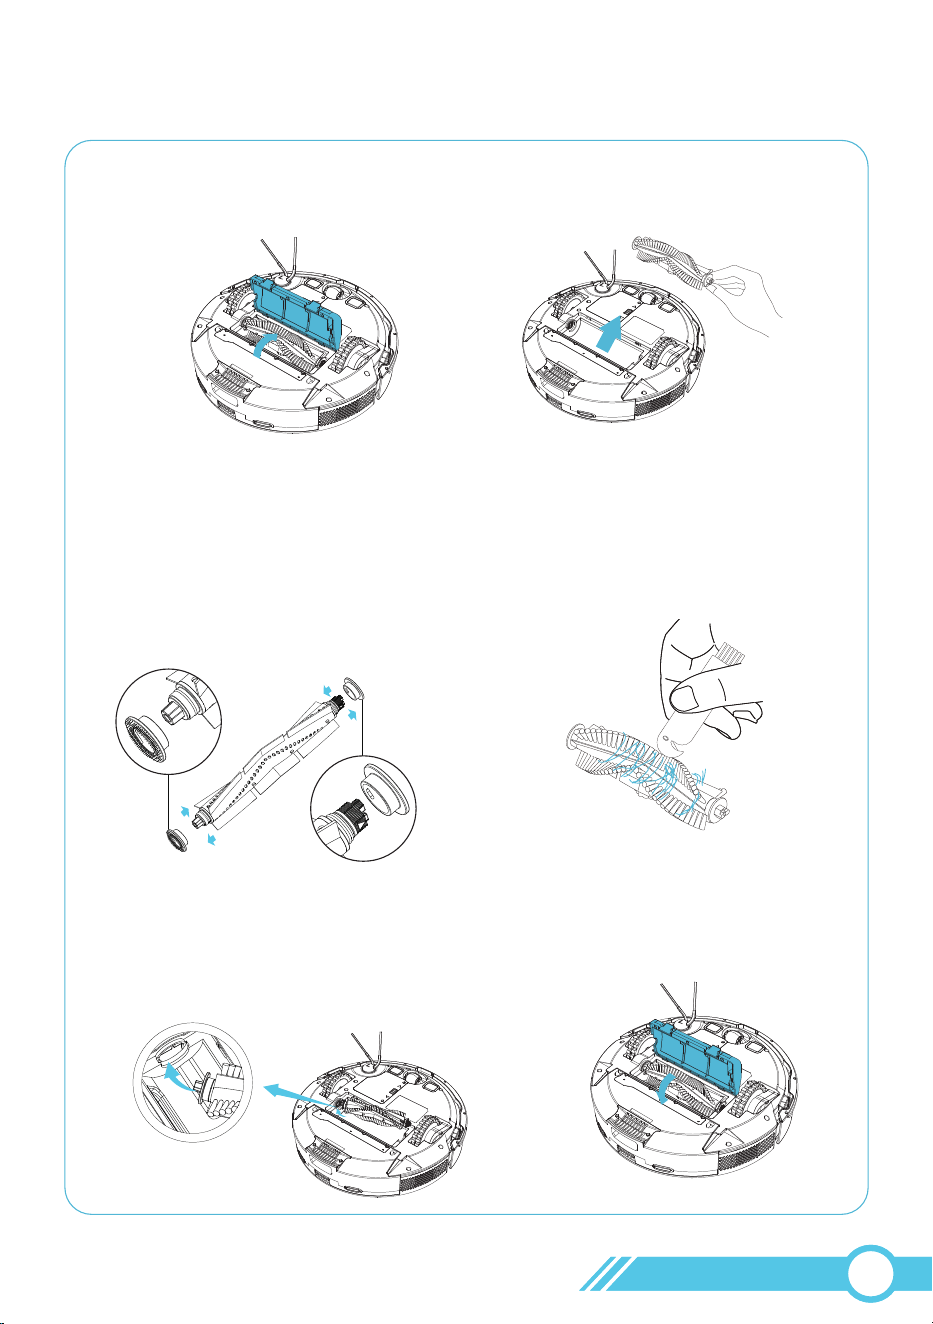
4.4 Clean Main Brush
1. Press the release switch on the brush
guard to open it.
2. Take off main brush.
5. Install the Main Brush into the robot,
ensuring to pay attention to the direction.
Insert the fixed protruding end first,
then click it into place.
6. Press down to securely install
the brush guard into place.
3. Open the two caps on the sides of
the main brush, remove and clean
any hair or dirt present on both sides.
Reinstall the two caps on the main
brush.
Please pay attention to the direction
of cap installation.
4. Use the blade on the provided
Cleaning Brush to cut any hair or
string wrapped around the main
brush. Then, use the brush to
remove dirt from the main brush.
02
66
Notes:
1
3
4.5 Clean Side Brush
1. Remove the side brush.
2. Carefully unwind and remove any hair or string that is wrapped around the robot
and the side brush.
3. Use a cloth dampened with warm water to clean dust from the brush or gently
reshape it.
4. Reinstall the side brush on the robot.
Only use the side brushes when they are completely dry.
To safeguard your wooden or carpeted floors, our side brushes are crafted from
soft materials and may become curled over time. However, this will not impact
their cleaning effectiveness.
If the bristles of the side brush become curled, immerse them in boiled water for
approximately 2 minutes, then use a dry cloth to dry and reshape the bristles.
1
2
3
02
67
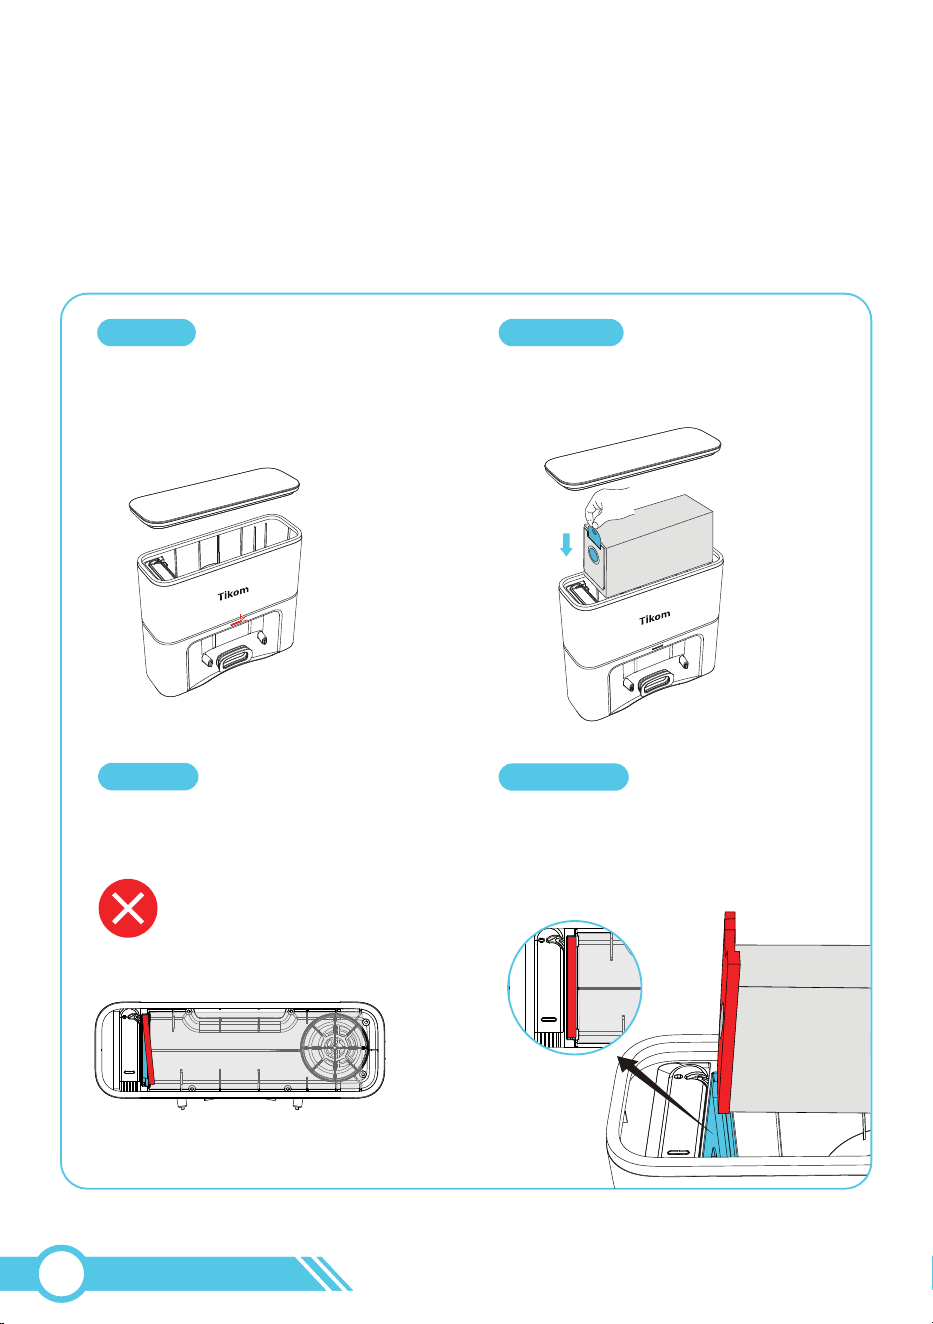
4. Please ensure the new dust bag handle
is retracted, and the new dust bag inlet
is open.
3. Discard the used dust bag to trash bin.
43
Note:
When removing the used dust bag,
please ensure the dust bag handle is
extended. This will cause the used dust bag
inlet to close, preventing dust from spilling
out during removal.
1. Lift the top cover open.
2. Lift the handle to remove the used
dust bag.
1
2
4.6 Replace the Dust Bag
02
68
Note:
If the new dust bag is installed
correctly, the LED status light on the
Self-Empty Base will be white. If the light
is red, it indicates that the new dust bag
has not been installed properly.
5. Install the new dust bag by sliding its
paper board into the guide rails until it
clicks into place.
6. Close the top cover
65
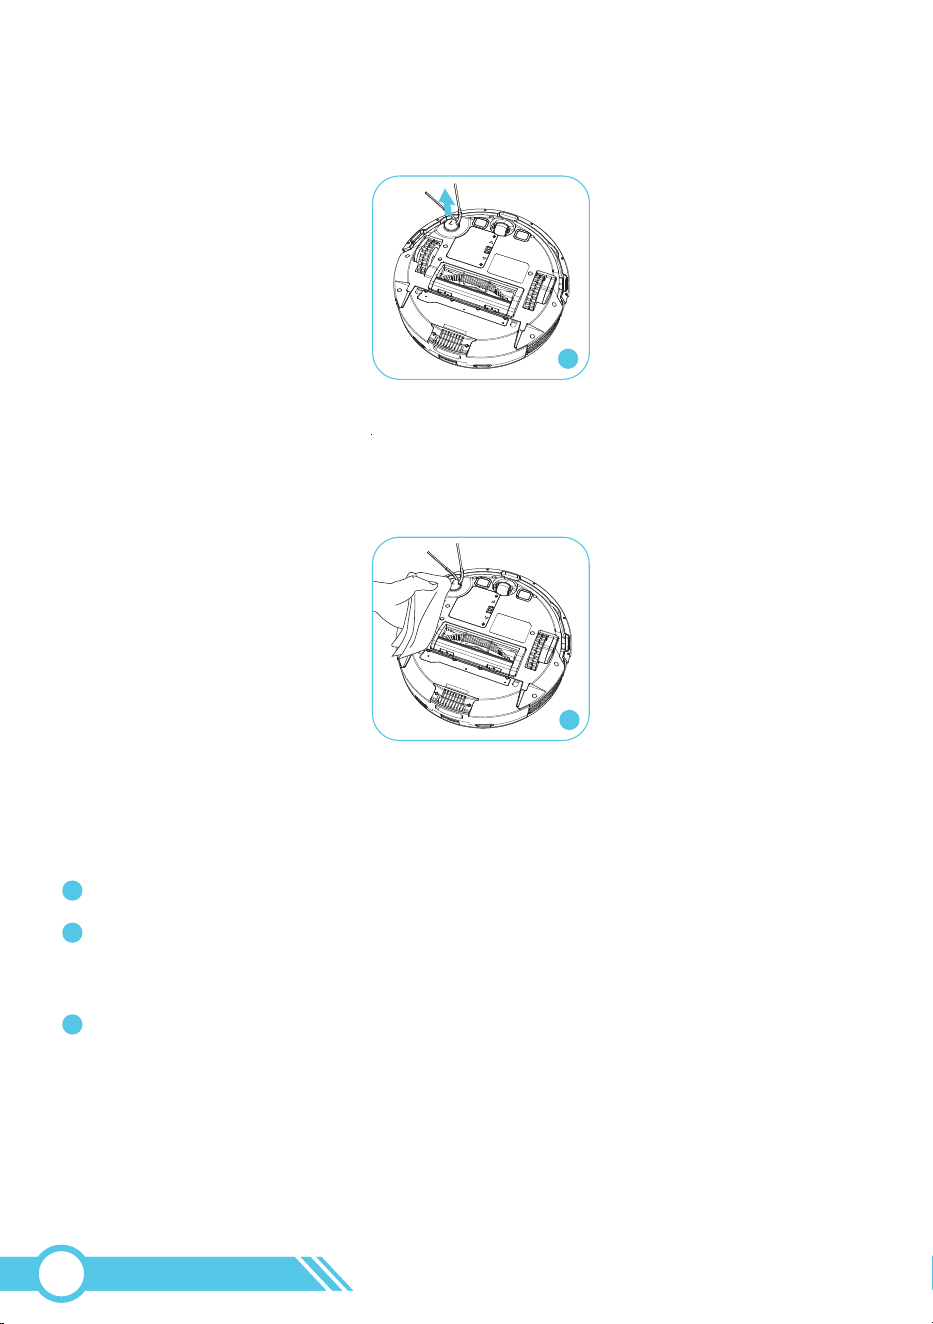
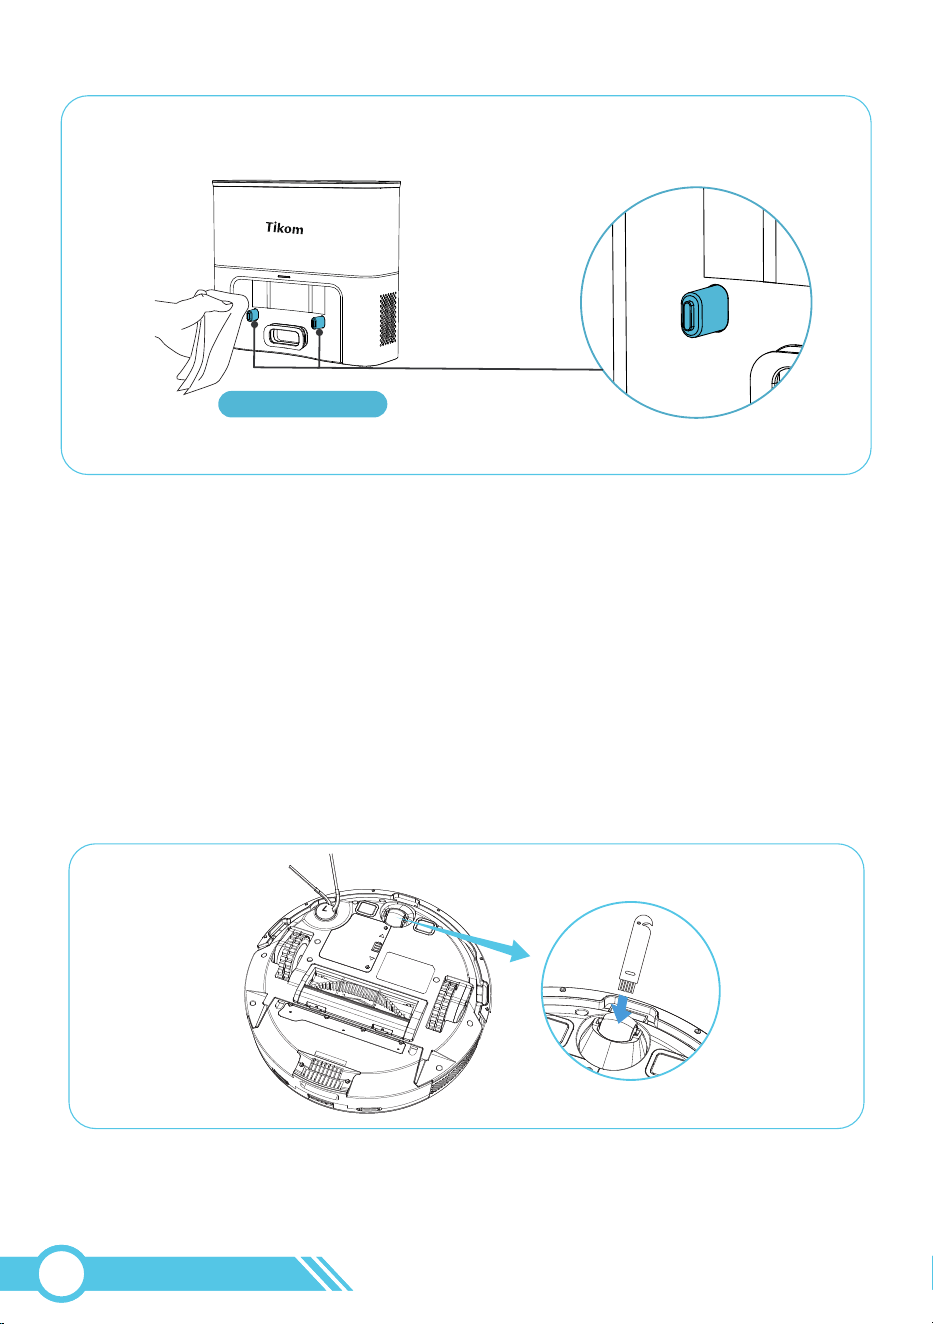
4.7 Clean Sensor and Charging Contacts
1. Use a damp cloth to clean all sensors (marked as blue) on the robot and the
Self-Empty Base.
Use Damp Cloth
02
69

Use Dry Cloth
Dust Bin
Use Dry Cloth
Robot without Dust Bin
Use Dry Cloth
Dust Bin
2. Use a dry cloth to clean 8 charging contacts (marked as blue) on robot, dust bin and
Self-Empty Base.
02
70
Use Dry Cloth
Self-Empty Base
Note:
Before cleaning the charging contacts on the robot and Self-Empty Base,
make sure to turn the robot OFF and unplug the Self-Empty Base.
Notes:
Do not clean the Caster Wheel with water.
4.8 Clean Caster Wheel
The Caster Wheel can't be pulled out, please remove any hair or debris that is wrapping
the wheel or entangled inside the wheel cavity with the provided Cleaning Brush.
02
71

5. Troubleshooting
5.1 Error & Voice Alarm
In the event of a runtime error, the Robot Status Light will flash red, accompanied by a
voice prompt and an error displayed on the app. The robot will stop on the ground and
enter standby mode.
Please refer to the table below to troubleshoot the issue.
Error & Voice Alarm of Robot
SolutionCause
Main brush is stuck.
Side brush is stuck.
Error Voice Prompt
/ APP Message
Main brush is stuck.
Wheel is stuck.
Side brush is stuck.
1. Power Off robot, turn over robot,
Use hand to push wheels and
rotate wheels to check if there is
foreign objects inside wheels.
2. Move robot to open space.
1. The left or right wheels
may be stuck or entangled
with foreign objects inside
the wheels.
2. The robot is stuck or
trapped by foreign objects
on the ground, preventing
the robot from moving.
Power off the robot, then check the
side brush and remove any foreign
objects as instructed in "4.5 Clean
Side Brushes" on Page 67.
Power Off robot and open main
brush guard, please clean main
brush as “4.4 Clean Main Brush” in
Page 66.
Flash Red On Robot Error Pop-up On Tuya Smart APP
02
72
Front bumper is stuck.
Front bumper is stuck.
Insert dust bin.
1. The dust bin is not
installed properly.
2. The dust bin has been
removed.
Please gently press the left, middle,
and right parts of the bumper to
check if it can pop out.
Reinstall the dust bin and lightly
press it.
If the error persists, please contact
assistance.
Put Robot on the floor
before starting.
Tilt detected.
Please place the
robot on flat ground.
Robot is trapped.
Please move Robot
to an open area.
1. Please move the robot to a flat
surface and restart it.
1. Move the robot to a flat surface.
2. If the issue persists, please restart
the robot following the
instructions in "3.13 Restart
Robot" on page 58.
1. Please move the robot to an
open area.
2. Check the area around the Laser
Distance Sensor (LDS) for any
obstructions.
If you find any obstructions,
remove them.
2. Clean the Anti-Drop Sensor with
a damp cloth as instructed in
"4.7 Clean Sensor and Charging
Contacts" on page 69.
3. Set up a "No-Go Zone" or "Virtual
Wall" on the black carpet to
prevent the robot from going
onto the black carpet.
4. Restart the robot following the
steps in "3.13 Restart Robot" on
page 58.
If the error persists, please
contact [email protected]
for assistance.
1. The robot has been
picked up or is suspended
in the air.
1. The robot is trapped.
2. The Laser Distance
Sensor (LDS) is blocked
by an object.
2. The Anti-drop sensor
is dirty.
3. The robot is on a black
carpet, causing the
anti-drop sensor to
mistakenly perceive the
black carpet as a cliff.
The robot is on a tilted
surface.
02
73
Recharge failed,
please manually put
Robot onto
Self-Empty Base.
1. Remove objects within 1.6 ft
/ 0.5 m to the left and right side,
and within 4.9 ft / 1.5 m in front
of the Self-Empty Base. Place the
Self-Empty Base against a wall
on a hard, level surface.
1. The Self-Empty Base is
blocked by an object.
2. The Self-Empty Base does
not have power.
3. The contact pins on the
Self-Empty Base are dirty.
4. The Self-Empty Base has
been moved to another
place while the robot is
cleaning.
5. The robot is trapped.
Please check if Laser
Distance Sensor is
stuck.
Please check if Laser
Distance Sensor is
blocked.
If the above solutions do not work, please contact [email protected]
for further assistance.
The Laser Distance Sensor
(LDS) is not rotating.
The Laser Distance Sensor
(LDS) is blocked by an object.
2. Check if the Power Status Light on
the Self-Empty Base lights up.
3. Clean the charging contact
pins on the Self-Empty Base
and robot with a dry cloth as
instructed on page 70.
4. Manually place the Robot onto
the Self-Empty Base.
Restart the robot following the
instructions in "3.13 Restart Robot"
on page 58.
If the error persists, please contact
assistance.
Please check around the Laser
Distance Sensor (LDS) to see if
there is an object blocking it. If so,
please remove the object.
If the error persists, please contact
assistance.
02
74
If a runtime error occurs, the Self-Empty Base Status Light will turn red, accompanied
by a voice prompt thru robot and an app error notification. In this case, the Self-Empty
Base will stop vacuuming dust from the robot's dust bin.
Error Voice: No dust bag, please install dust bag.
No dust bag is installed.
Cause
Please install a dust bag in the
Self-Empty Base.
Dust bag is not installed properly.
Install the dust bag by sliding
its paper board into the guide rails
until it clicks into place.
Cause
Solution
Solution
Error & Voice Alarm of Self-Empty Base
02
75
Robot cannot be charged.
1. Verify if the Power Status Light on the Self-Empty Base
is illuminated. If not, please contact us via
2. Clean the charging contact pins on the
Self-Empty Base and robot with a dry cloth.
3. Use a needle to press the Reset button as described
in "3.13 Restart Robot" on page 58.
4. If the issue persists, please contact
[email protected] for further assistance.
SolutionsProblems
Robot cannot be activated.
Robot stops working suddenly.
1. Ensure that the battery is fully charged, which is
indicated by 100% battery level shown in the
robot's app.
1. Check if the robot is trapped or stuck on an obstacle.
2. Verify if the robot has an error alarm in voice or
displayed on the app (for more details, refer to
"5.1 Error & Voice Alarm" on page 72).
3. Ensure that the battery level is not too low.
4. Use a needle to press the Reset button as described
in "3.13 Restart Robot" on page 58.
5. If the issue persists, please contact
[email protected] for further assistance.
2. The robot can only operate effectively within the
ambient temperature range of 32°F/0°C to
104°F/40°C. If the temperature exceeds this range,
the robot may not function properly.
3. Please use a needle to press the Reset button as
described in "3.13 Restart Robot" on page 58.
4. If the issue persists, please contact
[email protected] for further assistance.
5.2 Frequently Asked Question
02
76
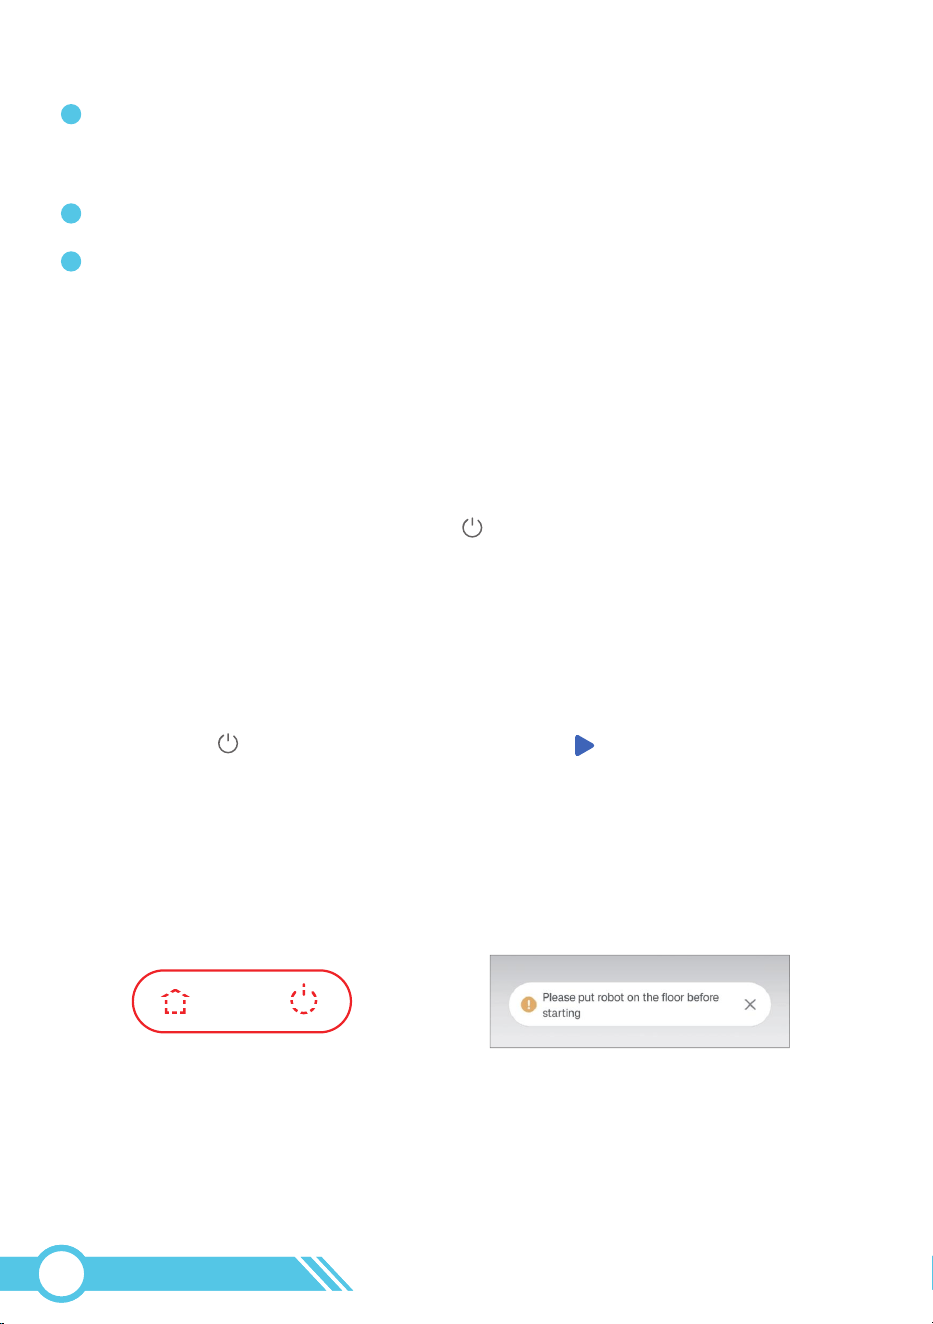
Why is the robot’s battery
time so short?
The robot returning to the charging station does not
necessarily mean that the battery is low.
1. To measure the runtime, check whether the indicators
for the Power button and the Home button are both
red. Only when they are red and the robot returns to
recharge does it indicate that the robot currently has
low battery.
Why need dock robot onto
Self-Empty Base in all time?
Is it safe?
1. When not in use, we recommend keeping the robot
docked on the Self-Empty Base for a full charge,
allowing the robot to be ready for cleaning at any time
if needed. Rest assured, the Self-Empty Base has low
power consumption once the robot is fully charged.
2. The Self-Empty Base is equipped with circuit
protection, ensuring that it is safe to dock the robot
on the Self-Empty Base at all times.
Slow charging speed.
Robot cannot return
to Self-Empty Base.
1. When used at high or low temperatures (>104°F/40°C,
<32°F/0°C), the robot will automatically reduce the
charging speed to extend the battery life.
1. Clear any objects within 1.6 ft / 0.5 m to the left and
right sides, and within 4.9 ft /1.5 m in front of the
Self-Empty Base.
Ensure to place the Self-Empty Base against a wall
on a hard, level surface.
2. Clean the charging contact pins on the Self-Empty
Base and robot with a dry cloth as instructed in
"4.6 Clean Sensor and Charging Contacts" on page 69.
2. Verify if the Power Status Light on the Self-Empty Base
is illuminated.
3. Clean the charging contact pins on the
Self-Empty Base and robot with a dry cloth as
instructed in "4.6 Clean Sensor and Charging Contacts"
on page 69.
4. Check for any obstructions around the Laser Distance
Sensor (LDS) that could be affecting its function.
5. Manually place the Robot onto the Self-Empty Base.
02
77
1. Verify if the dust bin is full and needs to be emptied.
2. Check if the Main Brush is obstructed by foreign
objects and clean it as described in "4.4 Clean Main
Brush" on Page 66.
Poor cleaning ability or
dust falling out.
3. Ensure there are no obstructions blocking the
suction inlet.
4. Check if the HEPA filter is blocked and requires
cleaning.
5. Verify if the HEPA filter is wet due to water or other
liquids on the floor. Ensure to air-dry the filter
completely before use, or consider replacing it with
a new HEPA filter.
6. Check if the Dust Bin Transparent Blocking Plate is
functioning properly. There are 2 spare plates in the
package for replacement.
7. If the issue persists, please contact
[email protected] for further assistance.
Why is the robot’s battery
time so short?
2. If the indicators are white, it means the robot
has completed the current cleaning task and still
has power.
3. In our lab tests, Eco suction mode can clean for
approximately 150 minutes, Standard suction for
120 minutes, and Max suction for 90 minutes.
If after a full charge, the cleaning time is shorter
than our lab test results, please contact
[email protected] for assistance.
Robot misses cleaning spots
to be cleaned, or repeats
cleaning the area cleaned.
1. Ensure that the floor wax is completely dried before
the Robot starts cleaning.
2. Check for any obstructions around the Laser Distance
Sensor (LDS).
3. Verify if the Laser Distance Sensor (LDS) is rotating
properly.
4. Check if the map on the Tuya Smart App is incorrect
or missing. If so, please restore the correct map from
the map list in "Map Management".
5. If the issue persists, please contact
[email protected] for further assistance.
02
78
What's the mopping
cloth holder function?
1. The robot will detect the mopping cloth holder for
the mopping function. Therefore, before mopping,
please ensure to install the mopping cloth holder
onto the robot.
2. If no water comes out during mopping, please check
and re-install the mopping cloth holder again.
Main Brush does not rotate.
Side Brush does not rotate.
1. Verify if the Main Brush is obstructed by foreign
objects; if so, please remove them and clean the
main brush as described in "4.4 Clean Main Brush"
on Page 66.
1. Check if the Side Brush is obstructed by foreign
objects; if so, please remove them and clean the side
brush as instructed in "4.5 Clean Side Brush"
on Page 67.
2. Verify if the Side Brush has been installed correctly.
3. If the issue persists, please contact
[email protected] for further assistance.
2. Check if the Main Brush and brush guard have been
installed correctly.
3. If the issue persists, please contact
[email protected] for further assistance.
Robot produces loud or
sharp noises.
1. It is normal for the Robot to produce a certain amount
of noise during cleaning. Plan your cleaning time
accordingly to avoid being interrupted by the sound.
2. If a sharp noise is heard, check if the Main Brush, Side
Brush, or Wheel is entangled with any foreign objects.
Remove any foreign objects wrapped around the Main
Brush, Side Brush, or Wheel. Clean the main brush and
side brush as described in chapter 4 on page 66.
3. Check if the robot has collected objects inside the
Dust Bin that could be causing noise.
4. If the issue persists, please contact
[email protected] for further assistance.
02
79
Why the water tank is
leaking when I take out
it from the robot?
It is normal for the water tank to leak when it is removed
from the robot in a tilted position. However, the tank will
not leak if it is taken out individually and placed
horizontally, or when the water tank is properly installed
inside the robot and the robot is not in mopping mode.
If your water tank is taken out separately and also leaks
when placed horizontally, please contact us via email
No or little water
during mopping.
Too much water
during mopping.
1. Please check if there is water in the water tank.
2. Ensure that the water tank and Mopping cloth holder
are properly installed, and adjust the water volume
switch to high in the App. If the mopping cloth holder
is installed correctly, there will be a voice prompt
"Start Sweeping & Mopping" during robot cleaning.
3. Clean the Signal Contacts of the Water Tank and
Robot with a dry cloth as instructed in
"Clean Contacts" on page 56.
4. Use a needle to poke the 3 small water outlets under
the water tank to prevent water tank clogging as
instructed in "2.2.5 Dust Bin & Water Tank" on page 6.
5. If the issue persists, please contact
[email protected] for further assistance.
1. Ensure that the rubber water inlet has been
properly sealed.
2. Adjust the "Water Volume" setting in the App to Low.
If the issue continues, please contact
[email protected] for assistance.
3. When starting the robot with the mopping cloth
holder attached, the robot will announce "Start
Sweeping & Mopping" indicating that it will sweep
and mop simultaneously.
What's the mopping
cloth holder function?
When starting the robot without the mopping cloth
holder attached, the robot will announce "Start
Sweeping" indicating that it will only sweep without
mopping.
02
80
In app, the current map
disappears and keeps
displaying map drawing.
1. Turn off the VPN if you're using it and try again.
2. Put the robot near the router and try again.
3. Login your Tuya app account in another mobile
device to check whether it is normal.
If further assistance is needed, please contact us via
email [email protected].
In the app, the current map
doesn't display properly,
there are extra areas that are
skewed and overlapping.
Firstly, please reset the current map.
1. If there are previously saved maps in the Map
Management list, use one to restore the current map.
2. If not, initiate Quick Map or Start Clean (Whole Home),
and the robot will create a new map. Remember to
save the newly completed map.
For additional assistance, please contact us via email
In App, robot is shown offline.
1. Ensure that the robot is powered on.
2. Verify that the Wi-Fi is successfully connected, and
the Wi-Fi Status Light is solid blue.
4. Remove the robot from the Tuya Smart App and
re-add the robot to the app.
3. It is normal for the Wi-Fi signal to weaken when the
robot is far from the Wi-Fi router. When the robot
moves closer to the router, it will reconnect to the
Wi-Fi network.
Robot cannot connect to
a Wi-Fi network.
1. Place the robot near the Wi-Fi router.
2. Ensure that your mobile phone is connected to the
Wi-Fi network.
3. Make sure the Wi-Fi password is entered correctly.
4. Reset the Wi-Fi connection and download the latest
Tuya Smart App, then try connecting again.
For details, see“3.4 Connect Robot with App”
on page 18.
5. Restart the robot, then try pairing again.
02
81
I have set “Restricted Zone” on
the map in Tuya Smart APP,
why Robot will enter these
“Restricted Zone”.
Robot movements or travel
path are abnormal.
Schedule Cleanings couldn’t
be activated.
1. Please check if the map on the Tuya Smart App is
incorrect or missing. If so, please restore the correct
map from the map list in "Map Management".
1. Check the wheels, side brushes, and Main Brush for
any foreign objects; if found, please remove them.
Clean the main brush and side brushes as instructed
in chapter 4 on page 66.
1. Ensure that the robot is turned on.
2. Verify that the scheduled time has been set correctly.
3. Check for any error alarms on the robot (refer to
"5.1 Error & Voice Alarm" on page 72), as it may
prevent the scheduled cleaning from starting.
4. Confirm that the robot has sufficient power to start
cleaning; scheduled cleaning will only commence
when the remaining power is 15% or above.
5. If the issue persists, please disconnect the robot, wipe
data from the Tuya Smart App, and re-add the robot
to the app.
2. Verify if there are any obstructions around the
Laser Distance Sensor (LDS) that could be affecting
its function.
3. Check if the Laser Distance Sensor (LDS) is rotating
properly.
4. If the issue persists, please contact
[email protected] for assistance.
2. Verify if the Restricted Zones have been set correctly.
3. If the issue persists, please contact
[email protected] for further assistance.
02
82
1. After changing the location of the Self-Empty Base,
place the robot on the Self-Empty Base. When the
robot emits the "start charging" voice prompt, it
indicates that the robot has started charging.
When I change the location
of my Self-Empty Base, how
do I update the
Self-Empty Base location
on the Tuya Smart app?
2. Press the Power button on the robot or tap the
"Start Clean" icon in the Tuya Smart app to start
the cleaning.
After the robot drives out of the Self-Empty Base, it will
start relocating and updating the new Self-Empty Base
position.
Self-Empty Base will be marked as sign on the map.
Why does my app page display
the message "Unable to reach
the target point, start
recharging" when I choose to
Select Room cleaning?
1. It's possible that the route to that room is obstructed
by a door, so please open any closed doors along the
path to that room.
2. Please check your restricted zone settings, as there
may be a restricted zone set up along the route to
the target room. Alternatively, the route may be too
narrow for the robot to pass. Ensure that the channel
width is at least 1.5 times the robot diameter.
Remove the restricted zone and try again. Refer to
the instructions in "3.6.4 Restricted Zone Setting"
on page 39.
3. If the issue persists, please contact
[email protected] for further assistance.
My APP displays a message
“Please check the remaining
life of accessories and replace
them in time”.
1. Please check the current remaining life of your
accessories and replace them in a timely manner.
Resetting the part's remaining time in the Tuya Smart
app will close the reminder pop-up.
2. Tikom offers a range of replacement parts and
accessories. For more information on replacement
parts, please contact Customer Service at
02
83
How to use robot to clean
without connection to Wi-Fi.
1. Please check whether your robot has enough power
to start cleaning;
2. Press the Power button to start and pause cleaning;
3. Press the Home button to start and pause recharging.
If further assistance is needed, please contact us via
email [email protected].
How can I share the device
with my roommates or family
on APP.
1. Please log in to the app on another mobile device
using the same Tuya Smart account. An Tuya Smart
account can be used to log in to the app on different
devices.
2. If you prefer not to use the same Tuya Smart account
for logging in, please share the device on the app.
Please click the on the top right corner of the Tuya
device map page, and then click the Share Device
button to add the other's account and start sharing.
If you require further assistance, please contact us via
email at [email protected].
How can I get the robot to
clean different floors?
1. When the robot finishes cleaning on one floor and is
taken to another floor, it will first start relocating.
When it finds itself in a completely different new
environment from the previous map, the robot will
clear the currently saved map and redraw a new map.
If we don't save the map in advance for replacement,
the robot will need to remap before cleaning each
floor, which will increase the overall cleaning time.
2. To reduce the total cleaning time of the robot, we
suggest that you can save the maps of different floors
in the Map Management after the robot finishes
mapping and cleaning each floor for the first time.
When the robot needs to clean different floors, you
can apply the saved floor maps to replace the current
robot map in the Map Management. You can refer to
the details in Section "3.6.5 Map Management"
on page 44.
02
84

If the above solutions do not work, please contact [email protected]
for further assistance.
You cannot control Robot
with Amazon Alexa.
You cannot control Robot
with the Google Assistant.
1. Verify if there are any Internet connection issues.
1. Verify if there are any Internet connection problems.
2. Check if you have installed the Google Home App on
your smart device.
3. Ensure that you have a Tuya Smart account and have
successfully connected to the Robot.
4. Make sure you have connected Google Assistant on
the Tuya Smart App. For detailed instructions, please
refer to "3.6.14 Work with Amazon Alexa or Google
Assistant" on page 48.
2. Confirm that you have installed the Amazon Alexa
App on your smart device.
3. Ensure that you have a Tuya Smart account and have
successfully connected to the Robot.
4. Make sure you have connected Alexa on the Tuya
Smart App. For detailed instructions, please refer to
"3.6.14 Work with Amazon Alexa or Google Assistant"
on page 48.
5. Ensure that you are using the correct Alexa voice
commands, which are also listed in section 3.6.14 on
page 49.
5. Confirm that you are using the correct Google Home
voice commands, which are also listed in section
3.6.14 on page 49.
02
85

Before setting up Wi-Fi, ensure that your mobile device, Robot, and Wi-Fi network
meet the following requirements.
Ensure that your smartphone or tablet is connected to a Wi-Fi network.
Make sure that the Bluetooth switch on your smartphone or tablet is turned ON.
5.3 Wi-Fi Connection
5.3.1 Wi-Fi Setup Requirement
5.3.1.1 Mobile Device Requirement
1. The Wi-Fi Status Light on the Robot is flashing blue, indicating it is waiting for a
Wi-Fi connection.
2. The Robot is attached to the Self-Empty Base to ensure it has sufficient power
during setup.
5.3.1.2 Robot Requirement
1. Ensure that the robot and your mobile device are close to the router during the
connection process.
4. Avoid using a VPN (Virtual Private Network) or Proxy Server during the setup.
3. Avoid using emojis, special characters, or symbols in your Wi-Fi name and password.
2. Double-check that you have entered the correct Wi-Fi name and password when
connecting.
5.3.1.3 Wi-Fi Requirement
5. When connecting to a hidden network, ensure that you enter the correct network
name (SSID) in a case-sensitive manner and connect to a wireless network.
6. If using a network extender/repeater, ensure that the network name (SSID) and
password match your primary network.
7. Make sure your Wi-Fi router supports 802.11b/g/n standards and the IPv4 protocol.
8. Use WPA and WPA2 security protocols with TKIP, PSK, AES, or CCMP encryption.
9. WEP EAP (Enterprise Authentication Protocol) is not supported for the connection.
10. In North America, use Wi-Fi channels 1-11, and outside North America, use channels
1-13 (refer to local regulatory agencies for specific guidelines).
02
86
If you are unable to control the Robot with your smart device, try the following solutions
to resolve the issue.
5.3.2 Wi-Fi Connection troubleshooting
Voice Prompt
Wi-Fi Connected
Cause
1. The Robot has connected to
your router but cannot access
the Internet.
2. There may be an issue with
the App server.
1. Verify if your router is connected to the Internet. Contact your Internet service
provider to address any connectivity problems.
2. Wait for several hours and recheck the app control to ensure that the connection
to the App server is successful.
Solution
Wi-Fi Status Light
Flash Blue
Voice Prompt
/
Cause
Solution
Wi-Fi Status Light
Flash Blue
1. The Robot cannot connect to
your wireless router.
2. The Wi-Fi connection is reset or
has not been set up before.
1. Place the robot near the Wi-Fi router.
2. Ensure that your mobile phone is connected to the Wi-Fi network.
3. Make sure the Wi-Fi password is entered correctly.
4. Reset the Wi-Fi connection and download the latest Tuya Smart App, then try
connecting again. For details, see“3.4 Connect Robot with App” on page 18.
5. Restart the robot, then try pairing again.
02
87
If the above solutions don’t resolve the issue, please contact us via
[email protected] for assistance.
Voice Prompt
/
Cause
Solution
Wi-Fi Status Light
OFF
1. The Robot is turned off.
2. The Robot's power level is low.
3. The Robot is in Sleep Mode.
1. Fully charge the Robot by attaching it to the Self-Empty Base.
2. Once fully charged, power on the robot to recheck.
02
88
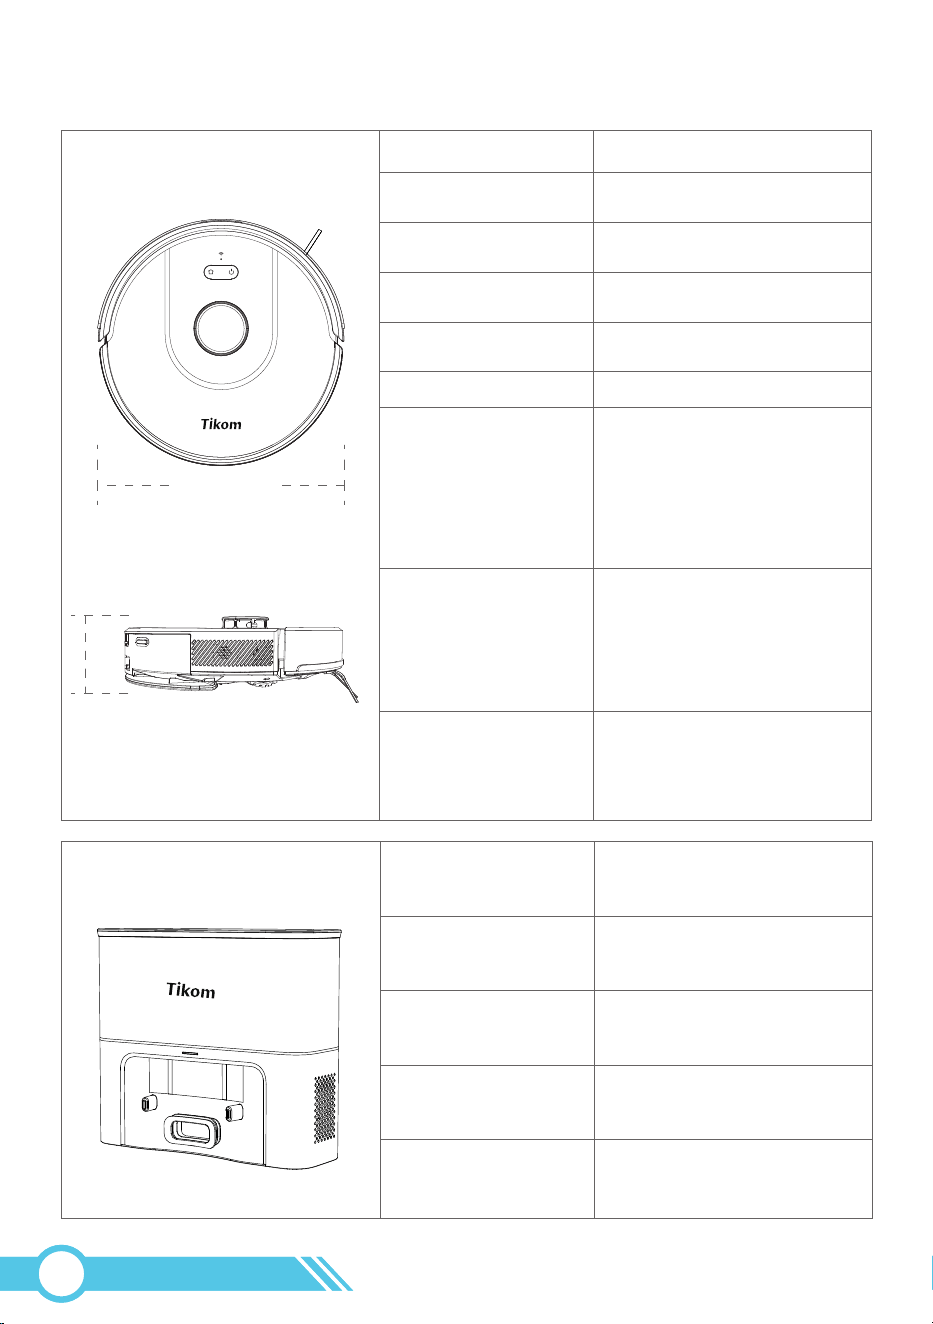
Model No
Size
Power Input
SD40
11.97 x 10.27 × 4.44 inches
AC 120V ~ 60 Hz
Rated Power 650W
Dust bag Capacity 3L
6.Specifications
Model No
Navigation
Suction Power
Dust Bin Capacity
Battery
Mopping Time
Size
L8000 Plus
Laser Lidar
6000 Pa
450 ml
DC 14.4V 2600mAh
Water Tank Capacity 300 ml
Water Tank if full
Low: about 120mins
Medium: about 90mins
High: about 60mins
Running Time
After Full Charged
Eco: about 150mins
Standard: about 120mins
Max: about 90mins
Will change after usage
3.68 in
Diameter:
12.73 in / 323.50 mm
Height:
3.68 in / 93.62 mm
12.73 in
02
89
7.Customer Service
For FAQs and more information, please visit www.tikom.com.
Email: [email protected]
We have also uploaded numerous robot troubleshooting and maintenance videos to
our YouTube channel.
You can search for 'Tikom Technology' on YouTube to locate our channel.
Support & Rewards
02
90
Manufacturer: Shenzhen Tikom Technology & Innovation Co.,LTD
Address: 217, C Building, Chengshishanhai Center, Bantian, Longgang
District, Shenzhen, Guangdong, China
L8K Plus_EN_V1.5
Website: www.tikom.com
Email: [email protected]
@TikomOfficial @TikomOfficial
@TikomOfficial
@TikomOfficial
Support & Rewards
