Please read all the instructions before using and keep it well for future reference.
User Manual
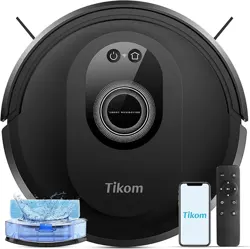
8000 Max
Robot Vacuum Cleaner
Support & Rewards
CONTENTS
1. Important Safety Instructions
2. About Robot
2.1 What’s in the Box
2.2 Product Overview
2.2.1 Top View
2.2.2 Status Light
2.2.3 Bottom View
2.2.4 Charging Station
2.2.5 Dust Bin & Water Tank
2.2.6 Remote Controller
2.3 LED Indication
3. Using Robot
3.1 Getting Started
3.2 Important Tips Before Usage
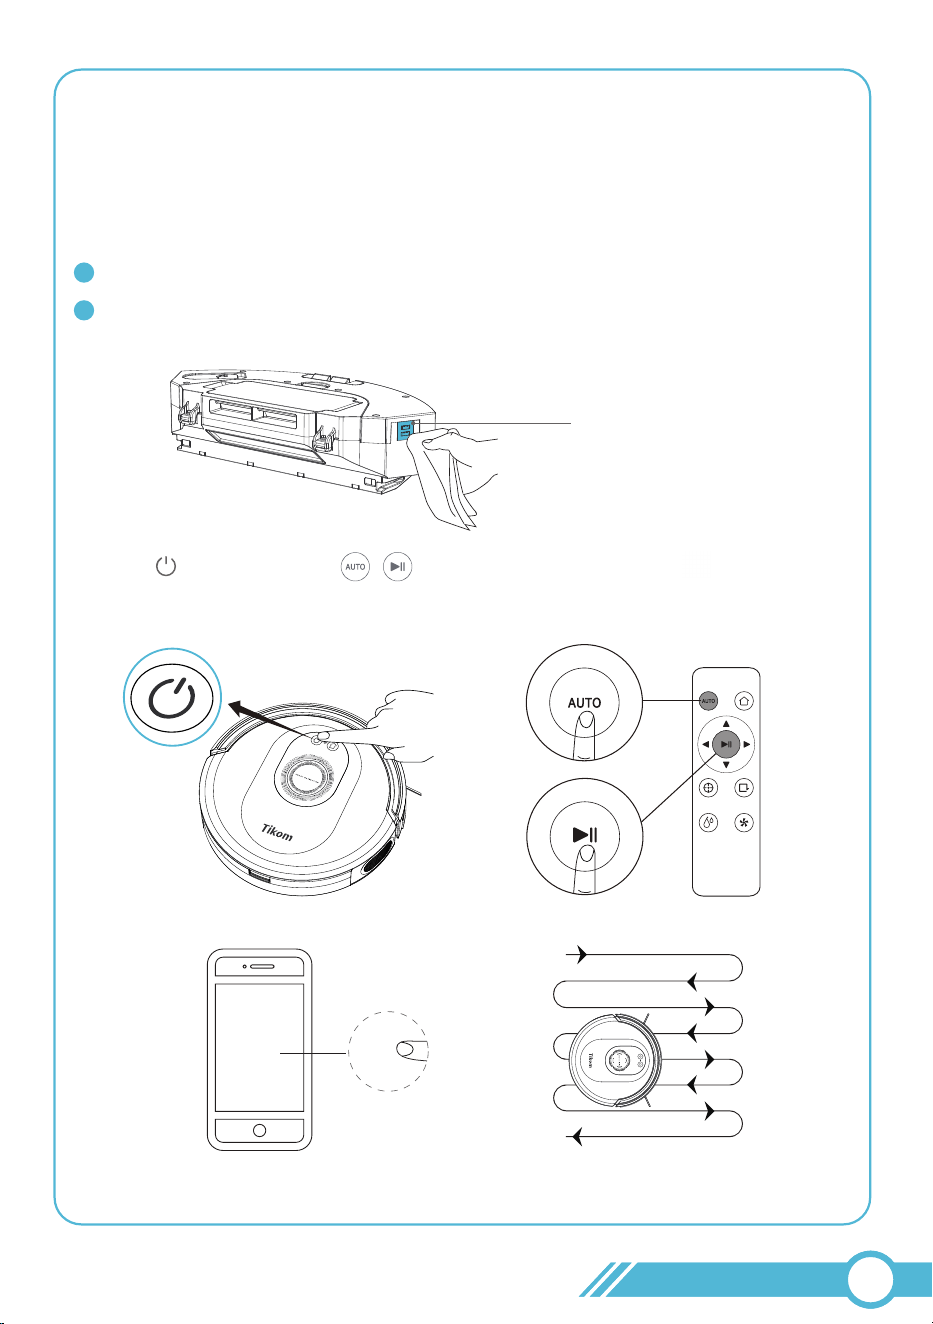
3.3 Power On/Off Robot
3.4 Connect To Wi-Fi
3.4.1 App Download and Installation
3.4.1.1 App Download
3.4.1.2 App Registration and Login
3.4.2 Wi-Fi Connection Requirement
3.4.2.1 Mobile Device Requirement
3.4.2.2 Robot Requirement
3.4.2.3 Wi-Fi Requirement
3.4.3 Wi-Fi Status Light
3.4.4 Network Connection via Tuya Smart App
01
04
04
05
05
05
06
06
07
08
08
10
10
13
15
16
16
16
16
16
16
17
17
18
18
3.4.5 Tuya Smart App introduction
3.4.6 Work with Amazon Alexa or Google Assistant
3.5 Cleaning Mode
3.5.1 Smart Cleaning
3.5.2 Manual Cleaning
3.5.3 Spot Cleaning
3.5.4 Edge Cleaning
3.5.5 Random Cleaning
3.6 Schedule Cleaning
3.7 Standby Mode
3.8 Sleep Mode
3.9 Error
3.10 Charging
3.11 Boundary Strip Usage
3.12 Mopping the Floor
3.13 Firmware Update
3.14 Restart Robot
4. Maintenance and Care
4.1 Cleaning and Replacement Frequency
4.2 Clean Dust Bin, Filter & Water Tank
4.3 Clean Mopping Cloth
4.4 Clean Main Brush
4.5 Clean Side Brushes
4.6 Clean Sensor and Charging Contacts
4.7 Clean Caster Wheel
20
23
25
25
26
27
27
28
28
28
28
29
29
30
31
34
34
35
35
36
38
40
41
42
42
5. Troubleshooting
5.1 Error & Alarm
5.2 Frequently Asked Question
5.3 Wi-Fi Connection
5.3.1 Wi-Fi Setup Requirement
5.3.1.1 Mobile Device Requirement
5.3.1.2 Robot Requirement
5.3.1.3 Wi-Fi Requirement
5.3.2 Wi-Fi Connection Troubleshooting
6. Specifications
7. Customer Service
43
43
45
51
51
51
51
52
53
54
54

1. Important Safety Instructions
PLEASE READ CAREFULLY BEFORE USE • FOR HOUSEHOLD USE ONLY
To reduce the risk of injury or damage, read these safety instructions carefully and keep
them at hand when setting up, using, and maintaining this device.
This robot could be used by users aged from 8 years and above, but for the persons
with reduced physical, sensory or mental capability, or by people who are lack of
related experience and knowledge, only if they have received proper supervision or
instructions by a professional who knows how to use the robot in a safe way and
understand the hazards involved.
DO NOT let children or your pet play with the robot. Do not allow them to sit or
stand on the robot either.
DO NOT let the robot to clean a room where an infant or child is unattended.
DO NOT handle any part of the robot with wet hands.
DO NOT operate the robot on the wet surfaces, or in a bathroom, or near a pool.
DO NOT spill any water on the robot, or expose it to any moisture, rain or snow.
DO NOT allow robot to clean anything wet, like paint, chemicals, etc..
DO NOT utilize the robot to clean flammable or combustible liquids, such as petrol,
perfume.
DO NOT utilize the robot to pick up anything that is burning or smoking, such as
cigarettes, matches, or hot ashes, etc., to avoid catching fire.
DO NOT operate the robot in the room where there are open fireplaces, lit candles
or fragile objects on the floor or where there are candles on candlesticks, tables, etc.,
which may accidentally hit or bump into, thus leading to fire or causing damage to
the appliance.
DO NOT place anything on the robot or hit against the robot.
NEVER use the power cable or plug that partly damaged.
DO NOT operate this robot in areas where exist exposed electrical outlets on the
floor.
DO NOT operate the robot on waxed floor, which may result in the damage to the
robot or the floor. It's recommended to use the robot on any hard or carpeted floors.
This robot is designed to be used on floors without scratching them. Before cleaning
your whole house, it's advised to perform a pre-test on your floor to ensure that no
scratches are made.
Ensure that everyone in the room is aware of the robot when cleaning to avoid
stepping on it or the tripping hazard.
Make sure the Dust Bin or the Filter are in place before using this robot.
Remove all power cords and other items that could get tangled in the robot from the
area to be cleaned before use.
Before cleaning, please pick up some objects like loose clothing or paper due to the
limited size of the openings. Otherwise, the openings may be blocked.
Keep the robot free of line, hair, and anything that may reduce airflow.
Clean the robot with a dry or damp cloth.
02
01

The Power Adapter of Charging Station must be removed from the socket before
cleaning robot or maintaining robot.
Cleaning and maintenance shall not be done by the children without any adult
supervision.
Unplug the Charging Station when not in use for extended periods.
DO NOT use the accessories or replacement parts from unauthorized channels. Only
use the ORIGINAL parts provided by Tikom. Please directly contact us whenever they
are needed.
We assume no liability or responsibility for any fire, explosion or electrical shock
caused by improper operation.
BATTERY
A rechargeable Li-ion battery is installed in the robot.
DO NOT attempt to disassemble or replace the battery in the robot by yourself as the
incorrect operation might cause overheating, fire or injury.
DO NOT expose the battery pack inside of the robot to any fire, heat source, direct
sunlight or high temperature, which may result in the risk of explosion.
DO NOT dispose of this robot or the battery pack in fire, any water or other liquids to
avoid the risk of explosion.
The Li-ion battery in the robot should be serviced or recycled by an authorized
service provider, and must be recycled or disposed of separately from household
waste. Dispose of the battery according to your local environmental laws and
regulations.
02
02
FCC Caution
Any Changes or modifications not expressly approved by the party responsible for
compliance could void the user's authority to operate the equipment.
This device complies with part 15 of the FCC Rules. Operation is subject to the following
two conditions:
This device may not cause harmful interference.
this device must accept any interference received, including interference that may
cause undesired operation.

02
03
Note:
This equipment has been tested and found to comply with the limits for a Class B digital
device, pursuant to part 15 of the FCC Rules. These limits are designed to provide
reasonable protection against harmful interference in a residential installation. This
equipment generates, uses and can radiate radio frequency energy and, if not installed
and used in accordance with the instructions, may cause harmful interference to radio
communications. However, there is no guarantee that interference will not occur in a
particular installation. If this equipment does cause harmful interference to radio or
television reception, which can be determined by turning the equipment off and on, the
user is encouraged to try to correct the interference by one or more of the following
measures:
—Reorient or relocate the receiving antenna.
—Increase the separation between the equipment and receiver.
—Connect the equipment into an outlet on a circuit different from that to which the
receiver is connected.
—Consult the dealer or an experienced radio/TV technician for help.
This equipment complies with FCC radiation exposure limits set forth for an uncontrolled
environment .This equipment should be installed and operated with minimum distance
20cm between the radiator&your body.
This transmitter must not be co-located or operating in conjunction with any other
antenna or transmitter.
ISED Warning
Le present appareil est conforme aux CNRd'Industrie Canada applicables aux appareils
radio exempts de licence. Sexploitation est autorisee aux deux conditions suivantes:
The device is compliance with RF exposure guidelines, users can obtain Canadian
information on RF exposure and compliance.The minimum distance from body to use
the device is 20cm. Le present appareil est conforme Apres examen de ce materiel
auxconformite ou aux limites d'intensite de champ RF, les utilisateurs peuventsur T
exposition aux radiofrequences et la conformite and compliance d'acquerir les
informations correspondantes.
This device complies with Industry Canada licence-exempt RSS standard(s). Operation is
subject to the following two conditions:
this device may not cause interference, and
this device must accept any interference, including interference that may cause
undesired operation of the device.
I'appareil ne doit pas produire de brouillage, et
I'utilisateur de I'appareil doit accepter tout brouillage radioelectrique subi, meme si le
brouillage est susceptible d'en compromettre lefonctionnement.
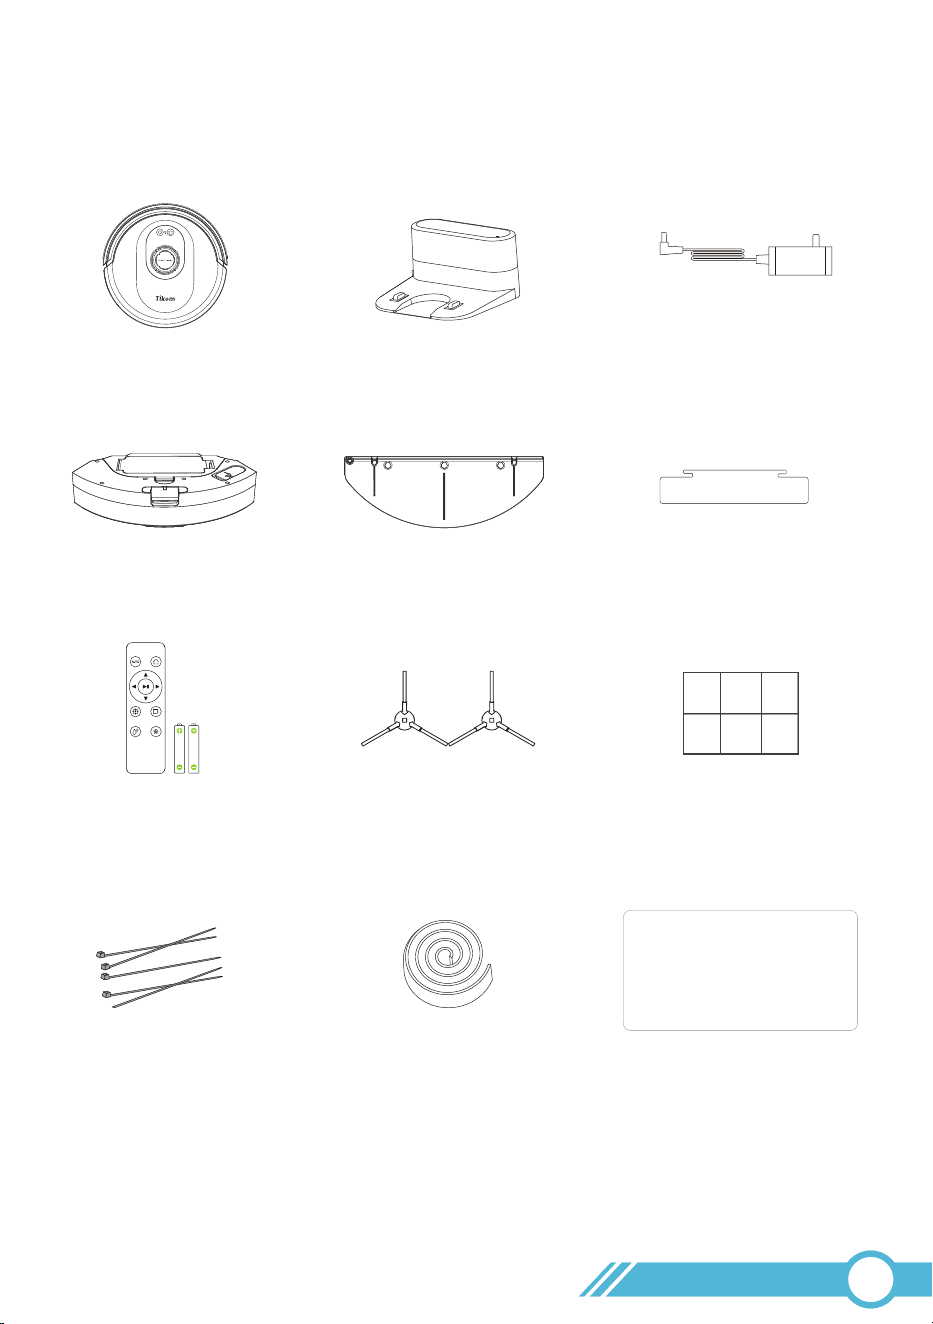
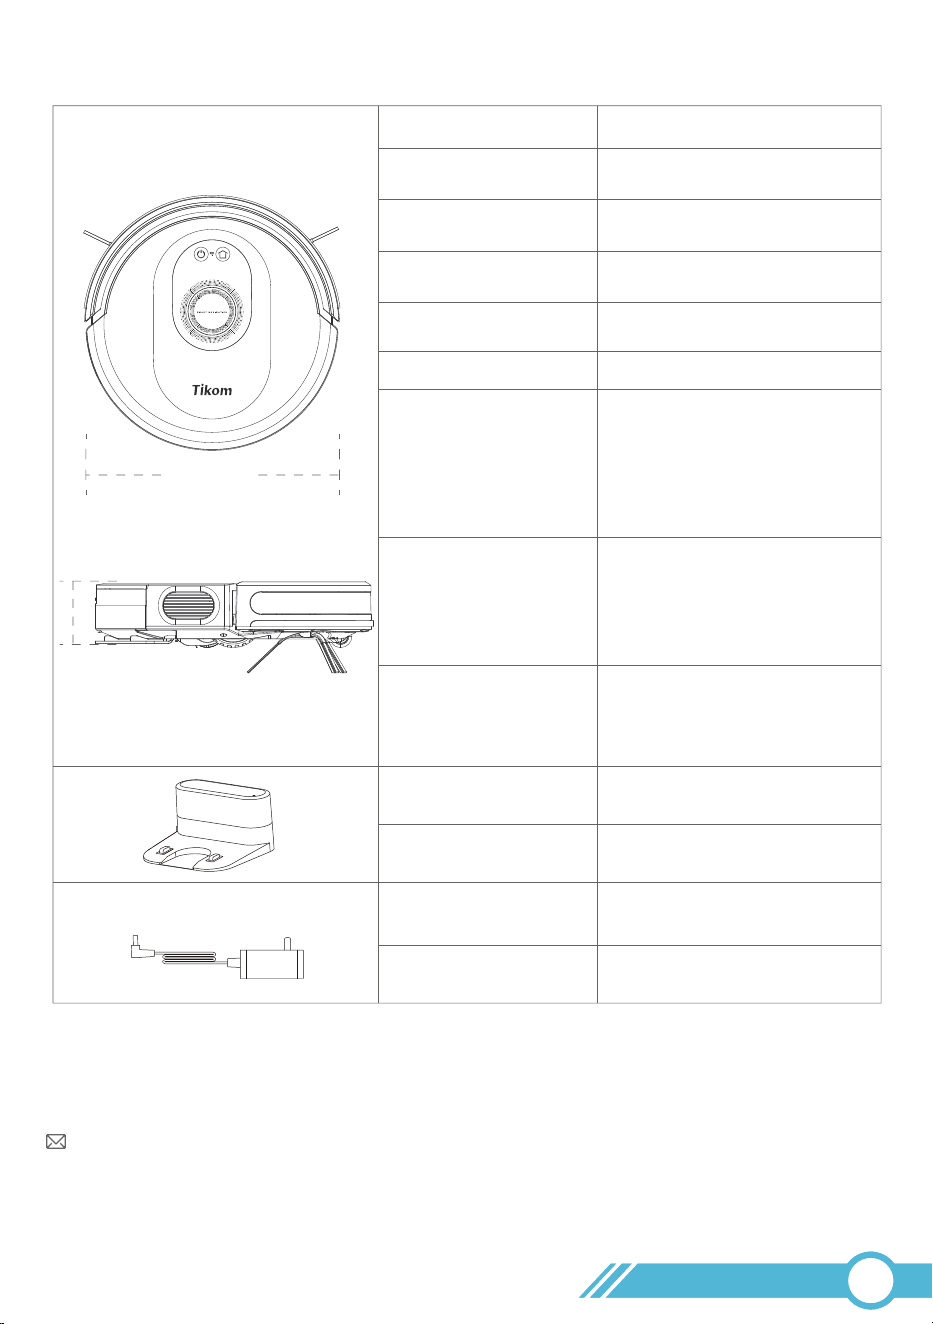
2. About Robot
2.1 What’s in the Box
Boundary Strip (3.3ft / 1m)
Side Brushes x 2
User Manual & Quick Start Guide
Robotic Vacuum Cleaner
(Dust Bin Included)
Charging Station
Electric Control Water Tank Mopping Cloth Holder
(With Mopping Cloth)
Cable Ties x 5
Power Adapter
(for Charging Station)
Remote Controller
with Battery
Adhesive Tapes for
Boundary Strip x 1
(In the User Manual Bag)
Spare Dust Bin
Transparent Dust Flap x 1
(In the User Manual Bag)
Figures and illustrations are for reference only and may differ from actual product appearance.
Product design and specifications are subject to changes without notice.
Note:
02
04
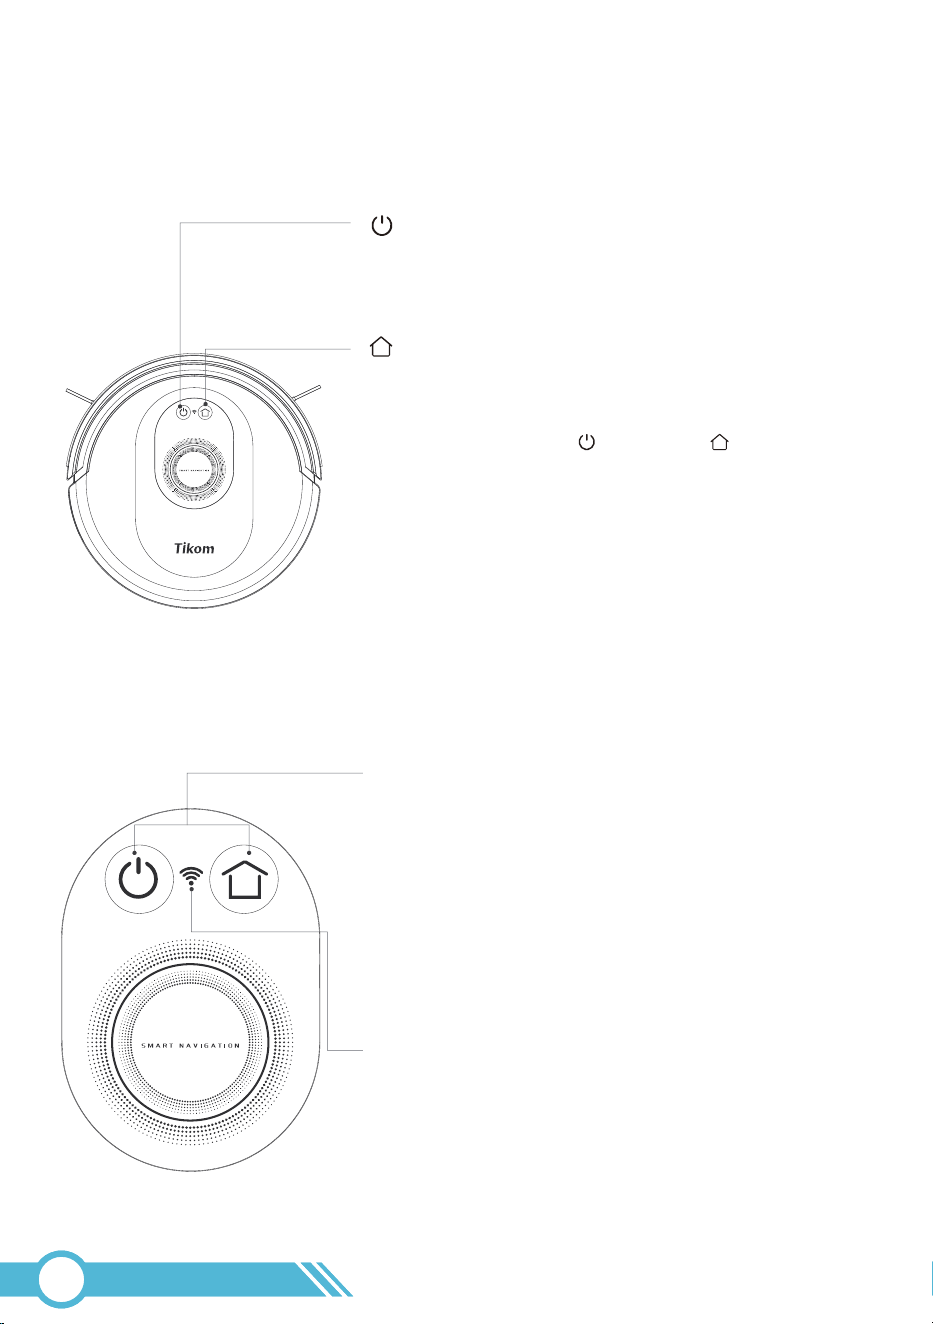
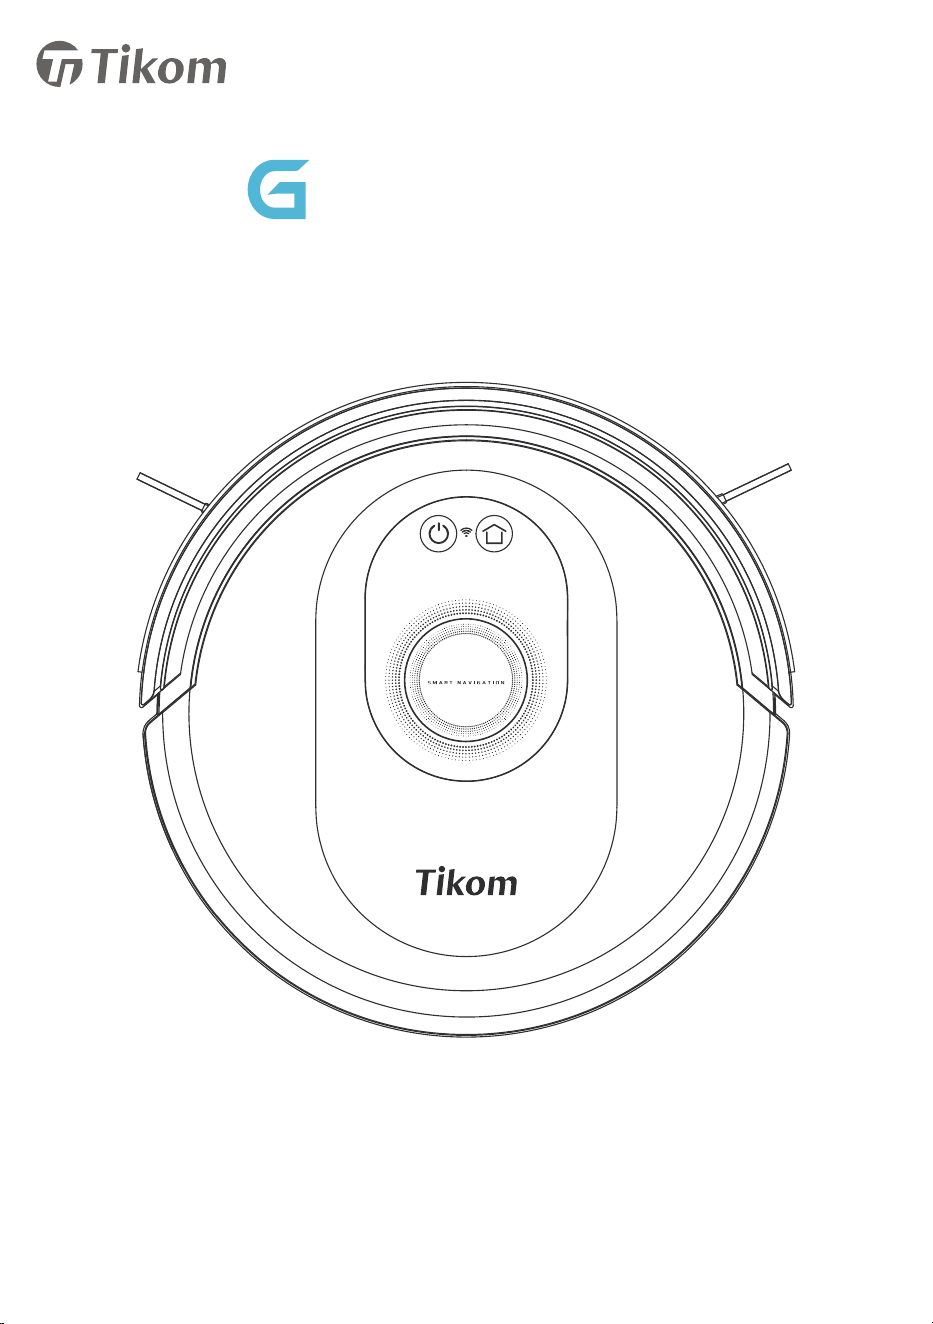
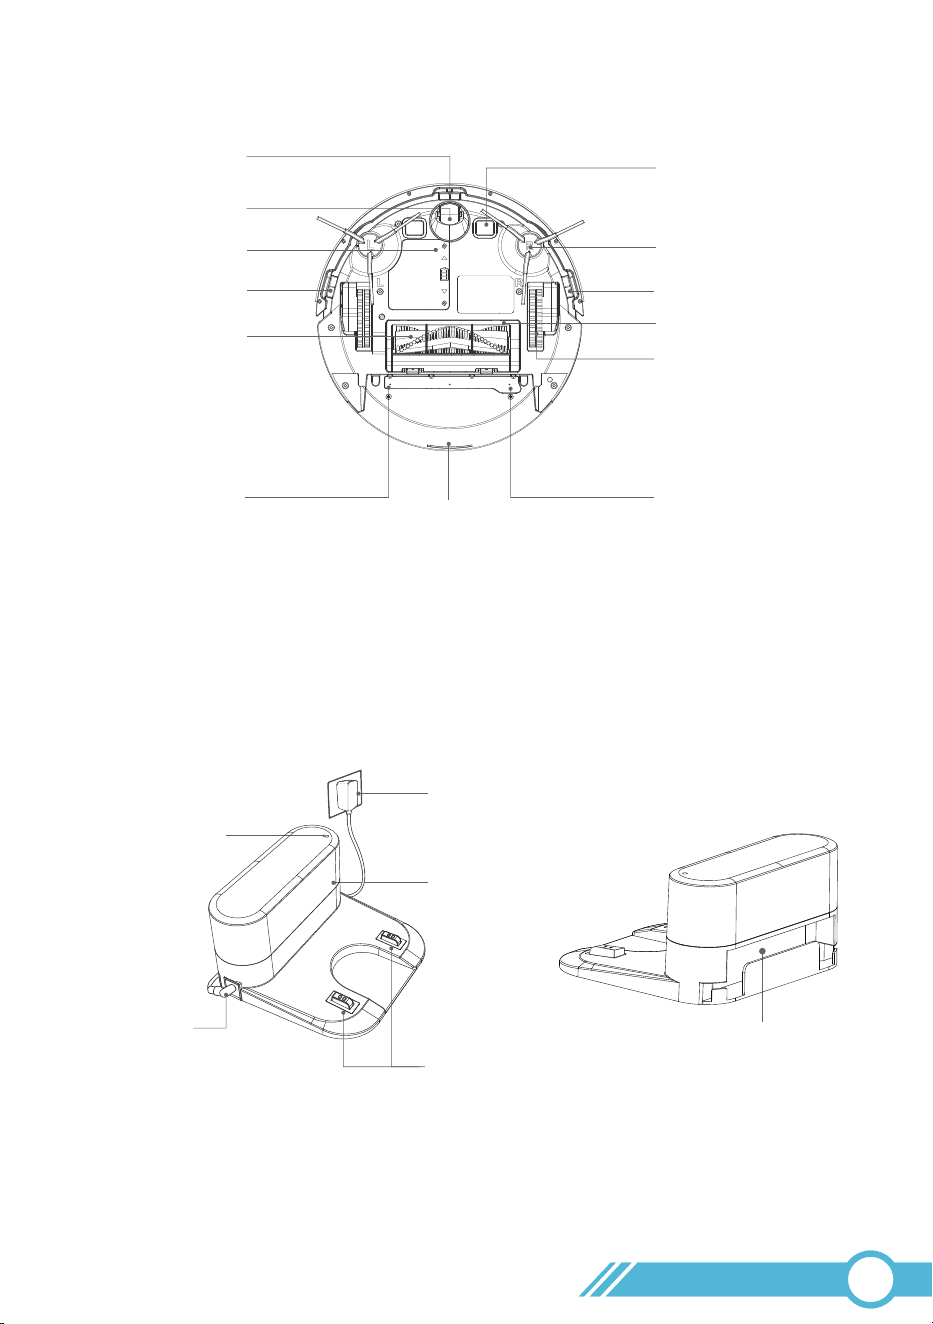
2.2 Product Overview
2.2.1 Top View
2.2.2 Status Light
Home Button
Robot Status Light
Light under two buttons
SolidWhite:FullCharged (OnChargingstation) /
Standby(NotonChargingstation)
FlashWhite:Charging(OnChargingstation)
SolidRed (without the urgent beep):LowBattery
Solid / Flash Red (with the urgent beep):Robot malfunction
Off: Power Off or Sleep
Reset Wi-Fi connection:
Press and hold Power and Home buttons
for 3s simultaneously.
Wi-Fi Status Light
ON: Wi-Fi Connected
Flash: Pairing mode
Off: Sleep / Power off / Wi-Fi not connected
Clean / Power Button
1.Power On/Off: Press and hold the button for 3 seconds.
2.Start/ Stop Cleaning: Short press the button.
02
05
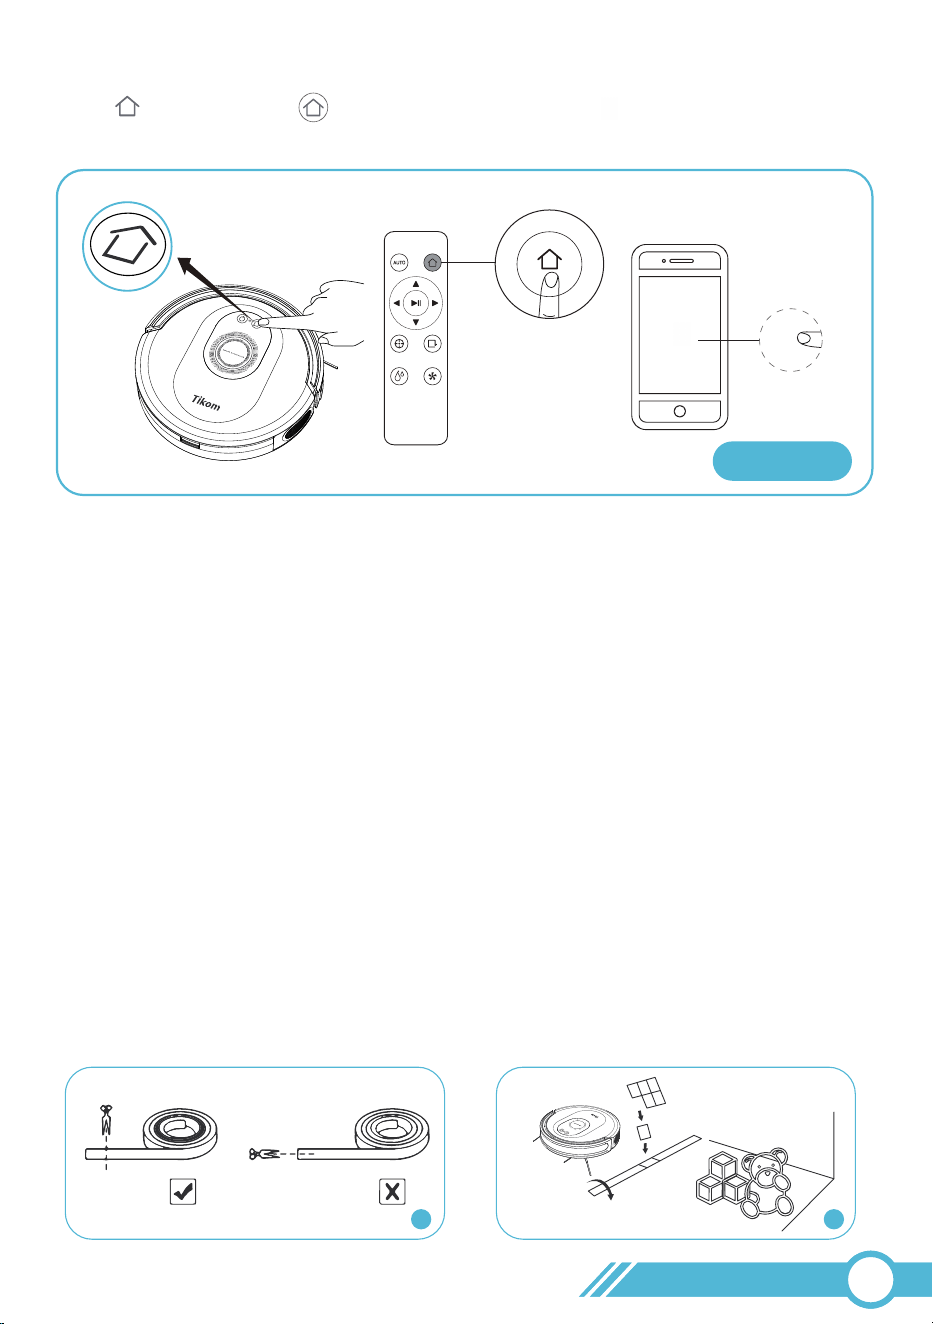
Return to Charging Station: Short press the button.
1.Power On/Off: Press and hold the button for 3 seconds.
2.Start/ Stop Cleaning: Short press the button.
2.2.3 Bottom View
Anti-drop Sensor
Prevent robot from tumbling down stairs
Anti-drop Sensor
Anti-drop Sensor
Caster Wheel
Side Brush
Water Outlet
Water Tank
Water Outlet
Wheel
Charging Contact
Battery Compartment
Brush Guard
2.2.4 Charging Station
Power Cord Storage
Compartment
02
06
Infrared Signal Emitter
Power Status Light
Main Brush
Power Adapter
Charging Contacts
Power Socket
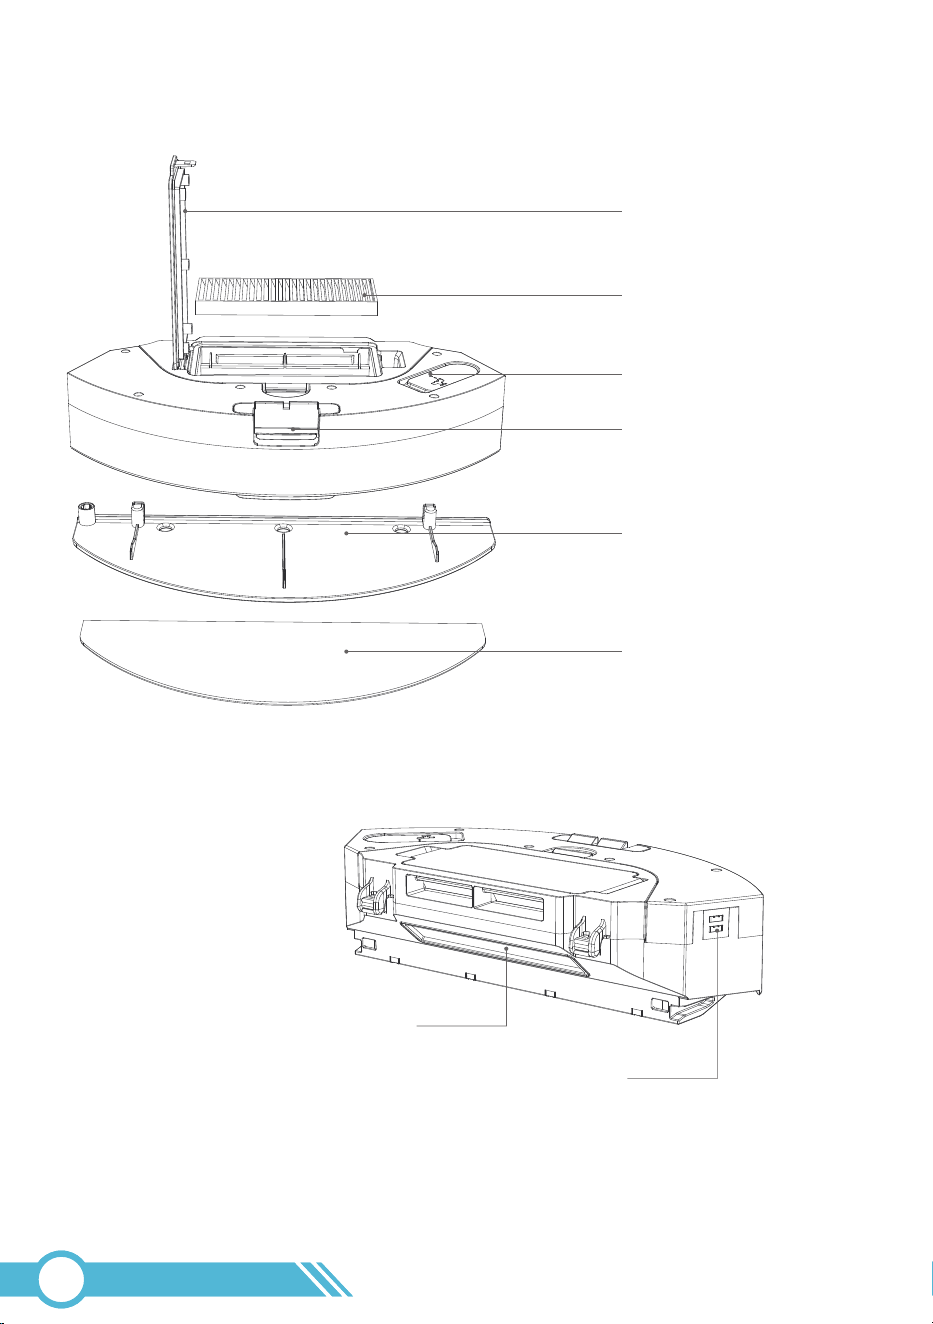
2.2.5 Dust Bin & Water Tank
02
07
Water Control Contact
Transparent Dust Flap
Filter Cover
HEPA Filter
Water Inlet
Dust Bin Release Button
Mopping Cloth Holder
Mopping Cloth
2.2.6 Remote Controller
Back to Charging Station
Smart Cleaning
Manual Control of
Cleaning Direction
Spot Cleaning
Please stop the robot's cleaning
before manually controlling it.
Note:
High Level: 3 “Beep”
Middle Level: 2 “Beep”
Low level: 1 “Beep”
Strong Level: 3 “Beep”
Normal Level: 2 “Beep”
Gentle level: 1 “Beep”
Start/Stop Cleaning
Edge Cleaning
Suction Power Control:
Mop Water Control:
On Charging Station
Fully Charged
Cleaning
Cleaning Mode
1. Standby Mode
2. Manually Stop
Recharging
Back to
Charging Station
Stop & not on
the Charging Station
Solid White
Robot Status Light Robot Condition
Not in use & not
on the Charging
Station
Status
Note:
To wake the robot, please short press
any button on the device or use the Tuya
Smart App.
Note:
The robot automatically returns to the
charging station to recharge when cleaning is
complete or when commanded by the user.
Sleep Mode
Off
2.3 LED Indication
02
08
Charging
Low Power
Status
In pairing mode, ready for network connection
Network connection successful
Sleep Mode / Power Off
/ Not connected to Wi-Fi
On Charging Station
Back to
Charging Station
Robot Condition
During Wi-Fi setup
Power on
/
Flash White
Solid Red
(without the
urgent beep)
Wi-Fi Status Light
OFF
Robot Malfunction
Note:
When the battery level drops below
15%, the robot will automatically return to
recharge.
1. Please refer to section 5.1 Error & Alarm
page 43 to identify the specific error;
2. You can also quickly check the robot's
errors through the Tuya Smart App.
Notes:
Note:
Please refer to section 3.4 Connect to
Wi-Fi page 16 to start network connection.
Robot Malfunction
Solid Red
/ Flash Red
(with the urgent
beep)
Flash White
Solid White
02
09
Robot Status Light Robot Condition Status
3. Using Robot
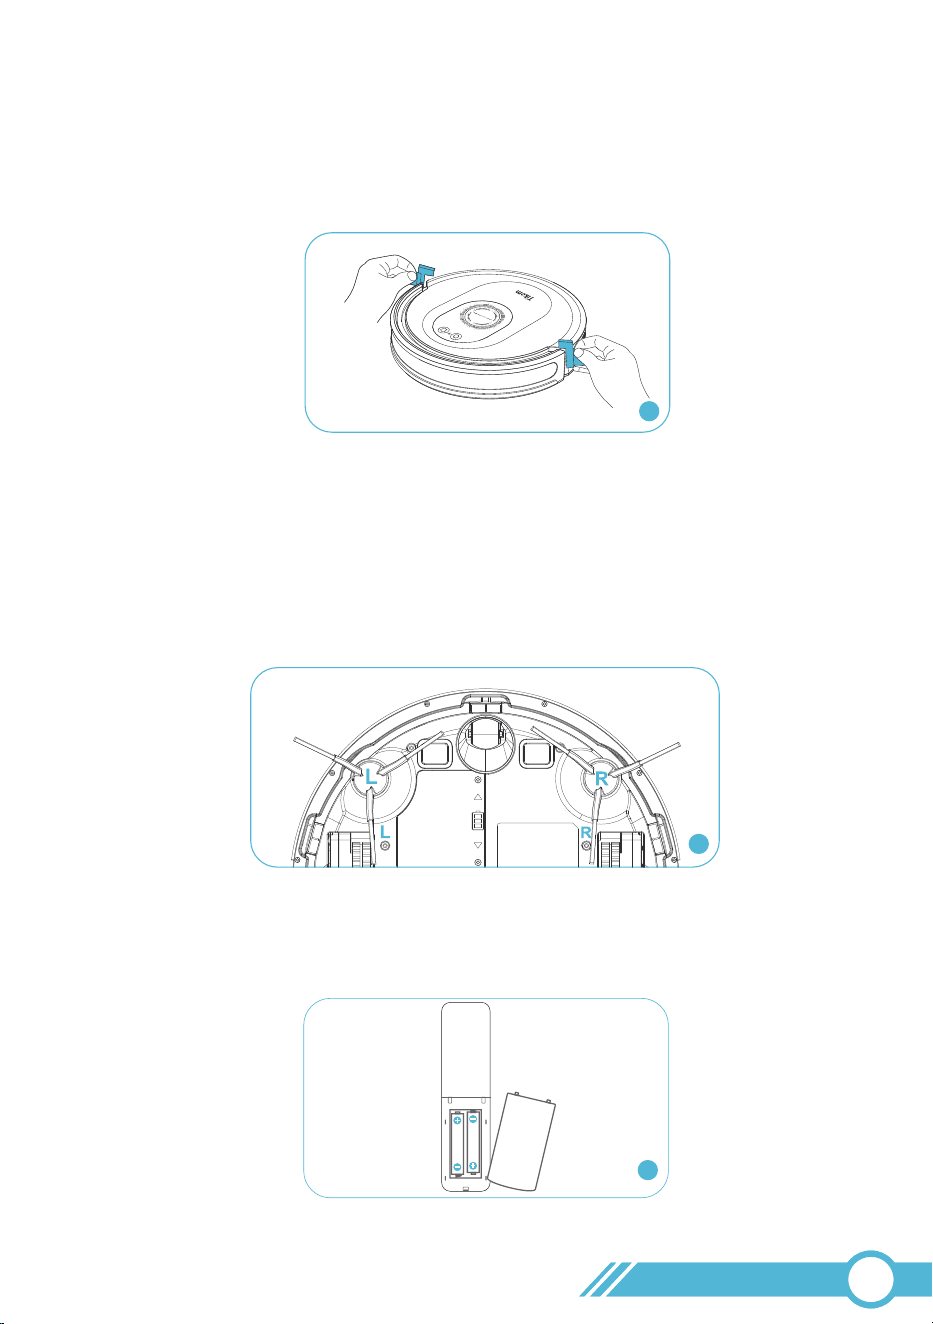
2. Install the side brushes before use:
-Place the left brush (L) and the right brush (R) against the corresponding letters
“L” and “R” on the bottom.
-Press the side brushes until you hear a "click" sound, indicating that the side brushes
are properly installed.
3.1 Getting Started
2
3. Insert the supplied AAA batteries into the remote controller.
3
02
10
1. Remove the protection material from 2 sides of the robot.
1

4. It is recommended to position the Charging Station against a wall on a hard,
level surface instead of on rugs or carpets.
Note:
It is advised to use the provided adhesive tapes to secure the charging station
to the ground.
5. Clear objects within 3 ft / 1 m of the left and right sides, and within 6 ft / 2 m
in front of the Charging Station.
6. Connect the original adapter to the Charging Station and a wall outlet.
Notes:
1. The Power Status Light will turn solid white when powered on.
2. Keep the Charging Station plugged in for automatic robot recharging.
3. Store spare cables in the back compartment to avoid tangling.
02
11
5
6
4
3ft/1m
3ft/1m
6ft/2m
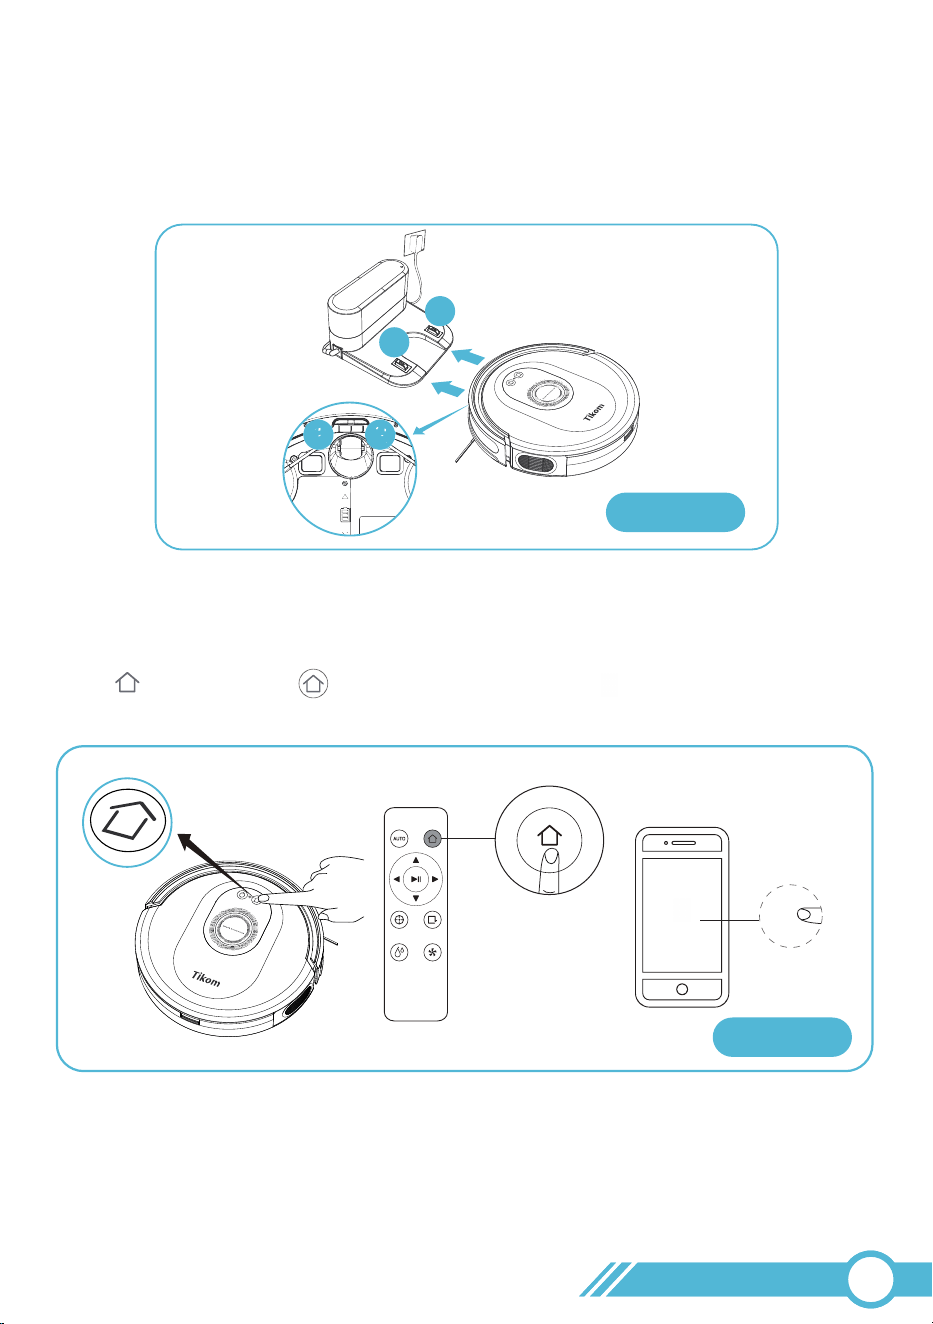
Method 2:
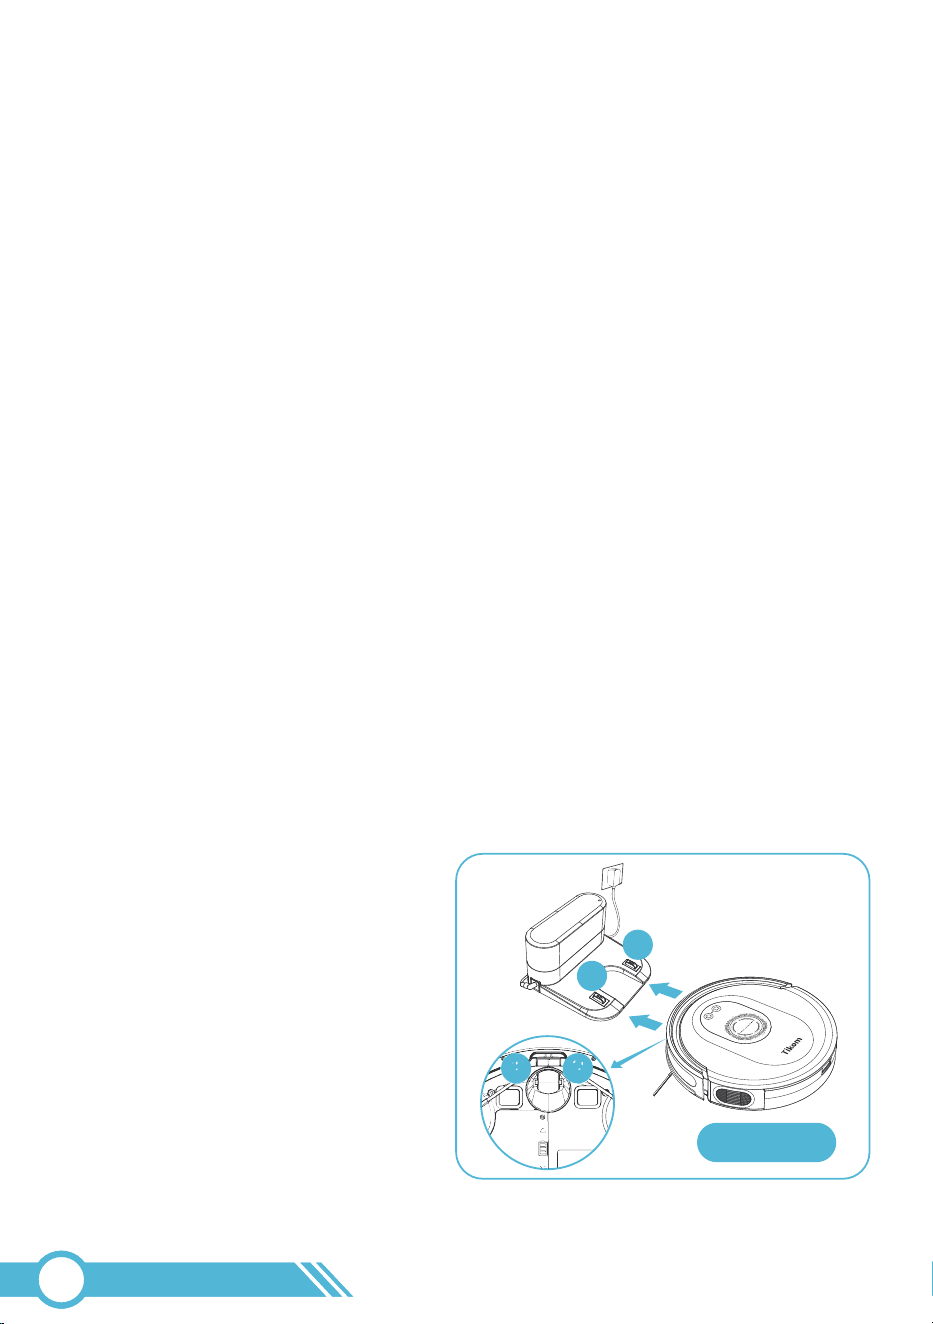
Press on the robot, or on the remote controller, or on the app to automatically
return the robot to the charging station.
Charge
Method 2
Charge
1
2
21
Attach the robot to the charging station by aligning its charging pins. A sound will
indicate successful connection.
Method 1:
7. Please ensure your robot is fully charged before its first use.
02
12
Method 1

Flash White
Charging
Status light for Battery
Full Charged Low Battery
Solid White
Solid Red
Notes:
It takes 6-6.5 hours to reach a full charge.
The robot will find and return to the Charging Station when the battery gets low,
but it will not move when the battery reaches a critical low level. Please manually
place it on the charging station in this case.
During periods of non-use, we recommend keeping the robot docked on the
charging station for a full charge, so it can clean whenever needed.
The charging station has low power consumption once the robot is fully charged
and features circuit protection for safety.
To prolong the battery's lifespan, recharge the robot at least once every 3 months
if not in use for an extended period.
If the robot does not charge, please contact [email protected] for further
assistance.
1
2
3
4
5
6
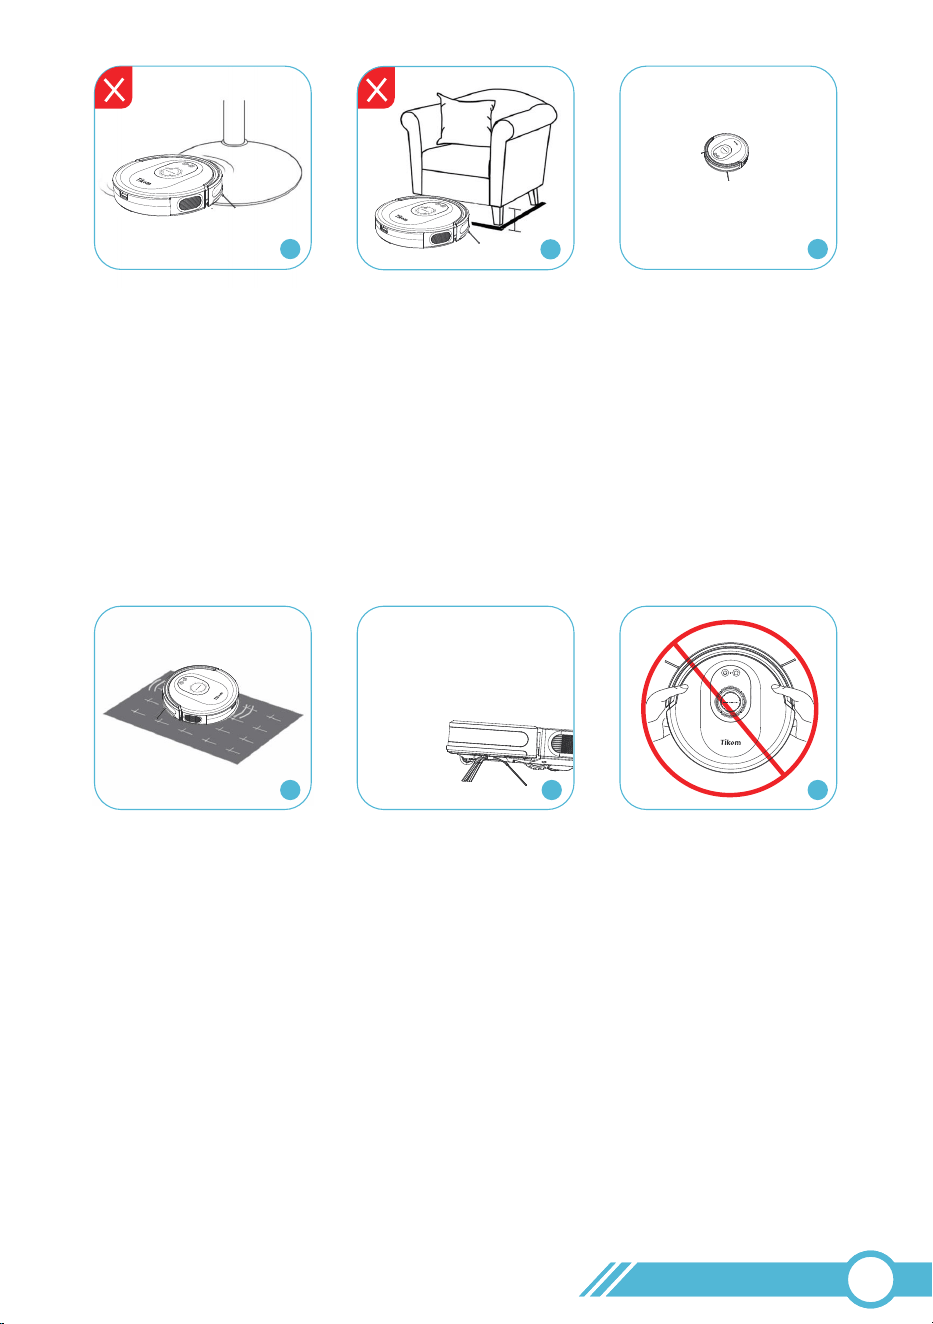
1. Please remove any objects from the floor that may entangle the robot vacuum, such as
pet waste, socks, clothing, tissues, toys, slippery surfaces, and power cords. You can use
the provided Cable Ties to organize your wires and power cords.
2. Before using the robot on a rug with tasseled edges, please fold the edges of the
rug under.
3. Keep the robot away from wet areas, such as the kitchen or bathroom.
3.2 Important Tips Before Usage
02
13
1 2 3
0.63 in /
16 mm
4. The round bases of certain bar chairs, tables, fans, and lamps may affect the robot's
mapping and navigation. Please remove these items or use the provided Boundary
Strip to block these areas during cleaning.
5. Avoid gaps close to 3.07 inch / 78 mm (the thickness of the robot's body) to prevent the
robot from getting stuck. Use the Boundary Strip to block off narrow spaces if needed.
6. Anti-drop sensors help prevent the robot from falling down stairs and steep drops,
but they may be less effective when they are dirty or on carpeted, reflective, or very
dark floors. It is recommended to use the provided Boundary Strip to block these areas.
7. The robot may not operate on certain darker black-colored surfaces because the
Anti-drop Sensors, which recognize edges or stairs, may mistake the black color for an
edge, causing the robot to avoid cleaning over it.
8. Avoid cleaning high-pile rugs thicker than 0.63 in / 16 mm, as they may cause the robot
to malfunction.
9. Do not pick up or move the robot while it is cleaning, or relocate the charging station,
as this may affect the robot's mapping ability and return to the charging station.
02
14
4 6
7 8 9
≈3.07 in
/ 78 mm
5

10. To prevent the robot from cleaning unwanted areas, apply the supplied Boundary Strip
with provided adhesive tape to create a virtual barrier. Ensure the strips are placed
FLAT on the floor.
Press and hold button on robot for 3
seconds.
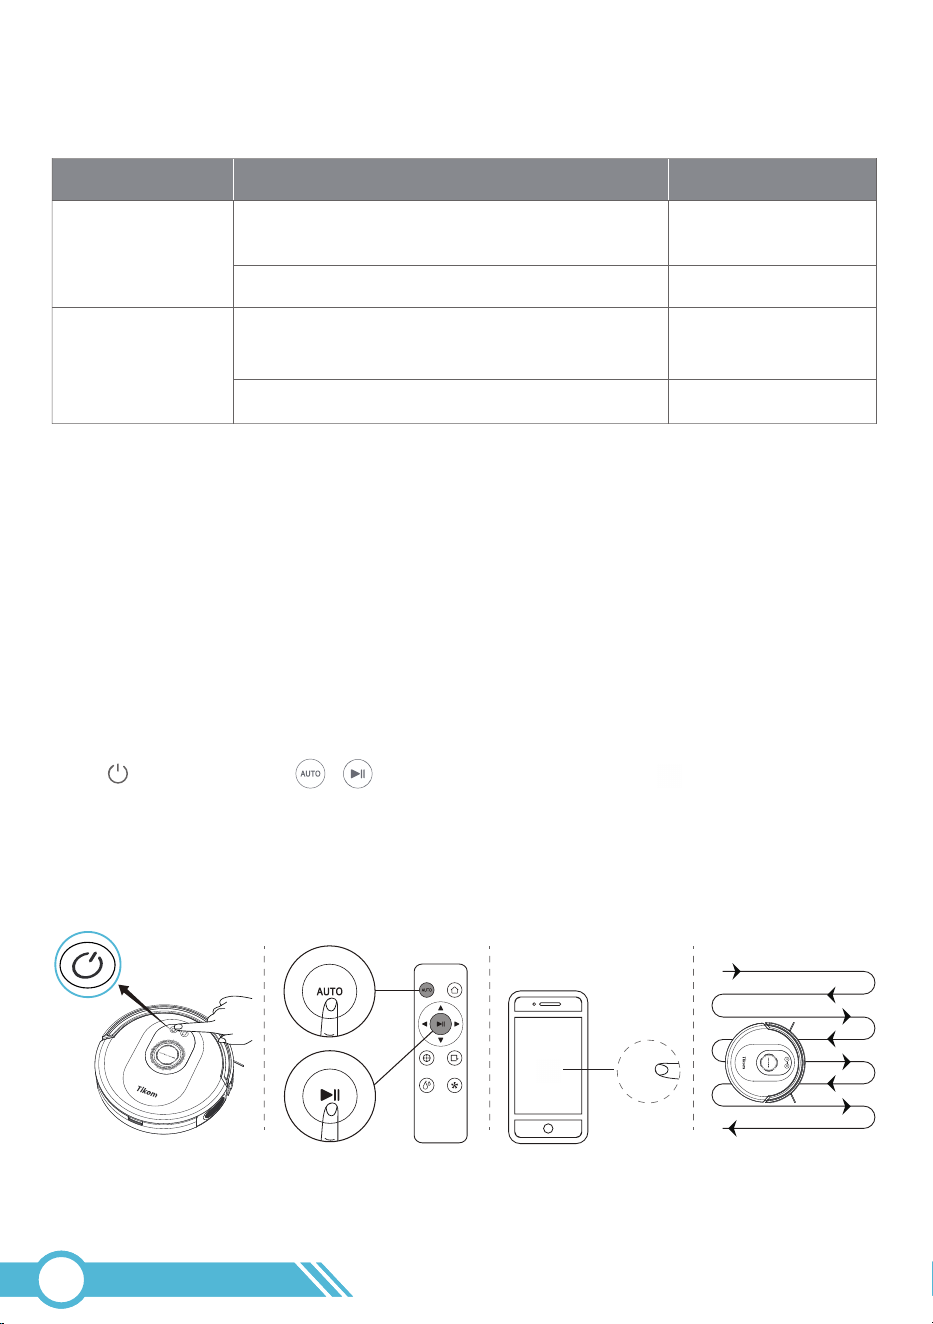
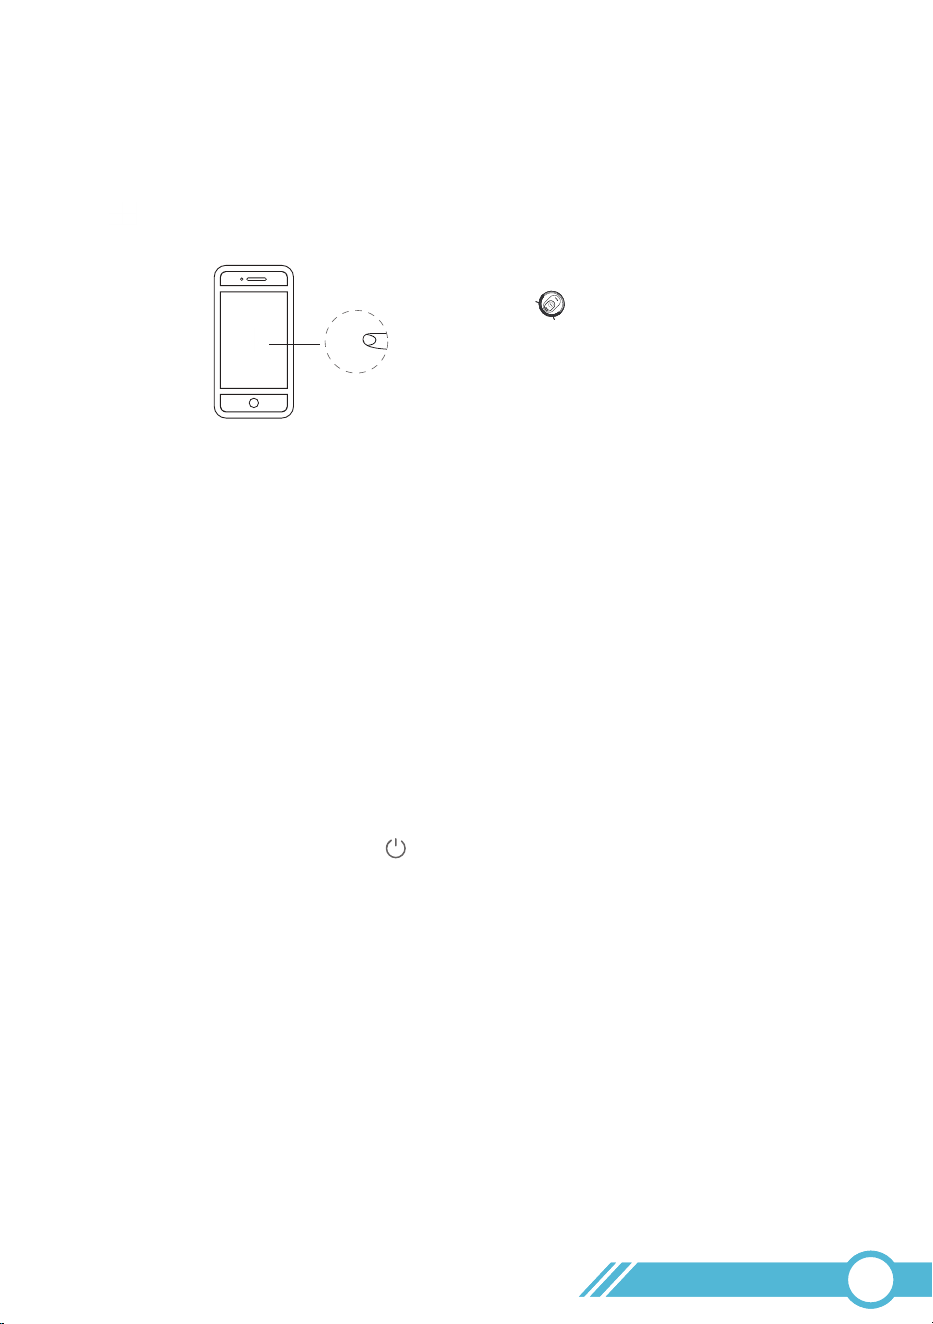
3.3 Power On/Off Robot
Power On Robot
Method 1: Method 2:
Manually attach the robot to the charging
station, and it will power on automatically.
1. Take off robot from Charging station
2. Press and hold button on robot for 3 seconds
Power Off Robot
02
15
10
Method 1 Method 2
1
2
21

Use the Tuya Smart App on 2.4GHz Wi-Fi for full features.
Option 2:
Scan the QR code on the Quick Start Guide or below to download and install the app.
Note:
Please make sure your smart Phone or tablet is running iOS 13.0 (or above) or
Android 6.0 (or above).
3.4 Connect To Wi-Fi
3.4.1 App Download and Installation
3.4.1.1 App Download
Option 1:
Search for Tuya Smart on the App Store or Google Play, then download and install it.
Note:
To ensure a successful connection, please grant permission for the Tuya Smart app to use your
Wi-Fi and cellular data when running it.
3.4.2 Wi-Fi Connection Requirement
3.4.2.1 Mobile Device Requirement
3.4.1.2 App Registration and Login
Ensure your smartphone or tablet is connected to a 2.4GHz Wi-Fi network and that
Bluetooth is turned on.
Launch the Tuya Smart app, register using your email, and then log in.
Bluetooth is turned on.
02
16

Note:
Ifthe2.4GHz/5GHzcombinednetworkfailstoconnect,pleaseseparatethe2.4GHz
networkandconnecttothestandalone2.4GHznetworkinstead.
3.4.2.2 Robot Requirement
Ensure the robot has sufficient battery before connecting it to the network
3.4.2.3 Wi-Fi Requirement
1. Ensure that the robot and your mobile device are close to the router during the
connection process.
3. Use only letters (A-Z) and numbers (0-9) in your Wi-Fi name and password. Emojis,
special characters, and symbols are not supported.
2. Make sure you have entered the correct Wi-Fi name and password when connecting.
4. It is not recommended to use a VPN (Virtual Private Network) or Proxy Server.
5. Our robot only supports 2.4GHz Wi-Fi. If your Wi-Fi router has the 2.4GHz and 5GHz
frequencies separated with different network names, please connect your mobile phone
to the 2.4GHz Wi-Fi network.
On the other hand, if your Wi-Fi router combines the 2.4GHz and 5GHz frequencies
and they share the same network name, you can simply connect your mobile phone as
usual, and the connection will automatically be established with the appropriate
frequency supported by our robot.
6. When connecting to a hidden network, ensure that you enter the correct network name
(SSID) and connect to a 2.4GHz wireless network.
7. When using a network extender or repeater, ensure that the network name (SSID) and
password are the same as your primary network.
8. Ensure that your Wi-Fi router supports 802.11b/g/n and the IPv4 protocol.
9. Use WPA and WPA2 with TKIP, PSK, AES/CCMP encryption.
10. WEP EAP (Enterprise Authentication Protocol) is not supported.
11. Use Wi-Fi channels 1-11 in North America and channels 1-13 outside North America
(refer to local regulatory agency guidelines).
02
17
3.4.3 Wi-Fi Status Light
02
18
Status
In pairing mode, ready for network connection
Network connection successful
Sleep Mode / Power Off
/ Not connected to Wi-Fi
Robot Condition
During Wi-Fi setup
Power on
/
Wi-Fi Status Light
OFF
Note:
Please refer to section 3.4 Connect to
Wi-Fi page 16 to start network connection.
Flash White
Solid White
02
19
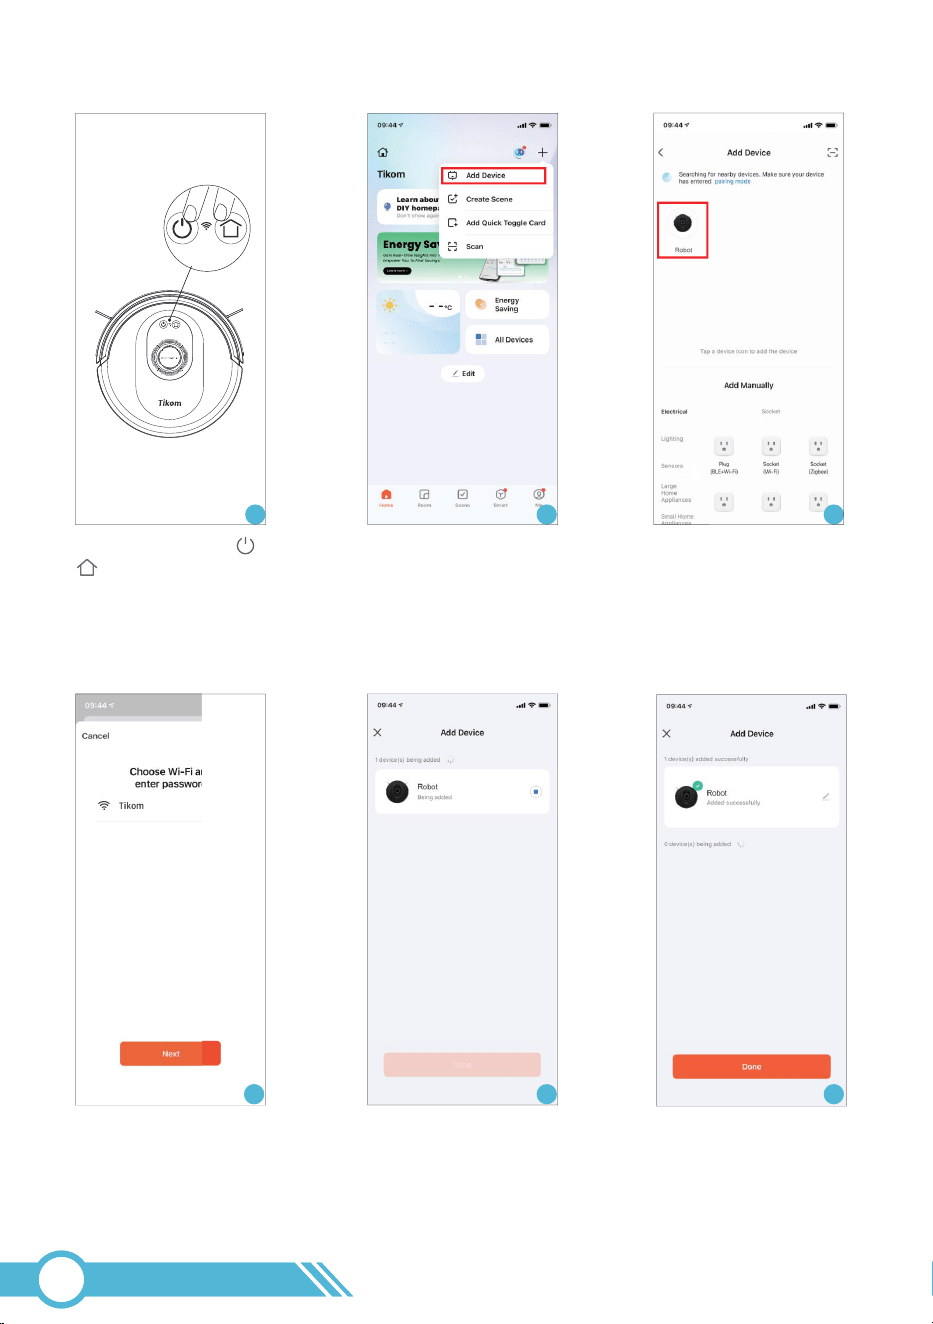
1. Press and hold the and
buttons on the robot for 3
seconds until a sound
prompts and the Wi-Fi Status
Light flashes rapidly.
1 2 3
2. Open TuyaSmart app, Tap
“+” and then “Add Device” at
the upper right corner.
3. Robot is discovered, then
tap Robot appeared.
4. Select the same 2.4GHz Wi-Fi
network as your mobile phone
and enter the password. Then
tap “Next”.
5. Connecting. 6. Connection successful.
54 6
3.4.4 Network Connection via Tuya Smart App
Once the robot vacuum's Wi-Fi setup is complete, you can remotely control it through the
Tuya Smart app using various network connections. This includes 2.4GHz and 5GHz Wi-Fi
networks, as well as 3G/4G/5G mobile data. Enjoy seamless control of your robot vacuum
anytime, anywhere.
Note:
3.4.5 Tuya Smart App introduction
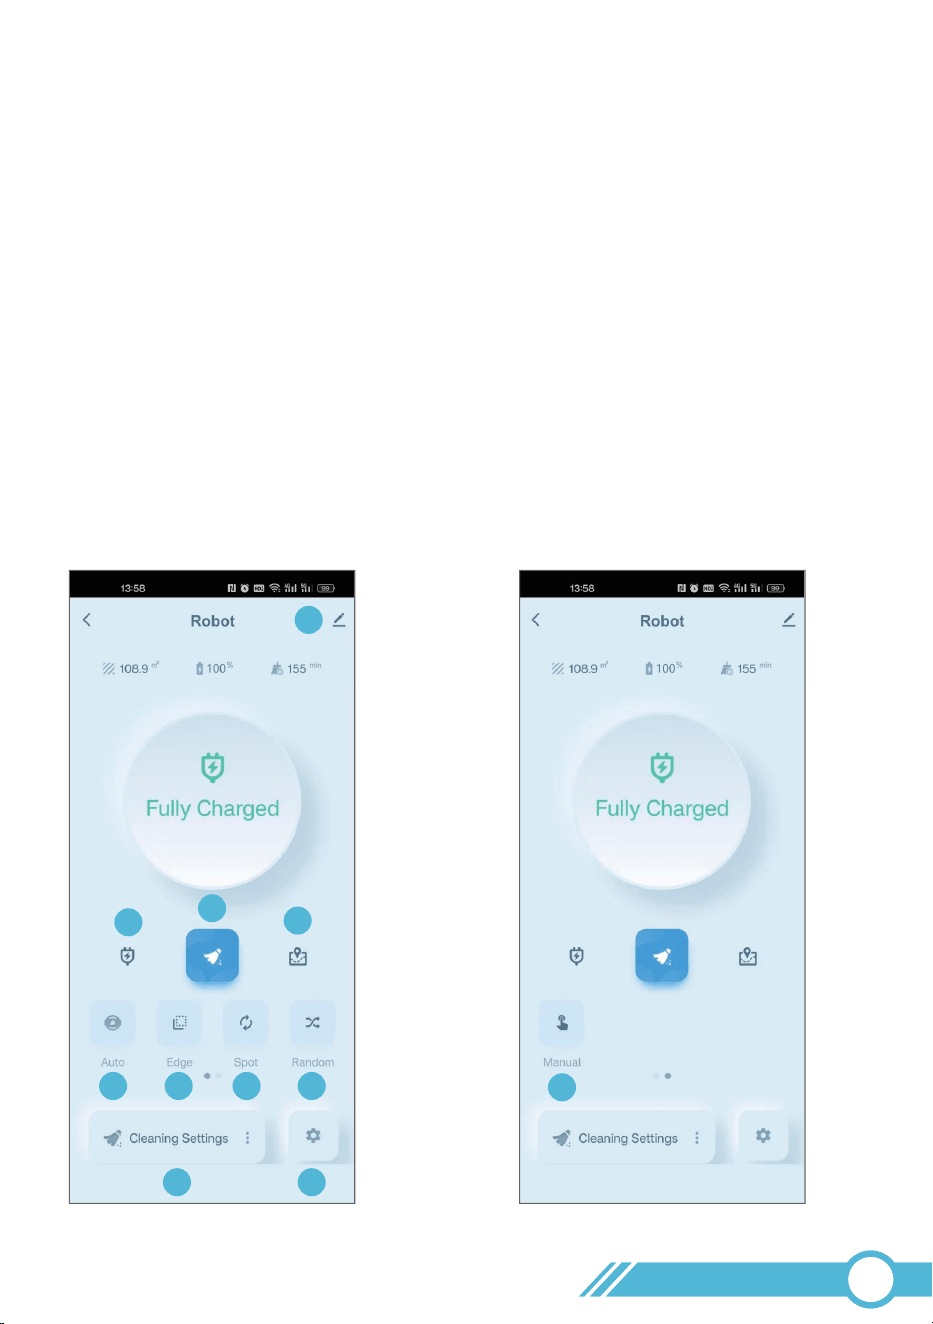
Main Page
Start the Tuya Smart app and go to the robot control screen (see the example below):
1. Device Information & Settings
2. Return to Charging Station
3. Start / Pause Cleaning
4. Live Cleaning Map
5. Smart Cleaning
6. Edge Cleaning
7. Spot Cleaning
8. Random Cleaning
9. Cleaning Settings
10. More Settings
11. Manual Cleaning
1
2
3
4
5
6
7
8
9
10
11
02
20
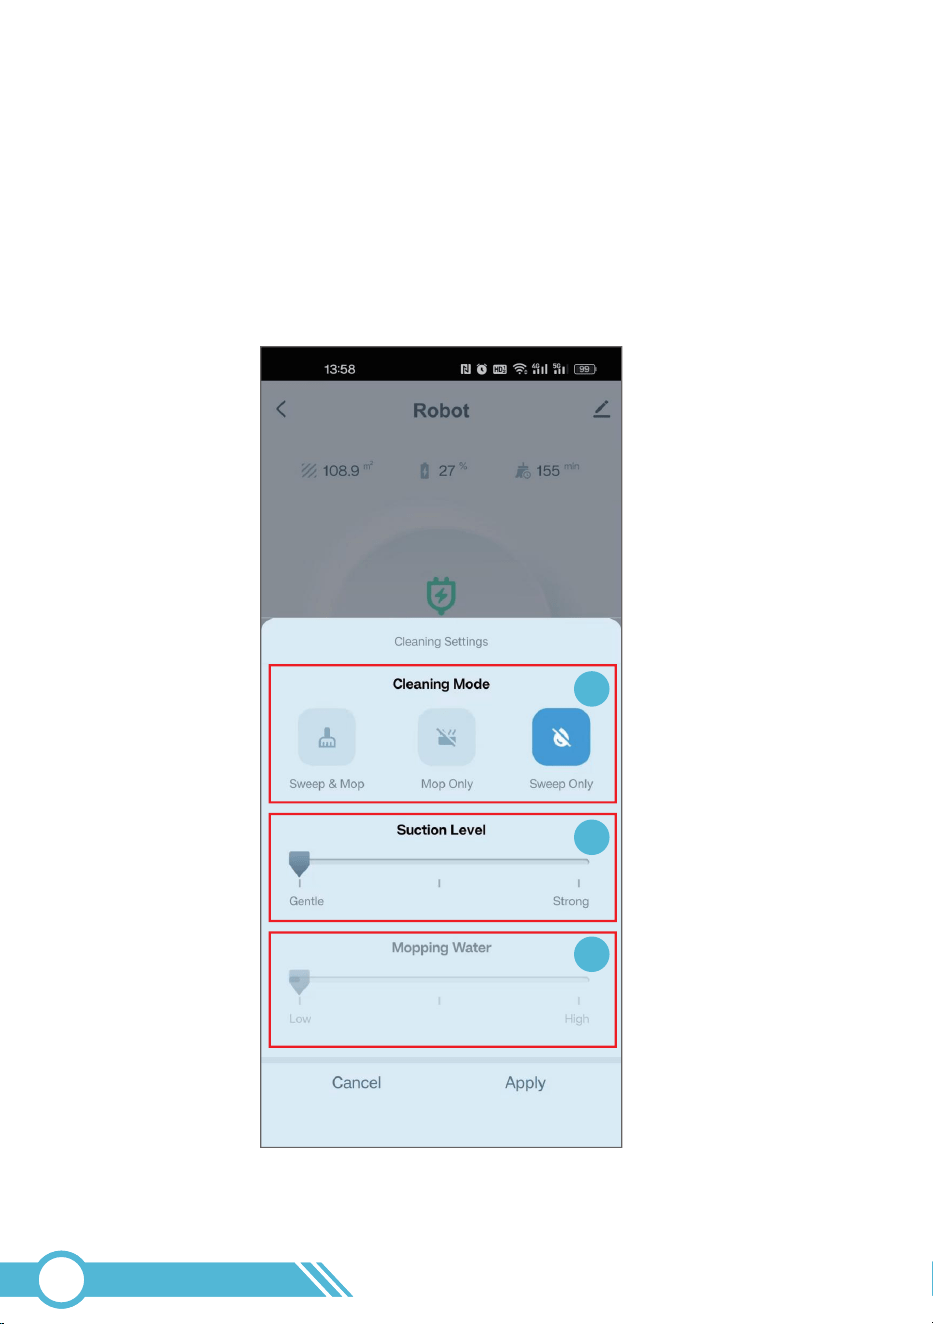
Cleaning Settings Page
1. Cleaning Mode
2. Suction Level Adjustment
3. Mopping Water Adjustment
Note:
The suction level and mopping water settings, once configured,
will take effect across all working modes.
1
2
3
02
21

The map is designed to track the robot's cleaning path, not to depict the cleaned area.
As a result, it does not support features like selective room cleaning or display your house
layout.
02
22
Live Map Page
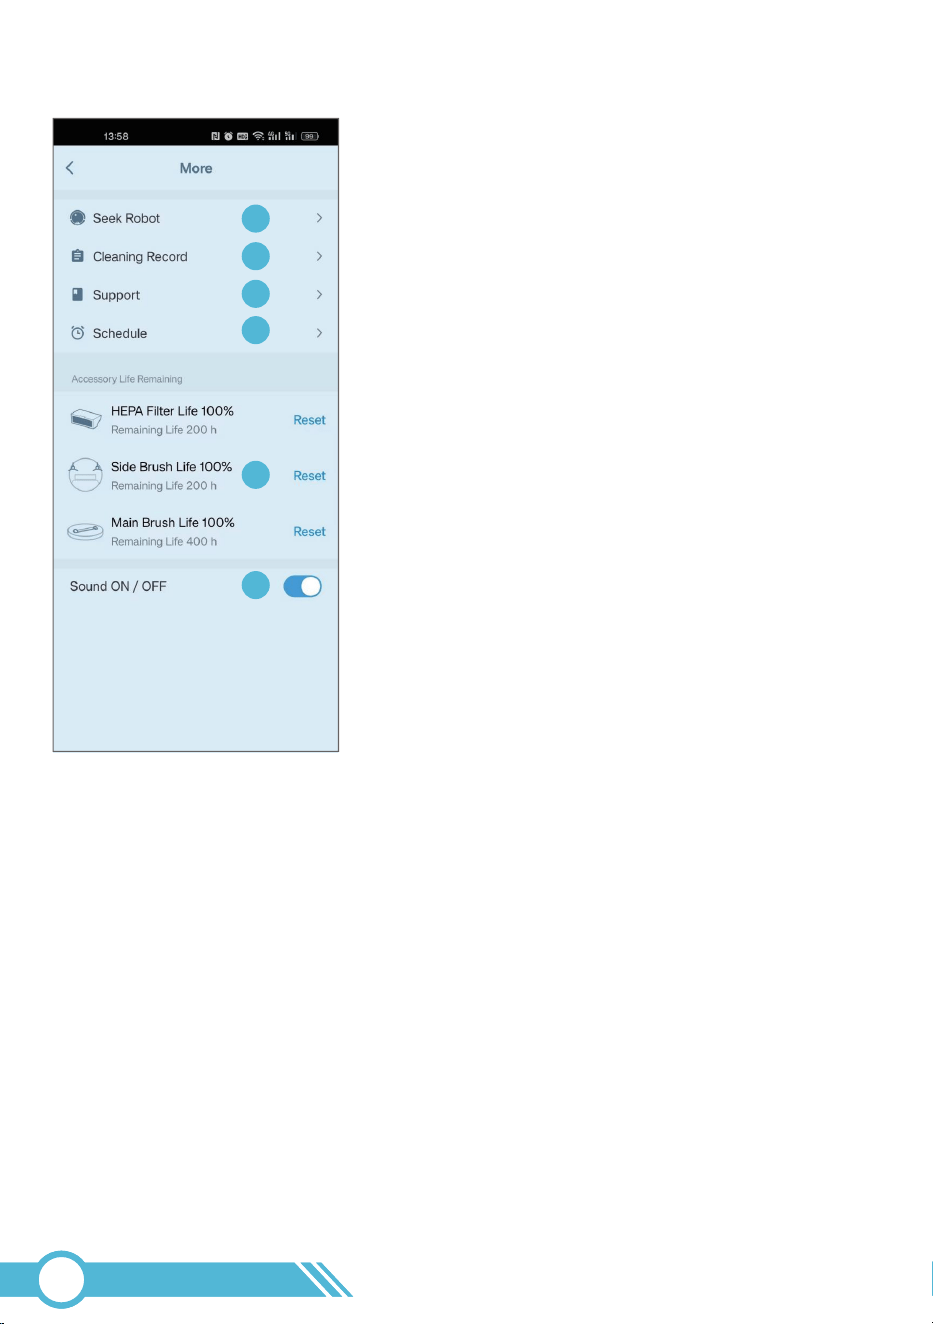
More Settings Page
More Settings Page :
1. Find Robot via Sound
2. Cleaning History
3. Support Page
4. Schedule Cleaning
5. Accessory Life Remaining
6. Sound ON / OFF
3.4.6 Work with Amazon Alexa or Google Assistant
Before using Amazon Alexa or Google Assistant for sound control, please ensure:
5. Your Alexa or Google Assistant device is registered and set up through its respective app.
4. The Alexa or Google Home app is installed on your smart device with an active account.
3. You have an Alexa-enabled device (e.g., Echo, Echo Dot) or Google Assistant device
(e.g., Google Home, Home Mini) - sold separately.
2. The robot is successfully connected to the Tuya Smart app.
1. The robot is properly docked at its charging station with sufficient power.
02
23
1
2
3
4
5
6
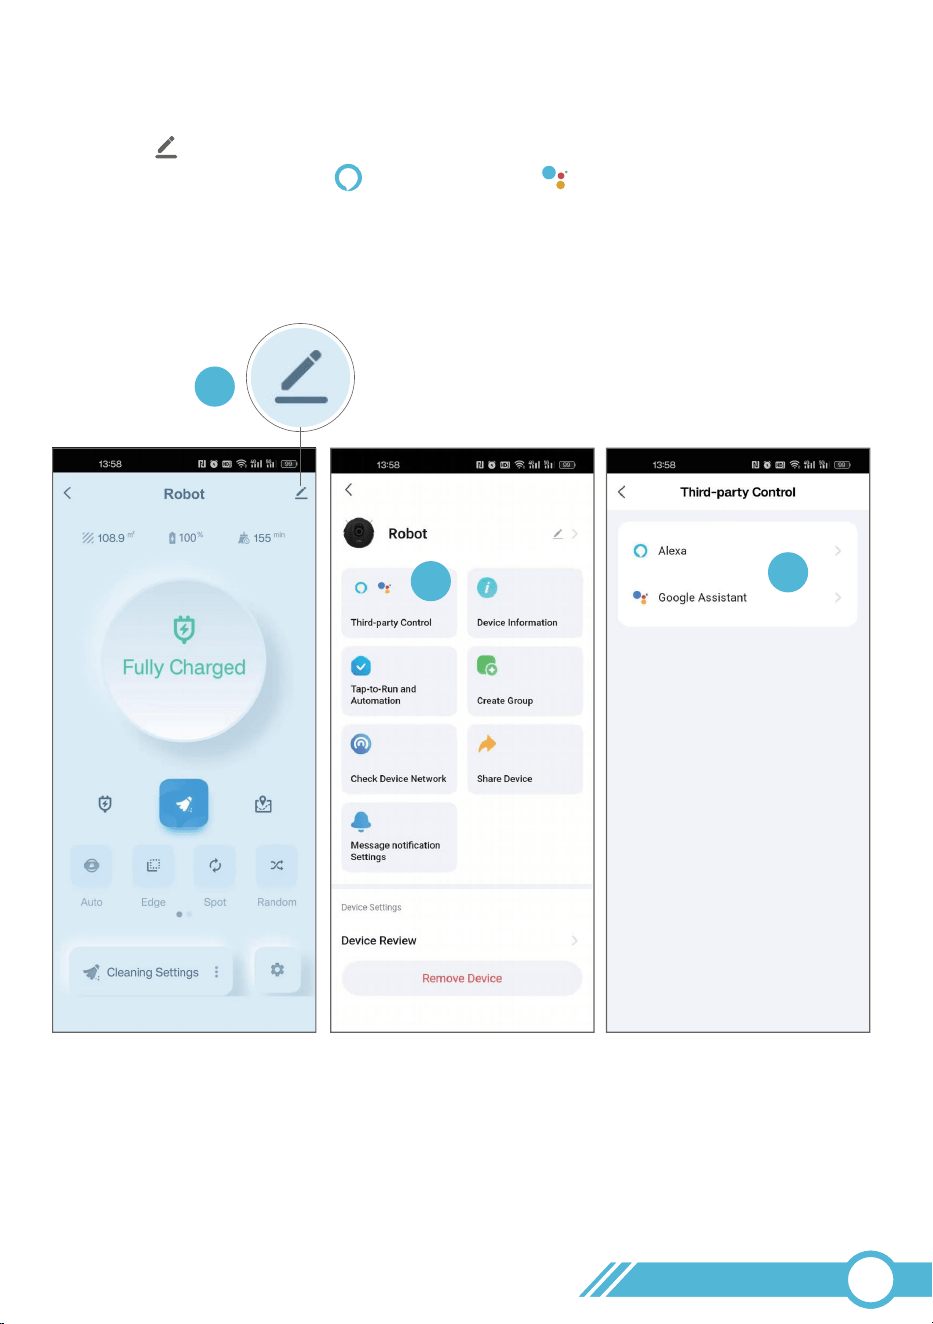
To control the Robot with Amazon Alexa or Google Assistant, follow these steps:
1. Launch the Tuya Smart app and navigate to your robot's control page.
2. Tap the in the top-right corner.
3. Select either 'Amazon Alexa ' or 'Google Home ' to initiate integration.
4. Follow the in-app instructions to complete the linking process with your chosen
sound assistant.
Simply follow the instructions in the app to add your robot to the Amazon Alexa app or
Google Home app.
02
24
1
2
3
Use these sound commands to control your robot with Amazon Alexa or Google Assistant:
Press on the Robot, or / on the Remote controller, or / in the APP
to initiate the Smart Cleaning mode.
The robot systematically cleans all reachable areas in a zigzag pattern until the
battery runs low.
Sound instruction of Amazon Alexa or Google Home device
Device
Amazon Alexa
Google home
Sound Instruction
"Alexa, turn on robot (or your robot's name
if you changed the robot name)."
"Alexa, turn off robot."
"OK Google, turn on robot (or your robot's
name if you changed the robot name)."
"OK Google, turn off robot."
Meaning
Auto Cleaning
Stop Cleaning
Auto Cleaning
Stop Cleaning
3.5 Cleaning Mode
3.5.1 Smart Cleaning
02
25
Auto
Auto
Suction Level
Gentle
Sound Indicator after setting
Runtime
150 min1 “Beep”
2 “Beep”
3 “Beep”
Normal 120 min
High 90 min
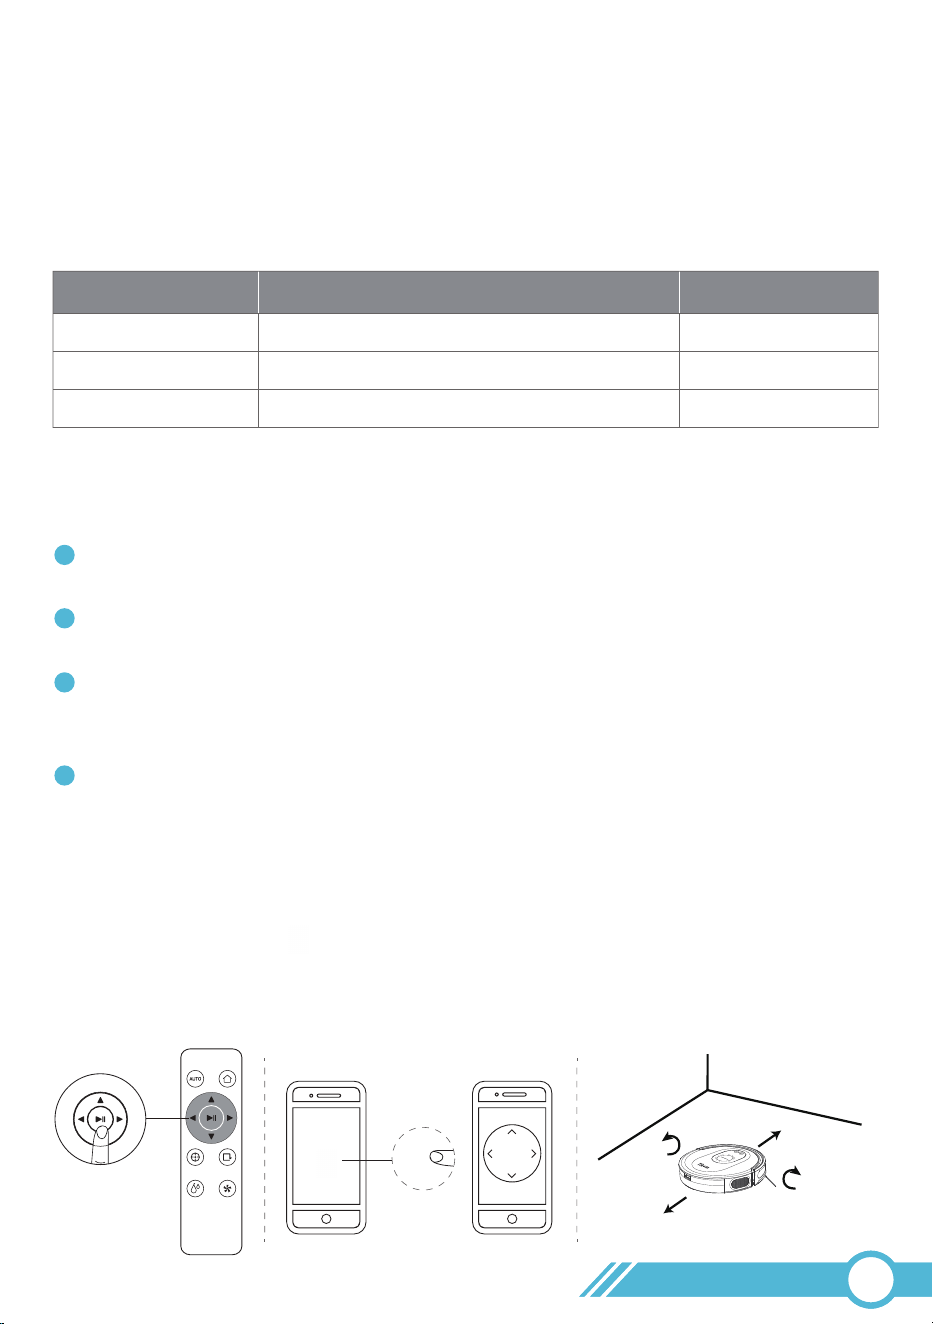
Manual
Move Forward
Move Backward
Turn Left
Turn Right
The Mopping cloth holder attachment enables Smart Cleaning mode selection.
Audible confirmation indicates proper installation.
Default Cleaning Mode is “Sweep & Mop” when equipped, with manual selection available
in Tuya Smart APP for “Sweep mode” or “Mop mode”.
Note:
The above working times are for reference only and may decrease after prolonged usage.
Cleaning Mode Switch
Suction Power Settings and Runtime
3.5.2 Manual Cleaning
Notes:
The robot will automatically return to the Charging Station for self-charging when the
battery level becomes low or when the cleaning is complete.
During periods of no cleaning, it is recommended to keep the robot docked on the
charging station for a full charge so that the robot can clean at any time if needed.
The charging station has low power consumption once the robot is fully charged and
features circuit protection for safety, making it safe to dock the robot on the charging
station at all times.
If the robot is unable to find the Charging Station due to obstacles or getting stuck,
please manually guide it to make contact with the Charging Station.
1
2
3
4
You can instruct the Robot to clean a specific area by using the directional buttons on
the remote controller or on the app to select Manual Cleaning.
Before manually controlling the Robot, please ensure to stop the robot's cleaning
operation first. Otherwise, the robot will not be responsive to manual control commands.
02
26
Manual
Edge
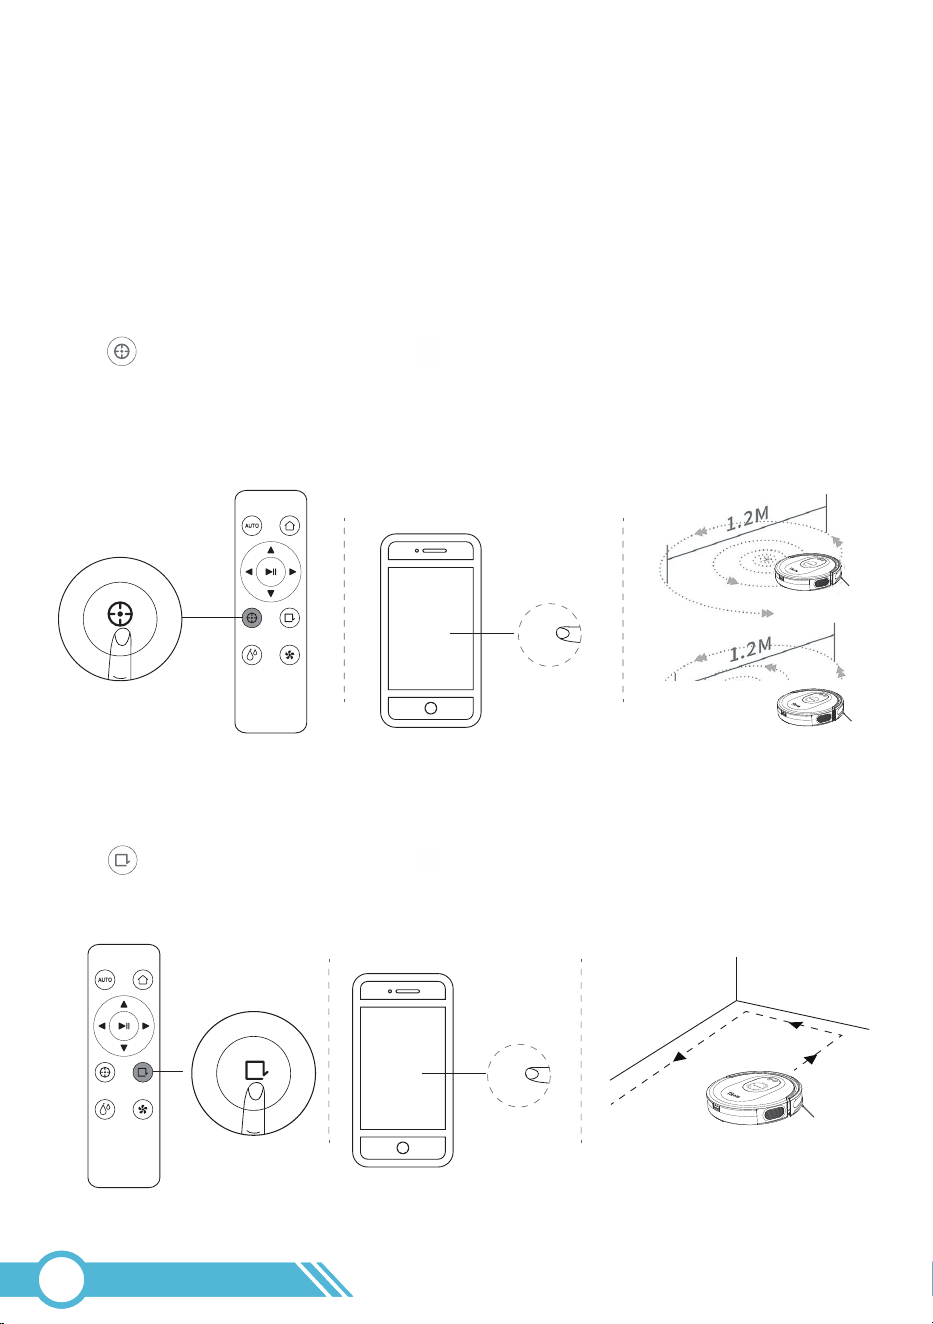
Spot
This cleaning mode is designed to thoroughly clean a specific area with a diameter of
3.9 ft. / 1.2 m.
Step 1:
Identify an area that requires intensive cleaning, where there is a significant amount of
or dust. Move the robot to the center of the area manually through the app, as indicated
in section 3.5.2 "Manual Cleaning" on Page 26.
Step 2:
Press on the Remote Controller or on the APP to start the spot cleaning process
in a spiral pattern. The maximum diameter of the spiral circle is approximately 3.9 ft /
1.2 meters The process will last around 2 minutes, after which the robot will return to the
starting point and enter standby mode if no further operations are carried out.
3.5.3 Spot Cleaning
This mode is designed to thoroughly clean the edges along the walls or furniture.
Press on the Remote Controller or on the APP to start the Edge cleaning process.
3.5.4 Edge Cleaning
02
27
Spot
Edge
3.9 ft /
3.9 ft /
Random
This mode is for cleaning in a random routine.
It can be used for special carpet environments where the robot cannot clean in a
zigzag pattern.
Press on the app to start the random cleaning process.
3.5.5 Random Cleaning
This function is configured in the app.
Through the app, you can schedule the Robot to start cleaning at a specific time.
You can set the time and customize the cleaning schedules from Sunday to Saturday.
Note:
If the scheduled cleaning fails to initiate, please consult page 45 for
troubleshooting steps.
3.6 Schedule Cleaning
The robot will be in Standby Mode under the following conditions:
1. When cleaning is stopped using button on the robot/app/remote controller.
2. If the robot encounters an error and stops cleaning.
3.7 Standby Mode
To conserve battery power, the robot will enter Sleep Mode if it remains in Standby
Mode for 10 minutes.
In Sleep Mode, all lights on the robot will be turned off.
To wake the robot up, press any button on the robot or any cleaning button on the
app / remote control.
3.8 Sleep Mode
02
28
Random
3.9 Error
If an error occurs, the Robot Status Light will flash red or stay solid red, accompanied by a
beep sound. Different error types are indicated by varying combinations of beep repetition
counts and light patterns. For details, please refer to section "5.1 Error & Alarm".
The robot will automatically stop and enter standby mode when an error is detected.
After 10 minutes in standby mode, the robot will switch to sleep mode, during which all
lights will be turned off.
Note:
3.10 Charging
1. When the battery is low or cleaning is complete, the robot will automatically return to
the charging station to recharge.
2.
During non-cleaning periods, it is recommended to keep the robot docked on the
charging station to maintain a full charge, ensuring it is ready for use at any time.
Once the robot is fully charged, the charging station consumes minimal power.
4. If the robot is unable to return to the charging station due to obstacles or being stuck,
please manually place the robot on the charging station to initiate charging.
3.
The charging station features built-in circuit protection, ensuring safe docking at all
times.
Auto Charging
Method 1:
Attach the robot to the charging station
by aligning its charging pins. A sound will
indicate successful connection.
Manual Charging:
02
29
Method 1
1
2
21
Method 2:
Press on the robot, or on the remote controller, or on the app to automatically
return the robot to the charging station.
3.11 Boundary Strip Usage
Boundary strips are used to create blocked-off areas that the robot will recognize and
avoid crossing. These areas may include the following:
Once you identify the areas or items you want to block off, follow these steps:
1. If necessary, use scissors to cut the Boundary Strip vertically to a shorter length based
on the size of the area you want to restrict. Note: The strip can only be cut vertically
to adjust its length, not horizontally to change its width. Be sure to measure the length
accurately before cutting.
2. Use the supplied adhesive tape to affix the Boundary Strip flat on the floor or under
a rug, ensuring it lies completely flat for optimal performance.
A. Avoid gaps close to 3.07 inch / 78 mm (the thickness of the robot's body) to prevent
the robot from getting stuck, such as behind a sofa or cabinet.
B. Designate areas where you do not want the robot to clean, such as around pet food
bowls, children's toys, the kitchen, or the bathroom.
02
30
Charge
Method 2
21
Charge
If the Boundary Strip is rolled up, remove it and then reapply it on the floor using
adhesive tape to ensure proper functionality.
Ensure that the strip is affixed at the same surface level as the robot for optimal
performance.
Exercise caution to avoid damaging the floor when using adhesive tape.
You can also use boundary strips to block off carpets or hide the strips underneath the
edges to prevent the robot from entering.
Keep the Boundary Strip away from objects that emit excessive heat.
1
2
3
5
4
3.12 Mopping the floor
1. Take out Water Tank
Notes:
2. Open the water tank cover, fill it with
water, and reseal it carefully.
Do not add floor cleaners or disinfectants
into the water tank as they may damage it.
Only clean water is recommended for use in
the water tank.
Note:
3. Install the mopping cloth holder
onto the water tank.
4. Install water tank back to robot.
02
31
1
2
The robot will detect the mopping cloth holder before mopping. Therefore, please
ensure the mopping cloth holder is properly installed before starting.
If no water is dispensed during mopping:
Notes:
Check and reinstall the mopping cloth holder to ensure it is properly attached.
Use a dry cloth to clean the metal contacts on the side of the water tank.
5. Press on the Robot, or / on the Remote controller, or / in the
APP to start mopping.
02
32
Water Control Contact
Auto
Auto
Mopping Water Level
Low
Sound Indicator after setting
Mopping Time
120 min1 “Beep”
2 “Beep”
3 “Beep”
Middle 90 min
High 60 min
Mopping Water Control and Mopping Time
For safety reasons, remove the mopping module (including the water tank and
mopping cloth holder) during charging or when the robot is not in use.
Additionally, since carpets cannot be mopped, please detach the mopping cloth holder
when cleaning carpeted areas. You can also use boundary strips to block off carpets or
hide the strips underneath the edges to prevent the robot from entering.
1
2
Notes:
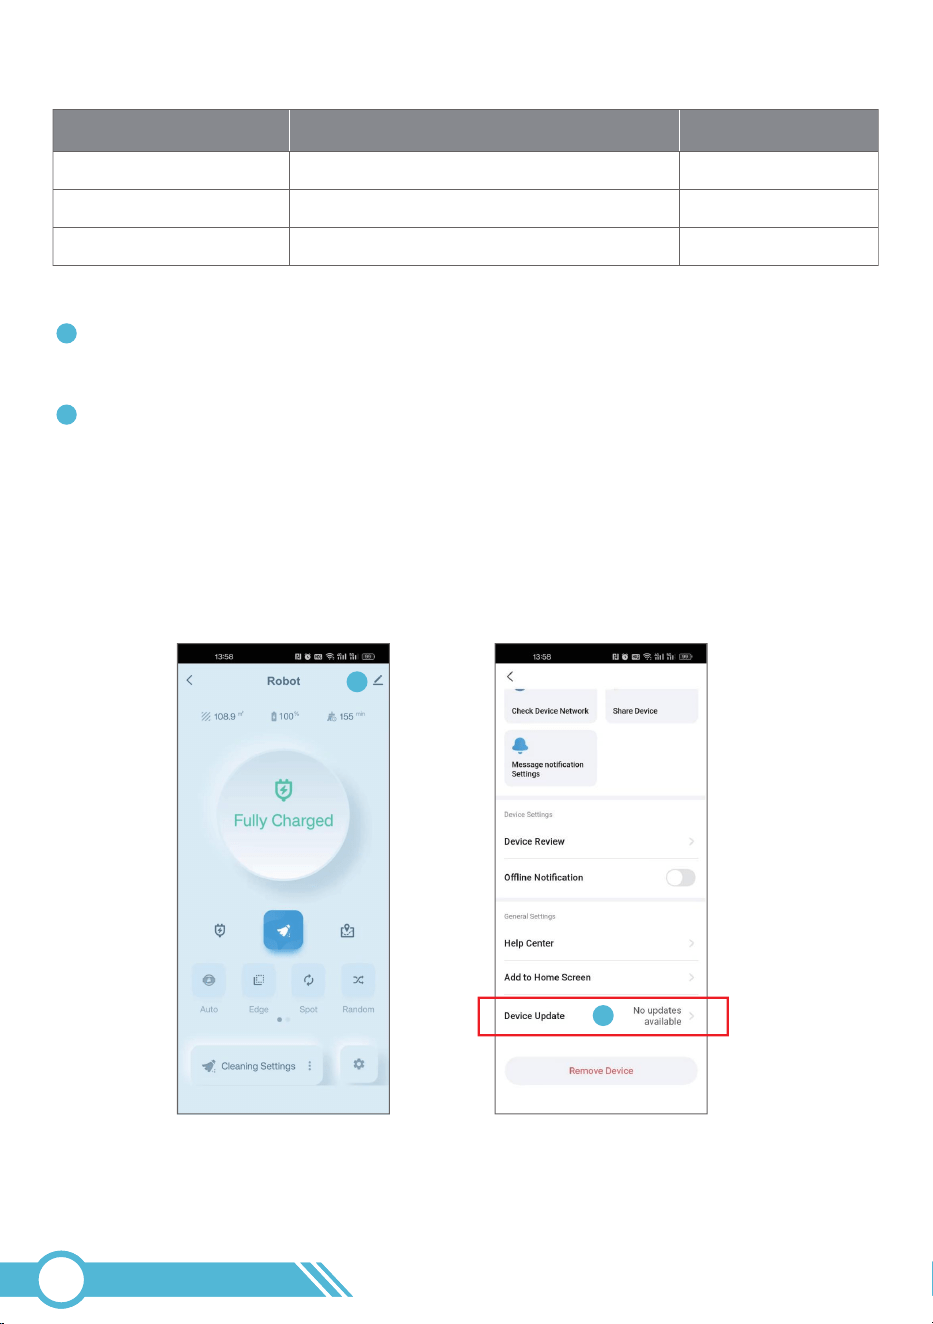
3.13 Firmware Update
Please update the robot's firmware via the Tuya Smart app as illustrated in the
images below.
To perform the firmware upgrade, ensure the robot's battery level is 50% or higher.
For a stable upgrade process, it is recommended to keep the robot docked on the
charging station.
2
02
33
1
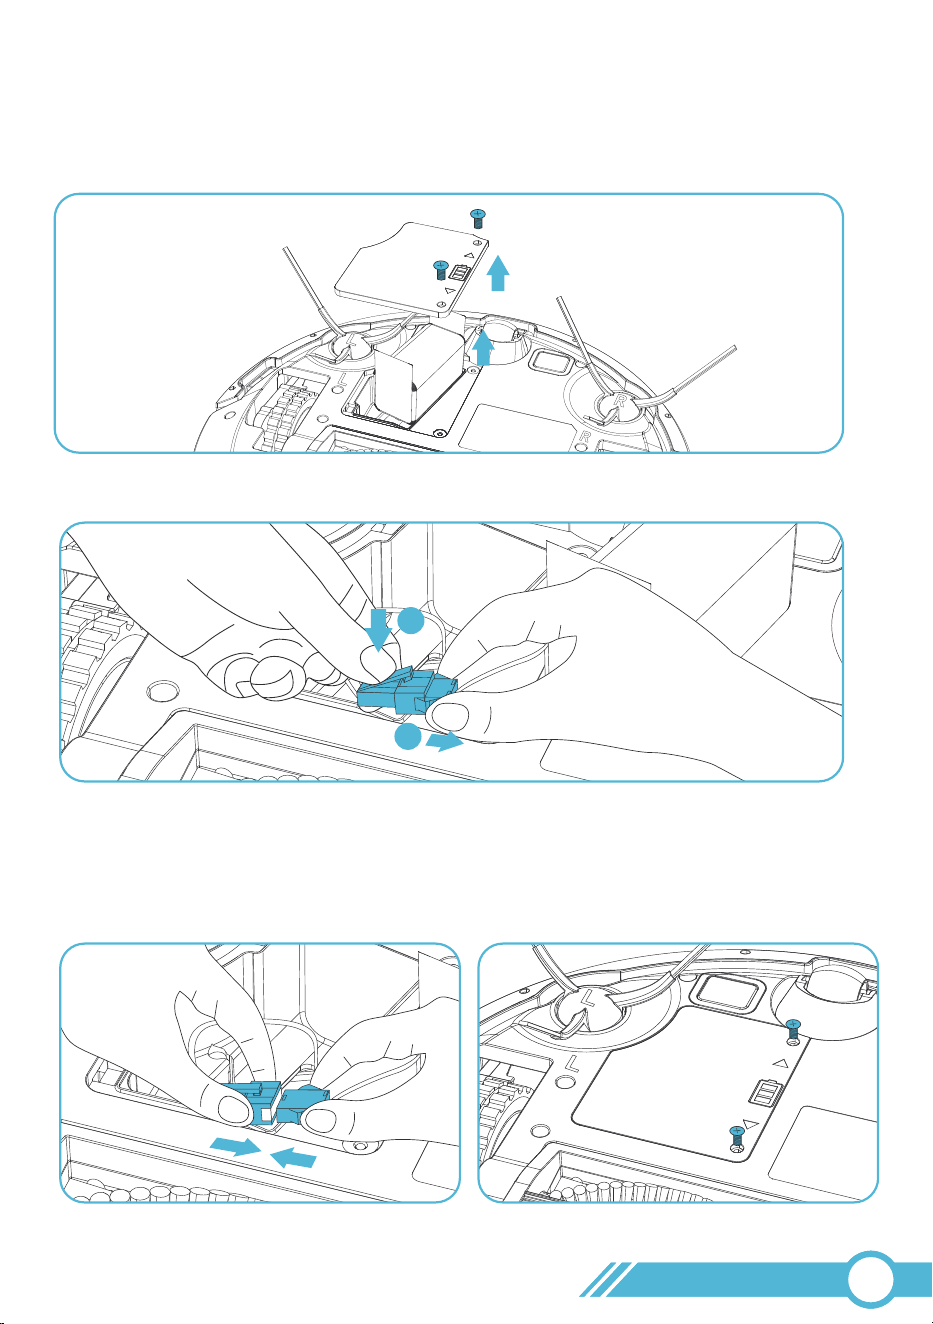
1. Loosen the screws on the battery cover located at the bottom of the robot.
2. Press the buckle on the power plug, then remove the battery.
3. Wait for 10 seconds to allow the device
to fully discharge, then align the pins of
the battery plug with the power plug to
ensure proper installation.
4. After reinstalling the battery, secure
the battery cover and then long press
the power button to restart Robot.
If the robot freezes or the buttons become unresponsive, please restart the device.
3.14 Restart Robot
02
34
2
1
Note:
Tikom offers a range of replacement parts and accessories. For more information on
replacement parts, please contact Customer Service at [email protected].
4. Maintenance and Care
4.1 Cleaning and Replacement Frequency
CLEANING AND REPLACEMENT FREQUENCY
To enhance your robot's performance, we recommend regularly maintaining and cleaning
specific parts of the device.
Part
Dust Bin
HEPA Filter
Side Brush
Main Brush
Brush Guard
Sensors
Charging Contacts
Caster Wheel
Water Tank
Mopping Cloth
Cleaning Frequency
After every use
Once a week
(Twice a week if you
have pets)
Once a week
Once a week
Once a month
Once a month
Once a month
Once a month
After every use
After every use
Replacement Frequency
/
/
/
/
/
/
When it shows visible signs of wear.
1. Every 3-6 months.
2. If the Filter life time on the app has
expired.
Replace the filter under any of the
conditions mentioned above.
1. Every 3-6 months.
2. When it shows visible signs of wear.
3. If the Side Brush life time on the app
has expired.
Replace the Side Brush under any of
the conditions mentioned above.
1. Every 6-12 months.
2. When it shows visible signs of wear.
3. If the Main Brush life time on the app
has expired.
Replace the Main Brush under any of
the conditions mentioned above.
02
35
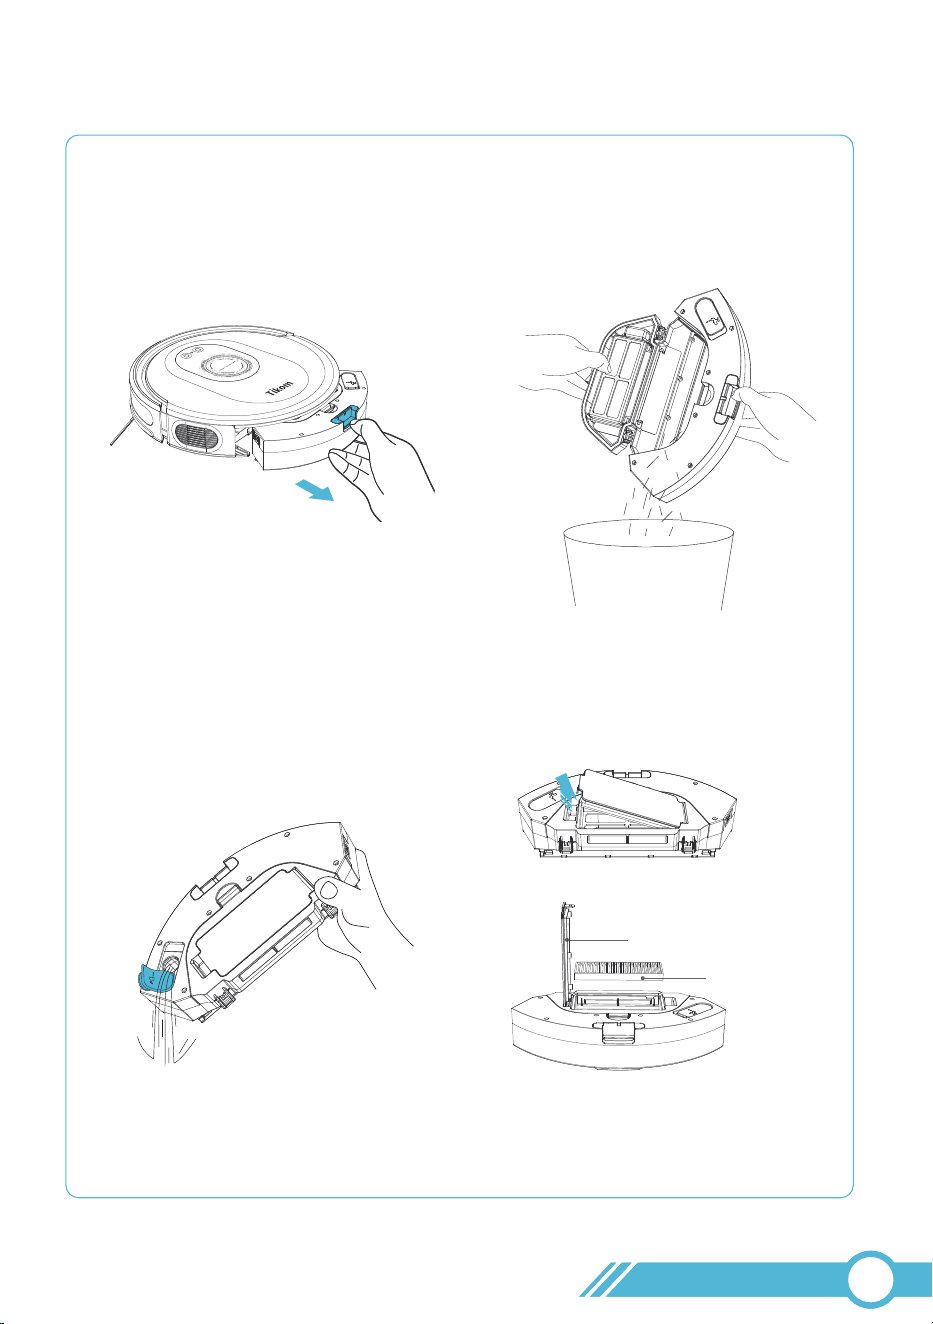
4.2 Clean Dust Bin, Filter & Water Tank
1. Take out the Dust Bin and
Water Tank from the Robot.
3. Open the rubber cover of the
Water Inlet and empty any
remaining water from the
water tank.
2. Press the Release Button on the
Dust Bin Cover to open the
Dust Bin and empty the dust into
a trash bin.
4. Open the filter cover of the dust bin,
then remove the HEPA filter.
02
36
Filter Cover
HEPA Filter
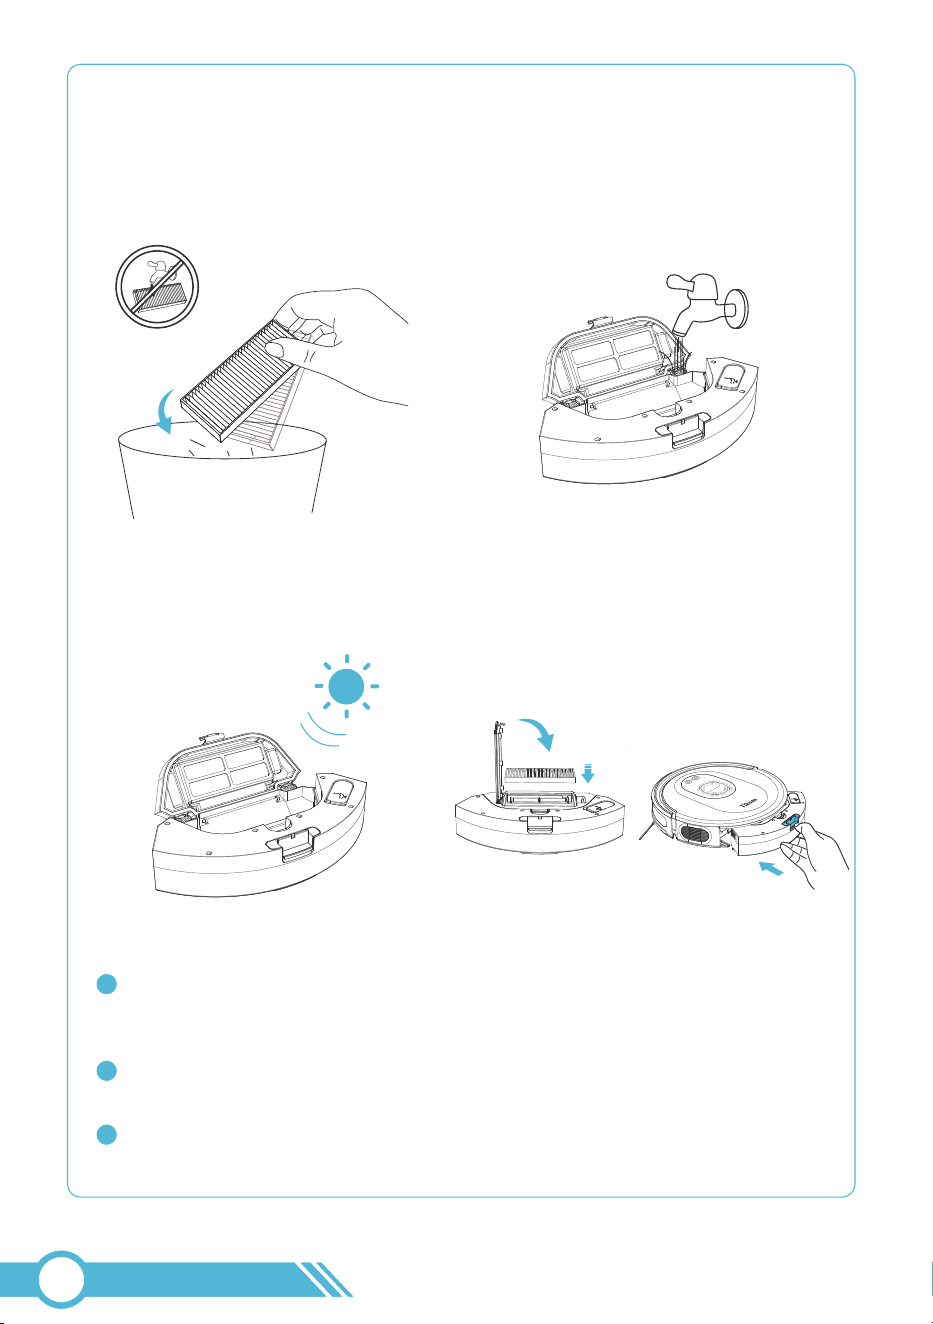
Do not wash the HEPA
filter with water.
Note:
5. Gently tap the HEPA filter to remove
any dust that has accumulated on it.
6. Rinse the dust bin with clean water,
without using any detergent.
7. Dry the dust bin thoroughly
before using them.
8. Reinstall the HEPA Filter into the
Filter Compartment, then place the
dust bin back into the robot.
The filters efficiently prevent dust and dirt from entering the interior of the
robot, safeguarding its ventilation system and preventing secondary air
pollution.
You can wash the Dust Bin & Water Tank with clean water.
Ensure they are completely air-dried before reassembling.
1
2
Avoid washing the HEPA Filter with water, as this may damage the filter and
reduce suction power.
3
Notes:
02
37
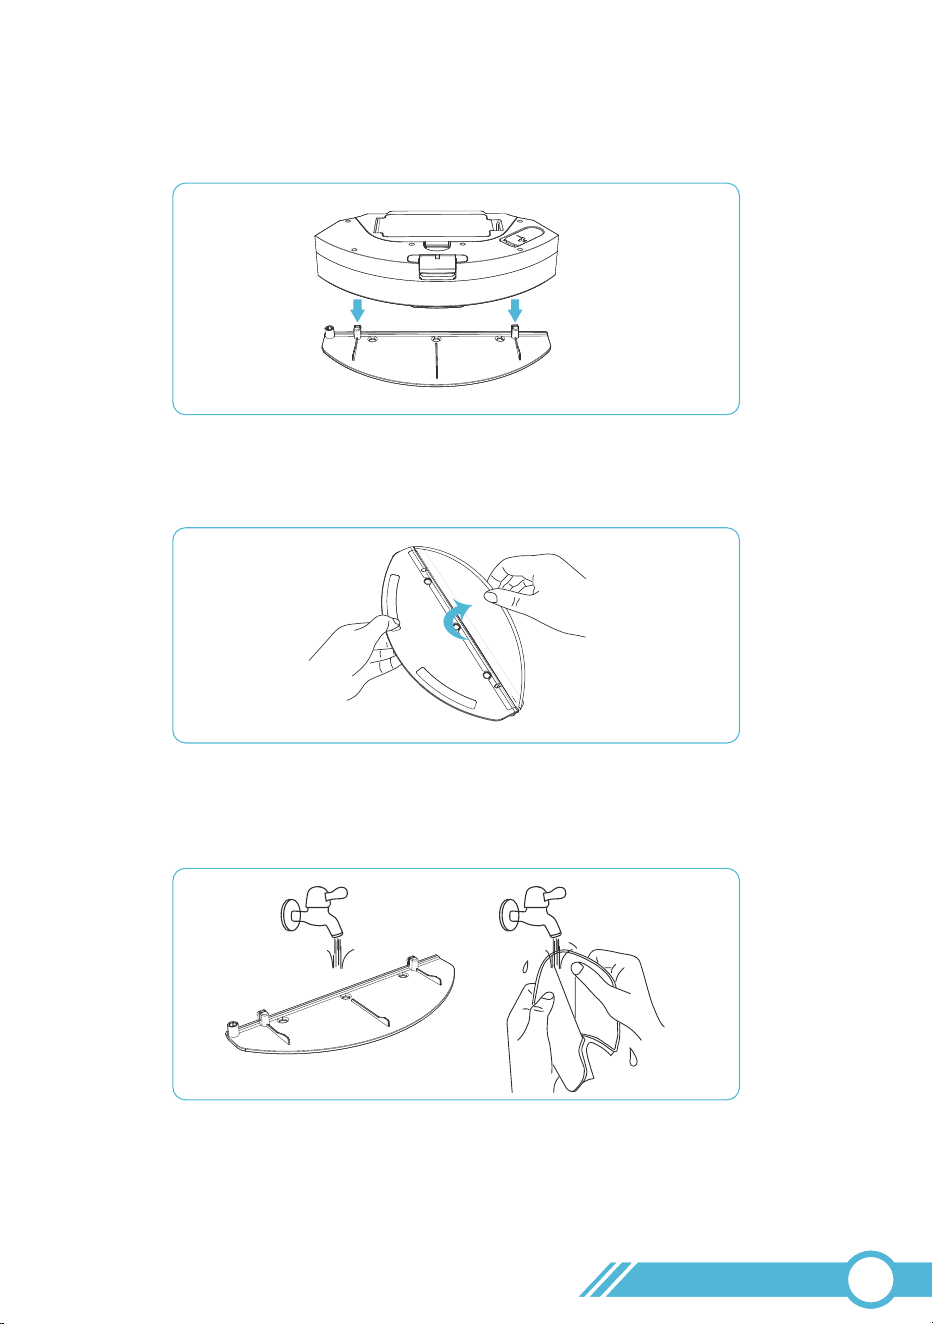
4.3 Clean Mopping Cloth
3. Wash the Mopping Cloth and Mopping Cloth Holder with clean water.
1. Remove the Mopping Cloth Holder from the Robot.
2. Remove the Mopping Cloth from the Mopping Cloth Holder.
02
38
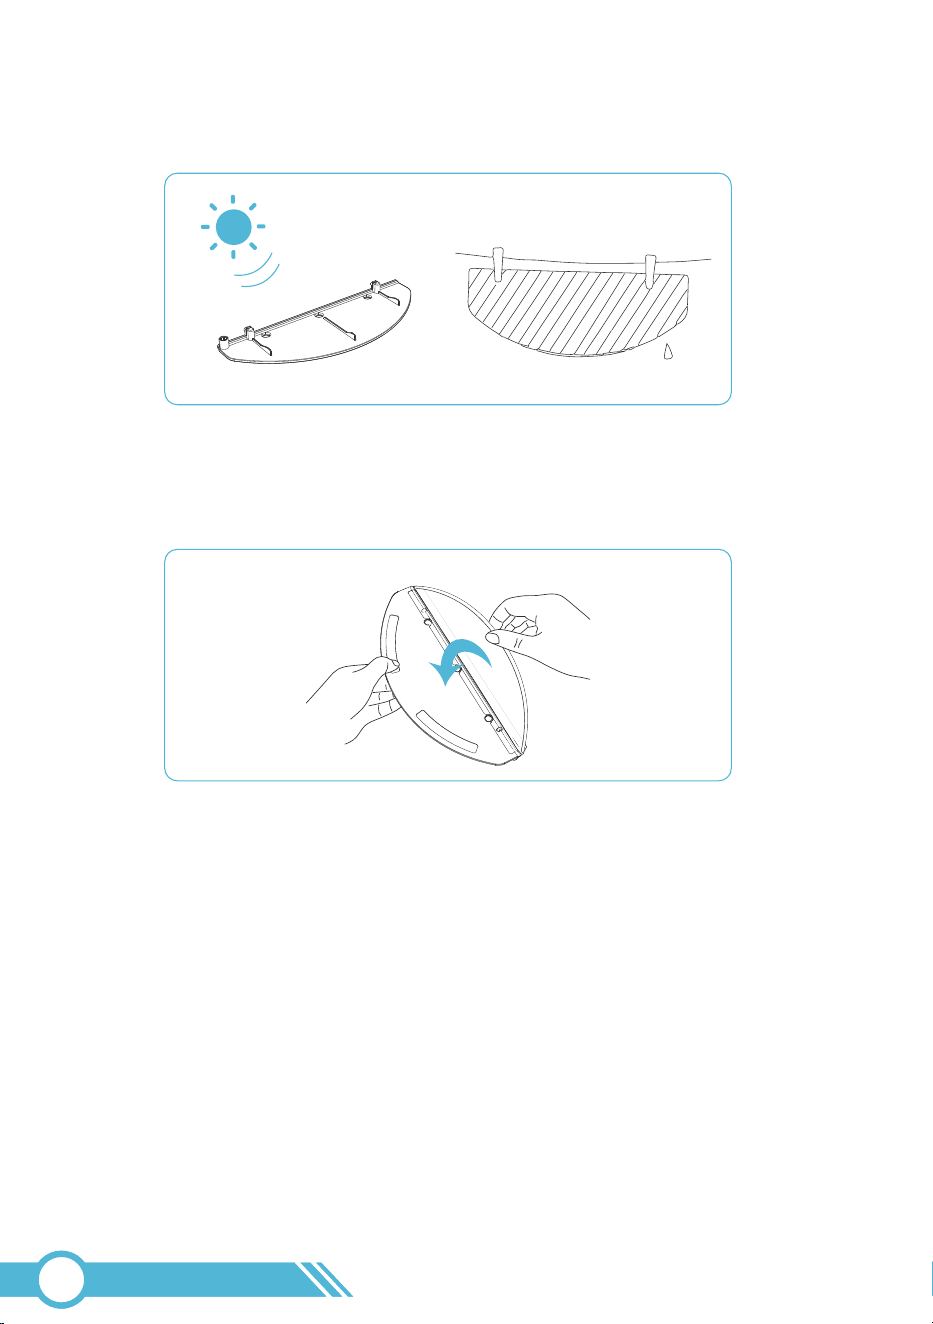
4. Dry the mop and the mopping cloth holder in the sun.
5. Affix the Mopping Cloth to the Mopping Cloth Holder.
02
39
4.4 Clean Main Brush
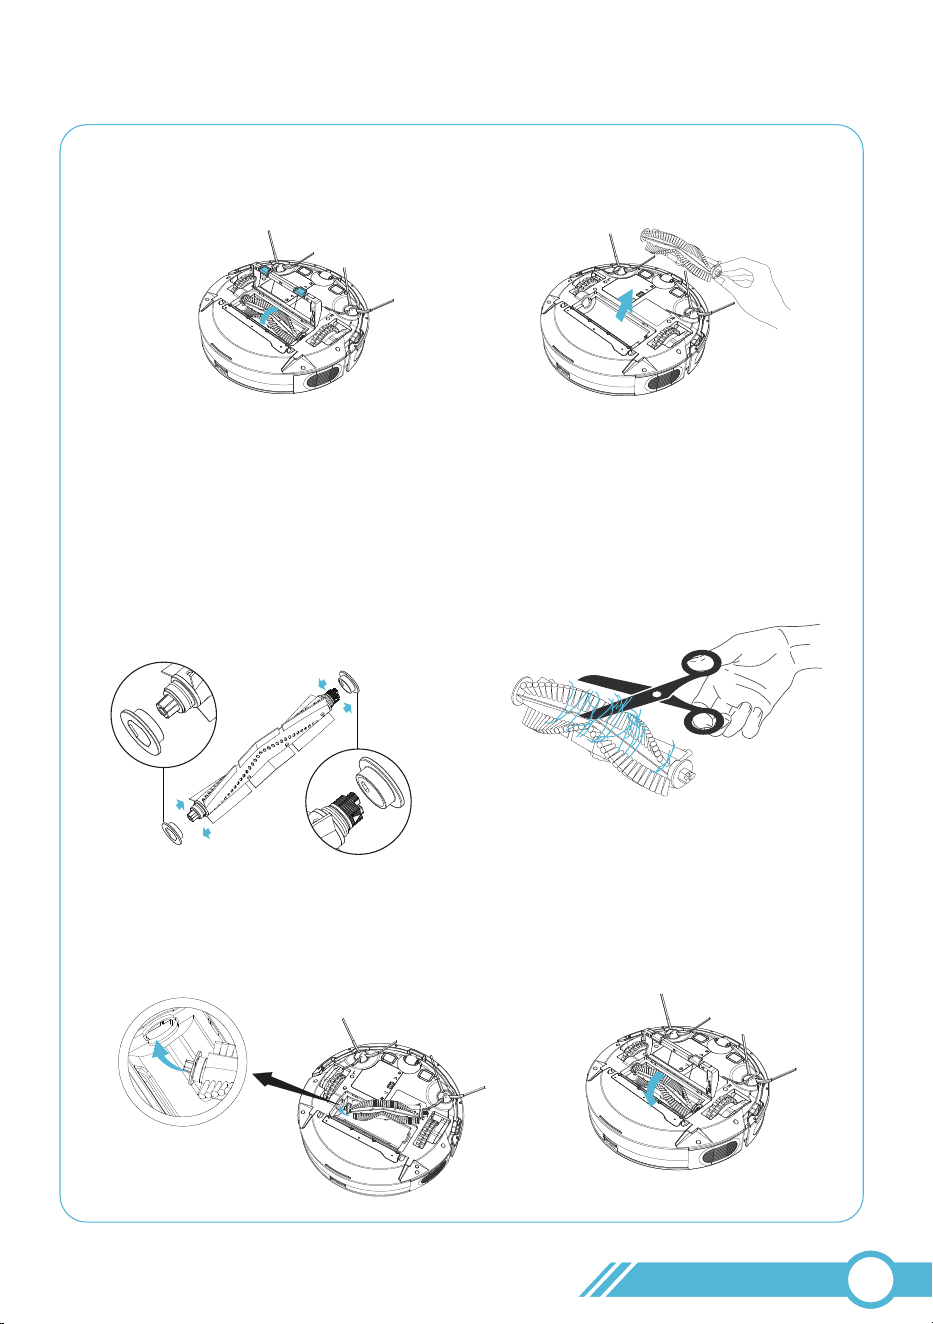
1. Press the release switch on the brush
guard to open it.
2. Take off main brush.
5. Install the Main Brush into the robot,
ensuring to pay attention to the direction.
Insert the fixed protruding end first,
then click it into place.
6. Press down to securely install
the brush guard into place.
3. Open the two caps on the sides of
the main brush, remove and clean
any hair or dirt present on both sides.
Reinstall the two caps on the main
brush.
Please pay attention to the
direction of cap installation.
4. Use scissors to cut away any hair
tangled around the Main Brush.
02
40
1
3
4.5 Clean Side Brushes
1. Remove the side brushes.
2. Carefully unwind and remove any hair or string that is wrapped around the robot
and the side brushes.
3. Use a cloth dampened with warm water to clean dust from the brushes or gently
reshape them.
4. Reinstall the side brushes on the robot.
Notes:
Only use the side brushes when they are completely dry.
To safeguard your wooden or carpeted floors, our side brushes are crafted from
soft materials and may become curled over time. However, this will not impact
their cleaning effectiveness.
If the bristles of the side brush become highly curled, immerse them in boiled
water for approximately 2 minutes, then use a dry cloth to dry and reshape the bristles.
1
2
3
02
41
1
Use Damp Cloth
2
Use Dry Cloth
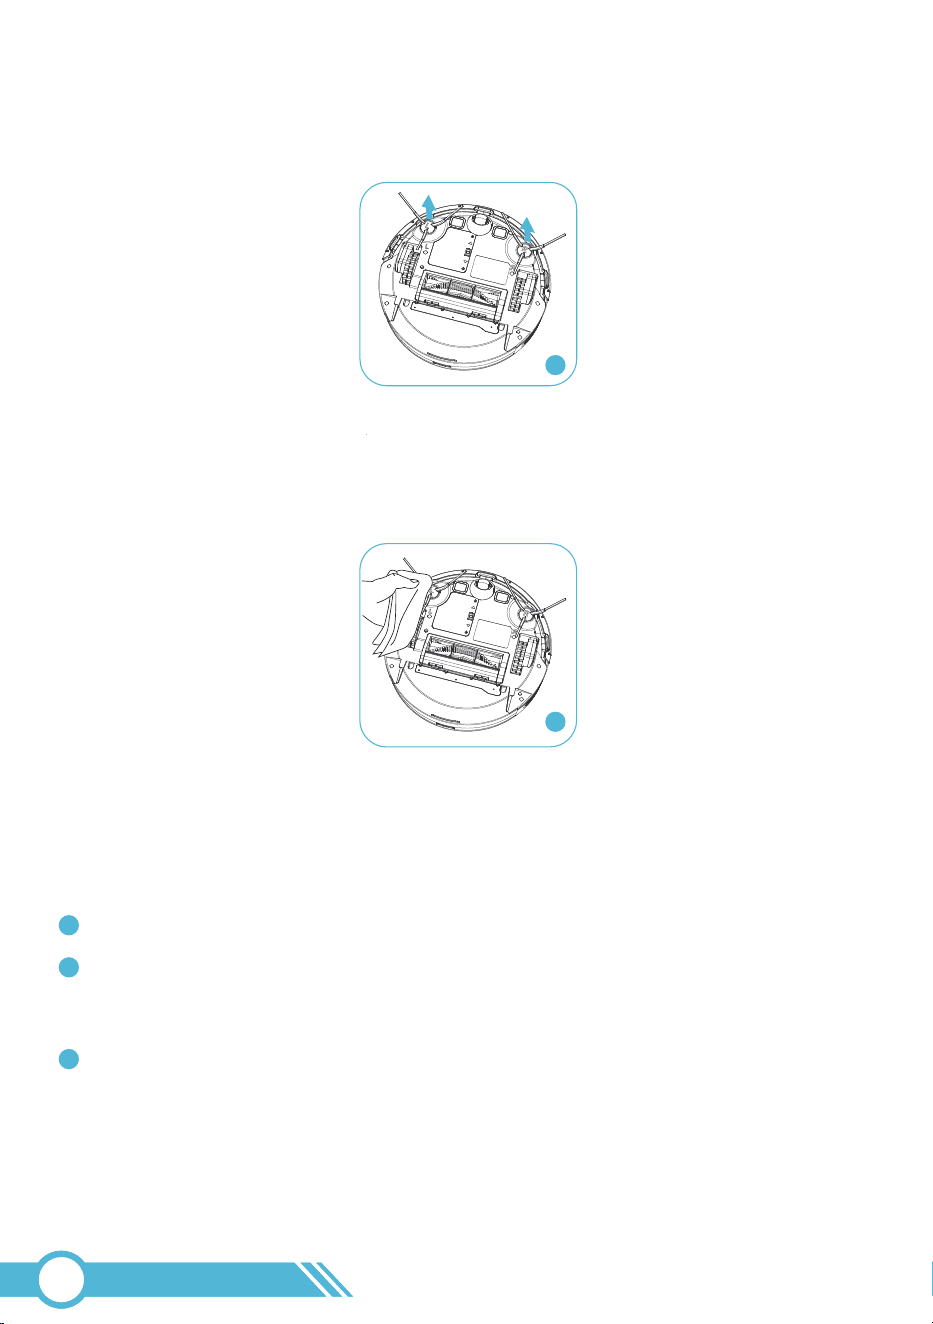
4.6 Clean Sensor and Charging Contacts
1. Use a damp cloth to clean all sensors on the robot and the Charging Station.
Note:
Before cleaning the charging contacts on the robot and Charging Station,
make sure to turn the robot OFF and unplug the Charging Station.
2. Use a dry cloth to clean the charging contacts on the robot and Charging Station.
Note:
Do not clean the Caster Wheel with water.
4.7 Clean Caster Wheel
The Caster Wheel can't be pulled out, please remove any hair or debris that is
wrapping the wheel or entangled inside the wheel cavity.
02
42
5. Troubleshooting
5.1 Error & Alarm
When a runtime error occurs, the Robot Status Light flashes red or solid red, a sound prompt
is given, and the error is displayed on the app. The robot will stop on the ground and enter
standby mode. Please refer to the table below to troubleshoot the issue.
Solution
1. The left or right wheels
may be stuck or
entangled with foreign
objects inside the
wheels.
1. Power off the robot,
turn it over,
use your hand to push
and rotate the wheels
to check for foreign
objects inside the
wheels.
2. Move the robot to an
open space.
Please gently press the
left, middle, and right
parts of the bumper to
check if they can pop out.
If the error persists,
please contact
for assistance.
2. The robot is obstructed
by foreign objects on
the ground, preventing
it from moving.
Front bumper is stuck
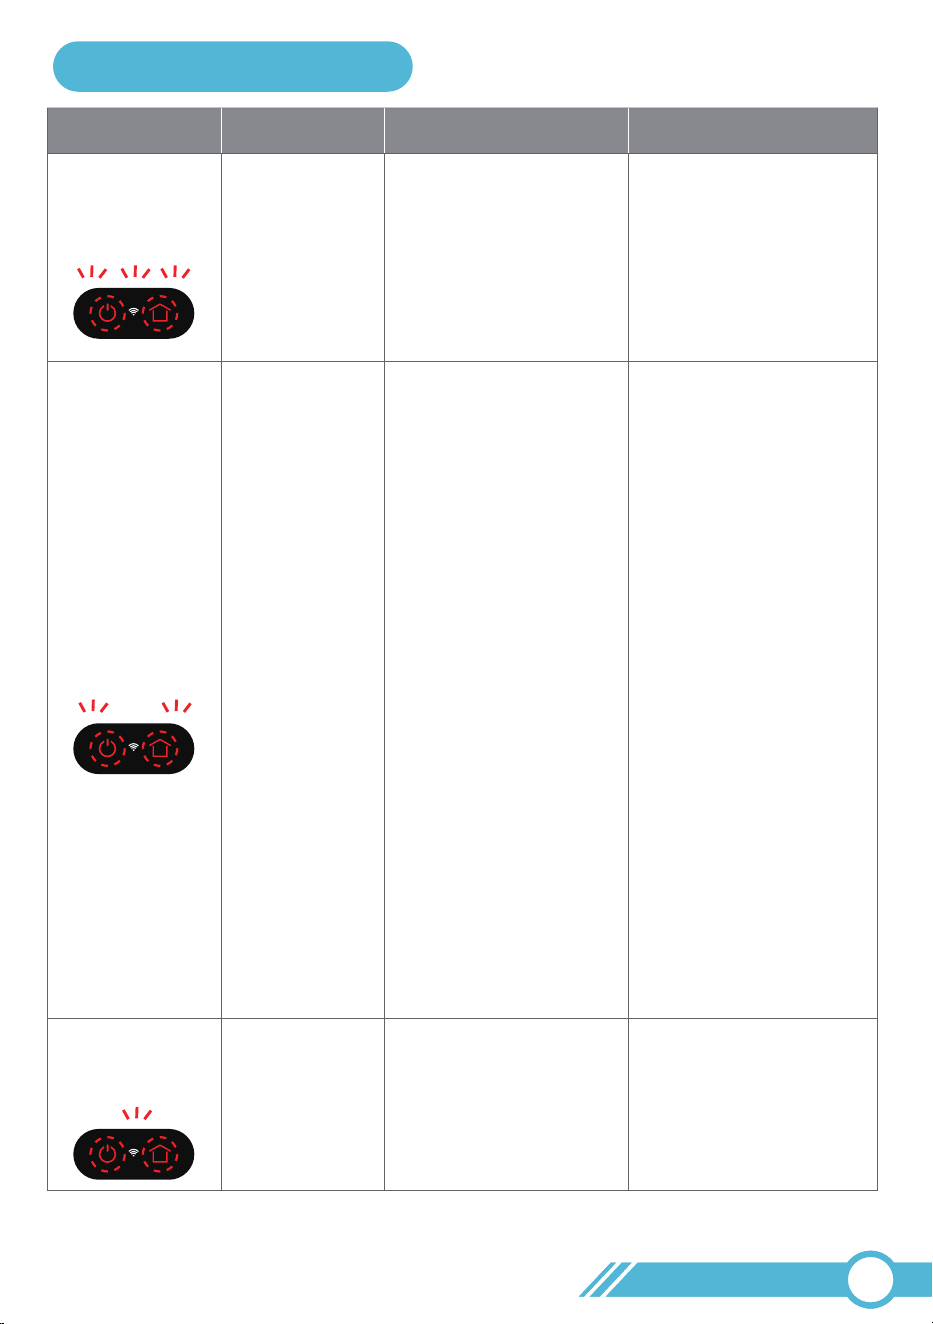
App Message Cause
Wheel is stuck /
Robot is trapped
Front Bumper
is stuck
Sound Prompt
Beep 3 times
+ Solid Red
beep beep beep
beep
beep
beep
Beep 2 times
+ Solid Red
02
43
Power off the robot, then
please check the side
brush and remove any
foreign objects as
described in
"4.5 Clean Side Brush"
on Page 41.
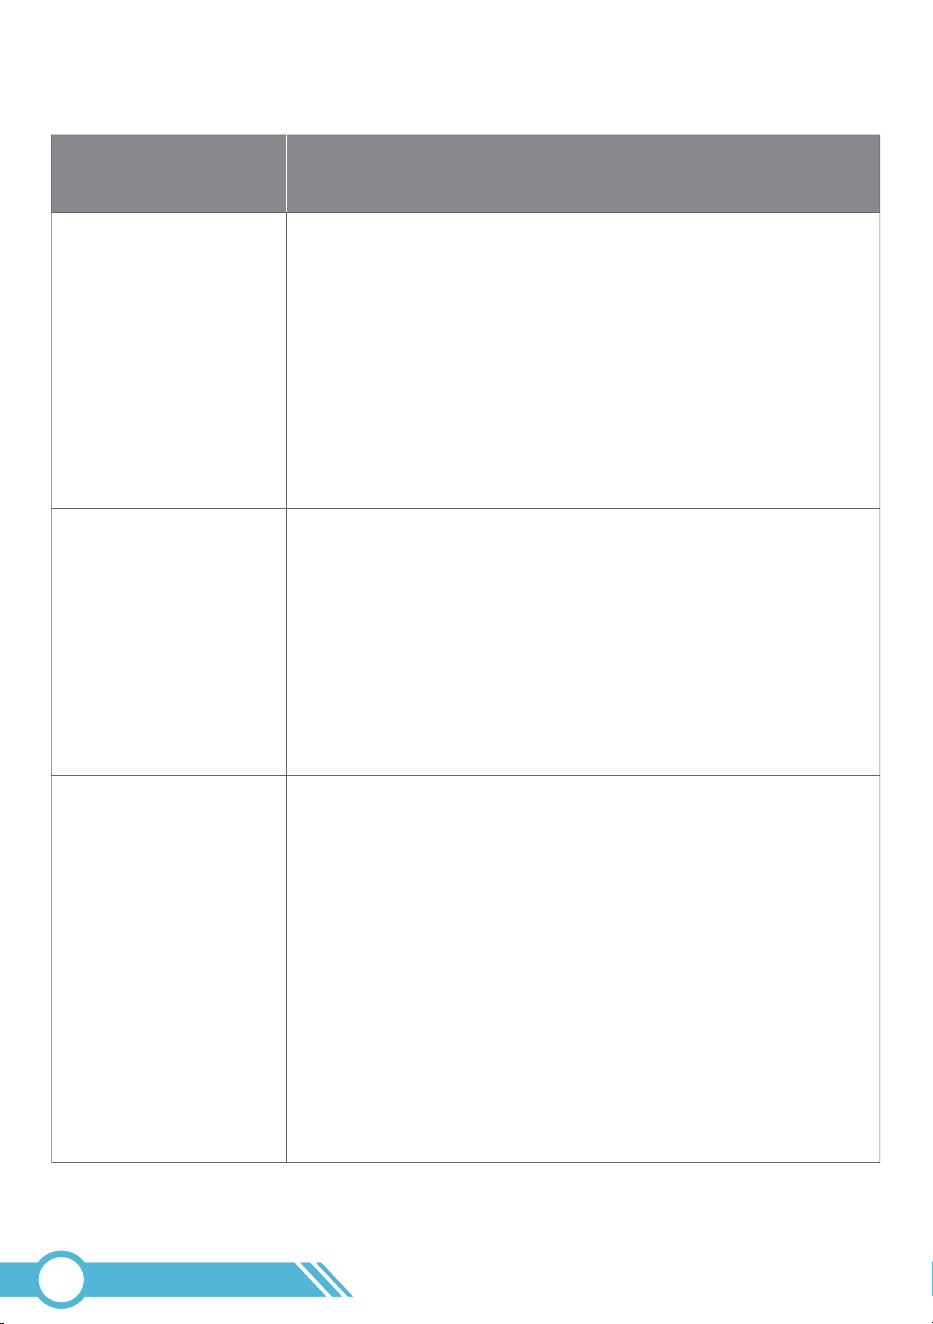
The side brush may be
stuck or entangled with
foreign objects.
Side Brush
is stuck
Beep 1 time
+ Solid Red
Robot Status Light: Solid Red
If the above solutions don’t resolve the issue, please contact us via
[email protected] for assistance.
02
44
SolutionApp Message Cause
Sound Prompt
1. Robot is picked up or
suspended in the air.
1. Please move the robot
to a flat surface and
restart it.
2. Clean the Anti-Drop
Sensor with a damp
cloth as described in
"4.6 Clean Sensor and
Charging Contacts"
on page 42.
3. Use the supplied
boundary strips to
prevent the robot from
moving onto the black
carpet.
4. Restart the robot
following the
instructions in
"3.14 Restart Robot"
on page 34.
5. If the error persists,
please contact
support.us@tikom
.com for assistance.
Restart the robot following
the instructions in
"3.14 Restart Robot"
on page 34.
2. Anti-drop sensor
is dirty.
3. Robot is on a black
carpet where the
anti-drop sensor
perceives it as a cliff.
The Robot Navigation
module is malfunctioning.
Cliff Sensor Error
GYRO Error
Beep 2 times
+ Flash Red
Beep 1 time
+ Flash Red
Power off the robot and
remove the main brush
guard.
Please clean the main
brush as described in
"4.4 Clean Main Brush"
on Page 40.
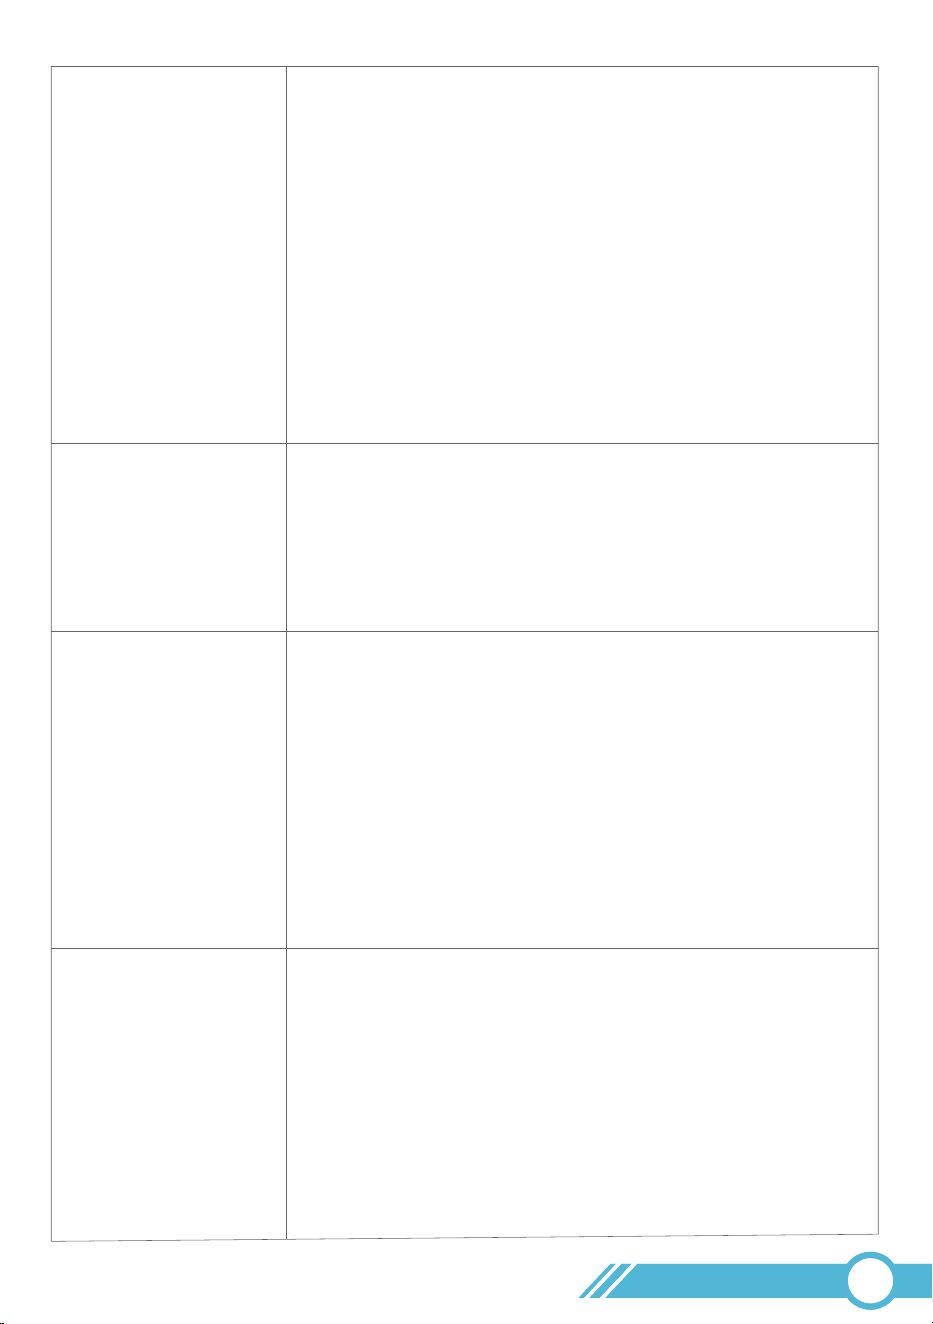
The main brush may be
stuck or entangled with
foreign objects.
Main brush
is stuck
Beep 3 times
+ Flash Red
Robot Status Light: Flash Red
beep
beep
beep
beep
beep beep
5.2 Frequently Asked Question
Problems Solutions
1. Make Sure the battery is full charged, which in app robot battery
electricity is shown 100%.
The robot cannot
be activated.
2. The robot can only operate effectively within the ambient
temperature range of 32°F/0°C to 104°F/40°C. If the temperature
exceeds this range, the robot may not function properly.
3. Please refer to section “3.14 Restart Robot” page 34 to restart
the robot.
4. If the issue persists, please contact [email protected]
for assistance.
4. Please refer to section “3.14 Restart Robot” page 34 to restart
the robot.
5. If the issue persists, please contact [email protected]
for assistance.
1. Ensure that the robot is turned on.
2. You can set the time of day and scheduled cleaning time via the app
3. Make sure the scheduled time has been set correctly.
You cannot schedule
cleanings.
1. Check if the robot is trapped or stuck on an obstacle.
The robot stops
working suddenly.
4. Check if the robot's power is sufficient to start cleaning; scheduled
cleaning will only start when the remaining power is 20% or above.
5. Scheduled cleaning will not work if the robot is offline, as the
schedule needs to be sent from the Tuya server at the set time.
6. Check if the robot has an error alarm (for details, please refer to
"5.1 Error & Alarm" on page 43); it may prevent the
scheduled cleaning from starting.
7. If the issue persists, please remove the robot from the Tuya Smart
app and add the robot into the app again.
2. Check if the robot has an error alarm in sound or displayed on the
app (for details, please refer to "5.1 Error & Alarm" on page 43).
3. Check if the battery level is too low.
02
45
If the robot's navigation is disrupted by foreign objects, it may clean
the same room repeatedly or miss certain rooms entirely. Therefore,
before starting a cleaning session, please ensure your home
environment complies with the guidelines in "3.2 Important Tips
Before Usage" on page 13. Pay special attention to points 1, 4, 8, and
9, as they significantly impact the robot's navigation performance.
The robot cleans the
same room twice or
doesn't clean all rooms.
1. It is normal for the robot to produce a certain sound during
cleaning. Please schedule your cleaning time properly to avoid
being interrupted by the sound.
Poor cleaning ability
or dust falling out.
The robot produces
loud or sharp noises.
The robot cleaning
time is too short.
2. If a sharp noise is heard, check if the Main Brush, Side Brush, or
Wheel is entangled with any foreign objects. Remove any foreign
objects wrapped around the Main Brush, Side Brush, or Wheel.
Clean the main brush and side brush as described in Chapter 4 on
page 40.
3. Check if the robot has collected objects inside the Dust Bin that
could cause noise.
4. If the issue persists, please contact [email protected]
for assistance
1. Please connect the robot to the app through a 2.4GHz Wi-Fi
connection.
2. Ensure the robot is fully charged and check if the battery level
displayed in the app shows 100%.
3. Adjust the suction power in the app to "Gentle" or via the
remote controller (Beep 1 time after setting).
4. In our lab tests, Gentle Suction can clean for approximately 150
minutes, Normal Suction for about 120 minutes, Strong Suction for
around 90 minutes. If after a full charge, the cleaning time is
shorter than our lab test results, please contact
[email protected] for assistance.
5. Check if the HEPA filter is wet due to water or other liquid on the
floor. Air-dry the filter completely before use, or replace it with a
new HEPA filter.
6. Ensure that the Dust Bin Transparent Dust Flap is functioning
properly; there is 1 spare Flap in the package for replacement.
7. If the issue persists, please contact [email protected]
for assistance.
1. Check if the dust bin is full and needs to be emptied.
2. Check if the Main Brush is stuck by foreign objects and clean the
main brush as described in "4.4 Clean Main Brush" on Page 40.
3. Check for any obstructions blocking the suction inlet.
4. Check if the HEPA filter is blocked and needs cleaning.
02
46
Why is it necessary to
always dock the robot
onto the charging
station? Is it safe?
1. When not in use, we recommend keeping the robot docked on the
charging station for a full charge, allowing the robot to be ready
for cleaning whenever needed.
2. The charging station has low power consumption once the robot is
fully charged.
3. The charging station is equipped with circuit protection, ensuring
it is safe to keep the robot docked on the charging station at all
times.
5. If the issue persists, please contact [email protected]
for assistance.
The robot cannot
be charged.
1. When used at high or low temperatures (>104°F/40°C, <32°F/0°C)
the robot will automatically reduce the charging speed to extend
the battery life.
1. Remove objects within 3 ft / 1 m to the left and right side and
within 6 ft / 2 m of the front of the Charging Station.
2. Please place the charging station against the wall on a level surface.
Slow charging speed.
The robot cannot
return to the Charging
Station.
4. When the Robot is in the vicinity of the Charging Station, it will
return more quickly. However, if the Charging Station is located far
away, the Robot will need more time to return. Please be patient
as it works its way back.
3. Verify if the Power Status Light on the Charging Station is
illuminated. If not, check if the correct charger with the Charging
Station is being used.
Our charger specification is DC 19V 0.6A output.
5. Clean the charging contact pins on the charging station and robot
with a dry cloth, and clean the sensors on the charging station and
robot with a damp cloth. For more details, refer to "4.6 Clean
Sensor and Charging Contacts" on page 42.
2. Clean the charging contact pins on the charging station and
robot with a dry cloth.
3. Verify if the correct power adapter is being used with the
Charging Station. Our charger specification is DC 19V 0.6A output.
1. Verify if the Power Status Light on the Charging Station is
illuminated. If not, please contact us via [email protected].
2. Verify if the correct power adapter is being used with the
Charging Station. Our charger specification is DC 19V 0.6A output.
3. Clean the charging contact pins on the Charging Station and
robot with a dry cloth.
4. Please refer to section “3.14 Restart Robot” page 34 to restart
the robot.
02
47
2. Verify if the Main Brush and brush guard have been installed
properly.
The main brush does
not rotate.
2. Verify if the Brush Guard traps the bristles of the Side Brush.
3. Ensure that the Side Brush has been installed properly.
The side brush does
not rotate.
1. Check if the Side Brush is stuck by any foreign objects; if so,
please remove them and clean the side brush as described in
"4.5 Clean Side Brushes" on Page 41.
1. Check if the Main Brush is stuck by any foreign objects; if so,
please remove them and clean the main brush as described in
"4.4 Clean Main Brush" on Page 40.
1. Clean the sensors carefully as described in "4.6 Clean Sensor and
Charging Contacts" on page 42.
The robot's movements
or travel path are
abnormal.
The robot cannot
connect to a Wi-Fi
network.
2. Check the wheels, side brushes, and Main Brush for any foreign
objects; if present, please remove them. Clean the main brush
and side brush as outlined in Chapter 4 on page 40.
3. If the issue persists, please contact [email protected]
for assistance.
1. Please ensure that the Bluetooth switch on your mobile phone
or tablet is turned ON.
2. Place the Robot near the Wi-Fi Router.
3. Make sure your mobile phone is connected to a 2.4GHz
Wi-Fi network.
4. Our robot only supports 2.4GHz Wi-Fi. If your router separates
2.4GHz and 5GHz with different names, connect your phone to
the 2.4GHz network. If they share the same name, just connect
as normal.
Note:
If the 2.4GHz/5GHz combined network fails to connect,
please separate the 2.4GHz network on the router's configuration
page and connect to the standalone 2.4GHz network instead.
5. Once the robot vacuum's Wi-Fi setup is complete, you can
remotely control it through the Tuya Smart app using various
network connections. This includes 2.4GHz and 5GHz Wi-Fi
networks, as well as 3G/4G/5G mobile data. Enjoy seamless
control of your robot vacuum anytime, anywhere.
02
48
1. Ensure that the robot is powered on.
In the app, the robot
is shown as offline.
The real-time cleaning map in the app is simply a map to show the
robot's cleaning track and does not represent your home layout.
Each time the robot is stopped, encounters an error, and restarts
cleaning, its position and direction may shift slightly. If the new
cleaning path is overlaid on the previous cleaning map, it could
disrupt the map's accuracy. To avoid this, the robot will generate a
new cleaning map under such conditions.
The map is designed to track the robot's cleaning path, not to
depict the cleaned area. As a result, it does not support features
like selective room cleaning or display your house layout.
In the app, the real-time
cleaning map does not
match my home layout.
Once the robot is
stopped or encounters
an error, when it restarts
cleaning, why does the
cleaning map redraw
as new?
It does not overlay on
the previous cleaning
map.
Unable to set to clean
a specific room on the
app.
2. Confirm that the Wi-Fi connection is successful, and the
Wi-Fi Status Light is solid white.
4. Remove the robot from the Tuya Smart app and add the robot
back into the app again.
3. It is normal for the Wi-Fi signal to weaken when the robot is far
from the Wi-Fi router. When the robot moves closer to the router,
it will reconnect to the Wi-Fi network.
1. Check for any Internet connection issues.
You cannot control
the robot with
Amazon Alexa.
2. Verify if you have installed the Amazon Alexa app on your
smart device.
3. Ensure you have a Tuya Smart account and have successfully
connected to the Robot.
4. Confirm that you have connected Alexa on the Tuya Smart app.
For more details, please refer to "3.4.6 Work with Amazon Alexa
or Google Assistant" on page 23.
5. Make sure you are using the correct Alexa sound commands,
which are also listed in section 3.4.6 on page 25.
02
49
1. Check for any Internet connection problems.
2. Verify if you have installed the Google Home app on your smart
device.
3. Ensure you have a Tuya Smart account and have successfully
connected to the Robot.
4. Confirm that you have connected Google Assistant on the Tuya
Smart app. For more details, please refer to "3.4.6 Work with
Amazon Alexa or Google Assistant" on page 23.
5. Make sure you are using the correct Google Home sound
commands, which are also listed in section 3.4.6 on page 25.
1. Check if there is water in the water tank.
2. Ensure the water tank and Mopping Cloth Holder are properly
installed, and set the water volume to high in the app or via the
remote controller (Beep 3 times after setting).
1. Please ensure that the water tank and Mopping Cloth Holder are
properly installed in place, and adjust the water volume switch to
low in the appor via the remote controller
(Beep 1 time after setting).
2. For more details on the mopping function, please refer to
"3.12 Mopping the floor" on page 31 in this manual.
You cannot control
Robot with the
Google Assistant.
No or little water is
dispensed during
mopping.
Too much water is
dispensed during
mopping.
3. The robot will automatically detect the Mopping Cloth Holder
before mopping. If no water is dispensed during mopping, check
and reinstall the Mopping Cloth Holder. If installed correctly, you
will hear a sound prompt.
4. Clean the contact on the water tank and robot, please refer to
section 3.12 Mopping the Floor on page 32 of this manual.
5. For more details on the mopping function, refer to section
3.12 Mopping the Floor on page 31 of this manual.
02
50
What is the function
of the mopping cloth
holder?
The robot will detect the mopping cloth holder for the mopping
function. Therefore, before mopping, please ensure the mopping
cloth holder is properly installed onto the robot.
Note:
If no water comes out during mopping, please check and
reinstall the mopping cloth holder.
If the above solutions don’t resolve the issue, please contact us via
[email protected] for assistance.
Before setting up Wi-Fi, ensure that your mobile device, Robot, and Wi-Fi network
meet the following requirements.
Ensure that your smartphone or tablet is connected to a 2.4GHz Wi-Fi network.
Make sure that the Bluetooth switch on your smartphone or tablet is turned ON.
5.3 Wi-Fi Connection
5.3.1 Wi-Fi Setup Requirement
5.3.1.1 Mobile Device Requirement
Ensure the robot has sufficient battery before connecting it to the network
5.3.1.2 Robot Requirement
02
51
How can I share the
device with my
roommates or family
on APP.
1. Please log in to the app on another mobile device using the same
Tuya Smart account. An Tuya Smart account can be used to log
in to the app on different devices.
2. If you prefer not to use the same Tuya Smart account for logging
in, please share the device on the app.
Please click the on the top right corner of the Tuya device
main page, and then click the Share Device button to add the
other's account and start sharing.
If you require further assistance, please contact us via email at

1. Ensure that the robot and your mobile device are close to the router during the
connection process.
3. Use only letters (A-Z) and numbers (0-9) in your Wi-Fi name and password. Emojis,
special characters, and symbols are not supported.
2. Make sure you have entered the correct Wi-Fi name and password when connecting.
4. It is not recommended to use a VPN (Virtual Private Network) or Proxy Server.
5. Our robot only supports 2.4GHz Wi-Fi. If your Wi-Fi router has the 2.4GHz and 5GHz
frequencies separated with different network names, please connect your mobile phone
to the 2.4GHz Wi-Fi network.
On the other hand, if your Wi-Fi router combines the 2.4GHz and 5GHz frequencies
and they share the same network name, you can simply connect your mobile phone as
usual, and the connection will automatically be established with the appropriate
frequency supported by our robot.
6. When connecting to a hidden network, ensure that you enter the correct network name
(SSID) and connect to a 2.4GHz wireless network.
7. When using a network extender or repeater, ensure that the network name (SSID) and
password are the same as your primary network.
8. Ensure that your Wi-Fi router supports 802.11b/g/n and the IPv4 protocol.
9. Use WPA and WPA2 with TKIP, PSK, AES/CCMP encryption.
10. WEP EAP (Enterprise Authentication Protocol) is not supported.
11. Use Wi-Fi channels 1-11 in North America and channels 1-13 outside North America
(refer to local regulatory agency guidelines).
5.3.1.3 Wi-Fi Requirement
02
52
Note:
Ifthe2.4GHz/5GHzcombinednetworkfailstoconnect,pleaseseparatethe2.4GHz
networkandconnecttothestandalone2.4GHznetworkinstead.
If you are unable to control the Robot with your smart device, try the following solutions to
resolve the issue.
5.3.2 Wi-Fi Connection troubleshooting
Cause
Solution
Wi-Fi Status Light
OFF
If the above solutions don’t resolve the issue, please contact us via
[email protected] for assistance.
Robot is not connected to Wi-Fi.
Cause
Solution
Wi-Fi Status Light
OFF
Robot is turned off or in Sleep Mode.
1. Fully charge the Robot by attaching it to the Charging Station.
2. Once fully charged, power on the robot to recheck.
3. Press and hold the buttons on the robot for 3 seconds to enter in pairing mode.
02
53
1. Please ensure that the Bluetooth switch on your mobile phone or tablet is turned ON.
2. Place the Robot near the Wi-Fi Router.
3. Make sure your mobile phone is connected to a 2.4GHz Wi-Fi network.
4. Our robot only supports 2.4GHz Wi-Fi. If your router separates 2.4GHz and 5GHz with
different names, connect your phone to the 2.4GHz network. If they share the same name,
just connect as normal.
5. Please reset the Wi-Fi, restart the device, and download the latest version of the Tuya Smart
app before attempting to reconnect. For details, please refer to section 3.4 "Connect to Wi-Fi"
on page 16.
Note:
If the 2.4GHz/5GHz combined network fails to connect, please separate the 2.4GHz
network and connect to the standalone 2.4GHz network instead.
6. Once the robot vacuum's Wi-Fi setup is complete, you can remotely control it through the
Tuya Smart app using various network connections. This includes 2.4GHz and 5GHz Wi-Fi
networks, as well as 3G/4G/5G mobile data. Enjoy seamless control of your robot vacuum
anytime, anywhere.
6. Specifications
Model No
Navigation
Suction Power
Dust Bin Capacity
Battery
Mopping Time
Size
Power Input/Output
Station Size
Power Input
Power Output
G8000 Max
Gyroscope
5000Pa
450ml
DC 14.4V 2600mAh
Water Tank Capacity 300ml
Water Tank is Full
Low: About 120mins
Middle: About 90mins
High: About 60mins
Suction Time
After Full Charged
Gentle: About 150mins
Normal: About 120mins
Strong: About 90mins
Will change after usage
DC 19V 0.6A
147*142*81mm
AC 100-240V~ 50/60Hz
0.4A max
DC 19V 0.6A
7. Customer Service
For FAQs and more information, please visit www.tikom.com.
Email: [email protected]
We also have many robot troubleshooting and maintenance videos available on our
YouTube channel.
You can search for "Tikom Technology" on YouTube to find our channel.
02
54
12.69 in
3.07 in
Diameter:
12.69 in / 322.50 mm
Height:
3.07 in / 78 mm
Manufacturer: Shenzhen Tikom Technology & Innovation Co.,LTD
Address: 217, C Building, Chengshishanhai Center, Bantian, Longgang
District, Shenzhen, Guangdong, China
G8K Max_EN_1.3
Website: www.tikom.com
Email: [email protected]
@TikomOfficial @TikomOfficial
@TikomOfficial @TikomOfficial
Support & Rewards
