
1
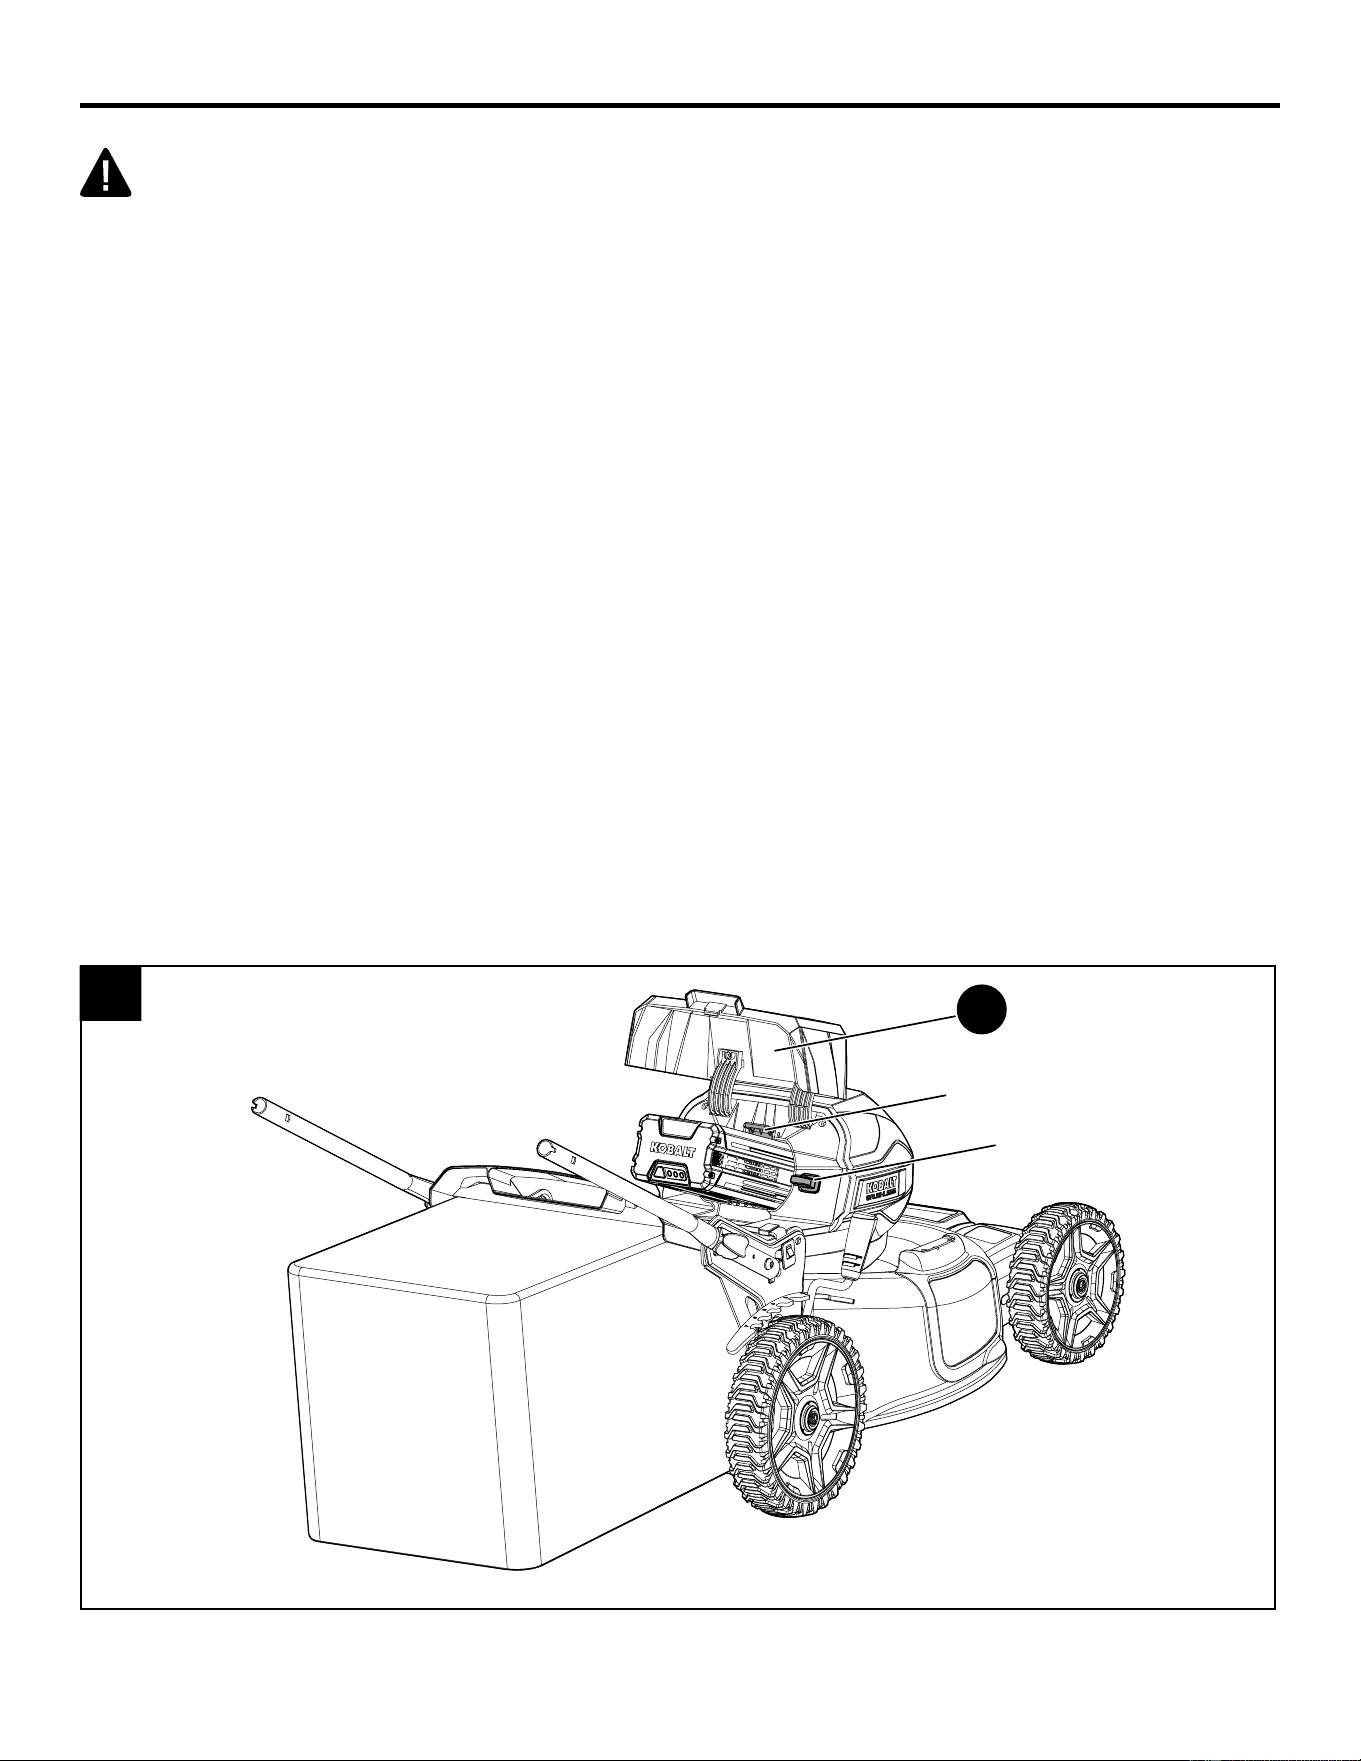
21-INCH DECK WIDTH SELF-PROPELLED MOWER
ITEM #1130000
MODEL #KMP 6080-06
Español p. 28
Questions, problems, missing parts? Before returning to your retailer, call our customer
service department at 1-888-3KOBALT (1-888-356-2258), 8 a.m. - 8 p.m., EST,
Monday - Friday.
ATTACH YOUR RECEIPT HERE
Purchase Date
PH18625
Serial Number

2
TABLE OF CONTENTS
PRODUCT SPECIFICATIONS
SPECIFICATIONS
Battery type 80 V Lithium-ion
Charge time 90 minutes, for 80 V 6 Ah battery
No-load speed 2,800 RPM
Self propelled speed 2.3-4.44 fps. (0.7-1.35 m/s)
Height adjustments 1-3/8 - 3-3/4 in.
Functions 3-in-1: Mulch, side discharge or rear bag
Unit weight (without battery) 60 lbs. (27.2 kg)
Product Specications .................................................................................................2
Package Contents ....................................................................................................... 3
Hardware Contents ......................................................................................................4
Symbols ..................................................................................................................... 5
Safety Information ...................................................................................................... 7
Preparation .............................................................................................................. 13
Assembly Instructions .............................................................................................. 13
Operating Instructions .............................................................................................. 17
Care and Maintenance.............................................................................................. 21
Troubleshooting ........................................................................................................ 25
Warranty ................................................................................................................. 26
Replacement Parts List ............................................................................................. 27
3
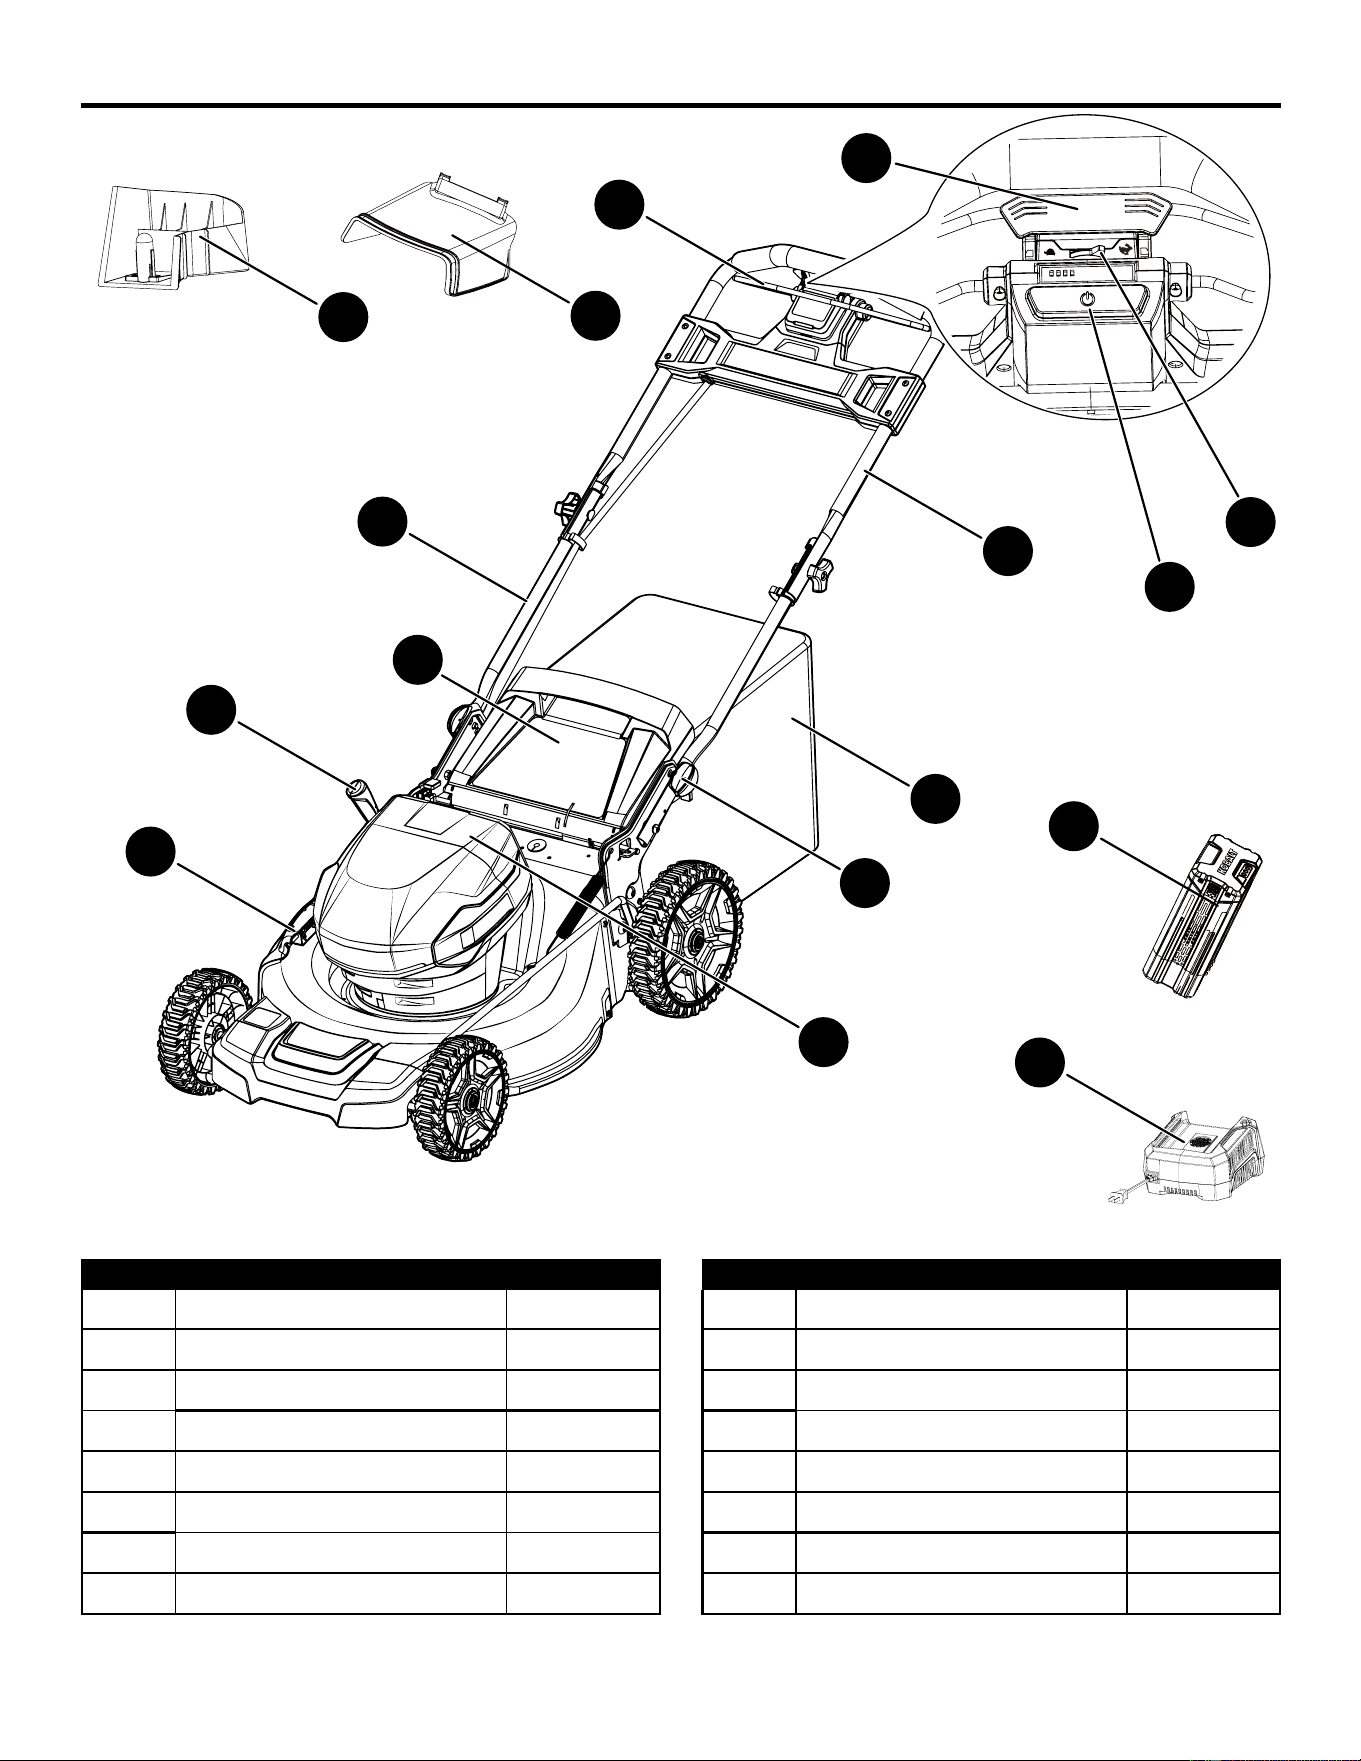
PACKAGE CONTENTS
PART DESCRIPTION QUANTITY
A Handle lock knobs 1
B Lower handle 1
C Upper handle 1
D Mulching plug 1
E Rear discharge cover 1
F Grass catcher 1
G Side discharge cover 1
H Side discharge chute 1
PART DESCRIPTION QUANTITY
I Battery door 1
J Safety switch button 1
K Bail lever 1
L Self-propel paddle 1
M Speed control 1
N Height adjustment lever 1
O Battery 1
P Charger 1
A
C
F
H
B
I
G
N
E
O
P
D
J
K
M
L
4
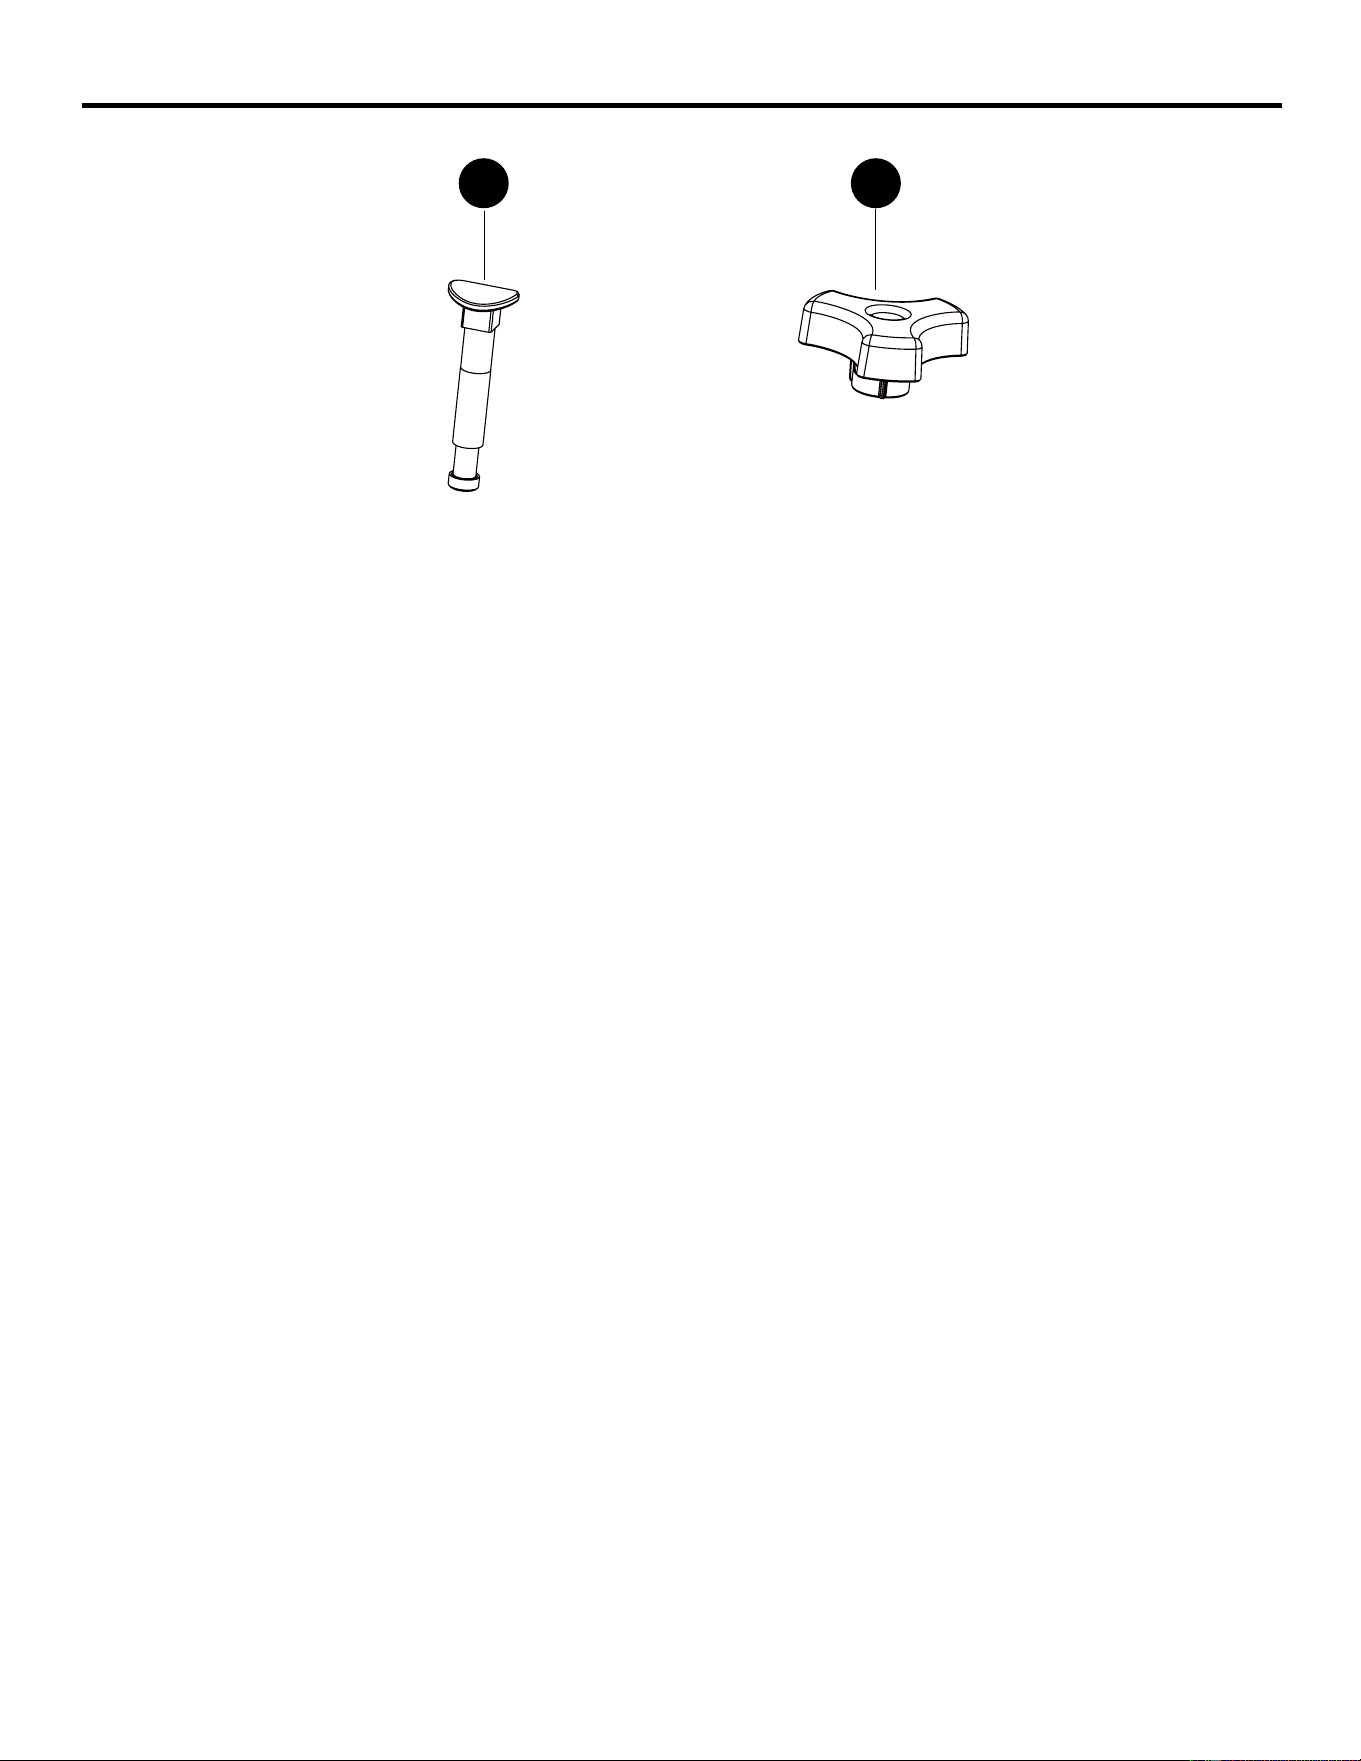
HARDWARE CONTENTS (not shown actual size)
AA BB
Handle bolt
Qty. 2
Handle knob
Qty. 2
5
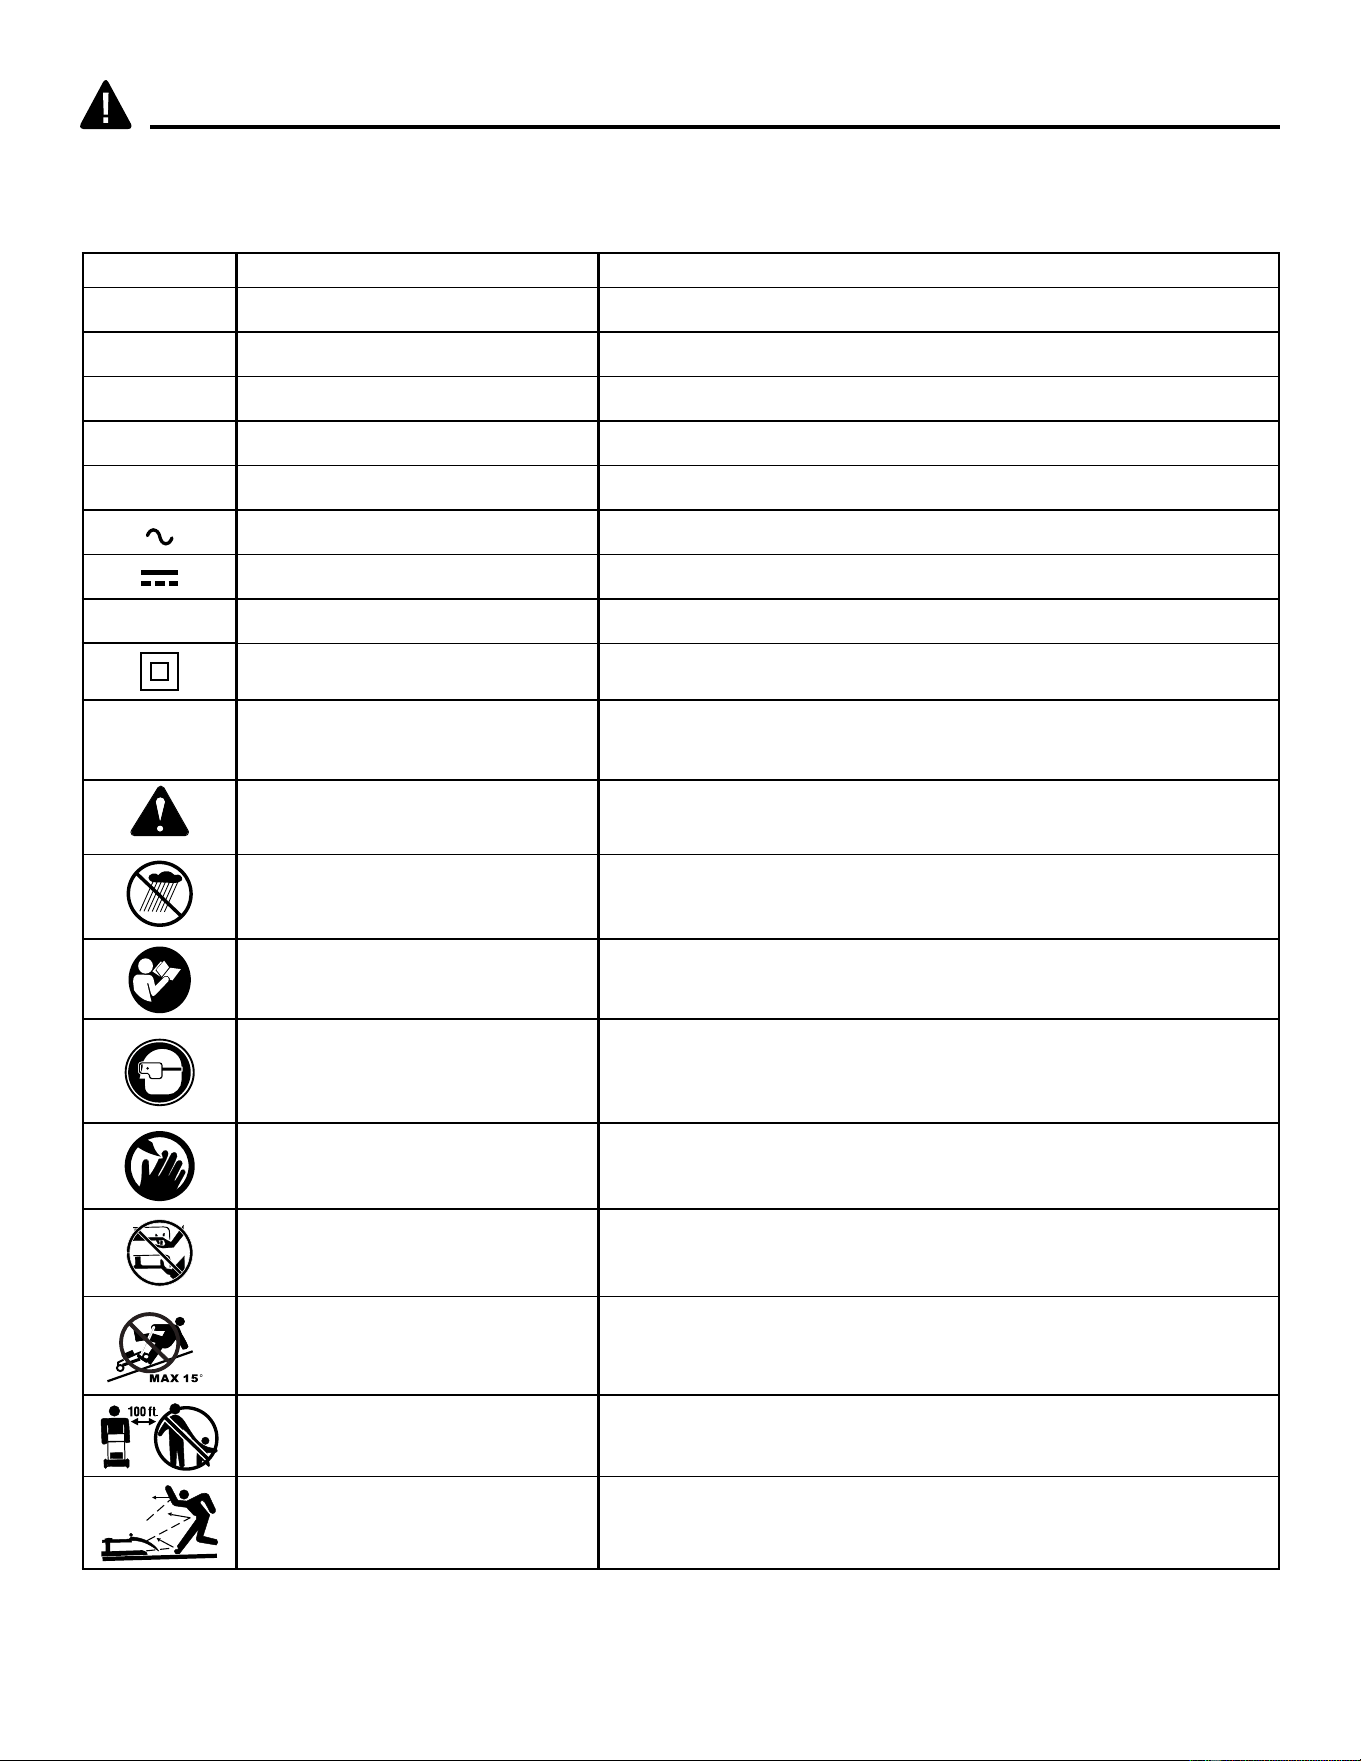
SYMBOLS
Some of the following symbols may be used on this product. Please study them and learn their
meaning. Proper interpretation of these symbols will allow you to operate the product better and safer.
SYMBOLS DESIGNATION EXPLANATION
V Volts Voltage
A Amperes Current
Hz Hertz Frequency (cycles per second)
W Watts Power
min Minutes Time
Alternating Current Type of current
Direct Current Type or a characteristic of current
no No Load Speed Rational speed, at no load
Class II Construction Double-insulated construction
/min Per Minute
Revolutions, strokes, surface speed, orbits, etc., per
minute
Safety Alert Precautions that involve your safety.
Wet Conditions Alert Do not expose to rain or use in damp locations
Read The Operator’s Manual
To reduce the risk of injury user must read and
understand operator’s manual before using this product.
Eye Protection
Always wear eye protection with side shields marked to
comply with ANSI Z87.1.
Keep Hands and Feet Away Keep hands and feet away from blade and cutting area.
No Reach Do not reach hands or feet under mower deck.
No Slope
Do not operate on inclines greater than 15º. Mow
across the face of slopes, never up and down.
Keep Bystanders Away Keep all bystanders at least 100 ft. away.
Ricochet
Pay attention that bystanders are not injured through
foreign objects thrown from the mower.
6
The following signal words and meanings are intended to explain the levels of risk associated
with this product.
WARNING
• To avoid serious personal injury, do not attempt to use this product until you have read this Owner's
Manual thoroughly and understand it completely. If you do not understand the warnings and
instructions in this Owner's Manual, do not use this product. Call 1-888-356-2258 for assistance.
The operation of any power tool can result in foreign objects being thrown into your eyes, which
can result in severe eye damage. Before operating a power tool, always wear safety goggles,
safety glasses with side shields, or a full face shield when needed. A Wide Vision Safety Mask is
recommended for use over eyeglasses or standard safety glasses with side shields. Always use
eye protection that is marked to comply with ANSI Z87.1.
•
SYMBOL SIGNAL MEANING
DANGER
Indicates an imminently hazardous situation, which, if not
avoided, will result in death or serious injury.
WARNING
Indicates a potentially hazardous situation, which, if not
avoided, could result in death or serious injury.
CAUTION
Indicates a potentially hazardous situation, which, if not
avoided, may result in minor or moderate injury.
CAUTION
(Without Safety Alert Symbol) Indicates a situation that may
result in property damage.
SYMBOLS
SAVE THESE INSTRUCTIONS

7
• This symbol indicates important safety instructions. If these instructions are not followed, it could
endanger the personal safety and/or property of the operator and others. Read and understand all
instructions in this manual before attempting to operate the mower. Failure to comply with these
instructions may result in personal injury.
• Basic safety precautions should always be followed when using electric lawn mowers, in order to
reduce the risk of re, electric shock, and personal injury.
• Use of this mower should be restricted to individuals who have read and understood and will
follow the warnings and instructions that are printed in this manual and on the mower.
SAFETY INFORMATION
GENERAL SAFETY RULES
READ ALL INSTRUCTIONS CAREFULLY
WARNING
This mower was built to be operated according to the rules for safe operation that are contained
in this manual. As with any type of power equipment, carelessness or error on the part of the
operator can result in serious injury. This mower is capable of amputating body parts and
throwing objects. Failure to observe the following safety rules could result in serious injury or
death.
DANGER
• Carefully read all instructions on the mower and in the manual before attempting to assemble and
operate the mower. Keep this manual in a safe place for future reference, and consult it regularly.
• Become familiar with all controls and their proper operation. Know how to stop the mower and
how to disengage the power in an emergency.
• In order to avoid contact with the blade or injury caused by a thrown object, stay in the operating
zone behind the handles, and keep children and bystanders at least 100 ft. (30 m) away from the
mower while it is in operation. Stop the motor immediately if someone enters the mowing area.
• Thoroughly inspect the area where the mower is to be used. Remove all stones, sticks, wire,
bones, toys, and other objects that could be tripped over or thrown by the blade. Thrown objects
can cause serious personal injury.
• Plan your mowing pattern in such a way as to avoid discharging material toward roads, sidewalks,
bystanders, etc. Do not discharge material against a wall or obstruction. Doing so may cause the
discharged material to ricochet back toward the operator.
• Always wear proper eye protection that complies with ANSI Z87.1 in order to protect your eyes
while operating or performing any adjustment or repair. Thrown objects that ricochet can cause
serious eye injury.
• Always wear a face mask or a dust mask when operating the mower in a dusty environment.
• Dress properly. Do not wear loose clothing or jewelry that can get caught in moving parts. The
wearing of protective gloves and safety footwear is recommended.

8
SAFETY INFORMATION
• Many injuries occur as a result of the mower being pulled over the operator’s foot during a fall
caused by slipping or tripping. Do not operate this mower in bare feet, or while wearing sandals or
lightweight (e.g., canvas) shoes. Do not hold on to the mower if you are falling. Release the
handle immediately.
• Never pull the mower back toward you while you are walking. If you must back the mower away
from a wall or an obstruction, rst look down and behind in order to avoid tripping, and then follow
these steps:
• Step back from the mower in order to fully extend your arms.
• Be sure that you are well balanced.
• Pull the mower back slowly.
• Do not use the mower for any job except that for which it is intended. Do not force the mower.
• Do not operate the mower while under the inuence of alcohol or drugs.
• Stay Alert: Do not operate the mower when you are tired. Pay attention to what you are doing. Use
common sense.
• Do not put hands or feet near rotating parts or under the cutting deck. Contact with the blade can
amputate hands and feet.
• Do not attempt to adjust the wheels or the cutting height while the motor is running.
• Avoid dangerous environments. Do not operate the mower in the rain or in wet or damp grass.
• Mow only in daylight or in good articial light. Do not rush a mowing job.
• Stop the blade when crossing gravel driveways, walkways, or roads.
• If the mower starts to vibrate excessively, stop the motor and check for the cause immediately.
Vibration is generally a warning of trouble.
• Stop the motor and wait until the blade comes to a complete stop before removing the grass
catcher or unclogging the chute. The cutting blade will continue to rotate for a few seconds after
the motor is shut off. Do not place any part of your body in the blade area until you are sure that
the blade has stopped rotating.
• Never operate mower without a proper trail shield, discharge cover, grass catcher, switch control,
or other safety device in place and in working order. Do not operate the mower with damaged
safety devices. Doing so can result in injury.
• Don’t force the lawn mower. It will do the job better and safer at the rate for which it was designed.
• Always store your lawn mower indoors. When not in use, the lawn mower should be stored
indoors in a dry and locked place, out of reach of children.
• Maintain your lawn mower. Keep cutting edges sharp and clean to ensure the best performance
and safe operation.
• If lawn mower strikes a foreign object, follow these steps:
• Stop lawn mower, release the bail lever.
• Remove the battery.
• Inspect for damage.

9
• Repair any damage before restarting and operating the lawn mower.
• Do not charge lawn mower in rain or in wet location.
• Remove or disconnect battery before servicing, cleaning or removing material from lawn mower.
• Use identical replacement blades only.
• Do not open or break the battery. Broken batteries can release corrosive electrolytes which can
cause damage to the eyes or skin. It may be toxic if swallowed.
• When using, keep out of water, direct sunlight and do not expose to rain.
• Store indoors, and do not expose to rain or water. Avoid direct sunshine.
CHILD SAFETY
Tragic accidents can occur if the operator is not aware of the presence of children.
• Keep children out of the mowing area and under the watchful care of a responsible adult.
• Do not allow children under the age of 14 to operate this mower. Children who are 14 years of age
and older must read and understand the operating instructions and safety rules in this manual,
and must be trained and supervised by a parent.
• Stay alert, and turn the mower off if a child or any other person enters the mowing area.
• Look behind and down for small children before and while moving backwards.
• Use extreme care when approaching blind corners, doorways, shrubs, trees, or other objects that
may obscure your view of a child who may run into the path of the mower.
SAFETY INFORMATION
WARNING
• To reduce the risk of damage and danger, never clean the tool with pressure washer or under running
water.
• Store indoors only. Always remove the battery from mower and charger when cleaning or storing the
tool.

10
BATTERY & CHARGER
SAFETY INFORMATION
CAUTION
Use only Kobalt approved replacement batteries. Other batteries may cause injury or damage to the
mower. For use only with Kobalt KB 280-06/KB 2580-06/KB 480-06/KB 580-06/KB 680-06 batteries and
KRC 30-06 charger.
BATTERY SAFETY RULES
• Battery tools do not have to be plugged into an electrical outlet; therefore, they are always in
operating condition. Be aware of possible hazards when not using your battery tool or when
changing accessories. Following this rule will reduce the risk of electric shock, re, or serious
personal injury.
• Do not place battery tools or their batteries near re or heat. This will reduce the risk of explosion
and possibly injury.
• Do not crush, drop or damage battery pack. Do not use a battery pack or charger that has been
dropped or received a sharp blow. A damaged battery is subject to explosion. Properly dispose of
a dropped or damaged battery immediately.
• Batteries can explode in the presence of a source of ignition, such as a pilot light. To reduce the
risk of serious personal injury, never use any cordless product in the presence of open ame. An
exploded battery can propel debris and chemicals. If exposed, ush with water immediately. Do
not charge battery tool in a damp or wet location. Following this rule will reduce the risk of electric
shock.
• For best results, your battery tool should be charged in a location where the temperature is more
than 43°F (6ºC) but less than 104°F (40ºC). To reduce the risk of serious personal injury, do not
store outside or in vehicles.
• Under extreme usage or temperature conditions, battery leakage may occur. If liquid comes in
contact with your skin, wash immediately with soap and water. If liquid gets into your eyes, ush
them with clean water for at least 10 minutes, then seek immediate medical attention. Following
this rule will reduce the risk of serious personal injury.
• When battery pack is not in use, keep it away from other metal objects like: paper clips, coins,
keys, nails, screws, or other small metal objects that can make a connection from one terminal to
another. Shorting the battery terminals together may cause sparks, burns, or a re.
• Always remove battery pack from your tool when you are assembling parts, making adjustments,
cleaning, or when not in use. Removing battery pack will prevent accidental starting that could
cause serious personal injury.
• Always remove battery pack before storing the device. When battery becomes fully charged,
unplug the charger from the power supply and remove the battery pack from the charger.
• Always wear eye protection with side shields marked to comply with ANSI Z87.1, along with
hearing protection. Failure to do so could result in objects being thrown into your eyes and other
possible serious injuries.
• Keep battery pack dry, clean, and free from oil and grease. Always use a clean cloth when
cleaning. Never use brake uids, gasoline, petroleum-based products, or any solvents to clean
battery pack.

11
PROPER BATTERY CARE
Off-season storage
To obtain the longest possible battery life, the following steps are suggested:
• Remove the battery pack from the charger once it is fully charged and ready for use.
For battery pack storage longer than 30 days:
• Store the battery pack where the temperature is below 80°F and away from moisture.
• Store battery packs in a 30% - 50% charged condition.
• Every two months of storage, charge the pack as normal.
CHARGER SAFETY RULES
• Charge the mower battery in a dry area that is protected from the weather. Do not expose the
mower or the charger to rain. Do not charge the battery in a wet location. Operate the battery
charger in temperatures between 43°F and 104°F. In order to reduce the risk of electric shock, use
only the charger that is provided by the manufacturer to charge the battery.
• Do not misuse the charger cord. Never carry the charger by the cord. Do not disconnect the char-
ger from the outlet by pulling the charger cord.
• Do not use a damaged charger. Replace the charger cords or the charger immediately.
• Keep the mower and the charger away from water, heat sources (radiators, heaters, stoves, etc.),
ames, and chemicals.
• Make sure the battery pack is secured in the charger before beginning operation.
• The battery pack will become slightly warm to the touch while charging. This is normal and does
not indicate a problem.
• Do not place the charger and battery pack in an area of extreme heat or cold. They will work best
at normal room temperature.
• When batteries become fully charged, unplug the charger from the power supply and remove the
battery pack.
SAFETY INFORMATION
WARNING
When transporting or servicing unit, always remove the battery.
WARNING (PROPOSITION 65)
Some dust created by power sanding, sawing, grinding, drilling, and other construction activities
contains chemicals known to cause cancer, birth defects or other reproductive harm. Some
examples of these chemicals are:
• Lead from lead-based paints
• Crystalline silica from bricks and cement and other masonry products, and
• Arsenic and chromium from chemically treated lumber.
Your risk of exposure to these chemicals varies depending on how often you do this type of work.
To reduce your exposure to these chemicals, work in a well-ventilated area, and work with
approved safety equipment, such as dust masks that are specially designed to lter out microscopic
particles.
12
SAFETY INFORMATION
SERVICE
Servicing requires extreme care and knowledge and should be performed only by a qualied service
technician. For service, it is suggested you return the product to your nearest AUTHORIZED
SERVICE CENTER for repair. When servicing, use only identical replacement parts.
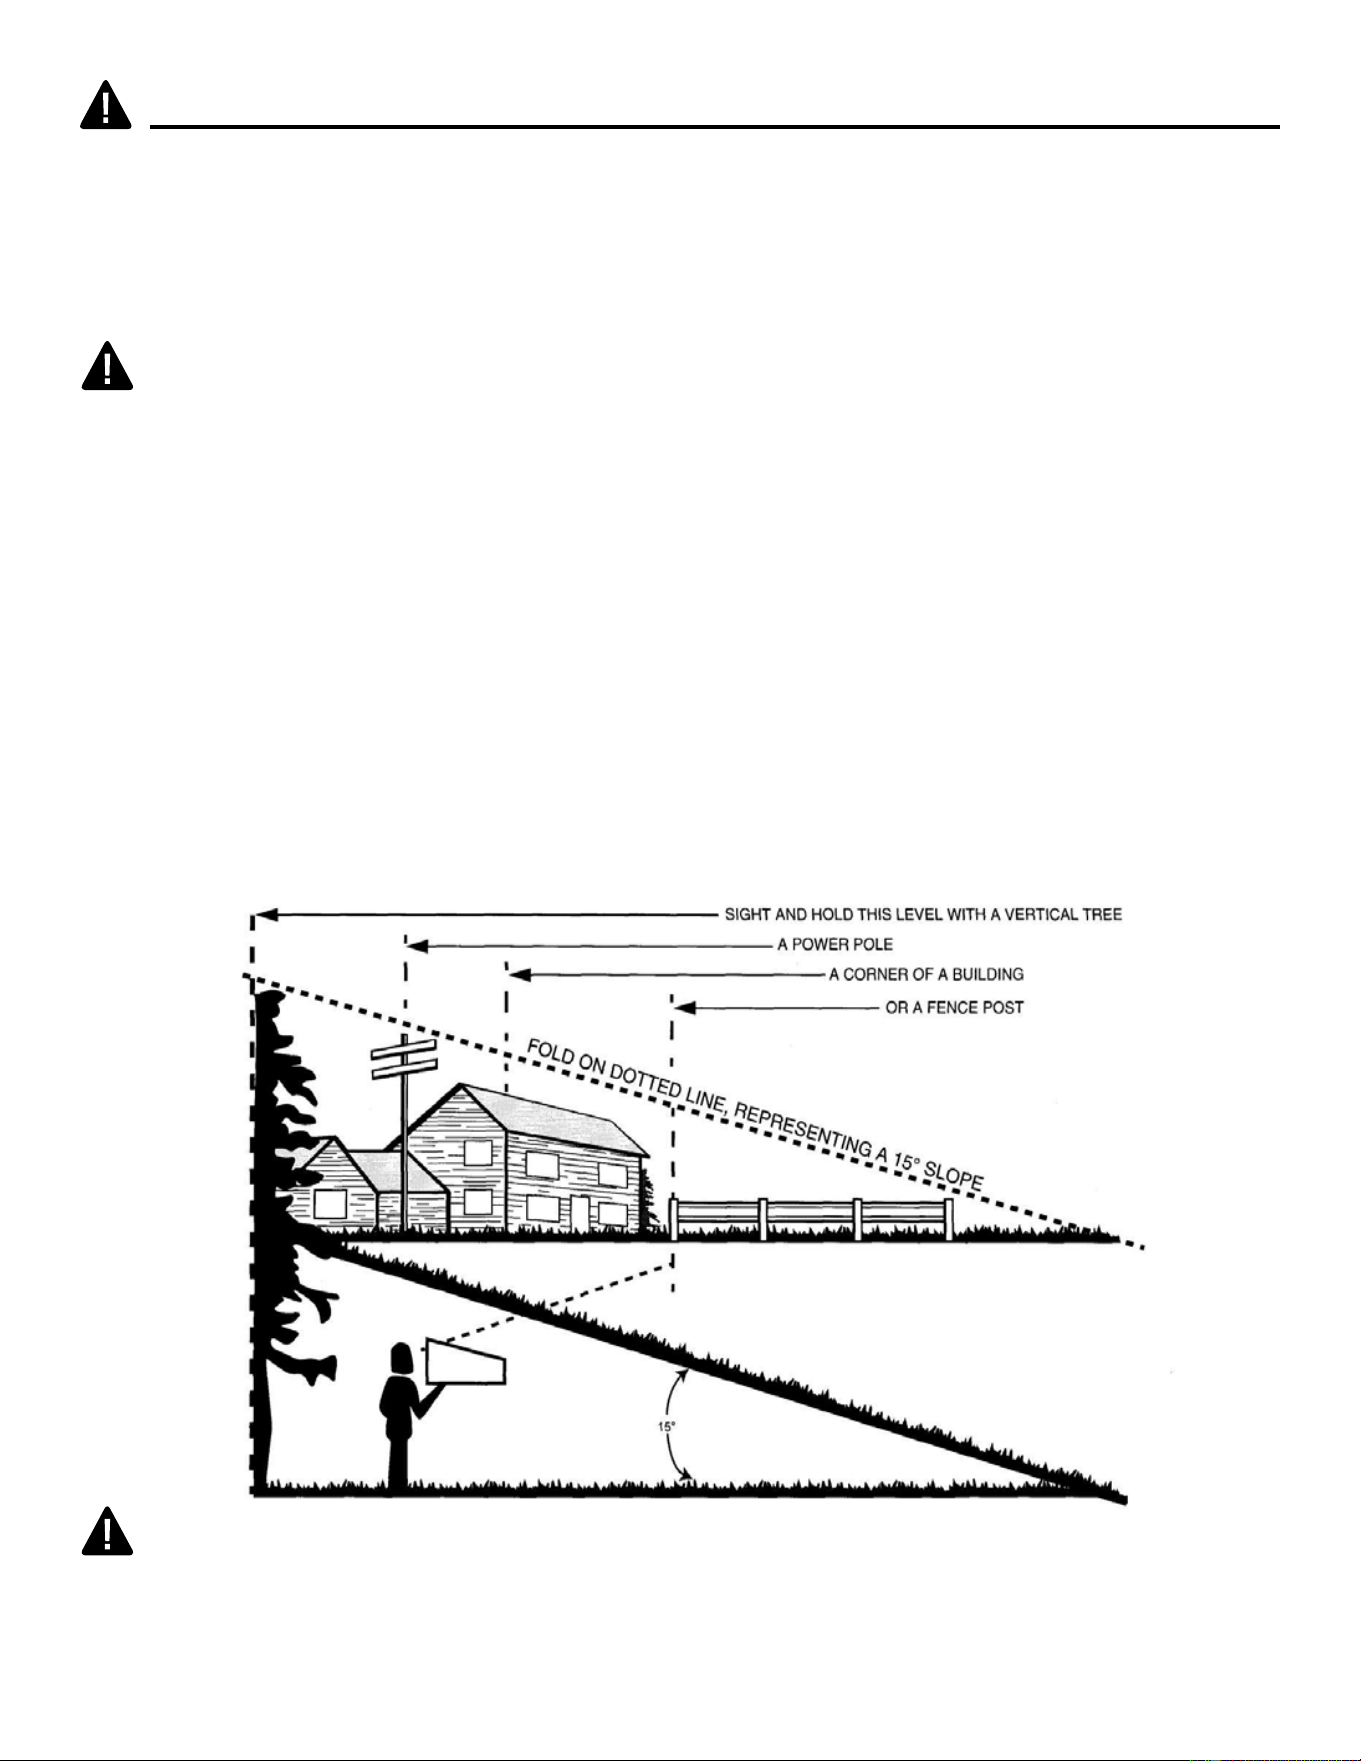
Slope gauge
Slopes are a major factor related to accidents involving slips and falls, which can result in severe
injury. Operating the mower on a slope requires extra caution. If you feel uneasy on a slope, do not
mow it. For your safety, use the slope gauge that is included as part of this manual to measure slopes
before operating this unit on a sloped or hilly area.
• Mow across the face of a slope, and never up and down. Exercise extreme caution when
changing direction on a slope.
• Watch for holes, ruts, rocks, hidden objects, or bumps that may cause a slip or a trip. Tall grass
can hide obstacles.
• Always be sure of your footing. If you feel like you are losing your balance, release the
blade/motor control handle immediately. The blade will stop rotating within 3 seconds.
• Do not mow near drop-offs, ditches, or embankments, because you could lose your footing or
balance.
• Do not mow a slope that has an angle of greater than 15°, as determined using the slope gauge.
• Do not mow wet or damp grass. Unstable footing can cause slipping.
WARNING
WARNING
Do not mow a slope that has an angle of greater than 15° (a rise of approximately 2-1/2 ft. every 10
ft.). Mow across the face of a slope, and never up and down.

13
PREPARATION
Before beginning assembly of product, make sure all parts are present. Compare parts with package
contents list and hardware contents list. If any part is missing or damaged, do not attempt to
assemble the product.
UNPACKING
• Carefully remove the product and any accessories from the box. Make sure that all items listed in
the package contents and hardware contents lists are included.
• Inspect the product carefully to make sure no breakage or damage occurred during shipping.
• Do not discard the packing material until you have carefully inspected and operated the product.
• If any parts are damaged or missing, please call 1-888-356-2258 for assistance.
Estimated Assembly Time: 5 minutes
ASSEMBLY INSTRUCTIONS
WARNING
• If any parts are damaged or missing, do not operate this product until the parts are replaced.
Using a product with damaged or missing parts could result in serious personal injury.
• Do not attempt to modify this product or create accessories not recommended for use with this
product. Any such alteration or modication is misuse and could result in a hazardous condition
leading to possible serious personal injury.
• Do not insert battery until assembly is complete and you are ready to mow. Failure to comply
could result in accidental starting and possible serious personal injury.
• To prevent accidental starting that could cause serious personal injury, always remove the battery
pack from the product when assembling parts.
• Never operate the mower without the proper safety devices in place and working. Never operate
the mower with damaged safety devices. Operation of this product with damaged or missing parts
could result in serious personal injury.
14
WARNING
Folding or unfolding the handle improperly can damage the cables, causing an unsafe operating
condition.
• Do not damage the cables when folding or unfolding the handle.
• If a cable is damaged, contact an Authorized Service Dealer.
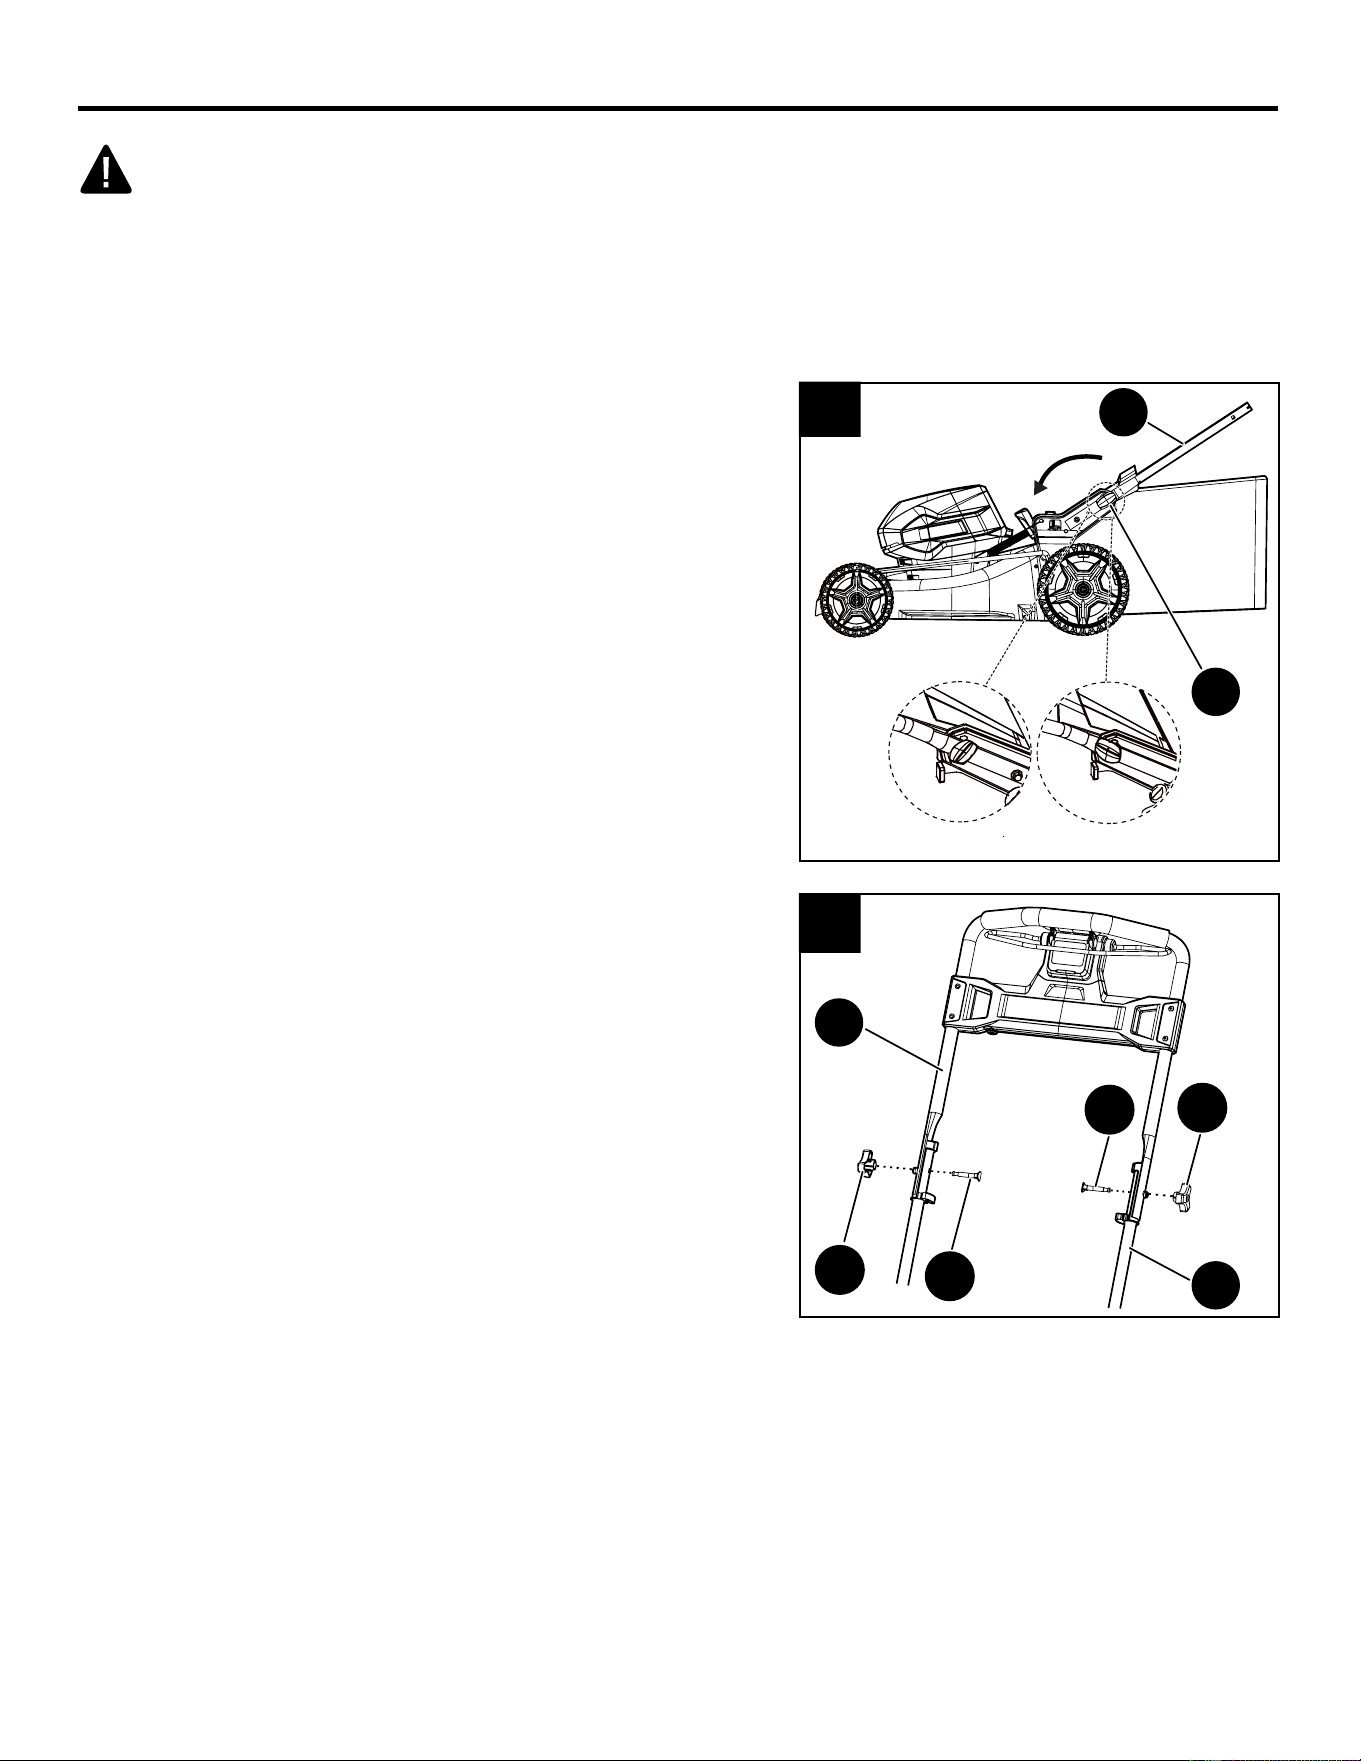
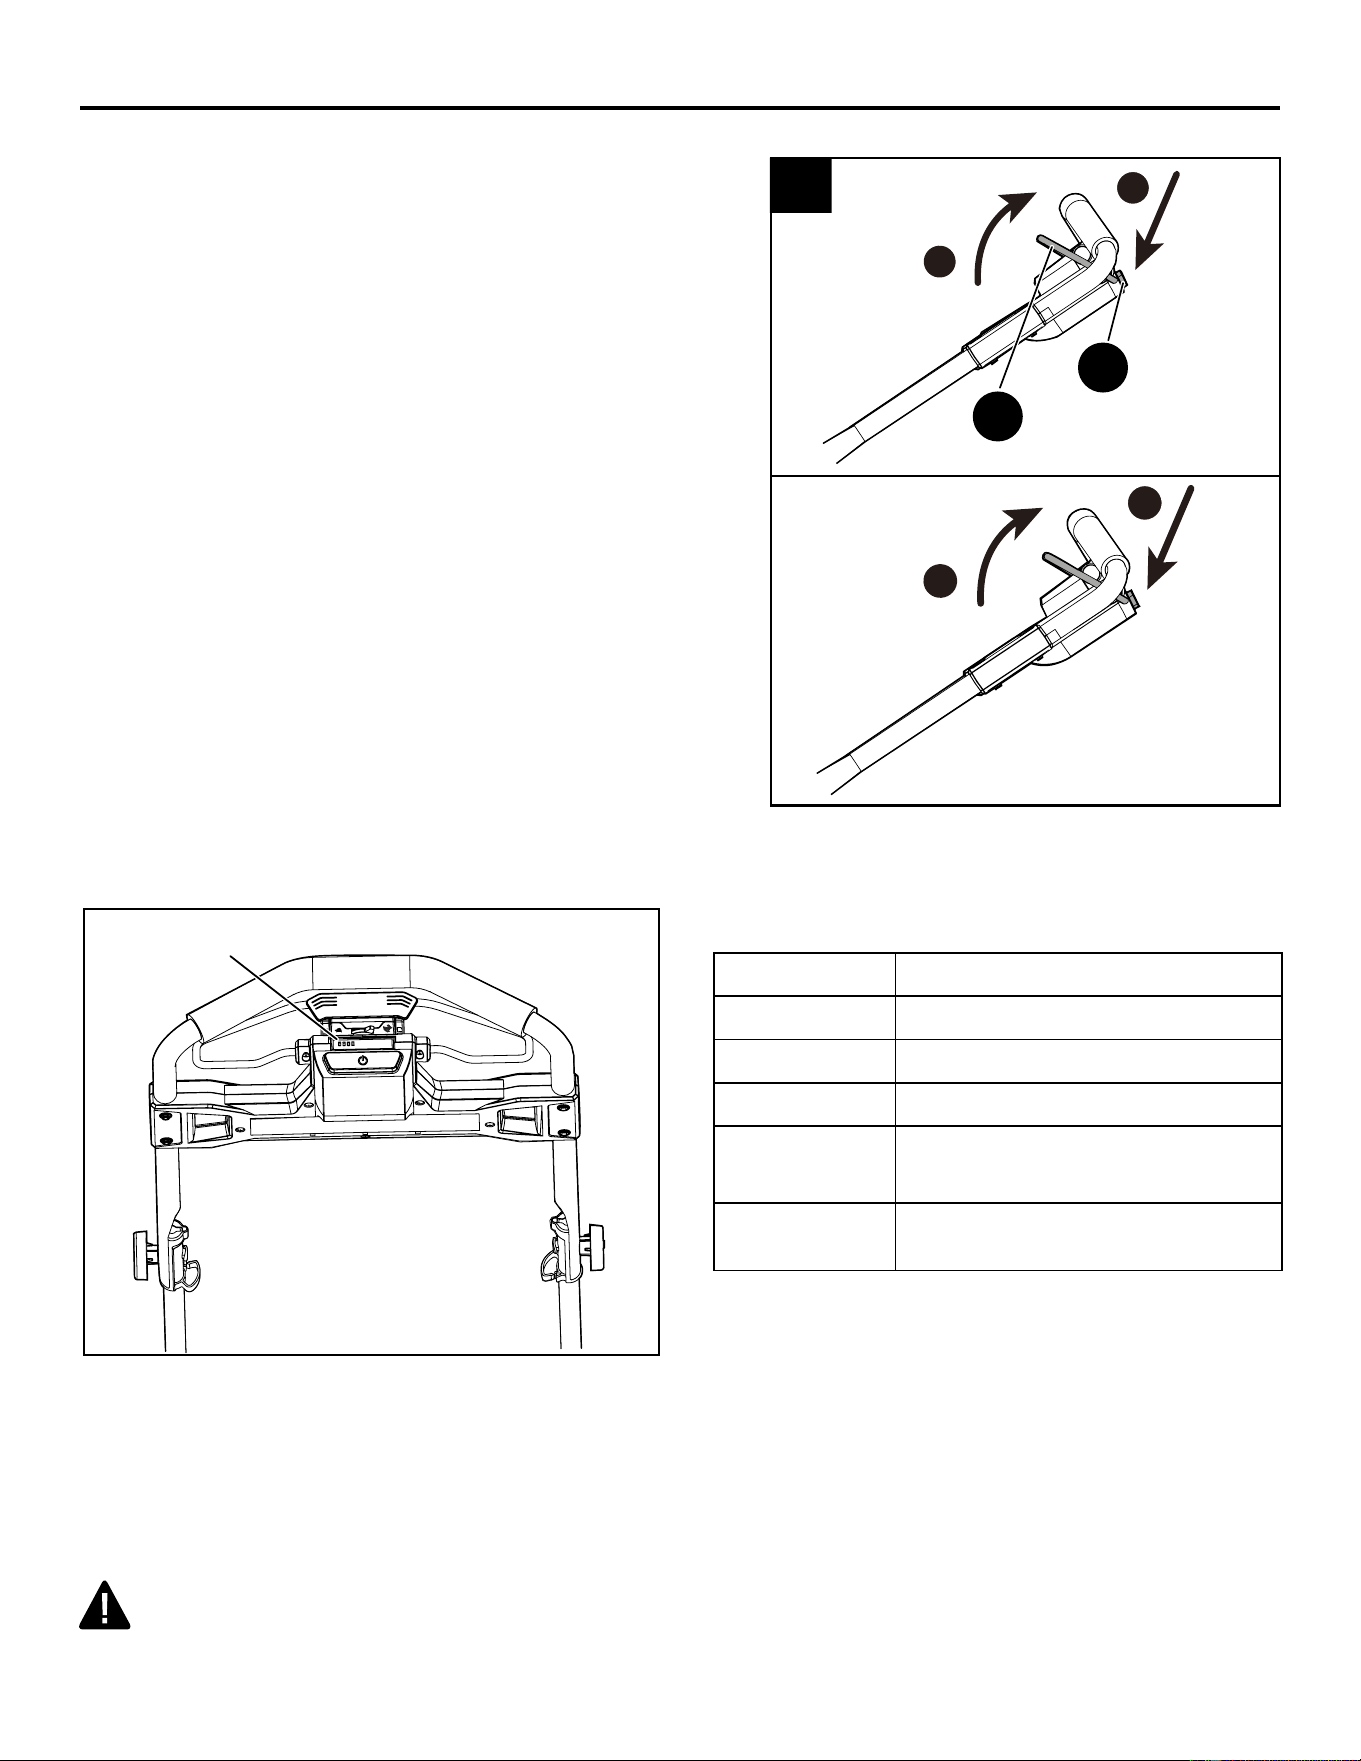
• Pull and rotate the handle lock knobs (A) 90° on
both sides to loosen the lower handles (B) on both
sides.
• Move the lower handles to the operating position.
You may raise or lower the handles to a position
comfortable for you. There are 3 positions for you to
choose.
• Release the handle knobs to lock the lower handles
into position.
• Align the mounting holes on the upper handle (C)
and the lower handle (B). Insert the handle bolts
(AA) and secure using the handle knobs (BB).
Repeat for both sides.
Note: Ensure both sides are set at the same position
for proper assembly.
1a. Unfolding and adjusting handle
1b. Installing upper handle:
1a
1b
Unlocked position
Locked position
ASSEMBLY INSTRUCTIONS
C
B
A
B
AA
AA
BB
BB
15
ASSEMBLY INSTRUCTIONS
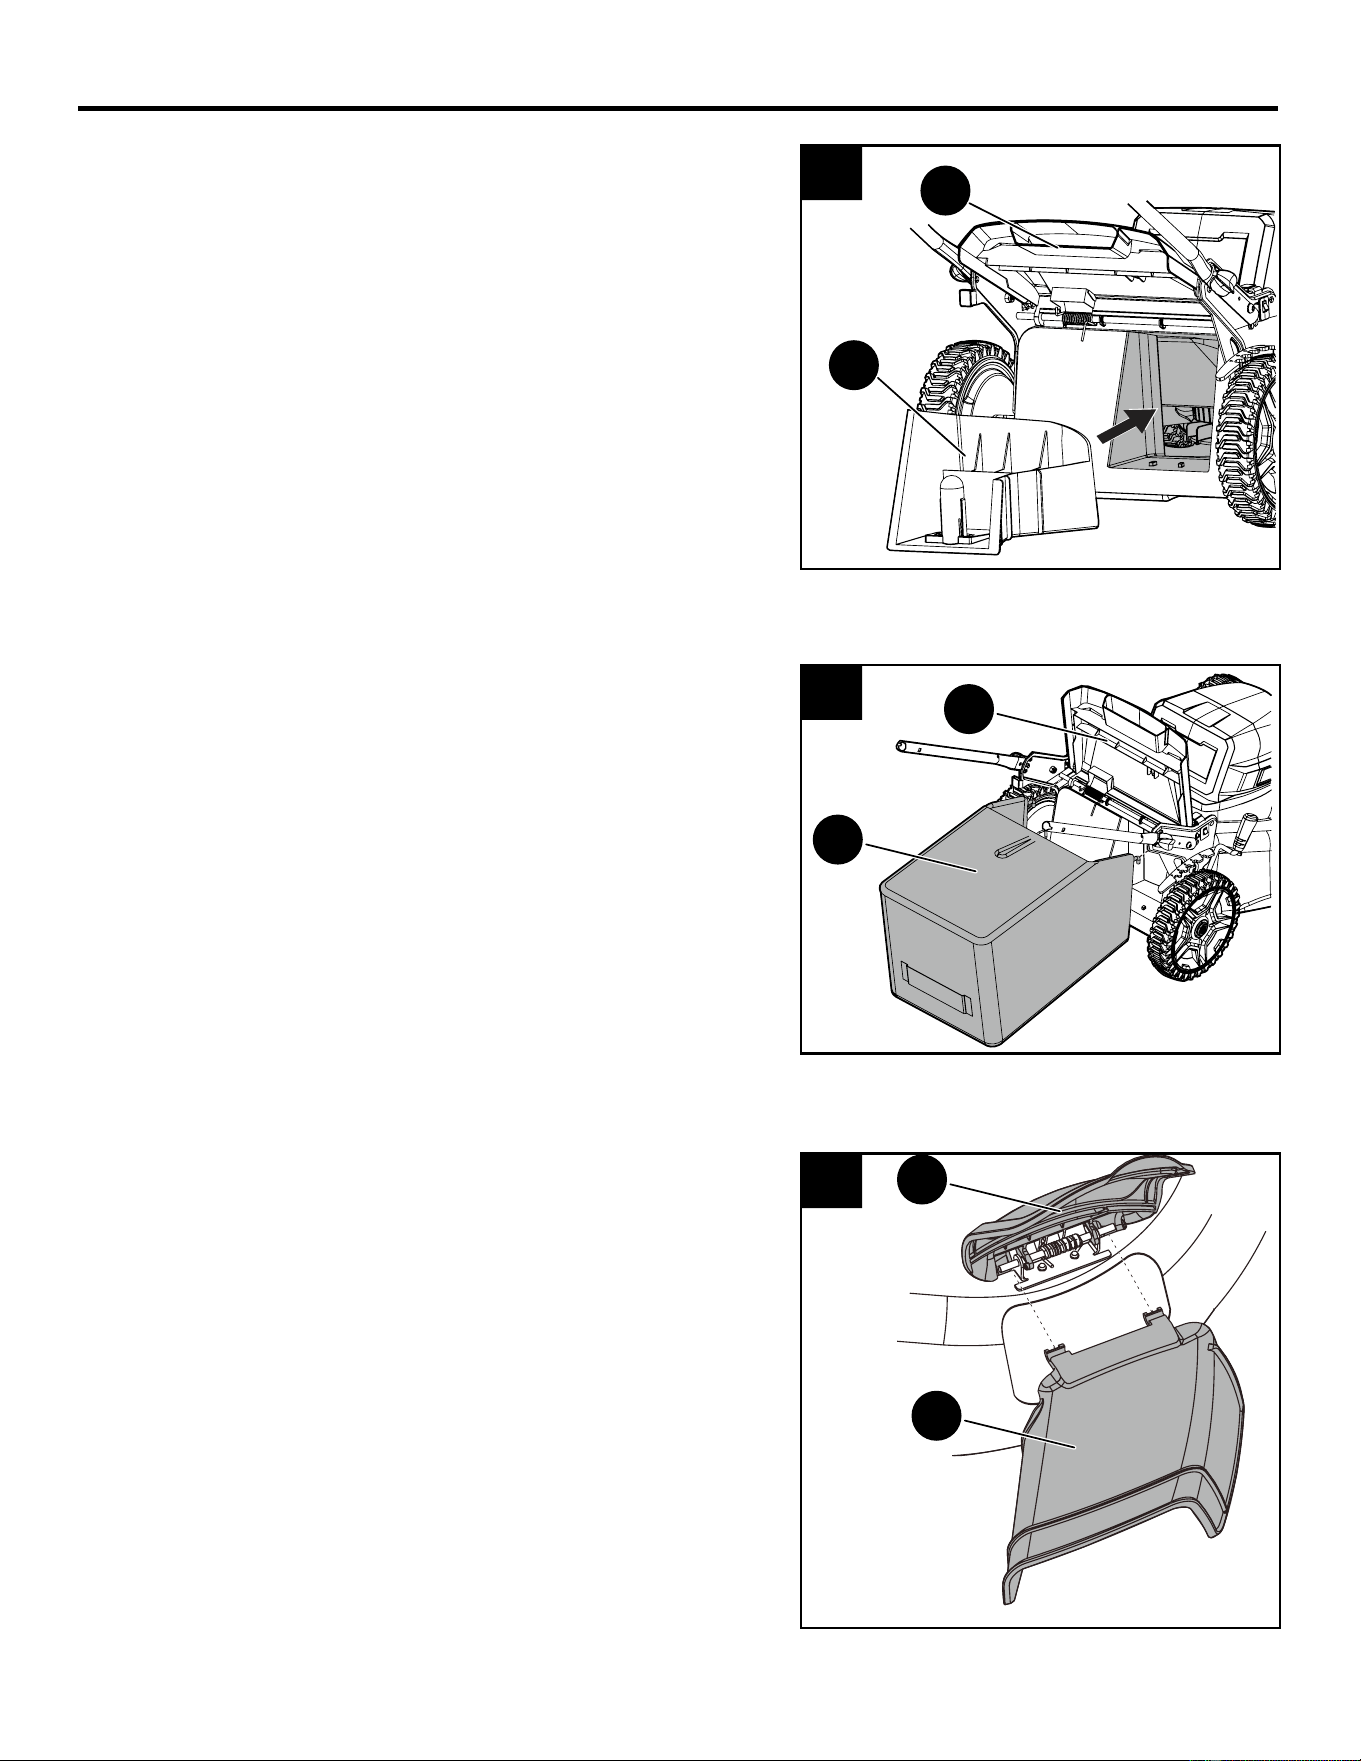
• To remove the mulching plug (D), lift the rear
discharge door (E).
• Grasp the handle of the mulching plug (D). Using
this handle, lift and pull the mulch plug out.
• The mulching plug (D) is inserted at an angle, so it
requires some force to remove.
• The mulching plug (D) must be removed in order to
install the grass catcher bag.
• The mulching plug (D) must be re-installed when
the grass catcher bag is removed.
2. Removing the mulching plug
2
• Lift the rear discharge door (E).
• Lift the grass catcher (F) by its handle and place
under the rear discharge door so that the hooks on
the grass catcher are seated on the door rod.
• Release the rear discharge door (E). When installed
correctly, the hooks on the grass catcher will extend
through the openings on the rear discharge door.
3. Installing the grass catcher bag
3
• Lift the side discharge cover (G).
• Align the grooves on the side discharge chute (H)
with the pins on the underside of the side discharge
cover (G).
• Lower the side discharge chute until the hooks on
the mower deck are secured in the openings of the
side discharge chute.
• Release the side discharge cover.
• Ensure the mulch plug is installed for side discharge
to operate correctly.
4. Installing the side discharge chute
4
E
F
G
H
E
D
16
ASSEMBLY INSTRUCTIONS
• Lift and hold up the battery door (I).
• Place the battery pack in the mower. Align the ribs on battery pack with grooves in the battery port.
• Make sure the battery release button snaps in place and that battery is fully seated and secure in
the mower before beginning operation.
• Insert the safety key.
• If the machine is not going to be used immediately, do not insert the safety key.
• Close the battery door.
• Release the power lever to stop the mower.
• Open the battery door (I) to access the battery compartment.
• Remove the safety key.
• Press and hold the battery release button. This will cause the battery to raise out of the tool
slightly.
• Remove battery pack from the mower.
5a. To install battery
5b. To remove battery
WARNING
Always remove battery from your tool when you are assembling parts, making adjustments, cleaning,
or when not in use. Removing battery will prevent accidental starting that could cause serious
personal injury.
5
Battery release button
Safety key
I
17
1
2
OPERATING INSTRUCTIONS
1
Solution 1:
1. Press and hold the safety switch button (J).
2. Pull the bail lever (K) upward to the handle to
start the mower and release the safety switch
button.
Solution 2:
1. Pull the bail lever (K) upward to the handle and
hold it.
2. Press the safety switch button (J) to start the
mower and release the button.
1a. Powering on
1b. Powering off
• Release the bail lever.
This mower is equipped with a “soft-start” feature. When initially starting up, the mower will take
approx. 3 seconds to get up to full speed. If the mower does not initially start: Remove the
battery and check under the mower deck to ensure there is nothing obstructing the blade and that the
blade can spin freely by hand. Even a small amount of grass on start up will prevent the “soft start”
from turning the mower on.
2. Soft-Start
WARNING
Do not attempt to override the operation of the safety switch button or bail lever.
Battery capacity indicator
Lights Capacity
4 Green Lights The battery is at full capacity
3 Green Lights The battery is at 75% capacity
2 Green Lights The battery is at 50% capacity
1 Green Light
The battery is at 25% capacity and
requires charging soon
Lights go out
The battery is under 25% capacity
and requires charging immediately
Solution 1
Solution 2
K
J
Battery capacity
indicator
2
1
18
S
ELF-PR
O
P
E
LLED
OPERATING INSTRUCTIONS
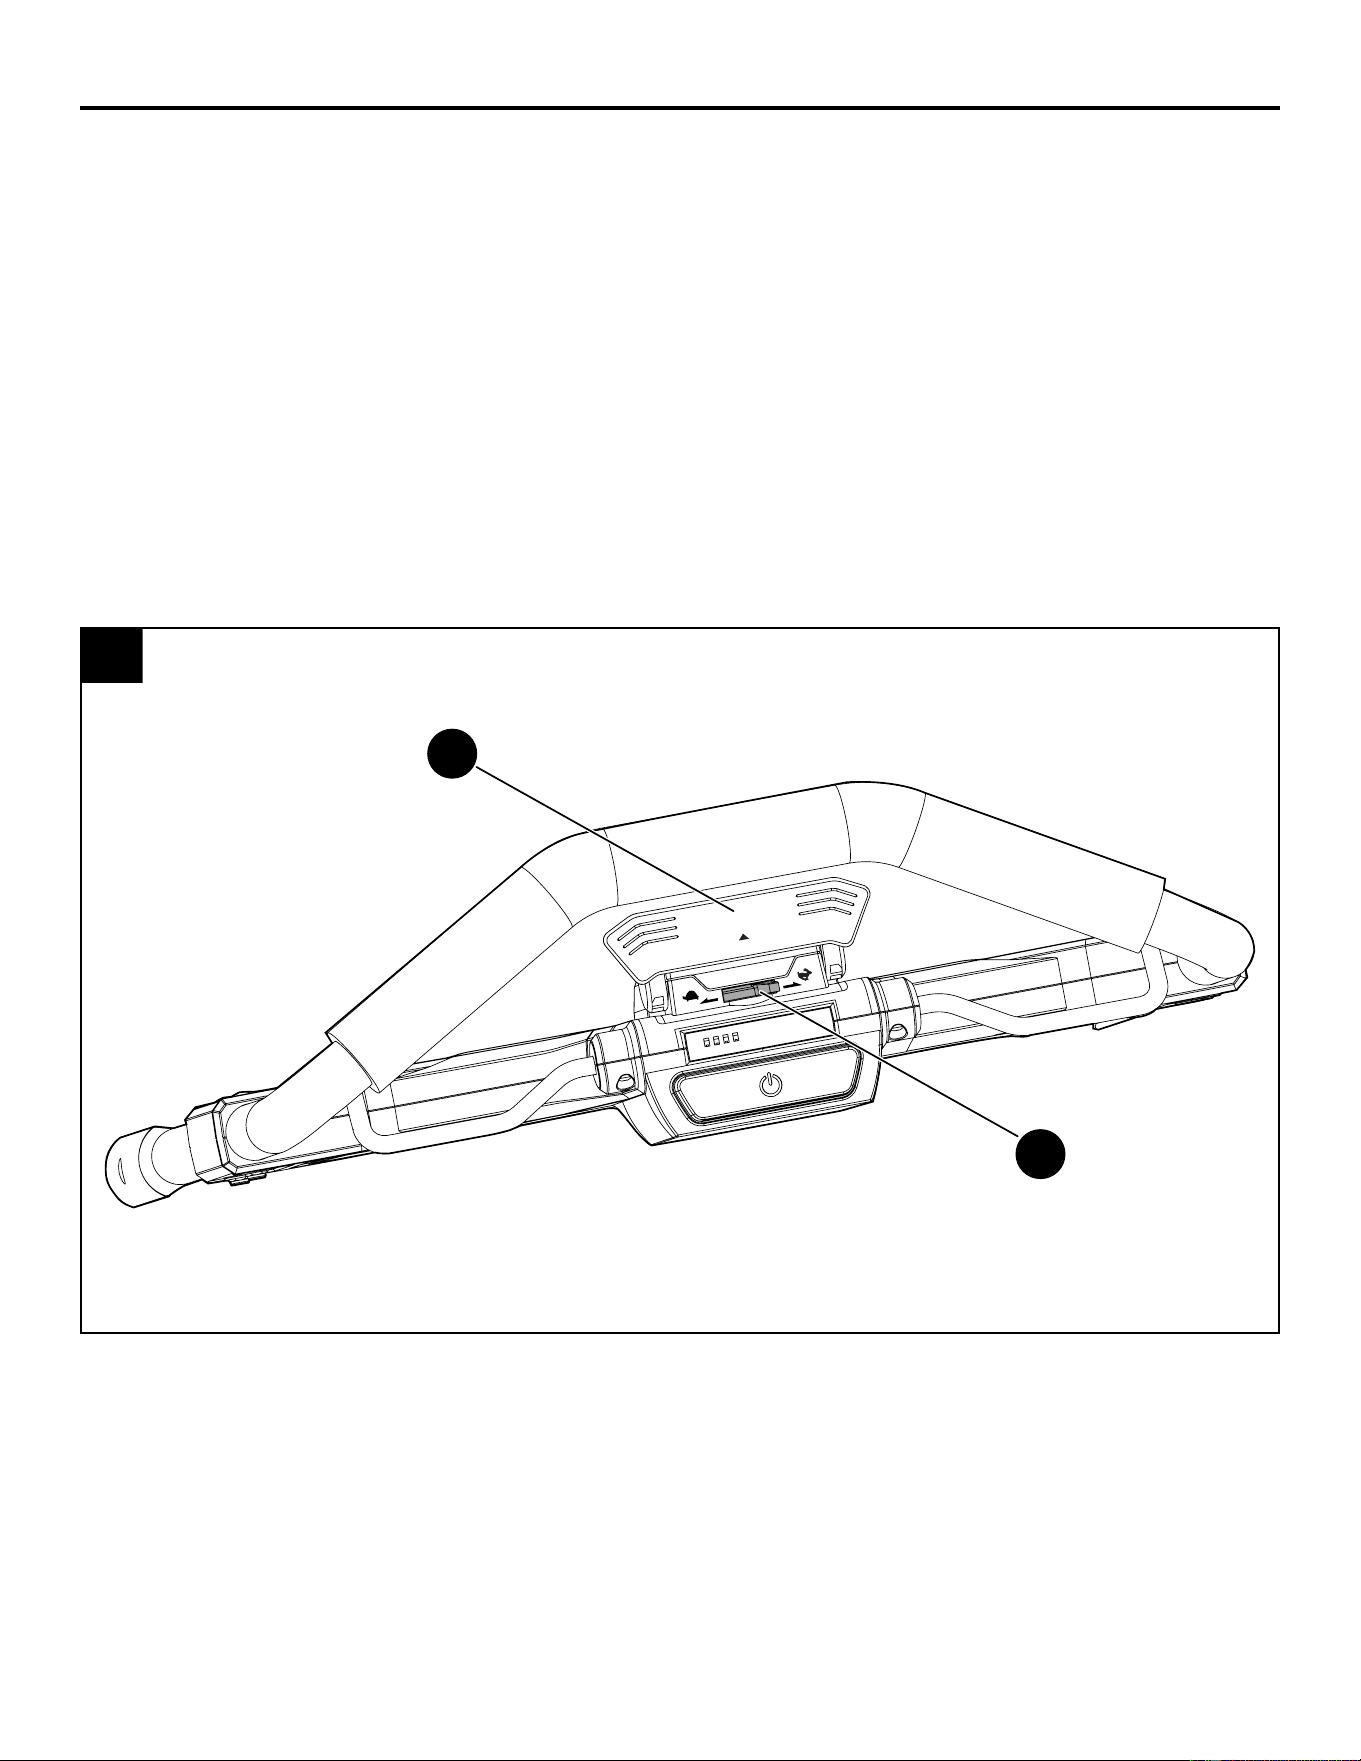
a. To engage the self-propelled feature:
• Ensure the battery and key are installed in the mower
• Push the self-propel paddle (L) forward with your thumb
b. To disengage the self-propelled feature:
• Release the self-propel paddle (L).
3. Self-propelled mowing
3
c. To adjust the speed of self-propelled feature:
• Move the speed controls (M) toward the Rabbit Symbol to increase speed.
• Move the speed controls (M) toward the Turtle Symbol to decrease speed.
L
M

19
OPERATING INSTRUCTIONS
WARNING
• The operation of any mower can result in foreign objects being thrown into the eyes, which can
cause severe eye damage. Always wear safety glasses while operating the mower and while
performing any adjustments or repairs.
• Ensure that other people and pets remain at least 100 ft. away when the mower is in use.
• Remove all stones, sticks, wires, bones, and other debris that might be thrown by the rotating
blades.
When shipped, the wheels on the mower are set to a low-cutting position. Before using the mower
for the rst time, raise the cutting position to the height best suited for your lawn. The average lawn
should be between 1-1/2 in. and 2 in. during cool months and between 2 in. and 3-1/2 in. during hot
months.
To adjust the blade height:
• To raise the blade height, grasp the height adjustment lever (N) and move it toward the back of
the mower.
• To lower the blade height, grasp the height adjustment lever (N) and move it toward the front of
the mower.
4. Cutting height adjustment
4
Height Adjustments
1st setting
2nd setting
3th setting
4th setting
5th setting
6th setting
7th setting
1-3/8 - 3-3/4 in.
1 3/8 in.
1 7/8 in.
2 1/8 in.
2 5/8 in.
3 in.
3 3/8 in.
3 3/4 in.
N
20
OPERATING INSTRUCTIONS
Mowing tips
Note: A sharp blade will greatly enhance the performance of the mower, especially when cutting
high grass. Be sure to check the blade and to sharpen it at least once per year, as described in
the Care and Maintenance section.
• Verify that the lawn is free of stones, sticks, wires, and other objects that could damage the
blades or the motor. These objects could be accidentally thrown by the mower in any
direction, and could cause serious personal injury to the operator and to others. In order to
prevent electric shock, do not operate the mower in damp or wet conditions.
• Do not mow in circles. Travel back and forth across the lawn.
• When cutting thick grass, reduce walking speed in order to allow for a more effective cut and
a proper discharge of the clippings.
• For a healthy lawn, always cut off one-third or less of the total length of the grass. The
average lawn should be approximately 1-1/2 to 2 inches long during cool months, and
between 2 to 3-1/4 in. long during hot months. If there is growth, the lawn should be cut in
the fall.
Mulching tips
Note: Inspect the area where the mower is to be used and remove all stones, sticks, wires,
bones, and other debris that might be thrown by the rotating blade.
• Release the bail lever to turn the mower OFF when crossing any graveled area (stones can
be thrown by the blade).
• Set mower to the highest cutting height when mowing on uneven ground or in tall weeds.
• For effective mulching, do not cut wet grass, because it tends to stick to the underside of the
deck, preventing proper mulching of grass clippings. New or thick grass may require a nar-
rower cut. The ground speed should be adjusted to the condition of the lawn. If mowing has
been delayed and the grass has been allowed to grow longer than 4 in. (10 cm), mow the
lawn twice in order to reduce the grass height to a maximum of 3-1/4 in. (8.3 cm).
• Walk at a steady pace. Overlap the cutting rows. Do not let the grass get too tall. If the grass
gets too long, start at the highest cutting position and work down to the desired cutting height.
WARNING
If you strike a foreign object, stop the motor and remove the battery. Thoroughly inspect the mower
for any damage. Repair any damage before operating the mower. Excessive vibration of the
mower during operation is an indication of damage. Thoroughly inspect the mower and repair any
damage before operating the mower.
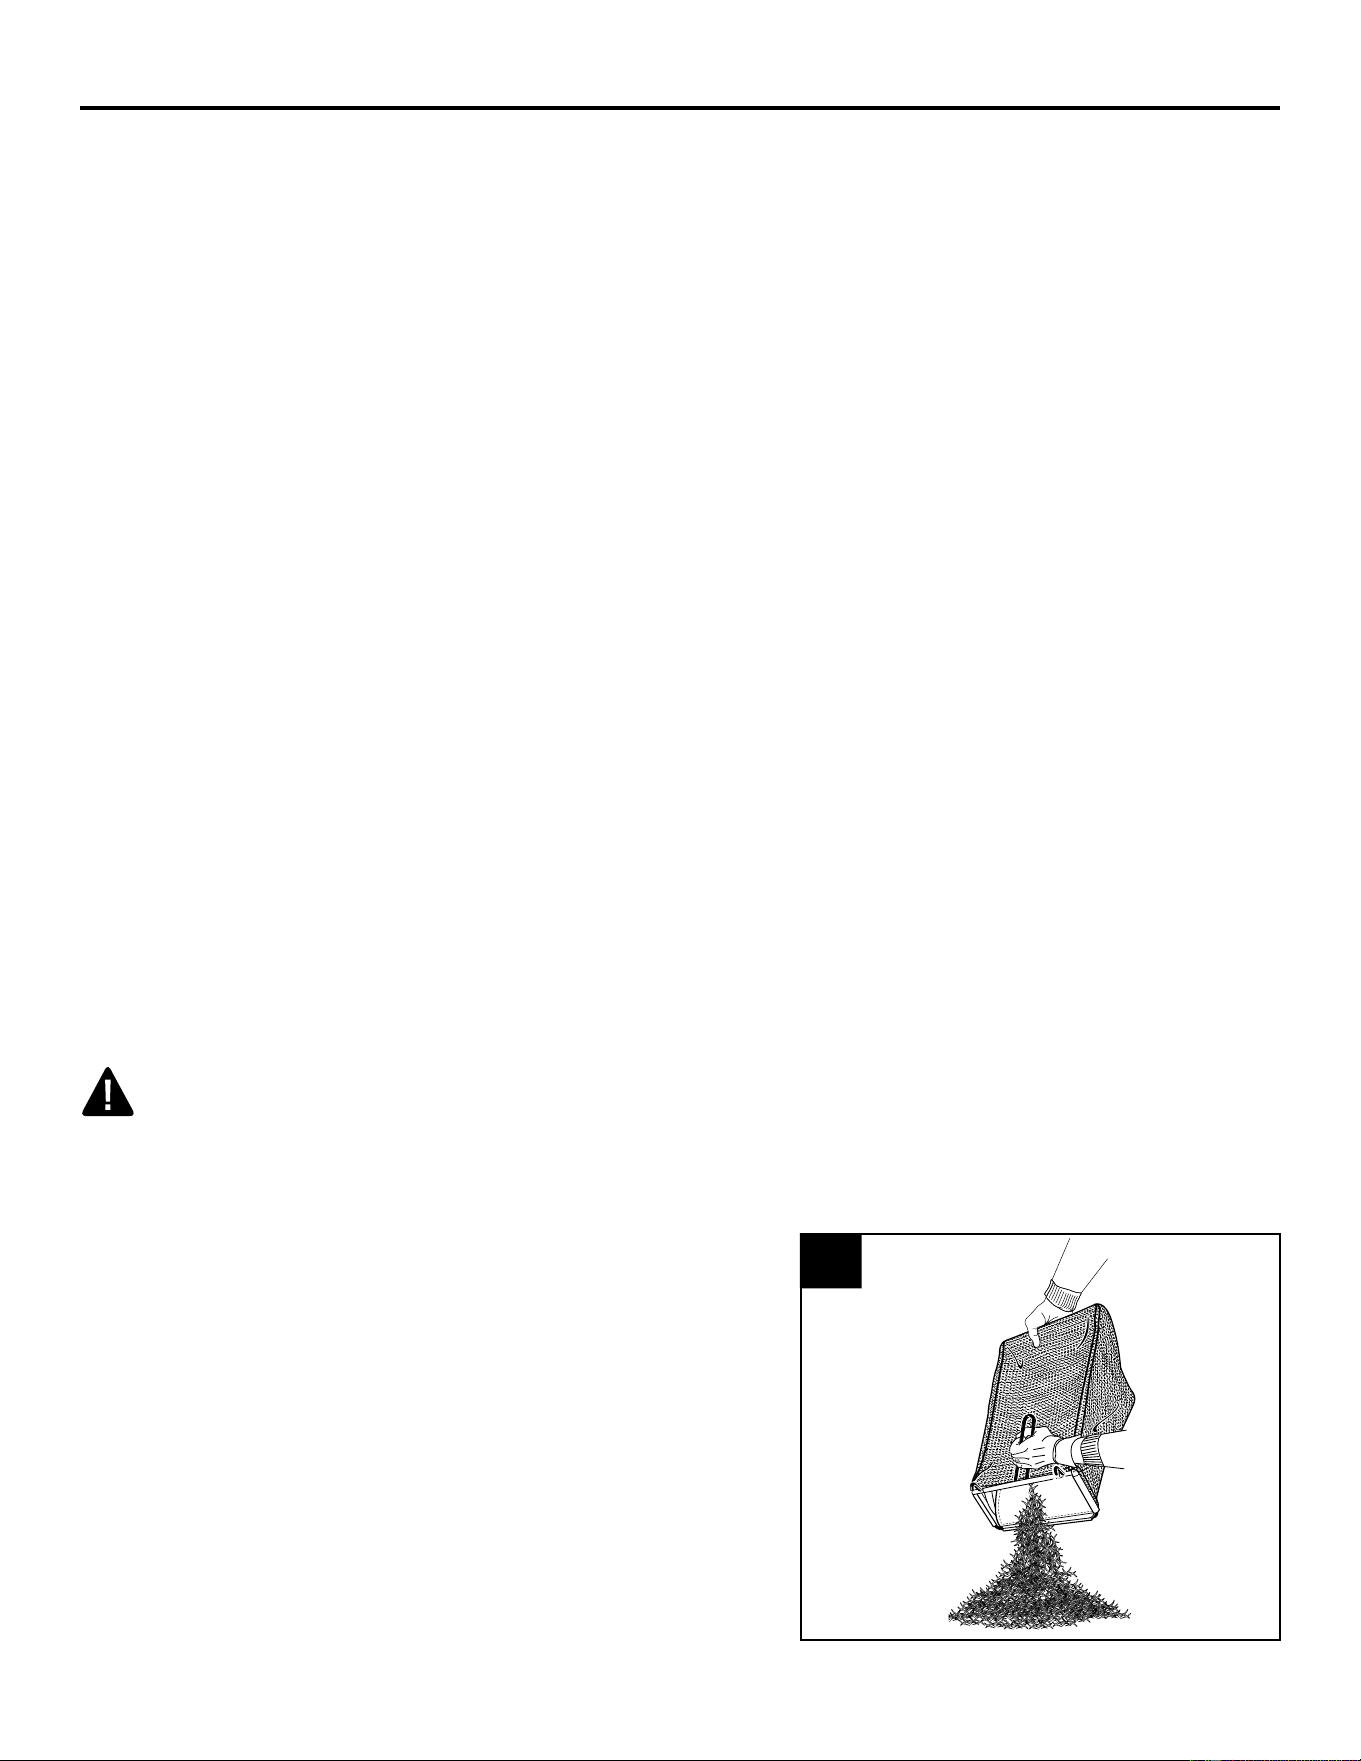
• Stop mower, allow blades to completely stop, and
remove the battery.
• Lift the rear discharge cover.
• Lift the grass catcher bag by its handle to remove from
mower.
• Empty grass clippings.
• Lift the rear discharge cover and reinstall the grass
catcher bag as described earlier in this manual.
5. Emptying the grass catcher bag
5
21
CARE AND MAINTENANCE
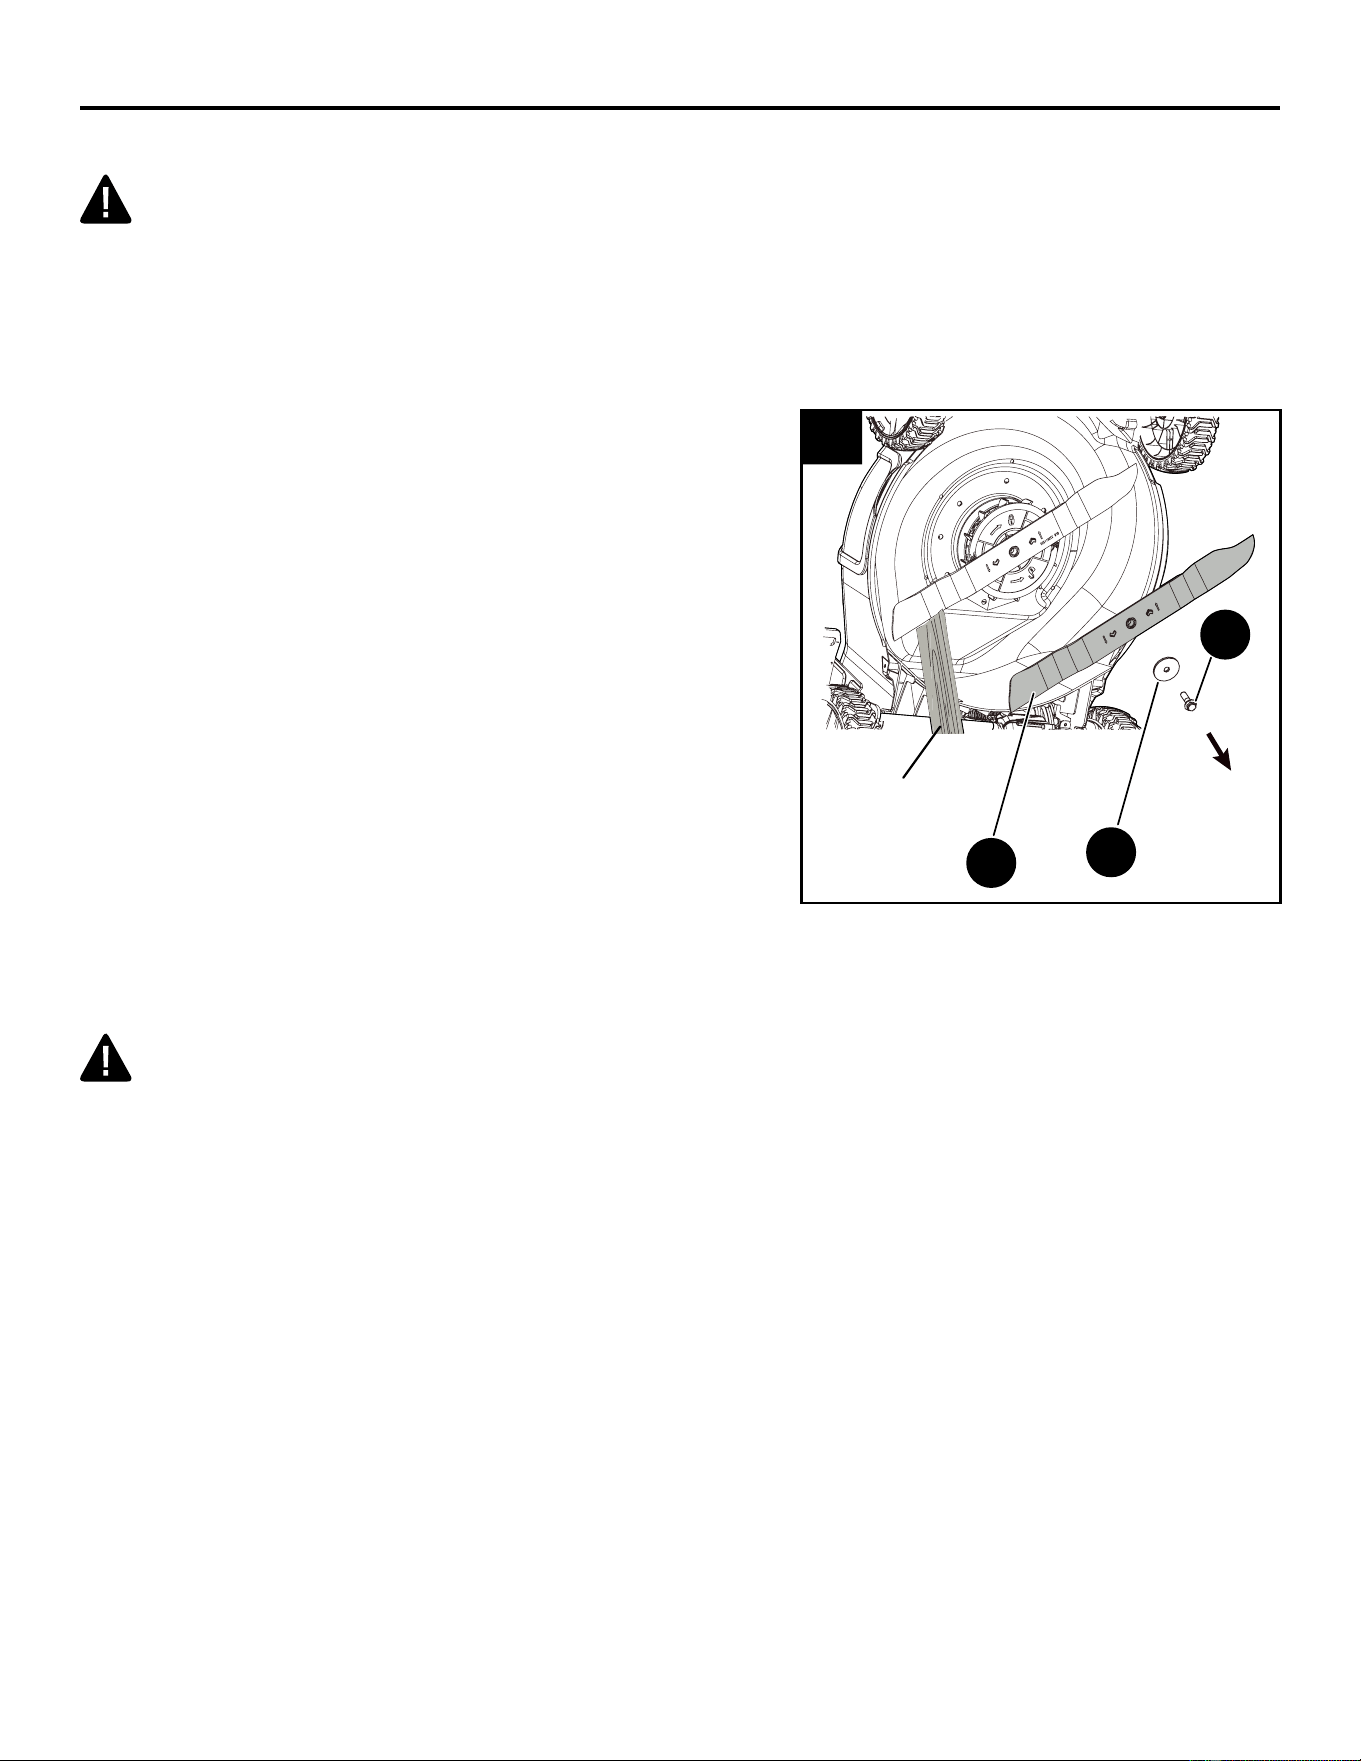
Replacing the cutting blade
WARNING
Always protect your hands by wearing heavy gloves and/or wrapping the cutting edges with rags or
other materials when performing any maintenance on the blades. Always remove the battery when
servicing or transporting the mower.
• Remove battery.
• While wearing leather padded gloves, wedge a block of
wood between the blade and the mower deck in order
to prevent the blade from turning when the nut is being
removed.
• Using an adjustable wrench or 27mm socket (not
included), loosen the blade bolt (R), spacer (V) and
remove the blade (Q). Turn the bolt counterclockwise to
loosen it and clockwise to tighten it.
• Remove the bolt and the blade.
• To re-install the blade, position the blade with the
cutting edges toward the ground. Assemble the bolt as
shown. Using a socket or wrench, turn the blade bolt
“CLOCKWISE” in order to secure the blade.
Cleaning the mower
WARNING
• In order to reduce the risk of electric shock, do not expose the mower to water. The underside of
the mower deck should be cleaned after each use, because grass clippings, leaves, dirt, and other
debris will accumulate, which will cause rust and corrosion.
• Remove any build-up of grass and leaves on or around the motor cover (do not use water).
Occasionally wipe the mower clean with a dry cloth. If debris builds up on the underside of the
mower during use, stop the motor, remove the battery, and then tilt the mower on its side, and
scrape it clean using an appropriate tool.
Use only a Kobalt replacement blade (Item #0648547, sold separately).
1
Block of wood
Q
R
V
22
CARE AND MAINTENANCE
Storing The Mower
The following steps should be taken in order to prepare the lawn mower for storage.
• Clean the mower as described in the previous section.
• Inspect the blade and replace it or sharpen it, if required (refer to the Replacing the cutting blade
section).
• Store the mower in a dry, clean location. Do not store it next to corrosive materials, such as
fertilizer or rock salt.
• Store the mower indoors, in a cool, dry place, out of the reach of children. Do not cover the lawn
mower with a solid plastic sheet. Plastic coverings trap moisture around the mower, which causes
rust and corrosion.
• The handle may be folded away completely for storage. Ensure that the handles “click” or lock into
place in the storage position.
• Remove the battery and store it in a cool dry location.
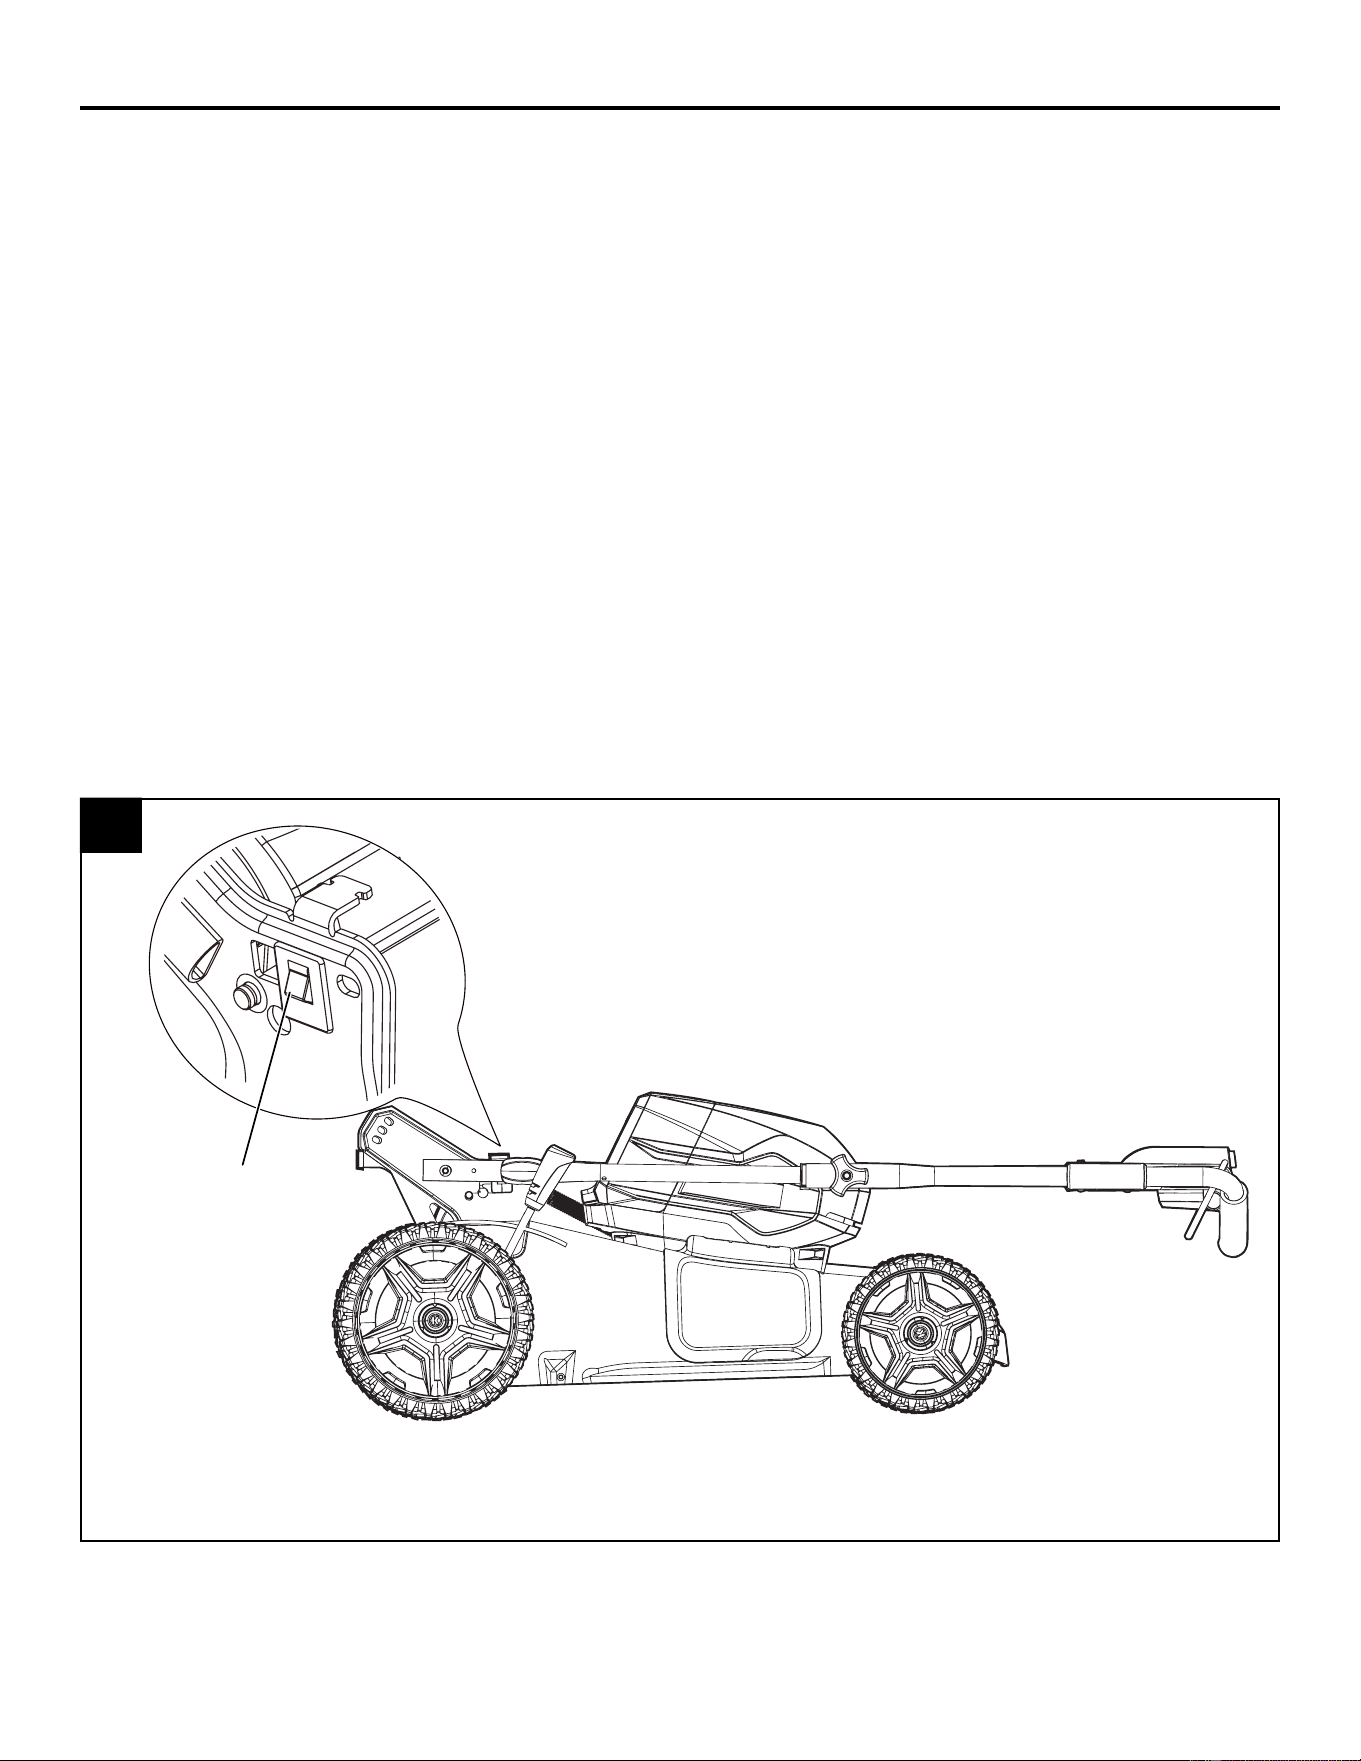
Storage Switch
When the handle is rotated into the fully locked storage position, the mower is equipped with a
storage switch that will disable the mower from running in the storage position. The storage switch
does not replace the need to remove the battery to prevent accidental start-up or unauthorized use.
2
Storage switch
23
CARE AND MAINTENANCE
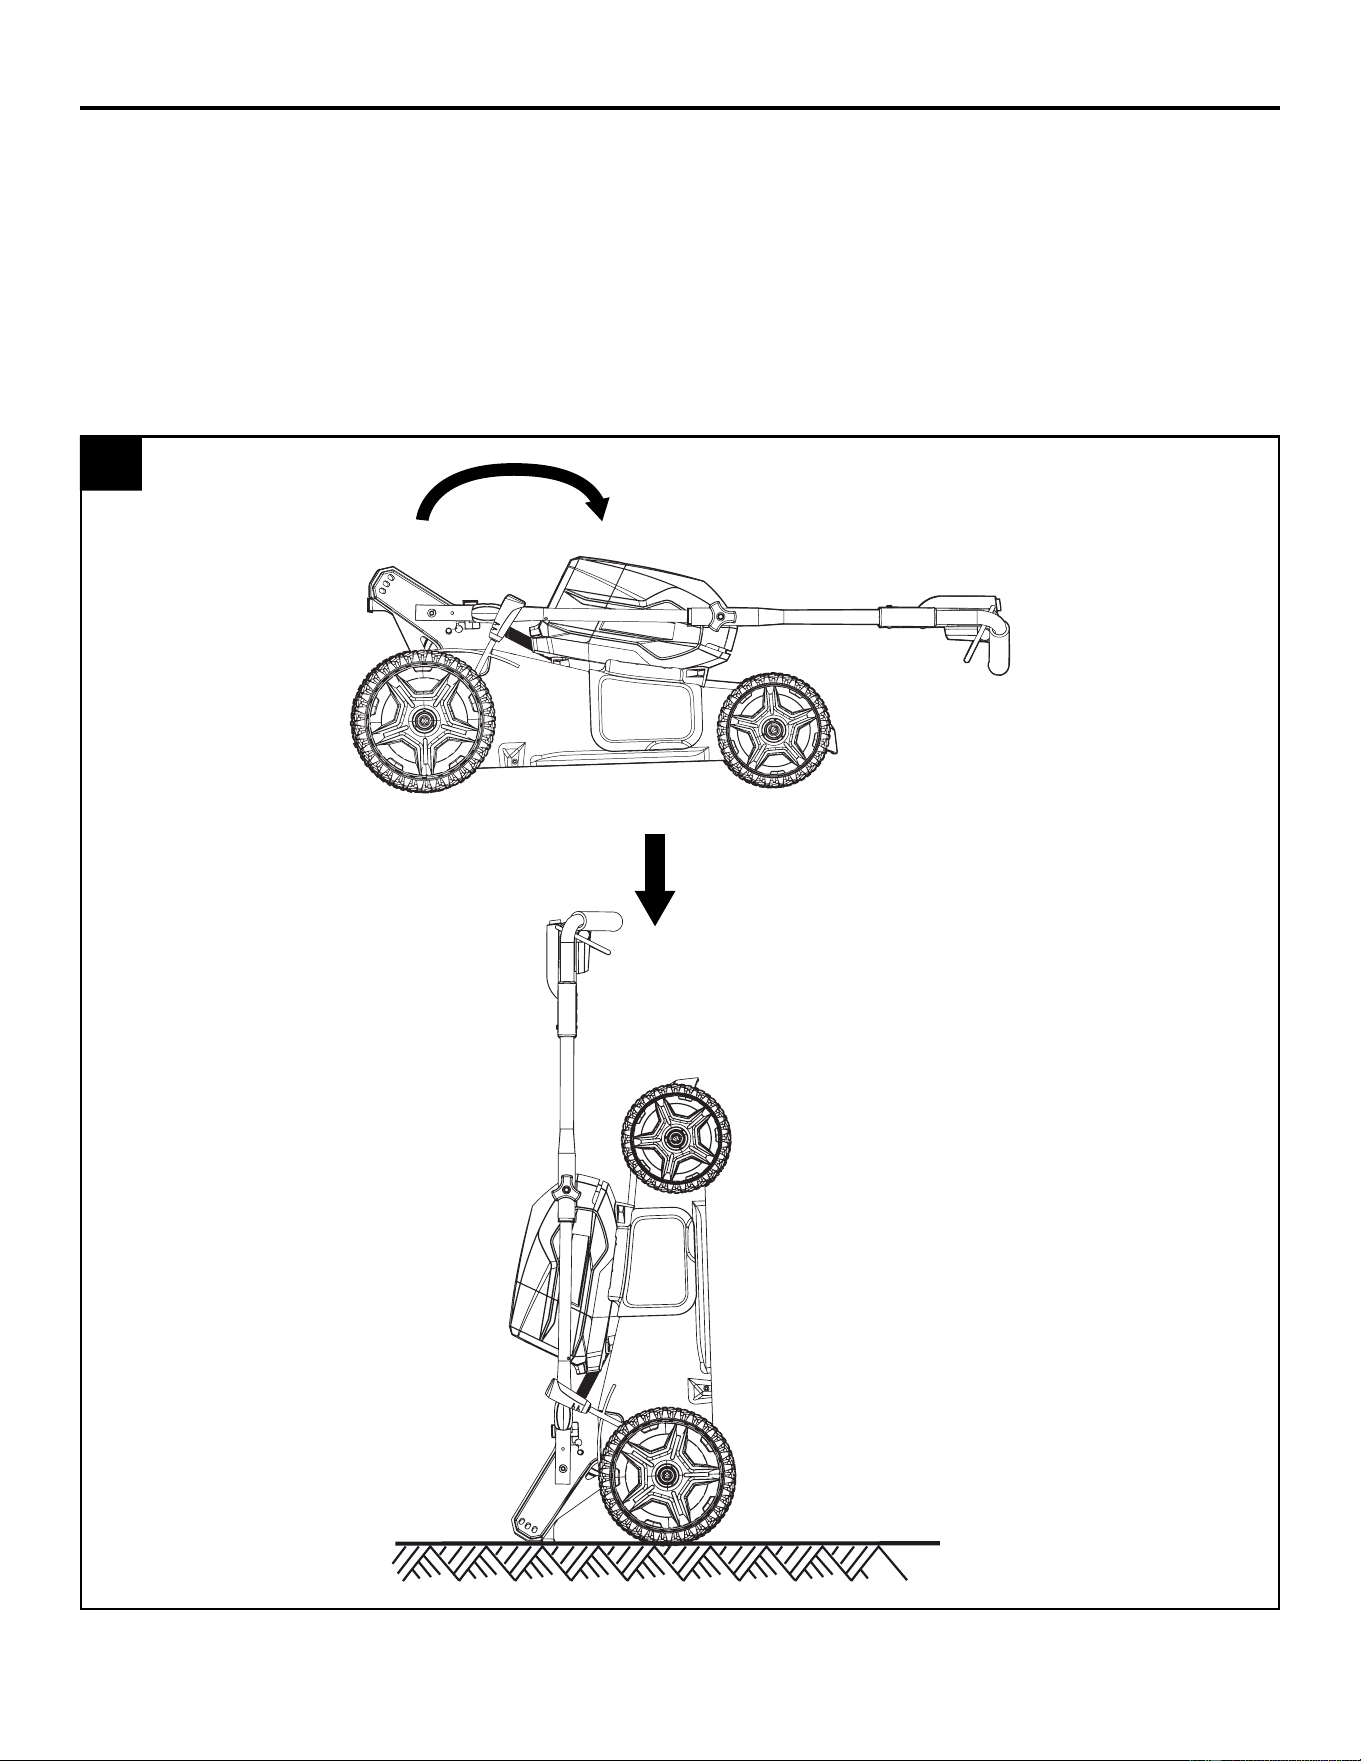
Storing the mower vertically
• Remove the battery and the key from the mower. Store in a cool and dry location.
• Remove the grass catcher bag if it is installed on the mower.
• Rotate the handle knobs to the unlocked position.
• Lower the handle assembly and rotated the handle knobs to the locked position.
• Lift the mower by the front end to the vertical position.
3

24
CARE AND MAINTENANCE
Service
Servicing requires extreme care and knowledge and should be performed only by a qualied service
technician. For service, it is suggested you return the product to your nearest AUTHORIZED
SERVICE CENTER for repair. When servicing, use only identical replacement parts.
WARNING
• When servicing the mower, use only identical replacement parts that are available from the
manufacturer. In order to obtain replacement parts, call the toll-free helpline, at 1-888-356-2258.
The use of parts that do not meet the original equipment specications may lead to improper
performance, and may compromise safety.
• Before cleaning, repairing, or inspecting; verify that the blade and all moving parts have come to a
complete stop. Remove the battery when making any adjustments or when any of the four wheels
must be lifted off the ground.
• Keep the handles dry, clean, and free of oil and grease.
• In order to reduce the risk of re, keep the motor free of grass, leaves, and debris build-up.
• Check the blade and motor mounting bolts for proper tightness frequently. Visually inspect blade
for damage (e.g., bent, cracked, or worn).
• For best and safest performance, maintain the mower with care. Keep the mower blade sharp and
clean. Mower blades are sharp and can cut. Wrap the blades or wear gloves, and use extra
caution when servicing.
• Keep all nuts, bolts, and screws tight in order to be sure that the equipment is in safe working
condition.
• Never tamper with safety devices. Check them regularly for proper operation.
• After striking a foreign object, stop the motor. Thoroughly inspect the mower for any damage.
Repair any damage before operating the mower.
• The grass catcher components, discharge cover, and trail shield are subject to wear and damage,
which could expose moving parts or allow objects to be thrown. As a safety precaution, check
these components frequently, and immediately replace any parts that show signs of wear, or that
are cracked or broken. Use original equipment manufacturer's (OEM) parts only, as listed in this
manual.
• When it is not in use, store the mower indoors in a dry area, and out of the reach of children.
WARNING
Always remove battery when servicing or transporting the mower.

25
TROUBLESHOOTING
If you still have questions or an unresolved issue after going through this troubleshooting guide, or
just want to speak to a Kobalt product expert, please call our Kobalt customer service department at
1-888-356-2258.
PROBLEM POSSIBLE CAUSE CORRECTIVE ACTION
The mower does
not start.
1. The battery is not charged.
2. The switch is defective.
3. Grass jammed at blade.
4. The battery is not inserted all the
way in the mower.
4a. Battery may need replacement.
1. Charge the battery.
2. Replace the switch.
3. Remove battery; check under
deck for jams or built up grass.
4. Insert the battery until it clicks.
4a. Call 1-888-356-2258.
The mower cuts
the grass unevenly.
1. The lawn is rough or uneven.
2. The cutting height is not set
properly.
1. Check the mowing area.
2. Move the wheels to a higher
setting.
The mower does
not mulch properly.
1. Wet grass clippings are sticking to
the underside of the deck.
2. The mulching plug is missing.
1. Wait until the grass dries before
mowing.
2. Install the mulching plug.
The mower is hard
to push.
1. The grass is too tall, or the cutting
height is too low.
2. The rear of the mower housing
and the blade are dragging in thick
grass.
1. Raise the cutting height.
2. Empty the grass clippings from
the grass catcher bag.
The mower vibrates
at higher speed.
1. The motor shaft is bent.
2. The blade is unbalanced.
1. Stop the motor, disconnect the
mower from the power source,
and inspect it for damage. Repair
the mower before restarting. If
the vibration persists, call
1-888-356-2258.
2. Call 1-888-356-2258.
Mower turns off
during mowing.
1. The battery is not charged.
2. Grass or debris is jammed between
the blade and deck.
3. Cutting height is set too low.
4. Operating temperature of the
mower is too high.
1. Charge the battery.
2. Remove battery; check under deck
for jams.
3. Increase the cutting height.
4. Move the mower to a cool, dry
location. Let rest for 30 minutes.

26
WARRANTY
5-YEAR LIMITED WARRANTY
This Kobalt 80 V 21 in. cordless self-propelled lawn mower is warranted to the original purchaser from
the original purchase date for ve (5) years subject to the warranty coverage described herein.
This Kobalt 80 V 21 in. cordless self-propelled lawn mower is warranted for the original user to be
free from defects in material and workmanship.
If you believe that the Kobalt 80 V 21 in. cordless self-propelled lawn mower is defective at any time
during the specied warranty period, simply call our Warranty service (1-888-356-2258) along with
proof of purchase.
This warranty is void if: defects in materials or workmanship or damages result from repairs or
alterations which have been made or attempted by others or the unauthorized use of nonconforming
parts; the damage is due to normal wear, damage is due to abuse (including overloading of the tool
beyond capacity), improper maintenance, neglect or accident; or the damage is due to the use of the
tool after partial failure or use with improper accessories or unauthorized repair or alteration.
This warranty excludes replacement blades and grass bag.
This warranty gives you specic legal rights, and you may also have other rights that vary from state
to state.
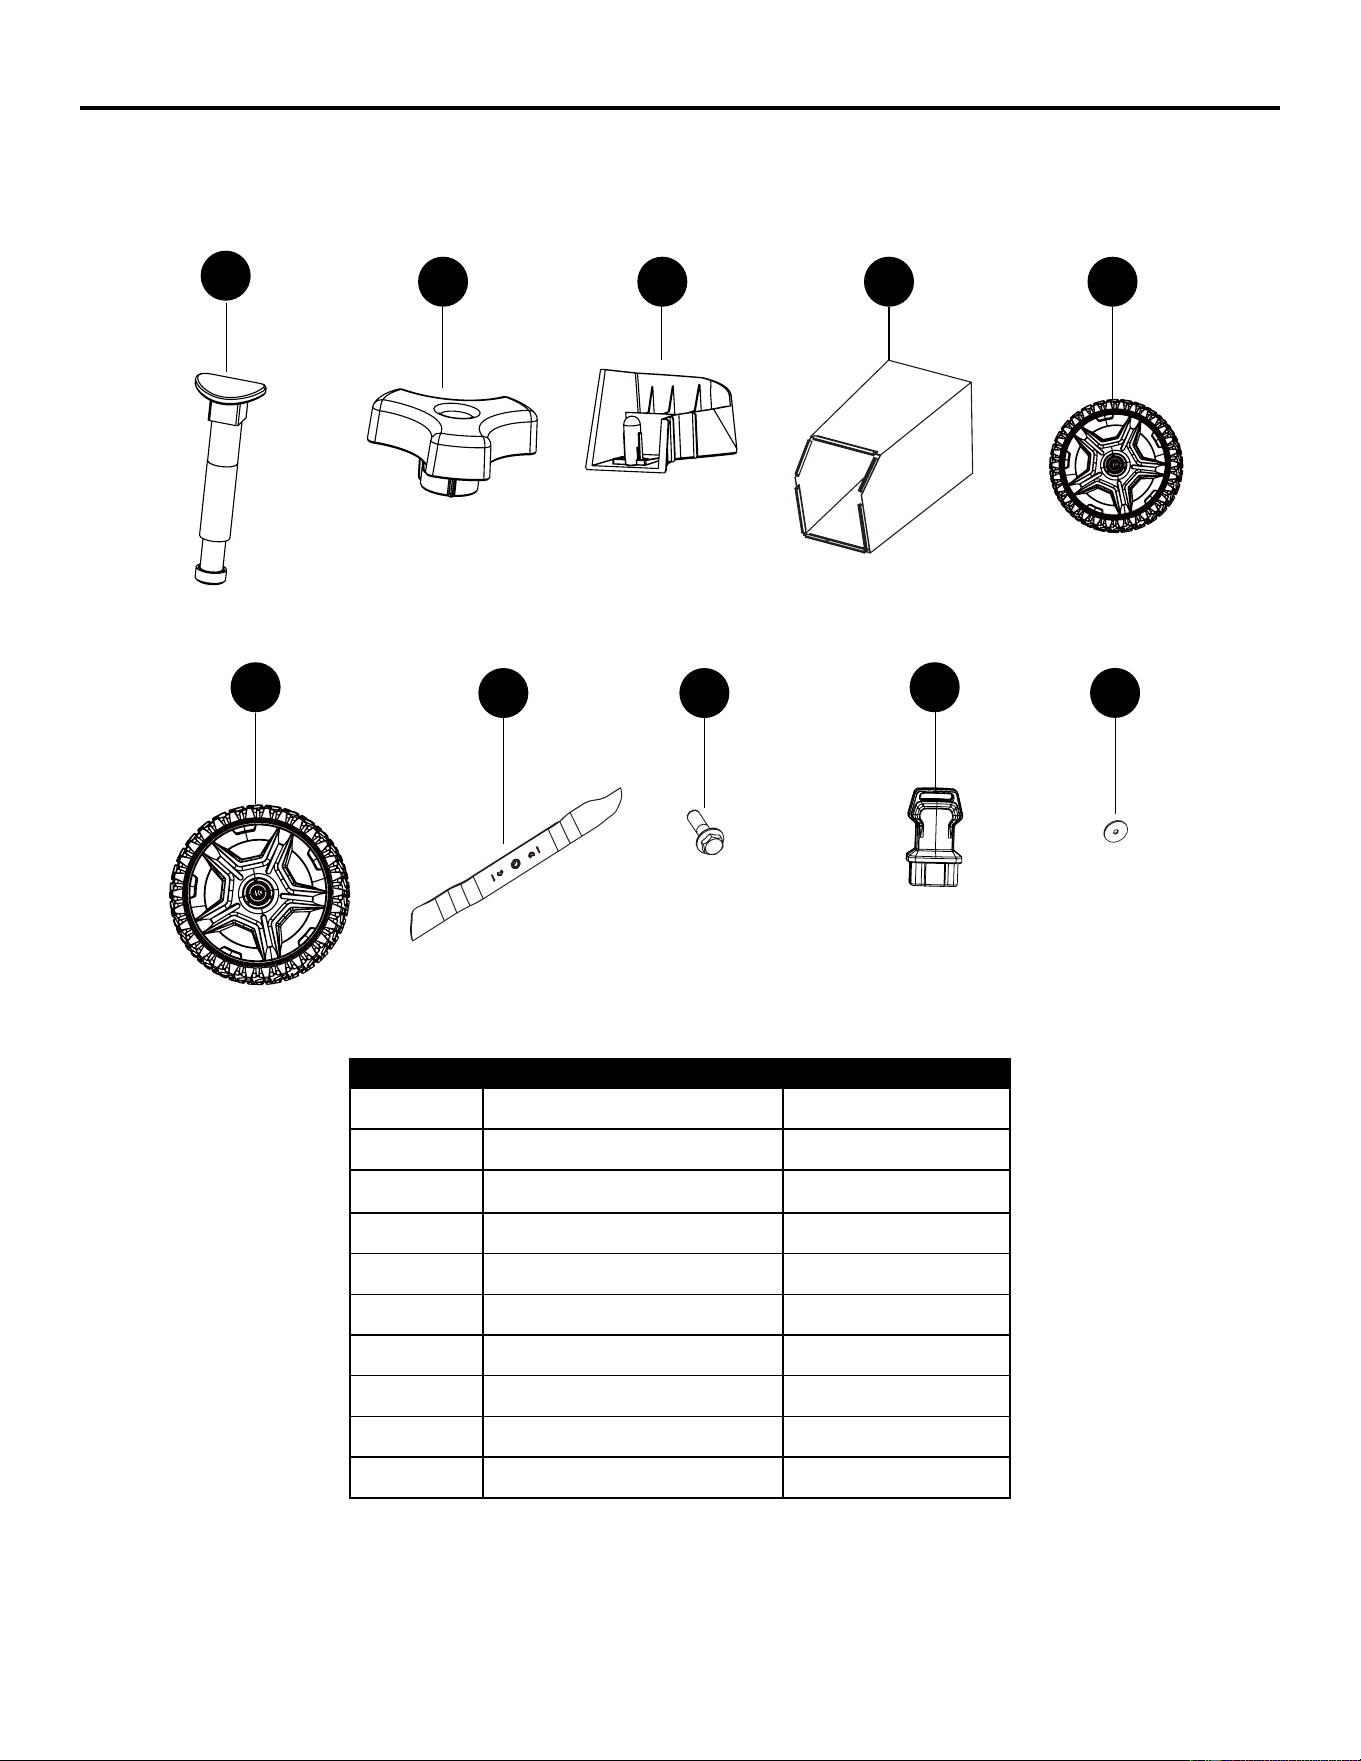
27
REPLACEMENT PARTS LIST
For replacement parts, call our customer service department at 1-888-356-2258.
PART DESCRIPTION PART #
AA Handle bolt 322011043A
BB Handle knob 341291179
D Mulching plug 341043431
F Grass catcher 349011179KC
S Front wheel 341981555A
T Rear wheel 341971555A
Q Blade 333041179
R Blade bolt 322041555
U Safety key 311082374
V Spacer 333021527
Printed in China
AA
BB D F S
T
Q R
U
V