7081 295-00
Operating instructions
Wine storage cabinet
Page 16

16
Many thanks for your trust.
Congratulations on your purchase of this wine storage cabinet. In buying this product,
which is distinguished by its perfect user-friendliness, impeccable reliability and high
quality, you have chosen a top class appliance. We wish you a lot of pleasure with your
new wine storage cabinet - and a lot of enjoyment from your wines.
The right environment for your wines.
A vine is an extremely sensitive plant. From the time it is planted to its maturing period
and the time the grapes are harvested and the wine is made, it is dependent on three
factors: light, air humidity and ambient temperature. This sensitivity continues even once
the wine is bottled. To allow the avour of the wine to fully develop or to preserve the
excellent aroma, the wine has to be stored perfectly - and your wine storage cabinet
oers the best conditions for this.
The fewer the grapes produced in an area, the better
the wine.
Poor, well-drained soils are best for good wines. The properties of the soil inuence
the vitality of the vine, which in turn aects the quality of the grape. Climate is another
factor that is important for wine. Because light and air humidity are important for the
development of the avour of the wine.
EPREL database
As from 1 March 2021, information about energy labelling and ecodesign require-
ments will be available in the European product database (EPREL). You can access
the product database using the following link: https://eprel.ec.europa.eu/. You will be
asked to enter the model identier. You will nd the model identier on the type plate.
17
EN
Contents Page
Setting up ...........................................................................................18
Range of appliance use ......................................................................18
Dimensions ......................................................................................... 18
Electrical requirement .........................................................................19
Operating and control elements ..........................................................19
Switching the appliance on and o .....................................................20
Setting the temperature ......................................................................20
Fan switch ........................................................................................... 20
Audible warning signal .......................................................................21
Interior light .........................................................................................21
Setup mode ........................................................................................22
Equipment ..........................................................................................24
Storing wine ........................................................................................25
Defrosting ...........................................................................................26
Cleaning .............................................................................................26
Malfunctions .......................................................................................27
Shutting your appliance down ............................................................. 27
Safety instructions and warnings ........................................................28
Disposal notes ....................................................................................29
Wall mounting .....................................................................................29
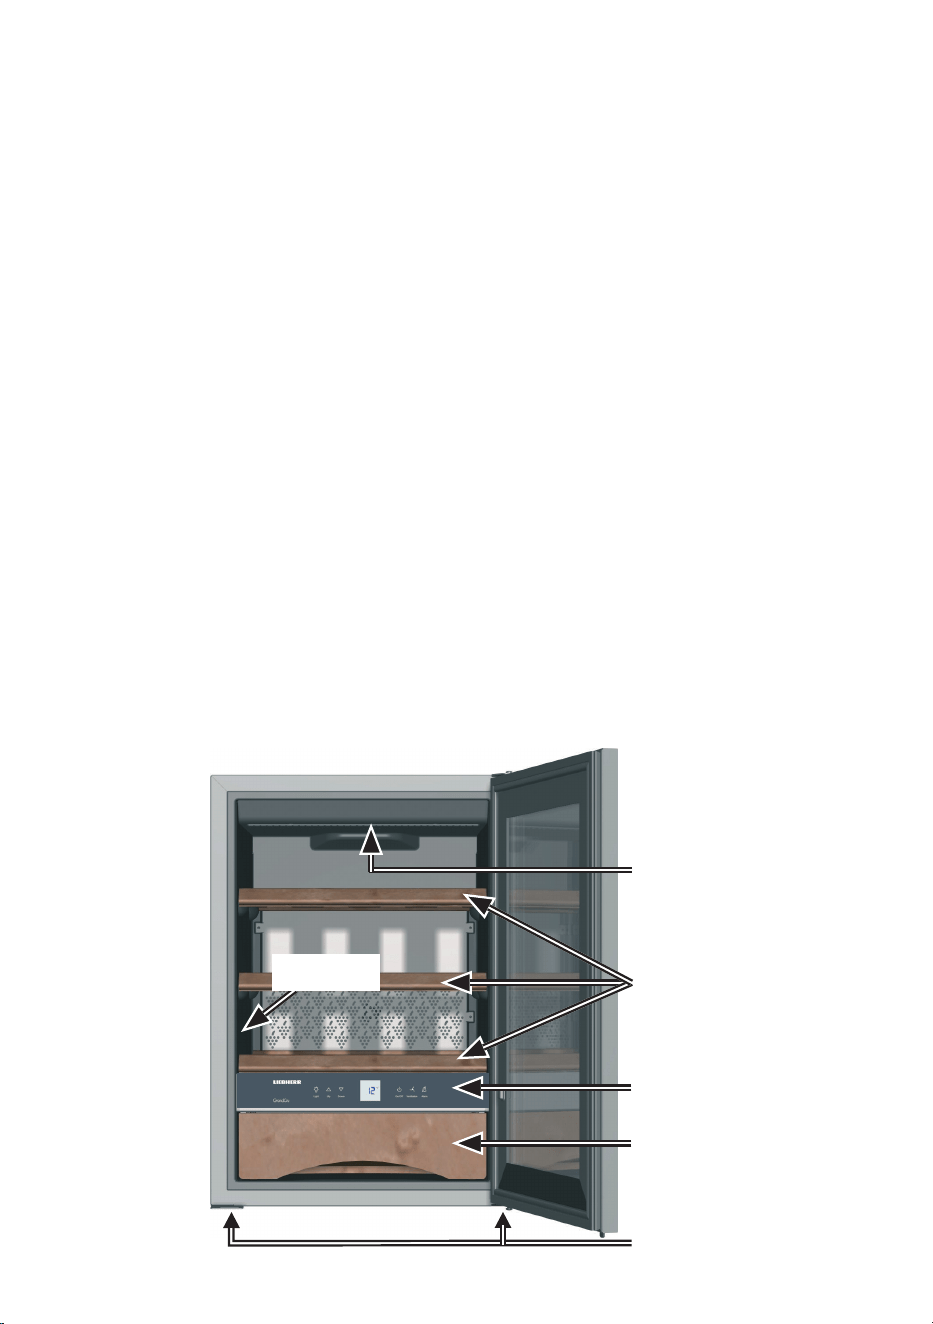
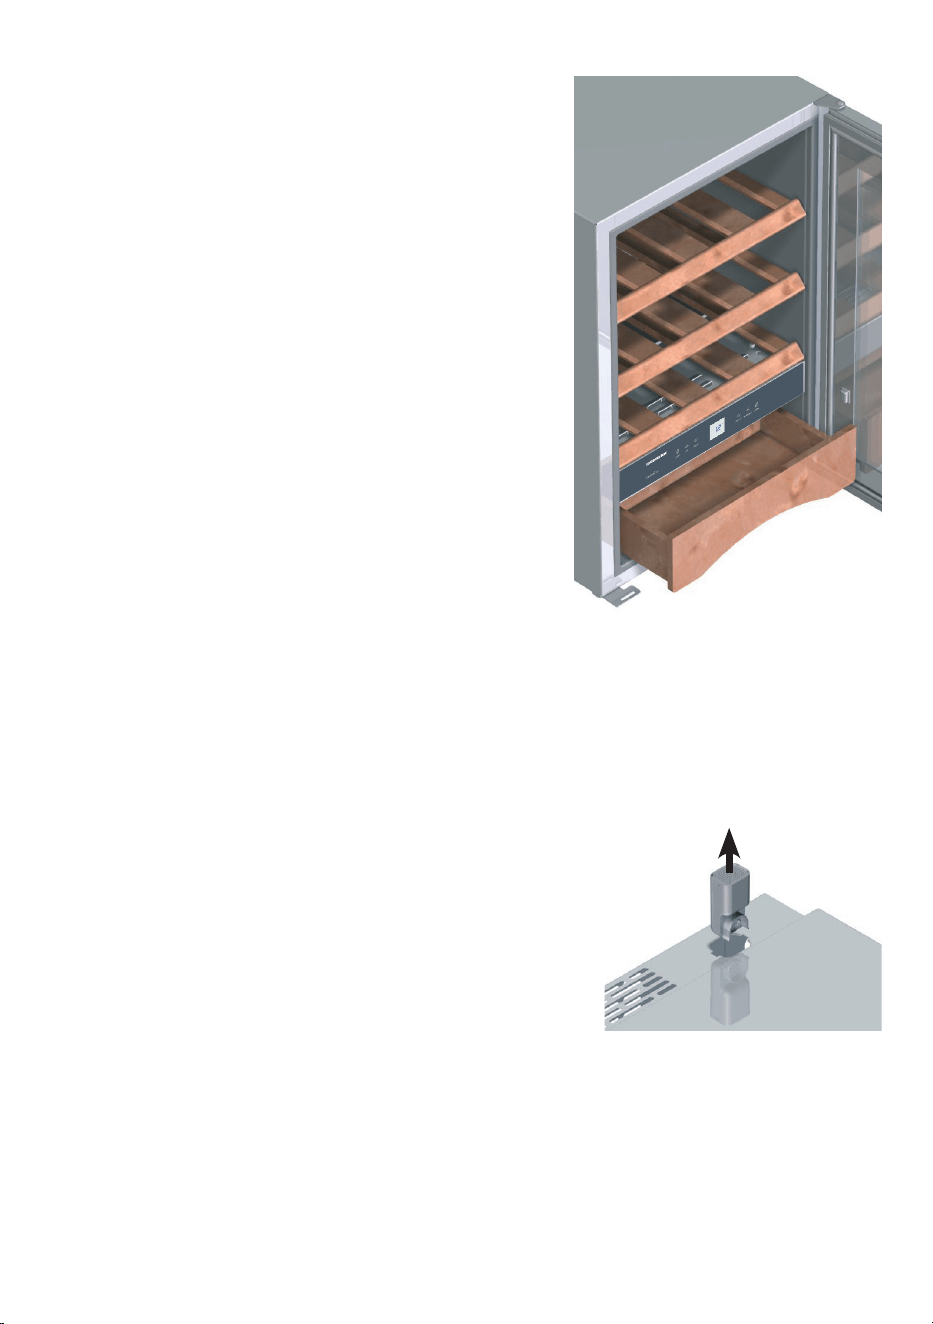
Description of appliance and equipment
Adjustable-height feet
Operating and
control elements
Bottle grids
Accessories drawer (for
corkscrews etc.)
Interior light
Type plate
18
Setting up
• Avoid locating the appliance in direct sunlight or near heat sources such as an
oven or a radiator.
• The oor should be level and even. You can
compensate for an uneven oor by adjusting the
adjustable feet.
• Please make sure the appliance is properly venti-
lated. The ventilation slots must not be covered!
• Standard EN 378 species that the room in which you install your appliance must
have a volume of 1 m
3
per 8 g of R 600a refrigerant used in the appliance, so as
to avoid the formation of inammable gas/air mixtures in the room where the ap-
pliance is located in the event of a leak in the refrigerant circuit. The quantity of
refrigerant used in your appliance is indicated on the type plate on the inside of the
appliance.
• The appliance is set to operate within specic ambient temperature limits accord-
ing to its climate rating. These temperature limits should not be exceeded.
The appliance has the following climate rating: SN = +10°C to +32°C.
• When installing two appliances next to each other, always leave a gap of 50 mm to
prevent condensation forming in the gap.
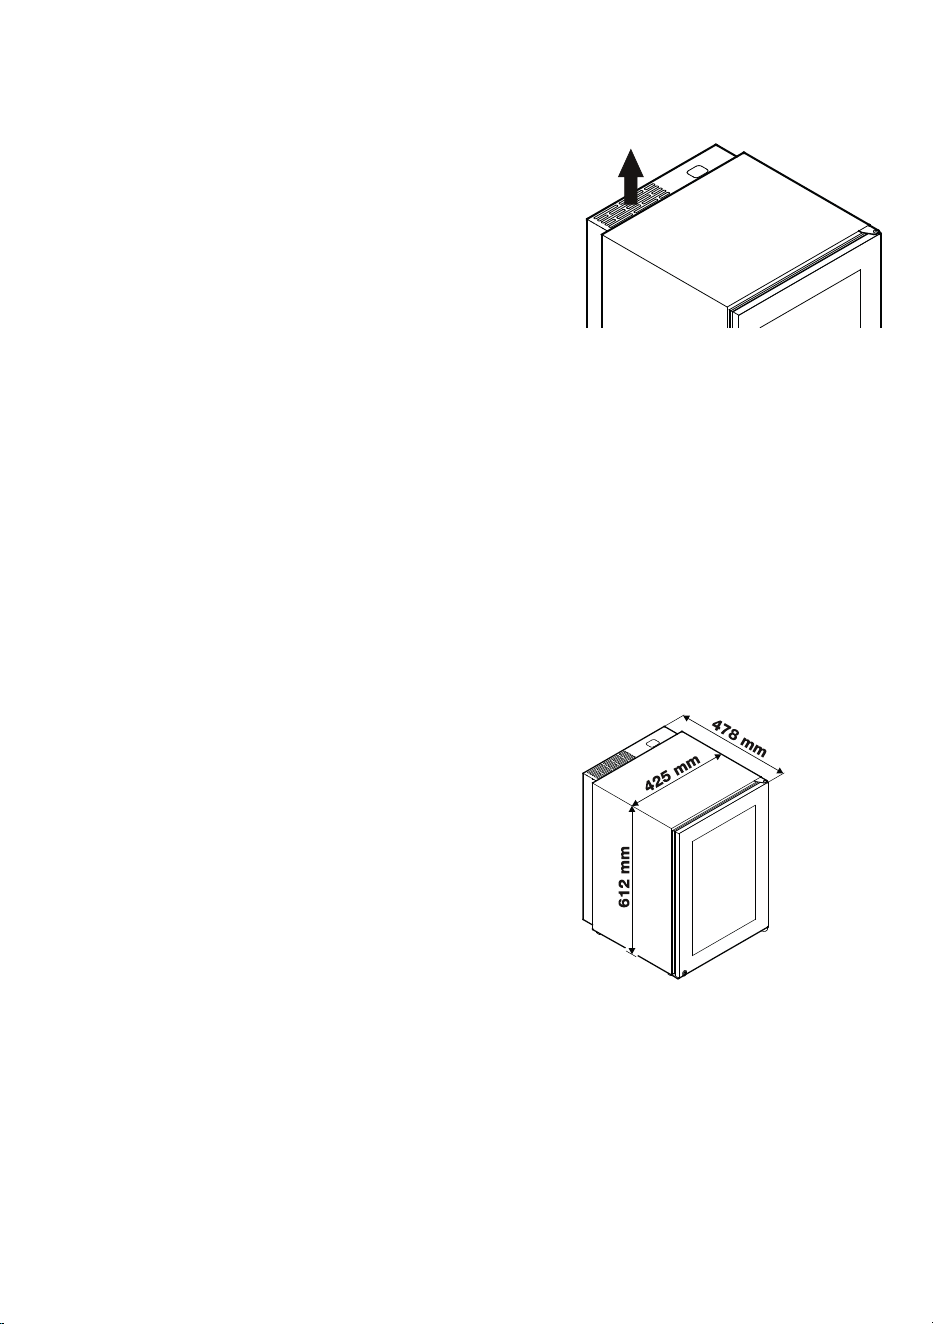
DimensionsRange of appliance use
The appliance is suited only for storing
wine.
The appliance is not suited for storing and
cooling pharmaceuticals, blood plasma,
laboratory preparations or similar sub-
stances and products subject to the Medi-
cal Devices Directive 2007/47/EC.
Any misuse of the appliance may result in
damage to or spoilage of the stored goods.
Furthermore, the appliance is unsuited
for use in areas exposed to an explosion
hazard.
19
EN
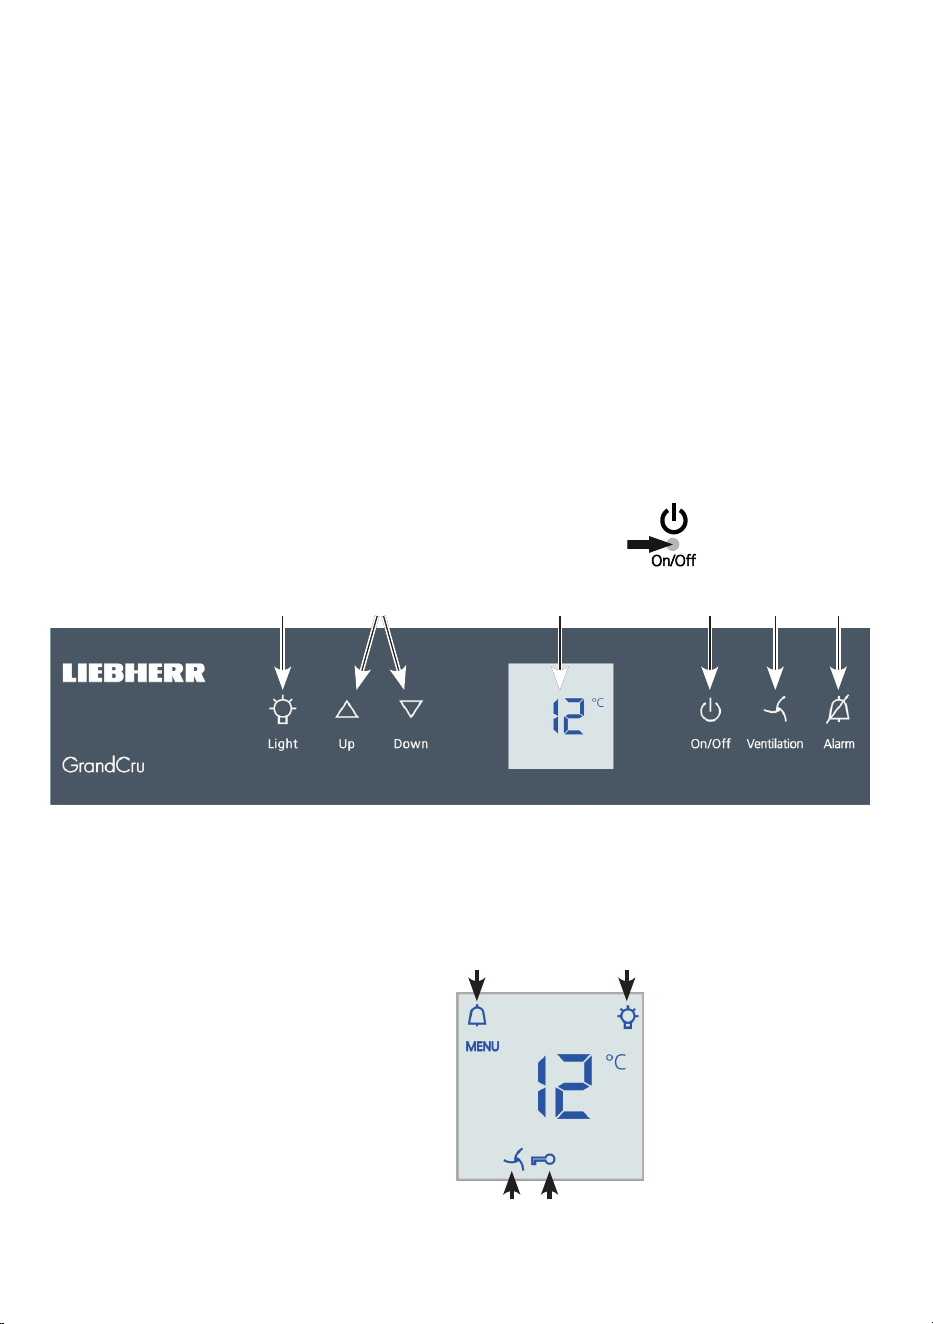
Operating and control elements
The electronic control panel has the new "touch capacitance technology". Any
function can be activated by a ngertip touching the corresponding icon.
The exact contact point is between the symbol and its label
Operating elements
Appliance ON/OFF
Temperature setting buttons
Interior light ON/OFF
Mute alarm
Fan ON/OFF
Temperature display
Control elements
Interior light ON symbol
Alarm symbol
Child lock activated symbol
Fan ON symbol
(1)(2)(3) (6) (4 )(5)
(8) (7)
bl (9)
Electrical connection
Only operate the appliance with alternating current (AC). The permissible voltage
and frequency are indicated on the type plate.
The socket must be properly earthed and protected by a fuse. The tripping current of
the fuse must be between 10 A and 16 A.
The socket must not be situated behind the appliance and must be easily
accessible.
Do not connect the appliance using an extension cable or extension socket.
Do not use stand-alone inverters (conversion of direct current to alternating/three-
phase current) or energy-saving plugs. Risk of damage to the electronic control
system!
20
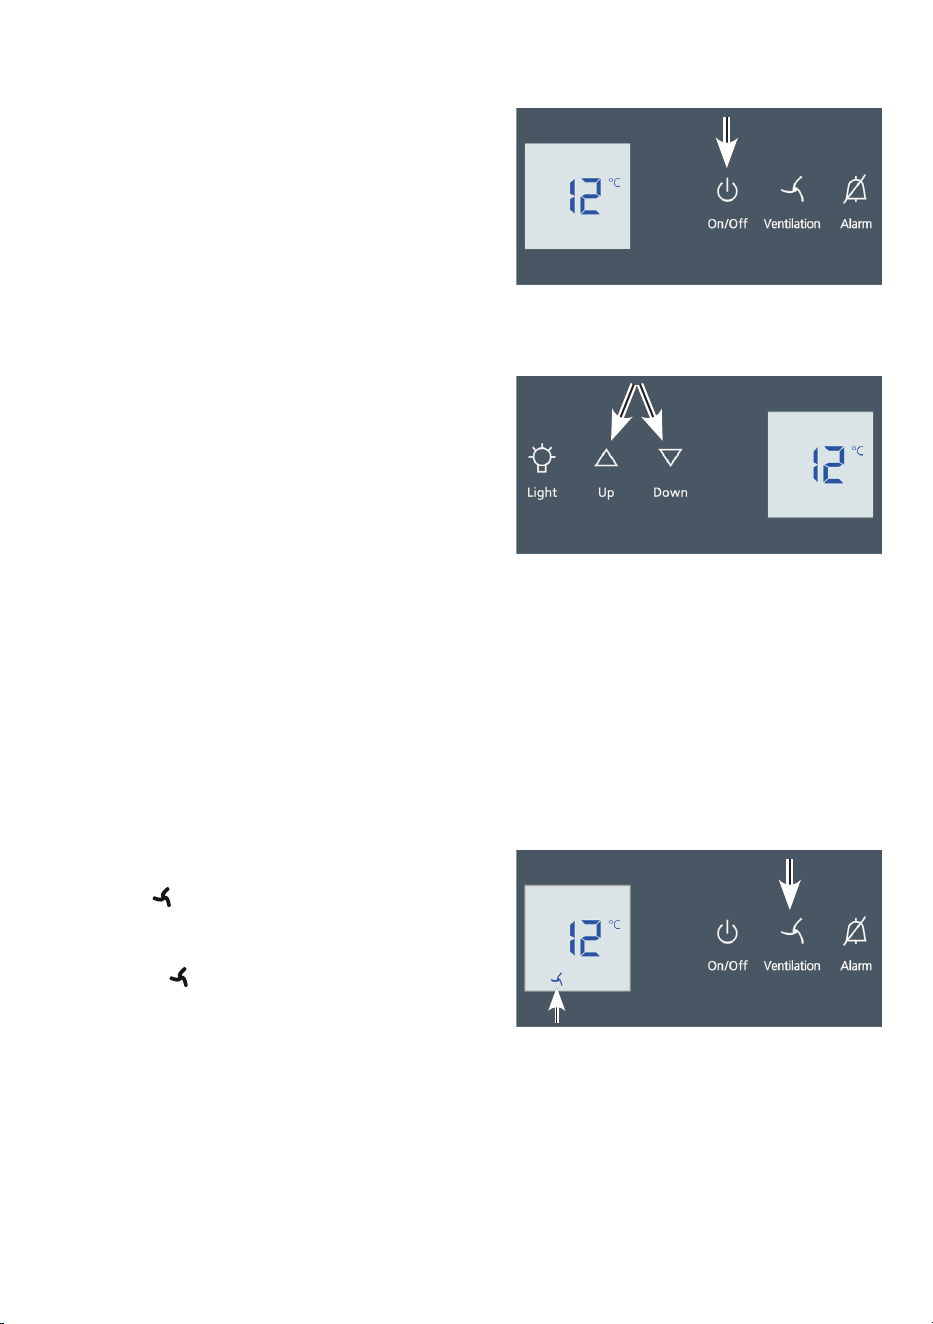
Switching the appliance on an o
Switching on: Press the On/O button so
that the temperature display lights up.
Switching o: Press the On/O button for
approx. 3 seconds so that the temperature
display goes out.
Setting the temperature
To reduce the temperature:
Press the Down button.
To increase the temperature:
Press the Up button.
- While you are entering the temperature, the
set temperature will ash on the display.
- You can change the settings in increments
of 1°C briey pressing the button again.
- The electronic controls will switch over automatically about 5 seconds after the last
time you pressed the button, and the actual temperature will be displayed.
The temperature can be set between +5°C and +20°C.
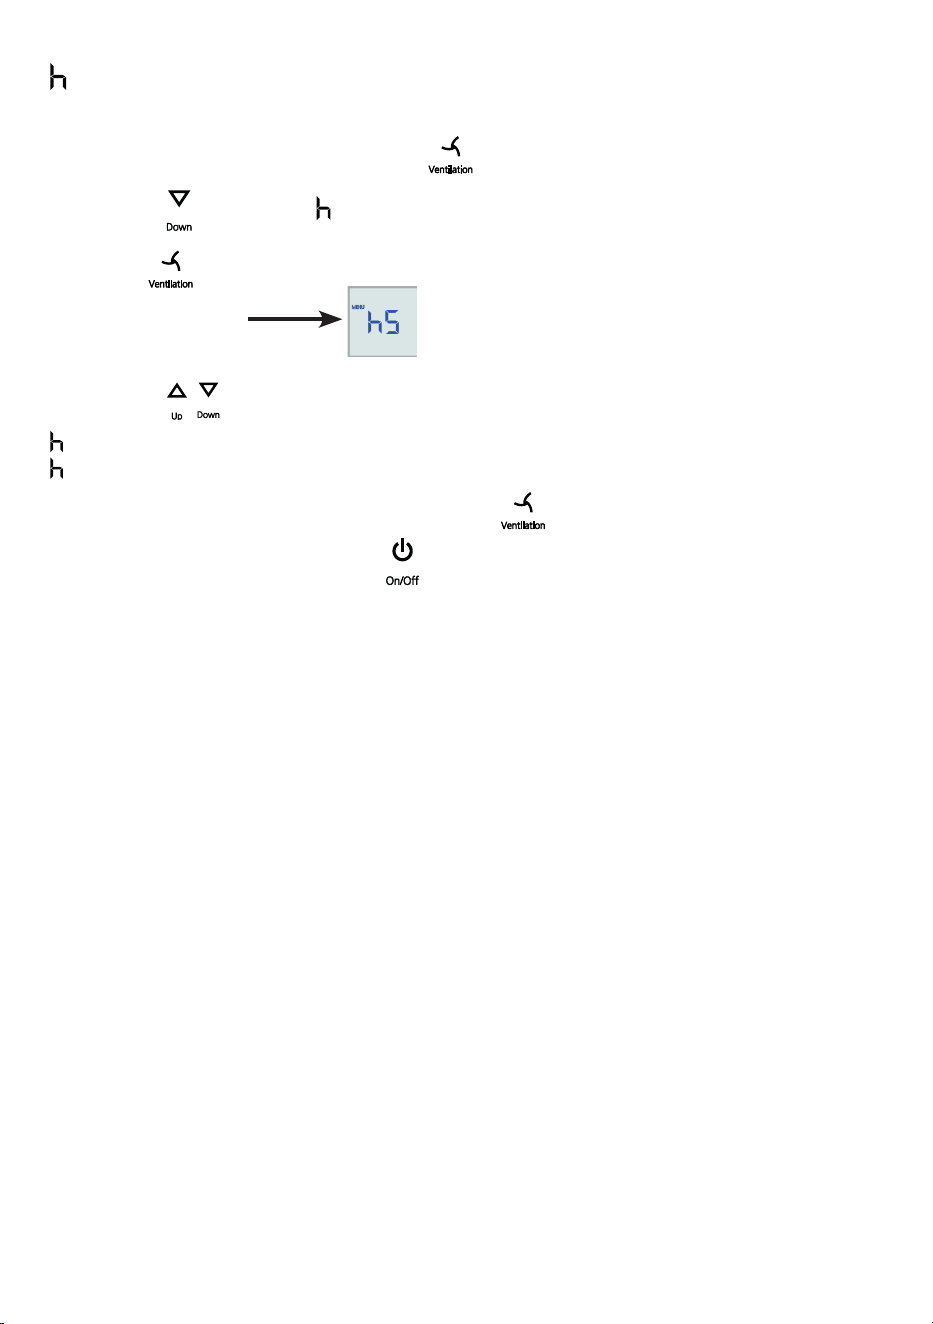
Fan switch
Thereby a climate which corresponds to that of a wine cellar is achieved inside the
appliance. Corks are prevented from drying out due to an increased level of humidity.
Switching on: Press the Ventilation but-
ton. The symbol will light up.
Switching o: Press the Ventilation button
again. The symbol will go out.
21
EN
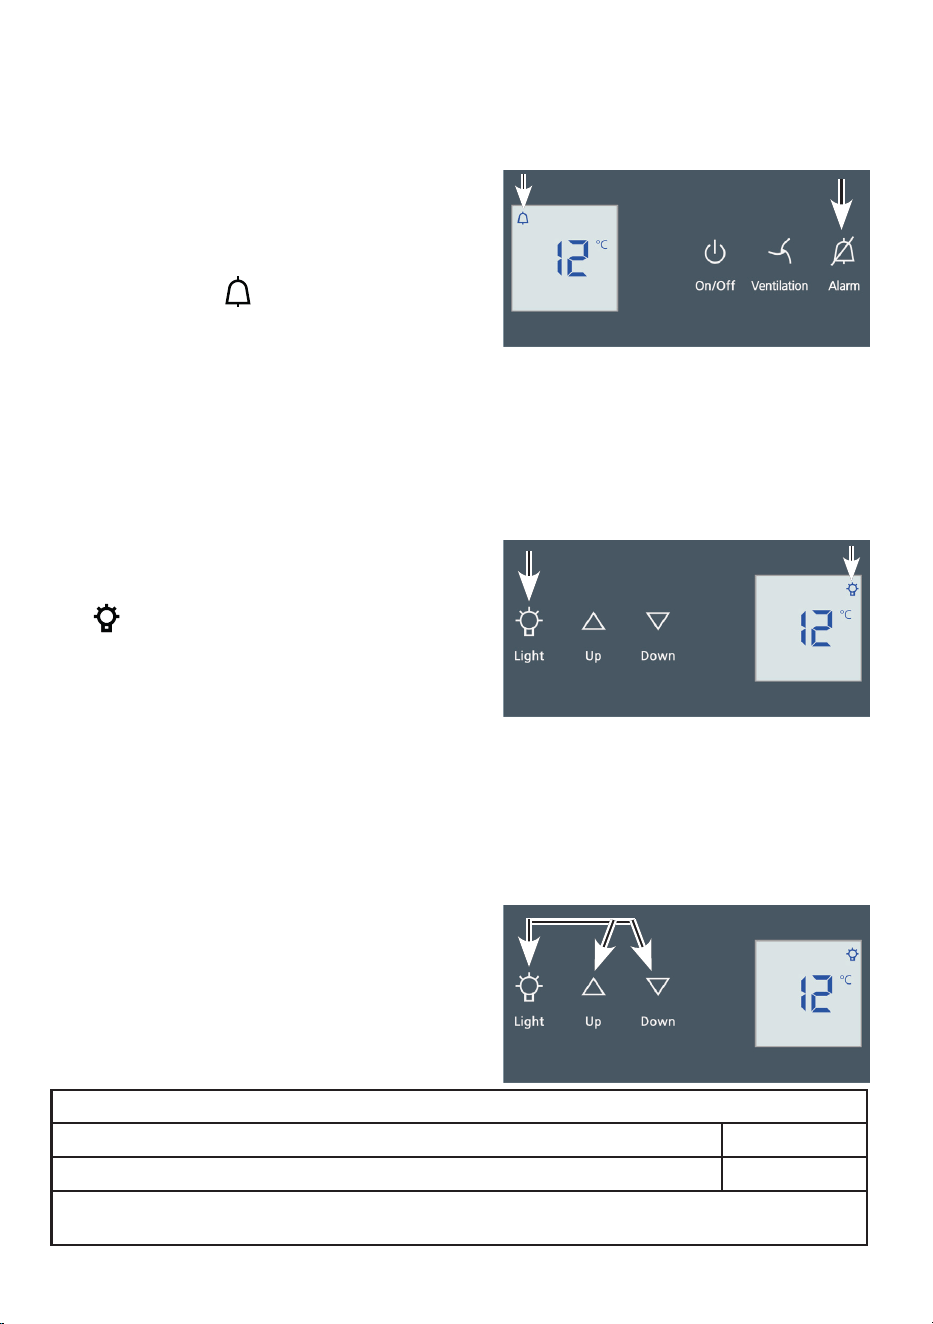
Audible warning signal
The audible warning signal helps to protect your wines against excessive tempera-
tures uctuations.
It sounds when the door has been left open
for longer than 60 seconds.
It sounds when the interior gets too warm or
too cold. The temperature display will also
ash. The symbol
lights up.
The audible warning device is switched o by
pressing the Alarm button.
The temperature display will continue to ash until the cause of the alarm has been
rectied.
Interior light
The interior light is tted on the inside at the top.
The interior lighti can be switched on and o
using the Light button.
The
symbol lights up when the light is
switched on.
Caution - class 1M laser radiation. When
cover is removed, do not look directly at
light through optical instruments.
The interior lighting may only be replaced by the customer service techni-
cian or by competent skilled personnel!
Furthermore, the brightness of the lighting can be adjusted.
Press and hold the Light button and at the
same time press the temperature setting but-
tons to increase or decrease the brightness.
Down = darker
Up = brighter
Lighting
Class
1
Light source
This product contains a light source that meets energy efficiency rating G
LED
1
The appliance may contain light sources with different energy efficiency classes. The lowest
energy efficiency class is indicated.
22
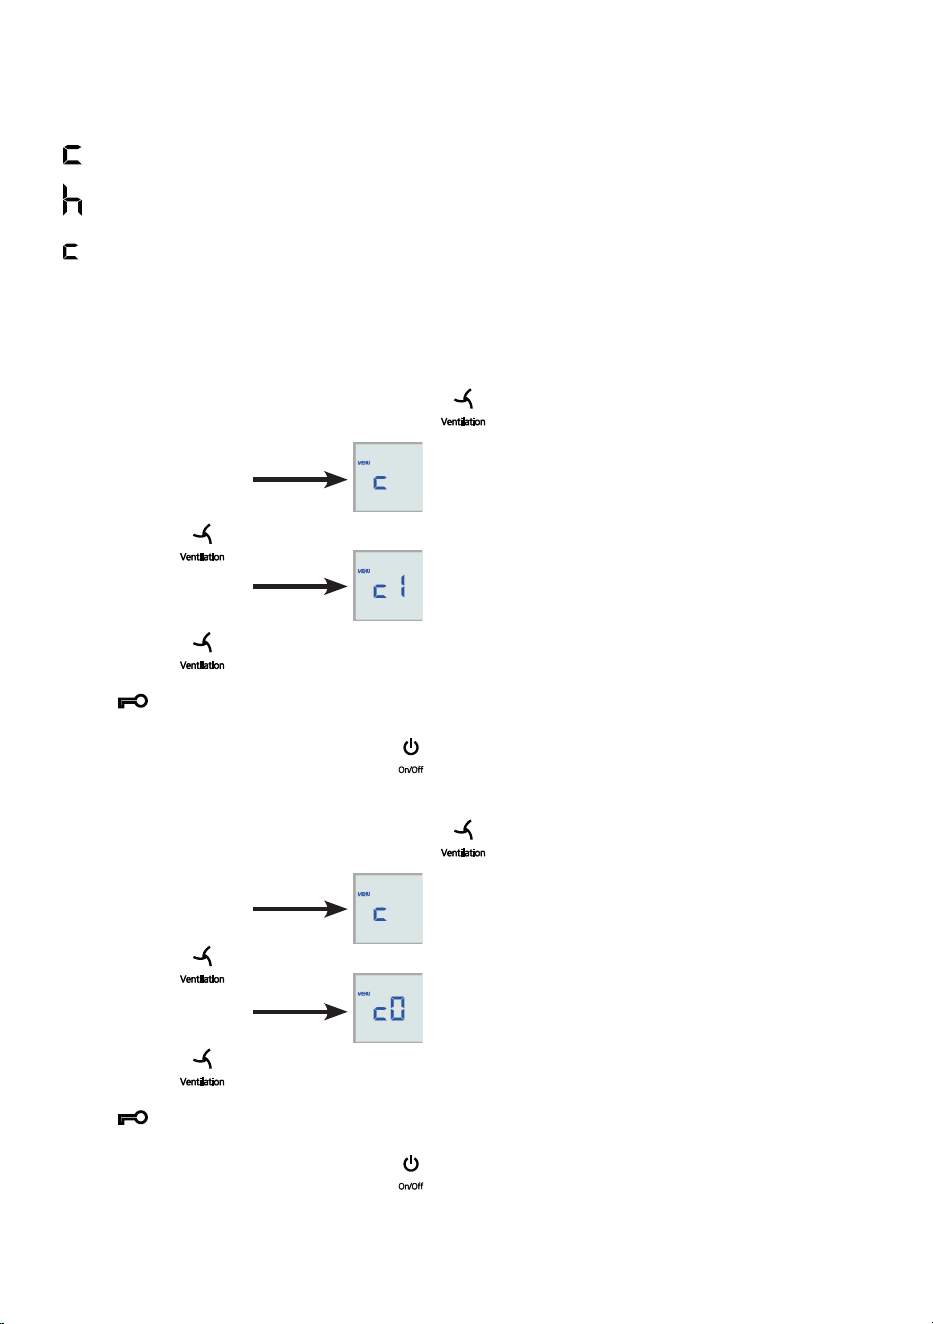
Setup mode
The following functions can be activated in setup mode:
= Child lock
= Display brightness
= Child lock
The child lock is designed to protect the appliance from being switched o acciden-
tally.
Activating the child lock
• Activate setup mode by pressing the
button for 5 seconds.
- The display reads
• Press the button.
- The display reads
• Press the button again.
- The symbol will light up to indicate that the child lock is activated.
• Exit setup mode by pressing the button.
Deactivating the child lock
• Activate setup mode by pressing the
button for 5 seconds.
- The display reads
• Press the button.
- The display reads
• Press the button again.
- The symbol will go out, indicating that the child lock is deactivated.
• Exit setup mode by pressing the button.
23
EN
= Display brightness
Adjusting the display brightness
• Activate setup mode by pressing the
button for 5 seconds.
• Press the
button until appears in the display.
Press the
button.
- The display reads
• Press the buttons and set the brightness between
0 = minimum and
5 = maximum.
• When you reach the desired level, press the
button.
• Exit setup mode by pressing the button.
• Close the door. The new setting will activate after about 1 minute.
24
Equipment
Wooden shelves
The shelves are designed for the horizontal storage
of wine bottles. This prevents the corks from drying
out.
Accessories drawer
Accessories such as corkscrews etc. can be kept in
the bottom drawer.
The shelves and drawer can be removed by simply
pulling them towards you. To do this, the door must
be open at least 90°.
Air exchange with activated charcoal lter
The way in which wines continue to mature depends on the ambient conditions. The
quality of the air is therefore decisive for preserving the wine.
To guarantee optimum air throughput, the appliance is tted with an activated char-
coal lter at the top of the rear wall.
We recommend that you replace the illustrated lter once a year. Filters can be ob-
tained from your dealer.
Changing the lter:
The lter can be removed by depressing the recesses
on the left and right with a small screwdriver.
25
EN
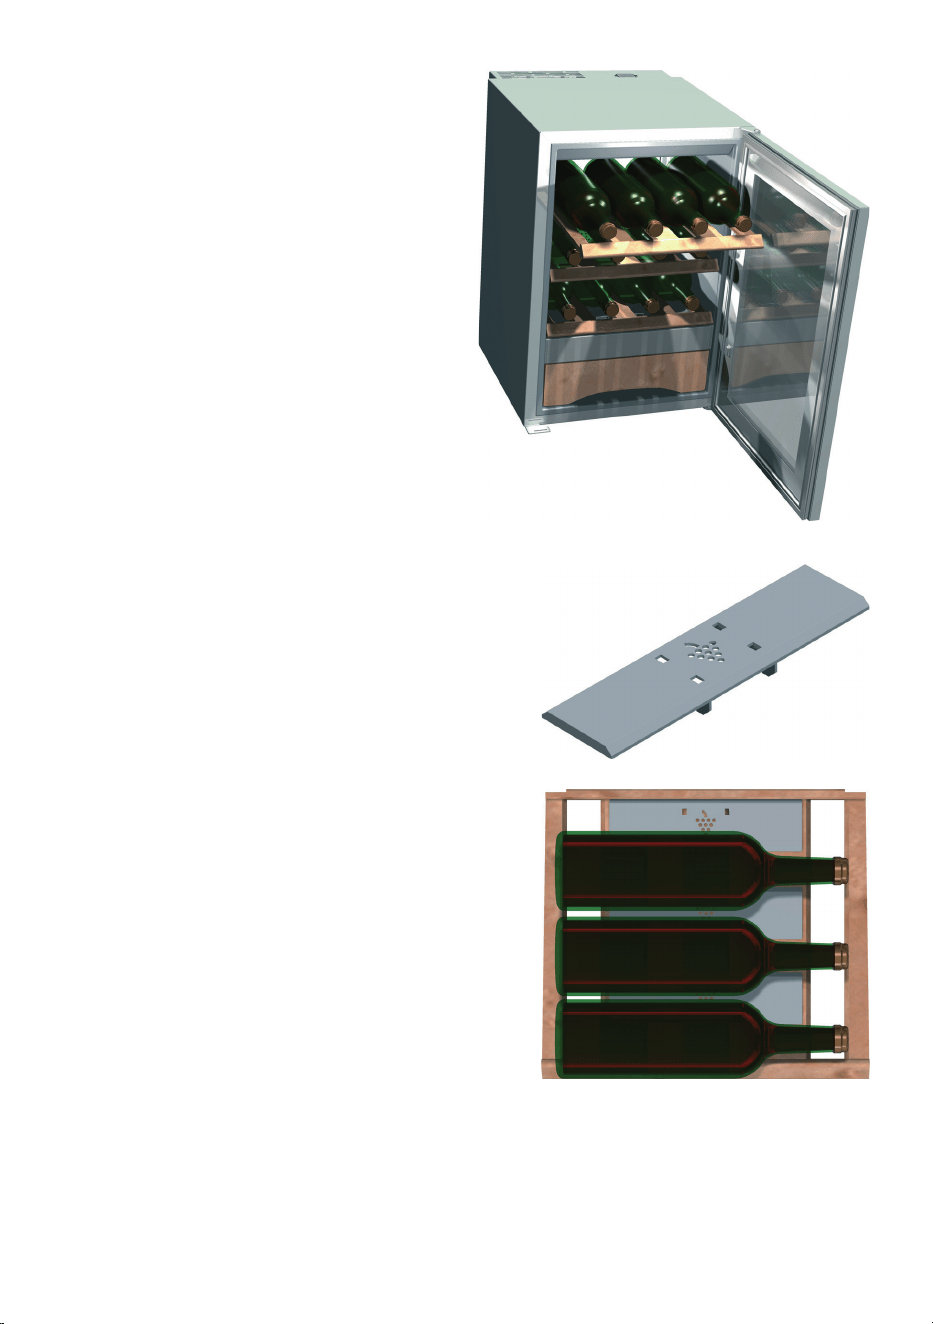
Storing wine
Four bottles can be stored side by side on
a wooden shelf.
Tall wine bottles can also be stored crossways in
the appliance.
To ensure stable storage of the bottles, click the
retaining plates provided onto the middle slat of
the wooden shelf.

26
Defrosting
The appliance defrosts automatically. The water that forms on the rear wall drains
into a reservoir at the back of the appliance and evaporates automatically through
the compressor heat.
Cleaning
Before cleaning always switch o the appliance. Pull out the mains plug or
remove/unscrew the fuse.
Never use abrasive or acidic cleaning agents or chemical solvents. We recommend
the use of an all-purpose cleaner with neutral pH.
Do not use steam cleaners because of the risk of injury and damage.
• Do not use abrasive sponges or scourers, do not use concentrated cleaning
agents and never use cleaning agents containing sand, chloride or acid or chemi-
cal solvents, as these would damage the surfaces and could cause corrosion.
• Clean the side panels and door surfaces with a clean and soft cloth. If necessary,
use a moist cloth (water + detergent). Alternatively, use a micro-bre cloth.
• Clean the inside of the appliance, except the wooden grid shelves, with lukewarm
water and a little detergent.
• Ensure that no cleaning water penetrates into the elec trical compo nents.
• Dry all parts well with a cloth.
• Do not remove the type plate from the inside of the appliance; it is important for
servicing purposes.
27
EN
Malfunctions
You may be able to rectify the following faults by checking the possible causes your-
self.
• Appliance does not function:
– Is the appliance switched on?
– Is the plug correctly tted in the mains socket?
– Is the fuse intact?
• Loud running noise:
– Is the appliance set up rmly on the oor?
– Does the appliance cause nearby items of furniture or objects to vibrate? Please
note that noises caused by the refrigerant circuit cannot be avoided.
• The temperature is not low enough:
– Is the temperature setting correct (see "Setting the temperature")?
– Does the separately installed thermometer show the correct reading?
– Is the ventilation system working properly?
– Is the appliance set up too close to a heat source?
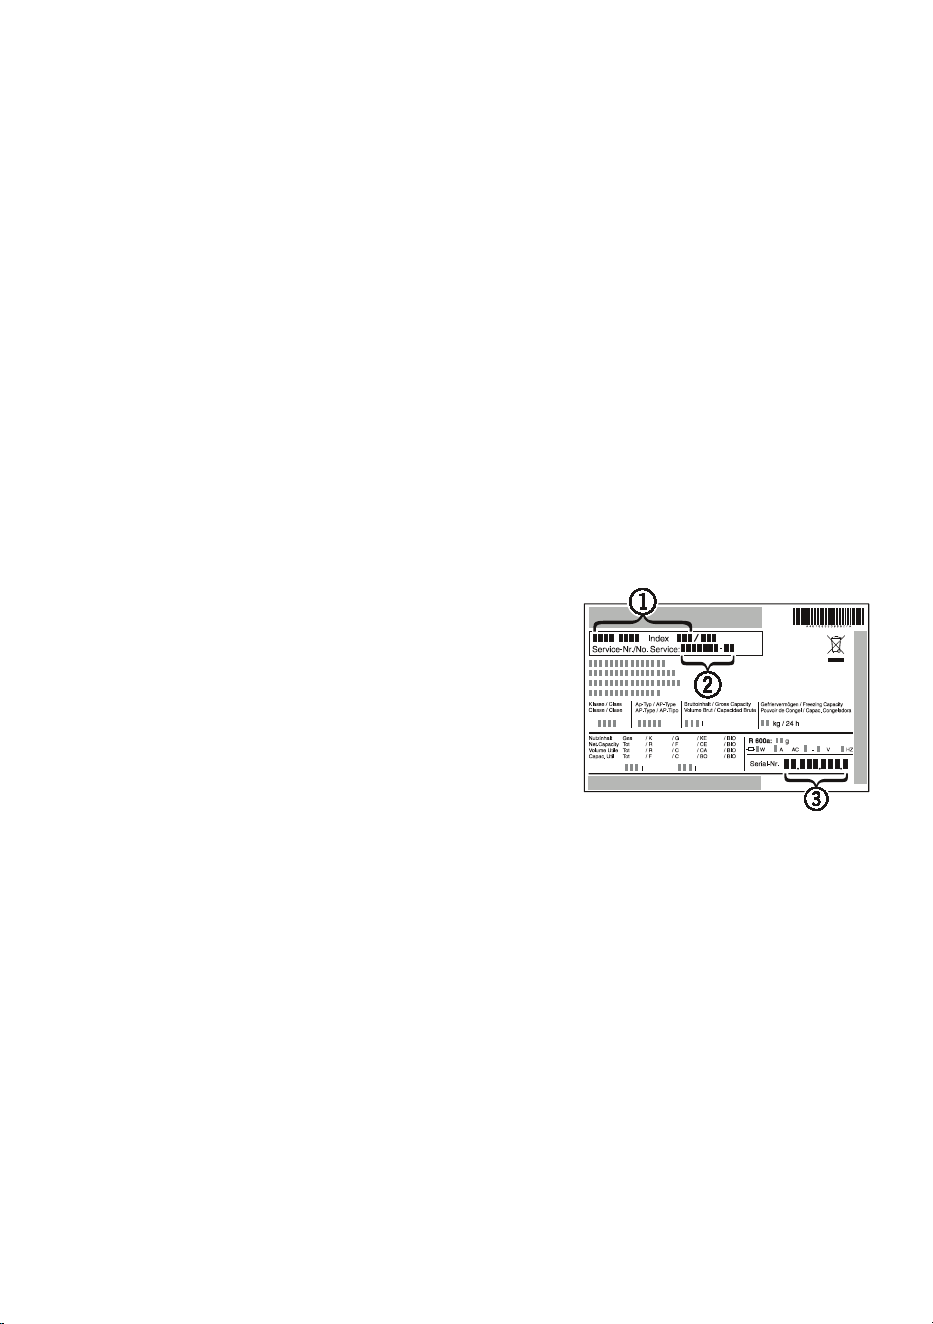
If none of the above causes apply and you cannot
rectify the fault yourself, contact the nearest customer
service department stating the type designation (1),
service number (2) and appliance number (3)as indi-
cated on the type plate.
The position of the type plate is shown in the section
entitled Description of the appliance.
Shutting your appliance down
If your appliance is to be shut down for any length of time, switch it o and discon-
nect the plug or switch o or unscrew the fuse. Clean the appliance and leave the
door open in order to prevent unpleasant smells.
The appliance complies with the relevant safety regulations and EU Directives
2014/30/EU and 2014/35/EU.

28
Safety instructions and warnings
• To prevent injury or damage to the unit, the appliance should be unpacked and set
up by two people.
• In the event that the appliance is damaged on delivery, contact the supplier imme-
diately before connecting to the mains.
• To guarantee safe operation, ensure that the appliance is set up and connected as
described in these operating instructions.
• Disconnect the appliance from the mains if any fault occurs. Pull out the plug,
switch o or remove the fuse.
• When disconnecting the appliance, pull on the plug, not on the cable.
• Any repairs and work on the appliance should only be carried out by the
customer service department, as unauthor ised work could prove highly
dangerous for the user. The same applies to changing the mains power
cable.
• Do not stand on the plinth, drawers or doors or use them to support anything else.
• This appliance can be used by children of 8 years old and over, and also by per-
sons with restricted physical, sensory or mental capacity or lack of experience and
knowledge, if they are supervised or have been instructed on safe use of the appli-
ance and understand the resulting risks. Children must not be allowed to play with
the appliance. Cleaning and user maintenance must not be carried out by children
without supervision.
• Avoid prolonged skin contact with cold surfaces or chilled/frozen food. This could
cause pain, numbness and frostbite. In the case of prolonged skin contact, protec-
tive measures should be taken, e.g. gloves should be worn.
• If you have a lockable appliance, do not keep the key near the appliance or
within reach of children.
• Do not use electrical appliances inside the appliance.
• Do not damage the refrigerant circuit pipes.
• Do not allow naked ames or ignition sources to enter the appliance. When trans-
porting and cleaning the appliance ensure that the refrigerant circuit is not dam-
aged. In the event of damage, make sure that there are no ignition sources nearby
and keep the room well ventilated.
• The appliance is designed for use in enclosed areas. Do not operate the appliance
outdoors or in areas where it is exposed to splash water or damp conditions.
• The LED light strip illuminates the interior of the appliance. It is not suitable for
lighting a room.

29
EN
Disposal notes
The appliance contains reusable materials and should be disposed of pro-
perly - not simply with unsorted household refuse. Appliances which are no
longer needed must be disposed of in a professional and appropriate way,
in accordance with the current local regulations and laws.
When disposing of the appliance, ensure that the refrigerant circuit is not
damaged to prevent uncontrolled escape of the refrigerant it contains (data
on type plate) and oil.
• Disable the appliance.
• Pull out the mains plug.
• Cut through the connection cable.
WARNING
Danger of suocation due to packing material and plastic lm!
Do not allow children to play with packaging material.
Take the packaging material to an ocial collection point.
Wall mounting
The appliance can be wall-mounted. There are two
mounting holes at the back of the appliance
Make sure the wall and fastenings can withstand the
weight of the appliance when fully loaded. The empty
appliance weighs 31 kg.
Important!
To ensure sucient ventilation through the ventilation
slots, the four wall spacers must always be inserted,
regardless of whether the appliance is wall-mounted or
standing on the oor against a wall.
Simply insert the spacers in the openings provided.

Liebherr Hausgeräte Lienz GmbH * Dr.-Hans-Liebherr-Strasse 1 * A-9900 Lienz ** www.liebherr.com
