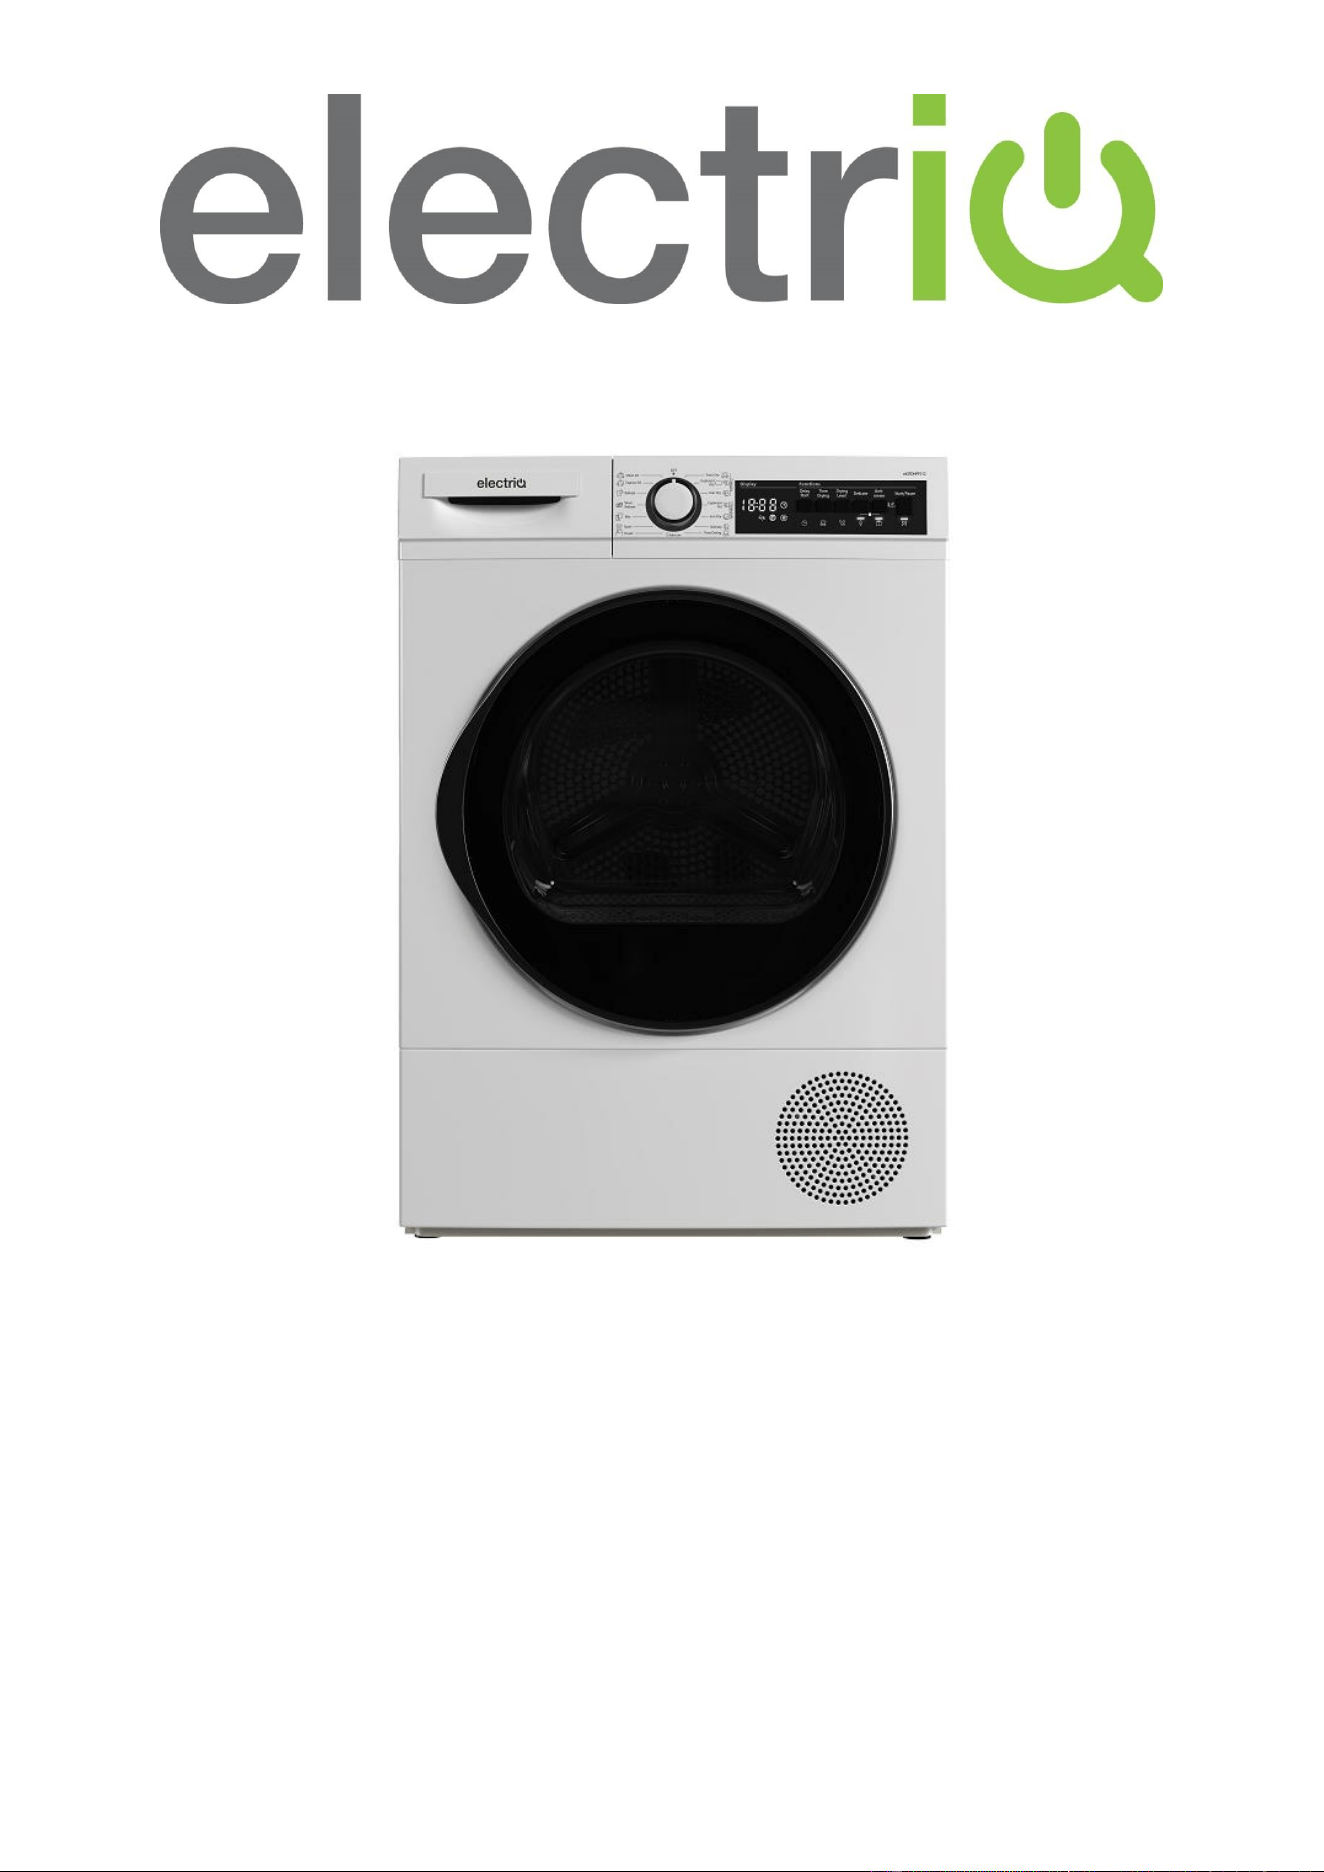
USER MANUAL
12KG HEAT PUMP DRYER
eiQTDHPFS12
Thank you for choosing electriQ
Please read this user manual before using this heat pump dryer and
keep it safe for future reference
2

3
CONTENTS
SAFETY
4
PRODUCT OVERVIEW
6
INSTALLATION
7
LABEL INFORMATION
9
OPERATION
10
BEFORE DRYING
14
AFTER DRYING
14
EMPTYING THE WATER CONTAINER
15
CLEANING THE FILTER
15
CLEANING THE HEAT EXCHANGER
16
TROUBLESHOOTING
17
PRODUCT FICHE
18
ERROR CODES
19
SUPPORT
19

4
SAFETY INSTRUCTIONS
• Keep these instructions for use with the appliance. If the appliance
should be sold or passed on to others, make sure that the instructions
are passed on with it.
• This appliance is not intended for use by persons (including children)
with reduced physical, sensory or mental capabilities, or lack of
experience and knowledge, unless they have been given supervision or
instruction concerning use of the appliance by a person responsible for
their safety.
• This dryer is intended for normal domestic use only.
• This appliance can be used by children aged from 8 years and above
and persons with reduced physical, sensory or mental capabilities or
lack of experience and knowledge if they have been given supervision
or instruction concerning use of the appliance in a safe way and
understand the hazards involved.
• Children shall not play with the appliance.
• Cleaning and user maintenance shall not be made by children without
supervision.
• Children of less than 3 years should be kept away unless continuously
supervised.
• It is not recommended that the dryer is placed directly next to ovens or
cookers as the performance of the dryer may be affected.
• Do not stack the dryer on top of other appliances without the correct
stacking kit.
• Any electrical work required to install the appliance should be carried
out by a qualified person.
• It is important to clean the lint filter after each drying cycle or the
restrictions to airflow will extend drying times and could cause the
safety cut-out to trip.
• Under no circumstances should anything other than the recommended
articles be placed in the dryer.
• The dryer should be serviced by an appointed service organisation and
only genuine parts used.
• It is dangerous to alter or modify the product in any way other than
which is stated in this manual.
• We recommend that the appliance is unplugged each time after use. It
should always be disconnected from the mains.
• The rear of the dryer will get quite hot during use. Position the dryer so
that the back is not accessible while in operation, but ensure that the
sides have space available to allow adequate airflow

5
• The mains cable and plug assembly must only be replaced with a
genuine part by the manufacturer or his service agents in order to avoid
a hazard.
• It is important to clean fluff from the window of the dryer and around the
door seal after each drying cycle. Failure to do so could result in water
leaking and the door sealing properly.
• If you need to stop the dryer before the end of a drying cycle, ensure
that the load and appliance are cooled before opening the door.
• Once the load is removed, all items need to be quickly spread out so
that any residual heat is dissipated.
• Remove all objects from pockets such as lighters and matches.
• DO NOT block the air inlets at the base and side of your dryer.
• DO NOT allow fluff to accumulate around the dryer.
• DO NOT exceed the recommended maximum load.
• DO NOT place articles in the dryer if anything other than a water
solution has been used in the cleaning process.
• DO NOT use the dryer if you suspect that it is damaged or faulty in any
way. Under no circumstances should you attempt to repair the
appliance yourself. Repairs carried out by inexperienced persons can
result in serious injury.
• Consult your local appointed service engineer and insist on genuine
spare parts.
• The dryer must be installed by a competent person and following the
instructions in this manual.
• Any electrical work required to install the appliance should be carried
out by a qualified person.
• The dryer should be serviced by an appointed service organisation and
only genuine parts used.
• It is recommended that the dryer be serviced annually by a person
competent to service dryers.
• The mains cable and plug assembly must only be replaced with a
genuine part available from the manufacturer or service agent.
• Packaging should be responsibly disposed of and kept away from
children and pets.
• Keep pets away from the appliance.
• It could be possible for a child or pet to gain access to the dryer through
the door. Therefore, please check the drum before loading or starting
the appliance.
• DO NOT use a two-way adaptor, or extension lead. The dryer must be
connected to its own socket.
6
• DO NOT dry unwashed items in the dryer.
• DO NOT attempt to dry dripping wet articles.
• The appliance must not be supplied through an external switching
device, such as a timer, or connected to a circuit that is regularly
switched on and off by a utility.
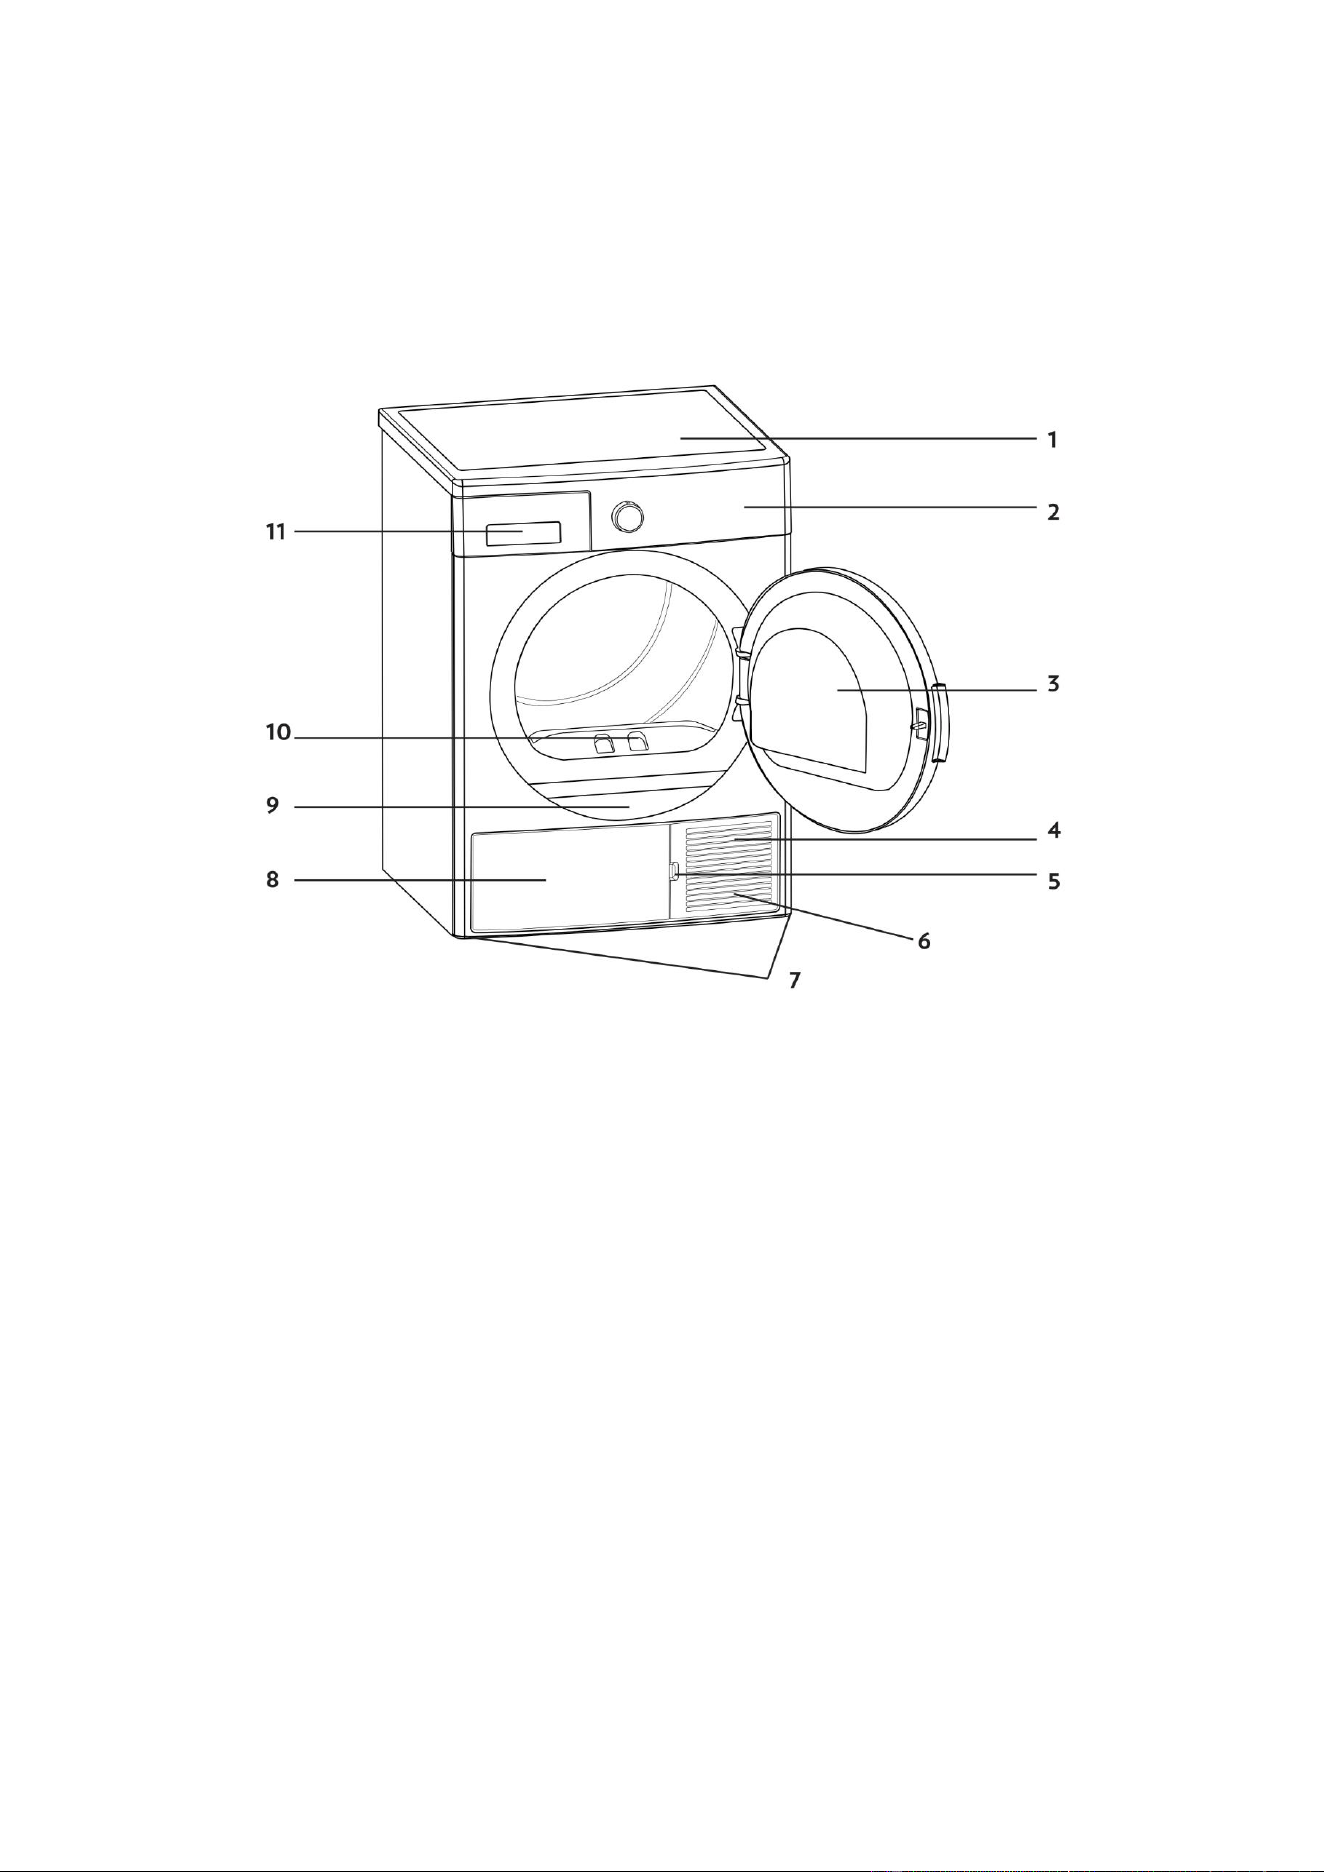
PRODUCT OVERVIEW
1. Top of unit
2. Control panel
3. Loading door
4. Plinth
5. Plinth opening slot
6. Ventilation grills
7. Adjustable feet
8. Plinth cover
9. Type plate
10. Lint filter
11. Water tray
7
INSTALLATION
• The dryer must be installed in a clean dry place. Air must be able to circulate freely
around the appliance.
• Do not obstruct the front air inlet or the air inlet grilles at the back of the machine.
• The dryer should be placed on a firm level surface to avoid unwanted noise and
improve performance.
• The feet must never be removed.
• Once the dryer is in its permanent position check that the dryer is level with the aid
of a spirit level. If not, adjust the feet with a screwdriver.
• Ensure that the voltage of the power supply is the same as the electrical
specifications of the appliance.
• A minimum of clearance of 25mm at the top, 20mm at the sides and 50 mm at the
back of the unit must be allowed.
• Please install the dryer in a working environment between 5⁰C - 35⁰C.
• Do not place the dyer next to other items such as an oven or refrigerator.
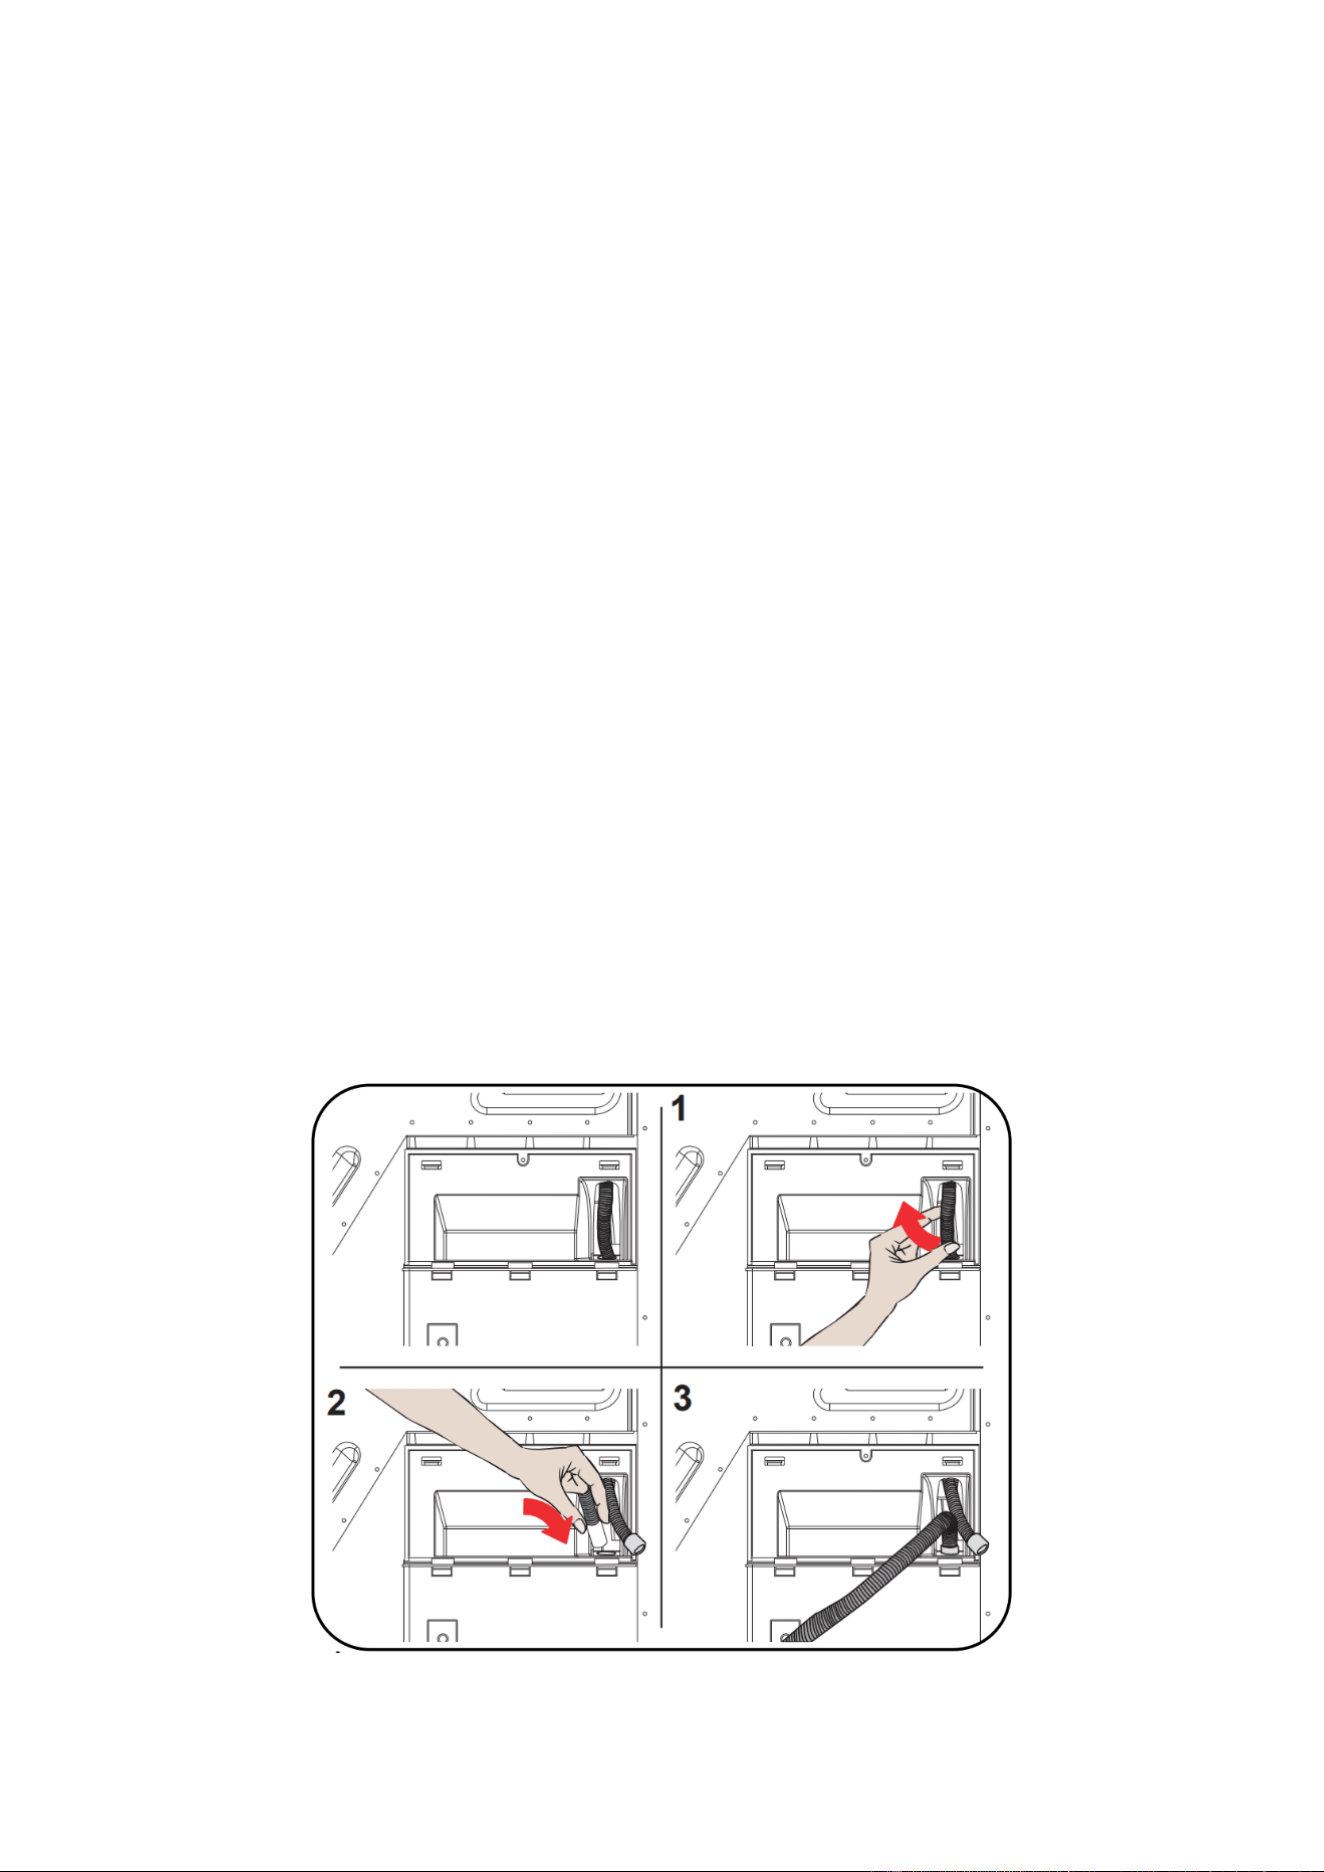
DRAIN PIPE INSTALLATION
If you are stacking your dryer, or do not wish to use the water box, you can install to
a drainage pipe (included) to remove water from the unit.
1. Remove the connecting pipe at the rear of the water box and install the
drainage pipe. Ensure that it is securely connected.
2. Without twisting of crimping the pipe, insert the other end into a suitable
drainage system. Ensure that the pipe is not higher than the dryer, or the
water will not drain.
8
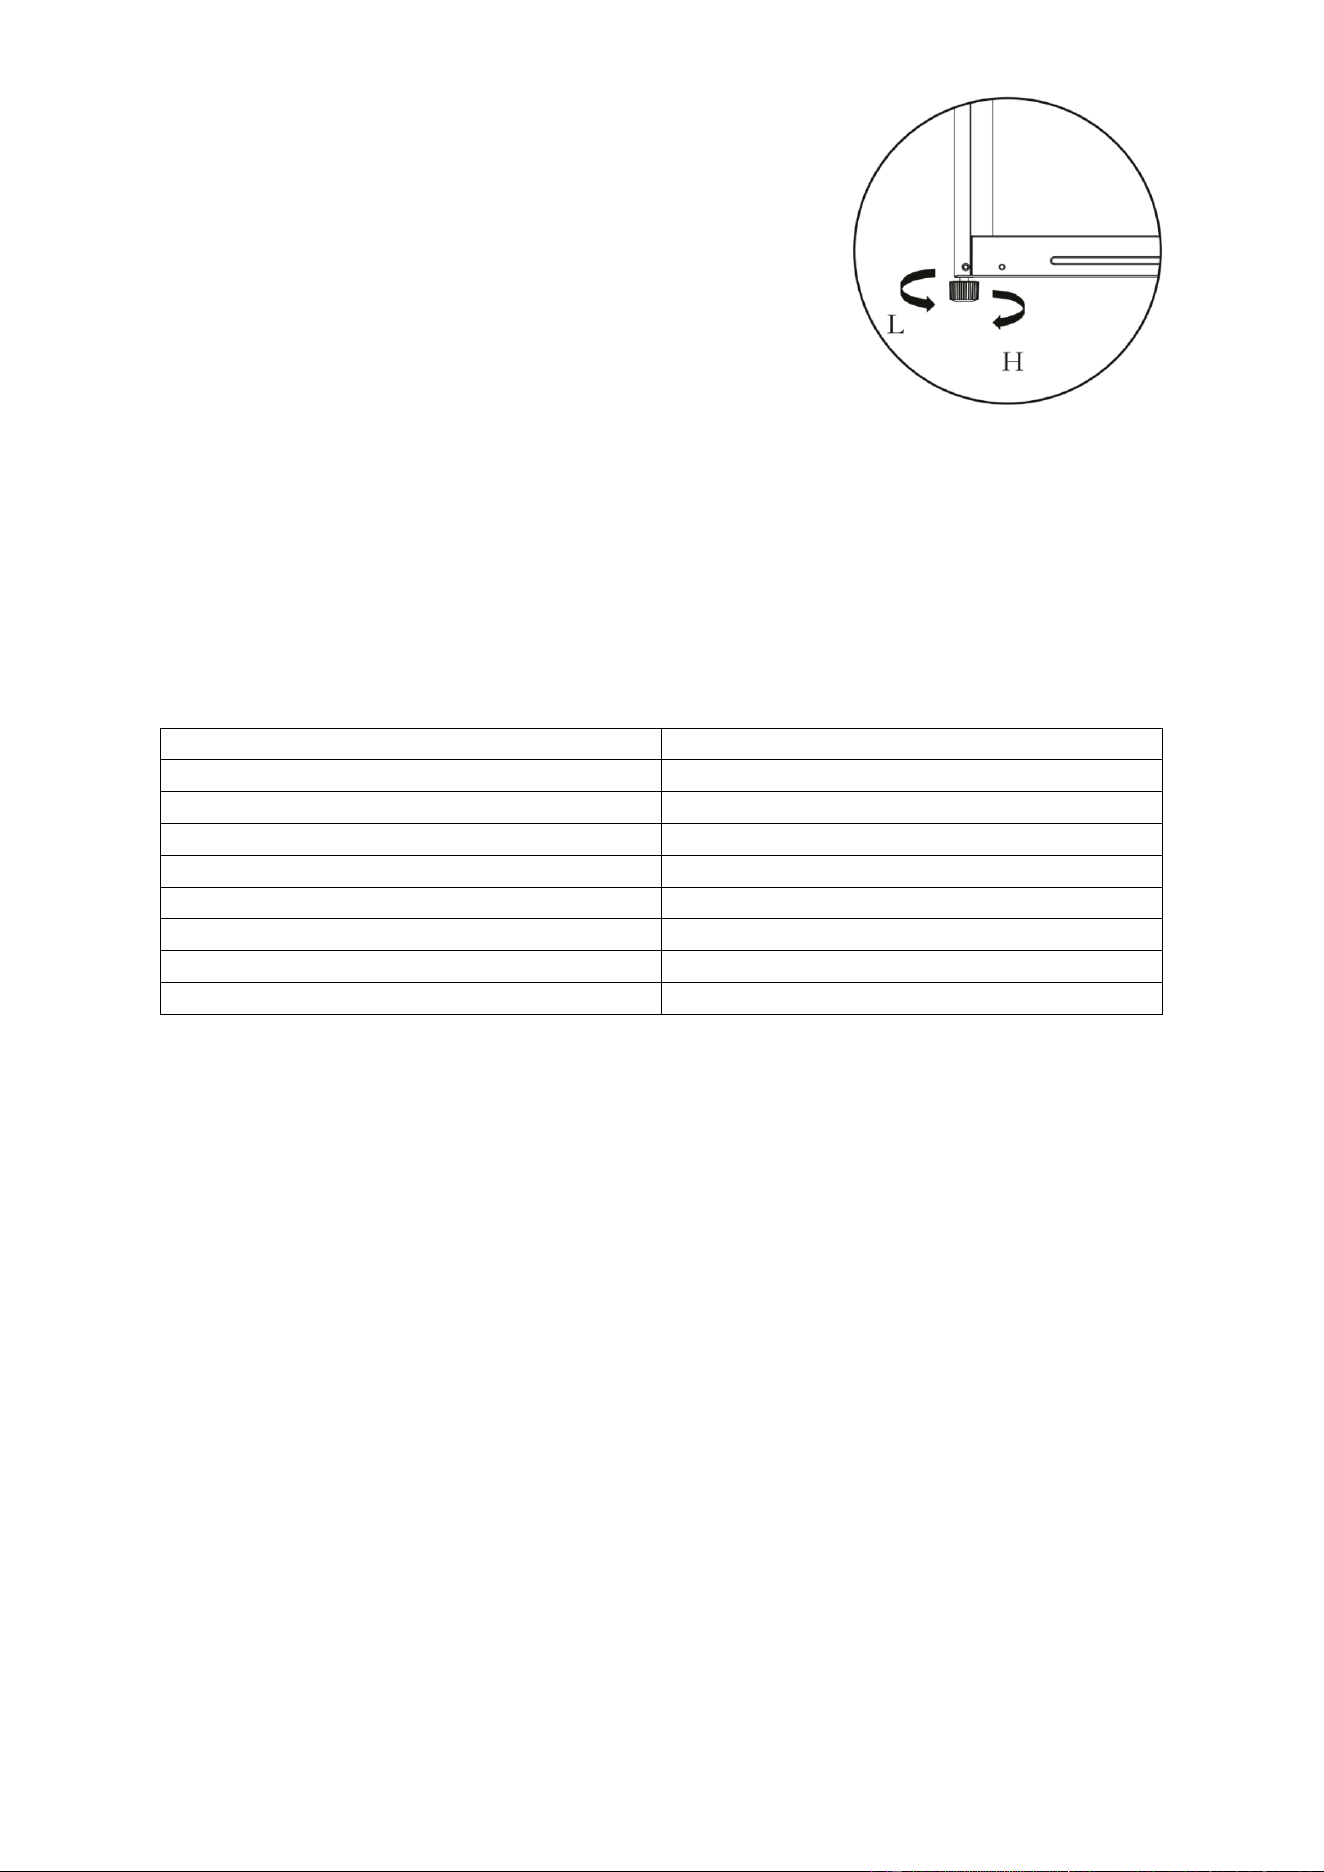
LEVELLING THE FEET
Once the appliance has been positioned, the feet must
be adjusted to ensure it is level.
• Twist the feet clockwise to raise the appliance.
• Twist the feet anti-clockwise to lower the
appliance
LOAD CAPACITY
It is not recommended to load the dryer with more laundry than the amount shown in
the table below.
When overloaded, the drying performance of the dryer will decrease and the dryer
and laundry might become damaged overtime.
LAUNDRY
DRY LOAD WEIGHT (GR)
DOUBLE BEDSHEET
725
PILLOWCASE
240
BATH TOWEL
700
HAND TOWEL
225
SHIRT
190
COTTON SHIRT
200
JEANS
650
T-SHIRT
120
9
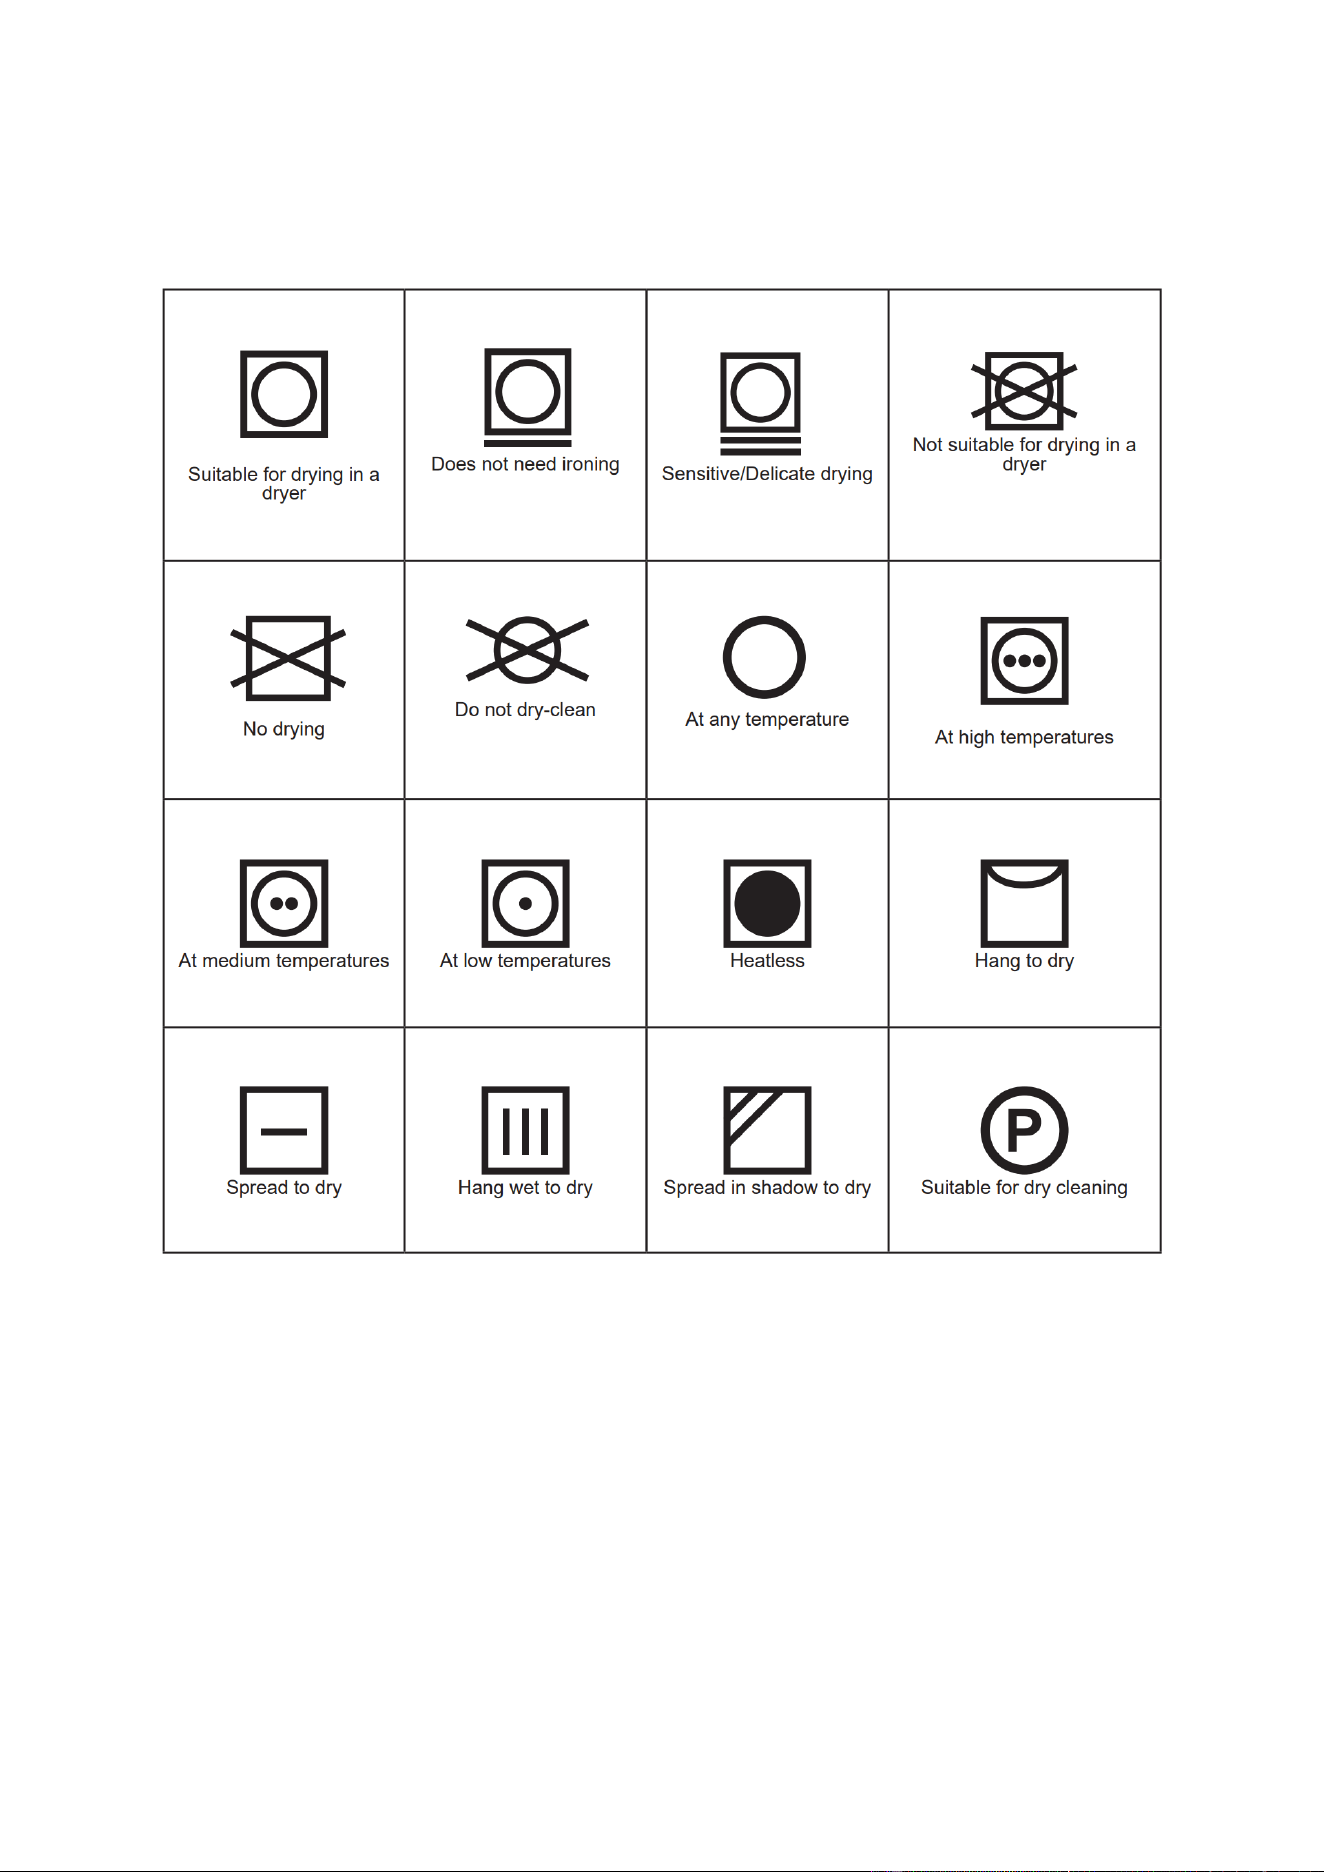
LABEL INFORMATION
Please check the labels of the clothing items you intend to dry before drying them to
prevent damage. The below table explains the different meanings of the symbols
found on clothing labels.

10
OPERATION
PROGRAM DIAL
Program
Description
Cotton extra
dry
This programme dries thick and multi-layer fabrics, such as cotton
towels, bedsheets, pillowcases, bathrobes, at a high temperature to
allow you to place them in a closet.
Cotton
cupboard dry
This programme dries cotton pyjamas, underwear, tablecloths etc. to
allow you to place them in a closet.
Cotton iron
dry
This programme dries cotton laundry to prepare it for ironing. Laundry
removed from the machine will be damp.
Synthetics
cupboard dry
This programme dries synthetics, such as shirts, t-shirts, blouses, at a
lower temperature compared to the cottons programme to allow you to
place them in a closet.
Synthetics
iron dry
This programme dries synthetics, such as shirts, t-shirts, blouses, at a
lower temperature compared to the cottons programme to prepare
them for ironing. Laundry removed from the machine will be damp.
Delicate
This programme dries thin clothes like shirts, blouses and silk
garments at a low temperature to make them ready to wear.
Time drying
Press to set the dryer to work at low heat for a specific time period
from 10 min. to 180 min. The program will automatically stop at the
chosen time, regardless of how dry the laundry is.
Baby care
This programme dries delicate infant clothes at a low temperature to
make them ready to wear.
Duvet
This programme is used to dry duvets.
Sport
Sport program is used for synthetic sport laundries like shorts, t-shirts
at low temperature.
Mix
This programme dries cotton-synthetic mixed garments that do not
discolour to make them ready to wear.
Wool refresh
Wool refresh helps wool textiles to remove excess water after washing
by applying low temperature and gentle movements of drum.
Refresh
Use the Time drying option in the refresh program to set a working
time between 10 minutes to 120 minutes. No heat will be produced in
refresh.
Express 34’
1 kg cotton shirts spun at a high speed in the washing machine are
dried in 34 minutes.
Shirts 20’
2 to 3 shirts are ready for to be ironed in 20 minutes.
WATER TRAY
Collects the water from the drying
cycle. Please see page 15 for more
information. The drawer is not needed
if using the drain pipe extraction
method.
PROGRAM DIAL
Use the dial to
choose the
program or turn
the unit off.
DISPLAY
Displays
program
information.
FUNCTIONS
Access the dryer’s
extra functions.
Please see page 11.

11
FUNCTIONS
Start/pause
After choosing the program with the dial, press start to start the
program. During operation, press the button again to pause the
program. The program can’t be changed when paused.
Anti-crease
Press the anti-crease button to make the drum rotate intermittently, to
prevent the creasing of clothes. Press any button or open the door to
cancel this.
Dry level
The humidity level obtained after drying can be increased by 3 levels.
The levels that can be selected other than the standard setting: 1, 2, 3.
After selection, the LED of the relevant drying level will turn on.
Delay start
Use the delay start button to delay the start time of the selected
program.
After the program has been selected, press the delay start button to set
an appointment time of up to 24 hours in increments of 1 hour.
The time set will indicate when the program will finish. The appointment
time must be longer than the running time of the program.
Child lock
When a program is selected, press and hold the “Delicate” and “Anti-
crease” buttons together until the child lock symbol illuminates. All other
functions are now locked until child lock is exited. To exit child lock,
repeat the steps to enter child lock until the child lock symbol is no
longer illuminated.
Time drying
When the program dial is positioned to the Time Drying programme,
press the Time Drying option button and then press the Start/Pause
button. Long pressing on time drying button will change the time
continuously.
Mute
The dryer gives an audible warning when the program selection dial is
turned, buttons are pressed and at the end of programme.
To cancel these warnings, press and hold the “Delicate Drying Option”
button for 3 seconds. When you press the button, you will hear an
audible warning that the option has been cancelled.
Display
Displays program information.
DISPLAY
The display shows the current program
information, including the remaining
program time, fault codes, and other
information.
The remaining time on the display may
be different from the actual remaining
time due to a number of factors including
weight and clothing type. The actual
drying time will be automatically
adjusted.
12
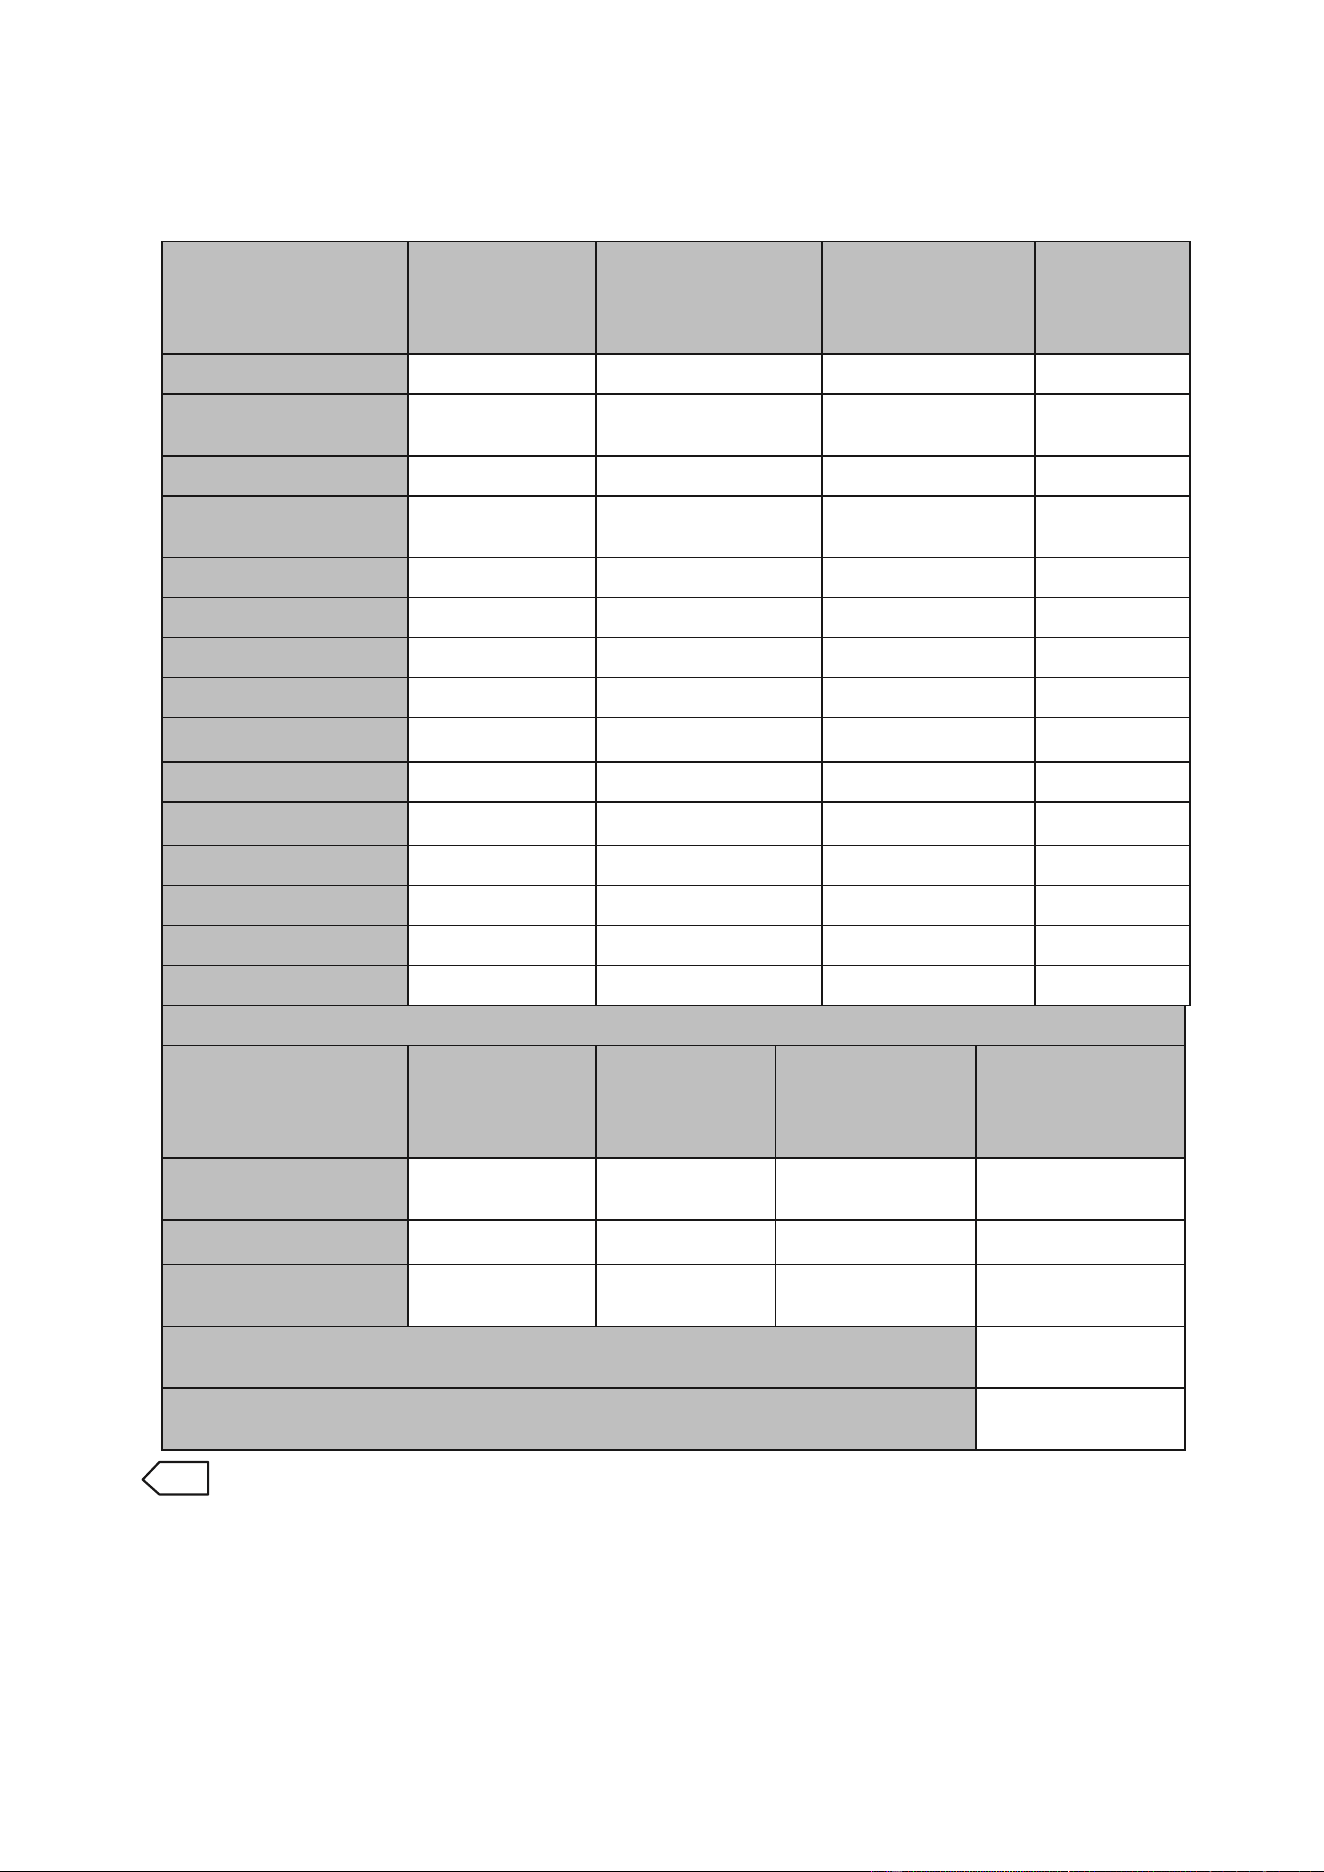
PROGRAM INFORMATION
NOTE: As part of the energy saving process, heat pump dryers run longer cycles
than non-heat pump dryers.
Programme
Load (kg)
Washing
machine spin
speed
Approximate
amount of
remaining
humidity
Duration
(minutes)
Cotton Extra Dry
12
1000
60%
365
Cotton Cupboard
Dry
12
1000
60%
356
Cotton Iron Dry
12
1000
60%
253
Synthetics Cupboard
Dry
6
800
40%
120
Synthetics Iron Dry
6
800
40%
88
Delicate
2
600
50%
74
Time drying
-
-
-
-
Baby Care
3
1000
60%
95
Duvet
2,5
800
60%
158
Sport
4
800
40%
85
Mix
4
1000
60%
136
Wool Refresh
-
-
-
5
Refresh
-
-
-
10
Express 34'
1
1200
50%
34
Shirts 20'
0.5
1200
50%
20
Energy consumption values
Programme
Load (kg)
Washing
machine
spin speed
Approximate
amount of
remaining
humidity
Energy
consumption
values (kWh)
Cotton Cupboard
Dry
12
1000
60%
2,81
Cotton Iron Dry
12
1000
60%
2,14
Synthetics Cupboard
Dry
6
800
40%
1,05
Power consumption in the "off mode"
P
O
(W)
0.5
Power consumption in the "on mode"
P
L
(W)
1
The Cotton Cupboard Dry programme is the standard drying programme that can be run with a full or
half load and for which the information is given on the label and product receipt. This programme is the
most energy efficient programme to dry normal wet cotton clothes.
*Energy labelling standard programme (EN 61121:2013)
* For standard tests, the water drain hose must be connected to the water drain according to the relevant
installation instructions.
All values in the table were determined in accordance with the EN 61121:2013 standard. Consumption values
may vary from the values in the table depending on the fabric type, spin speed, environment conditions and
voltage values.
13
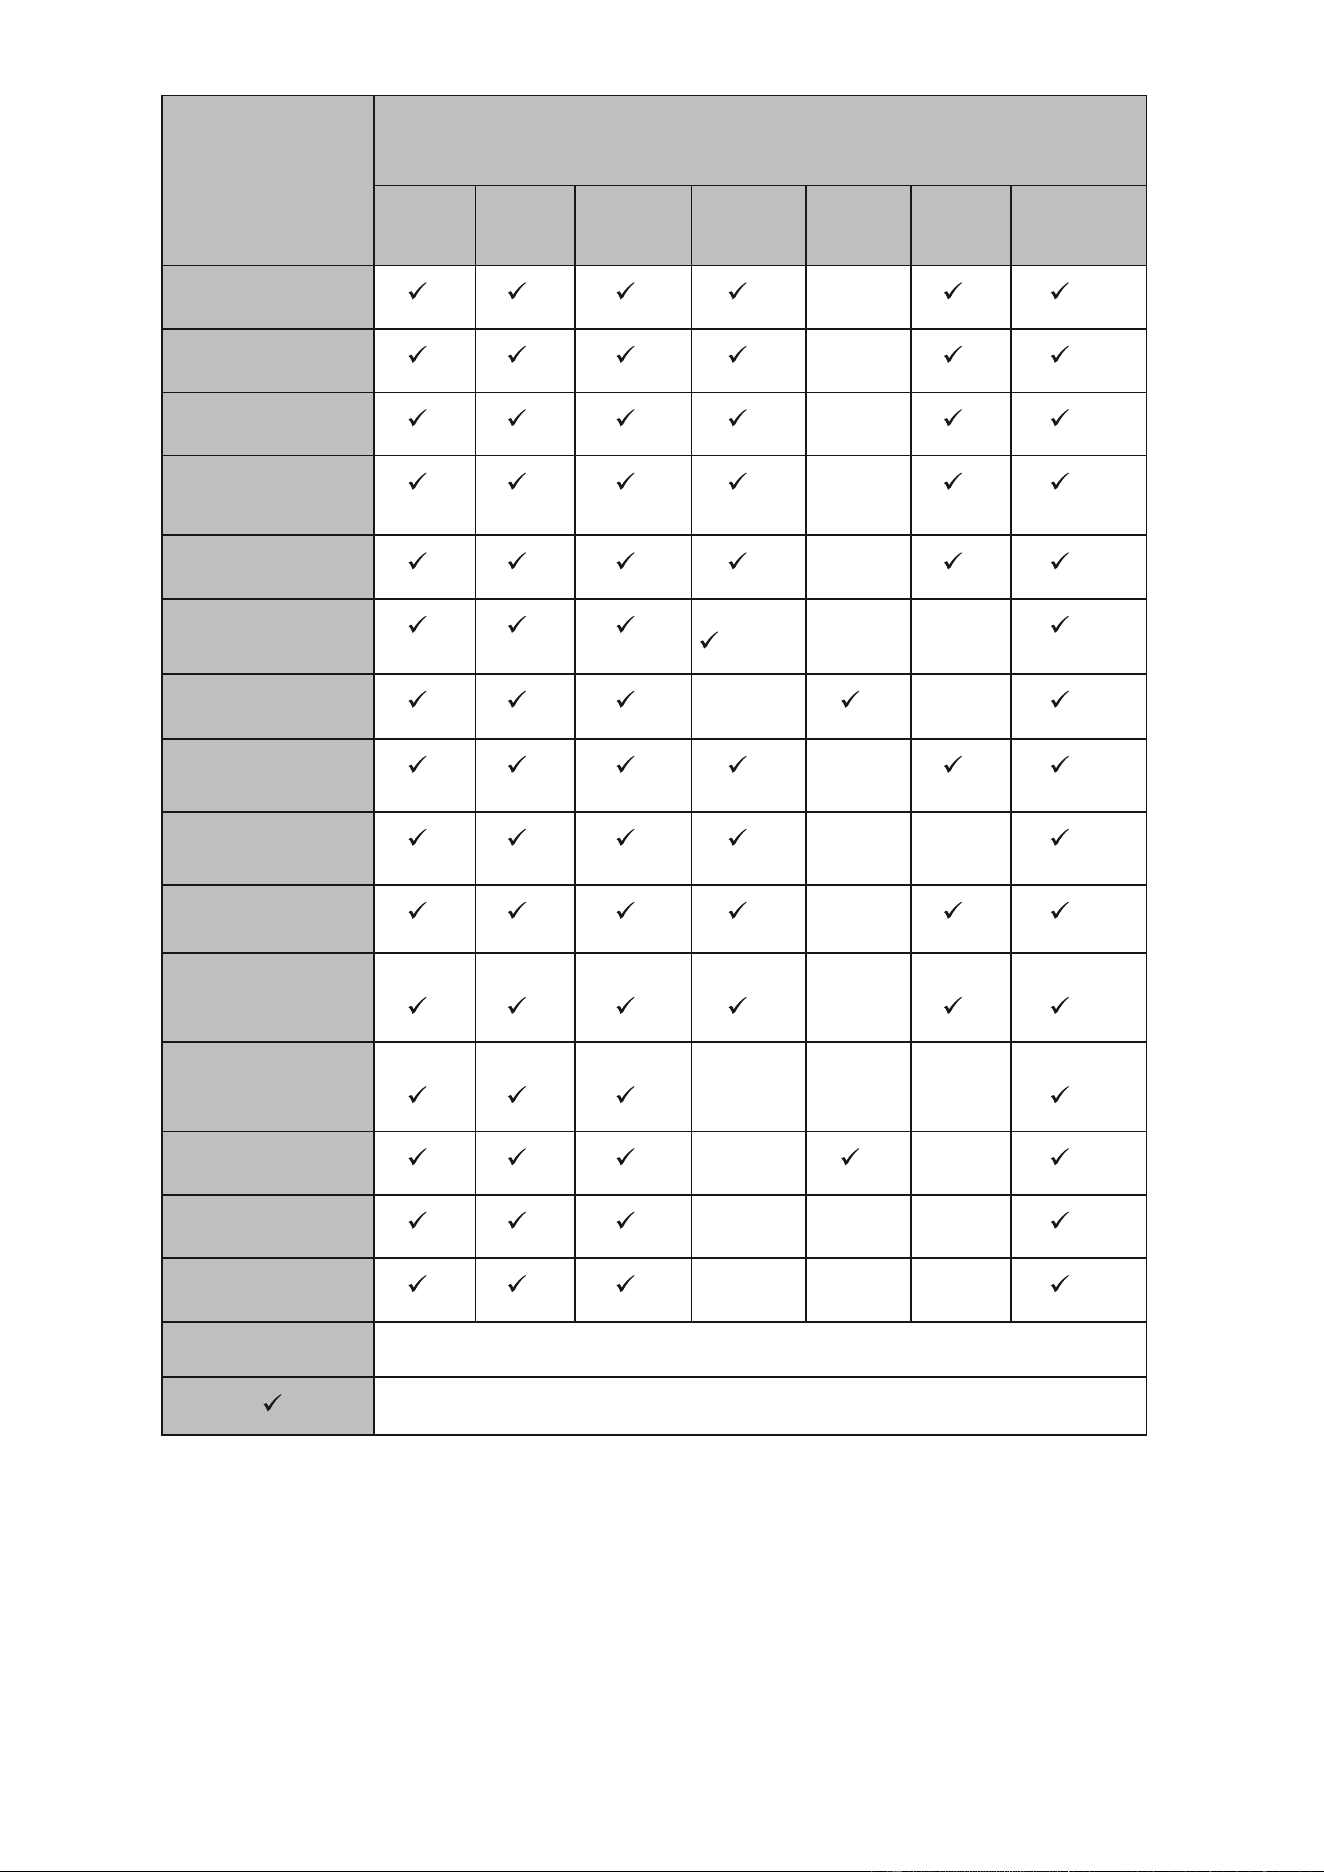
PROGRAMMES
OPTIONS
Delay
Start
Buzzer
Cancel
Child Lock
Delicate
Time
Drying
Drying
Level
Anti-crease
Cotton Extra Dry
X
Cotton Cupboard Dry
X
Cotton Iron Dry
X
Synthetics Cupboard
Dry
X
Synthetics Iron Dry
X
Delicate
(default)
X
X
Time drying
X
X
Baby Care
X
Duvet
X
X
Sport
X
Mix
X
Wool Refresh
X
X
X
Refresh
X
X
Express 34'
X
X
X
Shirts 20'
X
X
X
X
Not selectable
Selectable

14
BEFORE DRYING
Leave the dryer to stand for 2 hours before first use.
Use a soft fabric cloth to clean inside the drum.
• Before drying, thoroughly spin the laundry in the washing machine.
• Sort the laundry according to fabric type and drying programme.
• Before drying, close zips, hooks, and eyelets, button up and tie fabric belts.
• Do not dry articles containing rubber or small elastic materials.
AFTER DRYING
Open the door and
remove the dry clothes
Slide out the water collection
drawer
Empty the water
from the drawer
Clean the filter
Turn the power off
and unplug the
appliance
Load the dryer, taking
care to not overload to
drum.
Plug in the dryer
Close to door
ensuring that it
makes a click.
15
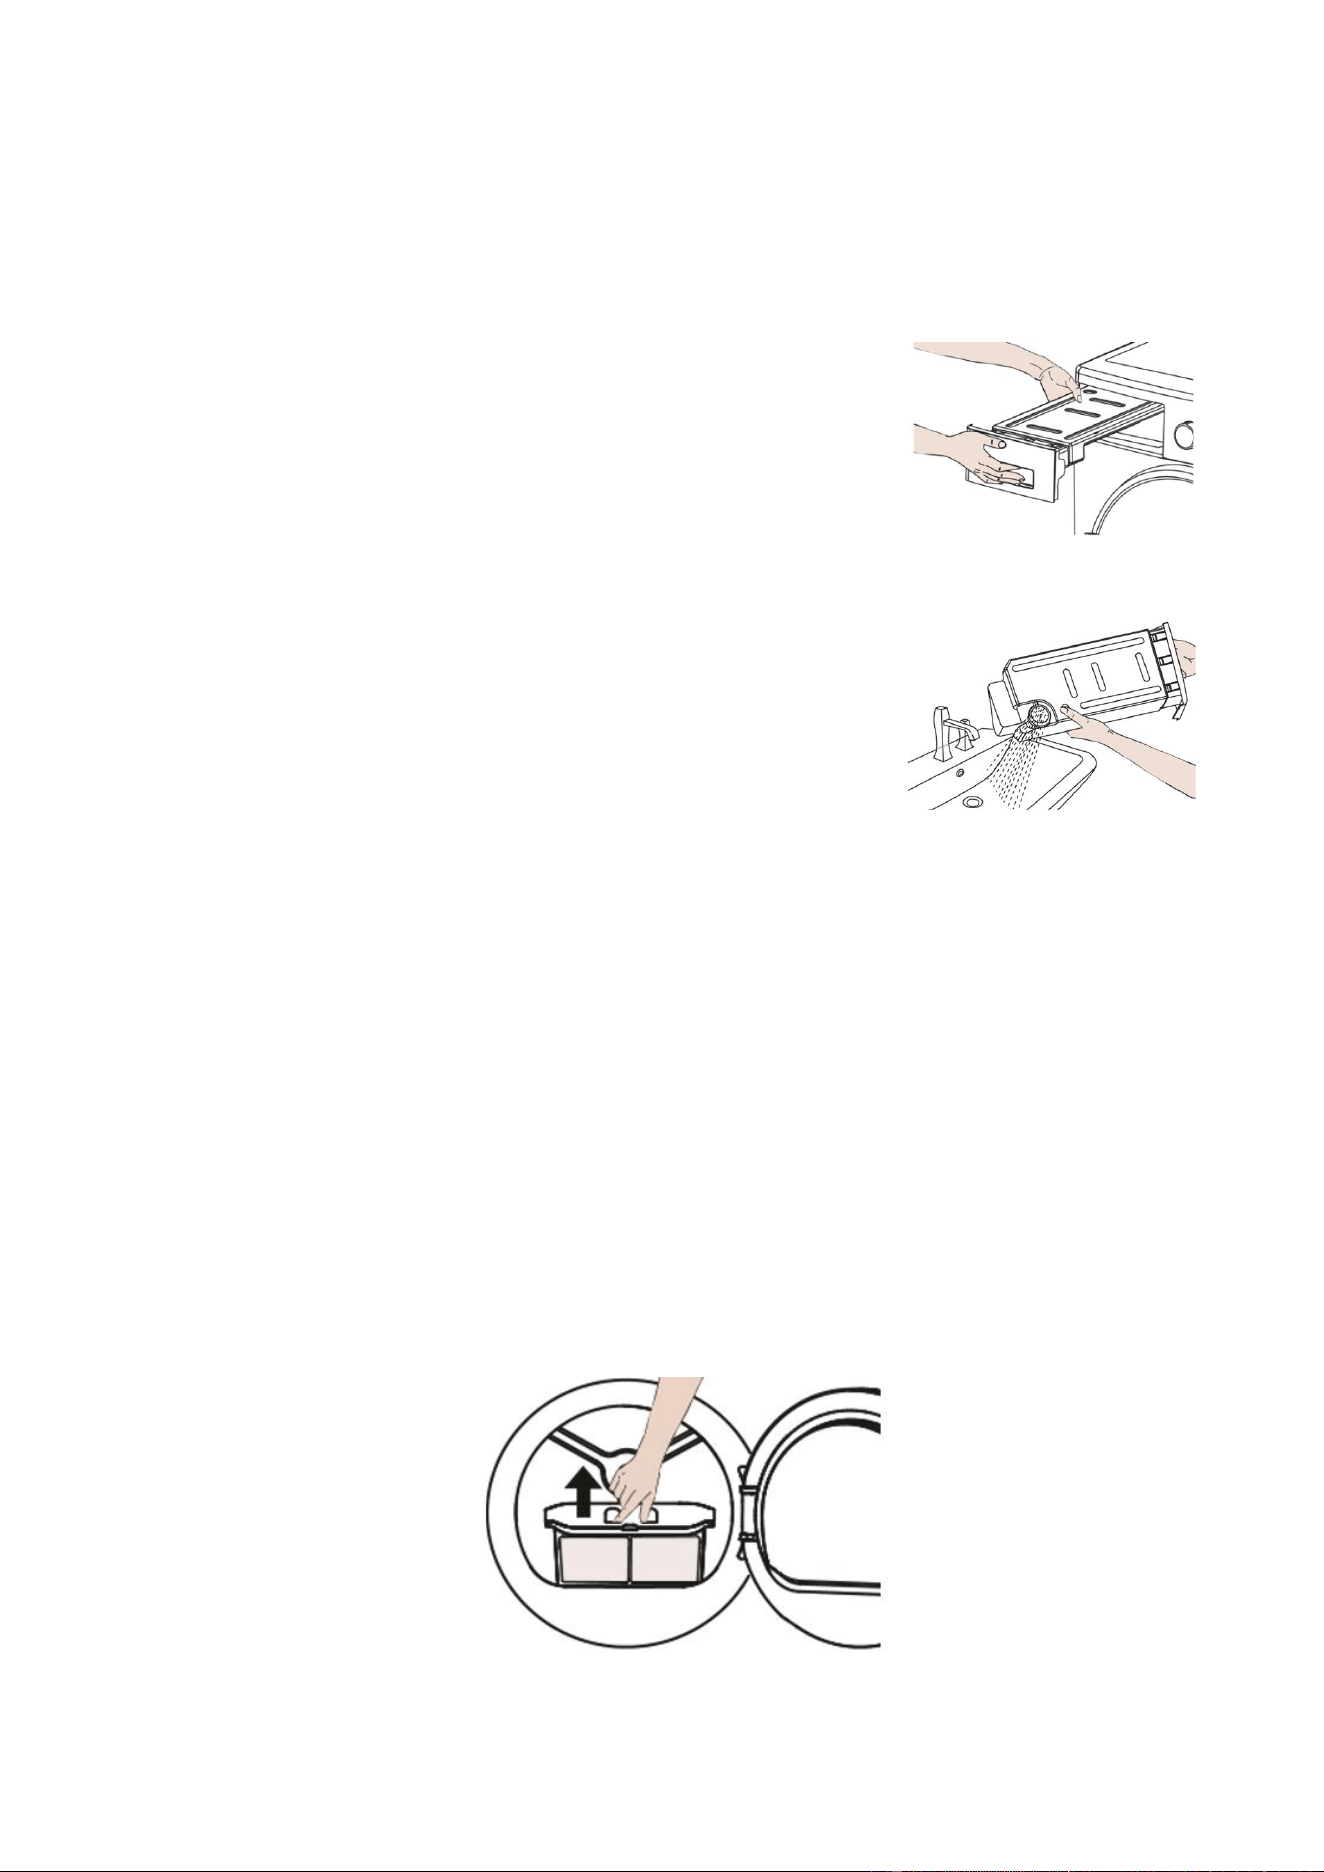
EMPTYING THE WATER CONTAINTER
Empty the water container after each use, when the container is full, the programme
will be paused and the FULL indicator will be illuminated.
After emptying the container, press the start/pause button to resume the drying
cycle. Do not use the dryer without the water container in place.
Hold and slide out the water container with two hands.
Tilt the water container and pour the water into the sink.
When all the water has drained, place the water
container back into the tumble dryer.
CLEANING THE DOOR FILTER
Disconnect the power before cleaning.
Do not operate the dryer without the filter.
1. Open the door.
2. Remove the filter tray.
3. Clean the filter tray by wiping off the lint and fluff that has been accumulated. If
using water to clean the tray, ensure that it is thoroughly dried using a soft cloth
before reinstalling.
4. Reinstall the filter tray.
16
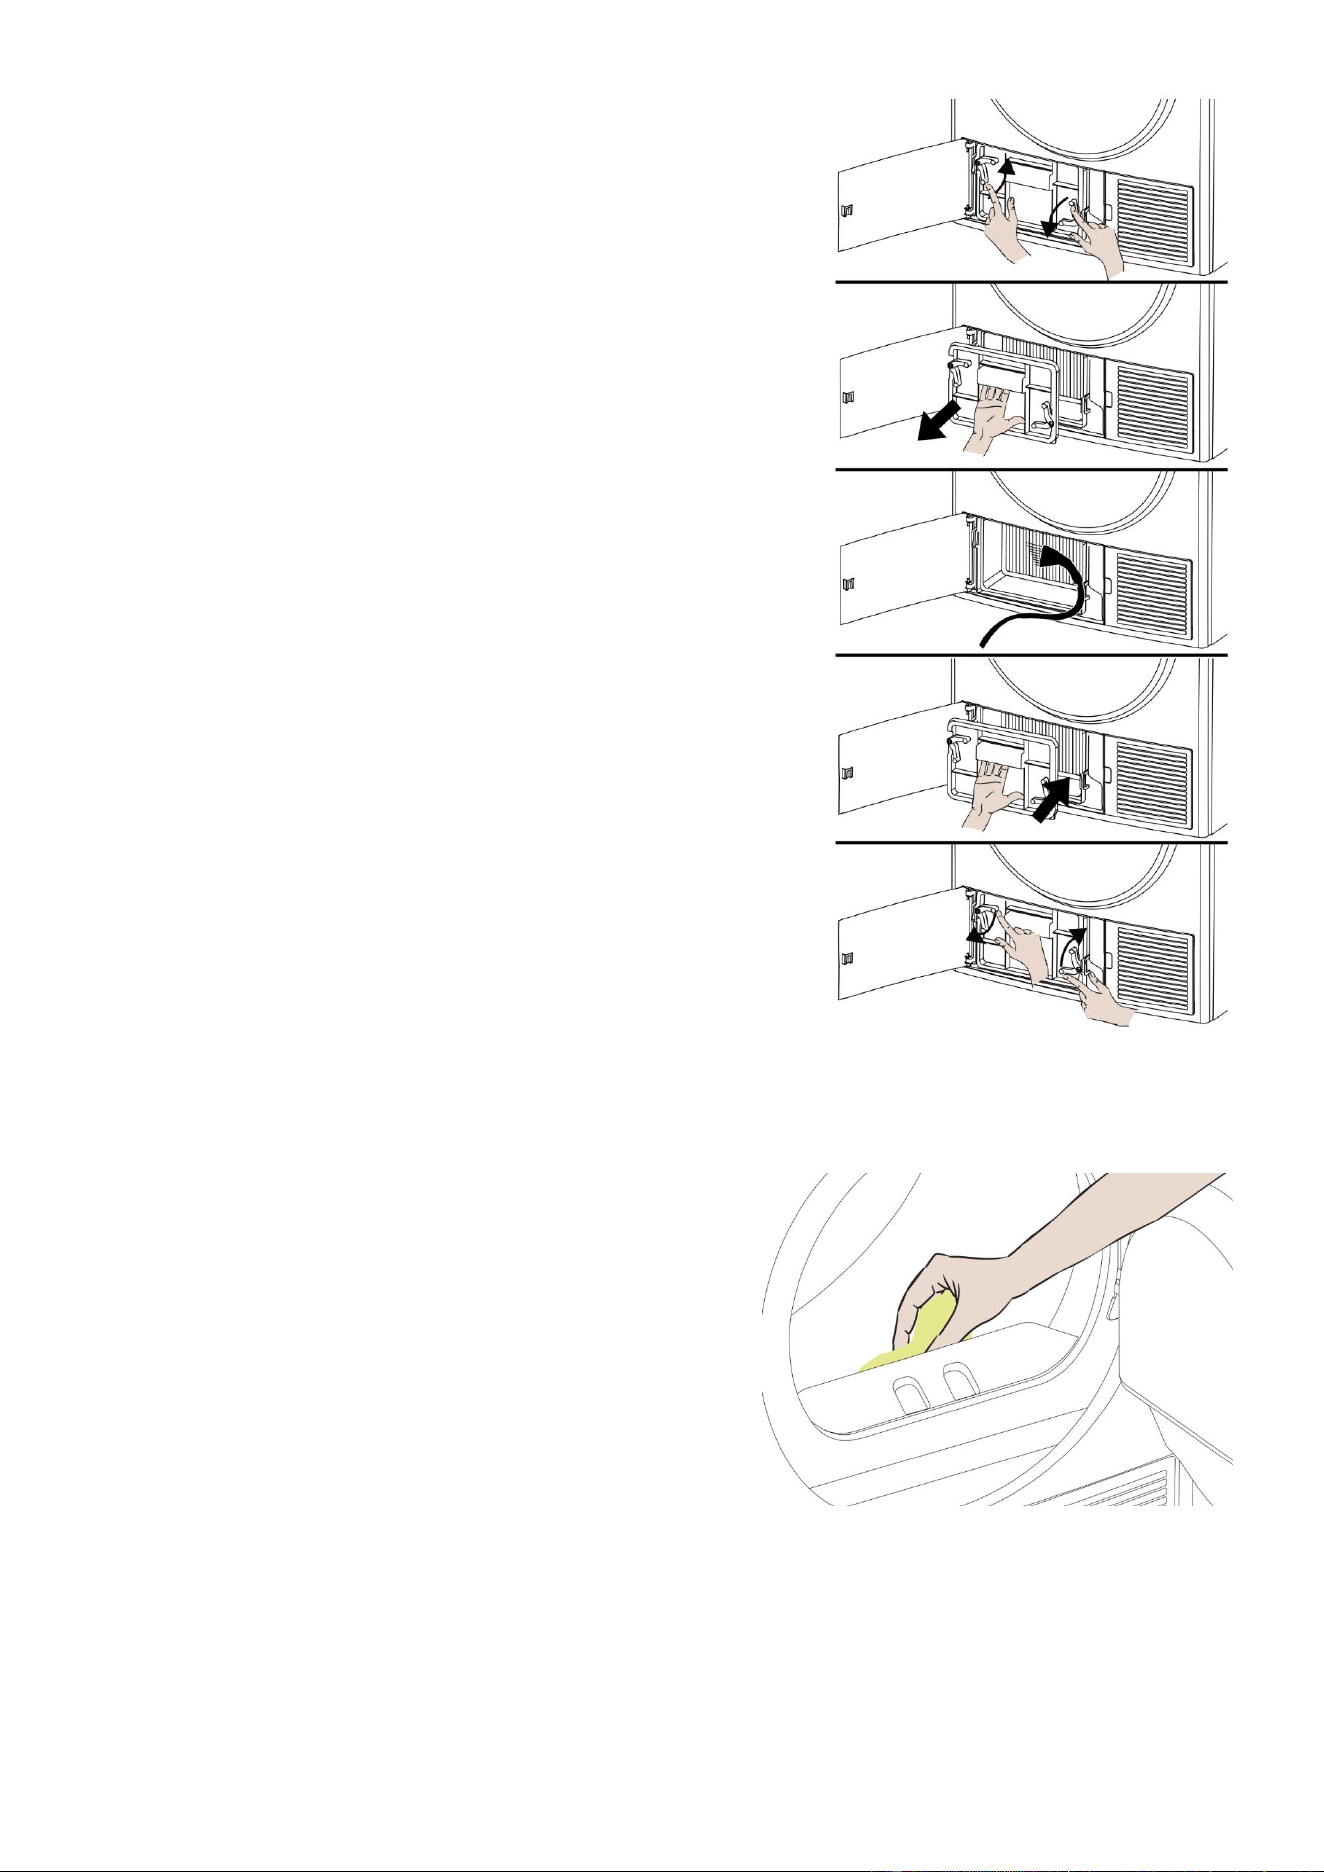
CLEANING THE FILTER BASE
1. Open the cover.
2. Twist both locking levers towards each other.
3. Remove the filter base.
4. Clean the filter base completely.
5. Reinsert the filter base and ensure that the two
locking levers are in place.
6. Close the cover until it locks into position.
Approximately every 2 months remove fluff from the
heat exchanger using a sponge or soft brush. Use
gloves when cleaning.
CLEANING THE HUMIDITY SENSORS
Inside the machine there are humidity sensors that detect whether the laundry is dry
or not. To clean the sensors:
1. Open the loading door of the machine.
2. If the machine is still hot due to the drying
process, wait for it to cool down.
3. Using a soft cloth soaked in vinegar, wipe
the metal surfaces of the sensor and dry
them.
REPLACING THE DISPLAY LED
Any replacement or maintenance of the units LED lighting is intended to be made by
the manufacturer, its service agent or similar qualified person.
17
TROUBLESHOOTING
PROBLEM
SOLUTION
Dryer doesn’t start
Check the power supply.
Confirm the start/pause button has been
pressed.
Confirm the door is closed.
Dryer doesn’t start and displays
“END”
Is the program setting correct?
Confirm the dryer is not empty.
Excessive drying time
Check the program setting is correct.
Is the dryer to full?
Clean the filter.
Drain the water box.
Water is leaking
Make sure the dryer is level.
Check that the door is not blocked.
Poor drying
Check the program setting is correct.
Is the dryer to full?
Clean the filter.
Drain the water box.
Load is not properly sorted.
Clothes are wrinkled
Clothes have dried to long.
Clothes have been left in the appliance for
too long.
Dryer is too loud
Look for debris in the drum.
Check the lint filter.
Make sure the unit is level.
Some noise is normal when in use.
Clothes are shrinking
Care instructions on the clothing label has
not been followed.
Use a lower heat setting.
Lint is left on clothes
Clean the lint filter.
Clothes have not been sorted properly.
Some fabrics cause lint and should be dried
separately.
Tissue has been left in pockets.
Odour
Some odour upon first use is normal.
Use the detergent you are using following the
manufactures recommendation.
If clothes have an odour, they may have
been left in for too long after drying. Its
recommended to empty the drum as soon as
the clothes are dry.
Clean the inside of the dryer.
Clean the lint filter.
18
PRODUCT FICHE
Complying Commission Delegated Regulation (EU) No 392/20
12
Supplier name or trademark
electriQ
Model name
eiQTDHPFS12
Rated capacity (kg)
12
Type of Tumble Dryer
Heat Pump
Energy efficiency class
(1)
A++
Annual Energy Consumption (kWh)
(2)
326
Automatic of Non-automatic
Automatic
Energy Consumption of the standard cotton programme at full load (kWh)
2,81
Energy Consumption of the standard cotton programme at partial load (kWh)
1,39
Power consumption of the off-mode for the standard cotton programme at full load
P
O
(W)
0,5
Power consumption of the left-on mode for the standard cotton programme at
full load
P
L
(W)
1
The duration of the left mode on (min)
n/a
Standard cotton programme
(3)
-
Programme time of the standard cotton programme at full load, T
dry
(min.)
356
Programme time of the standard cotton programme at partial load, T
dry1/2
(min.)
171
Weighted programme time of the standard cotton programme at full and partial
load
(T
t
)
254
Condensation efficiency class
(4)
B
Average condensation efficiency of the standard cotton programme at full load
C
dry
81%
Average condensation efficiency of the standard cotton programme at partial
load
C
dry1/2
81%
Weighted condensation efficiency of the standard cotton programme at full load
and partial load C
t
81%
Sound power level for the standard cotton programme at full load
(5)
65
Built-in
No
1) Scale from A+++ (most efficient) to D (least efficient)
2) Energy consumption based on 160 drying cycles of the standard cotton
programme at full and partial load, and the consumption of the low-power
modes. Actual energy consumption per cycle will depend on how the
appliance is used.
3) “Cotton cupboard dry programme” used at full and partial load is the standard
drying programme to which the information in the label and the fiche relates,
that this programme is suitable for drying normal wet cotton laundry and that
it is the most efficient programme in terms of energy consumption for cotton
4) Scale from G (least efficient) to A (most efficient)
5) Weighted average value - L wA expressed in dB(A) re 1 pW
19
ERROR CODES
CODE
Solution
E03/
Empty the water tank, if problem is not solved, contact supplier
E04
Contact the supplier
E05
Contact the supplier
E06
Contact the supplier
E07
Contact the supplier
E08
There may be voltage fluctuation in mains. Wait until voltage is
appropriate for working range.
electriQ UK SUPPORT
www.electriQ.co.uk/support
Call: 0330 390 3061
Office hours: 9AM - 5PM Monday to Friday
www.electriQ.co.uk
Unit 2A, Trident Business Park,
Neptune Way, Leeds Road, Huddersfield, HD2 1UA
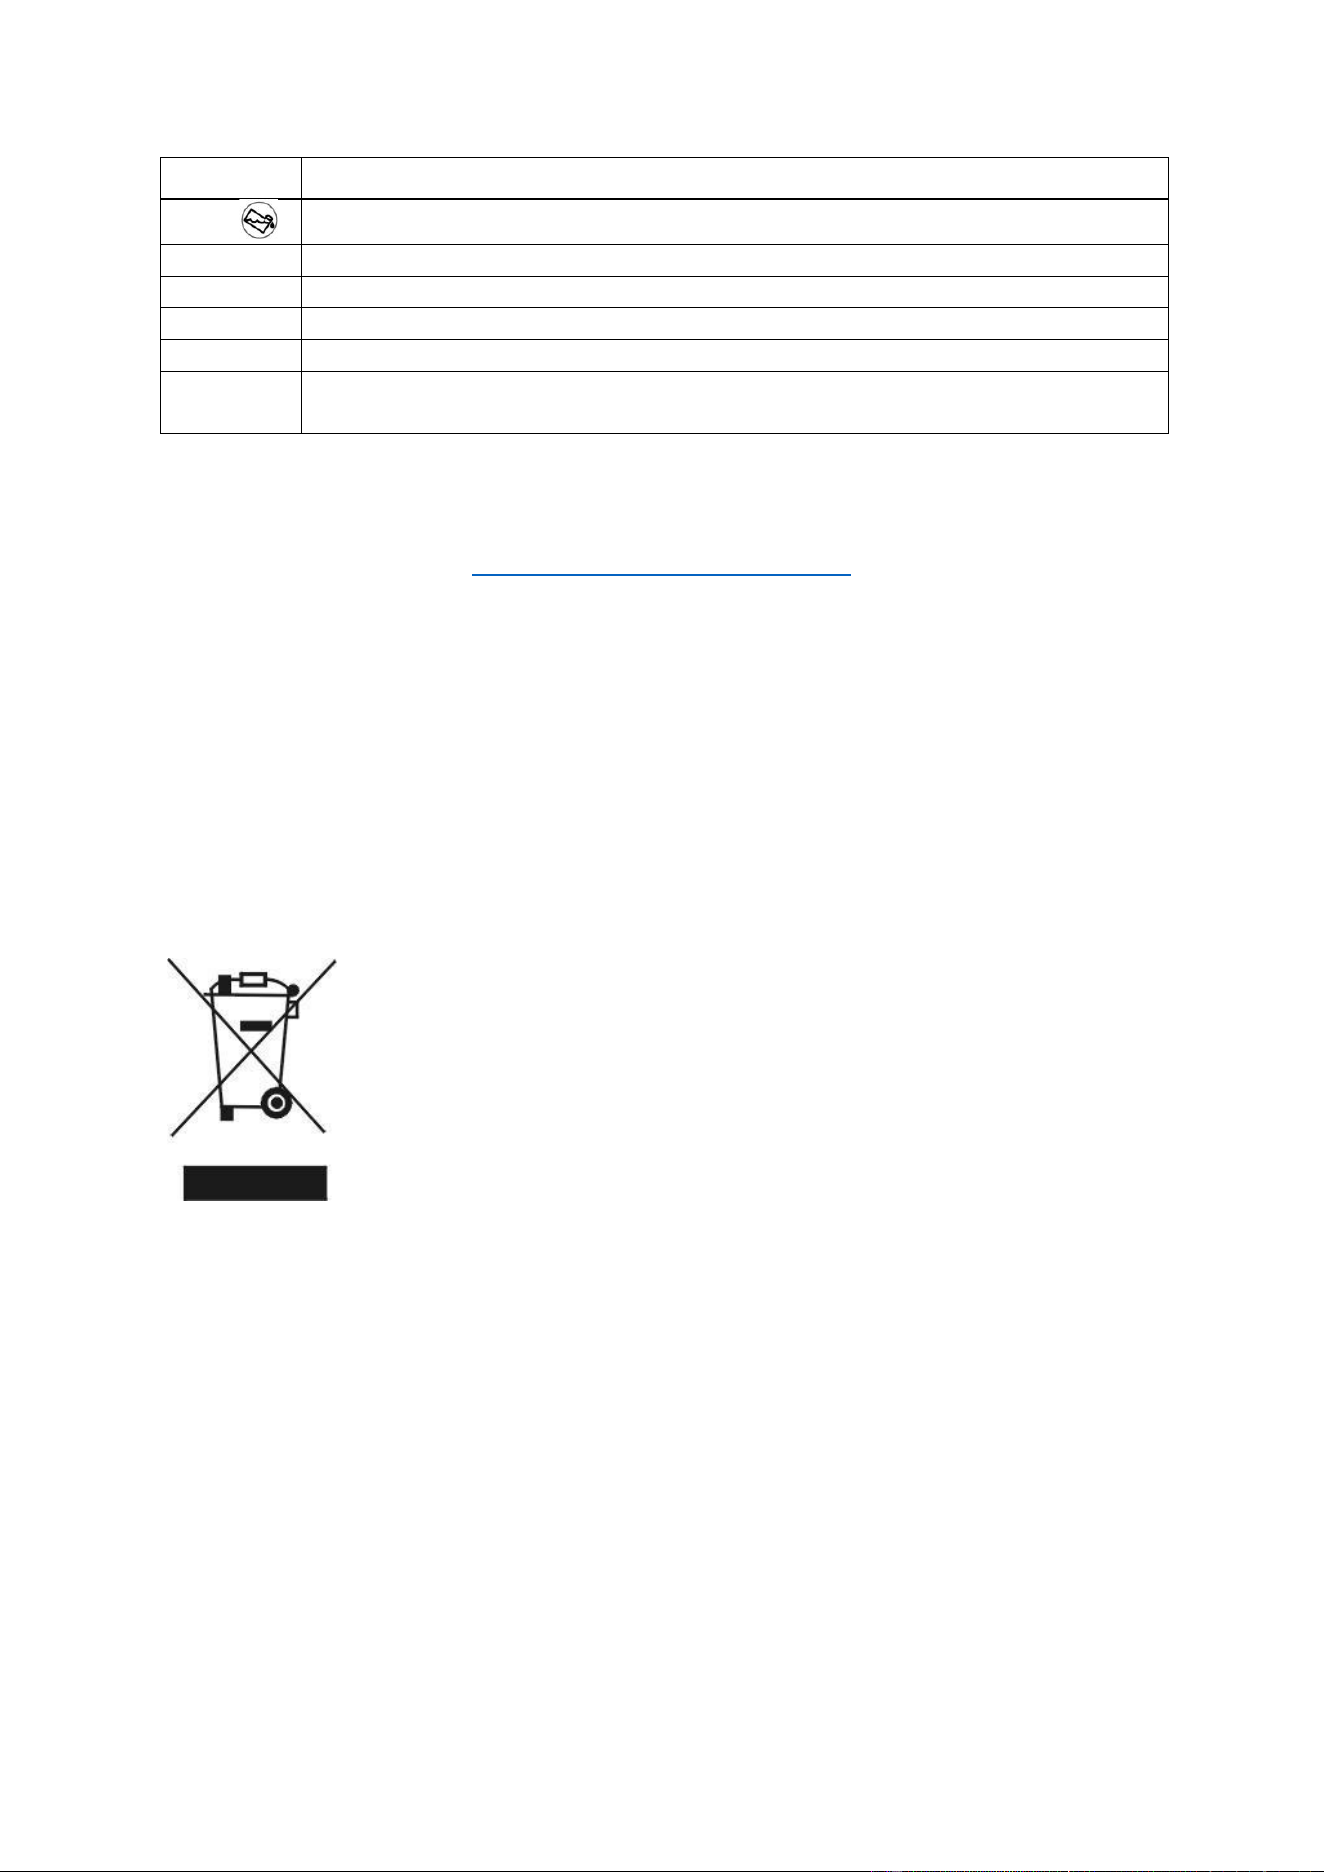
Recycling facilities are now available for all customers at
which you can deposit your old electrical products.
Customers will be able to take any old electrical
equipment to participating sites run by their local councils.
Please remember that this equipment will be further
handled during the recycling process, so please be
considerate when depositing your equipment. Please
contact the local council for details of your local household
waste recycling centers.