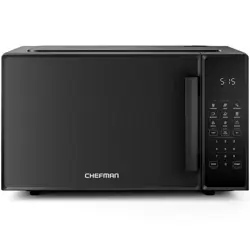
Countertop
1.1 Cu. Ft.
Microwave
RJ55-11-V2
COVER DRAWING
2
FEATURES DRAWING
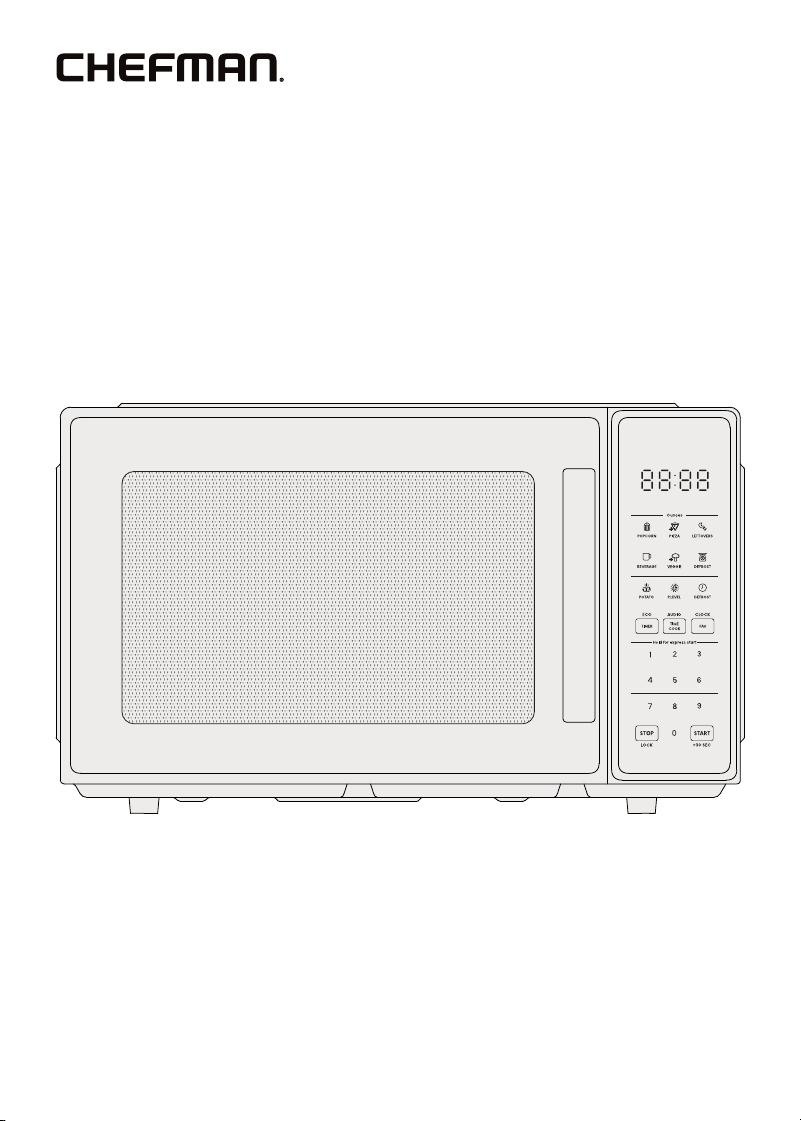
Get to Know Your Microwave
1. Childproof lock button
2. Door and window assembly
3. Safety interlock system
4. Control panel
5. Interior light
6. Turntable shaft
7. Glass turntable
8. Turntable support ring
READ ALL INSTRUCTIONS BEFORE USE
For your safety and continued enjoyment of this product,
always read the instruction manual before using.
4
2
5
6
8
7
1
3

3
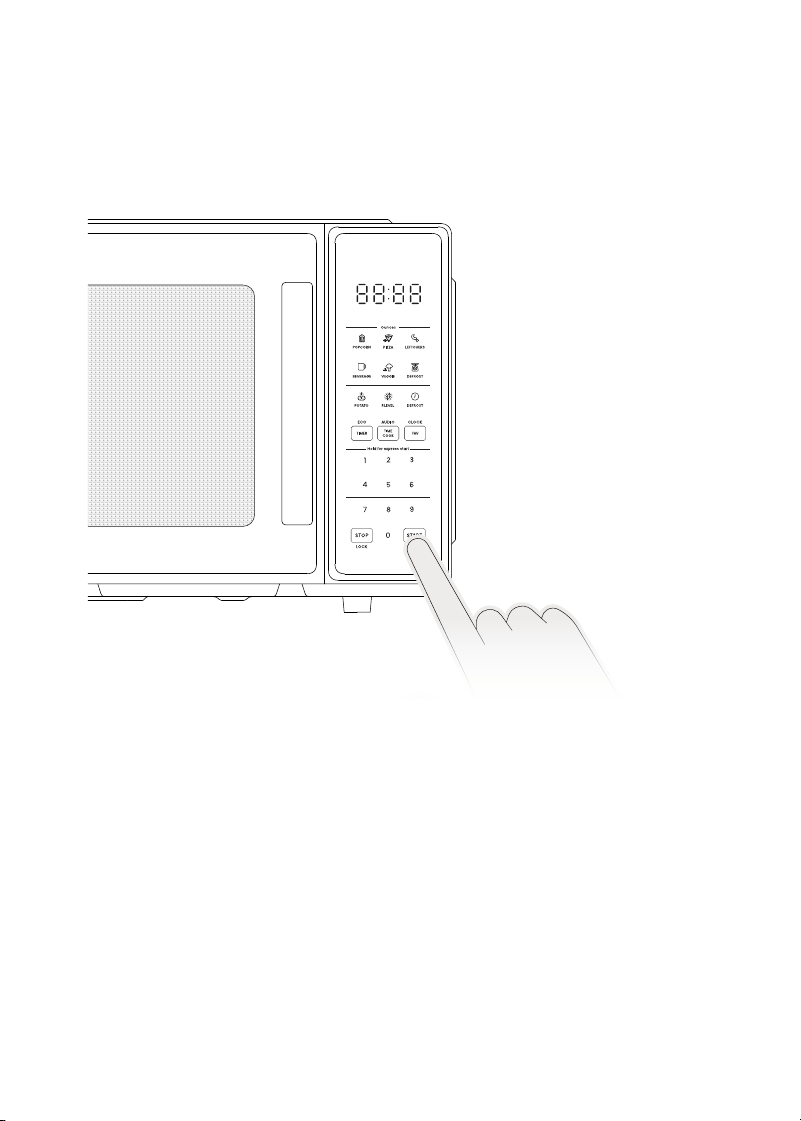
Control Panel
Clock/Timer Display Counts down to the
end of an active cooking cycle. Displays
time of day in Standby Mode.
Preset Icons Use to select preset cooking
functions for six popular foods (see p. 15).
P. LEVEL Button Press to set power level
from 0 to 10 (default power is 100%).
DEFROST Buttons (2) Press to defrost by
weight or by time (see p. 16).
TIMER/ECO Button Press to set a timer
for kitchen tasks (with no microwaving).
Press and hold for ECO Mode (see p. 17).
TIME COOK/AUDIO Button Press to
set cooking time. Press and hold to
mute beeps.
FAV/CLOCK Button Press to set
and use favorites (see p. 16); press and
hold to set microwave’s clock (see p. 10).
Number Pad Use to manually enter
cooking time or set clock or kitchen
timer. Numbers 1 through 6 can also
be used for one-touch quick cooking
(see p. 14).
STOP/LOCK Button Use to
stop active cooking or return to
Standby Mode. Press and hold to
put button in Lock Mode.
START/+30 SEC Button Use to start
cooking after selecting a preset or
entering time manually OR to add
30 seconds of cooking at any time.
CONTROL PANEL
44
SAFETY INSTRUCTIONS &
IMPORTANT SAFEGUARDS
PRECAUTIONS TO AVOID POSSIBLE EXPOSURE TO EXCESSIVE MICROWAVE ENERGY
1. Do NOT attempt to operate this oven with the door open, since that can
result in harmful exposure to microwave energy. It is important not to
disable or tamper with the safety interlock system.
2. Do NOT place any object between the oven front face and the door or
allow soil or cleaner residue to accumulate on sealing surfaces.
3. Do NOT operate the oven if it is damaged. It is particularly important
that the oven door closes properly and that there is no damage to the:
a. DOOR (bent)
b. HINGES AND LATCHES (broken or loosened)
c. DOOR SEALS AND SEALING SURFACE
4. The oven should not be adjusted or repaired. If the oven breaks, please
contact Chefman® Customer Support for assistance.
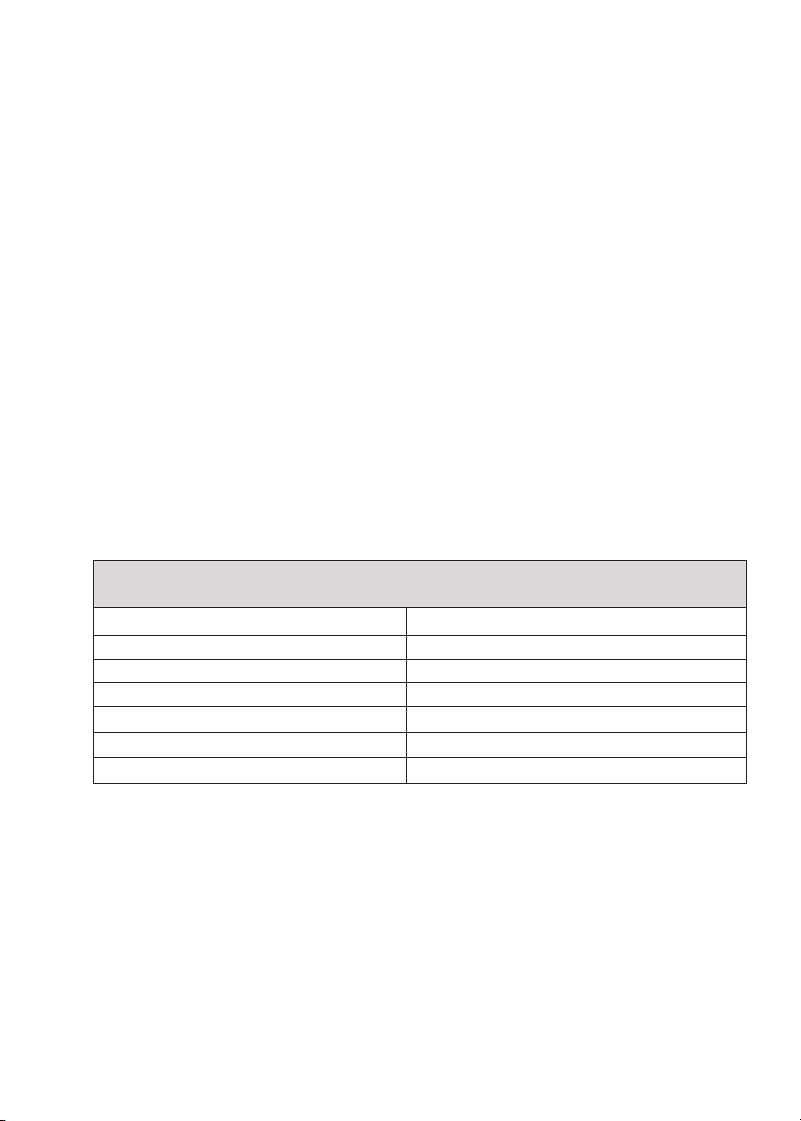
Specifications
Model RJ55-11-V2
Voltage 120V~, 60Hz
Microwave Power 1000W
Capacity 1.1 cu ft
External dimensions 20.1 x 14.5 x 12 in
Turntable diameter 12.4 in
Weight 30.9 lb
To reduce the risk of burns, electrical shock, fire, injury to persons, or
exposure to excessive microwave energy when using your oven, follow
basic safety precautions, including:
1. Read all instructions before using the appliance.
2. Read and follow the specific “PRECAUTIONS TO AVOID POSSIBLE EXPOSURE
TO EXCESSIVE MICROWAVE ENERGY” above.
3. As with most cooking appliances, close supervision is necessary to
reduce the risk of a fire in the oven cavity.

55
SAFETY INSTRUCTIONS &
IMPORTANT SAFEGUARDS
4. To reduce the risk of fire in the oven cavity:
a. Do NOT overcook food. Carefully attend the appliance when paper,
plastic, or other combustible materials are used in the oven.
b. Remove wire twist ties and metal handles from paper or plastic
containers or bags before placing them in the oven.
c. If materials inside the oven ignite, keep the oven door closed. Turn the
oven off and unplug the appliance.
d. Do NOT use the oven cavity for storage purposes. Do NOT leave paper
products, cooking utensils, or food in the cavity when not in use.
5. This oven must be grounded. Connect only to a properly grounded outlet.
See “GROUNDING INSTRUCTIONS” on p. 7.
6. Install or locate this oven only in accordance with the installation
instructions provided on pp. 9–10.
7. Some products—such as whole eggs, sealed glass jars, and other sealed
food containers—are liable to explode and should not be heated in the
oven. Closed containers should be opened and plastic pouches should
be pierced before cooking.
8. Use this appliance only for its intended uses as described in this manual.
Do NOT use corrosive chemicals or vapors in this appliance. This oven
is specifically designed to heat, cook, or dry food. It is not designed for
industrial or laboratory use.
9. HOT CONTENTS CAN CAUSE SEVERE BURNS. DO NOT ALLOW CHILDREN TO
USE THE MICROWAVE. Use caution when removing hot items.
10. Do NOT operate any appliance if it has a damaged cord or plug, or
after the appliance malfunctions or has been damaged in any manner.
Contact Chefman® Customer Support for examination, repair, or
adjustment.
11. Do NOT attempt to service or repair this microwave. Instead, contact
Chefman® Customer Support for assistance.
12. Do NOT cover or block any openings on the oven.
13. Do NOT store or use this appliance outdoors.
14. Do NOT use this oven near water—for example, near a kitchen sink,
in a wet basement, near a swimming pool, or in similar locations.
15. Do NOT immerse the cord or plug in water.

6
SAFETY INSTRUCTIONS &
IMPORTANT SAFEGUARDS
16. Keep the cord away from heated surfaces.
17. Do NOT let the cord hang over the edge of a table or counter.
18. When cleaning the oven, door, and sealing surfaces, use only mild,
nonabrasive soaps or detergents applied with a sponge or soft cloth.
19. This appliance is for private household use only.
20. In a microwave, liquids such as water, coffee, or tea can become
overheated beyond the boiling point without appearing to be boiling.
Visible bubbling is not always present when the container is removed
from the microwave oven. THIS COULD RESULT IN VERY HOT LIQUIDS
SUDDENLY BOILING OVER WHEN THE CONTAINER IS DISTURBED OR A
SPOON OR OTHER UTENSIL IS INSERTED INTO THE LIQUID.
a. Do NOT overheat liquids.
b. Stir liquids both before and halfway through heating them.
c. Do NOT use straight-sided containers with narrow necks.
d. After heating, allow the container to stand in the oven for a short
time before removing it.
e. Use extreme care when inserting a spoon or other utensil into
a container.
SAVE THESE INSTRUCTIONS
FOR HOUSEHOLD USE ONLY

7
SAFETY INSTRUCTIONS &
IMPORTANT SAFEGUARDS
GROUNDING INSTRUCTIONS
DANGER
Electrical Shock Hazard
Touching some of the internal components can cause serious personal injury
or death.
Do NOT disassemble this appliance.
This appliance must be grounded. In the event of an electrical short circuit,
grounding reduces the risk of electrical shock by providing an escape wire
for the electric current. To protect against electrical shock, this appliance is
equipped with a cord having a 3-prong grounding-type plug for insertion into
a proper grounding-type electrical outlet. Do NOT alter the plug for use in a
2-prong outlet. If the plug will not fit into an outlet, have a proper outlet installed
by a qualified electrician.
WARNING: Improper use of the grounding plug can result in electrical shock.
Consult a qualified electrician or serviceman if the grounding instructions are
not completely understood or if doubt exists as to whether the appliance is
properly grounded.
1. A short power-supply cord is provided to reduce the risks of entanglement
or tripping over a longer cord.
2. Extension cords may be used if care is exercised in their use.
3. If an extension cord is used:
a. The marked electrical rating of the cord set and/or the marked
electrical rating of the extension cord should be at least as great
as the electrical rating of the appliance.
b. The extension cord must be a 3-wire cord that has a 3-pronged
grounding plug and a 3-slot receptacle to accept the appliance’s plug.
c. The longer cord should be arranged so that it will not drape over a
countertop or tabletop where it can be pulled on by children or
tripped over.

8
California Proposition 65:
(Applicable for California Residents only)
WARNING: Cancer and Reproductive Harm
www.P65Warnings.ca.gov
Do not place the appliance on a
stovetop or any other heatable surface,
even if stovetop is not on.
Doing so is a fire hazard.
SAFETY INSTRUCTIONS &
IMPORTANT SAFEGUARDS
Utensil Test
Certain nonmetallic utensils and containers may not be safe to use in
the microwave. For more details on microwave-safe materials, refer to the
chart on pp. 11–12. If in doubt, you can test the utensil or container with the
following procedure:
1. Fill a microwave-safe container with 1 cup of cold water.
2. Place the water container and the empty container/utensil being tested
on the glass turntable and microwave for 1 minute. Do not exceed the
1-minute cooking time.
3. Carefully feel the container or utensil. If the empty container or utensil is
warm, do not use it in the microwave.
DO NOT OPERATE THE APPLIANCE IF THE POWER CORD SHOWS ANY DAMAGE
OR IF THE APPLIANCE WORKS INTERMITTENTLY OR STOPS WORKING ENTIRELY.
99
How to Use the Microwave
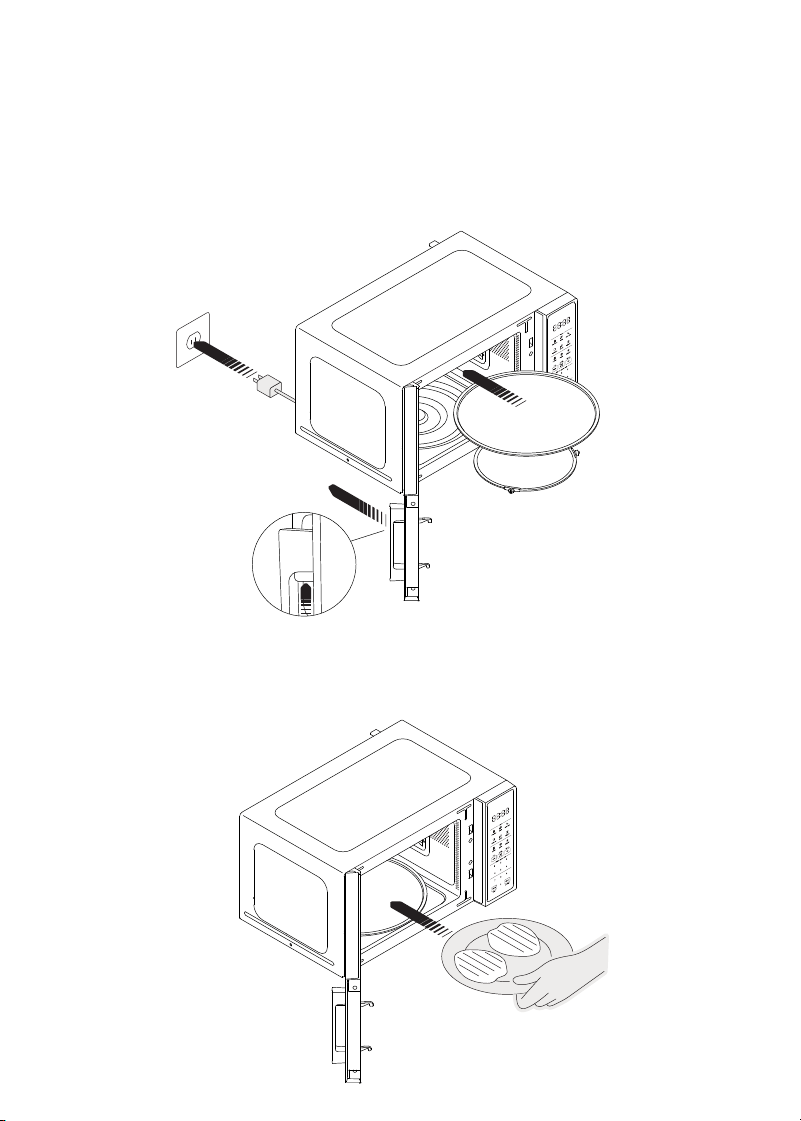
Before First Use
1. Remove all packaging materials, and read and remove all removable
stickers. (Leave the rating label on the unit.) Be sure that all parts and
accessories are accounted for before throwing away any packaging.
2. To unlock the door, press up on the childproof lock button with your index
finger, then pull the handle toward you.
3. Gently wipe the exterior and interior of the oven with a clean, damp cloth
and dry thoroughly. Wash the interior with a mild liquid soap and a damp
cloth or sponge. NOTE: Do not use abrasive cleansers, such as steel wool
pads, as they may damage the finish. Never immerse the unit in water or
other liquids.
4. Hand-wash the glass turntable and dry thoroughly. (The turntable is also
dishwasher safe.)
5. Install the microwave as directed below, and install the turntable as
directed on p. 10.
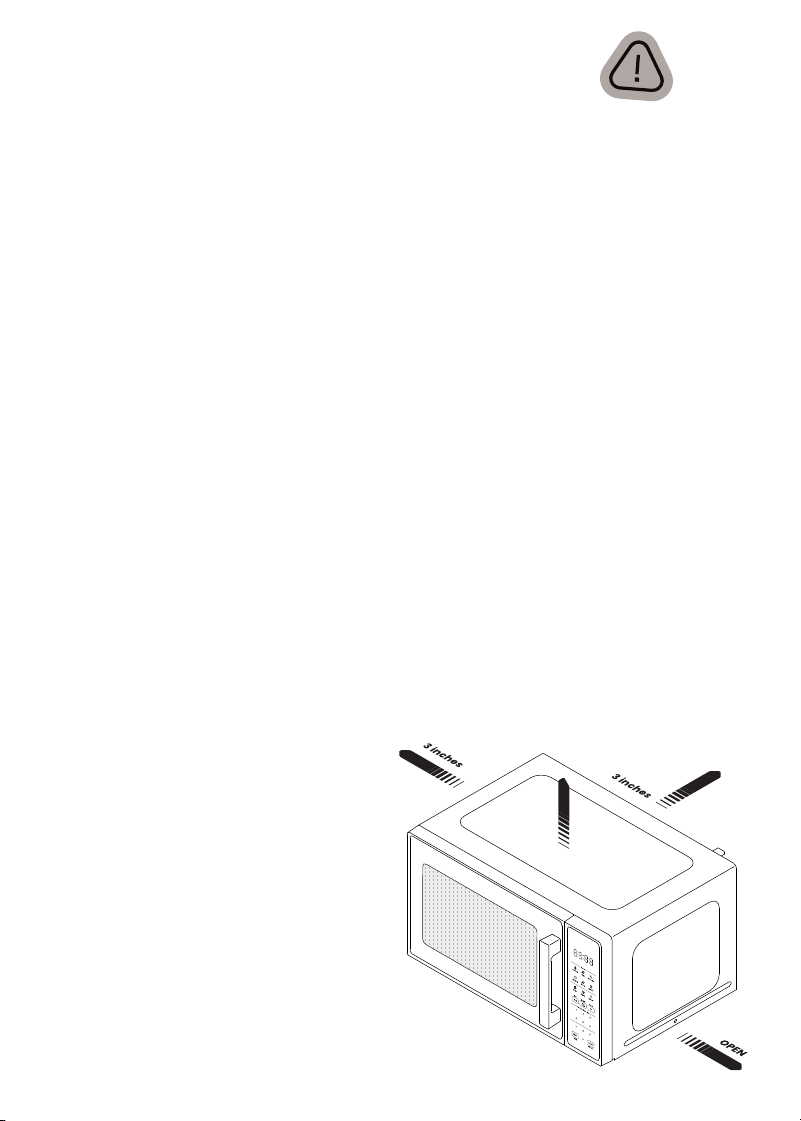
Countertop Installation
1. Place the microwave on a firm, level surface with the following
clearance for intake and outtake openings:
• right side of microwave must be open a minimum clearance of
3 inches between the other sides and any adjacent walls
• a minimum clearance of 12 inches between the top of the
microwave and any upper cabinets
• a minimum installation height of 3 feet
NOTE: Blocking openings
can damage the oven.
INSTALLATION DRAWING
12 inches

10
How to Use the Microwave
10
2. Place the oven far away from radios and television sets, as the operation
of the oven may cause interference with them. If there is still interference,
it can be reduced by taking the following measures:
• Clean the door and sealing surface of the oven.
• Reorient the receiving antenna of the radio or television.
• Plug the oven into a different outlet so that the oven and receiver are
on different branch circuits.
3. Plug your oven into a standard household outlet. Be sure the voltage and
the frequency are the same as the voltage and the frequency on the
rating label. WARNING: Do not install the oven over a range cooktop or
other heat-producing appliance. If installed near or over a heat source,
the oven could be damaged, and the warranty would be void.
4. This device complies with part 18 of the FCC rules.
Turntable Installation
Both the glass turntable and the turntable support must be used whenever
you operate the oven.
1. Set the turntable support in the oven interior so the wheels make contact
with the oven floor.
2. Place the glass turntable over the support, aligning the hub on the
underside of the turntable with the turntable shaft in the oven floor.
Never place the turntable upside down.
3. ALWAYS use the turntable and place food in a microwave-safe bowl
or plate. NOTE: If the turntable or turntable support cracks or breaks,
contact Chefman® Customer Support.
Setting the Clock
1. Press and hold the FAV/CLOCK button for 3 seconds.
2. Enter the current time using the keypad (1:00 to 12:59).
3. Press the START/+30 SEC button to confirm the setting.
11
Materials You Can and Can’t Use
in the Microwave
Material Can Use in the Oven? Notes
Dinnerware Yes, microwave-safe only Refer to manufacturer’s label and/or
instructions. Do not use cracked or
chipped dishes.
Glass jars Yes Always remove lid. Use to heat food only until
just warm. Most glass jars are not heat-
resistant and may break.
Glassware Yes, heat-resistant only Make sure there is no metallic trim. Do not
use cracked or chipped glassware.
Paper oven-
cooking bags
Yes Follow manufacturer’s instructions. Do not
close with metal twist ties. Make slits to allow
steam to escape.
Plastic bags Yes, microwave-safe only Follow manufacturer’s instructions.
“Boiling bags” and tightly closed plastic bags
should be slit, pierced, or vented as directed
on package.
Aluminum foil No May cause arcing.
Paper plates
and cup
Yes Use for short–term cooking/warming only.
Do not leave oven unattended while cooking.
Paper towels Yes Use with supervision for short-term cooking
only. Use to cover food while reheating to
prevent splatter and absorb fat.
Parchment paper Yes Use as a cover to prevent splattering or as a
wrap for steaming.
Wax paper Yes Use as a cover to prevent splattering and
retain moisture.
Plastic wrap Yes, microwave-safe only Use to cover food containers during cooking
to retain moisture. Do not allow plastic wrap
to touch food.
Plastic containers Yes, microwave-safe only Check manufacturer’s label and instructions.
Some plastic containers soften as the food
inside gets hot.
Thermometer Yes, microwave-safe only Check manufacturer’s label and instructions.
Browning dish Yes, microwave-safe only Follow manufacturer’s instructions. The
bottom of the browning dish must be at
least 3/16 inch (5 mm) above the turntable.
Incorrect usage may cause the turntable
to break.
Aluminum trays No May cause arcing. Transfer food to a
microwave-safe dish.

12
Materials You Can and Can’t Use in the Microwave
Material Can Use in the Oven? Notes
Food carton with
metal handle
(i.e., Chinese
takeout carton)
No May cause arcing. Transfer food to a
microwave-safe dish.
Metal twist ties No May cause arcing and could cause a fire in
the oven.
Paper bags No May cause a fire in the oven.
Plastic foam
(Styrofoam)
No May melt or contaminate food when
exposed to high temperatures.
Wood No Will dry out and may catch fire when used in
the microwave oven.
13
Quick Start:
How to Microwave in Manual Mode
1. Ensure the oven is plugged in and the turntable is properly installed.
Open the door by pushing the childproof lock button up with your index
finger while pulling forward on the handle.
2. Place your food on the turntable in a microwave-safe vessel and
close the door. NOTE: ALWAYS use the turntable and place food in
a microwave-safe bowl or plate.
STEP 1
STEP 2
14
Quick Start: How to Microwave in Manual Mode
3. For express-start cooking at 100% power, press and hold any of the keypad
numbers 1 through 6. for the specified number of minutes. The microwave
will automatically start cooking for that many minutes. Alternatively, to
cook for longer than 6 minutes, enter the time in minutes and seconds
(e.g., “7-3-0” for 7 minutes and 30 seconds)., then press START.
4. You can also adjust the power level for your cook: Press P.LEVEL, then
enter your preferred power level (1 for 10%, 2 for 20%, etc). Press TIME COOK,
then enter your desired time in minutes and seconds and press
START again.
5. Opening the door or pressing STOP pauses cooking while the unit is
operating. Close the door and press START to resume, or press STOP
again to return to Standby Mode.
6. To add time during cooking, press +30 SEC (same as the START button)
as many times as needed.
7. After the timer finishes counting down, the unit will beep five times.
Open the door, remove the food, and enjoy!
STEP 3

15
Presets & Special Functions
To Use Preset Functions
The preset functions make it quick and easy to program the oven for cooking
some popular foods.
1. Open the door and place your food on the turntable in a microwave-safe
vessel. NOTE: ALWAYS use the turntable and place food in a microwave-
safe bowl or plate.
2. Press one of the preset icons and continue pressing that button to toggle
through the size/quantity choices that appear on the display. (The menu
reflects only the relevant choices for your chosen preset.) See the chart
below for more information on the preset functions.
3. Press START. The unit will begin cooking and counting down.
4. After the timer finishes counting down, the unit will beep five times.
Preset Function Chart
Preset Name Size/Quantity Options Notes
POPCORN 1.75 oz, 2.7 oz, 3.2 oz Choose closest size if your packet does not
match one of the size options.
PIZZA 4 oz, 8 oz, 12 oz Reflects time to reheat from frozen.
LEFTOVERS 9 oz, 12 oz, 16 oz Reflects time to reheat refrigerated leftovers.
BEVERAGE 6 oz, 8 oz, 10 oz, 12 oz Reflects time to reheat a beverage that has
cooled to room temperature.
VEGGIE 4 oz, 8 oz, 16 oz Reflects time to defrost and cook
frozen vegetables.
POTATO 1, 2, 3 count Based on whole potatoes, approx. 8 oz each
(prick skin with a fork first).

16
Presets & Special Functions
To Defrost
1. You can defrost frozen foods either by weight or by time. Open the door
and place your food on the turntable in a microwave-safe vessel.
NOTE: ALWAYS use the turntable and place food in a microwave-safe bowl
or plate.
2. Press the WEIGHT DEFROST button, then use the keypad to enter the
ounce weight of your food (from 4 to 50 oz). Alternatively, press the TIME
DEFROST button and use the keypad to enter your desired defrosting time
in minutes and seconds.
3. Press START. The unit will begin defrosting and counting down. For even
defrosting, flip your food halfway through the running time.
4. After the timer finishes counting down, the unit will beep five times.
To Use the Favorites Function
You can program up to three favorite cooking cycles (for instance, 5 minutes
and 30 seconds at 50% power) to be stored in memory and activated with
one touch.
1. To program: Press the FAV button on the keypad once. (Press it twice
to program a second favorite cycle.)
2. Enter the cooking time using the keypad, in numbers and seconds (e.g.,
“5-3-0” for 5 minutes and 30 seconds).
3. Press P.LEVEL, then enter your power level, from 1 to 10 (e.g., press “5”
for 50% power).
4. Press START to save the setting. The unit will beep and display “F1” on
the screen (or “F2” or “F3” if this is your second or third favorite saved).
5. To use the saved favorite: Press the FAV button on the keypad once and
the screen will display “F1” (or to select an already-programmed second
favorite, press the button twice; the screen will display “F2”; for a third
favorite, press the button three times; the screen will display “F3”). Press
START and cooking will begin.

17
Presets & Special Functions
Turning Sound Off and On
To mute all beeps on the unit, press and hold the TIME COOK/AUDIO button on
the keypad for 3 seconds. To turn the sound back on, press and hold the same
button for 3 seconds.
TIMER
The built-in kitchen timer gives you a timer at your fingertips for all sorts of
tasks that don’t use the microwave. To use it, press the TIMER button, set the
desired time, and press START (maximum time is 99 minutes and 99 seconds).
When the timer ends, the microwave will beep 5 times. NOTE: The timer does
not start or stop the microwave oven, and the oven cannot be used to cook
when the timer is in use.
ECO Mode
To put the unit in power-saving ECO Mode, press and hold the TIMER/ECO
button on the keypad for 3 seconds. In ECO Mode, the clock will not display
when the microwave is not in use. To turn the clock back on, press any button.
LOCK Mode
To put the unit in childproof LOCK Mode, press and hold the STOP/LOCK button
for 3 seconds. The unit will give a long beep. In LOCK Mode the screen displays
as , and the microwave cannot be started. To turn off the Lock Mode,
press and hold the STOP/LOCK button for 3 seconds again.

18
Keep It Clean
Periodically wipe down the interior of the microwave with a damp cloth.
If food splatters on the interior or on the glass turntable, clean both with mild
soap and a damp cloth. The turntable is also top-rack dishwasher safe.
Do not immerse the unit in water. The unit and turntable support are not
dishwasher safe.

19
Problem Possible Cause Solution
Oven will not start a. Electrical cord for oven is not
plugged in.
b. Door is open.
c. Wrong operation is set.
a. Plug into a three-prong
outlet.
b. Close the door and try again.
c. Check instructions.
Arcing or sparkling
while oven is
running
a. Wrong materials used in
the microwave.
b. The oven is operated while
empty.
c. Spilled food remains in the
oven interior.
a. Refer to chart on pp. 11–12 for
materials you can and can’t
use in the microwave.
b. Do not operate the oven
while empty.
c. Clean the interior with a
damp cloth.
Unevenly cooked
food
a. Wrong materials used in the
microwave.
b. Cooking time and power level
are not suitable.
c. Food is not flipped or stirred.
a. Refer to chart on pp. 11–12 for
materials you can and can’t
use in the microwave.
b. Use correct cooking time and
power level.
c. Flip or stir food midway
through cooking cycle.
Overcooked food a. Cooking time is too long or
power is too high.
a. Reduce cooking time and/
or power.
Undercooked food a. Cooking time is too short or
power is too low.
b. Food is not completely
defrosted.
c. Wrong materials used in the
microwave.
d. Oven ventilation ports are
restricted.
a. Increase cooking time and/
or power.
b. Completely defrost food
before cooking.
c. Refer to chart on pp. 11–12 for
materials you can and can’t
use in the microwave.
d. Move unit so there is ample
space around ventilation
ports (see p. 9).
Incompletely
or unevenly
defrosted food
a. Defrosting time is too short or
power is too low.
b. Wrong materials used in the
microwave.
c. Food is not flipped or stirred.
a. Increase defrosting time
and/or power.
b. Refer to chart on pp. 11–12 for
materials you can and can’t
use in the microwave.
c. Flip or stir food midway
through defrosting cycle.
An error code
displays on the
screen.
a. Err0: sensor has short-circuited.
b. Err1: open circuit on sensor.
Contact Chefman Customer
Support.
Having Trouble?
If you encounter problems with your oven, refer to the chart below for
possible causes and solutions. If you continue to have trouble, please
contact Chefman Customer Support.

20
Terms & Conditions
Limited Warranty
RJ Brands, LLC d/b/a Chefman® offers a limited 1-year Warranty (the “Warranty”)
available on sales through authorized distributors and retailers only. Please
note that this Warranty becomes valid from the date of initial retail purchase
and that the Warranty is nontransferable and applies only to the
original purchaser.
This Warranty is void without proof of purchase within the United States and
Canada. Please be aware that this Warranty supersedes all other warranties
and constitutes the entire agreement between the consumer and Chefman®.
Any changes to the Terms and Conditions of this Warranty must be in writing,
signed by a representative of Chefman®. No other party has the right or ability
to alter or change the Terms and Conditions of this Warranty.
We may ask you to please submit, via email, photos and/or video of the issue
you are experiencing. This is to help us better assess the matter and possibly
offer a quick fix. Photos and/or video may also be required to determine
Warranty eligibility.
We encourage you to register your product. Registering can make the Warranty
process easier and can keep you informed of any updates or recalls on
your product. To register, follow the directions on the Chefman® Warranty
Registration page in the Chefman® User Guide. Please retain your proof of
purchase even after registering. In the event that you do not have proof of
your purchase date, we may declare your Warranty void or we may, at our sole
discretion, apply the date of manufacture as the purchase date for purposes of
this Warranty.

21
Terms & Conditions
What the Warranty Covers
• Manufacturer Defects
Chefman® products are warranted against defects in material and
workmanship, under normal household use, for a period of 1 year from the
date of purchase when used in accordance with the directions listed in the
Chefman® User Guide. If your product does not work as it should, please
contact Customer Support at support@chefman.com so that we may
assist you.
This Warranty Does Not Cover
• Misuse
Damage that occurs from neglectful or improper use of products, including,
but not limited to, damage that occurs as a result of usage with incompatible
voltage, regardless of whether the product was used with a converter or
adapter. See Safety Instructions in the Chefman® User Guide for information
on proper use of product;
• Poor Maintenance
General lack of proper care. We encourage you to take care of your
Chefman® products so that you may continue to enjoy them. Please see
Keep It Clean directions in this Chefman® User Guide for information on
proper maintenance;
• Commercial Use
Damage that occurs from commercial use;
• Normal Wear and Tear
Damage or degradation expected to occur due to normal use over time;
• Altered Products
Damage that occurs from alterations or modifications by any entity
other than Chefman® such as the removal of the rating label affixed to
the product;
• Catastrophic Events
Damage that occurs from fire, floods, or natural disasters; or
• Loss of Interest
Claims of loss of interest or enjoyment.

22
Terms & Conditions
For product information, please visit us at Chefman.com.
EXCEPT WHERE SUCH LIABILITY IS REQUIRED BY LAW, THIS WARRANTY DOES NOT
COVER, AND CHEFMAN® SHALL NOT BE LIABLE FOR, INCIDENTAL, INDIRECT, SPECIAL,
OR CONSEQUENTIAL DAMAGES, INCLUDING WITHOUT LIMITATION, DAMAGE TO, OR
LOSS OF USE OF THE PRODUCT, OR LOST SALES OR PROFITS OR DELAY OR FAILURE TO
PERFORM THIS WARRANTY OBLIGATION. THE REMEDIES PROVIDED HEREIN ARE THE
EXCLUSIVE REMEDIES UNDER THIS WARRANTY, WHETHER BASED ON CONTRACT,
TORT OR OTHERWISE.
23
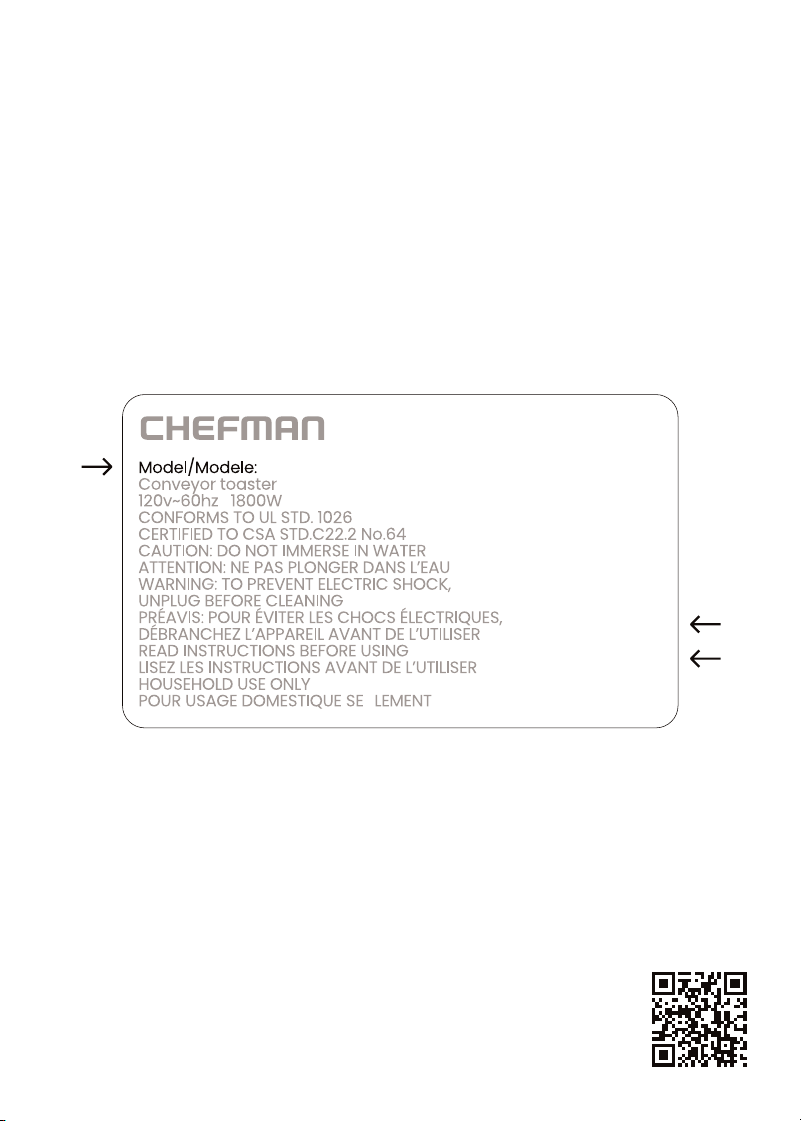
How do I register my product?
All you need to do is fill out a simple Chefman® registration form.
You can easily access the form in one of the two ways listed below:
• Visit Chefman.com/register.
• Scan the QR code to the right to access site.
NOTE: Label depicted here is an example.
Please see label on your product for actual model/date code/access code.
Warranty Registration
What do I need to register my product?
• Contact Information
• Model Number (see example below)
• Proof of Purchase (online confirmation, receipt, gift receipt)
• Date Code (see example below)
• Access Code (see example below)
Date Code:
0000
Access Code:
Xxxxxxxx
Made in China/Fabrique en Chine
AC Only/ AC Seulement
XXXXX

RJ5511V2UG121124
Countertop
1.1 Cu. Ft.
Microwave
Chefman® is a registered trademark of RJ Brands, LLC.
