7085 921-00
Cliff 156
Cliff 234
Operating instructions Page 10
Supermarket cabinet
Read the operating instructions before switching on for the rst time
EN
14
Safety instructions and warnings
- WARNING: do not seal
ventilation openings on
the appliance housing or
enclosure.
- WARNING: only use the mechanical devices or
other aids recommended by the manufacturer to
help speed up the defrosting process.
- WARNING: do not damage the refrigerant circuit.
- WARNING: do not use any electrical devices
in the refrigerator compartment which do not
comply with the design recommended by the
manufacturer.
- WARNING: the mains cable must not be dam-
aged while installing the appliance.
- WARNING: multi-sockets or distributor strips
and other electronic devices (such as halogen
transformers) must not be positioned and oper-
ated at the rear of appliances.
- WARNING: danger of injury through electric
shock. There are live parts under the cover. Only
have the interior LED light replaced or repaired
by customer service staff or trained personnel.
- WARNING: risk of injury from the LED lamp. The
light intensity of the LED light complies with laser
class RG 2. If the cover is defective, do not look
directly at the light through optical lenses from
close distance. This may damage your eyes.
- WARNING: this appliance must be secured as
described in the operating instructions (Installa-
tion instructions) to rule out any potential risks
due to its instability.
- This appliance can be used by children of 8 years
old and over, and also by persons with restricted
physical, sensory or mental capacity or lack of
experience and knowledge, if they are supervised
or have been instructed on safe use of the appli-
ance and understand the resulting risks. Children
must not be allowed to play with the appliance.
Cleaning and user maintenance must not be
carried out by children without supervision.
- Do not store any explosive substances, such as
aerosol containers with flammable propellant
gas, inside the appliance.
- To prevent injury and damage to property, the
appliance should only be installed by 3 people.
Priority of warnings
DANGER
identies a situation involving direct
danger which, if not obviated, may result
in death or severe bodily injury.
WARNING
identies a dangerous situation which,
if not obviated, may result in death or
severe bodily injury.
CAUTION
identies a dangerous situation which,
if not obviated, may result in minor or
medium bodily injury.
NOTICE
identies a dangerous situation
which, if not obviated, may result in
damage to property.
Note
identies useful information and tips.
Content
Priority of warnings .................................................................14
Safety instructions and warnings ........................................... 14
Symbols on the appliance ...................................................... 15
Intended use ...........................................................................15
Foreseeable incorrect use......................................................15
Declaration of conformity ....................................................... 15
Noise emissions from the appliance ......................................15
EPREL database .................................................................... 15
Climate class .......................................................................... 16
Setting up ...............................................................................16
Description of the appliance ...................................................16
Display in indicating mode ..................................................... 17
Setup mode ............................................................................ 17
Activating setup mode ............................................................17
Setting the real time clock ......................................................18
Changing the temperature setting ..........................................18
Activating the defrost function manually ................................18
Interior light
(depending on options) ...........................................................19
Malfunctions ...........................................................................19
Switching the appliance o ....................................................20
Switching the appliance on ....................................................20
Storing ....................................................................................20
Equipment (depending on conguration) ...............................20
Repositioning the shelves ......................................................21
Cleaning .................................................................................22
Cleaning the glass door .........................................................22
Cleaning the shelves ..............................................................22
Removing the pull-out basket ................................................. 23
Cleaning the dust lter ............................................................23
Customer service ...................................................................24
Disposal notes ........................................................................24
Shutting your appliance down ................................................ 24
Additional information:............................................................24
15
EN
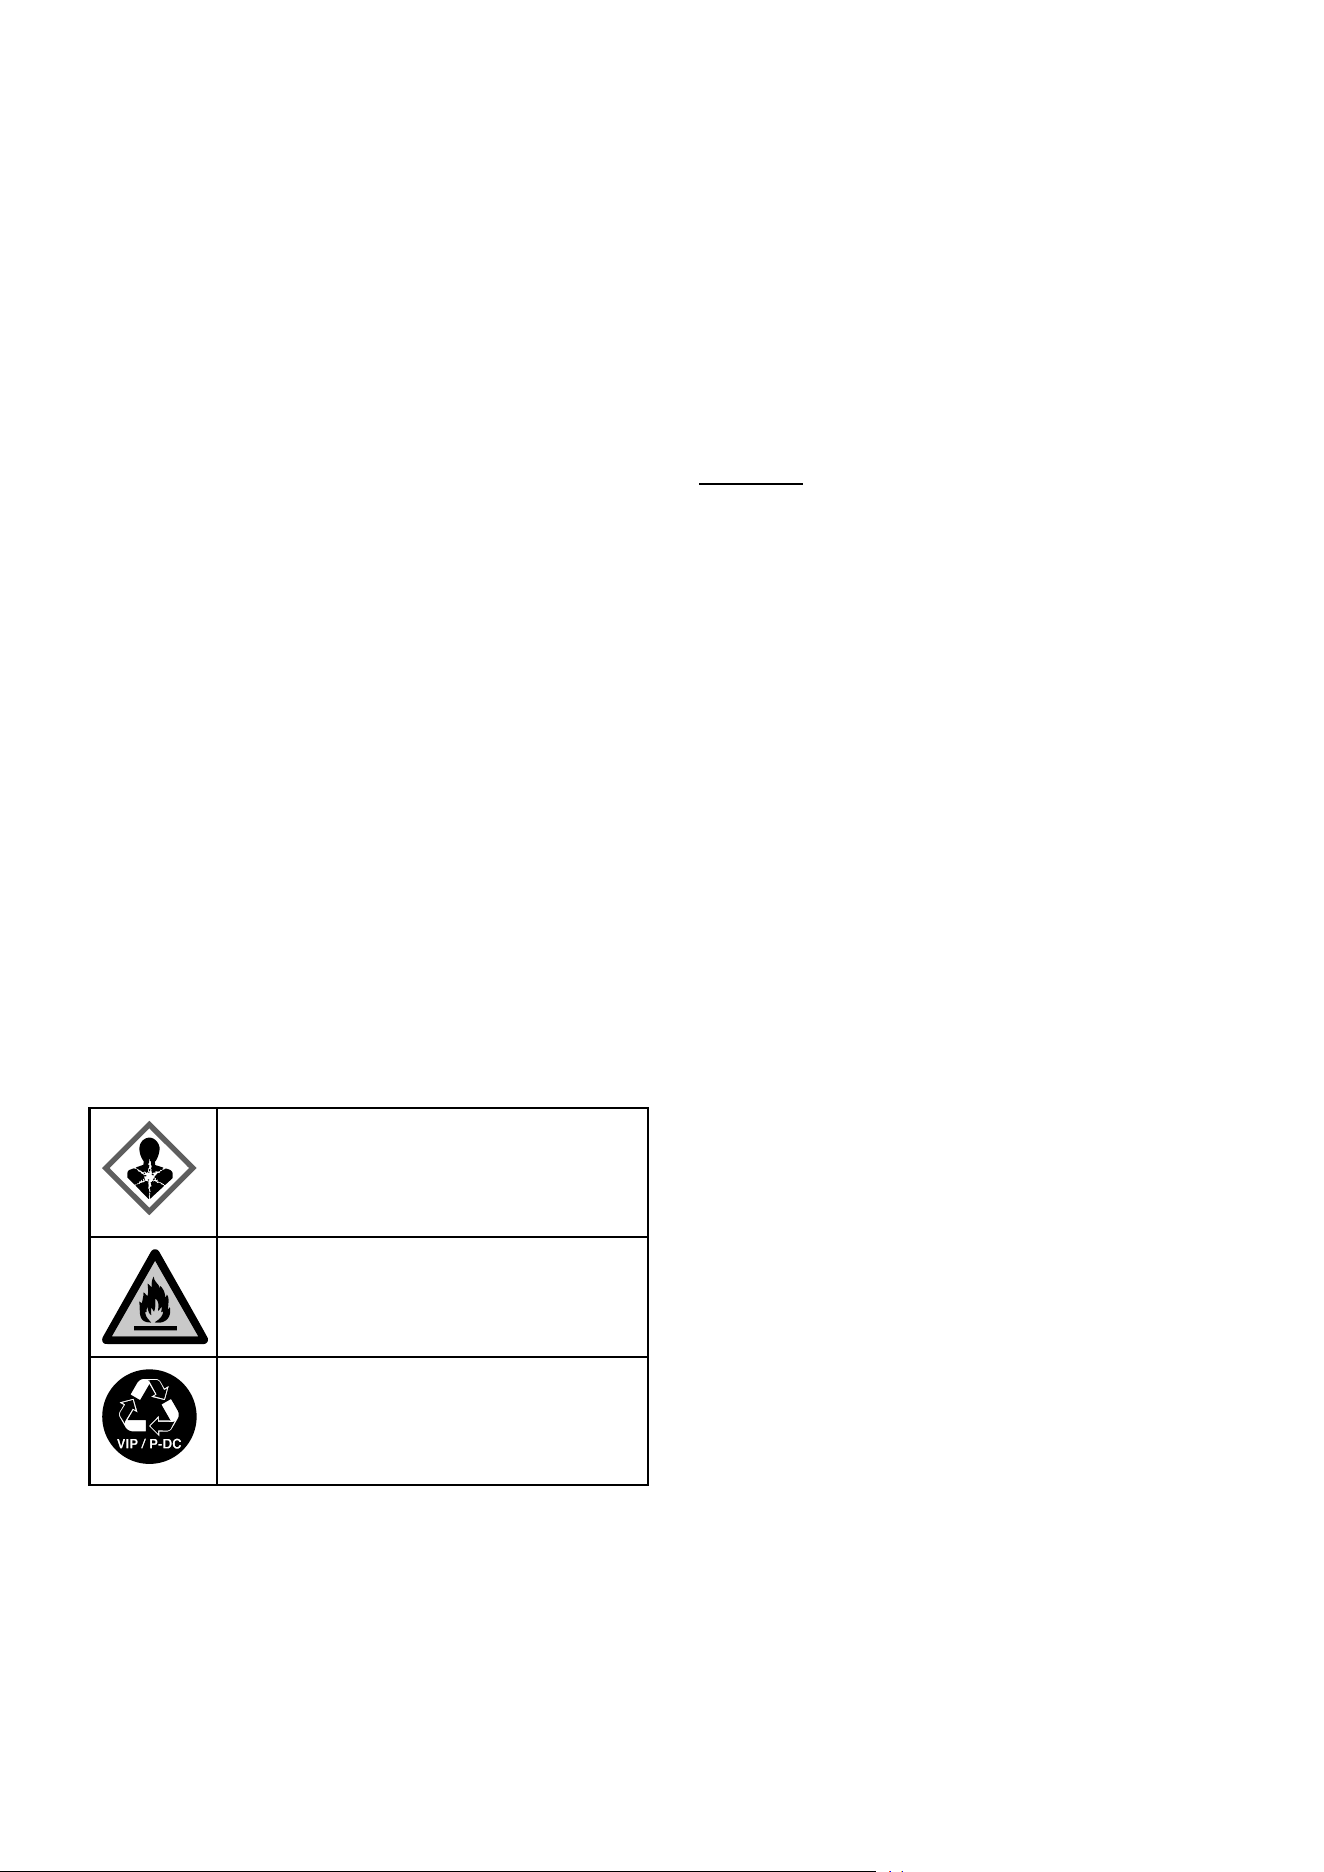
Symbols on the appliance
The symbol can be located on the compressor. It
refers to the oil in the compressor and indicates
the following danger: swallowing or inhaling can
be fatal. This is only relevant for recycling. There
is no danger in normal operation.
Warning about inammable substances.
A sticker to this eect may be applied to the rear
of the appliance. It refers to the foampadded
panels in the door and/or the housing. This is
only relevant for recycling. Do not remove the
sticker.
Noise emissions from the appliance
The noise level while the appliance is operating is below 70 dB(A)
(relative noise level 1 pW).
Declaration of conformity
The refrigerant circuit has been tested for leaks. The appliance
complies with the relevant safety regulations and EU Directives
2006/42/EG, 2014/30/EU, 2009/125/EG and 2011/65/EU.
Intended use
The appliance is suited only for cooling food.
This appliance may be used to display food and drink in retail
sales outlets. It is suitable for commercial use, for example in
restaurants, canteens, hospitals and in commercial businesses
such as bakeries, butchers' shops, supermarkets, etc.
This appliance is only suitable for storing food that has already
been frozen.
The appliance is not suitable for freezing fresh food.
The appliance is designed for use in enclosed rooms. All other
types of use are not permitted.
Foreseeable incorrect use
Do not use the appliance for the following applications:
• For the storage and cooling (freezing) of:
- Chemically unstable, inflammable or caustic substances
- Medicines, blood plasma, laboratory preparations or similar sub-
stances and products subject to the Medical Devices Directive
2007/47/EC.
• Use in potentially explosive atmospheres.
• Use outdoors or in areas where it is exposed to splash water or
damp conditions.
Incorrect use of the appliance will result in damaging or spoiling
the goods stored in it.
- After unpacking it, check the appliance for signs
of damage. Contact the supplier if it is damaged.
Do not connect the appliance to the mains power
supply.
- Avoid prolonged skin contact with cold surfaces
(e.g. chilled/frozen products). If necessary, take
safety action (e.g. gloves).
- All repairs and work on the appliance may only
be carried out by customer service personnel
or other trained personnel. The same applies to
changing the mains power cable.
- Only carry out repair and other work on the ap-
pliance when the mains plug has visibly been
disconnected.
- In the event of a fault, pull out the plug or switch
o the fuse.
- When disconnecting the appliance from the
mains, pull on the plug. Do not pull on the cable.
- Ensure that food which has been stored for too
long is not consumed. Dispose of food which has
been stored for too long properly.
- Do not allow naked ames or ignition sources to
enter the appliance.
- Alcoholic drinks or other vessels containing al-
cohol should be sealed tightly for storage.
EPREL database
As from 1 March 2021, information about energy labelling and
ecodesign requirements will be available in the European product
database (EPREL). You can access the product database using
the following link: https://eprel.ec.europa.eu/. You will be asked
to enter the model identier. You will nd the model identier on
the type plate.
16
NOTICE
The maximum load per grid shelf is 130 kg/m².
The maximum load per pull-out basket is 160 kg/m².
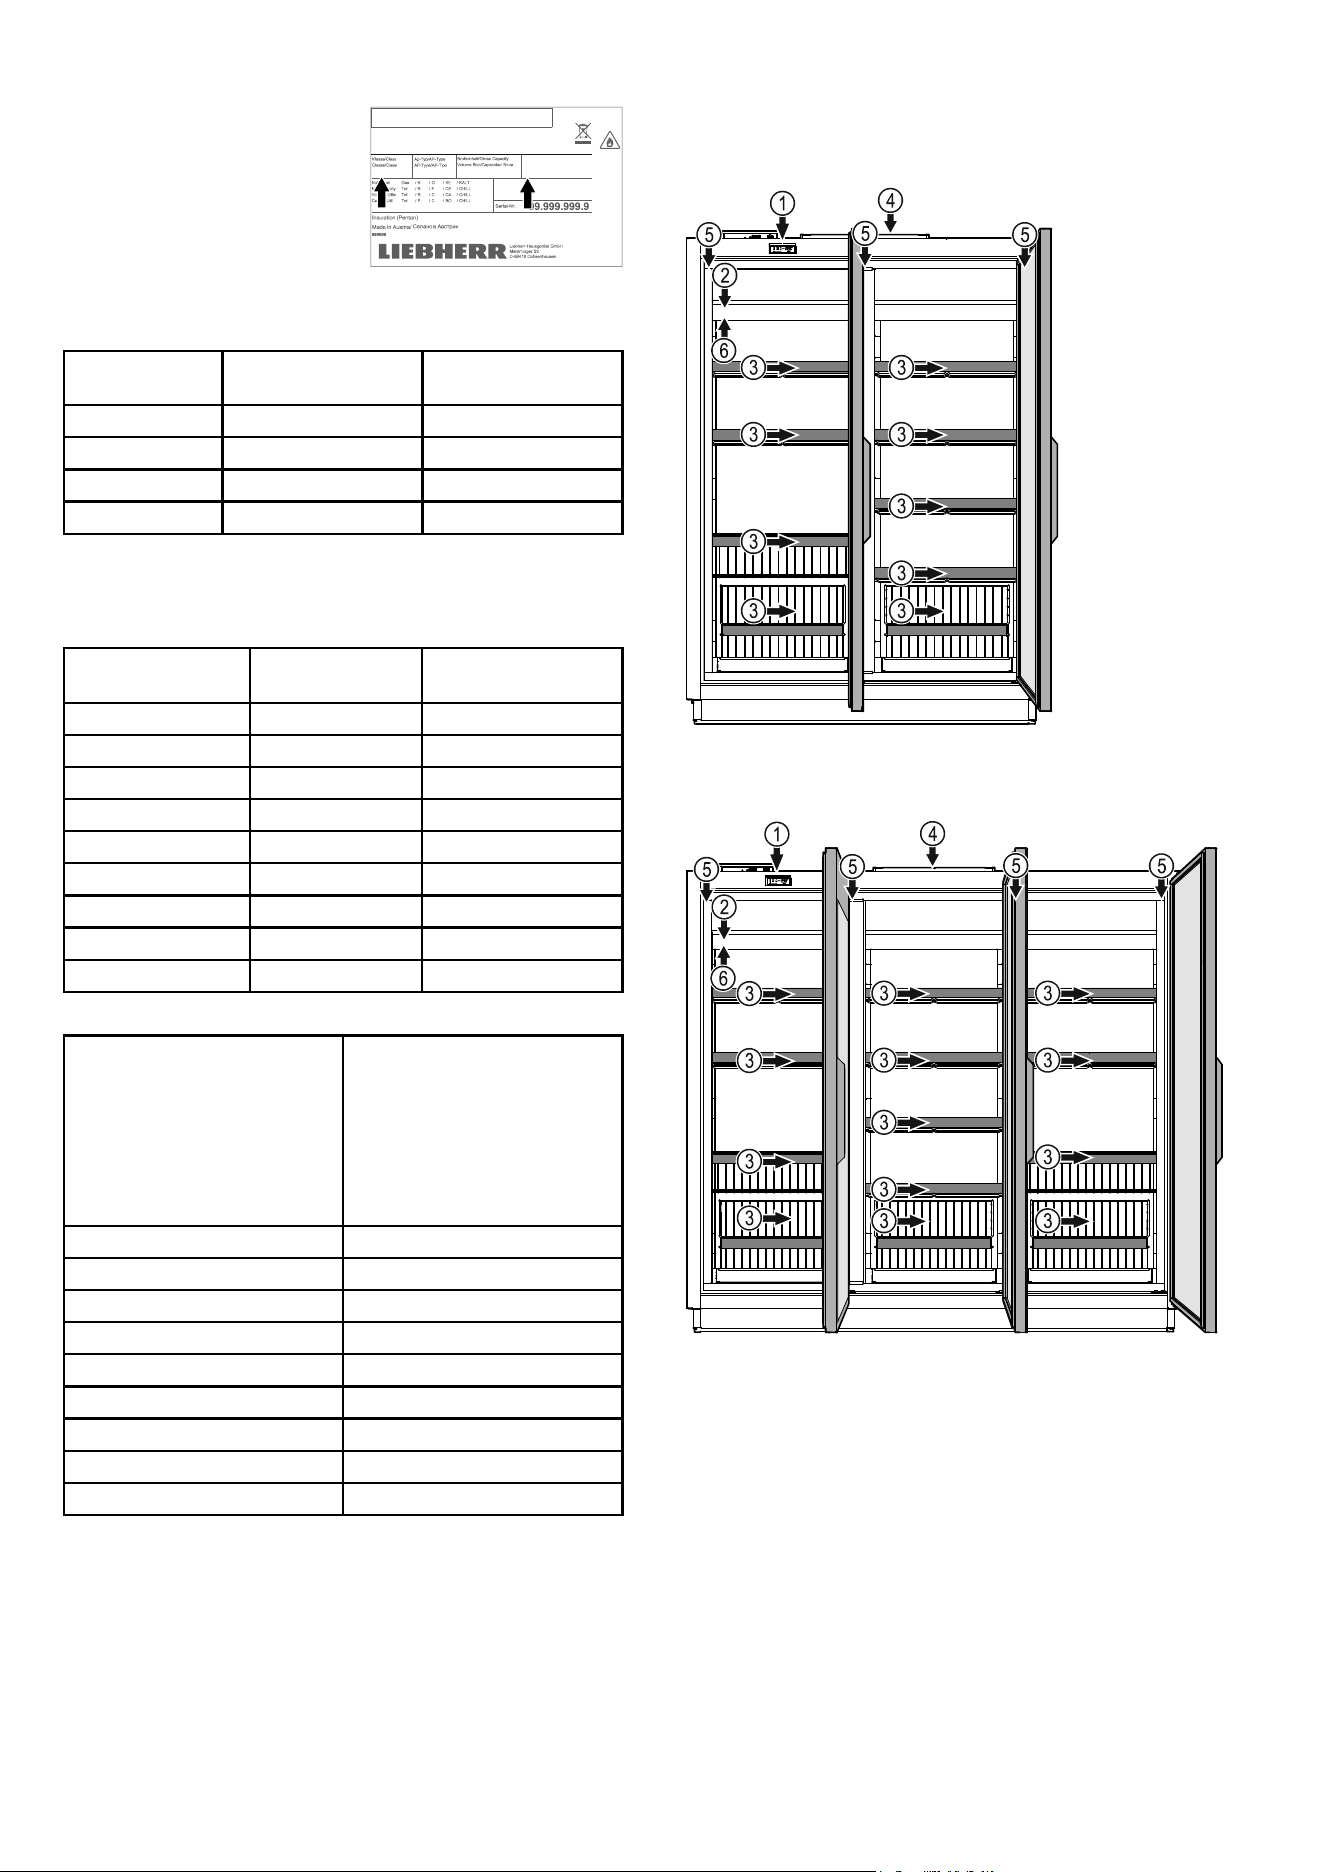
Description of the appliance
(1) Operating and control elements
(2) Type plate
(3) Austattung
Grid shelves
Grid shelves
Hanging basket
Pull-out basket
(4) Dust lter
(5) Interior light (LED light strips)
(6) Load sticker
Climate class
The climate class [X] specifies the
ambient conditions in which the
appliance can be operated safely.
The climate class [Y] and tempera-
ture class [Z] define the maximum
outline conditions in which the
appliances will operate perfectly.
The climate rating is indicated on the type plate.
[X]
Climate class
Max. room
temperature
Max. relative
humidity
3 25 °C 60 %
4 30 °C 55 %
5 40 °C 40 %
7 35 °C 75 %
The minimum room temperature at the place of installation is 16°C.
[Y]
Climate class
Temperature Relative humidity
0 20 °C 50 %
1 16 °C 80%
8 24 °C 55%
2 22 °C 65%
3 25 °C 60%
6 30 °C 55%
6 27 °C 70%
5 40 °C 40%
7 35 °C 75%
Recommended temperature setting:
[Z]
Temperature class
Temperature setting
L1 -18 °C
L2 -18 °C
L3 -15 °C
M0 +4 °C
M* 6 °C
M1 +5 °C
M2 +7 °C
H1 +10 °C
H2 +10 °C
Cliff 156
Cliff 234
Setting up
• The more coolant there is in the appliance, the larger the room
in which the appliance is installed must be. If the room is too
small, any leak may create a flammable mixture of gas and air.
For each 8 g of coolant the installation space must be at least
1 m³. Information on the coolant is on the model plate inside the
appliance.
XXXX XXXX
999999999 / Service-No.: 9999999-99
/ EIS
/ ICE
/ GLA
/ HIE
... A ~220-240V 50Hz
R : g
X
Temp.-Klasse/Temp. class
Classe de temp./Clase de temp.
Y, Z
17
EN
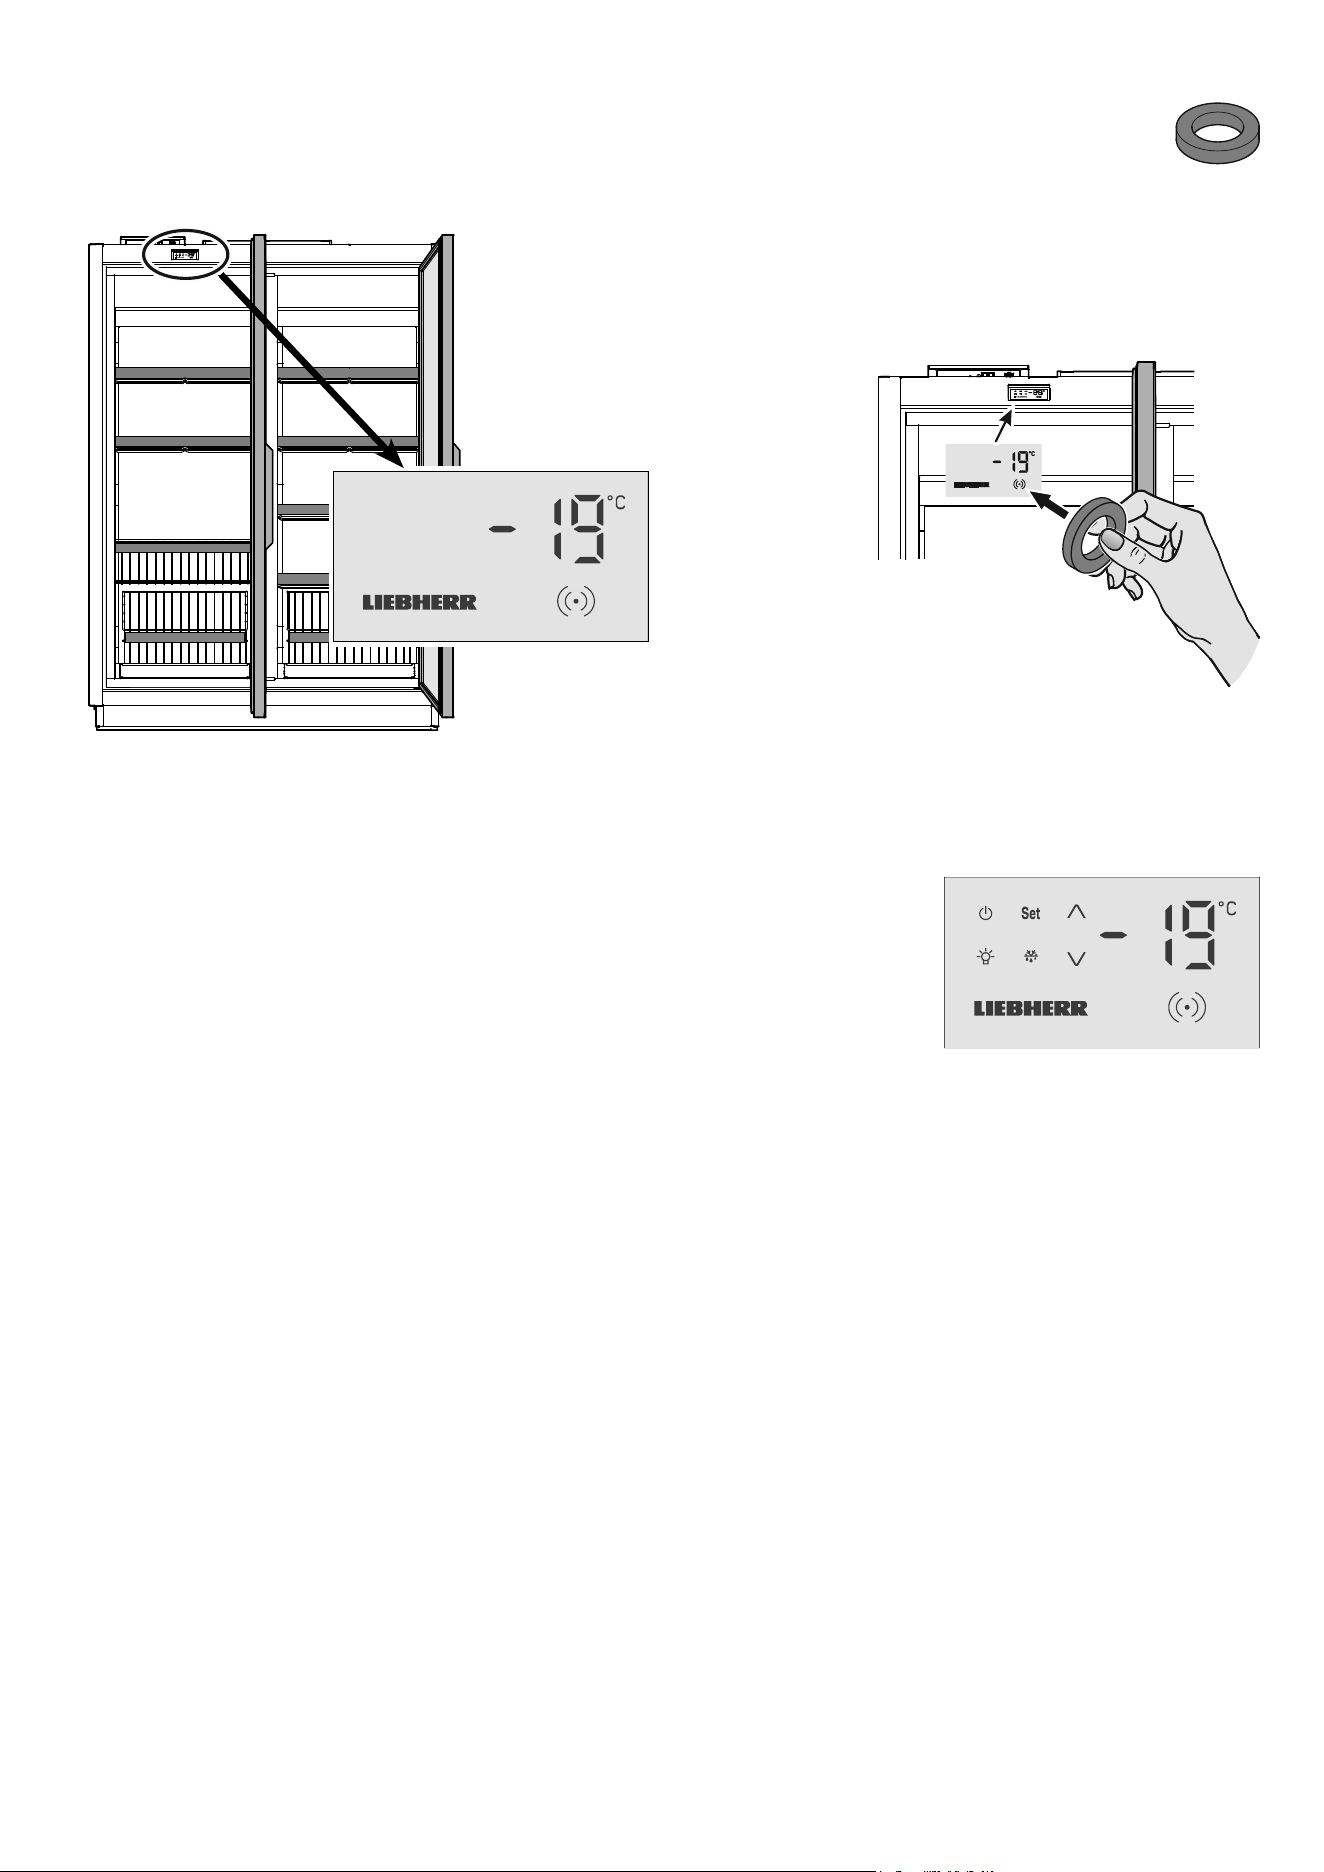
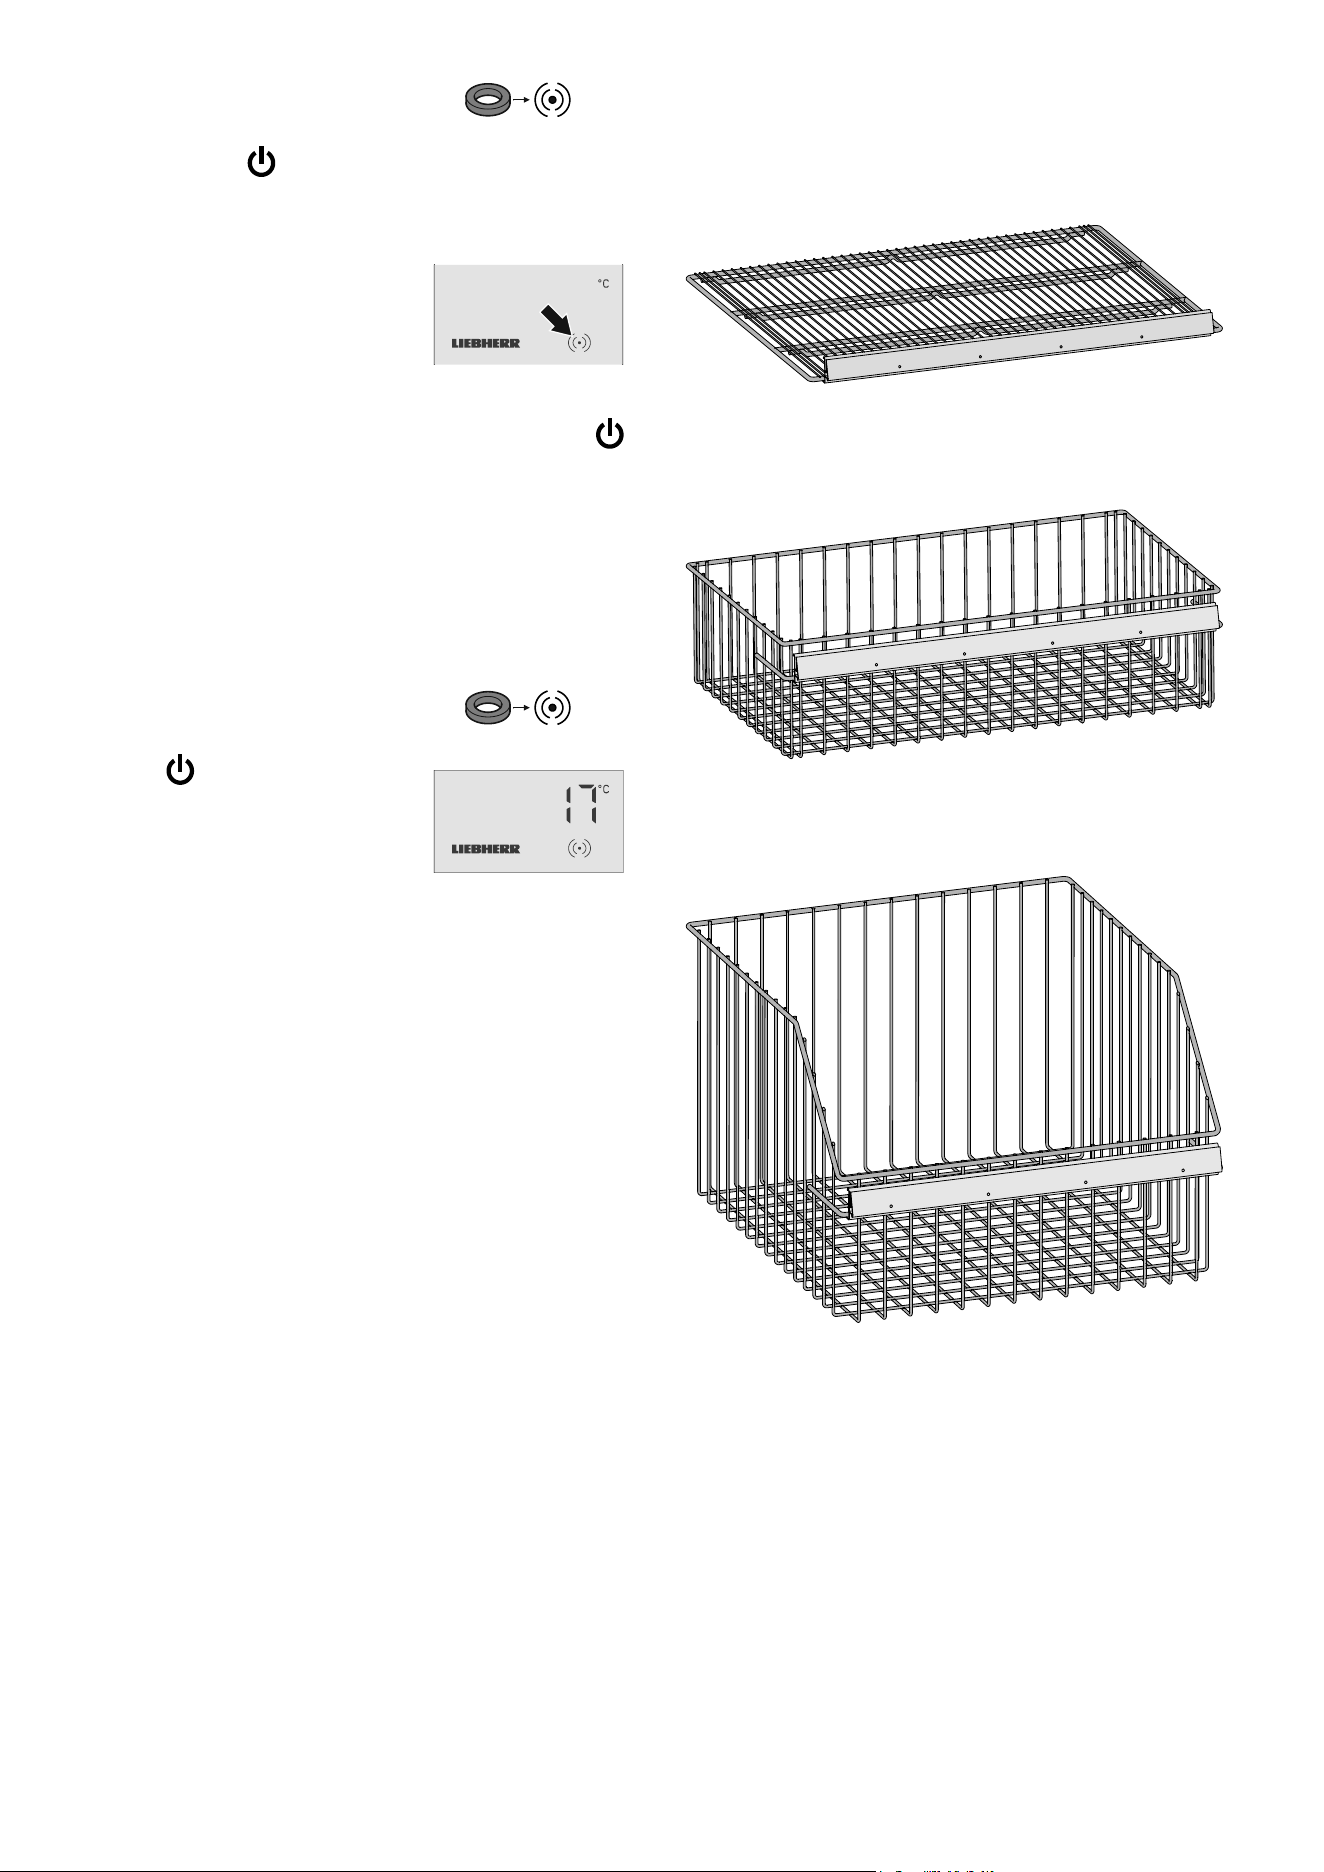
Activating setup mode
• Touch the activation point on the display with the release key.
Setup mode
The supplied release key is required to activate setup
mode.
The operating symbols are
displayed.
Note
If no button is pressed for 2 minutes, the electronic control system
will automatically switch back to indicating mode.
Display in indicating mode
After being commissioned by the team of technicians, the display
will be in indicating mode.
The display shows the current interior temperature.
Important note
The goods must not be inserted until -18°C is shown
in the display.
An audible warning signal will sound
for 1 second.
18
Changing the temperature setting
The desired temperature can be set between -18°C and -23°C.
Depending on the customer's version, dierent control areas may
be blocked or released.
Proceed as follows:
• Activate setup mode using the release key
The current temperature inside the appliance is displayed.
• Press
-23 flashes.
• Press
Set The new setting will be saved.
The electronic control system will switch back to indicating mode.
Note
Repeat these steps to reset the temperature to -18°C.
Press the
button instead of the button.
Note
The temperature in the warmest area of the interior may be higher
than the temperature setting.
If the door is left open for a lengthy period, the temperature in the
appliance's compartments may rise dramatically.
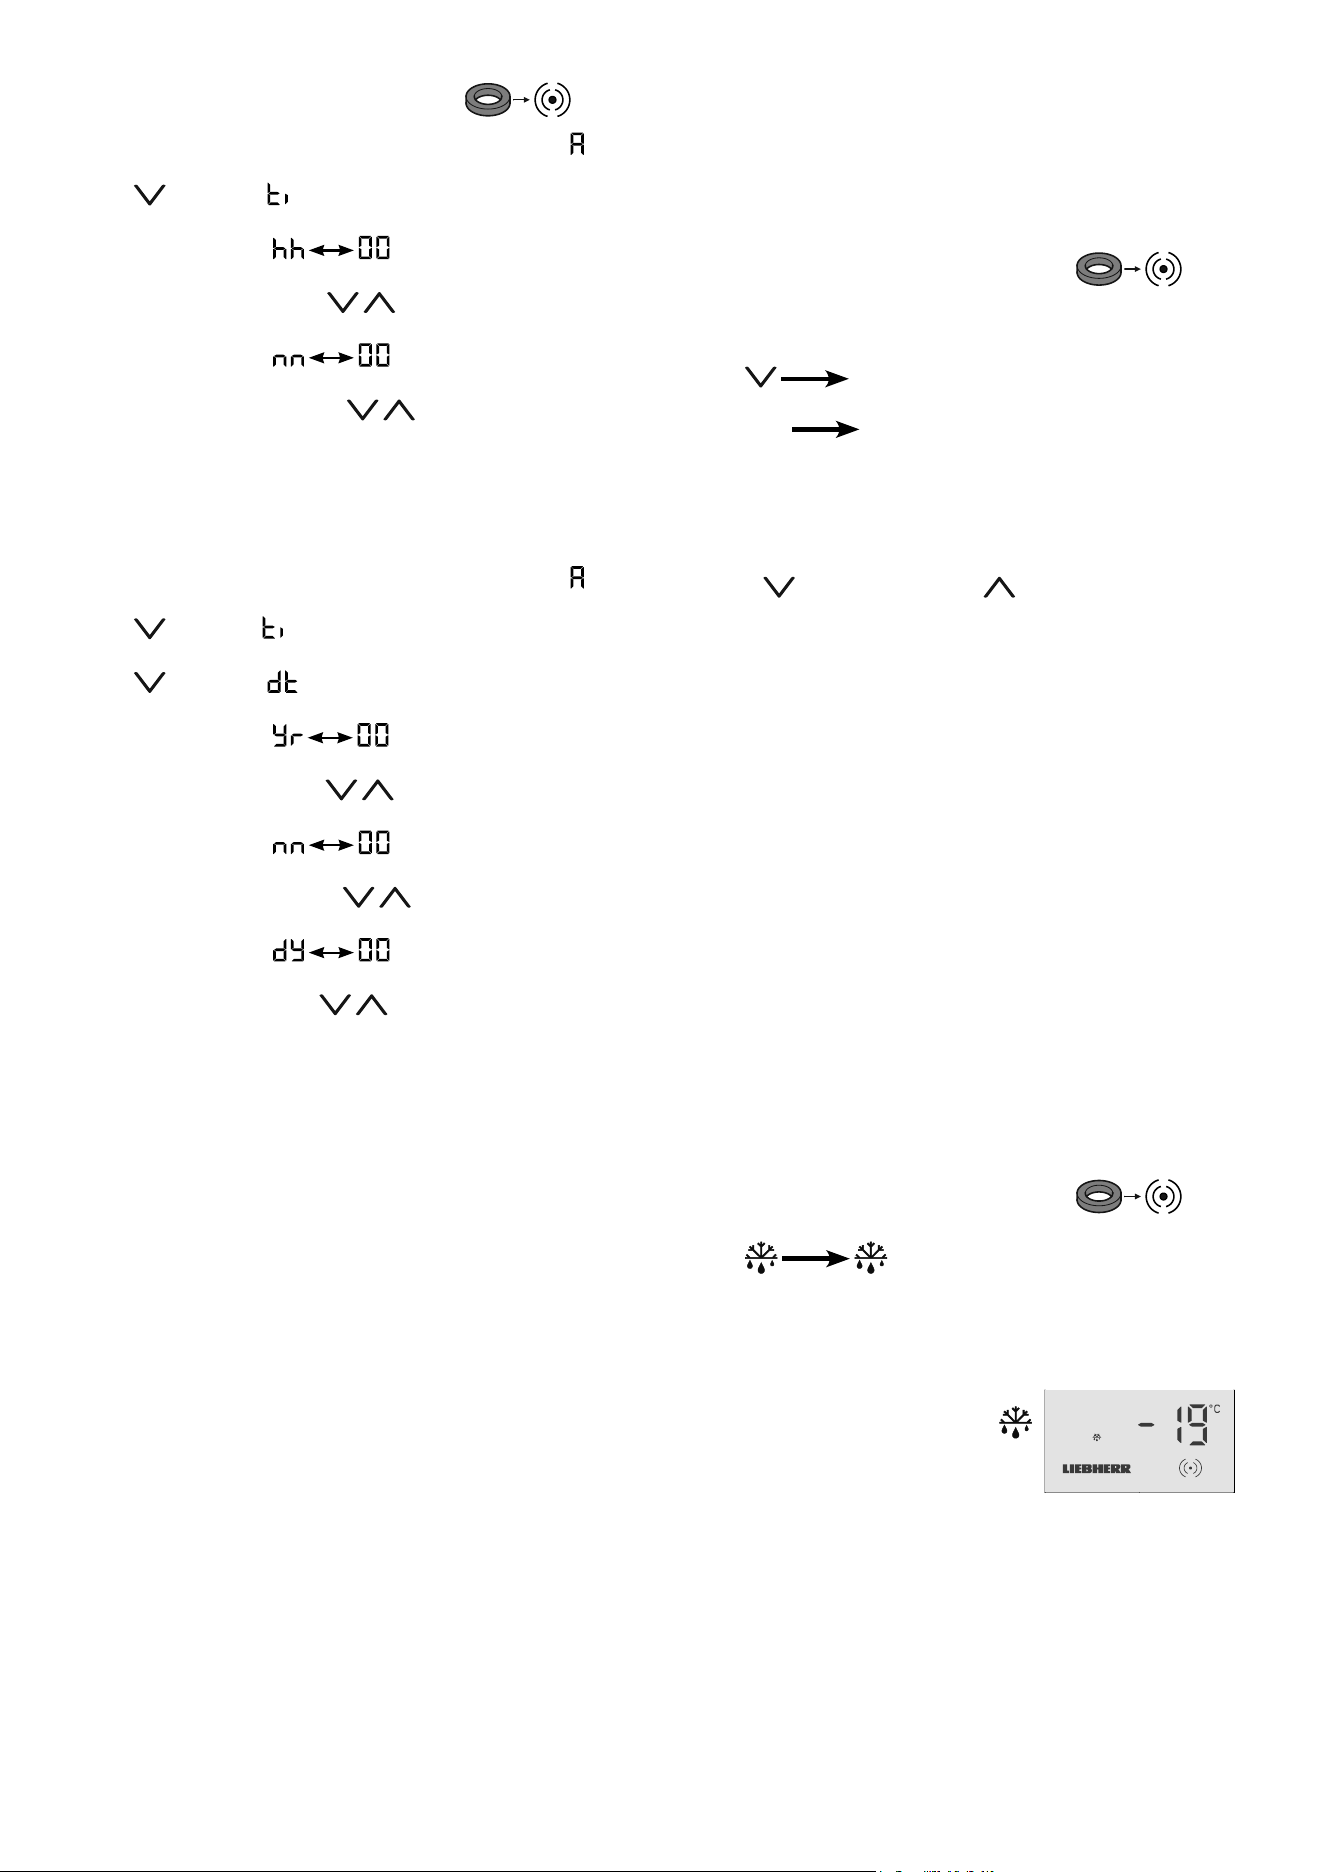
Activating the defrost function manually
The appliance defrosts automatically.
Increased frost may form on the interior container in high ambient
temperature and humidity.
In this case, activate the defrost function manually.
Proceed as follows:
• Activate setup mode using the release key
• Press flashes.
• Press
Set. The defrosting process will be started.
The electronic control system will switch
back to indicating mode. The LED
will be lit until the defrosting process is
nished.
Setting the real time clock
• Activate setup mode using the release key
• Press and hold the Set button for 5 seconds. Display =
• Press . Display =
• Press Set. Display =
• Set the hour by pressing the buttons.
• Press
Set. Display =
• Set the minute by pressing the buttons.
• Press
Set. The new setting will be saved.
The electronic control system will switch back to indicating mode.
• Press and hold the
Set button for 5 seconds. Display =
• Press . Display =
• Press . Display =
• Press Set. Display =
• Set the year by pressing the buttons.
• Press
Set. Display =
• Set the month by pressing the buttons.
• Press
Set. Display =
• Set the day by pressing the buttons.
• Press
Set. The new setting will be saved.
The electronic control system will switch back to indicating mode.
19
EN
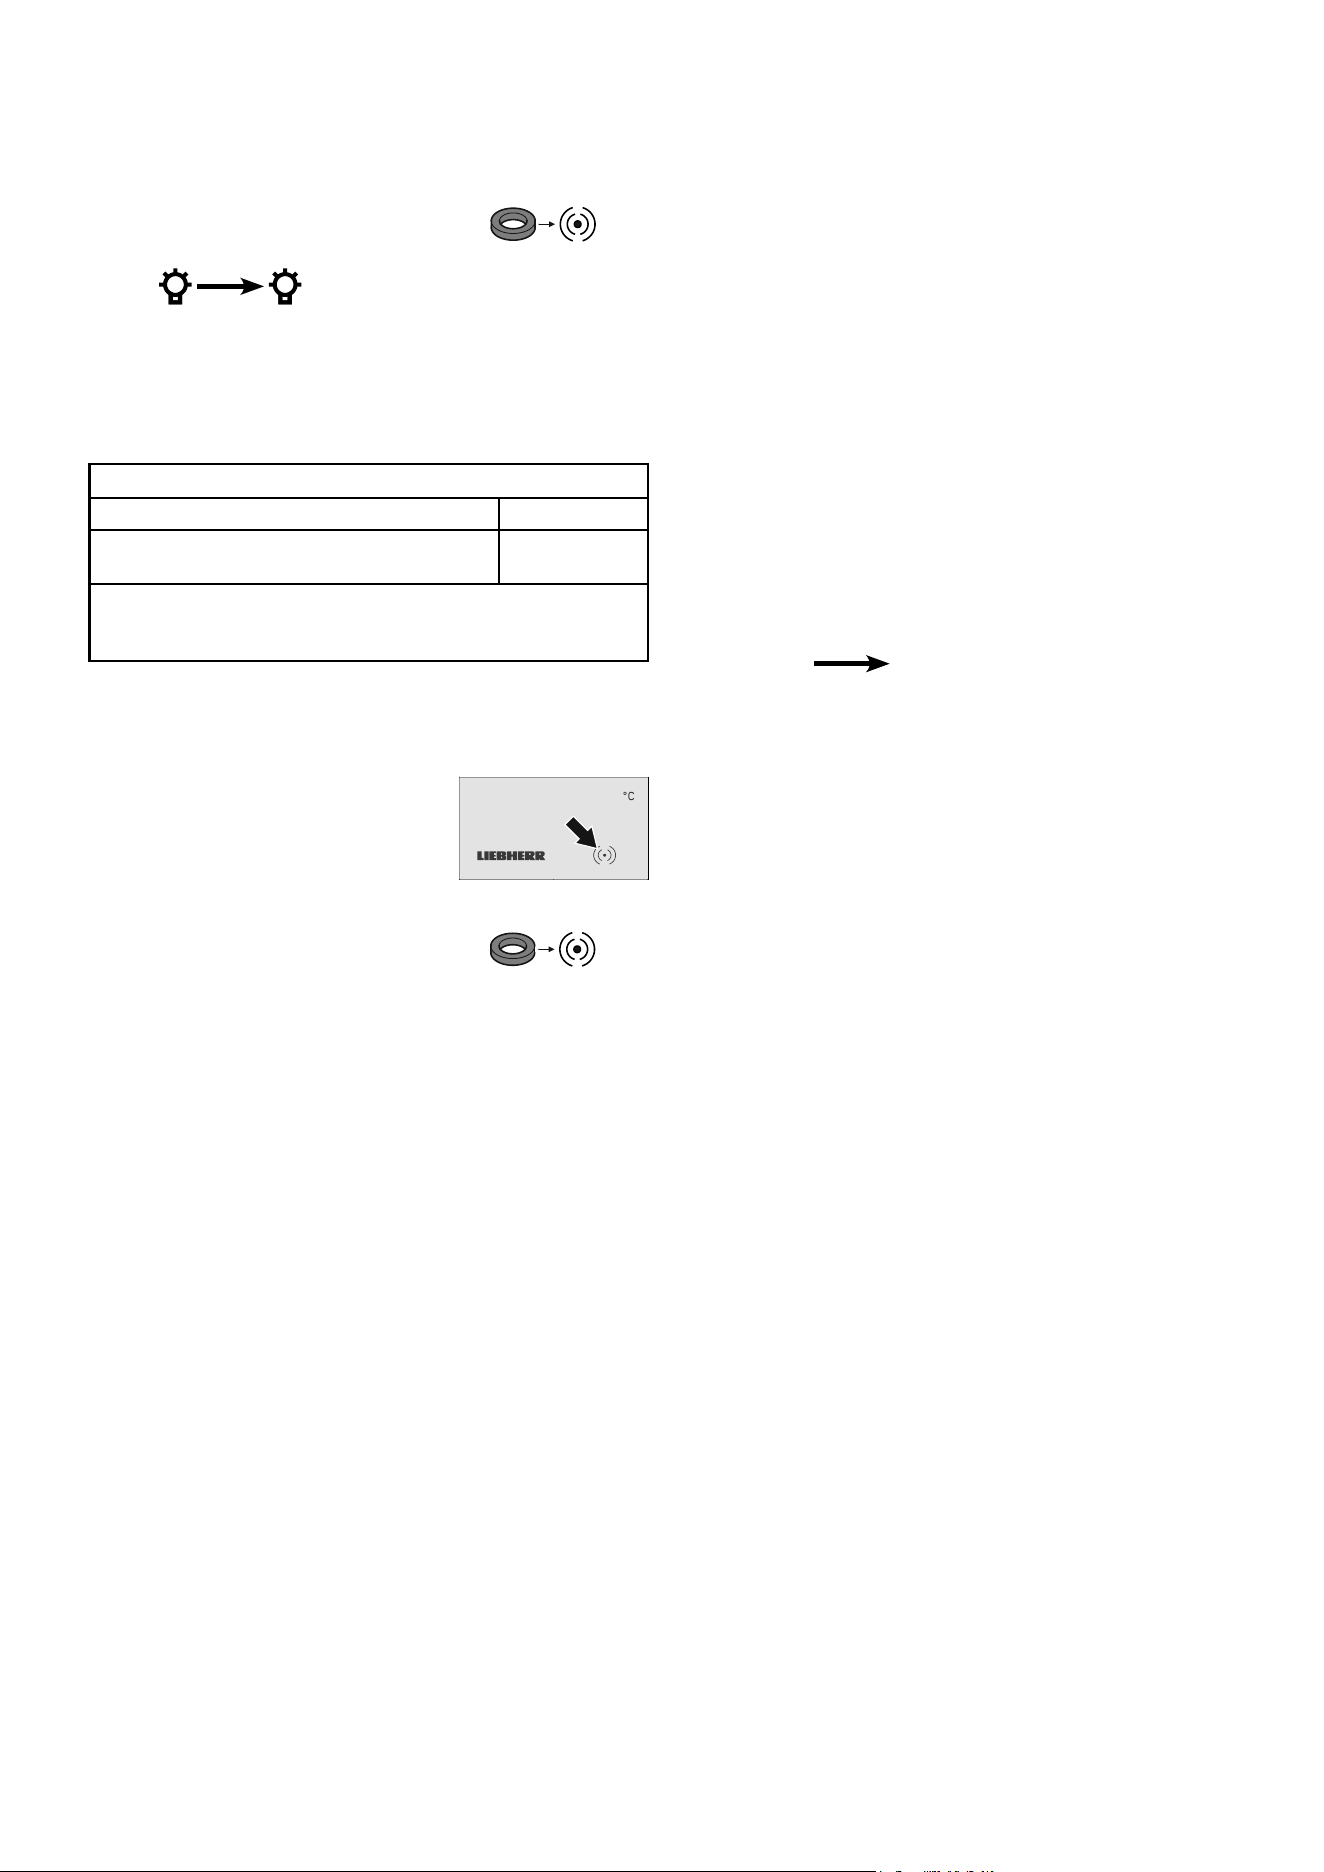
Interior light
(depending on options)
Switch the interior light on or o as required.
Switching on the interior light
• Activate setup mode using the release key
• Press flashes.
• Press
Set. The interior light is switched on.
Note
Repeat these steps to switch o the interior light again.
Malfunctions
The release key symbol (dot) will ash in
the event of a malfunction or if the appli-
ance is defective.
Proceed as follows::
• Activate setup mode using the release key
Either a ashing temperature display or an error code will
appear in the display.
Action to take if the temperature display is
ashing
• First check whether the appliance doors are closed.
If the temperature falls after closing the doors, no further action
is required.
If no drop in temperature is apparent after approx. 10 minutes:
• Transfer the goods immediately to other appliances.
• Notify the customer service department.
Action to take if an error code is displayed
Error code F1, F2, F4 or F5
The temperature sensor in the appliance is defective.
Action
• Notify the customer service department.
The goods can be left in the appliance since the temperature is
maintained by the appliance being in emergency mode.
Error code
Ht
The temperature inside the appliance is too high (warm).
Action
• Transfer the goods immediately to other appliances.
• Notify the customer service department.
Error code
nA
A mains failure has occurred.
Action
• Press Set The maximum (warmest) temperature
during the mains failure is displayed.
• Decide whether the goods can be used depending on the level
of the temperature rise.
Lighting
Class
1
Light source
This product contains a light source that meets
energy eciency rating E
LED
1
The appliance may contain light sources with dierent
energy eciency classes. The lowest energy eciency class
is indicated.
20
Switching the appliance o
• Activate setup mode using the release key
• Press and hold the button for 5 seconds.
The temperature display will go out.
The interior light will go out.
The release key symbol (dot) will still be lit
to show that the appliance is connected to
the electricity supply.
Important note
If the appliance has been switched o using the
button, the refrigeration system is switched off but
the appliance has not been fully disconnected from
the mains.
Before cleaning, always disconnect the appliance
from the mains. Switch o the fuse.
Switching the appliance on
• Activate setup mode using the release key
• Press the button.
The display will show the current temper-
ature inside the appliance.
Storing
NOTICE
Store raw meat or sh in clean sealed containers on the bottom
shelf of the refrigerator/freezer compartment so that it cannot
come into contact with any other food or drip liquid onto it.
A failure to follow these instructions may result in the food being
spoilt.
Equipment (depending on conguration)
Grid shelves
Hanging basket
Pull-out basket
21
EN
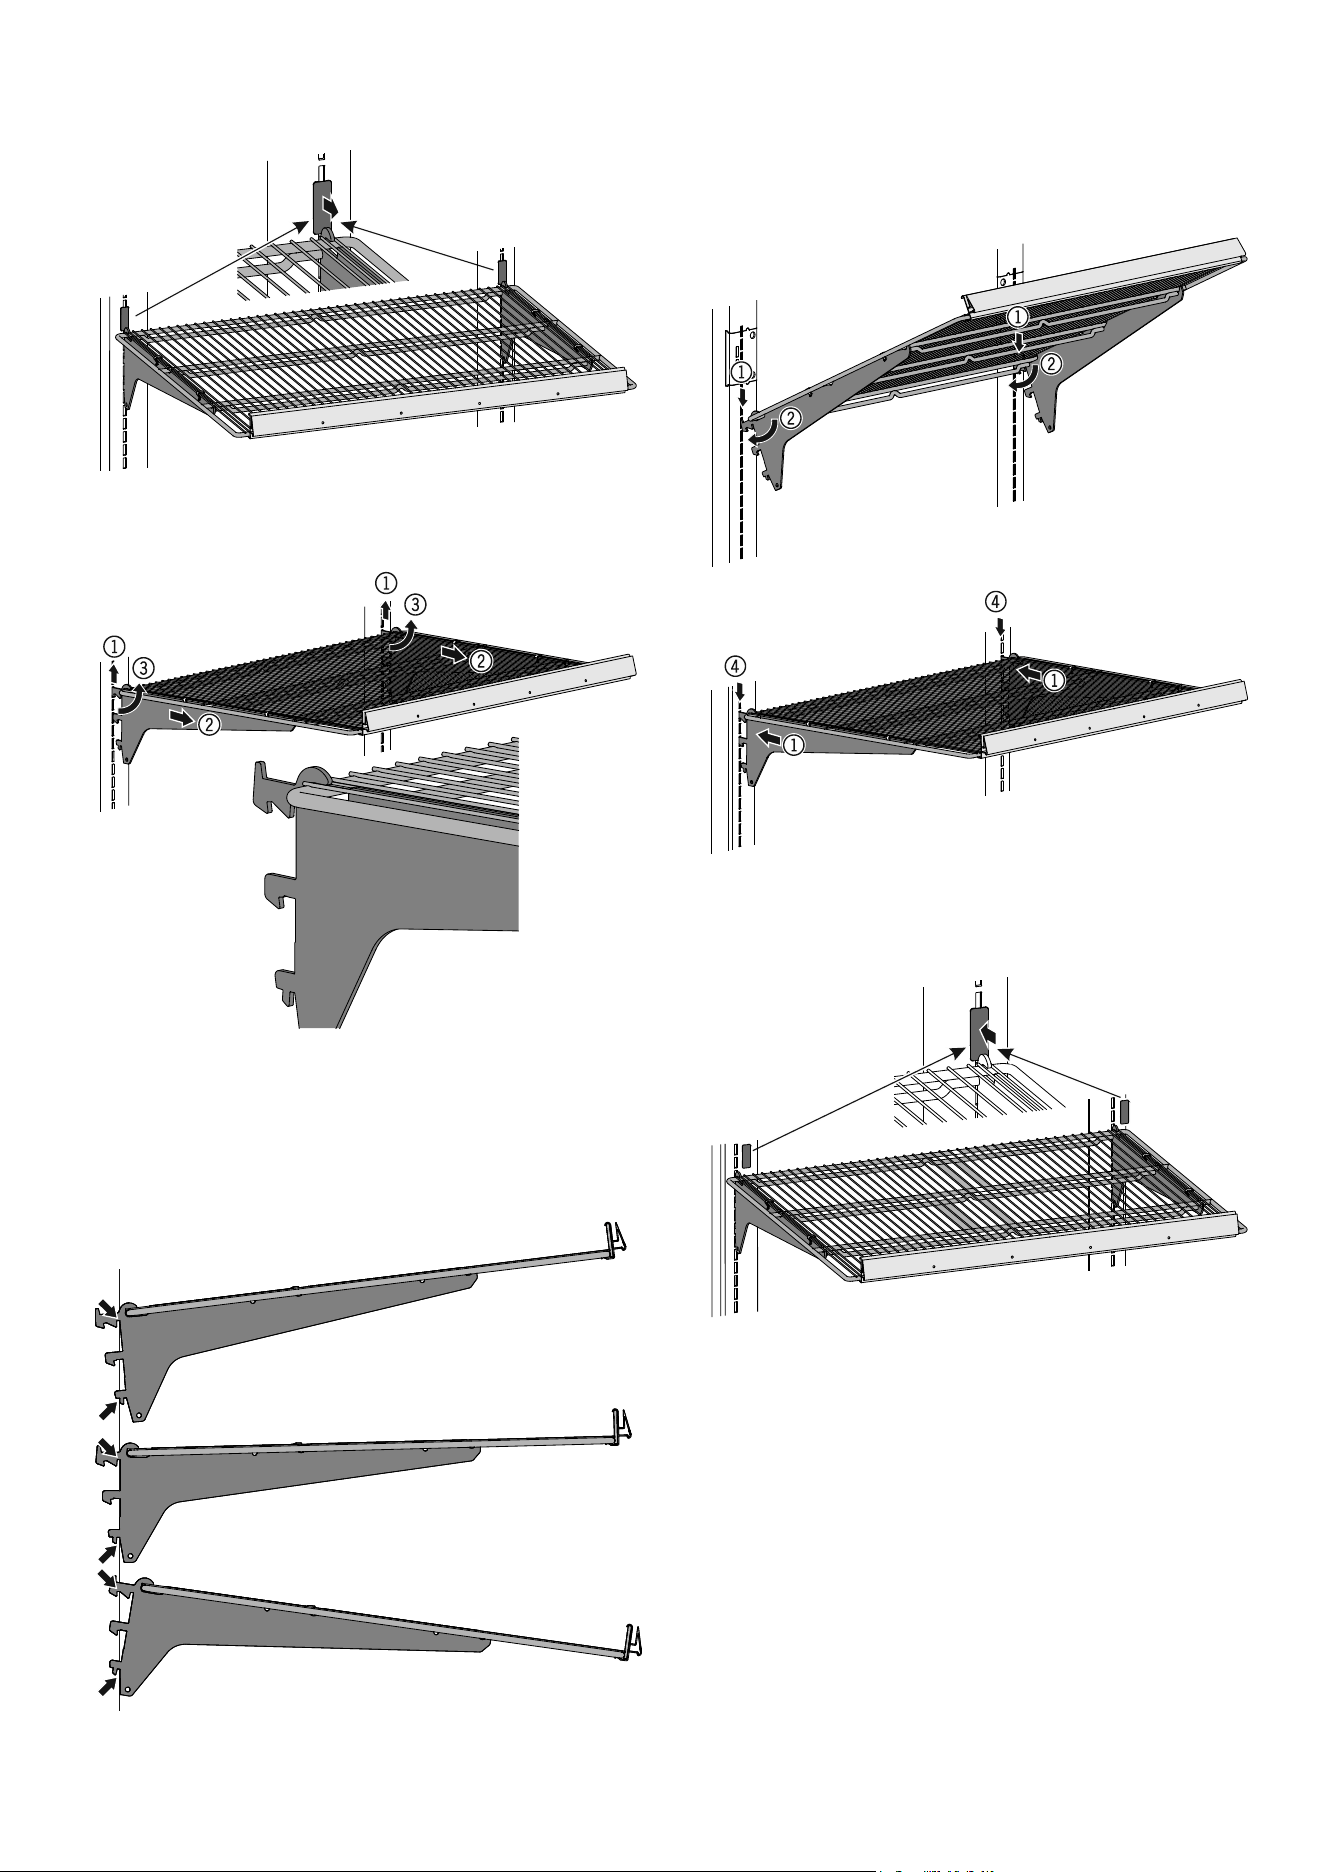
Remove the safety catches.
(1) Push the shelf upwards on both sides.
(2) Pull it forwards.
(3) Push it upwards.
Repositioning the shelves
Possible settings for shelf angle
Install the safety catches.
(1) Attach the shelf at the top.
(2) Pull it downwards.
(3) Push it towards the rear.
(4) Press it downwards.
22
Cleaning
WARNING
Before cleaning, always disconnect the appliance
from the mains. Pull out the plug or switch o the
fuse.
Surfaces which may come into contact with food
and accessible drain systems must be cleaned at
regular intervals.
CAUTION
Risk of damage to the appliance components and
risk of injury due to hot steam.
Do not use steam cleaning equipment to clean
the appliance.
• Clean the inside, equipment parts and outer walls with lukewarm
water and a little detergent. Do not use chemical solvents or any
cleaning agents containing sand or acid.
• To avoid short-circuits, ensure no cleaning water penetrates into
the electrical components when cleaning the appliance.
• Dry all parts well with a cloth.
• Use a commercially available stainless-steel cleaning agent for
stainless-steel appliances.
• Do not damage or remove the type plate on the inside of the
appliance. It is very important for servicing purposes.
Cleaning the glass door
Guideline for correct maintenance of anti-fog
lm:
• When the surface becomes dirty due to fingerprints, wipe them
off with a soft cloth soaked in water (or neutral detergent diluted
with water) - do not rub roughly. If you use alcohol-based cleaning
products, their alcohol content must not exceed 35 %.
• Do not use chemicals or solvents.
• Do not use brushes or abrasives.
• Do not rub with sharp objects or hard objects.
• Do not spill or spray liquids directly on the film.
• Do not remove the film once applied on the glass door: adhesive
properties will vanish once removed.
• Do not use, store or leave the film in hot places or under a direct
source of heat, e.g. by the fire, near a heater, etc.
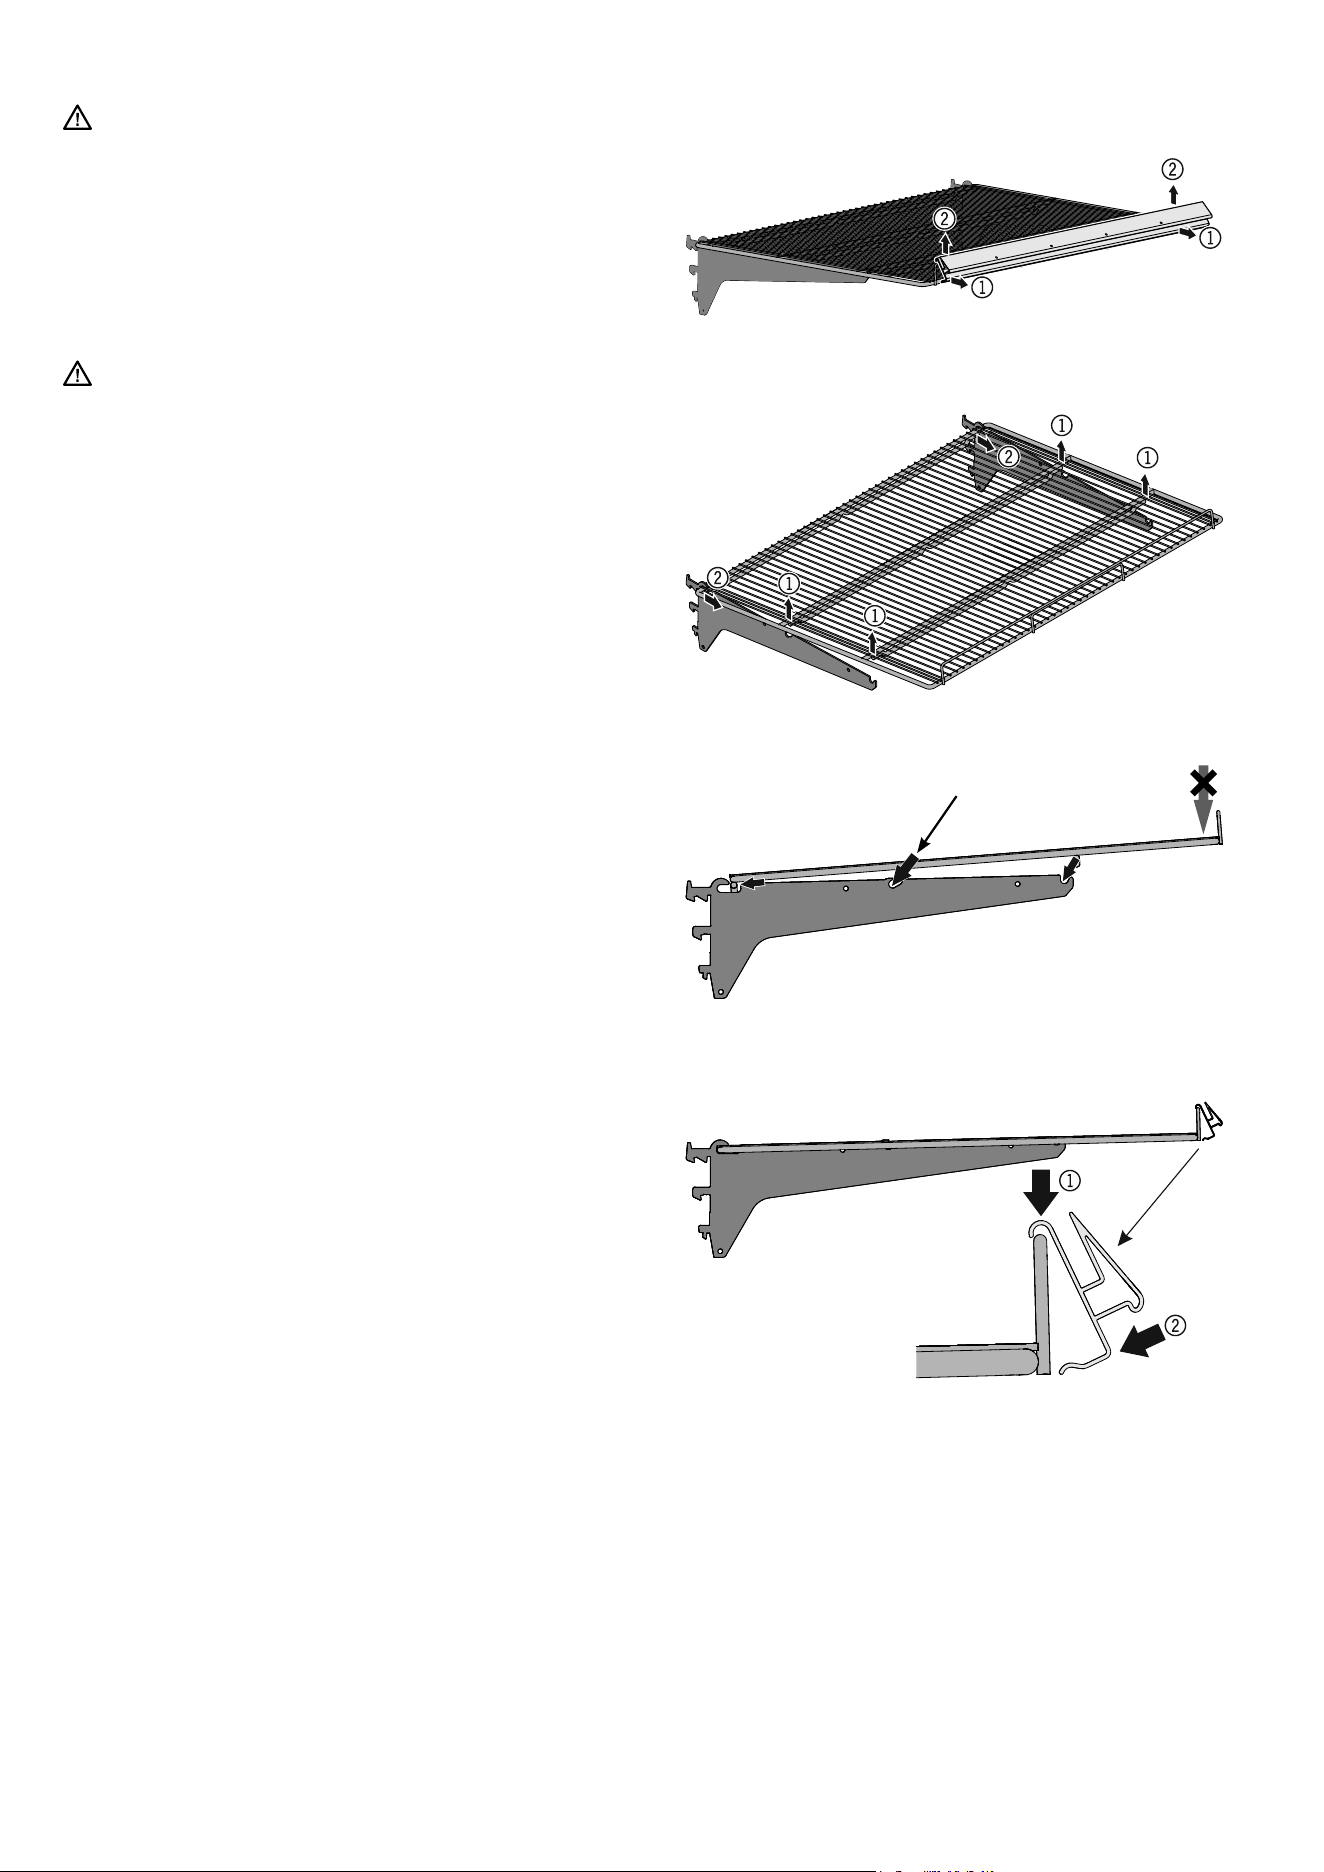
Remove the pricing strip.
Remove the grid shelf.
Install the grid shelf.
Install the pricing strip. (depending on conguration)
Cleaning the shelves
Push
23
EN
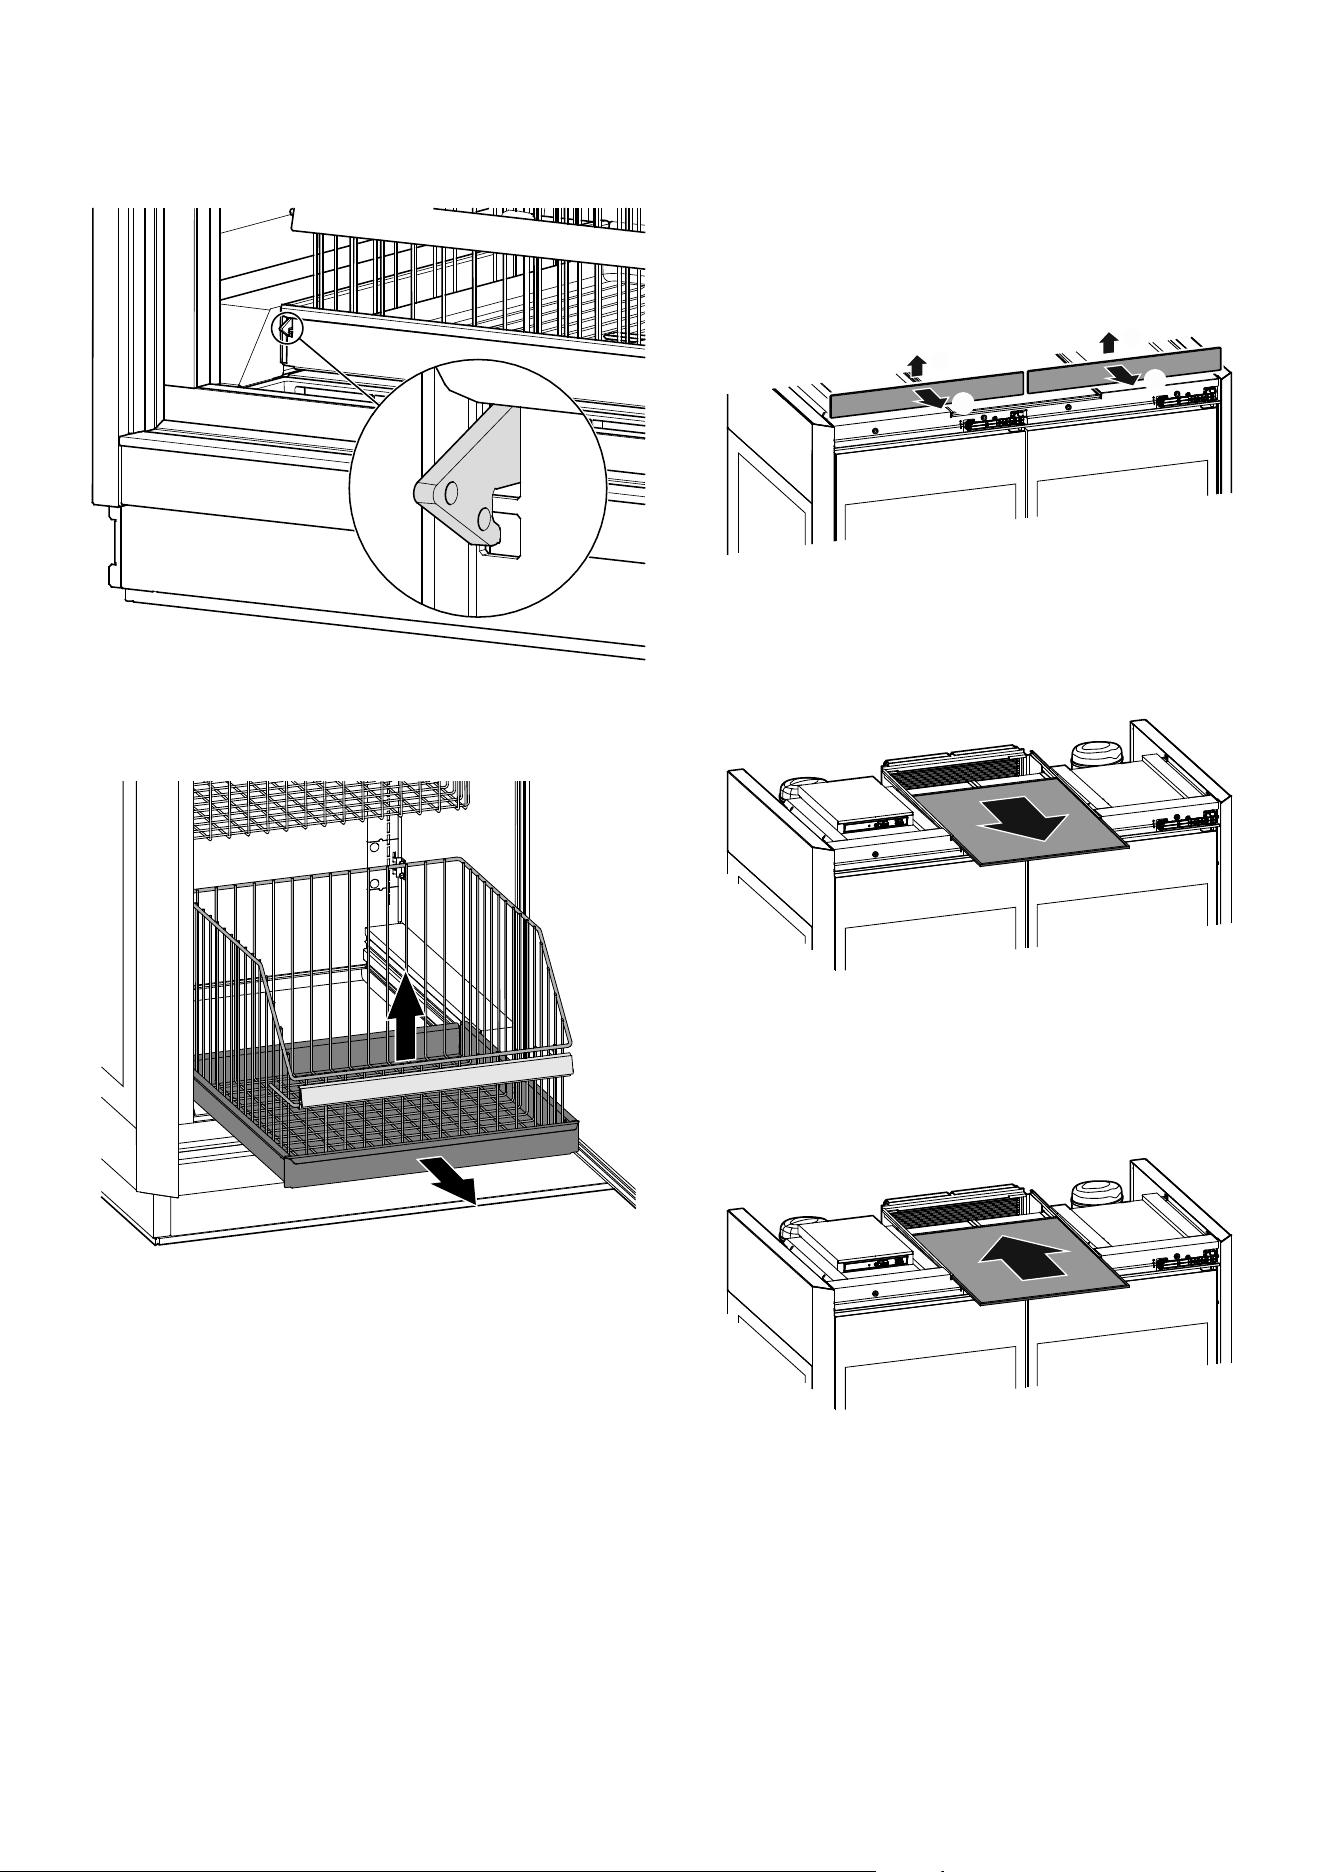
Remove the pull-out shelf. Remove the pull-out basket by lifting
it upwards.
Removing the pull-out basket
Note
Do not climb into the pull-out drawer.
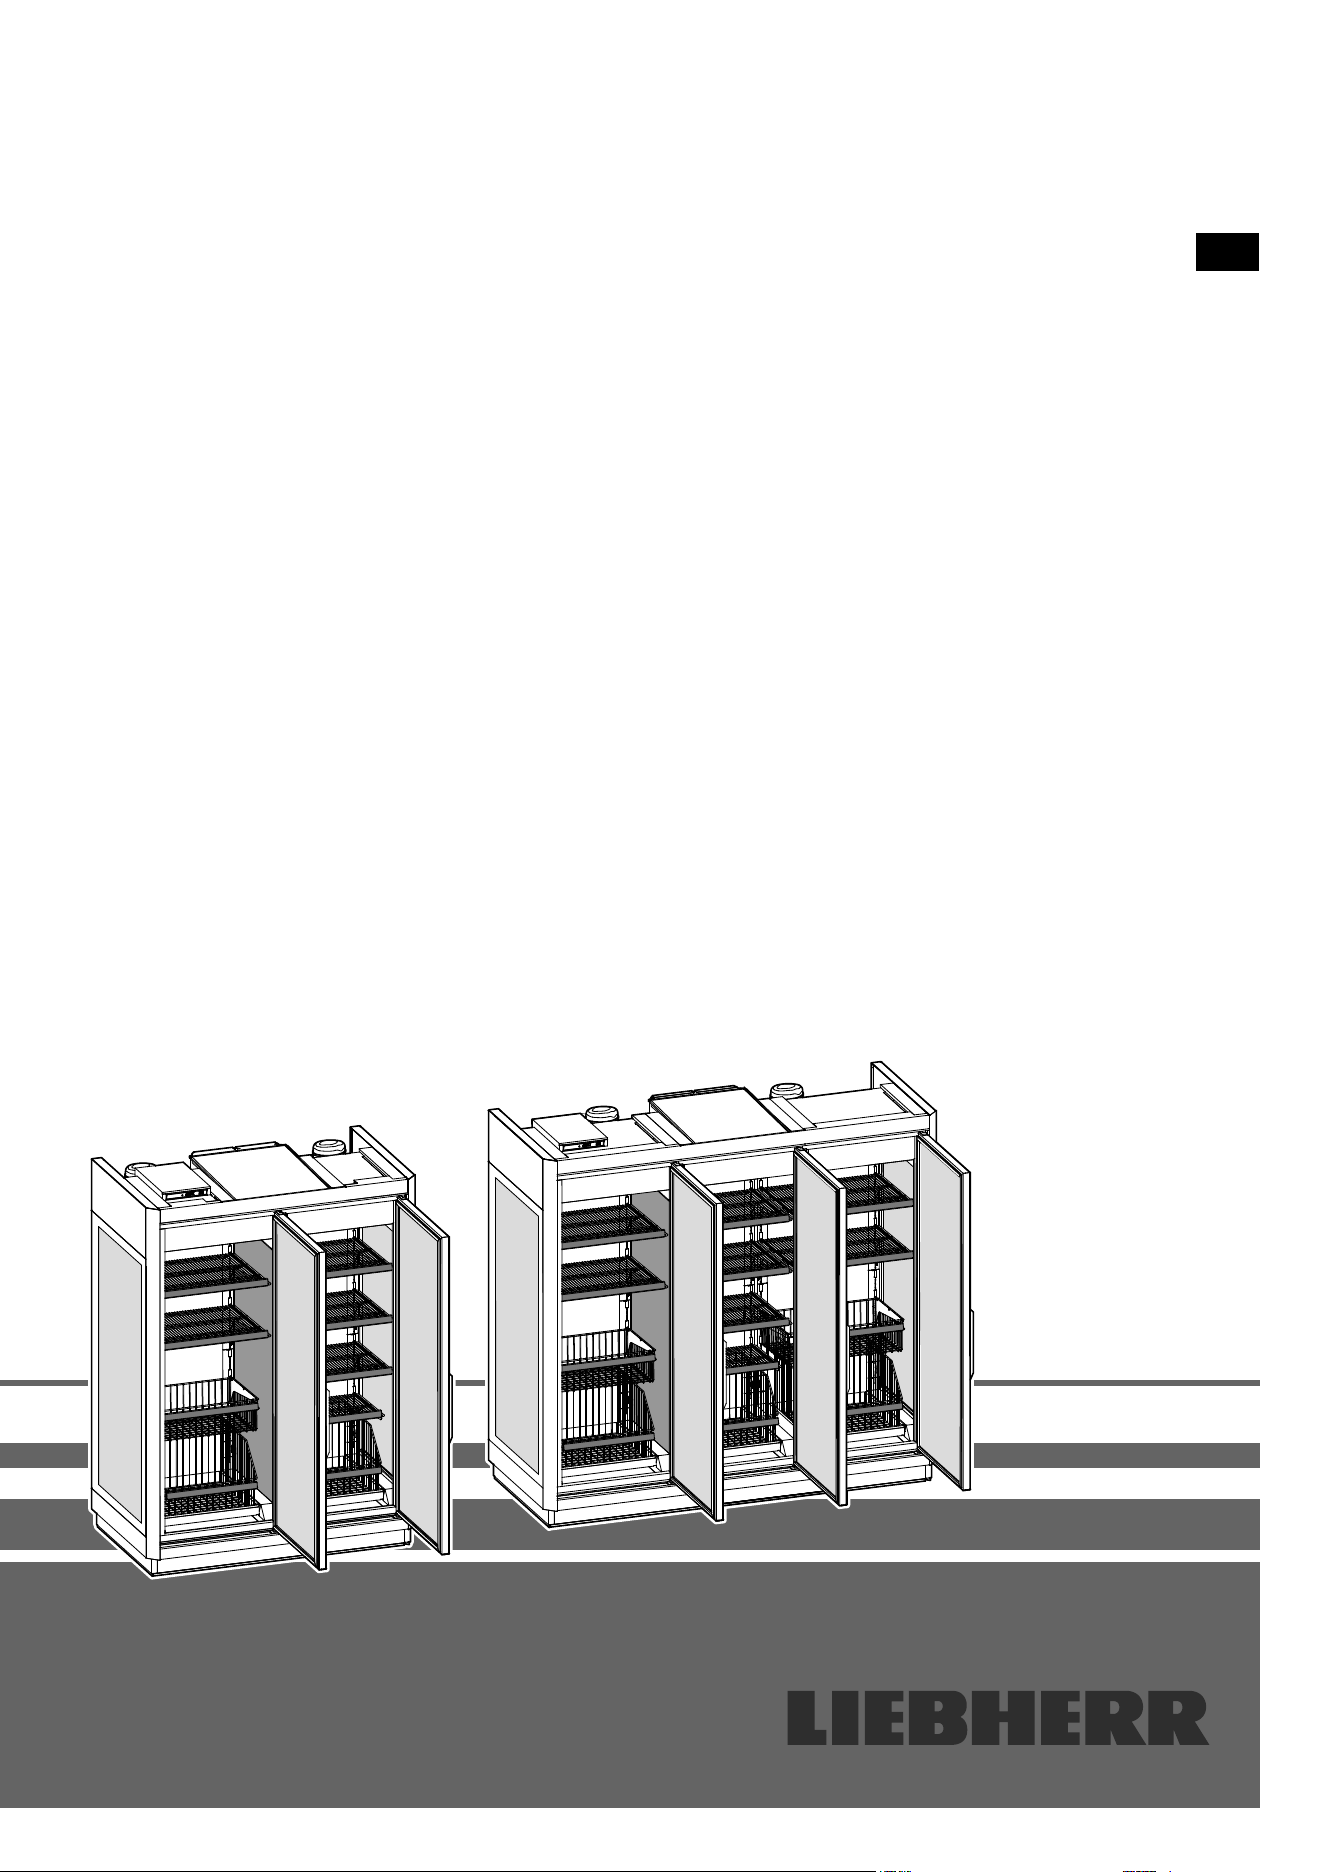
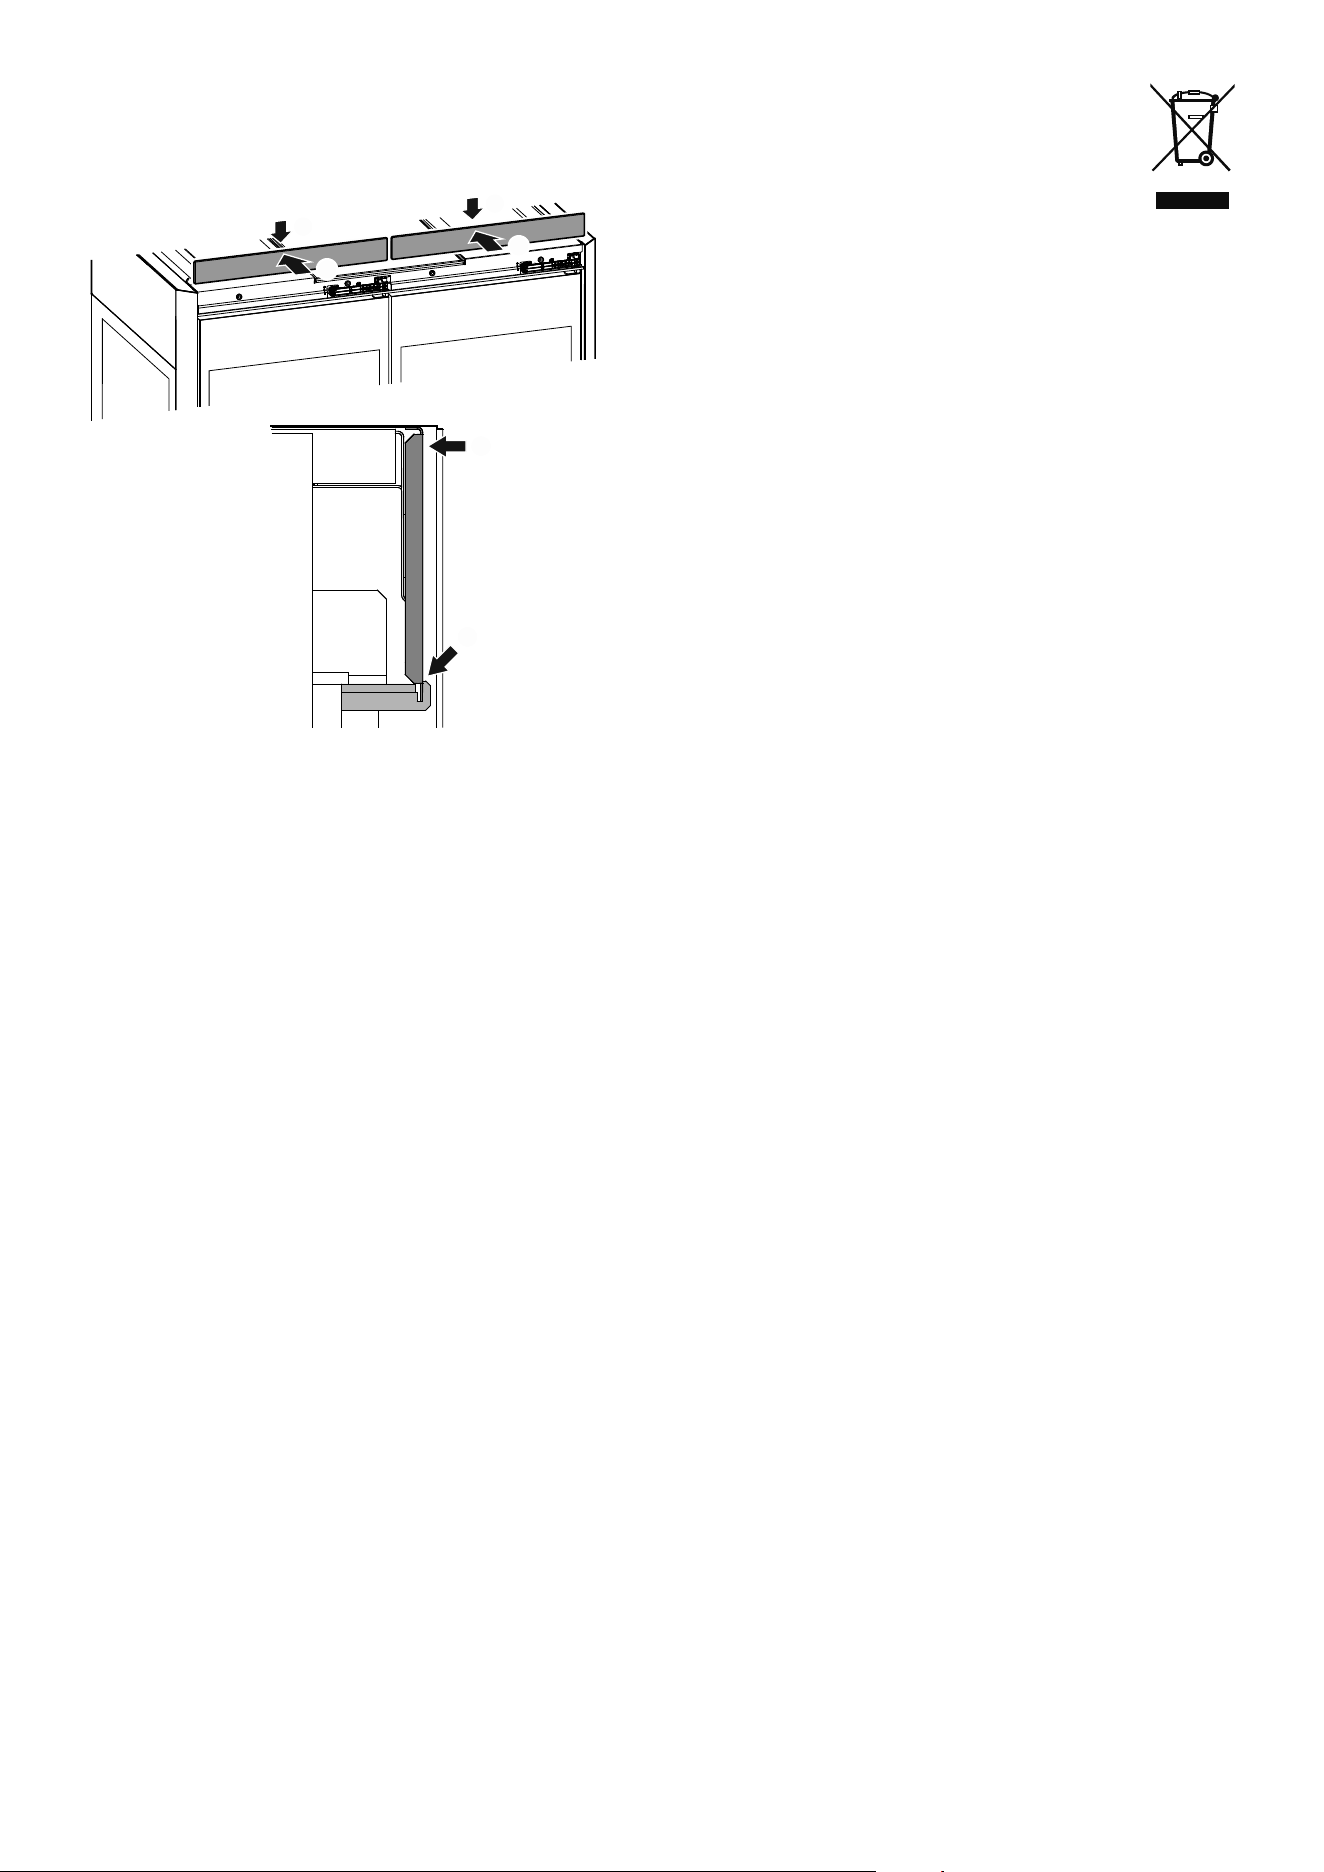
Cleaning the dust lter
The dust lter must be checked at least once a year and more
often if necessary.
The cover is held in place by magnets which means that no tools
are required for removal.
(1) Tip the top of the cover forwards.
(2) Remove it upwards.
1
2
1
2
Vacuum the dust lter and clean it by hand with water and deter-
gent. Dry the lter.
Pull the dust lter towards the front.
Push the pull-out compartment backwards, lift the safety catch.
24
Attach the cover (1) and push it towards the rear (2).
2
1
2
1
2
1
Customer service
If the appliance suers a malfunction:
• Transfer the stored goods to other appliances.
• Switch off the appliance.
See section entitled Switching the appliance off.
• Disconnect the appliance from the mains > switch off the fuse.
• Notify the customer service department quoting the appliance
details.
The appliance details are shown on the service type plate.
The position of the service type plate is shown in the section
entitled Description of the appliance.
Shutting your appliance down
If the appliance is left empty for a lengthy period, it must be
switched o, defrosted, cleaned and dried and the door is to be
left open to prevent mould formation.
Disposal notes
The appliance contains reusable materials and should
be disposed of properly - not simply with unsorted
household refuse. Appliances which are no longer
needed must be disposed of in a professional and
appropriate way, in accordance with the current local
regulations and laws.
Do not damage the refrigerant circuit of an appliance that is no
longer needed during its disposal.
This appliance contains inammable gases in the refrigerant
circuit and insulation foam.
Your local council or a waste disposal contractor can provide
information about how to dispose of the appliance correctly.
Additional information:
- Food will remain fresh for longer if stored at the correct temper-
ature. This can prevent having to discard food needlessly.
- If the condenser coil is not cleaned every year, it will significantly
reduce the appliance's efficiency.
- The period during which spare parts, necessary for the repair
of the refrigerating appliance with a direct sales function, are
available is 10 years.
- The minimum duration of the guarantee of the refrigerating ap-
pliance with a direct sales function offered by the manufacturer,
importer or authorised representative is 2 years.

25
EN


28
*708592100*
Liebherr-Hausgeräte GmbH
Memminger Straße 77-79
88416 Ochsenhausen
Germany
home.liebherr.com
