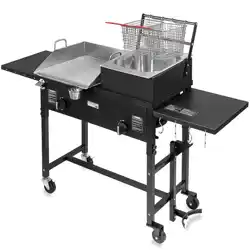
OUTDOOR DOUBLE BURNER STOVE
SAVE THIS MANUAL: KEEP THIS MANUAL FOR SAFETY WARNINGS, PRECAUTIONS, ASSEMBLY,
OPERATING, INSPECTION, MAINTENANCE AND CLEANING PROCEDURES. WRITE THE PRODUCT’S
SERIAL NUMBER ON THE BACK OF THE MANUAL NEAR THE ASSEMBLY DIAGRAM (OR MONTH
AND YEAR OF PURCHASE IF PRODUCT HAS NO NUMBER).
OWNER’S MANUAL AND SAFETY INSTRUCTIONS
ITEM: 95534
FOR QUESTIONS PLEASE CALL OUR CUSTOMER SUPPORT: (909) 628-0880 MON-FRI 9AM TO 3PM PST
IMPORTANT SAFETY INFORMATION
1
GENERAL SAFETY WARNINGS
Read all safety warnings and instructions. Failure to follow the warnings and instructions may
result in electric fire and/or serious injury. Save all warnings and instructions for future reference.
Read these instructions for use carefully. Familiarize yourself with the appliance before connecting it to
a gas cylinder. Keep these instructions for future reference. This instruction manual contains important
information necessary for the proper assembly and safe use of the appliance. Follow all warnings and
instructions when using the appliance.
DO NOT allow persons to operate or assemble the product until they have read this manual and have
developed a thorough understanding of how it works.
DO NOT modify this product in any way. Unauthorized modification may impair the function and/or
safety and could affect the life of the product. There are specific applications for which the product was
designed.
NEVER operate this appliance unattended.
NEVER operate this appliance within 10 ft (3 m) of any structure, combustible material or other gas
cylinder.
NEVER operate this appliance within 25 ft (7.5 m) of any flammable liquid.
NEVER allow oil or grease to get hotter than 400°F or 200°C. If the temperature exceeds 400°C (200°C),
or if oil begins to smoke, immediately turn burner or gas supply OFF.
Heated liquids remain at scalding temperatures long after the cooking process. NEVER touch cooking
appliance until liquids have cooled to 115°F (45°C) or less.
If a fire should occur, keep away from appliance and immediately call your fire department. DO NOT
attempt to extinguish an oil or grease fire with water.
If you smell gas: Shut off gas to the appliance at the tank. Extinguish any open flame. If odor continues,
keep away from the appliance and immediately call your fire department.
DO NOT leave this appliance unattended while in use. The user must remain in the immediate area of
the product and have a clear view of the product at all times during operation.
Keep children and pets away from burner at all times.
The use of alcohol, prescription or non-prescription drugs may impair your ability to properly assemble or
safely operate this appliance.
For OUTDOOR use only. DO NOT use in a building, garage or any other enclosed area. DO NOT use in
or on recreational vehicles or boats. NEVER use this appliance as a heater.
DO NOT operate appliance under ANY overhead construction. Keep a minimum clearance of 10 feet (3
m) from the sides, front and back of appliance to ANY construction. Keep the area clear of all combustible
material and flammable liquids, including wood, dry plants and grass, brush, paper, and canvas.
Use ONLY on a level, stable non-combustible surface like bricks, concrete or dirt. DO NOT use this
appliance on any surface that will burn or melt like wood, asphalt, vinyl, or plastic.

IMPORTANT SAFETY INFORMATION
2
Keep the fuel supply hose away from any heated surfaces.
To prevent accidental res, before using the appliance ensure that the hose is not damaged and all joints
and connections are not leaking by turning on the cylinder valve, leave the burner valve closed, and apply
a soapy solution to the joints and connections. If a continuous hissing sound is heard, or if the soapy
solution bubbles, there is a leak. DO NOT use the appliance if there is a leak. Replace the faulty parts.
Extinguish all open ames before connecting the gas supply to the appliance and before checking for
leaks.
When cooking with oil or grease, a thermometer MUST be used.
NEVER allow oil or grease temperature to get hotter than 400ºF (200ºC). If the temperature exceeds
400ºF (200ºC) or if oil begins to smoke, IMMEDIATELY turn burner off.
When cooking with oil or grease, re extinguishing materials shall be readily accessible. In the event of
an oil or grease re DO NOT attempt to extinguish with water. Use a Type BC dry chemical re extinguisher
or smother re with dirt, sand or baking soda.
NEVER overll the cooking pot with oil, grease or water. Follow instructions in this manual for establishing
proper oil, grease or water levels.
When frying with oil or grease, all food products MUST be completely thawed and towel dried to remove
excess water. Failure to completely thaw and dry food may cause oil or grease to overow. Follow
instructions in this manual for frying foods.
When frying, slowly submerse food products into the oil or grease. DO NOT drop.
DO NOT place an empty cooking vessel on burner while in operation. Use caution when placing anything
in the cooking vessel while burner is in operation.
In the event of rain, hail, sleet or other forms of precipitation, while cooking with oil or grease, IMMEDIATELY
turn off burner(s) and gas supply, then cover cooking vessel.
DO NOT move the appliance when in use. Allow unit to cool to 115°F (45°C) before moving or storing.
This appliance will be hot during and after use. Use insulated oven mitts or gloves for protection from hot
surfaces or splatter from cooking liquids.
In case there is a re, call the local re department or dial 911. Stay clear from ames. DO NOT attempt
to extinguish an oil or grease re with water.
Use only accessories, such as cooking vessels recommended by the manufacturer, to allow safe and
proper performance of the product. Never use a cooking vessel larger than the capacity and diameter
recommended by the manufacturer.
This product is not intended for commercial use.
ALWAYS allow the appliance to cool before covering with patio cover.
ALWAYS cover the appliance, with patio cover (if supplied), when not in use.
In the event the appliance has been exposed to water, tilt the appliance forward and allow water to drain
from the burners before attempting to ignite.
Before opening LP tank valve, check the coupling nut for tightness. When appliance is not in use, turn off
control knob and LP tank valve on supply cylinder.

3
IMPORTANT SAFETY INFORMATION
Use appliance only with LP (propane) gas and the regulator/valve assembly supplied. • Installation must
conform with local codes, or in their absence with National Fuel Gas Code, NFPA 54/ANSI Z223.1.
Handling and storage of LP cylinders must conform to LP Gas Code NFPA/ANSI 58. Appliance is not
for use in or on recreational vehicle and/or boats.
NEVER use LP tank if visibly rusted, damaged, or out of date.
If you notice grease or other hot material dripping from appliance onto valve, hose or regulator, turn off
gas supply at once. Determine the cause, correct, clean and inspect valve, hose and regulator before
continuing. Perform a leak test.
The regulator may make a humming or whistling noise during operation. This will not affect the safety or
use of appliance.
Clean and inspect the hose before each use of the appliance. If there is evidence of abrasion, wear, cuts
or leaks, the hose must be replaced prior to the appliance being put into operation. See product sheet for
hose & regulator information.
DO NOT block holes in bottom or sides of appliance.
ALWAYS close LP tank valve and remove coupling nut before moving LP tank form specied operating
position.
NEVER store a spare LP tank under or near appliance or in enclosed areas. NEVER ll the cylinder
beyond 80% full. An overlled spare LP tank is hazardous due to possible gas released from the safety
relief valve. Failure to follow these instructions exactly could cause a re resulting in death or serious
injury.
If you see, smell, or hear escaping gas, immediately get away from the LP tank/appliance and call your
re department.
Combustion by-products produced when using this product contain chemicals known to the State of
California to cause cancer, birth defects, or other reproductive harm.
Turn OFF all control knobs and LP tank valve. Turn coupling nut counterclockwise by hand only – DO
NOT use tools to disconnect. Install safety cap onto LP tank valve. ALWAYS use cap and strap supplied
with valve. Failure to use safety cap as directed may result in serious personal injury and/or property
damage.
A disconnected LP tank in storage or being transported must have a safety cap installed (as shown).
DO NOT store an LP tank in enclosed spaces such as a carport garage, porch, covered patio or other
building. NEVER leave an LP tank inside a vehicle, which may become overheated by the sun.
Storage of an appliance indoors is permissible only if the cylinder is disconnected and removed from the
appliance.
Inspect and test the folding tables on the side to make sure they are locked.
The LP tank used with your appliance must meet the following requirements: Purchase LP tanks only
with these required measurements: 12” (30.5cm) (diameter) x 18” (45.7cm) (tall) with 20 lb. (9 kg.)
capacity maximum. Be constructed and marked in accordance with specications for LP tank of the U.S.
Department of Transportation (DOT) or the National Standard of Canada, CAN/CSA-B339, Cylinders,
Spheres and Tubes for the Transportation of Dangerous Goods. The propane cylinder used with this
appliance must include a collar to protect the cylinder valve.
4
IMPORTANT SAFETY INFORMATION
LP tank valve must have: Type 1 outlet compatible with regulator or appliance. Safety relief valve. • UL
listed Overll Protection Device (OPD). This OPD safety feature is identied by a unique triangular hand
wheel. Use only tanks equipped with this type of valve. LP tank must be arranged for vapor withdrawal.
LP gas is non-toxic, odorless and colorless when produced. For Your Safety, LP gas has been given an
odor (similar to rotten cabbage) so that it can be smelled.
LP gas is highly ammable and may ignite unexpectedly when mixed with air.
Leak test must be repeated each time LP tank is exchanged or relled. DO NOT smoke during leak test.
DO NOT use an open ame to check for gas leaks.
Appliance must be leak checked outdoors in well-ventilated area, away from ignition sources such as
gas red or electrical appliances. During leak test, keep appliance away from open ames or sparks.
Use a clean paintbrush and 50/50 soap and water solution. Use mild soap and water. DO NOT use
household cleaning agents. Damage to gas train components can result.Brush soapy solution onto all
weld seams and entire valve area.
DO NOT use appliance until leaks are checked. If you cannot stop a gas leak, immediately close LP tank
valve and call LP gas supplier or your fire department.
SAVE THESE WARNINGS
When the griddle is not in use, turn off all control knobs and LP cylinder valve. If growing bubbles
appear, do not use or move the fuel tank. Contact an LP gas supplier or your fire department.
NEVER move the griddle while it is hot or in use.
Maximum weight on side shelf is 10lbs.
The grease tray must be inserted into the griddle and emptied after every use. DO NOT store or
remove grease until the tray has completely cooled off.
The stove, plancha, comal and cso may be wiped down with soap and water.
5
PRODUCT INFORMATION ELECRTODES
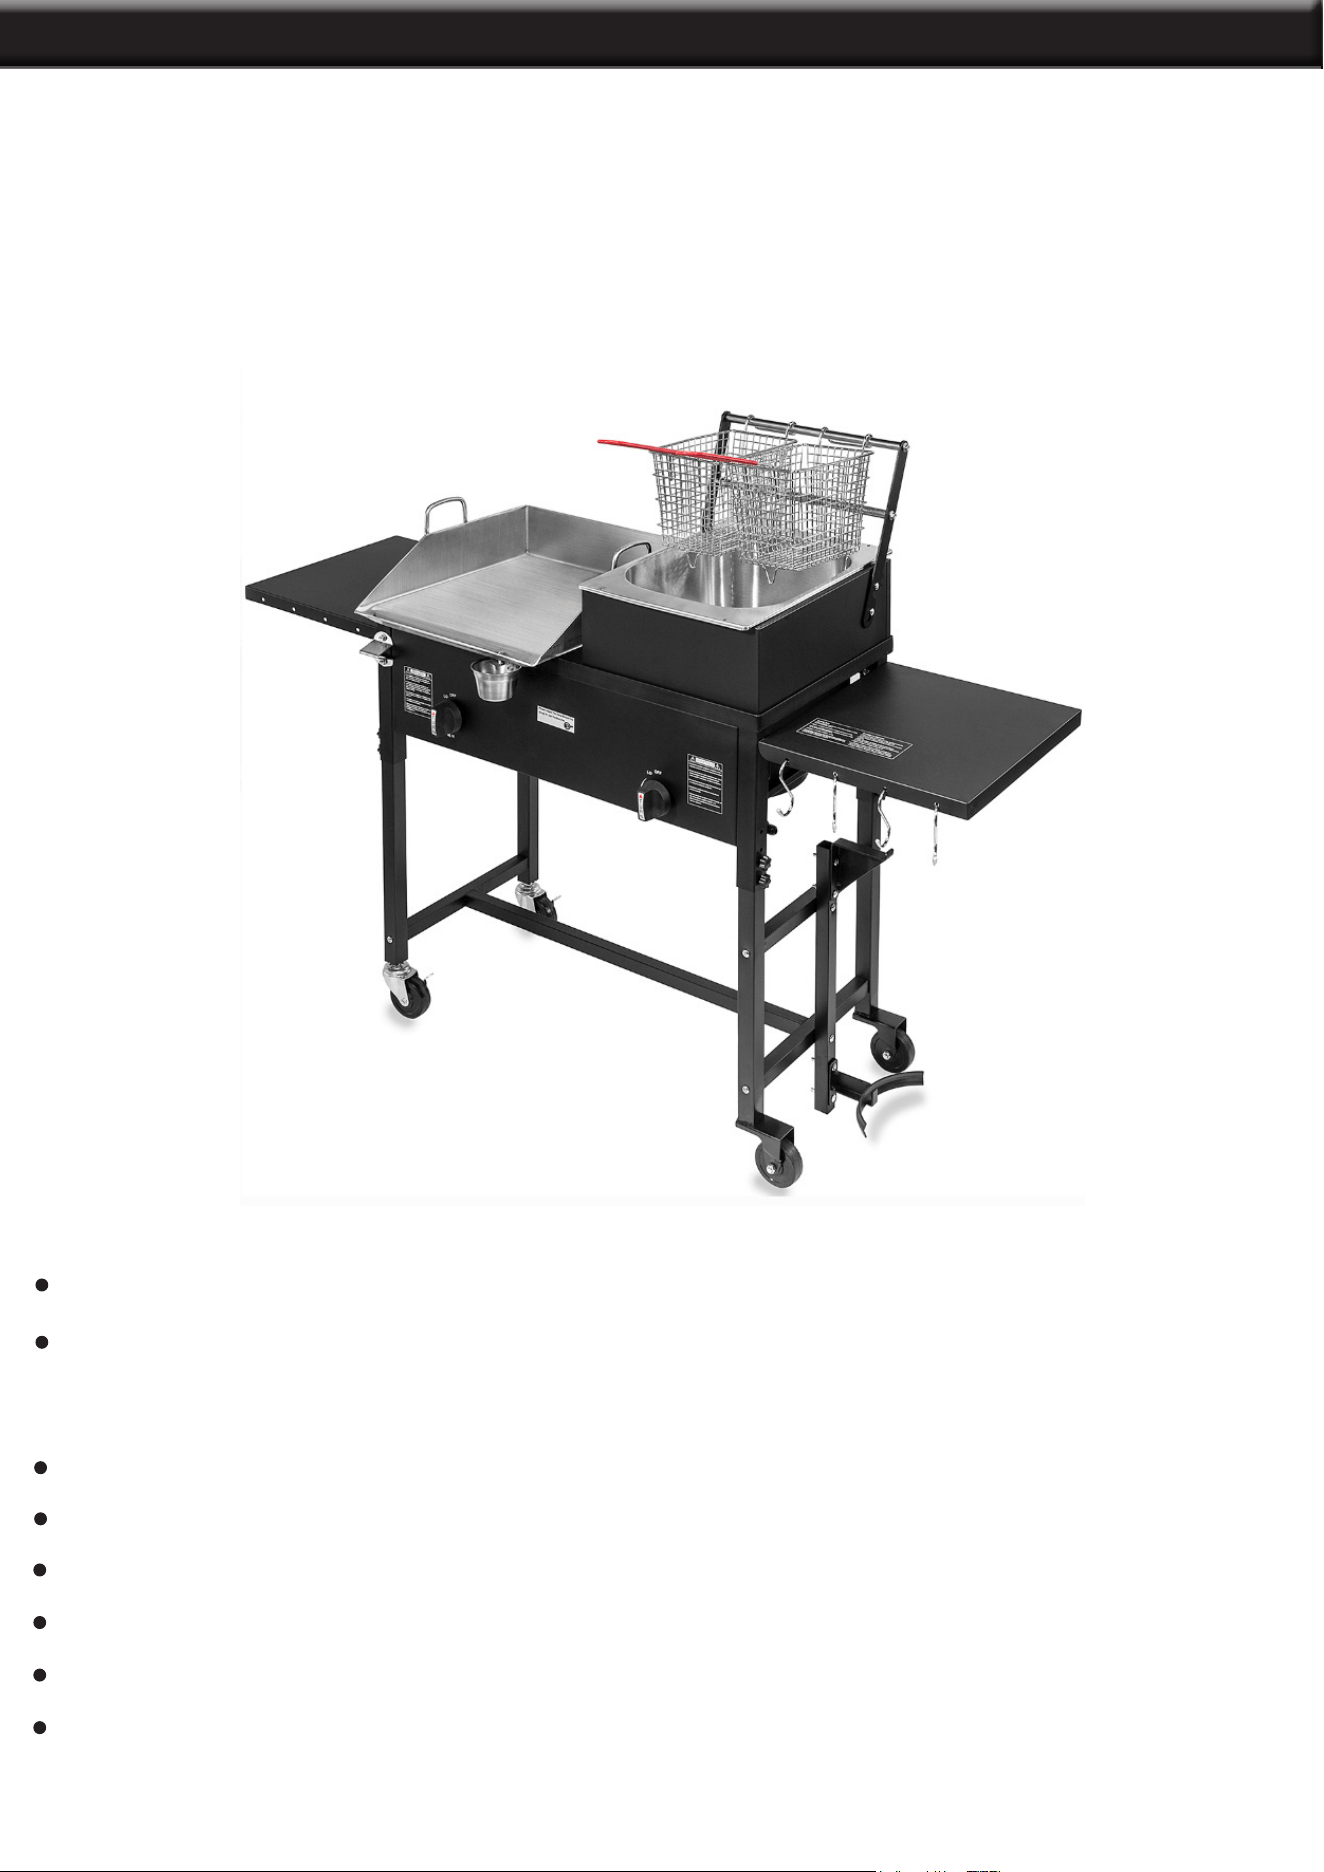
58,000 BTU Outdoor Gas Propane Double Burner Stove Cook Station Flat Top Griddle
& Deep Fryer BBQ Grill Camp Side Table
The Barton Outdoor Camping Propane Double Burner Stove Station features triple 87,000 BTU propane
stoves and convenient drop-down side tables made to be compact and portable for a diverse selection of
outdoor cooking applications. This outdoor cooking stove is perfect for on-the-go cooking when bringing
friends or family for some outdoor camping and adventure fun. Easily transport the triple burner stove on and
off the campsite using its built-in swivel caster wheels for quick mobility and easy transport.
FEATURES
58,000 BTU
The pot support area is made with Iron that has been nished with a high heat resistant coating. We
use an open cruciform shape in order to keep a secure foundation while still allowing the most heat
transmission to your cooking surface.
Temperature control knobs
CSA Certied regulator
For use with stainless steel griddle or other similar products
Stainless steel racks and hooks
Comes with an oil collecting cup for griddle
Drop down side tables for compact storage
6
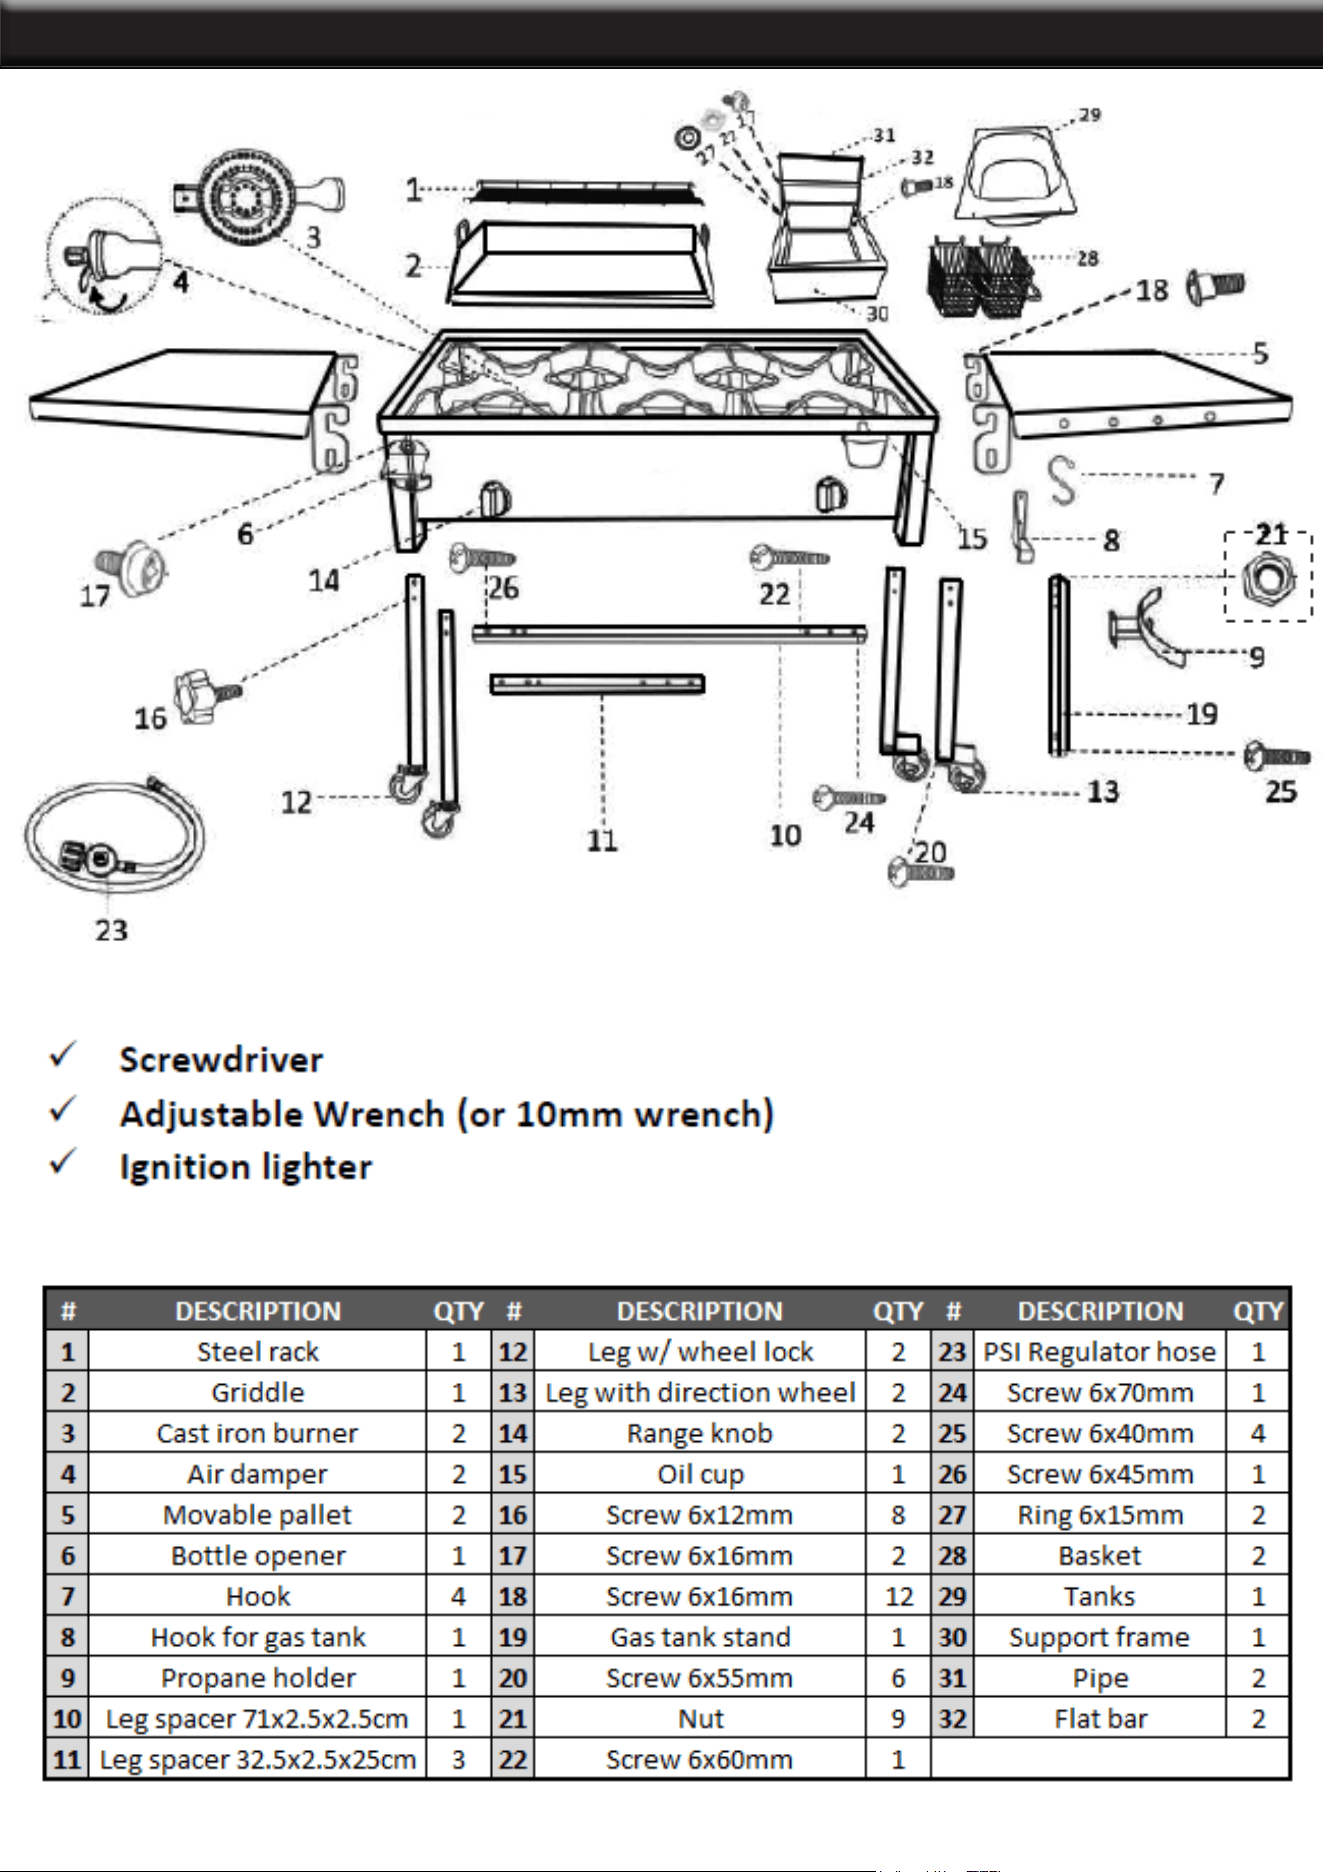
ELECRTODES
Tools needed for assembly
Parts List
7
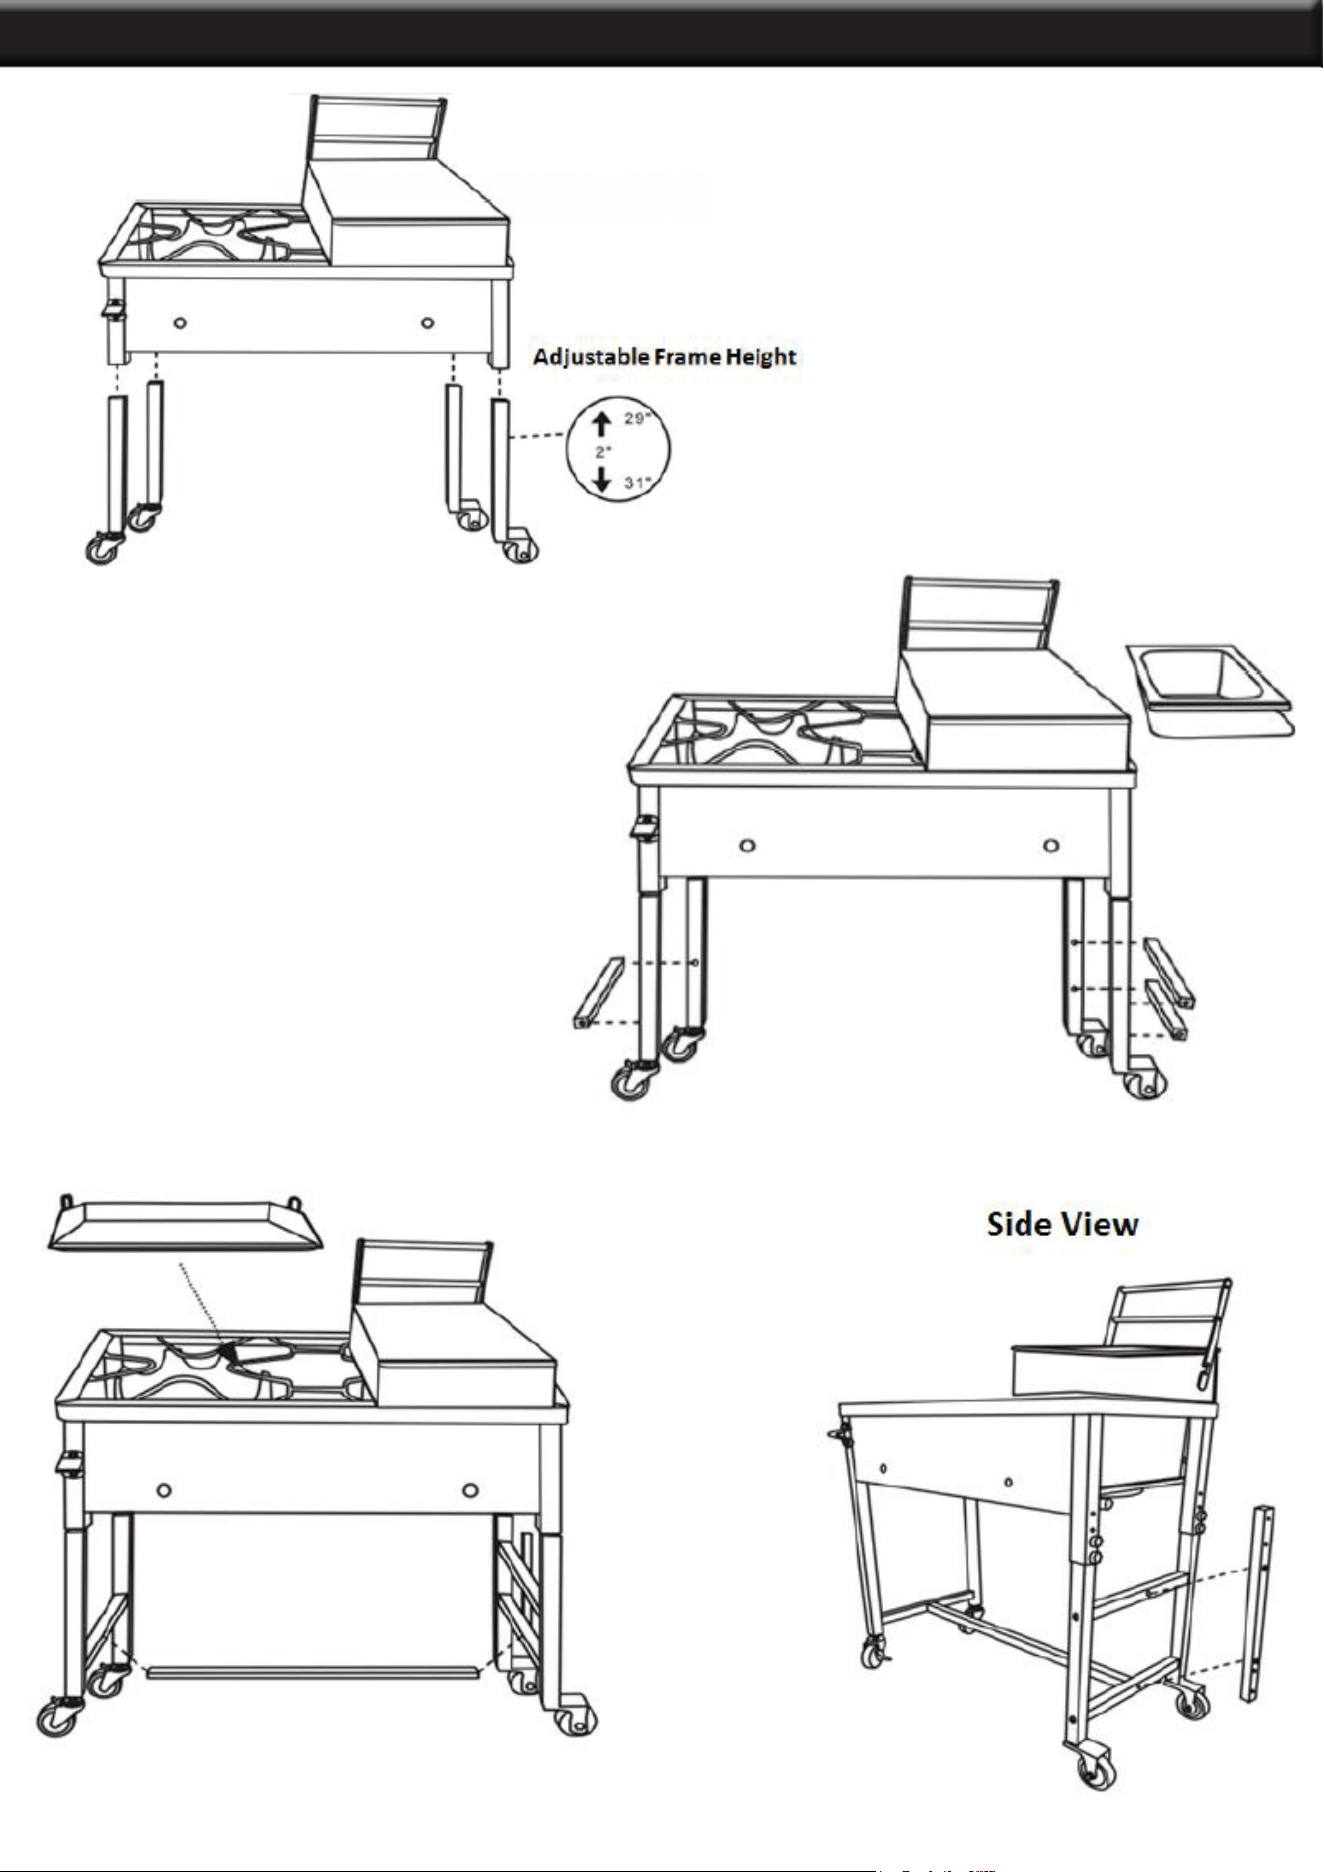
ASSEMBLY OPERATION
STEP 1
STEP 2
STEP 3
8
OPERATION
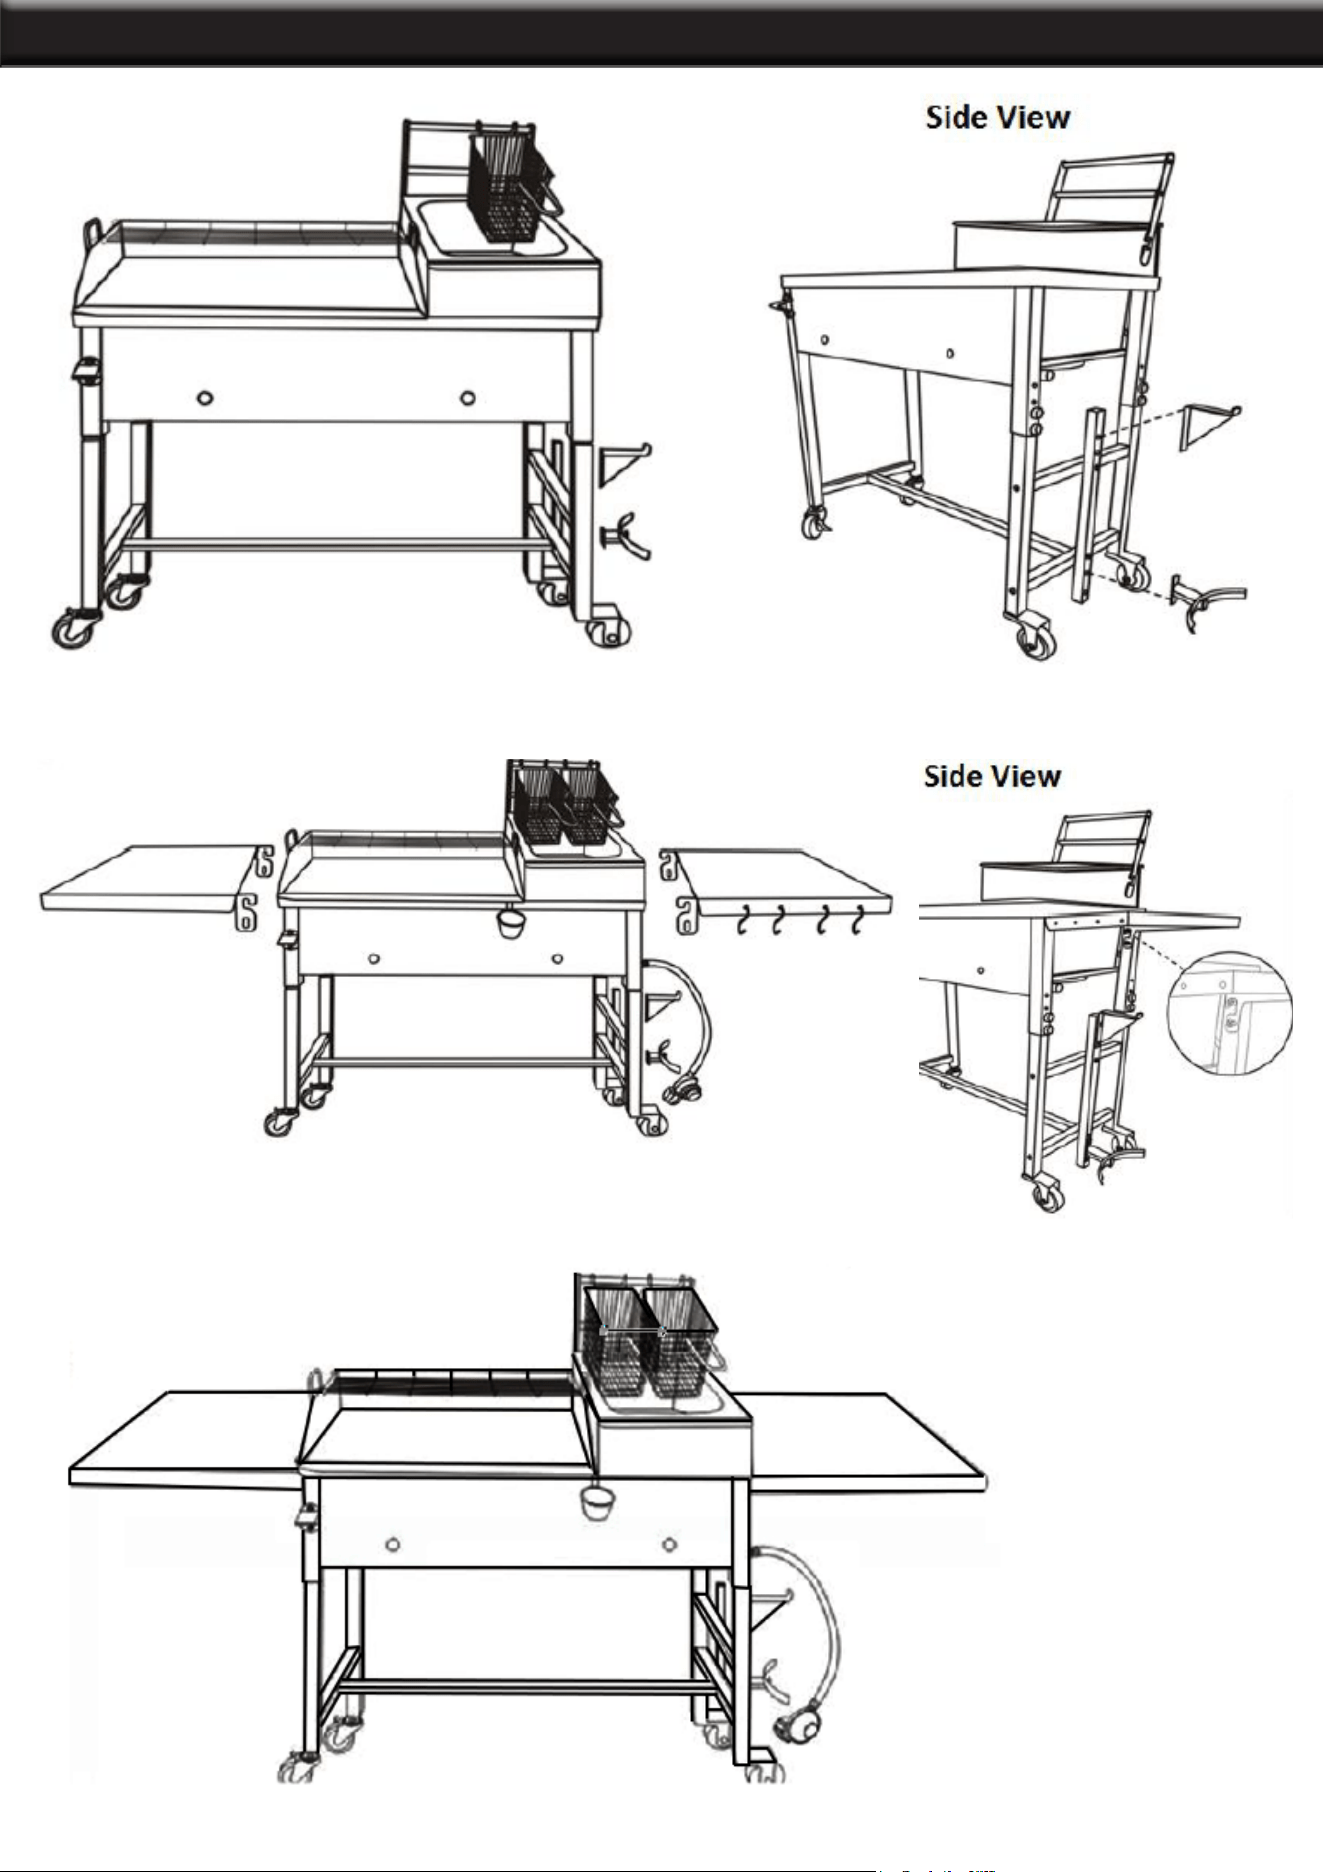
STEP 4
STEP 5
Finished product should look like this
9
OPERATION
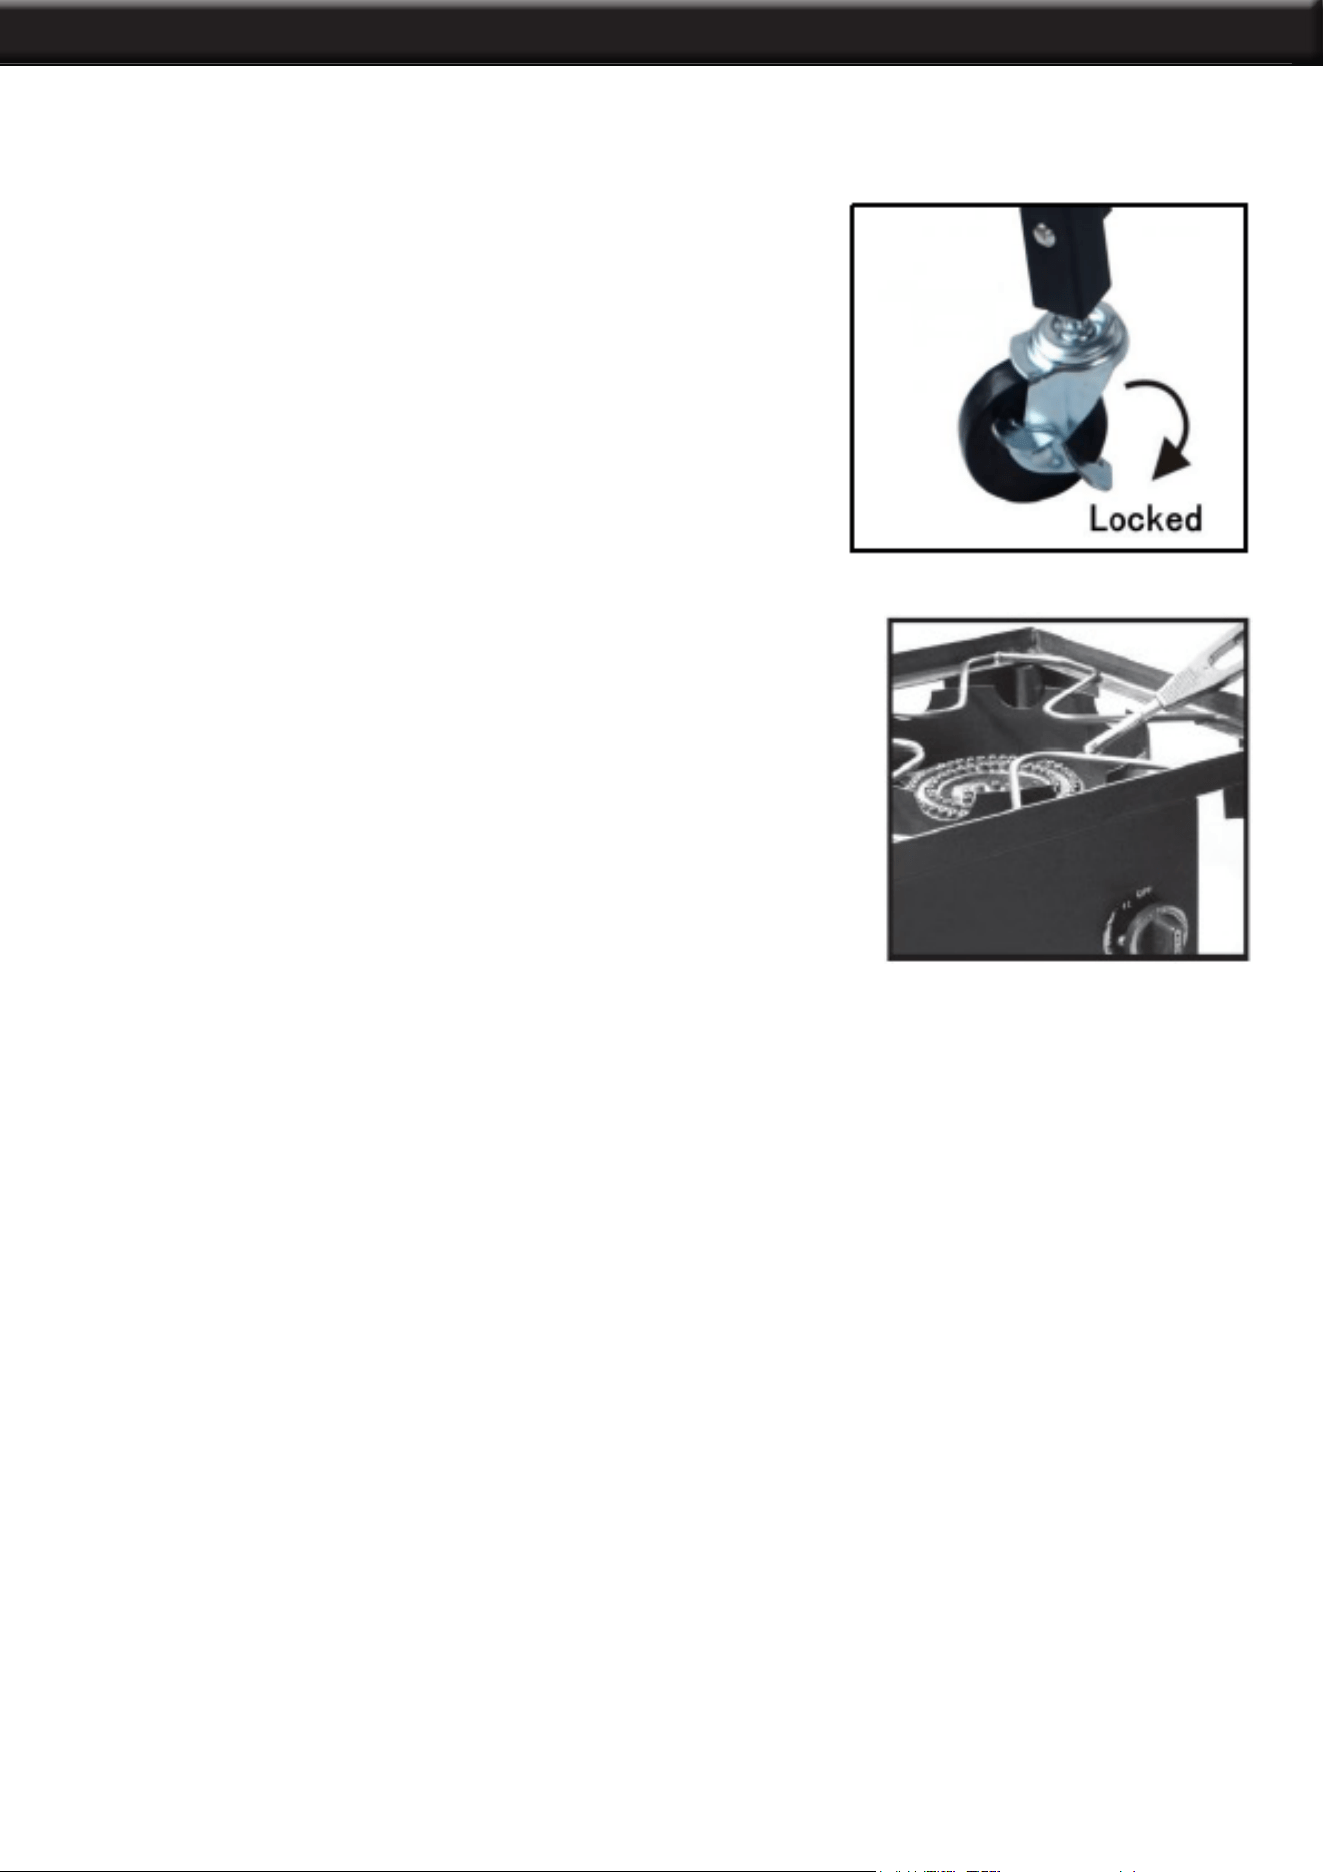
STEP 1: Make sure the wheels are locked to prevent it
from moving during operation.
STEP 2: Hold a lighter near the burner.
Begin the following steps ONLY after performing a leak test and no leaks are detected.
STEP 3: • Light burner; rotate knob(s) from HIGH to LOW. You should see a smaller ame in
LOW position than seen on HIGH. Always check ame prior t o each use. The air damper
mounted on the back of your burner helps to control the amount of primary air that mixes with
the LP gas. A blue flame with little or no yellow flame provides the best heat. Adjust the air
damper by turning it clockwise or counterclockwise until the desired flame is achieved.
STEP 4: Place the griddle on top of the cooking surface to cook.
STEP 5: To turn off the stove: Turn all knobs to OFF position. Turn LP tank OFF by turning
hand wheel clockwise to a full stop.
If the ame is accidentally extinguished, turn the appliance valves OFF and
WAIT 5 minutes before attempting to ignite.
NOTE: Before each use, check to see if hoses are cut or worn. Replace damaged hose
assembly before using appliance. Use only valve/ hose / regulator specied by manufacturer.
See product sheet for hose & regulator information.

MAINTENANCE
CLEANING THE BURNER: Spiders and small insects can spin webs and build nests inside
the burner. This especially occurs in late summer and fall before frost when spiders are most
active. These nests can obstruct gas ow and cause a re in and around the burner and
orice. Such a re can cause operator injury and serious damage to the appliance. To help
prevent a blockage and ensure full heat output, clean and inspect burner tube often (once or
twice a month). NOTE: Water or air pressure will not normally clear a spider web.
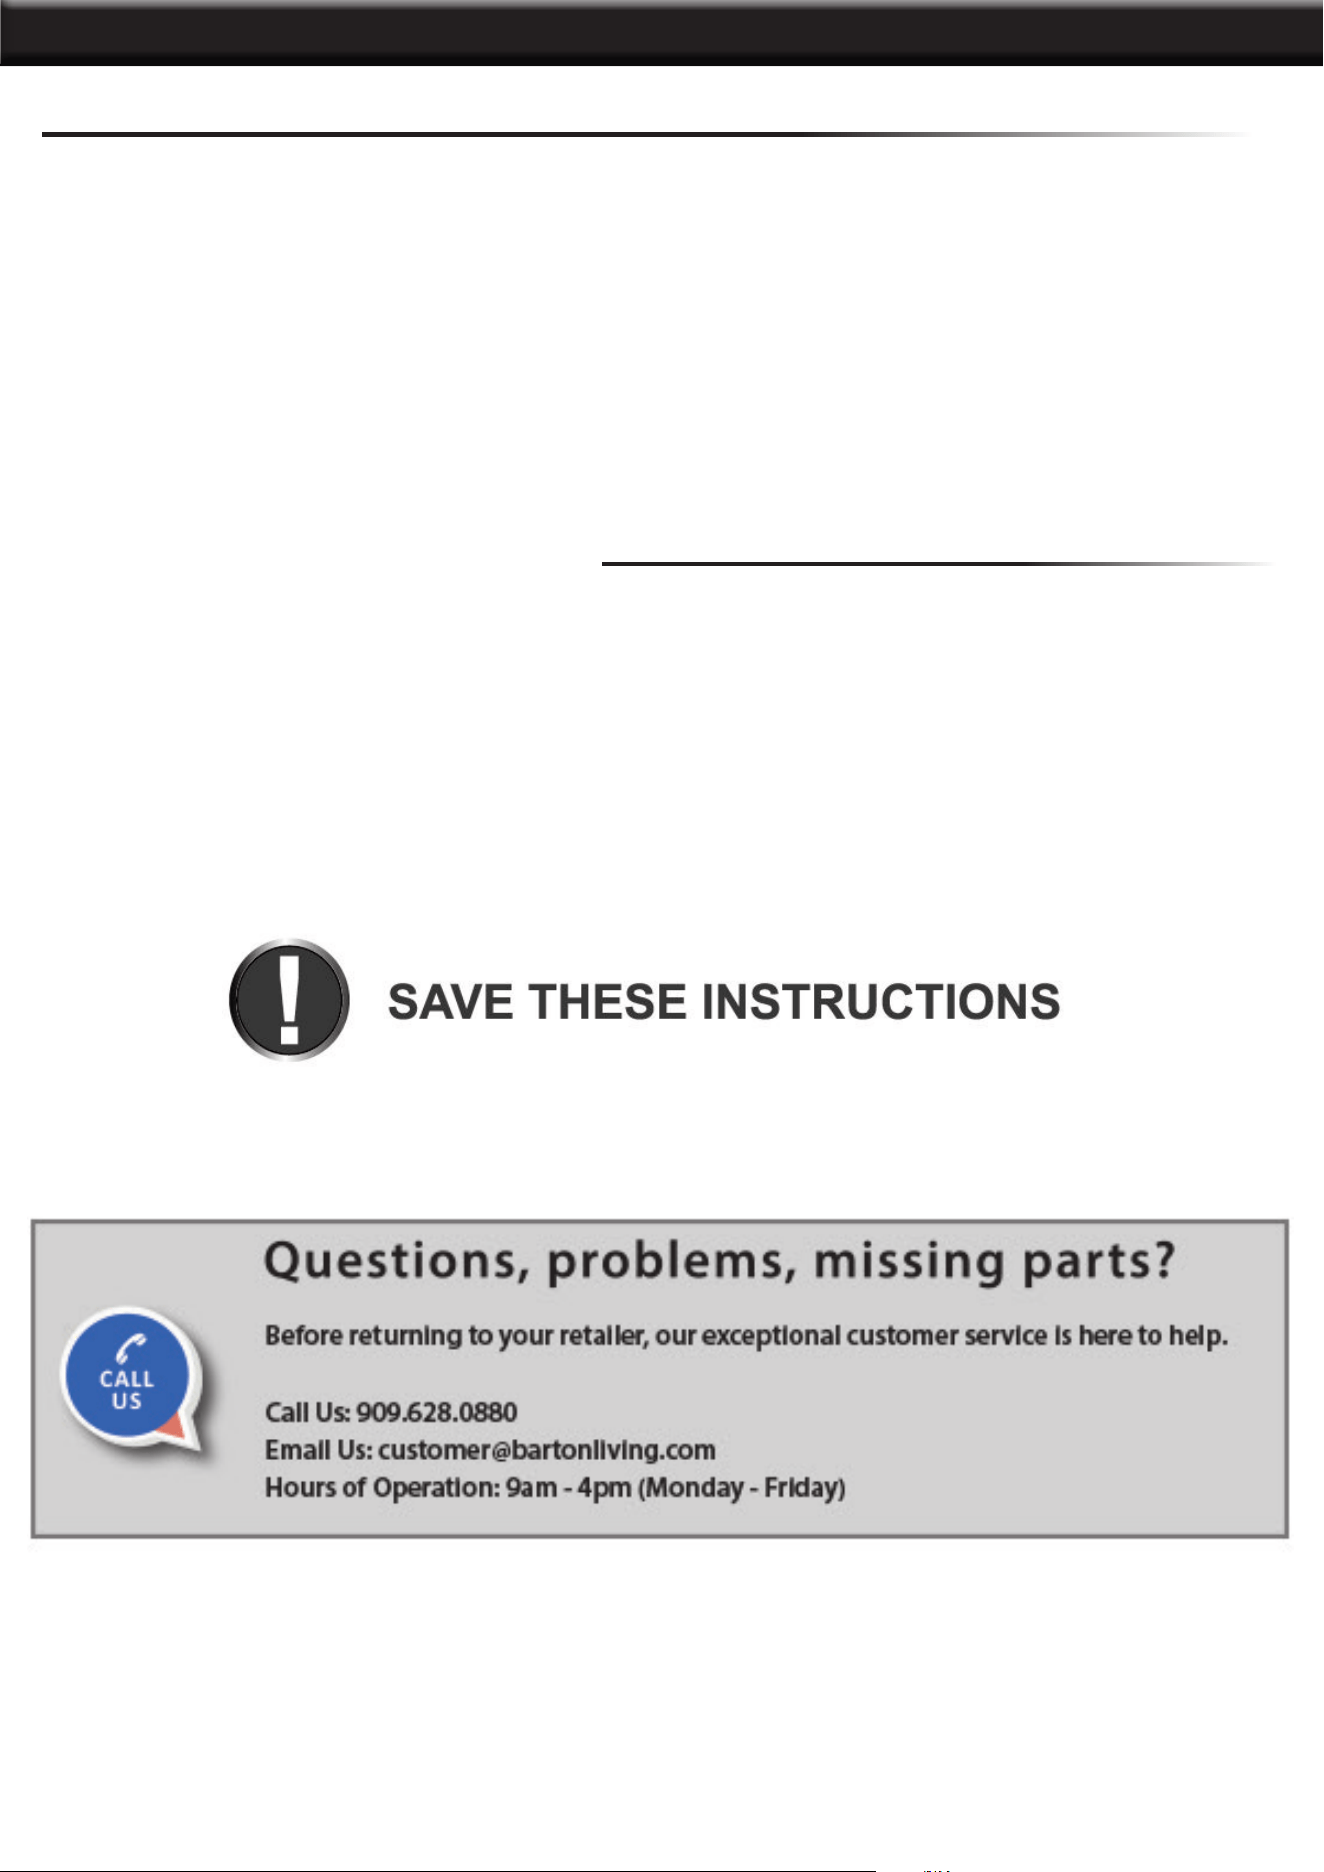
STEPS FOR CLEANING THE BURNER
STEP 1: Remove orice/valve from burner.
STEP 2: Look inside the burner tube for nests, webs, or mud.
STEP 3: To remove the above obstructions, use an accessory exible venturi brush or bend
a small hook on one end of a long exible wire or use an air hose.
STEP 4: Inspect and clean the burner if needed.
STEP 5: Reattach orice/hose to burner.
COMPONENT CLEANING
BURNER: Wire brush loose corrosion from burner exterior. Clean clogged gas port holes with
an opened paper clip. Replace corroded or damaged burners that would emit excess gas.
COOKING SURFACES, POTS AND PANS: Clean the cooking surface with soapy water and a
nylon cleaning pad.
After appliance has cooled, wipe areas where paint and nish have burned off to minimize rusting.
When cooking with oil or grease, a thermometer must be used.
Introduction of water from any source into the cooking oil or grease may cause overow and severe burns
from hot oil and water splatter. When frying with oil and grease, all food products MUST be completely
thawed and towel dried to remove water before being immersed in the fryer.
Be sure thermometer is in good working condition. To check the thermometer, insert it into a pot of boiling
water and ensuring that it registers approximately 212°F ± 20°F (100°C ± 10°C). If it does not function
properly, obtain a replacement thermometer specied by the manufacturer before using the appliance.
DO NOT over ll the pot with cooking liquid. NEVER ll appliance more than half full of cooking liquid or
past the maximum ll line (a permanent marking on fryer).
If cooking liquid has spilled and ignited, do not attempt to extinguish with water. Immediately turn gas supply
OFF at the supply cylinder and: Extinguish ames using a BC type re extinguisher as recommended by
the fryer manufacturer; or Smother ames with dirt or sand.
In case there is a re, call the local re department or dial 911.
To avoid accidental burns from burner ame or hot cooking liquid, turn the burner off before inserting or
removing food from the fryer.
When removing food from the fryer, be sure to avoid burns from hot cooking liquid drippings.
10
11
THE MANUFACTURER AND/OR DISTRIBUTOR HAS PROVIDED THE PARTS LIST AND ASSEMBLY
DIAGRAM IN THIS MANUAL AS A REFERENCE TOOL ONLY. NEITHER THE MANUFACTURER OR
DISTRIBUTOR MAKES ANY REPRESENTATION OR WARRANTY OF ANY KIND TO THE BUYER THAT
HE OR SHE IS QUALIFIED TO MAKE ANY REPAIRS TO THE PRODUCT, OR THAT HE OR SHE IS
QUALIFIED TO REPLACE ANY PARTS OF THE PRODUCT. IN FACT, THE MANUFACTURER AND/OR
DISTRIBUTOR EXPRESSLY STATES THAT ALL REPAIRS AND PARTS REPLACEMENTS SHOULD BE
UNDERTAKEN BY CERTIFIED AND LICENSED TECHNICIANS, AND NOT BY THE BUYER. THE BUYER
ASSUMES ALL RISK AND LIABILITY ARISING OUT OF HIS OR HER REPAIRS TO THE ORIGINAL
PRODUCT OR REPLACEMENT PARTS THERETO, OR ARISING OUT OF HIS OR HER INSTALLATION
OF REPLACEMENT PARTS THERETO.
Record Product’s Serial Number Here:
Note: If product has no serial number, record month and year of purchase instead.
Note: Some parts are listed and shown for illustration purposes only and are not available individually
as replacement parts.
PLEASE READ THE FOLLOWING CAREFULLY
DISCLAIMER
PRODUCT MADE IN CHINA
