User Manual
v1.4
Fast Nugget Ice Maker

Contents
Safety Precautions
Product Introduction & Functions
Cleaning and Maintenance
Product Specifications
Troubleshooting
Certifications
Support
01
03
06
09
09
11
11

Please read all safety instructions carefully before using the ice maker.
Failure to follow these precautions could result in electric shock, fire,
personal injury, or property damage.
To reduce the risk of injury or damage, follow these safety precautions:
1. Power Requirements
The voltage from the power outlet must match the specifications listed on the
appliance’s nameplate.
2. Grounding
This appliance must be properly grounded. Do not use it without a grounding
connection.
3. Use of Extension Cords
Using an extension cord may cause overheating and increase the risk of fire. If one
must be used:
- a) Only use an extension cord with a grounding plug.
- b) The marked electrical rating of the extension cord must be equal to or greater
than the rating of the appliance.
4. Damaged Components
Do not operate the appliance if the power cord, plug, or any other component is
damaged.
5. Cleaning
Always unplug the unit before cleaning. Never immerse any part of the unit in water.
6. Adult Use Only
Only responsible and capable adults should operate the ice maker.
7. Power Cord Safety
Do not place the power cord where it can be pulled by children or become a
tripping hazard.
8. Child Safety
Keep children away from the unit during operation. Never leave the ice maker
unattended around children.
9. Water Source
Do not
use water that is micro-biologically unsafe or of unknown quality.
10. Evaporator Warning
Do not touch the evaporator or ice-making components while the unit is operating.
11. Wet Hands Hazard
Do not plug in or unplug the unit with wet hands.
Safety Precautions
01

12. Proper Installation
Install and place the ice maker according to the installation instructions before use.
13. Flammable Materials
Do not store or use flammable liquids or vapors near the unit.
14. No Disassembly
Do not attempt to disassemble, repair, modify, or replace any part of the unit
without proper authorization. Repairs should be performed by qualified personnel
only.
15. Do not damage the refrigerant tubing while handling, installing, or operating the
unit.
16. Dispose of the unit in accordance with Federal, State, and Local Regulations.
Contact your local waste authority for environmentally safe disposal.
17. Keep ventilation openings around the unit clear and unobstructed.
18. Do not place the unit near heat sources such as stoves or ovens.
19. Ensure a minimum of 6 inches (150mm) of clearance on all sides and the back of
the unit for proper air circulation.
20. Do not place the unit in direct sunlight.
21. If refrigerant leakage is suspected, immediately evacuate the area and ventilate
thoroughly. Do not use open flames, electrical switches, or devices that may
create sparks.
SAVE THESE INSTRUCTIONS
WARNING: FIRE OR EXPLOSION HAZARD – FLAMMABLE
REFRIGERANT
02

Product Introduction & Functions
3.1 Product Introduction
3.2 Before First Use
Citric Acid Descaling Powder7
4
3
2
1
5
6
7
Air VentTransparent lid
32
Control Panel
1
Ice Scoop 1
4 Ice Scoop 2
5
Ice Basket
6
1. Transportation Warning: Do not tilt the unit more than 45° or turn it upside down
during transport, as this may damage the compressor or sealing system.
2. Remove all packaging materials from the unit.
3. Inspect the unit, power cord, and plug for any visible damage after unpacking.
4. Place the unit on a level surface with at least 150 mm (6 inches) of clearance on all
sides for proper ventilation.
5. Keep it at least 1 meter (3 feet) away from ovens, radiators, or other heat sources.
6. After positioning the unit, leave the transparent lid fully open and allow it to stand
for at least 2 hours before first use.
7. For the best taste and texture, use the ice cubes promptly after production.
8. Ensure that the household power supply matches the unit’s rated voltage:
110-120V~, 60Hz.
03
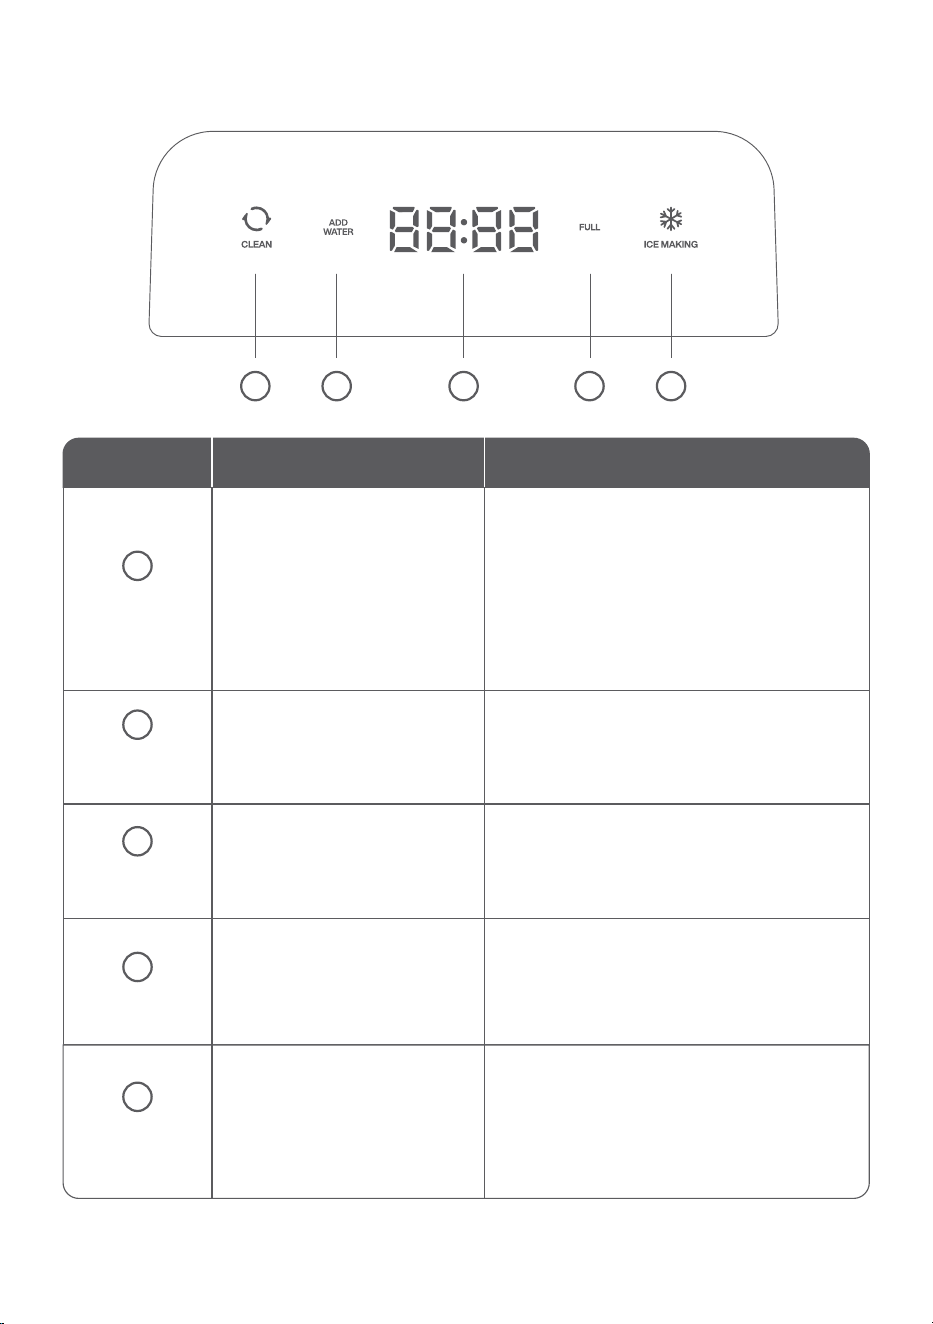
3.3 Control Panel Introduction
4
4
32
1
5
5
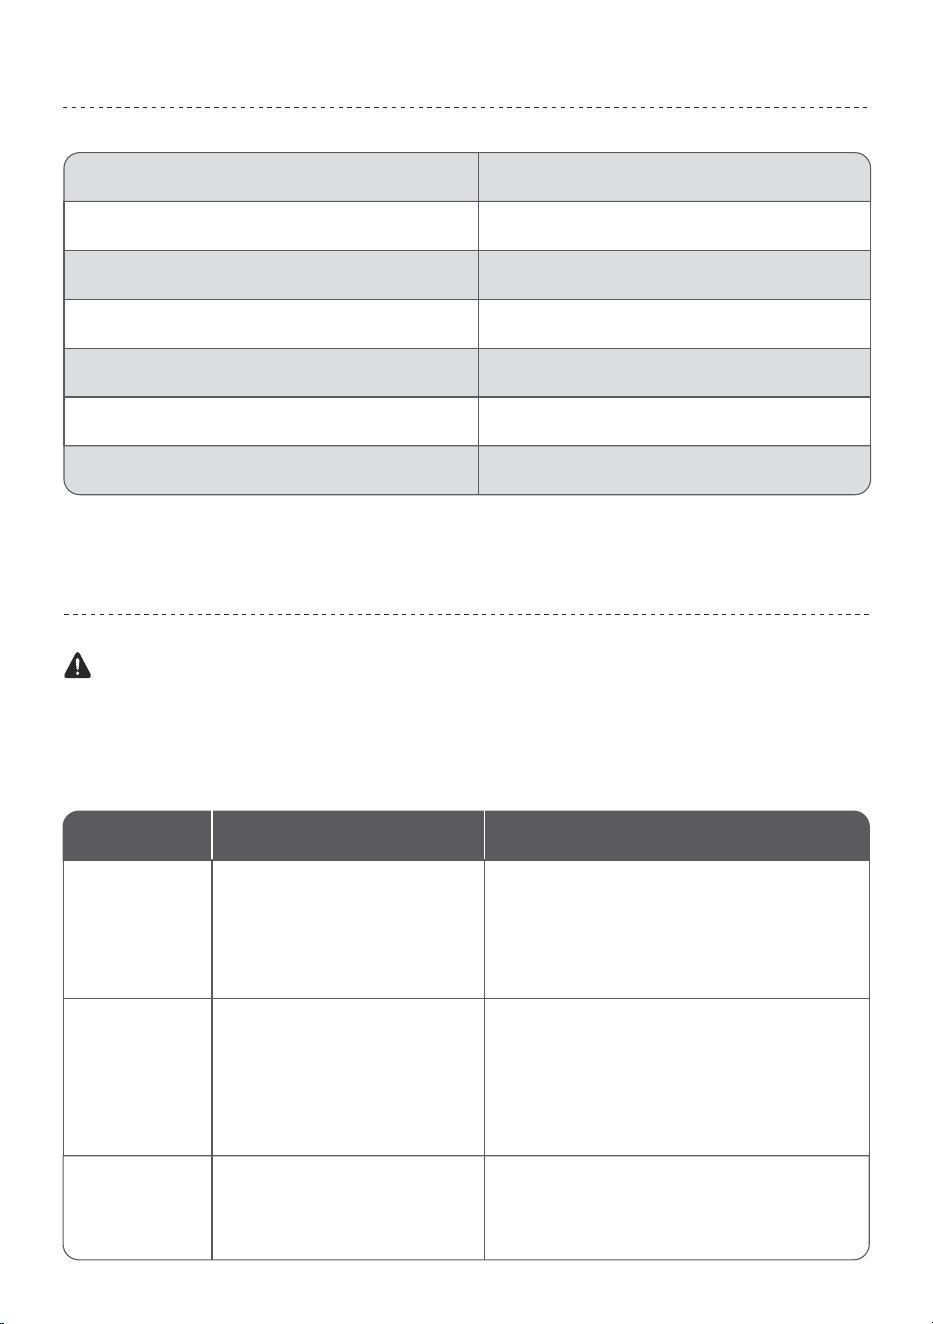
Status/Mode Panel Display Operation/Response
Cleaning
Mode
CLEAN light on, ICE MAKING
light off; display shows
7:00
countdown
• Runs a 7-minute cleaning cycle with water
circulation.
• Press any button to stop at any time.
• After cleaning, unit returns to
Standby
Mode.
• To make ice again, press ICE MAKING
while in Standby.
ADD WATER icon stays on
ICE MAKING and CLEAN
lights are off (dim)
FULL icon stays on
• Water level is too low or empty.
• Refill reservoir with clean water up to the
MAX line.
• After refilling, press
ICE MAKING to restart.
• The appliance is powered on and ready.
• From Standby, press
ICE MAKING to start
making ice.
• Or press
CLEAN to begin a cleaning cycle.
• The ice basket is full.
• Remove ice to continue operation.
• The unit restarts automatically once ice
level drops below the sensor.
• Actively producing ice.
• Automatically pauses when basket is full.
• After closing the lid, wait 10 seconds
before pressing
ICE MAKING again if
needed.
1
ADD water
Mode
Standby
Mode
Full Mode
Ice Making
Mode
2
3
ICE MAKING light on,
CLEAN light off; rotating
animation on display
04
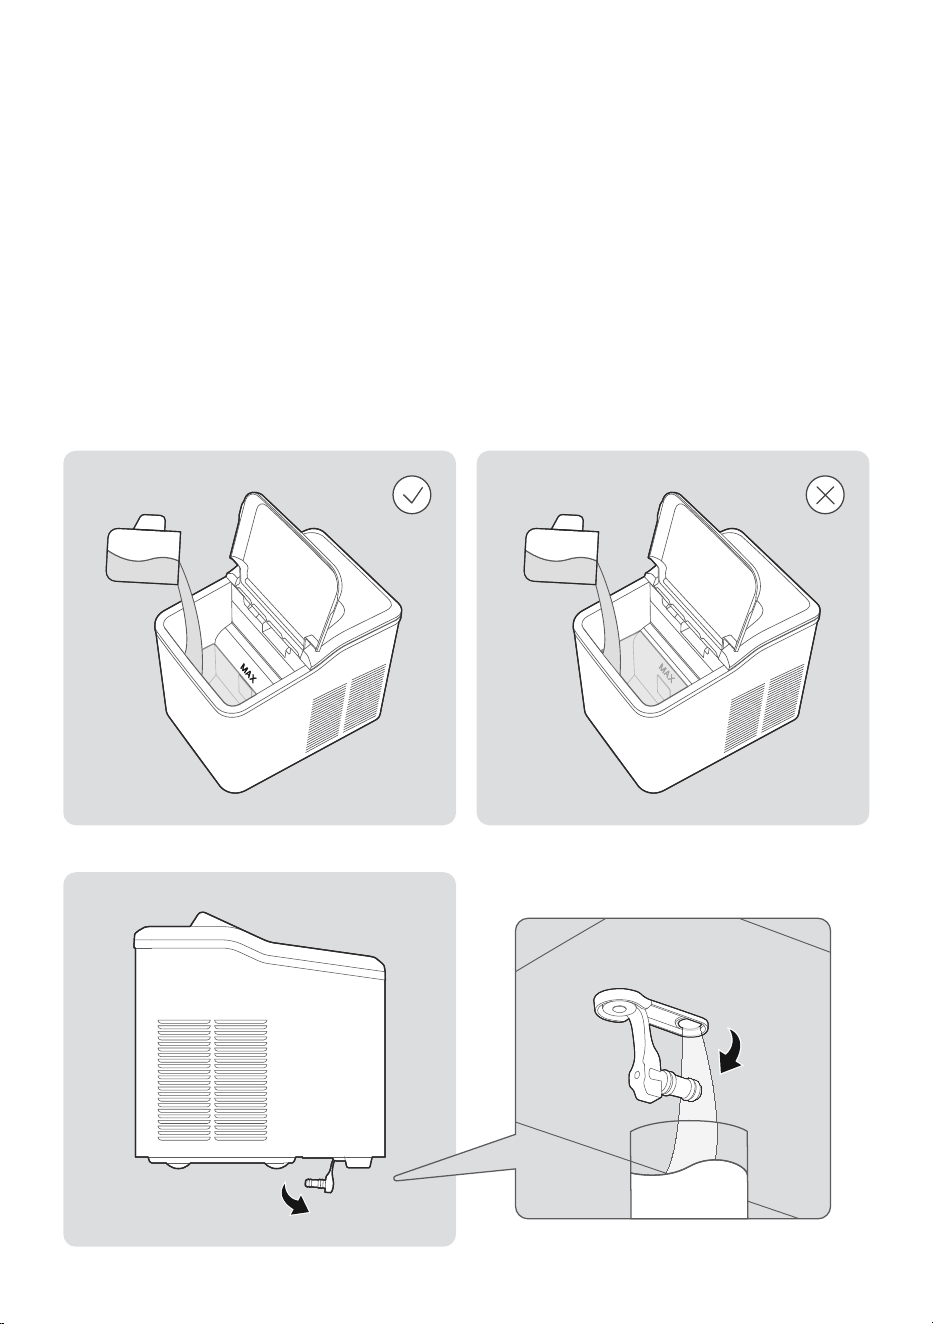
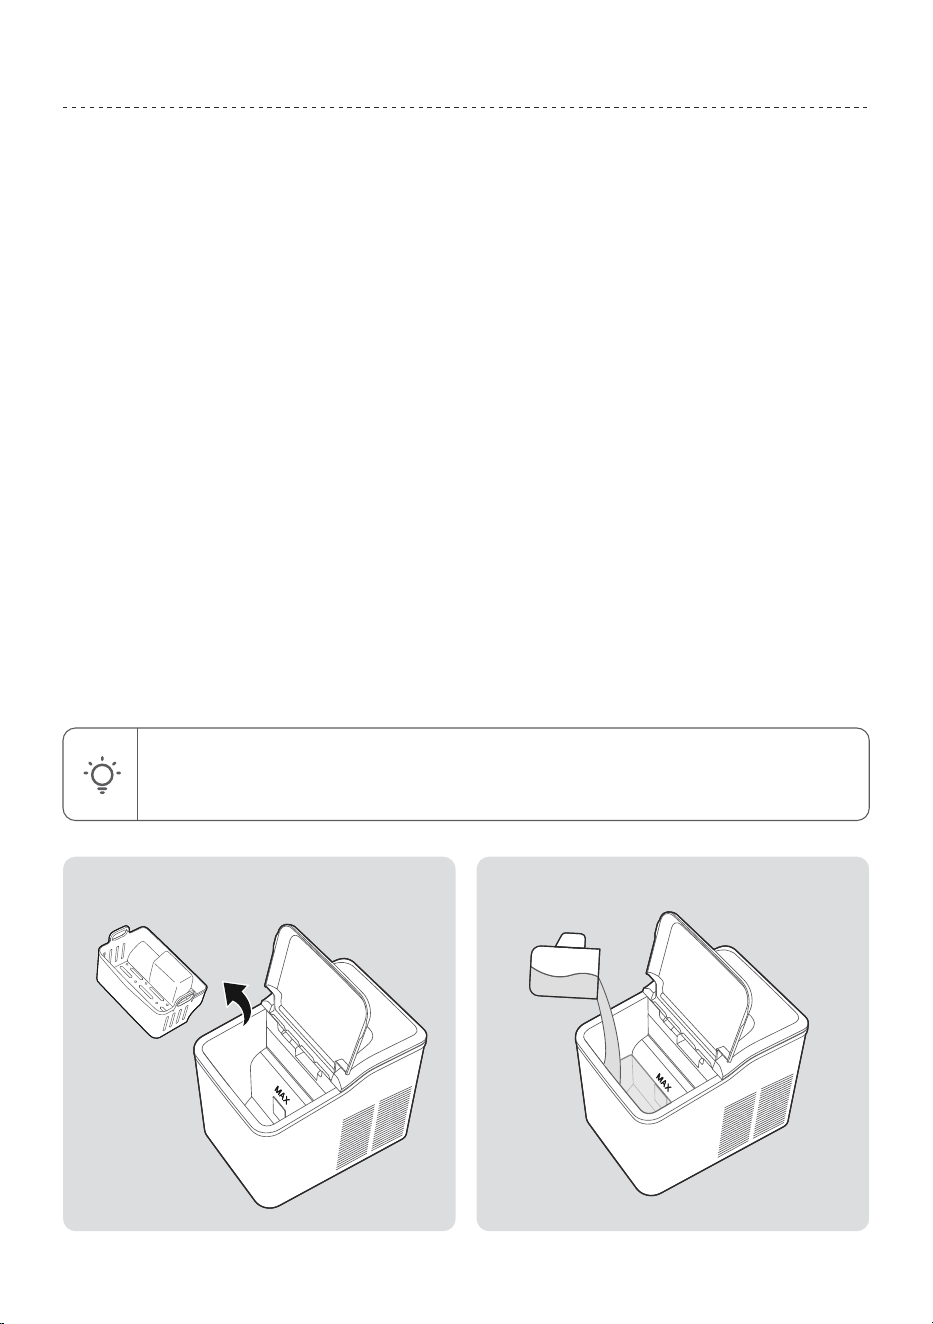
How to Make Ice Cubes
Step 1: Fill Water
• Open the transparent lid, then remove the ice basket.
• Fill the water reservoir up to the MAX level mark (do not overfill).
• If the reservoir is overfilled, remove the drain plug on the bottom panel to drain the
excess water.
• Close the lid securely.
Step 2: Start the Machine
• Plug the power cord into a grounded 110-120V~ / 60Hz outlet.
• Press the ICE MAKING button to begin the ice-making process.
05
Cleaning and Maintenance
4.1 Clean
Cleaning Procedure
Initiation
• In Standby Mode, press the “CLEAN” button to activate the cleaning cycle.
Indicator Status
• “CLEAN” indicator illuminates steadily.
• “ICE MAKING” indicator turns off.
• Digital display shows 7:00 countdown.
Operation Process
• Use plain water, or prepare the cleaning solution as needed according to the usage
instructions provided on the packaging of the citric acid descaling powder.
• Pump and agitator motors operate simultaneously.
• Water circulates continuously between lower and upper tanks.
Completion
• Unit automatically returns to standby mode after 7 minutes.
• Remove the drain plug on the bottom panel to drain the water.
• Close the lid securely.
NOTE: For deep cleaning or descaling, repeat the cycle with fresh solution.
Avoid using harsh chemicals. Always rinse with clean water before making
ice again.
06

4.2 Cleaning and Maintenance
Regular Cleaning
1. Clean the interior with citric acid descaling powder (follow the instructions on the
package).
2. Repeat the cleaning procedure.
3. Rinse thoroughly with clean water before reuse.
CAUTION: Never use harsh chemicals, acids, gasoline, or petroleum-based
cleaners. These may damage the unit or contaminate the ice.
Ventilation & Defrosting
• Maintain at least 150 mm (6 in) of clearance around the unit for proper airflow.
• Use only manufacturer-approved methods to defrost.
7 min
150 mm (6 in)
150 mm (6 in)
150 mm (6 in)
07

After Extended Non-Use
1. If the “ADD WATER” icon stays on (airlock issue):
• Press ICE MAKING to switch to Standby.
• Restart the ice-making cycle.
2. If unused for more than 24 hours:
• Drain all water and dry the interior completely.
• Before reuse, run a full cleaning cycle with fresh potable water.
Compressor Protection
• After a power failure, water shortage, or full basket, the compressor will delay for 3
minutes before restarting. This protects the unit from damage.
Water Quality Requirements
WARNING: HEALTH RISK
• Replace the reservoir water every 24 hours to prevent bacterial growth.
• Use ONLY NSF/ANSI 61-certified potable water.
• Before initial use or after long-term storage, run a full cleaning cycle with fresh
water to ensure sanitary conditions.
08
Product Specifications
Troubleshooting
Power loss during operation (from unplugging or manual shutdown) cause ice
fragments to become trapped in the evaporator. Solution: Restart the ice maker
normally.
CM03
110-120 V~ / 60 Hz
1.8 A
1.4 L
1.5 L
Stainless Steel
12.08× 8.98 × 12.36 inch
(307*228.3*314mm)
Model
Rated Voltage/Frequency
Ice-Making Current
Ice Storage Capacity
Water Tank Capacity
Material
Product Size
Problem Possible Causes Solution
Sandy
Ice Formation
1. User uses hard water or water
containing impurities.
2. Refrigeration system operates
unstably.
3. Internal equipment malfunction.
1. Replace with purified water.
2. Conduct continuous testing for no less than
30 minutes.
3. If the fault persists, contact customer service.
1. Nugget ice has a soft texture,
with a faster melting rate than
cube ice and bullet ice (normal
equipment characteristic).
2. Ice Basket zone has insufficient
refrigeration and heat preserva-
tion performance.
Each unit undergoes a full-function
test with clean water before factory
shipment; residual small amount of
water is normal post-test residue.
This is a normal condition, and the unit can
be put into normal use.
This is a normal phenomenon. It is recom-
mended to use the ice promptly or transfer
it to a refrigerator for cold storage.
Excessive Ice
Melting
Water Stains
on/Inside the Unit
WARNING
09

Problem Possible Causes Solution
Noise During
Ice-Making
(50-60dB)
Routine operational actions
(e.g., heat dissipation, water
pump operation, ice
shedding) during ice-mak-
ing generate noise within
this decibel range (normal
operational noise of the unit)
This is normal unit operation; no additional
action is required.
Retighten the bottom drain valve; if the
water leakage fault persists, contact
customer service.
System abnormality,
possibly caused by:
abnormal fan operation,
evaporator blocked by ice
cubes, internal scaling,
abnormal compressor
operation.
Louder Noise
During Ice-Making
1. Bottom drain valve is
not fully tightened.
2. Internal pipeline
malfunction.
Water Leakage
1. Fill the lower water tank up to the MAX
water level mark.
2. Press the “ICE MAKING” function button
to switch to standby mode.
3. Press the “ICE MAKING” function button
again to restart the ice-making cycle.
Insufficient water in the
tank during the ice-mak-
ing cycle.
“ADD WATER”
Icon Remains
Illuminated
Let the unit stand for at least 2 hours, then
reconnect the power supply and conduct
continuous testing for more than 30
minutes; if the fault persists, contact
customer service.
Let the unit stand for at least 2 hours, then
reconnect the power supply and conduct
continuous testing for more than 30
minutes; if the fault persists, contact
customer service.
1. Refrigeration system
has not stabilized.
2. Internal equipment
malfunction.
1. Evaporator is jammed
by ice cubes internally.
2. Internal equipment
malfunction.
Internal unit malfunction.
Please contact customer service for
assistance.
Unit Powered On
But Fails to
Produce Ice
Normally
All Indicator
Lights Flash
Simultaneously
E1 Error
1. Ensure the ice maker is placed vertically
on a flat, clean surface, with no less than 6
inches of space reserved on both sides
and the back of the unit.
2. Check if the rear fan is blocked by
foreign objects; clean the blockage
promptly if present.
3. Run the unit’s self-cleaning cycle to
remove frozen components; it is recom-
mended to use a descaling agent for deep
cleaning.
10

Certifications
This symbol, affixed to the product or its packaging, indicates that the product
must not be processed with household waste. It must be brought to an electric
or electronic waste collection point for recycling and disposal. By ensuring the
appropriate disposal of this product you also help in preventing potentially negative
consequences for the environment and human health. The recycling of materials
helps preserve our natural resources. For further information regarding the recycling
of this product, please contact your municipality, local waste disposal centre or the
store where the product was purchased.
Product Name: Typhur Fast Nugget Ice Maker
Model Number: CM03
Supplier’s Name: Typhur Inc.
Supplier’s Address (USA): 2860 Zanker Road, Suite 105, San Jose, CA 95134
Supplier’s Email: allen.f@typhur.com
Please contact our Customer Support Team if you have any questions.
:
1(888) 838-6563(USA)
: support@typhur.com
: support.typhur.com
Typhur Privacy Statement
We value your privacy and personal data rights, and we, Typhur Inc. is the entity
responsible for the collection, use, and disclosure of information under our Privacy
Statement. For more details, please visit https://www.typhur.com/privacy-statement.
Terms of Service
For details about Typhur Terms of Service, please visit
https://www.typhur.com/terms-of-service
Refund & Return Policy
Typhur has a 30 calendar day hassle-free return policy. For more details please visit
https://www.typhur.com/refund-and-return
Warranty
Full details are stated in Typhur's warranty policy at https://www.typhur.com/warranty
Support
11

Model: CM03
