
2
Mirror Dash Cam G890
User Manual
V03

IC warning:
This device contains licence-exempt transmitter(s)/receiver(s)/ that comply with Innovation Science and
Economic Development Canada's licence-exempt RSS(s). Operation is subject to the following two conditions:
1. This device not cause interference.
2. This device must accept any interference, including interference that may cause undesired operation of the
device.
Radiation Exposure: This equipment complies with Canada radiation exposure limits set forth for an
uncontrolled environment. To maintain compliance with IC's RF Exposure guidelines, this equipment should be
installed and operated with minimum distance of 20cm the radiator your body. This device and its antenna(s)
must not be co-located or operation in conjunction with any other antenna or transmitter.
Déclaration de l'ISED Canada:
Cet appareil contient des tasmittre (s) / récepteur (s) sans licence / conformes à l'innovationRSS exemptes de
licence de Sciences et Développement économique Canada. L'opération est sous réserve des deux conditions
suivantes:
1. Cet appareil ne peut pas causer d'interférences et
.
2. Cet dispositif doit accepter toute interférence, y compris peut provoquer le fonctionnement indésirable de
l'appareil.
Exposition aux rayonnements : Cet équipement est conforme aux radiations du Canada limites d'exposition
pour un environnement incontrôlé noncé d'exposition RF Pour maintenir le respect des guides d'exposition RF
d'IC, cquipment doit être.installé et actionné avec une distance minimale de 20cm le radiateur de votre corps.
Cet appareil et ses antennes ne doivent pas être co-localisé ou en opération en conjonction avec toute autre
antenne ou émetteur.

01
CONTENT
Precautions
Specification
Package Contents
Installation
Wiring Introduction
Product Overview
Settings
Data Playback
Play on Computer
Trouble Shooting
Customer Support
02
04
05
07
15
22
23
36
38
38
39

02
Please read this manual carefully before operation and keep it for future reference. It will be
helpful should you encounter any operational problem.
Improper installation will void the manufacturer's warranty. The installation instructions
do not apply to all types of vehicles and are written as guidelines to assist in installing the
system.
Consult an experienced technician if you are not comfortable installing the product.
Please make sure to read and understand call local laws and regulations regarding cameras
and their use in a vehicle. Laws vary by state.
Do not obscure the view of the road ahead or impede the deployment of any airbags in the
event of an accident.
When not in use, please disconnect the car adaptor from both the12/24V DC outlet in your
vehicle and the device itself.
Precautions

03
Only clean the device with a soft dry cloth, for tough dirt, apply some neutral detergent
diluted in 5 to 6 parts water to a soft cloth.
Note that alcohol, thinner, benzene, etc could cause damage to the paint or coatings.
Avoid making contact with the Lens as damage may be caused.
The video recordings made by this Digital Video Recorder are intended for personal use
only.
Whilst driving, do not adjust the controls of your device as this is a distraction to driving.

04
Specification
Item Name
Model
Screen Size
Display Resolution
Recording Resolution
Lens
Recording Format
Photo Format
Memory Card
Storage Temperature
Operating Temperature
Product Weight
Item Dimension
Input
Output
WOLFBOX G890
12" IPS Touch Screen
1480 x 320
JPEG
Micro SD card 32G-512G U1
-22°F~176°F
-4°F ~158°F
3.76 lb
11.4 x 2.8 x 1.2 (in)
DC 12V
DC 5V - 3A
12" Stream Media Mirror Dash
Cam with 3 Channels
Front Camera: 2560×1440
Internal Camera: 1920 x 1080
Rear Camera: 1920 x 1080
Front Camera: F1.55 136°
Internal Camera: F1.8 140°
Rear Camera: F1.8 140°
MP4
05
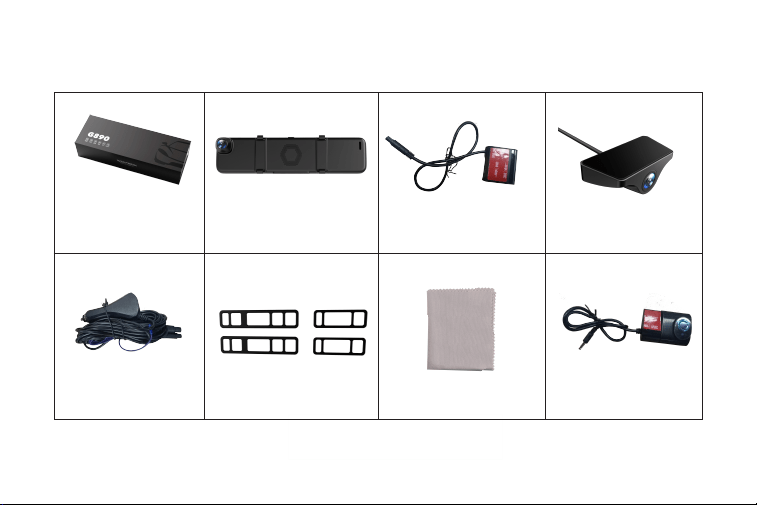
Package Contents
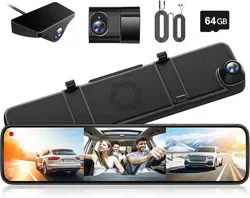
WolfBox G890
Mirror dash cam
Package contents
Car Charger
Rubber Strap x 4
Cleaning Cloth Internal Camera
Rear Camera
Docking station
06
Rear Camera Cable
Car Wire Trim Tool
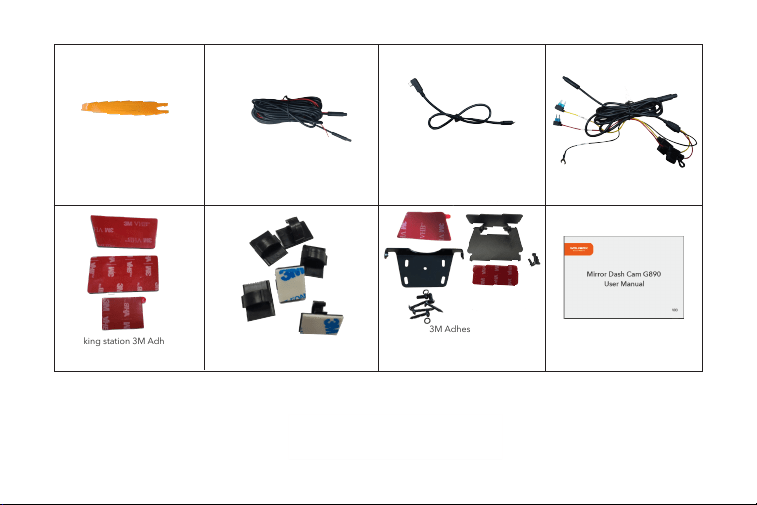
1 Docking station 3M Adhesive * 1
3 Internal Camera 3M Adhesive * 1
2 Rear Camera 3M Adhesive * 1
3M Adhesive x 2
Internal rear camera bracket * 1
Screws x 4
Outside rear camera bracket * 1
Cable Clips * 6
Hardware Kit
Type-c Power Cable
User Manual * 1

07
Installation
Warning
Please MAKE SURE to connect all cameras and wires BEFORE power ON the Mirror Screen,
otherwise, the camera cannot work properly.
Please follow the instructions below for the first-time installation of the Stream Media Mirror
Dash Camera. It is designed to be fitted to the existing rear-view mirror using the straps.
Insert Micro SD Card
Insert the Micro SD Card into the stream media mirror dash camera, taking care that the gold
contacts are facing towards the backside of the stream media mirror dash camera. Push the
memory card until it clicks into the slot.

08
Insert Micro SD Card
Notice:
Notice:Use your nail to push the memory card into a slot if required. Take care that the card
has clicked into the slot, a second push inwards will release the memory card.
Do not remove or insert the memory card when the Mirror Dash Cam is turned on. This may
damage the memory card.
Take care when removing the SD card from the Mirror Dash Cam when it is installed in the
vehicle. Due to the card slot mechanism, the card will spring from the slot when released.
Periodically reformat the memory card. Every 2-3 weeks we recommend that you reformat
the memory card. Please do this after you've downloaded any files from the SD card that you
may want to keep, as formatting the card will remove all content.
Format your memory card using the Mirror Dash Cam. This will make sure that the card is
structured specifically for your camera.
Press to enter into the setting and choose the Format Card option to follow the
on-screen instructions accordingly.
09
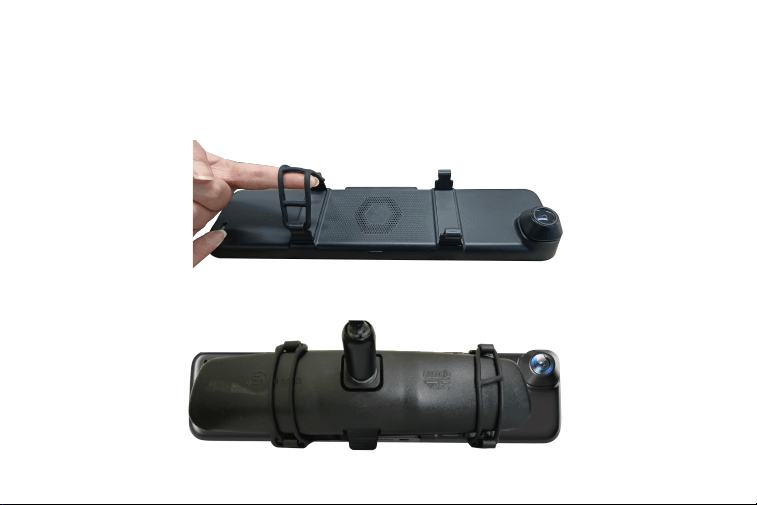
Mount the Mirror Dash Cam
Step 1: Attach the upper end of the straps to the retaining hooks on the top of the rear-view
mirror.
Step 2: Extend the straps around the back of the rear-view mirror and attach them to the
bottom retaining hooks.

10
The straps have been designed so they can be cut down to give further size options, as
required.
The straps should be a tight fit when fitted, thus ensuring the Stream Media Mirror Dash
Camera is securely fitted to the existing rear-view mirror.
Notice:
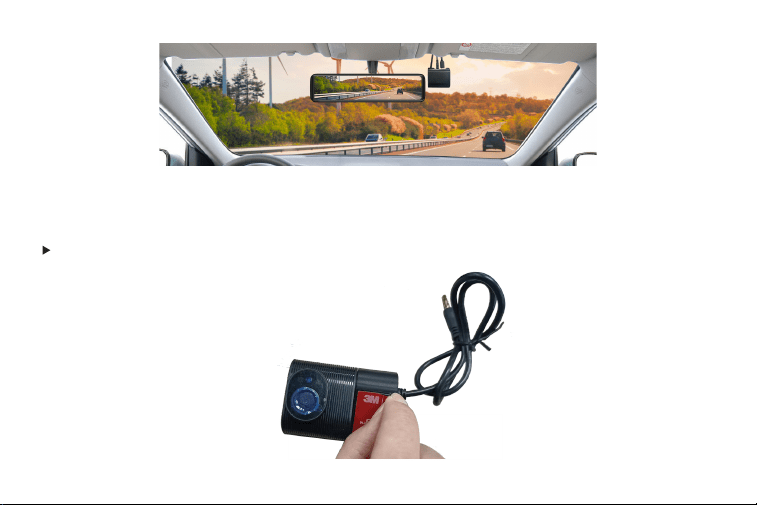
Docking Station Installation (As shown in illustration)
step 1: Take the docking station out of the box, and tear off 3M adhesive of it. Then please affix
it to the front windshield.
step 2: After installed, please link the host of G890 with docking station.
Please pay attention to that interface of the dock should be upward.
11
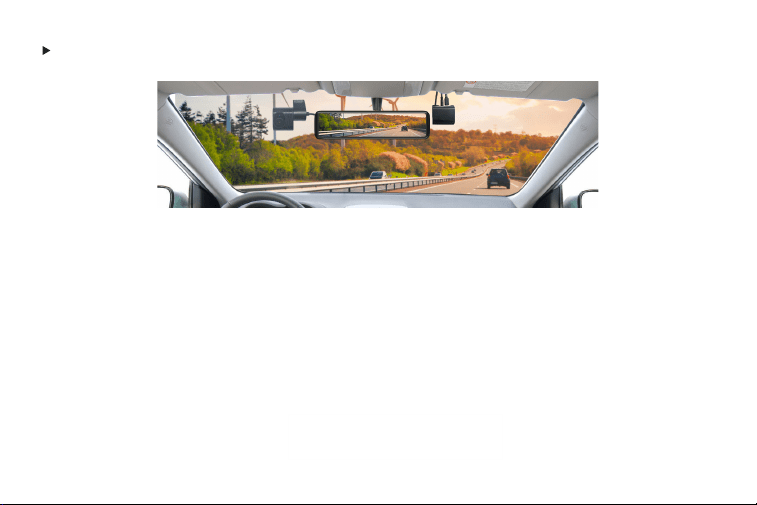
Camera Installation
Uncover the 3M tape protective film and lens protective film of the front camera and the
internal camera.
12
Attach the internal camera to a suitable position on the front windshield.
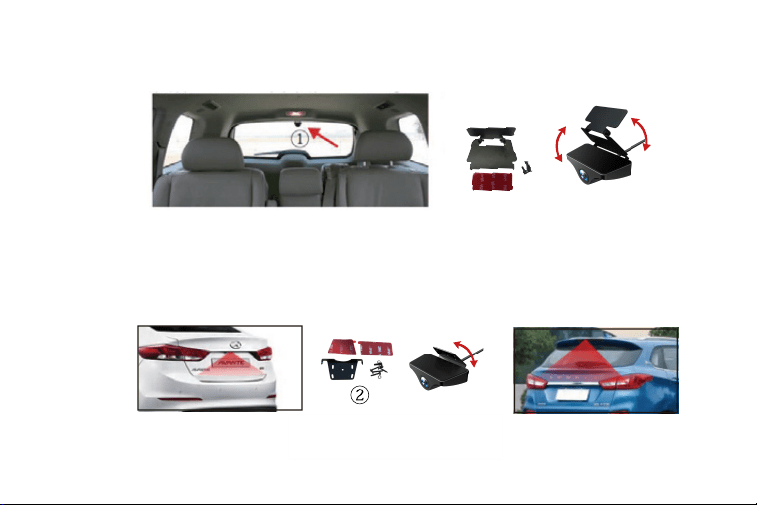
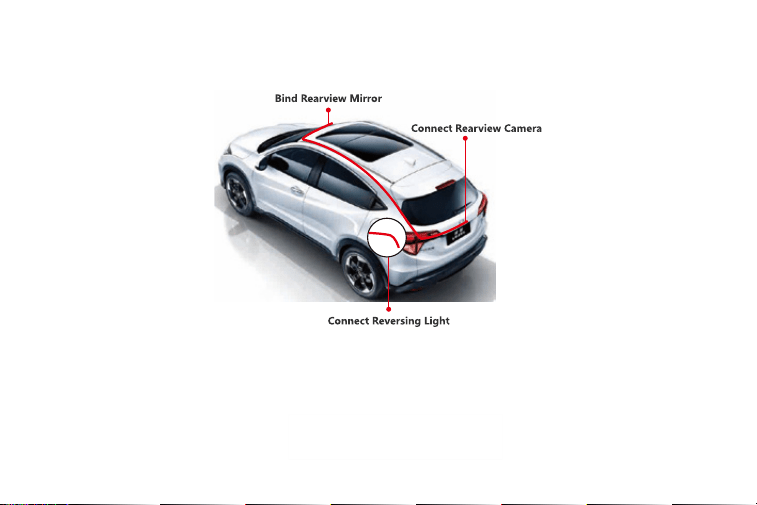
Rear Camera Installation
Use the provided double-sided tape or screws to fix rear camera. The angle can be adjusted,
so be sure to find a perfect viewing angle for your camera before fix it.
13
Install inside the car
Please choose type 1 bracket to mount the rear camera if you'd like to install it inside your
vehicle.
Install outside the vehicle
Please choose type 2 bracket to mount the rear camera if you'd like to install it outside your
vehicle.

14
Rear Camera Installation
Notice:
Make the connection first and ensure the machine work well before installing.
Keep away with the driving operation and the active part of the car. Do not get caught by
screws or seat gaps.
When drilling holes in car, please do not break the vibrator, tank and wires.
Before attaching the double-sided tape, please remove stain or oil with alcohol cleaner from
the surface.
When temperature is low, please warm up the mounting surface with dryer, in order to
improve the adhesion before sticking.
The provided 3M sticker cannot be reused, or the adhesion will not be strong enough.
Do not disassemble or change any part of this product, this will not be covered by warranty.
15
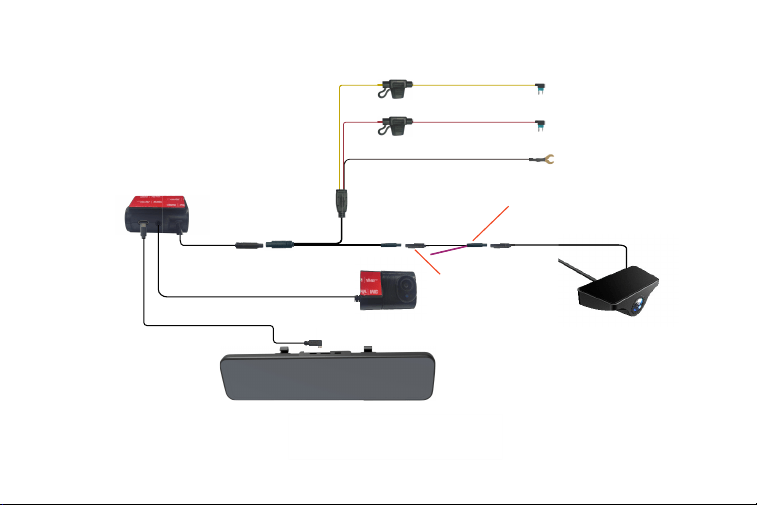
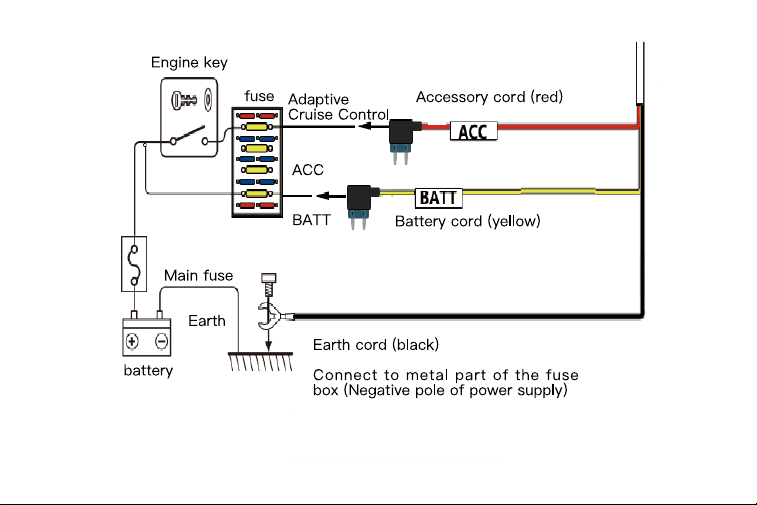
Wiring Introduction
NOTICE: The purple line in the picture refers to the reversing light line.
Connect the red trigger wire to
the positive of the reversing lamp
Yellow: Constant Power
Red: ACC Power
Black: Attach to the Grounding
Docking Station
Type-c Power Cable
4 pin Interface
8 pin Interface
Internal Camera Rear Camera
Rear camera cable
16

17
Insert Red, Yellow & Black Cables
a. Yellow cable (BATT/B+)
The yellow wire should be connected to the constant power supply in the car
fuse box.
Test method: Use a voltage tester to check the fuse slot to make sure it still has
power when the car's engine is turned off.
c. Black cable (GND)
Connect this black cable(GND) to the metal part of the vehicle. Most cars have
screws or metal parts next to the fuse box. Connect the black cable to the screw
or metal part. (As shown on the left).
b. Red cable (ACC)
The red wire should be connected to the ACC power supply in the car fuse box.
Test method: Use a voltage tester to check the fuse slot to make sure it has
power when the car's engine is on but no power when the engine is off.
18
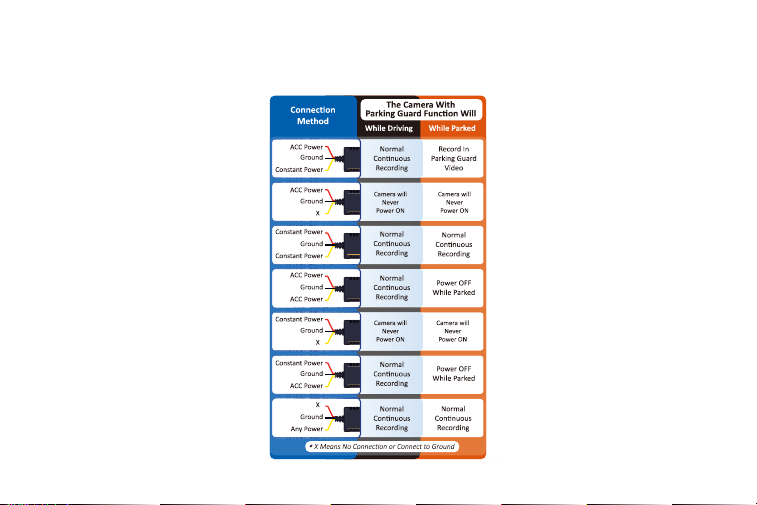
Universal Compatibility Chart

19
Attention
Before using this product, please read all precautions and instructions to ensure proper and
safe use.
If you have any questions about installation, please feel free to contact us.
Please install by professional installation personnel, if personal operation improper, resulting
in short circuit of car power, car battery damage, or car interior damage, the company is not
liable.
Loss caused by installation problems rather than quality problems of the product itself, the
company is not liable.
The working performance of the product is affected by the reliability of the automobile
power supply, automobile battery and main equipment. The product cannot be used
normally due to quality problems other than the product itself, the company is not liable.
Please use this product to the extent permitted by law.
20
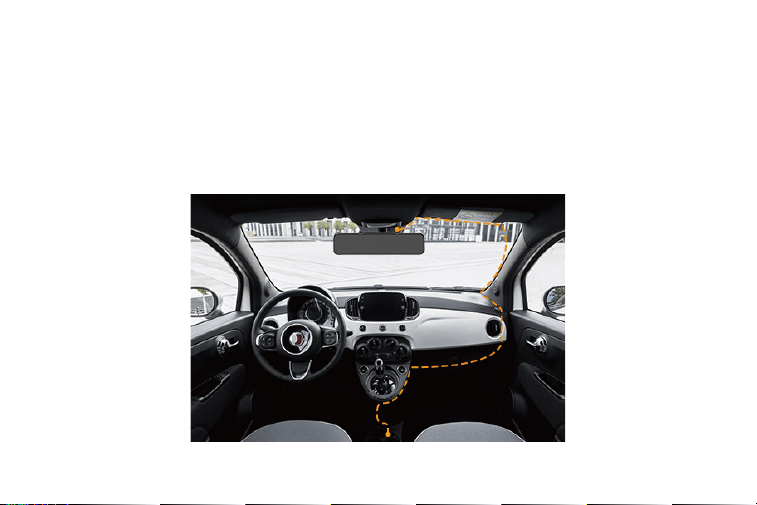
Wire Layout in the Vehicle
Step 1: Connect the car charger to the cigar socket.
Step2: After connecting the interior camera and the display screen, plug the interior camera
into the docking station. Please ensure that the docking station and the interior camera are
installed in the proper position of the front windshield.
21
Step3: Connect the interface of the rear cable with the interface of the docking station, and
hide the rear camera cable inside the vehicle.
Note: If wiring doesn't meet expectations for installation in the vehicle, cable clips can be used
to secure the cables installation as desired.
22
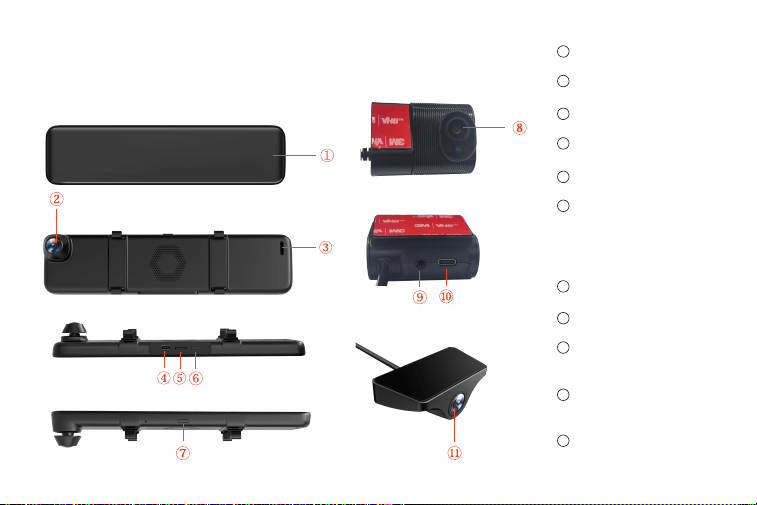
1
2
3
4
5
6
7
8
9
10
11
Screen
Front Camera
Speaker
Power supply port
Micro SD card slot
Power Button
Power Button
Internal Camera
Internal Camera
Interface
Docking Station
Power interface
Rear camera
Product Overview
Appearance Description
• Short press to switch off/
on the screen, long press
to switch off/on the power
23
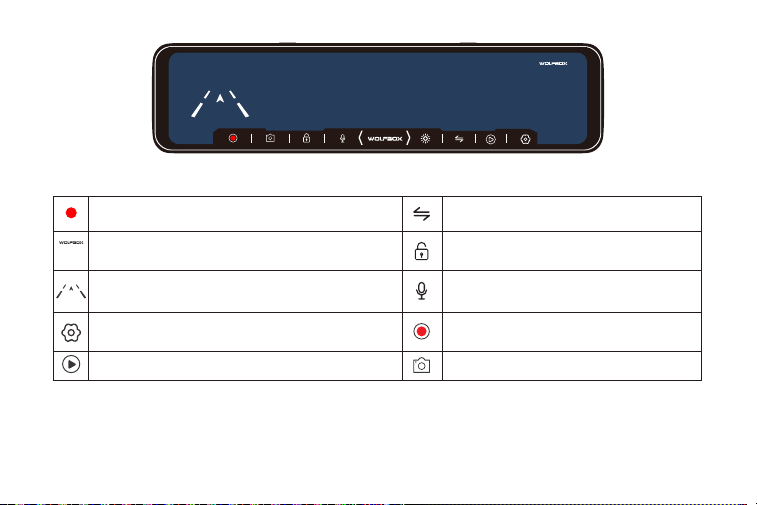
Notice: You need to pause recording before entering into settings.
21:10
03/12 Sun.
000 km/h
00:21
Recording status: During normal recording, it is red, turns
yellow while emergency recording
Click on it, the clock setting appears on the screen
GPS Status: Once gps antenna connected, the GPS
icon on the home screen will show
Menu Setting:Touch and enter to set the screen in
your favor (Please pause recording first)
Video/Photo Playback: Playback the video & Photo
Rear view/Front view switchable: Switch
between front view & rear view one moment
Emergency Lock: Lock videos as event files
so it won't be overwritten by loop recording
Sound Record is on
Start/Stop Recording: Record and save every
precious moment
Photograph: Take photos one moment
21:10
03/12 Sun.
000 km/h
24
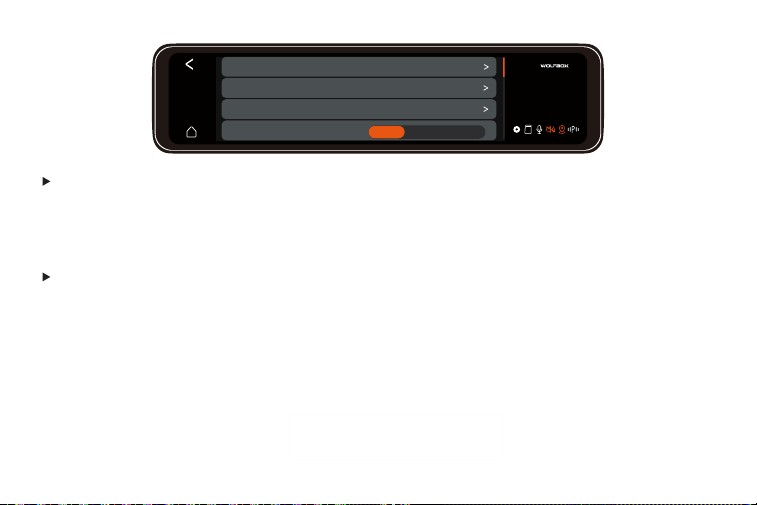
Language: Set the language, the default is English.
Automatically sets The Time By GPS: On/Off
Note: You can set the current time manually if this settings is off.
Time zone: Select the desired time zone.
24-Hour: On/Off
Time&Date:
Optional languages: English/Français/Español/Deutsch/ltaliano
/ 简体中文
/pyccKиЙ/
日本語
/
Polski.
21:10
03/12 Sun.
Timed formatting
Storage(0.3GB/29.5GB)
Time&Date
Language
Off 15Days 30Days
25
Storage(~GB/~GB): Format SD Card.
Time Formatting: Off/15Days/30Days (Default Off)
Format your SD card regularly to avoid running out of space for recording.
Note: 1The storage information of Free Space, Video, Photo and Cap are all here.
2Front storage means occupied, the latter means the total storage.
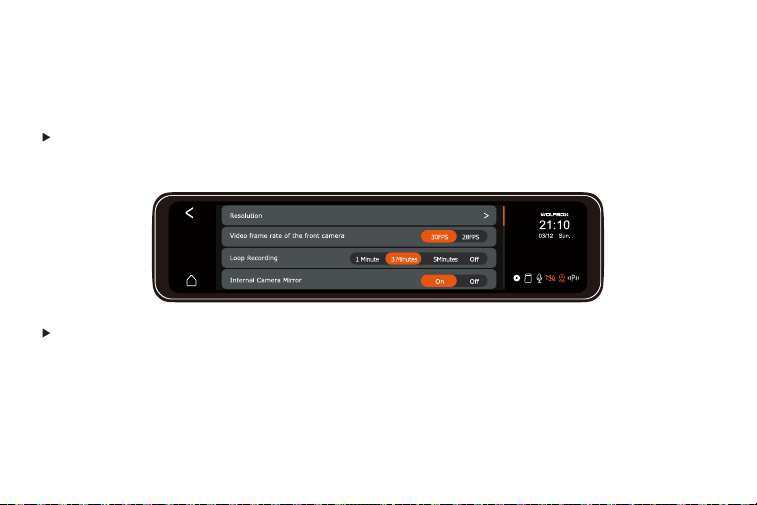
Resoultion: (2 resolution modes)
Front+Internal+Rear: 1440P+1080P+1080P/1080P+1080P+1080P
Front+Rear: 2160P+1080P/1440P+1080P/1080P+1080P
26
Video frame rate of the front camera: 30FPS/28FPS
Loop recording: 1minutes/3minutes/5minutes/OFF
Internal Camera Mirror: On/Off (Default On)
Note: Turn it on, the recording image of internal camera wiil be shown on the screen.
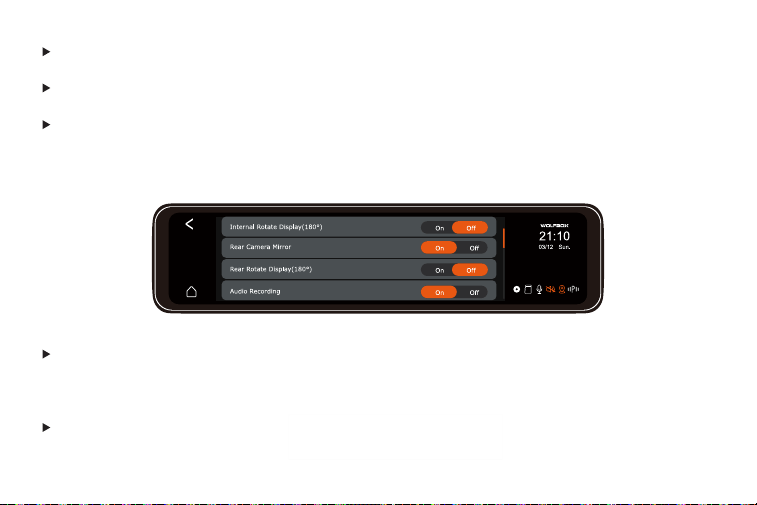
Internal Rotate Display(180°): On/Off (Default Off)
Rear Camera Mirror: On/Off (Default On)
Note: Turn it on, the recording screen of internal camera will be adjusted to 180°.
27
Note:Turn it on, the recording image of rear camera will be shown on the screen.
Audio Recording: System will start audio recording automatically once turned on.
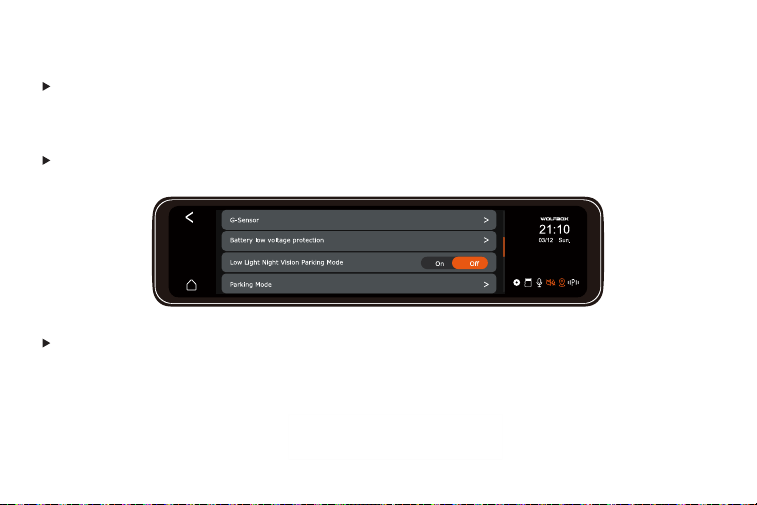
G-Sensor: Select the sensitivity of the G-Sensor or turn it off. The locked files will not be over
written. Please copy important locked files to your computer for storage, and format the SD
card every two to three weeks.
Note: Turn it on, the recording screen of rear camera will be adjusted to 180°
Rear Rotate Display (180°): On/Off (Default Off)

28
Select the sensitivity of G-Sensor. (Each directions included)
Forward and Backward:1/2/3/4/5/Off
Leftward and Rightward:1/2/3/4/5/Off
Upward and Downward:1/2/3/4/5/Off
Note: Not support for 24V Battery
Battery Low Voltage Protection: 12V Car Protection Voltage: 11.8V/12V/12.4V
Mode Introduction:
1. When plugged by hardware kit, the unit will automatically adjust to battery.
2. When the battery of vehicle reaches the certain protection, it will be shut down immediately.
Low Light Night Vision Parking Mode: On/Off
Note: The highest sensitivity of G-Sensor is 5 level.

29
Mode introduction:
In order to ensure the safety of parking at night, this product adopts low-light night vision
function, which effectively enhances the night vision effect in parking mode. The lens of front
camera will be adjusted and operate automatically when entering the parking lot.
Parking Mode:
Collision Detection: On/Off. When turning on, you can set its sensitivity (1/2/3/4/5)
Low Framerate Mode: Set turn/off. This mode is set to enable further debugging mode options.
Mode introduction: It wiII record time-Iapse video at 1FPS/3FPS/5FPS/10FPS recording one
frame with in 4/8/12/24/Unlimited hours after parking.
The frame rate of Parking monitoring video: 1/3/5/10FPS
Motion Detection: On/Off.

30
Mode introduction:
In the parking monitoring mode, the front camera will automatically capture the movement
changes in front, and load the first 5 seconds of motion detection into the motion detection
video, and the video will be set to 30 seconds.
Note:1 Turning off the DASH CAM manually will cause this mode to turn off.
2This mode will be ceased automatically when the recording is enabled normally.
The sensitivity of Motion detection: Low/Medium/High
Parking Recording Duration: 4H/8H/12H/24H/Unlimited
31
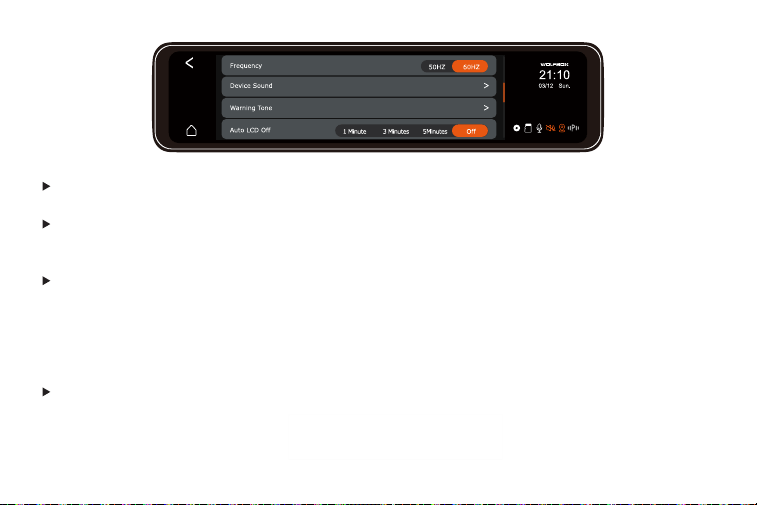
Frequency: 50HZ/60HZ
Device Sound: Off/Low/Medium/High (Default Medium)
Set the sound of the host, including the sound of startup, prompt, button, and video playback.
Warning Tone: (Default ON)
Format Reminder Setup: On/Off
Video Locked Prompt Tone: On/Off
Abnormal Video Recording Stopped Prompt Tone: On/Off
Keys Sound: On/off
Auto LCD OFF: (Set screen saver time)
-1 minute/3minutes/5minutes
-Off (Set to OFF, the screen will keep on)
32
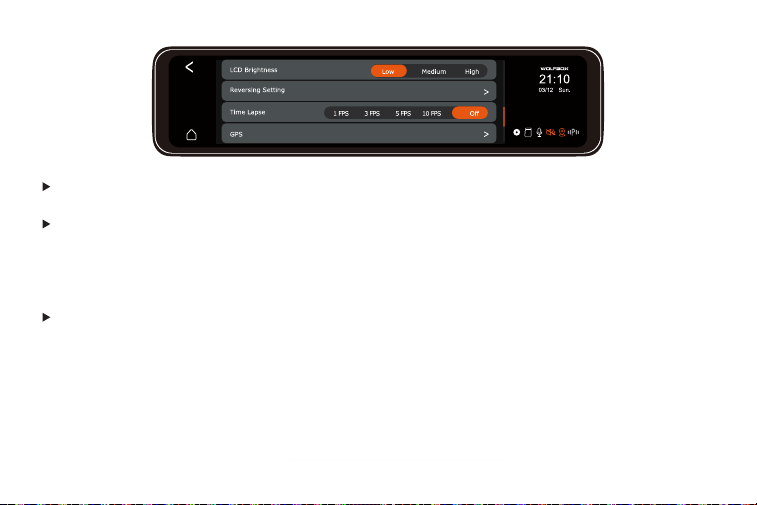
LCD Brightness: Low/Medium/High
Reversing Setting:
Reverse aid line: On/Off
Reverse Preview Seetings: You can adjust the reverse line in this settings. (zoom in and out,
lengthen and shorten, widen and narrow)
Time Lapse: 1FPS/3FPS/5FPS/10FPS/Off
Note: Set the frame rate of the time-lapse recording of the video.
33
GPS:On/Off (Default On.)
Speed Unit: kmh/mph
GPS Information: Longitude and Latitude
Speed
GPS State (You can check these info here)
Stamp: Date/Time Stamp: On/Off
Speed Stamp: On/Off
GPS Location Stamp: On/Off
Default Settings: Restore the initial settings.
21:10
03/12 Sun.
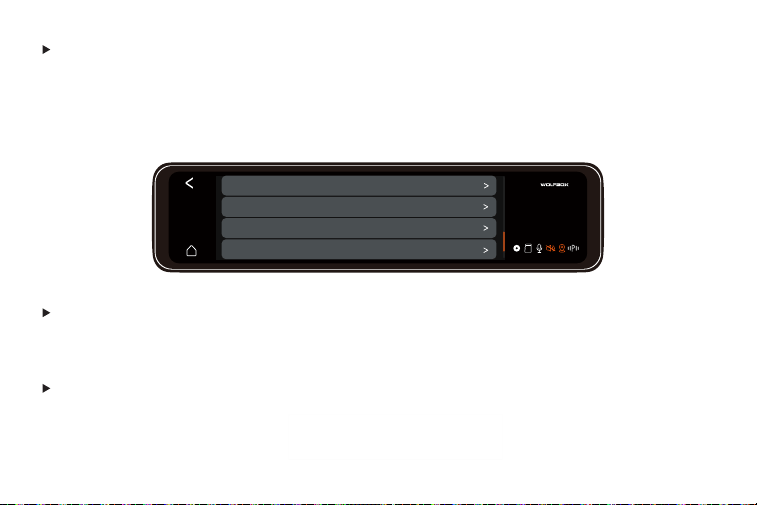
Help Center
System Info
Default Settings
Stamp
34
System Info: Model
Software
Website
MCU Version(You can check these info here )
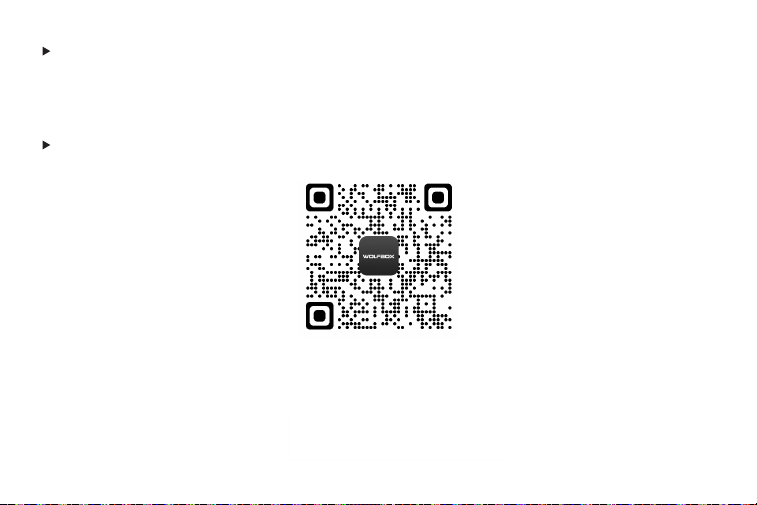
Help Center: WolfBox after-sales service QR code
https://wolfbox.com/contact-us/
35
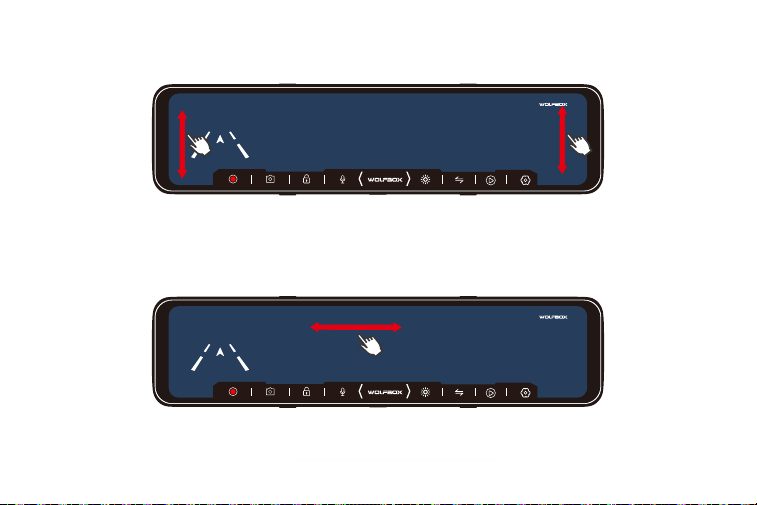
Brightness and visual angle Adjustment:
On the LEFT side of the screen: Slide up and down to adjust the angle of view.
On the RIGHT side of the screen: Slide up and down to adjust the brightness.
Anywhere on the screen: Swipe the screen left or right to switch between front view, rear view,
or split-screen view.
21:10
03/12 Sun.
000 km/h
00:21
21:10
03/12 Sun.
000 km/h
00:21
36
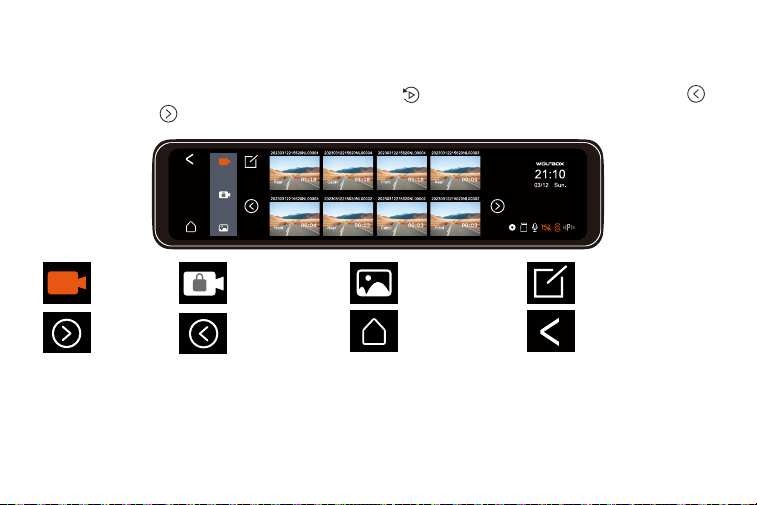
Data Playback
To select a video or photo for playback, press the button. Press the icons of left arrow
and right arrow to switch the list and then select the desired video to start playback.
Video
Left Switch
Lock Video
Right Switch
Photo
Home Screen Return
Video Selection
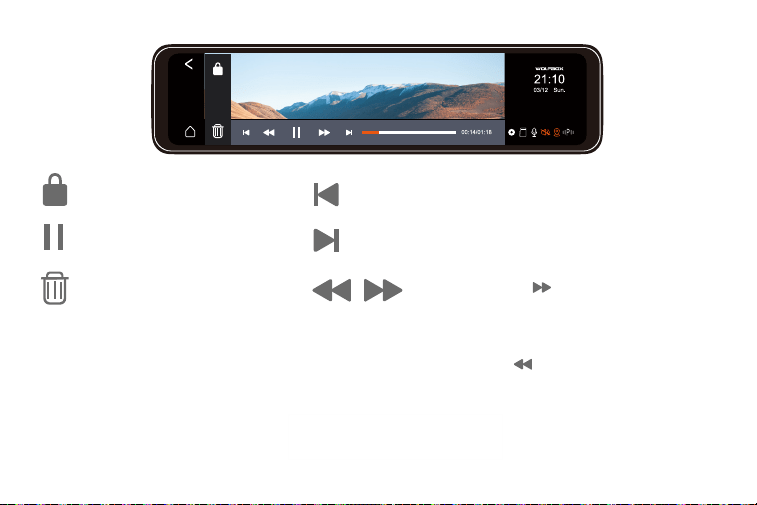
37
Lock/Unlock the file.
Start or pause the playback.
Display the previous photo/video.
Display the next photo/video.
Delete the file.
Note: Click the icon once to
accelerate the playback speed by 2
times,
and click the icon once to reduce the
playback speed by 2 times.
Increase or decrease the speed up to 8
times.
38
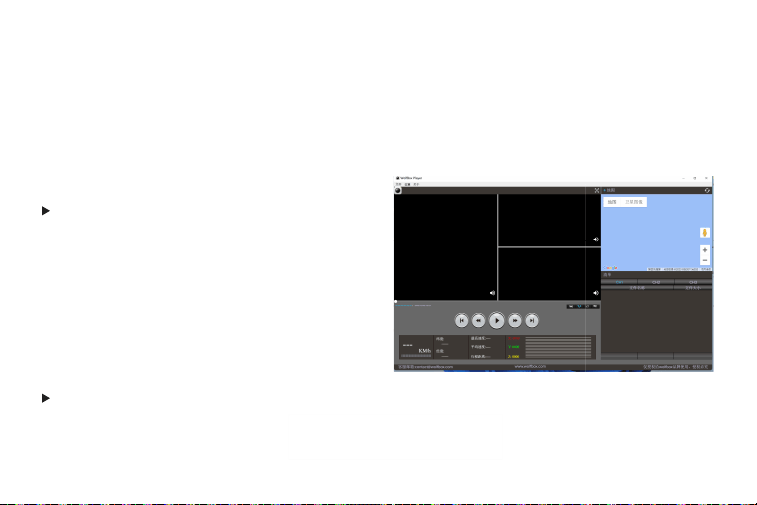
Play on Computer
Correct Video Player to Play 4K Videos
We recommend GPS Media player which can view google maps. You can get it free. Mac/Win
Version Download
:
https://wolfbox.com/gps-player/
CAUTION:
If you encounter problems during use, please
CONTACT US.
Trouble Shooting
The power does not turn on
Please check that the cigarette power cable is not damaged, and whether the indicator light of
the cigar plug is on.

39
The power is on but this device can not be turned on
When checking that the cigarette plug power supply is right in place, please long press the
power button to see whether it is turn on. If it still cannot be turned on, please reset it.
Stop recording as soon as it start recording
Please check that the mirco SD Card is inserted, and the capacity of the Micro SD card.
Time display is incorrect after setting
Please ensure to choose the correct time zone when GPS antenna is connected.
Warranty & Support
Warranty
All dashcams come with a 12-month manufacturer warranty, and all accessories come with a
90-day manufacturer warranty. This warranty is to cover manufacturer defects and does not
apply to the mistreatment or mishandling of the dashcam.
40
Support
If you have any questions about the product functions or installation, please feel free to contact
us through amazon or [email protected]. Your inquiries will be answered within 6-12 hours
of the working day.
Your opinion matters
We work hard day and night to improve the quality of our products,services and the user
experience. Please feel free to contact our company if you have any valuable suggestions for
product improvement. Expecting your contact.

41
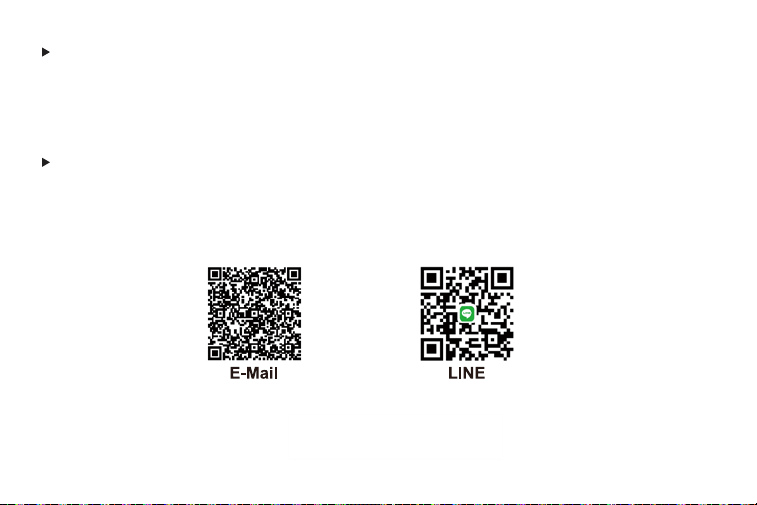
After-sales Support
E-mail: [email protected]
Customer Phone Service:
+1 888 296 8399
Business Day, Mon-Fri
6 AM-12 AM, 1 PM-8 PM
EST (GMT-4)
Check us out here!
We have professional customer service!
E-mail: [email protected]
Phone: +1 888 296 8399