
SCC 1000BK
EN
MULTI-CAPSULE COFFEE MACHINE
3 IN 1
Translation of the original manual
SCC 1000BK
A
1
2
11
12
13
14
15
16
10
9
8
6
5
3 4
7
B
1
2
3
4
5
6
7
8 9 10
C
1
2
6
7
10
3
4
5
8
11
9
13
12
D
E

- 1 -
05/2025
2025, .
EN
Multi-Capsule Coffee Machine 3 in 1
User Manual
Important Safety Instructions
READ CAREFULLY AND STORE FOR FUTURE
USE.
• Children aged 8 and above may use this appliance if
they are supervised or instructed in the safe use of the
appliance and understand the potential hazards.
• Children must not play with the appliance.
• Cleaning and user maintenance must not be carried out
by children unless they are over 8 years old and under
supervision.
• Keep the appliance and its power cord out of the reach of
children under 8 years of age.
• The appliance may be used by persons with reduced
physical, sensory or mental abilities or lack of experience
and knowledge, provided they are supervised or have
been instructed on the safe use of the appliance and
understand the potential hazards.
• If the power cord is damaged, have it replaced in
aprofessional service centre in order to prevent
adangerous situation. Never use the appliance if the
power cord is damaged.
• This appliance is intended for household use. It is also
suitable for personal non-commercial use in spaces such
as:
– kitchenettes in shops, offices and other workplaces;
– agricultural premises;
- 2 -
05/2025
2025, .
– hotels, motels and other residential premises;
– bed and breakfast establishments.
• The appliance must not be immersed in water when it is
being cleaned.
WARNING:
Prevent the plug from getting wet.
Clean the surfaces that come into contact with water
according to the instructions in this manual.
WARNING:
There is arisk of injury if used incorrectly.
The surface of the heating element contains residual
heat after use.
The appliance must not be placed in acabinet when
in use.
• Before connecting the appliance to apower socket, make sure that its nominal voltage indicated on the rating plate matches the electrical voltage of
the socket.
• Connect the appliance only to aproperly earthed socket. For safety reasons, we do not recommend using adaptors or extension cables.
• Do not place the appliance on windowsills, sink drain trays or unstable surfaces. Always place the appliance on astable, flat and dry surface.
• Do not place the appliance on an electric or gas stove or near an open flame.
• Never use the appliance in the immediate vicinity of abath, shower or swimming pool.
• The appliance is designed for brewing coffee. Use the appliance only for its intended purpose.
• Do not use the appliance outdoors.
• Use the appliance according to the instructions in this user manual. Failure to do so may result in injury, damage to the appliance, or ahazardous
situation.
• Leave at least 15 cm of free space around and above the appliance to ensure proper air circulation during operation.
• Do not use the top surface of the appliance to store other items.
• Fill the water tank with clean, cold water. Do not pour heated water or other liquids into the tank or insert any objects into it.
• Before turning on the appliance, make sure that:
– the drip tray and grille are in place;
– the water tank is filled with asufficient amount of water and is properly in place. The water level must not exceed the maximum mark.
• Never operate the appliance with an empty water tank. This can damage the appliance.
• Take extra care when operating the appliance to avoid scalding with hot water or steam.
• Regularly check the water level in the tank while using the appliance. If the water level drops below the minimum mark, refill the tank according to
the instructions in this manual.
• Above the adaptor inside the appliance there is asharp needle that is used to pierce the coffee capsule. Take extra care to avoid injury. Do not put
your hands inside the appliance when the holder is removed.
• Be careful when handling the full drip tray. The water can be hot and there is arisk of scalding or burns.
• Do not move the appliance when there is acup of coffee on the drip tray grille or cups on the surface for heating them up.
• Ensure that the power cable does not come into contact with hot surfaces.
• Unplug the appliance from the power socket by pulling on the plug, not the power cable. Otherwise, you may damage the power cable or the
socket.
• Make sure that the power cable and plug do not come into contact with water or other fluids.
• Fully unwind the power cord before use.
• Do not let the power cord hang over the edge of atable or worktop, touch hot surfaces, or become tangled. Do not place heavy objects on the power
cord.
- 3 -
05/2025
2025, .
• For safety reasons, we recommend connecting the appliance in an independent electrical circuit separated from other appliances. Do not use multi-
plug adapters or extension cords to connect the appliance to the mains.
• To prevent electric shock, do not immerse the appliance, its base or the power cord in water or other liquids.
. . . . . . . . . . . . . . . . . . . . . . . . . . . . . . . . . . . . . . . . . . . . . . . . . . . . . . . . . . . . . . . . . . . . . . . . . . . . . . . . . . . . . . . . . . . . . . . . . . . . . . . . . . . . . . . . . . . . . . . . . . . . . . . . . . . . . . . . . . . .
EXPLANATION OF SYMBOLS PLACED ON THE PRODUCT OR INTHE ACCOMPANYING DOCUMENTATION
The product meets all the basic requirements of the applicable EU directives.
This symbol on products or original documents means that used electric or electronic products must not be added to ordinary municipal
waste.
. . . . . . . . . . . . . . . . . . . . . . . . . . . . . . . . . . . . . . . . . . . . . . . . . . . . . . . . . . . . . . . . . . . . . . . . . . . . . . . . . . . . . . . . . . . . . . . . . . . . . . . . . . . . . . . . . . . . . . . . . . . . . . . . . . . . . . . . . . . .
- 4 -
05/2025
2025, .
EN
Multi-Capsule Coffee Machine 3 in 1
User Manual
• Thank you for purchasing our SENCOR product; we hope it will serve
to your satisfaction.
• Before using the product, please familiarise yourself with the user
manual, even if you are already acquainted with similar products. Use
the product only as described in this user manual. Keep the manual
for future reference. If you pass the product on to someone else,
ensure the manual is included.
• Carefully unpack the product and take care not to discard any part
of the packaging until you have removed all the components. It is
recommended to keep the original packaging, packing material,
receipt and confirmation of the extent of the seller'sliability or warranty
certificate at least for the duration of the legal right to file defect claims
or the quality warranty. When transporting the product, it is advisable
to repack it in the original manufacturer’sbox.
. . . . . . . . . . . . . . . . . . . . . . . . . . . . . . . . . . . . . . . . . . . . . . . . . . . . . . . . . . . . . . . . . . . .
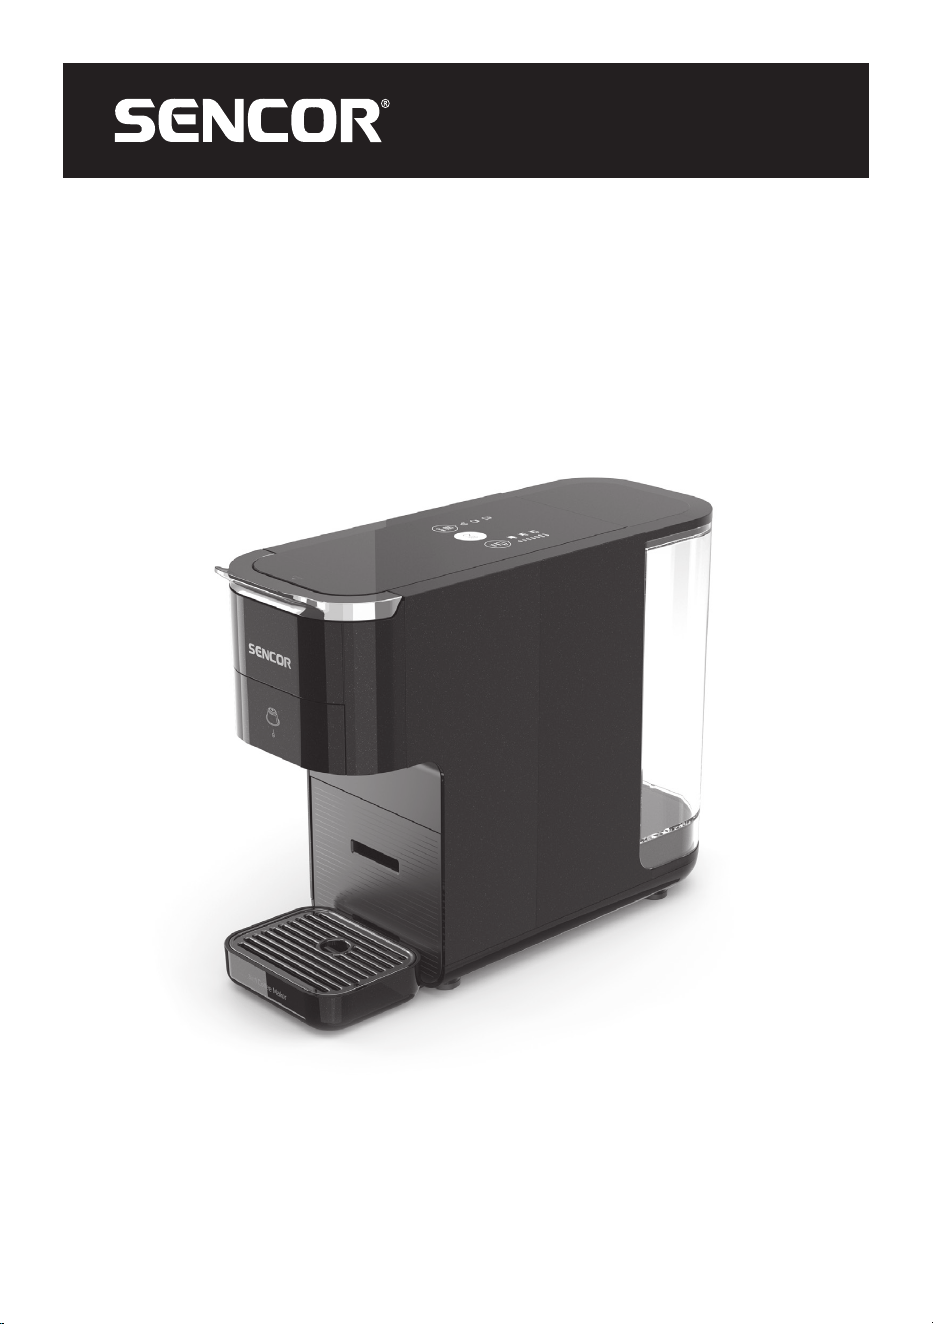
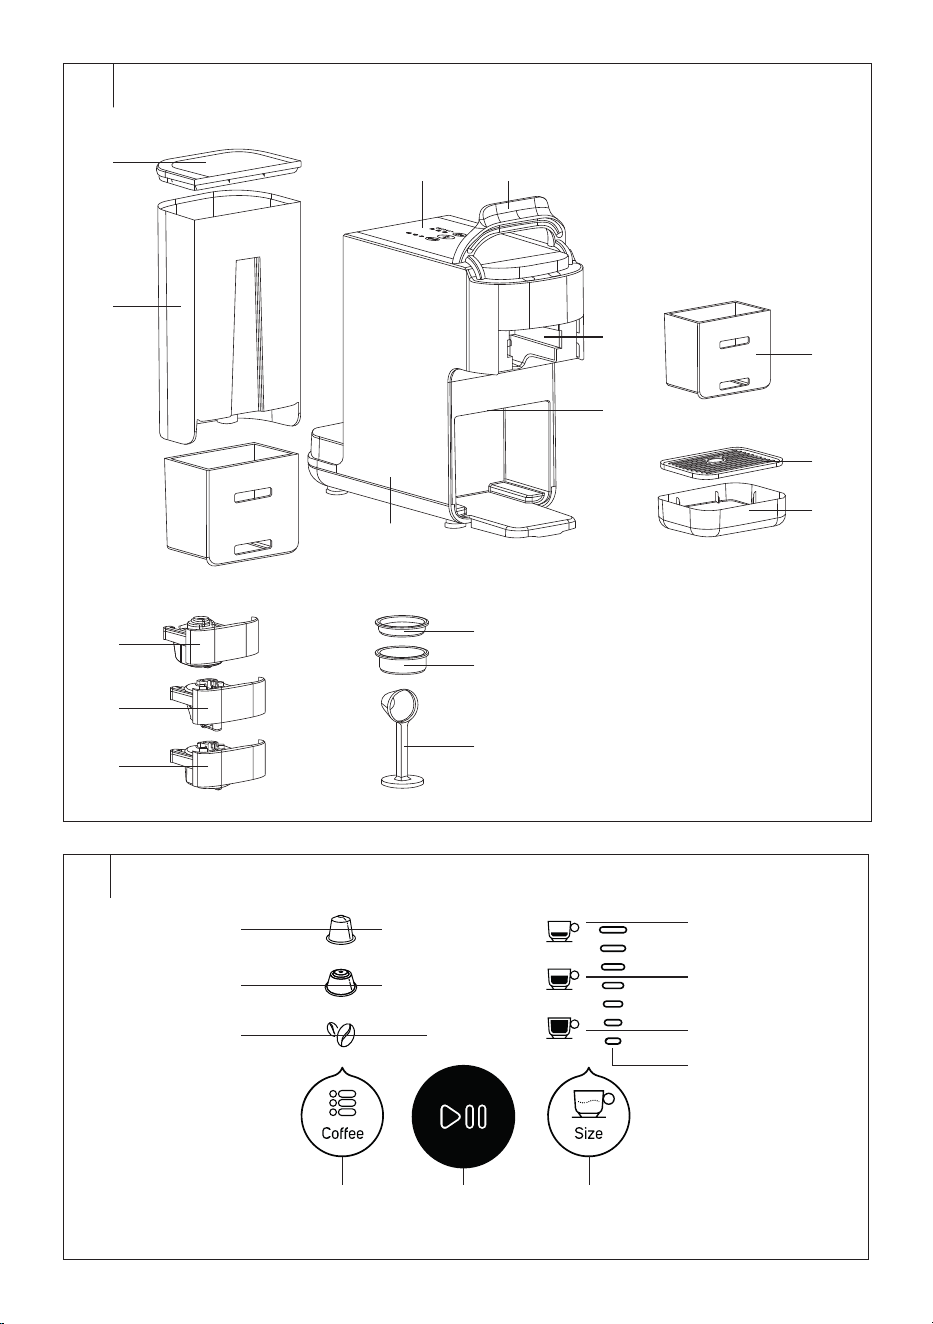
DESCRIPTION OF THE COFFEE MACHINE
A1 Water tank lid
A2 Water tank
A3 Control panel
A4 Locking handle
A5 Space for holder
A6 Coffee dispensing nozzle
A7 Coffee machine body
A8 Storage box
A9 Drip grille
A10 Drip tray
A11 Holder for Nespresso
®
Original* and similar capsules
A12 Holder for NESCAFÉ
®
Dolce
Gusto
®
* and similar capsules
A13 ESE pod / ground coffee
holder
A14 ESE pod filter
A15 Ground coffee filter
A16 Measuring cup / tamper
. . . . . . . . . . . . . . . . . . . . . . . . . . . . . . . . . . . . . . . . . . . . . . . . . . . . . . . . . . . . . . . . . . . .
DESCRIPTION OF THE CONTROL PANEL
B1 Nespresso
®
Original* capsule
icon
B2 NESCAFÉ
®
Dolce Gusto
®
*
capsule icon
B3 Ground coffee / ESE pod icon
B4 Single coffee icon
B5 Double coffee icon
B6 Lungo coffee icon
B7 Range of coffee volume icons
for NESCAFÉ
®
Dolce Gusto
®
*
capsules
B8 Coffee button toselect the
type of capsule holder
B9 button toswitch the coffee
machine on/off; to start/pause
coffee dispensing
B10 Size button toselect the type
of cup / amount of coffee
dispensed
• *Nespresso
®
Original andNESCAFÉ Dolce Gusto
®
are trademarks
of their respective third-party companies that are not affiliated with
FAST ČR, a.s.
. . . . . . . . . . . . . . . . . . . . . . . . . . . . . . . . . . . . . . . . . . . . . . . . . . . . . . . . . . . . . . . . . . . .
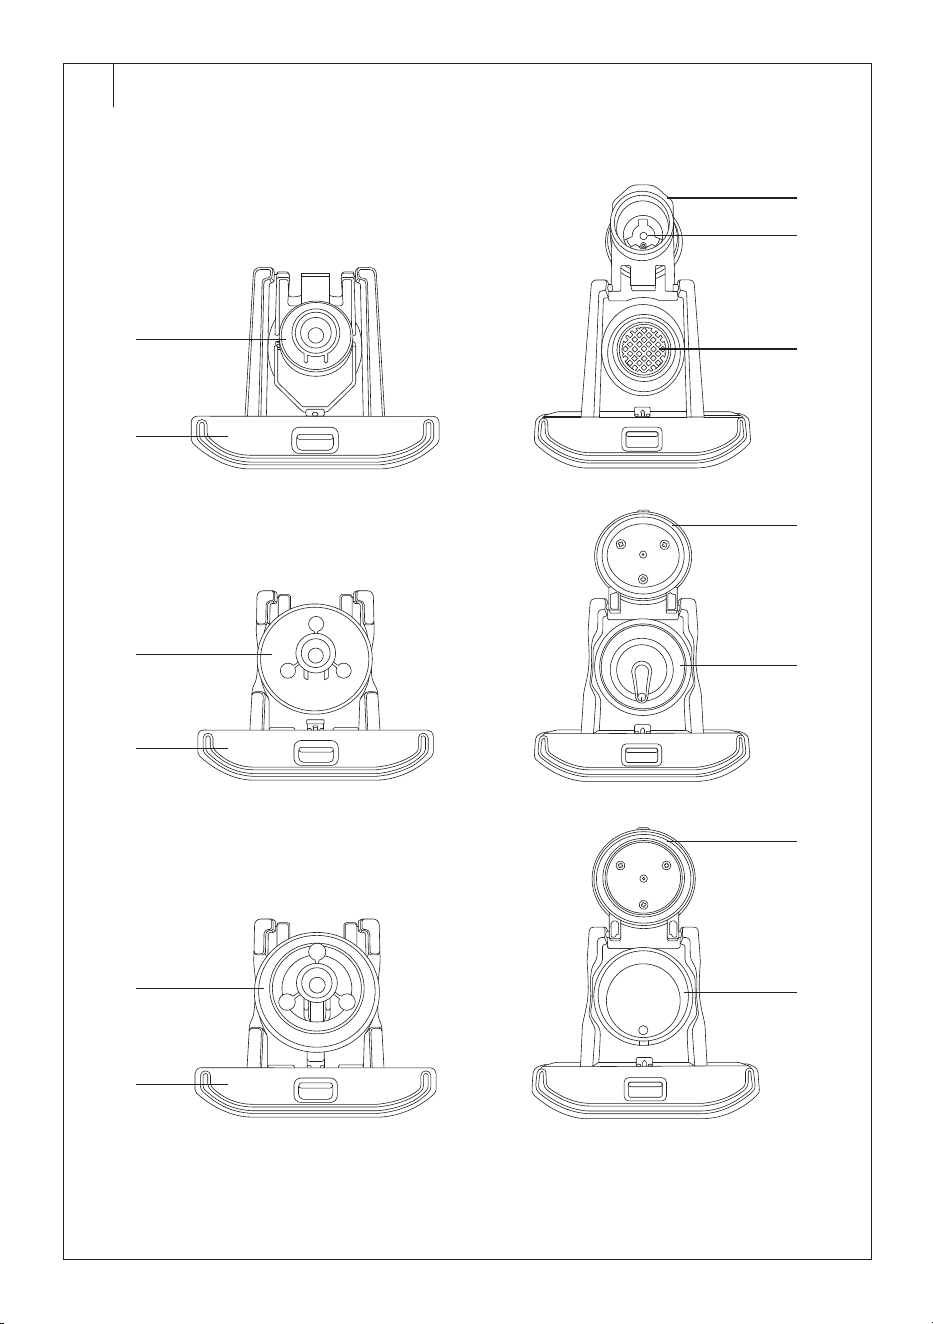
DESCRIPTION OF HOLDERS
Holder for Nespresso and similar capsules
C1 Cover
C2 Lock
C3 Capsule compartment
C4 Capsule piercing spikes
C5 Inner part of holder
Holder for Dolce Gusto and similar capsules
C6 Cover
C7 Lock
C8 Capsule piercing spike
C9 Capsule compartment
ESE Pod / ground coffee holder
C10 Cover
C11 Lock
C12 Filter compartment
. . . . . . . . . . . . . . . . . . . . . . . . . . . . . . . . . . . . . . . . . . . . . . . . . . . . . . . . . . . . . . . . . . . .
USE
• The Sencor SCC 3000BK coffee machine is designed for making
coffee using capsules, ESE pods or ground coffee.
. . . . . . . . . . . . . . . . . . . . . . . . . . . . . . . . . . . . . . . . . . . . . . . . . . . . . . . . . . . . . . . . . . . .
SETUP BEFORE USE
Before first use
• Before first use, remove all packaging and advertising labels/stickers
from the appliance.
• Place the coffee machine on aflat, firm and stable surface well away
from the mains socket. Ensure there is enough free space (at least
15centimetres) around the coffee machine to enable air to circulate
properly.
Warning:
The coffee machine is not intended for use as abuilt-
in appliance and must not be placed in acabinet
when in use.
• Remove the water tank, milk container, the drip tray and grille, and
measuring scoop/tamper. Wash them in warm water with alittle
kitchen detergent, rinse and wipe dry.
• Wipe the outer surface of the coffee machine and the holders with
aslightly damp cloth. Dry thoroughly.
• Put all the washed parts back into the machine.
Filling the water tank
• Always make sure that the power cord is disconnected from the mains
socket before filling the tank. Always fill the water tank with clean, cold
drinking water.
1. Remove the lid and pull the tank upwards from the back of the
coffee machine.
2. Fill the water tank up to the MAX mark.
3. Insert the tank back into the machine and press lightly to connect
the contacts on the bottom of the tank and the coffee machine. Put
the lid back on.
Warning:
The maximum capacity of the water tank is 1.4 litres.
Do not overfill it. When filling the tank, always keep
the level below the maximum mark. Never fill the
tank with warm or heated water, sparkling water or
other liquids such as milk. This could damage the
appliance.
Note:
Do not leave the water in the tank for more than one day.
You should always use fresh water to make quality coffee.
Using water that is not fresh will affect the taste of the final
beverage.
• You can fill the water tank while it is inserted in the coffee machine.
In this case, remove the cap and pour water into the tank. Put the lid
back on.
Warning:
Take care when pouring water to avoid splashing the
coffee machine or the power cord.
- 5 -
05/2025
2025, .
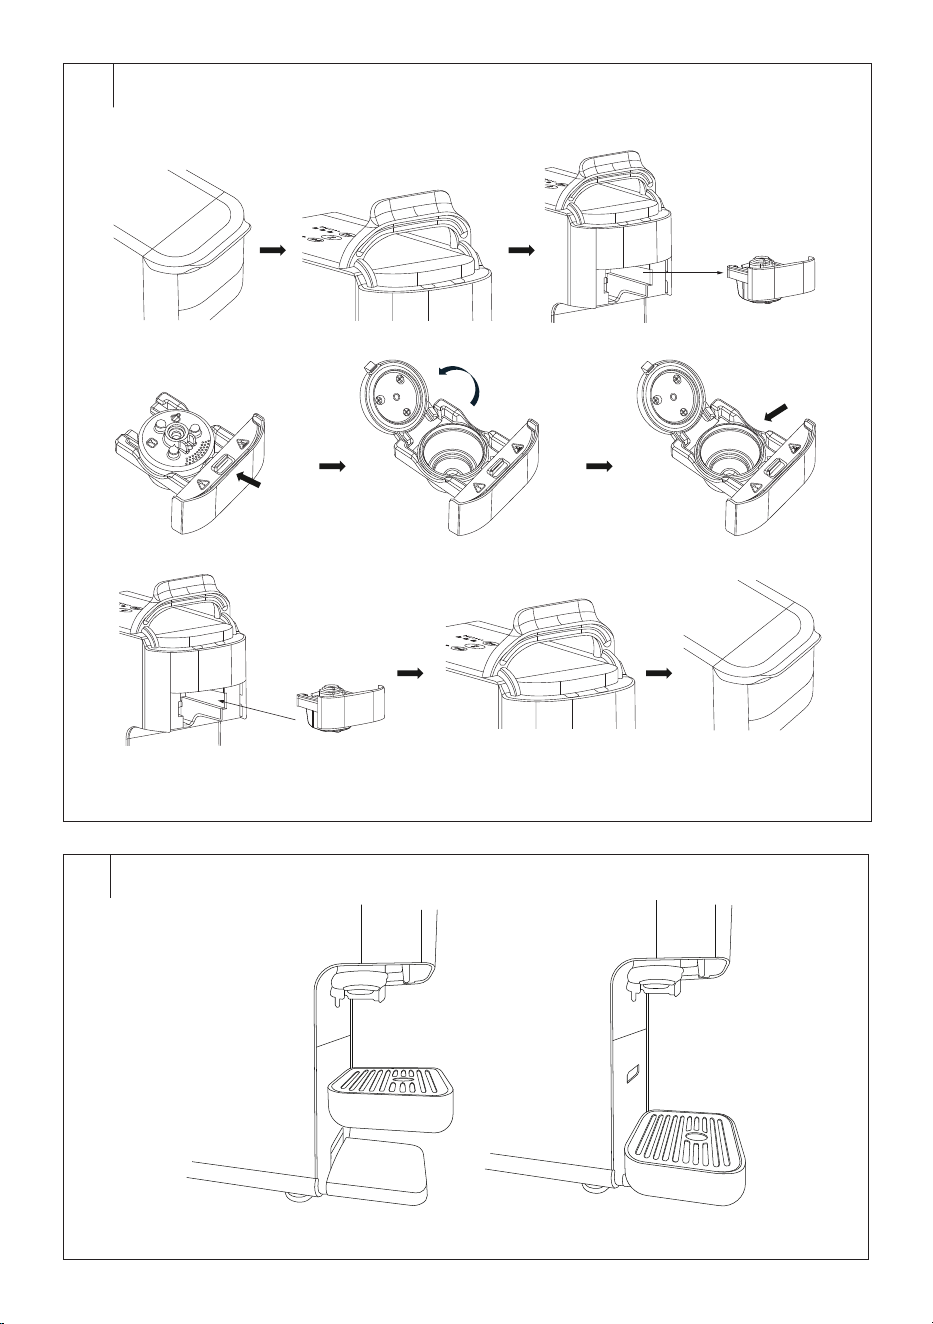
Inserting the capsule andholder into the coffee machine (Fig. D)
1. Grasp the locking handle andfold it upwards.
2. Remove the holder from the coffee machine.
3. Select the appropriate holder for the type of capsule you want to
use.
4. Press the lock so that you can release and open the cover.
5. Insert the capsule andclose the cover. Press gently until you hear
aclick. This indicates that the cover is securely in place.
6. Insert the holder into the coffee machine and fold the locking handle
downwards.
Warning:
Always use the holder designed for the capsule you
are using. Do not combine capsules and holders. This
can seriously damage the holder and the machine.
Warning:
You cannot remove or insert the capsule holder when
the locking handle is folded down.
Warning:
Do not use the coffee maker while the locking handle
is folded up.
Inserting the ESE pod filter and ESE pod / ground coffee holder into the
coffee machine
1. Grasp the locking handle andfold it upwards.
2. Remove the holder from the coffee machine.
3. Remove the ESE pod / ground coffee holder.
4. Press the lock so that you can release and open the cover.
5. Insert the ESE pod filter and place the ESE pod into the filter. Close
the cover. Press gently until you hear aclick. This indicates that the
cover is securely in place.
6. Insert the holder into the coffee machine and fold the locking handle
downwards.
Inserting the ground coffee filter and ESE pod / ground coffee holder into
the coffee machine
1. Grasp the locking handle andfold it upwards.
2. Remove the holder from the coffee machine.
3. Remove the ESE pod / ground coffee holder.
4. Press the lock so that you can release and open the cover.
5. Insert the ground coffee filter into the compartment. Use the
measuring scoop to tip ground coffee into the filter. Use the other end
of the scoop to tamp the ground coffee in the filter. After tamping,
the ground coffee inthe filter should be up to the MAX mark on the
inside of the filter.
6. Close the cover. Press gently until you hear aclick. This indicates
that the cover is securely in place.
7. Insert the holder into the coffee machine and fold the locking handle
downwards.
Connecting to the power supply
• Plug the power cable into aproperly grounded mains socket. You will
hear ashort beep. All the control panel button lights will go out.
Turning the coffee machine on
• Press the
button to turn the coffee machine on. The button will
start to flash and the machine will start to preheat.
• The coffee machine is preheated when all the control panel buttons,
the Nespresso capsule icon and the Single coffee icon light up.
Note:
If you release the locking handle while the coffee machine
is switched on, the entire control panel will flash and you
cannot adjust or start the coffee machine until you fold the
locking handle down.
Note:
You cannot start brewing coffee while the coffee machine
is heating up.
Flushing the coffee machine
Before using the coffee machine for the first time or after not using it
for some time, it is essential to flush it to clean the internal piping and
components.
1. Ensure that the water tank is full, there is no capsule or ground
coffee in the holder, and the locking handle is down. Place acup on
the drip tray grille to catch the water.
2. Once the machine is preheated, insert any holder into the machine
andselect the size of the cup, press the
button and the machine
will start. Water will be drawn into the internal piping, heated, and
then flow through the brewing head and dispensing nozzle into the
cup.
3. Once the flushing process is complete, you will hear abeep and the
control panel will light up.
4. Empty the cup and the coffee machine is now ready to use.
Making coffee
1. Insert acapsule into the holder and the holder into the coffee
machine, turn it on andlet it preheat.
2. Place acup on the drip tray.
3. Press the Coffee button repeatedly to select the type of coffee you
want:
: making coffee using aNespresso capsule;
: making coffee using aDolce Gusto capsule;
: making coffee using ground coffee / an ESE pod.
4. Press the Size button repeatedly to select the type of cup / the
amount of coffee. If you choose coffee using aNespresso capsule or
ground coffee / an ESE pod, you will be able to choose to:
: brew one cup;
: brew two cups (more intense coffee);
: brew aLungo.
If you choose coffee using aDolce Gusto capsule, you will be able
to choose the amont of coffee to be dispensed. Each press of the
button lights up one icon on the scale (B7). The more bars that light
up, the more coffee you will get.
5. Press the
button and the machine will start brewing the coffee.
The button will remain lit on the control panel, as well as the
selected coffee type and the quantity/intensity. The other buttons
will go dark.
6. The brewing process will automatically stop once the preset amount
of coffee has been dispensed into the cup.
7. Take the cup from the drip tray and enjoy your coffee.
8. Fold up the locking handle andremove the holder. Dispose of the
used capsule /ESE in an environmentally-friendly manner following
the manufacturer'sinstructions. Dispose of the coffee grounds in
acompost bin.
Warning:
The holder, used capsule, or coffee grounds may be
very hot. There is arisk of burns if handled incorrectly.
Warning:
Do not fold the locking handle upwards while brewing
coffee.
Note:
You can stop brewing coffee at any time by pressing the
button.
Note:
Do not reuse capsules. Follow the instructions of the
capsule manufacturer.
- 6 -
05/2025
2025, .
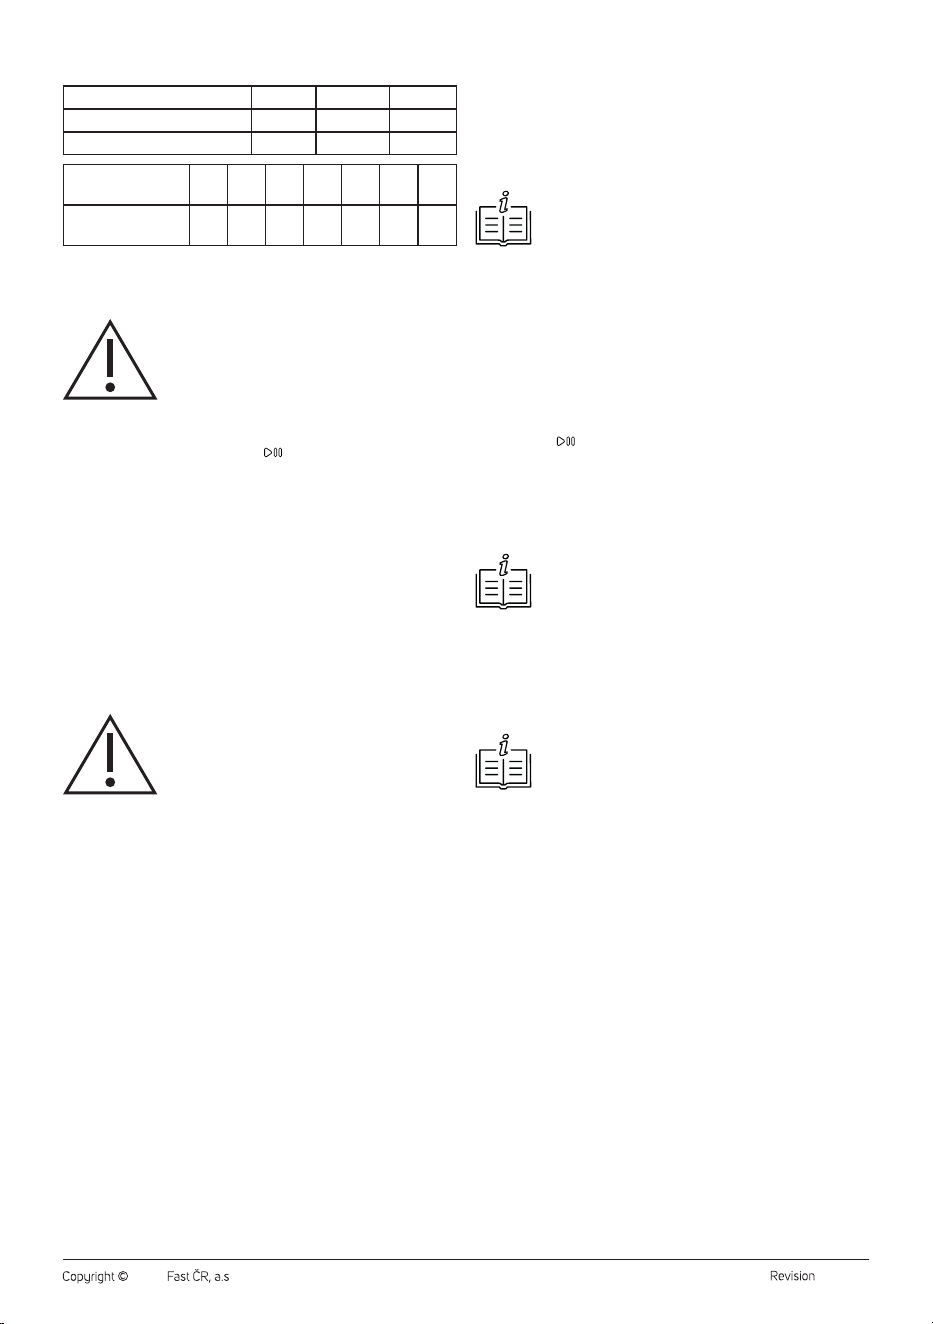
Table showing the default dispensing time for individual beverages
Coffee / Cup type Single Double Lungo
Nespresso capsules 30 ml 60 ml 110 ml
Ground coffee / ESE pod 30 ml 60 ml 110 ml
Coffee / Number of
lit bars
1234567
Dolce Gusto
capsules
30
ml
40
ml
70
ml
110
ml
160
ml
170
ml
220
ml
Refilling the water tank
• If the water in the tank runs out during use, it needs to be refilled. Take
off the lid andpour clean water into the tank. Put the lid back on.
Warning:
When refilling water into the tank, be careful not to
splash the coffee machine or the power cable. Wipe
up any spillage with adry cloth.
Automatic shut-off
• The coffee machine automatically turns off after being idle for 15
minutes. This is normal. Press the
button; the coffee machine will
turn on and start to preheat depending on the internal temperature.
Installing the drip tray (Fig. E)
• The drip tray can be installed in two positions: at the top for smaller
cups or at the bottom for larger cups, or you can remove it if using
atall glass/cup.
. . . . . . . . . . . . . . . . . . . . . . . . . . . . . . . . . . . . . . . . . . . . . . . . . . . . . . . . . . . . . . . . . . . .
CARE AND CLEANING
• Before cleaning the appliance, always disconnect the power cord from
the mains socket and let the machine cool sufficiently.
• Clean the coffee machine after each use.
• Do not use abrasive cleaning agents, solvents, etc. to clean any parts
of the appliance, as these could damage the surface. None of the
components of this appliance are dishwasher safe.
Warning:
To prevent the risk of electric shock, do not immerse
the appliance, power cable, or plug into water or any
other liquid.
Cleaning the holders
1. Fold up the locking handle andremove the holder from thecoffee
machine. Dispose of the used capsule/ESE in an environmentally-
friendly manner following the manufacturer'sinstructions. If you
have used ground coffee, dispose of the coffee grounds in acompost
bin.
2. Rinse the holder under warm running water and dry it with aclean
cloth.
3. After removing the holder, wipe the underside of the interior of the
coffee machine with aslightly damp sponge and aclean cloth.
4. Insert the holder back into the coffee machine andfold down the
locking handle.
Cleaning the drip tray and grille
1. Carefully remove the drip tray, take off the grille, and empty the tray.
2. Wash the tray and grille in warm water with alittle kitchen detergent
and rinse with clean water. Dry thoroughly.
Cleaning the water tank
1. Remove the water tank from the coffee machine and pour out the
water.
2. Rinse the tank with clean, warm water and wipe dry.
Cleaning the outer surface of the coffee machine
• Wipe the coffee machine with asoft, slightly damp sponge and wipe
dry with aclean cloth.
. . . . . . . . . . . . . . . . . . . . . . . . . . . . . . . . . . . . . . . . . . . . . . . . . . . . . . . . . . . . . . . . . . . .
DESCALING
• Over time, minerals from the water can build up in the machine’sinner
circuit. This is anatural process. Therefore, regular descaling is
necessary. Mineral deposits can spoil the taste of your coffee.
• When the coffee maker needs to be descaled (usually after
approximately 500 cups), the Coffee andSize buttons will flash
alternately.
Note:
Evenif the Coffee andSize buttons flash alternately, you
can still brew coffee. Restoring factory settings will not reset
the cup counter.
1. Fill the water tank with asolution of water and descaling agent up
to the MAX mark. Use adescaling agent suitable for capsule coffee
machines and follow the instructions provided with the descaling
agent.
2. Insert the holder into the coffee machine.
3. Place alarge bowl under the brew head to catch the used descaling
solution and mineral deposits.
4. Press andhold the Coffee andSize buttons simultaneously for
5seconds and the coffee machine will switch to descaling mode.
The Coffee andSize buttons will start flashing quickly.
5. Press the
button to start the descaling process.
6. Leave the coffee machine to complete the descaling process.
7. Remove the bowl and pour out the water.
8. Remove the water tank, rinse it out andclean it. Fill it with fresh
water and put it back in the machine.
9. Rinse the coffee machine two or three times to remove any residues
of descaling agent andmineral deposits.
Note:
If you need to cancel the descaling process, press and hold
the Coffee andSize buttons simultaneously for 5 seconds.
. . . . . . . . . . . . . . . . . . . . . . . . . . . . . . . . . . . . . . . . . . . . . . . . . . . . . . . . . . . . . . . . . . . .
STORAGE
• Before storing the appliance, ensure it is clean, dry, and completely
cool. Perform the descaling process. Store the appliance in awell-
ventilated, dry place out of reach of children and pets.
Tip:
You can store unused holders in the storage box.
. . . . . . . . . . . . . . . . . . . . . . . . . . . . . . . . . . . . . . . . . . . . . . . . . . . . . . . . . . . . . . . . . . . .
- 7 -
05/2025
2025, .
INSTRUCTIONS AND INFORMATION ON DISPOSAL OF USED
PACKAGING MATERIAL
Dispose of used packaging material at the designated municipal waste
disposal site.
DISPOSAL OF USED BATTERIES
Dispose of used batteries at the designated collection point. Proper
disposal of accumulators and batteries helps prevent damage to the
environment and human health.
DISPOSAL OF USED ELECTRICAL AND ELECTRONIC EQUIPMENT
Used electrical andelectronic products must not be disposed of in
ordinary municipal waste. To enable the proper disposal and recycling
of these products, deliver them to the designated collection points.
Alternatively, in some European Union states or other European
countries the products can be returned to the local retailer when buying
an equivalent new product. By properly disposing of this product, you
help preserve valuable natural resources and help to prevent potential
damage to the environment and human health resulting from improper
waste disposal. For more details, contact your local authority or nearest
collection point. Fines may be imposed for improper disposal of this type
of waste as per national regulations.
For business entities in European Union States
To dispose of electric or electronic equipment, request the necessary
information from your retailer or supplier.
Disposal in other countries outside the European Union
If you wish to dispose of this product, request the necessary information
about the correct disposal method from the local council or from your retailer.
. . . . . . . . . . . . . . . . . . . . . . . . . . . . . . . . . . . . . . . . . . . . . . . . . . . . . . . . . . . . . . . . . . . .
Changes to text and technical parameters are reserved.
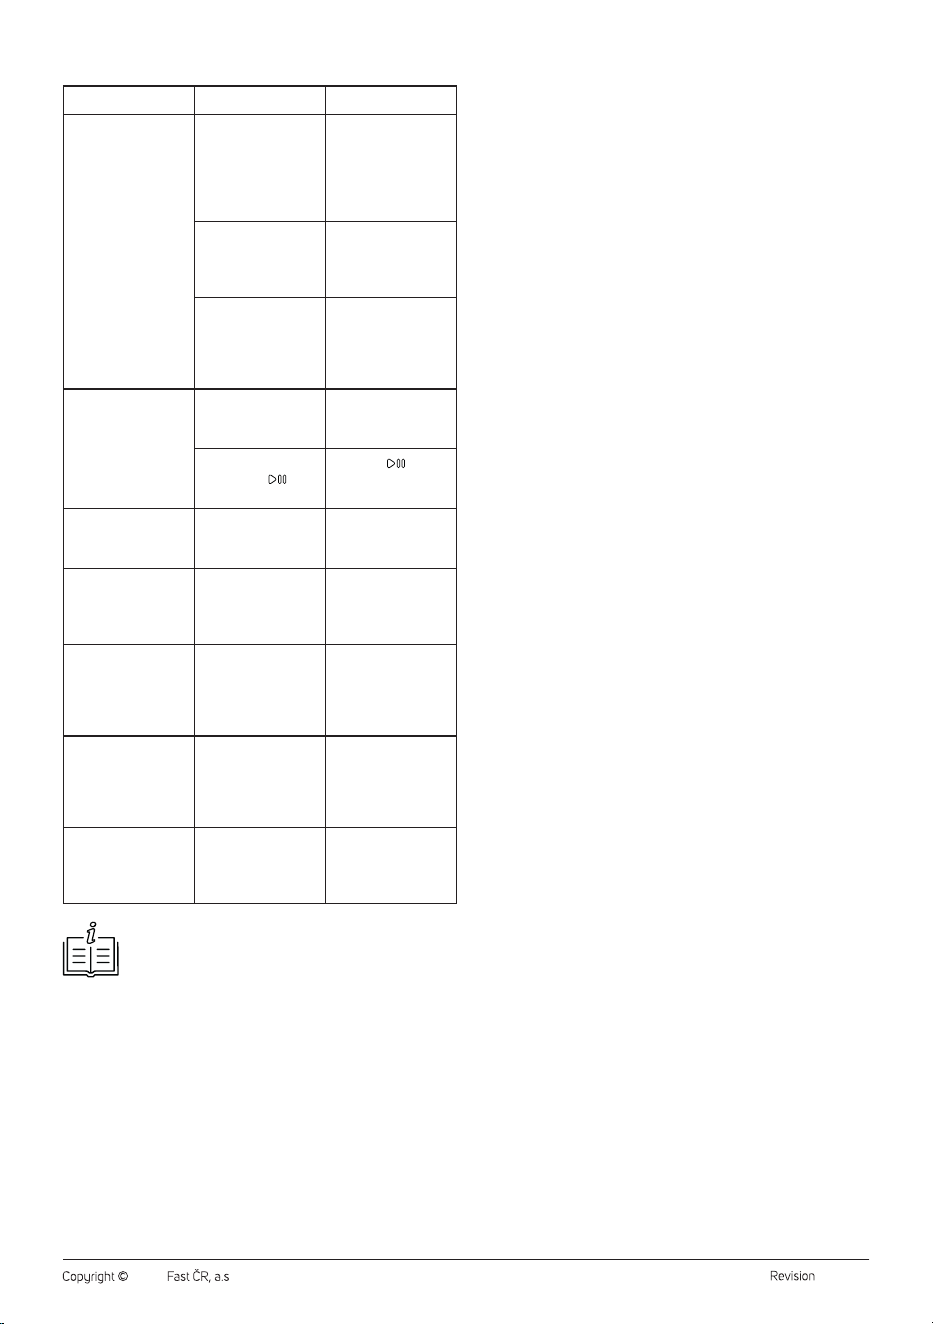
TROUBLESHOOTING
Problem Cause Solution
While brewing
coffee, the Coffee
andSize buttons
flash simultaneously
and the water pump
stops.
Fault at the water
inlet from the water
tank to the coffee
machine, or the
water tank is empty.
Remove the
tank anddry the
water inlet hole in
thecoffee machine,
or top up the water
tank.
The coffee flows
slowly, the capsule
may be blocked.
Remove the holder
andcheck that the
capsule is placed
correctly.
The coffee flows
slowly, you may
have used the
wrong holder for the
capsule.
Remove the holder
andcheck that the
capsule is in the
correct holder.
The machine does
not switch on.
The plug is not
inserted into the
socket.
Insert the plug into
the socket.
You have not
pressed the
button.
Press the button
to switch on the
coffee machine.
The coffee machine
is making an
unpleasant sound.
The water tank is
empty.
Refill the water tank.
The coffee machine
starts but does not
dispense coffee.
You have used the
wrong holder for the
capsule.
Remove the holder
andcheck that the
capsule is in the
correct holder.
There is water under
the coffee machine.
The water tank is not
inserted correctly.
Remove the tank
andreinsert it so that
it is in contact with
the coffee machine
water inlet.
The holder cannot
be inserted into the
coffee machine.
The locking handle
is folded down.
Fold the locking
handle up so that
the holder can be
inserted into the
coffee machine.
The machine makes
ahissing sound
when dispensing the
coffee.
This isnormal when
brewing coffee.
Note:
If the problem persists or is not listed above, switch off
the coffee machine, unplug it from the power supply, and
contact an authorised service centre.
. . . . . . . . . . . . . . . . . . . . . . . . . . . . . . . . . . . . . . . . . . . . . . . . . . . . . . . . . . . . . . . . . . . .
TECHNICAL SPECIFICATIONS
Rated voltage range ..............................................................................220–240 V~
Rated frequency ..........................................................................................50–60 Hz
Rated power input ................................................................................. 1215–1545 W
Power consumption in off mode .....................................................................0.3 W
Noise level ..........................................................................................................< 68 dB
The appliance automatically switches off in 15 minutes after finishing the
operation and when connected to the mains power.
. . . . . . . . . . . . . . . . . . . . . . . . . . . . . . . . . . . . . . . . . . . . . . . . . . . . . . . . . . . . . . . . . . . .

- 8 -
05/2025
2025, .

www.sencor.com
info@sencor.cz