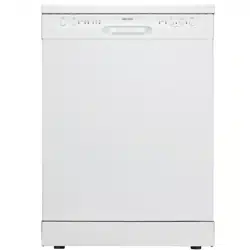
USER MANUAL
FREESTANDING 12-PLACE DISHWASHER
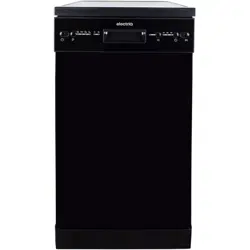
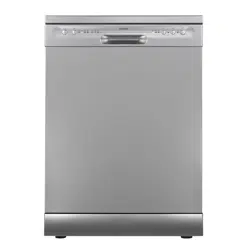
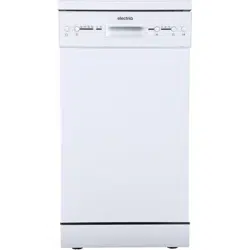
EQ60DW/ EQ60DWBLACK/ EQ60DWSILVER
Thank you for choosing electriQ
Please read the manual before using this dishwasher
and keep it safe for future reference.
Visit our page www.electriQ.co.uk for our entire product range

2

3
CONTENTS
SAFETY
4
PRODUCT OVERVIEW
6
INSTALLATION
7
HOW TO LOAD
11
OPERATION
13
CONTROL PANEL
15
WASH CYCLE TABLE
16
CHANGING PROGRAMS
17
ADDING SALT
18
WATER SOFTENER
19
CLEANING AND MAINTENANCE
20
TROUBLESHOOTING
22
ERROR CODES
24
TECHNICAL INFORMATION
24
SUPPORT
25

4
SAFETY INFORMATION
• Installation and repair must only be carried out by a qualified
technician.
• This appliance is intended to be used in household and similar
applications.
• Children should be supervised to ensure that they do not play with the
appliance.
• Cleaning and user maintenance must not be done by children without
supervision.
• This appliance is not intended for use by persons or children with
reduced physical, sensory or mental capabilities or lack of experience
and knowledge unless they have been given supervision or instruction
concerning the use of the appliance by a person responsible for their
safety.
• Packaging material could be dangerous for children.
• This appliance is for indoor household use only.
• To protect against the risk of electric shock, do not immerse the unit,
cord or plug in water or other liquid.
• Do not abuse, sit on, or stand on the door or dish rack of the
dishwasher.
• Do not operate your dishwasher unless all enclosure panels are
properly in place.
• Open the door very carefully if the dishwasher is operating; there is a
risk of water squirting out.
• Do not place any heavy objects on or stand on the door when it is
open. The appliance could tip forward.
• When loading items to be washed, locate sharp items so that they are
not likely to damage the door seal.
• WARNING: Knives and other utensils with sharp points must be
loaded in the basket with their points facing down or placed in a
horizontal position.
• Some dishwasher detergents are strongly alkaline, and they can be
extremely dangerous if swallowed. Avoid contact with the skin and
eyes, and keep children away from the dishwasher when the door is
open. Check that the detergent powder is empty after the wash cycle
is completed.
• Do not wash plastic items unless they are marked “dishwasher safe”
or the equivalent.

5
• For unmarked plastic items, check the manufacturer's
recommendations. Only use detergent and rinse agents that are
recommended for use in an automatic dishwasher.
• Never use soap, laundry detergent, or hand-washing detergent in your
dishwasher.
• The door should not be left in the open position since this could
present a tripping hazard.
• If the supply cord is damaged, it must be replaced by the
manufacturer, its service agent or a similarly qualified person in order
to avoid a hazard.
• During installation, the power supply must not be excessively or
dangerously bent or flattened.
• A carpet should not obstruct the openings on the base of the
appliance.
• Do not tamper with controls. The appliance needs to be connected to
the main water valve using new hose sets. Old sets should not be
reused. To save energy, in standby mode, the appliance will switch off
automatically if it does not operate for 30 minutes.
EARTHING INSTRUCTIONS
• This appliance must be earthed. In the event of a malfunction or
breakdown, earthing will reduce the risk of an electric shock by
providing a path of least resistance for electric current.
• This appliance is equipped with an earthing conductor plug. The plug
must be plugged into an appropriate outlet that is installed and
earthed in accordance with all local codes and ordinances. Improper
connection of the equipment-earthing conductor can result in the risk
of an electric shock.
• Check with a qualified electrician or service representative if you are
in doubt whether the appliance is properly grounded.
• Do not modify the plug provided by the appliance if it does not fit the
outlet. Have a proper outlet installed by a qualified electrician.
6
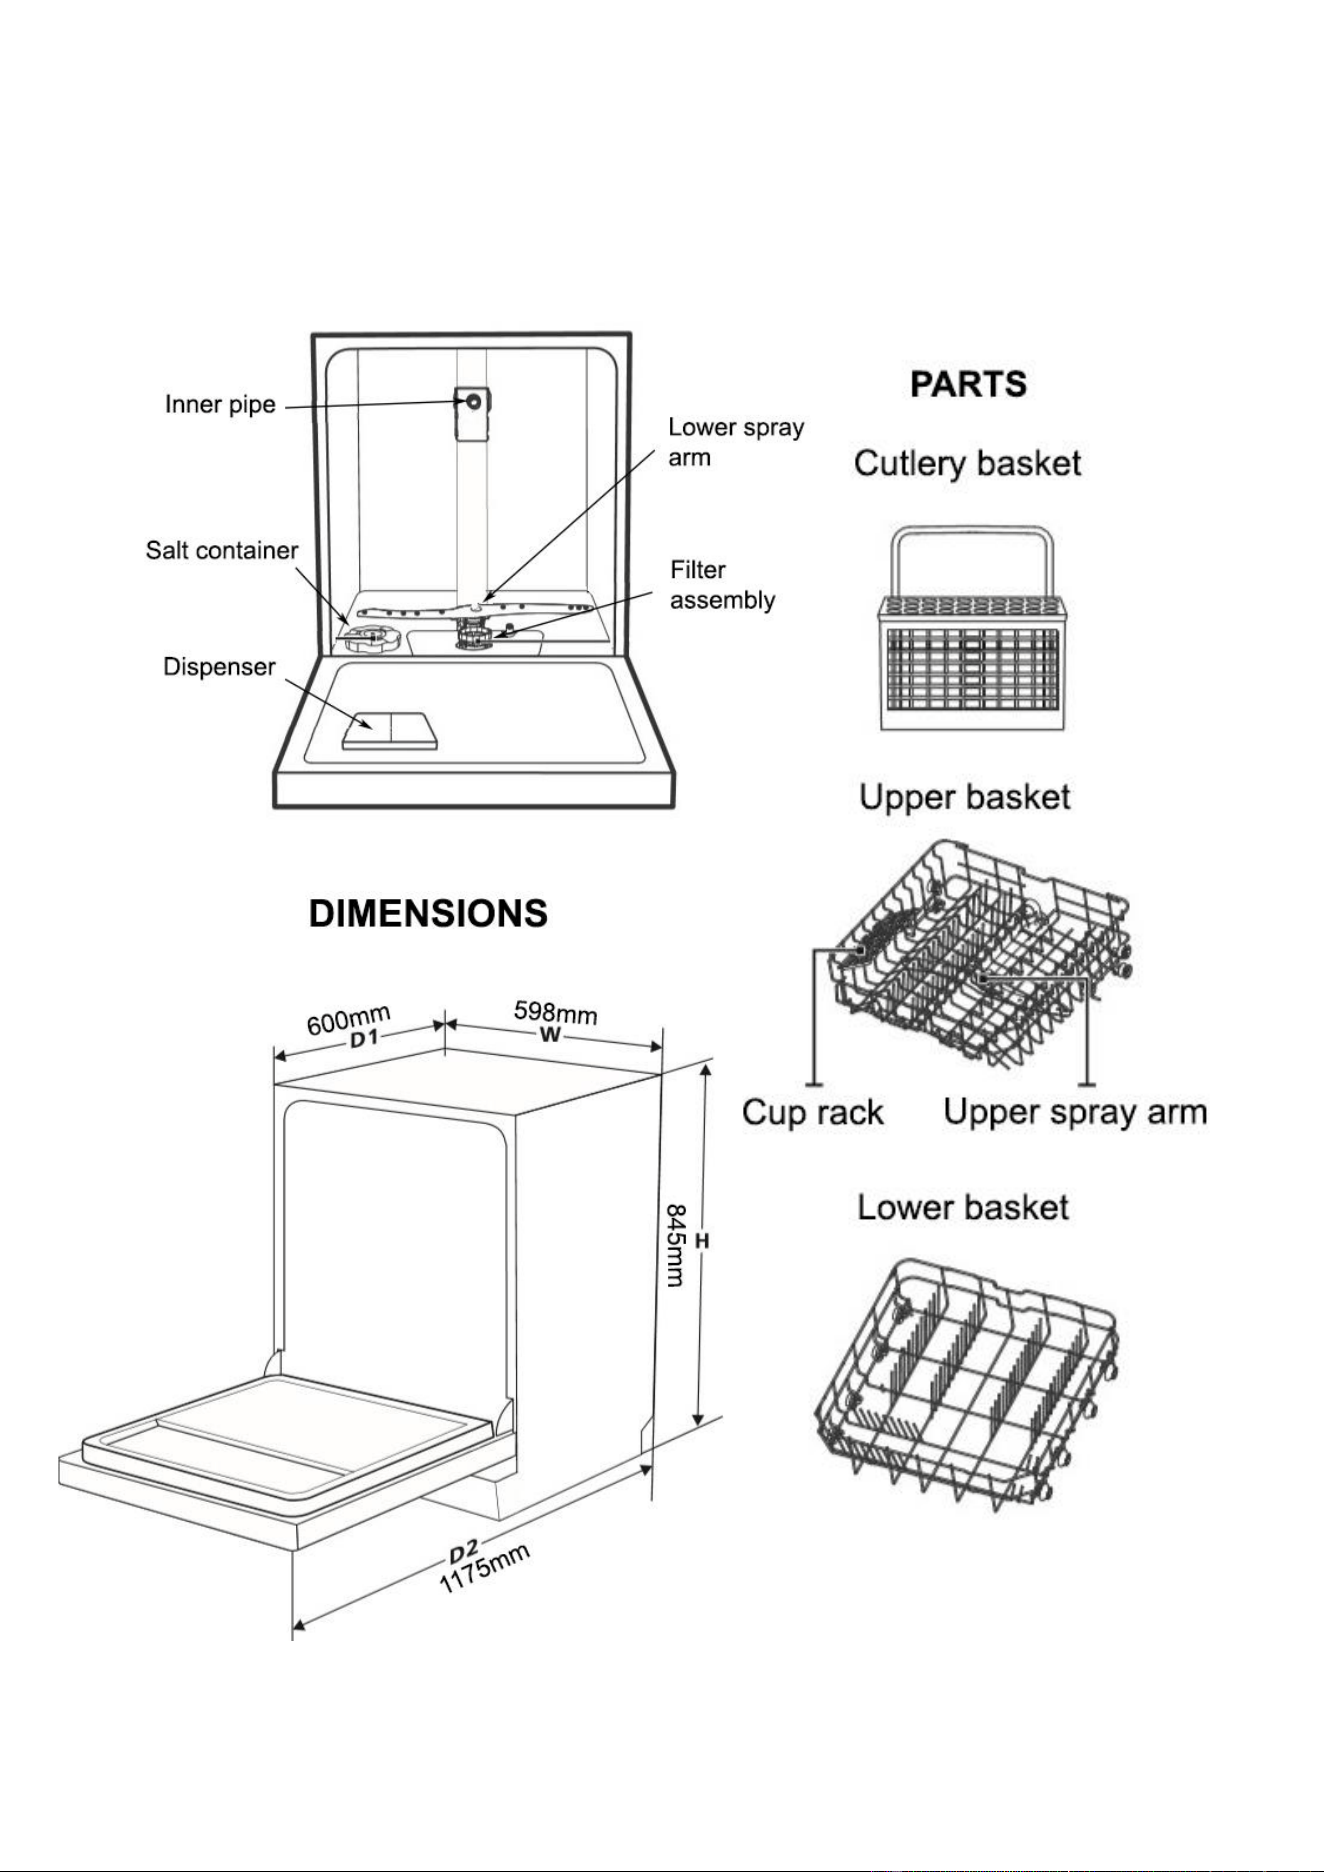
PRODUCT OVERVIEW
NOTE: To get the best performance from your dishwasher, read all operating
instructions before using it for the first time.
7
INSTALLATION INSTRUCTIONS
IMPORTANT: Electrical installation should only be performed by a professional and
qualified electrician.
Do not use an extension cord or an adapter plug with this appliance. Under no
circumstances should the earthing connection from the power cord be cut or
removed.
Please look at the rating label to determine the rating voltage and connect the
dishwasher to the appropriate power supply. Use the required 13Amp fuse, time
delay fuse, or circuit breaker, and provide a separate circuit serving only this
appliance.
Ensure the voltage and frequency of the power correspond to those on the rating
plate. Only insert the plug into an electrical socket that is earthed properly. If the
electrical socket to which the appliance must be connected is not appropriate for the
plug, replace the socket rather than using an adaptor or the like, as they could cause
overheating and burns.
WATER SUPPLY AND DRAIN
Cold water connection: Connect the cold-water supply
hose to a threaded 3/4(inch) connector and fasten it
tightly in place. If the water pipes are new or have not
been used for an extended period of time, let the water
run to ensure that it is clear. This precaution is needed
to avoid the risk of the water inlet being blocked and
damaging the appliance.
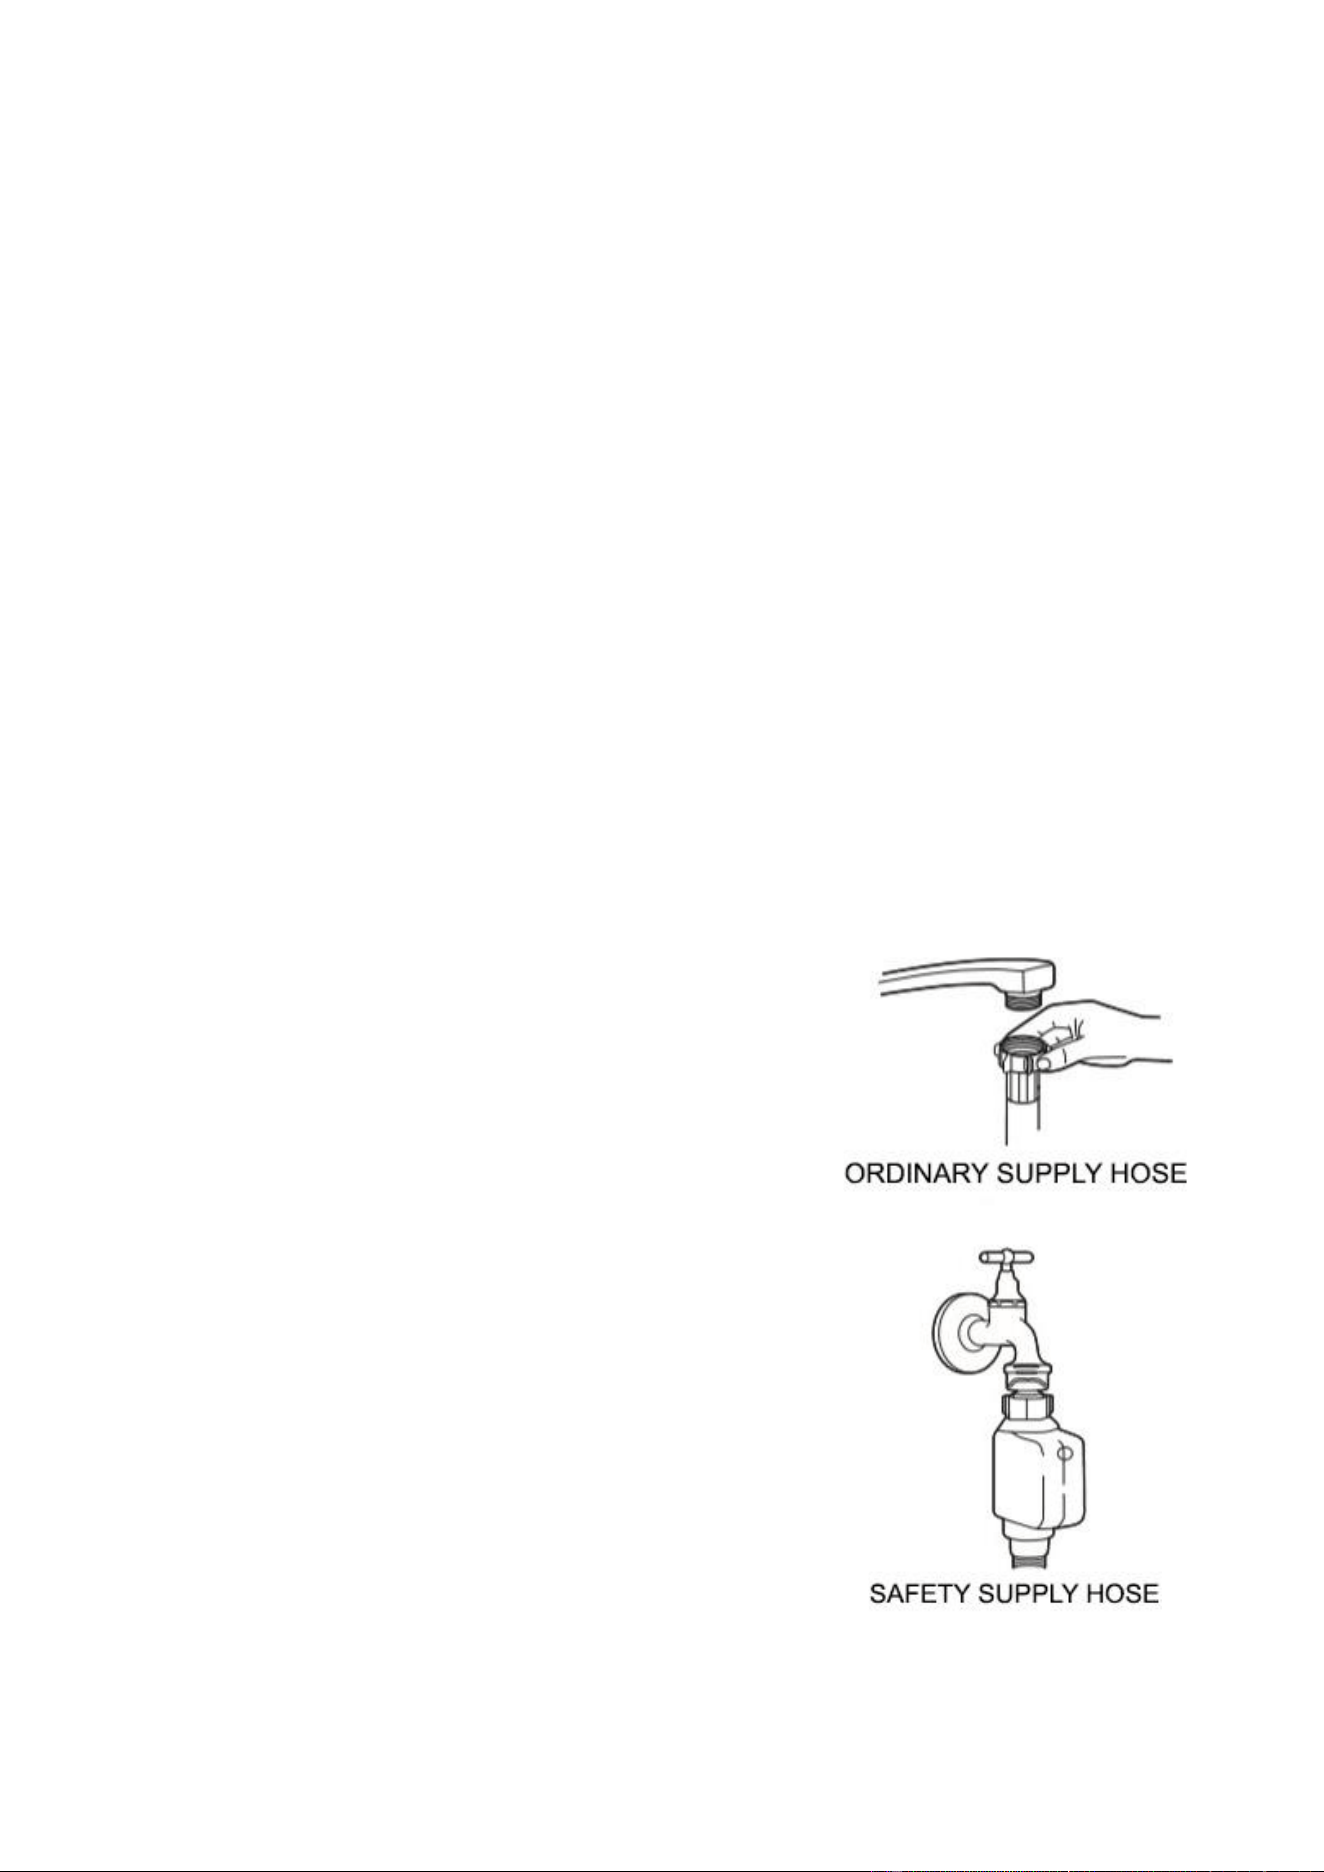
Safety supply hose: This hose consists of double walls.
The hose's system guarantees its intervention by blocking
the flow of water in case the supply hose breaks or when
the air space between the supply hose itself and the outer
corrugated hose is full of water.
8
HOW TO CONNECT THE SAFETY SUPPLY HOSE
1. Remove the safety supply hoses from the storage compartment located at the
rear of the dishwasher.
2. Tighten the screws of the safety supply hose to the faucet with 3/4-inch thread.
3. Turn the water fully on before starting the dishwasher.
HOW TO DISCONNECT THE SAFETY SUPPLY HOSE
1. Turn off the water.
2. Unscrew the safety supply hose from the faucet.
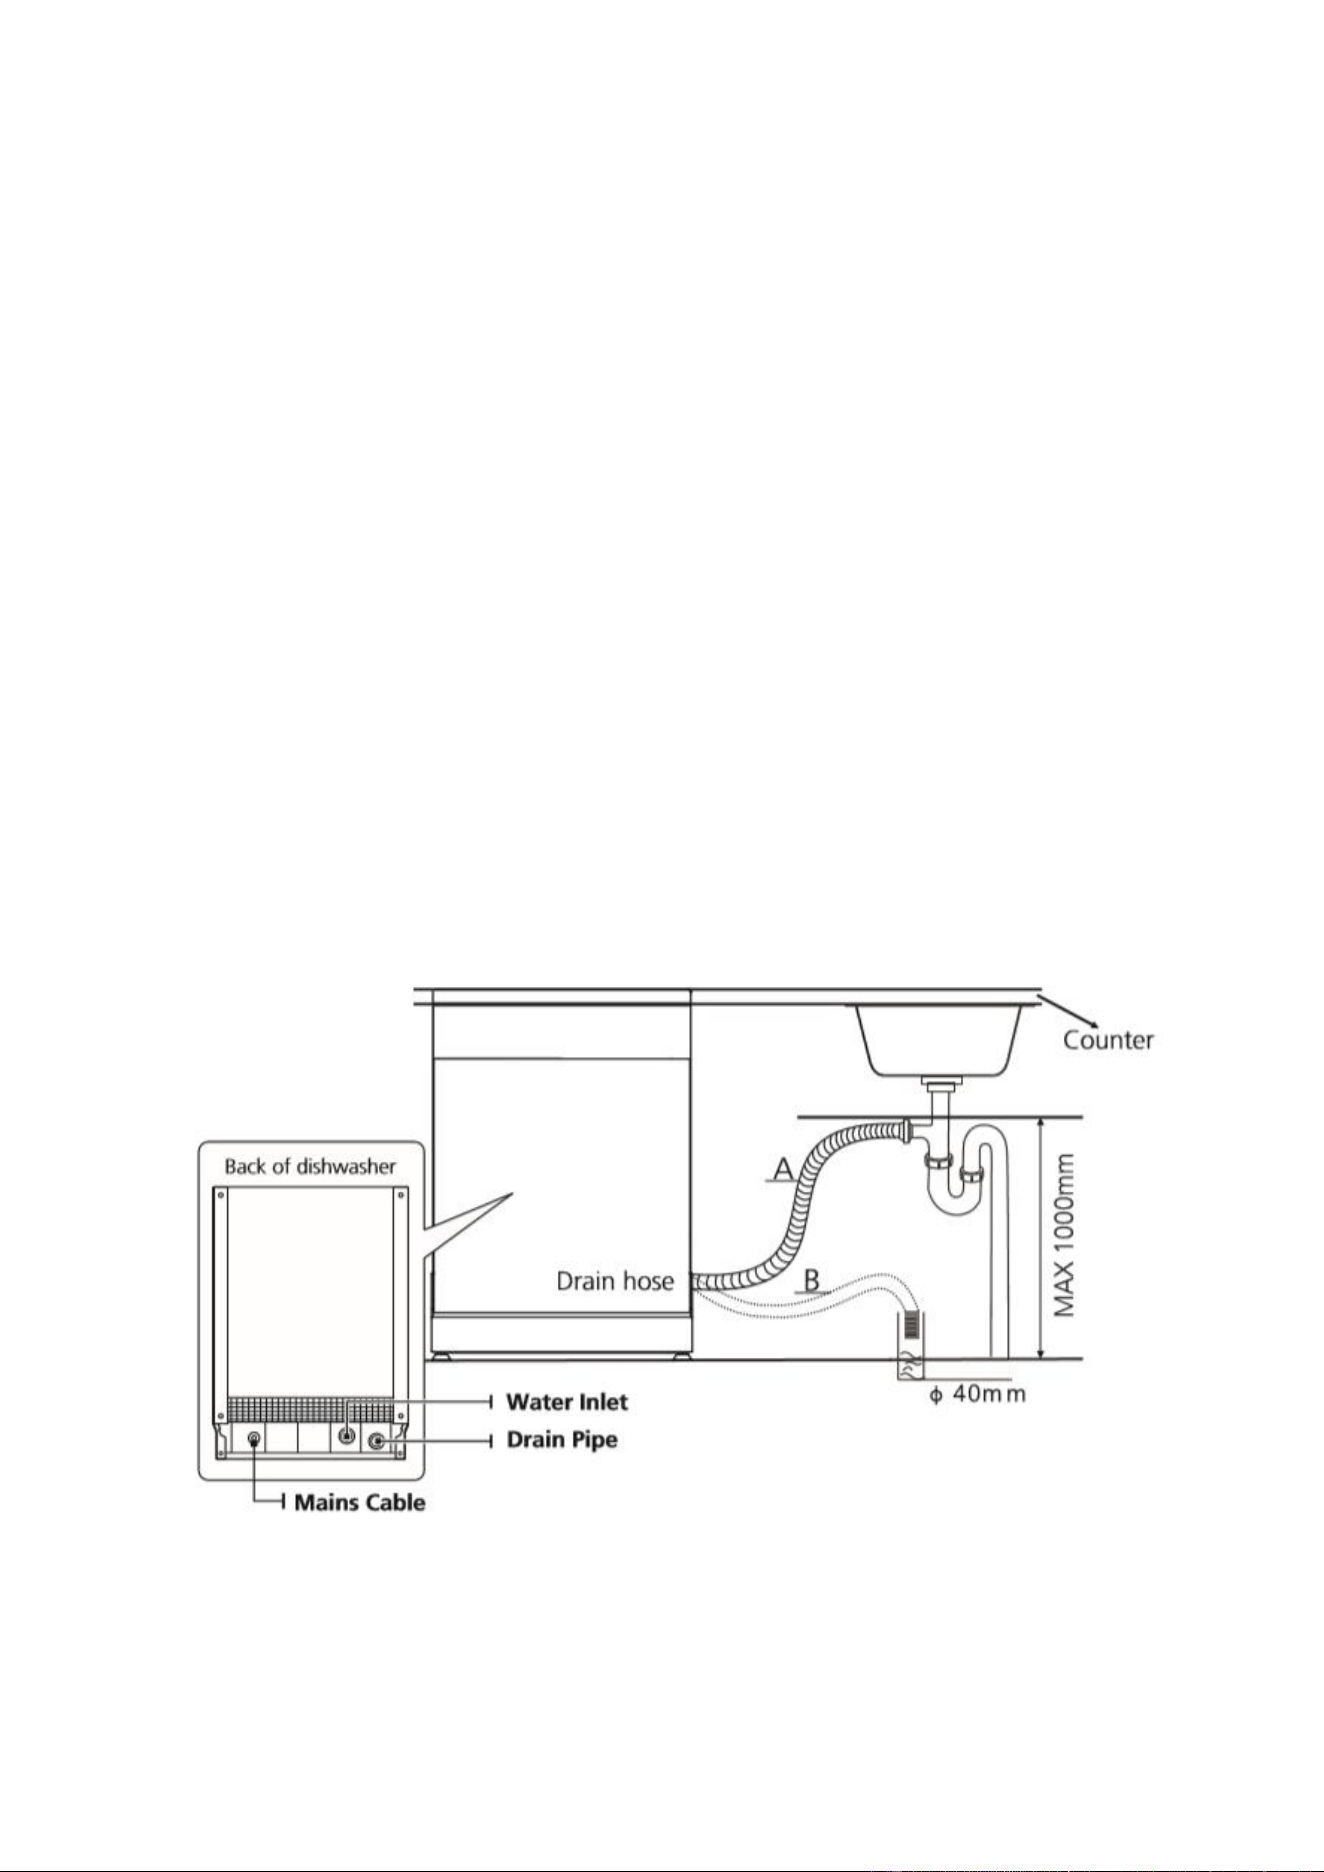
CONNECTION OF DRAIN HOSES
Insert the drain hose into a drainpipe with a minimum diameter of 4 cm or let it run
into the sink, making sure to avoid bending or crimping it. The drainpipe must be less
than 1000mm high. To avoid backflow, the free end of the hose must not be
immersed in water.
NOTE: Securely fix the drain hose in either position A or position B
9
HOW TO DRAIN EXCESS WATER FROM HOSES
If the sink is 100 cm higher than the floor, the excess water in the hoses cannot be
drained directly into the sink. It will be necessary to drain excess water from hoses
into a bowl or suitable container held outside and lower than the sink.
WATER OUTLET
Connect the water drain hose. The drain hose must be correctly fitted to avoid water
leaks. Ensure that the water drain hose is not kinked or squashed.
EXTENSION HOSE
If you need a drain hose extension, use a similar one. It must be no longer than 4
meters; otherwise, the dishwasher's cleaning effect could be reduced.
SYPHON CONNECTION
The waste connection must be at a height of less than 100 cm (maximum) from the
bottom of the dish. The water drain hose should be fixed.
FREESTANDING
The dishwasher's height is 845 mm, and it
has been designed to fit between existing
cabinets of the same height in modern fitted
kitchens. The feet can be adjusted so that the
correct height is reached. The laminated top
of the machine does not require any particular
care since it is heatproof, scratchproof, and
stainproof.
10
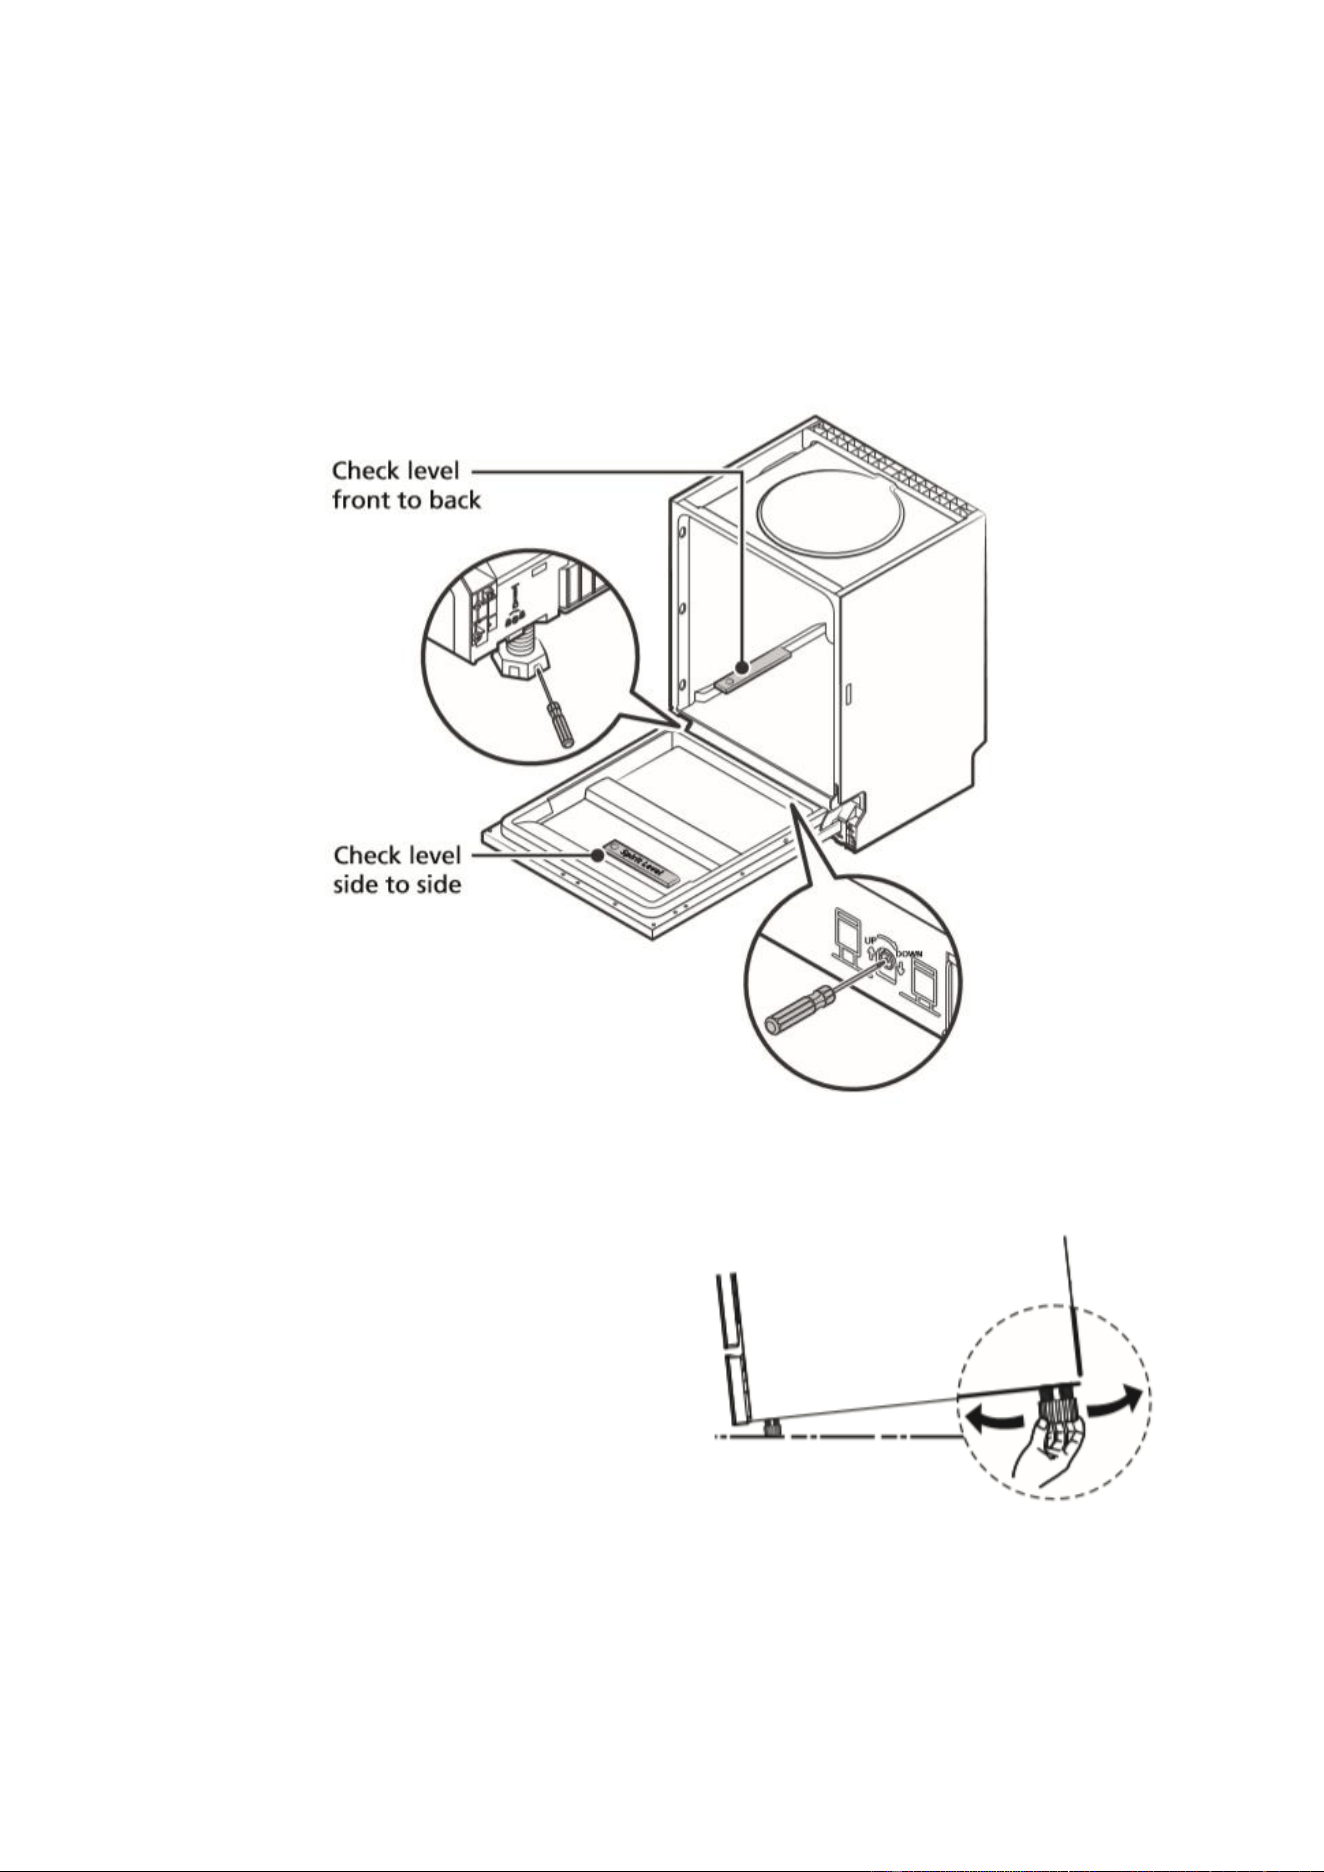
ADJUSTING THE HEIGHT
The dishwasher must be level to enable correct operation and wash performance.
Place a spirit level on the door and rack track inside the tub, as shown, to check that
the dishwasher is level. Then, level the dishwasher by adjusting the three levelling
legs individually. When levelling the dishwasher, please pay attention and do not let
it tip over.
NOTE: The maximum adjustment height of the feet is 50 mm.
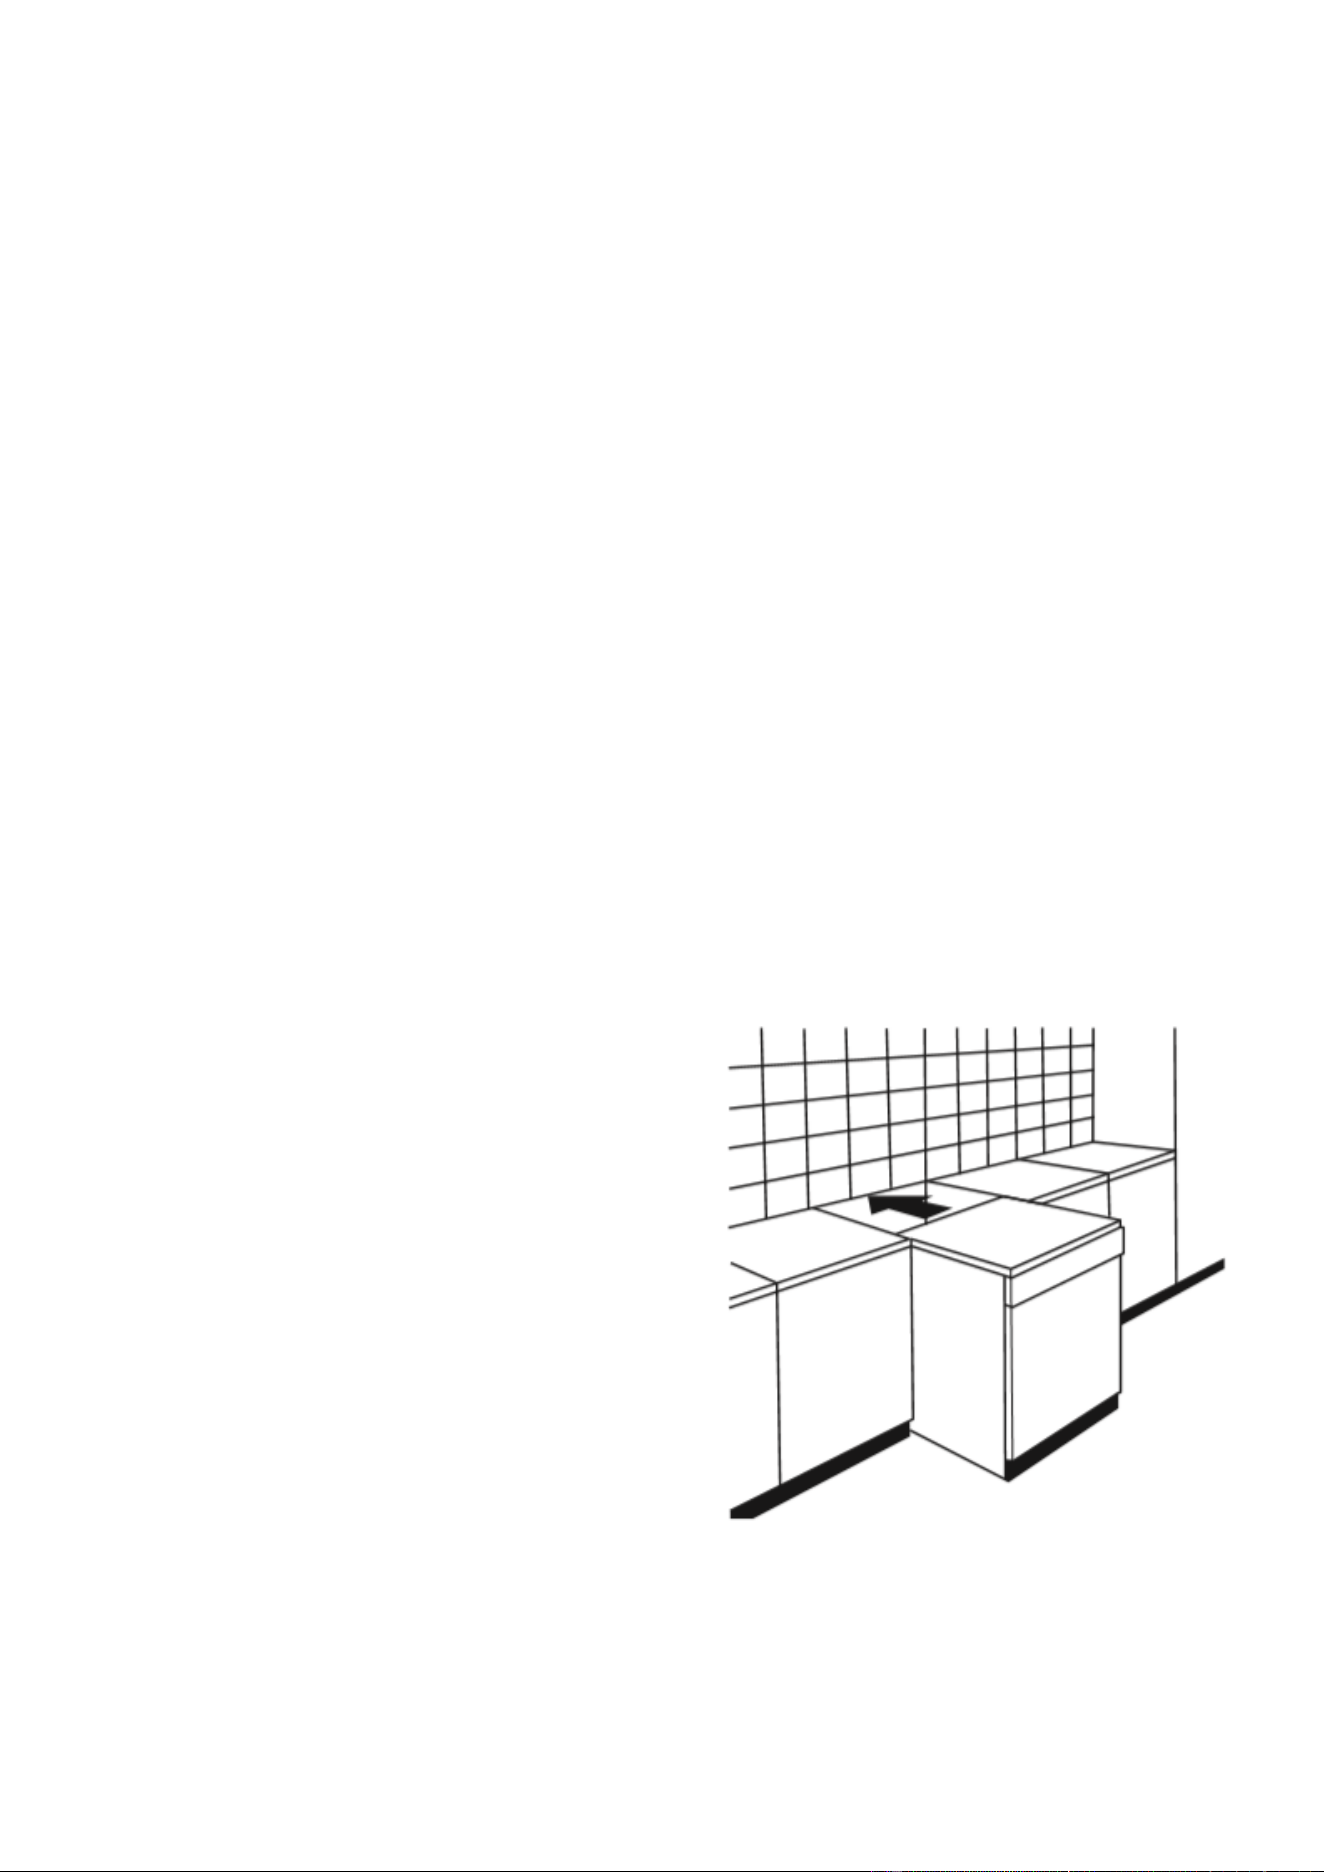
POSITION THE APPLIANCE
Position the appliance in the desired
location. The back should rest against the
wall behind it, and the sides, along the
adjacent cabinets or walls. The
dishwasher is equipped with a water
supply and drain hoses that can be
positioned either to the right or the left
sides to facilitate proper installation.
Levelling the appliance Once the appliance is positioned for levelling, the height of
the dishwasher may be altered via adjustment of the screwing level of the feet. In
any case, the appliance should not be inclined more than 2°
11
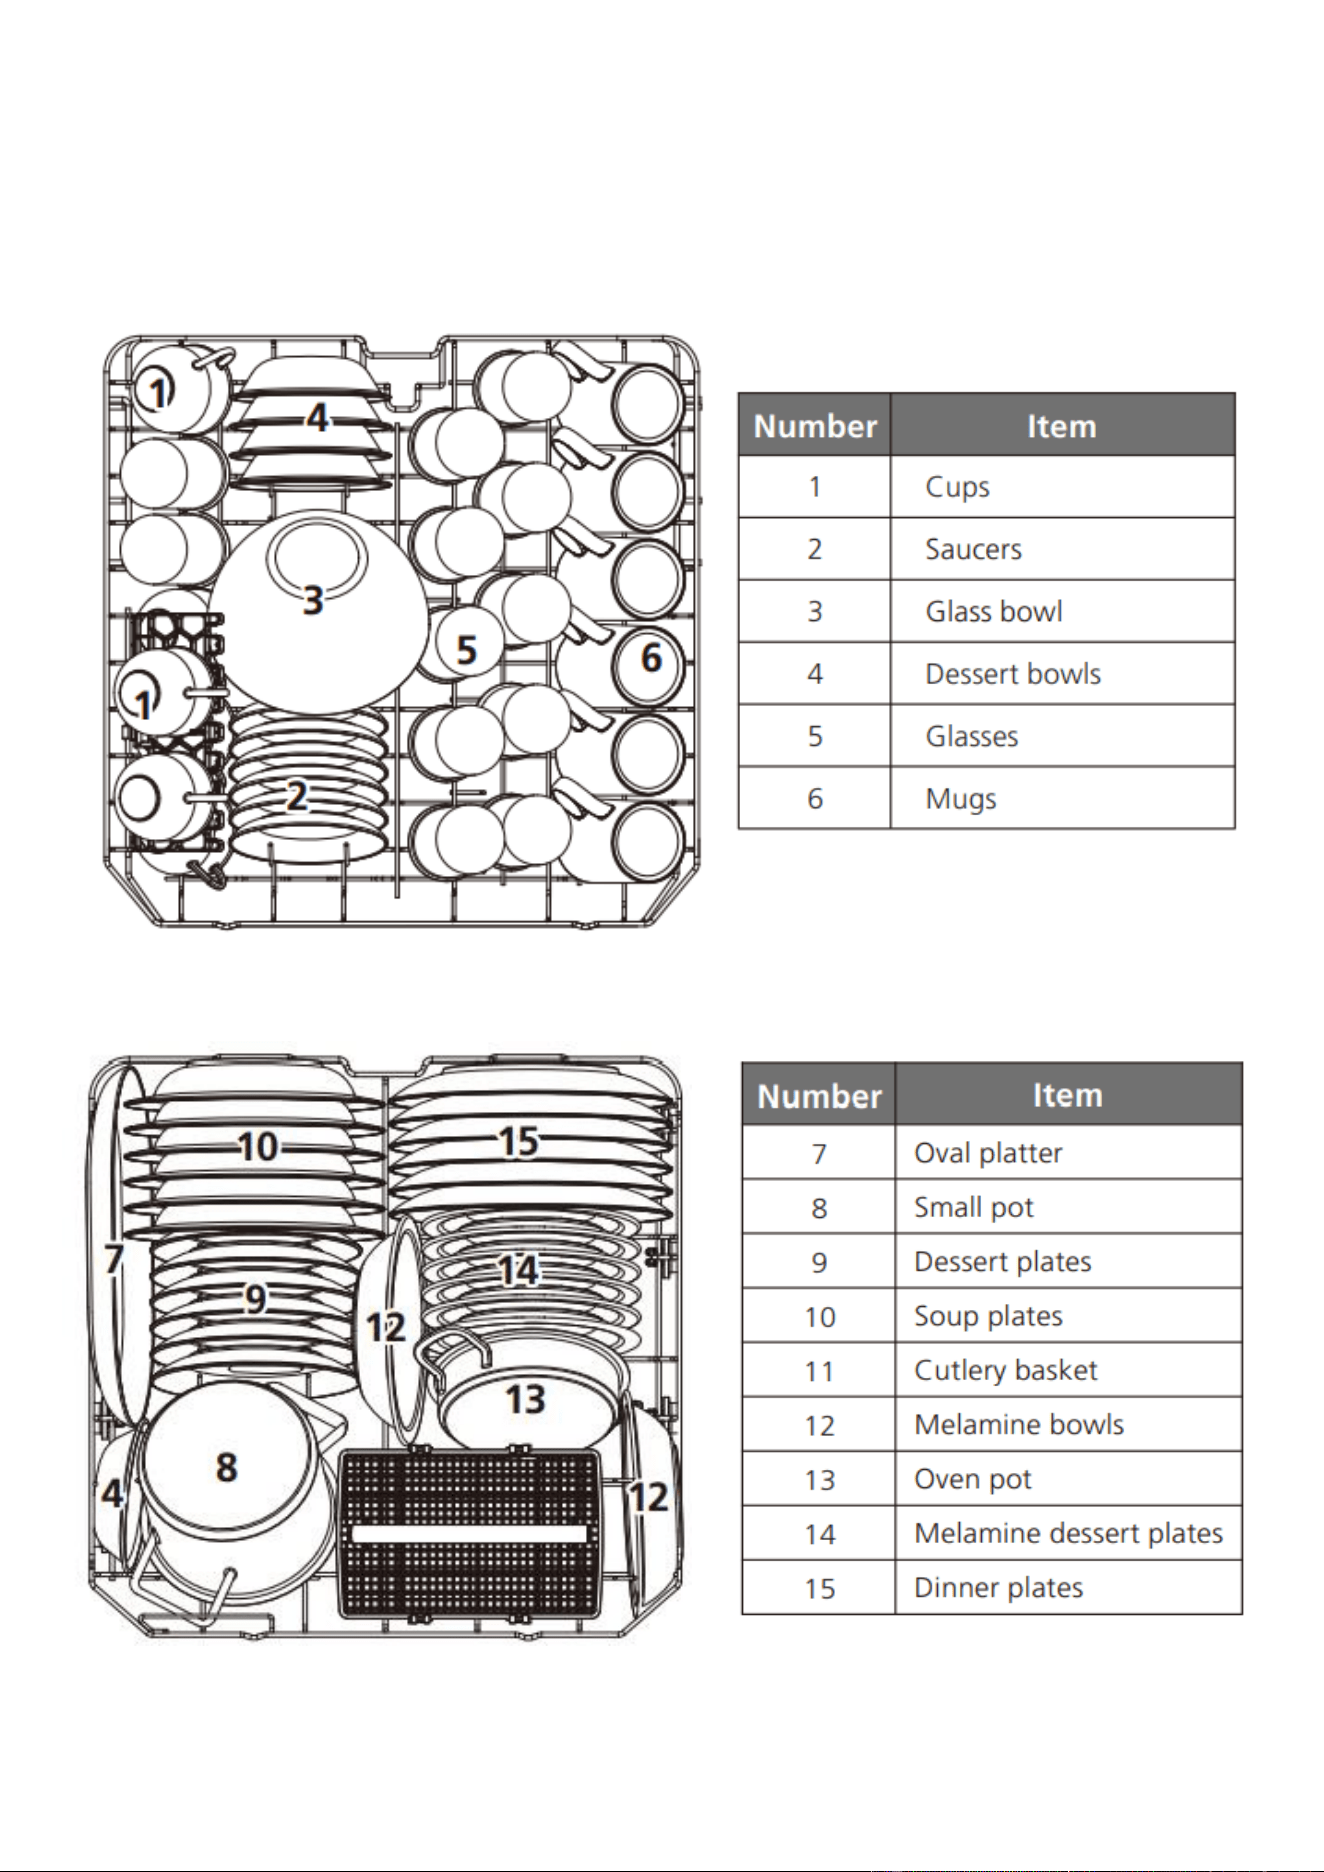
HOW TO LOAD THE BASKETS ACCORDING TO EN60436
UPPER BASKET
LOWER BASKET
12
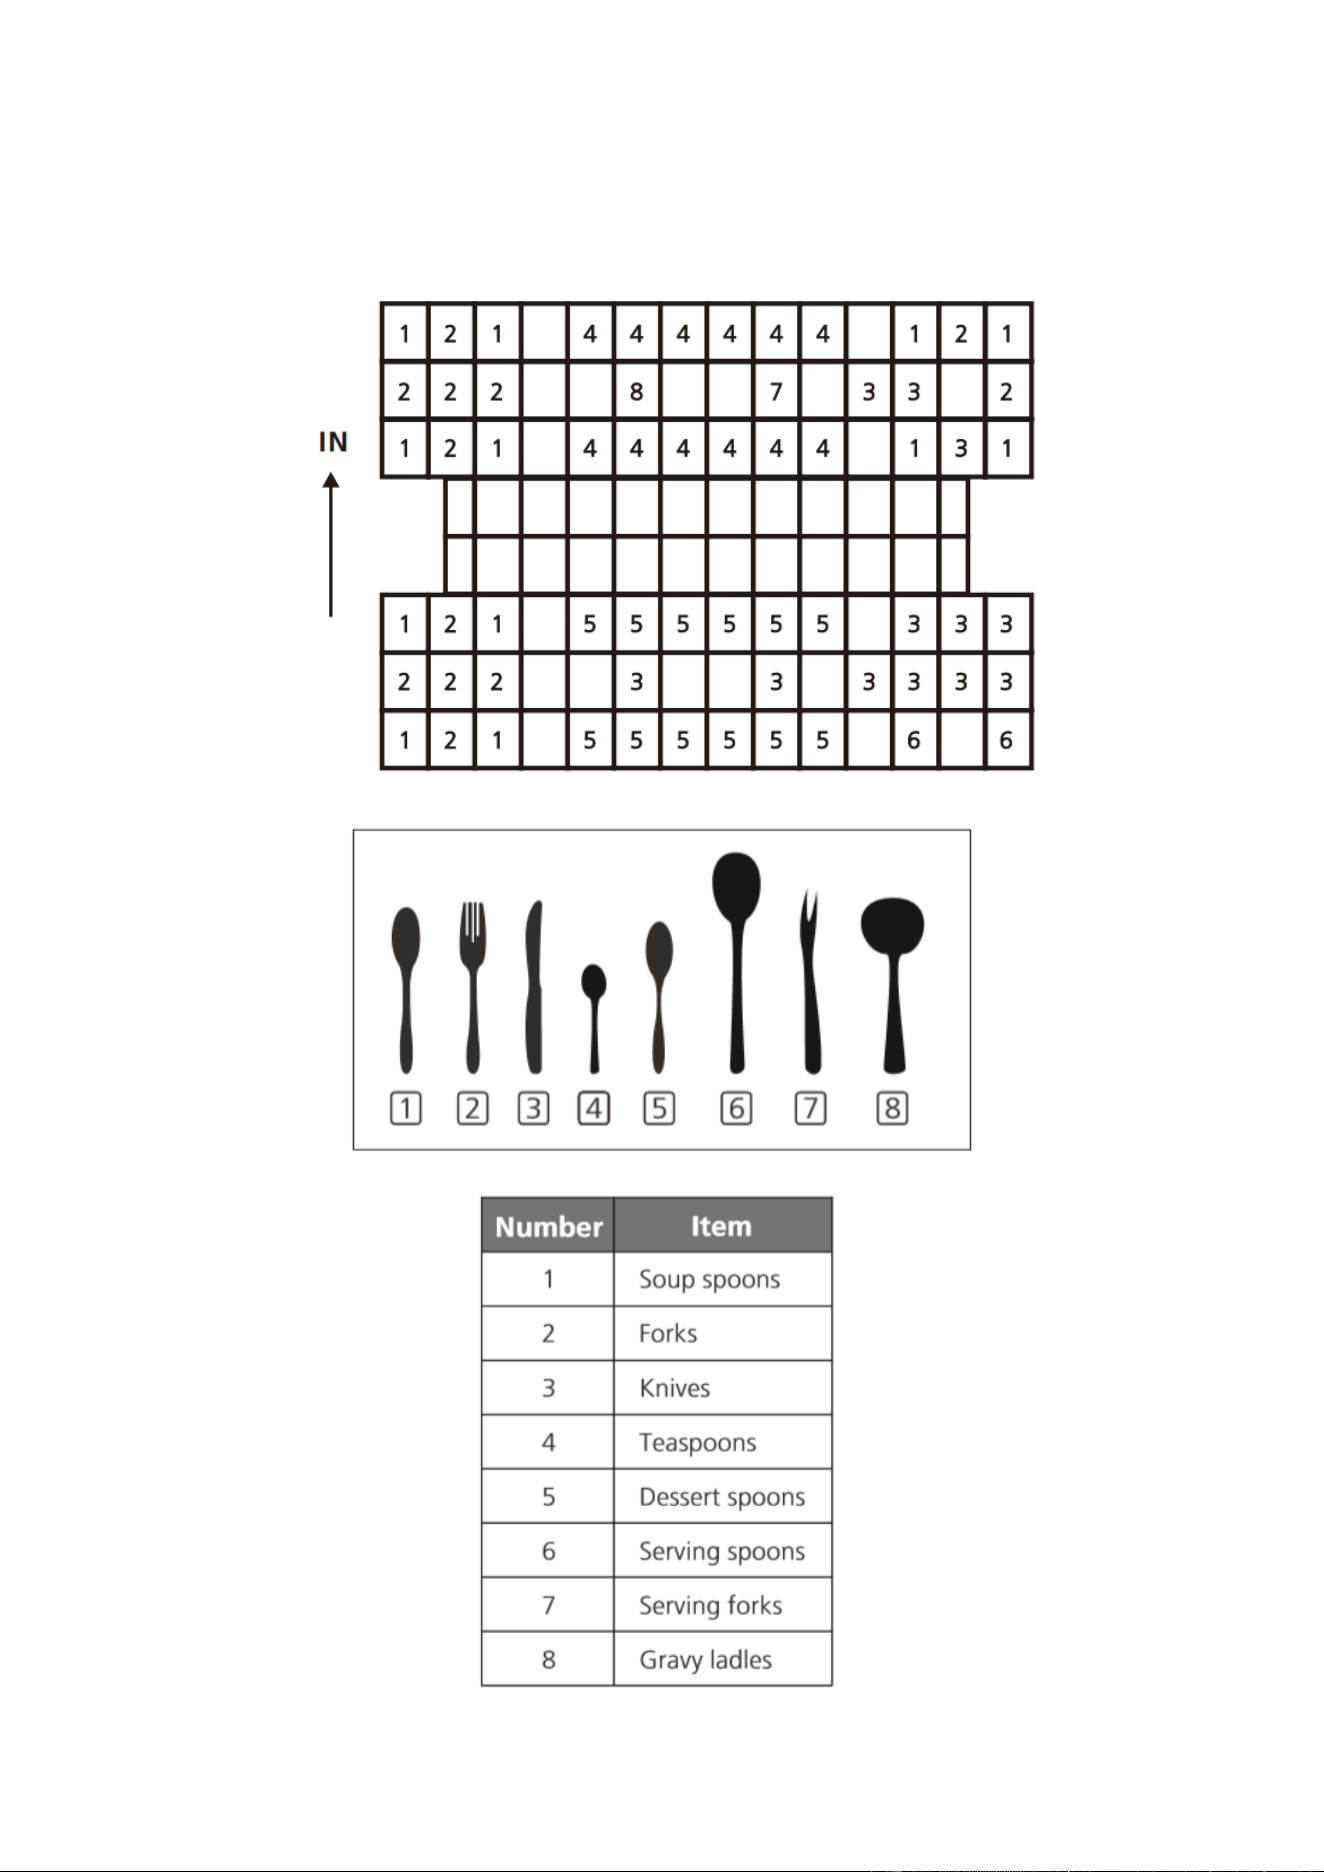
CUTLERY BASKET
Information for
comparability tests in
accordance with EN60436:
Capacity: 12 place
settings.
Position of the upper
basket: lower position.
Program: ECO
Rinse Aid Setting: Max.
Softener Setting: H3
13
OPERATION
Load the dishwasher according to the instructions given. This will ensure maximum
efficiency when the dishwasher is in use.
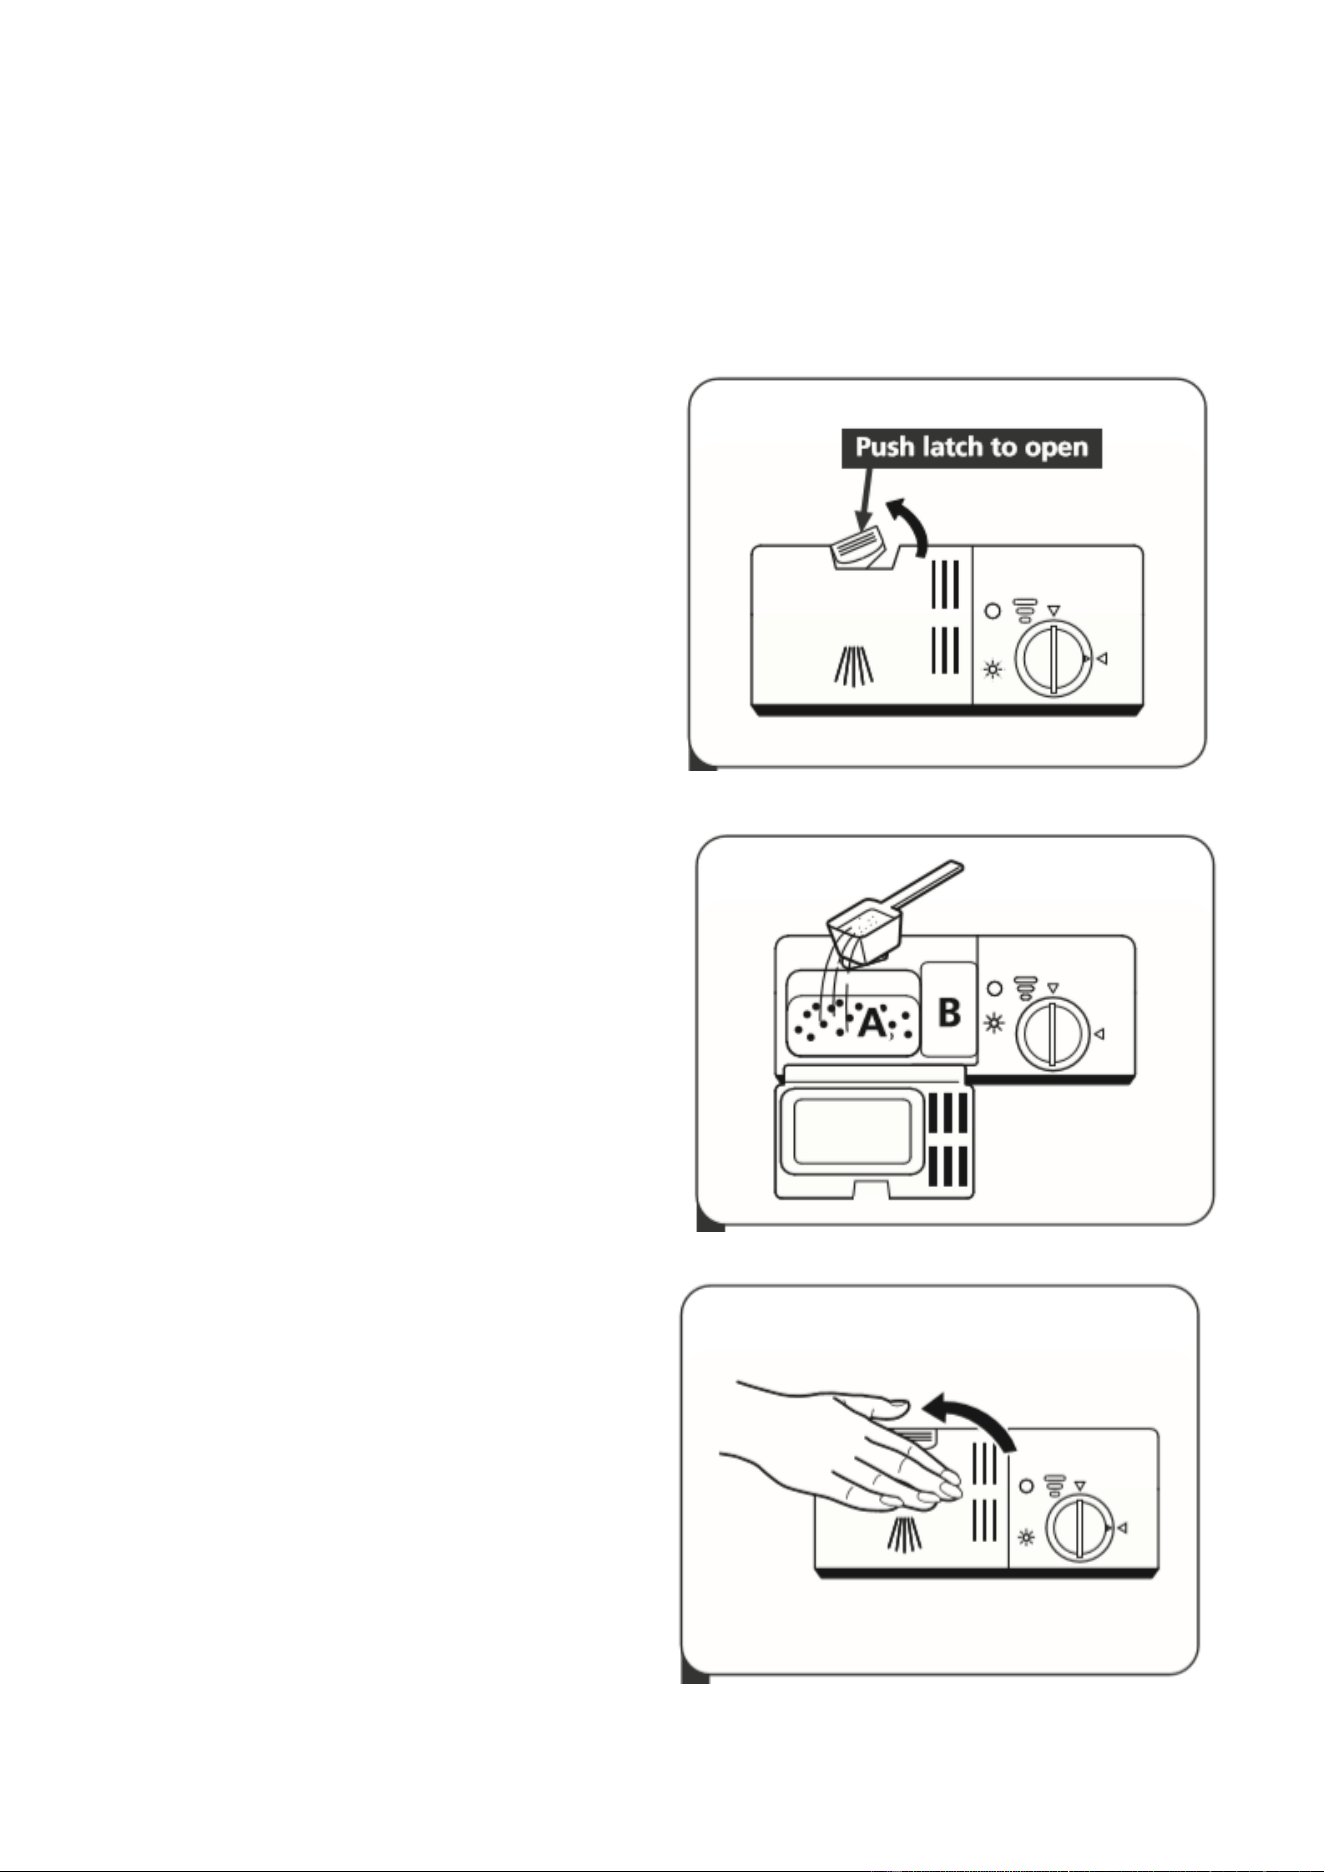
When the dishwasher is full, the detergent dispenser must be filled:
1. Press the release catch on the
dispenser to open the cover.
2. Add detergent into the larger cavity
(A) for the main wash.
3. If dishes need intensive cleaning, add
a small amount of detergent to the
smaller cavity (B) for the pre-wash
cycle.
4. Close the cover and gently push
down until a clicking noise is heard.
This noise indicates that the cover is
locked.
14
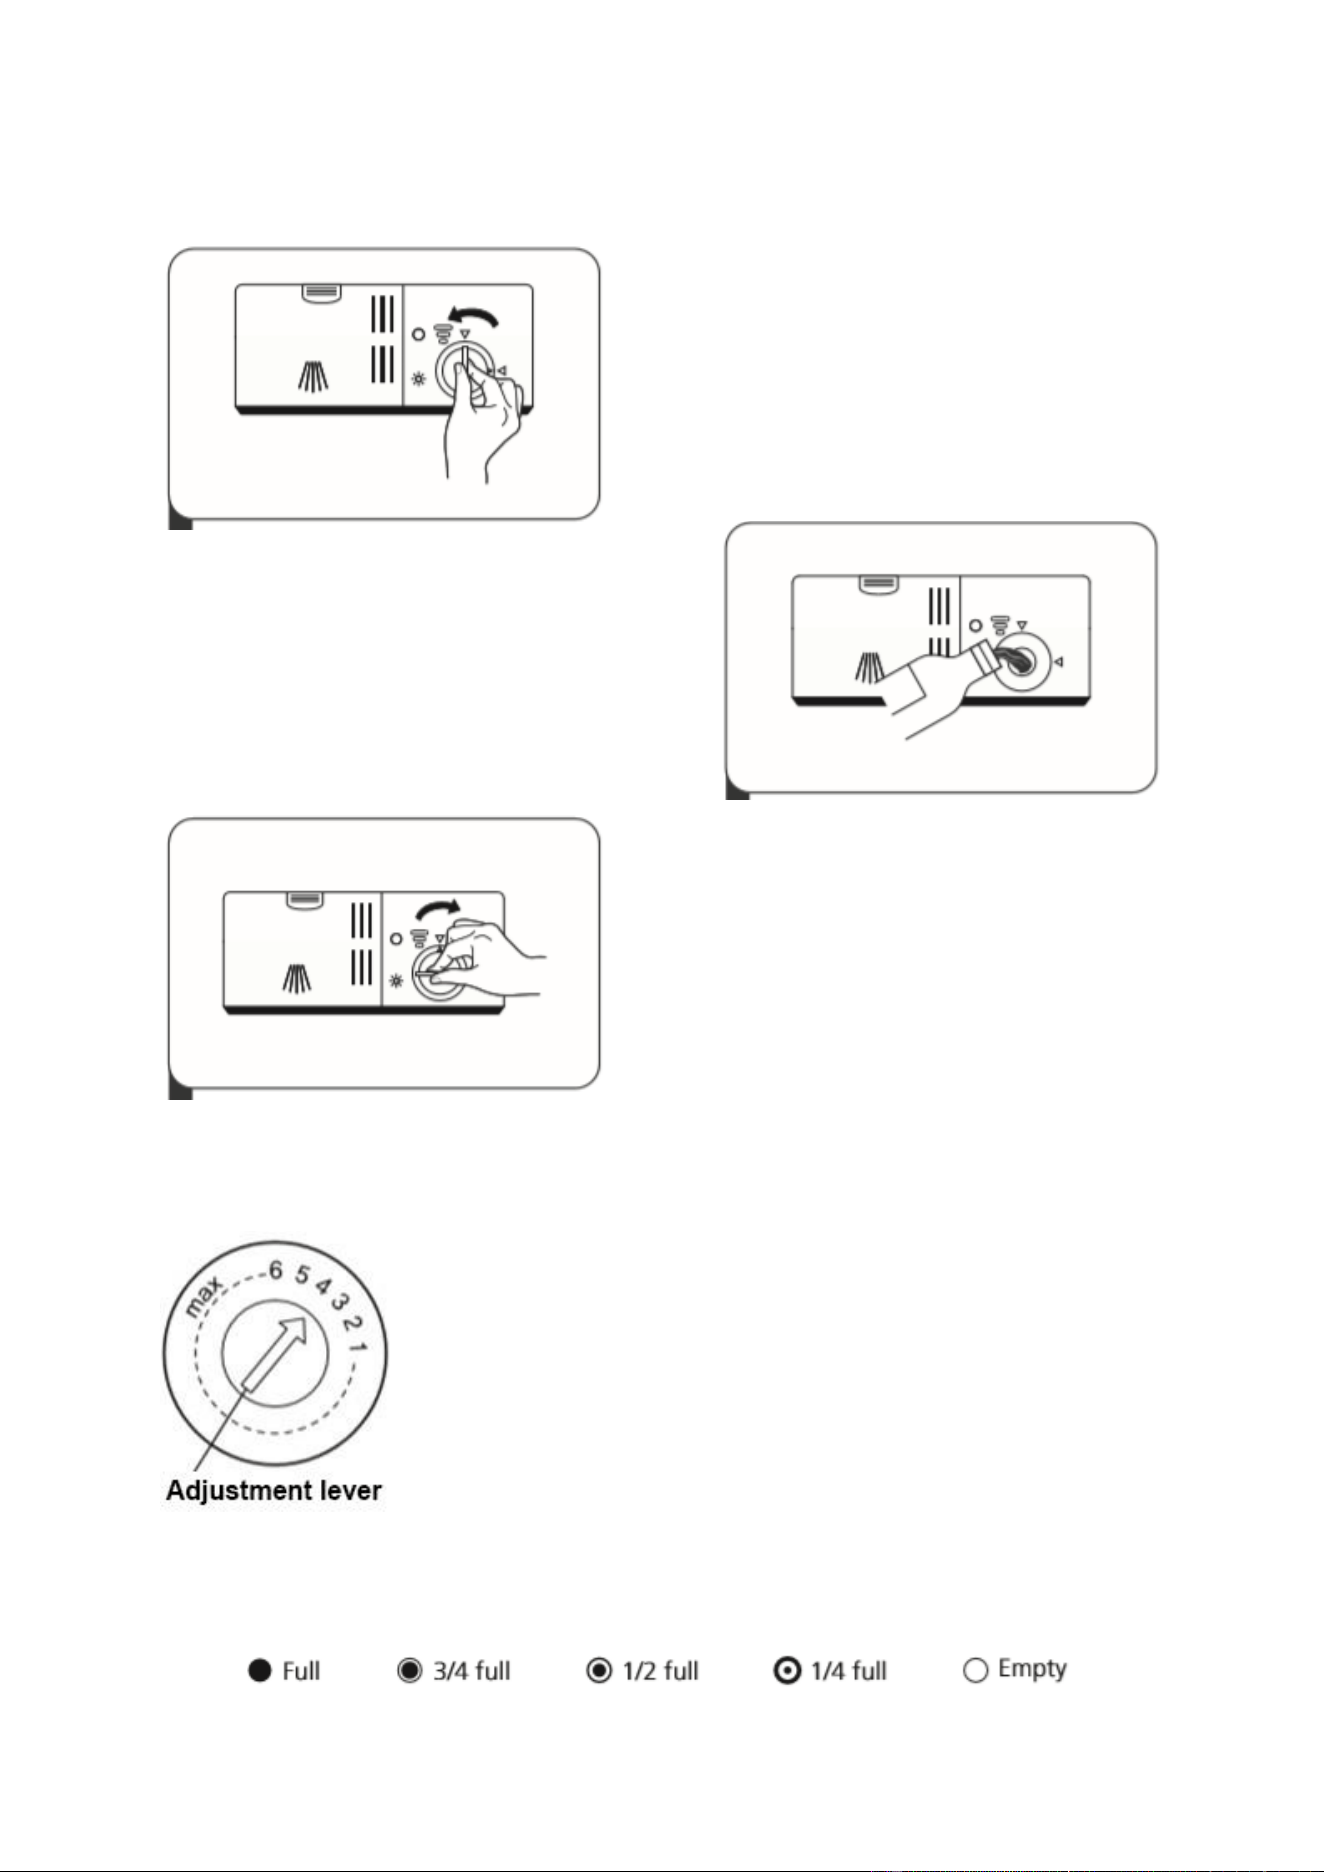
FILLING THE RINSE AID RESERVOIR
Remove the rinse aid reservoir cap by
rotating it anticlockwise.
Carefully pour the rinse aid into the
dispenser, making sure it does not overflow.
Close the rinse aid reservoir cap by rotating it
clockwise.
ADJUSTING THE RINSE AID RESERVOIR
Turn the rinse aid indicator dial to a number between 1 and 6.
The higher the number, the more rinse aid the dishwasher will
use. If the dishes are not drying properly or are spotted, adjust
the dial until they are spot-free. If there is a sticky residue or
bluish film on your dishes, reduce the rinse aid level.
NOTE: As the rinse aid diminishes, the size of the black dot on the rinse aid level
indicator changes.
15
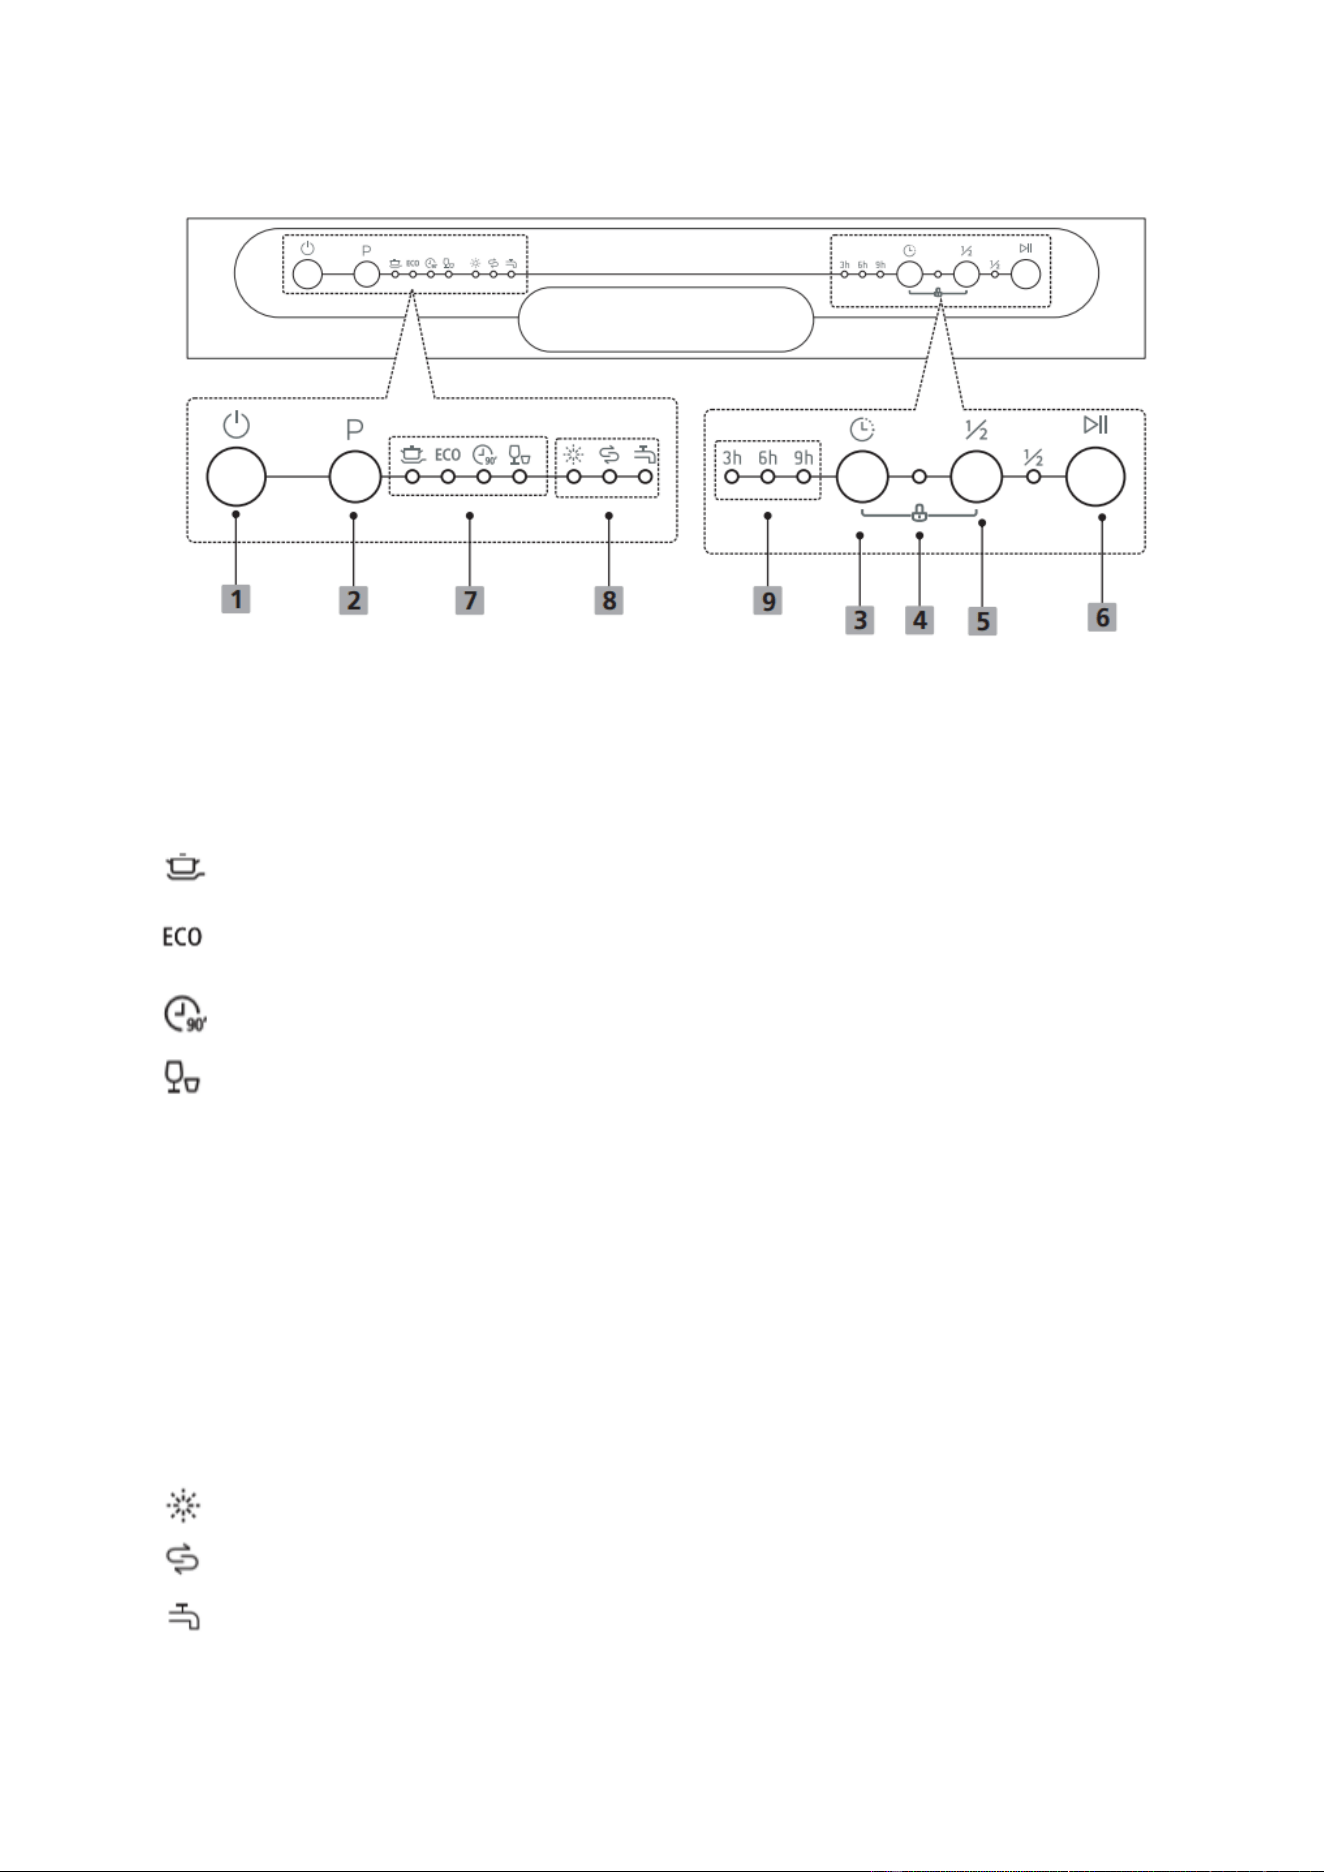
CONTROL PANEL
1. POWER: Press this button to turn on the dishwasher
2. PROGRAM: Select the appropriate washing program, and the selected program
indicator will be illuminated. The currently selected program will be illuminated on the
program indicator and can be chosen between:
Intensive is best used for heavily soiled dishes and dried food
Eco is the standard program. It is suitable for lightly soiled dishes and everyday
cleaning and is the most efficient program in terms of energy and water savings.
90 minutes is used for normally soiled dishes.
Rapid is ideal for shorter meals, with lightly soiled dishes that do not need drying.
3. DELAY: Press the button to set a delayed start to the washing program.
4. CHILD LOCK: This option allows you to lock the buttons on the control panel except
the Power button. To lock or unlock the buttons, press and hold both the half-load
button and the Delay button for 3 seconds.
5. HALF LOAD: When you have six or fewer place settings to wash, you can choose this
function to save energy and water. (It can only be used with Intensive, ECO, 90 mins.)
6. START/ PAUSE: To start the selected washing program or pause it during operation.
7. PROGRAM INDICATOR: Displays the currently selected wash program.
8. WARNING INDICATOR:
When illuminated, the dishwasher is low on rinse aid and needs refilling.
When illuminated, the salt needs to be refilled.
When illuminated, it indicates no water supply.
9. TIMER INDICATORS: To show the delay time (3h/6h/9h)
16
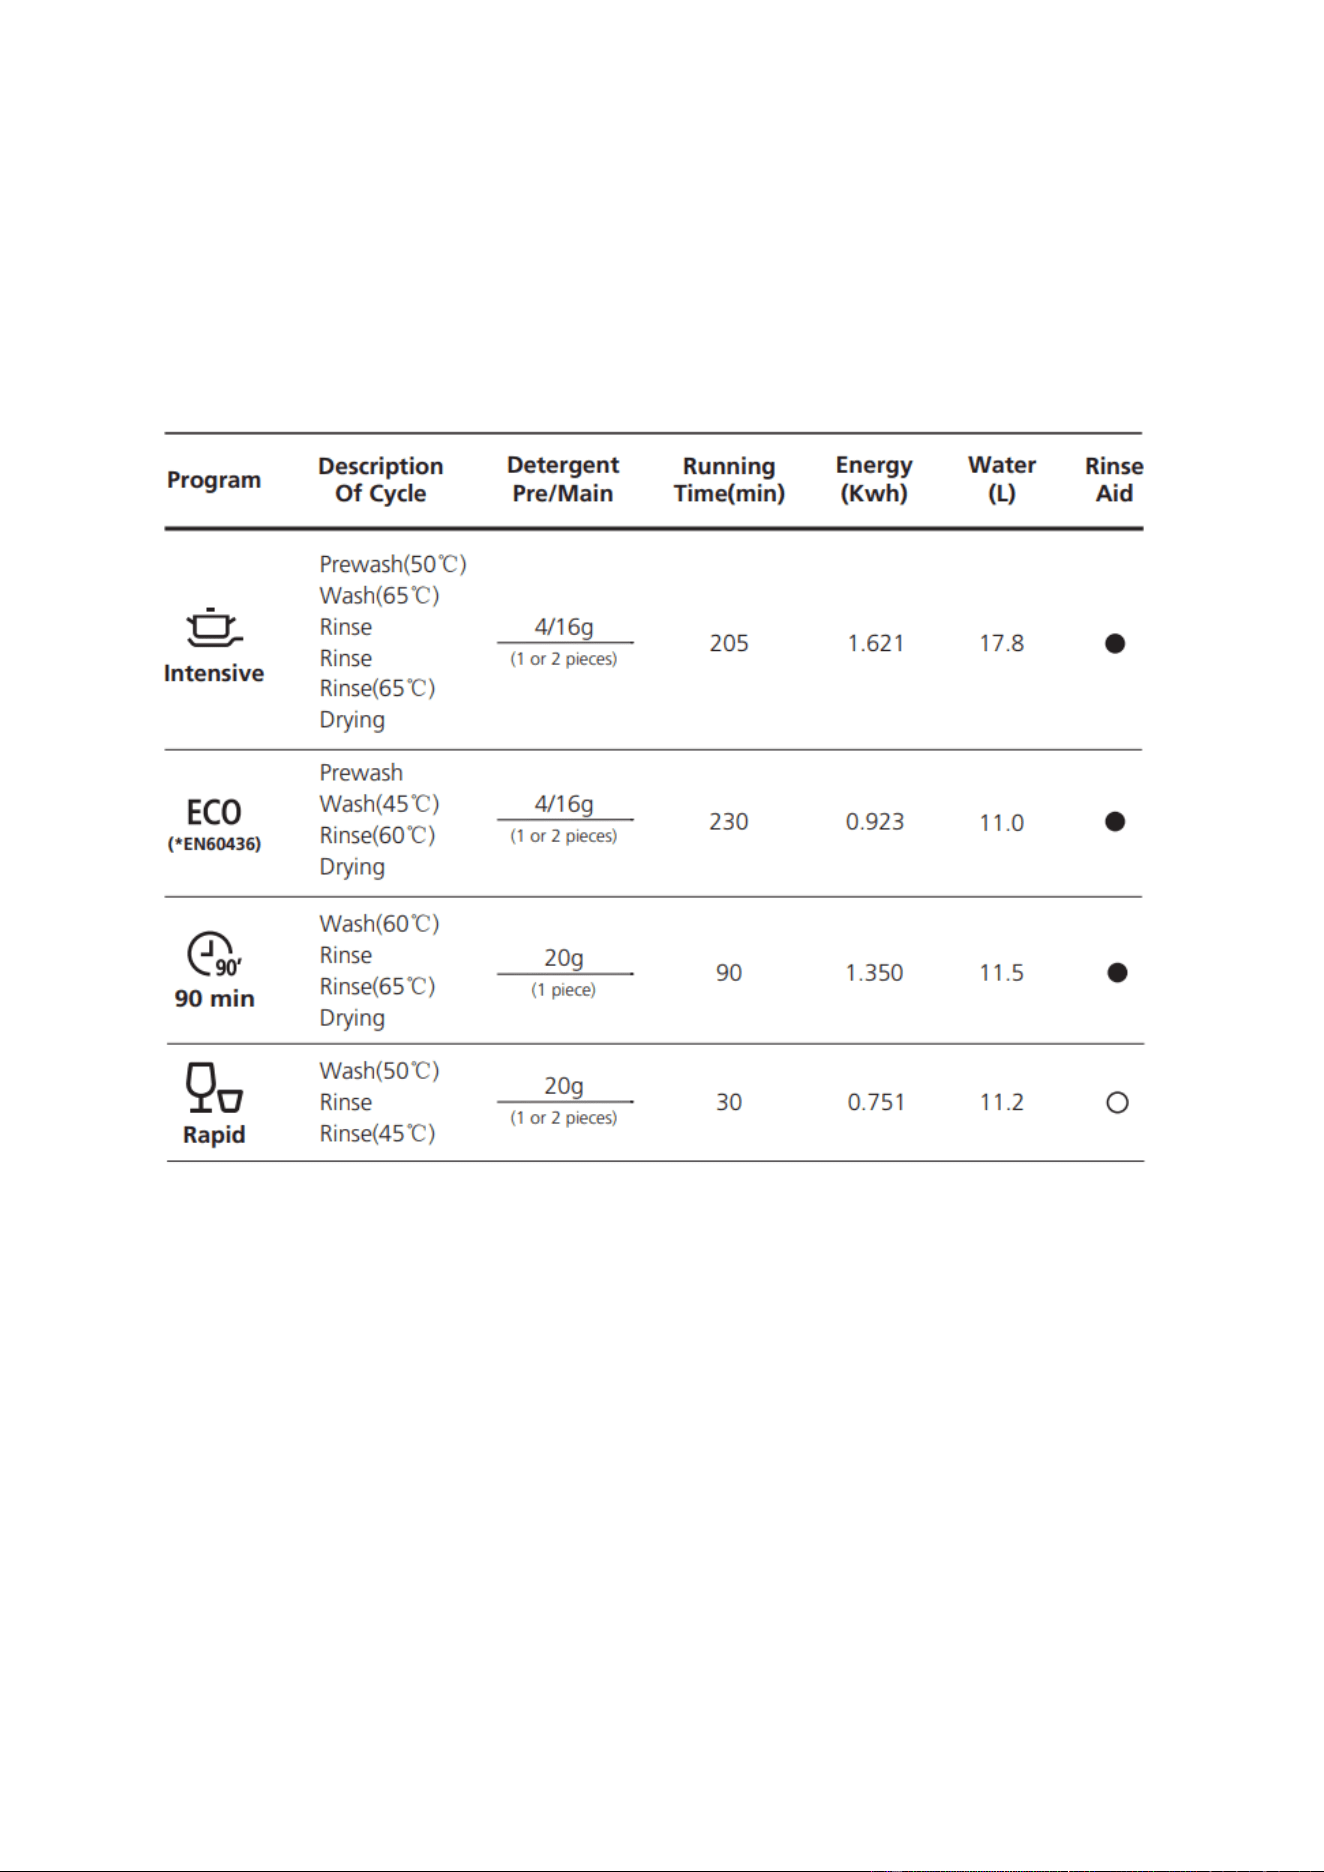
WASH CYCLE TABLE
The table below shows which programs are best for the levels of food residue on
them and how much detergent is needed. It also provides information about various
programs.
NOTE: EN 60436: The information for the comparability test in accordance with:
EN 60436. This program is the test cycle.
Starting A Cycle Wash
1. Slide out the lower and upper baskets, load the dishes, and push them back. It is
recommended that you load the lower basket first, then the upper one.
2. Insert the required quantity of detergent.
3. Plug in the appliance”. Make sure that the water supply is turned on to full
pressure.
4. Close the door and press the Power button to switch on the machine.
5. Select the required program. Then press the Start/Pause button, and the
dishwasher will start its cycle.
17
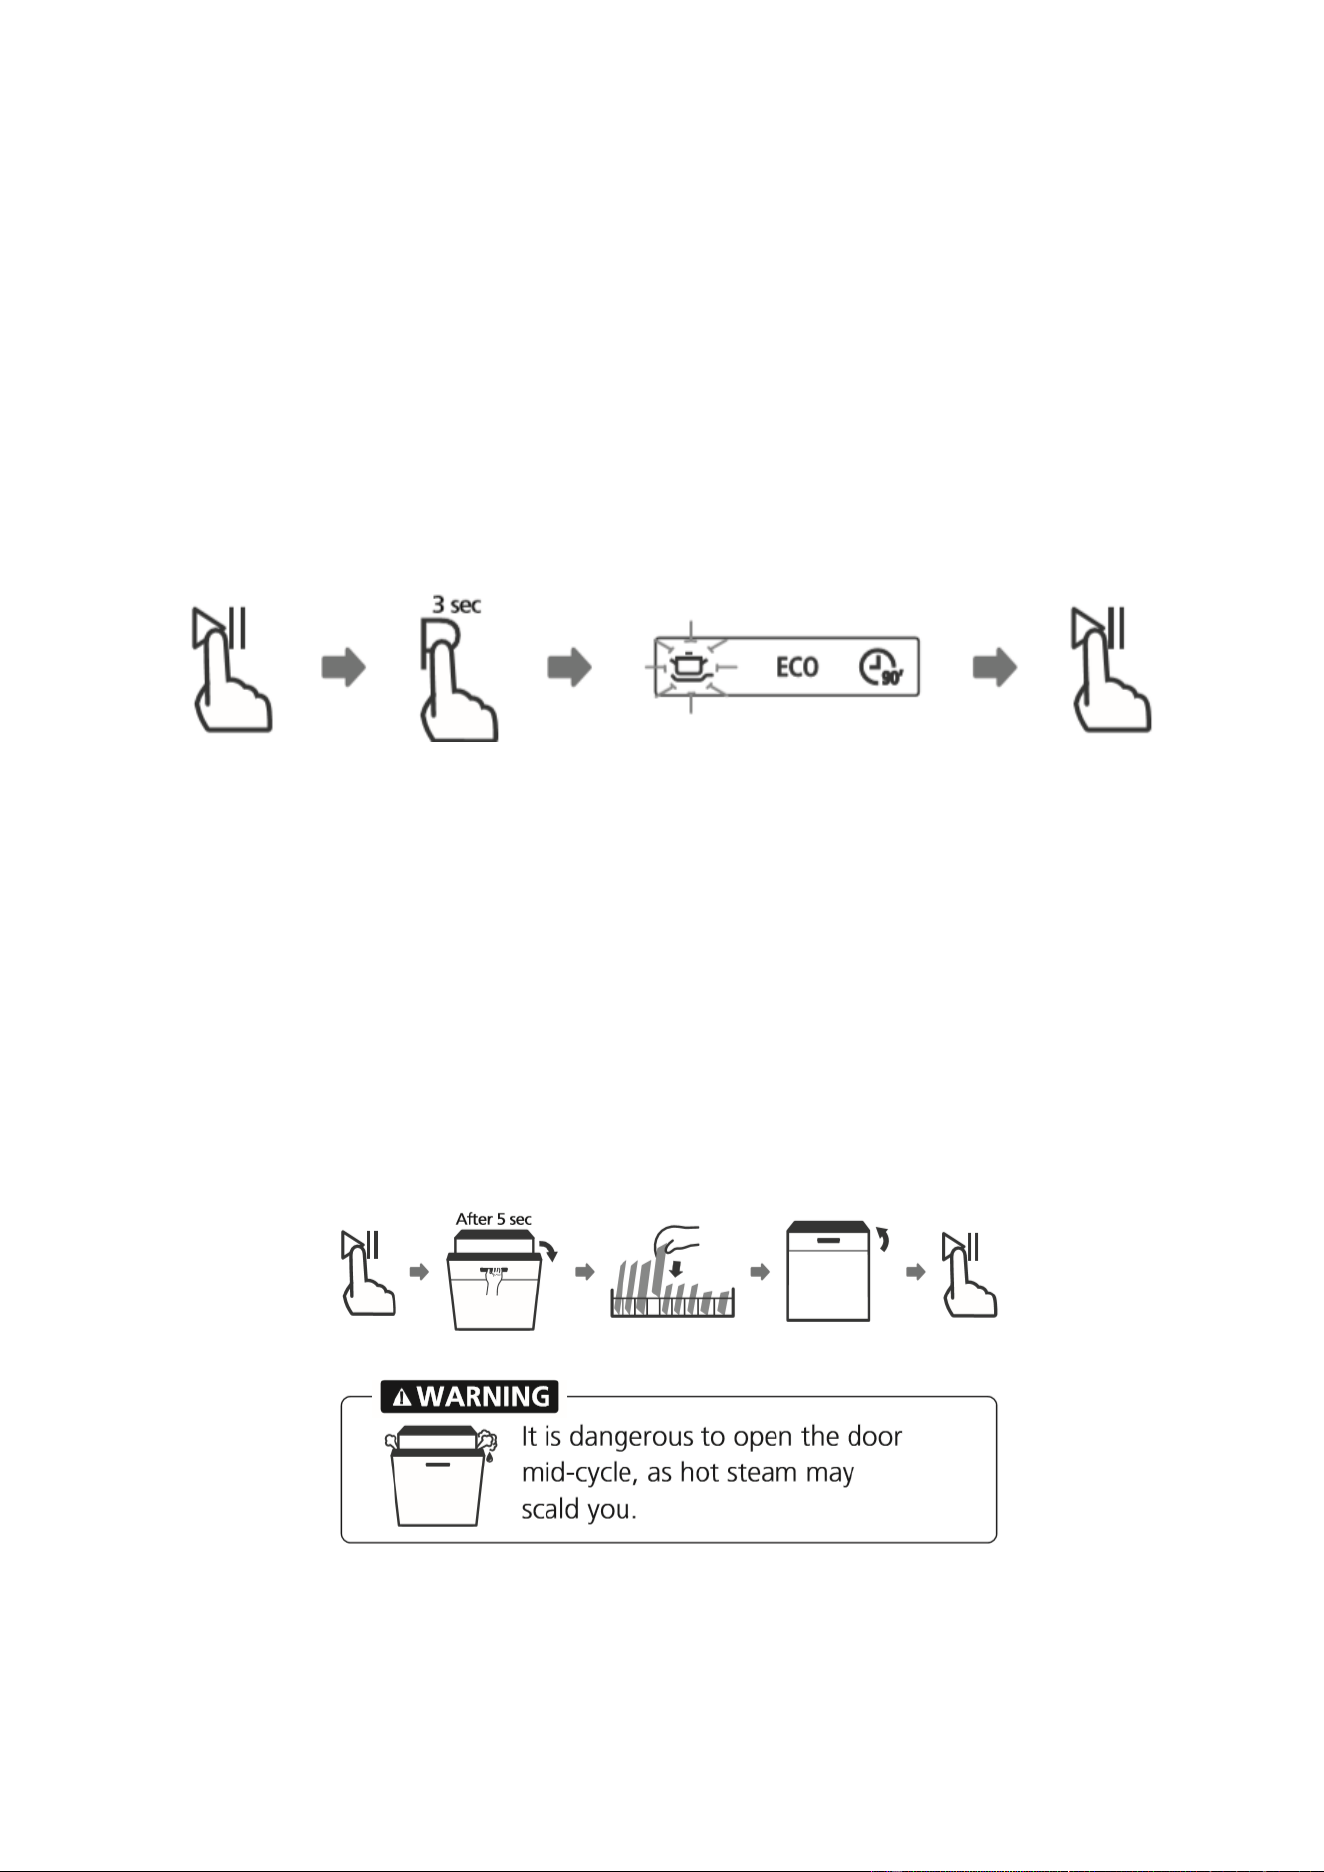
CHANGING THE PROGRAM MID-CYCLE
A wash cycle can only be changed if it has been running for a short time. Otherwise,
the detergent may have already been released, and the dishwasher may have
already drained the wash water. If this is the case, the dishwasher needs to be reset,
and the detergent dispenser needs to be refilled.
To reset the dishwasher, follow the instructions below:
1. Press the Start/Pause button to pause the washing.
2. Press and hold the Program button for 3 seconds, and the program will cancel.
3. Press the Program button to select the desired program.
4. Press the Start/Pause button. After 10 seconds, the dishwasher will start.
FORGOT TO ADD A DISH?
A forgotten dish can be added any time before the detergent dispenser opens. If this
is the case, follow the instructions below:
1. Press the Start/Pause button to pause the operation.
2. Wait 5 seconds, then open the door.
3. Add the additional items.
4. Close the door.
5. Press the Start/Pause button after 10 seconds, and the dishwasher will continue
its cycle.
18
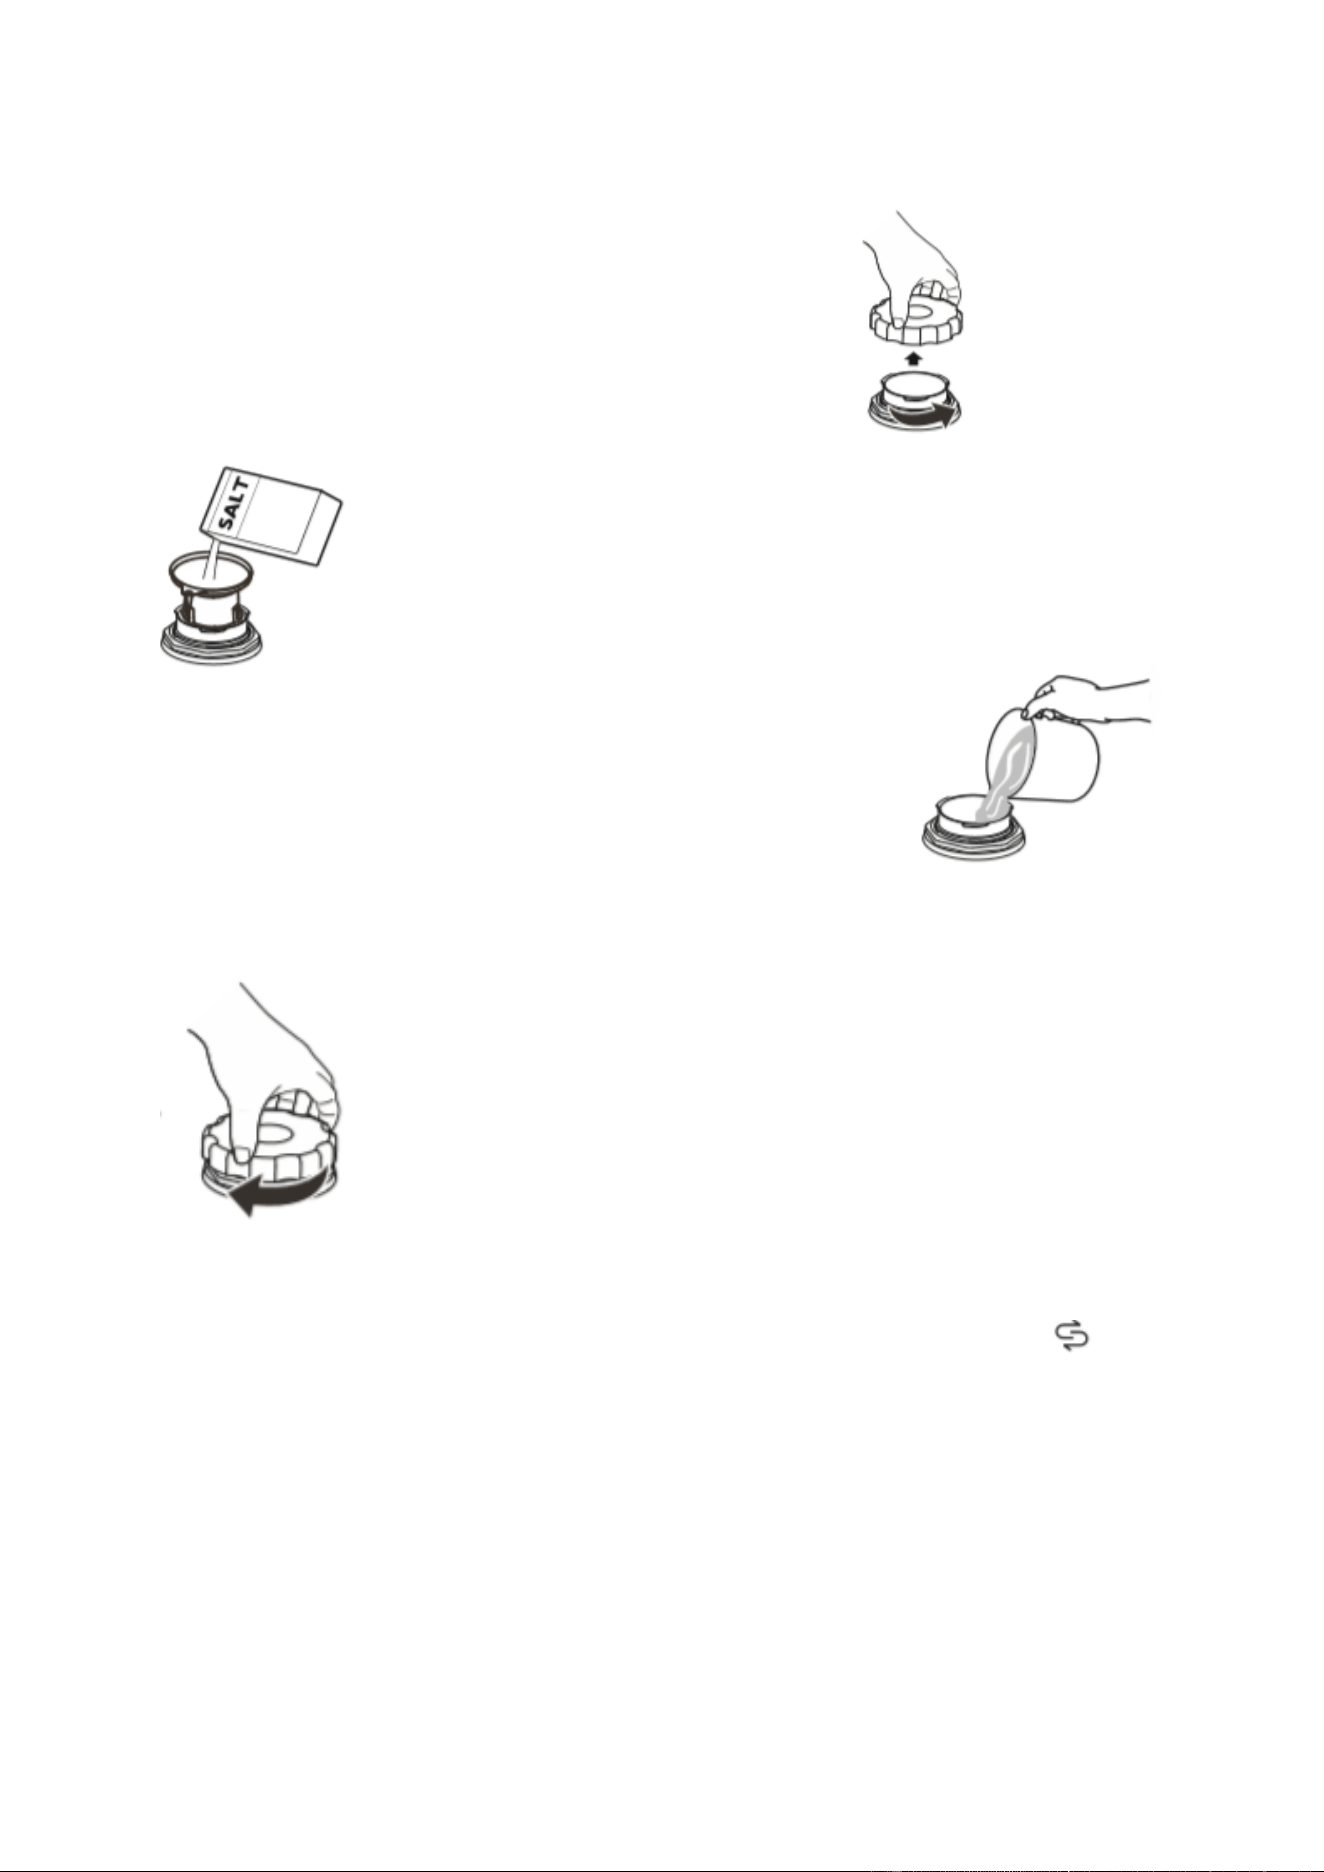
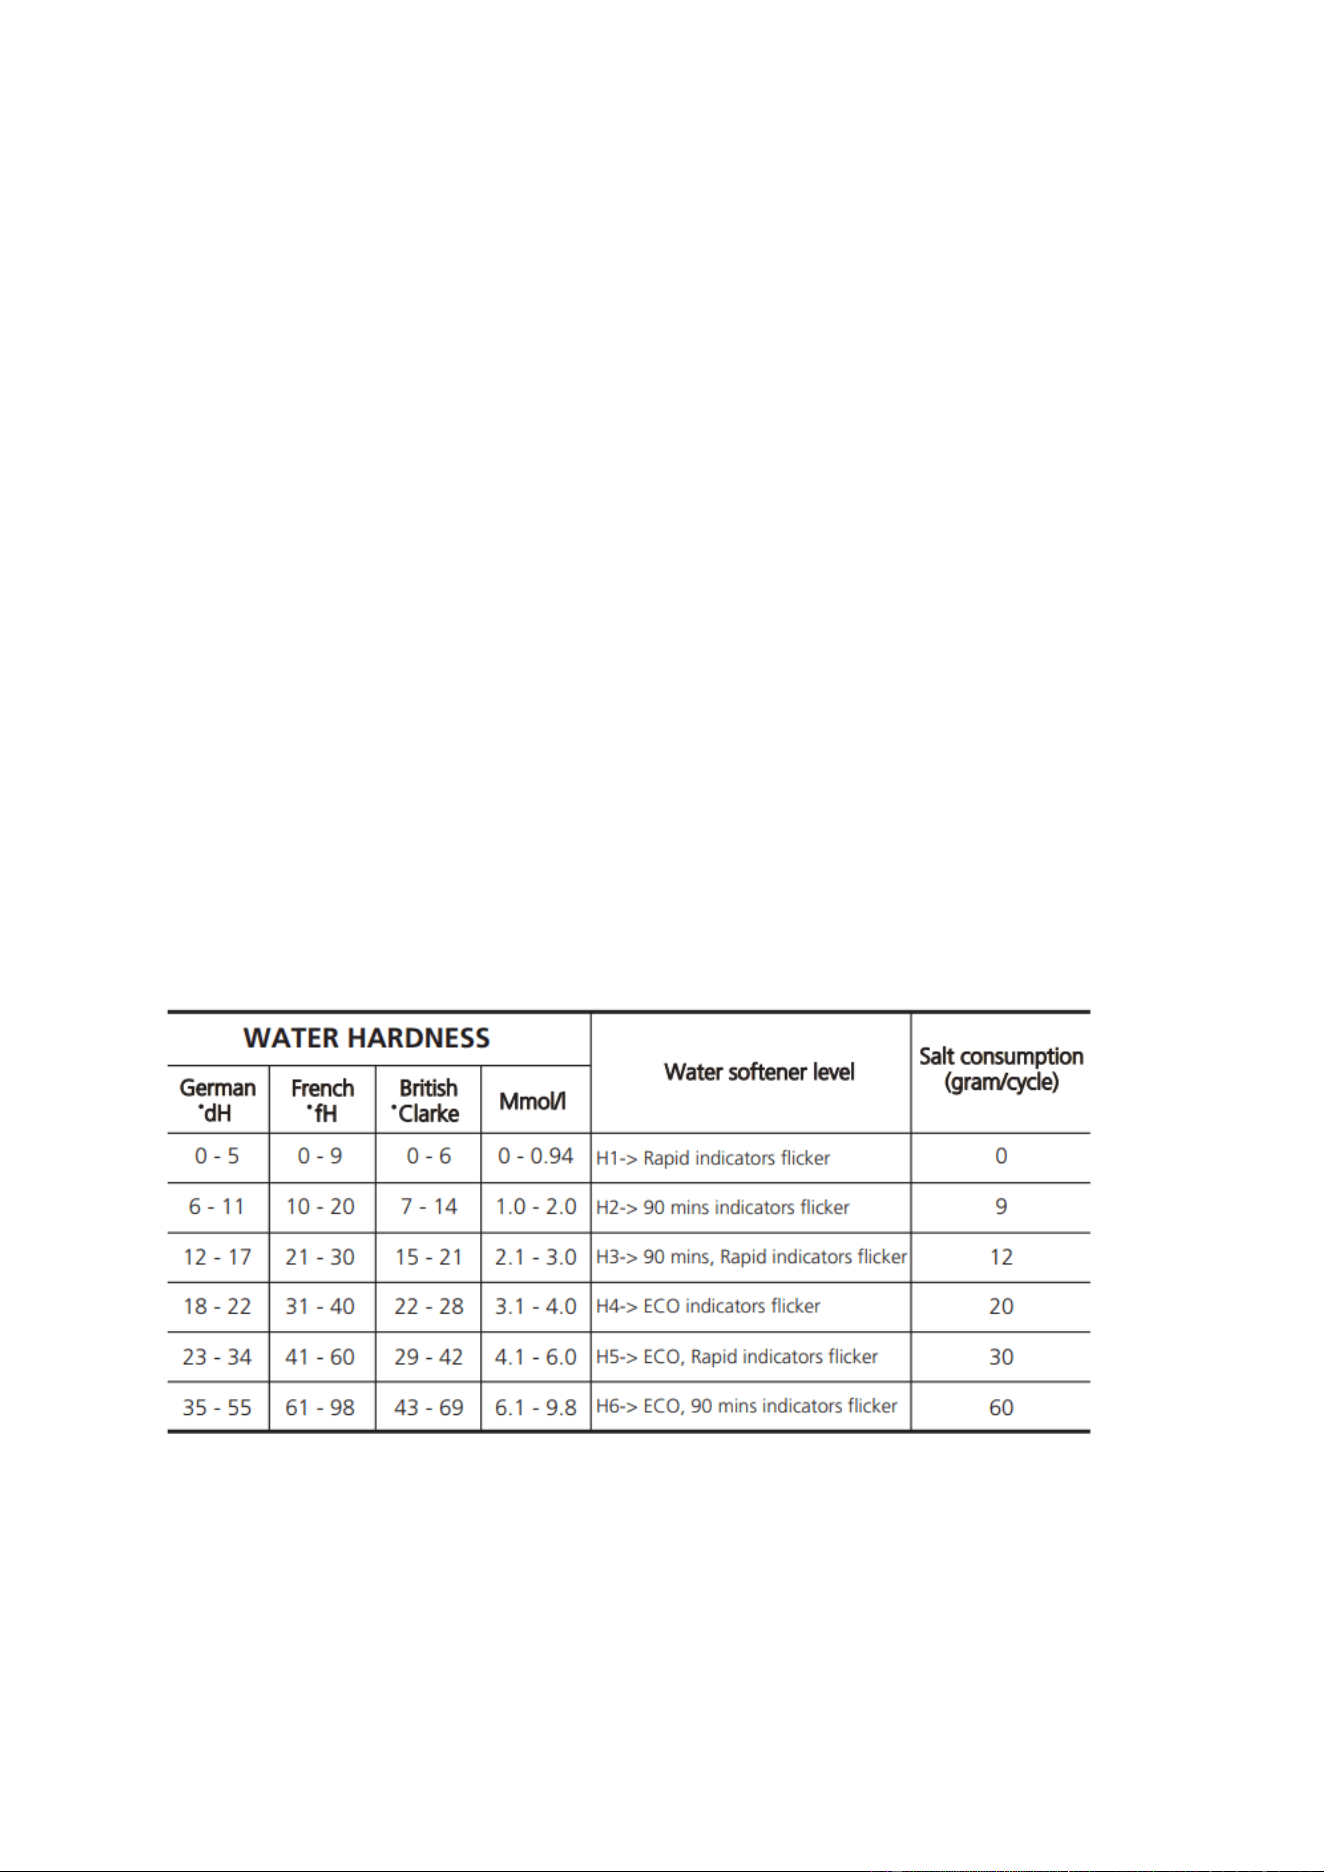
ADDING SALT
Remove the lower basket and unscrew the reservoir cap.
Place the end of the funnel into the hole and pour in around 1.5kg
of salt.
Fill the salt container to its maximum limit with water. It is
normal for a small amount of water to come out.
After filling the container, screw the cap back on.
The salt warning light will stop after the salt container has been
filled.
Immediately after filling the salt container with water, a washing
program should be started (we suggest using a short program).
Otherwise, salty water may damage the filter system, pump, or
other important parts of the machine. Failure to do this would be
considered misuse and not covered under the warranty.
NOTE: The salt container must only be refilled when the salt warning light ( ) on
the control panel illuminates.
Depending on how well the salt dissolves, the salt warning light may still be on even
though the salt container is filled. If salt has spilt, run a soak or quick program to
remove it.
19
WATER SOFTENER
• Water hardness varies from place to place. If hard water is used in the
dishwasher, deposits will form on the dishes and utensils. The appliance is
equipped with a special softener that uses a salt container specifically designed to
eliminate lime and minerals from the water.
• The water softener must be set manually using the water hardness dial. It is
designed to remove minerals and salts from the water that would have a
detrimental or adverse effect on the appliance's operation. The more minerals
there are, the harder your water is. The softener should be adjusted according to
the hardness of the water in your area. Your local Water Authority can advise you
on the hardness of the water in your area.
• Adjusting salt consumption: The dishwasher is designed to allow for adjustment in
the amount of salt consumed based on the hardness of the water used. This is
intended to optimise and customise the level of salt consumption.
1. Switch on the appliance and close the door.
2. Press the Program button for more than 5 seconds to start the water softener set
model within 60 seconds of switching on the appliance.
3. Press the Program button to select the proper set according to your local
environment. The sets will change in the following sequence:
H1->H2->H3->H4->H5->H6
4. Press the Power button to end the setup mode.
20
MAINTENANCE AND CLEANING
• Clean the door, and the door seal regularly with a soft, damp cloth to remove food
deposits. When the dishwasher is being loaded, food and drink residues may drip
onto the sides of the dishwasher door. These surfaces are outside the wash
cabinet and are not accessed by water from the spray arms. Any deposits should
be wiped off before the door is closed.
• If The control panel needs to be cleaned, it should be wiped with a soft damp
cloth.
NOTE: The filtering system in the base of the wash cabinet retains coarse debris
from the washing cycle. The collected coarse debris may cause the filters to clog.
Check the condition of the filters regularly and clean them, if necessary, under
running water. Follow the steps below to clean the filters in the wash cabinet.
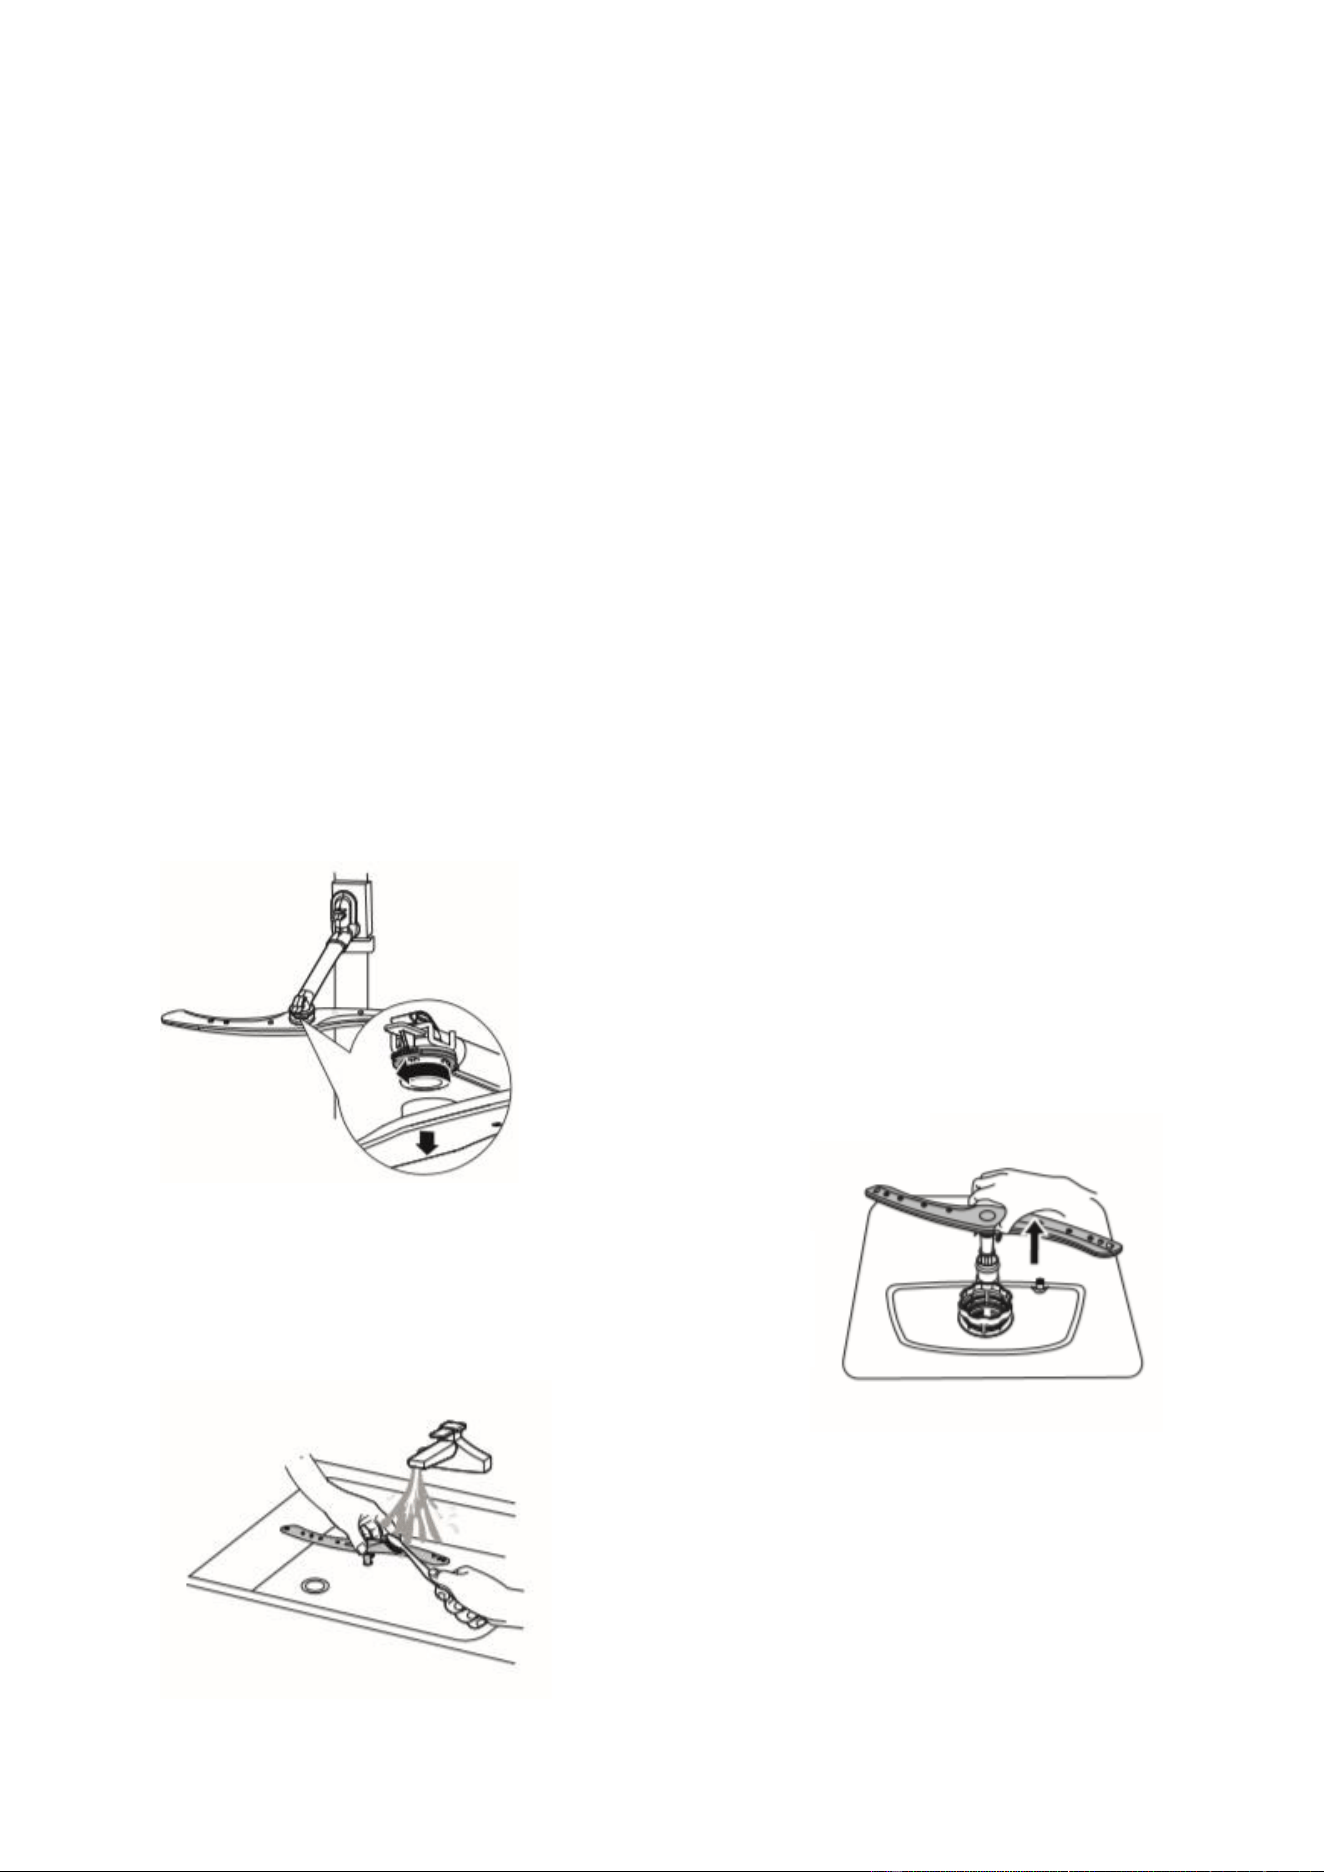
CLEANING THE SPRAY ARMS
It is necessary to clean the spray arms regularly, as hard water chemicals will clog
the spray arm jets and bearings. To clean the spray arms, follow the instructions
below:
To remove the upper spray
arm, hold the nut and rotate
the arm clockwise.
To remove the lower spray
arm, pull the spray arm out
with an upwards motion.
Wash the arms in soapy warm
water and use a soft brush to
clean the jets. Rinse
thoroughly and replace by
following the instructions in
reverse order.

21
FROST PRECAUTION
Please take frost protection measures on the dishwasher in winter. Every time after
washing cycles, please operate as follows:
1. Cut off the electrical power to the dishwasher at the supply source.
2. Turn off the water supply and disconnect the water inlet pipe from the water
valve.
3. Drain the water from the inlet pipe and water valve. (Use a pan to gather the
water)
4. Reconnect the water inlet pipe to the water valve.
5. Remove the filter at the bottom of the tub and use a sponge to soak up water in
the sump.
After every wash, turn off the appliance's water supply and leave the door slightly
open so that moisture and odours are not trapped inside.
Before cleaning or performing maintenance, always remove the plug from the
socket.
NO SOLVENTS OR ABRASIVE CLEANING
To clean the exterior and rubber parts of the dishwasher, do not use solvents or
abrasive cleaning products.
Only use a cloth with warm, soapy water. To remove spots or stains from the surface
of the interior, use a cloth dampened with water and a little vinegar, or a cleaning
product made specifically for dishwashers. When not in use for a long time, it is
recommended that you run a wash cycle with the dishwasher empty and then
remove the plug from the socket, turn off the water supply and leave the door of the
appliance slightly open. This will help the door seals to last longer and prevent
odours from forming within the appliance.
Seals One of the factors that cause odours to form in the dishwasher is food that
remains trapped in the seals. Periodic cleaning with a damp sponge will prevent this
from occurring.
22
TROUBLESHOOTING
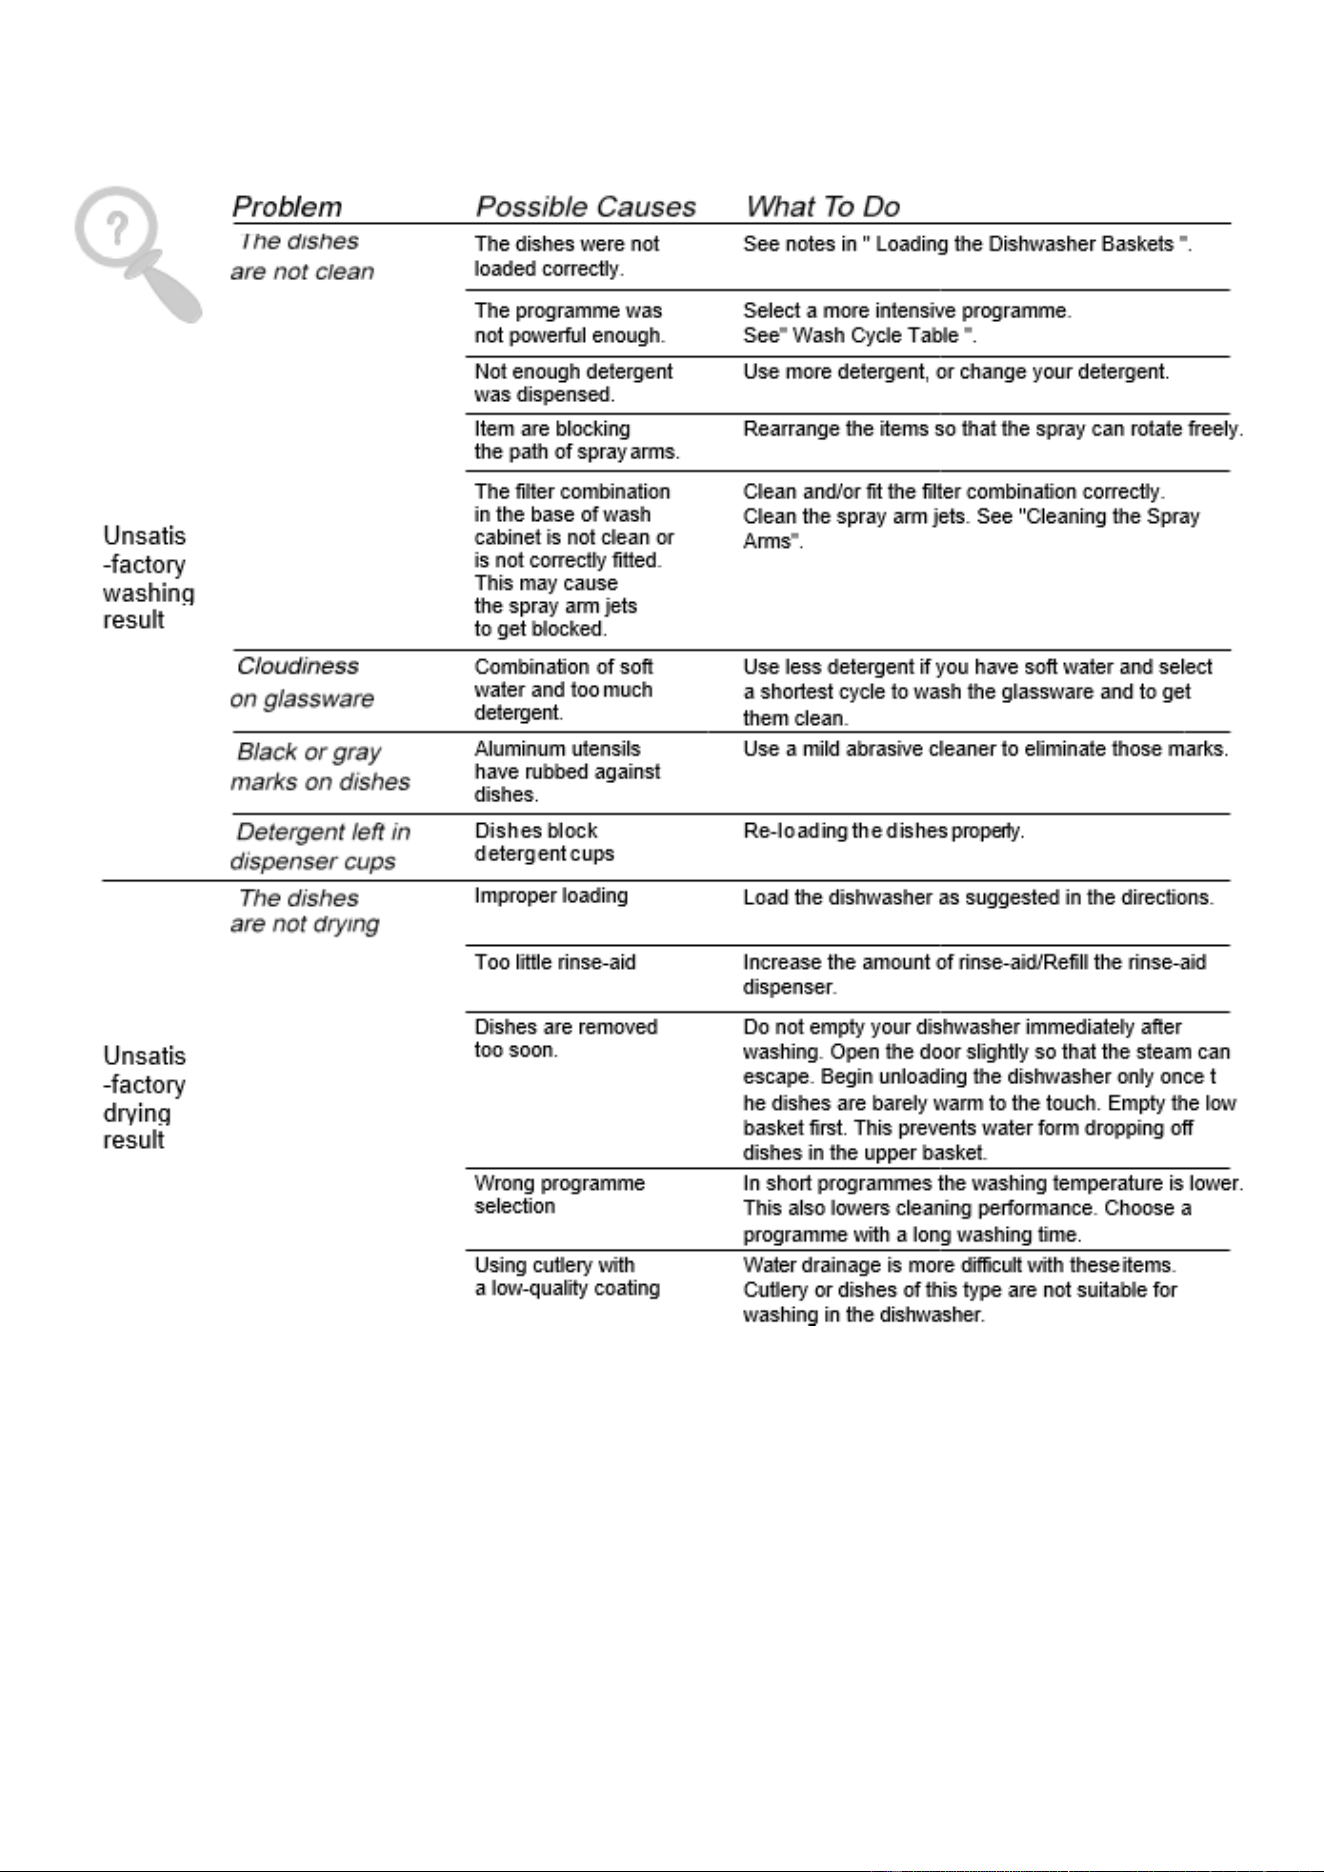
23
24
ERROR CODES
CODES
MEANINGS
POSSIBLE CAUSES
The rapid light flickers
Longer inlet time
Faucets are not opened; water
intake is restricted or water
pressure is to low
The rapid and 90-
minute light flicker
Not reaching the required
temperature
Malfunction of the heating
element
The ECO light flickers
Overflow
An element of the dishwasher
is leaking
The ECO, Rapid and
Intensive Indicator
flicker
Failure of communication
between the main PCB
with the display PCB
An open circuit or a break in
the internal wiring
WARNING: If the dishwasher overflows, turn off the main water supply before calling
for service. If water is in the base pan because of an overfill or small leak, it should
be removed before restarting the dishwasher.
TECHNICAL INFORMATION
MODEL
EQ60DW EQ60DWBLACK
COLOUR
WHITE / BLACK
DIMENSIONS
598x845x600mm
NET WEIGHT
40kg
LOADING CAPACITY
12
VOLTAGE
230V~
FREQUENCY
50 Hz
POWER
1930W
ENERGY EFFICIENCY CLASS
E
NOISE LEVEL
52dB
ENERGY CONSUMPTION PER CYCLE
0.885 kWh
ANNUAL ENERGY CONSUMPTION
258 kWh/a
WATER CONSUMPTION PER CYCLE
11 l
ANNUAL WATER CONSUMPTION
11 l/a
WATER PRESSURE
0.04 – 1.0 MPa
IP LEVEL
IPX1

25
electriQ UK SUPPORT
www.electriQ.co.uk/support
For your convenience, please check the troubleshooting guide before
calling the service line.
If the unit still fails to operate, call: 0330 390 3061
Office hours: 9 AM - 5 PM Monday to Friday
Unit 2A, Trident Business Park,
Neptune Way, Leeds Road,
Huddersfield, HD2 1UA
DISPOSAL
Do not dispose of this product as unsorted waste. Collection of such waste
must be handled separately as special treatment is necessary.
Recycling facilities are now available for all customers, where they
can deposit their old electrical products. Customers can take any old
electrical equipment to participating sites run by their local councils.
Please remember that this equipment will be further handled during
the recycling process, so please be considerate when depositing your
equipment. Please contact the local council for details of your local
household waste recycling centres.
V20250418L