
MODEL NO.
RPJ133_24DISP
720P smart Roku projector
Ideal for dark viewing environments for optimal performance.
Please note:Projector brightness is measured in ANSI lumens. Your viewing
environment is the deciding factor on how many lumens your projector needs.
PLEASE READ BEFORE OPERATING THIS EQUIPMENT
This product is manufactured and sold by SHENZHEN KEJINMING
ELECTRONIC CO.,LTD. RCA, the RCA logo, the two dogs (Nipper and
Chipper) logo, are registered trademarks or trademarks of RCA
TrademarkManagement and are usedunder license by SHENZHEN
KEJINMING ELECTRONIC CO.,LTD. Any other product, service, company,
trade or product name and logo referenced herein are neitherendorsed nor
sponsored by RCA Trademark Management or its affiliates. Roku, the Roku
logo, and Streaming Stick are the trademarks of Roku, Inc in the United
States and other countries.
3. Heed all Warnings.
5. Do not use this apparatus near water.
6. Clean only with a dry cloth.
8. Do not install near any heat sources such as radiators, heat registers, stoves, or
other apparaƚƵƐ;ŝŶĐůƵĚŝŶŐĂŵƉůŝĮĞƌ) that product heat.
convenience receptacles, and the point where they exit from the apparatus.
11. Unplug this apparatus during lightning storms or when unused for long periods
12. Refer all servicing toƋƵĂůŝĮĞd service personnel. Servicing is required when the
apparatus has been damaged in any way, such as power-supply cord or plug is
damaged, liquid has been spilled or objects have fallen into the apparatus, the
apparatus has been exposed to rain or moisture, does not operate normally, or
has been dropped.
13. Use only with a cart, stand, tripod, bracket, or taďůĞƐƉĞĐŝĮĞĚďLJ
the manufacturer or sold with the apparatus. When a cart is
1
Note:
®
®
1. Do not look directly into the projector light.
2. Don’t touch the project lens
3. Main adapter is used as disconnect device and it should remain readily
operable during intended use. In order to disconnect the apparatus from
the main completely, the main plug should be disconnected from the
main socket outlet completely.
4. CAUTION: Use of controls or adjustments or performance of procedures
other than those specified may result in hazardous radiation exposure.
5. WARNING: Changes or modifications to this unit not expressly approved by
the party responsible for compliance could void the user’s authority to
operate the equipment.
6. WARNING: Use of this unit near fluorescent lighting may cause
interference regarding use of the remote. If the unit is displaying erratic
behavior move away from any fluorescent lighting, as it may be the
cause.
7. WARNING: Shock hazard - Do Not Open.
8. Caution and marking information is located at the rear or bottom of the
apparatus.
9. WARNING: To reduce the risk of fire or electric shock, do not expose this
apparatus to rain, moisture, dripping, or splashing.
10. Objects filled with liquids, such as vases, shall not be placed on the
apparatus.
2
Note:
®
®
FCC Warning
This device complies with Part 15 of the FCC rules. Operation is subject to the
following two conditions: (1) this device may not cause harmful interference,
and (2) this device must accept any interference received, including
interference that may cause undesired operation.
NOTE: This equipment has been tested and found to comply with the limits for
a Class B digital device, pursuant to Part 15 of the FCC Rules. These limits are
designed to provide reasonable protection against harmful interference in a
residential installation. This equipment generates, uses, and can radiate radio
frequency energy and, if not installed and used in accordance with the
instructions, may cause harmful interference to radio communications.
However, there is no guarantee that interference will not occur in a particular
installation. If this equipment does cause harmful interference to radio or
television reception, which can be determined by turning the equipment off and
on, the user is encouraged to try to correct the interference by one or more of
the following measures:
Reorient or relocate the receiving antenna.
Increase the separation between the equipment and receiver.
Connect the equipment into an outlet on a circuit different from
that to
which the receiver is connected.
Consult the dealer or an experienced radio/TV technician for help.
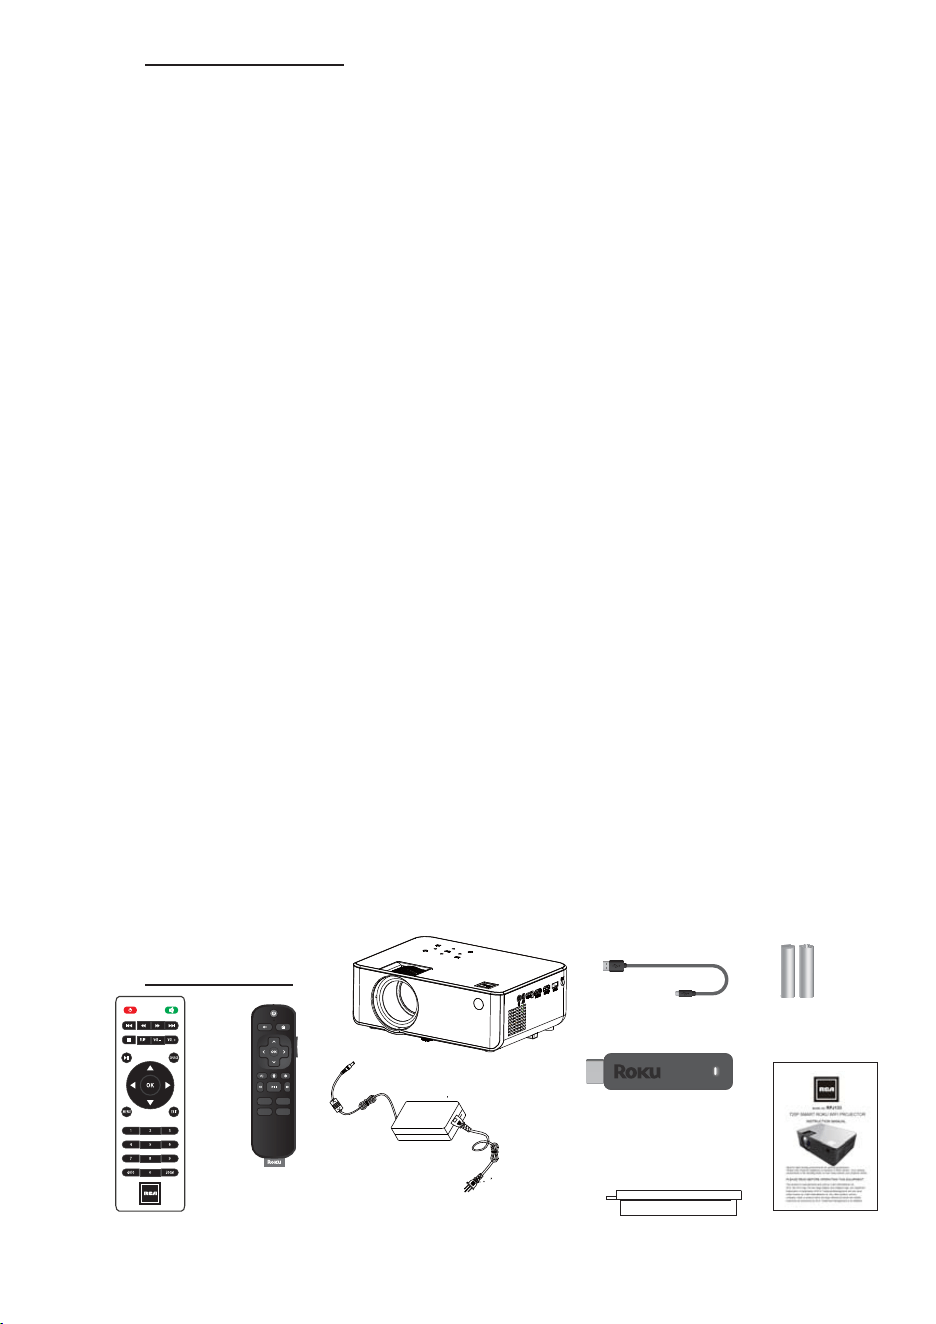
In The Box
3
Remote
Main unit
Lens
Cover
User Manual
AC Power Adapter
(2 X AAA batteries
not included)
Please see the Important Product Information insert in the Roku Streaming
Stick box for streaming player safety precautions, legal notices, and other
important information.
FCC RF Radiation Exposure Statement Caution: To maintain compliance with
the FCC's RF exposure guidelines,place the product at least 20cm from nearby
persons.
Roku Remote
Two AAA Batteries
USB Power Cable
Length:100mm
Roku Streaming
Stick
®
®

Table of Contents
Important Safety Instructions - - - - - - - - - - - - - - - - - - - - - - - - - - - - P1
Additional Warnings and Precautions - - - - - - - - - - - - - - - - - - - - - - P2
FCC Warning - - - - - - - - - - - - - - - - - - - - - - - - - - - - - - - - - - - - - - - - - P3
In The Box - - - - - - - - - - - - - - - - - - - - - - - - - - - - - - - - - - - - - - - - - P3
Table of Contents - - - - - - - - - - - - - - - - - - - - - - - - - - - - - - - - - - - - P4
Remove & Close the Lens Cover - - - - - - - - - - - - - - - - - - - - - - - - - P5
Placing Your Projector - - - - - - - - - - - - - - - - - - - - - - - - - - - - - - - - P5
To Reduce Image Distortion - - - - - - - - - - - - - - - - - - - - - - - - - - - - P6
Distance Between The Projector And Screen - - - - - - - - - - - - - - - - P6
Placing Your Projector On Ceiling - - - - - - - - - - - - - - - - - - - - - - - - P6
Adjust the Vertical Location - - - - - - - - - - - - - - - - - - - - - - - - - - - - P7
Adjust the Focus and Keystone - - - - - - - - - - - - - - - - - - - - - - - P7
Controls of Remote - - - - - - - - - - - - - - - - - - - - - - - - - - - - - - - - - - - P8
Install / Remove Battery Of Remote - - - - - - - - - - - - - - - - - - - - - - - P8
Controls of Projector - - - - - - - - - - - - - - - - - - - - - - - - - - - - - - - - - P9
Install Power Adapter - - - - - - - - - - - - - - - - - - - - - - - - - - - - - - - - - P10
4
Connect HDMI - - - - - - - - - P12
Connect AV - - - - - - - - - - - P12
Connect VGA - - - - - - - - - - - P13
Connect Audio Output (Aux Out / Line Out / Earphones) - - - - - - - - P13
Install USB Device And MicroSD Card - - - - - - - - - - - - - - - - - P14
Using microSD Card and USB Playback - - - - - - - - - - - - - - - - - - - - P15
Using Projector Menu 1.0 - - - - - - - - - - - - - - - - - - - - - - - - - - - - - - - P17
Using Projector Menu 2.0 - - - - - - - - - - - - - - - - - - - - - - - - - - - - - - - P18
Using Projector Menu 3.0 - - - - - - - - - - - - - - - - - - - - - - - - - - - - - - - P19
Using Projector Menu 4.0 - - - - - - - - - - - - - - - - - - - - - - - - - - - - - -
- P20
Specifications - - - - - - - - - - - - - - - - - - - - - - - - - - - - - - - - - - - - - - - - P21
Troubleshooting - - - - - - - - - - - - - - - - - - - - - - - - - - - - - - - - - - - - - - P22
- - - - - - - - -
Using Bluetooth playback - - - - - - - - - - - - - - - - - - - - - - - - - - - - - - P16
Set up/Install the Roku Streaming Stick -- - - - - - - - - - - - - - - - - - P11
®
®
- - - - - - - - - - - - - - - - - - - - - - - - - - - - -
- - - - - - - - - - - - - - - - - - - - - - - - - - - - -
- - - - - - - - - - - - - - - - - - - - - - - - - - - - -
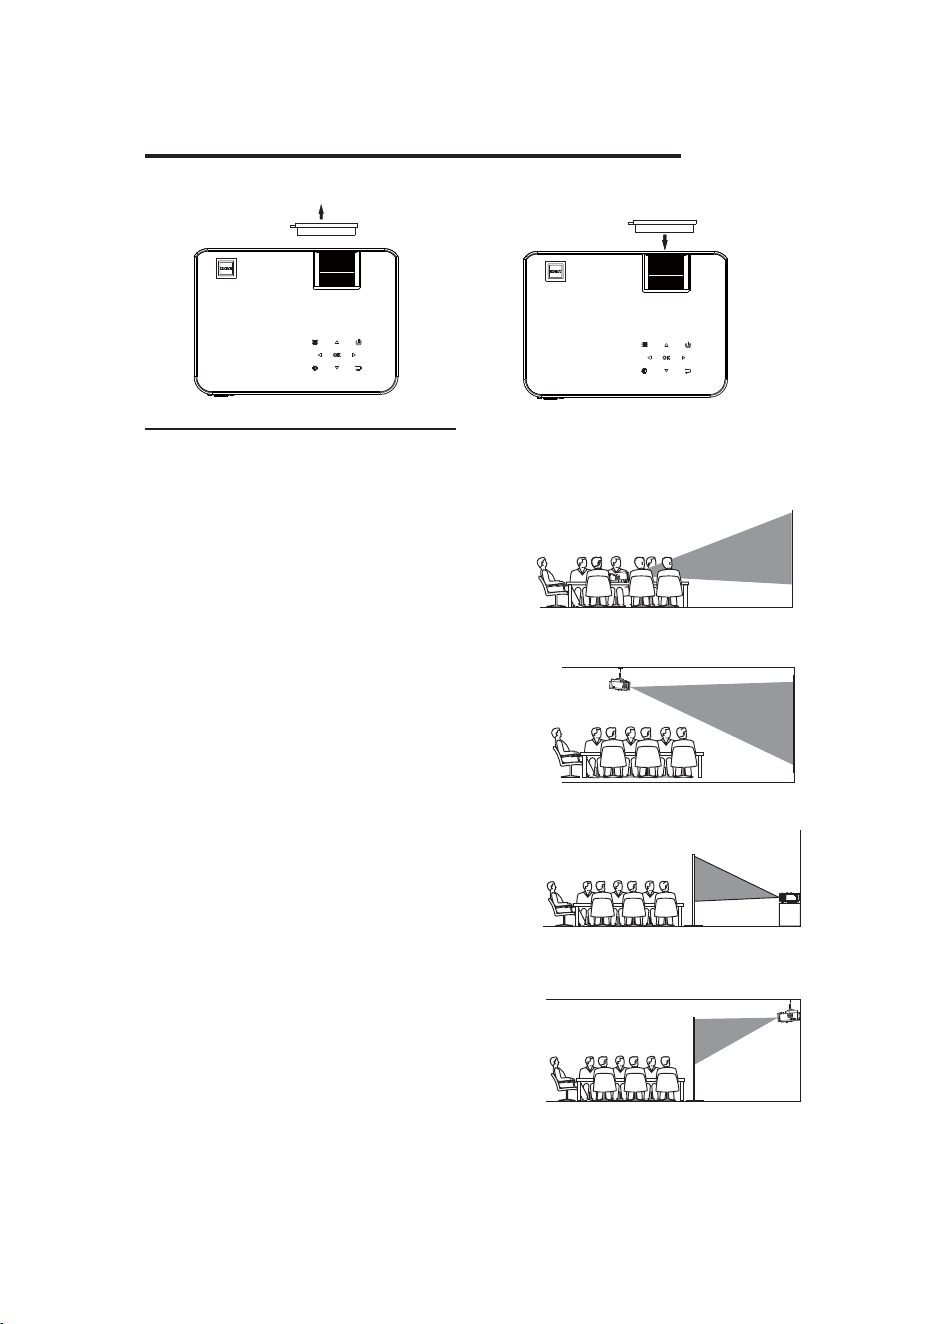
Remove & Close The Lens Cover
Placing Your Projector
Your projector can be installed in four different configurations ( see picture
below):
Front Table:
Select this location with the projector placed
near the floor in front of the screen. This is the
most common way to position the projector
for quick setup and portability.
Front Ceiling:
Select this location with the projector
suspended upside-down from the ceiling in
front of the screen.
NOTE: A projector mount is required to install
the projector in a ceiling.
Rear Table:
Select this location with the projector placed
near the floor behind the screen.
NOTE: That a special rear projection screen
is required.
Rear Ceiling:
Select this location with the projector
suspended upside-down from the ceiling
behind the screen.
NOTE:
A projector mount is required to install the
projector in a ceiling.
A special rear projection screen is required.
5
REMOVE
LENS COVER
CLOSE
LENS COVER
Remove the lens cover before using
Close the lens cover when unit not using
FRONT TABLE
REAR TABLE
FRONT CEILING
REAR CEILING
It is recommended to move the projector as close to
center of screen.
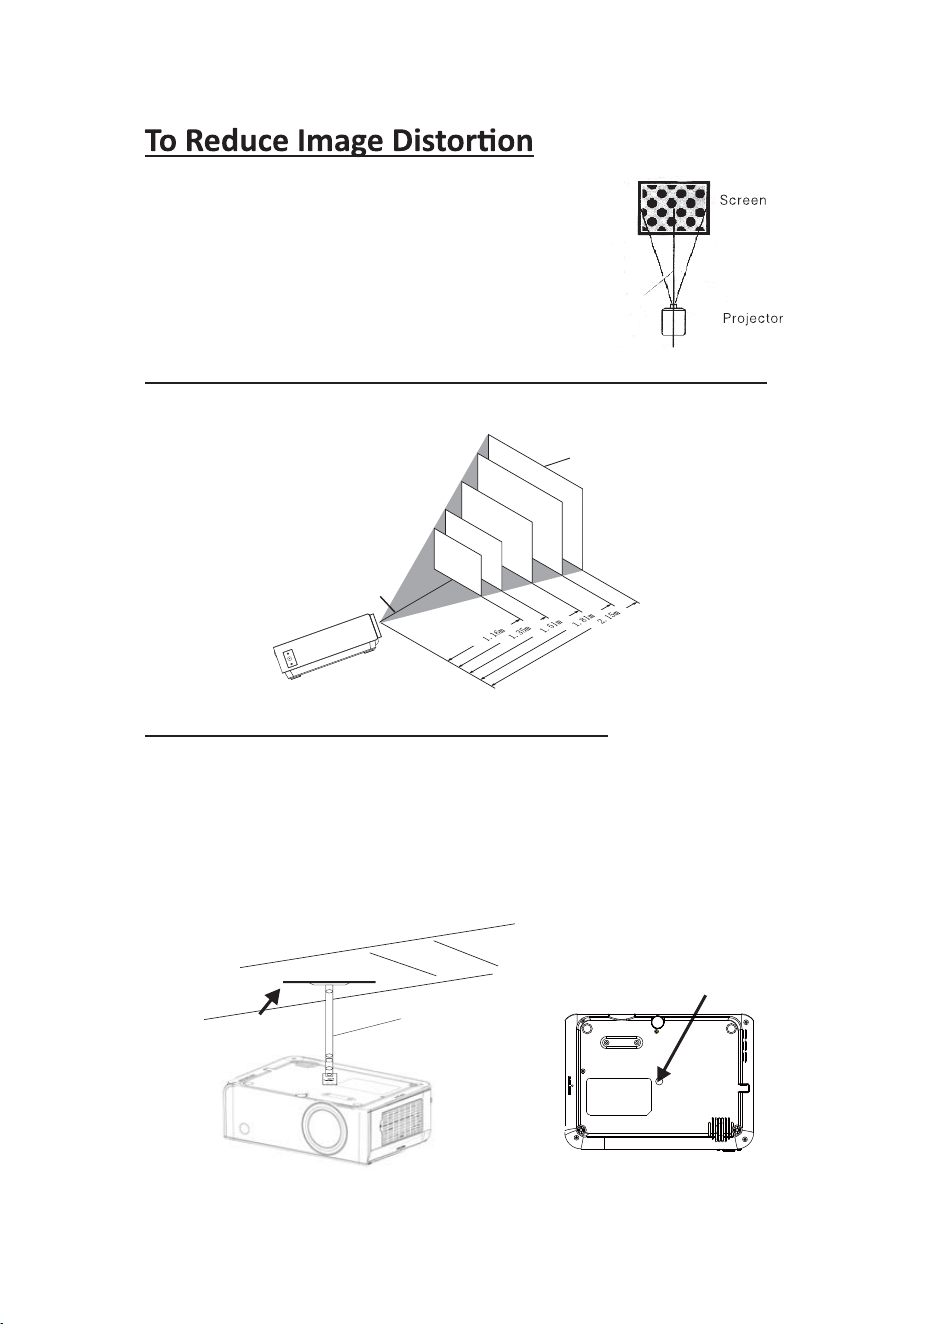
Distance Between The Projector And Screen
Measure the distance between the projector and where you want to
position the screen. This is the projection distance.
Placing Your Projector On Ceiling
When installing the projector in the ceiling, please purchase a projector mount
recommended by an installation professional and follow the instructions that
come with the mount.
Before installing the projector in the ceiling, please check to make sure the
ceiling structure can support the weight of the projector and the mount. If in
doubt, please ask the advice from an installation professorial.
NOTE: Projector mount and screw(s) not included
6
CEILING
HANGER
FIXED HANGER HOLE
Square /Rectangle
THE CENTER OF LENS
SCREEN
72
"
60
"
50
"
45
"
37
"
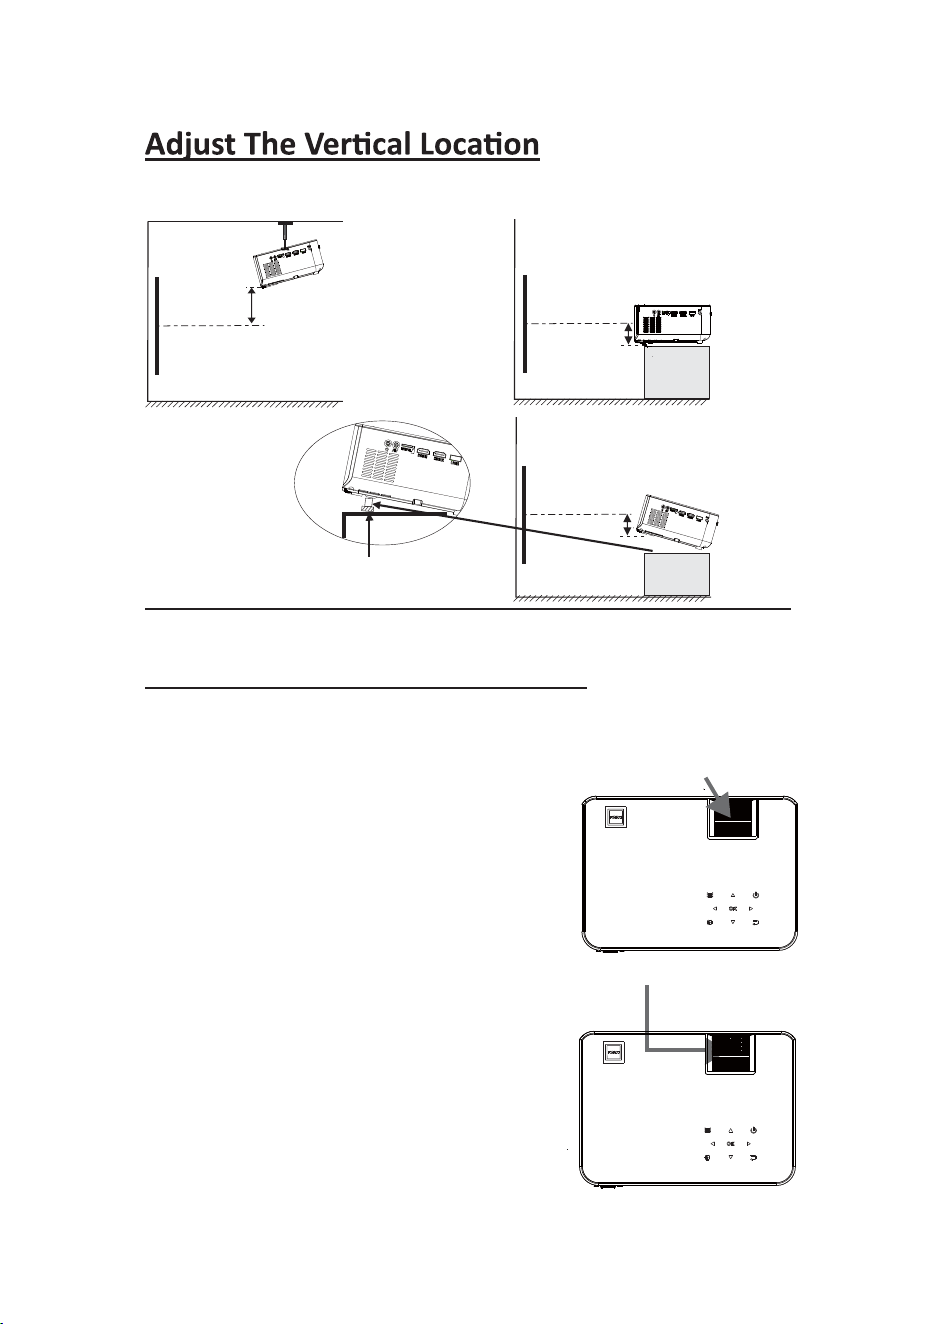
Follow below picture to adjust the vertical location.
Adjust The Focus And Keystone
Follow below picture to adjust the focus and trapezoidal screen.
Adjust the focus by turning the knob while
observing the image pixels near the center of the
screen. Optimal focus is obtained when the
pixels are clearly visible. Depending on the
projected screen size, the focus near the screen
edges may be less sharp than the screen center.
Keystone image is created when the projector
beam is projected to the screen in an angle.
Keystone correction will restore the distorted
image to a rectangular or square shape.
7
SCREEN
PROJECTOR
VERTICAL
DIMENSION
VERTICAL
DIMENSION
SCREEN
PROJECTOR
VERTICAL
DIMENSION
SCREEN
PROJECTOR
Adjust this knob ( ANGLE ADJ. knob)
to ¿ne- tune the display angle to higher.
FOCUS ADJ. KNOB
Then sharpen the image
by rotating focus knob.
TRAPEZOIDAL ADJ. KNOB
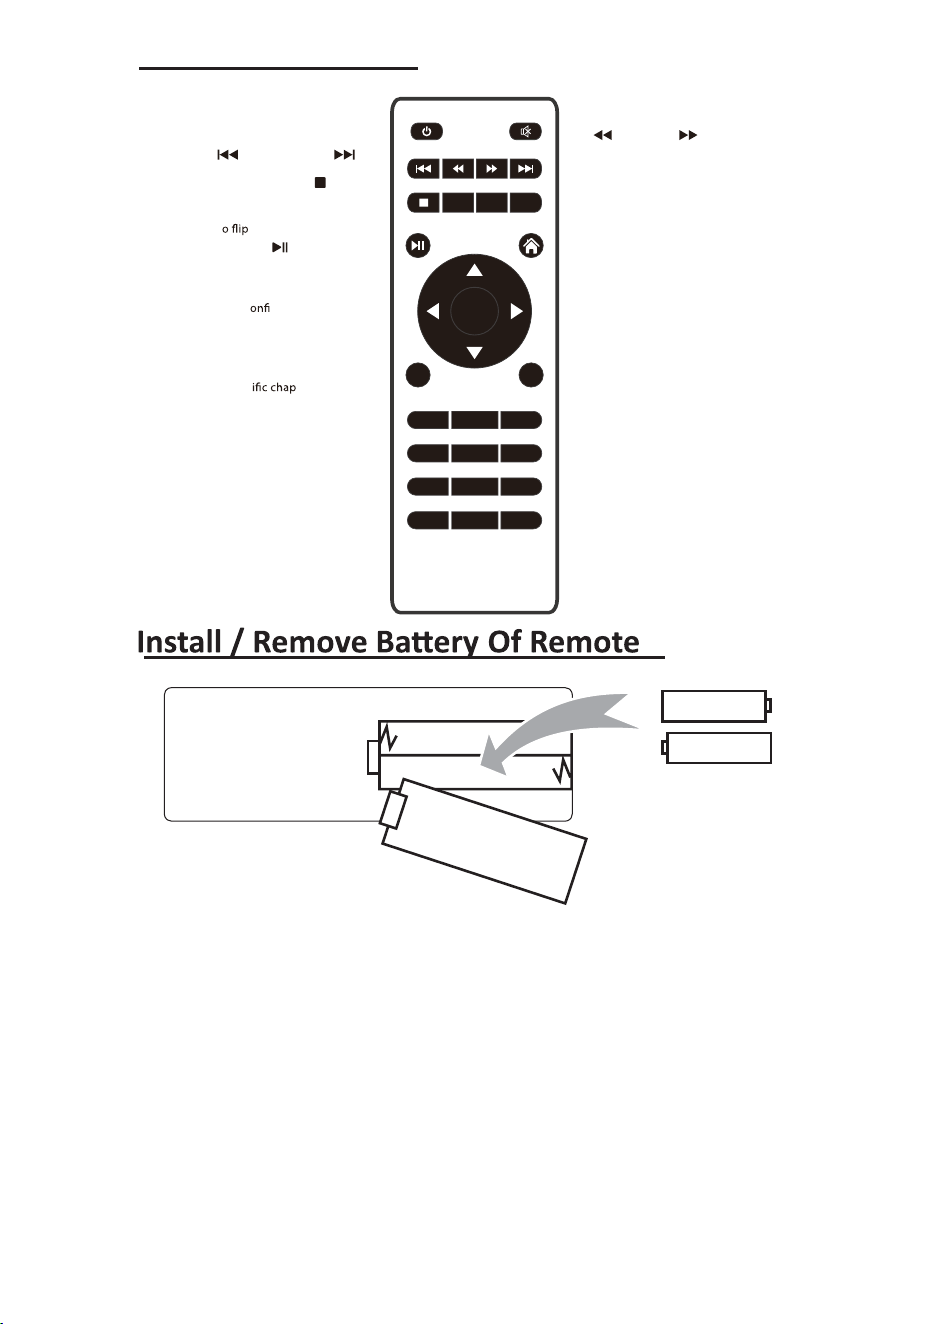
Controls Of Remote
Remove the battery compartment cover on the back of your remote by
carefully sliding to open. The battery cover can then be lifted away. Fit the
correct batteries (2 X AAA batteries not included), referring to the polarity
markings. Finally, replace the cover.
NOTES:
t Batteries shall not be exposed to excessive heat such as sunshine, fire
t Be sure that the batteries are installed polarity correctly.
t Do not mix old and new batteries.
t Only same or equivalent type batteries as recommend are to be used.
t Do not dispose of batteries in fire, battery may explode or leak. Do not try
to recharge a battery
8
AAA / UM4
AAA / UM4
BATTERY DOOR
t Do not mix alkaline, standard (carbon-zinc), or rechargeable (ni-cad, ni-mh,
etc) batteries
OK
123
456
789
0GOTO ZOOM
MENU
FLIP VOL – VOL +
EXIT
Power
Press to power ON.
Press twice to power OFF.
Previous / Next
Press to skip between chapters or tracks.
Stop
Press to stop playback.
Flip
Press t display image 180°.
Play/Pause
Press to play or pause an individual
chapter or track.
Arrows/OK
Press to navigate and c
rm selections in
Settings and other menus.
Menu
Press to access projector Settings.
Go To/Number Keypad
Press to enter spec
ter or track
numbers. Use Play button to begin
playing.
Mute
Press to mute volume.
Back / Fwd
Press to search through an individual
chapter or track.
VOL+ / VOL−
Press to adjust audio level.
Home
Press to enter home page
Exit
Press to exit menus.
Zoom
Press to zoom display image in or out.
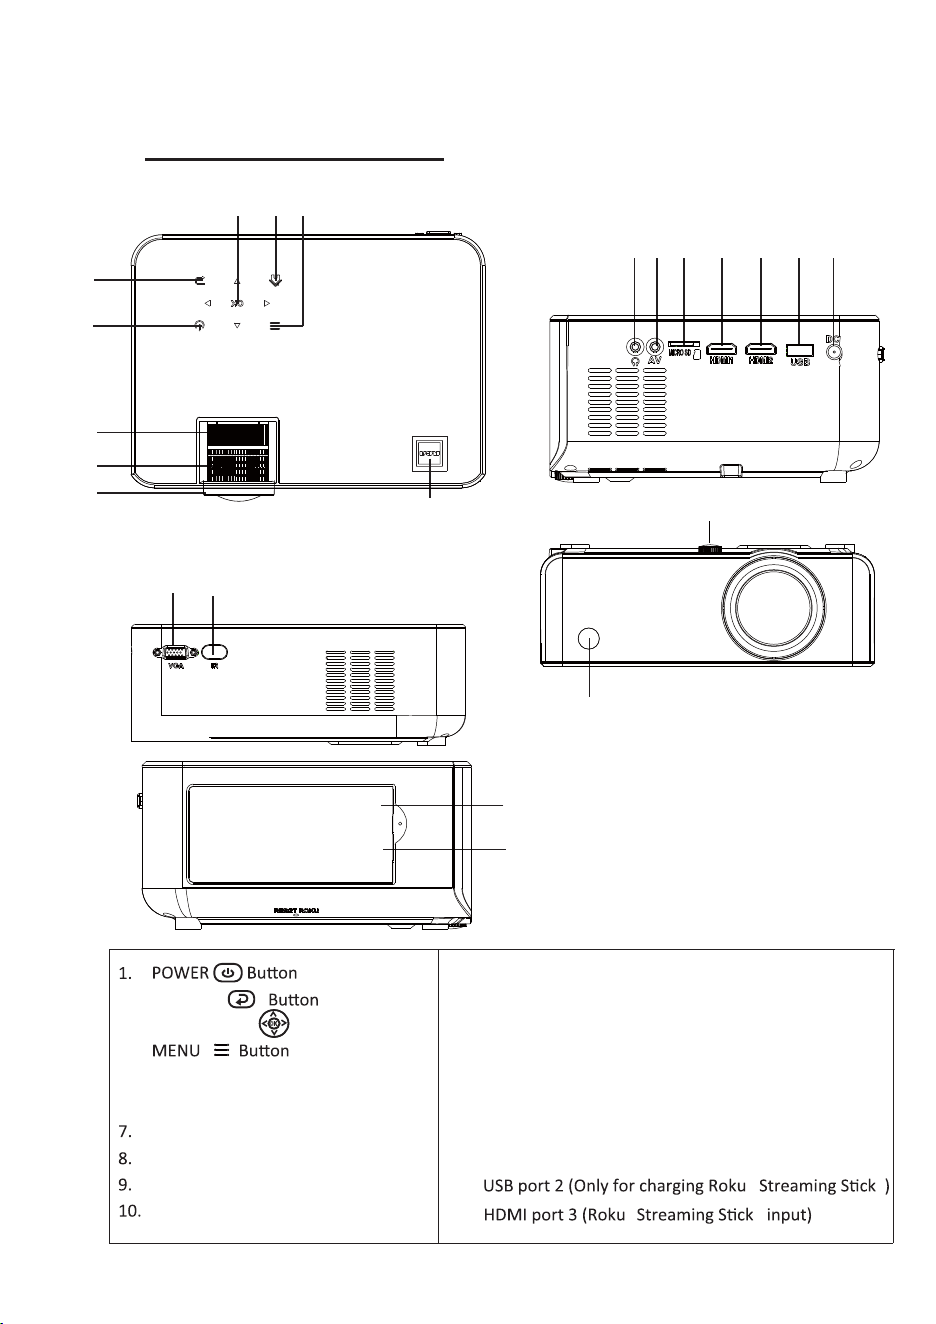
Controls Of Projector
9
2.
3.
4.
5.
6.
11.
16
18
19
20
LENS
FOCUS ADJ. Knob
TRAPEZOIDAL ADJ. Knob
OK
EAR PHONE Jack
AV IN Jack
Micro SD Card
RETURN
NAVIGATION
1
345
6
7
8
2
17
131415
910 1211
21
22
12.
13.
14.
15.
16.
17.
18.
19.
20.
POWER on Indicator
DC IN jack
IR Window ( Rear Side)
IR Window ( Front Side)
ANGEL ADJ. Knob
HDMI Port 1
USB Port
VGA Port
HDMI Port 2
21.
22.
HDMI3
USB2
®
®
®®
HOME
10
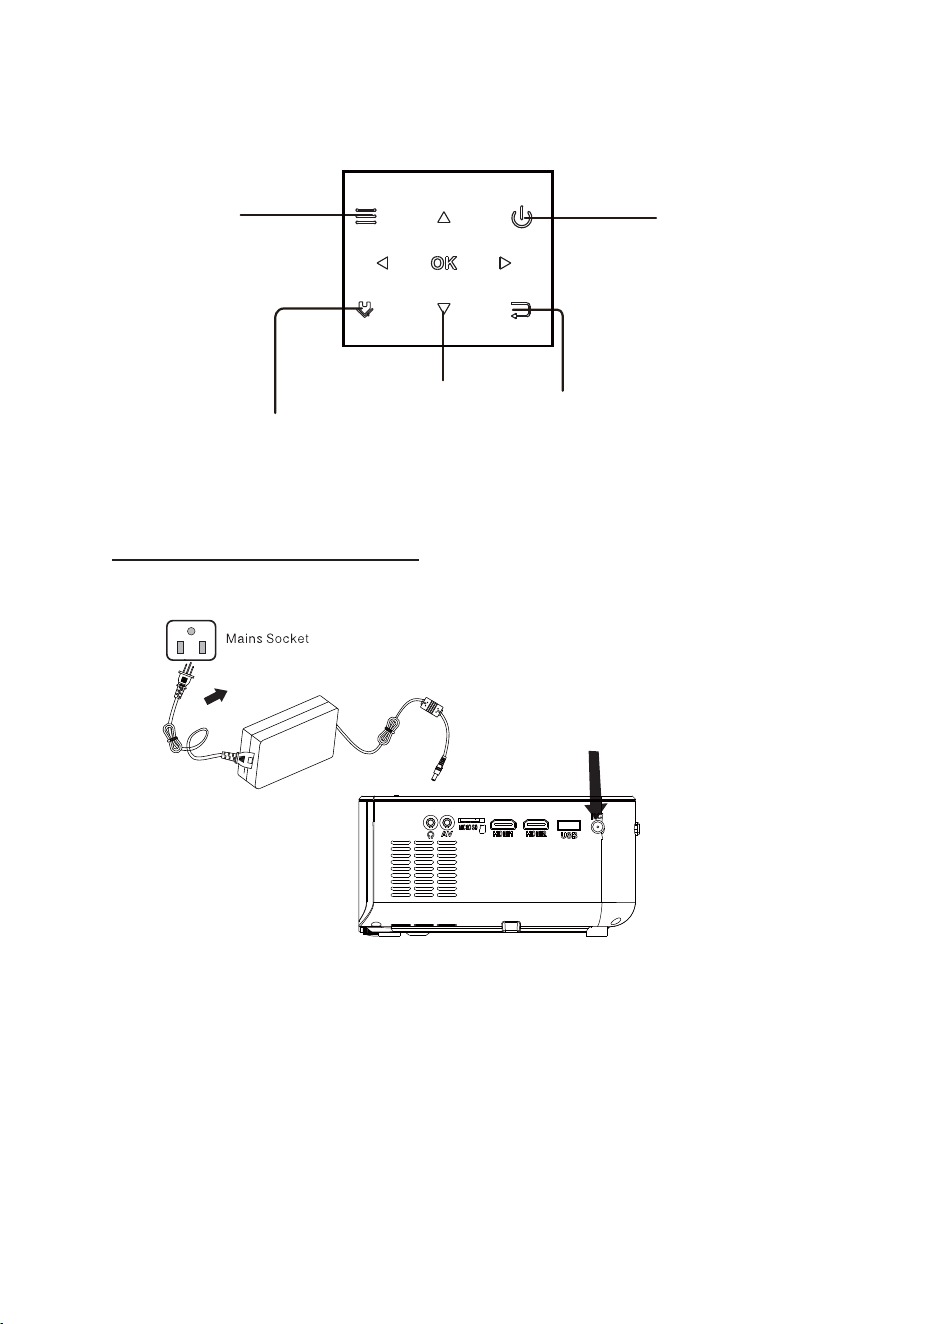
Controls
Install Power Adapter
Follow below picture to connect power adapter
Connect small end of adapter FIRST. Plug the adapter body to power outlet.
Menu
Press to access
on-screen
menus and
options
Power
Press to
power on the
projector.
Press twice
to power OFF.
Home
Press to enter
home page
Arrows/OK
Press to
navigate onscreen
menus and make
selections.
Back
Press to return
to a previous
page or setting
in the onscreen
menus.
11
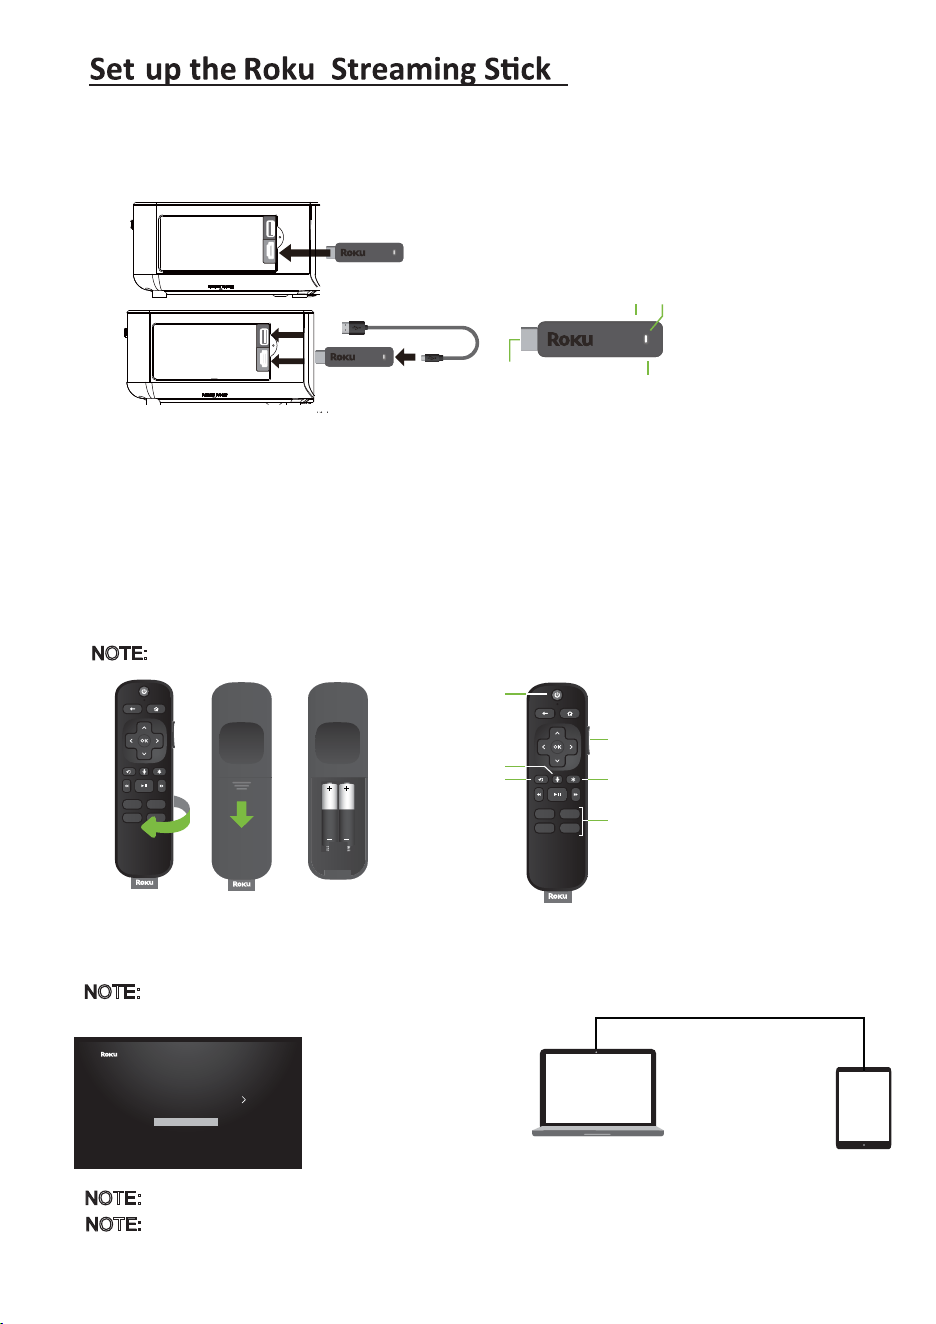
On-screen setup and activation
Follow the instruction on your projector. Activate your streaming player by using your
Vcomputer or smartphone to link to a Roku account.
NOTE:
Roku does not charge for activation support – beware of scams.
STEP 4 :
Make your new HD Projector smart!
Stream almost anything across thousands of free or paid streaming channels
including hit movies, popular shows, live TV, news, sports and more.
The Roku Streaming Stick may be pre-installed in select models.
®
®
NOTE:
STEP 1:
Install the Roku Streaming Stick
Plug your streaming player into the HDMI 3 port on your projector.
STEP 2: Connect to power
For the best streaming experience, use the included USB power cable to connect the streaming
player to the USB port on your projector. Power on the projector and select the HDMI 3 input.
STEP 3: Pair your Roku remote
On the back side of the remote, slide open the battery cover. Insert included AAA batteries placing
the negative (-) ends in first. Your remote should pair with your streaming player automatically.
For help pairing your remote, visit go.roku.com/remotehelp.
Be sure to always remove any connected devices when moving or transporting
the projector.
NOTE:
NOTE:
To operate your Roku Streaming Stick, you must use the included Roku remote.
Volume
Channel
shortcuts
Options
Power
Instant replay
Voice
Power and
status light
USB power
Reset
HDMI
®
connector
supplied USB cable
Roku Streaming Stick
H
D
M
I
3
U
S
B
2
H
DM
I
3
US
B
2
Let’s get started
English
Deutsch
Español
Français
12:40 pm | Options
Follow the instruction
on your projector.
Activate your streaming
player by using your
computer or smartphone
to link to a Roku account.
On-screen setup
and activation
NOTE:
Roku does not charge for activation suppotr- beware of scams.
12
Connect AV
Follow below picture to connect AV cable and device.
1. Turn off the unit before connect AV cable.
2. Use AV cable to connect follow below figure
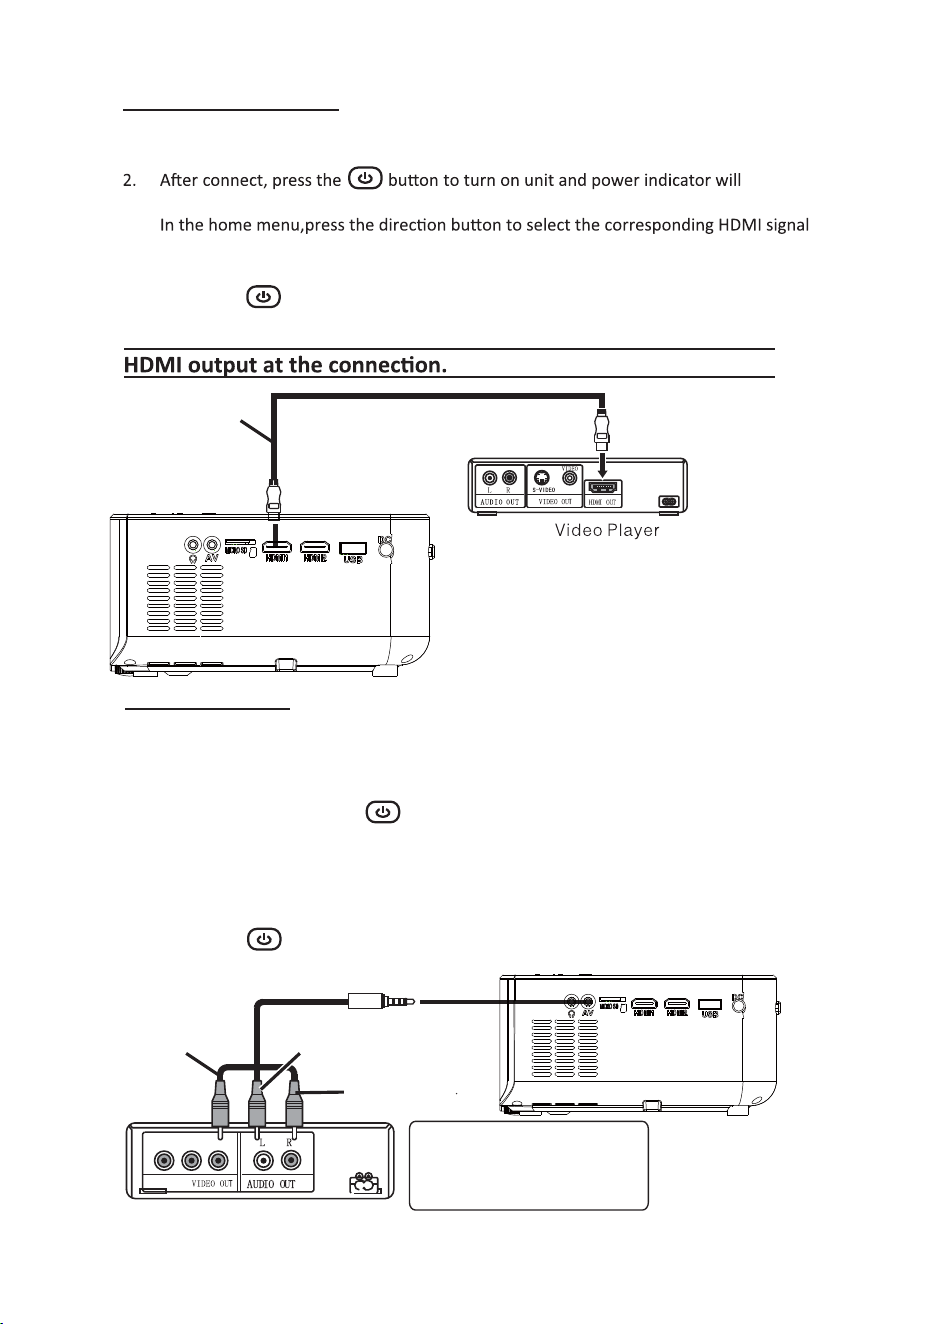
3. After connect, press the button to turn on unit and power indicator will
light white.
4.
Press the direction button to select the AV mode in home menu and the video on
the AV device will be displayed on the projector screen.
5. Press the button twice to turn off unit power.
LEFT CHANNEL
RIGHT CHANNEL
VIDEO CABLE
VIDEO PLAYER
VIDEO CABLE : YELLOW
AUDIO LEFT CHANNEL : WHITE
AUDIO RIGHT CHANNEL : RED
CABLE NOT INCLUDE
HDMI CABLE
CABLE NOT INCLUDE
In rare cases, if the projector’s speaker has
no sound when playing a DVD movie in a
player connecting to the HDMI input, please
check the player’s digital audio settings and
make sure it is set to “Auto” mode or “PCM”
mode.
HDMI HD signal input : this interface can be input with HD player
Connect HDMI
Follow below picture to connect HDMI cable and device.
1. Turn off the unit before connect HDMI cable.
light white.
3.
interface and in the HDMI mode the video of the HDMI device will be displayed on the
projector screen.
4. Press the button twice to turn off unit power.
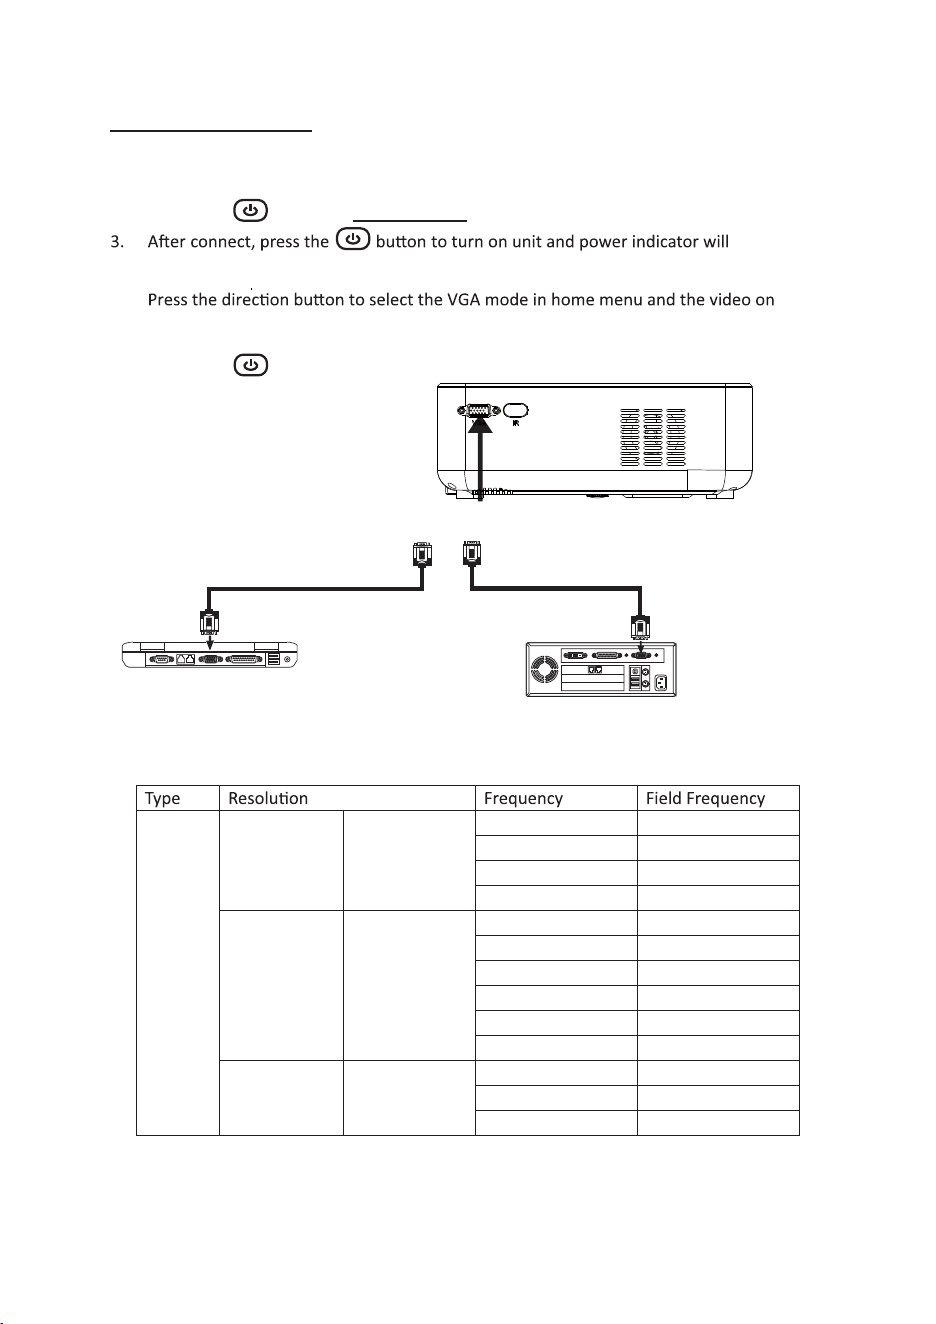
Please refer to the following table to adjust the output signal from computer
PC
VGA 640x480
31.5 60
34.7 70
37.9 72
37.5 75
SVGA 800x600
31.4 50
35.1 56
37.9 60
46.6 70
48.1 72
46.9 75
XGA 1024x768
40.3 50
48.4 60
56.5 70
13
Connect VGA
Follow below picture to connect HDMI cable to the device.
1. Turn off the unit before connect VGA cable.
2. Press the button to turn off power of your projector before connection.
light white.
4.
the VGA device will be displayed on the projector screen
5. Press the button twice to turn off unit power.
To VGA PORT
NOTE BOOK
DECK TOP
OR
C OMPUTER CABLE
C OMPUTER CABLE
CABLE NOT INCLUDE
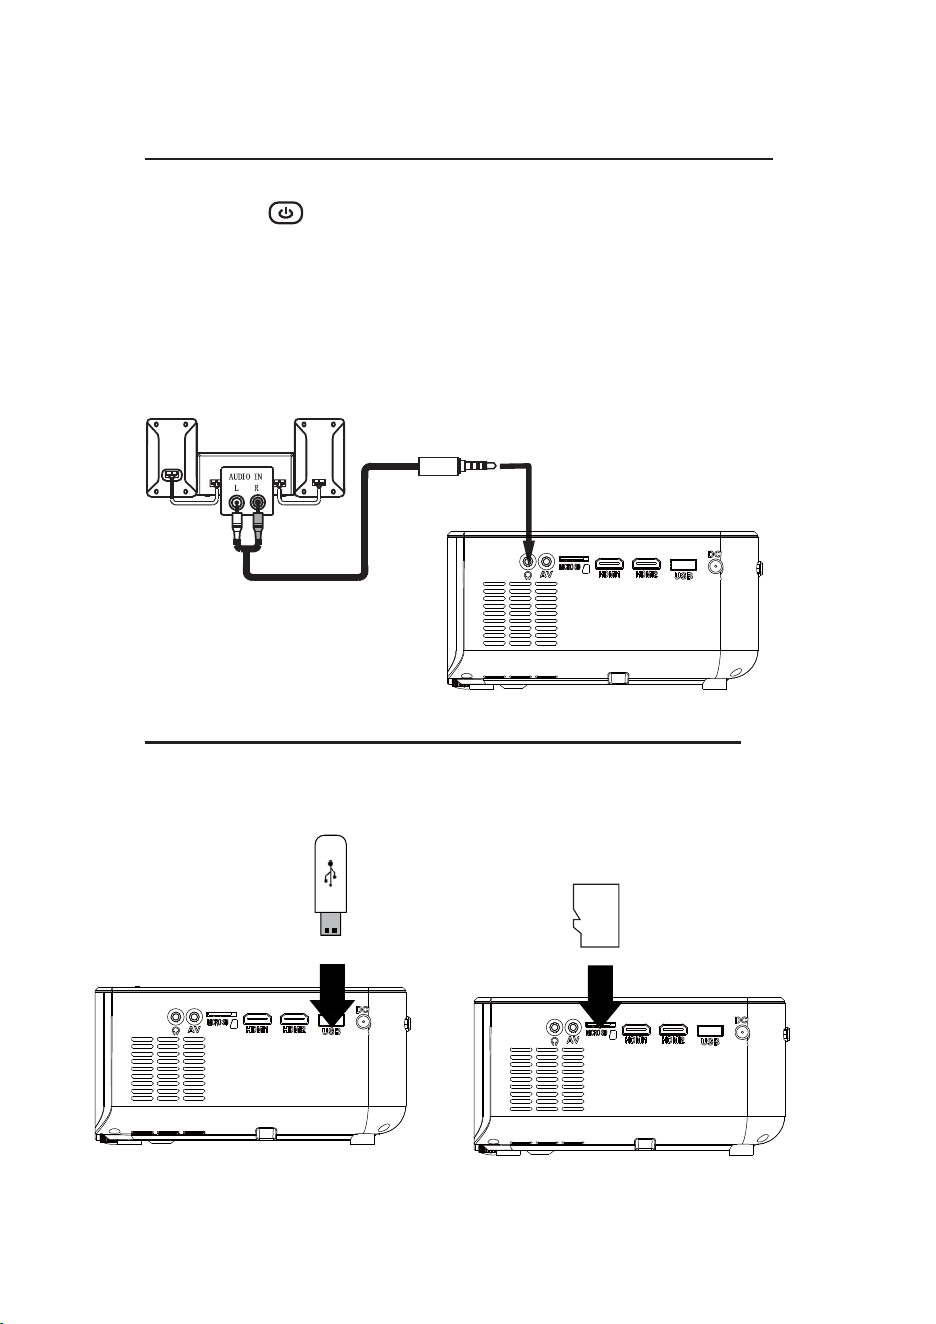
Connect Audio Output ( Aux Out / Line Out / Earphones)
Follow below picture to connect audio cable and device.
1. Press the button twice to turn off power of your projector before connection.
2. Use audio cable to connect follow below figure.
3. After connect and turn on both units. Your projector sound from external
device now.
4. After using , turn off both unit
Install USB Device And Micro SD Card
Follow below picture to install USB and microSD Card.
Turn off the unit before install USB / microSD Card.
14
MICRO SD
CABLE NOT INCLUDE
Station Amplifier
Audio cable
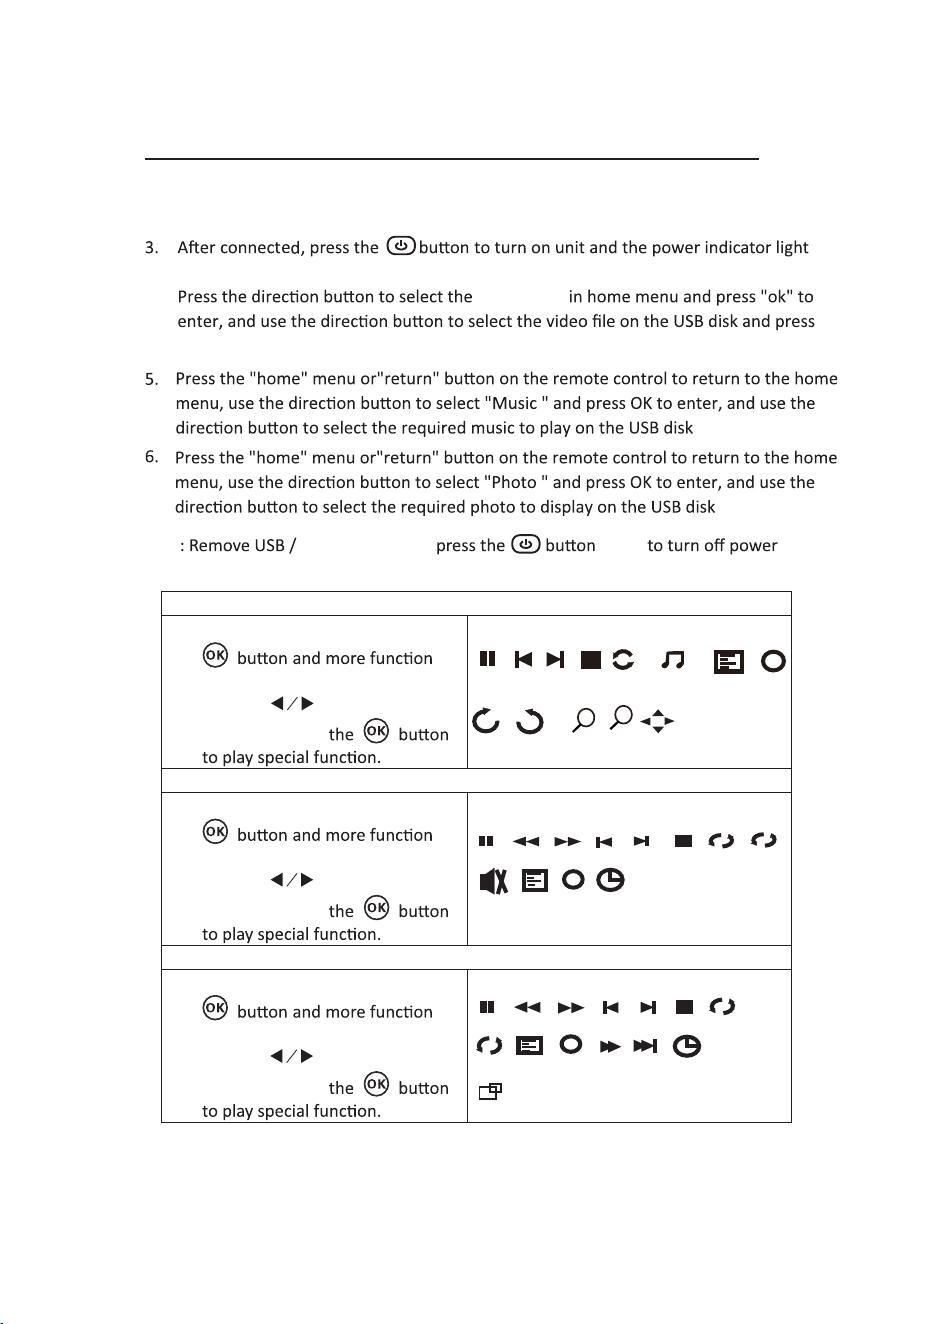
Using microSD Card And USB Playback (Media Player)
Install USB / microSD device:
1. Turn off the unit before install USB / microSD Card.
2. Install the USB device into USB port.
NOTE
FIRST.
Sub-Menu on Photo screen
1. When photo playback, press the
screen show on lower ;ĮŐƵre 1).
2. Use the button to select
icon and press
&ŝŐƵre 1.
Sub-Menu on Music screen
3. When music playback, press the
screen show on lower ;ĮŐƵre 2 ).
4. Use the button to select
icon and press
&ŝŐƵre 2
Sub-Menu on Movie screen
5. When movie playback, press the
screen show on lower ;ĮŐƵre 3).
6. Use the button to select
icon and press
&ŝŐƵre 3
15
Rotate
M...
Rotate
Pause
FB
FF
Next
Prev.
Stop
Re...
Set A
PL...
Info
Go...
AB
i
MUTE
Pause
FB
FF
Next
Prev.
Stop
Re...
Set A
PL...
Info
St...
Sl...
Go...
AB
i
AS...
Pause
Next
Prev.
Stop
Re...
PL...
Info
i
background
music
microSD device,
Blanc.
4.
ΗK<ΗƚŽƉůĂLJƚŚĞǀŝĚĞŽĮůĞŽŶƚŚĞhĚŝƐŬ
movie icon
twice
Zo...
Zo...
+
-
16
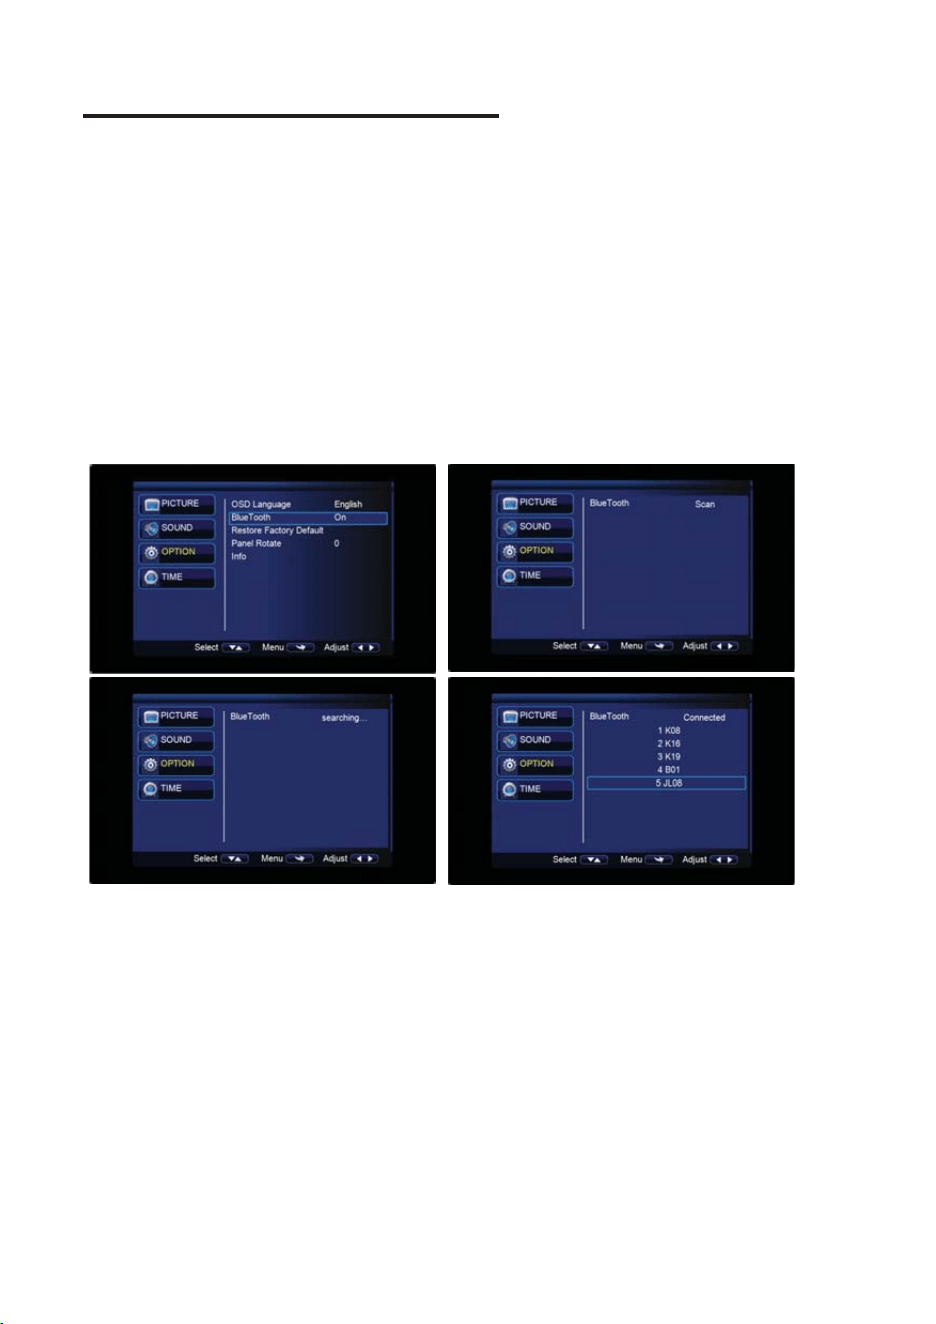
Using Bluetooth Playback
After initial pairing, the projector and the Bluetooth speakers will stay paired unless unpaired manually by
the user, or erased due to a reset of either device. If this occurs, or you find either unit is unable to
connect, repeat the above steps.
1.Enable Bluetooth on the receiver (external speakers, sound bar, etc.) to which you wish to
connect. Devices such as smartphones, tablets, or computers are not Bluetooth receivers and will
not connect to the projector. To eliminate confusion, you should disable Bluetooth on all
receivers to which you do not wish to connect.
The bluetooth pairing list is not acceptable, it needs show what is the step to turn on the
projector and show the picture on the manual.
Pairing to Bluetooth Wireless Speakers or Sound Bar
NOTE: Bluetooth is OFF by default when the projector powers ON. Bluetooth can be
turned ON or OFF from the OPTIONS Menu.
2.Power on the projector and make sure the projector's Bluetooth is on and in pairing mode (see note
above). Press the menu key from the remote>>>select OPTION>>>select BlueTooth>>>press the
navigation >/< to turn on the bluetooth>>>Select the bluetooth on, press the OK key from the remote,
when the Scan shows on the screen, press the OK key again>>>When the screen shows 'Searching,
pl...' >>>the bluetooth devices name will be shown on the screen, select it and press the OK key to
connect it.
3. When successfully paired, it will show ' Bluetooth Connected' on the menu. Exit the menu, the sound
will come out from the bluetooth speaker.
4. It can connect last bluetooth speaker automatically when the unit is powered on again.
Note: It needs power on the last connected bluetooth speaker first, then turned on the projector. if it
can't connect last devices automatically, please repeat step 2~3.
17
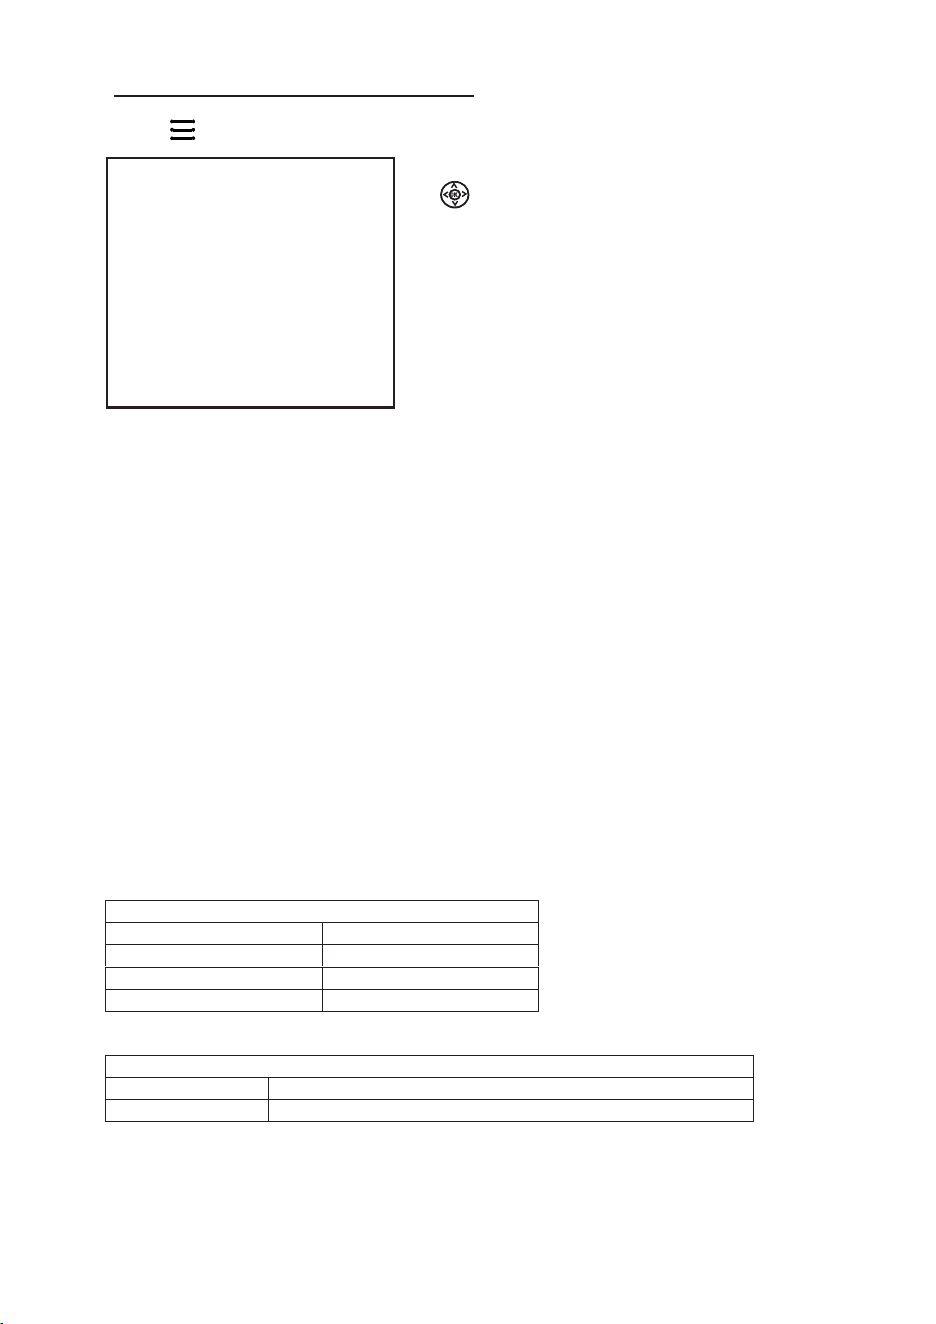
Using Projector Menu 1.0
Press button to enter projector menu. Press again to previous status.
Use buttons to select manual page.
This manual showed on right upper of view
screen.
Color temper… (temperature)
Customer define Parameter
red 0-100
blue 0-100
green 0-100
Aspect Ratio
4:3 The signal in a 4:3 aspect ratio projection image
16:9 The signal in a 16:9 aspect ratio projection image
OK
Picture Mode Standard
Contrast 5 0
Brithness 50
Color 50
Sharpness 50
Color Temperature Medium
Aspect Ratio Auto
Noise Reduction Middle
Screen
Tint
50
1.
Picture Mode
Select Vivid, User (custom), Soft ,or Standard
2.
Contrast ,Brightness, etc
Set Picture Mode to “User “ to adjust these settings
3.
Color Temperature
Select Warm ,Cool, or Medium.
4.
Aspect Ratio
Select 16:9, 4:3 , or Auto
5.
Noise Reduction
Select Off, Low , Middle , High or Default
6.
Screen
18
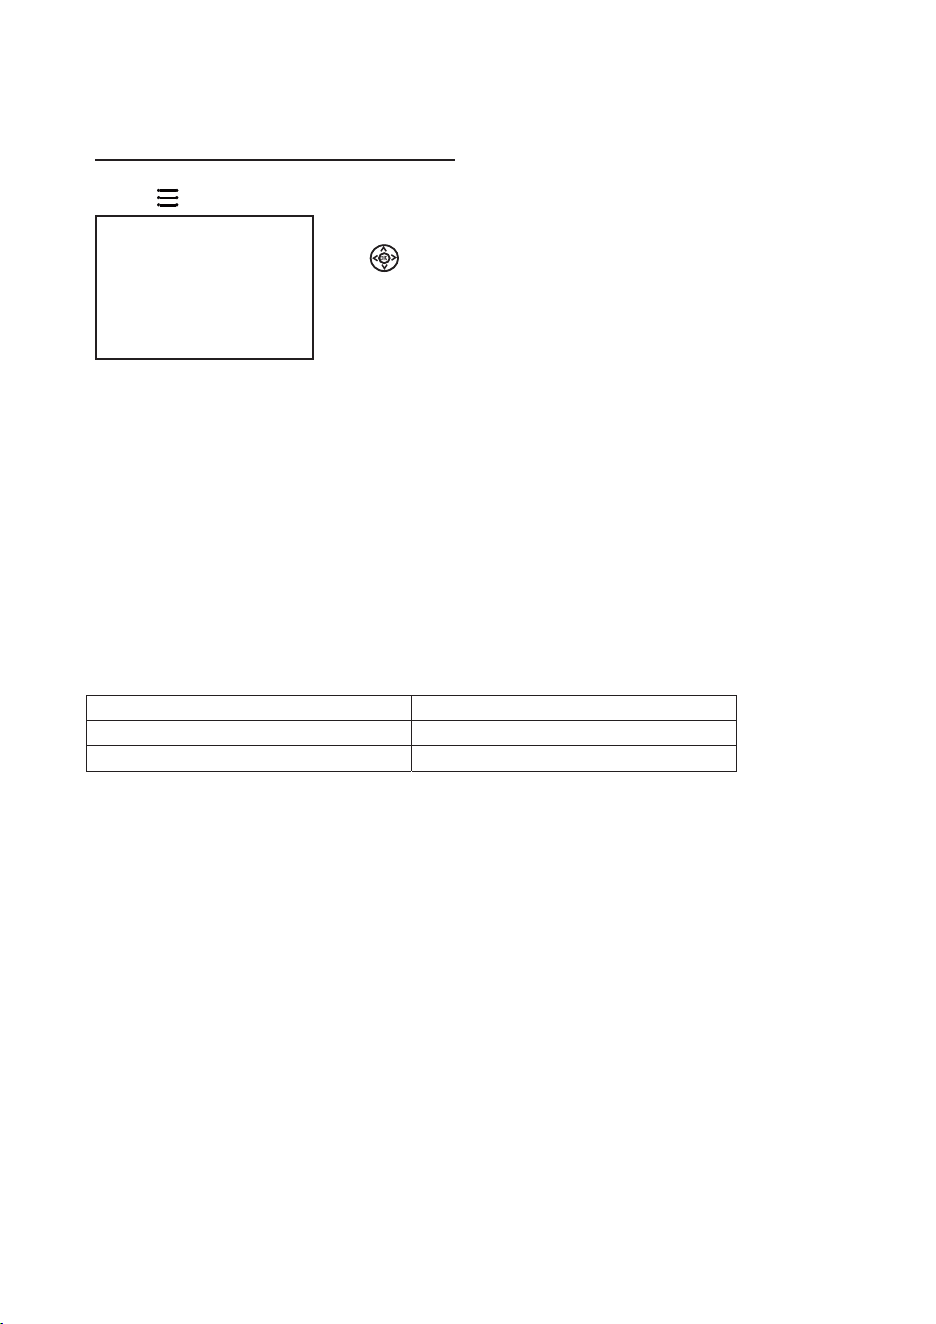
Using Projector Menu 2.0
Press button to enter projector menu. Press again to previous status.
Use buttons to select manual page.
This manual showed on right upper of view
screen.
Sound Mode - User Parameter
001-0 elberT
001-0 ssaB
Sound Mode Standard
Treble 50
Bass 50
Balance 0
Auto Volume Off
Surround Sound Off
OK
1.
Sound Mode
Select Music, Movie, User (custom), Sports ,or Standard
2.
Treble, Bass
Set Sound Mode to “User “ to adjust these settings
3.
Balance
Adjust the audio balance.
4.
Surround Sound
Turn Surround Sou
nd ON or OFF.
19
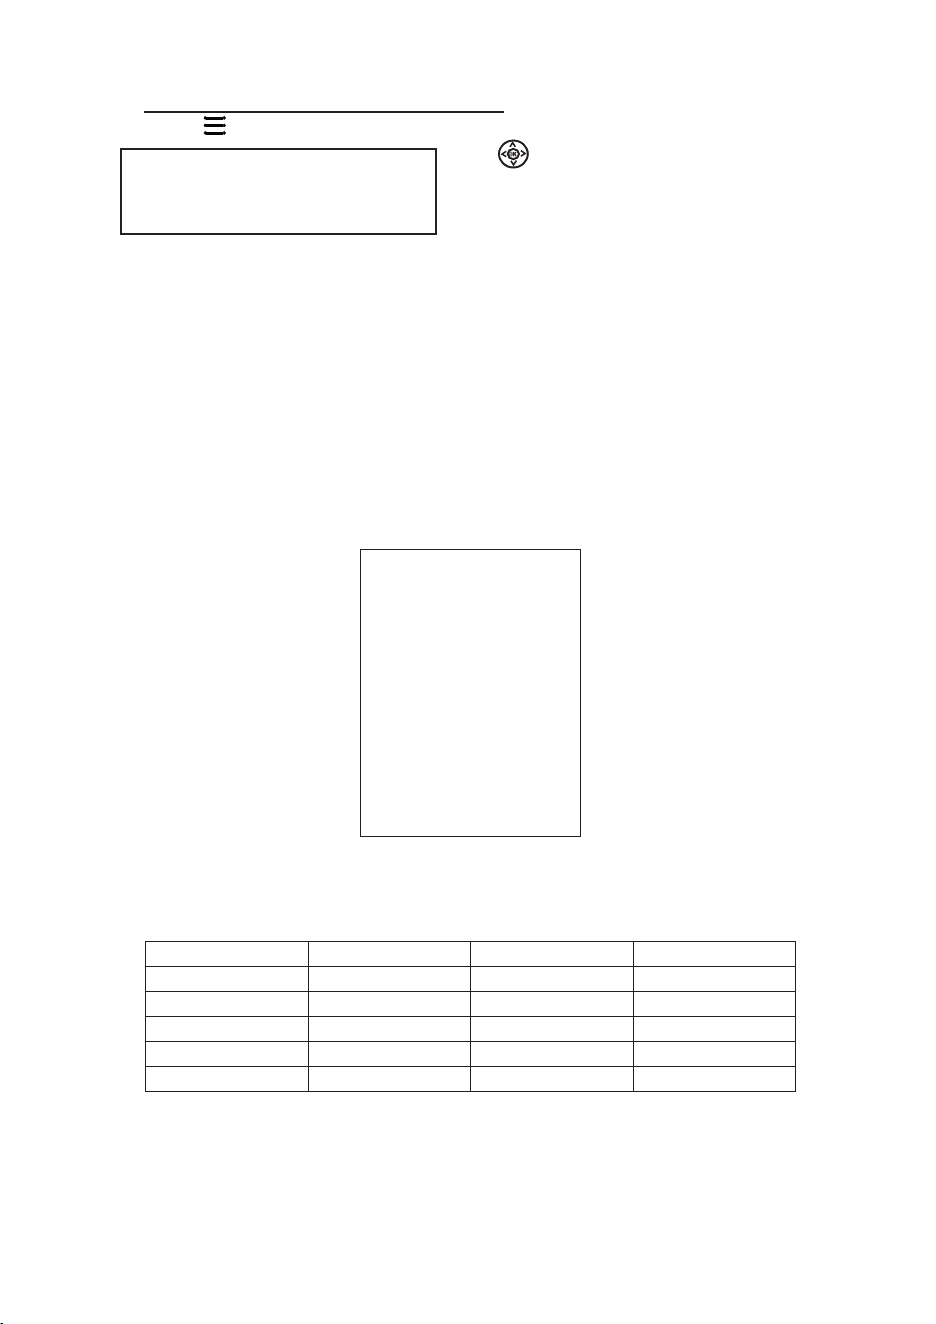
Using Projector Menu 3.0
Press button to enter projector menu. Press again to previous status.
Use buttons to select manual page.
This manual showed on right upper of viewing
screen.
English Hrvatski Nederlands Chinese
Franais Deutech Slovenina Slovak
Espanol Italiano Norsk
Portugues Magyar Srpski
Esky Polski Svenska
Dansk Romnete Suomi
OK
MODEL TY506
RPJ133
RCA
SW Ver: V1.0
TF39-720
1. OSD Language
Select different language, Follow below figure.
3. Restore Factory Default
Select Y or N.
4. Panel Rotate
Select rotate 0, rotate 1, rotate 2, rotate 3..
5. INFO
Display the unit information as below.
0
English
OSD Language
Restore Factory Default
Panel Rotate
Info
Bluetooth
Turn Bluetooth ON or OFF
Bluetooth
2.

20
Using Projector Menu 4.0
Press button to enter projector menu. Press again to previous status.
Use buttons to select manual page.
This manual showed on right upper of viewing
screen.
Clock - - - -
Off Timer Off
On Timer Off
Sleep Timer Off
Auto Sleep Never
OK
1. Clock-- --
Select clock to Day, Month, Year, Hour ,and Minutes.
2. Off Timer
Select turn off timer to Day, Hour ,and Minutes.
3. On Timer
Select turn on timer to Day, Hour ,and Minutes.
4. Sleep Timer
Select sleep timer to Off, 10min, 20min, 30 min, 60min, 90min, 120min,
180min, 240min
5. Auto Sleep
Select auto sleep function to
Never, 4 hour, 6 hour, 8 hour.

Specifications
Light Source Type
LED
Brightness Output
White light output ANSI: 168 Lumens
Color Light output ANSI: 162.4 Lumens
White brightness output ANSI: 116 Lumens
Display Native Resolution
1280 x 720
HDMI Input Supported
Video Resolution.
1080p , 1080i , 720p, 576i , 480p, and 480i
Power Consumption
Operating 36W; Standby 1W
Power Input
Connect Included Adapter
DC 24V , 3A
Included Adapter
Connect DC input of unit
Input AC100-240V,50/60Hz
Output DC 24V , 3A
Display Color
7000-8000K
Projection Size 30-150 inch
Signal Port
AV/ VGA / HDMI
USB Port Support USB device up to 32GB
Su
pport format mpeg1, Mpeg2 ,mpeg4, mp3 , Jpeg
SD Card Support microSD card up to 32GB
Support format mpeg1, Mpeg2 ,mpeg4, mp3 , Jpeg
Weight 1.4 KG
Dimension 235 x 168 x 83 mm
21
Ideal for dark viewing environments for optimal performance.
Please note:Projector brightness is measure in ANSI lumens. Your viewing environment
is the deciding factor on how many lumens your projector needs.
Speaker 1x5W
Bluetooth
Version 5.0
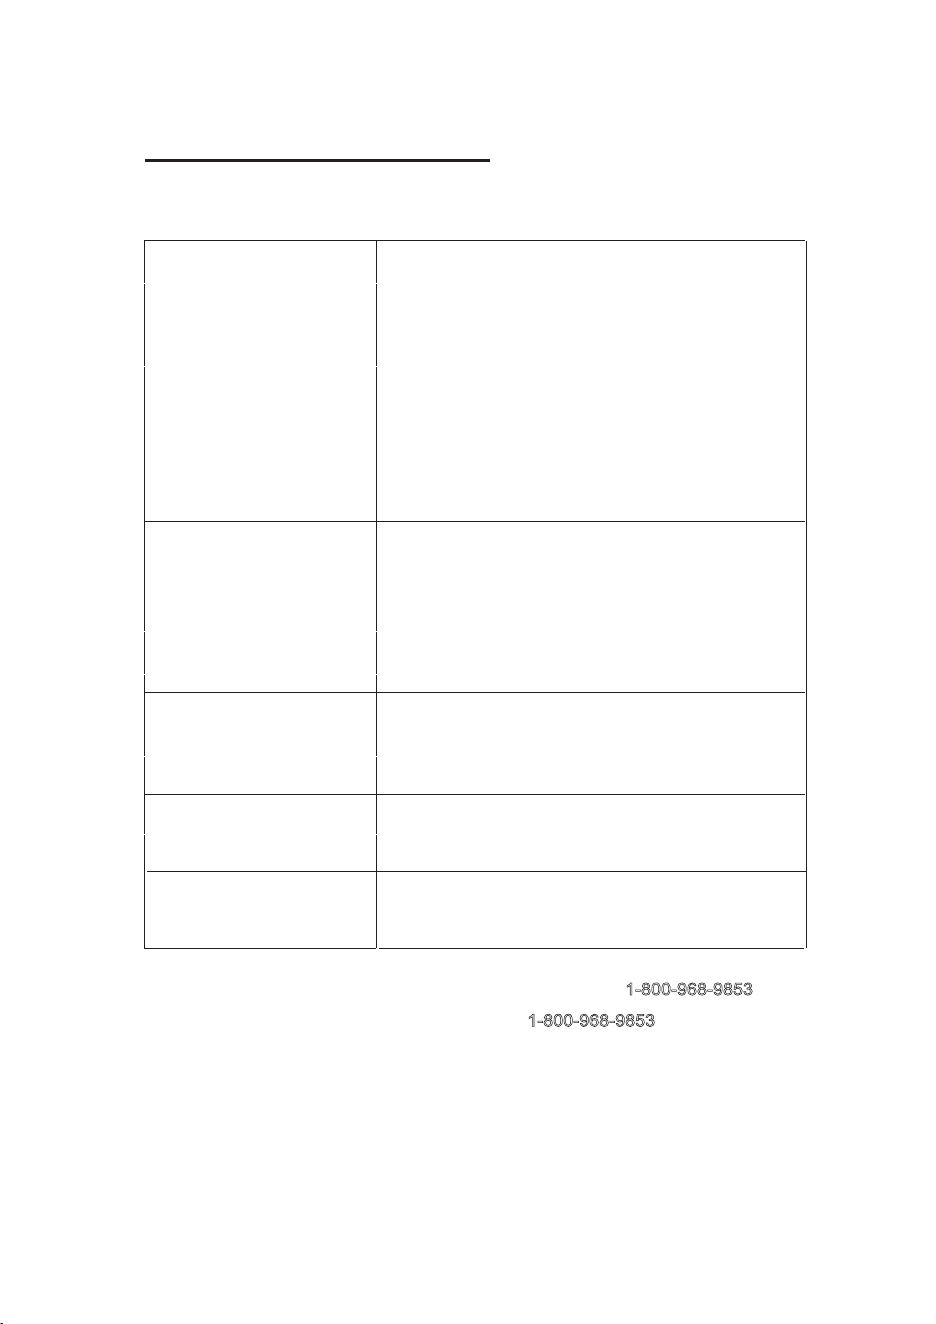
TROUBLESHOOTING
No Image is Projected or
a "No Signal" message is
displayed
1.Is the power hight on? If it is not on, check the
projector is plugged into the mains, that the
socket is switched on, and then press the power
button on the projector.
2.Check the lens cover has been removed.
3.Check the cables are securely attached and
installed as per the User Manual.
4.The image source may not be set correctly.
Press the Source button on the Control Panel or
the Remote, to select the correct setting.
5.Check in the Menu section under Video input
signal to make sure that has been set correctly.
The Lamp (Bulb) switches
off after a period of time
1.Leave the projector to cool for a few moments.
2.Once cooled, check
if anything
is blocking the
ventilation vents.
3.Turn on the projector.
If the issue persists please contact your support
provider for further assistance.
The Image is wider at
the top/bottom of the
screen
This is called keystone and is due to the projection
angle not being perpendicular to the screen. To
correct use the projectors inbuilt keystone function
to adjust the image.
22
Before resorting the maintenance service, please kindly check by yourself with
the following chart.
Spots on the screen
Using a vacuum cleaner to clean the lens. If
cleaning doesn’t resolve things, please contact
your support provider for further assistance.
The image brightness
has faded
This could possible be caused by the ambient
light in the room. If not ,the chances are that you
need to replace the lamp (bulb).
For service assistance and product information, please call: 1-800-968-9853.
Pour obtenir assistance et information appelez: 1-800-968-9853
.
SHENZHEN KEJINMING ELECTRONIC CO.,LTD
7045 BECKETT DRIVE, UNIT 15,
MISSISSAUGA, ON, L5S 2A3 www.curtisint.com