

Operator’s Manual
www. mechmaxx.com
WARRANTY


MAX performance,MAX Value,MAX Support that’s
Mini Trencher
Enhanced design features come standard
Engineered for the best user experience
Quality metal parts are used instead of plastic
A robust warranty supports all products
Budget-friendly prices make it practical
TABLE OF CONTENTS
TABLE OF CONTENTS
SPECIFICATIONS
SAFETY SIGNS
SAFETY
1
2
OPERATING THE TRENCHER
STARTING
13
13
START THE ENGINE FOLLOWING THE PROCEDURES
13
TRENCHING
13
A GENERAL DESCRIPTION ON HOW TO TRENCH
STOPPING THE ENGINE FOLLOWING THE
PROCEDURES:
13
WHEN BLOCKED
14
OPERATOR SAFETY
14
TOOLS SAFETY
14
FUEL SAFETY
14
DIGGING SAFETY
15
STOPPING
14
14
MAINTENANCE SAFETY
16
LUBRICATION
16
TRANSPORTING
17
STORING
17
GENERAL SAFETY RULES
WORK AREA
PERSONAL SAFETY
4
4
4
FUEL SAFETY
4
MACHINE USE AND CARE
5
SERVICE
5
PROPOSE
5
A NOTE TO ALL USERS
7
WHEELS
HANDLE ASSEMBLY
CHAIN ASSEMBLY
3
4
8
9
10
10
10
10
CHAIN GUARD
SHIELD
11
11
UNPACHING THE CONTAINER
TO-SCALE HARDWARE
ASSEMBLY
12
KNOW YOUR MACHINE
13
OPERATING THE TRENCHER
16
MAINTAINING YOUR TRENCHER
17
TRANSPORTING AND STORING
18
TROUBLESHOOTING
Your new Mini Trencher offers quality construction, and
is easy and safe to operate. With proper use and care, it
is designed to give you many years of dependable
service.
Prepare to experience the durability to take on any job
with the ease, portability, and convenience of your new
Mini Trencher !
1
www. mechmaxx.com
TABLE OF CONTENTS

SPECIFICATIONS
2
www. mechmaxx.com
SPECIFICATIONS
Engine
Model
Ducar
GC75
Engine Type Single cylinder, 4 stroke, air-cooled, OHV
Engine Displacement
212cc
Horsepower
7hp
Belts Material
Belt
Start
Kevlar
2 x V-belts
Recoil
Clutch Centrifugal clutch
Carbide Tip 21 x carbide alloy high-pressure teeth
Scraper 7 pcs
Tip Holder Material 42CrMo
Carbide Tip Material YG11C Alloy
Chain Length 64 in
Chain Speed 394 ft/min
Max. Trench Depth 18 in
Max. Trench Width
Wheelbase
Tire
Assembled Weight
Gross Weight
Packing Size (L*W*H)
Warranty
4 in
29 in
15*6-6 tubeless tire
347 lbs
393 lbs
41*31*34 in
1 year

3
www. mechmaxx.com
SAFETY SIGNS
The rating plate on your machine may show symbols. These represent important information about the product or instruc-
tions on its use.
SAFETY SIGNS

4
www. mechmaxx.com
GENERAL SAFETY RULES
WORK AREA
PERSONAL SAFETY
FUEL SAFETY
SAFETY
SAFETY
Read and understand the operator's manual and labels
affixed to the machine. Learn its application and limita-
tions as well as the specific potential hazards peculiar to
it.
Be thoroughly familiar with the controls and their proper
operation. Know how to stop the machine and disengage
the controls quickly.
Make sure to read and understand all the instructions and
safety precautions as outlined in the Engine Manufactur-
er's Manual. packed separately with your unit. Do not
attempt to operate the machine until you fully understand
how to properly operate and maintain the Engine and how
to avoid accidental injuries and/or property damage.
Never start or run the machine inside a closed area. The
exhaust fumes are dangerous. containing carbon monox-
ide, an odorless and deadly gas. Operate this unit only in a
well ventilated outdoor area.
Never operate the machine without good visibility or light.
Do not operate the machine while under the influence of
drugs,alcohol, or any medication that could affect your
ability to use it properly.
Dress properly. Wear heavy long pants,boots and gloves.
Do not wear loose clothing. short pants, and jewelry of
any kind. Secure long hair so it is above shoulder level.
Keep your hair.clothing and gloves away from moving
parts. Loose clothes, jewelry or long hair can be caught in
moving parts.
Use safety equipment. Always wear eye protection.
Safety equipment such as a dust mask, hard hat, or
hearing protection used for appropriate conditions will
reduce personal injuries.
Check your machine before starting it.Keep guards in
place and in working order. Make sure all nuts bolts,etc.
are securely tightened.
Never operate the machine when it is in need of repair or
is in poor mechanical condition. Replace damaged, miss-
ing or failed parts before using it. Check for fuel
leaks.Keep the machine in safe working condition.
Never remove or tamper with safety device. Check their
proper operation regularly.
Do not use the machine if the engine's switch does not
turn it on or off. Any gasoline powered machine that can
not be controlled with the engine switch is dangerous and
must be replaced.
Form a habit of checking to see that keys and adjusting
wrenches are removed from machine area before starting
it. A wrench or a key that is left attached to a rotating
part of the machine may result in personal injury.
Stay alert, watch what you are doing and use common
sense when operating the machine.
Do not overreach. Do not operate the machine while
barefoot or when wearing sandals or similar light weight
footwear. Wear protective footwear that will protect your
feet and improve your footing on slippery surfaces. Keep
proper footing and balance at all times. This enables
better control go the machine in unexpected situations.
Avoid accidental starting. Be sure the engine is off before
transporting the machine or performing any maintenance
or service on the unit. Transporting or performing mainte-
nance or service on a machine with engine on invites
accidents.
Fuel is highly flammable, and its vapors can explode if
ignited. Take precautions when using to reduce the
chance of serious personal injury.
When refilling or draining the fuel tank, use an approved
fuel storage container while in a clean, well-ventilated
outdoor area. While adding fuel or operating the unit, do
not smoke, and stay away from sparks, open flames, or
other sources of ignition near the area of operation. Never
fill the fuel tank .
Keep grounded conductive objects. such as tools, away
from exposed, live electrical parts and connections to
avoid sparking or arcing. These events could ignite fumes
or vapors.
Always stop the engine and allow it to cool before filling
the fuel tank. Never remove the cap of the fuel tank or add
fuel while the engine is running or when the engine is hot.
Do not operate the machine with known leaks is the fuel
system.

5
www. mechmaxx.com
SAFETY
Loosen the fuel tank cap slowly to relieve any pressure in
the tank.
Never over fill fuel tank. Fill tank to no more than 12.5
mm(1/2") below the bottom of the filler neck to provide
space for expansion as the heat of the engine can cause
fuel to expand,
Replace all fuel tank and container caps securely and
wipe up spilled fuel, Never operate the unit without the
fuel cap securely in place.
Avoid creating a source of ignition for spilled fuel. If fuel is
spilled, do not attempt to start the engine but move the
machine away from the area of spillage and avoid creating
any source of ignition until fuel vapors have dissipated.
Store fuel in containers specifically designed and
approved for this purpose.
Store fuel in a cool. well-ventilated area, safely away from
sparks, open flames or other sources of ignition.
Never store fuel or machine with fuel in the tank inside a
building where fumes may reach a spark, open flame, or
other sources of ignition, such as a water heater, furnace,
clothes dryer and the like, Allow the engine to cool before
storing in any enclosure.
Position the machine in such a way that it can not move
during maintenance, cleaning, adjustment, assembly of
accessories or spare parts, as well as under storage,
Do not force the machine. Use the correct machine for
your application, The correct machine will do the job
better and safer at the rate for which it was designed.
Do not change the engine governor settings or over-speed
the engine. The governor controls the maximum safe
operating speed of the engine.
Do not run the engine at a high speed when you are not
working.
Do not put hands or feet near rotating parts.
Avoid contact with hot fuel. oil. exhaust fumes and hot
surfaces. Do not touch the engine or muffler. These parts
get extremely hot from operation. They remain hot for a
short time after you turn off the unit, Allow the engine to
cool before doing maintenance or making adjustments.
If the machine start to make an unusual noise or vibra-
tion, immediately shut off the engine, disconnect the
spark plug wire, and check for the cause, Unusual noise or
vibration is generally warning of trouble .
Use only attachments and accessories approved by the
manufacturer. Failure to do so can result in personal
injury.
Maintain the machine. Check for misalignment or binding
of moving parts. breakage of parts and any other condition
that may affect the machine's operation. If damaged.
have the machine repaired before use. Many accidents are
caused by poorly maintained equipment.
Keep the engine and muffler free of grass,leaves, exces-
sive grease or carbon build up to reduce the chance of a
fire hazard.
Never douse or squirt the unit with water or any other
liquid. Keep handles dry, clean and free from debris. Clean
after each use.
Observe proper disposal laws and regulations for gas.oil
etc,to protect the environment.
Store idle machine out of the reach of children and do not
allow persons unfamiliar with the machine or these
instructions to operate it. Machine is dangerous in the
hands of untrained users.
Before cleaning, repair, inspecting, or adjusting, shut off
the engine and make certain all moving parts have
stopped. Disconnect the spark plug wire, and keep the
wire away from the plug to prevent accidental starting.
Have your machine serviced by qualified repair personnel
using only identical replacement parts. This is so that
that safety of the machine is maintained
This machine is designed solely to dig
trench and must not be used for any other
purpose. It should only be used by trained
operators who are familiar with the
content of this manual. It is potentially
hazardous to fit or use any parts other
than your dealer parts. We disclaim all
liability for the consequences of such use,
which in addition voids the machine
warranty
MACHINE USE AND CARE
SERVICE
PROPOSE
6
www. mechmaxx.com
SAFETY
Before using the Trencher:
Operators must be fully trained before using this machine.
User Manual is read and understood.
Blades are in good condition and secure. All blades are
sharpened or replaced in sets.
All fasteners are checked for tightness.
When using the Trencher:
Maintain strict discipline at all times and service machine
at specified periods.
During working, people should stand in the middle of the
two handles, and keep a certain space from engaged
wheel, so that avoid injuries of foot touching engaged
wheel during walking.
Keep body parts, foreign objects and clothing clear of
rotating auger and digging chain.
Coming into contact with buried utilities while digging
can cause severe injuries or DEATH.
Contact appropriate utility representatives to determine
if/where electrical cables, gas lines, water lines, etc. are
buried BEFORE operation.
DO NOT operate the machine while under the influence of
alcohol or drugs.
Only use the machine in daylight or illuminance above
500lux. Never operate the dumper after dark.
This is a high-powered machine, with moving parts
operating with high energy. You must operate the
machine safely. Unsafe operation can create a number of
hazards for you, as well as anyone else in the nearby area.
Always take the following precautions when using this
machine:
Keep in mind that the operator or user is responsible for
accidents or hazards occurring to other people, their
property, and themselves.
Always wear protective goggles or safety glasses with
side shields while using the Trencher to protect your eyes
from possible thrown debris.
Avoid wearing loose clothing or jewelry, which can catch
on moving parts.
Wear shoes with non-slip treads when using your
Trencher. If you have safety shoes, we recommend wear-
ing them. Do not use the machine while barefoot or wear-
ing open sandals.
Wear earplug when using your trencher to avoid noise.
Keep bystanders at least 50 feet (15m) away from your
work area at all times.Stop the engine when another
person or pet approaches.
Tragic accidents can occur if the operator is not alert to
the presence of children and pets.Children are often
attracted to the machine and the digging activity. Never
assume that children will remain where you last saw
them. Always follow these precautions:
Keep children and pets at least 50 feet(15m) from the
working area and ensure they are under the watchful care
of a responsible adult.
Be alert and turn the machine off if children or pets enter
the work area.
Never allow children to operate the Trencher.
Gasoline is a highly flammable liquid. Gasoline also gives
off flammable vapor that can be easily ignited and cause
a fire or explosion. Never overlook the hazards of gasoline.
Always follow these precautions:
Never run the engine in an enclosed area or without proper
ventilation as the exhaust from the engine contains
carbon monoxide, which is an odorless, tasteless, and a
deadly poisonous gas.
Store all fuel and oil in containers specifically designed
and approved for this purpose and keep away from heat
and open flame, and out of the reach of children.
Replace rubber fuel lines and grommets when worn or
damaged and after 5 years of use.
Fill the gasoline tank outdoors with the engine off and
allow the engine to cool completely. Don't handle gasoline
if you or anyone nearby is smoking, or if you're near
anything that could cause it to ignite or explode. Reinstall
the fuel tank cap and fuel container cap securely.
Protecting Yourself and Those around You
Safety for Children and Pets
Safety with Gasoline - Powered Machines

7
www. mechmaxx.com
SAFETY
If you spill gasoline, do not attempt to start the engine.
Move the machine away from the area of the spill and
avoid creating any source of ignition until the gas vapors
have dissipated. Wipe up any spilled fuel to prevent a fire
hazard and properly dispose of the waste.
Allow the engine to cool completely before storing in any
enclosure. Never store a machine that has gasoline in the
tank, or a fuel container, near an open flame or spark such
as a water heater, space heater, clothes dryer or furnace.
Never make adjustments or repairs with the engine
running. Shut down the engine, disconnect the spark plug
wire, keeping it away from the spark plug to prevent
accidental starting, wait 5 minutes before making adjust-
ments or repairs.
Never tamper with the engine's governor setting. The
governor controls the maximum safe operation speed and
protects the engine. Over-speeding the engine is danger-
ous and will cause damage to the engine and to the other
moving parts of the machine. If required, see your autho-
rized dealer for engine governor adjustments.
Keep combustible substances away from the engine
when it is hot.
Never cover the machine while the muffler is still hot.
Do not operate the engine with the air cleaner or the
carburetor air intake cover removed. Removal of such
parts could create a fire hazard. Do not use flarnmable
solutions to clean the air filter.
The muffler and engine become very hot and can cause a
severe burn; do not touch.
Never, under any conditions, remove, bend, cut, fit, weld,
or otherwise alter standard parts on the Trencher. This
includes all shields and guards. Modifications to your
machine could cause personal injuries and property
damage and will invalid your warranty.
If the machine start to make an unusual noise or vibrate,
shut down the engine, disconnect the spark plug wire,
keeping it away from the spark plug to prevent accidental
starting, wait 5 minutes for engine to cool down, then
inspect for damage. Vibration is generally a warning of
trouble. Check damaged parts and clean, repair and/or
replace as necessary.
Never tamper with safety devices. Check their proper
operation regularly.
Before performing any maintenance or inspection proce-
dure, shut down the engine, disconnect the spark plug
wire keeping it away from the spark plug to prevent
accidental starting, wait 5 minutes for machine to cool
down.
Never allow people who are unfamiliar with these instruc-
tions to use the Trencher. Allow only responsible individu-
als who are familiar with these rules of safe operation to
use your machine.
Never overload or attempt to dig trenches beyond the
manufacturer's recommendation. It could result in
personal injury or damage to the machine.
While using, don't hurry or take things for granted. When
in doubt about the equipment or your surroundings stop
the machine and take time to look things over.
Never operate the machine when under the influence of
alcohol, drugs, or medication.
Use the machine only in daylight.
Stay alert for hidden hazards or traffic.
Keep all nuts and bolts tight and keep the equipment in
good operating condition.
Your Trencher is a powerful tool, not a toy . Exercise
extreme caution at all times. The machine is designed to
dig trench. Do not use it for any other purpose.
Know how to stop the Trencher quickly.
Exercise caution to avoid slipping or falling.
See manufacturer's instructions for proper operation and
installation of accessories.
Never use the machine without ensuring that all guards
and shields are in place.
List of warnings and cautions cannot be all-inclusive. If
situations occur that are not covered by this manual, the
operator must apply common sense and operate this
TRENCHER in a safe manner. Contact the dealers for
assistance in your area.
Operating this Trencher safely is neces-
sary to prevent or minimize the risk of
death or serious injury. Unsafe operation
can create a number of hazards for you.
Always take the following precautions
when operating:
A NOTE TO ALL USERS
8
www. mechmaxx.com
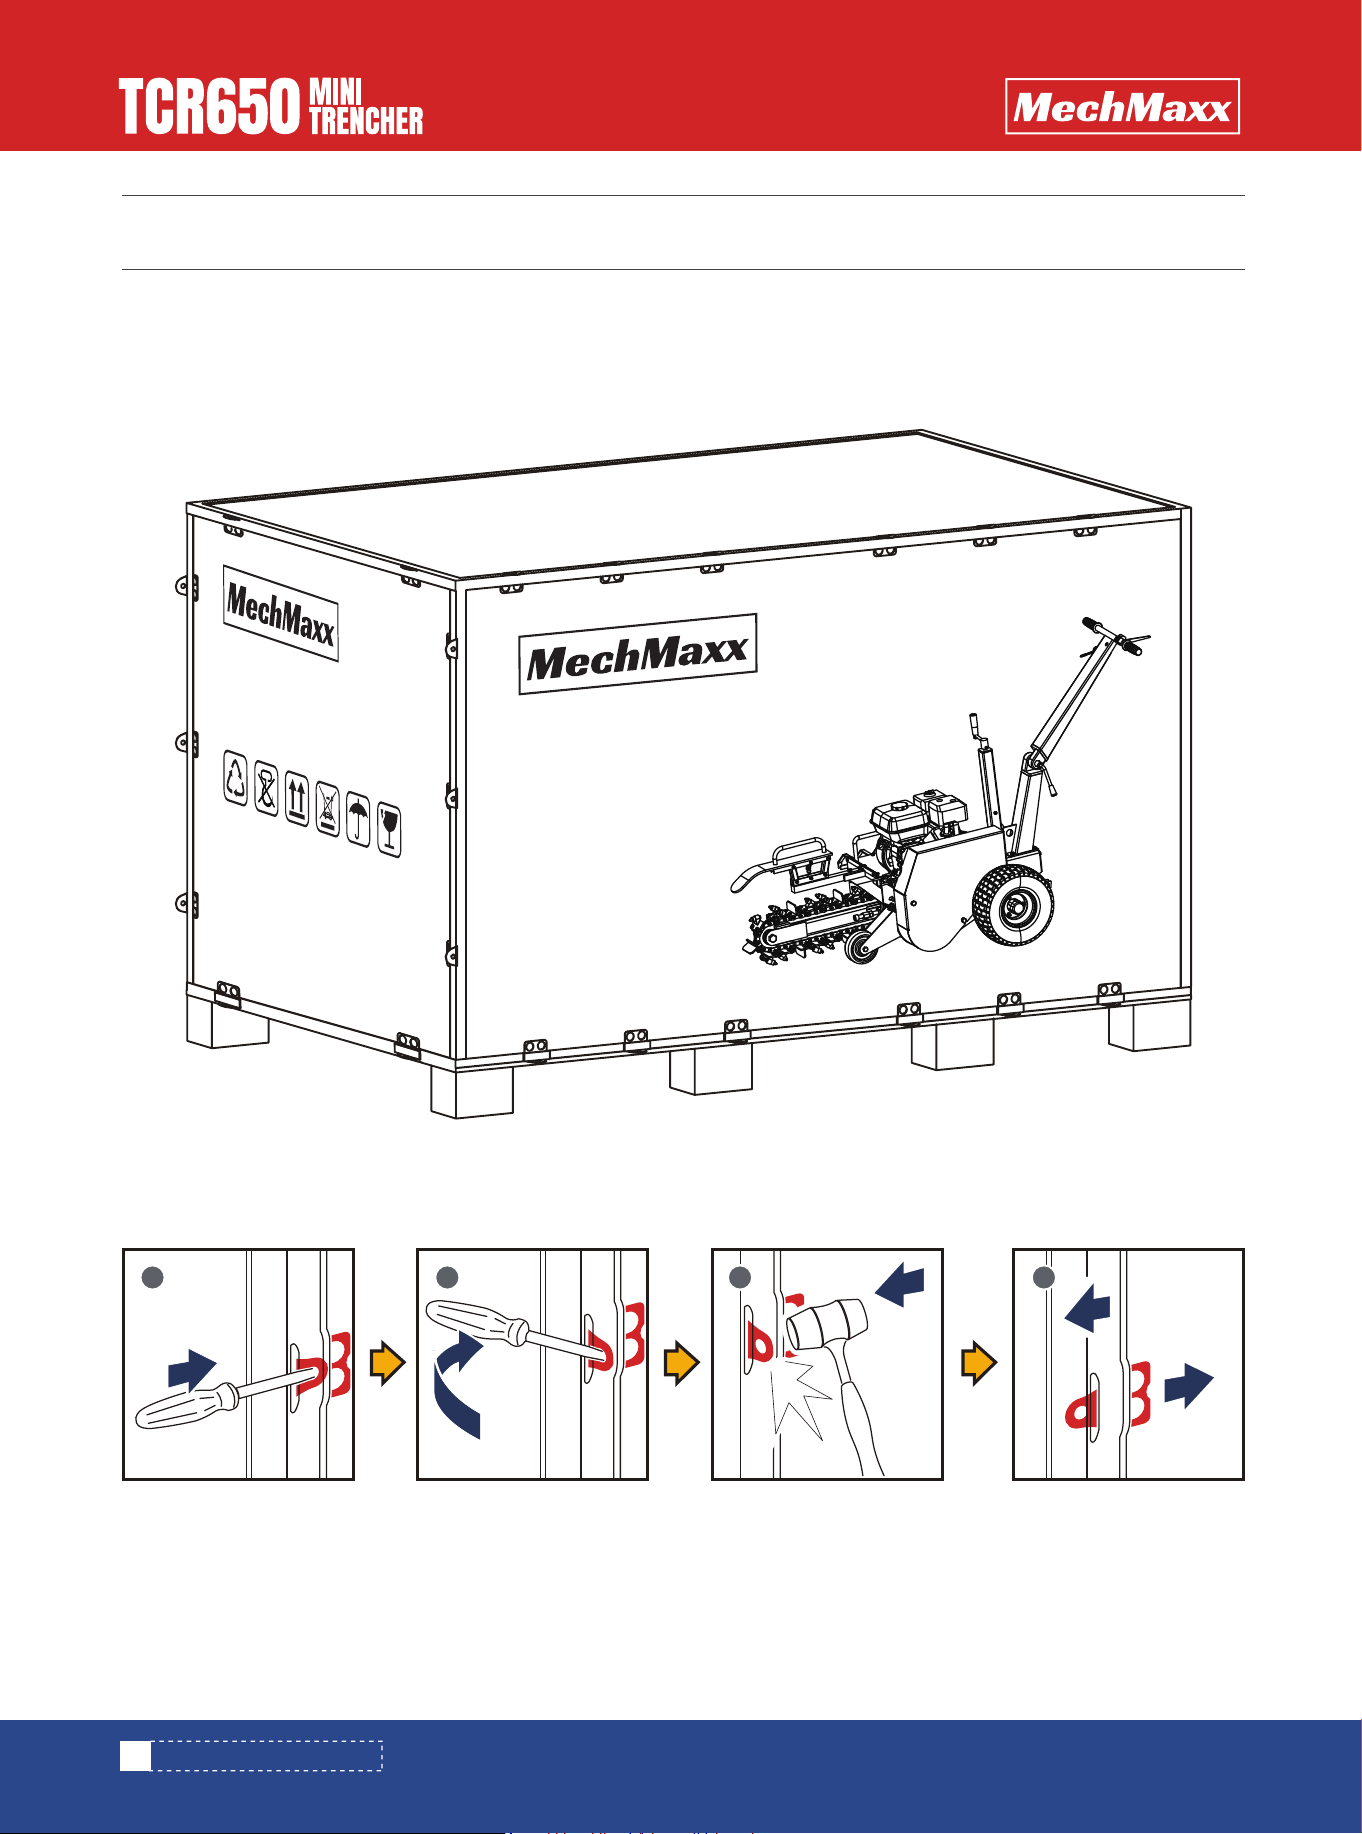
UNPACHING THE CONTAINER
UNPACHING THE CONTAINER
Use the screwdriver and hammer to open all the side locks.
1 2 3 4
www.mechmaxx.com
GASOLINE POWERED
MINI TRENCHER
Model Number:
Package size:
www.mechmaxx.com
Gross weight:
GASOLINE POWERED
MINI TRENCHER

9
www. mechmaxx.com
TO-SCALE HARDWARE
TO-SCALE HARDWARE
Hardware graphics are printed at 1:1 scale for ease of identification. Simply place the hardware over the image in the
tables to verify it is the correct size.
M8 X 25mm
Hex bolt
6X
M8 X 55mm
Hex bolt
2X
M16 X 90mm
Hex bolt
1X
M8 X 20mm
Hex bolt
4X
M6 X 25mm
Hex bolt
4X
M6 X 30mm
Hex bolt
2X
8
Flat washer
12X
6
Flat washer
4X
8
Spring washer
6X
4X
nut M6
Hex lock
6X
nut M8
Hex lock
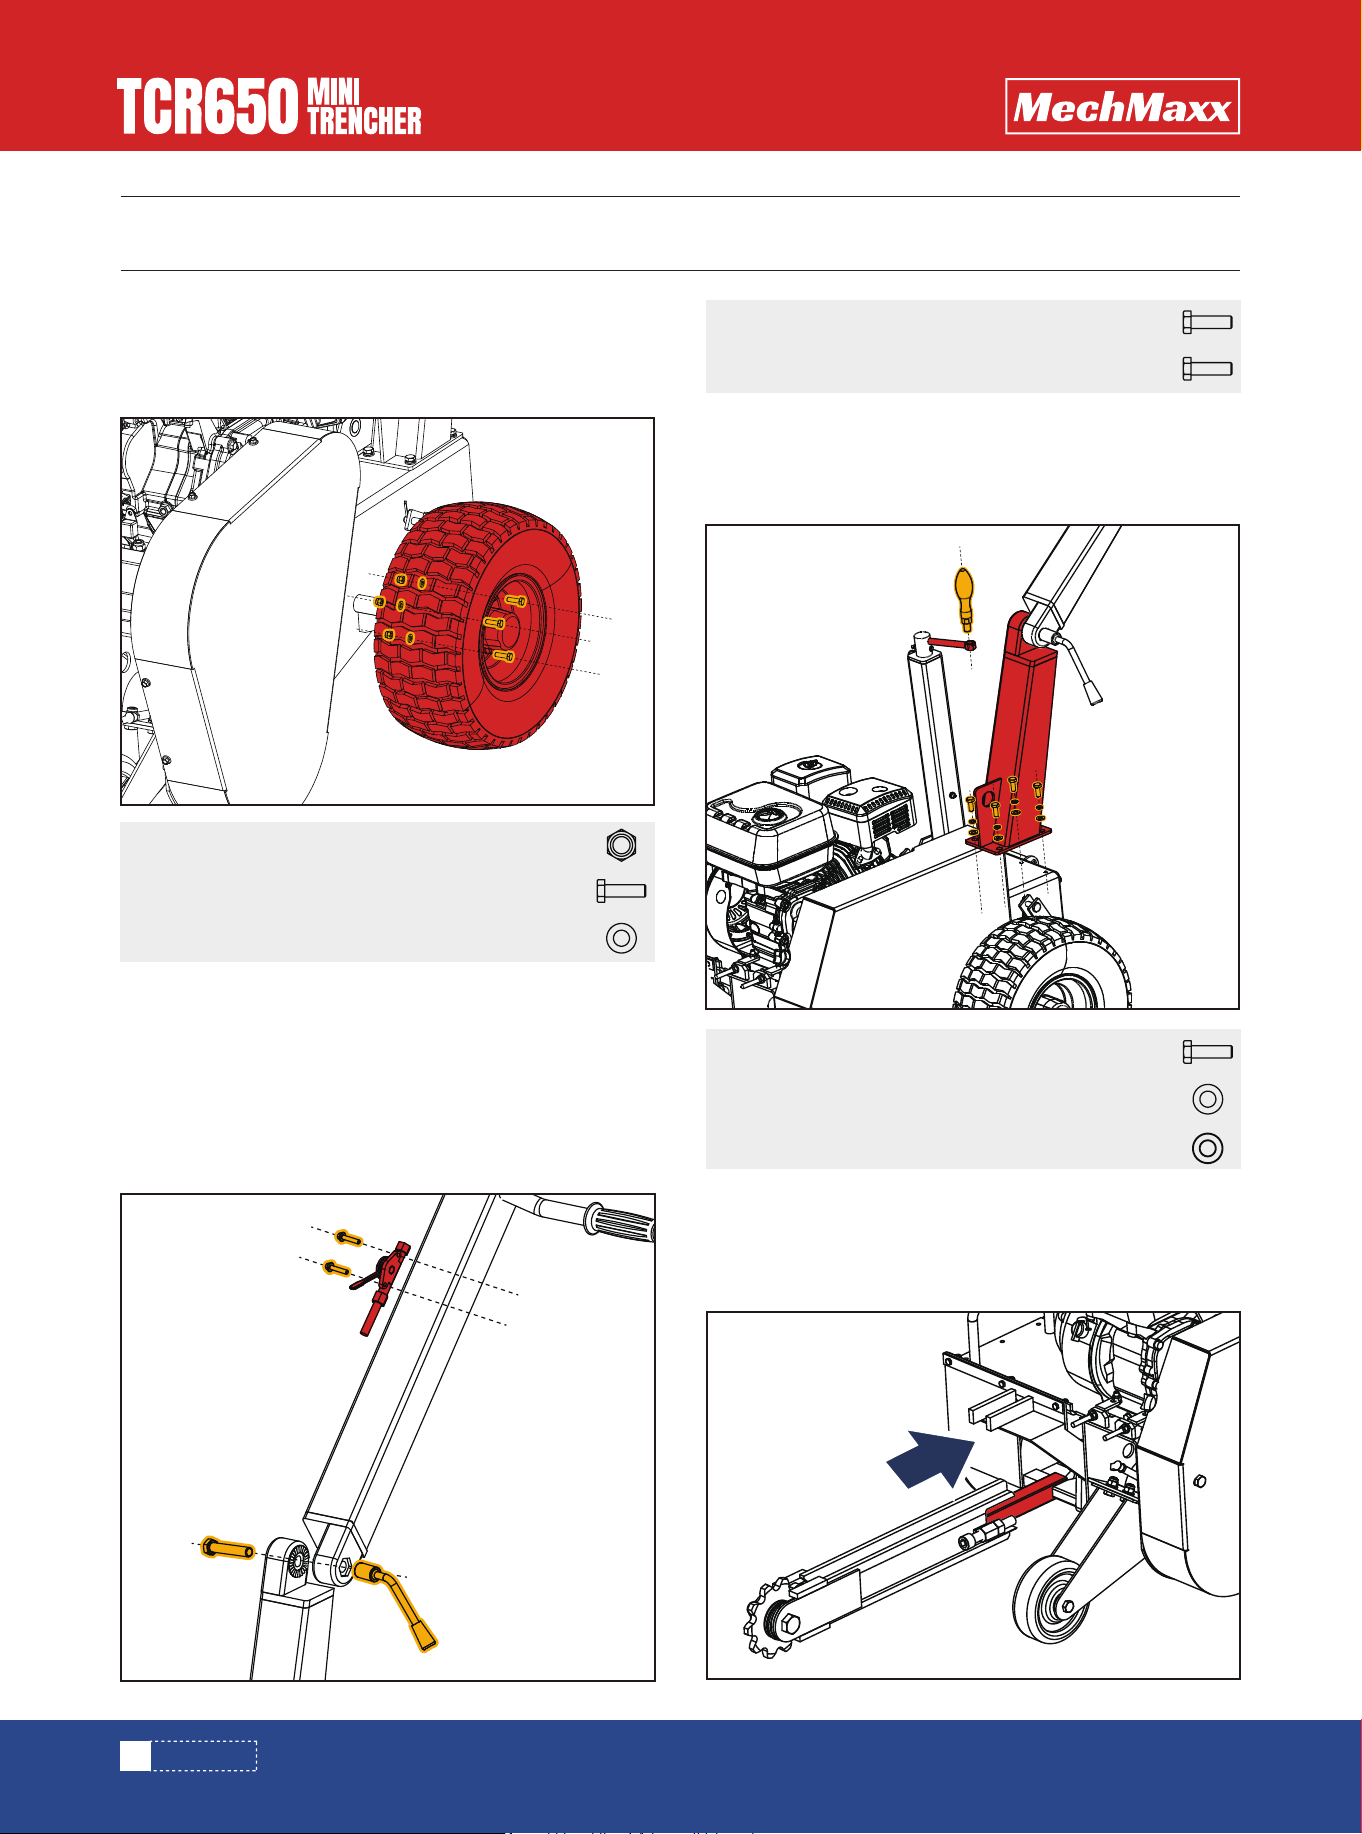
ASSEMBLY
ASSEMBLY
10
www. mechmaxx.com
Install throttle switch to upper handle with hex bolt
M6x30.
Install the upper handle to the lower handle with the hex
bolt M16x90, and then connect the Angle arm to the hex
bolt M16x90.(See Figure 2)
Using flat washers 8, nuts M8 and hex bolts M8x25.
Mount the tire to the main frame.(See Figure 1)
Attach the lower part of the handle to the rotation handle.
Attach lower handle to main frame with flat washer 8,
elastic washer 8 and hex bolt M8x20.(See Figure 3)
Connect the chain adaptor to the chain axle plate.(See
Figure 4)
Hex bolt M16 X 90mm
1X
Hex bolt M6 X 30mm2X
Spring washer 8
4X
Hex bolt M8 X 20mm
Flat washer 8
4X
4X
Hex lock nut M86X
Hex bolt M8 X 25mm
Flat washer 8
6X
6X
Figure 1
Figure 2
Figure 3
Figure 4
HANDLE ASSEMBLY
WHEELS
CHAIN ASSEMBLY
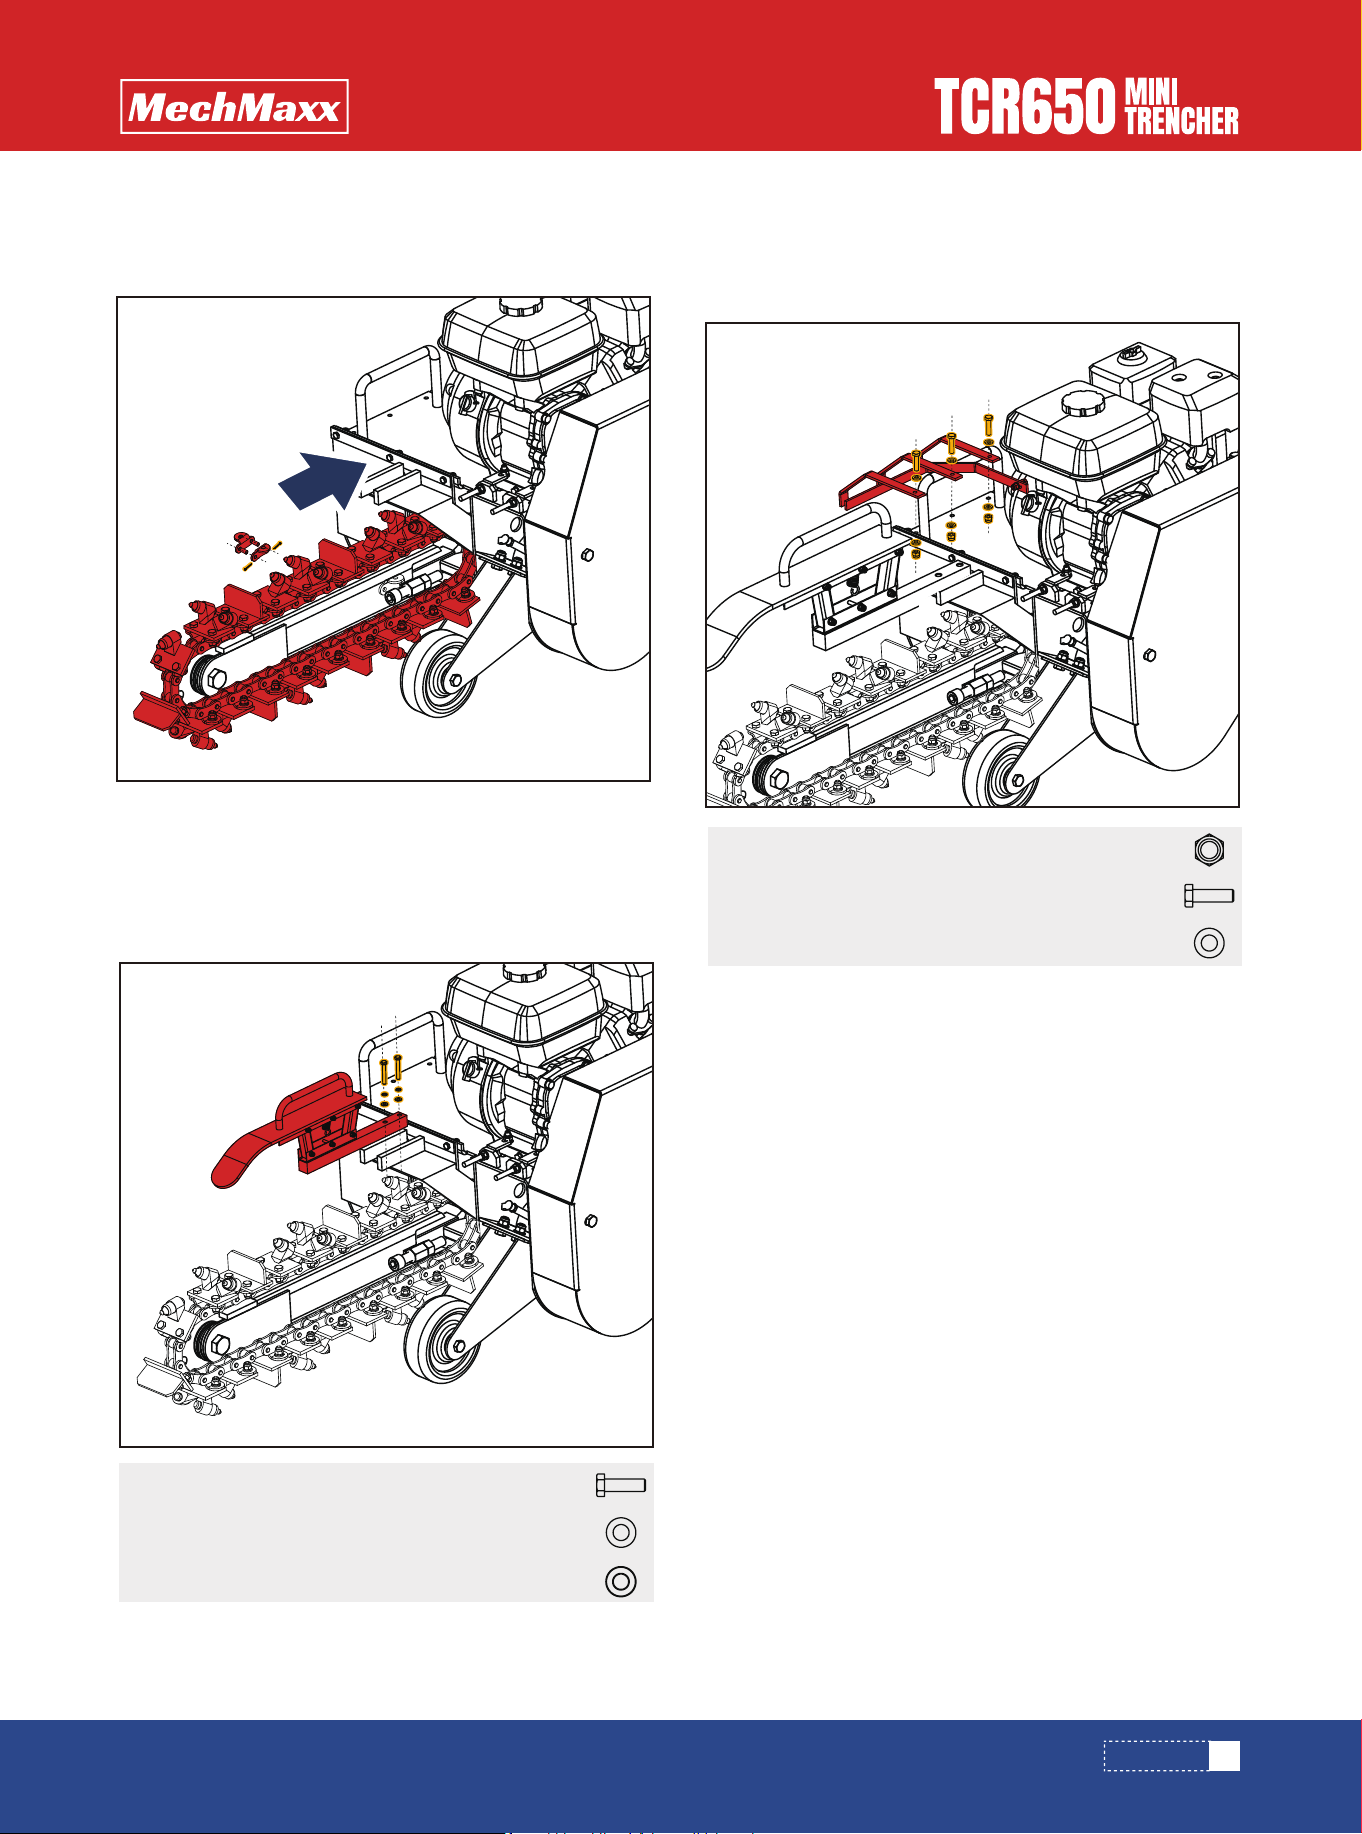
ASSEMBLY
11
www. mechmaxx.com
Lock the chain on the adapter to cirle with chainlock
chain lock and split cotter, Tighten the chain by tighten-
ing the bolt.(See Figure 5)
Connect the chain cover with connection arm plate with
flat washer 8,spring washer 8 and hex bolt M8x55.(See
Figure 6)
Install the shield on the main frame with hex bolt M6x25,-
flat washer 6 and lock nut M6.(See Figure 7)
Spring washer 8
2X
Hex bolt M8 X 55mm
Flat washer 8
2X
2X
Hex lock nut M64X
Hex bolt M6 X 25mm
Flat washer 6
4X
4X
Figure 5
Figure 6
Figure 7
CHAIN GUARD
SHIELD
12
www. mechmaxx.com
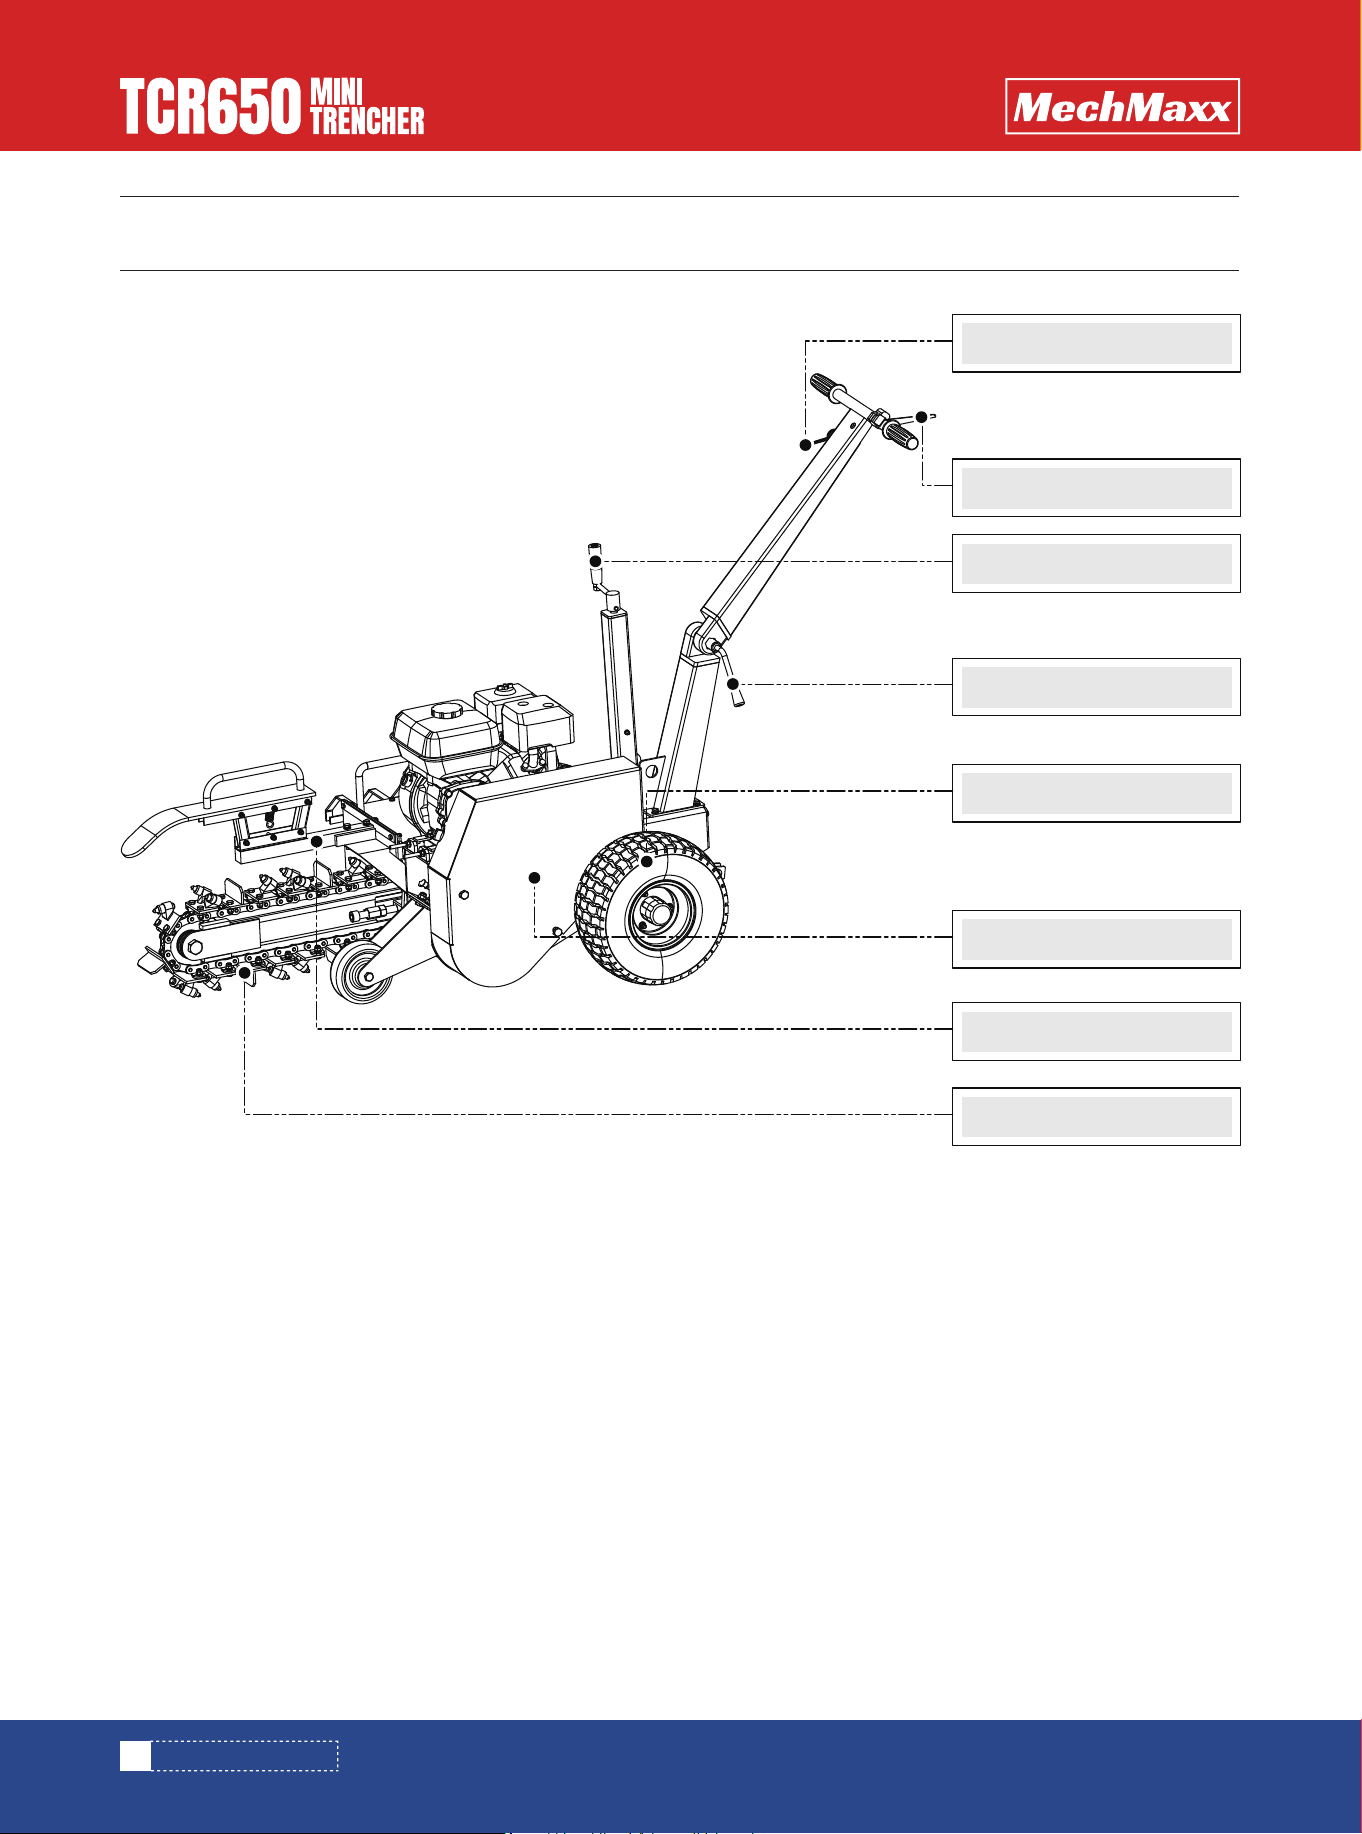
KNOW YOUR MACHINE
KNOW YOUR MACHINE
It is your responsibility as the operator of this piece of
equipment to know what specific requirements, precau-
tions and work hazards exist. You must read and under-
stand all of the information contained in the user manual.
The trencher is a small, operator propelled, chain-type
trencher designed for the installation of lines that require
a narrow shallow trench. It has more than enough power
to trench through the toughest soils, however, because of
its small size, low horse power and trench capacity, it is
limited in what it is capable of doing. The job site, soil
conditions, job specifications and operator experience
may dictate that a different tool or method be used to do
the job.
The digging chain has a tendency to pull the trencher in
the opposite direction you want to dig. For this reason, be
sure that the digging teeth are not in contact with the
ground or other objects while starting the engine and that
the wheel lock device engages before lowering the
digging bar into the ground. Be sure that you have a firm
grip on the machine and are ready to control it when the
digging bar comes in contact with the ground.
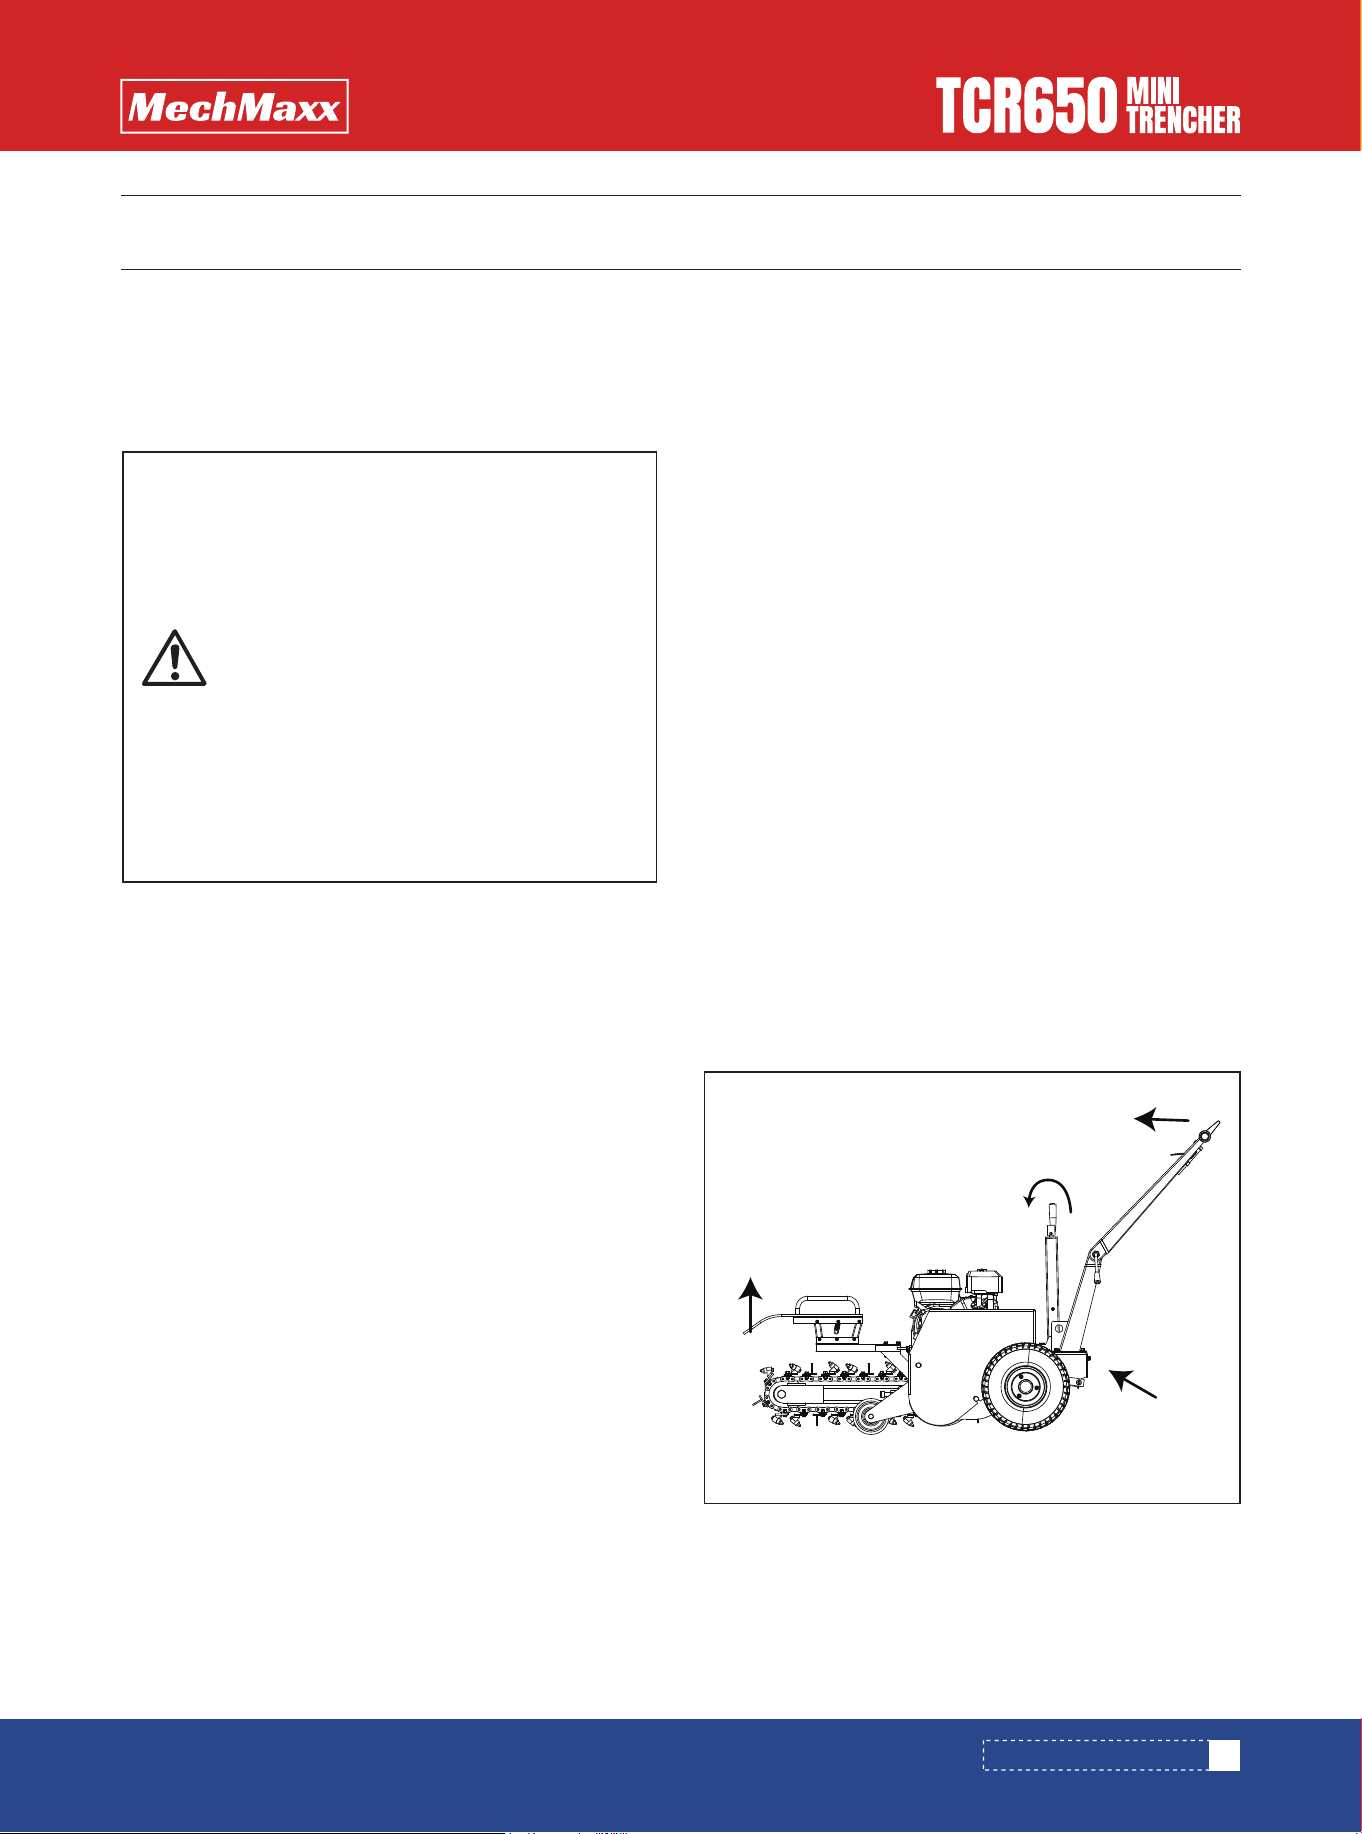
The trencher has a tendency to "hop" or "buck” under
certain conditions. This can be the result of certain soil
conditions or buried objects that the trencher cannot cut
through or lift to the surface. The trencher must be
stopped and the object removed, or restarts the trencyjc.
Wheel
Stop Switch
Throttle
Handle Control
Depth Control
Blade
Belt Cover
Guard
13
www. mechmaxx.com
OPERATING THE TRENCHER
OPERATING THE TRENCHER
It may be helpful to better familiarize your self with the
features of your Trencher before beginning the steps
outlined in this chapter.
Be sure the digging chain is not turning when the engine
is at an idle. Be sure the engine is off or at an idle before
moving the trencher at the job site.
NOTE: All depths are approximate. Actual depth may vary
depending upon soil conditions and trencher blade wear.
Also, soil conditions and operator experience will dictate
actual trenching action and speed
Be sure the depth control is in the "O" depth position and
move both stop switches to the "ON" position. Always
stand to the rear of the trencher, away from the side
delivery auger and digging chain while starting the engine.
Always start the trencher at the job site and allow it to
warm up. While the machine is running, check that all
controls are working properly before using.
Make sure the fuel shut-off valve is in the "ON” position.
Move the choke control lever to the "CHOKE” position
(should only be needed if the engine is cold).
Move the throttle control lever to the "FAST” position.
Recoil Start: Turn the Ignition Switch to the "On" position.
Push the handle of flame out switch and grasp the recoil
starter handle and slowly pull until you feel resistance.
Let the cord retract a little bit then pull the cord rapidly to
start the engine. One or two pulls usually starts the
engine.
Electric Start: Turn and hold the Key in the start position
until Engine starts then let the key return to run position.
Move the choke control lever (if used for cold engine)
slowly back to the "RUN" position when the engine is
running well.
If the Trencher has not been running (cold engine), warm
up the engine by running the engine at half throttle for 3
to 4 minutes, then advance the engine throttle control to
the maximum speed.
Anticlockwise rotate the depth control handle and lift the
chains, lock the anti forward control handle, then the
trencher can be pushed forward
Push forward the trencher to the work site, loose the
anti-forward control handle, then the trencher can only
move backwards. Clockwise rotate the depth control
handle and descend the chains to your desired depth.
Read and understand all instructions,
safety precautions, and/or warning slitted
in "PART I: General Safety Rules" before
operating the TRENCHER. If any doubt or
question arises about the correct or safe
method of performing anything found in
this manual, please contact the dealers in
your area.Before loading and operating
the Trencher, always wear protective
gear, including safety goggles, hearing
protection, tight-fitting gloves without
draw strings or loose cuffs, and steel-toed
shoes.
OPERATING THE TRENCHER
STARTING
TRENCHING
A GENERAL DESCRIPTION ON HOW TO
TRENCH:
START THE ENGINE FOLLOWING THE
PROCEDURES:
1. Anticlockwise rotate the
depth control handle
3. lock the anti-forward
control handle
4. Push Forward
2. The chains will li up

OPERATING THE TRENCHER
14
www. mechmaxx.com
Notes:
Lock: When we put the anti-forward control handle in the
slot, the anti-forward controller lift up, don't touch the
wheel gear, we can push forward.
Loose: When we pull back the anti-forward control handle,
it will automatically loose the anti-forward controller
down on the wheel gear, the trencher can't move forward
and can only move backwards
All the rack and pinion should be greased before every use.
Always wear the proper clothing and protective gear. Eye
and ear protection, hard hat, boots, gloves and dust
masks may be required.
Keep hair, fingers, and all other body parts away from
openings and moving parts. Always wear, long pants,
boots, and gloves.
Secure hair so it is above shoulder length.
Do not operate trencher indoors. Outdoor use only.
Do not operate trencher when tired, ill, or under the
influence of alcohol, drugs, or medication.
Always assume the digging location contains under-
ground utilities. Contact appropriate utility company to
determine where electrical cables, gas lines, water lines,
etc. are buried before operation.
Always use extreme caution while operating tool. Be sure
of your footing and physical capabilities.
Switching stop switch on handle.
Move the Throttle Lever to IDLE.
Recoil Start: Turn the Ignition Switch to the OFF position.
Electric Start: Turn the Key to the OFF position
If the Chain stops moving while digging trenches, the
engine should be stopped, take out the muds or anything
which stuck the chain, then restart the engine, and start
digging again.
There are two stop switches on the trencher; one on the
handle bar and one on the engine. Refer to the engine
manual for the switch location on your trencher. The
operator can turn the trencher off at any time by switch-
ing either stop switch to the "OFF" position. Both switch-
es must be "ON" before the engine can start.
Inspect entire trencher before each use. Replace
damaged or worn parts.
Check for fuel leaks and make sure all fasteners are in
place and securely fastened.
Replace digging blades that are severely worn. Be sure
the digging chain and engine is not moving.
Refuel outdoors and where no sparks and flames.
Store fuel in a container approved for gasoline.
Do not smoke or allow smoking near fuel or the trencher
or while using the trencher.
Clean up all fuel spills before starting engine.
Move at least 10 feet away from fueling site before start-
ing engine.
Stop engine before removing fuel cap
STOPPING
OPERATOR SAFETY
TOOLS SAFETY
FUEL SAFETY
WHEN BLOCKED
STOPPING THE ENGINE FOLLOWING
THE PROCEDURES:
2. Clockwise rotate
1.loose the anti-forward
control handle
4. Trencher backwards
3.Move down

15
www. mechmaxx.com
OPERATING THE TRENCHER
Be sure that the area is clear of potential hazards, such
as pipes, rocks or other materials that could possibly
entangle itself around the digging chain or cause unstable
footing before using the trencher.
Keep others bystanders and helpers outside a 15 foot
hazard zone from the trencher. Hold the trencher handle
firmly with both hands.
Keep all your body and clothing away from the digging
chain, auger and other moving parts.
Inspect the digging site. Soil conditions, job specifica-
tions, and operator experience may dictate that a differ-
ent trencher or method be used to complete the job.
DIGGING SAFETY
16
www. mechmaxx.com
Before performing any maintenance procedure or inspec-
tion, stop the engine, wait five minutes to allow all parts
to cool.
Disconnect the spark plug wire, keeping it away from the
spark plug. Disconnect the Battery Terminals (Electric
start only).
Stop engine before removing fuel cap.
Use only genuine replacement parts of the engine manu-
facturer.
Regular maintenance is the way to ensure the best perfor-
mance and long life of your machine. Please refer to this
manual and the engine manufacturer's user manual for
maintenance procedures.
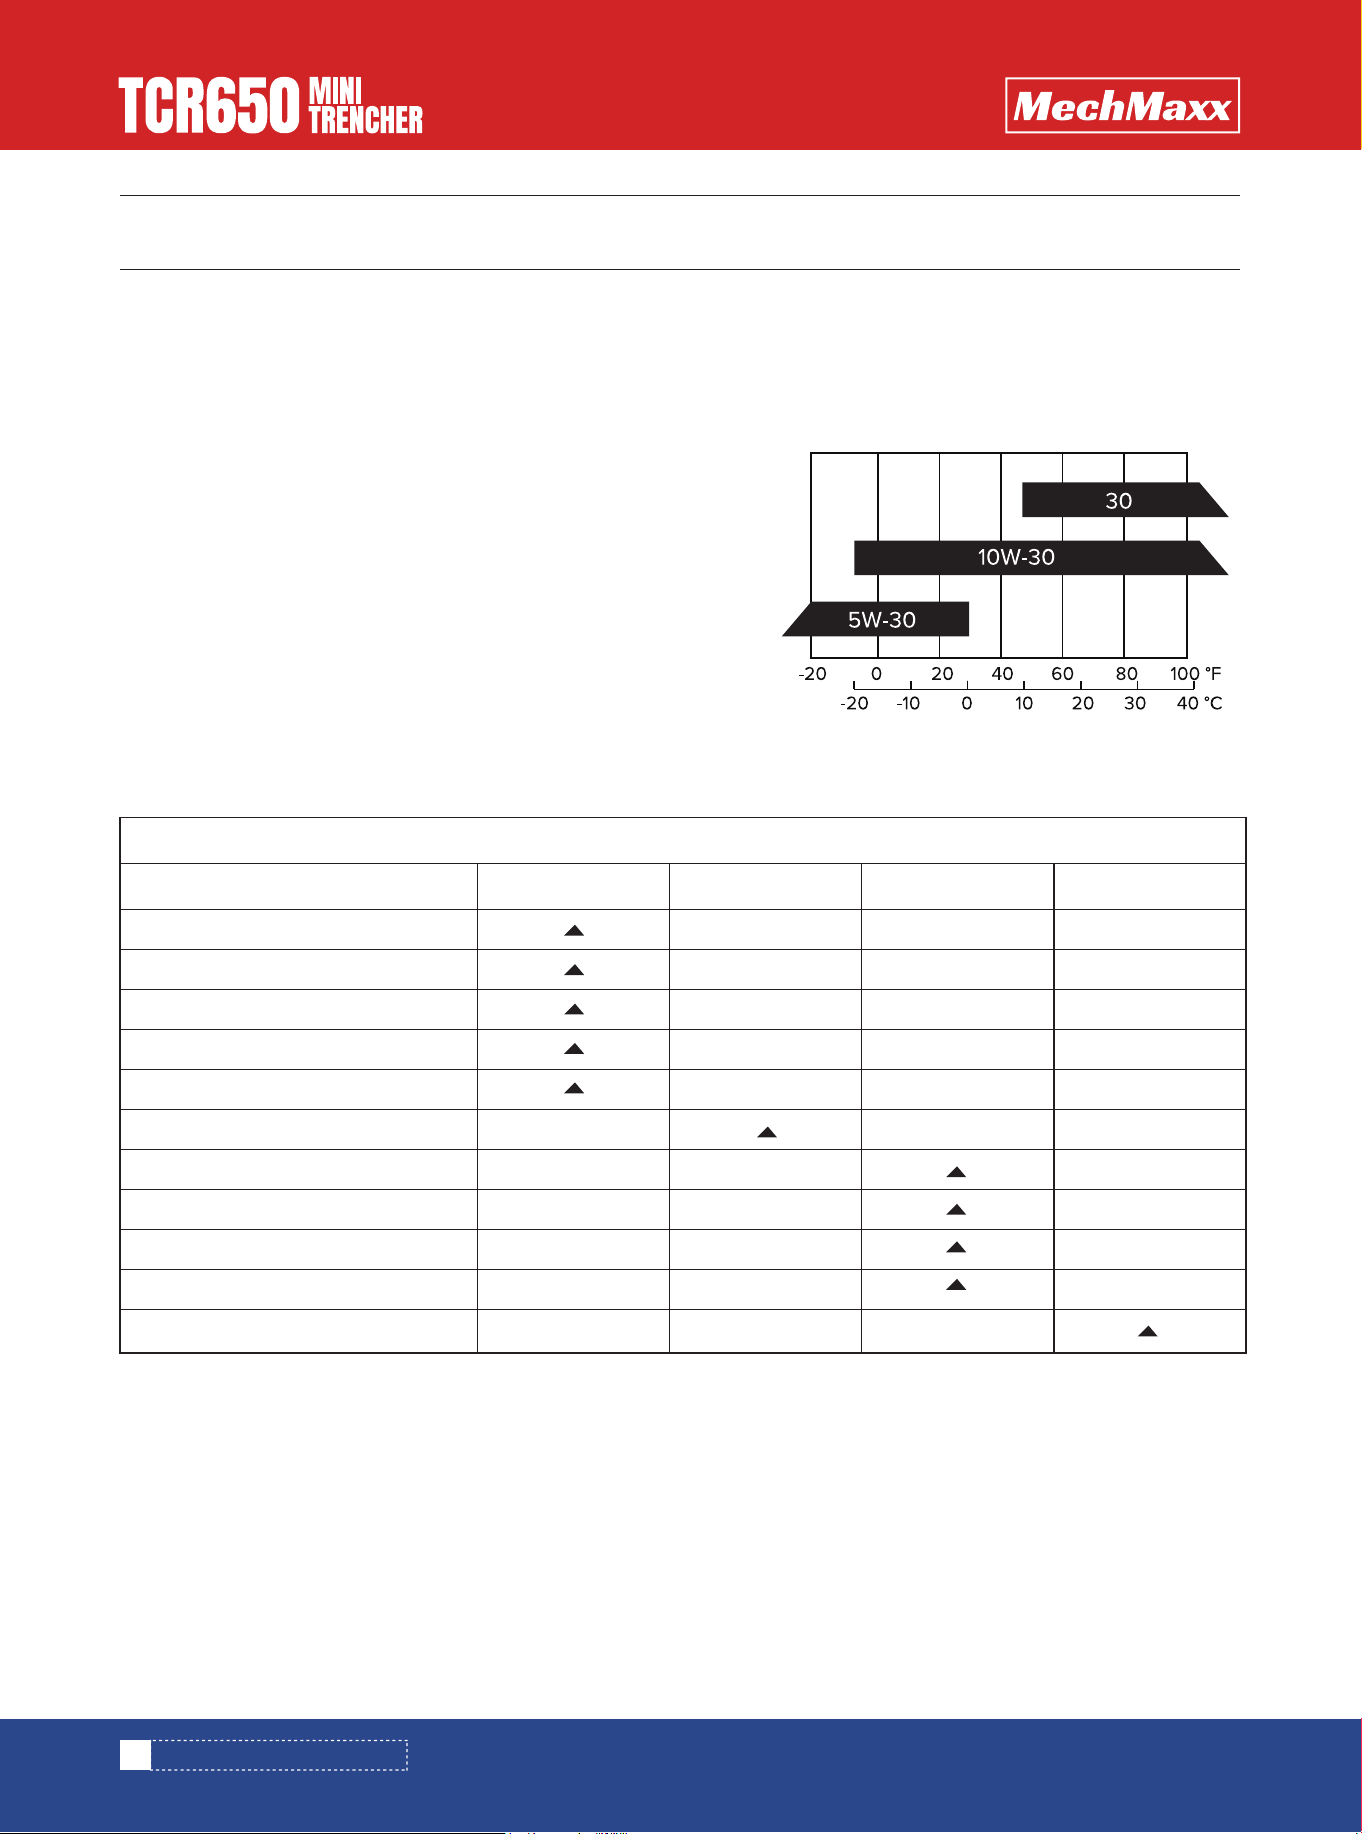
Recommended engine oil 4-stroke gasoline engine oil SF
under APl service classification or SAE10W-30(equivalent
to SG class).
MAINTAINING YOUR TRENCHER
MAINTAINING YOUR TRENCHER
MAINTENANCE SAFETY
LUBRICATION
SAE
AMBIENT TEMPERATURE
Procedure
Check engine oil level
Check general equipment condition
Check wedge for sharpness
Grease surface of slide rail
Check belts
Grease rack and pinion
Check tire pressure
Clean engine exterior and cooling
Change Engine Oil
Replace air filter
Replace spark plug
Before Each Use
First time 5hours
Every 3 Hours Every 25 Hours Every 100 Hours
Regular Maintenance Checklist
17
www. mechmaxx.com
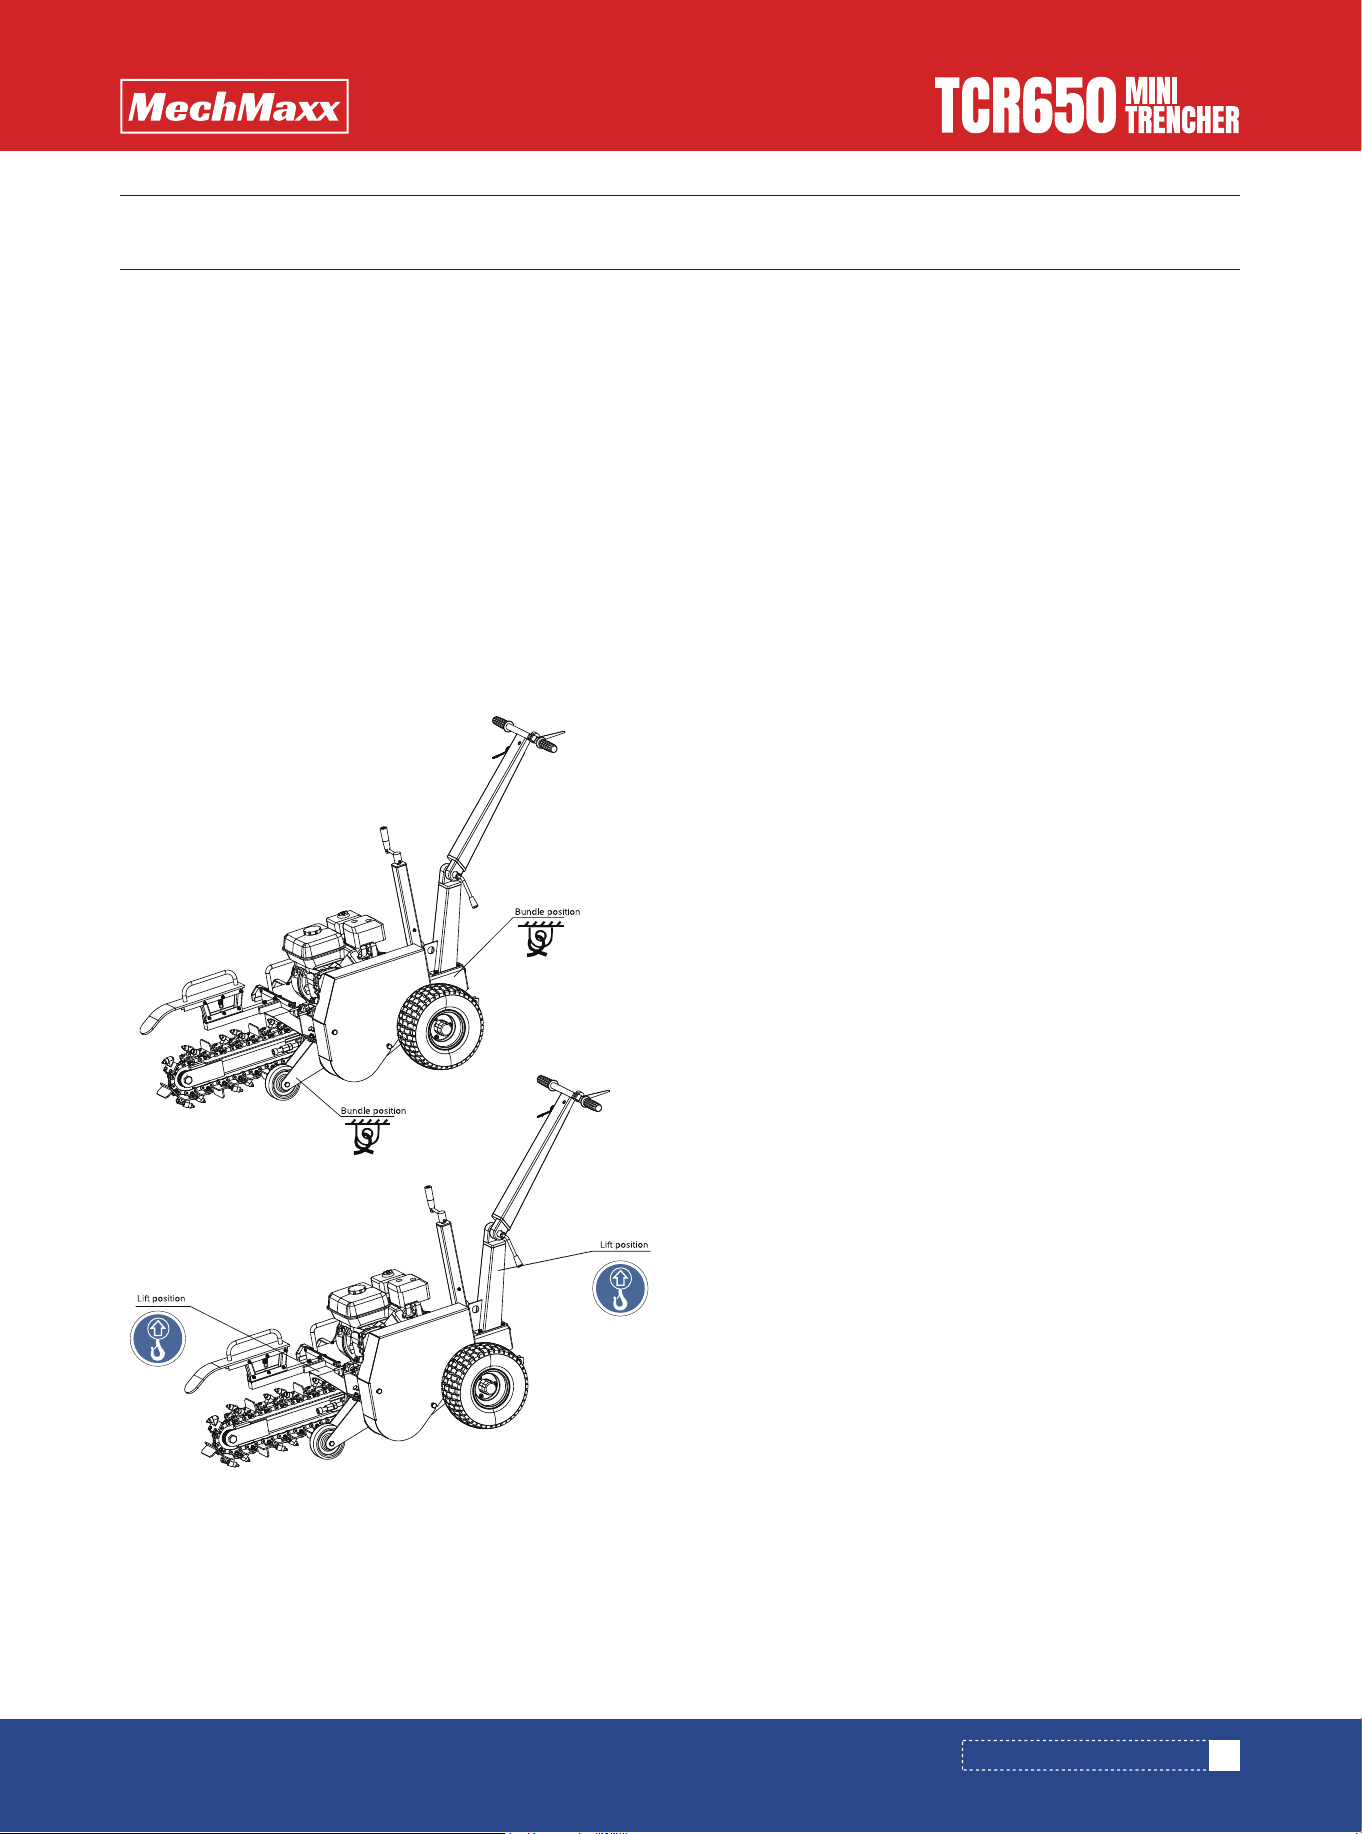
The mini trencher is designed to be transported via a van
or small trailer. The machine is equipped with grab bars
that are to be used for both lifting the machine, and strap-
ping it down. This machine weighs approximately 415lb
and should only be lifted using correct apparatus.
When the mini trencher is packaged in the plywood case,
we can carry machine by forklift.
Without package, we can lift the machine at the point of
lift label shown.
Tie the machine at the point of tying label when transport
for long distance to keep the machine stable.
When you finished using the mini trencher and it has
cooled, you must:
Cool engine before storage.
Clean the dumper.
Inspect for worn or damaged parts.
Choose covered storage location.
Prevent accidental starting.
Plan on exercising the engine at least monthly unless the
dumper is prepared for long term storage.
Always shut off the fuel valve and engine.
Always allow the engine to cool.
Store trencher and fuel where fuel vapors cannot reach
sources of combustion like, water heaters, electric
motors, switches, furnaces, etc.
Always secure this trencher with tie downs or similar
restraints when transporting.
The trencher shall be stored in a manner that prevents it
from falling, rolling or tipping over.
Note: There are legal road requirements for transiting mini
machines. It is the owner's responsibility to be aware of
these laws and to adhere to them.
TRANSPORTING STORING
TRANSPORTING AND STORING
TRANSPORTING AND STORING
18
www. mechmaxx.com
Before performing any maintenance
procedure or inspection, stop the engine,
wait five minutes to allow all parts to cool.
Disconnect the spark plug wire, keeping it
away from the spark plug.
Most problems are easy to fix. Consult the Troubleshoot-
ing Table below for common problems and their solutions.
If you continue to experience problems, contact the
dealers in your area.
Is the ignition switch in the "ON" position?
Is the fuel shut-off valve on?
Are you using fresh, clean gas? If the gas is old, change it. Use a fuel stabilizer if
you keep gas longer than 30 days. Is the spark plug clean? If the spark plug is dirty
or cracked, change it. If it's oily, leave it out, hold a rag over the plug hole and pull
the recoil cord several times to blow out any oil in the cylinder, then wipe off the
plug and reinsert it.
Check that the Throttle Lever is in the "Run" position. Is the air filter clean? If it's
dirty, change it following the procedure in the engine manufacturer's owner's
manual. Is the spark plug clean? If it's fouled or cracked, change it. If it's oily, leave
it out, hold a rag over the plug hole and pull your recoil cord several times to blow
out any oil in the cylinder, then wipe off the plug and reinsert it. Are you using fresh,
clean unleaded gasoline? If it's old, change it. Use a fuel stabilizer if you keep gaso-
line longer than 30 days. Does your engine have the right amount of clean oil? If it's
dirty, change it following the procedure in the engine manufacturer's owner's
manual. Check the oil level and adjust as needed.
Check the oil level and adjust as needed. Check the air filter and clean or replace if
needed. You may be using the wrong oil—too light for the temperature. Refer to
your Engine Owner's Manual for detailed information. Clean the cooling fins if
they're dirty.
TROUBLESHOOTING
TROUBLESHOOTING
SYMPTOM
POSSIBLE CAUSE
The engine won't start. (Please
refer to the engine user manual
for engine-specific procedures.)
The engine lacks power or is not
running smoothly. (Please refer
to the engine user manual for
engine-specific procedures.)
Engine smokes. (Please refer to
the engine user manual for
engine-specific procedures.)