

I
�
us
CORDLESS DRILL
ITEM N0.:47519
OWNER'S MANUAL AND SAFETY INSTRUCTIONS
SE THIS MANUAL: KEEP THIS MANUAL FOR SAFETY WARNINGS, PRECAUTIONS, ASSEMBLY,
OPERATING, INSPECTION, MAINTENANCE AND CLEANING PROCEDURES. WRITE THE PRODUCT'S
SERIAL NUMBER ON THE BACK OF THE MANUAL NEAR THE ASSEMB DIAGRAM (OR MONTH
AND YEAR OF PURCHASE IF PRODUCT HAS NO NUMBER)
FOR QUESTIONS PLEASE CALL OUR CUSTOMER SUPPORT: 909.628.0880 MON-F 9AM TO 3PM PST

IMPORTANT SAFETY INFORMATION
WORK AREA SAFETY
■
Keep work area clean and well lit. Cluttered or dark
areas invite accidents.
■ Do not opete power tools in explosive atmospheres,
such as in the presence of flammable liquids, gases
or dust. Power tools create sparks which may ignite
the dust or fumes.
■Keep children and bystanders away while operating
a power tool. Distractions can cause you to lose
control.
ELECTRICAL SAFETY
■Power tool plugs must match the outlet. Never
modify the plug in any way. Do not use any adapter
plugs with eahed (grounded) power tools. Unmodi
fied plugs and matching outlets will reduce risk of
electric shock.
■ Avoid body contact with eahed or grounded
suaces, such as pipes, radiators, ranges and
refrigerators. There is an increased risk of electric
shock if your body is eahed or grounded.
■Do not expose power tools to rain or wet conditions.
Water entering a power tool will increase the risk of
electric shock.
■Do not abuse the cord. Never use the cord for
caring, pulling or unplugging the power tool. Keep
cord away fro heat, oil, sharp edges or moving
pas. Damaged or entangled cords increase the risk
of electric shock.
■ When operating a power tool outdoors, use an
extension cord suitable for outdoor use. Use of a
cord suitable for outdoor use reduces the risk of
electric shock.
PERSONAL SAFETY
■Stay ale, watch what you are doing and use
common sense when operating a power tool. Do not
use a power tool while you are tired or under the
influence of drugs, alcohol or medication. A moment
of inattention while operating power tools may
result in serious personal injury.
■Use personal protective equipment. Always wear
eye protection. Protective equipment such as dust
mask, non-skid safety shoes, hard hat, or hearing
protection used for appropriate conditions will
reduce personal injuries.
■Prevent unintentional staing. Ensure the switch is
in the o-position before connecting to power
source and/or baery pack, picking up or carrying
the tool. Carrying power tools with your finger on
the switch or energising power tools that have the
switch on invites accidents.
■
Remove any adjusting key or wrench before turning
the power tool on. A wrench or a key left attached to
a rotating pa of the power tool may result in
personal injury.
■
Do not overreach. Keep proper footing and balance
at all times. This enables better control of the power
tool in unexpected situations.
■Dress properly. Do not wear loose clothing or
jewellery. Keep your hair, clothing and gloves away
from moving pas. Loose clothes, jewellery or long
hair can be caught in moving pas.
■
If devices are provided for the connection of dust
extraction and collection facilities, ensure these are
connected and properly used. Use of dust
collection can reduce dust-related hazards.
POWER TOOL USE AND CARE
■Do not force the power tool. Use the correct power
tool for your application. The correct power tool will
do the job better and safer at the rate for which it
was designed.
■Do not use the power tool if the switch does not turn
it on and off. Any power tool that cannot be controlled
with the switch is dangerous and must be repaired.
■
Disconne the plug f the power soue and/or the
bae pack f the power tool bore making any
1

IMPORTANT SAFETY INFORMATION
GENERAL SAFETY RULES
adjustments, changing accessories, or storing power
tools. Such preventive safety measus reduce the risk
of staing the power tool accidentally.
■
Store idle power tools out of the reach of children
and do not allow persons unfamiliar with the power
tool or these instructions to operate the power tool.
Power tools are dangerous in the hands of untrained
users.
■Maintain power tools. Check for misalignment or
binding of moving pas, breakage of pas and any
other condition that may affect the power tool's
operation. If damaged, have the power tool repaired
before use. Many accidents are caused by poorly
maintained power tools.
■Keep cutting tools sharp and clean. Properly
maintained cuing tools with sharp cutting edges
are less likely to bind and are easier to control.
■Use the power tool, and accessories in accordance
with these instructions, taking into account the
working conditions and the work to be performed.
Use of the power tool for operations dierent from
those intended could result in a hazardous situation.
■This appliance is not intended for use by persons
(including children) with reduced physical, sensory
or mental capabilities, or lack of experience and
knowledge, unless they have been given supervision
or instruction concerning use of the appliance by a
person responsible for their safety.
■
Children should be supervised to ensure that they do
not play with the appliance.
BAERY TOOL USE AND CARE
■
Ensure the switch is in the off position before
inseing battery pack. Inseing the battery pack
into power tools that have the switch on invites
accidents.
■
Recharge only with the charger specified by the
manufacturer. A charger that is suitable for one type
of battery pack may create a risk of fire when used
with another battery pack.
■
Use power tools only with specifically designated
battery packs. Use of any other battery packs may
create a risk of injury and fire.
■
When battery pack is not in use, keep it away from
other metal objects like paper clips, coins, keys,
nails, screws, or other small metal objects that can
make a connection from one terminal to another.
Shoing the battery terminals together may cause
burns or a fire.
■
Under abusive conditions, liquid may be ejected
from the battery; avoid contact. If contact acciden
tally occurs, flush with water. If liquid contacts eyes,
additionally seek medical help. Liquid ejected from
the battery may cause irritation or burns.
SERVICE
Have your power tool serviced by a qualified repair
person using only identical replacement pas. This
will ensure that the safety of the power tool is
maintained.
ADDITIONAL SAFETY INSTRUCTIONS
WEAR EAR PROTECTORS.
Exposure to noise can cause hearing loss. Loss of
control can cause personal injury.
■If possible, always use clamps or a vice to hold your
work piece.
■
Always switch off before you put the tool down.
■Ensure that the lighting is adequate.
■Do not put pressure on the tool, such that it slows
the motor down.
■
Keep the area free of tripping hazards.
■
Do not let anyone under 18 years to operate this tool.
■Only use accessories in good condition.
■Do not touch the blade after operation. It will be
very hot.
■
Keep your hands away from under the workpiece.
■
Never use your hands to remove sawdust, chips or
waste close by the blade.
■
Rags, cloths, cord, string and the like should never
be left around the work area.
■
Suppo the work properly.
■
If you are intept when opeing the tool, complete
the process and switch off before looking up.
■Periodically check that all nuts, bolts and other
fixings are properly tightened.
2

IMPORTANT SAFETY INFORMATION
ADDITIONAL SAFETY INSTRUCTIONS
■ When using the tool, use safety equipment
including safety glasses or shield, ear defenders,
and protective clothing including safety gloves.
Wear a dust mask if the cutting or sanding
operation creates dust.
If in doubt, do not plug in the tool. Using a power
source with a voltage less than the nameplate rating is
harmful to the motor.
The tool must be used only for its prescribed purpose.
Any use other than those mentioned in this Manual will
be considered a case of misuse. The user and not the
manufacturer shall be liable for any damage or injury
resulting from such cases of misuse. To use this tool
properly, you must observe the safety regulations, the
assembly instructions and the operating instructions to
be found in this Manual. All persons who use and seice
the machine have to be acquainted with this Manual
and must be informed about its potential hazards.
Children and frail people must not use this tool.
Children should be supervised at all times if they are in
the area in which the tool is being used. It is also
imperative that you observe the accident prevention
regulations in force in your area. The same applies for
general rules of occupational health and safety.
The manufacturer shall not be liable for any changes
made to the tool nor for any damage resulting from
such changes. Even when the tool is used as
prescribed it is not possible to eliminate all residual risk
factors. The following hazards may arise in connection
with the tool's construction and design:
Damage to the lungs if an effective dust mask is not
worn. Damage to hearing if effective ear defenders are
not worn.
ADDITIONAL SAFETY INSTRUCTIONS FOR THE CHARGER
■REMEPOWERUS tool with Lithium Ion batteries
should only be charged with the specifically
designed XTREMEPOWERUS Lithium Ion battery
charger purchased with the tool.
IT IS DGEROUS TO USE Y OTHER E
CHARGER TO CHARGE YOUR TOOL. Do not
attempt to charge the battery pack with any other
charger than the one supplied.
■Before using the charger, read all the instructions,
labels and cautionary markings on the charger and
battery pack as well as the instructions on using
the battery pack.
■Do not use the charger if it has been subjected to a
heavy knock, dropped or otherwise damaged in
anyway. Take the charger to an authorized service
center for a check or repair.
■Do not disassemble the charger. Opening or
removing covers may expose you to dangerous
voltages or other risks. Incorrect reassembly can
cause electric shock when you use the tool or
charger again. Take the charger to a power tool
repair center when service or repair is required.
Incorrect re-assembly may result in the risk of fire,
electric shock or electrocution. To reduce the risk
of electric shock, do not disassemble any pa of
the product.
DANGER
■If the battery pack is cracked or damaged in any
way, do not inse it in the charger
■Do not plug anything other than your tool into the
charger, as other objects may touch dangerous
voltage points or sho out pas, which could result
in fire or electric shock.
■Do not place the tool or charger on an uneven
surface, a fall may cause serious damage.
■Never place the tool or charger near or over a heat
source such as a radiator or heater.
■Do not operate the charger in a cabinet or other
enclosure unless proper ventilation is provided.
■Use the battery charger indoors only.
3

IMPORTANT SAFETY INFORMATION
ADDITIONAL SAFETY INSTRUCTIONS FOR THE CHARGER
RNING!
■Do not allow any liquid to come into contact with the charger. There is a danger of electric shock. Do not
position the tool or battery charger near water; for example, near a sink, wash bowl or toilet.
■Do not spill liquid of any kind on the tool or charger. Doing so may sho out pas, Causing damage to the
product and creating the risk of fire or electric shock.
■ To reduce the risk of an electric shock, unplug the charger from the power supply before attempting to
clean it. To clean tool or charger, wipe with a damp cloth. Use of any other cleaners is not recommended.
■Do not place any object on to, or allow anything to rest on the charger.
■Make sure that the charger cable is positioned where it will not be stepped on, tripped over or otherwise
subjected to damage or stress. Keep the lead away from operating machinery.
■ Do not pull on the lead of the charger to disconnect it from the mains power socket.
■Do not use an extension cord unless it is absolutely necessary. The use of an improper extension cord
could cause the risk of fire, electric shock or electrocution.
■
Never attempt to connect two chargers together.
■
Do not charge batteries or use the tool and battery pack in locations where the temperature may be below
0
°
C or exceed 40
°
C such as alongside sheds or metal structures.
■ The battery can be charged or operated at temperatures between 0
°
c and 40
°
C.
NEVER CHARGE YOU LITHIUM ION BAERY BELOW OR ABOVE TEMPERATURES RECOM
MENDED OTHERWISE FIRE OR SERIOUS DAMAGE TO THE BATTERY PACK MAY OCCUR.
RNING!
If you wish to charge a second battery pack, unplug the charger from the mains supply and leave it for at least
15 minutes. Aer this time you can charge a second battery pack.
ADDITIONAL SAFETY INSTRUCTIONS RELATED TO
THE BATTERY PACK AND BATTERY SAFETY
■
Use only the XTREMEPOWERUS batteries supplied with
the Tool or XTREMEPOWERUS -approved replacements.
■
Do not use the battery to power any device other
than the XTREMEPOWERUS tool it was sold with.
■Charge the battery only with the REMEPOWERUS
chargersupplied with the tool or XTREMEPOWERUS -
ap
proved replacements and according to the instruc
tions in the XTREMEPOWERUS Instruction Manual.
■Do not charge the battery in a place where static
electricity is generated nor let the battery touch
something that is statically charged.
■The battery can be stored at temperatures between
0
°
c and 40
°
C.
NEVER STORE OR LEAVE YOUR LITHIUM
ION BAERY IN TEMPERATURES OVER
THAT RECOMMENDED OTHERWISE FIRE
MAY OCCUR.
Do not store the Lithium Ion battery anywhere that the
temperature can easily reach higher temperatures than
recommended
-
this includes garden type sheds, and
Vehicles where the inside temperature can climb to
dangerous levels in the direct sunlight and on high
temperature days.
■The battery can be charged or operated at tempera
tures between 0
°
c and 40
°
C.
NEVER STORE OR LEAVE YOUR LITHIUM
ION BAERY IN TEMPETURES OVER THAT
ROMMENDED ESE ARE Y UR
4

IMPORTANT SAFETY INFORMATION
ADDITIONAL SAFETY INSTRUCTIONS RELATED TO
THE BATTERY PACK AND BATTERY SAFETY
The most suitable temperatures to charge the battery
pack are between 20 -25
°
C.
■
Always allow the battery pack to cool down after
charging, do not place it in a hot environment such
as a metal shed or open trailer left in the sun.
■
Take care where the tool is stored. Do not store in
areas of corrosive fumes, or salt air or similar
conditions. Try and store the tool in the packaging
supplied with the tool.
■
Do not dispose of the battery in a fire or put the
battery into a microwave oven, conventional oven,
dryer,
or high-pressure container. Under these
conditions, the battery may explode.
■
Never attempt to open the battery pack, puncture
the battery or subject the battery to strong physical
shock.
■
If the plastic housing of the battery pack breaks
open or cracks, immediately discontinue its use and
do not recharge it. Ensure the battery pack clip is in
good condition and will not allow the pack to fall
free from the tool. If the clip is damaged or for any
reason is not locking the pack in place Do Not
■Stop using the battery if it exhibits abnormal heat,
odor, color, deformation, or is in an abnormal
condition.
■If you detect leakage or a foul odor, it is especially
impoant to keep the battery away from fire. If
battery liquid leaks onto your skin or clothes, wash
well with clean water immediately. If liquid leaking
from the battery gets into your eyes, do not rub your
eyes. Rinse your eyes well (for at least 10 minutes)
with clean water, and consult a doctor immediately.
Do not use a leaking battery.
■Handle batteries with care to avoid shoing the
battery with conducting materials, such as nails,
screws, metal watch bands, rings, bracelets, and
keys. The battery may overheat and could burn you.
■After the battery has reached the end of its useful
life, we recommend recycling the materials at your
local municipal council recycling center. DO NOT
attempt to replace the battery cells in the battery
pack, repair or modify any pa of the battery pack
assembly.
■When recycling, make it non-conductive by
applying insulating tape to the terminals located on
the bae.
continue to use.
WHEN TO CHARGE THE BATTERY
New batteries are shipped in a low charged condition
and should be fully charged before Use. The battery
pack can be recharged at any time during use,
provided the pack is not overheated. If the battery pack
stas to cut out due to low voltage, or previous tasks
undeaken can no longer be performed, it is suggest
ed to stop using the tool and recharge the battery. For
storage, it is suggested to recharge the battery
between 50% and 75% charge.
WARNING!
Some dust created by power sanding, sawing,
grinding, drilling and other construction activities
contains chemicals known to the State of Califor
nia to cause cancer, bih defects of other
reproductive harm.
Some examples of these chemicals are:
■
Lead from lead-based paints
■Crystalline silica from bricks and cement and other
masonry products, and Arsenic and chromium from
chemically-treated lumber.
Your risk from these exposures varies, depending on
how often you do this type of work. To reduce your
exposure to these chemicals: work in a well-ventilated
area, and work with approved safety equipment, such
as those dust masks that are specially designed to filter
out microscopic paicles.
5
IMPORTANT SAFETY INFORMATION
UNPACKING
■Unpack all pas and lay them on a flat, stable
surface.
■Remove all packing materials and shipping devices,
if applicable.
■Make sure the delivery contents are complete and
free of any damage. If you find that pas are
missing or show damage do not use the product
but contact your dealer. Using an incomplete or
damaged product represents a hazard to people
and propey.
■ Ensure that you have all the accessories and tools
needed for assembly and operation. This also
includes suitable personal protective equipment.
£WARNING!
The product and the packaging are not children's
toys! Children must not play with plastic bags,
sheets and small pas! There is a danger of
choking and suocation!
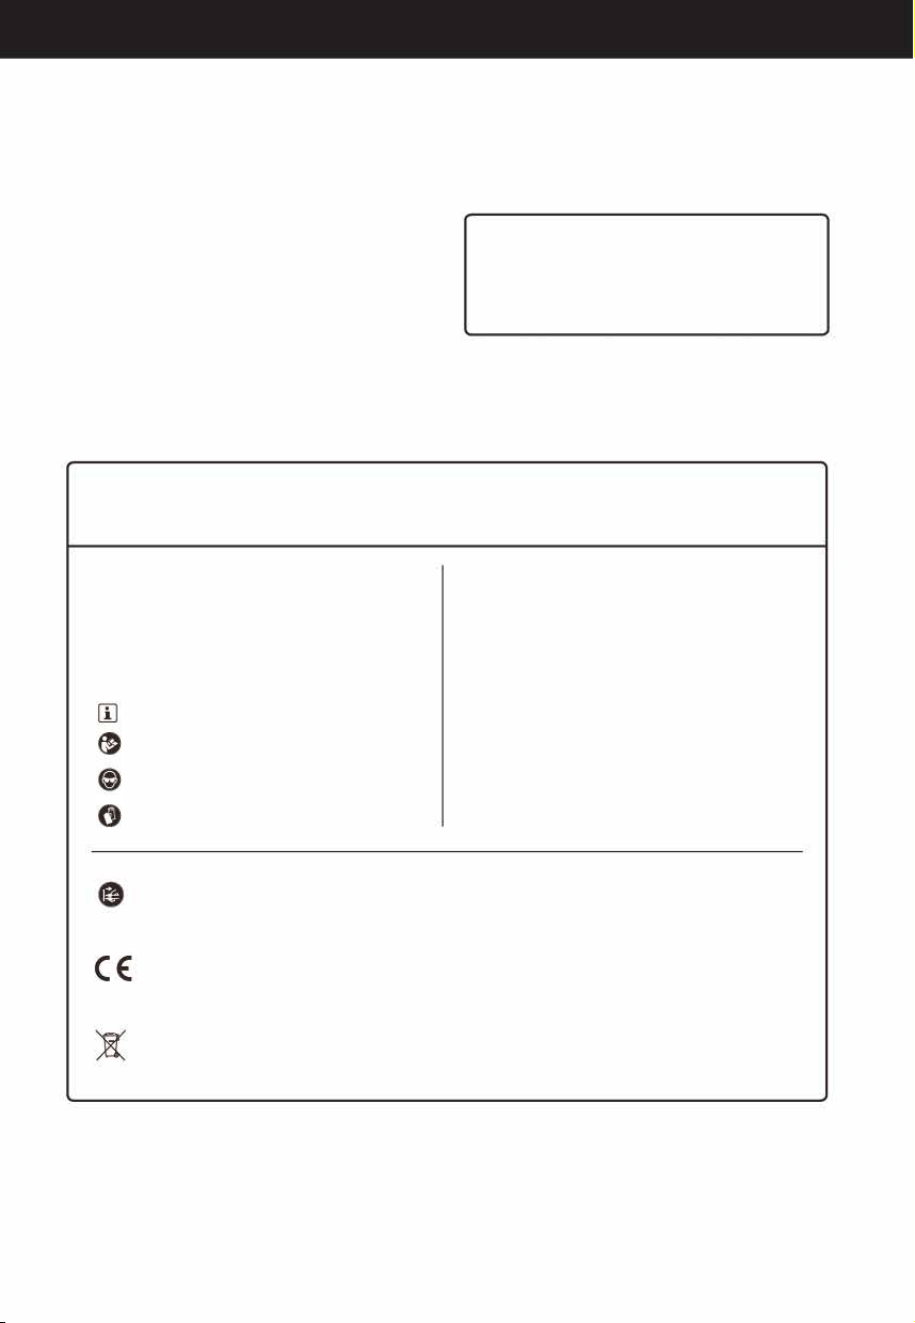
SYMBOLS
On the product, the rating label and within these instructions you will find among others the following
symbols and abbreviations. Familiarize yourself with them to reduce hazards like personal injuries
and damage to prope.
V-
Hz
w
Volt, (alternating voltage)
Hez
Watt
mm
Millimetre
kg
Kilogram
dB
Decibel (A-rated)
/min or min·' Per minute
�
Caution I Warning.
-
Note/ Remark.
Read the instructionmanual.
Wear eye protection.
Wear protective gloves.
®
�
Wear hearing protection.
Wear a dust mask.
Wear protective,
slipresis-
tant footwear.
Switch the product off and disconnect it from the power supply before assembly,
cleaning, adjustments, maintenance, storage and transpoation.
The product complies with the applicable European directives and an evaluation method
of conformity for these directives was done.
WEEE symbol. Waste electrical products should not be disposed of with household
waste. Please recycle where facilities exist. Check with your Local Authority or local store
for recycling advice.
6
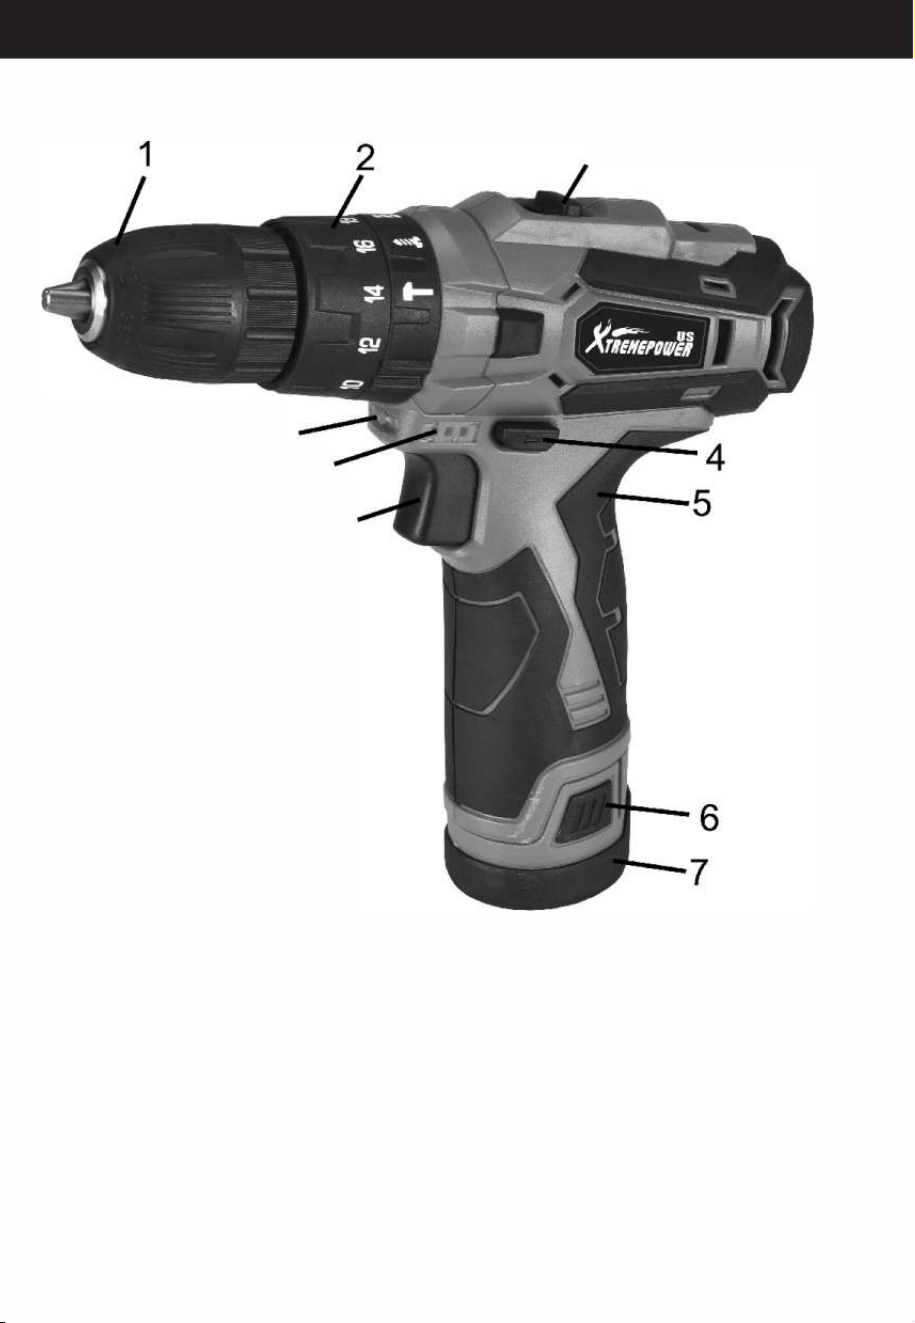
DESCRIPTION
3
9
10
8
1.10mm keyless chuck
6.Bae pack release buon
2.Torque adjustment collar
7.Bae pack
3.2-Speed gear control
8. Variable speed switch
4.Foard/Reverse rotation control
9.LED light
5.So grip handle
10.Bae capaci indicator
7

TECHNICAL DATA
SPECIFICATION
Charger
100-240V ~ 50/60Hz
Battery
Lithium-ion 2.0 Ah
Charging time
around 1 hour
No-load speed
0-400 I 0-1500 rpm
Torque settings
18 + 1 + 1
Max. torque
25N.M.
Chuck capacity
10mm keyless chuck
Max. drilling capacity for steel
6mm
Max. drilling capacity for wood
16mm
OPERATING INSTRUCTIONS FOR DRILL DRIVER
NOTE:
Before using the tool, read the instruction book
carefully.
INTENDED USE
The machine is intended for driving in and loosening
screws as well as for drilling in wood, metal and plastic.
BEFORE PUING INTO OPERATION
CHARGING THE BAERY
The battery charger supplied is matched to the Li-ion
battery installed in the machine. Do not use another
battery charger. The Li-ion battery is protected against
dp discharging. When the bte is empty, the machine
is switched o by means of a protective circuit: The
tool holder no longer rotates. In a warm environment or
after heavy use, the battery pack may become too hot
to permit charging. Allow time for the battery to cool
down before recharging. When the battery pack is
charged for the first time and after prolonged storage,
the battery pack will accept a 100% charge after
several charge and discharge cycles.
RECHARGEABLE BAERY
INSTALLATION/REMOVAL
Hold the handle tightly and push the battery latch (6) to
remove the battery (see Fig.1)
Inse the battery while observing its direction. Do not
apply too much force when installing the rechargeable
battery. Check the correctness of it installation.
8
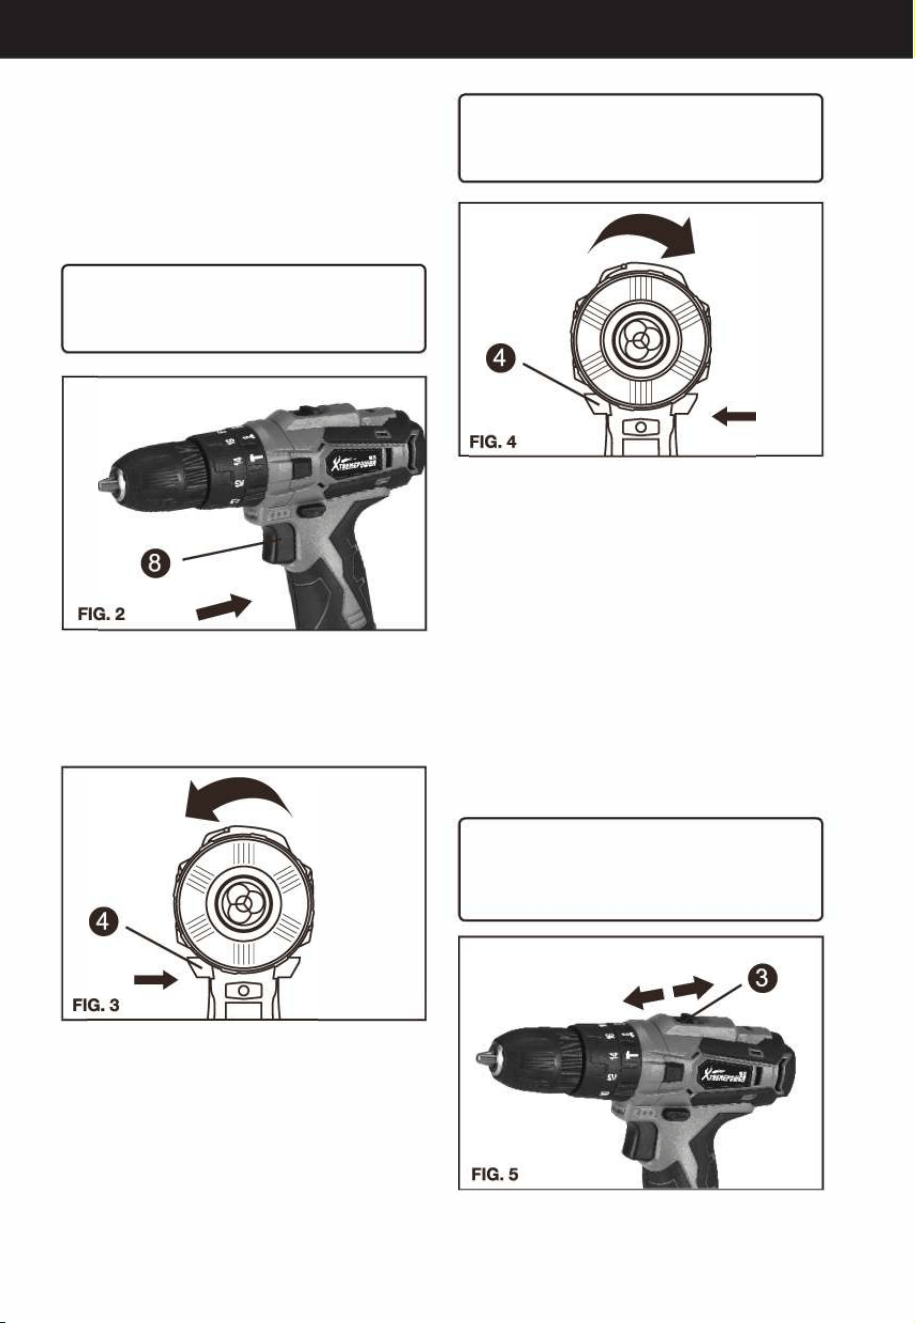
OPETION
1. ON / OFF SWITCH (SEE FIG. 2)
Depress the On/Off switch (8) to sta and release it to
stop your drill. The on/off switch is fitted with a brake
function which stops your chuck immediately when
you quickly release the switch. It is also a
variable speed switch that delivers higher speed
and torque with increased trigger pressure. Speed is
controlled by the amount of switch trigger precision.
RNING!
Do not operate for long periods at low speed
because excess heat will be produced internally.
2. FORRD/REVERSE ROTION CONTROL
The switch trigger (4) can be locked in the OFF position.
This helps to reduce the possibility of accidental
staing when not in use. To lock the switch trigger,
place the rotation control in the center position.
3.REVERSIBLE (SEE FIG. 3, FIG. 4)
For drilling and screw driving use forward rotation (4)
marked " " (lever is moved to the le}. Only use
reverse rotation marked "" {lever is moved to the
right) to remove screws or release a jammed drill bit.
RNING!
Never change the direction of rotation when the
chuck is rotating, wait until it has stopped.
4. O-SPEED GEAR CONTROL (SEE FIG. 5)
The drill has a two-speed gear control (3) designed for
drilling or driving at LOW (mark is 1) or HIGH (mark is 2)
speeds. A slide switch is located on top of the drill to
select either LOW or HIGH speed. When using the drill
in the LOW speed range, the speed will decrease and
the drill will have greater power and torque. When
using the drill in the HIGH speed range, the speed will
increase and the drill will have less power and torque.
Gear I
Low speed range: for screw driving or working with
large drilling diameter
Gear II
High speed range: for working with small drilling
diameter
RNING!
To prevent gear damage, always allow the chuck
to come to a complete stop before changing the
direction of rotation or the two-speed gear control.
9
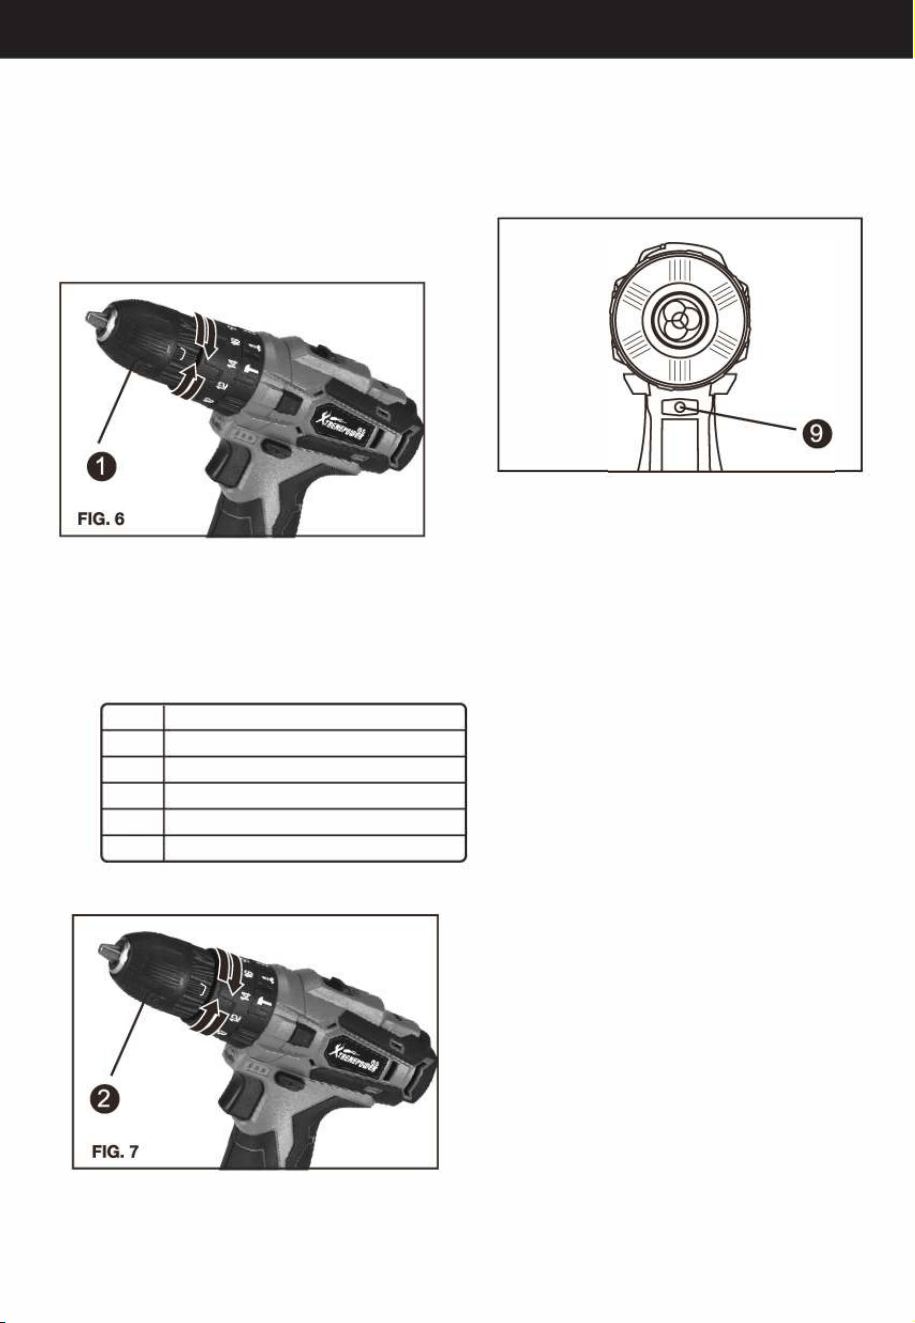
OPETION
5. CHUCK ADJUSTMENT (SEE FIG. 6)
To open the chuck (1) jaws rotate the front section of
the chuck. Inse the drill bit between the chuck jaws
and rotate the front section in the opposite direction.
Ensure the drill bit is in the center of the chuck jaws.
Finally, firmly rotate the front chuck section in the
opposite directions. Your drill bit is now clamped in
the chuck.
6. TORQUE ADJUSTMENT (SEE FIG. 7)
(Screw driving force of your drill driver)
The torque is adjusted by rotating the torque
adjustment ring (2). The torque is greater when the
torque adjustment ring is set on a higher setting. The
torque is less when the torque adjustment ring is set on
a lower setting. Make the setting as follows:
1 -4
For driving small screws
5-9
For driving screws into so material
10-14
For driving screws into so and hard material
15-18
For driving screws into hard wood
�
For heavy drilling
For hammer drill
10
7. USING THE LED LIGHT (SEE FIG. 8)
The LED light (9) allows you to keep a clear view under
less illuminated circumstances. To turn on the light
simply press the on/off switch. When you release the
on/off switch, the light will go out.
FIG.8
8. DRILLING
When drilling into a hard smooth surface, use a center
punch to mark the desired hole location. This will
prevent the drill bit from slipping off center as the hole
is staed. Hold the tool firmly and place the tip of the
bit at the point to be drilled. Depress the switch trigger
to sta the tool. Move the drill bit into the workpiece,
applying only enough pressure to keep the bit
rotating. Do not force or apply side pressure to
elongate a hole.
A. Drilling In wood
Holes in wood can be made with the same twist drill
bits used for metal or with spade bits. These bits
should be sharp and should be pulled out frequently
when drilling to clear chips from the flutes.
B. Drilling In Metal
Use a cutting lubricant when drilling metals. The
exceptions are cast iron and brass which should be
drilled dry. The cutting lubricants that work best are
sulfured cutting oil or lard oil.
9. TOOL PROTECTION SYSTEM
The tool will automatically stop during operation if
the tool and/or battery are placed under one of the
following conditions:
■Overloaded: The tool is operated in a manner that
causes it to draw an abnormally high current. In this
situation, release the Trigger Switch on the tool and
stop the application that caused the tool to
become overloaded. Then pull the Trigger Switch
again to resta.

OPETION
■ Overheated: Under the condition above, if the tool
does not sta, the Battery are overheated. In this
situation, let the Tool and Battery cool before
pulling the Trigger Switch again.
■Low battery voltage: The remaining Battery capaci
ty is too low and the tool will not operate. In this
situation, remove and recharge the Battery. drilled
dry. The cutting lubricants that work best are
sulfured cutting oil or lard oil.
PROBLEM SOLUTION
■
WHY DOES THE DRILL N TURN ON WHEN
YOU PRESS THE SWITCH?
The forward/reverse rotation control, which is on
top of the trigger, is positioned in the lock function.
Unlock the forward/reverse rotation control by
putting it into the required rotation position. Push
the trigger and the drill will sta to rotate. Or if the
LED light flashes at the same time you press the
Switch, please charge the battery.
■THE DRILL STOPS BEFORE THE SCREW
IS COMPLETELY TIGHTENED. WHY?
Verify the torque position of the torque adjusting
ring, you can find the torque-adjusting ring between
the chuck and the drill body. Position 1 is the lowest
torque (screw driving force) and position 18 is the
highest torque (screw driving force). Position � is
for drill operation. Position is for heavy drilling.
Regulate the torque adjusting ring to a higher
position to reach the best result.
■RONS FOR DIFFERENT ERY PACK
WORKING TIMES
Charging time problems, as above, and having not
used a battery pack for a prolonged time will
reduce the battery pack working time. This can be
corrected aer several charge and discharge
operations by charging & working with your drill.
Heavy working conditions such as large screws
into hard wood will use up the battery pack energy
faster than lighter working conditions. Do not
recharge your battery pack below 0
°
C and above
40
°
C as this will affect performance.
-
ENVIRONMENTAL PROTECTION
This product has been marked with a symbol relating to removing electric and electronic waste. This
means that this product shall not be discarded with household waste but that it shall be returned to a
collection system. It will then be recycled or dismantled in order to reduce the impact on the environment.
Electric and electronic equipment can be hazardous for the environment and for human health since they
contain hazardous substances.
DISPOSAL OFAN EXHAUSTED BATTERY PACK
Li
To preserve natural resources, please recycle or dispose of the battery pack properly. This battery pack
contains Li-ion batteries. Consult your local waste authority for information regarding available recycling
and/or disposal options. Discharge your battery pack by operating your tool, then remove the battery
.
pack from the tool housing and cover the battery pack connections with heavy-duty adhesive tape to
prevent short circuit and energy discharge. Do not attempt to open or remove any of the components.
11
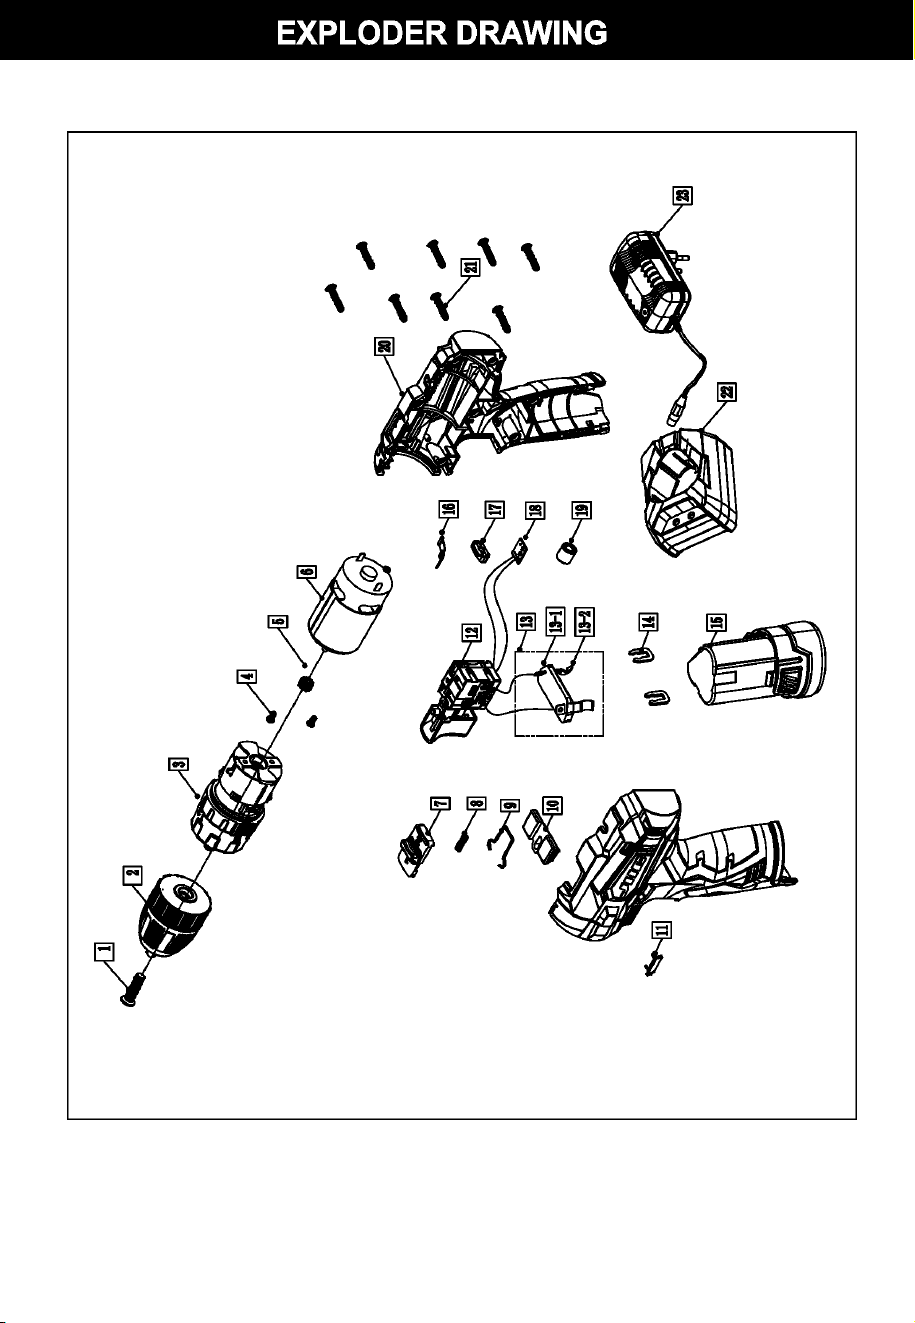
12

Part No. Description
Qty
1
M5*22 screw
1
2
Drilling chuck
1
3
Gear box assem.
1
4
M3*6 screw
2
5 Motor gear
1
6 550 motor
1
7
Double speed push button
1
8 Double speed push button spring
1
9
Double speed push button click spring
1
10
Click lever 1
11
Capacity show transparent cover
1
12
Trigger 1
13
Contact piece assem.
1
13-1
Contact shelf
1
13-2
Contact piece
2
14
Buckle
2
15
Battery pack
1
16 Gear shrapnel
1
17
LED transparent cover
1
18
Capacity show plate
1
19
Magnetic tube
1
20
Body housing
1
21
ST2.9*14 screw
8
22
Quick charger
1
23
Cord plug
1
13
14
