EN
ROBOTIC WINDOW CLEANER
Translation of the original manual
SRW 6010WH

SRW 6010WH
A
1
3
2
4
5
6
7
B
1
2
3
4
5
6
7
C
D1
D2
E
F
- 1 -
01/2024
2024
EN
Robotic Window Cleaner
Important Safety Instructions
READ CAREFULLY AND STORE FOR FUTURE USE.
General Warnings
• This appliance is not to be used by children.
• This appliance may be only used by persons with
physical, sensory or mental impairments or by
inexperienced persons provided they are properly
supervised or have been informed about how to use of
the product in asafe manner and understand the potential
dangers.
• Children must not play with the device. Cleaning and
maintenance must not be performed by children.
• If the power cord is damaged, have it replaced in
aprofessional service centre in order to prevent
adangerous situation. It is forbidden to use the appliance
with the power cord damaged.
• Liquid or steam must not flow towards theequipment
containing electrical components.
• The filling hole must not be open during use. Follow the
instructions for safe water container refilling.
• The appliance must be disconnected after use andbefore
user maintenance on the appliance.
• The appliance must not be left unattended while
connected to thepower supply.
- 2 -
01/2024
2024
• The appliance must not be used if it has fallen, there are
visible signs of damage or leaks.
• Do not allow access to children if the appliance is live or
cooling.
• To power the appliance, use only the provided power
supply!
• This appliance is designed for domestic and indoor use only. Do not use the product outdoors.
• This appliance is designed to clean windows. Do not use it for any other purposes. Do not use it for commercial purposes.
• Only use the appliance with the original accessories supplied with it. Do not use other accessories with the appliance and/or this
appliance’saccessories withanother appliance. Otherwise, there is arisk electric shock.
• Use the appliance at temperatures of 0 to 40C.
• Before connecting the power cord to apower socket, check that the technical details on the rating label match the electrical voltage in the socket.
• Connect the appliance only to aproperly grounded socket. Do not use an extension cord.
• Do not disconnect the power cord from the socket by pulling on the power cord. This could damage the plug or the socket. Disconnect the power
cord from the power socket by pulling the plug.
• Do not place the power cord over sharp objects. Make sure that the power cord does not hang over the edge of the table or touch aheated or hot
surface.
• Keep the power cord dry.
• Do not connect or disconnect the power cord to or from the power socket with wet hands.
• To prevent possible risk of electric shock, do not submerge this appliance or its power cord under water or any other liquid.
• Do not use the appliance if it is not working correctly, if it has been damaged or has been submerged in water.
• Do not disassemble, short-circuit or modify the appliance. There is arisk of injury by electrical shock. Do not throw the appliance into fire or expose it
to temperatures above 60°C.
• To avoid arisk of electric shock, do not repair and/or adjust the robotic window cleaner on your own. Have all repairs or adjustments performed at an
authorised service centre. Tampering with the appliance during the warranty period may void the warranty.
• Turn the appliance off and unplug the power cord from the wall outlet before any cleaning or maintenance.
• Always fully charge the backup battery before using this appliance.
• Remove dust, coarse dirt, stickers, etc. from the area to be cleaned. Remove or draw the curtains or drapes to the side to prevent contact with the
appliance. Loose parts could get tangled on the appliance andcause property damage.
• The area you to be cleaned should be dry anddegreased.
• If the surface to be cleaned is provided with aprotective film, the appliance will not function correctly.
• Do not expose the robotic window cleaner to direct sunlight and do not place it near open fire or appliances that are asource of heat.
• Avoid using or storing the appliance in environments where flammable, volatile, or explosive substances are used and/or stored.
• Do not use the appliance on windows exposed to direct sunlight or sharp light.
• If the appliance is to be used for cleaning external glasses or windows, it must not be used in rain, fog and/or in freezing, snowing or windy weather.
• Before using the appliance, make sure the safety cable is connected correctly.
• Before starting the appliance, make sure that the holders are correctly attached and covered with the mopping sleeves. Do not use the appliance
without the holders and mopping sleeves attached. There is arisk of damage to the appliance or breaking the glass.
• Do not use the appliance on glass/window that is broken, cracked or otherwise damaged.
• The minimum thickness of the glass on which the appliance can be used must be at least 3mm.
• Do not leave the appliance unattended while powered and in operation. Follow the instructions for attachment to and removal from glass inthis
manual.
• Do not cover the appliance ventilation openings. This may damage the appliance.
• Keep hair, fingers, loose pieces of clothing, etc. at asafe distance from moving parts of the appliance. Loose parts could become wrapped or sucked
andcause serious injury or damage to property.
• To clean the surface, use only clean water. Do not use cleaning agents or chemicals.
• This appliance may be used for windows or mirrors without frames. It may happen that it will display an error message.
• If you use the appliance toclean large glass surfaces, e.g. toclean glass doors without avisible frame that remain closed during cleaning, we
recommend placing awarning sign in front of such an area.
• When using the appliance on other than vertical windows (e.g. roof windows), the appliance may not choose the correct route during automatic
cleaning. Insuch acase, it is necessary to perform cleaning using the arrows on the controller.
• Keep the appliance clean. Follow the cleaning andmaintenance instructions provided inthis user'smanual.
• Turn the appliance off after use and store in awell-ventilated place out of reach of children and pets.
• If the appliance is not to be used for an extended period of time, we recommend charging the built-in battery regularly (every 3 months).
- 3 -- 3 -
01/2024
2024
• Thank you for purchasing our SENCOR product; we hope it will serve
to your satisfaction.
• Before using this appliance, please familiarise yourself with the
user’smanual, even if you are already familiar with using similar
types of appliances. Use the appliance only as described in this
user'smanual. Keep the manual for future reference.
• It is recommended to keep the original shipping carton, packing
material, receipt and confirmation of the extent of the seller'sliability
or warranty certificate at least for the duration of the legal right of
defective performance or quality guarantee. When transporting the
appliance, we recommend packaging it again in the original box
provided by the manufacturer.
. . . . . . . . . . . . . . . . . . . . . . . . . . . . . . . . . . . . . . . . . . . . . . . . . . . . . . . . . . . . . . . . . . . .
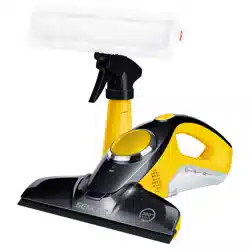
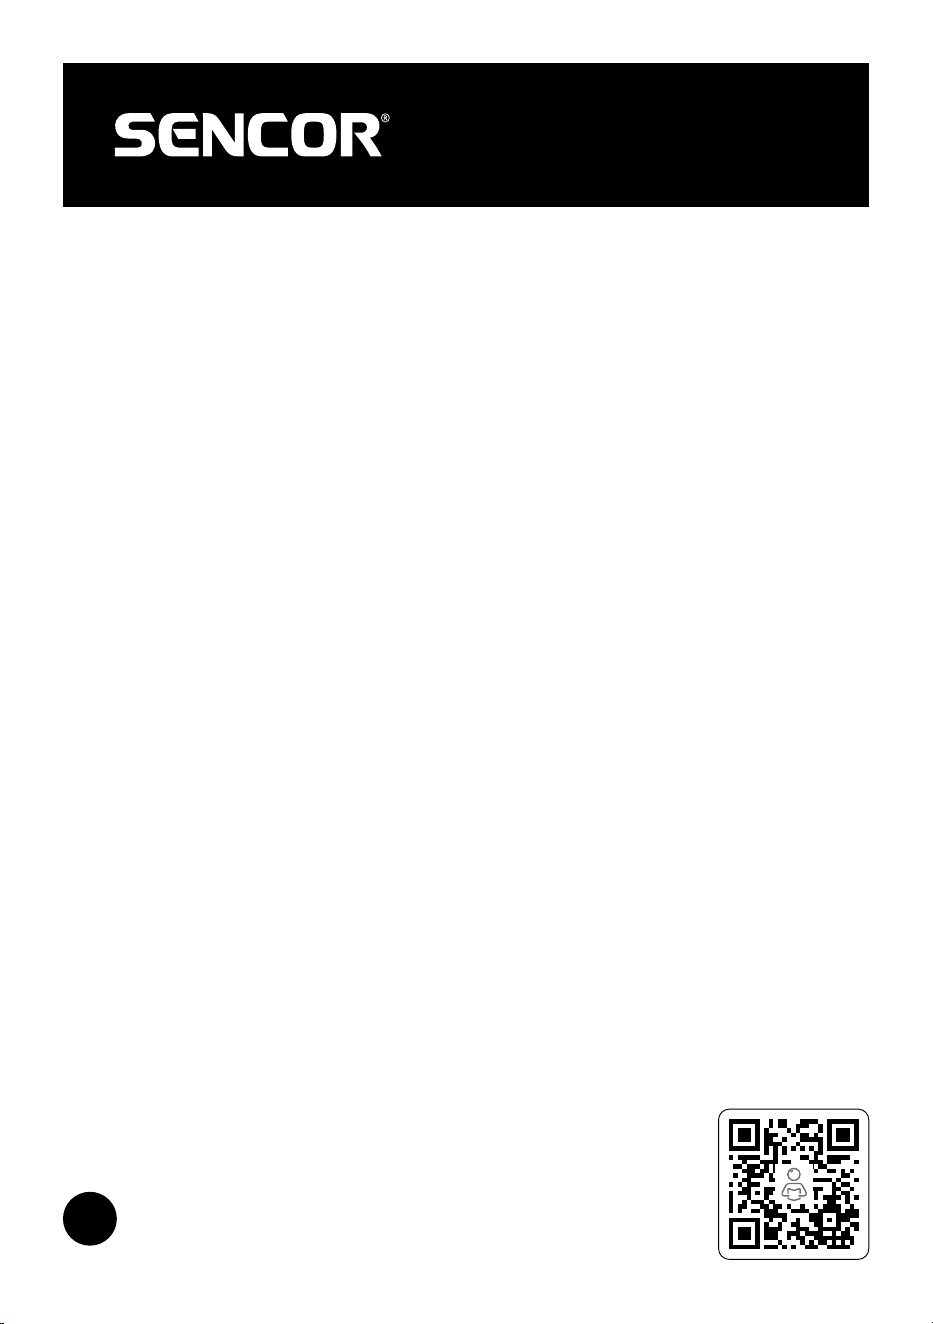
DESCRIPTION OF THE APPLIANCE
A1 Water tank cover
A2 On/off button
A3 LED indicator
A4 Buzzer
A5 Cable connection socket
A6 Nozzles
A7 Mopping sleeve holders
A8 Safety cable connection hole
. . . . . . . . . . . . . . . . . . . . . . . . . . . . . . . . . . . . . . . . . . . . . . . . . . . . . . . . . . . . . . . . . . . .
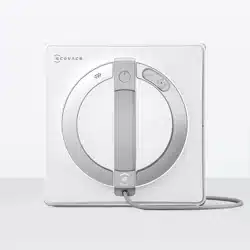
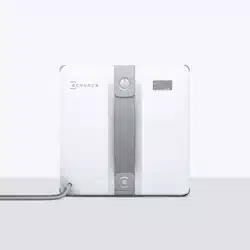
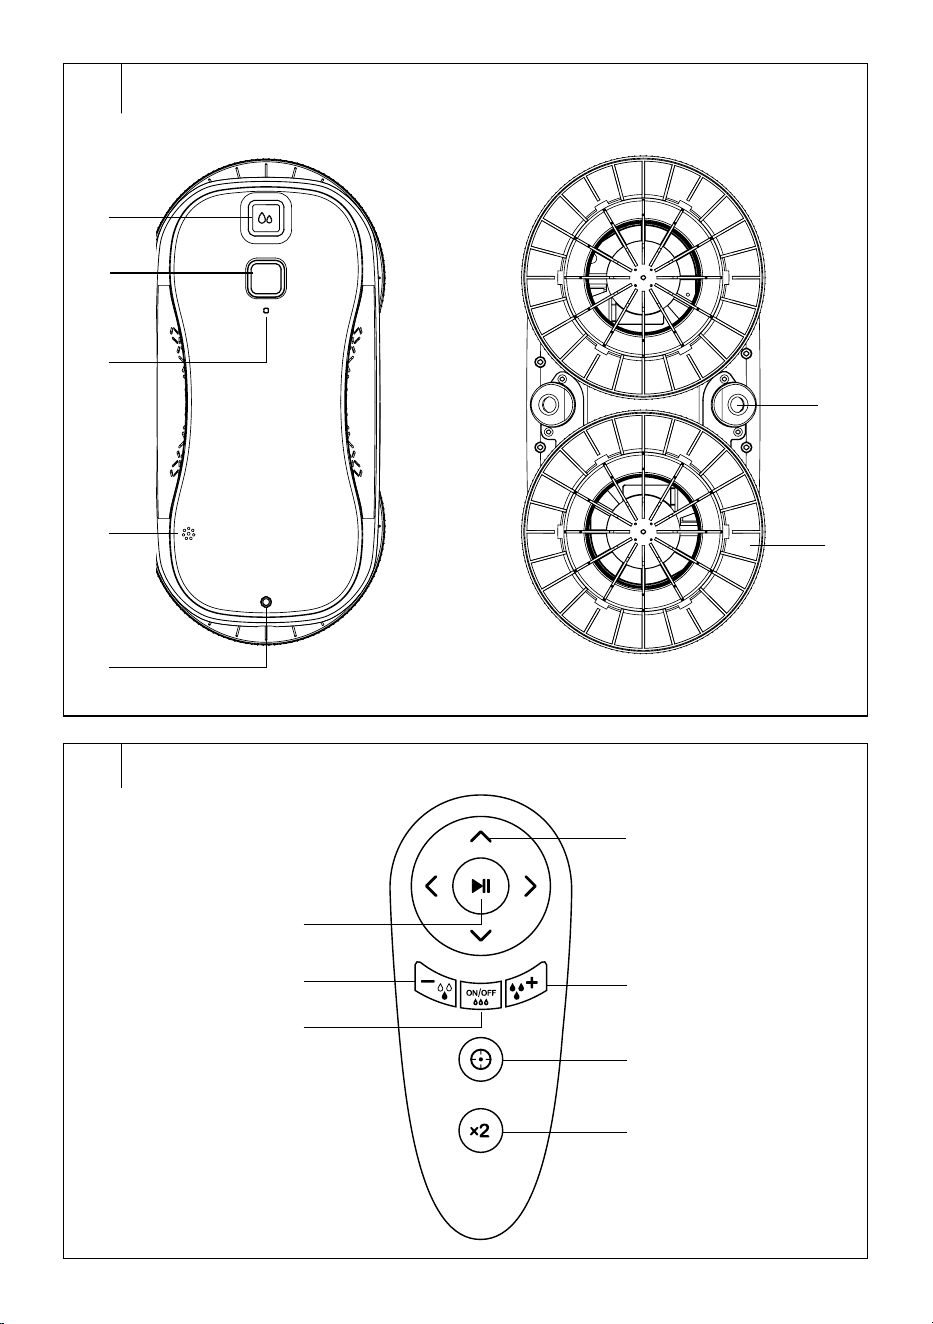
REMOTE CONTROL DESCRIPTION
B1 Operation start/pause button
B2 Water Dispensing Reduction
Button
B3 Water dispenser on/off button
B4 Direction buttons
B5 Water dispensing up button
B6 Local clean button
B7 Intensive cleaning button
. . . . . . . . . . . . . . . . . . . . . . . . . . . . . . . . . . . . . . . . . . . . . . . . . . . . . . . . . . . . . . . . . . . .
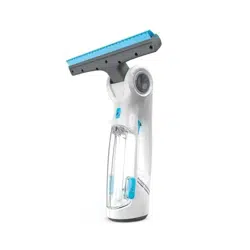
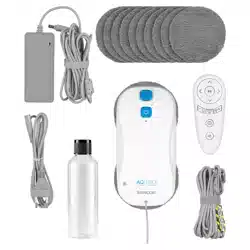
INCLUDED CONTENTS
• Robotic Window Cleaner
• Mopping sleeve holder (2 pcs)
• Remote control
• Mopping sleeve (10 pcs)
• Safety cable
• Connection cable
• Adapter
• Power cord
• Water bottle
• 2x AAA batteries for remote control
. . . . . . . . . . . . . . . . . . . . . . . . . . . . . . . . . . . . . . . . . . . . . . . . . . . . . . . . . . . . . . . . . . . .
CLEANING MODES
Automatic cleaning
• This is themain program of the robotic window cleaner. Long press the
Operation start/pause button to turn the robotic window cleaner on.
Place the robotic window cleaner on the window you want to clean.
Press the Operation start/pause button briefly or press
button on
the remote control to start the robotic window cleaner.
• The robotic window cleaner will automatically move up andthen
to the right until it reaches the top right corner, from where it starts
cleaning. The robotic window cleaner will move in an S-shaped curve
before an acoustic signal sounds indicating that the window has been
washed.
• If the water dispenser is switched on, the right nozzle will be switched
on when moving to the right and the left nozzle will be switched on
when moving to the left.
Local cleaning
• In the defined area, the robotic window cleaner will move up
anddown. If the water dispenser is switched on, the upward nozzle
will be switched on when moving upwards.
Intensive cleaning
Inthis mode, the robotic window cleaner will clean the area twice to
ensure maximum cleaning efficiency.
. . . . . . . . . . . . . . . . . . . . . . . . . . . . . . . . . . . . . . . . . . . . . . . . . . . . . . . . . . . . . . . . . . . .
PREPARING FOR USE
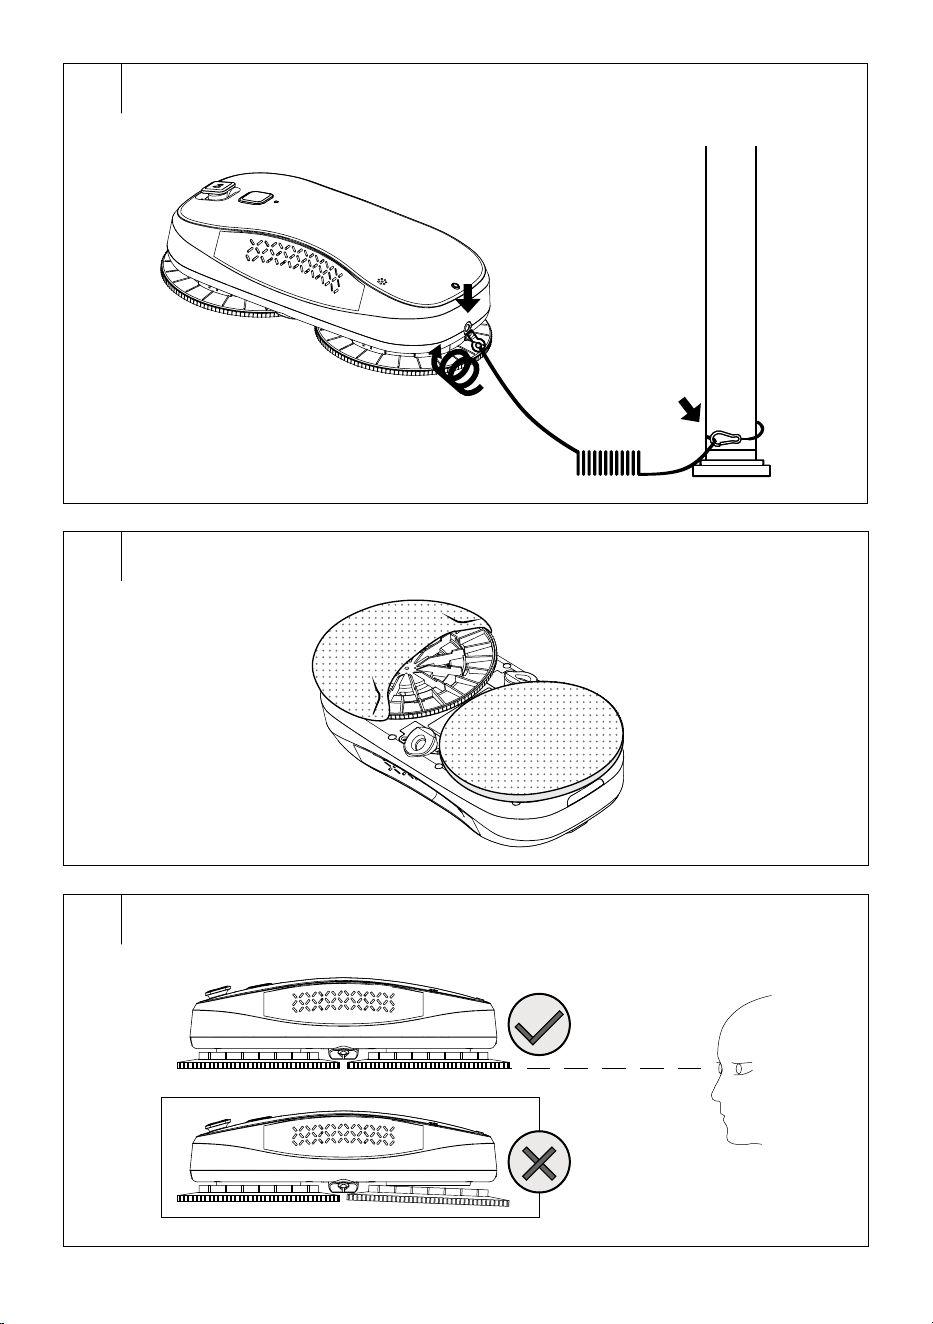
Safety cable (Fig. C)
• Insert the safety cable end into the safety cable connection hole
located in therear of the robotic window cleaner. Push until you feel
resistance.
• It is always necessary to attach the safety cable with asnap hook
toafirm object that will not bend andthat is high enough to ensure the
robotic window cleaner safe operation.
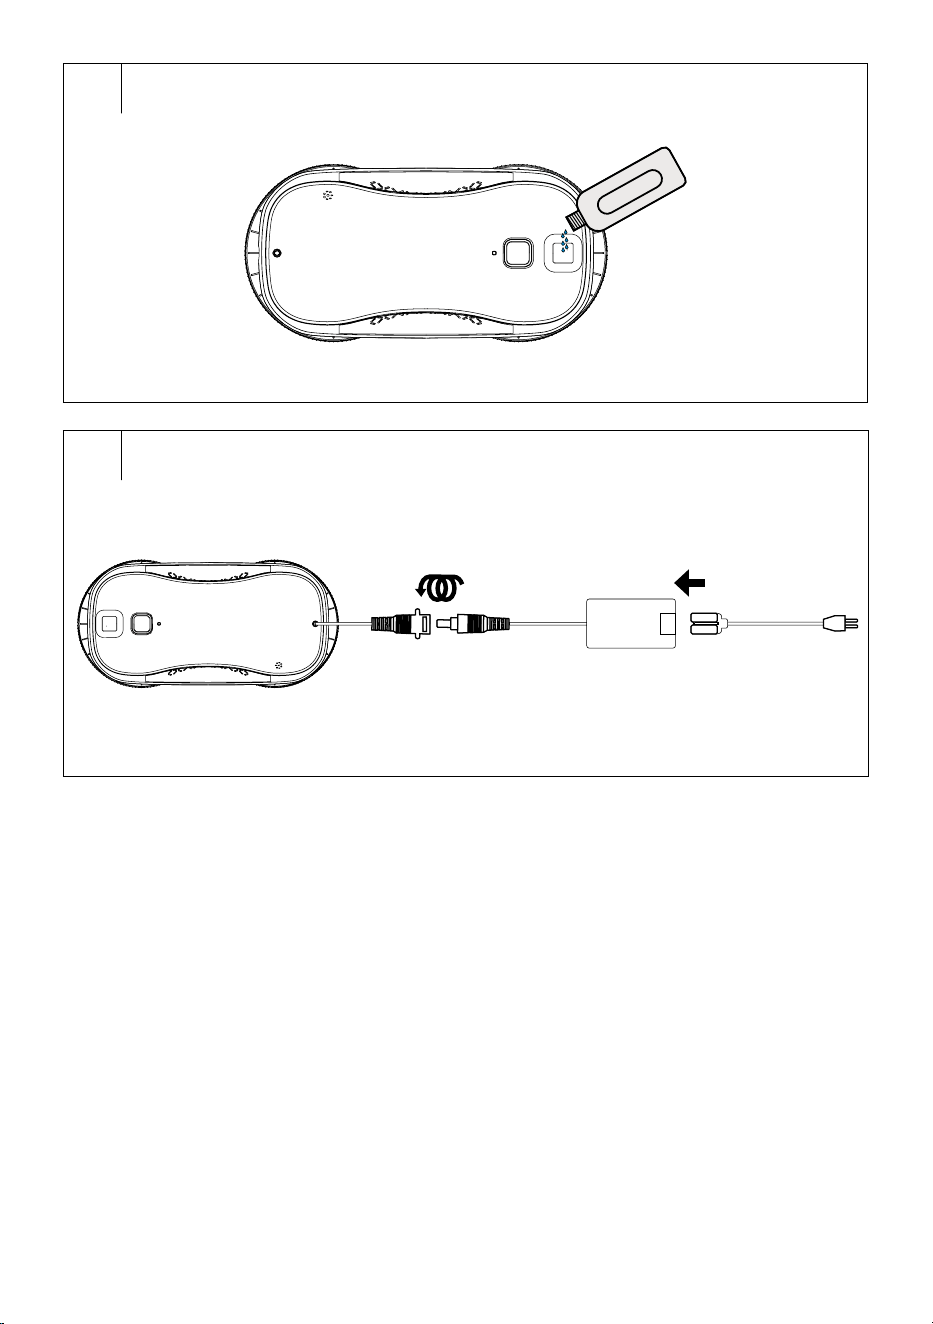
Mopping sleeve holders (Fig. D1, D2)
• Attach the holders to the robotic window cleaner’sbottom. There are
yellow "Pairing" markings on the holder and at the installation point.
These markings fit together. Align them together and push slightly to
attach the holder to the underside of the robotic window cleaner.
• Insert the mopping sleeves onto to the holders.
• If the windows are soiled with sand or dust, wipe the windows
manually first. If this is not possible, turn off the water dispensing
function andwipe the dirt with dry sleeves.
• Before starting the robotic window cleaner, make sure that the holders
withsleeves are properly attached to the window cleaner’sunderside.
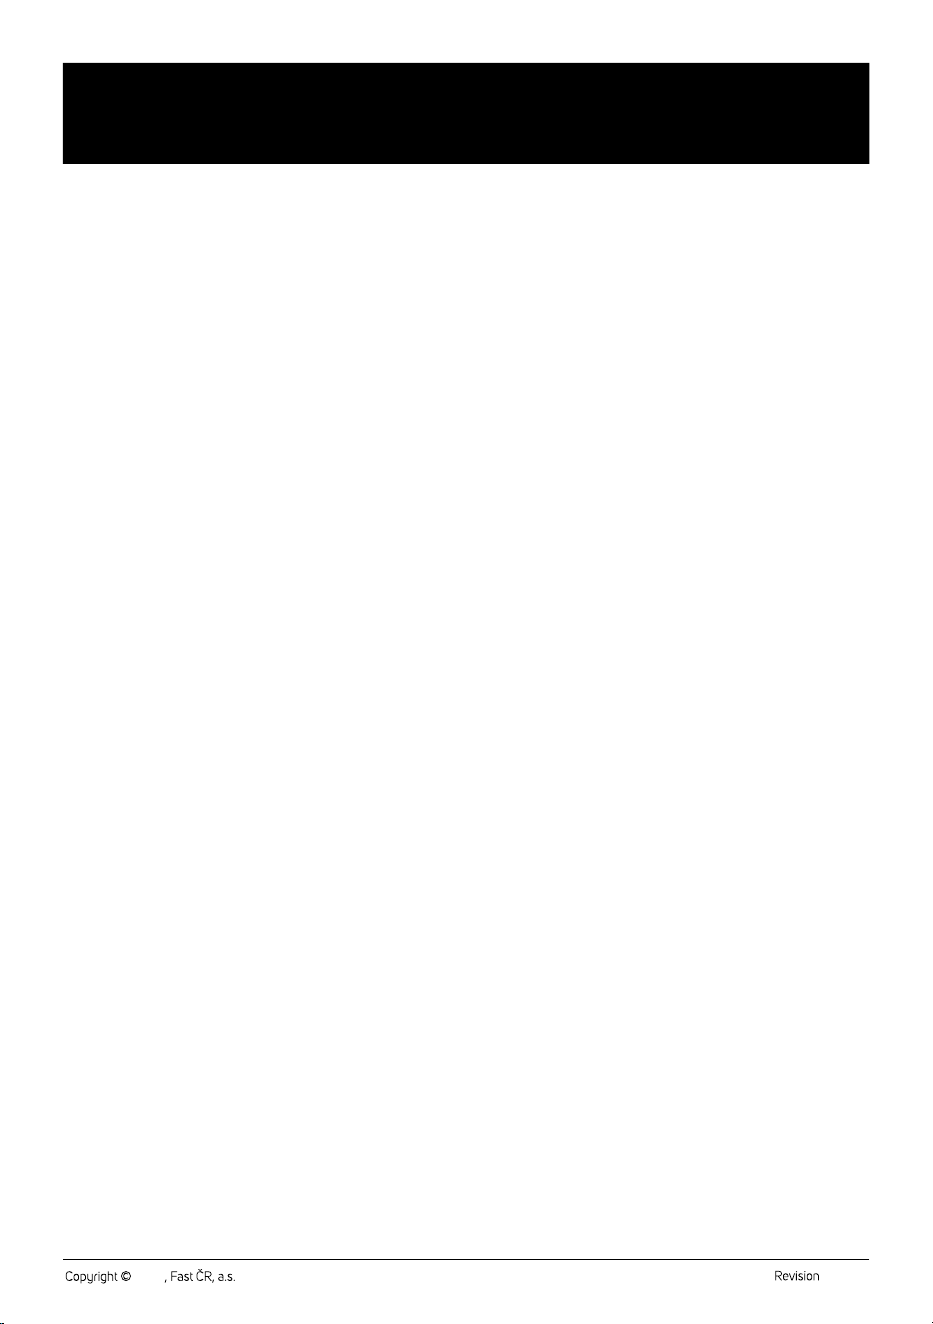
Filling the tank (Fig. E)
• Release the water tank cover anduse the bottle to pour water into the
water tank.
• If water is spilled on the outer surface, wipe the robotic window
cleaner’souter surface with adry cloth.
Warning:
Pour only clean water in the water tank. Do not
use any detergents. This could clog the nozzles
anddamage the robotic window cleaner.
Note:
The mopping sleeves must be changed duringthe
cleaning process. If dirty circles remain on the window
after cleaning, the mopping sleeves are already soiled
and need to be cleaned again.
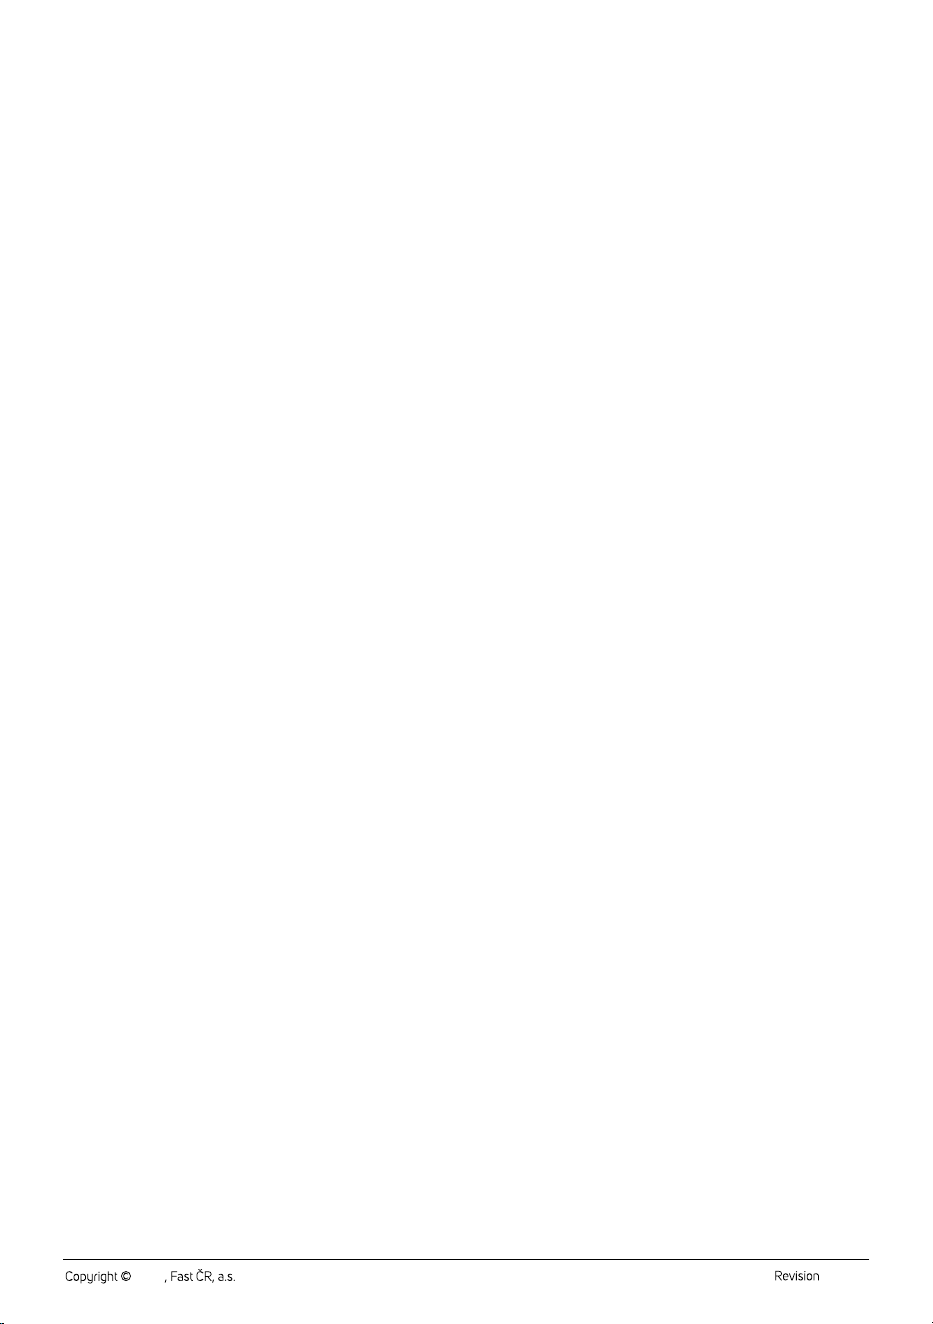
Charging (Fig. F)
• Only charge the robotic window cleaner using the supplied charging
cord andadapter.
• Insert the charging cord end into the connection socket. Attach the
other end of the charging cord to the adapter jack and tighten properly
in the direction of the arrows to prevent loosening. Insert the power
cord end into the adapter, then insert the plug into awall socket.
• When the LED indicator lights red, the robotic window cleaner needs
charging.
EN
Robotic Window Cleaner
User’sManual
- 4 -- 4 -
01/2024
2024
Important:
The robotic window cleaner must be connected to the
power supply when inoperation.
. . . . . . . . . . . . . . . . . . . . . . . . . . . . . . . . . . . . . . . . . . . . . . . . . . . . . . . . . . . . . . . . . . . .
OPERATION USING THE CLEANER BUTTON
The button on the robotic window cleaner is used as abasic control.
For advanced operation, use the remote control.
Turning on/off
• Long press the Operation start/pause button to turn the robotic
window cleaner on.
• When the fan starts, place the robotic window cleaner on the glass,
ideally on the centre.
• If the robotic window cleaner cannot stick to the glass, check that
the mopping sleeve holders are properly fit and flush and/or that the
mopping sleeves are properly attached.
• To turn the robotic window cleaner off, long press the Operation start/
pause button.
Starting the cleaning cycle
• When the robotic window cleaner is on, press the Operation start/
pause button briefly to start automatic cleaning.
Interrupting the cleaning process
• While the robotic window cleaner is inoperation, press the On/Off
button briefly and the cleaner is interrupted.
• To continuecleaning, press the Operation start/pause button briefly
again.
. . . . . . . . . . . . . . . . . . . . . . . . . . . . . . . . . . . . . . . . . . . . . . . . . . . . . . . . . . . . . . . . . . . .
OPERATION USING THE REMOTE CONTROL
• Remove the cover on the rear side of the remote control. Insert two
type AAA (1.5V) batteries into the remote control. When inserting
the batteries ensure the correct polarity as shown inside the battery
compartment. Put the cover back on and click it into place.
• In the event that the batteries are flat, replace them with new ones.
Do not combine various types of batteries or new and old batteries.
• The signal range of the remote control is approximately 6 m.
• When replacing batteries, first remove the flat batteries and then insert
the new ones.
Note:
Never combine flat and new batteries nor various
types of batteries.
Starting the cleaning cycle
• Press the
button to start automatic cleaning.
• Press the
button to start local cleaning.
• Press the
button to start intensive cleaning.
Interrupting the cleaning process
• While the robotic window cleaner is inoperation, press the
button
briefly to interrupt the cleaner operation.
• To continue cleaning, press the
button briefly again.
Cleaner movement
• The direction buttons are used to move the robotic window cleaner
manually. However, it is important that the robotic window cleaner is
not in operation.
– The
button is used to move upward.
– The
button is used to move downward.
– The
button is used to move left.
– The
button is used to move right.
If you need to change the direction, first press the
button to interrupt
the robotic window cleaner operation, then press the button of the
selected movement direction.
Dispensing hot water
• To enable water dispensing, press the
button.
• The button
reduces water dispensing, the button
increases water dispensing.
• To disable water dispensing, press the
button again.
. . . . . . . . . . . . . . . . . . . . . . . . . . . . . . . . . . . . . . . . . . . . . . . . . . . . . . . . . . . . . . . . . . . .
REMOVING THE CLEANER FROM THE GLASS
If you need to remove the robotic window cleaner from the glass, proceed
as follows:
1. Press the Operation start/pause button briefly to pause the
operation. (Skip this step if the robotic window cleaner has
completely completed the scheduled cleaning.)
2. Hold the robotic window cleaner with one hand and long press the
Operation start/pause button with other hand to turn it off.
3. Now you can remove the robotic window cleaner from the glass.
If the robotic window cleaner is positioned too high andyou need to finish
cleaning, use the
button to pause operation, then use the direction
buttons on the remote control to bring the robotic window cleaner within
your arm'sreach so you can turn it off and remove from he glass.
. . . . . . . . . . . . . . . . . . . . . . . . . . . . . . . . . . . . . . . . . . . . . . . . . . . . . . . . . . . . . . . . . . . .
LED INDICATOR COLOUR MEANING
LED indicator colour Meaning
Green light. Normal operation/ready fornormal
use.
It glows green and beeps
long three times.
Window cleaning is finished.
Red light. The robotic window cleaner needs
charging.
It flashes red. The power supply is disconnected.
Reconnect the cleaner to apower
supply or remove it from the glass.
The robotic window cleaner incorrectly
positioned on the glass. Check the
fitting of the holders andreattach the
robotic window cleaner.
Too high or too low friction. Replace the
mopping sleeve.
It flashes red andgreen
alternately.
Robotic window cleaner is faulty.
Disconnect the robotic window cleaner
from the mains andthen reconnect
it. If the fault persists, contact your
authorised service centre.
PROTECTION IN THE EVENT OF APOWER FAILURE
• The robotic window cleaner is equipped with abattery that ensures
that the cleaner remains attached to the glass for up to 20 minutes
in case of apower failure (e.g. due to wiring cut). Insuch acase, an
audible andvisual warning will be given.
• Remove the robotic window cleaner from the glass and turn it on again
after powering it up.
. . . . . . . . . . . . . . . . . . . . . . . . . . . . . . . . . . . . . . . . . . . . . . . . . . . . . . . . . . . . . . . . . . . .
- 5 -- 5 -
01/2024
2024
CLEANING AND MAINTENANCE
• Before cleaning, disconnect the robotic window cleaner from the
power source andturn it off.
• Do not use abrasive cleaning agents, solvents, or any substances to
clean any parts of the appliance that could damage the surface of the
appliance. None of the components of this appliance are dishwasher
safe.
Warning:
To prevent the risk of electric shock, do not submerge
the appliance, plug or power cord in water or any
other liquid.
Water tank
• Release the water tank cover and pour out the remaining water from
the tank.
• Leave the tank cover open to allow the tank to dry out. Otherwise
mould and unpleasant odour might form inside the tank.
External surface
• Wipe the robotic window cleaner outer surface with adry cloth.
Mopping sleeves
To prevent the formation of moulds and damaging microorganisms that
may cause unpleasant odours and be hazardous to health, it is necessary
to clean the mopping sleeve and the holder after each use.
1. Remove the mopping sleeve from theholder and remove the holder
from thecleaner.
2. Wipe the mopping sleeve holder using alightly dampened sponge
and wipe dry using aclean wiping cloth.
3. Hand wash the mopping sleeve in lukewarm water with asmall
amount of fine washing powder, wring it out by hand and allow
it to dry naturally. Do not wash the mopping sleeve in awashing
machine or dry it in aclothes dryer.
Storage
• If the appliance is not to be used for an extended period of time,
unplug the power cord from the mains socket, allow the appliance
to cool down and clean it by following the instructions in the chapter
“Cleaning and Maintenance”.
• Before storing, ensure that the appliance and all accessories are
thoroughly clean and dry.
• Store the appliance in adry, clean, and well-ventilated place away
from extreme temperatures and out of the reach of children or pets.
. . . . . . . . . . . . . . . . . . . . . . . . . . . . . . . . . . . . . . . . . . . . . . . . . . . . . . . . . . . . . . . . . . . .
TROUBLESHOOTING
Problem Cause Solution
The led indicator
light is flashing red
and there is ashort
beep.
The power
supply has been
disconnected or the
contact is loose.
Connect all parts of the
power supply.
Glass or mopping
sleeve is too wet.
Wipe the glass with
adry cloth or replace
the mopping sleeve.
There is too much
dirt on glass.
Wipe the glass
manually.
The holder is not
correctly fitted.
Remove the holder
andinsert it correctly.
The glass is greasy/
sticky.
Wipe the glass
manually.
Suction opening is
blocked.
Eliminate the cause of
the blockage.
The LED is flashing
alternately red
andgreen and
awarning beep is
sounding.
The robotic window
cleaner is faulty.
Disconnect the robotic
window cleaner from
the mains andthen
reconnect it. If the fault
persists, contact your
authorised service
centre.
The robotic window
cleaner is not
moving on the glass.
Replace the mopping
sleeve or check the
screws on the cleaning
roller to see if they are
loose.
The mopping sleeve
holder shakes
excessively during
operation.
The mopping sleeve
is too damp.
Replace the mopping
sleeve.
Asmall water
leakage occurred
after starting.
This is anormal
occurrence.
After cleaning, round
stains remain on the
glass.
The mopping sleeve
used was not clean.
Replace the mopping
sleeve andstart
cleaning again.
It seems that the
cleaning has been
finished, but the
cleaner is still
moving.
Interrupt the cleaner
operation andremove it
from the glass.
Errors occur during
the cleaning process.
Pause the cleaner
operation, remove it
manually, turn it off,
then turn it on and start
again.
The robotic window
cleaner slides down
during operation.
The mopping sleeve
is too damp.
Replace the mopping
sleeve.
The glass is too
greasy (e.g. from
cooking oil, etc.).
Interrupt the cleaner
operation, remove it
manually, turn it off,
replace the mopping
sleeve, then turn it on
and start again.
Grease should be wiped
off the glass manually
first before the cleaning
may start.
The mopping sleeve
is too dry.
Enable the water
dispensing function.
The robotic window
cleaner does not
stick to the glass.
The mopping sleeve
holders are not
installed correctly.
Install the holders
correctly so that they
are flush.
The mopping sleeve
is not fitted correctly.
Fit the mopping sleeve
correctly.
The glass is not flat,
it’srounded/curved
or contains stickers.
Use arobotic window
cleaner on flat glass and
remove any stickers
before use.
. . . . . . . . . . . . . . . . . . . . . . . . . . . . . . . . . . . . . . . . . . . . . . . . . . . . . . . . . . . . . . . . . . . .
- 6 -- 6 -
01/2024
2024
TECHNICAL SPECIFICATIONS
Voltage ...................................................................................................................... 24V~
Power consumption ...............................................................................................72W
Noise level ............................................................................................................... 70dB
Dimensions ..................................................................................278 x 140 x 80mm
Battery ...................................................................14.8V, 650mAh, 9.62Wh Li-Ion
Suction power ...................................................................................2000–3000Pa
Minimum usable area ....................................................................... 300 x 300mm
Power adapter
Rated voltage range ................................................................................100−240V~
Rated frequency ............................................................................................50/60Hz
Output ............................................................................................................ 24V
3A
We reserve the right to change the text and technical specifications.
Original Consumable Accessories
SRX 6001 Mopping sleeve
Safety Class for Electric Shock Protection:
Class II – Electric shock protection is provided by double or heavy-duty
insulation.
The product is intended for household use only. The
product is not intended for outdoor use.
This symbol indicates that the appliance must not be
used if the power plug is damaged.
. . . . . . . . . . . . . . . . . . . . . . . . . . . . . . . . . . . . . . . . . . . . . . . . . . . . . . . . . . . . . . . . . . . .
INSTRUCTIONS AND INFORMATION ON DISPOSAL OF USED
PACKAGING MATERIAL
Dispose of used packaging material in the designated waste disposal area
determined by the municipality.
DISPOSAL OF USED BATTERIES
This symbol means that used accumulators and
batteries do not belong in normal municipal waste.
Take used accumulators and batteries to designated
collection points for proper disposal. Proper disposal of
accumulators and batteries will help prevent negative
impacts on the environment and human health.
DISPOSAL OF USED ELECTRICAL AND ELECTRONIC EQUIPMENT
This symbol on the products or accompanying documents
indicates that used electrical and electronic products
should not be disposed of with regular municipal waste.
For proper disposal and recycling of these products, deliver
them to designated collection points. Alternatively, in some
European Union states or other European countries the
products can be returned to the local retailer when buying
an equivalent new product.
By properly disposing of this product, you help preserve valuable natural
resources and contribute to preventing potential negative impacts on the
environment and human health resulting from improper waste disposal.
For further details, contact your local authorities or the nearest collection
point.
Fines may be imposed for improper disposal of this type of waste in
accordance with national regulations.
For Business Entities in European Union States
If you want to dispose of electric or electronic devices, ask your retailer or
supplier for the necessary information.
Disposal in Other Countries Outside the European Union
This symbol is valid in the European Union. To dispose of this product
elsewhere, request necessary information on the correct disposal method
from local authorities or your retailer.
This product complies with all the essential requirements of
the applicable EU directives.

FAST ČR, a.s.
U Sanitasu 1621
CZ-251 01 Říčany
www.sencor.eu