
EN Blood pressure monitor
Instructions for use ................................................................. 2
ES Tensiómetro
Instrucciones de uso ............................................................. 18
PL Ciśnieniomierz
Instrukcja obsługi ................................................................. 35
BC 21

Included in delivery
•
Blood pressure monitor with cuff
•
2 x 1.5 V LR03 AAA batteries
•
Storage box
•
Instructions for use
Dear customer,
Thank you for choosing a product from our range. Our
name stands for high-quality, thoroughly tested prod-
ucts for applications in the areas of heat, weight, blood
pressure, body temperature, pulse, gentle therapy,
massage, beauty and air.
Read these instructions for use carefully and keep them
for later use, be sure to make them accessible to other
users and observe the information they contain.
With kind regards,
Your Beurer team
1. Getting to know your device
Check that the packaging of the Beurer BC21 blood
pressure monitor has not been tampered with and
make sure that all the required contents are present.
The wrist blood pressure monitor is used to carry out
non-invasive measurement and monitoring of arterial
blood pressure values in human adults. This allows
you to quickly and easily measure your blood pres-
ENGLISh
1. Getting to know your device .......................................2
2. Important notes ........................................................... 3
3. Device description .......................................................7
4. Preparing for the measurement ...................................7
5. Measuring blood pressure ........................................10
6. Evaluating results ......................................................11
7. Displaying and deleting measured values .................13
8. Error messages/troubleshooting ............................... 14
9. Cleaning and storing the device and cuff .................15
10. Technical specifications ..........................................15
11. Warranty / service ....................................................17
Contents
2
sure, save the measurements and display the devel-
opment of the measurements. You are also warned of
possible existing cardiac arrhythmia.
The recorded values are classified and evaluated
graphically.
The wrist blood pressure monitor also
has voice output in five dierent languages (English,
Spanish, Polish, Arabic and Farsi). The instructions
and measurement results are announced to you in the
selected language.
2. Important notes
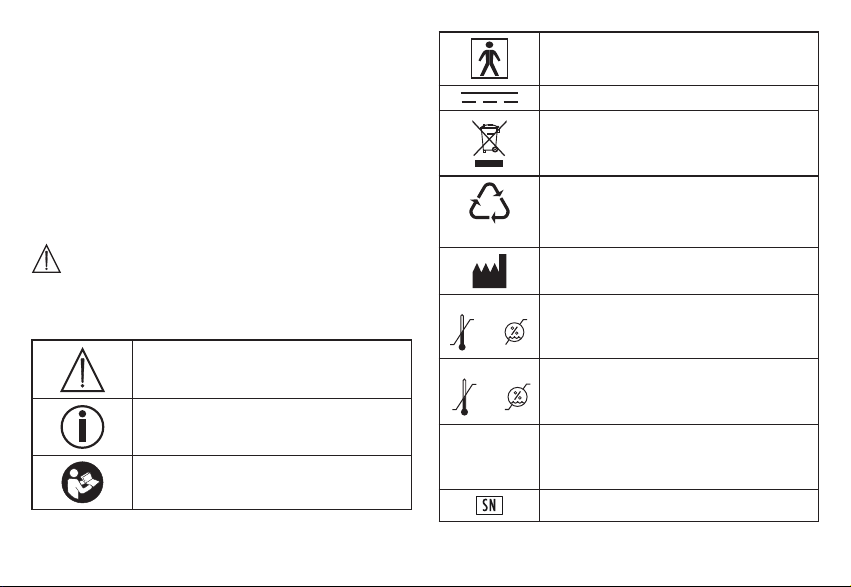
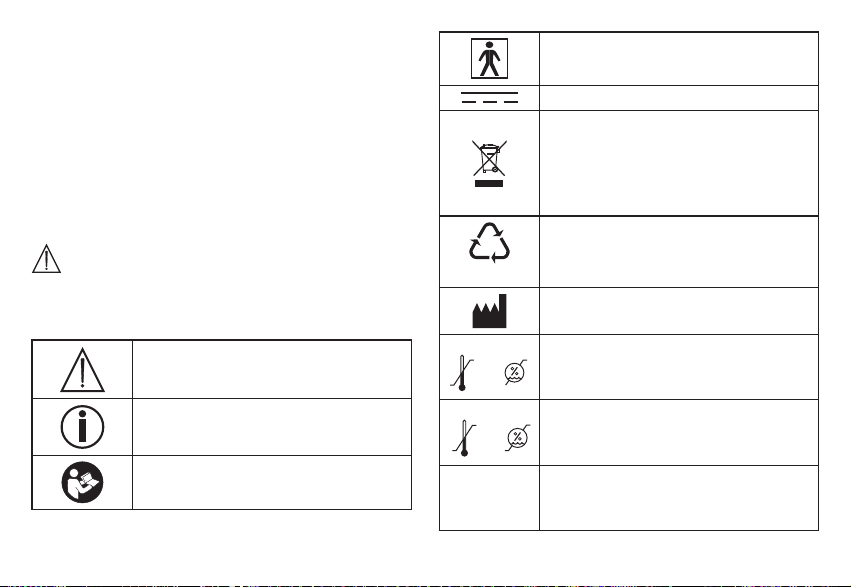
Signs and symbols
The following symbols are used in these instructions
for use, on the packaging and on the type plate for
the device and the accessories:
Attention
Note
Note on important information
Observe the instructions for use
Application part, type BF
Direct current
Disposal in accordance with the
Waste Electrical and Electronic
Equipment EC Directive – WEEE
21
PAP
Dispose of packaging in an environ-
mentally friendly manner
Manufacturer
Storage/Transport
Permissible storage and transport
temperature and humidity
Operating
Permissible operating temperature
and humidity
IP 22
Device protected against foreign
objects ≥ 12.5 mm and against water
dripping at an angle
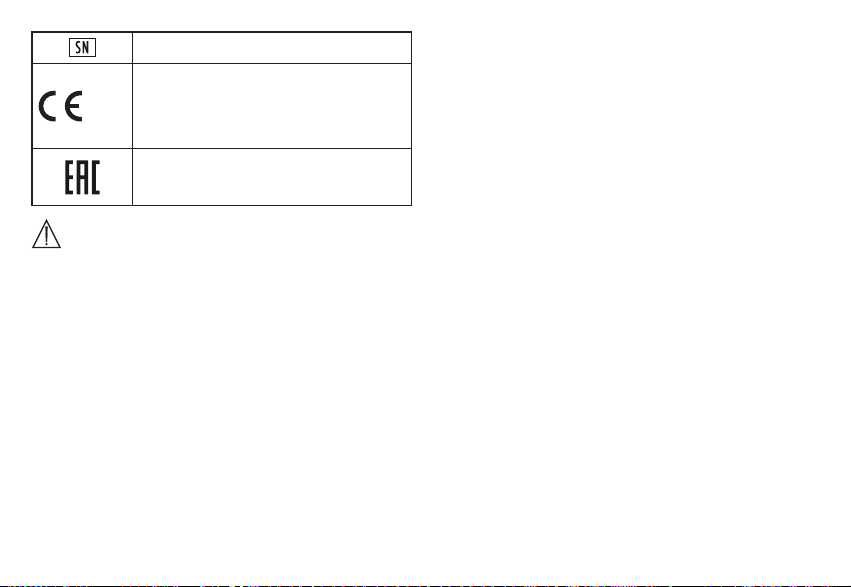
Serial number
3

0483
The CE labelling certifies that the
product complies with the essential
requirements of Directive 93/42/EEC
on medical devices.
Certification symbol for products that are
exported to the Russian Federation and
CIS countries.
Notes on use
•
In order to ensure comparable values, always
measure your blood pressure at the same time of
day.
•
Before every measurement, relax for about 5 min-
utes.
•
If you want to perform several measurements on
the same person, wait 5 minutes between each
measurement.
•
Do not take a measurement within 30 minutes of
eating, drinking, smoking or exercising.
•
Repeat the measurement if you are unsure of the
measured value.
•
The measurements taken by you are for your infor-
mation only – they are no substitute for a medical
examination! Discuss the measured values with your
doctor and never base any medical decisions on
them (e.g. medicines and their dosages).
•
Do not use the blood pressure monitor on new-
borns or patients with pre-eclampsia. Before using
the blood pressure monitor during pregnancy, we
recommend you consult with a doctor.
•
Cardiovascular diseases may lead to incorrect
measurements or have a detrimental effect on
measurement accuracy. The same also applies to
very low blood pressure, diabetes, circulatory dis-
orders and arrhythmias as well as chills or shaking.
•
In the case of restricted circulation on the arm as a
result of chronic or acute vascular diseases (includ-
ing vascular constriction), the accuracy of the wrist
measurement is limited. In this case you should use
an upper arm blood pressure monitor instead.
•
This device is not intended for use by people (in-
cluding children) with restricted physical, sensory or
mental skills or a lack of experience and/or a lack of
knowledge, unless they are supervised by a person
who is responsible for their safety or are instructed
by such a person in how to use the device. Supervise
children around the device to ensure they do not play
with it.
•
The blood pressure monitor must not be used in
connection with a high-frequency surgical unit.
4

•
Only use the device on people who have the speci-
fied wrist measurement for the device.
•
Please note that when inflating, the functions of the
limb in question may be impaired.
•
During the blood pressure measurement, the blood
circulation must not be stopped for an unnecessar-
ily long time. If the device malfunctions remove the
cuff from the arm.
•
Do not allow sustained pressure in the cuff or fre-
quent measurements. The resulting restriction of
the blood flow may cause injury.
•
Make sure that the cuff is not placed on an arm in
which the arteries or veins are undergoing medical
treatment, e.g. intravascular access or intravascu-
lar or therapy, or an arteriovenous (AV) shunt.
•
Do not use the cuff on people who have undergone
a mastectomy.
•
Do not place the cuff over wounds as this may
cause further injury.
•
Place the cu on your wrist only. Do not place the
cu on other parts of the body.
•
The blood pressure monitor can only be operated
with batteries.
•
To conserve the batteries, the blood pressure mon-
itor switches off automatically if you do not press
any buttons for one minute.
•
The device is only intended for the purpose
described in these instructions for use. The man-
ufacturer is not liable for damage resulting from
improper or careless use.
Instructions for storage and maintenance
•
The blood pressure monitor is made from preci-
sion and electronic components. The accuracy of
the measured values and service life of the device
depend on its careful handling:
– Protect the device from impacts, humidity, dirt,
marked temperature fluctuations and direct sun-
light.
– Do not drop the device.
– Do not use the device in the vicinity of strong
electromagnetic fields and keep it away from
radio systems or mobile telephones.
•
We recommend that the batteries be removed if
the device will not be used for a prolonged period
of time.
5
Notes on handling batteries
•
If your skin or eyes come into contact with battery fluid,
rinse the affected areas with water and seek medical
assistance.
•
Choking hazard! Small children may swallow and
choke on batteries. Store batteries out of the reach of
small children.
•
Observe the plus (+) and minus (-) polarity signs.
•
If a battery has leaked, put on protective gloves and
clean the battery compartment with a dry cloth.
•
Protect batteries from excessive heat.
•
Risk of explosion!
Do not throw batteries into a
fire.
•
Do not charge or short-circuit batteries.
•
Use identical or equivalent battery types only.
•
Always replace all batteries at the same time.
•
Do not use rechargeable batteries.
•
Do not disassemble, split or crush the batteries.
Instructions for repairs and disposal
•
Batteries do not belong in household waste. Please
dispose of empty batteries at the collection points
intended for this purpose.
•
Do not open the device. Failure to comply with this
instruction will void the warranty.
•
Do not repair or adjust the device yourself. Proper
operation can no longer be guaranteed in this case.
•
Repairs must only be carried out by Customer Ser-
vices or authorised suppliers.
Before making a claim, please check the batteries
first and replace them if necessary.
•
For environmental reasons, do not
dispose of the device in the household waste at the
end of its useful life. Dispose of the device
at a suitable local collection or recycling
point in your country. Dispose of the device
in accordance with EC Directive – WEEE
(Waste Electrical and Electronic Equipment). If you
have any questions, please contact the local au-
thorities responsible for waste disposal.
6
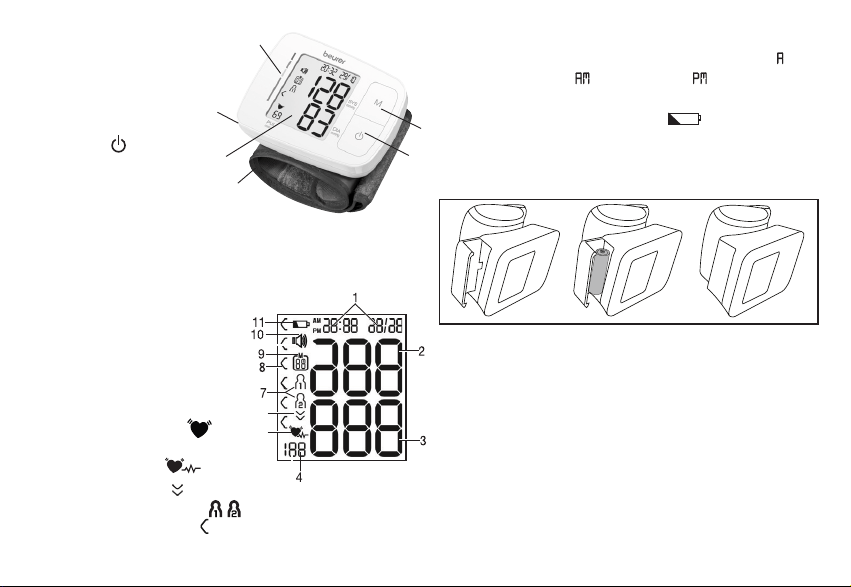
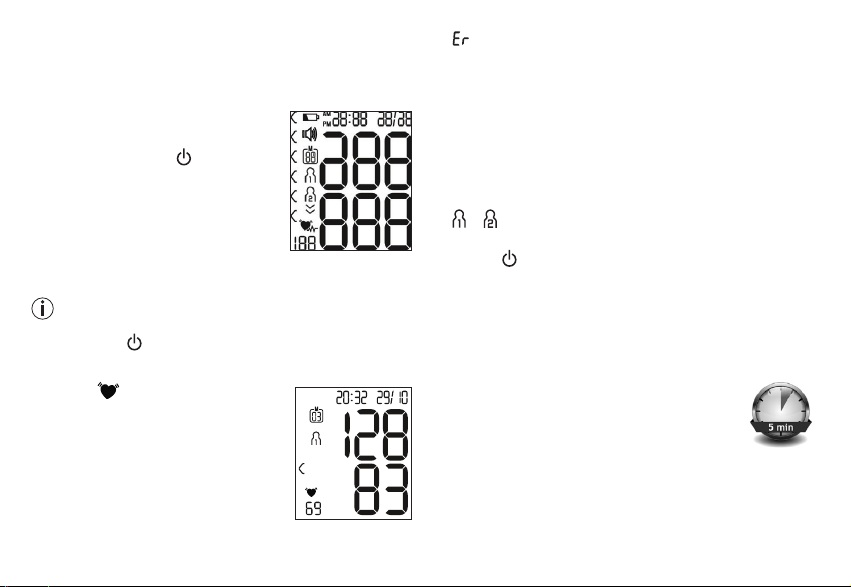
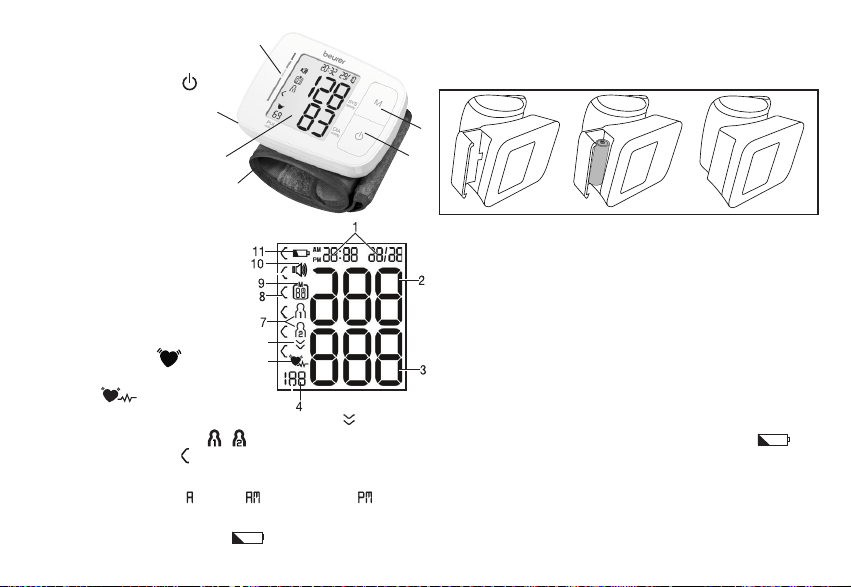
3. Device description
1. Memory button M
2. Start/stop button
3. Wrist cuff
4. Display
5. Battery compartment
lid
6. Risk indicator
Information on the display:
1. Time and date
2. Systolic pressure
3. Diastolic pressure
4. Calculated pulse value
5. Pulse symbol
Cardiac arrhythmia
symbol
6. Inflate, release air ( )
7. User memory /
8. Risk indicator
9. Memory space number/memory display for aver-
age value ( ), morning ( ), evening ( )
10. Voice output / sound
11. Battery replacement symbol
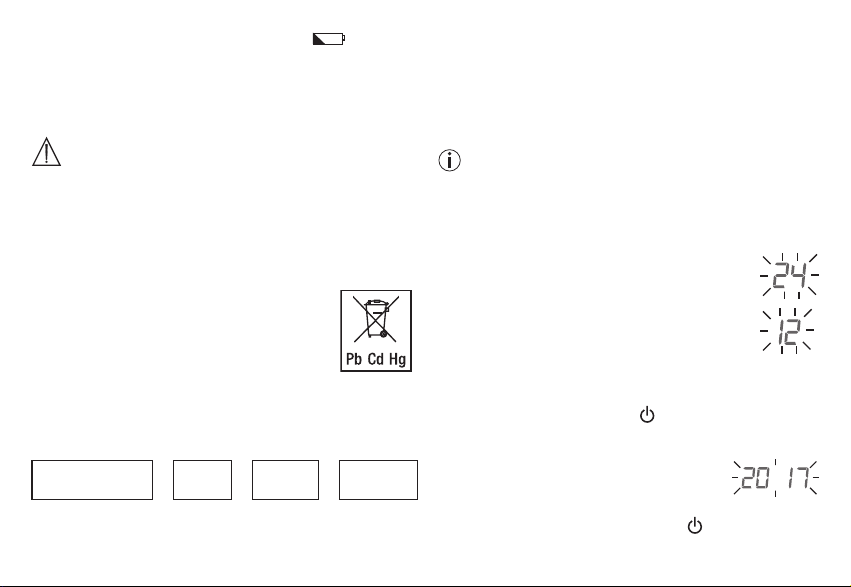
4. Preparing for the measurement
Inserting the battery
•
Remove the battery compartment lid on the left side
of the device. To simply remove the lid, lightly press
on it to undo the lock. Then remove the lid.
•
Insert two 1.5 V micro (alkaline type LR03) batteries.
Make sure that the batteries are inserted the correct
way round in accordance with the markings. Do not
use rechargeable batteries.
•
Close the battery compartment lid again carefully.
If the battery replacement symbol is displayed,
you can no longer perform any measurements and
must replace all batteries. Once the batteries have been
removed from the device, the date and time must be
set again. Any saved measured values are retained.
4
5
2
6
1
3
6
5
7
Battery disposal
• Empty, completely flat batteries must be disposed of
through specially designated collection boxes, recy-
cling points or electronics retailers. You are legally re-
quired to dispose of the batteries.
• The codes below are printed on batteries
containing harmful substances:
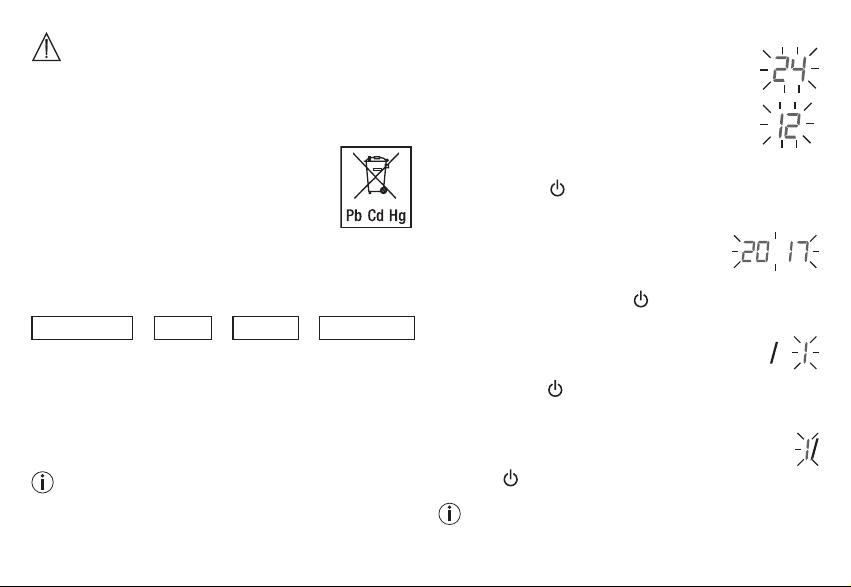
Pb = Battery contains lead,
Cd = Battery contains cadmium,
Hg = Battery contains mercury.
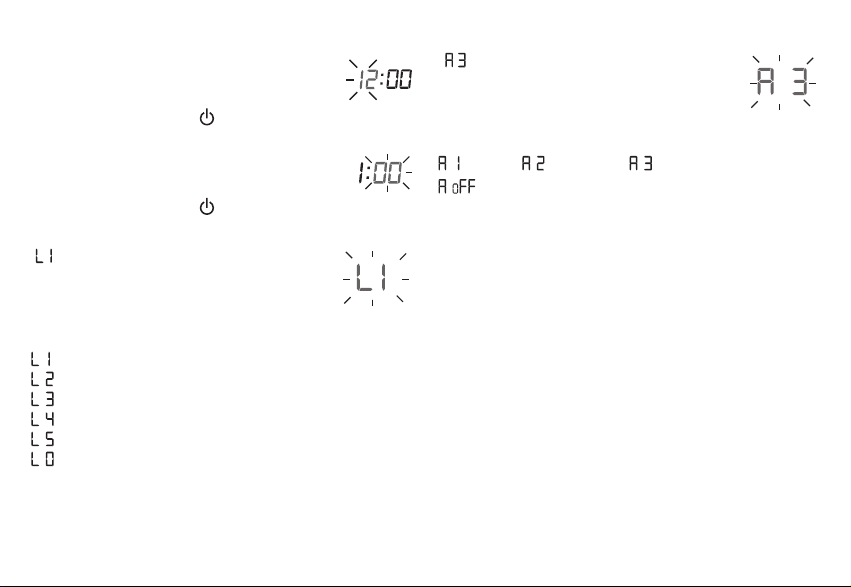
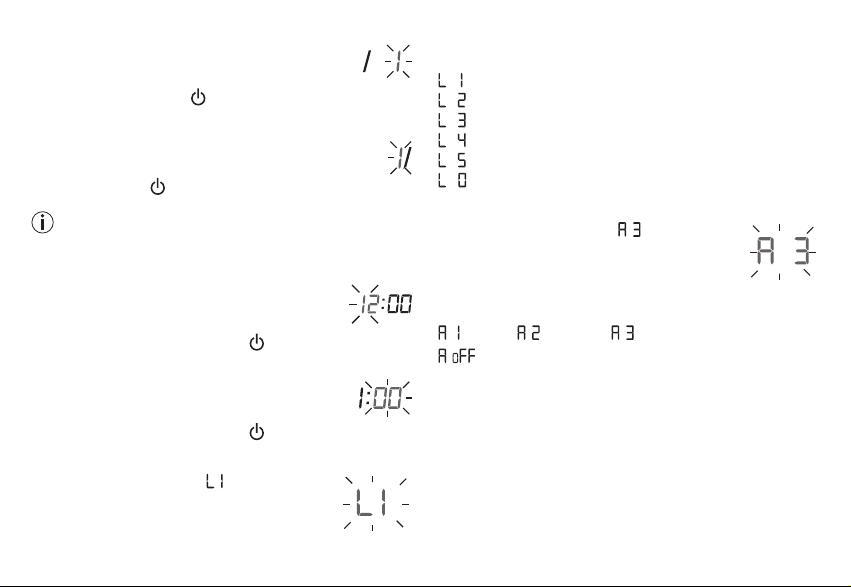
Setting the hour format, date, time and language
The following section describes the functions and set-
tings available on the blood pressure monitor.
hour format
➔
Date
➔
Time
➔
Language
It is essential to set the date and time. Otherwise, you
will not be able to save your measured values correct-
ly with a date and time and access them again later.
The device also has voice output in 5 languages
( English, Spanish, Polish, Arabic and Farsi). The de-
vice is set to English when supplied to the customer.
In order to select your values faster when using
the memory button M, you can also press and
hold the memory button M.
hour format
•
Press and hold the memory button M for
5 seconds or insert the batteries. The full
display is shown briefly. The hour format
then flashes on the display.
•
Now select the desired hour format using
the memory button M and confirm with the START/
STOP button .
Date
The year flashes on the display.
•
Select the desired year using the
memory button M and confirm with
the START/STOP button
.
The month flashes on the display.
•
Select the desired month with
the memory
button M
and confirm with the START/
STOP button .
The day flashes on the display.
•
Select the desired day with the memory but-
ton M and confirm with the START/STOP
button .
If the hour format is set as 12h, the day/month
display sequence is reversed.
8
Time
The hours flash on the display.
•
Select the desired hour using the
memory button M and confirm with the
START/STOP button .
The minutes flash on the display.
•
Select the desired minute using the
memory button M and confirm with the
START/STOP button .
Language
‘ ’
appears in the display for English. To
select another language, press and hold
the memory button M for 3 seconds
each time until the desired language is
shown. Confirm using the memory button M.
= English
= Spanish
= Polish
= Arabic
= Farsi
= No voice output, only acoustic signal
Voice output volume
“
” (loud) appears in the display. To
change the voice output volume, press
and hold the memory button M for 3sec-
onds each time. Confirm using the mem-
ory button M.
= quiet, = medium, = loud
= voice output is o.
Once all the data has been set, the device switches
o automatically.
9
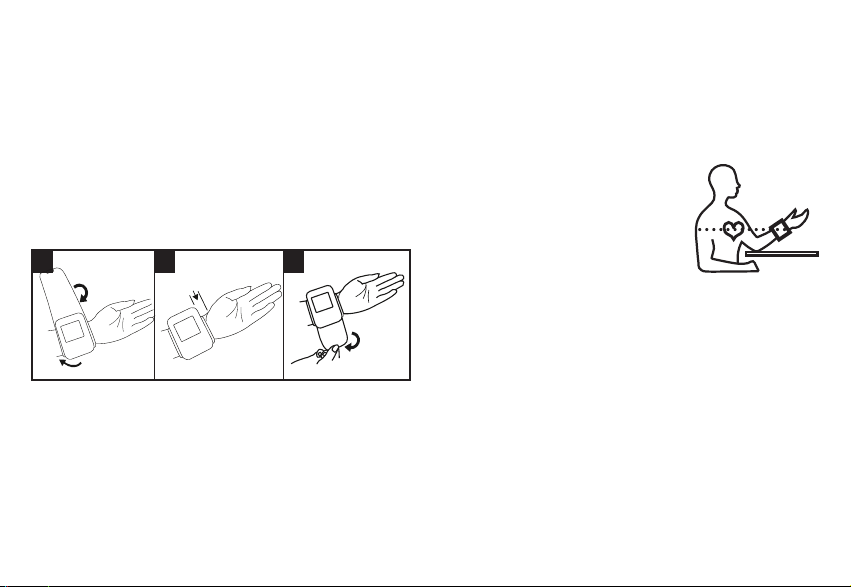
5. Measuring blood pressure
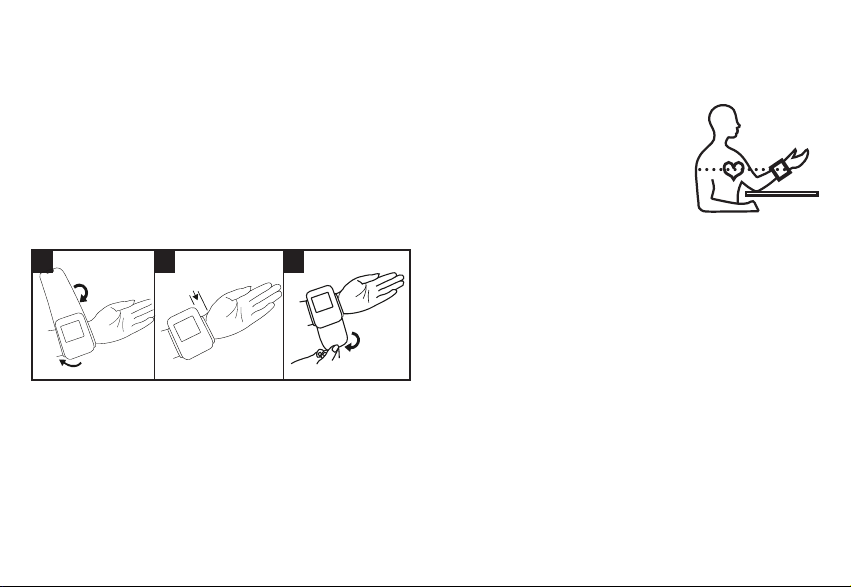
Attaching the cuff
Blood pressure may vary between the right and left
arm, which may mean that the measured blood pres
-
sure values are different. Always perform the meas-
urement on the same arm. If the values between the
two arms are significantly different, please consult
your doctor to determine which arm should be used
for the measurement. We generally recommend you
carry out the measurement on the left wrist.
1 2 3
1 cm
•
Expose your left wrist. Ensure that the circulation
of the arm is not hindered by tight clothing or simi-
lar.
Place the cuff on the inside of your wrist.
•
Close the cuff with the hook-and-loop fastener
such that the upper edge of the device is posi-
tioned approx. 1 cm underneath the heel of the
hand.
•
The cuff must be fitted tightly around the wrist, but
must not constrict.
Adopting the correct posture
•
Before every measurement,
relax for about 5 minutes. Oth-
erwise deviations can occur.
•
You can take the measurement
while sitting or lying down. To take
your blood pressure, make sure
you are sitting comfortably with your arms and back
leaning on something. Do not cross your legs. Place
your feet flat on the ground. Make sure to support your
arm and bend it. Always make sure that the device is
at heart level during the measurement. Otherwise sig-
nificant deviations can occur. Relax your arm and the
palm of your hand.
•
To avoid falsifying the measurement, it is important
to remain still during the measurement and not to
speak.
10
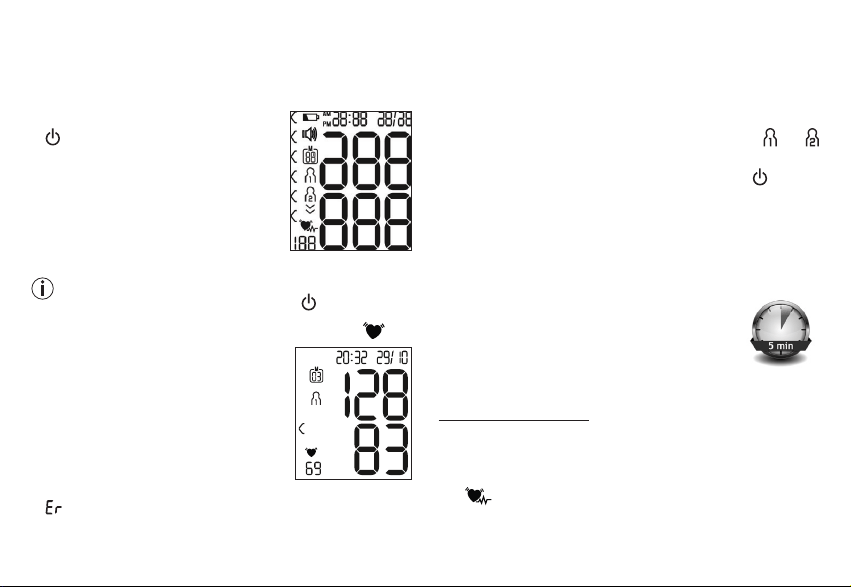
M
easuring blood pressure
As described above, attach the cu and adopt the
posture in which you want to perform the measure-
ment.
•
Press the START/STOP button
to start the blood pressure
monitor. All displays will illumi-
nate briefly.
• The last measured value is dis-
played and the blood pressure
monitor automatically begins the
measurement after 3 seconds.
You can cancel the measurement at any time by
pressing the START/STOP button .
As soon as a pulse is found, the pulse symbol will
be displayed.
•
Systolic pressure, diastolic pres-
sure and pulse readings are dis-
played.
•
_
appears if the measurement has not been
performed properly. Observe the chapter on error
messages/troubleshooting in these instructions for
use and repeat the measurement.
•
Now select the desired user memory by pressing
the memory button M. If you do not select a user
memory, the measurement is stored in the most
recently used user memory. The relevant or
symbol appears on the display.
•
Press the START/STOP button to switch o the
blood pressure monitor. The measurement is then
stored in the selected user memory.
If you forget to turn o the device, it will switch o
automatically after approx. 1 minute.
In this case too, the value is stored in the
selected or most recently used user
memory.
Wait at least 5 minutes before taking
another measurement!
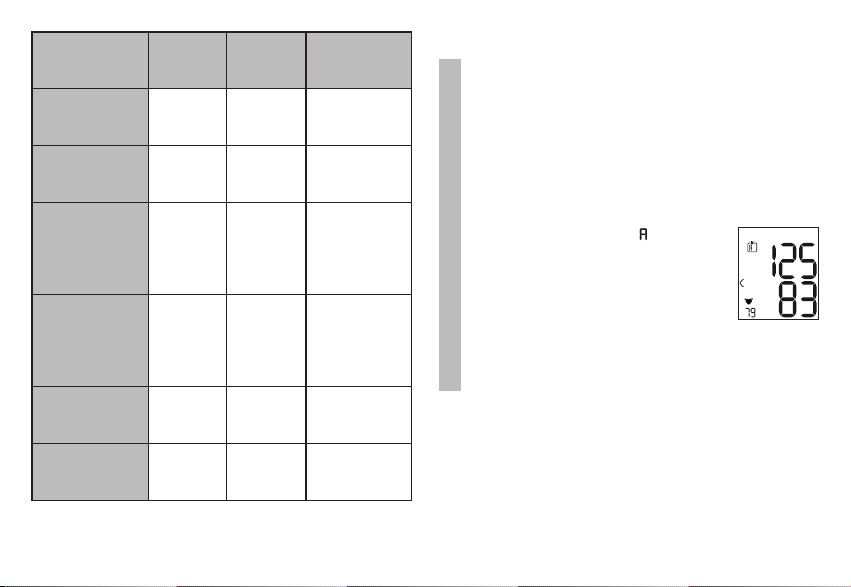
6. Evaluating results
Cardiac arrhythmia:
This device can identify potential disruptions of the
heart rhythm when measuring and, if necessary,
indicates this after the measurement with the sym
-
bol .
This can be an indicator for arrhythmia. Arrhyth-
mia is an illness in which the heart rhythm is abnor-
11
mal because of flaws in the bioelectrical system that
regulates the heartbeat. The symptoms (skipped or
premature heart beats, pulse being slow or too fast)
can be caused by factors such as heart disease, age,
physical make-up, excess stimulants, stress or lack
of sleep. Arrhythmia can only be determined through
an examination by your doctor.
If the symbol is shown on the display after the
measurement has been taken, repeat the meas-
urement. Please ensure that you rest for 5 minutes
beforehand and do not speak or move during the
measurement. If the symbol appears frequently,
please consult your doctor. Self-diagnosis and treat-
ment based on the measurements can be danger-
ous. Always follow your doctor’s instructions.
Risk indicator:
The measurements can be classified and evaluated in
accordance with the following table.
However, these standard values serve only as a gen-
eral guideline, as the individual blood pressure varies
in dierent people and dierent age groups etc.
It is important to consult your doctor regularly for ad-
vice. Your doctor will tell you your individual values
for normal blood pressure as well as the value above
which your blood pressure is classified as dangerous.
The classification on the display and the scale on the
device show which category the recorded blood pres-
sure values fall into. If the values of systole and di-
astole fall into two dierent categories (e.g. systole in
the ‘High normal’ category and diastole in the ‘Normal’
category), the graphical classification on the device
always shows the higher category; for the example
given this would be ‘High normal’.
Blood pressure
value category
Systole
(in mmHg)
Diastole
(in mmHg)
Action
Level 3:
severe
hypertension
≥ 180 ≥ 110
seek medical
attention
Level 2:
moderate
hypertension
160 – 179 100 – 109
seek medical
attention
Level 1:
mild
hypertension
140 – 159 90 – 99
regular
monitoring by
doctor
High normal 130 – 139 85 – 89
regular
monitoring by
doctor
Normal 120 – 129 80 – 84 self-monitoring
Optimal < 120 < 80 self-monitoring
Source: WHO, 1999 (World Health Organization)
12
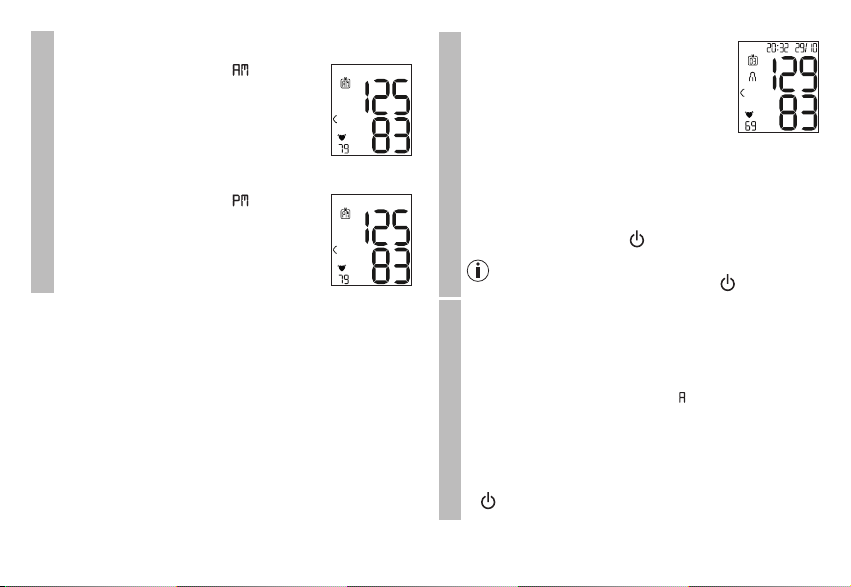
7. Displaying and deleting measured
values
User memory
The results of every successful measurement are
stored together with the date and time. The oldest
measurement is overwritten in the event of more
than 60 measurements.
•
To retrieve the measurement, press the
memory button M.
flashes on the display.
The average value of all saved
measured values in this user me-
mory is displayed.
To change the user memory, press and hold the
memory button M for approx. 3 seconds.
Average values
•
Press the memory button M.
flashes on the display.
The average value of the morning
measurements for the last 7 days
is displayed (morning: 5.00 a.m. –
9.00 a.m.).
•
Press the memory button M.
flashes on the display.
The average value of the evening
measurements for the last 7 days
is displayed (evening: 6.00 p.m. –
8.00 p.m.).
Individual measured values
•
When you press the memory
button M again, the last in-
dividual measurement is dis-
played (in this example, meas-
urement 03 of user 1).
•
When the memory button M is pressed again,
you can view your individual measurements.
•
To switch the device o again, press the
START/STOP button .
You can exit the menu at any time by pressing
the START/STOP button .
13

Deleting measured values
•
To clear the memory of the relevant user memory,
you must first select a user memory.
•
Start the retrieval of the average measured values.
flashes on the display and the average value of
all saved measured values in this user memory is
displayed.
•
Press and hold the memory button M and the
START/STOP button simultaneously for
5seconds.
All values of the current user me-
mory are deleted and the device
switches o.
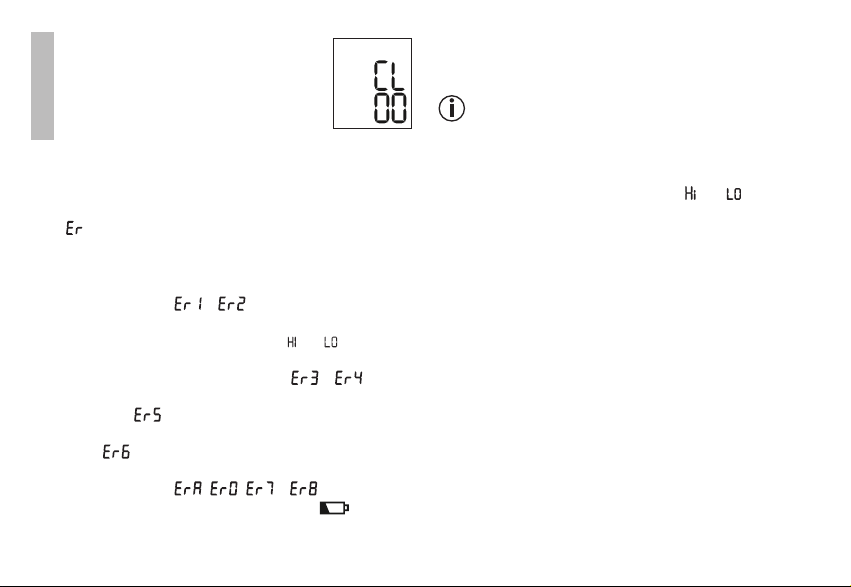
8. Error messages/troubleshooting
In the event of errors, the error message _ appears on
the display.
Error messages may appear if
• the systolic or diastolic pressure could not be measured
(
or
appears on the display),
•
the systolic or diastolic pressure was outside the
measure ment range (“
” or “ ” appears on the display),
• the cuff is fastened too tightly or loosely (
or
appears on the display),
• the blood pressure is higher than 300 mmHg (
ap-
pears on the display),
• inflating takes longer than 180 seconds (
appears
on the display),
• there is a system or device error (
, , or
appears on the display),
• the batteries are almost empty .
In such cases, repeat the measurement. Ensure that you
do not move or speak. If necessary, reinsert or replace
the batteries.
Technical alarm – description
Should the recorded blood pressure (systolic or dias
-
tolic) lie outside the limits specified in the section
“Technical specifications”, the technical alarm will
appear on the display indicating either “
” or “ ”. In
such cases, you should seek medical assistance and
check the accuracy of your procedure.
The limit values for the technical alarm are factory set
and cannot be adjusted or deactivated. These alarm
limit values are accorded second priority under the
standard IEC 60601-1-8.
The technical alarm is a non-locking alarm and does
not need to be reset. The signal shown on the dis
-
14

play will disappear automatically after about 8 sec-
onds.
9. Cleaning and storing the device and
cuff
•
Clean the device and cu carefully using a slightly
damp cloth only.
•
Do not use any cleaning agents or solvents.
•
Under no circumstances hold the device and cu
under water, as this can cause liquid to enter and
damage the device and cu.
•
If you store the device and cu, do not place heavy
objects on the device and cu. Remove the batter-
ies.
10. Technical specifications
Model no. BC 21
Measurement
method
Oscillometric, non-invasive
blood pressure measurement
on the wrist
Measurement range Cuff pressure 0 – 300 mmHg,
Systolic 60 -260 mmHg,
Diastolic 40 -199 mmHg,
Pulse 40 –180 beats/minute
Display accuracy Systolic ± 3 mmHg,
Diastolic ± 3 mmHg,
Pulse ± 5% of the value shown
Measurement
inaccuracy
Max. permissible standard
deviation according to clinical
testing:
Systolic 8 mmHg /
Diastolic 8 mmHg
Memory 2 x 60 memory spaces
Dimensions L 87 mm x W 67 mm x
H31 mm
Weight Approximately 105 g (without
batteries)
Cuff size 140 to 195 mm
Permissible
operating
conditions
+ 10°C to +40°C, ≤ 85% relative
humidity (non-condensing)
Permissible storage
conditions
-20°C to +50°C, ≤ 85% relative
humidity, 800 –1050 hPa
ambient pressure
Power supply 2 x 1.5V
AAA batteries
Battery life For approx. 200 measurements,
depending on levels of blood
pressure and inflation pressure
15

Accessories Instructions for use, 2 x 1.5V
AAA batteries, storage box
Classification Internal supply, IP22, no AP
or APG, continuous operation,
application part type BF
The serial number is located on the device or in the
battery compartment.
Technical information is subject to change without
notification to allow for updates.
•
This device complies with European Standard
EN60601-1-2 (in accordance with CISPR 11, IEC
61000-4-2, IEC 61000-4-3, IEC 61000-4-8) and
is subject to particular precautions with regard to
electromagnetic compatibility. Please note that
portable and mobile HF communication systems
may interfere with this device.
•
The device complies with the EU Medical Devices
Directive 93/42/EEC, the German Medical Devices
Act (Medizinproduktgesetz) and the standards
EN1060-1 (Non-invasive sphygmomanometers
– Part 1: General requirements), EN1060-3
(Non-invasive sphygmomanometers – Part
3: Supplementary requirements for electro-
mechanical blood pressure measuring systems)
and IEC80601-2-30 (Medical electrical equipment
– Part 2 – 30: Particular requirements for the basic
safety and essential performance of automated
non-invasive sphygmomanometers).
•
The accuracy of this blood pressure monitor
has been carefully checked and developed with
regard to a long useful life. If the device is used for
commercial medical purposes, it must be regularly
tested for accuracy by appropriate means.
Precise instructions for checking accuracy may be
requested from the service address.
Notes on electromagnetic compatibility
•
The device is suitable for use in all environments lis-
ted in these instructions for use, including domestic
environments.
•
The use of the device may be limited in the pre-
sence of electromagnetic disturbances. This could
result in issues such as error messages or the fai-
lure of the display/device.
•
Avoid using this device directly next to other
devices or stacked on top of other devices, as
this could lead to faulty operation. If, however, it is
necessary to use the device in the manner stated,
this device as well as the other devices must be
monitored to ensure they are working properly.
16

•
The use of accessories other than those specified
or provided by the manufacturer of this device can
lead to an increase in electromagnetic emissions or
a decrease in the device’s electromagnetic immu-
nity; this can result in faulty operation.
•
Failure to comply with the above can impair the
performance of the device.
11. Warranty / service
In case of a claim under the warranty please contact
your local dealer or the local representation which is
mentioned in the list “service international”.
In case of returning the unit please add a copy of
your receipt and a short report of the defect.
The following warranty terms shall apply:
1. The warranty period for BEURER products is either
5 years or- if longer- the country-specific warranty
period from date of Purchase.
In case of a warranty claim, the date of purchase
has to be proven by means of the sales receipt or
invoice.
2. Repairs (complete unit or parts of the unit) do not
extend the warranty period.
3. The warranty shall not be valid for damages
because of
a. improper treatment, e.g. nonobservance of the
user instructions.
b. repairs or tampering by the customer or
unauthorised third parties.
c. transport from the manufacturer to the
consumer or during transport to the service
centre.
d. The warranty shall not be valid for accessories
which are subject to normal wear and tear
(cu, batteries etc.).
4. Liability for direct or indirect consequential
losses caused by the unit are excluded even
if the damage to the unit is accepted as a
warranty claim.
Subject to errors and changes
17

Artículos suministrados
•
Tensiómetro con brazalete
•
2 pilas de 1,5V AAA LR03
•
Estuche
•
Instrucciones de uso
Estimada clienta, estimado cliente:
Nos alegramos de que haya elegido un producto de
nuestra colección. Nuestro nombre es sinónimo de
productos de alta y comprobada calidad en el ámbito
de aplicación de calor, peso, presión arterial, tempe-
ratura corporal, pulso, tratamiento suave, masaje, be-
lleza y aire.
Lea atentamente estas instrucciones de uso, consér-
velas para su futura utilización, póngalas a disposición
de otros usuarios y respete las indicaciones.
Atentamente,
El equipo de Beurer
1. Introducción
Compruebe que el embalaje del tensiómetro Beurer
BC 21 esté intacto y que su contenido esté completo.
El tensiómetro de muñeca sirve para la medición y el
control de los valores de la presión arterial de forma no
invasiva en personas adultas. Con él puede medirse
la presión arterial de forma rápida y sencilla, guardar
los valores de la medición en la memoria y consultar
ESPAñOL
1. Introducción ..............................................................18
2. Indicaciones importantes .......................................... 19
3. Descripción del aparato ............................................23
4. Preparación de la medición .......................................23
5. Medición de la presión arterial ..................................26
6. Evaluación de los resultados .....................................28
7. Consultar y borrar los valores medidos ....................29
8. Mensajes de error/solución de problemas ................ 31
9. Limpiar y guardar el aparato y el brazalete ...............31
10. Datos técnicos ........................................................32
11. Garantía/asistencia .................................................. 33
Índice
18
la evolución de los valores medidos. Además, advierte
de eventuales alteraciones del ritmo cardiaco.
Los valores medidos se clasifican y evalúan de forma
gráfica.
Además, el tensiómetro de muñeca dispone
de una emisión de voz en cinco idiomas distintos (in-
glés, español, polaco, árabe y persa). Las instruccio-
nes y los resultados de medición se facilitarán en el
idioma seleccionado.
2. Indicaciones importantes
Símbolos
En las presentes instrucciones de uso, en el emba
-
laje y en la placa de características del aparato y de
los accesorios se utilizan los siguientes símbolos:
Precaución
Nota
Indicación de información impor-
tante
Respetar las instrucciones de uso
Pieza de aplicación tipo BF
Corriente continua
Eliminación según la Directiva euro-
pea sobre residuos de aparatos eléc-
tricos y electrónicos (RAEE)
21
PAP
Eliminar el embalaje respetando el
medio ambiente
Fabricante
Storage/Transport
Temperatura y humedad de almace-
namiento y transporte admisibles
Operating
Temperatura y humedad de funcio-
namiento admisibles
IP 22
Aparato protegido contra cuerpos
extraños ≥12,5 mm y contra goteo
oblicuo de agua
Número de serie
19
0483
El sello CE certifica que este aparato
cumple los requisitos establecidos
en la Directiva 93/42/CEE relativa a
los productos sanitarios.
Símbolo de certificación para aquellos
productos que se exportan a la Federa
-
ción de Rusia y a los países de la CEI.
Indicaciones de utilización
•
Para garantizar la comparabilidad de los valores,
tómese la tensión siempre a la misma hora del día.
•
Repose unos 5 minutos antes de cada medición.
•
Si desea realizar más de una medición en una
misma persona, espere 5 minutos entre medición y
medición.
•
No coma, beba, fume ni realice esfuerzos físicos
durante un mínimo de 30 minutos antes de realizar
la medición.
•
Repita la medición si duda de la validez de los
valores medidos.
•
Las mediciones realizadas por uno mismo solo tie-
nen carácter informativo, en ningún caso pueden
reemplazar un examen médico. Hable de los valores
que obtenga con su médico. Bajo ningún concepto
debe tomar usted mismo decisiones médicas (p.ej.
sobre medicamentos y su dosificación).
•
No utilice el tensiómetro en recién nacidos ni en
pacientes con preeclampsia. Si va a utilizar el ten-
siómetro durante el embarazo, es recomendable
que consulte previamente a su médico.
•
Las enfermedades cardiovasculares pueden pro-
ducir errores de medición o afectar a la precisión
de la medición. Lo mismo ocurre en caso de tener
la presión arterial muy baja, de padecer diabetes,
problemas circulatorios y alteraciones del ritmo
cardiaco, o de sufrir escalofríos o temblores.
•
Si existe una restricción del flujo sanguíneo en un
brazo a causa de un trastorno vascular crónico o
agudo (entre otras, vasoconstricción), se reduce la
precisión de la medición en la muñeca. En estos
casos se recomienda utilizar un tensiómetro de
brazo.
•
Este aparato no debe ser utilizado por personas
(niños incluidos) con facultades físicas, sensoria-
les o mentales limitadas, o con poca experiencia o
conocimientos, a no ser que los vigile una persona
responsable de su seguridad o que esta persona les
indique cómo se debe utilizar el aparato. Se debe
vigilar a los niños para asegurarse de que no jueguen
con el aparato.
20

•
El tensiómetro no debe utilizarse junto con un
equipo quirúrgico de alta frecuencia.
•
Use este aparato únicamente en personas que ten-
gan el contorno de muñeca especificado.
•
Tenga en cuenta que durante el inflado la extremi-
dad en la que coloque el aparato puede sufrir limi-
taciones funcionales.
•
La medición de la presión arterial no debe inte-
rrumpir la circulación sanguínea más tiempo del
necesario. En caso de que el aparato no funcione
correctamente, retire el brazalete del brazo.
•
Evite exponerse a la presión continuada del bra-
zalete y no realice mediciones frecuentes, ya que
producen una disminución del flujo sanguíneo que
puede causar lesiones.
•
Asegúrese de no haber colocado el brazalete en
un brazo cuyas arterias o venas estén sometidas a
algún tipo de tratamiento médico, p.ej. acceso por
vía intravascular, administración de tratamiento por
vía intravascular o un shunt arteriovenoso (A-V).
•
No coloque el brazalete a personas a las que se les
haya practicado una mastectomía.
•
No coloque el brazalete sobre heridas, ya que pue-
den producirse más lesiones.
•
Coloque el brazalete exclusivamente en la muñeca.
No lo coloque en otras zonas del cuerpo.
El tensiómetro puede funcionar con pilas exclusi-
vamente.
•
El mecanismo de desconexión automática apaga
el tensiómetro para conservar las pilas si no se
pulsa ninguna tecla durante un intervalo de un
minuto.
•
Este aparato solo se ha diseñado para el fin des-
crito en estas instrucciones de uso. Por lo tanto,
el fabricante declinará toda responsabilidad por
daños y perjuicios debidos a un uso inadecuado o
incorrecto.
Indicaciones de conservación y cuidado
•
El tensiómetro está compuesto por elementos
electrónicos y de precisión. La precisión de los
valores de medición, así como la vida útil del apa-
rato, dependen de su correcta utilización:
– Proteja el aparato de impactos, humedad, sucie-
dad, fuertes oscilaciones térmicas y exposición
directa a la luz solar.
– Evite que el aparato se caiga.
– No utilice el aparato en las inmediaciones de
campos electromagnéticos de gran intensidad y
manténgalo alejado de instalaciones de radio y
de teléfonos móviles.
21

•
Si no se va a utilizar el aparato durante un periodo
de tiempo prolongado, se recomienda retirar las
pilas.
Indicaciones para la manipulación de pilas
•
En caso de que el líquido de una pila entre en contacto
con la piel o los ojos, lave la zona afectada con agua y
busque asistencia médica.
•
¡Peligro de asfixia! Los niños pequeños podrían
tragarse las pilas y asfixiarse. Guarde las pilas fuera del
alcance de los niños.
•
Respete los símbolos más (+) y menos (-) que indican
la polaridad.
•
Si se derrama el líquido de una pila, póngase guantes
protectores y limpie el compartimento de las pilas con
un paño seco.
•
Proteja las pilas de un calor excesivo.
•
¡Peligro de explosión!
No arroje las pilas al fue-
go.
•
Las pilas no se pueden cargar ni cortocircuitar.
•
Utilice únicamente el mismo tipo de pila o un tipo equi-
valente.
•
Cambie siempre todas las pilas a la vez.
•
No utilice baterías.
•
No despiece, abra ni triture las pilas.
Indicaciones acerca de reparaciones y
eliminación
•
No deseche las pilas con la basura doméstica.
Lleve las pilas usadas a los puntos de recogida
dispuestos para tal finalidad.
•
No abra el aparato. El incumplimiento de esta dis-
posición anula la garantía.
•
No repare ni ajuste el aparato usted mismo. Si lo
hace, no se garantizará un funcionamiento correcto
del mismo.
•
Las reparaciones solo deben ser realizadas por el
servicio de atención al cliente o por distribuidores
autorizados.
Antes de realizar cualquier reclamación, com-
pruebe el estado de las pilas y sustitúyalas si es
necesario.
•
Para proteger el medio ambiente
,
no se debe desechar el aparato al final de su vida
útil junto con la basura doméstica. Se pue-
de desechar en los puntos de recogida ade-
cuados disponibles en su zona. Deseche el
aparato según la Directiva europea sobre
residuos de aparatos eléctricos y electrónicos
(RAEE). Para más información, póngase en contac-
to con la autoridad municipal competente en mate-
ria de eliminación de residuos.
22
3. Descripción del
aparato
1. Tecla de memoriza-
ción M
2. Tecla de INICIO/
PARADA
3. Brazalete para
muñeca
4. Pantalla
5. Tapa del comparti-
mento de las pilas
6. Indicador de riesgo
Indicaciones en la pantalla:
1. Hora y fecha
2. Presión sistólica
3. Presión diastólica
4. Pulso medido
5. Símbolo de pulso
Símbolo de alteraciones del
ritmo cardiaco
6. Inflar, desinflar ( )
7. Registros de usuario /
8. Indicador de riesgo
9. Número de la posición de almacenamiento/indi-
cación de los valores promedio guardados ( ),
por la mañana ( ), por la tarde ( )
10. Emisión de voz/tonos
11. Símbolo de cambio de pilas
4. Preparación de la medición
Colocar las pilas
•
Retire la tapa del compartimento de las pilas, situado
en la parte izquierda del aparato. Para retirar fácil-
mente la tapa, presiónela ligeramente para soltar el
bloqueo. Tire a continuación de ella hacia arriba.
•
Coloque dos pilas del tipo 1,5 V Micro (alcalinas tipo
LR03).
Compruebe que las pilas se hayan colocado con la
polaridad correcta. No utilice baterías recargables.
•
Vuelva a cerrar con cuidado la tapa del comparti-
mento de las pilas.
4
5
2
6
1
3
6
5
23
Cuando el símbolo de cambio de pilas aparece,
no se pueden seguir realizando mediciones y se deben
cambiar todas las pilas. En cuanto se retiran las pilas
del aparato, se deben volver a ajustar la fecha y la hora.
Los valores de medición guardados no se pierden.
Eliminación de las pilas
• Las pilas usadas, completamente descargadas, deben
eliminarse a través de contenedores de recogida se-
ñalados de forma especial, los puntos de recogida de
residuos especiales o a través de los distribuidores de
equipos electrónicos. Los usuarios están obligados por
ley a eliminar las pilas correctamente.
• Estos símbolos se encuentran en pilas
que contienen sustancias tóxicas:
Pb = la pila contiene plomo,
Cd = la pila contiene cadmio,
Hg = la pila contiene mercurio.
Configurar formato de hora, fecha, hora e idioma
A continuación se describen las funciones y los ajus-
tes que puede realizar en el tensiómetro.
Formato de
hora
➔
Fecha
➔
hora
➔
Idioma
Es imprescindible ajustar la fecha y la hora, ya que
solo así se podrán guardar los datos de sus medicio-
nes con la fecha y hora correctas para su posterior
consulta.
Además, el aparato dispone de emisión de voz en 5
idiomas (inglés, español, polaco, árabe y persa). En el
estado de suministro, el aparato está ajustado para
funcionar en inglés.
Para seleccionar con mayor rapidez sus valores al
realizar los ajustes con la tecla de memorización
M, puede mantener pulsada también la tecla de
memorización M.
Formato de hora
•
Mantenga pulsada la tecla de memoriza-
ción M durante 5 segundos o inserte las
pilas. Se visualiza brevemente la pantalla
completa. A continuación parpadea en la
pantalla el formato de hora.
•
Seleccione entonces con la tecla de memorización
M el formato de hora deseado y confirme con la
tecla de INICIO/PARADA .
Fecha
El año parpadea en la pantalla.
•
Seleccione con la tecla de memori-
zación M el año deseado y confirme
con la tecla de INICIO/PARADA .
24
La indicación del mes parpadea en la pantalla.
•
Seleccione con
la tecla de memorización
M
el mes deseado y confirme con la tecla
de INICIO/PARADA .
La indicación del día parpadea en la pantalla.
•
Seleccione con la tecla de memorización M
el día deseado y confirme con la tecla de INI-
CIO/PARADA .
Si está ajustado el formato 12h, se invierte el or-
den de la indicación del día y del mes.
hora
La hora parpadea en la pantalla.
•
Seleccione con la tecla de memoriza-
ción M la hora deseada y confirme con
la tecla de INICIO/PARADA .
Los minutos parpadean en la pantalla.
•
Seleccione con la tecla de memorización
M los minutos deseados y confirme con
la tecla de INICIO/PARADA .
Idioma
En la pantalla aparece “
” para inglés.
Para seleccionar otro idioma, manten-
ga pulsada la tecla de memorización M
durante 3 segundos cada vez hasta que
aparezca el idioma deseado. Confirme con la tecla de
memorización M.
= inglés
= español
= polaco
= árabe
= persa
= sin emisión de voz, solo señal acústica
Volumen
En la pantalla aparece “
” (alto). Para
seleccionar otro volumen, mantenga pul-
sada la tecla de memorización M durante
3 segundos cada vez. Confirme con la
tecla de memorización M.
= bajo, = medio, = alto
= sin emisión de voz.
Una vez ajustados todos los datos, el aparato se apa
-
ga automáticamente.
25
5. Medición de la presión arterial
Colocación del brazalete
La presión arterial puede ser diferente en el brazo
derecho e izquierdo, por lo que los valores medidos
pueden resultar también distintos. Realice la medi
-
ción siempre en el mismo brazo. Si hay una gran
diferencia entre los valores de ambos brazos es con-
veniente consultar al médico en qué brazo debe rea-
lizarse la medición. En principio recomendamos rea-
lizar la medición en la muñeca izquierda.
1 2 3
1 cm
•
Descúbrase la muñeca izquierda. Asegúrese de
que la circulación sanguínea en el brazo no está
restringida por ropa demasiado estrecha o por algo
similar.
Coloque el brazalete en la parte interna de la
muñeca.
•
Cierre el brazalete con el cierre autoadherente, de
forma que el borde superior del aparato quede
aprox. 1 cm por debajo de la base de la mano.
•
El brazalete debe quedar bien ajustado a la
muñeca, pero no debe apretar.
Adopción de una postura correcta
•
Repose unos 5 minutos antes
de cada medición. De lo contra-
rio, podrían producirse variacio-
nes.
•
Puede sentarse o recostarse
para realizar la medición. Siéntese
cómodamente para medir la presión arterial. Apoye la
espalda y los brazos. No cruce las piernas. Apoye los
pies bien sobre el suelo. Apoye el brazo y dóblelo. En
cualquier caso, asegúrese de que el aparato esté a la
altura del corazón durante la medición. De lo contrario,
podrían producirse variaciones considerables. Relaje
el brazo y las palmas de las manos.
•
Para no falsear el resultado de la medición es
importante no moverse ni hablar durante la misma.
26
M
edición de la presión arterial
Póngase el brazalete como se ha descrito anterior-
mente y colóquese en la postura en la que desea rea-
lizar la medición.
•
Para poner en funcionamiento
el tensiómetro, pulse la tecla de
INICIO/PARADA . Todas las
indicaciones de la pantalla se
iluminan brevemente.
• Se visualiza el último valor medi-
do y transcurridos 3 segundos el
tensiómetro comienza automáti-
camente a medir la tensión.
El proceso de medición puede interrumpirse en
cualquier momento pulsando la tecla de INICIO/
PARADA .
En cuanto se detecta el pulso, se muestra el símbolo
de pulso .
•
Se muestran los resultados de
las mediciones de la presión sis-
tólica, la presión diastólica y el
pulso.
•
_
aparece cuando la medición no se ha podido
realizar correctamente. Consulte la sección
Mensajes de error/solución de problemas de estas
instrucciones de uso y repita la medición.
•
Seleccione el registro de usuario deseado pulsando
la tecla de memorización M. Si no selecciona nin-
gún registro de usuario, el resultado de la medición
se asignará al último registro de usuario utilizado.
En la pantalla aparece el símbolo correspondiente
o .
•
Apague el tensiómetro con la tecla de INICIO/PA-
RADA . De esa forma se memorizará el resultado
de la medición en el registro de usuario selecciona-
do.
Si olvida apagar el aparato, este se apaga de forma
automática después de aproximadamente 1 minuto.
También en este caso se memoriza el valor en el
registro de usuario seleccionado o en
el último registro utilizado.
¡Espere al menos 5 minutos para reali-
zar una nueva medición!
27

6. Evaluación de los resultados
Alteraciones del ritmo cardiaco:
Este aparato es capaz de reconocer eventuales alte
-
raciones del ritmo cardiaco durante la medición y, en
caso de que esto ocurra, lo indica tras la medición
con el símbolo .
Estas alteraciones pueden ser un indicador de arrit-
mia. La arritmia es una enfermedad en la que el ritmo
cardiaco es anormal debido a trastornos del sis-
tema bioeléctrico, que controla los latidos del cora-
zón. Sus síntomas (palpitaciones, pulso más lento
o demasiado rápido) pueden estar provocados por
enfermedades cardiacas, la edad, la predisposición
física, el exceso de estimulantes, el estrés o la falta
de sueño, entre otras causas. La arritmia solo puede
diagnosticarse con un examen médico.
Repita la medición si, tras efectuarla, aparece en la
pantalla el símbolo . Tenga en cuenta que debe
reposar durante 5 minutos y que durante la medición
no debe hablar ni moverse. Si el símbolo apa-
rece con frecuencia, consulte a su médico. Realizar
un autodiagnóstico e iniciar un tratamiento por su
cuenta puede ser peligroso. Es imprescindible seguir
las indicaciones de un médico.
Indicador de riesgo:
Los resultados de la medición pueden clasificarse y
valorarse según la tabla siguiente.
Estos valores estándar sirven únicamente como re-
ferencia, dado que la presión arterial individual varía
según la persona y el grupo de edad.
Es importante que consulte periódicamente a su mé-
dico, que le informará de sus valores personales de
presión arterial normal, así como del valor a partir del
cual puede considerarse peligroso un incremento de
la presión arterial.
La clasificación en la pantalla y la escala en el aparato
indican en qué rango se encuentra la presión arterial
medida. Si los valores de sístole y de diástole se en-
cuentran en dos rangos diferentes (p. ej. la sístole en el
rango “Normal alta” y la diástole en el rango “Normal”),
el gráfico de la clasificación del aparato indica siem-
pre el rango más alto. En este ejemplo, se muestra
“Normal alta”.
28
Rango de los
valores de
presión arterial
Sístole
(en mmHg)
Diástole
(en mmHg)
Medida
Nivel 3:
hipertensión
elevada
≥ 180 ≥ 110
Consulte a su
médico
Nivel 2:
hipertensión
media
160 – 179 100 – 109
Consulte a su
médico
Nivel 1:
hipertensión leve
140 – 159 90 – 99
Sométase
a revisiones
periódicas en
la consulta de
su médico
Normal alta 130 – 139 85 – 89
Sométase
a revisiones
periódicas en
la consulta de
su médico
Normal 120 – 129 80 – 84
Haga un segui
-
miento por su
cuenta
Ideal < 120 < 80
Haga un segui
-
miento por su
cuenta
Fuente: WHO, 1999 (World Health Organization)
7. Consultar y borrar los valores medidos
Registros de usuario
Los resultados de todas las mediciones correcta-
mente realizadas se guardan en la memoria junto
con la fecha y la hora. Cuando hay más de 60
valores de medición, se sobrescribe la medición
más antigua.
•
Para volver a consultar resultados de medi-
ción, pulse la tecla de memorización M.
En la pantalla parpadea
.
Se muestra el valor promedio de
todas las mediciones guardadas
de este registro de usuario.
Para cambiar el registro de usuario pulsada
la tecla de memorización M durante aprox. 3
segundos.
29
Valores promedio
•
Pulse la tecla de memorización M.
En la pantalla parpadea
.
Se muestra el valor promedio de
los 7 últimos días de las medicio-
nes matinales (por la mañana: de
5.00 a 9.00 h).
•
Pulse la tecla de memorización M.
En la pantalla parpadea
.
Se muestra el valor promedio de
los 7 últimos días de las medicio-
nes vespertinas (por la tarde: de
18.00 a 20.00 h).
Valores de medición individuales
•
Si vuelve a pulsar la tecla de
memorización M, se mostrará
en la pantalla la última medi-
ción (en este ejemplo, la medi-
ción 03 del usuario 1).
•
Si pulsa una vez más la tecla de memorización
M, podrá consultar sus respectivos valores me-
didos.
•
Para volver a apagar el aparato, pulse la tecla
de INICIO/PARADA .
Podrá salir del menú cuando lo desee pulsan-
do la tecla de INICIO/PARADA .
Borrar los valores medidos
•
Para borrar la memoria del registro de usuario co-
rrespondiente, deberá seleccionar primero un re-
gistro de usuario.
•
Inicie la consulta de los valores promedio de medi-
ción. En la pantalla parpadea , se muestra el valor
promedio de todas las mediciones guardadas de
este registro de usuario.
•
Mantenga pulsadas simultáneamente la tecla de
memorización M y la tecla de INICIO/PARADA
durante 5 segundos.
30
Todos los valores del registro de
usuario actual se borran y el apara-
to se apaga.
8. Mensajes de error/solución de
problemas
En caso de error, aparece en la pantalla el mensaje de
error
_.
Los mensajes de error pueden aparecer en los siguientes
casos:
• si no se pudo medir la presión sistólica o diastólica (en
la pantalla aparece
o
),
•
si la presión sistólica o diastólica queda fuera del rango
de medición (en la pantalla aparece “
” o “ ”),
• si el brazalete se ha colocado demasiado tenso o de-
masiado flojo (en la pantalla aparece
o
),
• si la presión arterial es superior a 300 mmHg (en la pan
-
talla aparece ),
• si el inflado dura más de 180 segundos (en la pantalla
aparece
),
• si se produce un error en el sistema o en el aparato (en
la pantalla aparece
, , o
),
• si las pilas están prácticamente agotadas
.
En estos casos, repita la medición. Procure no moverse
ni hablar. En caso necesario, vuelva a colocar las pilas o
sustitúyalas.
Alarma técnica – Descripción
Si la presión arterial medida (sistólica o diastólica)
está fuera de los límites indicados en el apartado
“Datos técnicos”, en la pantalla aparecerá la alarma
técnica en forma de la indicación “
” o “ “. En este
caso debería consultar a su médico o comprobar si
ha manejado correctamente el aparato.
Los valores límite para la alarma técnica están ajus
-
tados de fábrica y no pueden modificarse ni desac-
tivarse. En el marco de la norma IEC 60601-1-8, se
concede una prioridad secundaria a estos valores
límite de alarma.
La alarma técnica se apaga automáticamente y no
es necesario reponerla. La señal que se visualiza en
la pantalla desaparece automáticamente tras aprox.
8 segundos.
9. Limpiar y guardar el aparato y el
brazalete
•
Limpie con cuidado el aparato y el brazalete solo
con un paño ligeramente humedecido.
•
No use detergentes ni disolventes.
31

•
En ningún caso se deben sumergir en agua el apa-
rato ni el brazalete, ya que puede penetrar líquido en
ellos y dañarlos.
•
Cuando guarde el aparato y el brazalete, no se de-
ben colocar objetos pesados sobre ellos. Retire las
pilas.
10. Datos técnicos
N.º de modelo BC 21
Método de
medición
Oscilométrico, medición no
invasiva de la presión arterial
en la muñeca
Rango de medición Presión del brazalete
0 – 300 mmHg,
sistólica 60 -260 mmHg,
diastólica 40 -199 mmHg,
pulso 40 –180 pulsaciones por
minuto
Precisión de la
indicación
sistólica ±3mmHg,
diastólica ±3mmHg,
pulso ± 5 % del valor visualizado
Inexactitud de la
medición
La desviación estándar máxima
admisible según ensayo clí-
nico es de:
sistólica 8mmHg,
diastólica 8 mmHg
Memoria 2 x 60 posiciones de memoria
Dimensiones Largo 87 mm x ancho 67 mm x
alto 31 mm
Peso Aprox. 105 g (sin pilas)
Diámetro del
brazalete
De 140 a 195 mm
Condiciones de
funcionamiento
admisibles
+ 10°C a +40 °C, ≤ 85 % de
humedad relativa del aire (sin
condensación)
Condiciones de
almacenamiento
admisibles
-20 °C a +50 °C, ≤ 85 % de
humedad relativa del aire,
800 –1050 hPa de presión
ambiente
Alimentación 2 pilas AAA de 1,5 V
Vida útil de las pilas Para unas 200 mediciones,
según el nivel de la presión
arterial y la presión de inflado
Accesorios Instrucciones de uso, 2 pilas
AAA de 1,5 V, estuche
32

Clasificación Alimentación interna, IP22,
sin AP/APG, funcionamiento
continuo, pieza de aplicación
tipo BF
El número de serie se encuentra en el aparato o en el
compartimento de las pilas.
Reservado el derecho a realizar modificaciones de
los datos técnicos sin previo aviso por razones de
actualización.
•
Este aparato cumple con la norma europea
EN60601-1-2 (conformidad con la norma CISPR
11, IEC 61000-4-2, IEC 61000-4-3, IEC 61000-4-8)
y está sujeto a las medidas especiales de precau-
ción relativas a la compatibilidad electromagnética.
Tenga en cuenta que los dispositivos de comuni-
cación de alta frecuencia portátiles y móviles pue-
den interferir en el funcionamiento de este aparato.
•
Este aparato cumple la directiva europea en lo
referente a productos sanitarios 93/42/CEE, las
leyes relativas a productos sanitarios y las normas
europeas EN1060-1 (Esfigmomanómetros no inva-
sivos, Parte 1: Requisitos generales) y EN1060-3
(Esfigmomanómetros no invasivos, Parte 3: Requi-
sitos suplementarios aplicables a los sistemas
electromecánicos de medición de la presión arte-
rial) e ICE 80601-2-30 (Equipos electromédicos,
Parte 2–30: Requisitos particulares para la seguri-
dad básica y funcionamiento esencial de los esfig-
momanómetros automáticos no invasivos).
•
La precisión de este tensiómetro ha sido com-
probada exhaustivamente y se ha diseñado para
lograr una larga vida útil. Si se utiliza el aparato en
el ejercicio de la medicina, deberán realizarse con-
troles metrológicos con los medios adecuados.
Puede solicitar más información sobre la compro-
bación de la precisión del aparato al servicio de
asistencia técnica en la dirección indicada.
Indicaciones relativas a la compatibilidad electro-
magnética
•
El aparato está diseñado para usarse en todos los
entornos que se especifican en estas instrucciones
de uso, incluido el ámbito doméstico.
•
El aparato solo se puede usar cerca de perturbaci-
ones electromagnéticas de forma restringida y en
determinadas circunstancias. Como consecuencia,
podrían mostrarse mensajes de error o producirse
averías en la pantalla o el dispositivo.
•
Se debe evitar el uso de este aparato junto a otros
aparatos o apilado con otros aparatos, ya que esto
podría provocar un funcionamiento incorrecto.
33

Pero si resulta inevitable hacerlo, deberá vigilar
este y los demás aparatos hasta estar seguro de
que funcionan correctamente.
•
El uso de accesorios que no sean los indicados o
facilitados por el fabricante de este aparato puede
tener como consecuencia mayores interferencias
electromagnéticas o una menor resistencia contra
interferencias electromagnéticas del aparato y pro-
vocar un funcionamiento incorrecto.
•
Si no se tienen en cuenta estas indicaciones,
podrían verse afectadas las características de fun-
cionamiento del aparato.
11. Garantía/asistencia
En caso de reclamaciones en el marco de la garantía
diríjase a su distribuidor local o a la delegación local
(ver lista “Service international”).
Cuando nos envíe el aparato, adjunte una copia del
recibo de compra y una breve descripción del pro-
blema.
Se aplican las siguientes condiciones de garantía:
1. El periodo de garantía para productos de BEURER
es de 5 años o, si es superior, se aplica el periodo
de garantía vigente en el país correspondiente a
Salvo errores y modificaciones
partir de la fecha de compra.
En caso de una reclamación de la garantía, la
fecha de compra deberá demostrarse con el
recibo de compra o una factura.
2. Las reparaciones (todo el aparato o solo algunas
piezas) no hacen que se prolongue el periodo de
garantía.
3. La garantía no tiene validez para daños debidos a
a. Uso indebido, p.ej. si no se siguen las instruc-
ciones de uso.
b. Reparaciones o cambios realizados por el
cliente o por una persona no autorizada.
c. Transporte del fabricante al cliente o durante el
transporte al centro de servicio.
d. La garantía no tiene validez para accesorios
sometidos al desgaste habitual (brazalete, pilas,
etc.).
4.
La responsabilidad por daños derivados directos
o indirectos provocados por el aparato también
queda excluida incluso si se reconoce una recla-
mación de la garantía en caso de daño del aparato.
34

Zawartość opakowania
•
Ciśnieniomierz zmankietem
•
2 baterie AAA 1,5 VLR03
•
Pudełko do przechowywania
•
Instrukcja obsługi
Drodzy Klienci!
Cieszymy się, że zdecydowali się Państwo na zakup
naszego produktu. Firma Beurer oferuje dokładnie
przetestowane, wysokiej jakości podgrzewacze, wagi,
przyrządy do pomiaru ciśnienia tętniczego, tempera-
tury ciała itętna, atakże do pielęgnacji ciała iwłosów,
oraz urządzenia do masażu inawilżania powietrza.
Należy dokładnie przeczytać izachować niniejszą in-
strukcję obsługi, przechowywać ją wmiejscu dostęp-
nym dla innych użytkowników iprzestrzegać podanych
wniej wskazówek.
Zpoważaniem
Zespół Beurer
1. Informacje ourządzeniu
Ciśnieniomierz Beurer BC21 należy sprawdzić przed
użyciem pod kątem obecności zewnętrznych uszko-
dzeń oraz kompletnej zawartości opakowania.
Ciśnieniomierz nadgarstkowy służy do nieinwazyjne-
go pomiaru imonitorowania ciśnienia tętniczego krwi
uosób dorosłych. Umożliwia on łatwy iszybki pomiar
POLSKI
1. Informacje ourządzeniu ............................................35
2. Ważne wskazówki .....................................................36
3. Opis urządzenia .........................................................40
4. Przygotowanie do pomiaru .......................................40
5. Pomiar ciśnienia tętniczego ......................................43
6. Interpretacja wyników ................................................ 44
7. Odczyt iusuwanie wyników pomiaru ........................ 46
8. Komunikaty błędów / usuwanie błędów ...................48
9. Czyszczenie iprzechowywanie urządzenia oraz
mankietu ....................................................................48
10. Dane techniczne ......................................................49
11. Gwarancja/serwis ....................................................50
Spis treści
35
ciśnienia krwi, atakże zapisanie zmierzonych warto-
ści i wyświetlenie ich w formie wykresu. Urządzenie
ostrzega użytkownika w razie wystąpienia zaburzeń
rytmu serca.
Zmierzone wartości są klasyfikowane ioceniane wfor-
mie graficznej.
Ponadto ciśnieniomierz nadgarstkowy
umożliwia obsługę wpięciu różnych językach (angiel-
ski, hiszpański, polski, arabski ifarsi). Instrukcje iwy-
niki pomiarów będą podawane wwybranym języku.
2. Ważne wskazówki
Objaśnienie symboli
Winstrukcji obsługi, na opakowaniu itabliczce zna
-
mionowej urządzenia oraz akcesoriów, znajdują się
następujące symbole:
Uwaga
Wskazówka
Ważne informacje
Należy przestrzegać instrukcji
obsługi
Część aplikacyjna typu BF
Prąd stały
Utylizacja zgodnie zdyrektywą WE
ozużytych urządzeniach elektrycz-
nych ielektronicznych – WEEE
(Waste Electrical and Electronic
Equipment)
21
PAP
Opakowanie zutylizować wsposób
przyjazny dla środowiska
Producent
Storage/Transport
Dopuszczalna temperatura iwilgot-
ność powietrza podczas przechowy-
wania oraz podczas transportu
Operating
Dopuszczalna temperatura iwilgot-
ność powietrza podczas pracy
IP 22
Ochrona urządzenia przed ciałami
obcymi owielkości ≥12,5 mm iprzed
kroplami wody spadającymi ukośnie
36
Numer seryjny
0483
Oznakowanie CE potwierdza zgod
-
ność zzasadniczymi wymogami
dyrektywy 93/42/EWG wsprawie
wyrobów medycznych.
Oznakowanie certyfikacyjne produktów
eksportowanych do Federacji Rosyjskiej
oraz WNP.
Wskazówki dotyczące użytkowania
•
Ciśnienie należy mierzyć zawsze otej samej porze
dnia, aby zmierzone wartości były porównywalne.
•
Przed każdym pomiarem należy odpocząć ok.
5minut!
•
Wprzypadku wykonywania kilku pomiarów ujed-
nej osoby należy zachować 5-minutowe przerwy
między pomiarami.
•
Przez co najmniej 30 minut przed wykonaniem
pomiaru nie należy jeść, pić, palić ani podejmować
wysiłku fizycznego.
•
Pomiar należy powtórzyć, jeśli zmierzona wartość
budzi wątpliwości.
•
Zmierzone wartości mają wyłącznie charakter infor-
macyjny – pomiar ciśnienia nie zastępuje badania
lekarskiego! Wyniki pomiaru ciśnienia należy skon-
sultować zlekarzem. Na podstawie pomiaru wżad-
nym wypadku nie wolno samodzielnie podejmować
decyzji medycznych (np. dotyczących stosowania
leków iich dawkowania)!
•
Nie należy stosować ciśnieniomierza unoworod-
ków ipacjentów ze stanem przedrzucawkowym;
zalecamy konsultację zlekarzem przed użyciem
ciśnieniomierza wczasie ciąży.
•
Choroby układu krążenia mogą powodować błędy
pomiaru lub zaburzać jego dokładność. Dotyczy
to także bardzo niskiego ciśnienia krwi, cukrzycy,
zaburzeń rytmu serca iukrwienia, atakże dreszczy
idrgawek.
•
Wprzypadku problemów zukrwieniem ręki
wwyniku przewlekłych lub ostrych schorzeń naczy-
niowych (m.in. zwężenia naczyń krwionośnych)
dokładność pomiaru ciśnieniomierza nadgarstko-
wego jest ograniczona. Wtakim przypadku należy
stosować ciśnieniomierz naramienny.
•
Urządzenia nie mogą obsługiwać osoby (wtym dzie-
ci) o ograniczonej sprawności fizycznej, ruchowej
oraz umysłowej lub z brakiem doświadczenia i/lub
wiedzy, chyba że (dla bezpieczeństwa) znajdują się
one pod nadzorem odpowiedniej osoby lub otrzyma-
ły instrukcje, wjaki sposób korzysta się zurządzenia.
37

Należy uważać, aby dzieci nie bawiły się urządze-
niem.
•
Ciśnieniomierza nie wolno stosować jednocześ-
nie zurządzeniem chirurgicznym korzystającym
zprądu owysokiej częstotliwości.
•
Urządzenie stosować tylko uosób opodanym
obwodzie nadgarstka.
•
Podczas pompowania mankietu może dojść do
zaburzenia sprawności danej kończyny.
•
Nie wolno zakłócać przepływu krwi przez zbyt długi
pomiar ciśnienia. Wprzypadku błędnego działania
urządzenia należy zdjąć mankiet zramienia.
•
Unikać dłuższego utrzymywania ciśnienia wman-
kiecie oraz częstych pomiarów. Wynikające ztego
zaburzenie przepływu krwi może spowodować
uszczerbek na zdrowiu.
•
Mankietu nie należy zakładać na ramię, wktórym
leczone są tętnice iżyły, np. gdy stosowana jest
angioplastyka / terapia naczyń krwionośnych, lub
gdy występuje przetoka tętniczo-żylna.
•
Nie zakładać mankietu osobom po amputacji
piersi.
•
Nie zakładać mankietu na rany, ponieważ może
dojść do dalszych obrażeń.
•
Zakładać mankiet wyłącznie na nadgarstek. Nie
zak ładać mankietu winnych miejscach ciała.
•
Ciśnieniomierz może być zasilany wyłącznie bater-
iami.
•
Jeśli przez minutę nie zostanie naciśnięty żaden
przycisk, nastąpi automatyczne wyłączenie ciśnie-
niomierza wcelu oszczędzania baterii.
•
Urządzenie jest przeznaczone wyłącznie do użycia
wcelu określonym wniniejszej instrukcji obsługi.
Producent nie ponosi odpowiedzialności za szkody
wynikające zniewłaściwego użytkowania urządze-
nia.
Wskazówki dotyczące przechowywania
ikonserwacji
•
Ciśnieniomierz składa się zprecyzyjnych podzes-
połów elektronicznych. Zurządzeniem należy
obchodzić się ostrożnie, gdyż ma to wpływ na
dokładność pomiarów itrwałość urządzenia:
– Urządzenie należy chronić przed wstrząsami, wil-
gocią, zanieczyszczeniem, dużymi wahaniami
temperatury ibezpośrednim nasłonecznieniem.
– Nie dopuszczać do upadku urządzenia.
– Nie należy używać ciśnieniomierza wpobliżu sil-
nych pól elektromagnetycznych, atakże nadajni-
ków radiowych itelefonów komórkowych.
•
Jeśli urządzenie nie będzie używane przez dłuższy
czas, należy wyjąć baterie.
38
Wskazówki dotyczące postępowania
zbateriami
•
Jeśli dojdzie do kontaktu elektrolitu ze skórą lub ocza-
mi, należy przemyć je wodą iskontaktować się zleka-
rzem.
•
Niebezpieczeństwo połknięcia! Małe dzieci
mogą połknąć baterie isię nimi udusić. Dlatego baterie
należy przechowywać wmiejscach niedostępnych dla
dzieci!
•
Należy zwrócić uwagę na znaki polaryzacji plus (+) imi-
nus (–).
•
Jeśli zbaterii wyciekł elektrolit, należy założyć rękawice
ochronne iwyczyścić komorę baterii suchą szmatką.
•
Baterie należy chronić przed zbyt wysoką temperaturą.
•
Niebezpieczeństwo wybuchu!
Nie wrzucać ba-
terii do ognia.
•
Nie wolno ładować ani zwierać baterii.
•
Należy używać tylko tego samego lub równoważnego
typu baterii.
•
Zawsze należy wymieniać jednocześnie wszystkie ba-
terie.
•
Nie należy używać akumulatorków!
•
Baterii nie wolno rozmontowywać, otwierać ani roz-
drabniać.
Wskazówki dotyczące naprawy iutylizacji
•
Baterii nie wolno wyrzucać do zwykłego pojemnika
na śmieci. Wyczerpane baterie należy oddawać do
punktu zbiórki zużytych baterii.
•
Nie otwierać urządzenia. Nieprzestrzeganie powyż-
szych zasad powoduje utratę gwarancji.
•
Nie naprawiać ani nie regulować samodzielnie
urządzenia. Wprzeciwnym razie nie można zagwa-
rantować prawidłowego działania.
•
Naprawy mogą być wykonywane tylko przez ser-
wis producenta lub autoryzowanego dystrybutora.
Przed złożeniem reklamacji należy zawsze spraw-
dzić baterie iwrazie potrzeby je wymienić.
•
Aby chronić środowisko naturalne, należy prze-
strzegać następujących zasad:
Niewyrzucać wyeksploatowanego urządze-
nia do kosza na śmieci. Urządzenie należy
oddać do utylizacji w odpowiednim punk-
cie zbiórki. Urządzenie należy zutylizować
zgodnie zdyrektywą WE ozużytych urządzeniach
elektrycznych i elektronicznych – WEEE (Waste
Electrical and Electronic Equipment). Wprzypadku
pytań należy zwrócić się do odpowiedniej instytucji
odpowiedzialnej za utylizację.
39
3. Opis urządzenia
1. Przycisk pamięci M
2. Przycisk Start/Stop
3. Mankiet nadgarstkowy
4. Wyświetlacz
5. Pokrywa komory baterii
6. Wskaźnik ryzyka
Wskazania na wyświetlaczu:
1. Godzina idata
2. Ciśnienie skurczowe
3. Ciśnienie rozkurczowe
4. Zmierzone tętno
5. Symbol tętna
Symbol zaburzeń rytmu
serca
6. Pompowanie, wypuszczanie powietrza ( )
7. Pamięć użytkownika /
8. Wskaźnik ryzyka
9. Numer pozycji wpamięci / wskaźnik pamięci
wartości średniej ( ), rano ( ), wieczorem ( )
10. Głos / dźwięki
11. Symbol wymiany baterii
4. Przygotowanie do pomiaru
Wkładanie baterii
•
Zdejmij pokrywę baterii znajdującą się po lewej stro-
nie urządzenia. Aby było łatwiej zdjąć pokrywę, lekko
ją naciśnij wcelu zwolnienia blokady. Następnie zdej-
mij pokrywę.
•
Włóż dwie baterie typu 1,5 VAAA (alkaliczne, typ
LR03).
Pamiętaj ozachowaniu prawidłowej biegunowości,
zgodnie zoznakowaniem. Nie używaj akumulatorków
do wielokrotnego ładowania.
•
Ostrożnie zamknij pokrywę komory baterii.
Po wyświetleniu symbolu wymiany baterii nie
będzie już można zmierzyć ciśnienia. Należy wymie-
nić wszystkie baterie. Po wyjęciu baterii zurządzenia
konieczne jest ponowne ustawienie daty igodziny.
Zapisane wyniki pomiarów nie zostaną utracone.
4
5
2
6
1
3
6
5
40
Utylizacja baterii
• Zużyte, całkowicie rozładowane baterie należy wyrzu-
cać do oznakowanych specjalnie pojemników zbior-
czych, przekazywać do punktów zbiórki odpadów
specjalnych lub do sklepu ze sprzętem elektrycznym.
Użytkownik jest zobowiązany do utylizacji baterii zgod-
nie zprzepisami.
• Na bateriach zawierających szkodliwe
związki znajdują się następujące
oznaczenia:
Pb = bateria zawiera ołów.
Cd = bateria zawiera kadm.
Hg = bateria zawiera rtęć.
Ustawienie formatu godziny, daty, godziny ijęzyka
Poniżej opisano możliwe funkcje iustawienia ciśnie-
niomierza.
Format godziny
➔
Data
➔
Godzina
➔
Język
Należy koniecznie ustawić datę igodzinę. Tylko wten
sposób można poprawnie zapisać iodczytać wartości
pomiaru wraz zdatą igodziną.
Ponadto urządzenie umożliwia obsługę wpięciu róż-
nych językach (angielski, hiszpański, polski, arabski
ifarsi). Wmomencie dostawy wurządzeniu ustawiony
jest język angielski.
Aby szybciej wybierać wartości podczas konfigu-
rowania za pomocą przycisku pamięci M, można
również przytrzymać przycisk pamięci M.
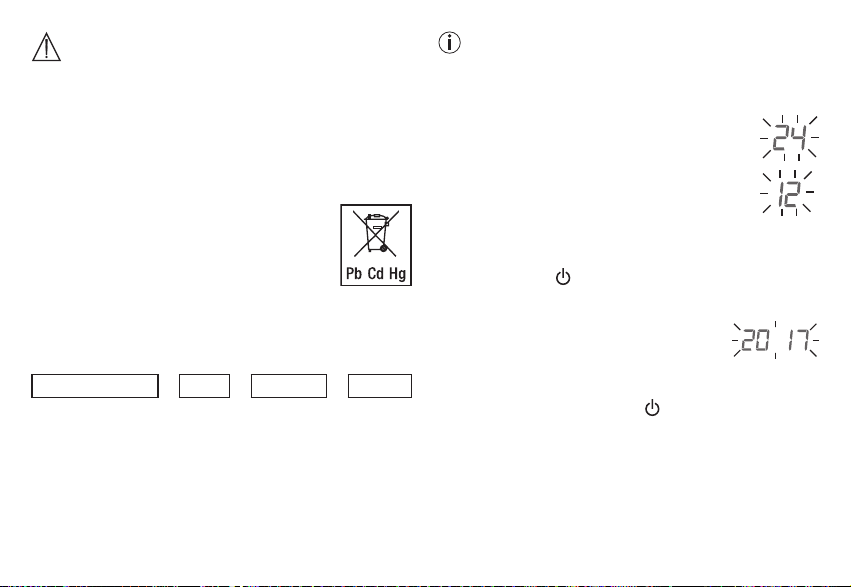
Format godziny
•
Naciśnij i przytrzymaj przycisk pamięci
M przez 5 sekund lub włóż baterie. Na
krótką chwilę pojawią się wszystkie ele-
menty wyświetlacza. Na wyświetlaczu
pulsuje format godzinowy.
•
Przyciskiem pamięci M ustaw odpowiedni for-
mat godziny, a następnie potwierdź przyciskiem
START/STOP .
Data
Na wyświetlaczu zacznie migać wska
-
zanie roku.
•
Przyciskiem pamięci M ustaw od-
powiedni rok, anastępnie potwierdź
przyciskiem START/STOP .
41
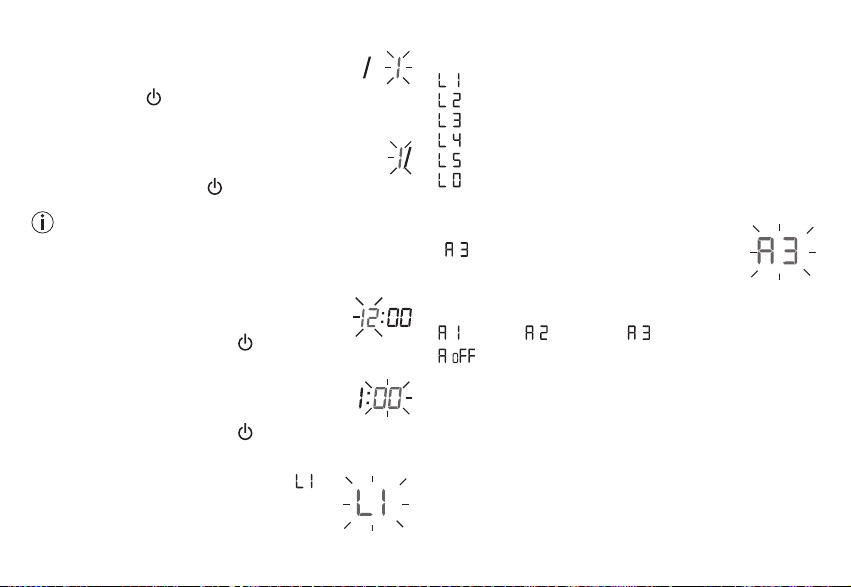
Na wyświetlaczu zacznie migać wskazanie miesiąca.
•
Przyciskiem pamięci
M
ustaw odpowiedni
miesiąc, anastępnie potwierdź przyciskiem
START/STOP .
Na wyświetlaczu zacznie migać wskazanie dnia.
•
Za pomocą przycisku pamięci Mustaw od-
powiedni dzień, anastępnie potwierdź przy-
ciskiem START/STOP .
Jeśli jako format godziny ustawiono 12 h, nastąpi
zmiana kolejności wyświetlania dnia imiesiąca.
Godzina
Na wyświetlaczu zacznie migać wskazanie godziny.
•
Przyciskiem pamięci M ustaw odpo-
wiednią godzinę, anastępnie potwierdź
przyciskiem START/STOP .
Na wyświetlaczu zacznie migać wskazanie minut.
•
Przyciskiem pamięci M ustaw odpo-
wiednią minutę, a następnie potwierdź
przyciskiem START/STOP .
Język
Na wyświetlaczu pojawi się symbol „
”
dla języka angielskiego. Aby wybrać inny
język, naciśnij i przytrzymaj przycisk
pamięci M przez 3 sekundy, aż poja-
wi się żądany język. Zatwierdź wartość za pomocą
przycisku pamięci M.
= angielski
= hiszpański
= polski
= arabski
= farsi
= bez głosu, tylko sygnał dźwiękowy
Głośność głosu
Na wyświetlaczu pojawi się symbol
„
” (głośno). Aby wybrać głośność gło-
su, naciśnij iprzytrzymaj przycisk pamięci
Mprzez 3 sekundy. Zatwierdź wartość za
pomocą przycisku pamięci M.
= cicho, = średnio, = głośno
= głos wyłączony.
Po ustawieniu wszystkich danych urządzenie wyłączy
się automatycznie.
42
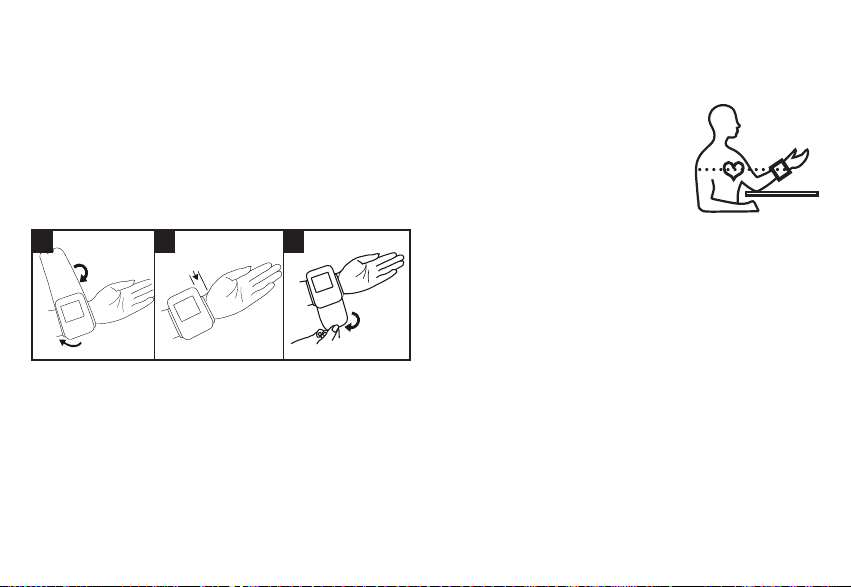
5. Pomiar ciśnienia tętniczego
Zakładanie mankietu
Ciśnienie krwi może się różnić wzależności od tego,
czy pomiar jest wykonywany na prawym, czy lewym
ramieniu. Dokonuj pomiarów zawsze na tym samym
ramieniu. Jeśli wartości znacznie odbiegają od sie
-
bie na obu ramionach, ustal zlekarzem, na którym
ramieniu przeprowadzać pomiar. Zasadniczo zale-
camy wykonanie pomiaru na lewym nadgarstku.
1 2 3
1 cm
•
Odkryj lewy nadgarstek. Zwróć uwagę, czy
przepływ krwi wręce nie jest ograniczony przez
zbyt ciasną odzież itp.
Przyłóż mankiet po wewnętrznej stronie
nadgarstka.
•
Zapnij mankiet za pomocą zapięcia na rzep, tak
aby górna krawędź ciśnieniomierza znajdowała się
wodległości ok. 1 cm od dłoni.
•
Mankiet musi ściśle przylegać do nadgarstka, lecz
nie powinien być zapięty zbyt mocno.
Przyjmowanie prawidłowej pozycji ciała
•
Przed każdym pomiarem należy
odpocząć ok. 5 minut! Wprze-
ciwnym razie pomiar może być
niedokładny.
•
Ciśnienie można mierzyć wpozy-
cji siedzącej lub leżącej. Usiądź
wygodnie do pomiaru ciśnienia. Oprzyj plecy iręce.
Nie zakładaj nogi na nogę. Oprzyj stopy płasko na
podłodze. Ramię powinno być koniecznie podparte
iugięte. Zwróć uwagę na to, aby urządzenie podczas
pomiaru znajdowało się na wysokości serca. Wprze-
ciwnym razie mogą wystąpić duże niedokładności
pomiaru. Ramię idłoń powinny być rozluźnione.
•
Podczas pomiaru nie należy się ruszać ani rozma-
wiać, aby nie doszło do zaburzenia wyniku.
43
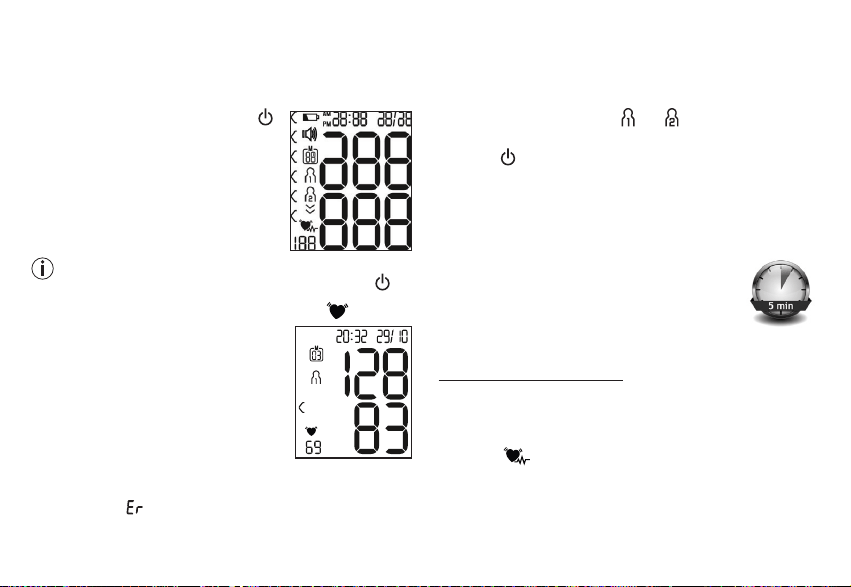
P
omiar ciśnienia krwi
Załóż mankiet zgodnie zpowyższym opisem iprzyjmij
pozycję, wktórej ma być dokonany pomiar.
•
Aby włączyć ciśnieniomierz, na-
ciśnij przycisk START/STOP .
Na wyświetlaczu pojawią się na
chwilę wszystkie symbole.
• Wyświetlą się wyniki ostatnie-
go pomiaru, a po 3 sekundach
ciśnieniomierz automatycznie
rozpocznie pomiar.
Pomiar można wkażdej chwili
przerwać, naciskając przycisk START/STOP .
Po rozpoznaniu tętna pojawia się symbol tętna.
•
Wyświetlane są wyniki pomiaru
ciśnienia skurczowego, rozkur-
czowego itętna.
•
Jeśli pomiar był wykonany nieprawidłowo, pojawi
się symbol
_
. Przeczytać rozdział „Komunikaty
błędów / usuwanie błędów” wniniejszej instrukcji
obsługi, anastępnie powtórzyć pomiar.
•
Naciskając przycisk pamięci M, wybierz żądaną
pamięć użytkownika. Jeżeli nie zostanie wybrana
żadna pamięć, wynik pomiaru zostanie zapisany
wostatnio użytej pamięci. Na wyświetlaczu pojawi
się odpowiedni symbol lub .
•
Wyłącz urządzenie za pomocą przycisku START/
STOP . Spowoduje to zapisanie wyniku pomiaru
wwybranej pamięci.
Jeżeli zapomnisz wyłączyć urządzenie, wyłączy się
ono automatycznie po upływie około 1minuty.
Również wtakim przypadku wynik pomiaru zostanie
zapisany wwybranej lub ostatnio
używanej pamięci użytkownika.
Przed rozpoczęciem kolejnego pomiaru
odczekaj co najmniej 5 minut!
6. Interpretacja wyników
Zaburzenia rytmu serca:
Podczas pomiaru urządzenie może rozpoznać ewen
-
tualne zaburzenia rytmu serca. Użytkownik jest infor-
mowany otym po zakończeniu pomiaru za pomocą
symbolu .
Może to być objaw arytmii serca. Arytmia to cho-
roba polegająca na zaburzeniach rytmu serca wsku-
tek nieprawidłowości wukładzie bioelektrycznym
sterującym biciem serca. Objawami tej choroby są
44

przedwczesne uderzenia serca lub ich opuszczanie,
atakże zbyt wolne lub zbyt szybkie tętno. Przyczyny
to m.in. choroby serca, podeszły wiek, predyspozy-
cje wynikające zbudowy ciała, nadmierne spożycie
używek, stres lub zbyt mała ilość snu. Arytmię może
stwierdzić tylko lekarz po przeprowadzeniu odpo-
wiedniego badania.
Jeśli po zakończeniu pomiaru na wyświetlaczu
pojawi się symbol , pomiar należy powtórzyć.
Przed rozpoczęciem pomiaru należy odpocząć co
najmniej 5 minut, apodczas pomiaru nie rozmawiać
inie ruszać się. Wprzypadku częstego pojawiania
się symbolu skontaktuj się zlekarzem. Samo-
dzielne diagnozowanie ileczenie woparciu ozmie-
rzone wartości może być niebezpieczne dla zdrowia.
Należy koniecznie przestrzegać zaleceń lekarskich.
Wskaźnik ryzyka:
Wyniki pomiarów można klasyfikować ioceniać zgod
-
nie zponiższą tabelą.
Podane wartości standardowe służą jedynie jako ogól-
ne wytyczne, ponieważ indywidualne wartości ciśnie-
nia uróżnych osób iw różnych grupach wiekowych
różnią się od siebie.
Ważne jest więc regularne korzystanie z konsultacji
lekarskich. Podczas konsultacji lekarz określi nor-
malne wartości ciśnienia oraz wartości, które należy
uznać za niebezpieczne.
Wykres słupkowy na wyświetlaczu i skala na urzą-
dzeniu informują o tym, w jakim zakresie mieści się
zmierzone ciśnienie. Jeśli wartość ciśnienia skurczo-
wego irozkurczowego znajdzie się wdwóch różnych
zakresach (np. ciśnienie skurczowe wzakresie „Nor-
malne podwyższone”, aciśnienie rozkurczowe wza-
kresie „Normalne”), wyświetlany jest zawsze wyższy
zakres– wopisywanym przykładzie będzie to ciśnienie
„Normalne podwyższone”.
45
Zakres wartości
ciśnienia
Ciśnienie
skurczo-
we
(wmmHg)
Ciśnienie
rozkurczo
-
we
(wmmHg)
Rozwiązanie
Poziom 3:
wysokie
nadciśnienie
≥ 180 ≥ 110
Udaj się do
lekarza
Poziom 2:
umiarkowane
nadciśnienie
160 – 179 100 – 109
Udaj się do
lekarza
Poziom 1:
lekkie
nadciśnienie
140 – 159 90 – 99
Regularna kon
-
trola lekarska
Normalne
podwyższone
130 – 139 85 – 89
Regularna kon
-
trola lekarska
Normalne 120 – 129 80 – 84
Samodzielna
kontrola
Optymalne <120 <80
Samodzielna
kontrola
Źródło: WHO, 1999 (World Health Organization)
7. Odczyt iusuwanie wyników pomiaru
Pamięć użytkownika
Wyniki każdego udanego pomiaru są zapisywane
łącznie z datą i godziną pomiaru. Jeśli liczba
wyników przekroczy 60, najstarsze dane
pomiarowe są zastępowane nowymi.
•
Aby wyświetlić wyniki pomiarów, należy
nacisnąć przycisk pamięci M.
Na wyświetlaczu będzie migać
symbol
.
Wyświetlana jest średnia wartość
wszystkich pomiarów zapisanych
wpamięci tego użytkownika.
Aby zmienić użytkownika, należy przytrzymać
przycisk pamięci Mprzez ok. 3 sekundy.
46
Średnie wyniki pomiarów
•
Naciśnij przycisk pamięci M.
Na wyświetlaczu będzie migać
symbol
.
Zostanie wyświetlona średnia
wartość porannych pomiarów
z ostatnich 7 dni (rano: godz.
5:00–9:00).
•
Naciśnij przycisk pamięci M.
Na wyświetlaczu będzie migać
symbol
.
Zostanie wyświetlona średnia
wartość wieczornych pomiarów
z ostatnich 7 dni (wieczór: godz.
18:00–20:00).
Pojedyncze wyniki pomiaru
•
Jeśli ponownie naciśniesz
przycisk pamięci M, na wy-
świetlaczu pojawi się ostatni
pojedynczy pomiar (wprzykła-
dzie pomiar03 użytkownika 1).
•
Jeśli ponownie naciśniesz przycisk pamięci
M, możesz zobaczyć poszczególne zmierzone
wartości.
•
Aby ponownie wyłączyć urządzenie, naciśnij
przycisk START/STOP .
Możesz w każdej chwili opuścić menu,
naciskając przycisk START/STOP .
Kasowanie wyników pomiaru
•
Aby skasować wybraną pamięć użytkownika, nale-
ży ją najpierw wybrać.
•
Rozpocznij wyświetlanie wartości średnich. Na
wyświetlaczu miga , wyświetla się średnia wartość
wszystkich pomiarów zapisanych wpamięci tego
użytkownika.
•
Wciśnij jednocześnie przycisk pamięci
Mi START/STOP i przytrzymaj przez 5se-
kund.
47
Wszystkie wartości aktualnej
pamięci użytkownika zostaną wy-
kasowane, a urządzenie wyłączy
się.
8. Komunikaty błędów / usuwanie błędów
Wprzypadku wystąpienia błędów na wyświetlaczu poja-
wia się komunikat _.
Komunikaty obłędzie mogą pojawić się, jeśli:
• niemożliwy jest pomiar ciśnienia skurczowego lub roz
-
kurczowego (
na wyświetlaczu pojawia się symbol
lub
);
•
ciśnienie skurczowe lub rozkurczowe nie mieści się
wzakresie pomiaru (na wyświetlaczu pojawia się sym
-
bol „ ” lub „ ”);
• mankiet został zaciśnięty zbyt słabo lub zbyt mocno
(
na wyświetlaczu pojawia się symbol lub
);
• ciśnienie krwi jest wyższe niż 300 mmHg (na wyświetla
-
czu pojawia się symbol );
• pompowanie trwa dłużej niż 180 sekund (na wyświetla
-
czu pojawi się symbol );
• wystąpił błąd systemu lub urządzenia (na wyświetlaczu
pojawia się symbol
, , lub
);
• baterie są prawie wyczerpane
.
Wtakich przypadkach pomiar należy powtórzyć. Należy
pamiętać otym, aby podczas pomiaru nie ruszać się
inie rozmawiać. Wrazie potrzeby włóż ponownie bate-
rie lub wymień je.
Alarm techniczny – opis
Jeśli zmierzone ciśnienie (skurczowe lub rozkur
-
czowe) przekroczy granice określone wczęści „Dane
techniczne”, na wyświetlaczu pojawi się alarm tech
-
niczny wpostaci oznaczenia „ ” lub „ ”. Wtaki
przypadku należy skontaktować się zlekarzem lub
sprawdzić, czy urządzenie działa prawidłowo.
Wartości graniczne zostały ustawione fabrycznie inie
da się ich zmienić ani wyłączyć. Wartości te zostały
ustalone woparciu onormę IEC 60601-1-8.
Alarm techniczny nie jest wyświetlany wsposób
nieprzerwany inie trzeba go resetować. Symbol
wyświetlany na wyświetlaczu znika automatycznie po
8 sekundach.
9. Czyszczenie iprzechowywanie
urządzenia oraz mankietu
•
Urządzenie imankiet należy czyścić ostrożnie, wy-
łącznie za pomocą lekko zwilżonej szmatki.
•
Nie używać środków czystości irozpuszczalników.
•
Wżadnym wypadku nie wolno zanurzać urządzenia
i mankietu w wodzie, gdyż może to spowodować
48

przedostanie się wody do wnętrza i uszkodzenie
urządzenia imankietu.
•
Na urządzeniu imankiecie nie wolno stawiać cięż-
kich przedmiotów. Należy wyjąć baterie.
10. Dane techniczne
Nr modelu BC 21
Metoda pomiaru Oscylometryczny, nieinwazyjny
pomiar ciśnienia na nadgarstku
Zakres pomiaru Ciśnienie wmankiecie
0–300 mmHg,
ciśnienie skurczowe
60–260 mmHg,
ciśnienie rozkurczowe
40–199 mmHg,
tętno 40–180 uderzeń/min
Dokładność wska
-
zania
ciśnienie skurczowe ±3mmHg,
ciśnienie rozkurczowe ±3mmHg,
tętno ±5% wyświetlanej war-
tości
Odchylenia pomiaru maks. dopuszczalne odchy-
lenie standardowe zgodnie
zkontrolą kliniczną:
ciśnienie skurczowe 8mmHg /
rozkurczowe 8mmHg
Pamięć 2 × 60 pomiarów
Wymiary dł. 87 mm × szer. 67 mm ×
wys. 31 mm
Waga Około 105 g(bez baterii)
Wielkość mankietu od 140 do 195 mm
Dop. warunki eks
-
ploatacji
od + 10°Cdo +40°C, ≤ 85%
względnej wilgotności powie-
trza (bez kondensacji)
Dop. warunki prze
-
chowywania
od -20°Cdo +50°C, ≤ 85 %
względnej wilgotności powie-
trza, ciśnienie atmosferyczne
800–1050 hPa
Źródło zasilania 2 baterie 1,5V
AAA
Żywotność baterii Ok. 200 pomiarów, wzależ
-
ności od wysokości ciśnienia
tętniczego lub ciśnienia pom-
powania
Akcesoria Instrukcja obsługi, 2 baterie
1,5VAAA, pudełko do prze
-
chowywania
Klasyfikacja Zasilanie wewnętrzne, IP22, nie
jest to urządzenie kategorii AP
ani APG, praca ciągła, część
aplikacyjna typu BF
49

Numer seryjny znajduje się na urządzeniu lub
wkomorze baterii.
Producent zastrzega sobie prawo do zmiany danych
technicznych zpowodu aktualizacji bez konieczności
powiadamiania.
•
Urządzenie spełnia wymogi europejskiej normy
EN60601-1-2 (zgodność z CISPR 11, IEC 61000-
4-2, IEC 61000-4-3, IEC 61000-4-8) iwymaga
zachowania szczególnych środków ostrożności
dotyczących kompatybilności elektromagnetycz-
nej. Należy pamiętać, że przenośne urządzenia
komunikacyjne pracujące na wysokich częstotliwo-
ściach mogą zakłócać działanie urządzenia.
•
Urządzenie spełnia wymogi dyrektywy EU 93/42/
EWG dotyczącej wyrobów medycznych, ustawy
owyrobach medycznych oraz norm EN1060-1
(Nieinwazyjne sfigmomanometry – Część 1: Wyma-
gania ogólne), EN1060-3 (Nieinwazyjne sfigmo-
manometry – Część 3: Wymagania dodatkowe
dotyczące elektromechanicznych systemów do
pomiaru ciśnienia krwi) oraz IEC80601-2-30
(Medyczne urządzenia elektryczne, Część2–30:
Wymagania szczegółowe dotyczące bezpieczeń-
stwa podstawowego oraz funkcjonowania zasadni-
czego automatycznych nieinwazyjnych sfigmoma-
nometrów).
•
Dokładność niniejszego ciśnieniomierza została
starannie sprawdzona idostosowana do długiego
okresu użytkowania. Wprzypadku korzystania
zurządzenia wpraktyce lekarskiej należy przepro-
wadzać kontrole pomiarowe za pomocą odpowied-
nich środków. Dokładne dane dotyczące spraw-
dzania dokładności można uzyskać, kontaktując
się zserwisem.
Wskazówki dot. kompatybilności elektromagne-
tycznej
•
Urządzenie jest przeznaczone do użytkowania w
każdym otoczeniu wymienionym w niniejszej inst-
rukcji obsługi, włącznie z domem.
•
Przy zakłóceniach elektromagnetycznych w pew-
nych warunkach urządzenie może być użytkowane
tylko w ograniczonym zakresie. Wskutek tego
mogą wystąpić np. komunikaty o błędach lub awa-
ria wyświetlacza/urządzenia.
•
Należy unikać stosowania tego urządzenia
bezpośrednio obok innych urządzeń lub wraz z
innymi urządzeniami w skumulowanej formie,
ponieważ mogłoby to skutkować nieprawidłowym
działaniem. Jeśli stosowanie w wyżej opisany
50

sposób jest konieczne, należy obserwować
niniejsze urządzenie i inne urządzenia w celu upew-
nienia się, że działają prawidłowo.
•
Stosowanie innych akcesoriów niż te określone lub
udostępnione przez producenta urządzenia może
prowadzić do zwiększenia zakłóceń elektromagne-
tycznych lub do zmniejszenia odporności elektro-
magnetycznej urządzenia oraz do nieprawidłowego
działania.
•
Nieprzestrzeganie tej instrukcji może prowadzić do
ograniczenia wydajności urządzenia.
11. Gwarancja/serwis
Wprzypadku roszczeń ztytułu gwarancji należy
zwrócić się do miejscowego dystrybutora lub
partnera (patrz lista „Service international”).
Przy odsyłce urządzenia należy załączyć kopię
dowodu zakupu ikrótki opis usterki.
Obowiązują następujące warunki gwarancji:
1. Okres gwarancji na produkty firmy BEURER
wynosi 5 lat lub, jeśli jest dłuższy, obowiązuje
wdanym kraju od daty zakupu.
Wprzypadku roszczeń ztytułu gwarancji
Zastrzega się prawo do pomyłek i zmian
konieczne jest potwierdzenie daty zakupu przez
okazanie dowodu zakupu lub faktury.
2. Naprawy (całego urządzenia lub jego części) nie
przedłużają okresu gwarancyjnego.
3. Gwarancja nie obowiązuje wprzypadku uszkodzeń
powstałych wnastępujących okolicznościach:
a. Zpowodu niewłaściwego użytkowania, np.
nieprzestrzegania instrukcji obsługi.
b. Wwyniku napraw lub modyfikacji wykonanych
przez klienta lub osoby nieupoważnione.
c. Podczas transportu od producenta do klienta
lub podczas transportu do Servicecenter.
d. Ponadto nie obejmuje akcesoriów
dostarczonych zurządzeniem, które ulegają
regularnemu zużyciu.
4. Odpowiedzialność za szkody bezpośrednio lub
pośrednio spowodowane przez urządzenie jest
wykluczona także wtedy, gdy wprzypadku jego
uszkodzenia uznane zostanie roszczenie ztytułu
gwarancji.
51
52
21
PAP
Storage/Transport
Operating
53
54
55
4
5
2
6
1
3
6
5
56
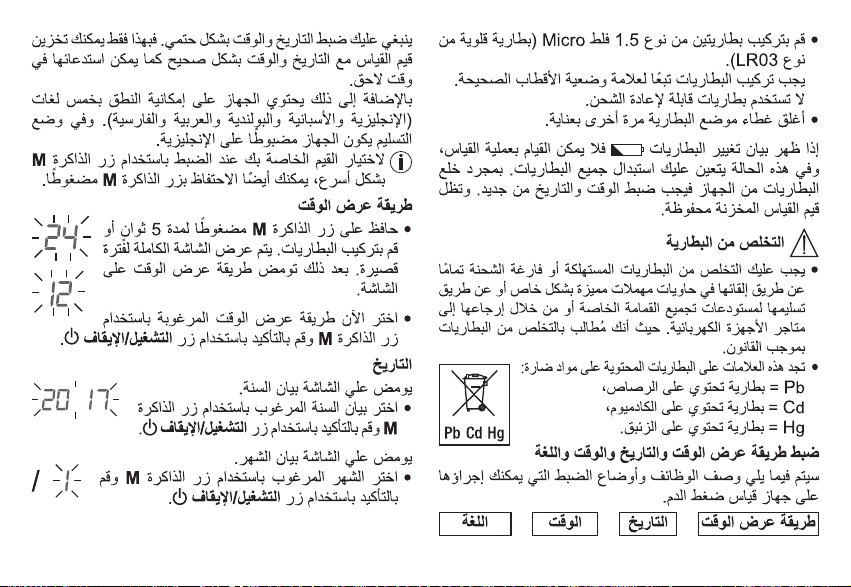
➔ ➔ ➔
57
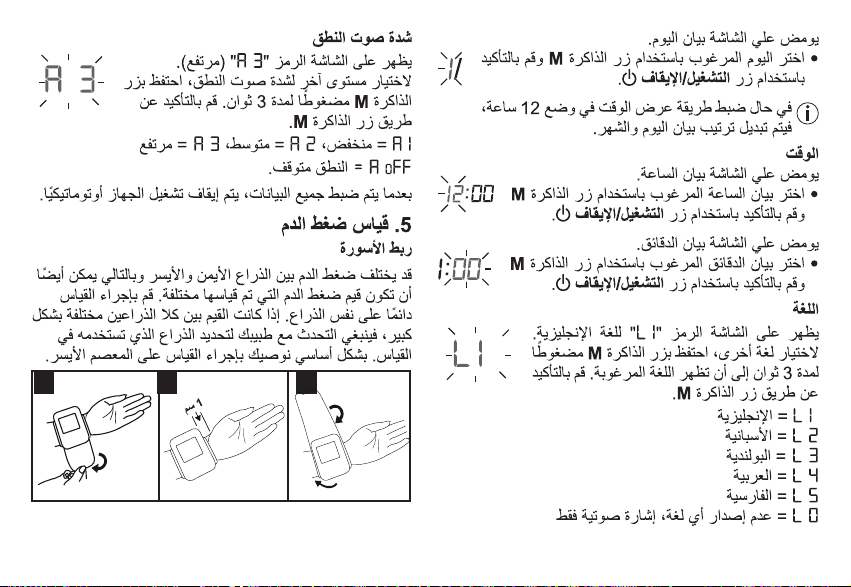
123
1 cm
58
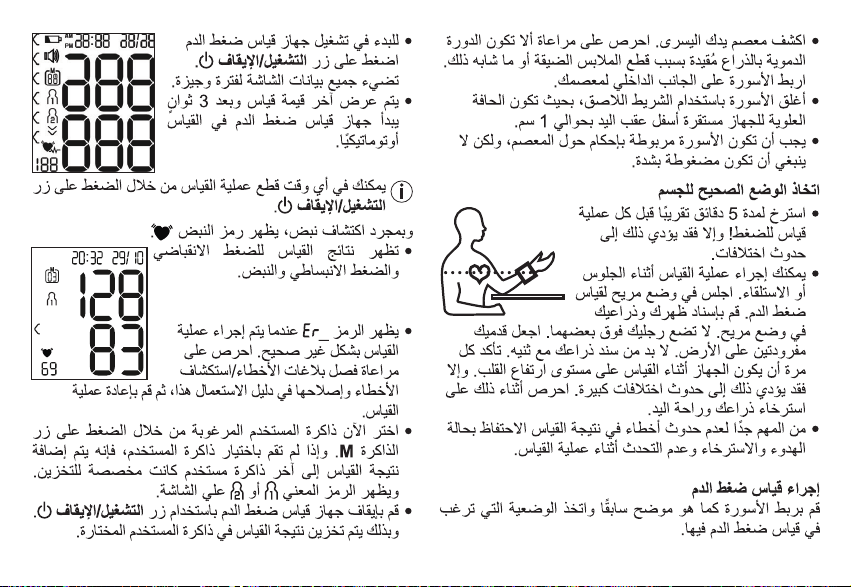
59

60
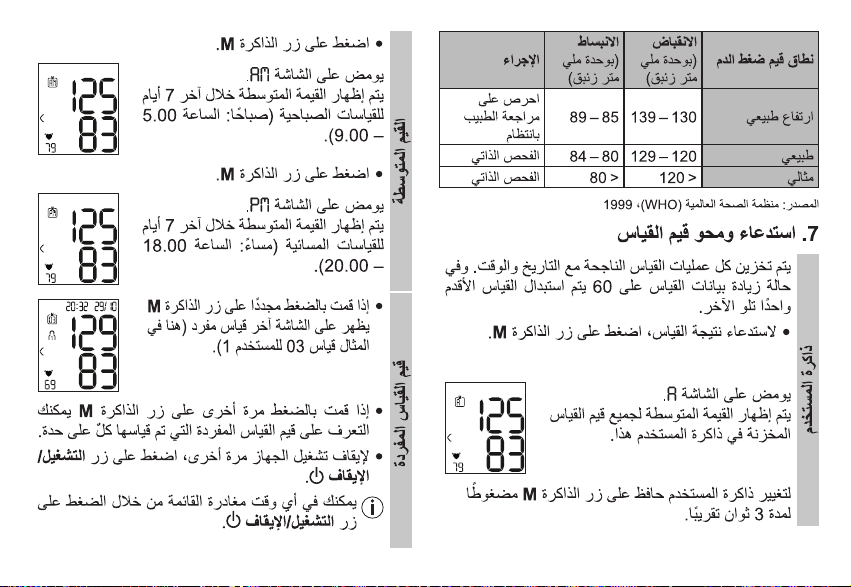
61
62
63
64
65

21
PAP
Storage/Transport
Operating
66
67
68
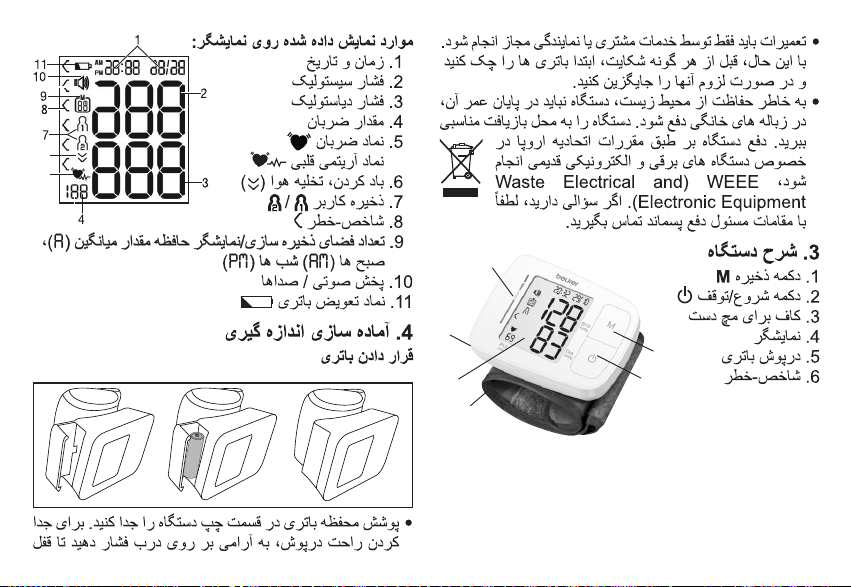
4
5
2
6
1
3
6
5
69
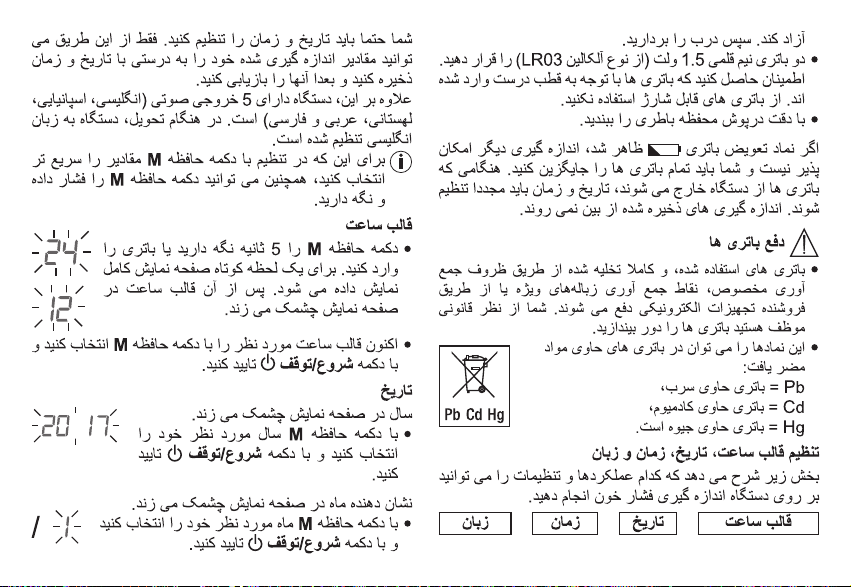
➔ ➔ ➔
70
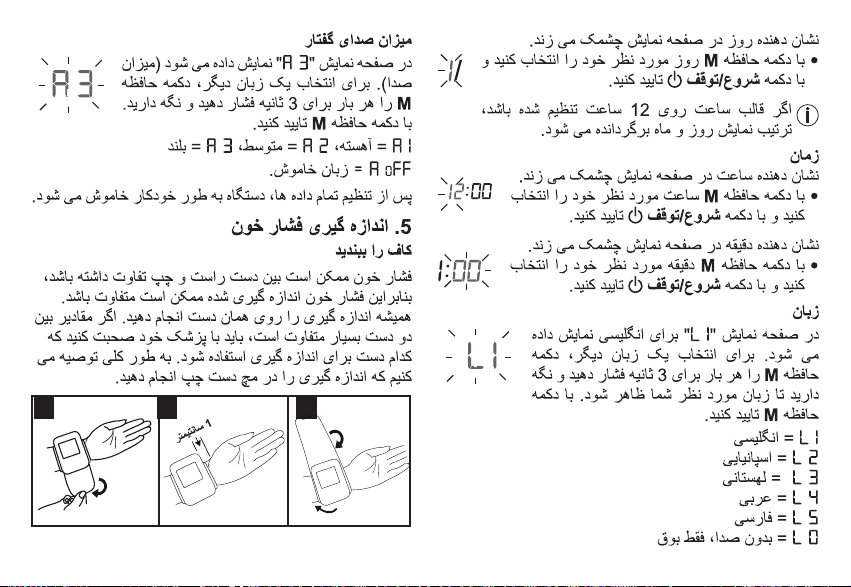
123
1 cm
71
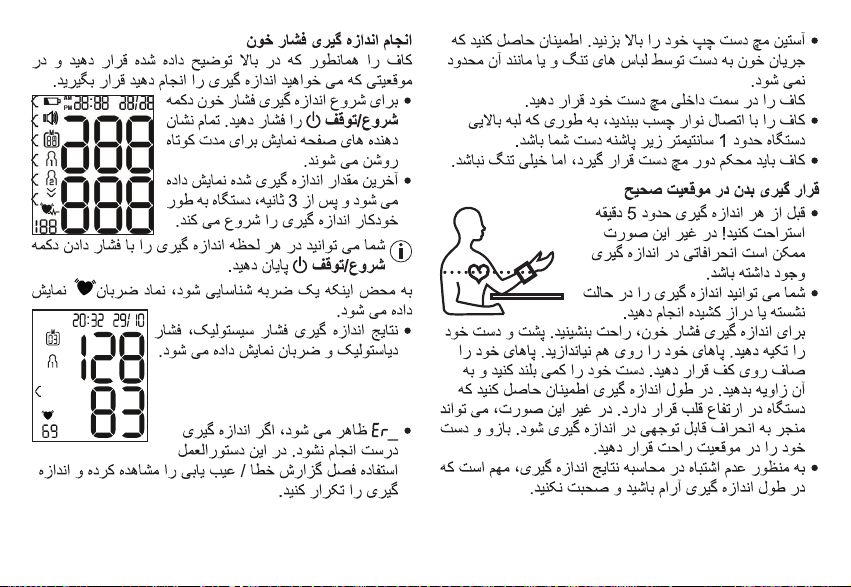
72
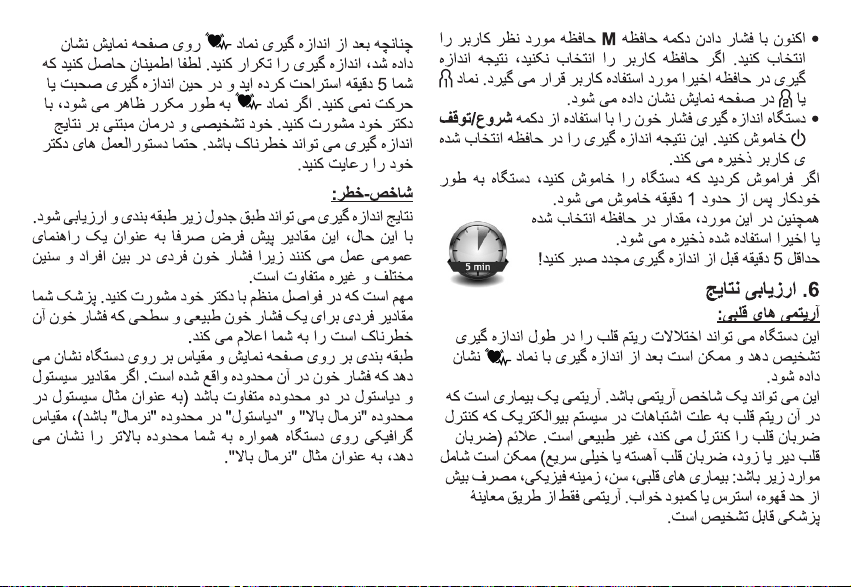
73
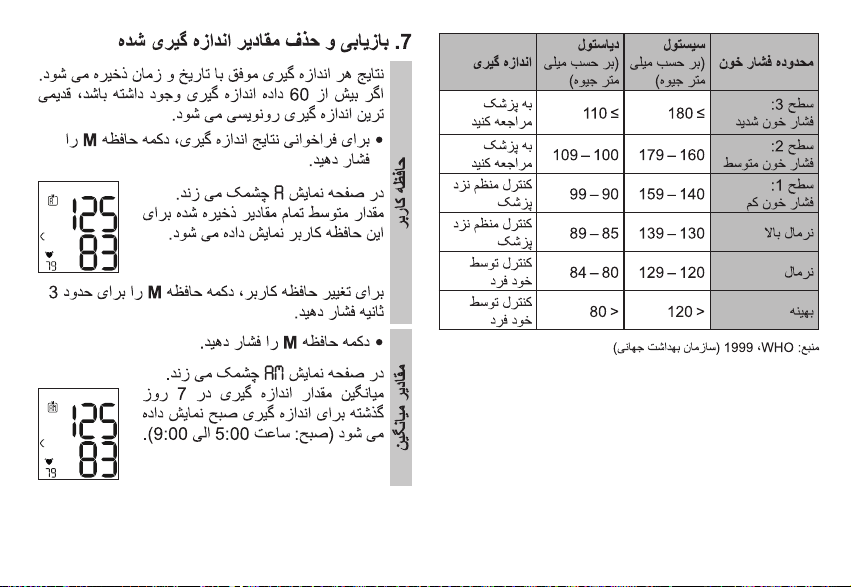
74
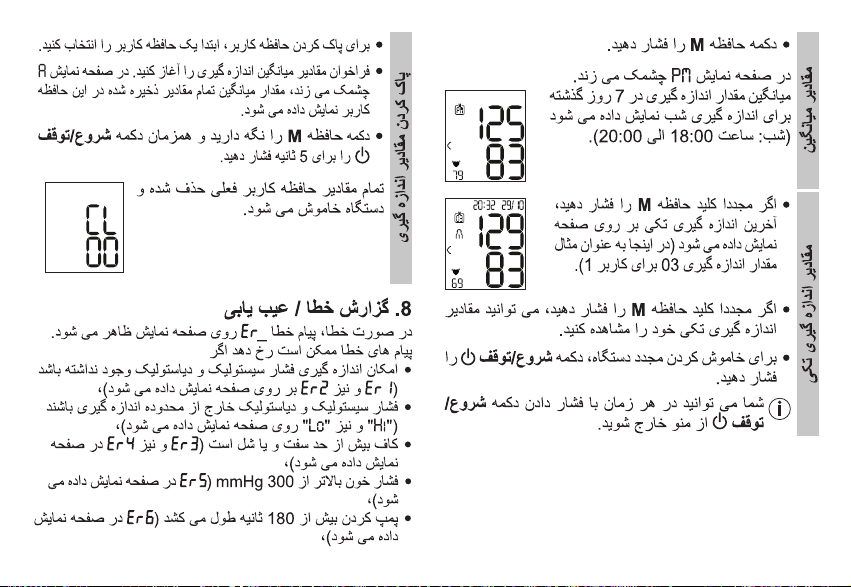
75
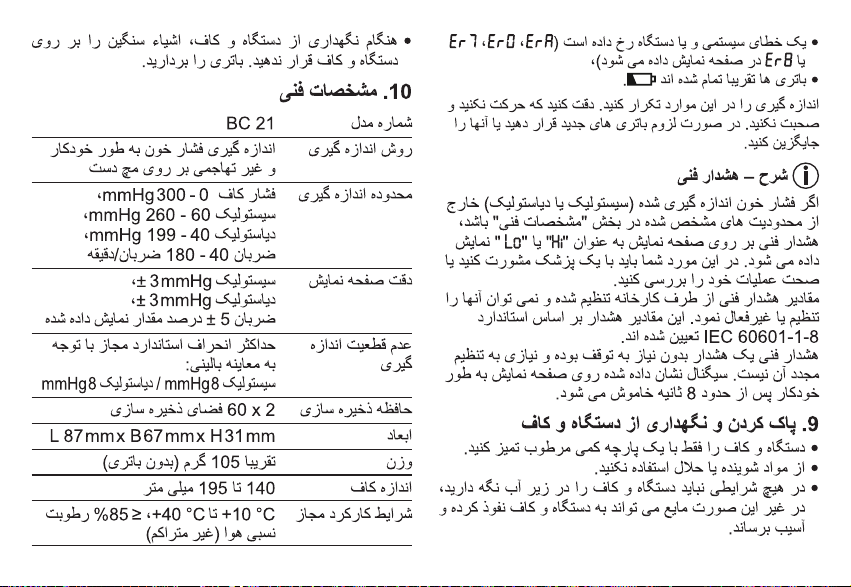
76
77
78

79

BEURER GmbH • Söinger Str. 218 • 89077 Ulm (Germany) • www.beurer.com
www.beurer-gesundheitsratgeber.com • www.beurer-healthguide.com
650.40_BC21-SK1_2018-05-30_03_IM1_BEU
80
