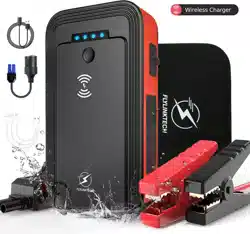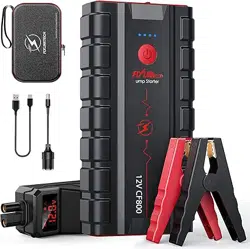
Battery Jump Starter
Model:CF800


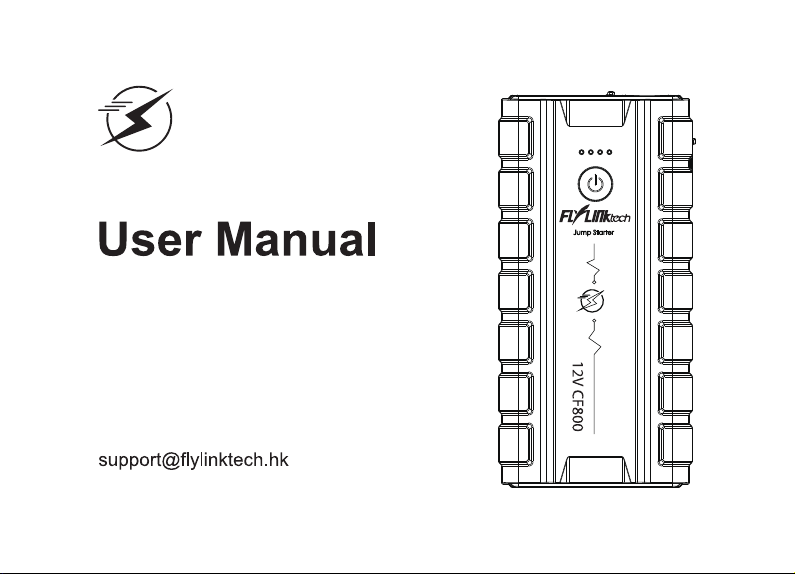
English
1-13
14-26
27-39
40-52
53-65
66-78
Français
taliano
español
Deutsche
日本語
CONTENTS
Battery Jump Starter
Model:CF800
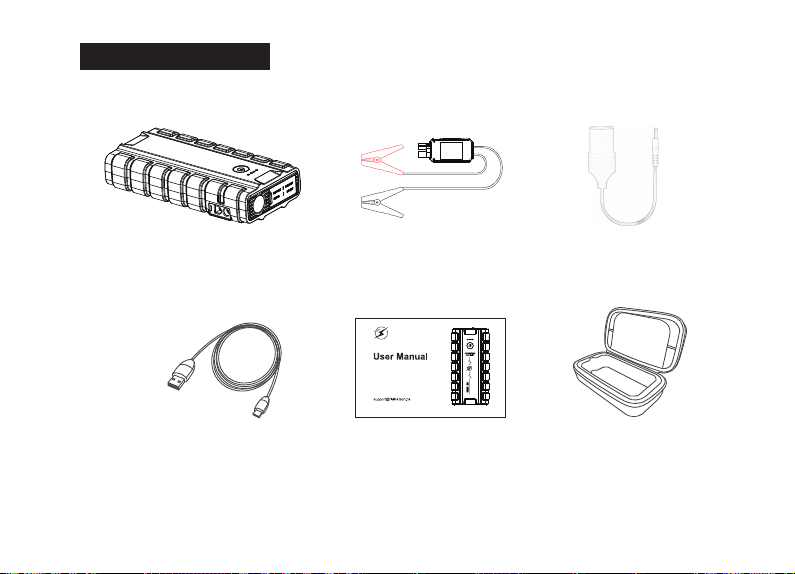
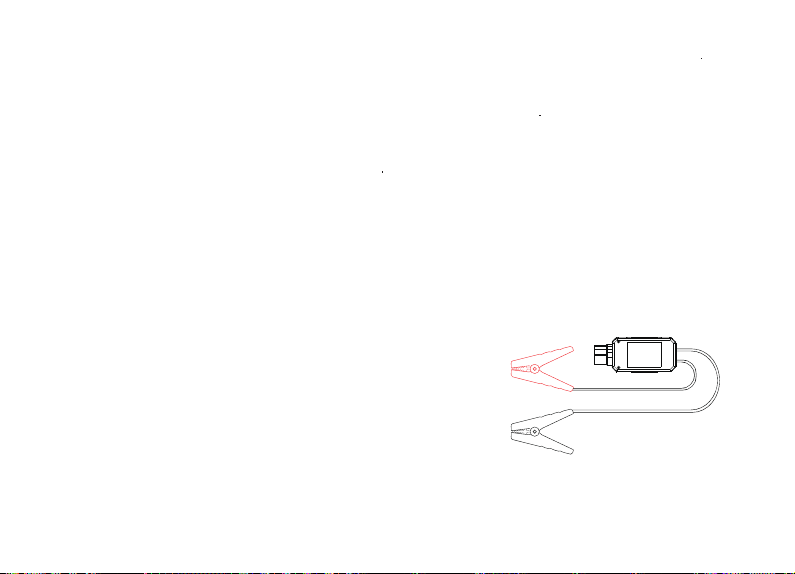
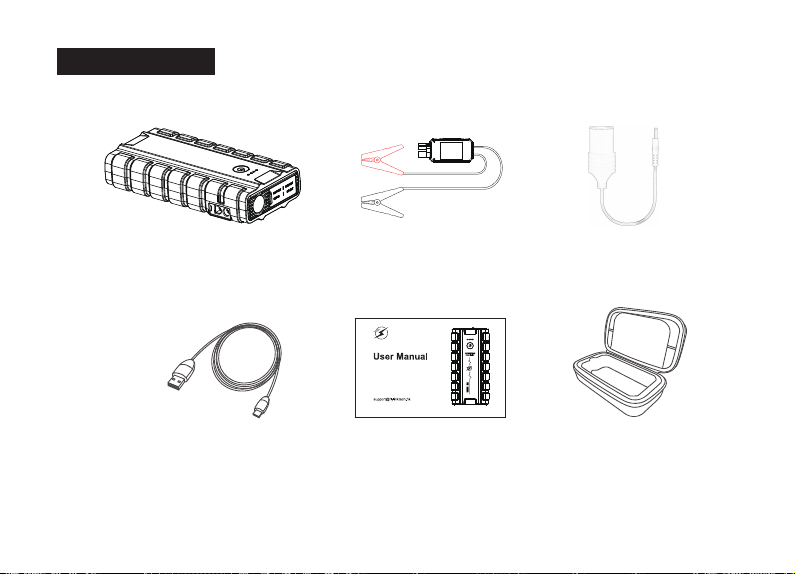
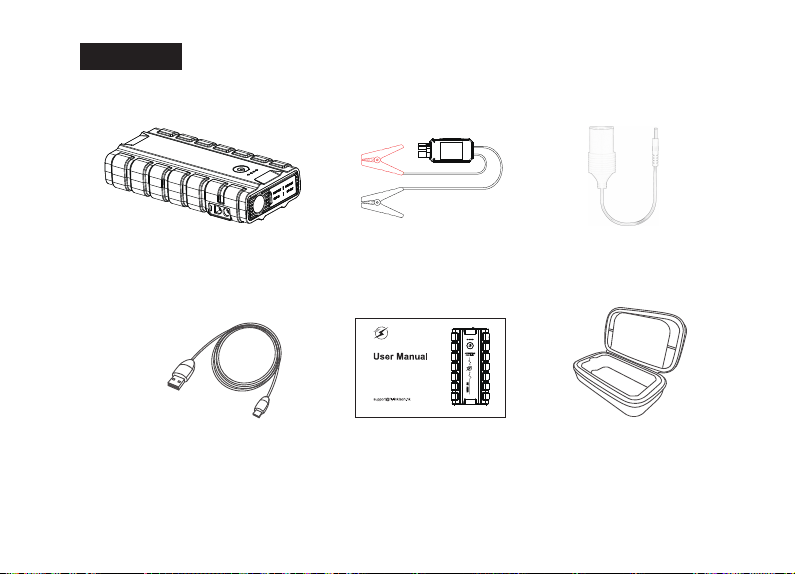
DC to Cigarette Light Adapter.
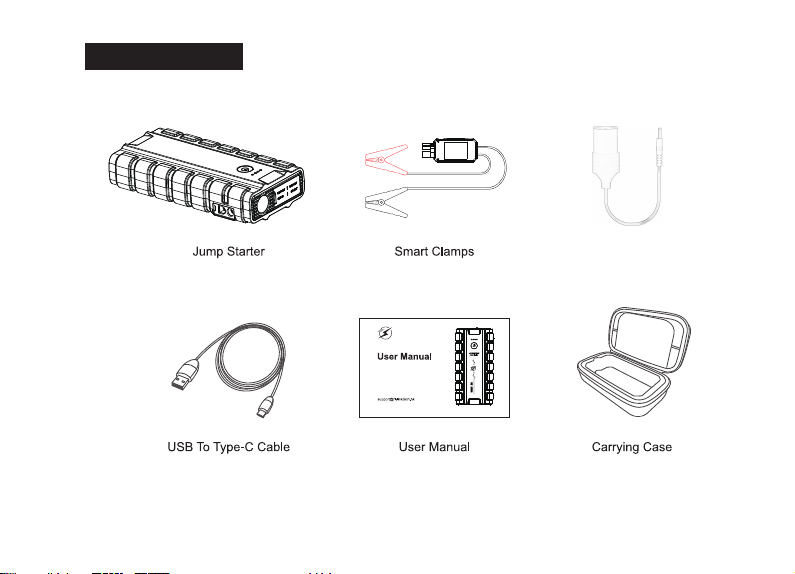
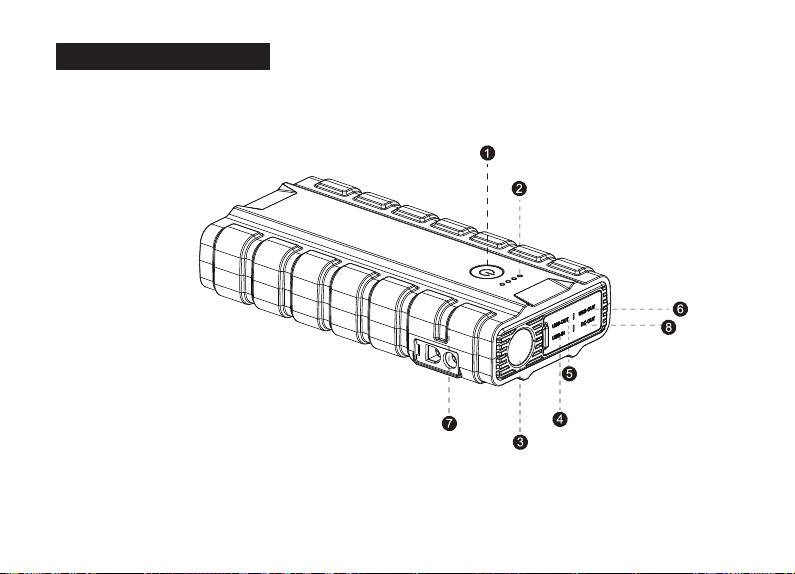
1
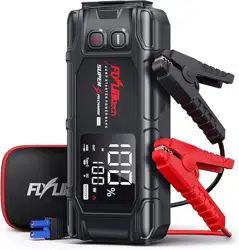
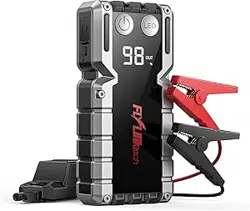
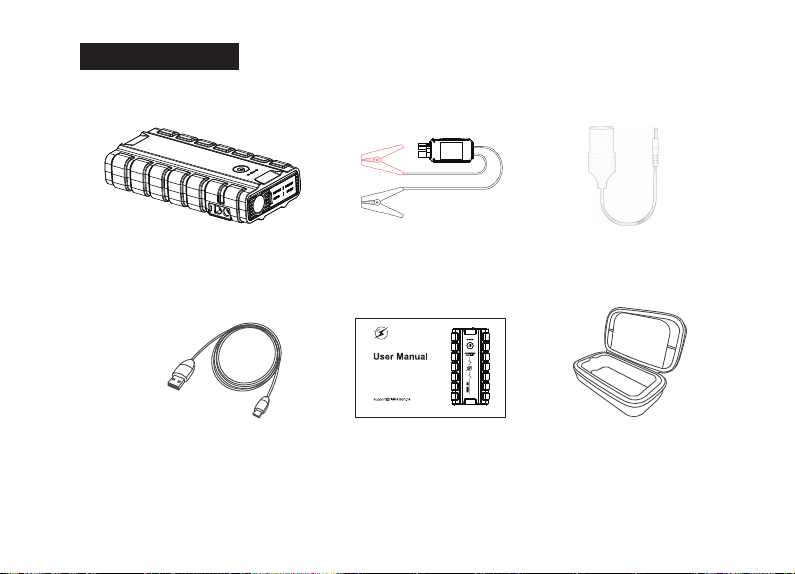
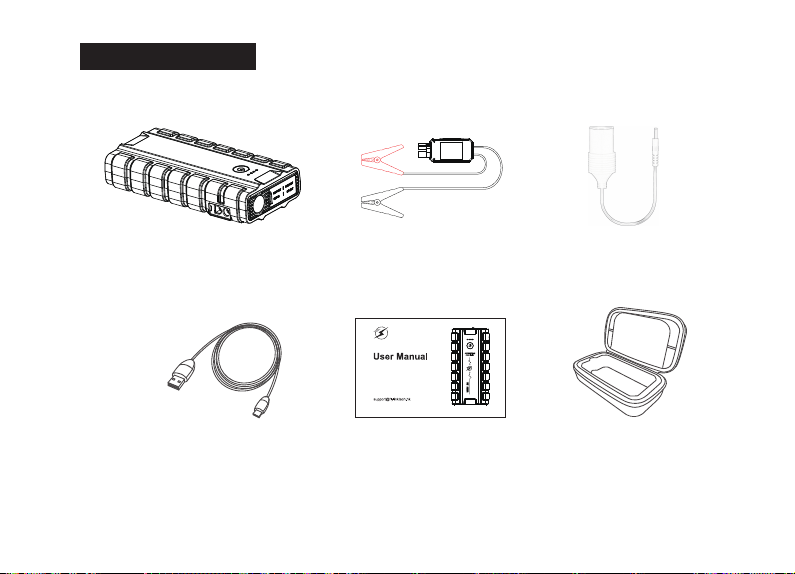
product package

2
Technical Specifications

Normal,SOS,Strobe,Warning Light,off
DC output Supply DC power for car cigarette lighter
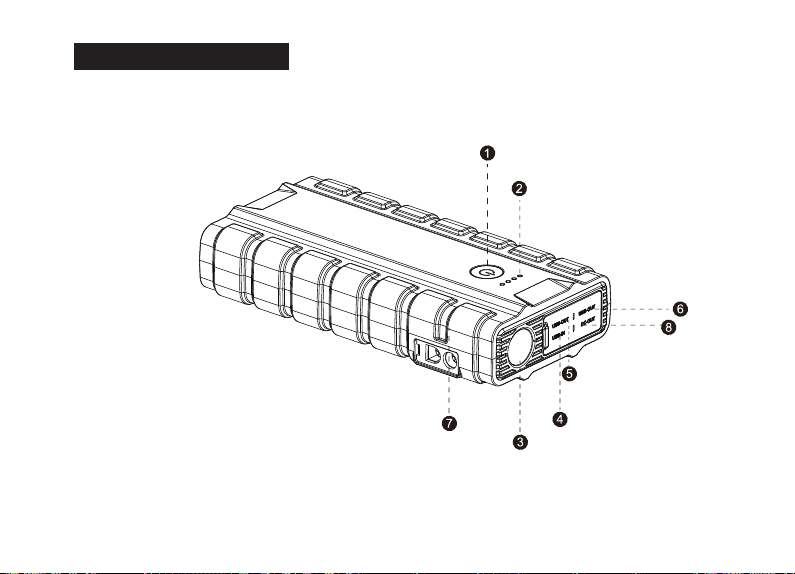
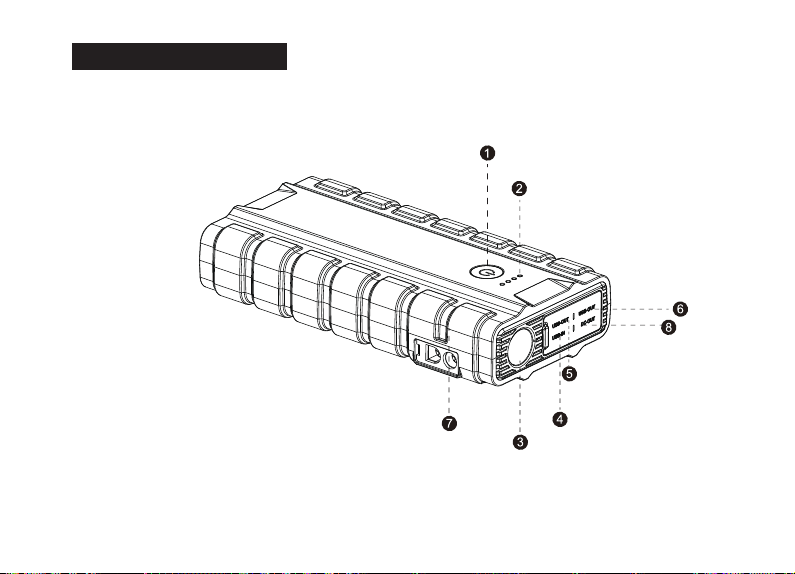
3
ON/OFF Button
Function
OperationNo
Press the button to see the remaining capacity.Long press the
button to turn on/off the flashlight
Charge indicator light
Shows the charging press:25%,50%,75% and 100%
Flashlight
USB C input Charge the starter with Type c cable
USB1 Output
Charge your phone,tablet,camera,etc.75% faster than standard charge
Output 2 USB Charge your phone,tablet,camera,etc. 5V/2.4A 12W output
Jump starting
port
Insert the plug into the jump starting port
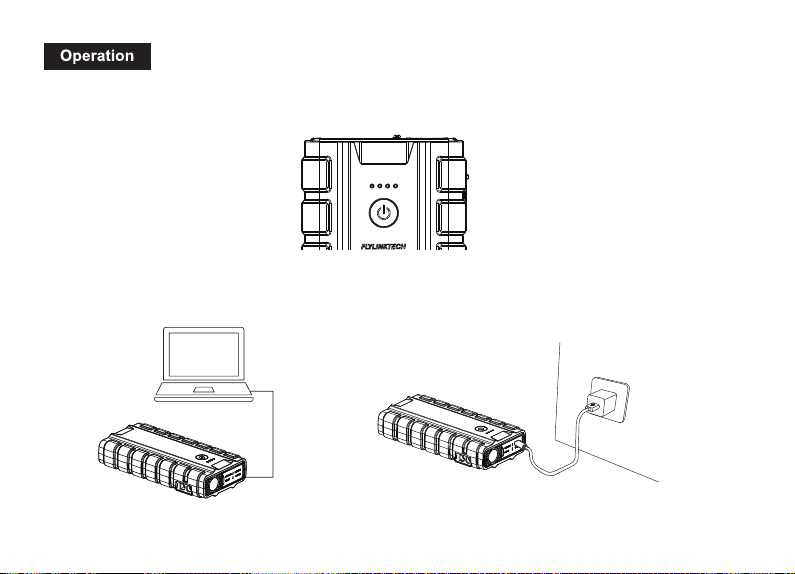
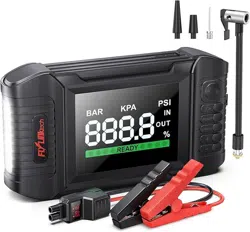
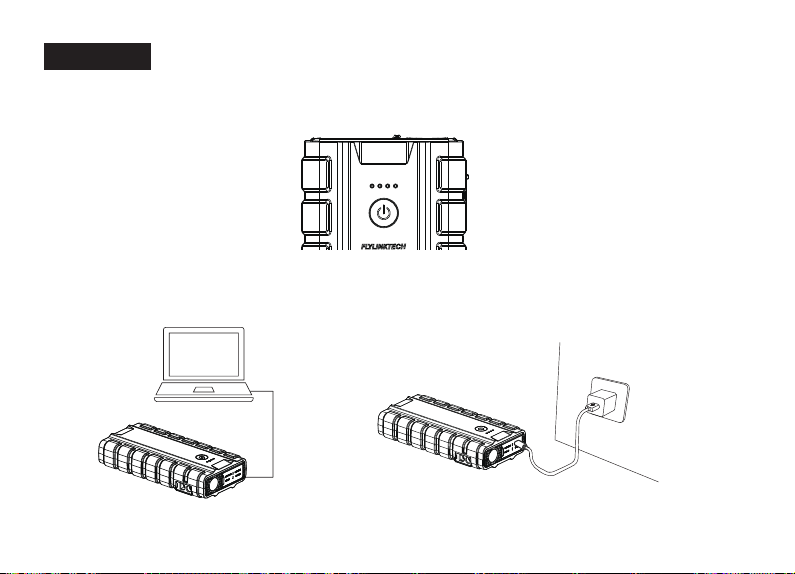
Power indicator light
Press the power button to check the capacity of the Jump starter.Indicator Lights as below picture(25%,50%,75%,100%)
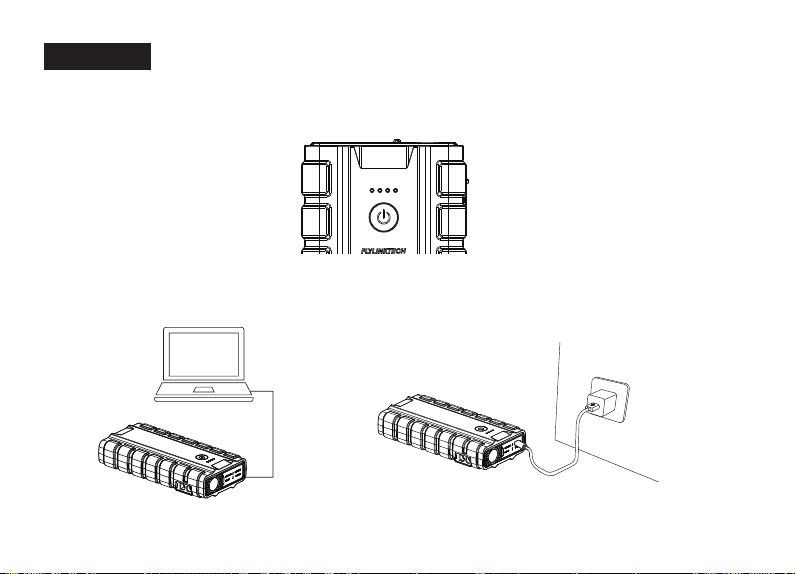
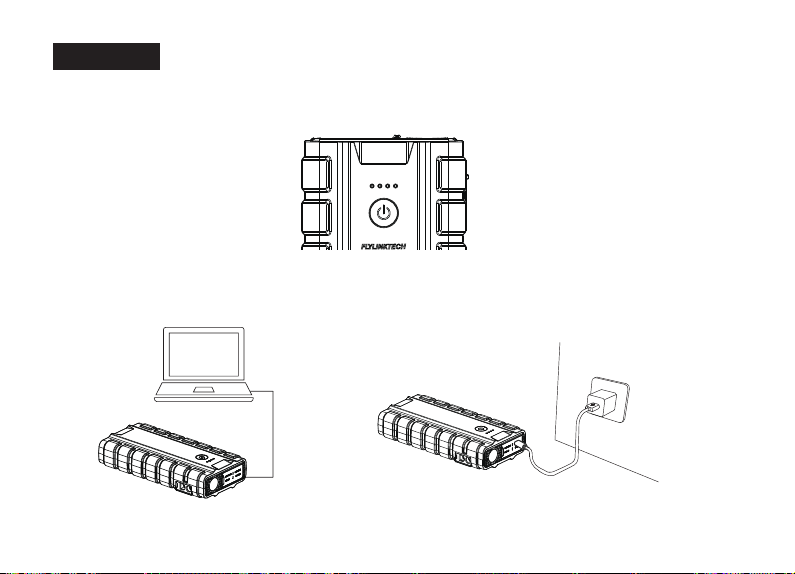
Charging the Jump starter
Note:In order to reduce the risk of fire or electric shock,an adapter shall be chosen that is suitable for the application
and is certified as a class 2 or LPS power supply or power adapter.
4

1.Plug the usb cable into computer or any USB 2A wall adaptor (not included)
2.Connet the UCB C cable onto the Jump starter
Note: It is recommended to recharge the Jumpstarter every 3-4months to maintain efficiency and prolong the
service life of the internal battery even if the unit has not been used.
Charging your Devices
Use the original manufacturer's USB cable that came with your device and plugs it into one of the USB output
ports. You can charge two devices at the same time. One of the ports has a maximum output of 9V/2.4A while the
other has a maximum output of 5V/2.4A.The power level indicator will show the battery level. To check the power
capacity again, simply press the power button once.
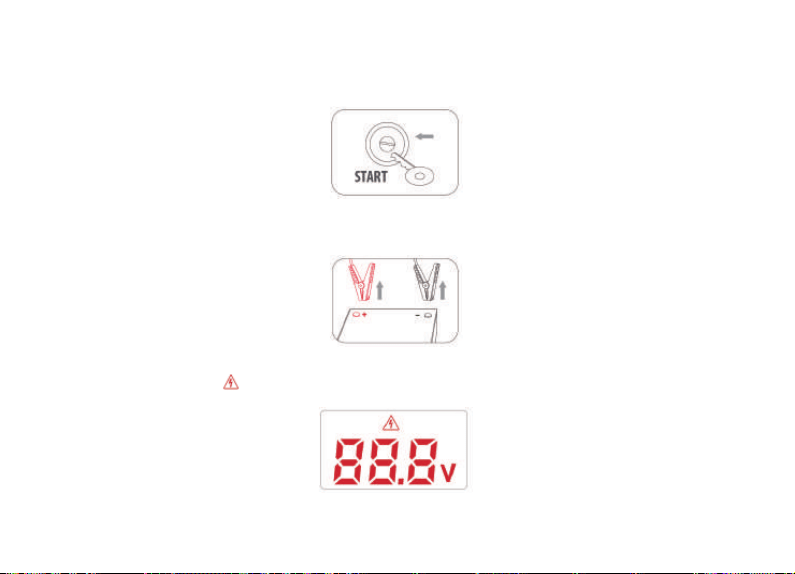
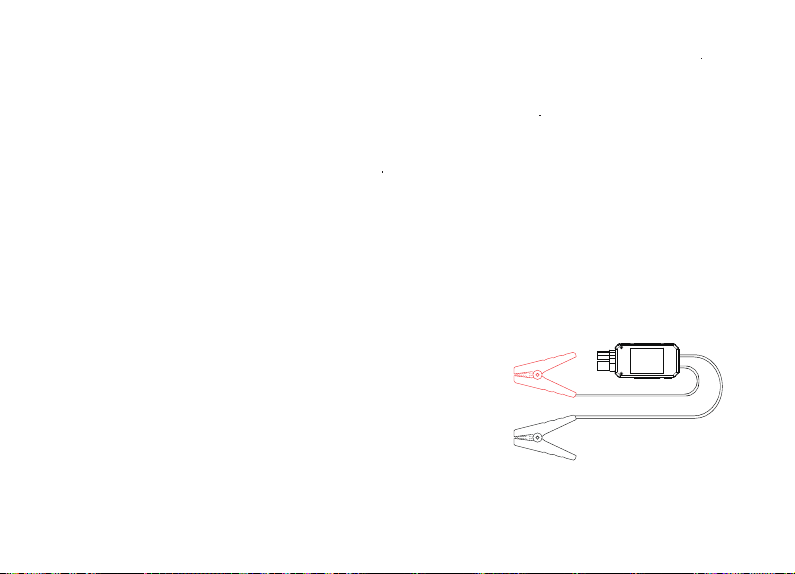
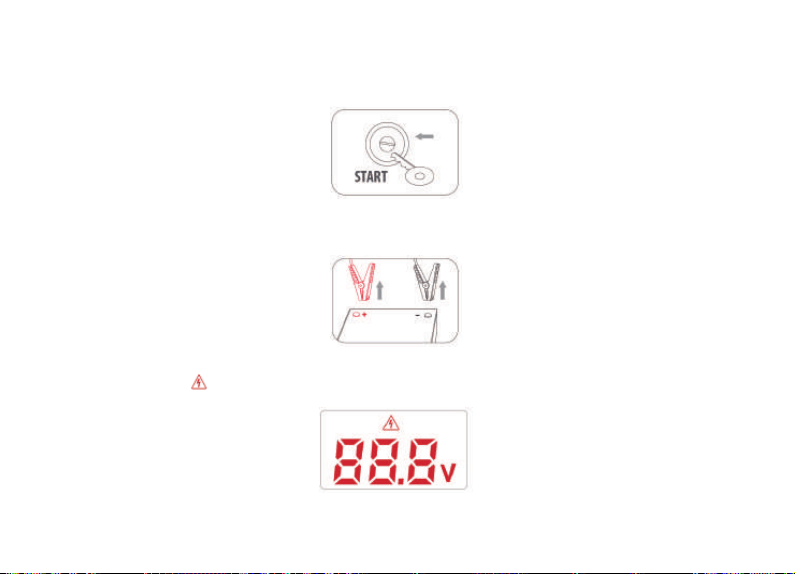
Jump starting a Car
To jump-start the vehicle battery put the vehicle in park(neutral if the vehicle
has a manual transmission)and engage the emergency brake. Locate the
battery for the vehicle and follow the steps listed below.
Jump cables are color-coded, RED for POSITIVE(+)and BLACK for
NEGATIVE(-). Do not mix up the cables or allow the metal ends to touch
together because this may damage the battery, charging system, and/or
electronics on a vehicle.
5

Note:
1.This product is for 12V car only.Check to make sure that 3 or 4 indicator lights are illuminated(battery level is
above 50%) before you use it to jump start your car.
2.Before using the jump starter to start the engine, please keep the doors and lights off.
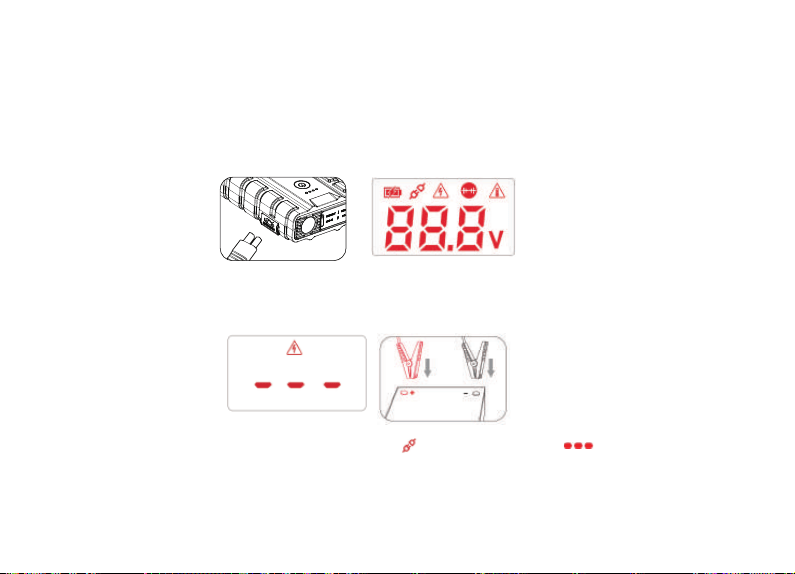
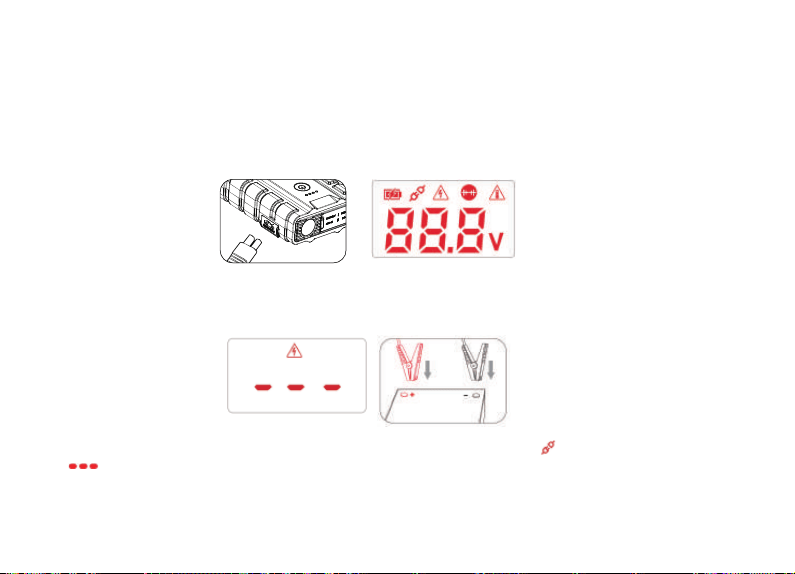
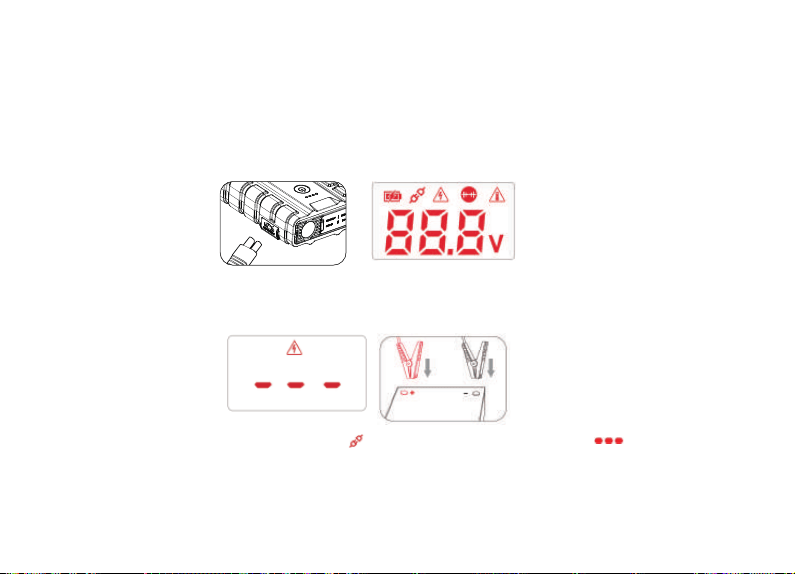
Step1:Insert the plug of the smart battery clamp completely into the jump starter,the clamp screen will
display the voltage of just starter,The upper small icons are displayed from left to right. You can
proceed to the next step.
Step 2:Connect the red clamp to the positive teminal(+)of the car battery and conneted the black
clamp to the negative(-)of the car battery,If the smart clip screen shows the current battery voltage,
you can safely continue the operation next step.
However:if the indicator light is on but if the screen shows " ",voltage shows“ ” with beeps
warning,it indicates :1.The battery clamp may be connected in reverse.if so,you need to disconnect the
battery clamp from the vehicle and the jump starter.
2.Adjust the clamps for maximum contact with the battery terminals.
6
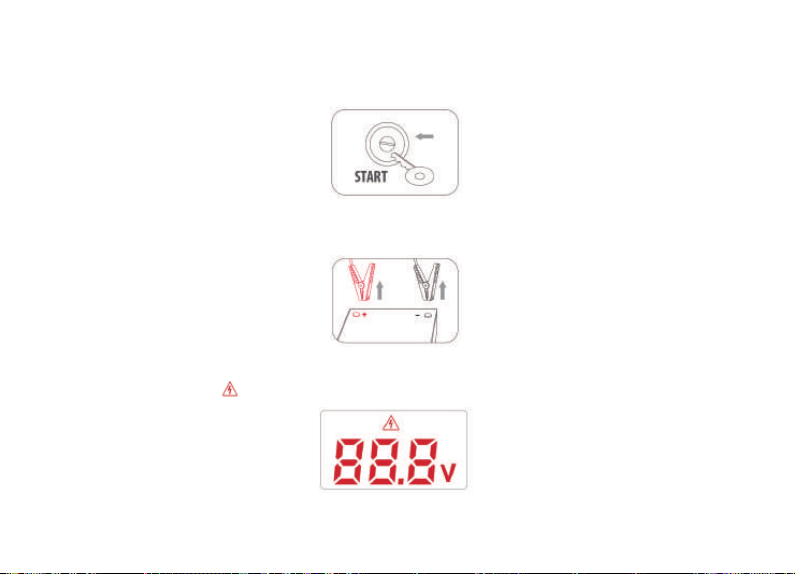
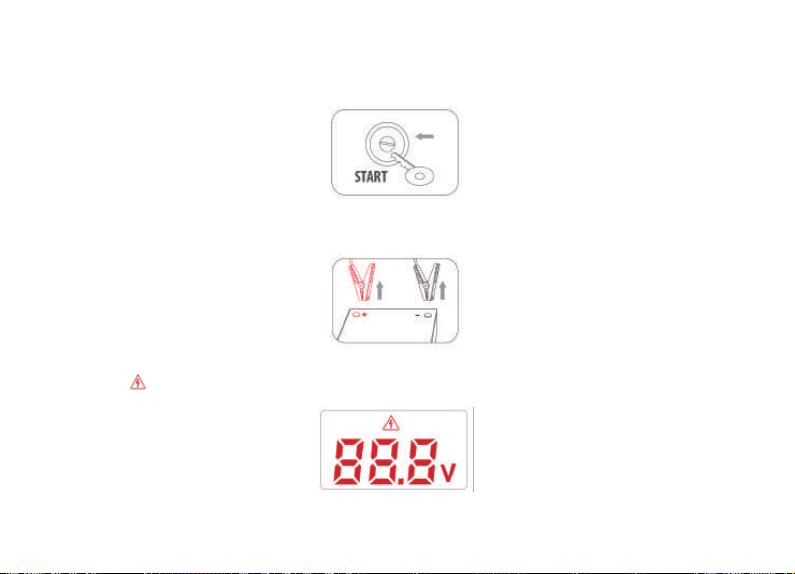
Step3:Start your car.
If you failed to start your car,you need to disconnect the battery clamp from the vehicle and the jump starter.wait for
at least 30 seconds,then try again.if you failed to start your car after 2 attempts.please contact the seller for
support
Step 4:
Once your car is started.remove the battery clamp from the car-battery and the jump starter within 30 seconds.
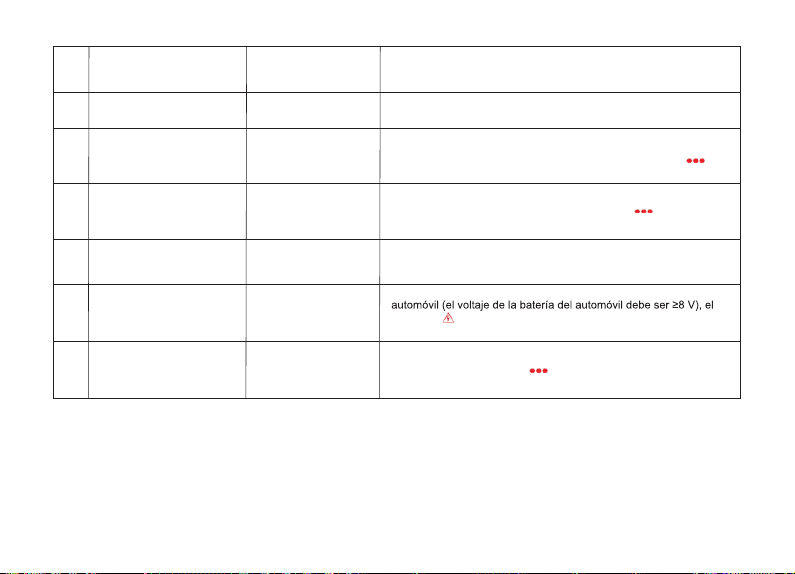
Car Battery Voltage Detection
When the smart clip is only connected to the car battery (the car battery voltage needs to be ≥8V), the " "
symbol will light up, and the current battery voltage will be displayed at the same time.
7

Input low voltage protection
14.0V±0.5V
EC5 port voltage at no load, when the protection is triggered, the “ ”
symbol will light up, and the buzzer will sound once every 1 second;
meanwhile, the current voltage value of the starting power supply will
be displayed.
Input high voltage protection
17.5V±0.5V
EC5 port voltage at no load,When the protection is triggered, the " "
character flashes, and the buzzer long beeps.
Minimum identification resistance
3±2Ω
The minimum resistance that the clamp can recognize.
△V ≥0.3V
Anti-charge protection
Emergency power supply, voltage after ignition>voltage before
ignition, trigger protection; when protection is triggered
The “ ” symbol is on, the “ ” symbol flashes, and the buzzer
sounds once every 1 second; after the fault is removed, it can be
restored to the standby state.
Reverse connection protection
Support
The red/black clip of the wire clip is reversely connected to the car
battery (battery voltage ≥0.8V), and the protection is triggered
When the “ ” symbol is on, the “ ” symbol flashes, the buzzer
will sound once every 1 second; after the fault is removed, it can be
restored to the standby state.
High temperature protection
65±5℃/150±10℉
When the protection is triggered, the “ ” character will be on, the “
symbol will flash, and the buzzer will sound once every second
Support
Short circuit protection
In the standby state, the red and black clip ends are short-circuited,
and the symbol “ ” lights up, and the symbol “ ”
The indicator flashes and the buzzer sounds once per second; after
the fault is removed, it can be restored to the standby state.
1
2
3
4
5
6
7
8
No
Term
Technical
Parameter
Other Instructions

Starting Current
1000A±10%
Lasts 1s
Start Overrun Protection
Support
Support
Support
Support
Emergency power supply voltage<6.5V, continuously exceeding
0.2S; voltage<5V, continuously exceeding
0.02S; the protection is triggered, and the “ ” symbol flashes.
Start-up protection
8 times
After the wire clamp is activated 8 times continuously, the protection
is triggered, and the symbol of "8 times activation times protection"
flashes
High temperature release
55±5℃/131±10℉
When the temperature drops, it can return to the standby state.
8
9
10
11
12
13
14
Work instructions
Battery voltage detection
Starter adhesion failure alarm
The current emergency start-up power battery voltage will be
displayed when the wire clamp is turned on.
When the wire clip is only connected to the car battery (the car
battery voltage needs to be ≥8V) " " symbol point on, the
current battery voltage is displayed at the same time.
When the clamp is powered on for the first time, if the
relay has adhesion failure, the " " symbol will flash
and the buzzer will beep for a long time.
9

Warnings
1. Use / store in a place that is out of the reach of small children.
2. Do not modify or disassemble this product.
3. Do not use in places with flammable liquid or gas, or in places with a lot of dust, It may cause fire or burns.
4.Do not leave this product in a place where the temperature exceeds 120 ° F (50 ° C).
5.Do not use this product with wet hands.
Model
Battery Capacity
USB C Input
USB1 Output
USB2 Output
Dimensions(L*W*H)
Overload/Discharge Fuse
Working Temperature
Blackflow protection
Short circuit fuse protection
Reverse polarity protection
CF800
20000mAh
5V/2A,9V/2A,12V/1.5A
5V/3A,9V/2A,12V/1.5A
5V/2.4A
178*88*38mm
≤16.8V±0.3V
65℃±5℃
≥16.8V±0.3V
√
√
Details
10

6.Do not touch the terminals of this product with metal pins or attach dust. Also, dust on the terminals, etc.
7.When using this product, please keep away from fire such as cigarettes.
8.Keep this product away from heat sources such as stoves.
9. If you notice a strange odor or sound from this product, stop using it immediately.
10.To avoid an unexpected situation, do not leave the product or vehicle while using the product.
11.Before using this product, pull the side brake of the vehicle / park the gear or put it in neutral etc. ensure safety
so that both do not move.
12.please do not use this product while charging.
13.Do not 12V and 5V terminals at the same time.
14.Do not jump start the vehicle battery, if the battery is extremely deteriorated or over-discharged. This may lead
to damaged.
Battery Disposal
The battery is self-contained and not consumer replaceable,The battery must be disposed of properly when it no
longer holds a charge.Proper charging practices will increase the life of the product.For information on battery
recycling,call toll-free.
11

Trouble shooting
Issue
Cause
Remedy
Can not jump start
Wrong clamp connection
8-second timer to jump start has
expired
Low battery status
Make sure to clamp the RED jumper cable to the
Postive(+)post on the battery.And Black jumper cable to
Negative(-)post or car interior.
Jump starter timed out,Disconned the cables from the vehicle
battery and reconnected
Recharge the unit via usb cable until at least three solid lights
or 51% charge
LED light keeps flashing Protection circuit is working
Refer to the status table on the indicator box or page 6 of the
maunal
Flashing is not working
Low battery
The unit is charging
Recharge the unit via usb cable
As a safety precaution,the flashlight light will not work while
the unit is charging.Please unplug the unit from charging or
wait until the unit finishes charging before using the light.
No wall adaptor
Charge via USB cable
Plug the USB cable into computer or any USB 2A wall
adapter
No indicator Light
Low battery
Power bank in off mode
Refer to Power level indicator on page 3 of the manual
Press the power on/off
1212

Warranty
The warranty period of this product is 24 months from the date of purchase.
please note:
Even within the warranty period, the warranty is not covered in the following cases.
1. Drop, impact, damage due to external factors, repair or modification by anyone other than us.
2. When using a battery that has been disassembled and modified. (If the battery is disassembled or modified, it
may explode or leak
3. Battery deterioration. (The battery is a consumable item.)
4. Failure or damage due to external factors. such as Fire, earthquake, water damage, lightning strike, other
natural disasters, pollution, salt damage, gas damage (sulfide gas), abnormal voltage, etc.
contact us
For any inquiries or comments concerning our products, please send an email to [email protected],
and we will respond to you as soon as possible.
13
Battery Jump Starter
Model:CF800
Port Sortie DC Pinces intelligentesBooster batterie de voiture
Câble USB vers Type-C Manuel de l'Utilisation Sac de transport
14
Paquet de produit

15
spécifications techniques

Normal, SOS, stroboscope, voyant d'avertissement, éteint
Sortie DC Alimentation CC pour allume-cigare de voiture
16
Bouton ON / OFF
Function
OpérationNo
Appuyez sur le bouton pour voir la capacité restante.Appuyez
longuement sur le bouton pour allumer / éteindre la lampe de
poche
Témoin lumineux de
chargelight
Affiche la presse de charge: 25%, 50%, 75% et 100%
Lampe de poche
Entrée USB C Chargez le démarreur avec un câble de type c
USB1 Sortie
Chargez votre téléphone, tablette, appareil photo, etc. 75% plus
rapidement que la charge standard
Sortie 2 USB
Chargez votre téléphone, tablette, appareil photo, etc. Sortie 5V / 2.4A 12W
Port de départ de
saut
Insérez la fiche dans le port de démarrage de saut

Charger le démarreur Jump
Remarque: afin de réduire le risque d'incendie ou d'électrocution, il faut choisir un adaptateur adapté à l'application et
certifié en tant que bloc d'alimentation ou adaptateur secteur de classe 2 ou LPS. "classe 2 ou LPS. "
17
Opération
Témoin lumineux d'alimentation
Appuyez sur le bouton d'alimentation pour vérifier la capacité du Jump starter. Le voyant s'allume comme sur l'image
ci-dessous (25%, 50%, 75%, 100%)

1.Branchez le câble USB sur l'ordinateur ou sur tout adaptateur mural USB 2A (non inclus)
2.Branchez le câble UCB C sur le démarreur Jump
Note: Il est recommandé de recharger le Jump starter tous les 3-4 mois pour maintenir l'efficacité et prolonger la
durée de vie de la batterie interne même si l'unité n'a pas été utilisée.
Charger vos appareils
Utilisez le câble USB du fabricant d'origine fourni avec votre appareil et branchez-le sur l'un des ports de sortie
USB.Vous pouvez charger deux appareils en même temps.L'un des ports a une sortie maximale de 9V / 2,4A
tandis que l'autre a un maximum de 5 V / 2,4 A. L'indicateur de niveau de puissance indiquera le niveau de la
batterie. Pour vérifier à nouveau la capacité de puissance, appuyez simplement une fois sur le bouton
d'alimentation. "
Aller démarrer une voiture
Pour redémarrer la batterie du véhicule, placez le véhicule en stationnement
(point mort si le véhicule est équipé d'une transmission manuelle) et
engagez le frein d'urgence. Localisez la batterie du véhicule et suivez les
étapes ci-dessous.
Les câbles de saut sont codés par couleur, ROUGE pour POSITIF (+) et
NOIR pour NÉGATIF (-). Ne mélangez pas les câbles et ne laissez pas les
extrémités métalliques se toucher car cela pourrait endommager la batterie,
le système de charge et / ou l'électronique d'un véhicule.
18

"Note:
1.Ce produit est uniquement destiné aux voitures 12V.Assurez-vous que 3 ou 4 voyants sont allumés (le niveau
de la batterie est supérieur à 50%) avant de l'utiliser pour démarrer votre voiture.
2. Bevor Sie den Motor mit dem Starthilfe starten, halten Sie bitte die Türen und Lichter aus."
Étape 1: Insérez complètement la fiche de la pince de batterie intelligente dans le démarreur de saut,
l'écran de la pince affichera la tension du démarreur uniquement, les petites icônes supérieures sont
affichées de gauche à droite. Vous pouvez passer à l'étape suivante.
Étape 2: connectez la pince rouge au terminal positif (+) de la batterie de voiture et connectez la pince
noire au négatif (-) de la batterie de la voiture, si l'écran du clip intelligent indique la tension actuelle de
la batterie, vous pouvez continuer en toute sécurité le opération étape suivante.
"Cependant: si le voyant est allumé mais si l'écran affiche" ", la tension indique" "avec des bips
d'avertissement, cela indique: 1. La pince de batterie peut être connectée à l'envers.Si c'est le cas, vous
devez déconnecter la batterie pince du véhicule et du démarreur de saut.
2. Ajustez les pinces pour un contact maximum avec les bornes de la batterie. "
19
"Étape 3: Démarrez votre voiture.
Si vous ne parvenez pas à démarrer votre voiture, vous devez déconnecter la pince de batterie du véhicule et le
démarreur.attendez au moins 30 secondes, puis réessayez.Si vous n'avez pas réussi à démarrer votre voiture
après 2 tentatives, veuillez contacter le vendeur pour Support."
"Étape 4:
Une fois votre voiture démarrée, retirez la pince de batterie de la batterie de la voiture et le démarreur de secours
dans les 30 secondes."
"Détection de tension de batterie de voiture
Lorsque le clip intelligent est uniquement connecté à la batterie de la voiture (la tension de la batterie de la voiture
doit être ≥8V), le symbole " " s'allume et la tension actuelle de la batterie s'affiche en même temps."
20

Protection basse tension d'entrée
14.0V±0.5V
Tension du port EC5 à vide, lorsque la protection est déclenchée, le
symbole « » s'allume et le buzzer retentit une fois toutes les 1
seconde; pendant ce temps, la valeur de tension actuelle de
l'alimentation de démarrage sera affichée.
Protection haute tension d'entrée
17.5V±0.5V
Tension du port EC5 à vide, lorsque la protection est déclenchée, le
caractère " " clignote et le buzzer émet un long bip.
Résistance d'identification
minimale
3±2Ω
La résistance minimale que la pince peut reconnaître.
△V ≥0.3V
Protection anti-charge
Alimentation de secours, tension après allumage> tension avant
allumage, protection de déclenchement; lorsque la protection est
déclenchée
Le symbole « » est allumé, le symbole « » clignote et l'avertisseur
retentit une fois toutes les 1 seconde; une fois le défaut supprimé, il
peut être remis en état de veille. "
Protection de connexion inverse
Oui
"Le clip rouge / noir du clip de fil est inversement connecté à la batterie
de la voiture (tension de la batterie ≥0.8V), et la protection est
déclenchée
Lorsque le symbole « » est allumé, le symbole « » clignote, la
sonnerie retentit une fois toutes les 1 seconde; une fois le défaut
supprimé, il peut être remis en état de veille. "
Protection haute température
65±5℃/150±10℉
Lorsque la protection est déclenchée, le caractère « » sera
allumé, le symbole « » clignotera et la sonnerie retentira une fois
par seconde
Oui
Protection de court circuit
"En mode veille, les extrémités du clip rouge et noir sont
court-circuitées, le symbole« »s'allume et le symbole« »
L'indicateur clignote et l'avertisseur retentit une fois par seconde;
une fois le défaut supprimé, il peut être remis en état de veille.
1
2
3
4
5
6
7
21
No
Term
Paramètre
techniqueParameter
Autres instructions

Courant de démarrage
1000A±10%
Dure 1s
Démarrer la protection contre
les dépassements
Oui
Oui
Oui
Oui
"Tension d'alimentation de secours < 6,5 V, dépassant
continuellement 0,2 S; tension < 5 V, dépassant continuellement
0,02S; la protection est déclenchée et le symbole « » clignote. "
Protection au démarrage
8 fois
Une fois que le serre-fil est activé 8 fois en continu, la protection est
déclenchée et le symbole 8 fois la protection des temps
d'activation clignote
Libération à haute température
55±5℃/131±10℉
Lorsque la température baisse, il peut revenir à l'état de veille.
8
9
10
11
12
13
14
Instructions de travail
Détection de la tension de
la batterie
Alarme d'échec d'adhérence
du démarreur
La tension actuelle de la batterie d'alimentation de démarrage
d'urgence sera affichée lorsque le serre-fil est allumé.
Lorsque l'attache-fil est uniquement connectée à la batterie de la
symbole « » est allumé, la tension actuelle de la batterie est
affichée en même temps.
Lorsque la pince est mise sous tension pour la première fois, si le
relais a un échec d'adhérence, le symbole « » clignotera et le
buzzer émettra un bip pendant une longue période.
22

Details
23
Modèle
Capacité de la batterie
Entrée USB C
USB1 Sortie
USB2 Sortie
Dimensions (L * W * H)
Fusible de surcharge / décharge
Température de fonctionnement
Protection contre les reflets noirs
Protection par fusible contre les courts-circuits
Protection contre l'inversion de polarité
CF800
20000mAh
178*88*38mm
≤16.8V±0.3V
65℃±5℃
≥16.8V±0.3V
√
√
Avertissements
1. Utilisez / stockez dans un endroit hors de la portée des jeunes enfants.
2. Ne modifiez ni ne démontez ce produit.
3. Ne pas utiliser dans des endroits avec un liquide ou un gaz inflammable, ou dans des endroits avec beaucoup
de poussière, cela peut provoquer un incendie ou des brûlures.
4. Ne laissez pas ce produit dans un endroit où la température dépasse 120 ° F (50 ° C).
5. N'utilisez pas ce produit avec les mains mouillées.
5V/2A,9V/2A,12V/1.5A
5V/3A,9V/2A,12V/1.5A
5V/2.4A

6. Ne touchez pas les bornes de ce produit avec des broches métalliques et ne collez pas de poussière. De plus,
de la poussière sur les bornes, etc.
7. Lors de l'utilisation de ce produit, tenez-vous à l'écart du feu tel que les cigarettes.
8. Gardez ce produit à l'écart des sources de chaleur telles que les cuisinières.
9. Si vous remarquez une odeur ou un son étrange provenant de ce produit, arrêtez immédiatement de l'utiliser.
10.Pour éviter une situation inattendue, ne laissez pas le produit ou le véhicule pendant l'utilisation du produit.
11.Avant d'utiliser ce produit, tirez sur le frein latéral du véhicule / garez l'engrenage ou mettez-le au point mort,
etc.
que les deux ne bougent pas.
12. veuillez ne pas utiliser ce produit pendant le chargement.
13.Ne pas les bornes 12V et 5V en même temps.
14.Ne démarrez pas la batterie du véhicule si la batterie est extrêmement détériorée ou trop déchargée. Cela peut
conduire à
endommagé.
Mise au rebut de la batterie
La batterie est autonome et non remplaçable par le consommateur,la batterie doit être mise au rebut de manière
appropriée lorsqu'elle n'est plus chargée.De bonnes pratiques de charge augmenteront la durée de vie du produit.
24

Dépannage
Issue
Cause
Remedy
Impossible de démarrer
rapidement
Mauvaise connexion de la
pince
La minuterie de 8 secondes pour
le démarrage rapide a expiré
État de la batterie faible
Assurez-vous de fixer le câble volant ROUGE à la borne
Postive (+) de la batterie et le câble volant noir à la borne
négative (-) ou à l'intérieur de la voiture.
Le démarreur de saut a expiré, a déconnecté les câbles de la
batterie du véhicule et reconnecté
Rechargez l'unité via un câble USB jusqu'à ce qu'au moins
trois voyants fixes ou 51% de charge
La lumière LED continue de
clignoter
Le circuit de protection fonctionne
Reportez-vous au tableau d'état sur le boîtier de l'indicateur
ou à la page 6 du
La lumière LED ne
fonctionne pas
Batterie faible
L'unité est en cours de
chargement
Rechargez l'appareil via un câble USB
Par mesure de sécurité, la lumière de la lampe de poche ne
fonctionnera pas pendant que l'unité est en charge.Veuillez
débrancher l'unité de la charge ou attendre la fin de la charge de
l'unité avant d'utiliser la lumière.
No wall adaptor
Charge via un câble USB
Branchez le câble USB sur l'ordinateur ou sur n'importe
quel adaptateur mural USB 2A
No indicator Light
Batterie faible
Batterie externe en mode
éteint
Reportez-vous à Indicateur de niveau de puissance à la
page 6 du manuel
Appuyez sur la mise sous / hors tension
25

Avertissements
La période de garantie de ce produit est de 24 mois à compter de la date d'achat.
Note:
Même pendant la période de garantie, la garantie n'est pas couverte dans les cas suivants.
1. Chute, impact, dommages dus à des facteurs externes, réparation ou modification par une personne autre
que nous.
2. Lors de l'utilisation d'une batterie démontée et modifiée. (Si la batterie est démontée ou modifiée, elle peut
exploser ou fuir
3. Détérioration de la batterie. (La batterie est un élément consommable.)
4. Panne ou dommage dû à des facteurs externes. comme un incendie, un tremblement de terre, des dégâts
d'eau, un coup de foudre, d'autres catastrophes naturelles, la pollution, des dégâts de sel, des dégâts de gaz
(gaz sulfuré), une tension anormale, etc.
Nous contacter
Pour toute demande concernant nos produits, veuillez envoyer un e-mail à
[email protected], et nous vous répondrons dans les plus brefs délais.
26
Battery Jump Starter
Model:CF800
Uscita CC al caricatore per autoMorsetti intelligentiavviamento di salto
Cavo da USB a tipo C. Manuale d'uso Valigetta
27
Pacchetto del prodotto
28
specifiche tecnich

Normale, SOS, strobo, spia, spento
Uscita DC
29
Pulsante ON / OFF
Funzione
OperazioneNo
Premere il pulsante per vedere la capacità rimanente. Premere a
lungo il pulsante per accendere / spegnere la torcia
Indicatore luminoso
di caricalight
Mostra la stampa di ricarica: 25%, 50%, 75% e 100%
Torcia elettrica
Ingresso USB C. Caricare il motorino di avviamento con un cavo di tipo C.
USB1 Uscita
Carica il tuo telefono, tablet, fotocamera, ecc. 75% più velocemente
rispetto alla ricarica standardthan standard charge
Uscita 2 USB
Salta la porta di
partenza
Carica il tuo telefono, tablet, fotocamera, ecc. Uscita 5 V / 2,4 A 12 W.
Inserire la spina nella porta di avviamento di emergenza
Fornire corrente continua per accendisigari dell'auto
Ricarica dell'avviatore Jump
Nota: per ridurre il rischio di incendi o scosse elettriche, scegliere un adattatore adatto all'applicazione e certificato
come alimentatore o adattatore di corrente di classe 2 o LPS."
30
Operazione
Indicatore luminoso di alimentazione
Premere il pulsante di accensione per controllare la capacità dell'avviatore Jump. L'indicatore si accende come
nell'immagine sottostante (25%, 50%, 75%, 100%)
1.Collega il cavo USB al computer o a qualsiasi adattatore da parete USB 2A (non incluso)
2.Collega il cavo UCB C all'avviatore Jump
Nota: si consiglia di ricaricare il Jump Starter ogni 3-4 mesi per mantenere l'efficienza e prolungare la durata della
batteria interna anche se l'unità non è stata utilizzata.
Ricarica i tuoi dispositivi
Utilizza il cavo USB del produttore originale fornito con il dispositivo e collegalo a una delle porte di uscita USB.
Puoi caricare due dispositivi contemporaneamente. Una delle porte ha un'uscita massima di 9 V / 2,4 A mentre
l'altra ha un'uscita massima di 5 V / 2,4 A. L'indicatore del livello di alimentazione mostrerà il livello della batteria.
Per controllare nuovamente la capacità di alimentazione, premere semplicemente una volta il pulsante di
accensione."
Salta l'avvio di un'auto
Per avviare la batteria del veicolo, mettere il veicolo in parcheggio (folle se il
veicolo ha una trasmissione manuale) e inserire il freno di emergenza.
Individua la batteria del veicolo e segui i passaggi elencati di seguito.
I cavi di avviamento sono codificati a colori, ROSSO per POSITIVO (+) e
NERO per NEGATIVO (-). Non confondere i cavi e non lasciare che le
estremità metalliche si tocchino perché ciò potrebbe danneggiare la batteria,
il sistema di ricarica e / o l'elettronica di un veicolo.
"
31
"Nota:
1.Questo prodotto è solo per auto a 12V.Verifica che 3 o 4 spie luminose siano accese (il livello della batteria è
superiore al 50%) prima di utilizzarlo per avviare la tua auto.
2.prima di utilizzare l'avviamento di emergenza per avviare il motore, tenere spente le porte e le luci."
Passaggio 1: inserire completamente la spina del morsetto della batteria intelligente nell'avviatore di emergenza,
la schermata del morsetto visualizzerà la tensione del solo motorino di avviamento, Le icone piccole in alto
vengono visualizzate da sinistra a destra. Puoi procedere al passaggio successivo.
Passaggio 2: collegare il morsetto rosso al terminale positivo (+) della batteria dell'auto e collegare il
morsetto nero al negativo (-) della batteria dell'auto, se lo schermo della clip intelligente mostra la
tensione della batteria corrente, è possibile continuare in sicurezza il operazione passaggio
successivo.
"Tuttavia: se la spia è accesa ma se lo schermo mostra " " , la tensione mostra " " con segnali
acustici, indica: 1. Il morsetto della batteria può essere collegato al contrario. in tal caso, è necessario
scollegare il morsetto della batteria dal veicolo e l'avviamento di emergenza.
2. Regolare i morsetti per il massimo contatto con i terminali della batteria."
32

"Passaggio 3: avvia la tua auto.
Se non si è riusciti ad avviare la macchina, è necessario scollegare il morsetto della batteria dal veicolo e
l'avviamento di emergenza. attendere almeno 30 secondi, quindi riprovare. se non si è riusciti ad avviare la
macchina dopo 2 tentativi. si prega di contattare il venditore per assistenza."
"Passaggio 4:
Una volta avviata la tua auto. rimuovere il morsetto della batteria dalla batteria dell'auto e l'avviamento di
emergenza entro 30 secondi."
"Rilevamento della tensione della batteria dell'auto
Quando la smart clip è collegata solo alla batteria dell'auto (la tensione della batteria dell'auto deve essere ≥8V), il
simbolo " " si accenderà e contemporaneamente verrà visualizzata la tensione della batteria corrente."
33

Protezione a bassa tensione in
ingresso
14.0V±0.5V
Tensione della porta EC5 a vuoto, quando la protezione viene attivata, il
simbolo " " si accende e il buzzer suona una volta ogni 1 secondo; nel
frattempo, verrà visualizzato il valore della tensione corrente
dell'alimentatore di avviamento.
Protezione da alta tensione in
ingresso
17.5V±0.5V
Tensione della porta EC5 a vuoto, quando la protezione viene attivata, il
carattere " " lampeggia e il cicalino emette un lungo segnale acustico.
Minima resistenza all'identificazione
3±2Ω
La resistenza minima che la pinza può riconoscere.
△V ≥0.3V
Protezione anti-carica
Alimentazione di emergenza, tensione dopo l'accensione> tensione
prima dell'accensione, protezione del grilletto; quando la protezione è
attivata
Il simbolo “ ” è acceso, il simbolo “ ” lampeggia e il cicalino suona
una volta ogni 1 secondo; dopo che l'errore è stato rimosso, può essere
ripristinato allo stato di standby. "
Protezione dalla connessione
inversa
Support
Il fermaglio rosso / nero del fermaglio per cavo è collegato in senso
inverso alla batteria dell'auto (tensione della batteria ≥0,8 V) e la
protezione viene attivata
Quando il simbolo “ ” è acceso, il simbolo “ ” lampeggia, il
cicalino suonerà una volta ogni 1 secondo; dopo che l'errore è stato
rimosso, può essere ripristinato allo stato di standby.
Protezione dalle alte temperature
65±5℃/150±10℉
Quando la protezione è attivata, il carattere " " sarà acceso, il
simbolo " " lampeggerà e il cicalino suonerà una volta al secondo
Support
Protezione da cortocircuito
Nello stato di standby, le estremità della clip rossa e nera sono
cortocircuitate e il simbolo “ ”si accende e il simbolo“ ”L'indicatore
lampeggia e il cicalino suona una volta al secondo; dopo che il guasto è
stato rimosso, può essere ripristinato allo stato di standby.
1
2
3
4
5
6
7
34
No
Term
Technical
ParameterParameter
Other Instructions
Quando la temperatura scende, può tornare allo stato di standby.
Dura 1 sec
"Tensione di alimentazione di emergenza < 6,5 V, continuamente
superiore a 0,2 S; tensione < 5 V, continuamente superiore
0,02 S; la protezione si attiva e il simbolo “ ” lampeggia. "
Dopo che il serracavo è stato attivato per 8 volte consecutive, la
protezione viene attivata e il simbolo di " 8 volte attivazione
protezione volte lampeggia
La tensione della batteria corrente all'avvio di emergenza verrà
visualizzata quando il serracavo è acceso.
Quando il fermacavo è collegato solo alla batteria dell'auto (la tensione
" è acceso,
contemporaneamente viene visualizzata la tensione della batteria
corrente.
Quando la pinza viene accesa per la prima volta, se il relè ha una
mancata adesione, il simbolo " " lampeggerà e il buzzer suonerà a
lungo.
1000A±10%
Support
Support
Support
Support
8 times
55±5℃/131±10℉
8
9
10
11
12
13
14
35
Rilascio ad alta temperatura
Corrente di partenza
Avvia protezione da sovraccarico
Protezione all'avviamento
Istruzioni di lavoro
Rilevamento della tensione della
batteria
Allarme mancata adesione starter

Modello
Capacità della batteria
Ingresso USB C.
USB1 Uscita 1
USB2 Uscita2
Dimensioni (L * W * H)
Fusibile di sovraccarico / scarica
Temperatura di lavoro
Protezione contro il riflusso
Protezione da cortocircuito con fusibili
Protezione dall'inversione di polarità
CF800
20000mAh
178*88*38mm
65℃±5℃
Details
36
Avvertenze
1. Utilizzare / conservare in un luogo fuori dalla portata dei bambini piccoli.
2. Non modificare o smontare questo prodotto.
3. Non utilizzarlo in luoghi con liquidi o gas infiammabili o in luoghi con molta polvere, potrebbe causare incendi o
ustioni.
4.Non lasciare il prodotto in un luogo in cui la temperatura supera i 50 ° C (120 ° F).
5V/2A,9V/2A,12V/1.5A
5V/3A,9V/2A,12V/1.5A
5V/2.4A

5.Non utilizzare questo prodotto con le mani bagnate.
6.Non toccare i terminali di questo prodotto con piedini metallici o attaccare la polvere. Inoltre, polvere sui
terminali, ecc.
7.Quando si utilizza questo prodotto, tenerlo lontano dal fuoco come le sigarette.
8. Tenere questo prodotto lontano da fonti di calore come stufe.
9. Se si nota uno strano odore o suono da questo prodotto, interrompere immediatamente l'uso.
10.Per evitare situazioni impreviste, non lasciare il prodotto o il veicolo durante l'utilizzo del prodotto.
11.Prima di utilizzare questo prodotto, tirare il freno laterale del veicolo / parcheggiare la marcia o metterla in folle,
ecc.
che entrambi non si muovono.
12.si prega di non utilizzare questo prodotto durante la ricarica.
13. Non utilizzare i terminali 12V e 5V contemporaneamente.
14. Non avviare la batteria del veicolo se la batteria è estremamente deteriorata o eccessivamente scarica. Ciò
potrebbe causare danni.
Smaltimento delle batterie
La batteria è autonoma e non sostituibile dall'utente. La batteria deve essere smaltita correttamente quando non
mantiene più la carica. Pratiche di ricarica corrette aumenteranno la durata del prodotto.
37

Trouble shooting
Issue
Cause
Remedy
38
Non è possibile iniziare
subito
La luce LED continua a
lampeggiare
Il lampeggiamento non
funziona
Nessun adattatore da
parete
Nessun indicatore
luminoso
Collegamento del morsetto
errato
Il timer di 8 secondi per l'avvio
rapido è scaduto
Stato della batteria basso
Il circuito di protezione funziona
Batteria scarica
L'unità si sta caricando
Carica tramite cavo USB
Batteria scarica
Power bank in modalità off
Assicurati di fissare il cavo del ponticello ROSSO al polo positivo
(+) della batteria. E cavo jumper nero al palo negativo (-) o
all'interno dell'auto.
Avviatore di emergenza scaduto, scollegare i cavi dalla batteria
del veicolo e ricollegarli
Ricaricare l'unità tramite cavo USB fino a quando almeno tre luci
fisse o una carica del 51%
Fare riferimento alla tabella di stato sulla casella dell'indicatore oa
pagina 6 del manuale
Ricarica l'unità tramite cavo USB
Come precauzione di sicurezza, la luce della torcia non
funzionerà mentre l'unità è in carica.Si prega di scollegare l'unità
dalla ricarica o attendere che l'unità finisca di caricarsi prima di
utilizzare la luce.
Collega il cavo USB al computer o a qualsiasi adattatore da
parete USB 2A
Fare riferimento a Indicatore del livello di alimentazione a pagina
6 del manuale
Premere il pulsante di accensione / spegnimento

Garanzia
Il periodo di garanzia di questo prodotto è di 24 mesi dalla data di acquisto.
notare che:
Anche durante il periodo di garanzia, la garanzia non è coperta nei seguenti casi.
1. Cadute, urti, danni dovuti a fattori esterni, riparazioni o modifiche da parte di soggetti diversi da noi.
2. Quando si utilizza una batteria che è stata smontata e modificata. (Se la batteria viene smontata o
modificata, potrebbe esplodere o perdere liquido
3. Deterioramento della batteria. (La batteria è un oggetto di consumo.)
4. Guasto o danno dovuto a fattori esterni. come incendi, terremoti, danni causati dall'acqua, fulmini, altri
disastri naturali, inquinamento, danni da sale, danni da gas (gas solfuro), voltaggio anormale, ecc.
Contattaci
Per qualsiasi domanda o commento sui nostri prodotti, inviare una mail a
[email protected] e ti risponderemo il prima possibile.
39
Battery Jump Starter
Model:CF800
Salida de CC a la carga del cocheAbrazaderas inteligentesarrancador de coche
Cable USB a tipo C Manual de usuario Estuche de transporte
40
paquete de producto

41
especificaciones técnicas

42
No
Función
Boton de encendido /
apagado
Luz indicadora de carga
Linterna
Entrada USB C
USB1 Salida
Salida 2 USB
Puerto de arranque de
salto
Salida DC
Operación
Presione el botón para ver la capacidad restante. Mantenga presionado el
botón para encender / apagar la linterna
Muestra la prensa de carga: 25%, 50%, 75% y 100%
Normal, SOS, estroboscópico, luz de advertencia, apagado
Cargue el motor de arranque con cable tipo c
Cargue su teléfono, tableta, cámara, etc. 75% más rápido que la carga
estándar.
Cargue su teléfono, tableta, cámara, etc. Salida de 5V / 2.4A 12W
Inserte el enchufe en el puerto de arranque de salto
Suministro de energía CC para el encendedor de cigarrillos del automóvil
Luz indicadora de poder
Presione el botón de encendido para verificar la capacidad del arrancador auxiliar. Luces indicadoras como en
la imagen de abajo (25%, 50%, 75%, 100%)
Cargar el arrancador Jump
Nota: Para reducir el riesgo de incendio o descarga eléctrica, se elegirá un adaptador que sea adecuado para la
aplicación y esté certificado como fuente de alimentación o adaptador de corriente de clase 2 o LPS."
43
Operación
1.Conecte el cable USB a la computadora o cualquier adaptador de pared USB 2A (no incluido)
2.Conecte el cable UCB C al arrancador.
Nota: Se recomienda recargar el arrancador cada 3-4 meses para mantener la eficiencia y prolongar la vida útil de
la batería interna incluso si la unidad no se ha utilizado.
Carga de sus dispositivos
Utilice el cable USB del fabricante original que vino con su dispositivo y conéctelo a uno de los puertos de salida
USB. Puede cargar dos dispositivos al mismo tiempo.
Uno de los puertos tiene una salida máxima de 9V / 2.4A mientras que el otro tiene una salida máxima de 5V /
2.4A.
El indicador de nivel de energía mostrará el nivel de la batería. Para verificar la capacidad de energía
nuevamente, simplemente presione el botón de encendido una vez."
Arrancar un coche
Para arrancar la batería del vehículo, ponga el vehículo en estacionamiento
(neutral si el vehículo tiene transmisión manual) y active el freno de
emergencia. Busque la batería del vehículo y siga los pasos que se
enumeran a continuación.
Los cables de salto están codificados por colores, ROJO para POSITIVO (+)
y NEGRO para NEGATIVO (-).
No mezcle los cables ni permita que los extremos de metal se toquen entre
sí porque esto puede dañar la batería, el sistema de carga y / o los
componentes electrónicos de un vehículo."
44
Nota:
1.Este producto es solo para automóviles de 12V.Verifique para asegurarse de que 3 o 4 luces indicadoras estén
encendidas (el nivel de la batería está por encima del 50%) antes de usarlo para arrancar su automóvil.
2.avant d'utiliser le démarreur pour démarrer le moteur, veuillez garder les portes et les lumières éteintes."
Paso 1: Inserte el enchufe de la abrazadera de la batería inteligente completamente en el arrancador, la pantalla
de la abrazadera mostrará el voltaje del arrancador.
Los pequeños iconos superiores se muestran de izquierda a derecha. Puede continuar con el siguiente paso."
"Paso 2: Conecte la pinza roja al terminal positivo (+) de la batería del automóvil y conecte la pinza
negra al negativo (-) de la batería del automóvil.
Si la pantalla del clip inteligente muestra el voltaje actual de la batería, puede continuar con seguridad
el siguiente paso de la operación."
"Sin emabargo: Si la luz indicadora está encendida pero si la pantalla muestra " ", el voltaje muestra "
" con pitidos de advertencia, indica: 1. La pinza de la batería puede estar conectada al revés. Si es
así, debe desconectar la abrazadera de la batería del vehículo y el arrancador auxiliar.
2.Ajuste las abrazaderas para un contacto máximo con los terminales de la batería."
45
Paso 3: Enciende tu auto.
Si no pudo encender su automóvil, debe desconectar la abrazadera de la batería del vehículo y el arrancador
auxiliar. Espere al menos 30 segundos y vuelva a intentarlo.
Si no pudo encender su automóvil después de 2 intentos. Comuníquese con el vendedor para obtener asistencia."
Paso 4:
Una vez que su automóvil se enciende, retire la abrazadera de la batería del automóvil y el arrancador en 30
segundos."
Detección de voltaje de batería de automóvil
Cuando el clip inteligente solo está conectado a la batería del automóvil (el voltaje de la batería del automóvil
debe ser ≥8V), el símbolo " " se iluminará y el voltaje actual de la batería se mostrará al mismo tiempo."
46

Otras instrucciones
Voltaje del puerto EC5 sin carga, cuando se activa la protección, el
símbolo “ ” se iluminará y el zumbador sonará una vez cada 1
segundo; Mientras tanto, se mostrará el valor de voltaje actual de la
fuente de alimentación de arranque.
Voltaje del puerto EC5 sin carga, cuando se activa la protección, el
carácter " " parpadea y el zumbador emite un pitido largo.
La mínima resistencia que puede reconocer la pinza.
"Fuente de alimentación de emergencia, voltaje después del encendido>
voltaje antes del encendido, protección del gatillo;
Cuando se activa la protección, el símbolo “ ” está encendido, el
símbolo “ ” parpadea y el timbre suena una vez cada 1 segundo; Una
vez que se elimina la falla, se puede restaurar al estado de espera.
El clip rojo / negro del clip de alambre está conectado a la inversa a la
batería del automóvil (voltaje de la batería ≥0,8 V) y la protección se
activa
Cuando el símbolo “ ” está encendido, el símbolo “ ” parpadea, el
timbre sonará una vez cada 1 segundo; Una vez que se elimina la falla,
se puede restaurar al estado de espera."
En el estado de espera, los extremos del clip rojo y negro están en
cortocircuito y el símbolo “ ” se enciende, el indicador parpadea y el
zumbador suena una vez por segundo; Una vez que se elimina la falla,
se puede restaurar al estado de espera.
Cuando se activa la protección, el carácter “ ” estará encendido, el
símbolo “ ” parpadeará y el timbre sonará una vez por segundo.
14.0V±0.5V
17.5V±0.5V
3±2Ω
△V ≥0.3V
Apoyo
65±5℃/150±10℉
Apoyo
1
2
3
4
5
6
7
47
No
Parámetro
técnicoParameter
Término
Entrada de protección de bajo
voltaje
Entrada de protección de alto
voltaje
Resistencia mínima de
identificación
Protección anti-carga
Protección de conexión inversa
Protección contra
cortocircuitos
Protección de alta temperatura
Cuando la temperatura desciende, puede volver al estado de espera.
Dura 1 s
Voltaje de la fuente de alimentación de emergencia < 6.5V,
excediendo continuamente 0.2S; voltaje < 5V, excediendo
continuamente 0.02S; La protección se activa y el símbolo “ ”
parpadea.
Después de que la abrazadera de cable se activa 8 veces de forma
continua, la protección se activa y el símbolo de " " parpadea
El voltaje actual de la batería de energía de arranque de emergencia
se mostrará cuando se encienda la abrazadera de alambre.
Cuando el clip de alambre solo está conectado a la batería del
símbolo " " se enciende, el voltaje actual de la batería se muestra
al mismo tiempo.
Cuando la pinza se enciende por primera vez, si el relé tiene una falla
de adherencia, el símbolo " " parpadeará y el zumbador sonará
por un tiempo prolongado.
1000A±10%
Apoyo
Apoyo
Apoyo
Apoyo
8 times
55±5℃/131±10℉
8
9
10
11
12
13
14
48
Liberación a alta temperatura
Corriente de arranque
Iniciar protección contra
rebasamiento
Protección de puesta en
marcha
Instrucciones de trabajo
Detección de voltaje de
batería
Alarma de fallo de adherencia
del motor de arranque

Modelo
Capacidad de la batería
Entrada USB C
USB1 Salida
USB2 Salida
Dimensiones (L * W * H)
Fusible de sobrecarga / descarga
Temperatura de trabajo
Protección contra flujo negro
Protección de fusible de cortocircuito
Protección contra polaridad inversa
CF800
20000mAh
178*88*38mm
65℃±5℃
Detalles
49
Advertencias
1. Use / almacene en un lugar que esté fuera del alcance de los niños pequeños.
2. No modifique ni desmonte este producto.
3. No lo use en lugares con líquidos o gases inflamables, o en lugares con mucho polvo, puede causar fuego o
quemaduras.
4. No deje este producto en un lugar donde la temperatura supere los 120 ° F (50 ° C).
5. No utilice este producto con las manos mojadas.
5V/2A,9V/2A,12V/1.5A
5V/3A,9V/2A,12V/1.5A
5V/2.4A

6. No toque los terminales de este producto con clavijas de metal ni adhiera polvo. Además, polvo en los
terminales, etc.
7.Al utilizar este producto, manténgalo alejado del fuego, como los cigarrillos.
8. Mantenga este producto alejado de fuentes de calor como estufas.
9. Si nota un olor o sonido extraño de este producto, deje de usarlo inmediatamente.
10. Para evitar una situación inesperada, no abandone el producto ni el vehículo mientras lo utiliza.
11.Antes de usar este producto, tire del freno lateral del vehículo / estacione el engranaje o póngalo en neutral,
etc.
que ambos no se mueven.
12.Por favor, no use este producto mientras se carga.
13. No conecte terminales de 12V y 5V al mismo tiempo.
"14. No arranque la batería del vehículo si la batería está muy deteriorada o descargada en exceso. Esto puede
llevar adañado.
Eliminación de baterías
La batería es autónoma y no puede ser reemplazada por el consumidor, la batería debe desecharse correcta-
mente cuando ya no tenga carga. Las prácticas de carga adecuadas aumentarán la vida útil del producto.
Solución de problemas
50

Trouble shooting
51
Problema
No se puede arrancar
La luz LED sigue
parpadeando
Parpadear no funciona
Sin adaptador de pared
Sin luz indicadora
Causa
Conexión de abrazadera incorrecta
El temporizador de 8 segundos para
arrancar ha expirado
Estado de batería baja
El circuito de protección está
funcionando
Batería baja
La unidad se está cargando
Carga mediante cable USB
Batería baja
Banco de energía en modo apagado
Solución
Asegúrese de sujetar el cable puente ROJO al poste positivo (+)
de la batería. Y cable de puente negro al poste negativo (-) o al
interior del automóvil.
Se agotó el tiempo de espera del arrancador, desconecte los
cables de la batería del vehículo y vuelva a conectarlo.
Recargue la unidad a través de un cable USB hasta que al
menos tres luces sólidas o una carga del 51%.
Consulte la tabla de estado en el cuadro del indicador o la
página 6 del manual.
Recargue la unidad mediante un cable usb
Como medida de seguridad, la luz de la linterna no funcionará
mientras la unidad se esté cargando. Desenchufe la unidad para
que no se cargue o espere hasta que la unidad termine de
cargarse antes de usar la luz.
Conecte el cable USB a la computadora o cualquier adaptador
de pared USB 2A
Consulte Indicador de nivel de potencia en la página 6 del
manual.
Presione el botón de encendido / apagado

Garantía
El período de garantía de este producto es de 24 meses a partir de la fecha de compra.
Tenga en cuenta:
Incluso dentro del período de garantía, la garantía no está cubierta en los siguientes casos.
1. Caída, impacto, daño debido a factores externos, reparación o modificación por parte de otra persona.
2. Cuando utilice una batería que haya sido desmontada y modificada. (Si la batería se desmonta o modifica,
puede explotar o tener fugas
3. Deterioro de la batería. (La batería es un artículo consumible).
4. Fallo o daño debido a factores externos. como incendios, terremotos, daños por agua, rayos, otros desastres
naturales, contaminación, daños por sal, daños por gas (gas sulfuro), voltaje anormal, etc.
Contacta con nosotros
Para cualquier consulta o comentario sobre nuestros productos, envíe un correo electrónico a
[email protected], y te responderemos lo antes posible.
52
Battery Jump Starter
Model:CF800
DC out To Car ChargeIntelligente KlemmenStarthilfe
USB-Kabel vom Typ C. Benutzerhandbuch Tragetasche
53
Produktpaket
54
technische Spezifikationen

55
No
Funktion
An / aus Schalter
Ladeanzeige
Taschenlampe
USB C Eingang
USB1 Ausgang
USB2 Ausgang
Starthilfe Port
Gleichstromausgang
Betrieb
Drücken Sie die Taste, um die verbleibende Kapazität anzuzeigen.
Drücken Sie lange die Taste, um die Taschenlampe ein- und
auszuschalten
Zeigt die Ladepresse an: 25%, 50%, 75% und 100%
Normal, SOS, Blitz, Warnlicht, aus
Laden Sie den Anlasser mit einem Kabel vom Typ c auf
Laden Sie Ihr Telefon, Tablet, Ihre Kamera usw. 75% schneller als die
Standardladung auf
Laden Sie Ihr Telefon, Tablet, Ihre Kamera usw. Auf. 5V / 2,4A 12W
Ausgang
Stecken Sie den Stecker in den Starthilfe-Port
Versorgen Sie den Zigarettenanzünder mit Gleichstrom

Kontrollleuchte
Drücken Sie den Netzschalter, um die Kapazität des Starthilfes zu überprüfen. Anzeigelampen wie im Bild unten
dargestellt (25%, 50%, 75%, 100%)
Aufladen des Starthilfegeräts
Hinweis: Um die Gefahr eines Brandes oder eines Stromschlags zu verringern, muss ein Adapter ausgewählt werden,
der für die Anwendung geeignet ist und als Netzteil oder Netzteil der Klasse 2 oder LPS zertifiziert ist."
56
Betrieb

1. Stecken Sie das USB-Kabel in einen Computer oder einen USB 2A-Wandadapter (nicht im Lieferumfang
enthalten). 2. Schließen Sie das USB C-Kabel an den Starthilfe an
Hinweis: Es wird empfohlen, den Starthilfe alle 3-4 Monate aufzuladen, um die Effizienz zu erhalten und die
Lebensdauer der internen Batterie zu verlängern, auch wenn das Gerät nicht verwendet wurde.
Laden Sie Ihre Geräte auf
Verwenden Sie das mit Ihrem Gerät gelieferte USB-Kabel des Originalherstellers und schließen Sie es an einen
der USB-Ausgangsanschlüsse an. Sie können zwei Geräte gleichzeitig aufladen. Einer der Anschlüsse hat eine
maximale Ausgangsleistung von 9 V / 2,4 A, während der andere eine maximale Ausgangsleistung hat Ausgang
von 5V / 2.4A. Die Leistungsstandsanzeige zeigt den Batteriestand an. Um die Stromkapazität erneut zu
überprüfen, drücken Sie einfach einmal den Netzschalter. "
Ein Auto starten
Um die Fahrzeugbatterie zu starten, stellen Sie das Fahrzeug in den Park
(Neutral, wenn das Fahrzeug über ein Schaltgetriebe verfügt) und ziehen
Sie die Notbremse an. Suchen Sie die Batterie für das Fahrzeug und
befolgen Sie die unten aufgeführten Schritte.
Sprungkabel sind farbcodiert, ROT für POSITIV (+) und SCHWARZ für
NEGATIV (-). Verwechseln Sie nicht die Kabel und lassen Sie nicht zu, dass
sich die Metallenden berühren, da dies die Batterie, das Ladesystem und /
oder die Elektronik eines Fahrzeugs beschädigen kann."
57

"Hinweis:
1.Dieses Produkt ist nur für 12-V-Fahrzeuge geeignet.Vergewissern Sie sich, dass 3 oder 4 Kontrollleuchten
leuchten (der Batteriestand liegt über 50%), bevor Sie es zum Starten Ihres Fahrzeugs verwenden.
2.Antes de usar el arrancador auxiliar para arrancar el motor, mantenga las puertas y luces apagadas. "
Schritt 1: Stecken Sie den Stecker der Smart-Batterie-Klemme vollständig in den Starthilfe. Auf dem
Klemmbildschirm wird die Spannung des Starters angezeigt. Die oberen kleinen Symbole werden von
links nach rechts angezeigt. Sie können mit dem nächsten Schritt fortfahren.
Schritt 2: Verbinden Sie die rote Klemme mit dem Pluspol (+) der Autobatterie und verbinden Sie die
schwarze Klemme mit dem Minuspol (-) der Autobatterie. Wenn der Smart-Clip-Bildschirm die aktuelle
Batteriespannung anzeigt, können Sie die Spannung sicher fortsetzen Bedienung nächster Schritt.
Allerdings: Wenn die Anzeigelampe leuchtet, auf dem Bildschirm jedoch " " , angezeigt wird, zeigt die
Spannung " " mit Signaltonwarnung an, wird Folgendes angezeigt: 1. Die Batterieklemme kann in
umgekehrter Richtung angeschlossen werden, wenn Sie die Batterieklemme trennen müssen vom Fahrzeug
und dem Starthilfe.
2.Stellen Sie die Klemmen auf maximalen Kontakt mit den Batterieklemmen ein."
58
"Schritt 3: Starten Sie Ihr Auto.
Wenn Sie Ihr Auto nicht starten konnten, müssen Sie die Batterieklemme vom Fahrzeug und vom Starthilfe
trennen. Warten Sie mindestens 30 Sekunden und versuchen Sie es dann erneut. Wenn Sie Ihr Auto nach 2
Versuchen nicht starten konnten, wenden Sie sich bitte an den Verkäufer Unterstützung."
"Schritt 4:
Sobald Ihr Auto gestartet ist, entfernen Sie die Batterieklemme innerhalb von 30 Sekunden von der Autobatterie
und dem Starthilfe.
"Erkennung der Autobatteriespannung
Wenn der Smart Clip nur an die Autobatterie angeschlossen ist (die Autobatteriespannung muss ≥ 8 V sein),
leuchtet das Symbol " " auf und gleichzeitig wird die aktuelle Batteriespannung angezeigt."
59

Andere Anweisungen
EC5-Anschlussspannung im Leerlauf Wenn der Schutz ausgelöst wird,
leuchtet das Symbol „ “ auf und der Summer ertönt alle 1 Sekunde.
In der Zwischenzeit wird der aktuelle Spannungswert der
Startstromversorgung angezeigt.
EC5-Anschlussspannung ohne Last. Wenn der Schutz ausgelöst wird,
blinkt das Zeichen " " und der Summer ertönt lange.
Der minimale Widerstand, den die Klemme erkennen kann.
Notstromversorgung, Spannung nach Zündung> Spannung vor
Zündung, Schutz auslösen; wenn Schutz ausgelöst wird
Das Symbol „ “ leuchtet, das Symbol „ “ blinkt und der Summer
ertönt alle 1 Sekunde. Nachdem der Fehler behoben wurde, kann er in
den Standby-Zustand zurückversetzt werden.
Der rot / schwarze Clip des Kabelclips ist in umgekehrter Reihenfolge
mit der Autobatterie verbunden (Batteriespannung ≥ 0,8 V) und der
Schutz wird ausgelöst
Wenn das Symbol „ “ leuchtet, blinkt das Symbol „ “ und der
Summer ertönt alle 1 Sekunde. Nachdem der Fehler behoben wurde,
kann er in den Standby-Zustand zurückversetzt werden."
Im Standby-Zustand werden die roten und schwarzen Clipenden
kurzgeschlossen, und das Symbol" "leuchtet auf und das Symbol"
".Die Anzeige blinkt und der Summer ertönt einmal pro Sekunde.
Nachdem der Fehler behoben wurde, kann er in den Standby-Zustand
zurückversetzt werden. "
Wenn der Schutz ausgelöst wird, leuchtet das Zeichen „ “, das
Symbol „ “ blinkt und der Summer ertönt einmal pro Sekunde
1
2
3
4
5
6
7
60
No
Term
Eingang Niederspannungss-
chutz
Hochspannungsschutz eingeben
Minimaler Identifikationswider-
stand
Ladeschutz
Rückwärtsverbindungsschutz
Kurzschlussschutz
Hochtemperaturschutz
Technische
Parameter
14.0V±0.5V
17.5V±0.5V
3±2Ω
△V ≥0.3V
Unterstützung
Unterstützung
65±5℃/150±10℉

Wenn die Temperatur sinkt, kann sie in den Standby-Zustand
zurückkehren.
Hält 1s an
Notstromversorgungsspannung < 6,5 V, die kontinuierlich 0,2 S
überschreitet; Spannung < 5 V, die kontinuierlich übersteigt
0,02 S; Der Schutz wird ausgelöst und das Symbol „ “ blinkt. "
Nachdem die Drahtklemme 8-mal kontinuierlich aktiviert wurde, wird
der Schutz ausgelöst und das Symbol "8-maliger
Aktivierungszeit-Schutz" blinkt
Die aktuelle Spannung der Notstartbatterie wird angezeigt, wenn die
Kabelklemme eingeschaltet wird.
Wenn die Kabelklemme nur an die Autobatterie angeschlossen ist (die
"
gleichzeitig die aktuelle Batteriespannung an.
Wenn die Klemme zum ersten Mal eingeschaltet wird und das Relais
einen Haftungsfehler aufweist, blinkt das Symbol " " und der
Summer piept lange.
8
9
10
11
12
13
14
61
Hochtemperaturfreigabe
Anlaufstrom
Starten Sie den Überlaufschutz
Anlaufschutz
Work instructions
Battery voltage detection
Starter adhesion failure alarm
55±5℃/131±10℉
1000A±10%
Unterstützung
8 mal
Unterstützung
Unterstützung
Unterstützung

CF800
20000mAh
178*88*38mm
65℃±5℃
Einzelheiten
62
Modell
Batteriekapazität
USB C Eingang
USB1 Ausgang
USB2 Ausgabe
Abmessungen (L * B * H)
Überlast- / Entladungssicherung
Arbeitstemperatur
Blackflow-Schutz
Kurzschluss-Sicherungsschutz
Verpolungsschutz
Warnungen
1. Verwenden / lagern Sie es an einem Ort, der für kleine Kinder unerreichbar ist.
2. Ändern oder zerlegen Sie dieses Produkt nicht.
3. Nicht an Orten mit brennbaren Flüssigkeiten oder Gasen oder an Orten mit viel Staub verwenden. Dies kann zu
Bränden oder Verbrennungen führen.
4. Lassen Sie dieses Produkt nicht an einem Ort, an dem die Temperatur 50 ° C überschreitet.
5V/2A,9V/2A,12V/1.5A
5V/3A,9V/2A,12V/1.5A
5V/2.4A

5. Verwenden Sie dieses Produkt nicht mit nassen Händen.
6. Berühren Sie die Anschlüsse dieses Produkts nicht mit Metallstiften und bringen Sie keinen Staub an. Auch
Staub auf den Klemmen usw.
7.Wenn Sie dieses Produkt verwenden, halten Sie es bitte von Feuer wie Zigaretten fern.
8. Halten Sie dieses Produkt von Wärmequellen wie Öfen fern.
9. Wenn Sie einen seltsamen Geruch oder ein seltsames Geräusch von diesem Produkt bemerken, stellen Sie die
Verwendung sofort ein.
10. Um eine unerwartete Situation zu vermeiden, verlassen Sie das Produkt oder Fahrzeug nicht, während Sie das
Produkt verwenden.
11. Bevor Sie dieses Produkt verwenden, ziehen Sie die Seitenbremse des Fahrzeugs / stellen Sie das Getriebe
ab oder stellen Sie es in den Leerlauf usw. Stellen Sie die Sicherheit sicher
dass sich beide nicht bewegen.
12.Bitte verwenden Sie dieses Produkt nicht während des Ladevorgangs.
13.Schließen Sie nicht gleichzeitig 12V- und 5V-Klemmen an.
14.Starten Sie die Fahrzeugbatterie nicht sofort, wenn die Batterie stark beschädigt oder überladen ist. Dies kann
dazu führen beschädigt.
Batterieentsorgung
Der Akku ist in sich geschlossen und kann nicht vom Verbraucher ausgetauscht werden. Der Akku muss
ordnungsgemäß entsorgt werden, wenn er nicht mehr geladen ist. Durch ordnungsgemäßes Laden wird die
Lebensdauer des Produkts verlängert. Informationen zum Recycling von Akkus erhalten Sie gebührenfrei.
Fehlerbehebung
63

Fehlerbehebung
64
Problem
Kann nicht springen
LED-Licht blinkt weiter
Das Blinken funktioniert
nicht
Kein Wandadapter
Keine Kontrollleuchte
Ursache
Falsche Klemmverbindung
Der 8-Sekunden-Timer für den
Starthilfe ist abgelaufen
Niedriger Batteriestatus
Schutzschaltung funktioniert
Niedriger Batteriestatus
Das Gerät wird aufgeladen
Aufladen über USB-Kabel
Niedriger Batteriestatus
Power Bank im Aus-Modus
Abhilfe
Stellen Sie sicher, dass das ROTE Überbrückungskabel am
Postive (+) -Pfosten der Batterie befestigt ist. Und das Schwarze
Überbrückungskabel am Minuspol (-) oder am Fahrzeuginnen-
raum.
Zeitüberschreitung beim Starthilfe, Kabel von der Fahrzeugbat-
terie getrennt und wieder angeschlossen
Laden Sie das Gerät über ein USB-Kabel auf, bis mindestens drei
Dauerlichter oder 51% aufgeladen sind
Siehe die Statustabelle auf dem Anzeigefeld oder Seite 6 des
Maunals
Laden Sie das Gerät über ein USB-Kabel auf
Aus Sicherheitsgründen funktioniert die Taschenlampe während
des Ladevorgangs nicht. Bitte ziehen Sie den Netzstecker aus
der Steckdose oder warten Sie, bis der Ladevorgang
abgeschlossen ist, bevor Sie das Licht verwenden.
Stecken Sie das USB-Kabel in einen Computer oder einen USB
2A-Wandadapter
Siehe Leistungsstufenanzeige auf Seite 6 des Handbuchs
Drücken Sie das Gerät ein / aus

Garantie
Die Garantiezeit für dieses Produkt beträgt 24 Monate ab Kaufdatum.
bitte beachten Sie:
Auch innerhalb der Garantiezeit ist die Garantie in den folgenden Fällen nicht abgedeckt.
1. Sturz, Aufprall, Beschädigung durch äußere Einflüsse, Reparatur oder Änderung durch andere Personen als
uns.
2. Bei Verwendung einer Batterie, die zerlegt und modifiziert wurde. (Wenn der Akku zerlegt oder modifiziert
wird, kann er explodieren oder auslaufen
3. Batterieverschlechterung. (Die Batterie ist ein Verbrauchsartikel.)
4. Ausfall oder Beschädigung durch äußere Einflüsse. wie Feuer, Erdbeben, Wasserschäden, Blitzeinschlag,
andere Naturkatastrophen, Umweltverschmutzung, Salzschäden, Gasschäden (Sulfidgas), abnormale
Spannung usw.
kontaktiere uns
Für Anfragen oder Kommentare zu unseren Produkten senden Sie bitte eine E-Mail an
[email protected], und wir werden uns so schnell wie möglich bei Ihnen melden.
65
Battery Jump Starter
Model:CF800
カー チャージへ のDC出力ス マ ートクランプジャンプスターター
USB-Type-Cケーブル ユーザーマニュアル キャリングケース
66
パッケージ
67
技術仕様

68
No
操作
ボタンを押して、残りの容量を確認します。ボタンを長押しして、懐中
電灯のオン/オフを切り替えます。
充電プレスを表示:25%、50%、75%、100%
通常、SOS、ストロボ、警告ライト、オフ
タイプケーブルでスターターを充電します
スマートフォン、タブレット、カメラなどを通常の充電より75%速く充
電します
携帯電話、タブレット、カメラなどを充電します。 5V / 2.4A12W出力
ジャンプスタートポートにプラグを挿入します
車のシガレットライターにDC電源を供給します
関数
オン/オフボタン
充電インジケーター
ライト
懐中電灯
USBC入力
出力1USB
出力2USB
ジャンプスタートポ
ート
DC出力
4
電 源 インジケータライト
電源ボタンを押して、ジャンプスターターの容量を確認します。インジケーターは下の図のように点灯します
(25%、50%、75%、100%)
ジャンプスターターの充電
注:火災や感電のリスクを軽減するために、アプリケーションに適し、クラス2またはLPS電源または電源アダ
プターとして認定されているアダプターを選択する必要があります。"
69
操作

1.USBケーブルをコンピューターまたはUSB2Aウォールアダプター(別売)に差し込みます。2。UCBCケーブルをジ
ャンプスターターに接続します。
注:ユニットを使用していなくても、効率を維持し、内蔵バッテリーの寿命を延ばすために、ジャンプスタータ
ーを3~4か月ごとに再充電することをお勧めします。
デバイスの充 電
デバイスに付属の元のメーカーのUSBケーブルを使用して、USB出力ポートの1つに接続します。 2つのデバイス
を同時に充電できます。 一方のポートの最大出力は9V / 2.4Aで、もう一方のポートの最大出力は5V /2.4Aです。
電力レベルインジケーターにバッテリーレベルが表示されます。 電力容量を再度確認するには、電源ボタンを1
回押すだけです。"
車 をジャンプスタート
車両のバッテリーをジャンプスタートするには、車両を駐車場に置き(車両
にマニュアルトランスミッションがある場合はニュートラル)、緊急ブレー
キをかけます。 車両のバッテリーを見つけて、以下の手順に従います。
ジャンプケーブルは色分けされており、POSITIVE(+)は赤、NEGATIVE(
-)は黒です。 ケーブルを混同したり、金属の端が互いに接触したりしない
でください。バッテリー、充電システム、および/または車両の電子機器が
損傷する可能性があります。"
70
注意:
1.この製品は12V車専用です。 車をジャンプスタートする前に、3つまたは4つのインジケーターライトが点灯して
いる(バッテリーレベルが50%を超えている)ことを確認してください。
2.ジャンプスターターを使用してエンジンを始動する前に、ドアとライトをオフにしておいてください。"
ステップ1:スマートバッテリークランプのプラグをジャンプスターターに完全に挿入します。クラ
ンプ画面にはスターターだけの電圧が表示されます。上部の小さなアイコンが左から右に表示されま
す。 次のステップに進むことができます。
ステップ2:赤いクランプをカーバッテリーのプラス端子(+)に接続し、黒いクランプをカーバッテリーの
マイナス(-)に接続します。スマートクリップ画面に現在のバッテリー電圧が表示されている場合は、安全
に続行できます。 操作次のステップ。
"ただし、表示灯が点灯しているのに画面に「 」が表示されている場合、電圧が「 」と表示
され、ビープ音が鳴ります。1と表示されます。バッテリークランプが逆に接続されている可能性があり
ます。その場合は、バッテリークランプを外す必要があります。 車両とジャンプスターターから。
2.バッテリー端子との接触が最大になるようにクランプを調整します。"
71
"ステップ3:車を始動します。
車の始動に失敗した場合は、バッテリークランプを車両とジャンプスターターから外す必要があります。 30秒以
上待ってから、再試行してください。 2回試行しても車を始動できなかった場合。 サポートについては、販売者
にお問い合わせください。"
"ステップ4:
あなたの車が始動したら。 30秒以内にカーバッテリーとジャンプスターターからバッテリークランプを取り外し
ます。
"車のバッテリー電圧の検出
スマートクリップがカーバッテリーのみに接続されている場合(カーバッテリー電圧は8V以上である必要があり
ます)、「 」記号が点灯し、同時に現在のバッテリー電圧が表示されます。"
72

Other Instructions
無負荷時のEC5ポート電圧、保護がトリガーされると、「 」記号が点灯
し、ブザーが1秒に1回鳴ります。 その間、始動電源の電流-電圧値が表示さ
れます。
無負荷時のEC5ポート電圧、保護がトリガーされると、「 」の文字が
点滅し、ブザーが長く鳴ります。
クランプが認識できる最小抵抗。
非常用電源、点火後の電圧>点火前の電圧、トリガー保護; 保護がトリガー
されたとき
「 」の記号が点灯し、「 」の記号が点滅し、ブザーが1秒に1回鳴り
ます。 障害が除去された後、スタンバイ状態に復元できます。"
"
ワイヤークリップの赤/黒クリップがカーバッテリーに逆接続され(バッテ
リー電圧≥0.8V)、保護がトリガーされます
「 」の記号が点灯しているときは「 」の記号が点滅し、1秒に1回ブザ
ーが鳴ります。 障害が除去された後、スタンバイ状態に復元できます。"
"
スタンバイ状態では、クリップの赤と黒の端が短絡し、「 」の記号が
点灯し、「 」の記号が点灯します。
インジケーターが点滅し、ブザーが1秒に1回鳴ります。 障害が除去された
後、スタンバイ状態に復元できます。"
保護がトリガーされると、「 」の文字が点灯し、「 」の記号が点
滅し、ブザーが1秒に1回鳴ります。
1
2
3
4
5
6
7
73
No
Term
入力低電圧保護
入力高電圧保護
最小識別抵抗
帯電防止保護
逆接続保護
短絡保護
高温保護
Technical Parameter
14.0V±0.5V
17.5V±0.5V
3±2Ω
△V ≥0.3V
Support
Support
65±5℃/150±10℉

温度が下がると、スタンバイ状態に戻ることができます。
1秒持続
非常用電源電圧<6.5V、継続的に0.2Sを超える; 電圧<5V、継続的に
0.02Sを超える; 保護がトリガーされ、「 」記号が点滅します。
ワイヤークランプが8回連続して作動すると、保護が作動し、「
」の記号が点滅します。
ワイヤークランプをオンにすると、現在の緊急始動電源バッテリー
電圧が表示されます。
ワイヤークリップがカーバッテリーのみに接続されている場合(カ
ーバッテリー電圧は8V以上である必要があります)、「 」記号
が点灯すると、現在のバッテリー電圧が同時に表示されます。
初めてクランプの電源を入れたとき、リレーの接着不良が発生する
と、「 」の記号が点滅し、ブザーが長時間鳴ります。
8
9
10
11
12
13
14
74
高温放出
開始電流
オーバーラン保護を開始し
ます
起動時の保護
作業指示書
バッテリー電圧検出
スターター接着不良アラー
ム
55±5℃/131±10℉
1000A±10%
Support
8 times
Support
Support
Support

モデル
バッテリー容量
USBC入力
USB1出力
USB1出力
寸法(L * W * H)
ヒューズの過負荷/放電
作業温度
逆流防止
短絡ヒューズ保護
逆極性保護
CF800
20000mAh
178*88*38mm
65℃±5℃
詳細
75
警告
1.小さなお子様の手の届かない場所で使用/保管してください。
2.本製品を改造または分解しないでください。
3.引火性の液体やガスのある場所、ほこりの多い場所では使用しないでください。火災や火傷の原因になりま
す。
4.本製品を温度が120°F(50°C)を超える場所に放置しないでください。
5V/2A,9V/2A,12V/1.5A
5V/3A,9V/2A,12V/1.5A
5V/2.4A

5.濡れた手で本製品を使用しないでください。
6.本製品の端子に金属ピンで触れたり、ほこりを付けたりしないでください。また、端子等のホコリ等。
7.本製品を使用する際は、タバコなどの火に近づけないでください。
8.本製品をストーブなどの熱源から遠ざけてください。
9.本製品の異臭や異音に気づいた場合は、すぐに使用を中止してください。
10.予期せぬ事態を避けるため、製品の使用中は製品や車両から離れないでください。
11.本製品を使用する前に、車両のサイドブレーキを引く/ギアを駐車するか、ニュートラルにするなどして、安
全を確保してください。
どちらも動かない。
12.充電中は本製品を使用しないでください。
13.12V端子と5V端子を同時に使用しないでください。
14.バッテリーが極端に劣化したり、過放電したりした場合は、車両のバッテリーをジャンプスタートさせない
でください。破損する恐れがあります。
バッテリーの廃棄
バッテリーは自己完結型であり、消費者が交換することはできません。バッテリーが充電されなくなったら、
バッテリーを適切に廃棄する必要があります。 適切な充電方法により、製品の寿命が延びます。
76

Trouble shooting
Remedy
77
Issue
ジャンプスタートできま
せん
LEDライトが点滅し続け
る
点滅が機能しない
ウォールアダプターなし
インジケータなしライト
Cause
クランプ接続が間違っていま
す
ジャンプスタートまでの8秒
のタイマーが期限切れにな
りました
バッテリー残量が少ない
保護回路が機能している
電池残量が少ない
ユニットは充電中です
USBケーブルで充電する
電池残量が少ない
オフモードのパワーバンク
バッテリーのポジティブ(+)ポストにREDジャンパーケーブルを固
定してください。また、黒のジャンパーケーブルをネガティブ(-)ポ
ストまたは車内に接続します。
ジャンプスターターがタイムアウトし、ケーブルを車両のバッテリ
ーから切り離し、再接続しました
少なくとも3つの点灯または51%の充電が行われるまで、USBケー
ブルを介してユニットを再充電します
インジケータボックスまたはマニュアルの6ページにあるステータ
ステーブルを参照してください
USBケーブルを介してユニットを再充電します
安全上の注意として、ユニットの充電中は懐中電灯が機能しませ
ん。ライトを使用する前に、ユニットのプラグを抜くか、ユニットの
充電が完了するまで待ってください。
USBケーブルをコンピューターまたは任意のUSB2AACアダプター
に接 続します
マニュアルの6ページにある電力レベルインジケータを参照してく
ださい
電源のオン/オフを押します。

保証
この製品の保証期間は購入日から24ヶ月です。
ご注意ください:
保証期間内であっても、以下の場合は保証の対象外となります。
1.落下、衝撃、外的要因による損傷、修理、または当社以外の者による改造。
2.分解·改造した電池を使用する場合。 (バッテリーを分解または改造すると、爆発または漏れる可能性があ
ります
3.バッテリーの劣化。 (バッテリーは消耗品です。)
4.外的要因による故障または損傷。 火災、地震、水害、落雷、その他の自然災害、汚染、塩害、ガス被害(硫
化物ガス)、異常電圧など。
お問い合わせ
当社製品に関するお問い合わせやご意見は、メールにてお問い合わせください。
[email protected]、そして私たちはできるだけ早くあなたに応答します。
78