COMMERCIAL ICE MAKER
INSTRUCTION MANUAL
The picture is for reference only. Please be subject to the actual product.
Please read the user manual carefully before using the appliance and keep it for future reference.
Phone Number: +1(510)228-4672

1
IMPORTANT SAFETY REGULATIONS
When using electrical appliances, basic safety precautions should be followed to reduce the
risk of fire, electric shock and injury to persons or property. Please read all instructions
before operating the machine for the first time.
CAUTION: ICE CANNOT BE STORED IN THE ICE BIN DURING THE NIGHTTIME.
IT'S NOT A FREEZER, AND ICE WILL MELT INTO WATER AND DRAIN FROM THE
MACHINE.
● The machine must be assembled correctly according to the installation procedure before
use.
● Do not place the power cord on carpet or other heat sources. Also, do not place the power cord in
an area where people or objects are moving or immerse the power cord in water. The use of
extension cords is not recommended due to the risk of overheating or fire.
● If the power cord is damaged, it must be replaced by the manufacturer, its service department or
similarly qualified persons to avoid a hazard.
● Be sure to pull out the plug when the machine is no longer in use.
● Please pull out the plug or cut off the main power supply before cleaning or repairing the machine.
Note: If the machine needs to be repaired, it is strongly recommended to be operated by a
professional.
● Never pull the power cord with your hand to pull out the plug, and you must hold the plug with
your hand and pull it out in a straight line.
● Do not store explosives, such as combustion supporting spray, in the appliance;
The appliance is intended for domestic and similar purposes, e.g.:
- kitchen areas in shops, offices or other workplaces;
- Guests in farms as well as hotels, motels and residential-type environments;
- family hotel type environment;
- Used in food and beverage industry and similar non-retail industries.
Warning: Do not use the ice machine outdoors or expose it to rain. The ice machine shall be placed
and used indoors free of obstructions, with good ventilation, and away from direct sunlight. A
distance of 5.9 inches/15 cm at least should be kept from the walls in the front, at left or at right to
facilitate heat dissipation.
● Please do not tip or tilt the machine, as this may cause abnormal noise and ice cubes of abnormal
size, and more seriously may cause water leakage.
● If the machine has just been moved from the outdoors in winter, please turn it on after a period of
time when the temperature of the machine rises.
2
● Do not use electrical appliances in the pantry of the appliance other than the type recommended
by the manufacturer.
IMPORTANCE:
● The machine must be grounded and use a power supply of 120V ~/60Hz.
● Only connect to drinking water sources that comply with local drinking water standards.
●In addition to the methods recommended by the manufacturer, mechanical equipment or other
means shall not be used to accelerate the defrosting process, and the refrigeration circuit shall not
be damaged.
●The refrigeration system contains high-pressure refrigerant, and the refrigeration system shall not
be damaged. Special care must be taken during installation and handling. Installation and
maintenance must be carried out by the manufacturer or professionals. Scrap must be disposed of
by designated recycling departments.
WARNING:
RISK OF FIRE !
The ice machine has thermal insulation materials, which are combustible
materials and must be kept away from fire sources. Maintenance must be
carried out by the manufacturer or professionals. Scrap must be disposed of
by designated recycling departments.
The refrigerant used is R290 in this appliance. It is a highly flammable refrigerant. The foam
blowing agent used is Cyclopentane in this appliance. They are highly flammable.
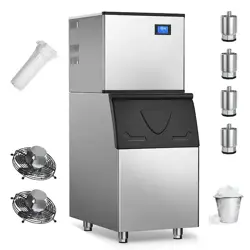
Thank you for selecting our Commercial Ice Maker. In order to protect your legitimate rights and
interests, please pay attention to the following points when you receive the machine.
1. Due to the logistics delivery requirements of this ice machine, we divided the ice machine into
two express delivery packages, one for the ice bin and another for the main machine
2. The outer packing of the machine is intact.
3. Machine's model is consistent with your purchase.
4. The appearance of the machine is in good condition.
5. The attached parts are complete.
6. The internal components of the machine are in good condition.
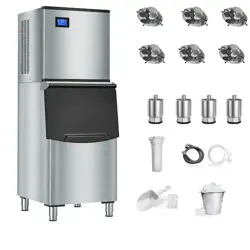
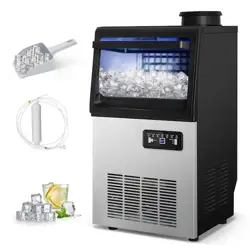
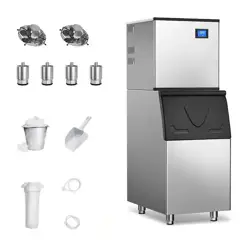
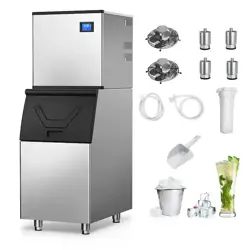
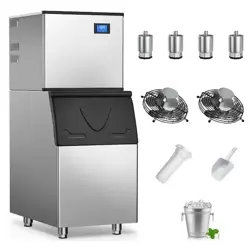
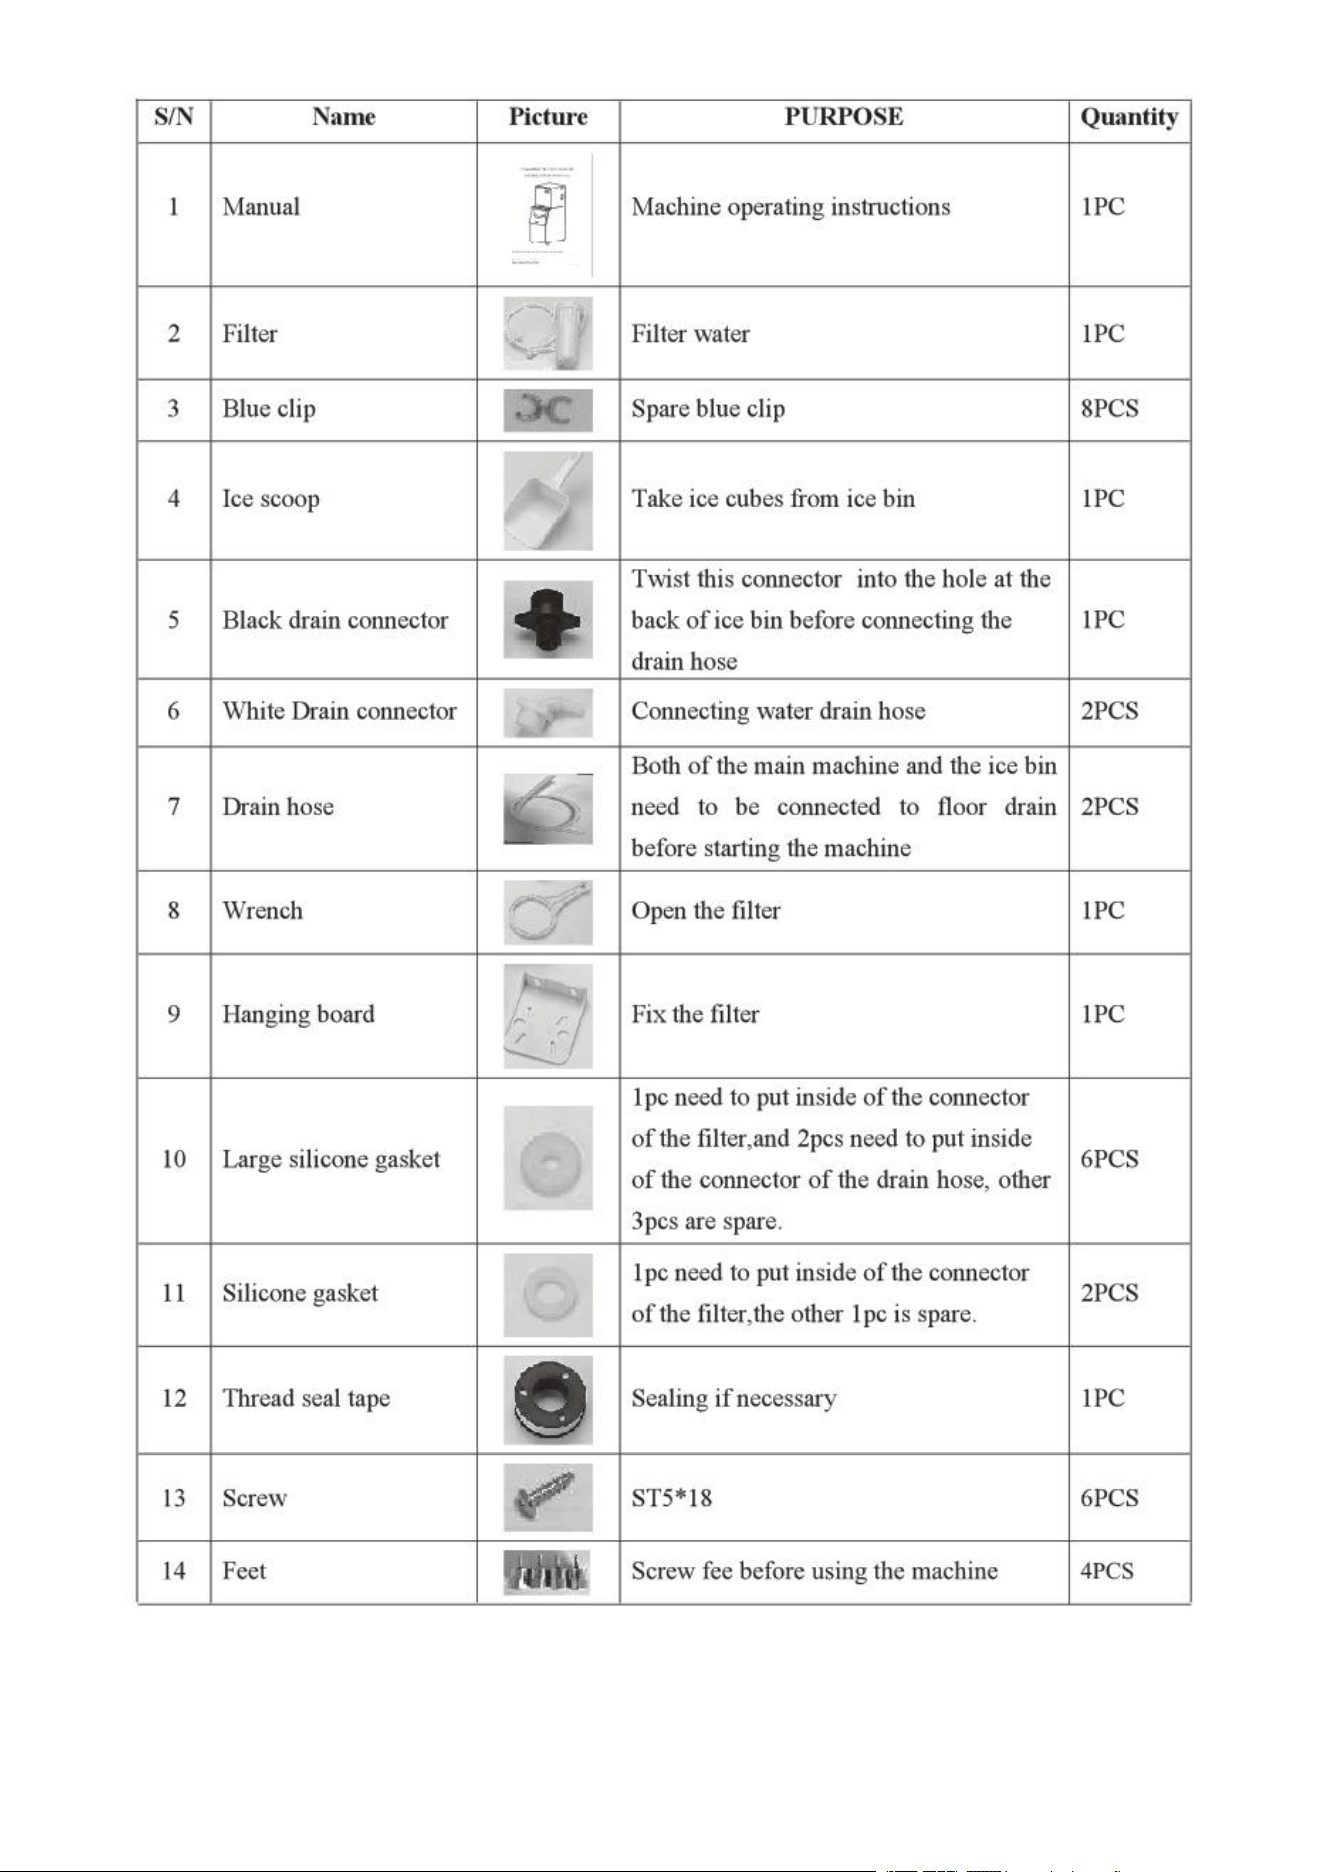
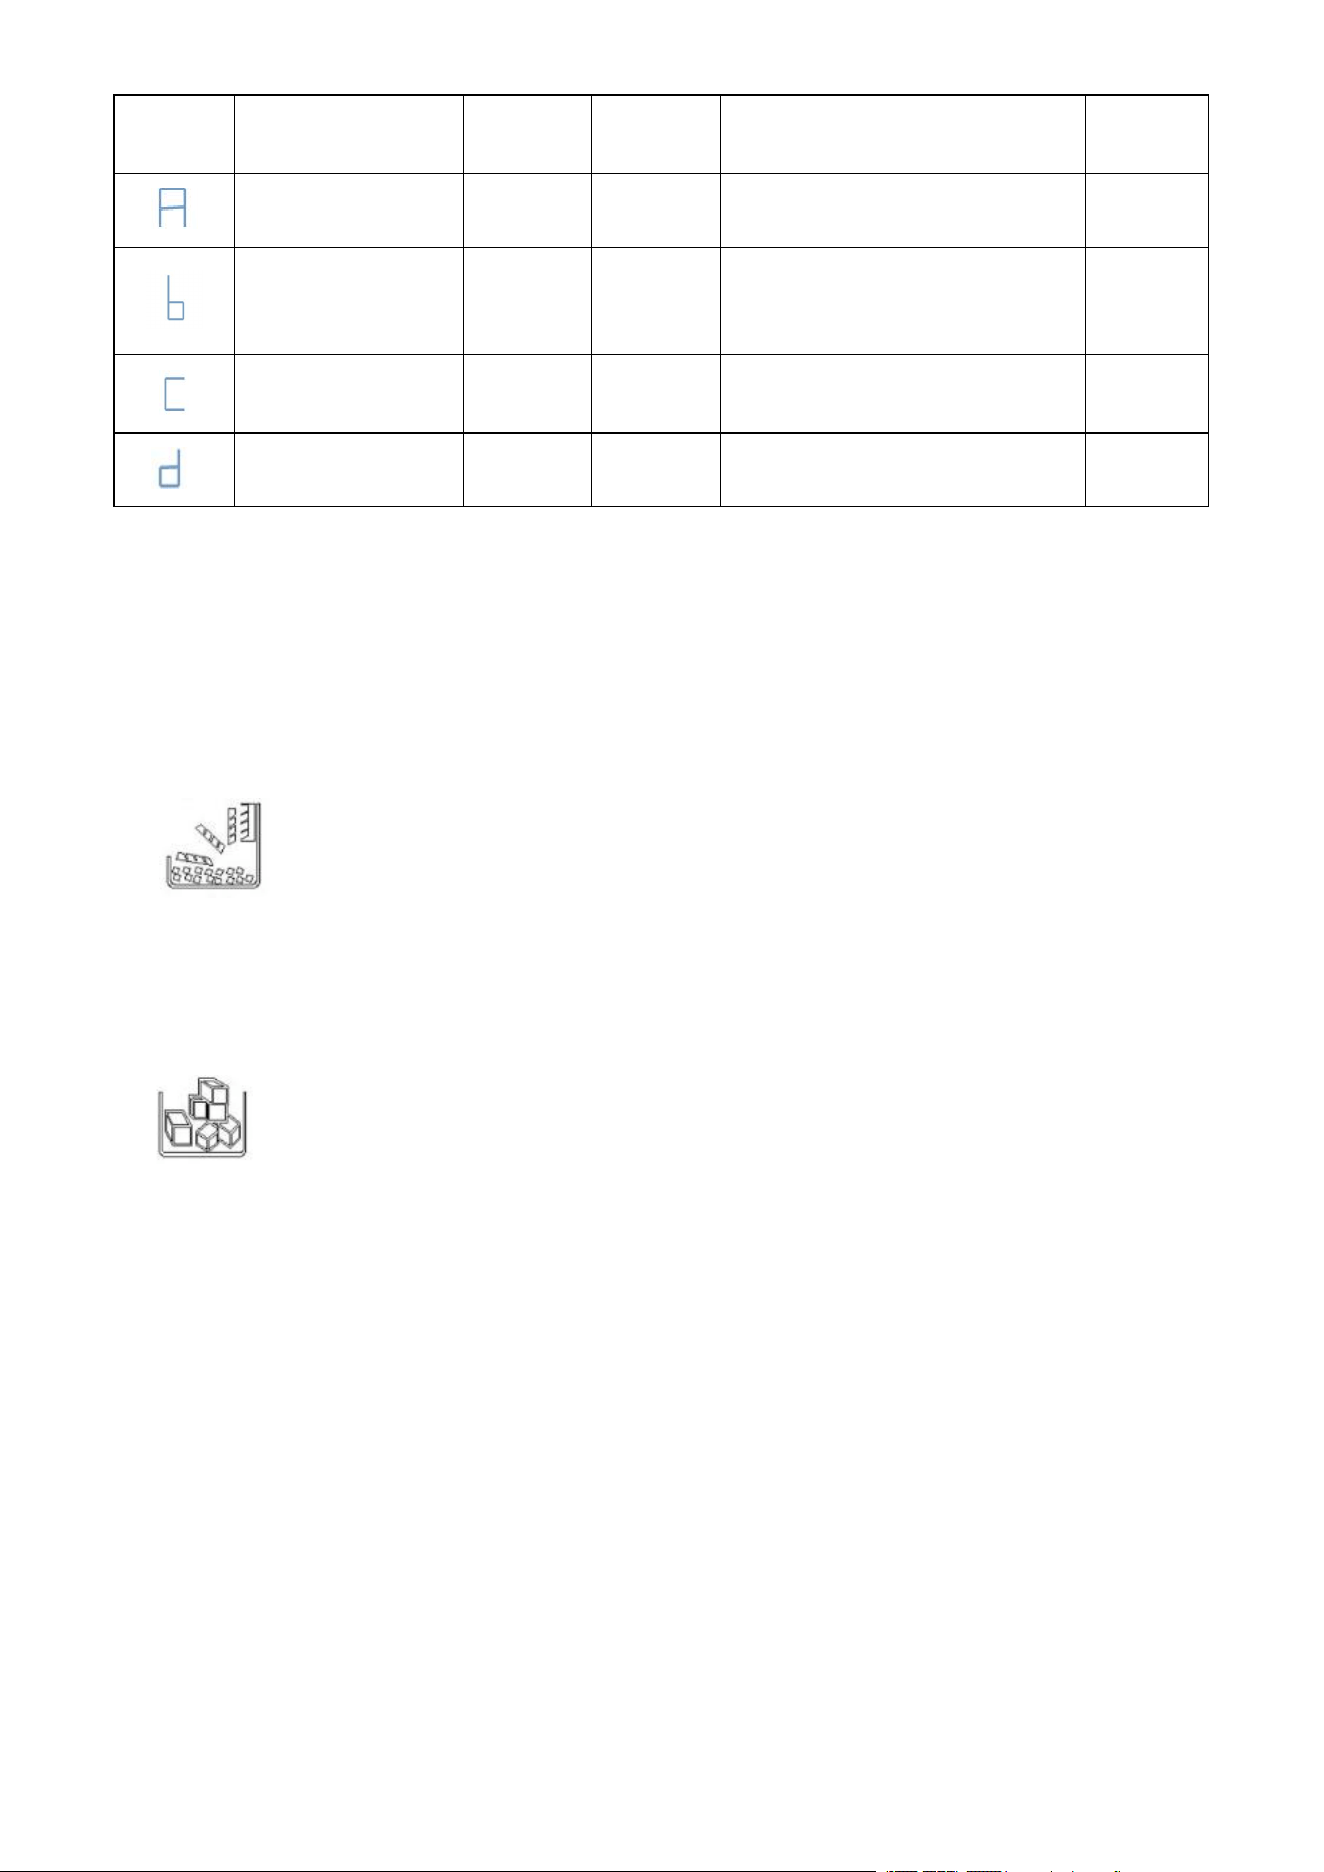
1) Accessories List
Take the two accessories bags from the ice bin and check whether all the below accessories are
included or not.
If any parts are missing, please contact our customer service

4
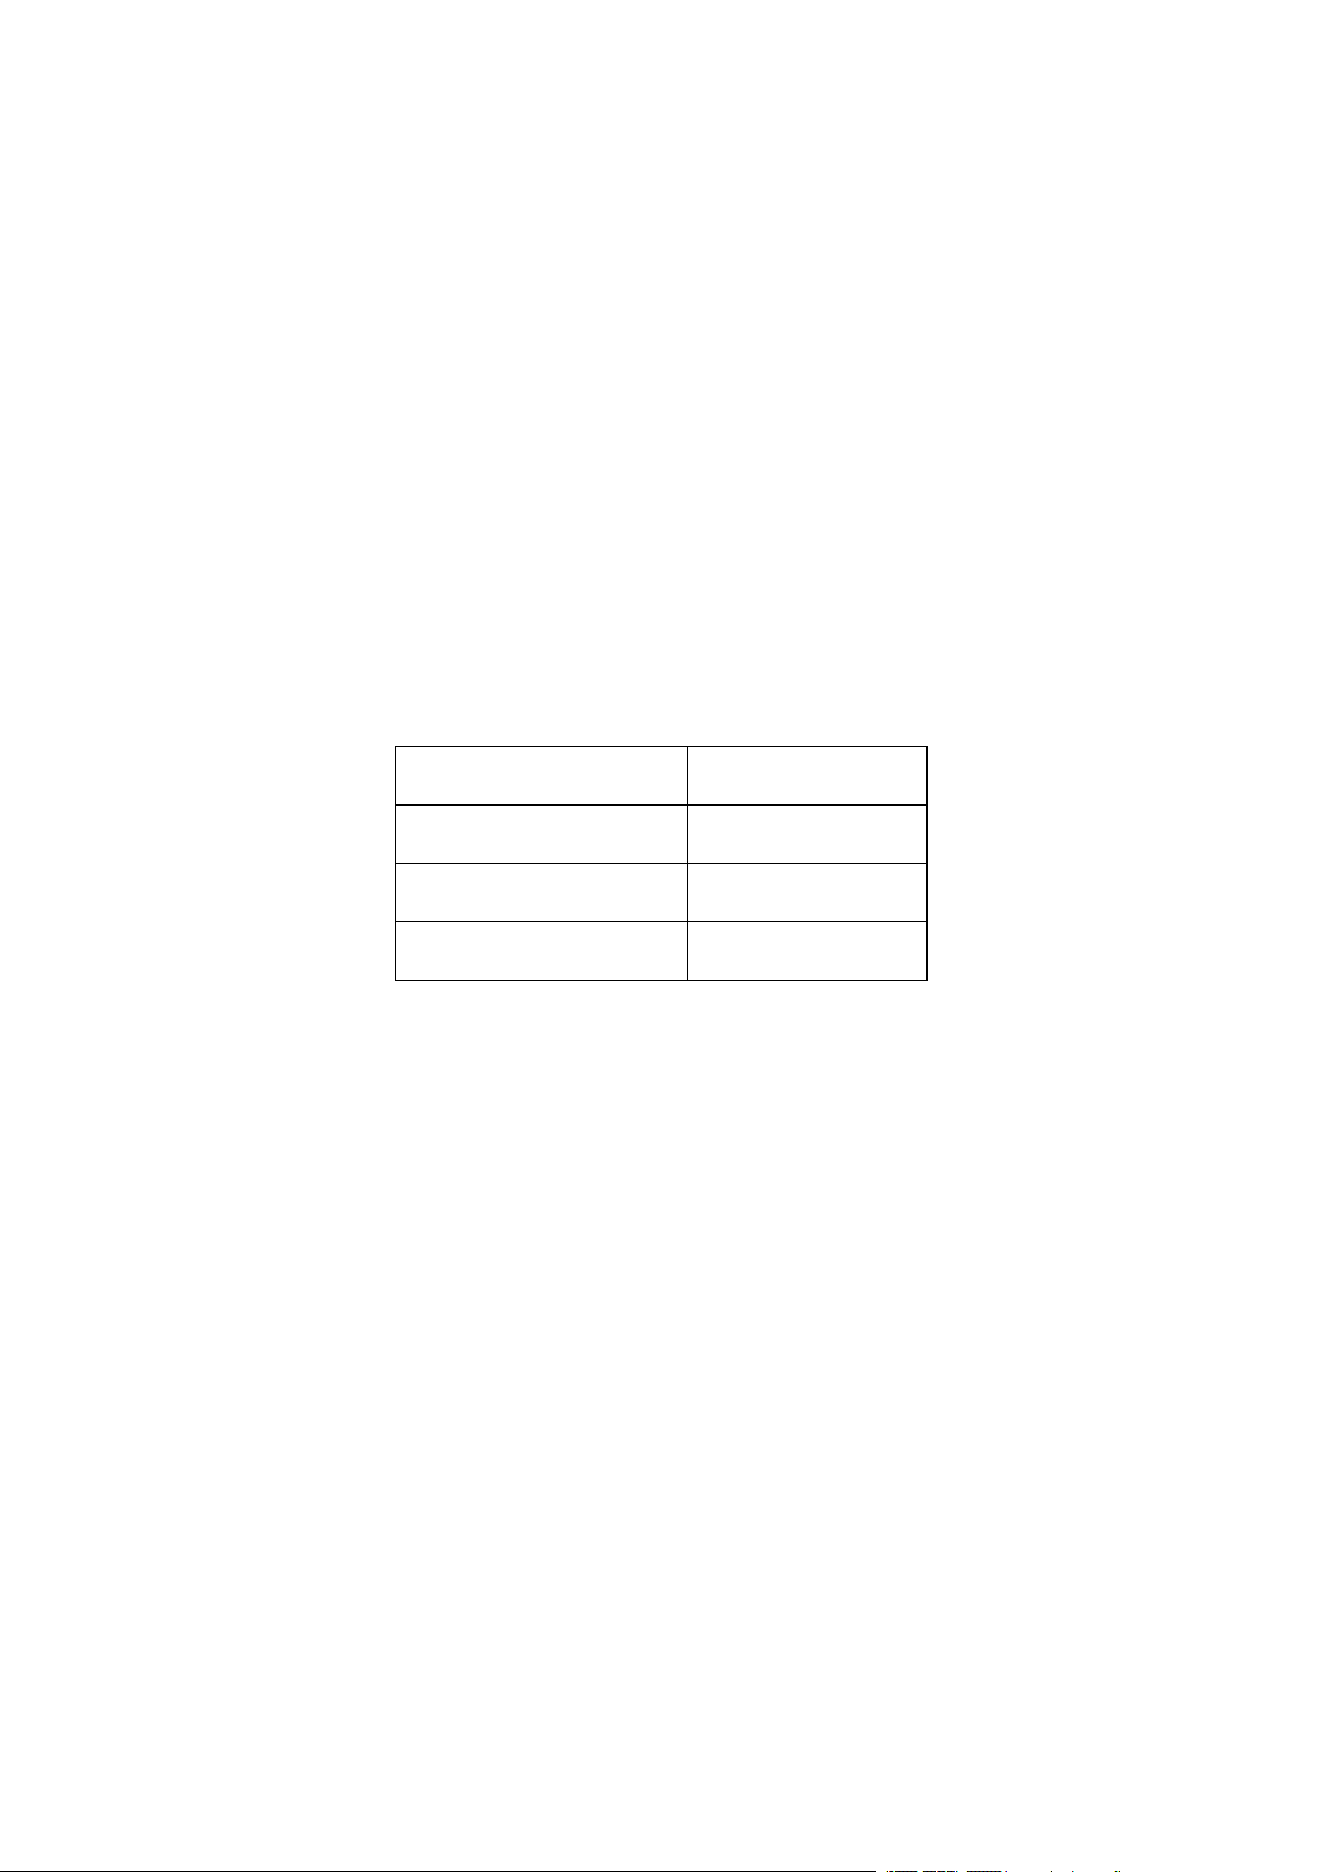
Note: Items 5 and 6 had been assembled together before being packaged
5
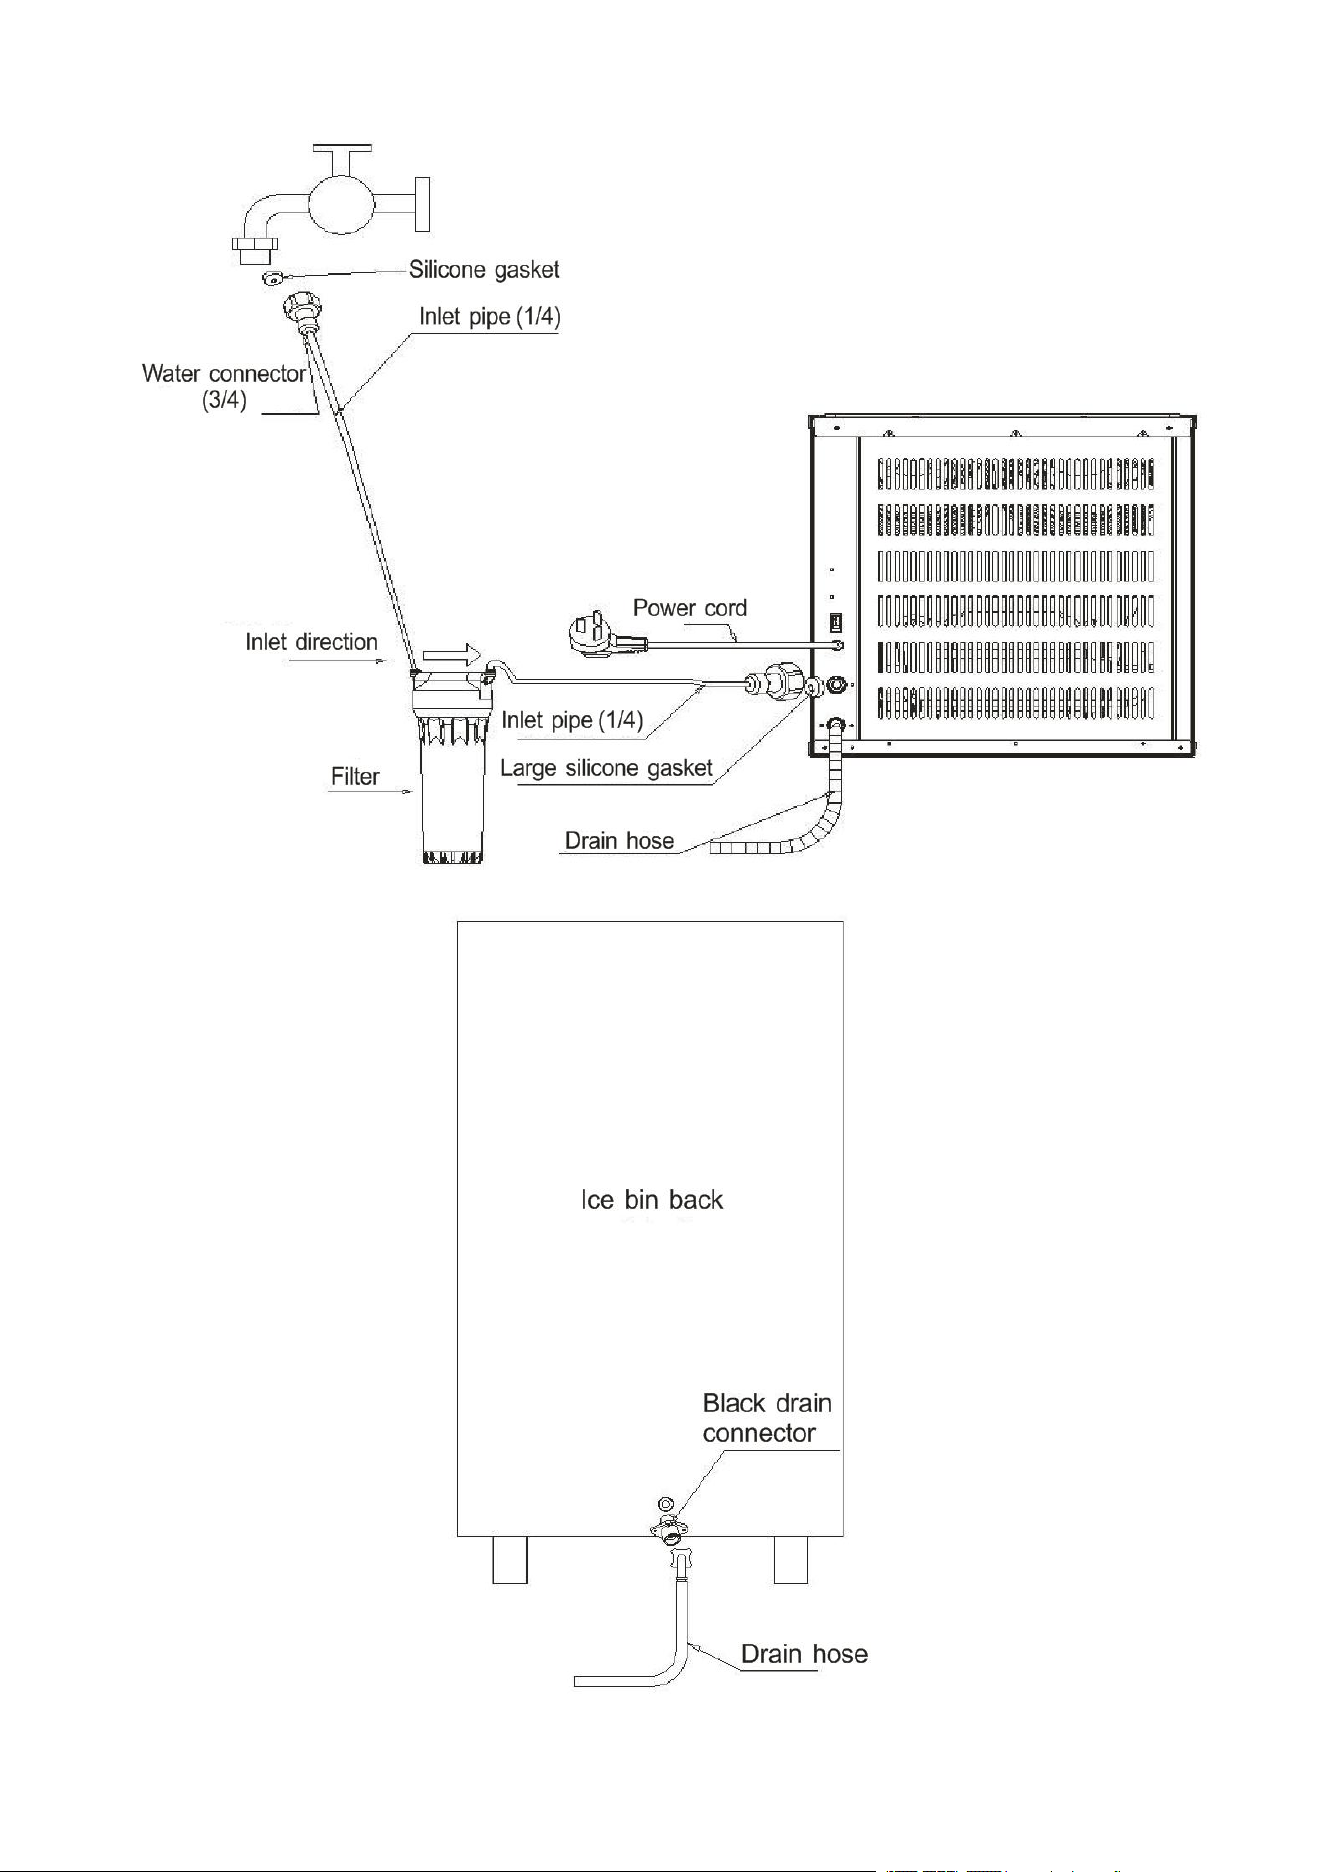
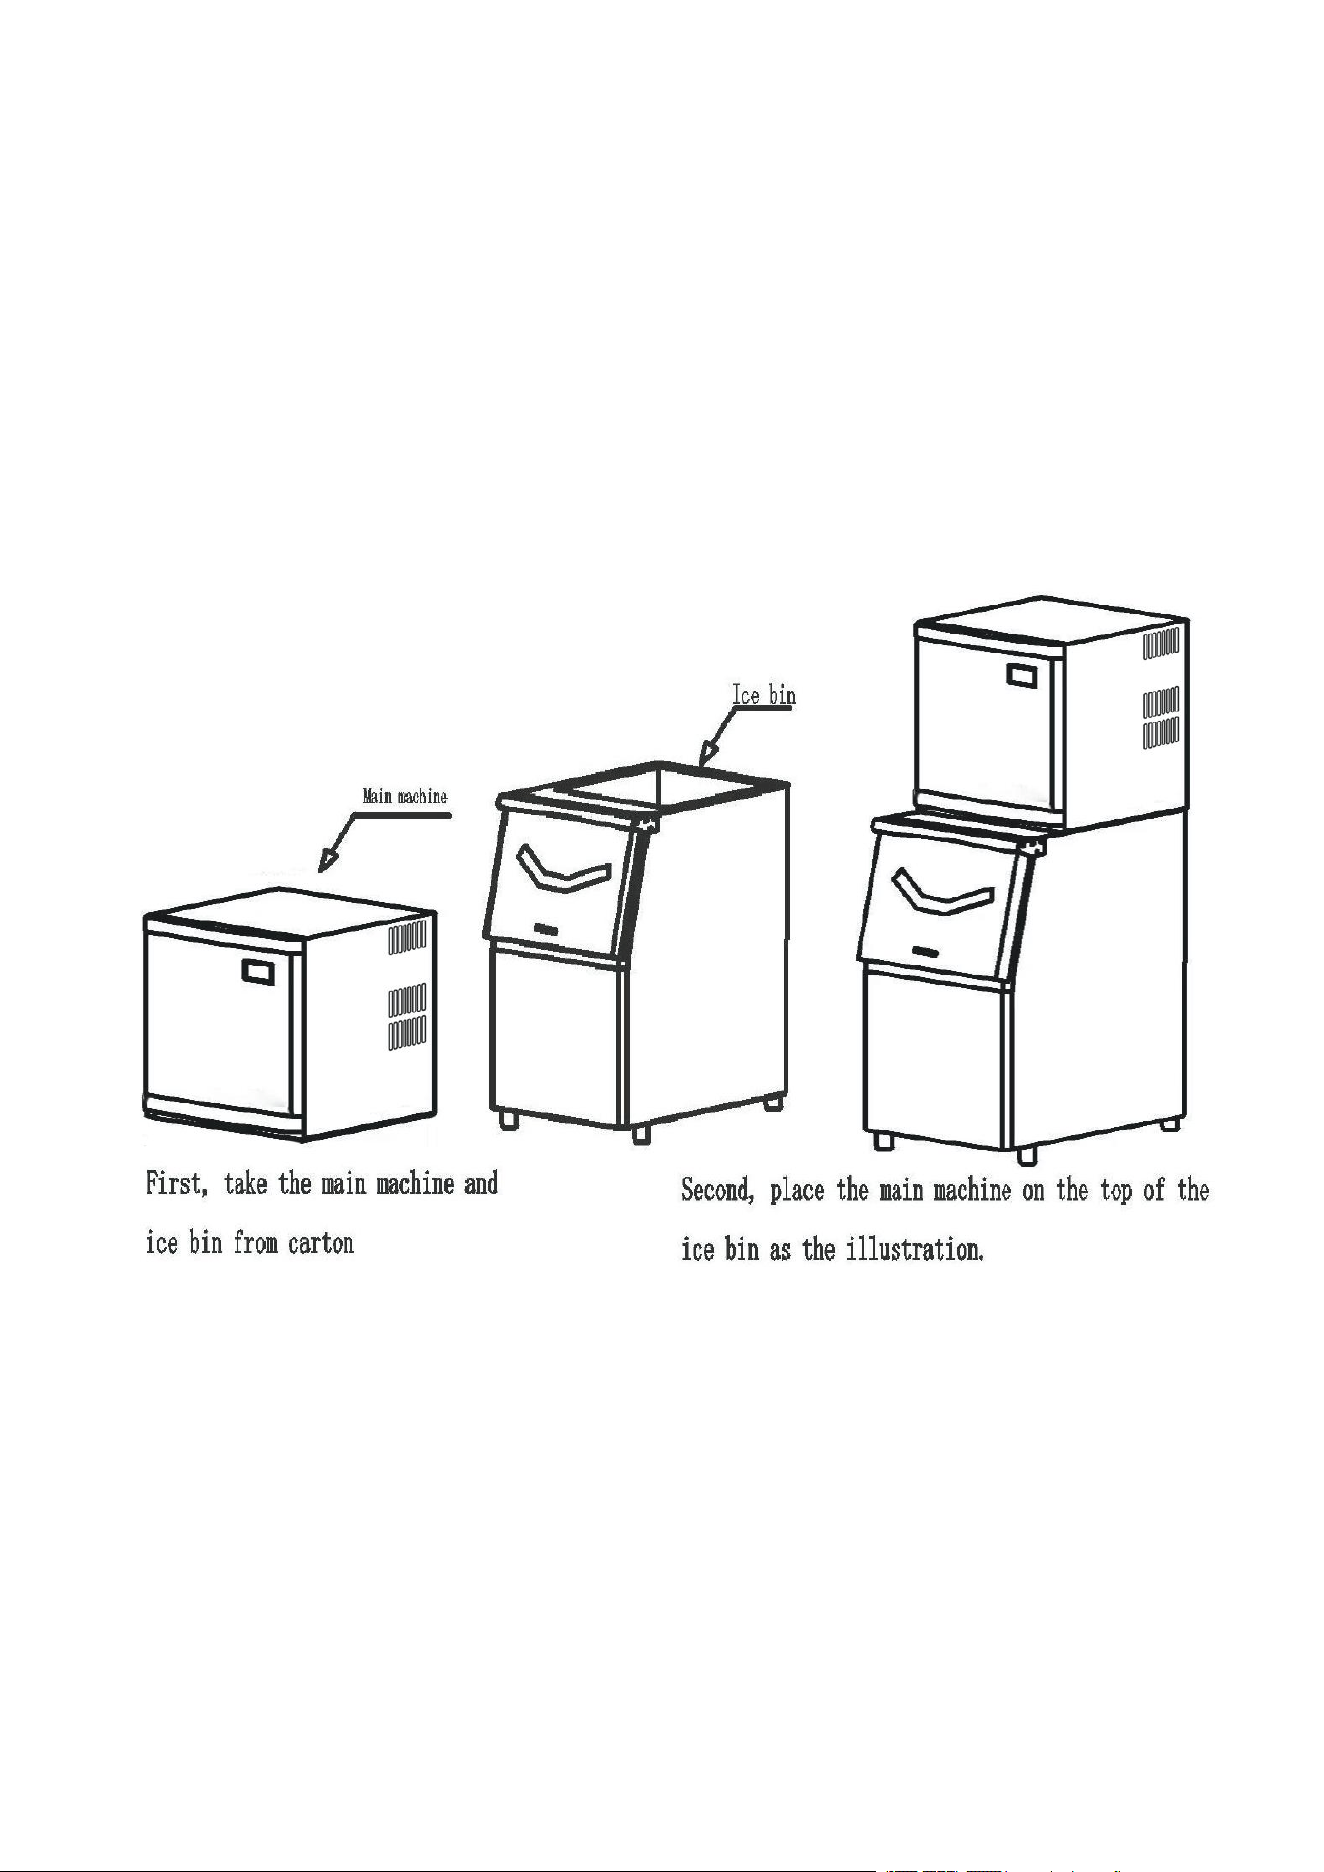
2) Installation and Connection
6
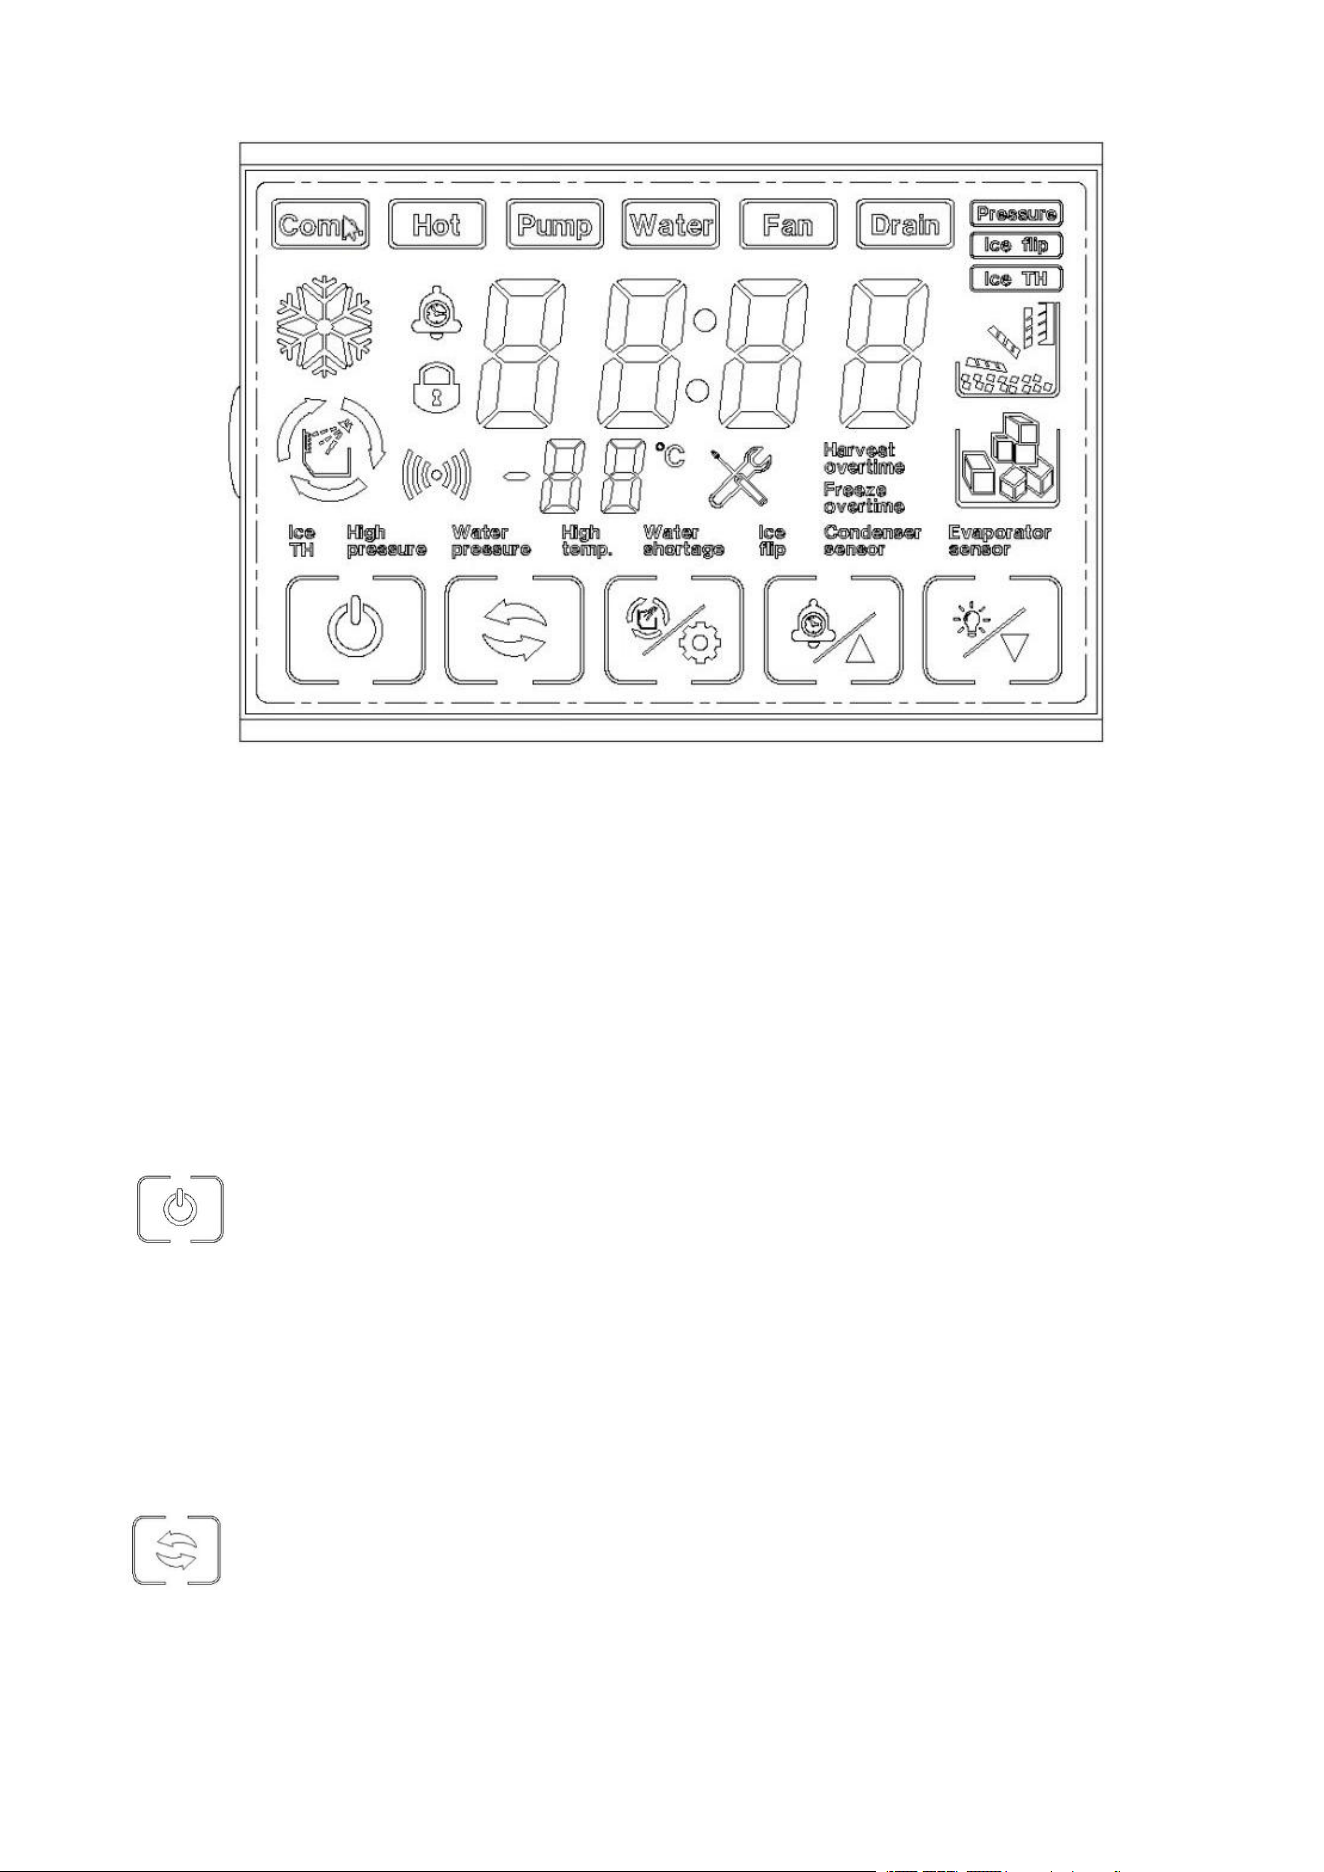
3) Control Panel
Operation Instruction
Plug in and turning on the switch on the back of the main machine will make the machine enter into
standby mode; The screen will be locked automatically after not operating any button for 60
seconds, hold any button for 3 seconds to unlock the screen. If the machine was powered off
because of the abnormal shutdown, the machine will enter into ice-making mode automatically after
restoring power.
ON/OFF Button:
When the unit is off, press this button to turn on the unit, and during the normal ice-making state,
hold this button for 2s to turn off the unit at once.
Turn on the machine, ice making and cleaning indicator will turn on, the machine will add water
automatically; if it detects that the water is enough, the machine will enter the ice making state after
a few seconds.
Mode Button:
When the mode button is touched in the power-on state, it can be adjusted with 3 modes manually
and cycle through the three states of ice making, water pump( drain) and heat valve (forced deicing)
in turn.
7
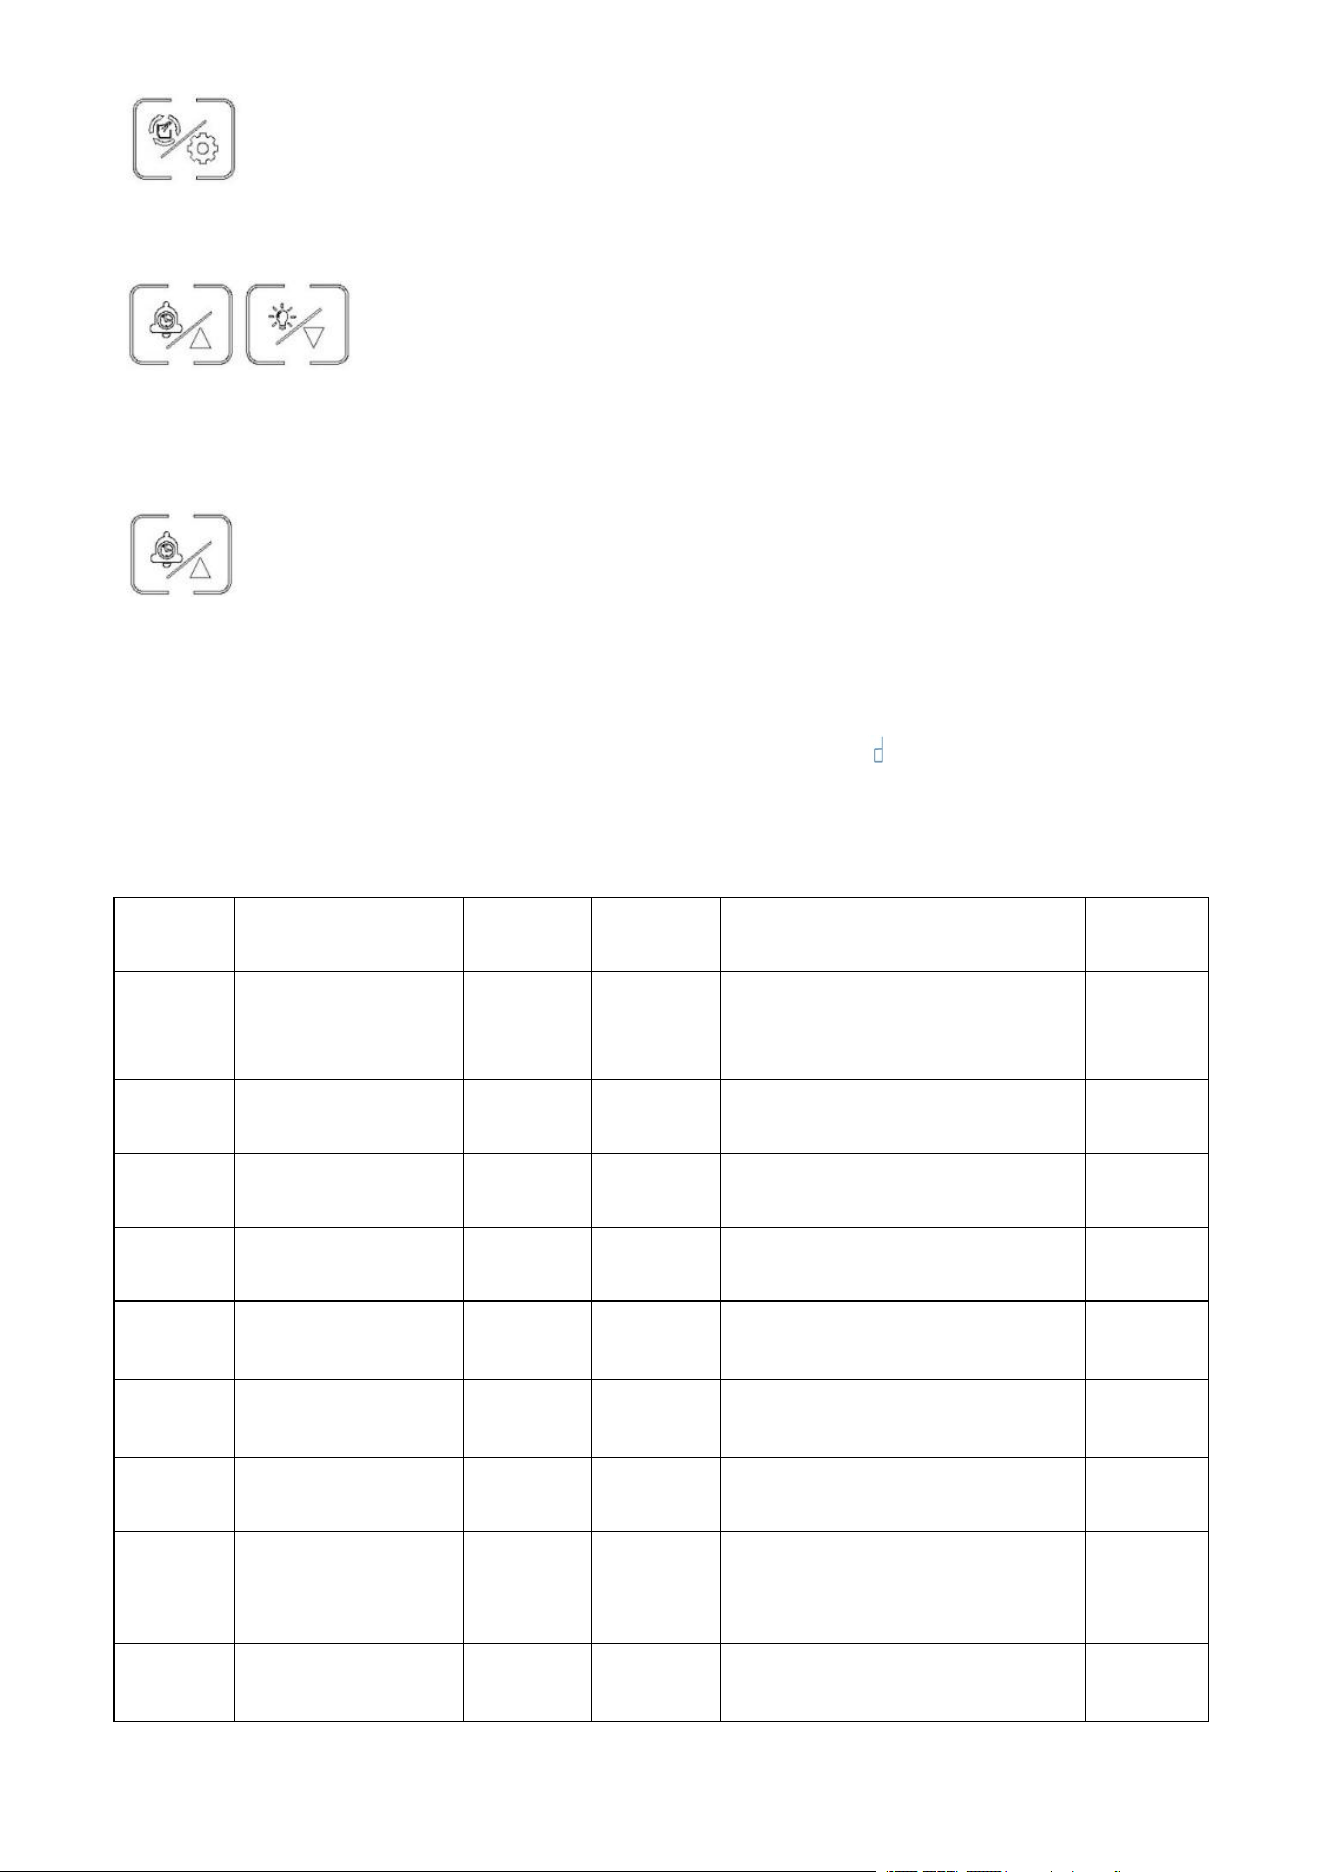
Clean and Setting Button:
In the power-on state, click the cleaning button to enter the cleaning state.
Adjust Ice-Making Time:
In the state of ice making or water inflow, touch “
△
” or “
▽
” to adjust the ice making time (scope
of ice making time is -5 minutes to +8 minutes)
Reservation Button:
In the standby mode, click the reservation button to enter the reservation function, and the
reservation time can be adjusted by pressing the “△” or “▽” button.
In the standby state, press and hold the setting button for 5 seconds to enter the setting state;
Click the setting button to set the previous code, and cycle from 0 to in turn. Click “+” or “-” to
adjust the last two digits. Please refer to the table below for each code number:
Table 1: Setting Reference Table
Previous
code
setting items
Setting
range
Defaults
Remark
Machine
status
0
Timeout deicing
time
1-10
6
Set for more than 6 minutes, and
turn on the pump in the last 1
minute
efficient
1
Sensitivity of ice
thickness detection
1-20 level
10 level
This parameter is only valid in
the ice thickness detection mode
Not
efficient-
2
Prepared cooling
time
10-120s
60 s
Stepping for 10 seconds
efficient
3
Water adding limit
time
01-45m’
5 m’
efficient
4
Cleaning setting
00/01
00
“00”Power on without cleaning;
“01”Power on with cleaning
efficient
5
With or without
drain setting
00/01
00
“00”have draining
;
“01”do not
have draining
efficient
6
drain cycle
00-20
05
Drain water after every 5 times
of ice making
efficient
7
High voltage
detection
00/01
00
“00”No high voltage detection;
“01” With high voltage
detection
efficient
8
mode selection
00/01
01
“00”ice thickness mode
;
“01”timed mode
Not
efficient-
8
9
Water-cooled and
air-cooled
00/01
00
“00”air-cooled
;
“01”water-cooled
Not
efficient-
High temperature
alarm
From 65
to 80℃
70℃
Condensation probe high
temperature alarm
efficient
Manual cleaning
time
From 2 to
30
minutes
10
minutes
efficient
Water intake
method
00/01
00
“00”running water;“01”water
bucket
efficient
Drain time
05-60S
20
seconds
Stepping for 5 seconds
efficient
1) Status Display:
1. Power On: The LCD is fully bright, and the four-digit number displays the version number.
2. Water Inlet: Time displays C00, ice making, deicing and full ice are light.
3. Thermal Valve: Cleaning, ice making, deicing and full ice are light.
4. Ice Making: When the ice making icon is on, the time displayed is the ice making time
5. Defrost:After the ice making process, the water pump is turned off, the defrost valve
is turned on, allowing the hot gas to enter the evaporator for about 1-2 minutes, the ice cubes slide
from the evaporator into the ice bin. When the deicing icon is on, the time displayed is the deicing
time.
6. Ice Full: In the running state, with the ice bin filled to a certain height, the ice sliding
board cannot be rebounded or reset because of the block of the freshly produced ice cubes, the ice
maker will stop.When the blocking ice cubes are taken away, the ice maker will turn back to ice
making process in a few seconds. When the ice full icon is on, the time displayed is the ice full
time.
7. Fault: The fault icon is flashing, and the corresponding fault English characters are bright.
8. Shutdown: Display OFF.
9. Appointment Time Setting: The appointment icon is on, and the time is displayed as the
scheduled power-on time.
10. Reservation Status: The reservation icon is flashing, showing the countdown of the reservation
time.
11. Setting Status: The time display digital tube displays the setting parameter number on the far
left, which is always on. The last two digits or three digits are parameter values, which are
flashing.
9
2) Installation Position
Note: first, screw the four foots supplied with the machine to the corresponding positions on the
bottom of the machine.
a) This series of machines shall be placed in a clean place with good air circulation. They shall not
be placed in the open air or exposed to sunlight or rain.
b) The machine cannot be placed near any heat source.
c) Around this series of machines, the ambient temperature should not be lower than 3°C (37.4°F)
and not higher than 40°C (104°F) , and an appropriate distance should be kept to maximize the
ice-making effect and heat dissipation of the machine
c) The machine shall be placed on a stable level base or the ground. Please calibrate the levels of
the front left and the front right directions during the installation.
d) Please do not place any objects on the top of the ice machine.
e) The enough space must be remained on the left and the right sides and the back so as to maintain
good air intake and facilitate the maintenance.
Location
Spacing (cm)
Side
15
Back
20
Front
50
3) Setting
Improper installation may cause injury to people or objects.
Please place the ice machine at a constant location where the power cord can be directly plugged
into the socket.
4) Electrical Connection
Warning: this machine must be grounded
a) There must be a power supply or socket that can provide 120V ~/60Hz, and the power supply or
socket must be reliably grounded.
b) The fusing current of the electrical box must be greater than 20A. If it needs to be replaced, it
must be done by professionals.
c) If the power cord or plug needs to be replaced, it must be done by a professional after-sales
service engineer.
d) The voltage fluctuation shall not exceed ±10% of the rated voltage, otherwise a voltage stabilizer
shall be installed.

10
5) Water Supply and Drainage Connections
Warning: the ice machine should only be connected to a drinking water source and the water
source must meet the local drinking water standard.
- The water supplied to the ice machine must be connected with a filter to improve the drinking
standard of the water. Please do not connect to the tap water directly. If the ice making fault is
caused by the tap water, our company will not be responsible for the maintenance.
- The water supply pressure should be 0.1-0.4MPa. If the pressure is greater than 0.4MPa, a
pressure reducing valve should be connected. Please use the new hose assembly attached to the
appliance. The old hose assembly cannot be reused
- As the water is drained through the dead weight of water, the drain pipe should have sufficient
height or drop.
1) Remove the plug on the water inlet connector on the back of the machine, insert the water inlet
line into the water inlet connector, and clamp the blue card into the slot of the water inlet
connector to ensure no water leakage.
2) Connect the other end of the external inlet pipe to the tap.
Method for Disassembling and Assembling the Plug and the Water Inlet Pipe
11
Installation and Connection
WARNING: The machine must stand for 24h before power on.
Install the machine according to the manual.
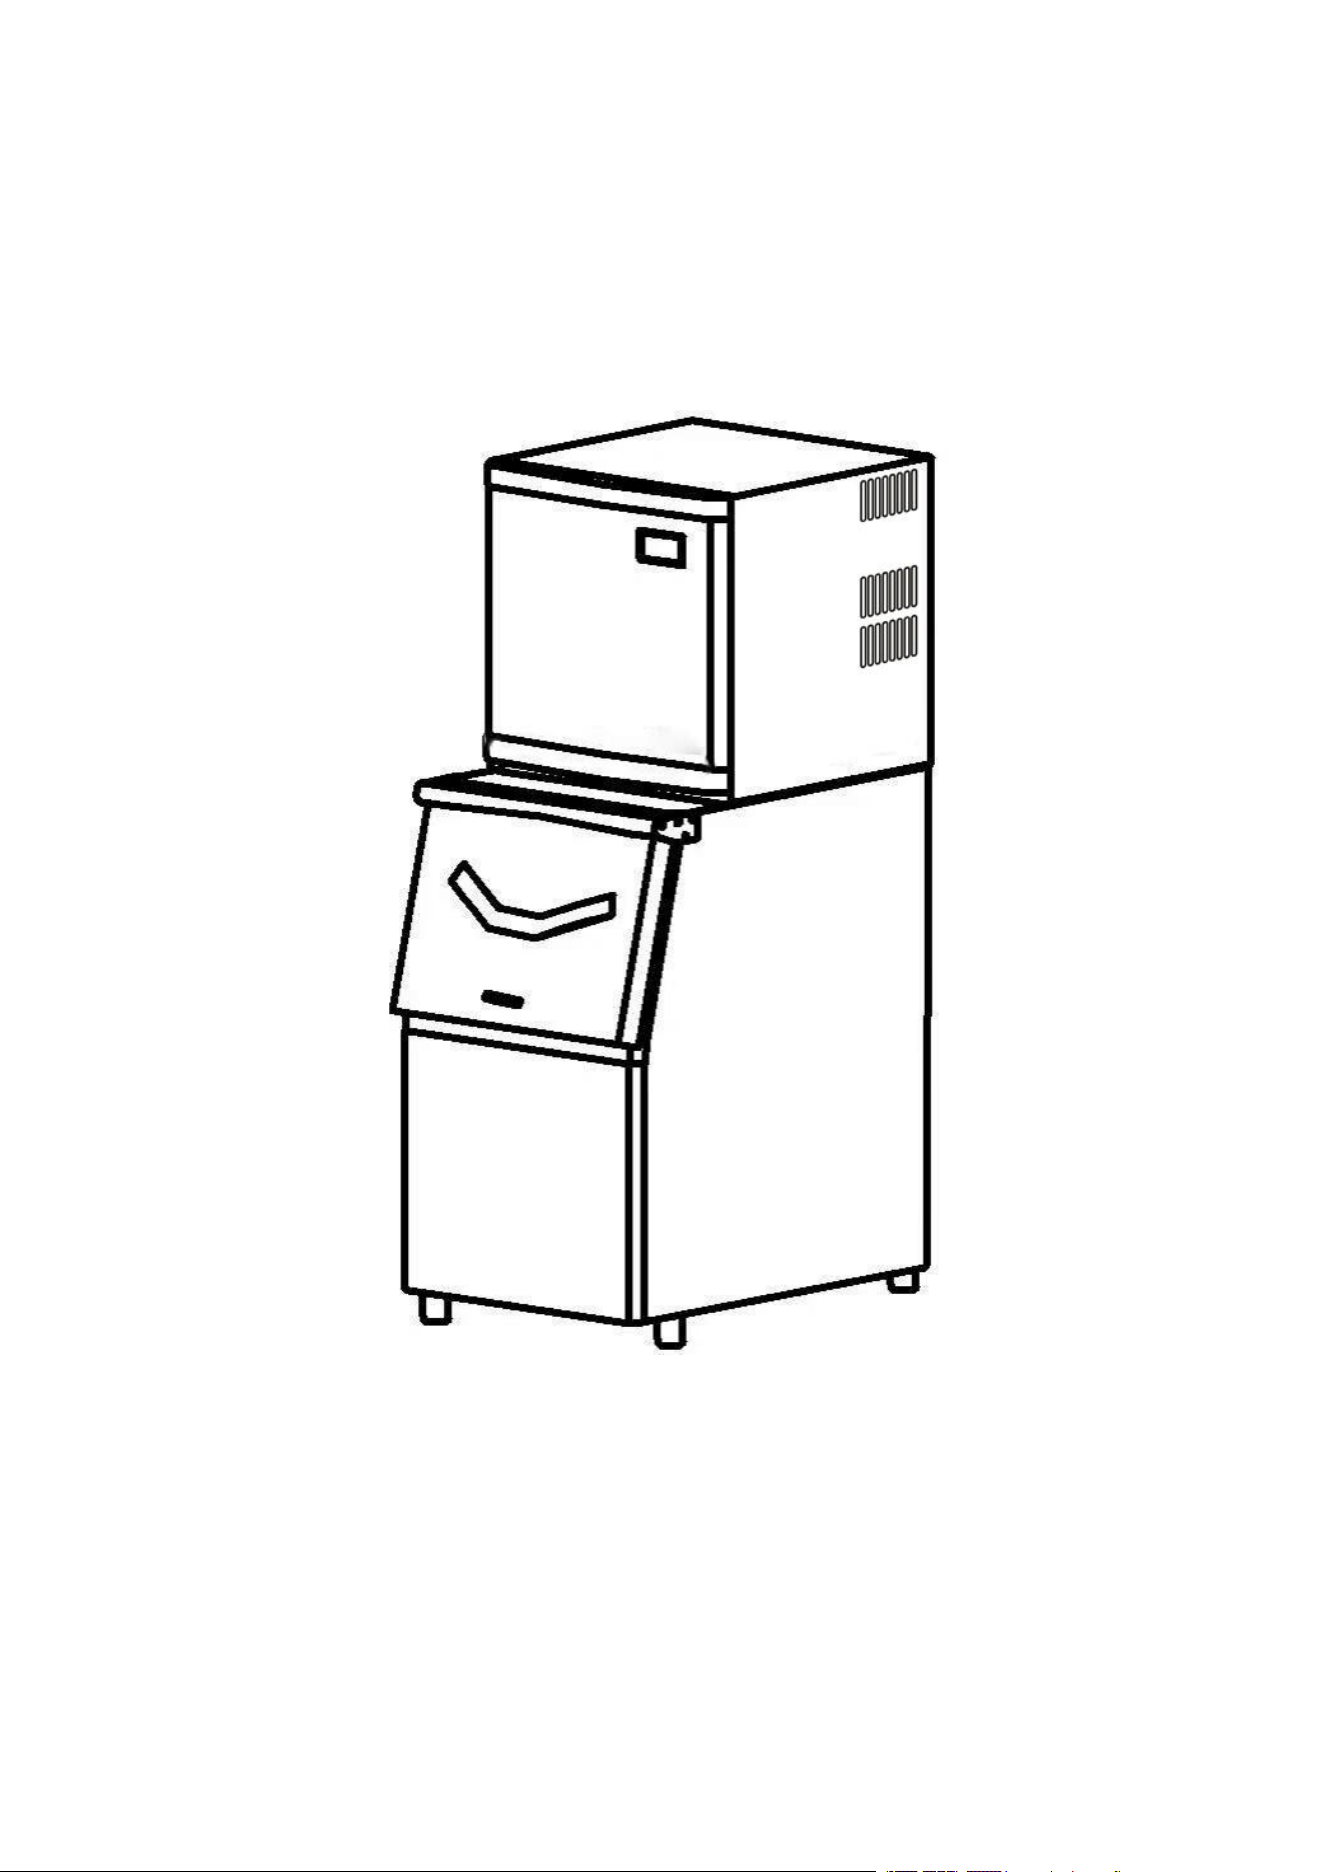
1)Unpack the Main Machine and Ice Bin
Note: Installation must be carried out by a professional according to the instruction manual.
Warning: Please do not use foam and other packaging materials as toys for children, because it
may bring them danger.
Note: Please remove all packing parts when using, otherwise the machine may not work normally.
Pre-filter installation
Operation in Struction
Warning:
1. This ice machine is used to manufacture and store ice for use, and in order to ensure the
hygiene of the ice, please follow the following principles:
- Wash your hands before taking out ice cubes, and use the plastic ice scoop provided in the
accessories to take the ice.
- Do not store anything other than ice cubes in the storage bin.
- Clean the storage bin before use. Keep the ice scoop clean and rinse with a neutral detergent. After

12
removing the ice, close the door to prevent dust from entering.
2. The use of any electrical appliance should follow the basic guidelines, in particular:
● The environment with high humidity will increase the risk of a short circuit or electric shock, if in
doubt, please cut off the power of the ice machine.
● Please do not directly pull down the power cord to shut down the machine.
● The ice machine cannot be used by children or the elderly without adult supervision.
1) Operation
The installation service personnel are usually authorized to start the automatic ice making
program. For smooth ice making, the following points need to be confirmed:
a) Opening of water supply taps;
b) The lower drain has been connected to the drain of the room;
c) The ice machine is connected to the power supply;
2) Prepare the long-term preservation for the ice machine
a) Unplug the power plug or cut off the power supply;
b) Close the water supply tap and remove the water inlet pipe;
c) Remove all ice and drain the storage bin and water tank;
d) Wash and dry the inner walls of the storage bin and water tank.
Cleaning & Maintenance
Warning: Do not use any alcohol or fumes to clean or sanitize the ice machine. It may cause cracks
on the plastic parts. Ask a trained service person to check and clean the condenser at least once a
year, in order to let the unit work properly. This appliance must be cleaned by use water jet.
CAUTION: If the ice machine has been left unused for a long time, before the next use it must be
thoroughly cleaned. Follow carefully any instructions provided for cleaning or use of sanitizing
solution.
● Do not leave any solution inside the ice machine after cleaning.
● Periodic cleaning and proper maintenance will ensure efficiency, top performance, hygienic, and
long life. The maintenance intervals listed are based on normal conditions. You may want to
shorten the intervals if you have pets, or there are other special considerations.
What Shouldn’t Be Done
Never keep anything in the ice storage bin that is not ice: objects like wine and beer bottles are not
only unsanitary but also their labels may slip off and obstruct the drain pipe.
Exterior Cleaning
The door may be cleaned with a mild detergent and warm water. Do not use solvent-based or
abrasive cleaners. Use a soft sponge and rinse with clean water. Wipe dry with a soft clean towel to
prevent water spotting.

13
NOTE: Stainless steel models exposed to chlorine gas and moisture, such as in areas with spas or
swimming pools, may have some discoloration of stainless steel. Discoloration from chlorine gas is
normal.
Interior Cleaning
For Ice Storage Bin
The ice storage bin should be sanitized occasionally. Clean the bin before the ice machine is used
for the first time and reused after stopping for an extended period of time. It is usually convenient to
sanitize the bin after the outside, the storage bin must be empty.
1. Disconnect power to the unit.
2. Open the door ad with a clean cloth, wipe down the interior with a sanitizing solution made of
28g of household bleach or chlorine and 7.5L of hot water.
3. Rinse thoroughly with clear water. The waste water will be drained out though the drain pipe.
4. Reconnect power to the unit.
5. The ice scoop should be washed regularly. Wash it just like any other food container.
WARNING: Do not use solvent-based or abrasive cleaners. These may transmit taste to the ice
cubes.
Cleaning Suggestion
1. DAYLY CLEANING
The ice spoon, door and the water dividing pipe should be cleaned by yourself per each day. At the
end of every day, rinse the ice spoon and wipe the both sides of the door with a clean cloth.
2. SEMI-MONTHLY CLEANING
The ice bin, water tank, the ice-full detecting plate and the surface of the evaporator are to be
cleaned by yourself semi-monthly according to interior cleaning program.
3. QUARTERLY CLEANING
All the components and surfaces exposed to water or ice cubes, like ice storage bin, water tank,
door, evaporator, water pump, water dividing pipe, etc. should be cleaned 3 months according to the
following steps:
a. Disassemble the front panel
b. Add water and vinegar or lemon juice mix (1:1 ratio) or other similar acid detergent into the
water tank.
c. Press “Clean” icon to make the machine enter self-clean mode, this progress takes about 10
minutes. When the Self-clean program is finished, drain off any remaining water.
NOTE: It is strongly recommended to clean the unit before initial use or after the unit has not been
in use for a long period of time.
14
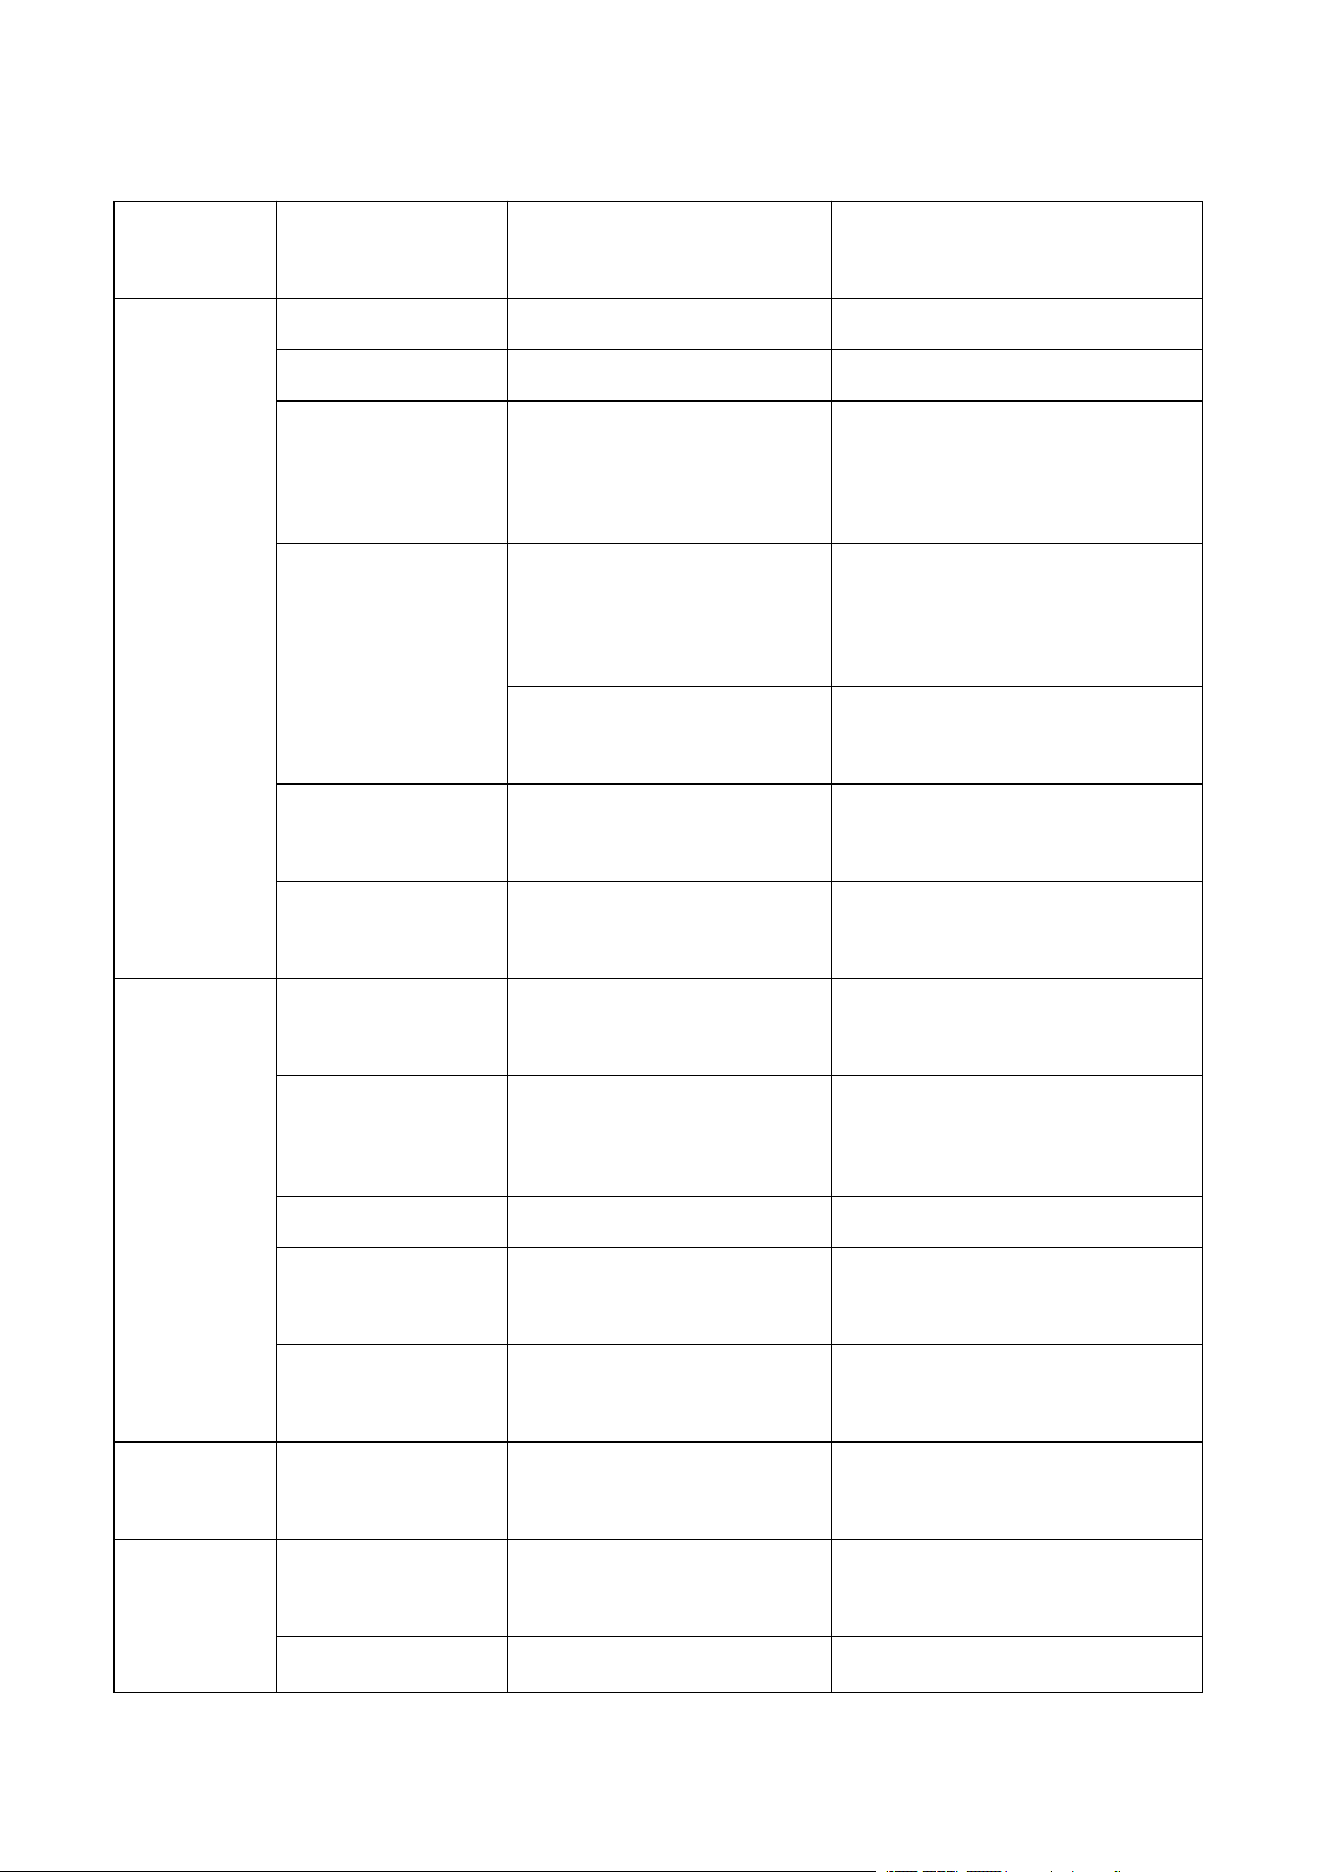
Trouble Shooting
1) No Ice Making
Fault
phenomenon
Inspection items
Possible causes
Solutions
Ice machine
is not running
Power cord
Not plugged in the socket
Plugged in the socket
Control panel fuse
Fused or damaged
Check and replace.
Storage bin
The ice is full, and the ice
cubes press the evaporator to
swing the blades
Remove ice cubes or remove ice
from evaporator swing vanes
Power supply
If there is no such situation,
the proximity switch is
faulty
Replace the proximity switch
No power or low voltage
Contact the power supply
department
Water supply tap
No water or low water
pressure
Increase water pressure
Inlet valve
The filter screen is blocked
or the inlet valve is broken
Clean the filter or replace the
inlet valve
The
compressor
does not run
or stops
suddenly
Power supply
1. The voltage is too low.
Contact the power supply
department
Air inlet
The air inlet is blocked
Leave a space of at least 5.9
inches/15 cm on the left, right
and rear sides
Condenser
Excessive ash deposit
Clean condenser
Cooling system
Refrigeration system
leakage
Contact after-sales service
personnel
Compressor
The connecting wire is
broken or falls off
Contact after-sales service
personnel
No water in
water tank
Floating ball
Floating ball is stuck or
clogged
Replace or clean the floating ball
Water
leakage
Inlet
Loose or improperly
installed
Tighten or reinstall
Inlet or drain
Water leakage due to rupture
Change
15
2) Low Ice Production
Fault
phenomenon
Inspection
items
Possible causes
Solutions
Ice making time
is too long
Water
pressure of
water supply
The water pressure is too low,
and the water supply time is too
long each time
Increase water pressure
Water
temperature
Water temperature too high
Lower water temperature
Ambient
temperature
The ambient temperature is too
high or too low
Place at an appropriate
temperature
Refrigerant
The refrigerant leaks
Contact after-sales service
personnel
Little or thin ice
Condenser
Excessive dust accumulation in
the condenser leads to poor air
intake, high condensation
temperature, and long ice
making time
Clean condenser
Filter screen
The filter screen is blocked,
causing poor water flow
Clean or replace the filter
screen
Water pump
Poor water flow due to water
pump failure
Replace water pump
Ambient
temperature
Ambient temperature too high
Place at a lower
temperature
Air inlet
Poor air intake leads to high
condensation temperature and
long ice making time
Leave a space of at least
5.9 inches/15 cm on the
left, right and rear sides
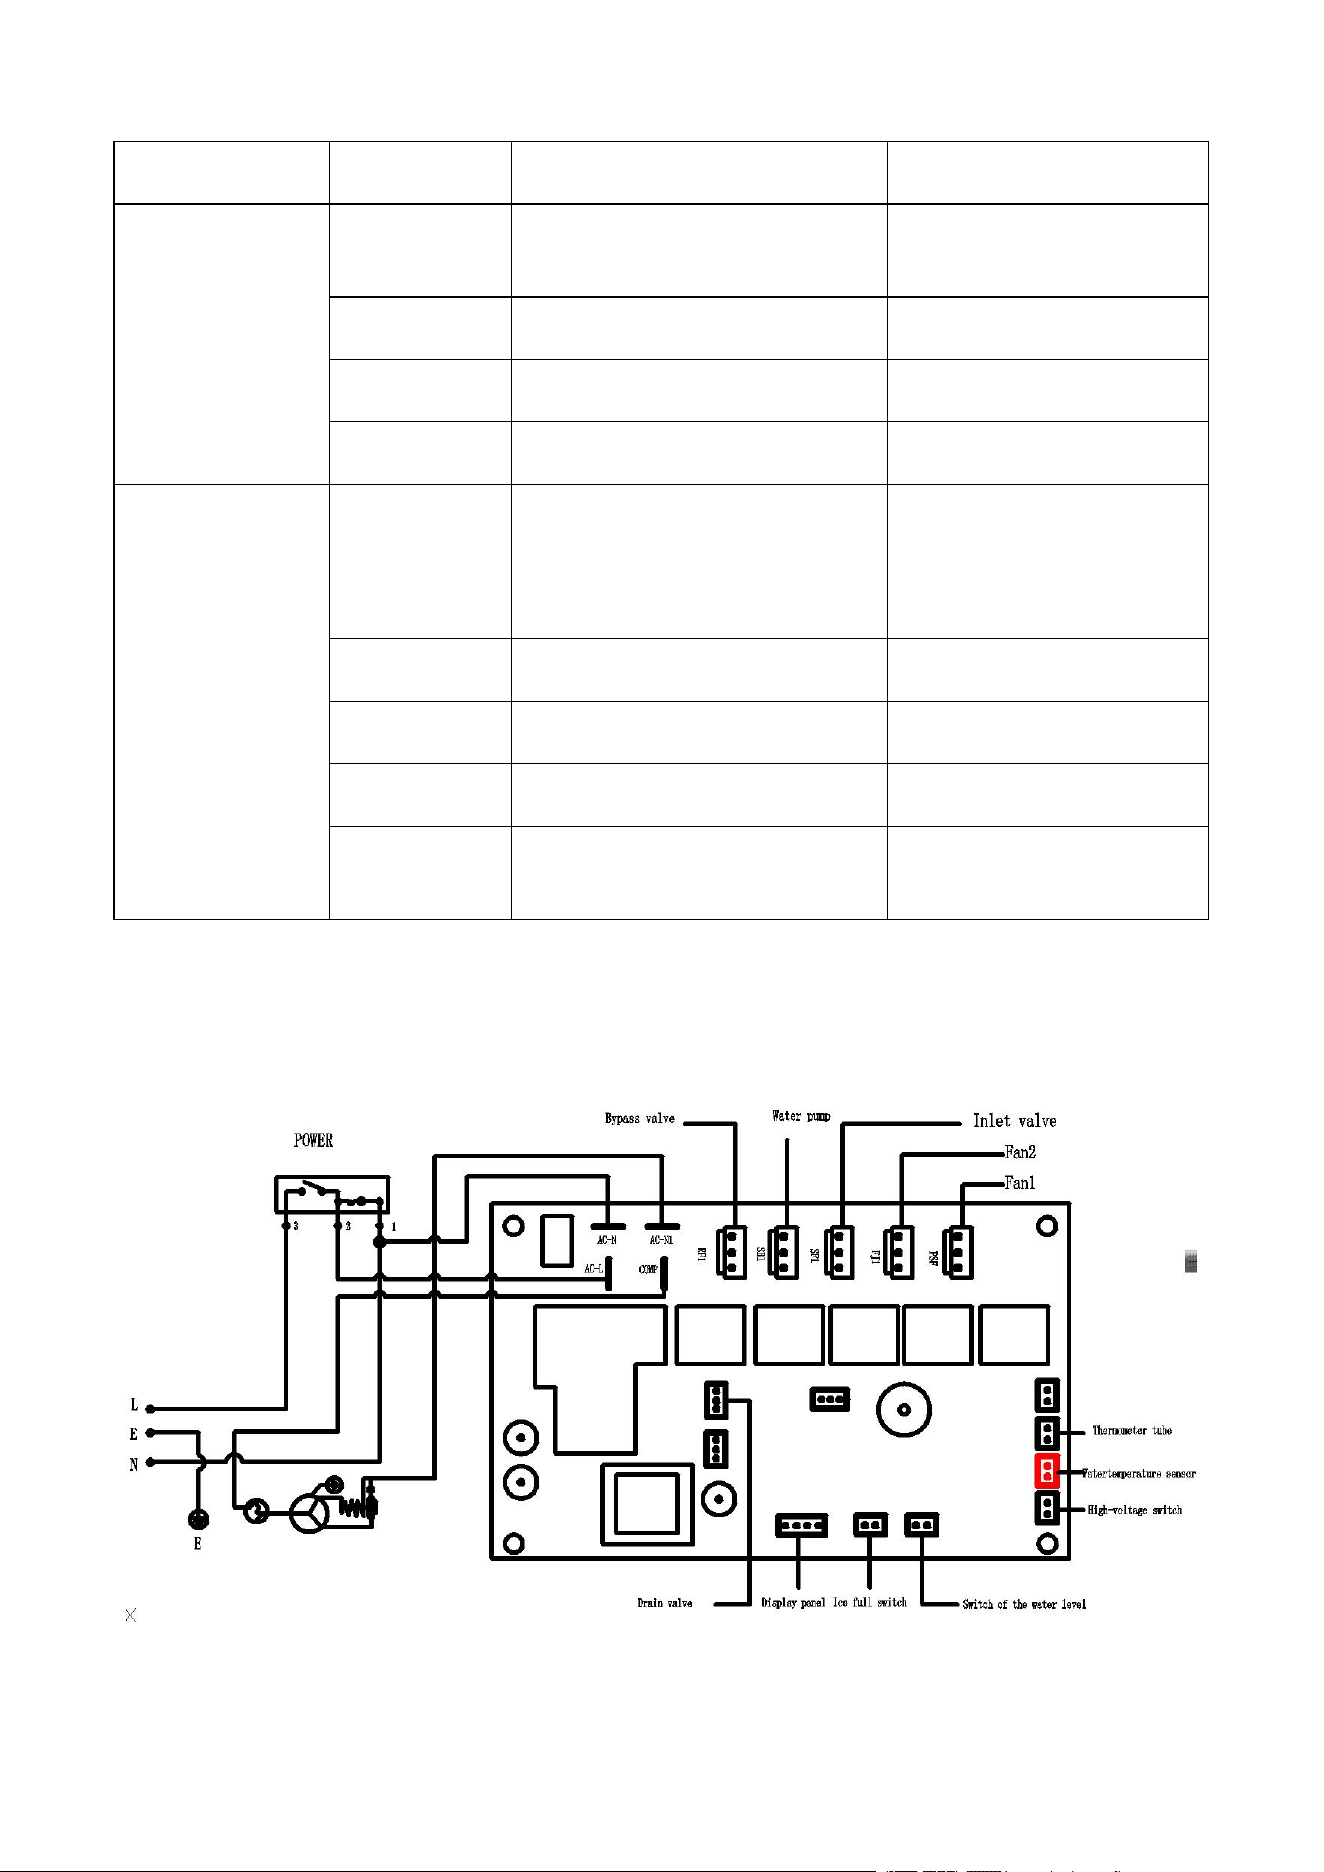
Circuit Diagram

16
After Sale Service
1. If your product breaks down or has any problems after purchase, please contact us, you can
always contact our customer service by email at support@tittla.com
2. Regarding any product problems or issues you encounter, our customer service will guide you
through the entire service process. We reserves the right to re-inspect damaged or returned
products.
If you have any warranty questions, please contact us at
Phone Number: +1(510)228-4672