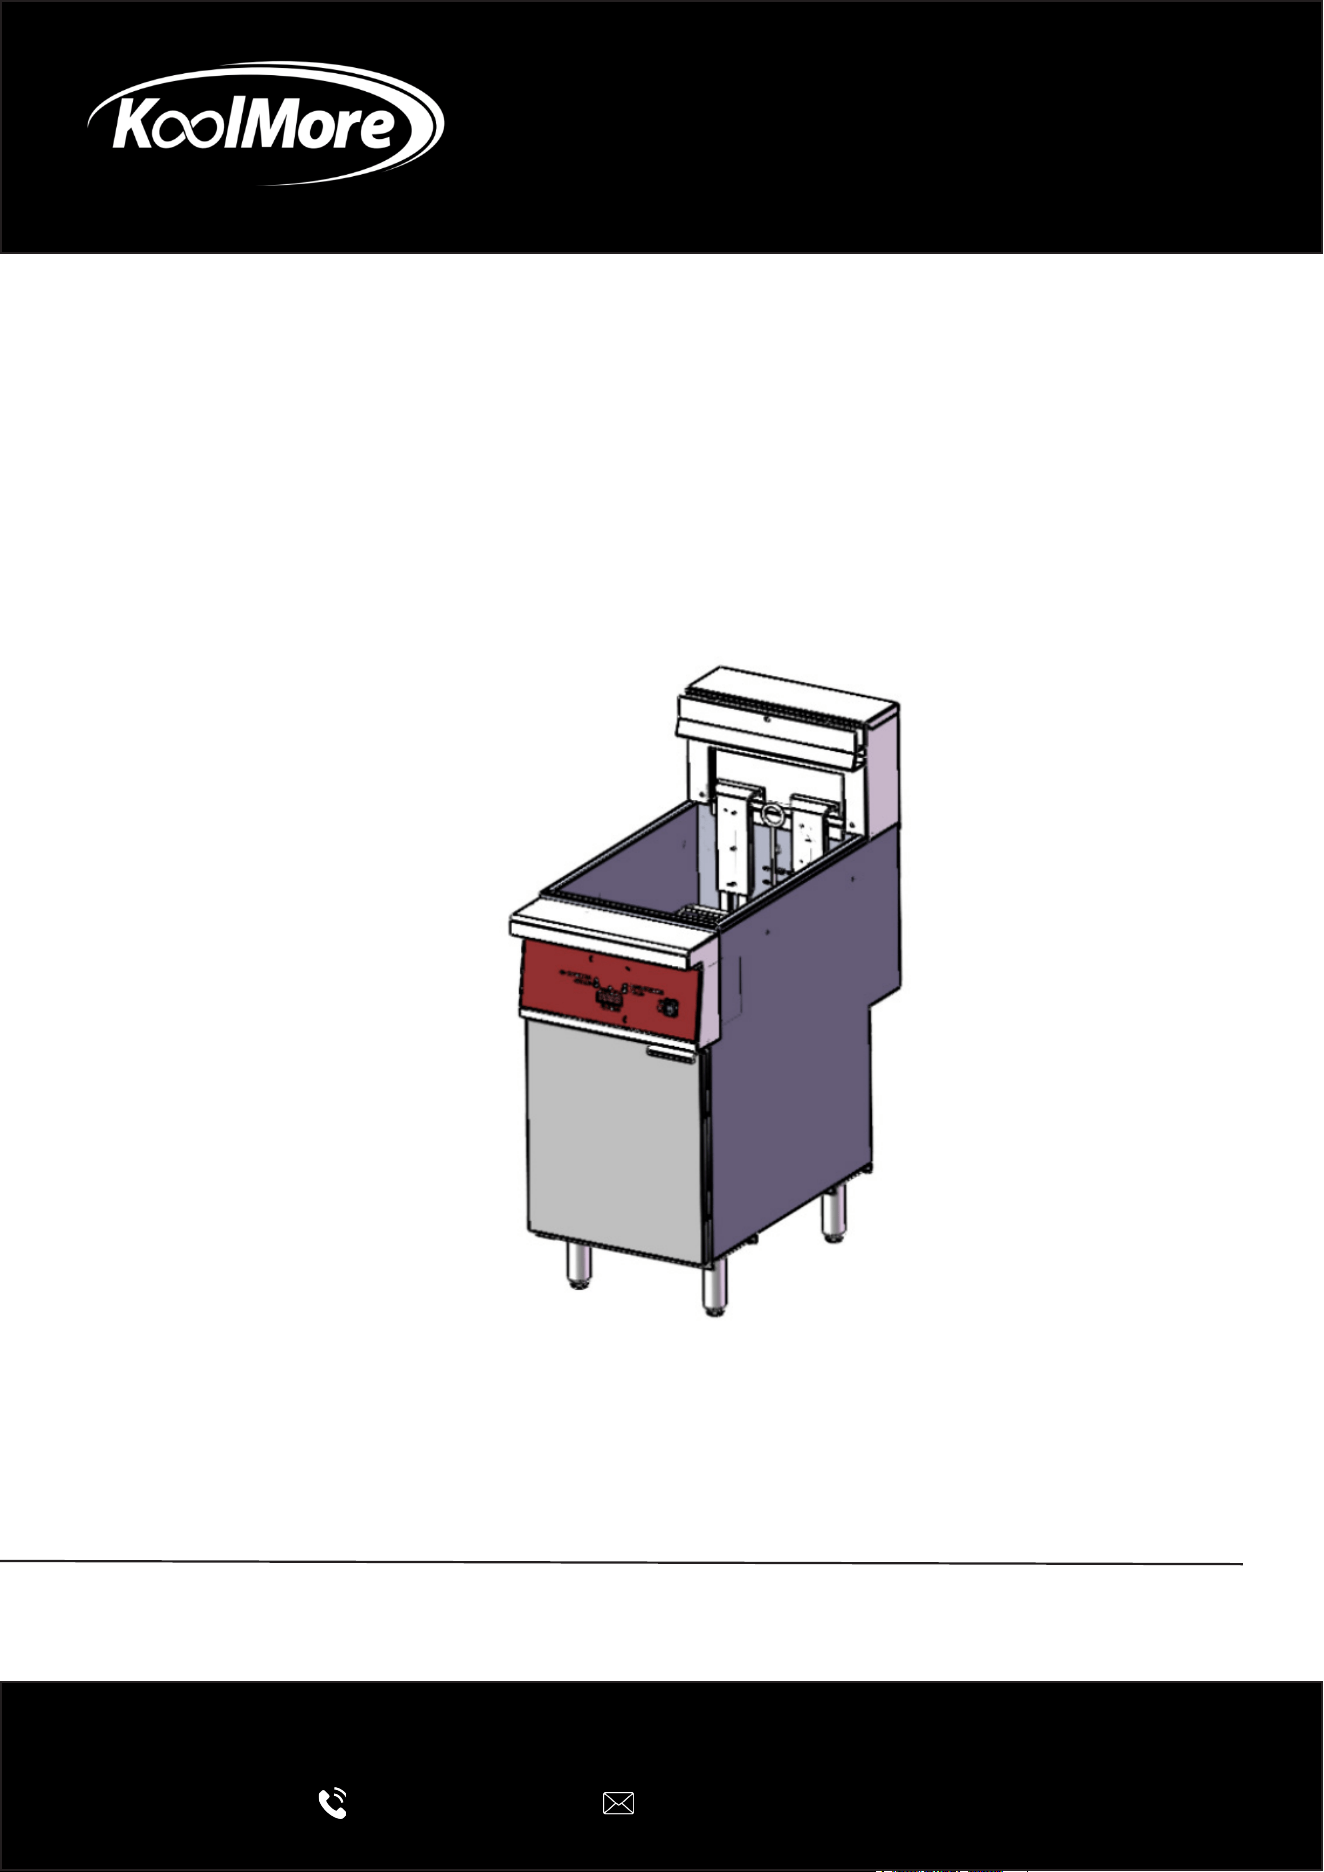
ELECTRIC DEEP FRYER
Commercial 40 lb Electric Deep Fryer
240 V 3 Phase
USER MANUAL
Before using, please read the operating instructions carefully to
ensure proper application and achieve satisfactory results.
For any service related issues, please contact us:
718-576-6342
suppor[email protected]
Models: KM-FDF40-EE
Stay informed with the latest information for your
KoolMore Appliance.
Scan the QR code below to access the most recent user manual
on our website, which is constantly being updated and improved.
If you need any assistance or have questions, our customer support
team is here to help.
Phone- 718-576-6342 Email- suppor[email protected]
Please write down the model number and serial number below for future reference. Both numbers are located on the
rating label on the back of your unit or inside of the unit and are needed to obtain warranty service. You may also
want to staple your receipt to this manual as it is your proof of purchase and may also be needed for service
under warranty.
Model Number:
Serial Number:
Date of Purchase:
To better serve you, please do the following before contacting customer service:
If you received a damaged product, immediately contact the retailer or dealer that sold you the product.
Read and follow this User Manual carefully to help you install, use, and maintain your unit.
Refer to the Troubleshooting section of this manual as it will help you diagnose and solve many common issues.

3
Contents
Safety ............................................................................................. 4
Technical Data ................................................................................ 6
Installation ...................................................................................... 7
Operations ...................................................................................... 9
Cooking Guide ................................................................................. 11
Maintenance ................................................................................... 12
Troubleshooting .............................................................................. 14
Warranty ......................................................................................... 15

4
Safety
Thank you for purchasing our appliance. Before using it, please read this manual carefully and
keep it for future reference. Proper setup, operation, and maintenance are essential for safe use
and to protect your warranty.
Important Safety Notes
• Do not modify or alter the appliance unless explicitly approved by the manufacturer. Only oper-
ate the device in safe, proper, and technically sound conditions.
• As a commercial appliance, the user is responsible for ensuring full compliance with all ap-
plicable local, regional, and national safety laws. This includes following the industrial safety
measures, accident prevention requirements, and environmental regulations in addition to the
instructions provided in this manual.
Documentation
• Keep these instructions in a safe, accessible place and provide them to any future owner of the
appliance.
• Anyone operating the appliance must follow the instructions, warnings, and tips contained in
this manual.
Intended Use
• This appliance is designed for indoor use only.
Warnings & Symbol Denitions
Warnings
The following symbols indicate important safety information. Read and follow all instructions as-
sociated with each symbol.
WARNING
Indicates a hazard that could cause injury. Follow all instructions carefully.
Electrical Hazard
Indicates a risk of electric shock. Failure to follow the safety instructions may result in serious
injury or death.
CAUTION
Highlights instructions that help prevent damage, malfunction, or breakdown of the appliance.
NOTE
Indicates helpful tips and information for ecient, safe, and trouble-free operation.
Hot Surface Warning
Indicates that certain surfaces may become hot during use. Touching them may cause burns.

5
Additional Safety Guidance
• Each chapter of this manual provides important safety instructions designed to prevent acci-
dents. Pay close attention to the symbols, pictograms, and labels on the appliance, and ensure
they remain legible at all times.
• The appliance is constructed in accordance with current safety and technological standards.
However, improper use can still pose a hazard.
• Carefully reading and understanding this manual will help prevent mistakes and ensure safe,
reliable operation.
• To maintain safety and achieve optimal performance, always follow the instructions provided
and perform regular maintenance as recommended.
6
Technical Data
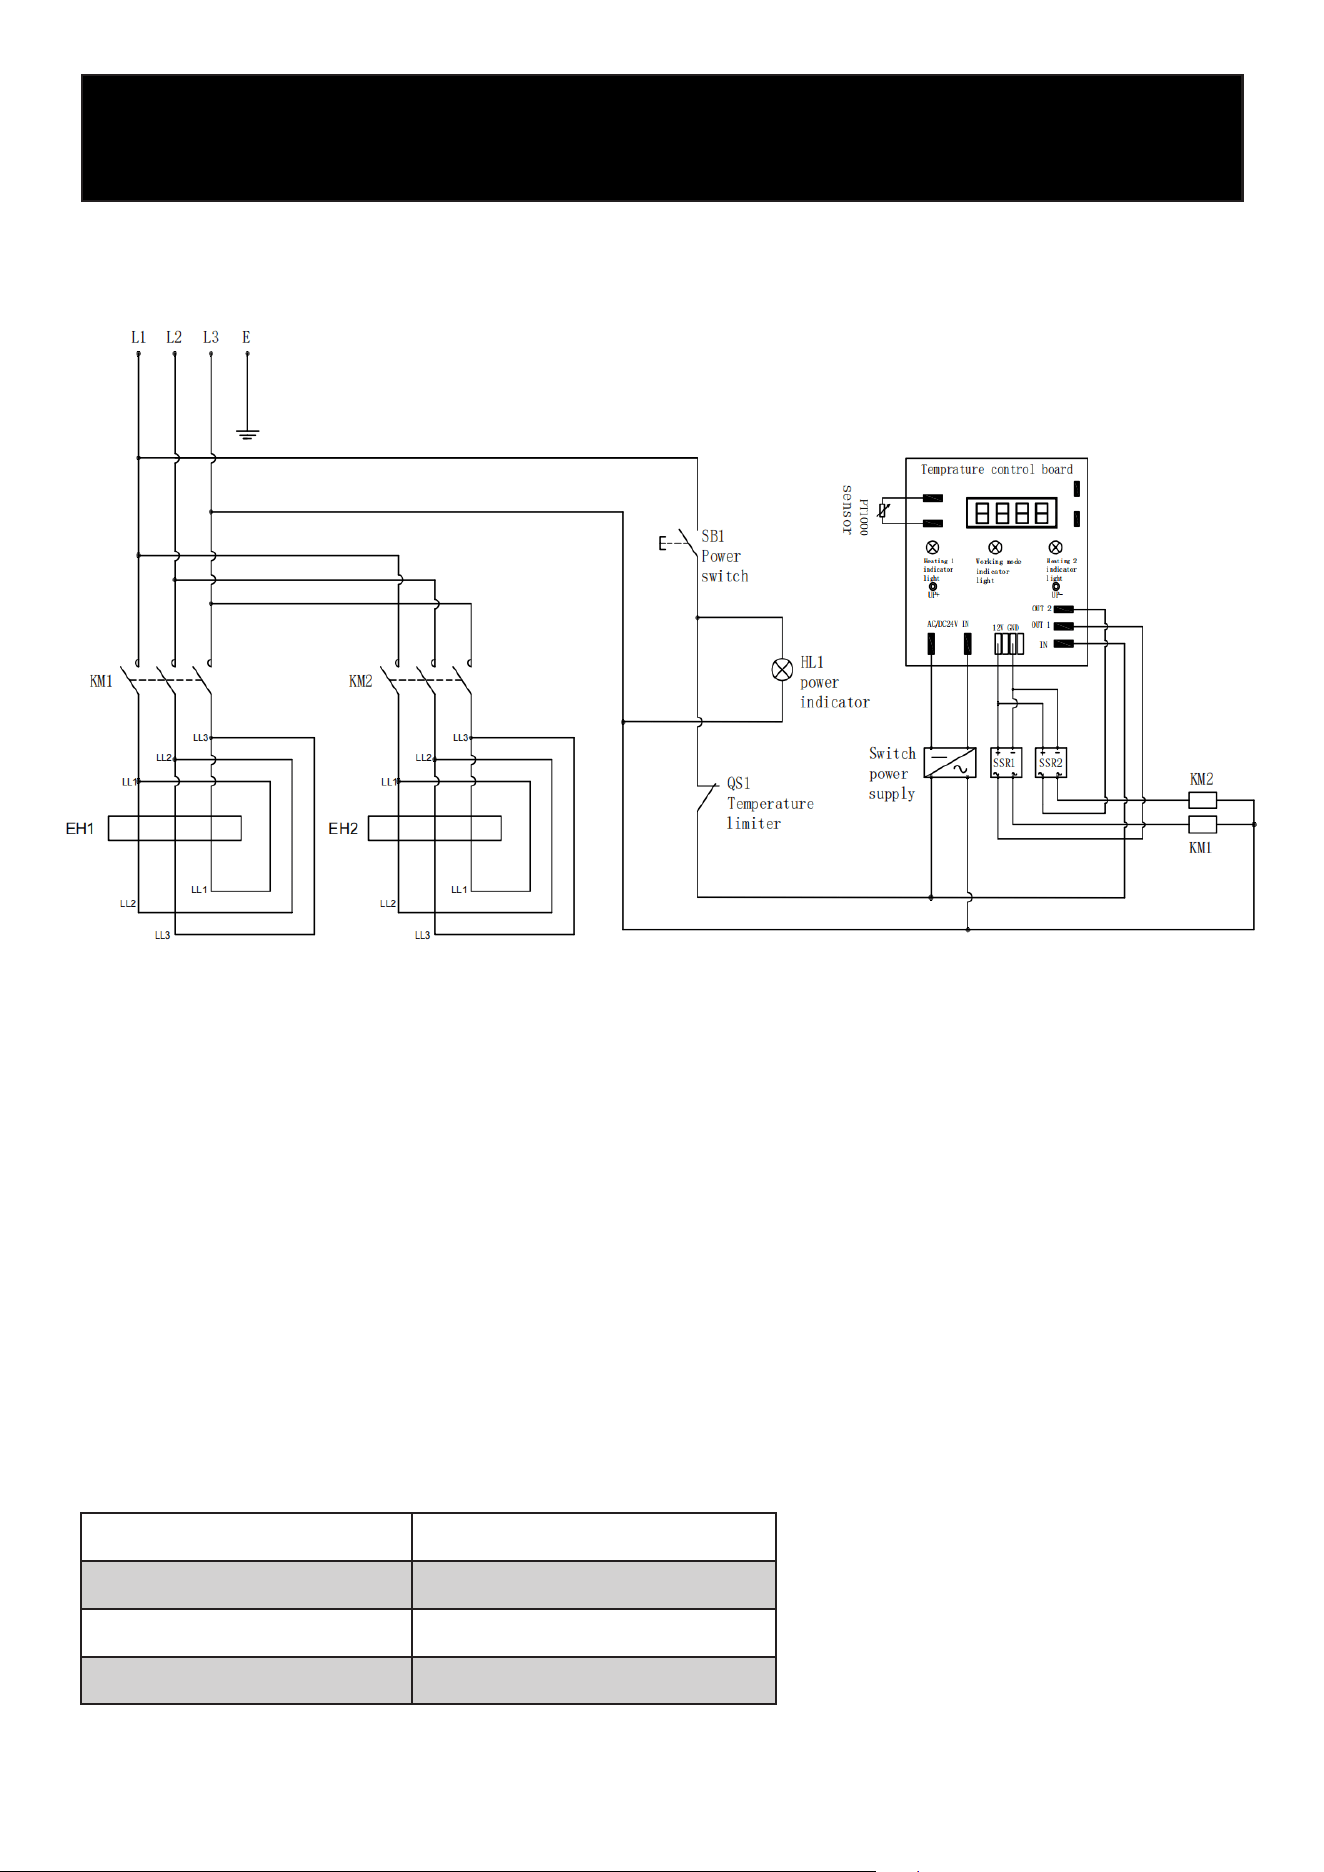
Circuit Drawing:
Dimension 15.51” x 30.07” x 44.66”
Electrical Data 240 V / 60 HZ / 3 Ph
Power 14 KW
Capacity 40 lbs.
Specications

7
Installation
Delivery Check
Inspect the appliance immediately upon delivery.
• Do not accept the unit if it is visibly damaged.
• Note any damage on the carrier’s delivery receipt.
• Report hidden damage immediately, as claims must be led within the carrier’s allowed time
frame.
Packaging
Do not discard the original packaging until the appliance has been fully installed and inspected.
The packaging can protect the unit during transport to its installation location or if the unit needs
to be moved within your facility.
Remove all inner and outer packing materials before installation.
NOTE: Follow your local regulations regarding disposal or recycling of packaging materials.
Safety Instructions
WARNING: Risk of Electric Shock
All electrical connections must comply with the wiring diagrams supplied with the appliance.
Refer to the diagrams located inside the appliance door when installing or servicing this unit.
Electrical Safety (Hardwired Installation)
WARNING: Electrical Hazard
Improper installation can cause electric shock.
• This appliance must be hardwired into a dedicated electrical circuit that matches the voltage
and amperage specied on the rating label.
• All wiring connections must be performed only by a licensed electrician in accordance with
local, regional, and national electrical codes.
• A disconnecting means (such as a circuit breaker or external switch) must be installed and
accessible to the operator.
• Ensure all wiring is protected from heat sources, moisture, and mechanical damage.
• Do not operate the unit if the electrical connection appears damaged or improperly installed.
• Before servicing or cleaning the appliance, disconnect power at the breaker.
General Operation Safety
• Do not use the appliance if it has malfunctioned, been dropped, or is damaged.
• Use only manufacturer-approved accessories and spare parts; unapproved parts may cause
injury, equipment damage, or void the warranty.
• Do not tilt or move the appliance while it is operating.
• Do not touch or operate the unit with wet hands.
• Never leave the unit unattended during operation—malfunctions can cause the oil or fat to over-
heat and ignite.

• Do not fry wet or moist foods. Always remove excess water or ice from frozen items before
frying.
Even small droplets of water can cause dangerous splashing or oil eruptions.
NOTE:
Excess moisture or overlling the basket can cause oil to foam excessively.
Do not leave food hanging over the basket edge while the basket is above hot oil.
Hot Oil Hazard
Do not move or reposition the fryer while the oil is hot.
Allow the oil to cool completely before handling the unit.
Hot oil can splash and cause severe burns.
CAUTION: Installation Must Be Performed by a Qualied Technician
• Place the appliance on a solid, level, stable, and heat-resistant surface.
• Do not install on ammable surfaces (e.g., tablecloths, carpets, etc.).
• Keep the device away from open ames, replaces, furnaces, electric heaters, or other heat
sources.
Required Clearances
Ensure adequate ventilation and service access:
• Minimum 6 in. clearance on both sides and rear.
• Minimum 24 in. clearance in front for safe operation and maintenance.
Avoid installations near water sources or areas with high moisture exposure.
Cleaning & Daily Care
• Do not allow grease to build up on the fryer’s frame or body.
• Clean the interior and exterior daily with detergent and hot water.
• Dry the unit thoroughly.
8
9
Operation
CAUTION! The fryer may only be operated by personnel who have been properly trained in its
use.
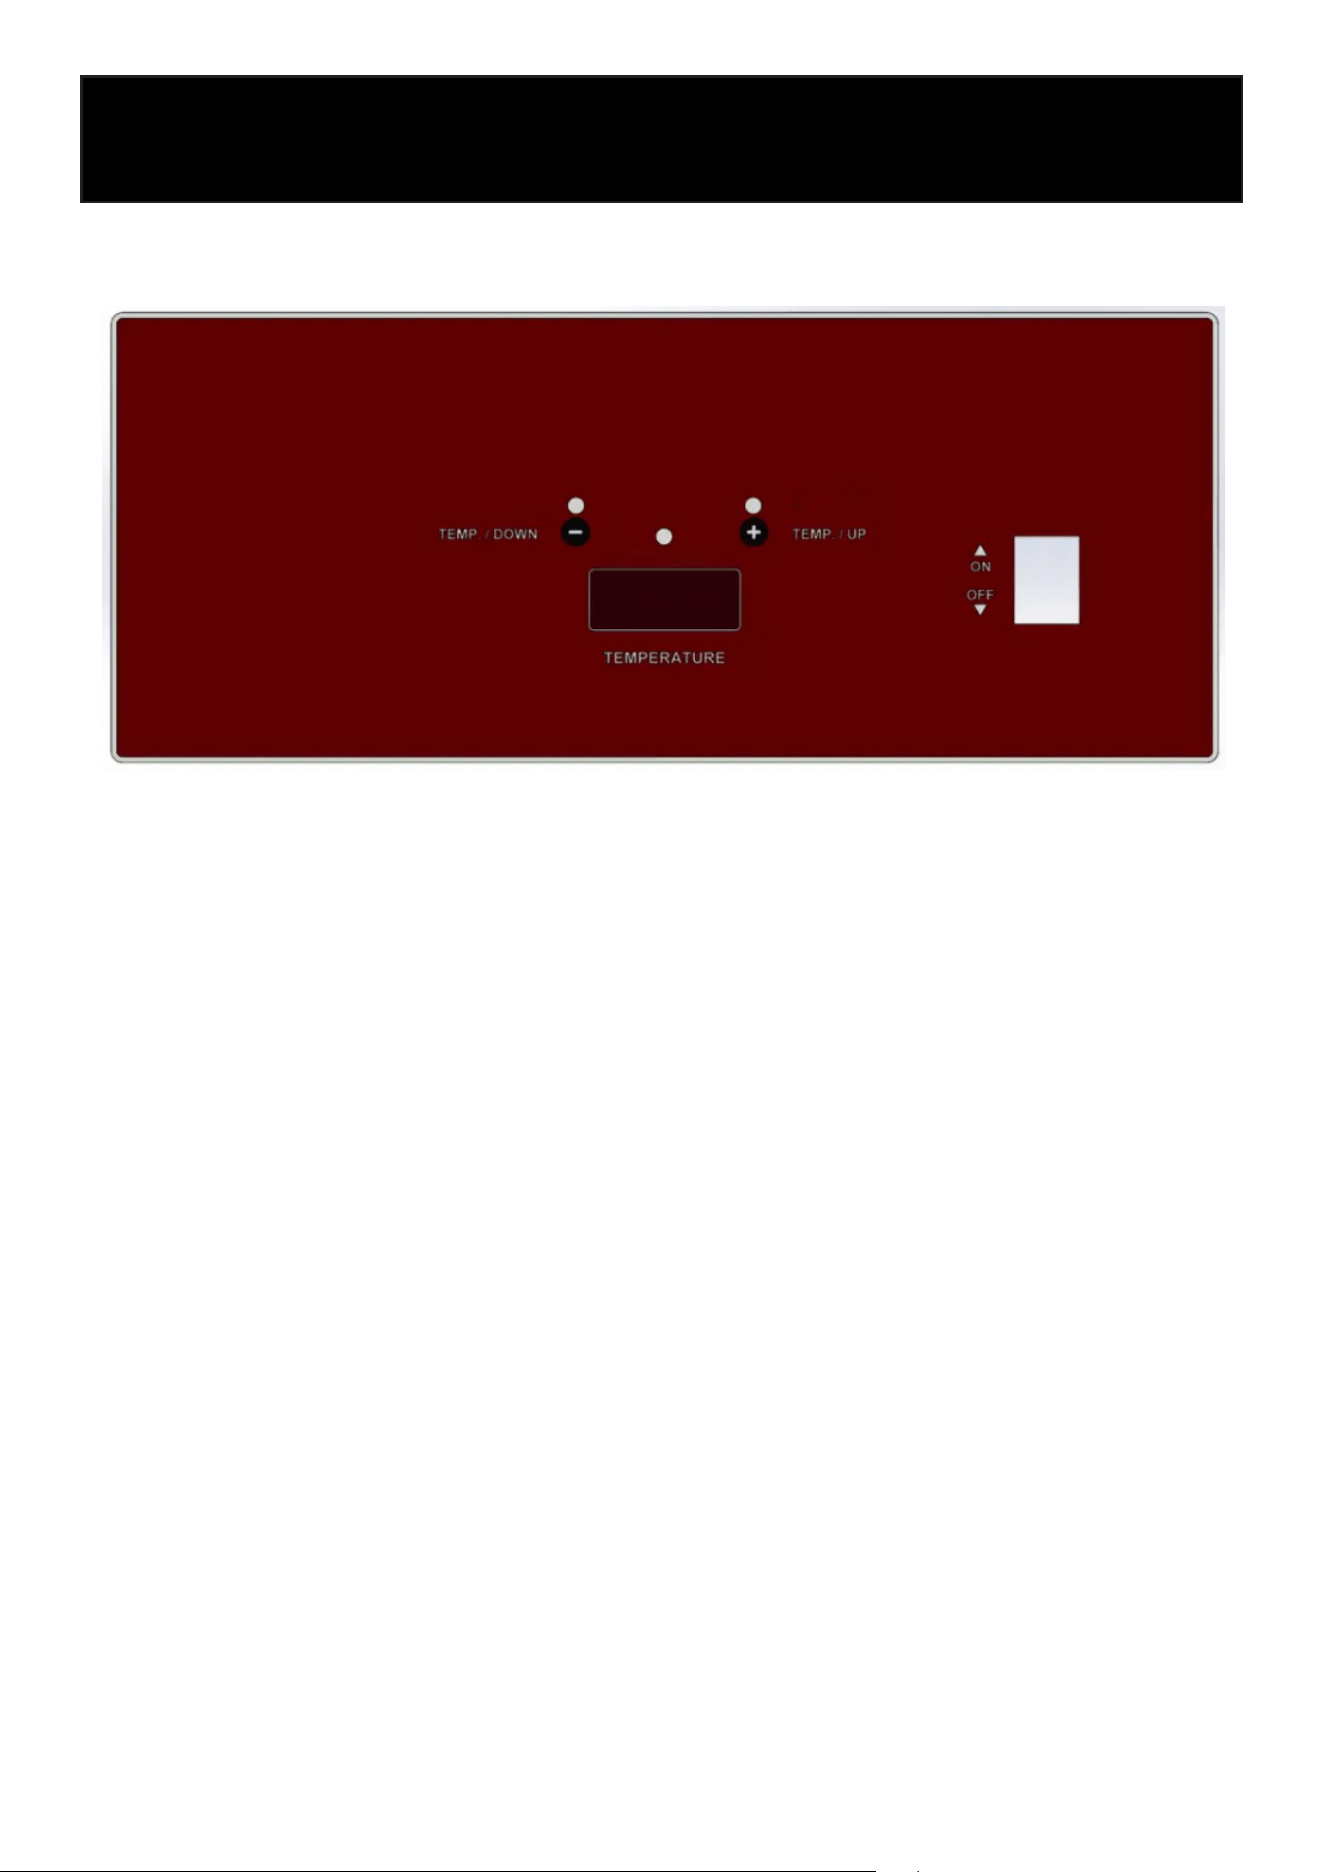
Control Panel Operation
The control panel is designed for simple and intuitive operation. To begin, press the ON/OFF
switch located on the right side of the panel to turn the fryer on. Once the unit is on, the Power
Indicator in the center of the panel will illuminate, and the digital temperature display will activate.
Use the TEMP / UP (+) button to increase the set temperature and the TEMP / DOWN (–) button to
lower it. The selected temperature will be shown on the digital display, allowing you to easily adjust
the fryer to your desired cooking level.
During operation, the Left Heating Indicator and Right Heating Indicator lights will turn on to show
when the heating elements are actively heating oil. These indicators help you monitor the heating
status at a glance. When the oil reaches the set temperature, the corresponding heating light will
turn off automatically. Use the temperature buttons at any time to make adjustments as needed.
The fryer will maintain the programmed temperature automatically for ecient and consistent
cooking.
Switching Between Fahrenheit (°F) and Celsius (°C)
The fryer is set to display temperatures in Fahrenheit (°F) when it leaves the factory.
To change the temperature display between °F and °C, follow the steps below:
1. Turn on the power switch and ensure the unit starts normally with no fault alarms.
2. Within the rst 30 seconds after powering on, press and hold the LEFT key for more than 5
seconds.
3. The rst two digits of the temperature display will show “AE.”
4. Press the LEFT key once more to toggle between °F and °C.
5. The display will automatically exit the setting mode and show the selected temperature unit.
You may repeat the same steps at any time to switch back from °C to °F.

10
Filling Tank With Shortening
Ensure that the device is switched off!
Notice: Solid shortening must NOT be used with this fryer. Melting solid shortening will damage
the tank and void your warranty.
• Close the drain valve.
• Fill the fryer tank with liquid shortening.
• Shortening level should be between the min and max lines in the fryer tank.
• Shortening will expand when heated. Do not ll the fryer tank past the MAX line.
• Add fresh shortening as needed to maintain oil level.
Fry Basket Capacity:
The recommended maximum load per basket is 2.5 lbs (1.1 kg).
Extending Shortening (Oil) Life
You can signicantly increase the life of your cooking oil by following these guidelines:
• Do not salt foods directly over the fryer.
• Use high-quality shortening or oil.
• Filter the shortening daily (minimum recommendation).
• Replace the oil if it develops an off-avor or unpleasant odor.
• Keep the equipment and surrounding areas clean.
• Set the thermostat correctly; avoid overheating.
• Remove excess moisture and loose particles from food before frying.
• Use a tted tank cover (not included) when the fryer is not in use to protect the oil from light
and oxygen.
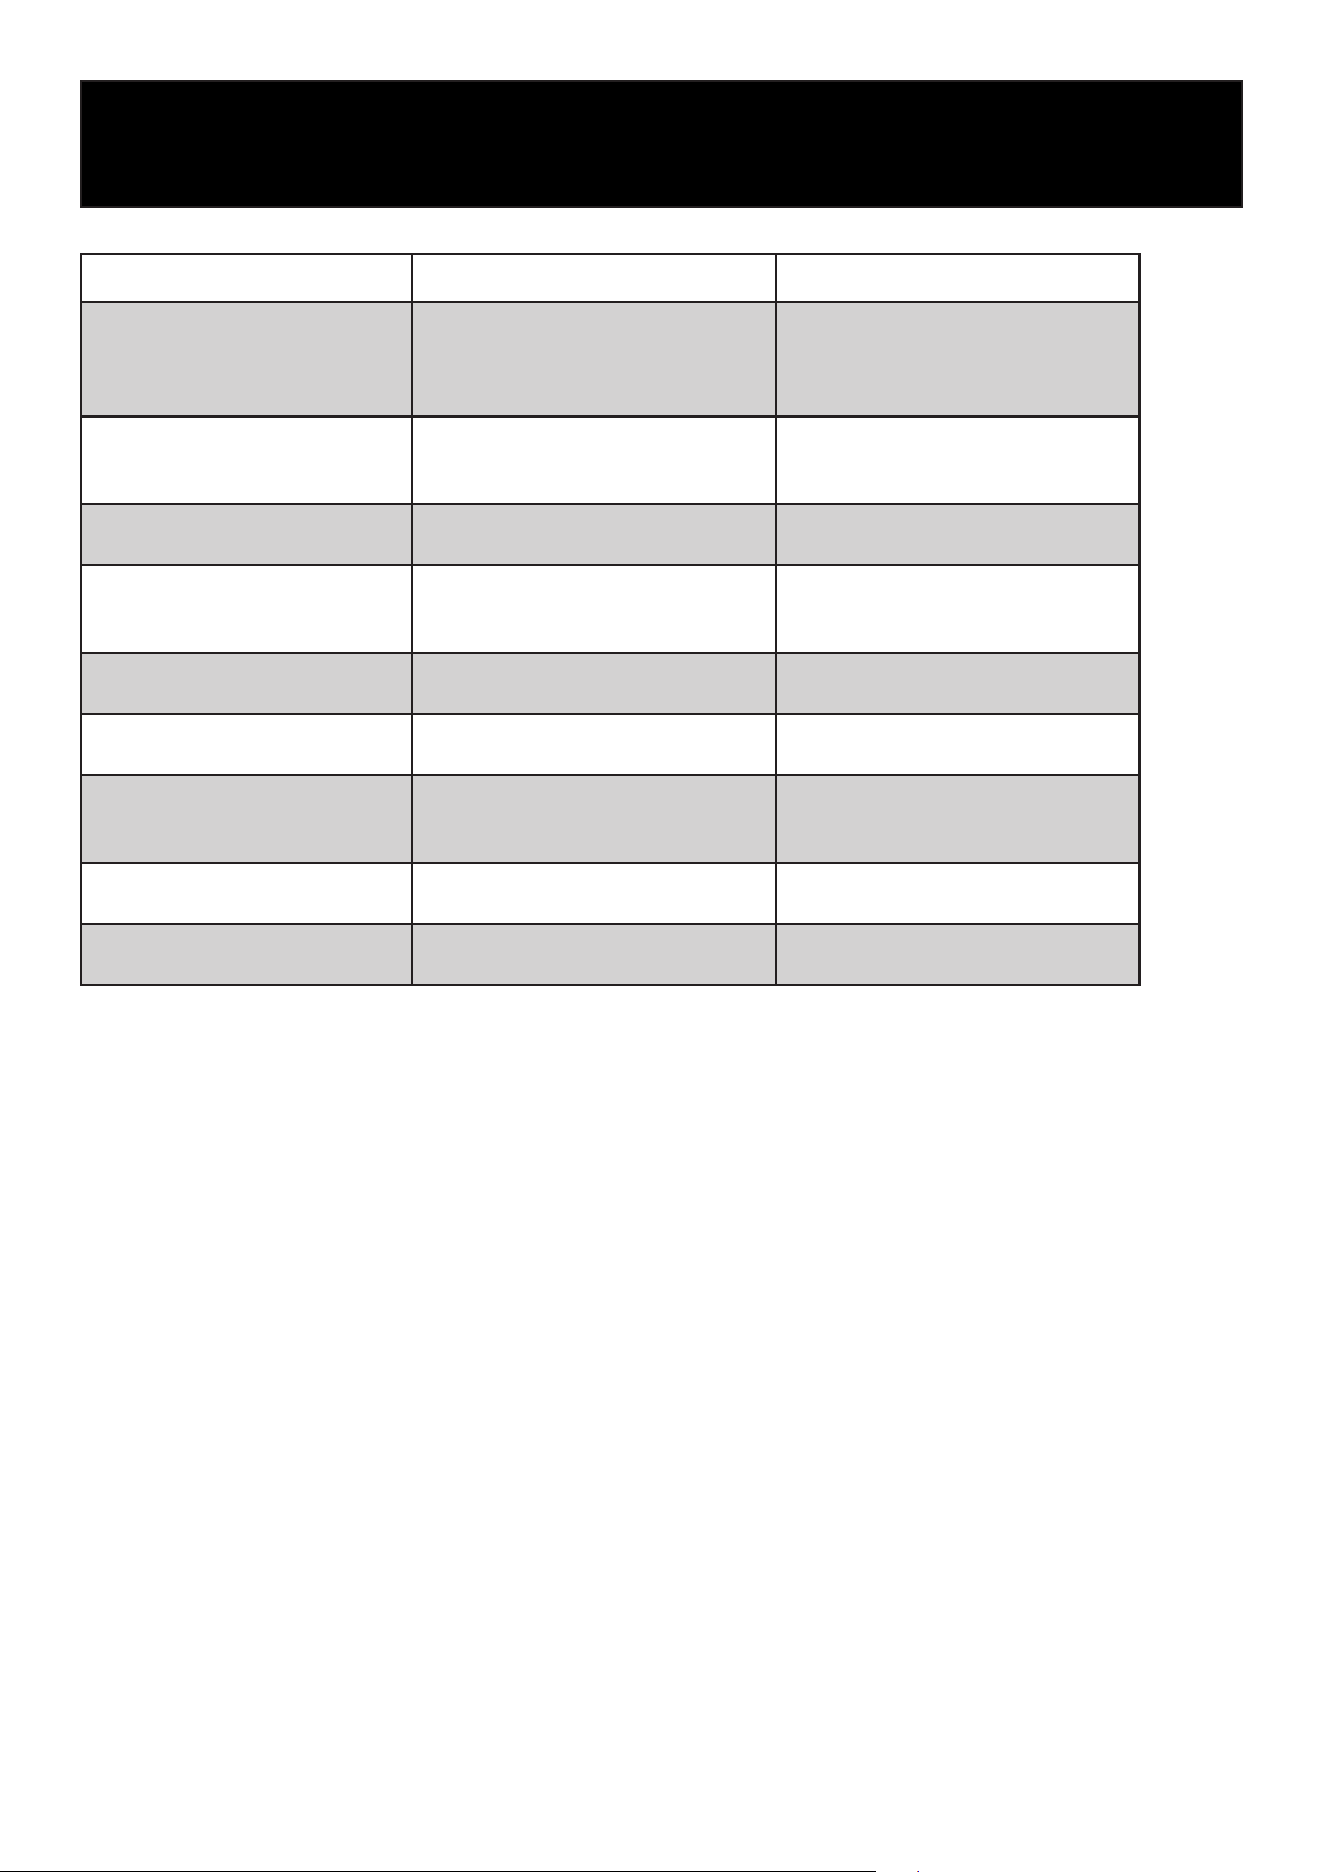
Food Item Recommended Temperature Cooking Notes
French Fries
325–375°F
(163–190°C)
For best results, use a two-stage
method: blanch at 325°F, nish at
375°F for crispiness. Avoid over-
crowding.
Chicken (Bone-In/Breaded) 350°F (177°C)
Ensure chicken reaches internal
temp of 165°F (74°C). Too low =
greasy; too high = burnt coating.
Chicken Tenders / Nuggets
350–365°F
(177–185°C)
Frozen breaded items may require
slightly longer cook times.
Fish Fillets / Shrimp / Seafood
350–375°F
(177–190°C)
Thin seafood cooks quickly; higher
temps (375°F) ideal for battered
sh.
Onion Rings
365–375°F
(185–190°C)
High heat improves crispness and
prevents soggy batter.
Mozzarella Sticks 350°F (177°C)
Fry quickly to avoid cheese blow-
out; do not overll the basket.
Donuts / Funnel Cakes 350°F (177°C)
Fry until golden brown; maintain
stable temperature for even cook-
ing.
Vegetables (Tempura, etc.)
350–365°F
(177–185°C)
Light batters cook best at moder-
ate-high temperatures.
Frozen Appetizers (Egg rolls,
spring rolls, etc.)
350–375°F
(177–190°C)
Adjust time based on size; fry until
internal temperature is reached.
11
Cooking Guide

12
Cleaning and Maintenance
Safety Advice
Before beginning with repair or cleaning, make sure the device has been disconnected from the
power supply and has cooled down. Do not use any acidic agents and make sure no water enters
the unit.
To protect yourself from electric shock, never immerse the unit or its cables in water or other liq-
uids.
CAUTION!
The device is not suited for direct washing via water jets. Therefore, you must not use any kind of
pressure water jet for cleaning the device!
Cleaning:
Frypot Cleaning (Weekly)
1. Fill the frypot with water to just below the upper oil-level mark.
2. Add 1 cup of detergent and bring the water to a boil.
3. Reduce heat and let the solution simmer for 10–15 minutes.
4. Drain the solution and rinse the frypot twice with clean water.
5. Add ¼ cup of white vinegar to the nal rinse to neutralize detergent residue.
6. Wipe the frypot dry with a clean towel before relling with oil.
7. If the fryer will not be used immediately, apply a thin coat of cooking oil to the interior to pre-
vent rust.
CAUTION
• Never wash or submerge the control panel (switching unit) in water.
Moisture in the control area can cause electric shock, creeping current, or malfunction.
• Clean the control panel, outer surfaces, and power cord only with a soft cloth and mild cleaning
solution.
• Do not allow water to enter the control panel or any electrical components.
• Avoid abrasive cleaners, caustic agents, or scouring pads.
Stubborn residue may be removed by soaking affected parts.
• After cleaning, dry all components thoroughly before reassembly.
• When storing for extended periods, keep the fryer in a dry location away from corrosive vapors,
acids, or gases.
Over-Temperature Shutdown (Safety Feature)
If the oil (shortening) becomes excessively hot, the fryer’s high-temperature safety shutoff will
automatically turn the unit off.
• If the fryer shuts down due to overheating:
Do NOT turn it back on until the oil temperature drops below 300°F (149°C).
13
This protects the fryer from damage and reduces the risk of re.
Draining the Oil
WARNING: Hot oil and hot components can cause severe burns. Use caution when draining,
cleaning, or servicing the fryer.
1. Turn off the fryer and allow the oil to cool to a safe handling temperature.
2. Insert the drain extension into the drain valve. Tighten hand-tight only.
3. Position the drain extension over the ltering device or collection container.
4. Slowly open the drain valve to begin draining the oil; once it ows smoothly, fully open the
valve.
5. When the frypot is empty, use a tank brush to remove any remaining debris.
6. Close the drain valve.
7. Rell the frypot with fresh shortening:
• Fill no lower than the MIN line, and
• No higher than halfway between MIN and MAX (oil expands as it heats).
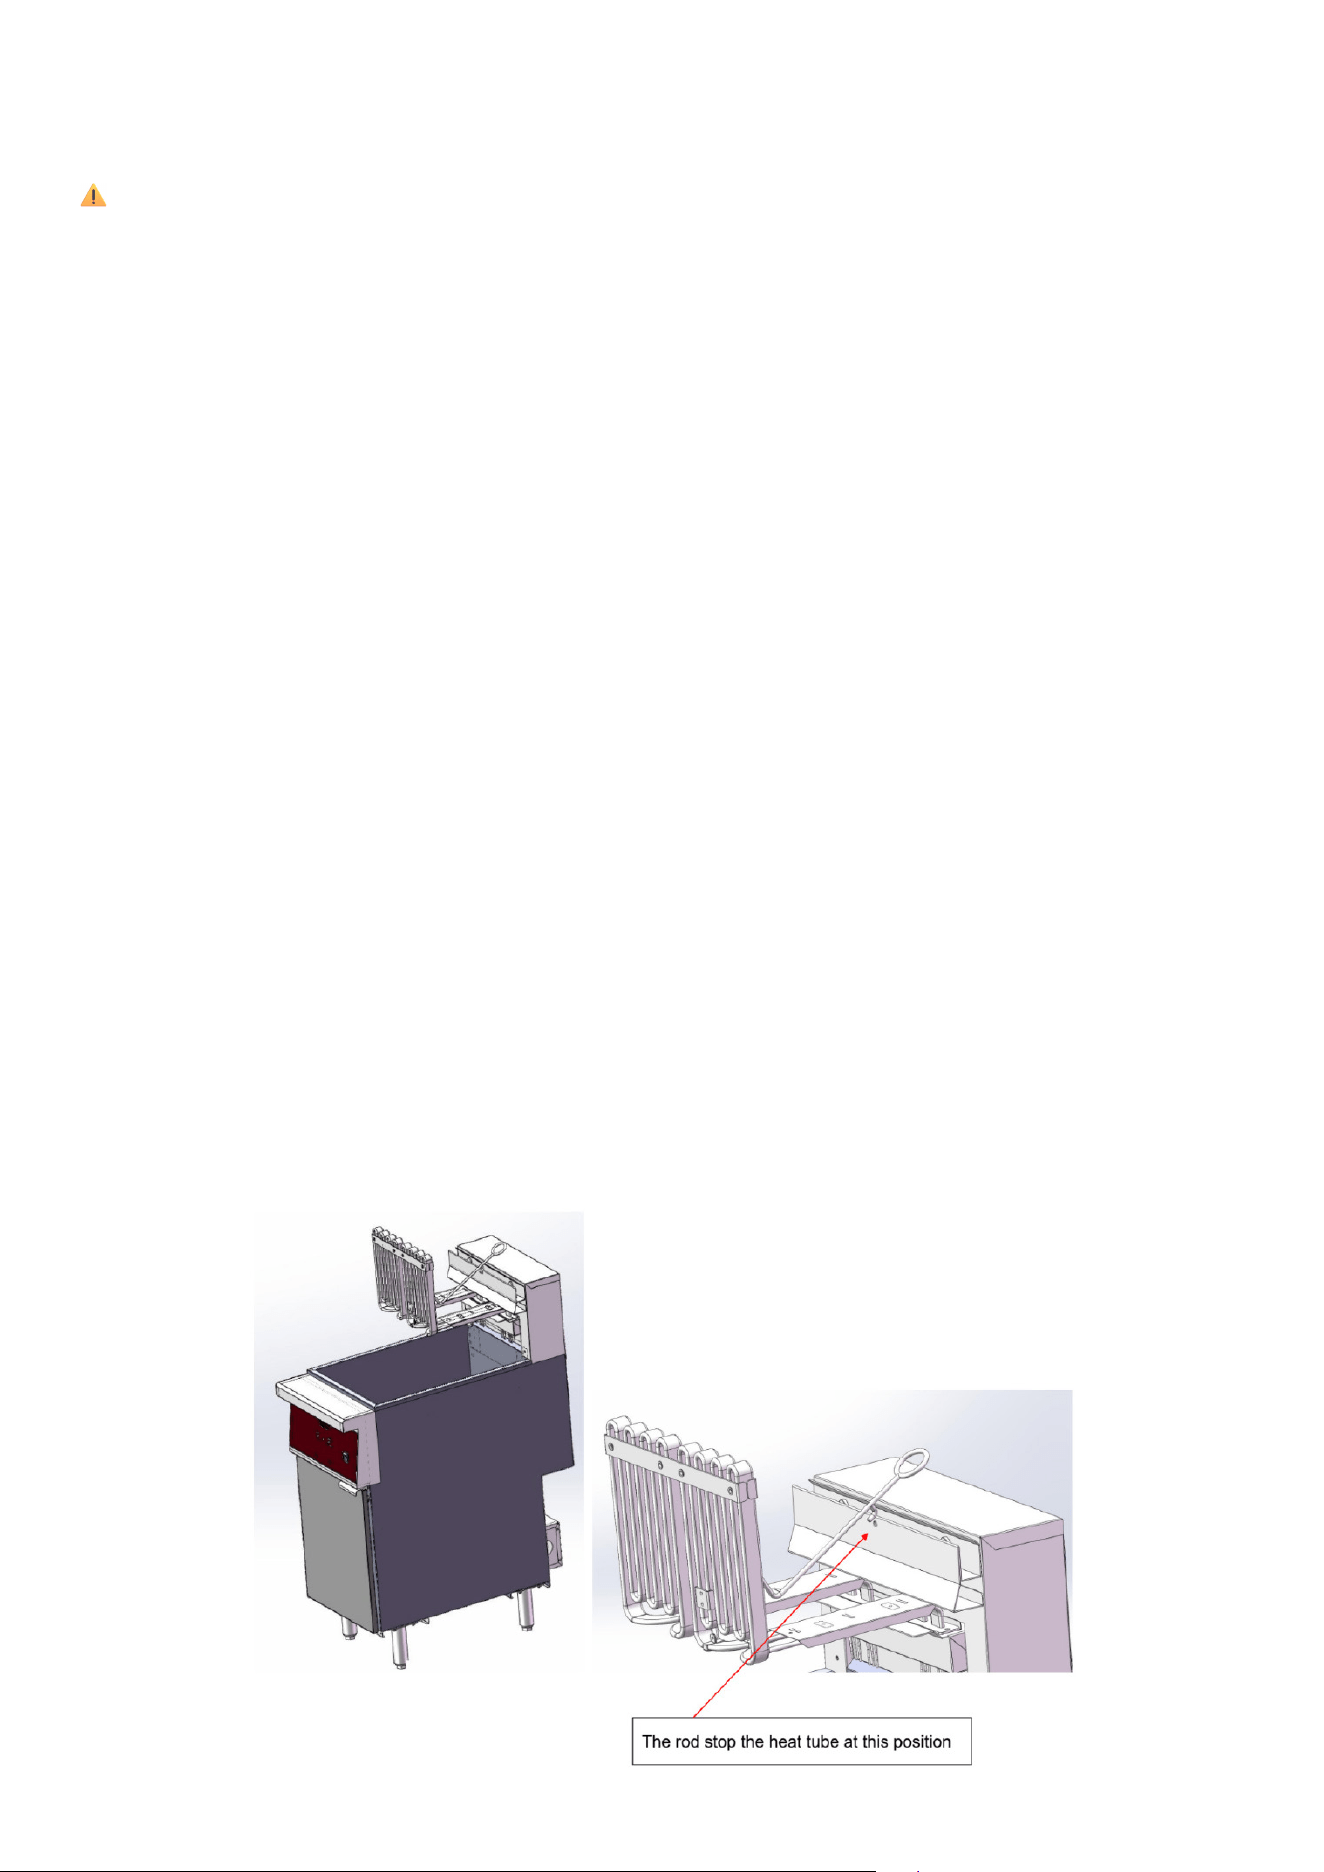
Lifting the Heating Elements for Maintenance
CAUTION: This procedure must only be performed after the oil has cooled to a safe temperature.
Hot oil can cause severe burns
1. Locate the O-Ring Lift Rod: Find the stainless-steel rod with the O-ring handle and small retain-
ing hook attached to the heating element assembly.
2. Lift the Heating Elements: Pull the O-ring straight upward; the elements will pivot on their hing-
es as they rise.
3. Engage the Hook: Continue lifting until the elements reach the upright position, then latch the
hook onto the basket-lift bar.
This secures the elements so they remain raised without being held.
4. Perform Maintenance: With the elements locked upright, the fry tank can be cleaned, inspect-
ed, or serviced.
5. Lower the Elements: Support the O-ring handle, lift slightly to release tension, unhook the rod,
and slowly guide the elements back into their operating position.
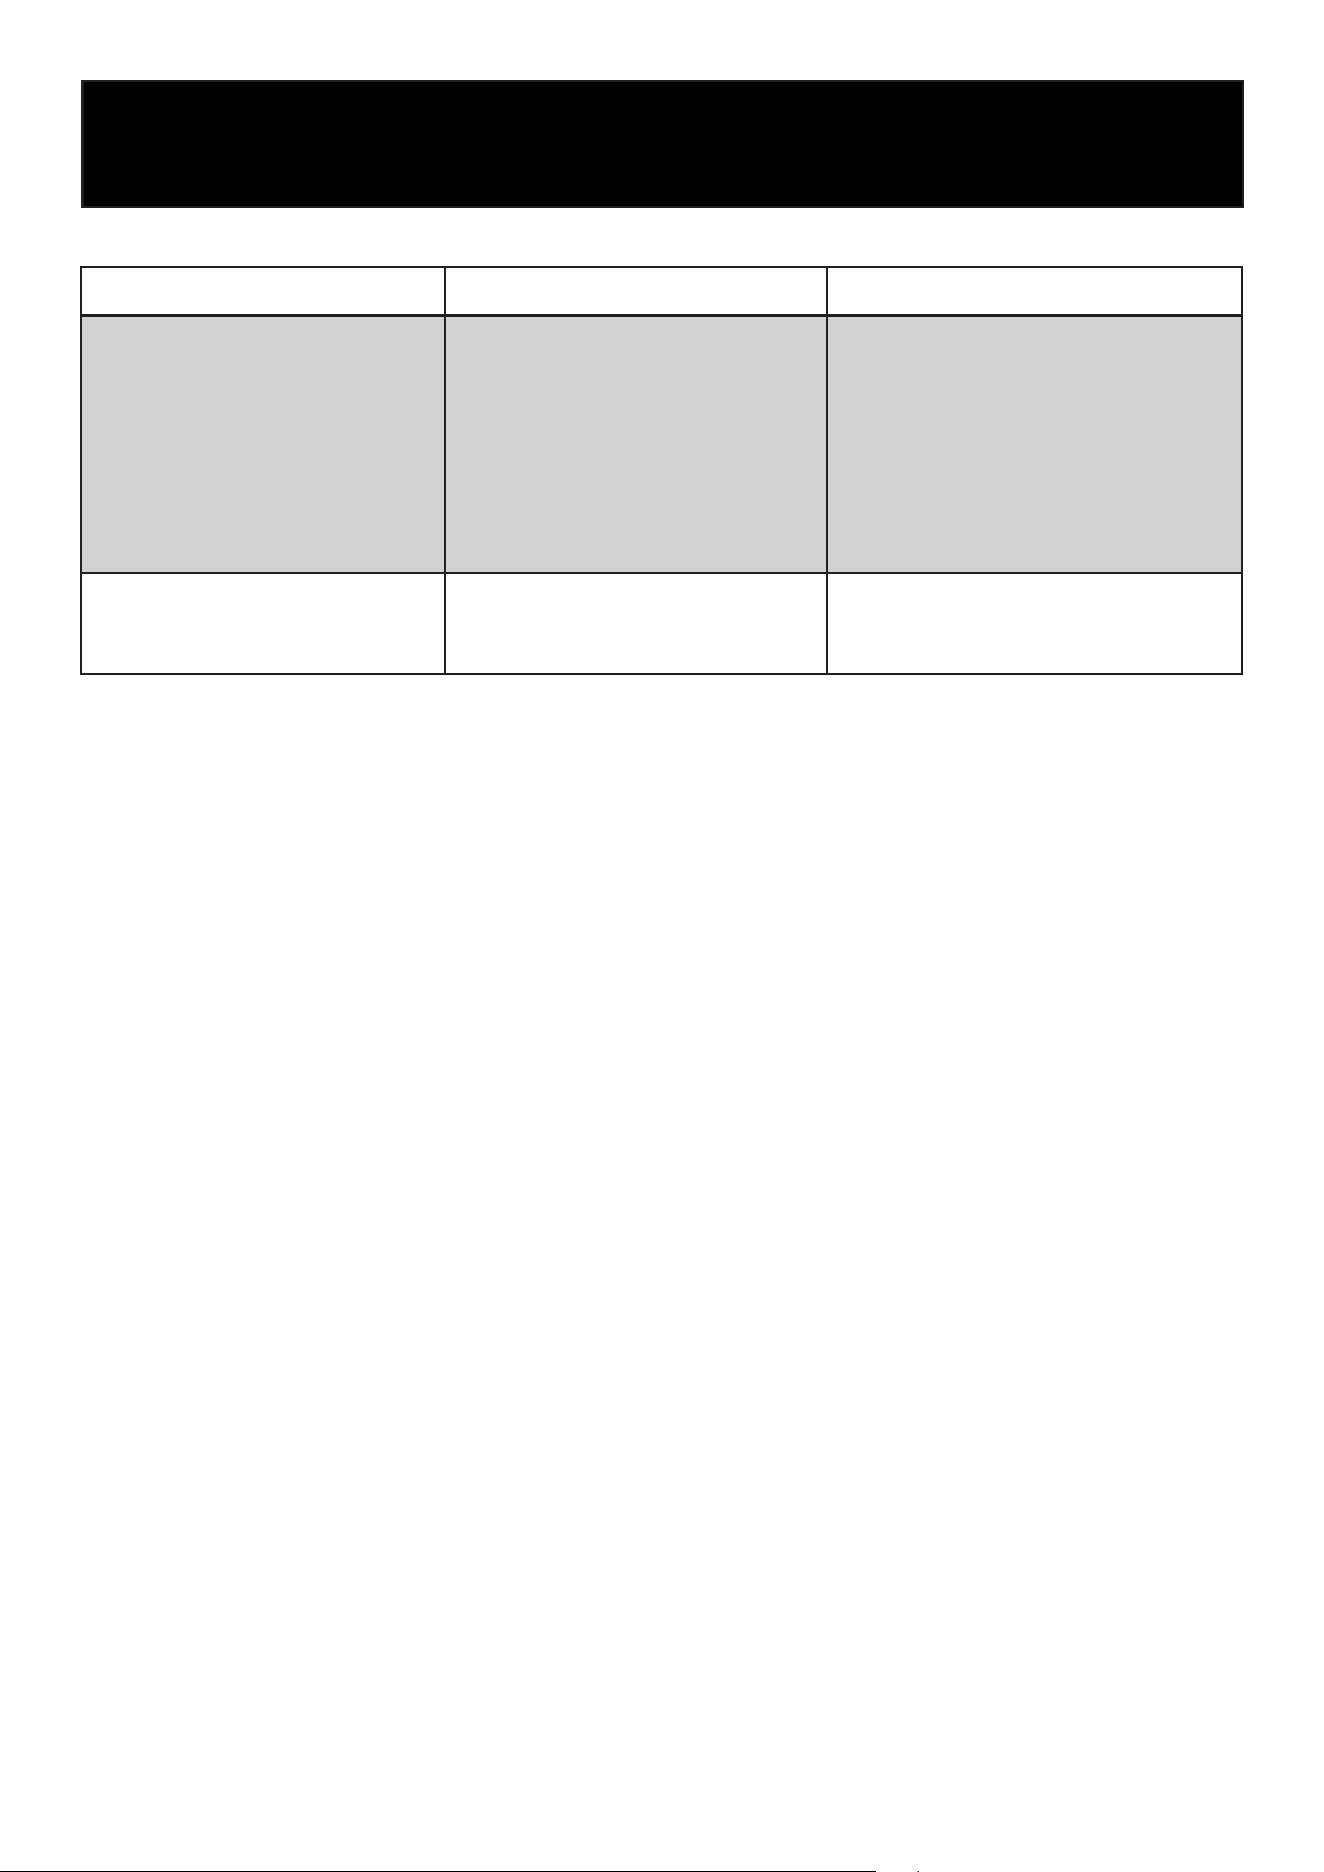
Troubleshooting
14
Problem Cause Solution
The unit is powered, but the power
indicator does not illuminate and
the fryer does not heat.
• Blown internal fuse or tripped
circuit breaker.
• Improper wiring connection.
• Over-temperature safety has
activated.
• Faulty temperature controller.
• Verify the circuit breaker has not
tripped and reset if necessary.
• Have a qualied technician inspect
all wiring connections.
• Allow the unit to cool and reset the
over-temperature safety device (per-
formed by technician if internal).
• Contact an authorized service tech-
nician for diagnosis and repair.
The heating indicator illuminates,
but the fryer temperature does not
increase as expected.
• Interrupted contact with heating
element.
• Damaged heating element.
• Contact Customer Service.
Failure Analysis & Trouble Shooting

15
LIMITED WARRANTY
KoolMore Supply Inc. extends a limited warranty to the original purchaser, guaranteeing that this KoolMore product is
free from manufacturing defects in material or workmanship for one year from the date of purchase.
Should you discover any such defect within the warranty period, KoolMore Supply Inc. reserves the right to repair or re-
place the product without charge, or to cover the cost of replacement parts and repair labor needed to correct defects
present at the time of purchase or resulting from regular usage, when the appliance has been installed, operated, and
maintained as per the instructions provided.
At its sole discretion, KoolMore Supply Inc. may decide to replace the product. In such an event, your replacement
appliance will carry the warranty for the remaining term of the original unit’s warranty period.
This warranty is valid exclusively to the original purchaser of the product and only applicable within the United States.
The warranty commences from the date of original consumer purchase. Proof of the original purchase date will be
required to obtain service under this warranty.
Under this limited warranty, your sole and exclusive remedy will be product repair, as outlined above. All services must
be provided by a KoolMore designated service company.
To claim warranty or request repair service:
Email [email protected]. Please include your name, address, phone number, warranty repair request, and a copy
of your proof of purchase receipt. Alternatively, visit koolmore.com and use the Contact Us page. A KoolMore custom-
er service representative will promptly arrange service for your appliance.
We thank you for choosing KoolMore.
WARRANTY EXCLUSIONS
This limited warranty will not cover:
1. Failure of the product to perform during power failures or interruptions,
or due to inadequate electrical service.
2. Damage incurred during transportation or handling.
3. Damage caused by accidents, vermin, lightning, winds, re, oods, or acts of God.
4. Damage resulting from accidents, alterations, misuse, abuse, improper installation, repair, or maintenance. This
includes using any external device that alters or converts the voltage or frequency of electricity.
5. Unauthorized product modications, repairs by unauthorized centers, or use of non-approved replacement parts.
6. Abnormal cleaning and maintenance not aligned with the user’s manual.
7. Use of incompatible accessories or components.
8. Any costs associated with repairs or replacements under these excluded circumstances shall be the responsibility
of the consumer.
WARRANTY