

SMG 7400SS
EN
MEAT GRINDER
Translation of the original manual

SMG 7400SS
A
1
2
3
5
4
7
8
9
B
9
2
3
4
5
76
8
10
11
1
12
13
C
2
3
1
D
2
3
4
5
8
6
1
7
E
1
2
3
4
5
6
F
G
H

- 1 -
06/2025
2025, .
EN
Meat grinder
User Manual
IMPORTANT SAFETY INSTRUCTIONS
READ CAREFULLY AND STORE FOR FUTURE USE.
• This appliance is not to be used by children. Keep this
appliance and its power cable out of the reach of children.
• The appliance may be used by persons with reduced
physical, sensory or mental abilities or lack of experience
and knowledge, provided they are supervised or have
been instructed on the safe use of the appliance and
understand the potential hazards.
• Children must not play with the appliance.
• If the power cord is damaged, have it replaced in a
professional service centre in order to prevent a dangerous
situation. Never use the appliance if the power cord is
damaged.
• Incorrect use may lead to injury.
• Pay special attention to the grinding blade, especially
when removing and cleaning it. Grinding blades are sharp
and there is a risk of serious injury.
• The parts of the appliance and accessories that come
into contact with food must be cleaned according to the
instructions in this user'smanual.
• Always disconnect the appliance from the power supply
when leaving it unattended and before assembly,
disassembly or cleaning.

- 2 -
06/2025
2025, .
• Before replacing the accessories or accessible movable
parts, please turn the appliance off and disconnect it from
the power supply.
. . . . . . . . . . . . . . . . . . . . . . . . . . . . . . . . . . . . . . . . . . . . . . . . . . . . . . . . . . . . . . . . . . . . . . . . . . . . . . . . . . . . . . . . . . . . . . . . . . . . . . . . . . . . . . . . . . . . . . . . . . . . . . . . . . . . . . . . . . . .
Additional important safety instructions foruse of the appliance
• This appliance is designed for household use. This appliance is intended for processing astandard amount of food in the household. Do not use it for
other purposes, for which it is not intended.
• Do not use the appliance in an industrial or laboratory environment or outdoors.
• Before connecting this appliance to an electrical power socket, make sure that the voltage stated on its rating label corresponds to the voltage in your
power socket. Connect the appliance only to a properly earthed socket. Do not use an extension cord.
• Before use, fully extend the power cord.
• Do not connect and disconnect the appliance'spower cord to and from the power socket with wet hands.
• Make sure that the power plug contacts do not come into contact with water or any other liquid. If precisely this happens, carefully dry the power
plug before using it again.
• Do not disconnect the appliance from the power socket by pulling on the power cord. Damage to the cable or power socket could occur. Disconnect
the cord from the power socket by pulling the plug.
• Do not place heavy objects on the power cord. Ensure that the power cord does not hang over the edge of the table or touch hot surfaces or sharp
objects.
• Keep the power cord dry.
• Do not wind the power cord around the appliance.
• Use the appliance only with the original accessories supplied with it.
• Before every use, check the selected accessory for damage. Never use the appliance with adamaged accessory.
• Only place the appliance on an even, dry and stable surface.
• Do not place the appliance or its accessories on an electric or gas stove or in its vicinity, on the edge of atable or on an unstable surface.
• Do not place the appliance and its accessories near heaters, open fires or other sources of heat.
• Make sure that the appliance is correctly assembled before putting it into operation.
• Do not touch rotating parts that are in motion during operation. Otherwise, injury may occur.
• Always adhere to the operating time and the time intended for the cooling down of the appliance prior to it being used again. These times are
provided in this user'smanual in the relevant chapter.
• Do not operate the appliance continuously for more than 5 minutes. Allow it to cool down for 10 minutes.
• Do not turn on the appliance when it is empty. Incorrect use of the appliance may negatively affect its lifetime.
• Do not use the appliance for crushing bones, nuts or other hard foods. Before using it, remove any bones, skin, cartilage, etc. from the meat.
• Never process frozen food. Frozen food must be defrosted prior to being processed in the appliance.
• To prevent the appliance from clogging, press down gently on the pusher when adding the food into the feed tube.
• Always use the pusher supplied with the appliance. Never use your fingers or other items to push ingredients through the feed tube while the
appliance is running.
• Do not perform any maintenance on the appliance other than cleaning the individual components as described in this user'smanual.
• Never use an appliance that is damaged in any way.
• Do not use the appliance if it has fallen on the floor, if it was submerged in water, if it is not functioning properly or if it is damaged in any other way.
• Always turn off the appliance and disconnect it from the power socket when not using it, when leaving it without supervision and before removing or
replacing accessories, and before cleaning, maintenance or storage.
• To prevent the risk of injury by electrical shock, never submerge the motor base unit and its power cord in water or any other liquid, or wash these
parts under running water.
• To prevent dangerous situations, do not repair or modify the appliance yourself. All repairs should be carried out by an authorised service centre.
Tampering with the appliance may result in the loss of your legal rights regarding faulty performance or warranty for quality.
. . . . . . . . . . . . . . . . . . . . . . . . . . . . . . . . . . . . . . . . . . . . . . . . . . . . . . . . . . . . . . . . . . . . . . . . . . . . . . . . . . . . . . . . . . . . . . . . . . . . . . . . . . . . . . . . . . . . . . . . . . . . . . . . . . . . . . . . . . . .
EXPLANATION OF SYMBOLS PLACED ON THE PRODUCT OR INTHE ACCOMPANYING DOCUMENTATION
The product meets all the basic requirements of the applicable EU directives.
This symbol on products or original documents means that used electric or electronic products must not be added to ordinary municipal
waste.
Safety Class for Electric Shock Protection: Class II – Electric shock protection is provided by double or heavy-duty insulation.
. . . . . . . . . . . . . . . . . . . . . . . . . . . . . . . . . . . . . . . . . . . . . . . . . . . . . . . . . . . . . . . . . . . . . . . . . . . . . . . . . . . . . . . . . . . . . . . . . . . . . . . . . . . . . . . . . . . . . . . . . . . . . . . . . . . . . . . . . . . .
- 3 -
06/2025
2025, .
• Thank you for purchasing our SENCOR product; we hope it will serve
to your satisfaction.
• Prior to using this appliance, please read the user manual thoroughly,
even in cases when you are already familiar with the use of similar
types of appliances. Use the appliance only as described in this
user manual. Keep the manual for future reference. If you pass the
appliance on to another person, ensure that this user manual is
included.
• Carefully unpack the appliance and make sure not to discard any part
of the packaging material until you have removed all the components.
It is recommended to keep the original packaging, packing material,
receipt and confirmation of the extent of the seller's liability or warranty
certificate at least for the duration of the legal right to file defect
claims or the quality warranty. When transporting the appliance,
we recommend repackaging it in the original box provided by the
manufacturer.
. . . . . . . . . . . . . . . . . . . . . . . . . . . . . . . . . . . . . . . . . . . . . . . . . . . . . . . . . . . . . . . . . . . .
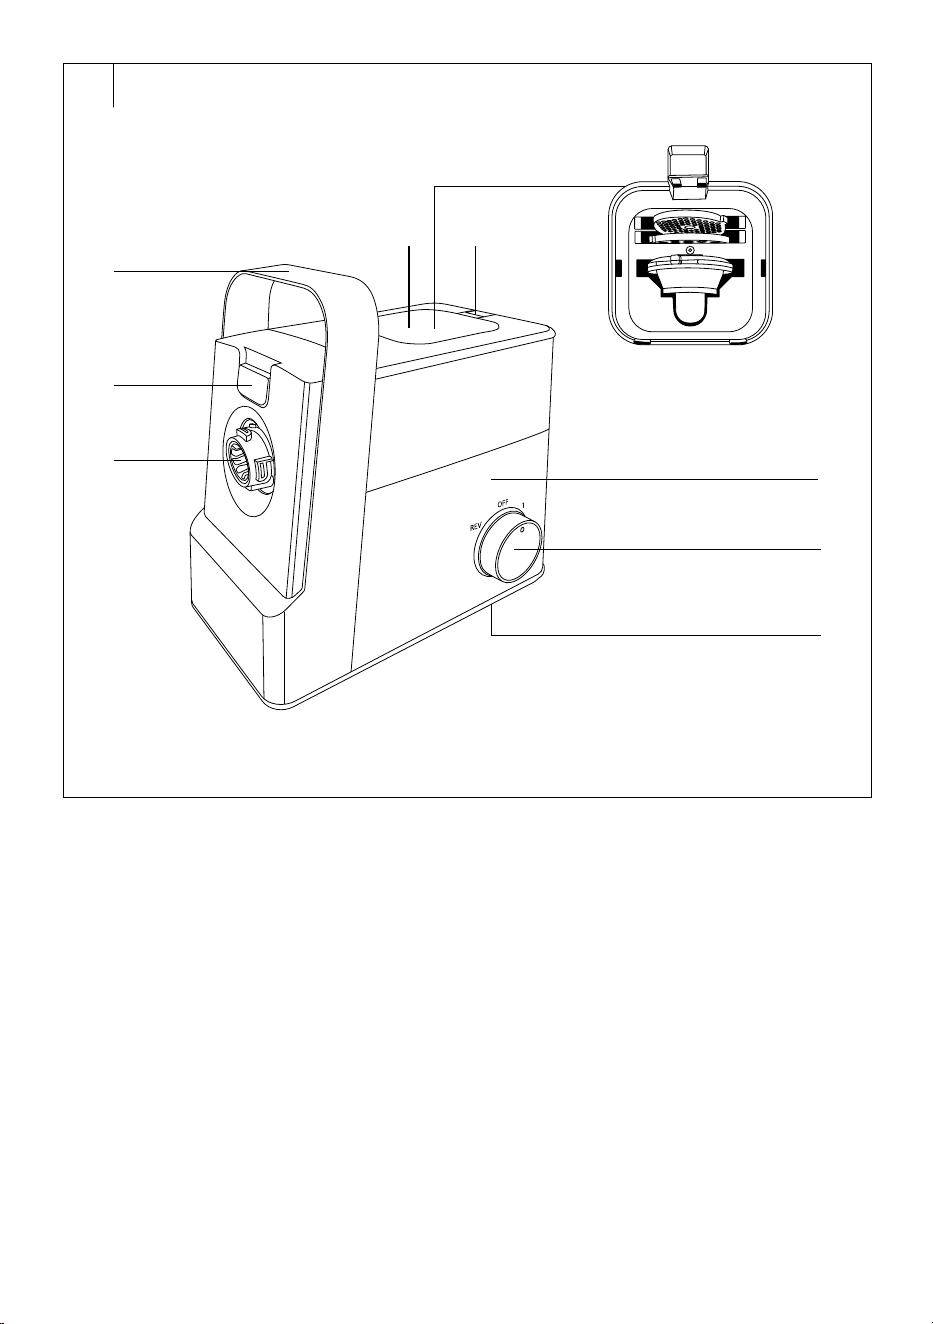
DESCRIPTION OF THE APPLIANCE
A1 Handle
A2 Grinder or grating attachment
lock/release button
A3 Hole for mounting the grinder
or the grating attachment
A4 Storage compartment cover
lock
A5 Storage cover
A6 Storage space for accessories
A7 Motor base unit
A8 Rotary knob
REV: reverse
OFF: turn off
1: low speed
2: high speed
A9 Antiskid feet (on the bottom)
. . . . . . . . . . . . . . . . . . . . . . . . . . . . . . . . . . . . . . . . . . . . . . . . . . . . . . . . . . . . . . . . . . . .
DESCRIPTION OF ACCESSORIES – MEAT GRINDER
B1 Grinder
B2 Feed tube
B3 Grinding chamber
B4 Feeder tray
B5 Pusher
B6 Worm shaft
B7 Cross blade
B8 Coarse grinding plate
B9 Fine grinding plate
B10 Extra fine grinding plate
B11 Screw ring
B12 Cookie maker
B13 Cookie maker holder
. . . . . . . . . . . . . . . . . . . . . . . . . . . . . . . . . . . . . . . . . . . . . . . . . . . . . . . . . . . . . . . . . . . .
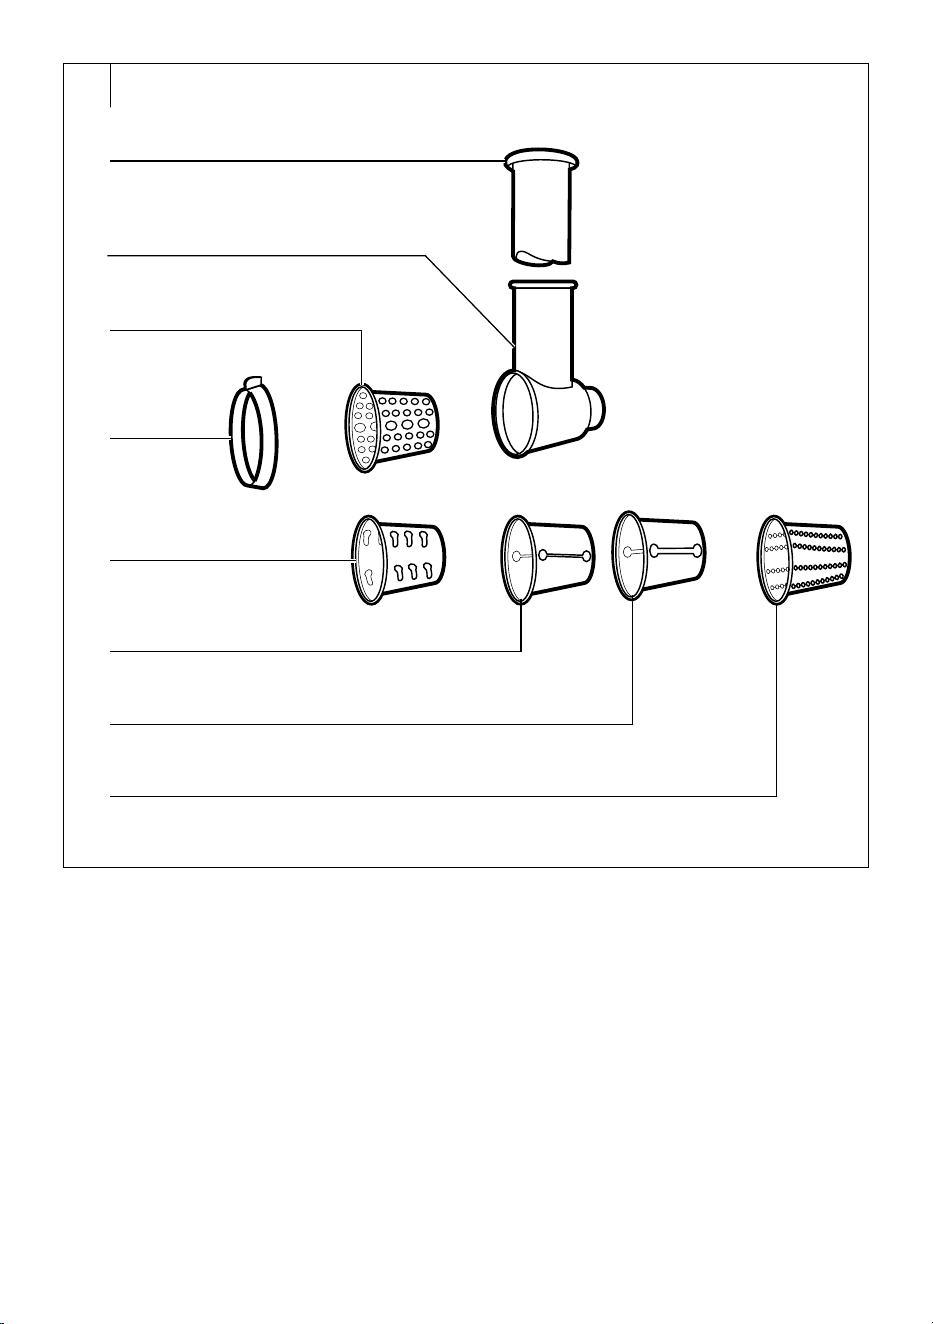
DESCRIPTION OF ACCESSORIES – SAUSAGE
STUFFER ATTACHMENT
C1 Sausage stuffer attachment
C2 Separator (for making Kebbe)
C3 Shaper (for making Kebbe)
. . . . . . . . . . . . . . . . . . . . . . . . . . . . . . . . . . . . . . . . . . . . . . . . . . . . . . . . . . . . . . . . . . . .
DESCRIPTION OF ACCESSORIES – GRATER
ATTACHMENT
D1 Pusher
D2 Grater
D3 Attachment for fine grating
D4 Nut for securing the sleeve
inside the chamber
D5 Attachment for coarse grating
D6 Attachment for cutting thin
slices
D7 Attachment for cutting thick
slices
D8 Grating attachment for hard
cheese and nuts
. . . . . . . . . . . . . . . . . . . . . . . . . . . . . . . . . . . . . . . . . . . . . . . . . . . . . . . . . . . . . . . . . . . .
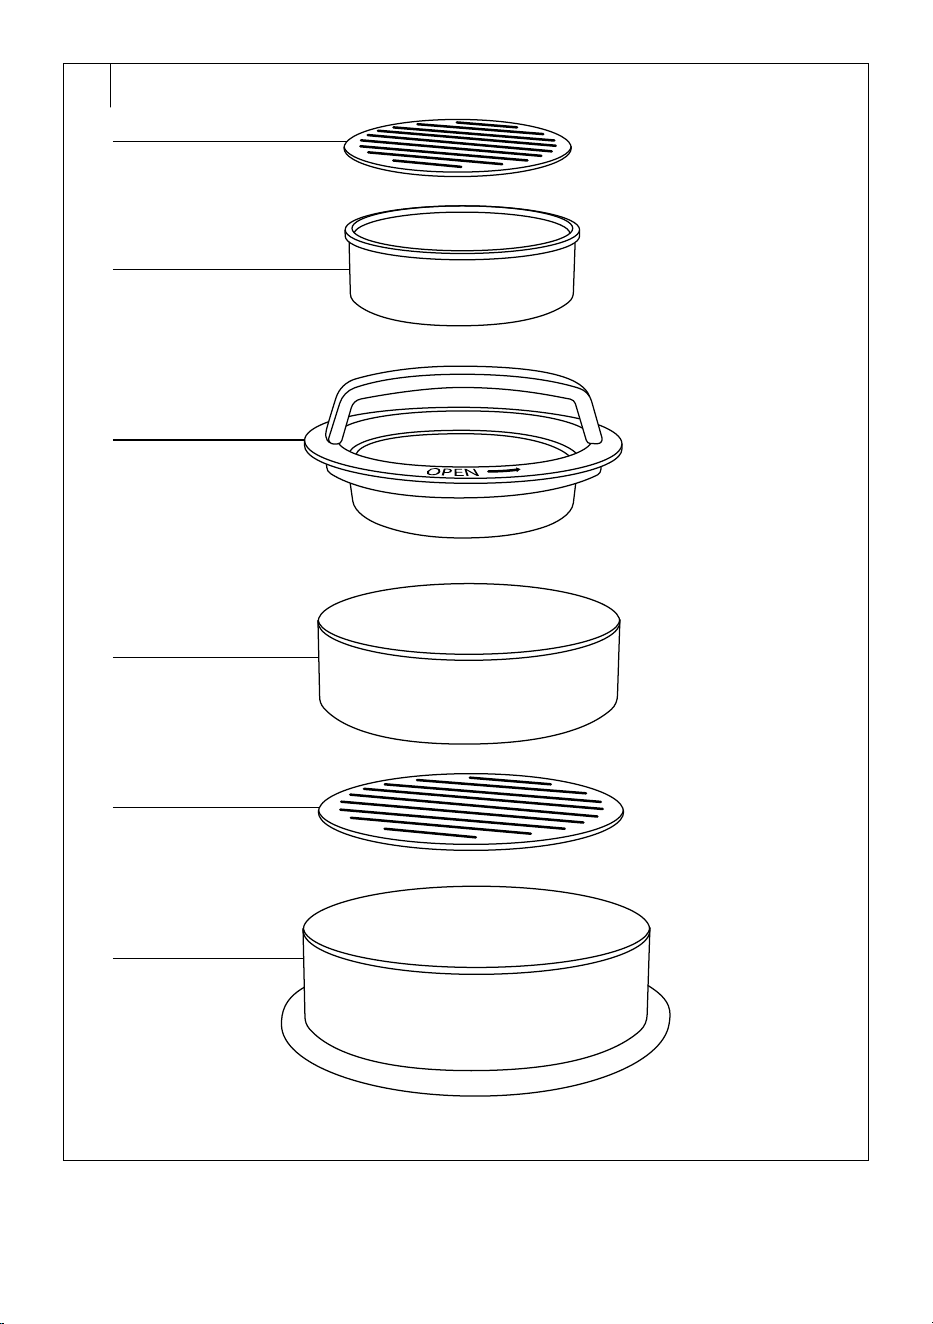
DESCRIPTION OF ACCESSORIES – HAMBURGER
PRESS
E1 Removable bottom of small
mould
E2 Small hamburger pan
E3 Press withhandle
E4 Removable lower part of the
press
E5 Removable bottom of large
mould
E6 Large burger pan
. . . . . . . . . . . . . . . . . . . . . . . . . . . . . . . . . . . . . . . . . . . . . . . . . . . . . . . . . . . . . . . . . . . .
INTENDED USE
• The grinder is intended for processing meat, poultry, fish, fruits and
vegetables. Enables the grinding of all types of meats free of bones,
sinew and skin.
• The grating attachment can be used for chopping, peeling, grating
and slicing practically all types of fruits and vegetables. The grating
attachments are used for the processing of fruit, vegetables, cheese
and similar types of food.
. . . . . . . . . . . . . . . . . . . . . . . . . . . . . . . . . . . . . . . . . . . . . . . . . . . . . . . . . . . . . . . . . . . .
BEFORE FIRST USE
• Before first use, remove the appliance and its accessories from the
packaging and discard all promotional labels and tags. Check that
neither the appliance nor any of its components is damaged.
• Before first use, wash all parts that come into contact with food in hot
water using neutral dish soap. Then rinse these parts with clean water
and allow them to dry naturally or dry them out using awiping cloth.
• Wipe the motor base unit and the hole for mounting the grinder or
grating attachment using adry wiping cloth.
Warning:
No part of this appliance is designed to be washed in
adishwasher! When cleaning the cross blade and the
graters, be very careful not to injure yourself on their
sharp edges.
Warning:
Do not rinse the motor base unit or its power cord
under water or submerge it in water. Prevent water
from entering into the buttons.
. . . . . . . . . . . . . . . . . . . . . . . . . . . . . . . . . . . . . . . . . . . . . . . . . . . . . . . . . . . . . . . . . . . .
PLACEMENT
• Place the motor base unit on an even, dry, clean and stable surface
within reach of apower socket.
• Ensure that there is sufficient free work space around the motor base
unit.
. . . . . . . . . . . . . . . . . . . . . . . . . . . . . . . . . . . . . . . . . . . . . . . . . . . . . . . . . . . . . . . . . . . .
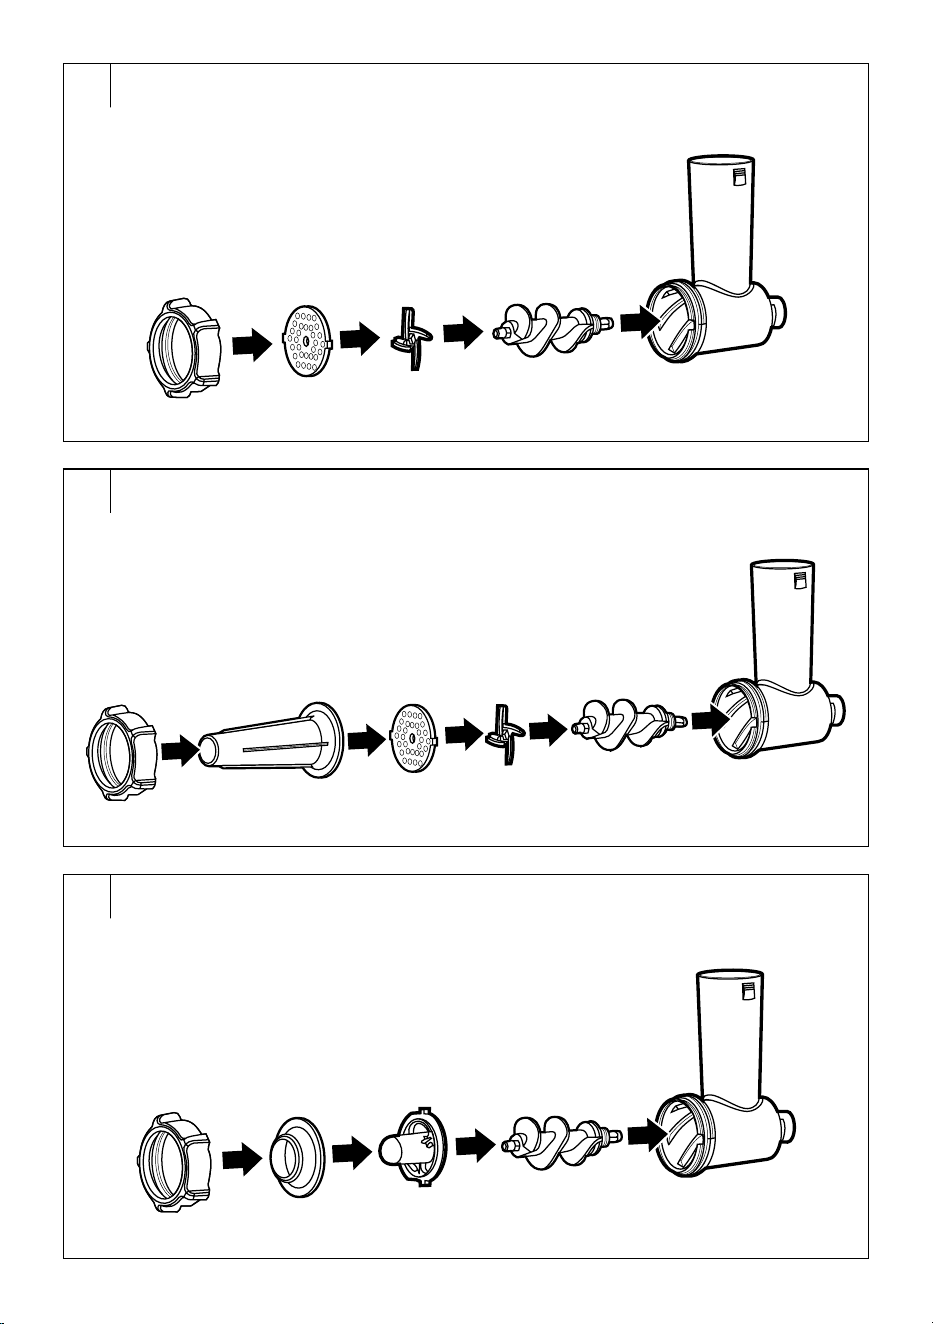
ASSEMBLY
Meat grinder (fig. F)
1. Push and hold down the grinder lock/release button and place the
grinder against the hole in the motor base unit.
2. Tilt the grinder to the right (at an angle of approx. 45°) and insert it into
the hole.
3. Turn the grinder anti-clockwise to secure it in place.
4. Release the grinder lock/release button.
5. Insert the screw shaft in the grinding chamber. Rotate it slightly so that
it slides into the holes in the motor base unit.
6. Put the cross blade on to the worm shaft so that the cutting edge faces
forwards.
7. Attach the required grinding plate so that the notch in the grinding
chamber slides into the groove in the grinding plate.
8. Finally, screw on the screw ring and tighten it firmly.
9. Insert the tray into the feed tube.
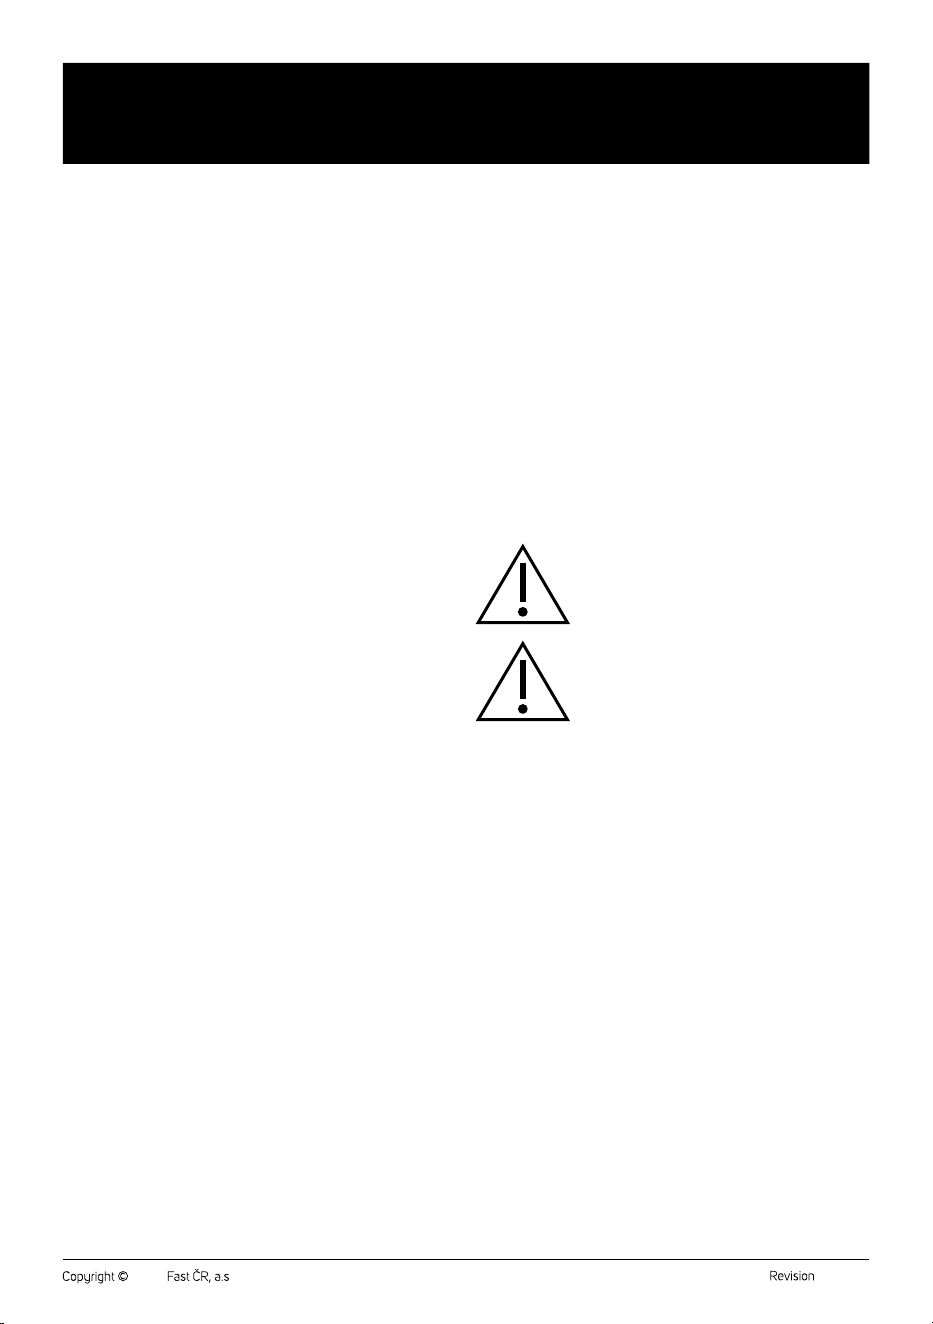
Grinder for stuffing sausages (fig. G)
1. Assemble the grinder according to steps 1–7 as described in the
section "Meat grinder".
EN
Meat grinder
User Manual
- 4 -
06/2025
2025, .
2. Place the sausage stuffer attachment on to the grinding plate.
3. Finally, screw on the screw ring and tighten it firmly.
4. Insert the tray into the feed tube.
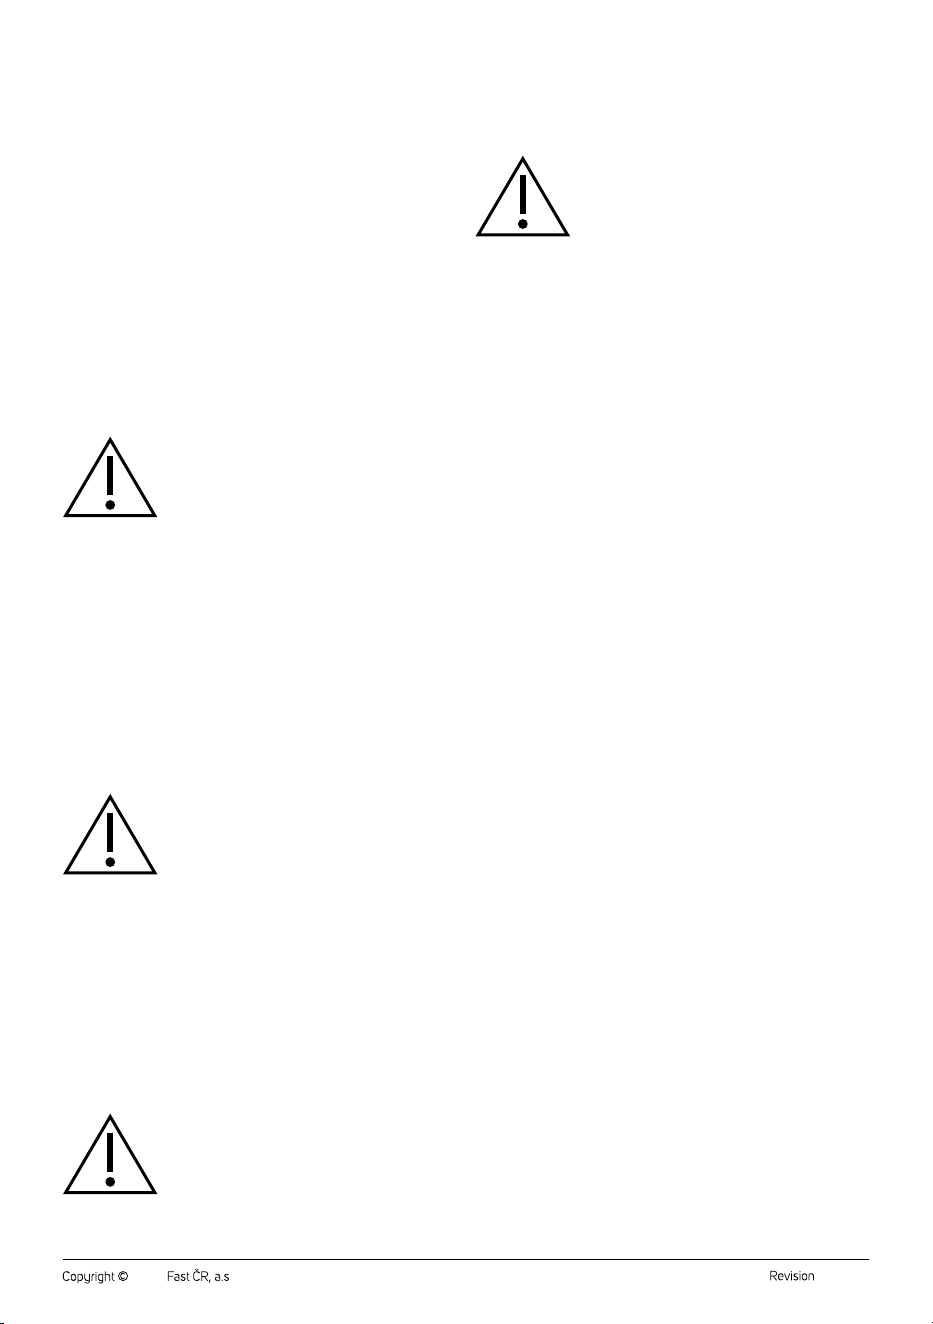
Grinder for making kebbe (fig. H)
1. Assemble the grinder according to steps 1–5 as described in the
section "Meat grinder".
2. Put the shaper on to the worm shaft and then the separator.
3. Finally, screw on the screw ring and tighten it firmly.
4. Insert the tray into the feed tube.
Grinder with the grating attachment
1. Press and hold the lock/release button and place the grating
attachment against the hole in the motor base unit.
2. Tilt the grating attachment to the right (at an angle of approx. 45°) and
insert it into the hole.
3. Turn the attachment anti-clockwise to secure it in place.
4. Release the lock/release button.
5. Insert a suitable attachment (D3, D5–D8) into the grater chamber and
secure it by screwing in the nut.
6. Insert the pusher into the feed tube of the attachment.
Warning:
When handling the cross blade or the graters, be very
careful not to injure yourself on their cutting edges.
Grinder with a cookie maker
1. Remove the cookie maker from the holder.
2. Insert the worm shaft into the grinding chamber.
3. Place the cookies maker on the shaft.
4. Place the screw ring on the grinding chamber and secure it by
screwing it in a clockwise direction. We recommend that you hold the
cookie maker holder with one hand when tightening the screw ring so
that it is in a horizontal position after tightening.
5. Insert the cookie mold into the hole in the holder.
. . . . . . . . . . . . . . . . . . . . . . . . . . . . . . . . . . . . . . . . . . . . . . . . . . . . . . . . . . . . . . . . . . . .
OPERATION
• Check that the grater is correctly assembled.
• Place the ingredients that you wish to process on to the feeder tray.
Warning:
Never attempt to grind frozen meat or other types
of frozen food, meat with bones, cartilage, sinewy
pieces of meat, pits, nuts in shells, etc. It is necessary
to allow frozen food to defrost completely before
grinding it.
• Underneath the grinder, place an appropriate bowl or plate, into which
the processed food will fall.
• Plug the power cord into the mains socket.
• Turn on the grinder by turning the control to position 1 (low speed) or
2 (high speed):
– low speed is suitable when preparing sausages or kebbe;
– high speed is suitable for meat grinding andgrating.
• The grinder will start.
• Gradually place the food into the feed tube, and using the pusher,
push it down into the grinding chamber. To prevent the grinder from
clogging, do not overfill the feed tube. Push down gently on the
pusher.
Warning:
Never use fingers or other items to push the
ingredients in. For this, always use the provided
pusher.
• If the feed tube becomes clogged, first turn off the grinder by turning
the control to the OFF position and attempt to release it using reverse
rotation. If reverse rotation does not release the grinder, disconnect it
from the power socket, take the grinder off the base unit and clean it
out. If necessary, completely disassemble the grinder, clean it out and
reassemble it. Mount it back on to the motor base unit and continue
working.
Warning:
The maximum continuous operation time of the
appliance is 5 minutes. Then allow it to cool down for
approximately 10 minutes.
• When you have finished using the grinder, turn the control to the OFF
position anddisconnect the power cord from the power socket. Make
sure that the rotating parts have stopped rotating, take the grinder
off the motor unit base and disassemble it into its individual parts.
Then clean all used parts according to the instructions in chapter
"CLEANING AND MAINTENANCE".
. . . . . . . . . . . . . . . . . . . . . . . . . . . . . . . . . . . . . . . . . . . . . . . . . . . . . . . . . . . . . . . . . . . .
REVERSE ROTATION
• If the grinder behaves in an unusual manner (e.g. it is noisier or
vibrating, the grinding chamber is clogged), turn it off by turning the
control to the OFF position.
• Then turn the rotary knob to the REV position. The worm shaft will
start rotating in reverse direction and the grinding chamber will start
emptying itself.
• If this does not happen, disconnect the base unit from the power
socket, completely disassemble the grinder, clean it out and
reassemble it. Mount it back on to the motor base unit and continue
working.
. . . . . . . . . . . . . . . . . . . . . . . . . . . . . . . . . . . . . . . . . . . . . . . . . . . . . . . . . . . . . . . . . . . .
TIPS AND ADVICE
Grinding
• Before grinding, remove any bones, cartilage and sinew from
the meat. Cut the meat into pieces measuring approximately
20x20x40 mm. Allow the meat to defrost completely before any
further processing.
• Cut fruit and vegetables into pieces that will freely pass through the
feed tube. Peel fruit or vegetables as required and remove any stones,
kernels, etc.
Stuffing sausages
• Prepare aground meat mixture and acasing for stuffing. Place the
casing into lukewarm water for 10 minutes before filling it. Slide the
wet casing on to the attachment. Leave afew free centimetres at the
end of the casing and then tie it or skewer it.
Grating
• Cut the food into pieces that will freely pass through the feed tube.
Peel fruit or vegetables as required and remove any stones, kernels,
etc.
Hamburger Press
• Prepare minced meat with a fat content of approximately 15–20 %.
Salt, pepper andseason to your taste.
• To make it easier to remove the hamburger, we recommend placing
baking paper on the bottom of the mould.
• Fill a large mould with minced meat. You can also cover with baking
paper.
• Apply the press and press slightly on the minced meat in the mould
so that it is evenly distributed throughoutthe mould. Push until a solid
compact pancake is formed. The hamburger should have a shape
andthickness according to the form.
• If you prefer weaker burgers, put in a smaller amount of minced meat.
• Lift the press carefully.
• When using a small mould, fill it to the brim, use a spoon to squeeze
the meat into the mould and align with butter knife as needed.
• Push down on the removable bottom from below. This will eject the
hamburger andyou will be able to easily remove it from themould.
- 5 -
06/2025
2025, .
• If you are going to prepare stuffed burgers, remove the bottom from
the press by turning it anti-clockwise. Insert the press into themeat
mould and press gently until a dimple is formed. Put the burger
filling in it (e.g. cheese, onions, mushrooms, etc.). Cover with a layer
of minced meat. Put the bottom of the press back on by turning it
clockwise andsqueezing the top layer to form a compact mass.
• After use, rinse all parts with warm water anddry them. Do not put in
dishwasher.
Tips:
• If the meat is too sticky, lightly moisten your hands or
the inside of the mould with water.
• Use baking paper between hamburgers for easy
storage.
• Do not press the minced meat with great force,
otherwise it could be stiff after baking.
Note:
The hamburger press is not designed for storing finished
hamburgers. Do not place in the fridge or freezer.
. . . . . . . . . . . . . . . . . . . . . . . . . . . . . . . . . . . . . . . . . . . . . . . . . . . . . . . . . . . . . . . . . . . .
DISASSEMBLING
• Make sure that the grinder is turned off and the power cord plug is
disconnected from the power socket.
• Press and hold the lock/release button.
• Turn the grinder/attachment clockwise to an angle of approximately
45° and slide it off the hole of the motor base unit.
• Release the lock/release button.
. . . . . . . . . . . . . . . . . . . . . . . . . . . . . . . . . . . . . . . . . . . . . . . . . . . . . . . . . . . . . . . . . . . .
CLEANING AND MAINTENANCE
• The grinder must be cleaned after every use.
• Before cleaning, disconnect the power plug from the mains socket and
allow the appliance to cool down.
• Do not use abrasive cleaning agents, solvents, etc. to clean any parts
of the appliance, as these could damage the surface. None of the
components of this appliance are dishwasher safe.
Warning:
To prevent the risk of electric shock, do not immerse
the appliance, power cable, or plug into water or any
other liquid.
Grinder/grating attachment
• Disassemble the grinder or the grating attachment into its individual
parts. Clean all the removed parts from food remains, wash in warm
water with dish soap and rinse under clean running water. Then allow
them to dry naturally or dry them out thoroughly using awiping cloth.
• Remains of unground meat may remain in the grinding chamber
that are hard to clean away. To make their removal easier, you can
grind apiece of bread or bread roll. We recommend disassembling
the grinding attachment in akitchen sink or alarger bowl to prevent
potentially soiling the work surface. If the grinder or the grating
attachment is used for an extended period of time, it is possible
that the base unit may be hot to touch. Allow it to cool down before
cleaning it.
Warning:
No part of this appliance is designed to be washed in
adishwasher!
When cleaning the cross blade and the graters,
be very careful not to injure yourself on their sharp
edges.
Motor base
• Wipe the motor base unit and the hole for mounting the grinder or
grating attachment using adry wiping cloth.
Storage
• If you are not going to use the appliance for an extended period
of time, unplug it from the power socket, allow it to cool down
and clean it according to the instructions in the “CLEANING AND
MAINTENANCE” section.
• Before storing, ensure that the appliance and all accessories are
thoroughly clean and dry.
• Store the appliance in a dry, clean, and well-ventilated place away
from extreme temperatures and out of the reach of children or pets.
. . . . . . . . . . . . . . . . . . . . . . . . . . . . . . . . . . . . . . . . . . . . . . . . . . . . . . . . . . . . . . . . . . . .
TECHNICAL SPECIFICATIONS
Rated voltage...........................................................................................220–240 V~
Rated frequency ..........................................................................................50–60 Hz
Rated input power ..............................................................................................700 W
Maximum rated input ..................................................................................... 2100 W
Noise level ......................................................................................................≤93 dB(A)
The declared noise emission value of this appliance is ≤93 dB(A), which
represents the A sound power level relative to a reference sound power
of 1 pW.
. . . . . . . . . . . . . . . . . . . . . . . . . . . . . . . . . . . . . . . . . . . . . . . . . . . . . . . . . . . . . . . . . . . .
Values provided according to Commission Regulation EU
2023/826
Off mode
Power consumption in off mode 0.2 W
Time needed for the equipment to automatically reach
off mode
0 min
Standby mode
Power consumption in Standby mode –
Time needed for the equipment to automatically reach
standby mode
–
Networked standby mode (Wi-Fi)
Power consumption in networked standby –
Time needed for the equipment to automatically reach
networked standby mode
–
. . . . . . . . . . . . . . . . . . . . . . . . . . . . . . . . . . . . . . . . . . . . . . . . . . . . . . . . . . . . . . . . . . . .
INSTRUCTIONS AND INFORMATION ON DISPOSAL
OF USED PACKAGING MATERIAL
Dispose of used packaging material at the designated municipal waste
disposal site.
. . . . . . . . . . . . . . . . . . . . . . . . . . . . . . . . . . . . . . . . . . . . . . . . . . . . . . . . . . . . . . . . . . . .
DISPOSAL OF USED ELECTRICAL AND ELECTRONIC
EQUIPMENT
Used electrical andelectronic products must not be disposed of in
ordinary municipal waste. To enable the proper disposal and recycling
of these products, deliver them to the designated collection points.
Alternatively, in some European Union states or other European
countries the products can be returned to the local retailer when buying
an equivalent new product. By properly disposing this product, you
help preserve valuable natural resources and help to prevent potential
damage to the environment and human health resulting from improper
waste disposal. For more details, contact your local authority or nearest
collection point. Fines may be imposed for improper disposal of this type
of waste as per national regulations.
For business entities in European Union States
To dispose of electric or electronic equipment, request the necessary
information from your retailer or supplier.
Disposal in other countries outside the European Union
If you wish to dispose of this product, request the necessary information
about the correct disposal method from the local council or from your
retailer.
. . . . . . . . . . . . . . . . . . . . . . . . . . . . . . . . . . . . . . . . . . . . . . . . . . . . . . . . . . . . . . . . . . . .
Changes to text and technical parameters are reserved.

- 6 -
06/2025
2025, .

FAST ČR, a.s.
U Sanitasu 1621
CZ-251 01 Říčany
www.sencor.com
info@sencor.cz